Note: Descriptions are shown in the official language in which they were submitted.
CA 02592617 2007-07-03 _
WO 2004/012579 PCT/US2003/024212
TITLE OF THE INVENTION
SELF-ANCHORING
SLING AND INTRODUCER SYSTEM
BACKGROUND OF THE INVENTION
[002] Various surgical techniques benefit from the use of non-native flat
supporting
members inserted into the patient's body to apply pressure to the patient's
own tissue. Such
implanted supporting members can be made from synthetic material, natural
material, =
whether hatvested from the patient or elsewhere, or composites of both
synthetic and natural
materials. When using harvested natural material, it may be desirable to treat
the source
tissue to alter its physical properties to insure it is biocompatible and does
not cause an
adverse reaction with the patient's immune system.
[003] One example of a sheet-like support structure for use in a range of
surgical
techniques is described in U.S. Patent No. 6,197,036. This patent discloses a
pelvic floor
reconstruction surgical patch made from natural or synthetic biocompatible
material.
According to the'036 patent, the preferred material for use in the patch is
synthetic fabric
made from polyester, more preferably, collagen coated polyester. The patch has
a number of
holes which are arranged in a specific manner with respect to the patch's
corners.
[004] Another material that can be used as a patch to reinforce soft tissue is
processed porcine intestinal tissue. Examples of support structures made from
such material
include the Surgisis Go1dT"' Hemia Repair Grafts, the Surgisis Soft Tissue
Grafts, and the
CA 02592617 2007-07-03
WO 2004/012579 PCT/US2003/024212
Surgisism IHMrM Inguinal Hernia Matrix, all manufactured by Cook Surgical, of
Bloomington, Indiana and described in Cook Surgical's literature.
[005] An increasingly-widespread technique for treating female urinary
incontinence
is that of sling suspension. Examples of such procedures and equipment which
can be
employed are discussed in U.S. Patent Nos. 5,112, 344, 5,899,909, and
6,273,852 B1. In this
technique, a flat supporting member is used to treat female urinary
incontinence by
permanently positioning a strip-like sling beneath the patient's urethra. By
implanting the
sling and then adjusting the sling to apply a desired level of force to the
patient's urethra, the
amount of pressure which the patient must thereafter exert to void her bladder
is increased,
improving continence. The sling member is preferably implanted in the
patient's tissue by
using a needle to draw the sling into its approximate position. Then, the
surgeon can make
fine adjustments to properly locate the sling member, and to apply the
required amount of
tension to the tissue requiring support.
[0061 Although originally implanted slings were anchored in the patient's
body, for
example, by using sutures to join the sling ends to the patient's pelvis, it
is now more
common to leave the sling ends unattached. The sling is maintained in position
through
friction between sling material and the patient's own tissue, in particular,
in the case of a sling
implanted in the lower abdomen, with the rectus fascia. This approach is known
as a "self-
anchoring" or "tension-free" procedure.
[007] In self-anchoring sling support procedures it is important that the
sling be held
firmly in place by friction with the patient's tissue. Should the ends of the
sling slip, then
insufficient support will be provided for the urethra to alleviate
incontinence, and the
procedure will be unsuccessful. It is also important that the sling material
used be strong
enough to withstand, without rupture or tear, any forces that are encountered
following
implantation, for example, when the patient sneezes.
-2-
CA 02592617 2007-07-03
WO 2004/012579 PCT/US2003/024212
[008] Slings can be made from tape or mesh. Numerous implant materials have
been considered and used for sling procedures, including both synthetic mesh
and natural
tissue.
[009] Although easy to sterilize, strong and inexpensive, synthetic mesh
material has
a number of shortcomings which will be discussed in further detail below. Just
by way of
example, when synthetic mesh material is used as a sling support, the
roughness of the
synthetic mesh may lead to abrasion of the patient's urethra, and that can
cause infection
and/or erosion of the patient's tissue.
[0010] When performing sling support procedures, it is important to use an
implant
which is well-tolerated by the patient's immune system. To this end, sling
supports can be
made from processed natural material. One example of such a processed tissue
sling support
is the Stratasis TF support, manufactured by Cook Urological, Inc. of
Spencer, Indiana. The
Stratasism TF support is a three-dimensional extracellular matrix which
includes collagen,
non-collagenous proteins, and biomolecules that is made of natural biomaterial
derived from
the small intestine of pigs. The Stratasis4D TF support is gradually replaced
by the patient's
body.
[0011] A traditional sling procedure involves placing a narrow strip of an
implant
material (natural tissue or synthetic mesh) under the urethra and securing it
to the rectus
fascia or other portions of the patient's anatomy with sutures to hold the
implant in position
during the healing process.
[0012] More recently, a newer technique has been used to place a strip of
synthetic
--mesh under- the-uretbra-wtthout-secaring-tfie-meslfi4ti-p}aee-wit-h-sutures-
i-ln this technique, the
itriplant member is held in place during the healing process by the friction
between the mesh
and the surrounding tissue. This improvement, which employs specialized
instrumentation,
has helped reduce operative time and has made the procedure less invasive.
-3-
CA 02592617 2007-07-03
WO 2004/012579 PCT/US2003/024212
100131 Although each of these techniques has demonstrated good results, each
has a
number of potential complications, due, in part, to the type of material from
which the sling is
formed.
[0014] Synthetic mesh is used with the self-anchoring techniques. Among the
benefits to using.synthetic mesh material is that the friction of the
synthetic mesh with the
surrounding issue allows or ure- e p acemen o e mes s~ip.-"Kits" are
commercially available which include a suitable mesh implant member and the
small needles
needed to pass the synthetic mesh implant member into the patient's body; few
other surgical
instruments are required. This has resulted in a simpler and less invasive
procedure in which
only small incisions are required, no patient tissue need be harvested, and
just a short hospital
stay is required.
[0015] Clinical articles have suggested that the synthetic mesh material used
in this
procedure is subject to a higher risk of causing erosion of the patient's
tissue than are natural
materials. Furthermore, the synthetic mesh material has a higher risk of
infection than does
natural material, probably because the mesh provokes a foreign body reaction
from the
patient's body or may harbor bacteria around the mesh. The synthetic mesh
material also
tends to have a greater amount of scar tissue formation around the mesh
fibers, instead of
vascular ingrowth.
100161 Natural materials, for example, autologous, allograft, or xenograft
tissues, or
soft collagen fiber engineered materials, which are used in traditional
techniques, offer such
benefits as a lower risk of erosion than the synthetic materials. Natural
materials also have a
--lower-risk-of-infeetion,-pr-esunj-abl-y-beeause-tfiere-is-no-fereign-bedy-r-
eaction.- The natural
materials also experience better tissue ingrowth than the synthetic materials
because they are
made up of collagen fibers, which can serve as a tissue-building framework.
-4-
CA 02592617 2007-07-03
WO 2004/012579 PCT/US2003/024212
[0017] Disadvantageously, the natural materials require sutures be used to
anchor the
material in position. To implant the natural material slings, traditional
instrumentation is
used. Such instrumentation often requires more invasive surgical techniques,
larger incisions,
harvesting of the patient's own tissue for use as the sling, and consequently,
may result in a
longer hospital stay.
[001$]-Al"ugh-natural-supperHnembers-offer-cnany-benefits-when used in the
manner described above (for example, they are not abrasive), they also are
generally more
expensive than their synthetic counterparts, since such support members are
derived from
natural source materials that must be treated to insure sterility, stability
and biocompatibility.
[00191 Given the expense of natural support members, it is desirable to reduce
the
amount of natural material used in each support member without also reducing
the self-
anchoring properties, positioning ability, strength or durability of that
support member.
[0020] There also exists a long-felt and unsolved need for a support system,
and, in
particular,.a sling suspension system which offers the respective cost and
tolerance benefits
of both synthetic and natural materials, without the weaknesses of either of
those techniques.
[0021] Although some doctors are satisfied with the results that they have
achieved
using synthetic mesh sling kits, other doctors prefer not to use the synthetic
materials due to
the materials' higher potential for complications such as the occurrence of
infection or
foreign body reaction around the mesh, or, urethral or vaginal wall erosion
due to the mesh.
In some cases of erosion, mesh has been observed to unravel, creating a sharp
"fishing line"
effect, which can slice through the patient's tissue. This is not a concern
with natural fibrous
__maSeraals such_as-autol.o.gous,_allograft,-or-xenograft-tissues,which-
~elongate-less-and-do not
neck down under load.
[0022] Existing surgical hardware, such as the McGuireTm suture guide, which
has a
central suturing hole, and available from C.R. Bard, Inc. of Murray Hill, New
Jersey, is based
-5-
CA 02592617 2007-07-03
WO 2004/012579 PCTIUS2003/024212
upon what is known as the "Stamey" needle. Although such devices could be
modified for
use in the field of this invention, they do not possess all the requisite
properties for the uses
envisioned for this invention.
[0023J Thus, there exists a long-felt and unsolved need for a sling suspension
system
which offers the distinct benefits of both synthetic- and natural materials,
without the
- wealCnesses of either of-thvse-techniques.
SUMMARY OF TAE INVENTION
100241 First, it should be understood that although this disclosure speaks of
the sling
suspension of the female urethra, this invention is not to be limited thereto.
By way of non-
limiting example, the devices and techniques taught herein could be employed
to support
other body organs such as the bowel or bladder. Consequently, all portions of
this
description should be understood to encompass such alternative uses of this
invention, as well
as all modifications in size and proportion of the disclosed invention's parts
which may be
required to implement those altemative uses.
[0025] Taken together, the components used in this invention and described
hereafter
provide a minimally invasive, simple technique that is easily learned and
which requims little
operative time. The implant member will offer the low complication rate and
good tissue
ingrowth of a natural material, while the texturing provides the self-
anchoring properties of a
synthetic mesh, thereby eliminating the need for sutures or other anchoring
means.
[0026] Among the benefits of this invention is improved flexibility; the
surgeon can
use this system for either an upward or a downward approach without any need
to employ
special equipment.
[0027] The present invention is intended to provide a self-anchoring sling
kit, using
natural material, hybrid material, or even synthetic material, which is an
improvement upon
-6-
CA 02592617 2007-07-03
WO 2004/012579 PCT/US2003/024212
known systems. This system takes advantage of the best features of both
synthetic mesh and
natural tissue implants, using those materials separately or together, and
provides an excellent
combination of versatility, ease of use, and safety.
[0028] The invention also concerns a new device and technique to treat stress
urinary
incontinence in women. The technique is a modification of a traditional
pubourethral sling
pcecedure, ide-nn-underlying-supp ' =~o.-~ t-he upeII.ra- --
[0029] More specifically, the present invention is directed to a system for
supporting
the urethra which includes an introducer needle at least one or both of the
ends of which are
flattened and which have openings therethrough, a handle having a latch
mechanism which
engages the opening in the flattened portion of the first end of the
introducer needle, an
implant member, and a connector joining the end of the implant member to the
flattened
portion of one of the ends of the introducer needle.
[0030] One aspect of this invention involves a system for supporting a female
urethra
having an introducer needle with first and second ends, each end having a
flattened portion
with an opening therethrough, a handle having a latch mechanism which engages
the opening
in the flattened portion of the first end of the introducer needle, an implant
member having an
end and a connector joining the end of the implant member to the flattened
portion of the
second end of the introducer needle. The introducer needle can be curved and
symmetrical,
and the flattened portion of the first end may differ in size from the
flattened end of the
second portion. The introducer needle can have a flared section with a cross-
sectional profile
that is larger than a cross-sectional profile of the connector.
-[0031~]----"Ttus mvention also is drawn to a comio-cS9x-fQr__atxacbment_to-
the-end_of an
implant member having an arm having a hole therethrough or an introducer
needle including
a flat spatulated section having an opening. The connector has a central
portion, a first arm
pivotally mounted to that central portion and having a first opening at a
first end, a second
-7-
CA 02592617 2007-07-03
WO 2004/012579 PCT/US2003/024212
arm pivotally mounted to the central portion and having a first projection
extending
therefrom, the first projection being positioned so that when the first arm
and the second arm
move together, the first projection is received in the first opening, and an
implant attachment
structure to which the implant membcr is connected. Teeth or a"+"-shaped boss
may
protrude from the arm surfaces to engage the-implant member. -Any other
suitable boss
Ompe, nder, also could be used. A second set of arms also may
be provided.
[0032] Still another aspect of this invention is a connector for attachment to
an
implant member or an introducer needle including a flat spatulated'section
having an
opening. This includes an elongated base portion having a first engaging
structure at a first
end and a second engaging structure at a second end, a first arm pivotally
mounted to the
elongated base portion and having a third engaging structure, the third
engaging structure
being positioned so that when the first arm pivots toward the elongated base
portion, the first
and the second engaging structures meet and engage, and a second arm pivotally
mounted to
the elongated base portion and having a fourth engaging structure, the fourth
engaging
structure being positioned so that when the second arm pivots toward the
elongated base
portion, the second and fourth engaging structures meet and engage. The
engaging structures
can be mating openings and projections.
[0033] Additionally, this invention relates to a connector for attachment to
an implant
member or an introducer needle with a flat spatulated section having an
opening. The
connector has an elongated base portion with a first engaging structure, an
arm pivotally
mounted to the elongated base portion and having a having a second engaging
shucture, the
engaging structures meeting when the arm pivots toward the elongated base
portion, and an
attachment point for connection to an implant member. The engaging structures
may have
-8-
CA 02592617 2007-07-03
WO 2004/012579 PCT/US2003/024212
openings and projections that can meet. The attachment point can be joined to
the implant
member by a staple, a rivet, an adhesive or a suture, for example.
[00341 A further aspect of this invention is an introducer needle for use in a
surgical
procedure having a central portion, first and second flat spatulated sections
that may be
integral with the central portion, at least one flat spatulated section having
a tip and a constant
iwidfiltpott' iarr,ar-d-an opening formed in the
flat spatulated section, and a flared section connects the first flat
spatulated section to the
central portion. The flared section has a cross-sectional profile that covers
a cross-sectional
profile of the first flat spatulated section. The introducer needle may be
asymmetric. The
spatulated sections may have different shapes.
[0035] Another introducer needle has a first flat spatulated section, a first
straight
portion connected to a distal end of the first flat spatulated section, a
curved portion
connected to a distal end of the first straight portion, a second straight
portion connected to a
distal end of the curved portion, a second flat spatulated section connected
to a distal end of
the second straight section, ; and a flared section connecting the first flat
spatulated section to
the first straight central portion, the flared section having a cross-
sectional profile that covers
a cross-sectional profile of the first flat spatulated section. At least one
flat spatulated section
has a tip and a constant width portion disposed between the tip and the
central portion, and an
opening formed in that the flat spatulated section. The spatulated sections,
flared section,
straight portions and curved portions can be integrally formed. The straight
portions may
differ in length.
_
_ 1~36] A o, an mdlpr neele~an ha~e tion~+ith_a..proximal straight
portion integral with a distal curved portion, a handle receiving the proximal
end of the
straight portion and a flat spatulated section having a"T"-shaped opening
located at the distal
end of the curved portion. The handle may be permanently attached to the
straight portion.
-9-
CA 02592617 2007-07-03
WO 2004/012579 PCT/US2003/024211
[0037] An introducer needle for use in a surgical procedure employing a
filament has
a tubular body, a rod disposed in the tube's lumen, and a needle tip movably
disposed in the
lumen at the distal end of the tubular body and attached to the rod, the
needle tip having an
opening therein for receiving the filament. When the rod is moved toward the
distal end of
the tubular body the needle tip moves forward.
le has-a-bodyportion-witlra-cnrved-portion,-a flared
section located at the distal end of the curved portion, and a flat spatulated
section having a
"T"-shaped opening located at the distal end of the flared section, a leg of
the "T" extending
to an edge of the flat spatulated section.
[00391 An introducer needle for use in a surgical procedure includes a body
portion
with a curved portion, a flared section located at the distal end of the
curved portion, and a
flat spatulated section having an intemal opening located at the distal end of
the flared
section. The internal opening may be "H"-shaped or substantially rectangular,
and in the
latter case, can have a central portion larger in size than a front end and a
back end of the
intemal opening.
[0040] Also, a handle for an introducer needle having a flat spatulated
section having
an opening includes a housing with an elongated portion having a distal end
with an opening
therethrough, the opening being dimensioned to receive the flat spatulated
section and hold
the flat spatulated position in a connecting position in the housing, and an
elastically-biased
latch portion having a projection dimensioned and disposed so that when the
flat spatulated
section is received by the opening and is held in the connecting position, the
projection passes
--- sooperatts.a,itlthe a~.ing~o secnreAe.handleAo thc introdu ousing may
be made from two shells, and also can include an insert with a slot
dimensioned to receive the
flat spatulated section, the insert being disposed between the shells. A
weight may be
disposed within the housing.
-10-
CA 02592617 2007-07-03
WO 2004/012579 PCT/US2003/024212
[0041] According to this invention, an implant member includes a central
portion
with first and second sides, first and second arm sections integral with the
first and second
sides of the central portion, respectively, at least one of the first and
second arm sections
having an irregular border. At least one of the central portion and the first
and second arms
can have an edge with slits or openings therein.
[0042 A different implant member includes an elongated body of flexible
rnaterial
with first and second ends and a central portion that includes an axis running
along a length
of the implant member. The central portion has slits arranged along the axis,
the slits moving
out of the implant member's plane when tension is applied to the implant
member.
[0043] Still another implant member has a central portion with first and
second ends,
and itrst and second arms joined to the first and second ends, respectively.
The central
portion can be made of a material that is differed from the first and second
arms, possibly
natural and synthetic materials, respectively.
10044] Still another implant member includes an elongated body with slits that
open
when tensile force is applied to the body.
[0045] Also, the implant member can include a body with first, second and
third
sections, the second section being located between the first and the third
sections, the first
and the third sections each having slits therein that open when tensile force
is applied to the
body. These slits can be arranged in rows, and the rows can be parallel. Slits
in adjoining
rows can be staggered in position.
[0046] A different implant member has first and second extension loops and a
-support section-with.first-and second ends having holes, the first extension
loop passing
through one hole and the second extension loop passing through another hole.
Connectors
with structure for attachment to a needle tip can be joined to the extension
loops.
-11-
CA 02592617 2007-07-03
WO 2004/012579 PCTlUS2003/024212
[0047) An implant can be made by providing a body and forming slits in the
body
that are arranged to open when tensile force is applied to the body. These
slits can be
arranged in rows, which may be parallel. A skin graft mesher can be used to
create the slits
in the body.
-[0048) Methods of providing support for a female urethra are taught that
involve
mreating at least-one-incisioa imtlitpatient~s a~domina}~+valf-attfie-level-
of~tlre-pubic-
symphysis, creating an incision in the anterior vaginal wall just below the
urethral meatus,
advancing an introducer needle, having a detachable handle joined thereto,
into the retropubic
space via the incision in the patient's abdomen and downward until the needle
is exposed at
the vaginal incision, connecting one end of an implant member to the end of
the introducer
needle protruding from the vaginal incision using a permanent snap-on tissue
connector,
withdrawing the introducer needle through the abdominal incision with the
implant member
attached, and positioning the implant member loosely under the urethra by at
least one of
gently pulling on the abdominal end of the implant member and by loosening the
implant
member by pulling on the implant member with a clamp at the vaginal incision.
[0049) Also, a method of providing support for a female urethra can involves
creating
at least one incision in the patient's abdominal wall at the level of the
pubic symphysis,
creating a second incision in the anterior vaginal wall below the urethral
meatus, advancing
an introducer needle, having a detachable handle joined thereto, through the
vaginal incision
upward until the introducer needle tip is exposed through the first abdominal
incision,
connecting one end of an implant member to the end of the introducer needle
protruding from
- ..tie~_~usin~a pEr~lanent cnon tissue_=ne.ctnr, drawing gp(- ien o-the
implant
inward through the vaginal incision and through the first abdominal incision,
and positioning
the implant member loosely under the urethra by at least one of gently pulling
on the
-12-
CA 02592617 2007-07-03
WO 2004/012579 PCT/US2003/024212
abdominal end of the implant member and by loosening the implant member by
pulling on
the implant member with a clamp at the vaginal incision.
[0050] Among the benefits of this invention is improved flexibility; the
surgeon can
use this system for either an upward or downward approach without the need to
employ
special equipment.
BRIEF DESCRIPTION OF THE DRAWINGS
[0051] In the accompanying drawing figures, which are merely illustrative, and
wherein like reference characters denote similar elements throughout the
several views:
[0052] FIGS. lA is a perspective view of an introducer handle with pushbutton
according to the present invention, seen from the front, right side and top,
and FIG. 1B is a
perspective view of the bottom shell portion of the handle shown in FIG. IA;
[0053] FIG. 2 is a perspective view of a dual-ended introducer needle
according to the
present invention, seen from the front, right side and top;
10054j FIG. 3A is a perspective view showing the handle connected to an
introducer,
as seen from the front, right side and top, and FIG. 3B is a perspective
exploded view of the
assembled components shown in FIG. 3A;
[00551 FIGS. 4A-B show the introducer handle with the top portion removed,
FIG.
4B showing the components in exploded form;
[00561 FIG. 5A is an exploded view showing another embodiment of a handle and
needle in accordance with this invention; FIG. 5B shows the assembled handle
as the needle
is being inserted thereinto, FIG. 5C depicts the needle as received in the
handle, and FIG. 5D
illustrates the needle received in the handle and covered by a sheath;
[0057] FIGS. 6A and 6B are close-up perspective views showing, respectively,
the
blunt and pointed tips of the needle depicted in FIG. 5A;
-13-
CA 02592617 2007-07-03
WO 2004/012579 PCT/US2003/024212
[00581 FIG. 7A is a side elevational view of a permanent snap connector
according to
a first embodiment in the open position, FIGS. 7B and 7C are perspective views
in the open
and closed positions, and FIG. 7D is a side elevational view in the closed
position of the
connector shown in FIG. 7A;
[0059] FIGS. 8A is a perspective views of a second embodiment of a permanent
snap
connector design, FIG. 8B being a side elevational view of the connector shown
in FIG. 8A;
[0060] FIGS. 9A-C are, respectively, top plan, side elevational and front
elevational
views of a further connector in accordance with this invention, the connector
being in a
closed configuration; FIG. 9D is a side elevational view showing the same
connector in an
open configuration;
[0061] FIG. 10 is a perspective view of a modified version of the connector
shown in
FIGS. 7A-D;
(0062] FIGS. I l A-B are side elevational views showing how the connector of
FIG.
10, in closed configuration, resists the application of closing force;
[0063] FIG. 12 is a perspective view of a textured natural tissue implant;
[0064] FIG. 13 is a perspective view showing the assembled introducer needle,
connector and tissue implant;
100651 FIGS. 14A and 14B are perspective views showing the connector of FIGS.
9A-D being affixed to an introducer needle;
[00661 FIGS. 15A-C are front, side and perspective views showing the connector
of
FIGS. 9A-D affixed to an implant member and a introducer needle;
[0067] FIGS. ] 6A-D are perspective views showing the assembly of an
introducer
system and implant member in accordance with the present invention using the
connector
depicted in FIGS. 7A-D;
-14-
CA 02592617 2007-07-03
WO 2004/012579 PCT/US2003/024212
[0068] FIGS. 17A-D are views depicting various implant memberos in accordance
with the present invention;
[0069] FIG. 18A depicts an implant member in accordance with the present
invention
in a tension-free state, and FIG. 18B shows that implant member when tension
is applied
thereto;
[0070] FIGS. 19A-E are views showing the configuration of different intemal
slits in
various implant members according to this invention;
[0071] FIGS. 20A-E are views showing the configurations of different implant
members in accordance with this invention;
[0072] FIG. 21A is a front view and FIG. 21B is a side view showing how an
implant
member in accordance with this invention deforms as it passes through a layer
of tissue;
[0073] FIGS. 22A-F are views showing various implant member configurations;
[0074] FIGS. 23A and 23B are perspective views showing changes in shape of an
implant member as it passes through a layer of tissue;
100751 FIGS. 24A-C are views showing alternative implant member arrangements
in
accordance with this invention;
[0076] FIGS. 25A-C are views showing how an implant member with straight but
slitted edges can be secured in tissue;
[0077] FIGS. 26A-E are top plan views showing a number of different implant
member configurations having internal slits to improve anchoring properties
over a flat
member,
-]0078] FIG. 27 is a top plan view of a composite implant member;
[0079] FIGS. 28A-28G are views showing various ways to assemble a composite
implant member in accordance with this invention;
-15-
CA 02592617 2007-07-03
WO 2004/012579 PCT/US2003/024212
[0080] FIG. 29 is a close-up perspective view of a portion of a slitted
support member
prepared in accordance with this invention and which is in the relaxed
(unexpanded) state;
[00811 FIG. 30 is a close-up perspective view of portion of the slitted
support member
of FIG. 29 under tension, in the expanded state;
[0082] FIG. 31 is a perspective view of a support member suitable for use in a
--- uredrral ng-suspensionprocednre;-- -
[0083] FIGS. 32A and 32B depict a support in accordance with this invention in
the
unexpanded and expanded state, respectively;
[0084] FIG. 33 is a top plan view depicting the support member of FIG. 31 in
an
expanded state as a result of tension applied thereto;
[0085] FIG. 34 is a top plan view in close-up showing a further embodiment of
this
invention having an altemate arrangement of slits;
[00861 FIG. 35 is a top plan view showing an embodiment of this invention in
which
all but the ends of the implant have slits;
100871 FIG. 36 is a top plan view of still another embodiment of this
invention having
an enlarged central section to better support body tissue;
[0088] FIG. 37 is a close-up of a portion of FIG. 36;
[0089] FIG. 38 is a perspective view showing one embodiment of an implant
member
used with connectors, and in the non-expanded state;
[0090] FIG. 39 is a perspective view showing another embodiment of an implant
meniber used with connectors;
[00911 FIGS. 40 and 41 are perspective views showing two different types o
connectors;
[0092] FIG. 42 is a perspective view showing another form of implant member,
-16-
CA 02592617 2007-07-03
WO 2004/012579 PCT/US2003/024212
[0093] FIGS. 43A-C are front perspective views showing several altemate
configurations of the implant member of FIG. 42;
[0094] FIGS. 44A and B are front perspective views of the implant member of
FIG.
42 showing the effect of force applied thereto;
[0095] FIG. 45 is a perspective view of an implant member;
[0096] FIGS. 46A and 46B are perspective viewsclmwi-,osaY~dion-Of4ho-,;mplant
member of FIG. 45 during placement in a patient;
[0097] FIG. 47 is a side cross-sectional view showing the implant member of
FIG. 45
as positioned in a patient's body;
[0098] FIG. 48 is a perspective view of another implant member;
[0099] FIG. 49 is a side cross-sectional view showing the implant member of
FIG. 48
during positioning in a patient;
[00100] FIG. 50A is a perspective view of a connector suitable for use with
the implant
member shown in FIG. 45; FIG. 50B is a perspective view of an altemate version
of the
connector of FIG. 50A, and FIG. 50C depicts another version of a connector
joined to the
implant member of FIG. 45;
[00101] FIGS. 51A and 51B are perspective and side cross-sectional views
showing
another embodiment of this invention;
[00102] FIG. 52 is a side cross-sectional view showing another embodiment of
this
invention;
[00103] FIGS. 53A and 53B are side views showing how an implant member such as
-that-shown in-R G,45-is-attaehed to an introducer-needle;
[00104] FIG. 54 is a side cross-sectional view showing the embodiment of FIG.
45
during implantation in a patient's body;
-17-
CA 02592617 2007-07-03
WO 2004/012579 PCT/US2003/024212
[00105] FIG: 55 is a simplified cross-sectional view of an introducer needle
according
to this invention;
[00106] FIGS. 56A-C are side plan views showing a portion of the introducer of
FIG.
55 in different stages of use;
[00107] FIGS. 57A-C are perspective views showing different steps in the use
of an
~impia~rt~n$mber irrsccordance-with this invention;
[00108] FIGS. 58A-G are side elevational views showing different ways of
forming
loops for use with an implant member in accordance with this invention;
[00109] FIG. 59 is a perspective view showing a portion of a loop connector
according
to this invention;
[00110] FIGS. 60A and 60B are perspective views showing another embodiment of
this invention in which a loop is captured by an introducer needle;
[00111] FIGS. 61A and 61B are perspective views showing another embodiment of
this invention in which a loop connector is captured by an introducer needle;
[00112] FIGS. 62A and 62B are perspective views showing another embodiment of
this invention in which a loop connector has a projection that is captured by
an introducer
needle; and
[00113] FIGS. 63A and 63B are perspective views showing another embodiment of
this invention in which a loop connector has a projection that is captured by
an introducer
needle.
DETAILED. DESCRIPTION OF THE PREFERREDEMBODIMENTS
[001141 Referring now to the drawings, the various embodiments of the present
invention will be discussed in detail.
-18-
CA 02592617 2007-07-03
WO 2004/012579 PCT/US2003/024212
[00115J In the following discussion, like numbers will be used to describe
like portions
of the different embodiments.
[00116J With general reference to FIG. 13 for the purpose of introducing
various
components of the present invention, this invention involves an implant member
1, which can
be made of natural material, synthetic material, or a combination thereof, and
which can be
_,_textured or slit, and also an introducer system having a handle 5, a
connector 7, and an
introducer needle 3. The purpose of this invention is to place a piece of
material beneath the
patient's urethra so that the urethra is supported, helping to prevent the
involuntary release of
urine from the bladder. Using this invention implants also could be placed in
other parts of a
patient's body to support other body organs.
[00117] Together, these components facilitate a minimally invasive and simple
technique that is easily learned and which requires little operative time. The
implant member
I is designed to have both a low complication rate and good tissue ingrowth of
a natural
material, while the texturing of the implant member 1 provides the self-
anchoring properties
of a synthetic mesh, eliminating the need for sutures or other anchoring
means.
[001181 As will later be discussed in detail, the handle 5 allows the surgeon
to guide
accurately the introducer needle 3 into the patient's body, and increases
device safety greatly
when compared to a conventional implantation system wherein the surgeon
directly grasps a
needle without a handle (not shown). One end 4 of the introducer needle 3 is
received in and
is securely held by the handle 5. The other, free, end 4 of the introducer
needle 3 is joined to
the implant member I by a connector 7. Using the handle 5 the surgeon can draw
the implant
---n,embeY-l-inte-place-beAeaEh the-patient's_uzethr.a The implant member 1 is
then detached
from the introducer needle 3 and is positioned as the surgeon wishes.
[00119] As will now be discussed in detail, this invention involves several
different
handle configurations, each of which can receive introducer needles that are
suitable for
-19-
CA 02592617 2007-07-03
WO 2004/012579 PCT/US2003/024212
performing a sling suspension procedure. Several different needle
configurations are also
proposed. In addition, a variety of different connectors for joining implant
members to the
needles are taught, and a number of implant members are disclosed. Some
implant members
can be joined directly to the needle.
[00120] As depicted in FIGS. 3A and 3B, the introducer system of the present
m en t n iducer needle body 3 having blunt-tipped
stainless steel introducer tips 4 at each end, and a modular handle 5 that can
be attached to
one of the ends 4 of the introducer needle 3. This introducer system is used
with a tissue
connector 7, as shown in FIG 13. The tissue connector 7 allows the implant
member 1 to be
quickly and securely joined to the introducer needle 3. The handle 5 provides
a solid,
ergonomic interface, enabling the user to advance the introducer needle 3 into
the patient's
body with a high degree of control.
[00121] The handle 5 can be securely locked onto the introducer needle 3, yet
still can
be easily detached by depressing a pushbutton 9. As explained below, the
pushbutton 9
releases the internal handle structure which holds the introducer needle 3 in
place on the
handle 5.
[00122] As will also be discussed later, at least one and possibly both ends 4
of the
introducer needle has a flat, spatulated section 13 with a rounded tip 15 that
serves as a
dissecting tip enabling the clean and atraumatic dissection of the patient's
tissue during
insertion. The flat, spatulated section 13 also helps the introduccr needle 3
remain close to
the surface of the pubic bone during the insertion procedure. The rounded tip
15 serves to
minimize unintended perforations of the bladder and other organs or vessels.
The introducer
needle 3 is dimensioned and curved to reflect the curvature of the posterior
surface of the
pubic bone, allowing the introducer needle 3 to stay in the "zone of safety"
during placement.
Symmetric or asymmetric introducers needles 3 can be used.
-20-
CA 02592617 2007-07-03
WO 2004/012579 PCT/US2003/024212
[00123] The present invention contemplates a handle 5 that can be removably
joined to
the introducer needle 3, as depicted in FIGS. 1A, 1B, 3A, 3B, 4A, 4B, and 5A-
5C. Each of
these drawings show somewhat different embodiments of the handle 5, but all
are intended to
improve safety by allowing the surgeon to securely hold and manipulate the
introducer needle
3 received therein.
---[00i-241 -~VVith-reference-nowto-FiGS.- IA and 1B, a first embodiment of
handle 5 is
preferably assembled from upper and lower shell portions 6a, 6b which, when
joined
together, have the desired handle shape, and which are designed to accommodate
various
handle components, discussed below. The handle 5 allows a solid, ergonomic
interface for
the user to advance the introducer needle 3 into the patient.
[00125] With continued reference to FIGS. lA and 1B, handle 5 is preferably
generally
"r' shaped, with the long leg 29 of the "T" being internally shaped to receive
one of the two
spatulated sections 13 of the introducer needle 3 (the handle 5 also can be
designed so that
only one end of an asymmetric introducer needle can be received therein). The
long leg 29 of
the "T" shape can facilitate orientation and use of the present invention, and
can be used for
guidance, as well as to indicate the position of the introducer needle 3. A
further benefit of
this arrangement is that the long leg and horizontal bar of the 'T' facilitate
orientation of the
needle held by the handle.
[00126] Turning now to FIGS. 5A-C, an asymmetric introducer needle 3 is shown.
The asymmetric geometry of this introducer needle 3 provides the benefits of
having a tight
bend radius as the distal end for close passage around the pubic bone, and a
straight portion at
the proximal end increases the working length of the needle. This working
length is
important because it allows the introducer needle 3 to fully extend between
the suprapubic
and retropubia incisions during use.
-21-
CA 02592617 2007-07-03
WO 2004/012579 PCT/US2003/024212
[00127] In contrast, if a dual-ended symmetric needle 3' such as that shown in
FIG. 2 is
used, it may be necessary to make compromises in needle design in order to
obtain both a
tight symmetrical curvature and, at the same time, an adequate working length.
[001281 In a further aspect of this invention, and with reference now to FIGS.
5A-C
._and 6A-B, the flat_portions 13 of the introducer needle 3 are made-with
different sizes and
sha*+Ps~er~a-help-in ducer ngedle-3 is-pr-,- I erieRted-dur-ing use.
[00129] As seen in FIG. 6A, the flat portion 13 of the needle tip which
adjoins the
flared portion 47 of the needle and fits into the handle 5 where it is secured
by the latch
mechanism 33 preferably is made generally rectangular in shape. This flat
portion 13 has a
width W.
[00130] In contrast, as shown in FIG. 6B, the flat portion 13 of the needle
tip 4 which
passes through the patient's tissue has a pointed dissecting tip 16a having a
gradual taper that
facilitates advancement of the flat portion 13 through such tissue. This
needle tip 4 also can
be somewhat wider in width W' than the needle tip 4 which is received in the
handle 5, since,
as noted above, this prevents the needle 3 from being installed backward in
the handle 5.
[00131] In addition, each of the flat portions 13 shown in FIGS. 6A and 6B has
a
central slot or opening 27, which, as already explained, insures that when the
introducer
needle 3 is joined to a connector 7 those parts are attached with the proper
orientation.
[00132] As can be seen in FIGS. IA-B and 4A-B, the end of the long leg 29 of
the "T"
formed by the joined upper and lower shells 6a, 6b has a small hole or slot 25
therein and an
internal cavity 31 sized to securely receive most of the spatulated end 13 of
a symmetric
introducer needle 3' or if an asymmetric needle 3 is used, the blunt end
16b_of the introducer
needle 3 intended to be secured in the handle 5. The handle 5 can be securely
locked onto an
introducer needle 3, yet also can be easily detached by depressing a
pushbutton 9, as will be
discussed below.
-22-
CA 02592617 2007-07-03
WO 2004/012579 PCT/US2003/024212
1001331 The edges of the two shell portions 6a, 6b are preferably armnged to
form a
lap joint (not shown) when assembled. Optionally, the shell portions 6a, 6b
can be arranged
with one she116a having projecting pins (not shown) and the other shell 6b
having matching
receptacles 10, preferably located at stress points. It is thought to be
preferable to employ
round pins and hexagonal holes 10; this way, air or adhesive pockets are
avoided when the
upper-and_lp~a,~er shelic 6a, (,h arnjninPr- tht- ntr or glue escaping through
the gaps formsd
between the different shaped parts, but any other hole and pin configuration,
such as round or
square, matching or nonmatching, also could be employed.
[00134] Also by way of non-limiting example, the upper and lower shell
portions 6a,
6b could be joined together using ultrasonic welding, a snap-fit, a press-fit,
adhesive bonding,
external fasteners, or any other suitable technique, whether now known or
hereafter
developed.
[001351 With continued reference to FIGS. IA-B and 3A-B, handle 5 also
includes a
slot or recess 2 which receives a weight'30. Weight 30 serves to improve the
balance of the
handle 5 when the two shells 6a, 6b are joined together to receive
the,introducer needle 3.
Preferably, weight 30 is chosen so that when the surgeon holds the assembly in
his hand, the
needle 3 rests horizontally and the needle tip 4 does not press down or up. In
other words,
the assembly should have neutral balance.
[00136] Altematively, a surgeon may prefer a different, non-neutral weight
balance, in
which case the weight 30 could be selected accordingly.
[00137] As explained in detail below, the handle 5 may latch on and off of the
-introducerlltezile-3,-ptefe-rably using the pushbutton release 9 on the
handle 5, or,
alternatively, via a smooth snap-on detent (not shown) that provides an
audible "elick" and/or
a tactile confirmation when the introducer needle 3 is snapped into or out of
the handle 5.
17he handle 5 is preferably removable because once the introducer needle 3 has
been used to
-23-
CA 02592617 2007-07-03
WO 2004/012579 PCT/US2003/024212
introduce the implant member I into the patient's body, it may be easier for
the surgeon to
separate the introducer needle 3 from the implant member 1 once the handle 5
has been
separated. Also, a detachable handle 5 could be suitably sterilized and
reused, which will
reduce expenses.
[00138] As-depicted in FIGS. 3A-B, 4A-B and 5A, the lower shell 6b of the
handle 5
~ - - CCI'tl , ,,.. 25 -= ical
introducer needle 3', or the slightly smaller blunt end 16b of an asymmetrical
introducer
needle 3, which ends are dimensioned to fit closely through the slot 25, and
provides a solid,
secure attachment for the needle. The distal end of the handle 5 also may be
tapered so as to
effectively increase the working length of the introducer needle 3.
[00139] The handle 5 has intemal structure arranged to accommodate and
cooperate
with a latch mechanism 33, as shown in FIGS. IB, 3B, 4A and 4B. As best seen
in FIGS. 3B
and 4A, the latch mechanism 33 has a biased and pivotable elongated latch
member 35 with a
projection 39 which engages the opening 27 in the end 4 of the introducer
needle 3. When
the handle 5 is assembled as shown, the latch mechanism 33 securely holds the
end 4 of the
introducer needle 3 until the operator chooses to release the end 4 of the
introducer needle 3
by pressing the button 9 on that latch mechanism 33.
[00140] As shown in FIGS. 1B, 3B and 4A, the elongated latch member 35 is
received
in the lower shell 6b of handle 5. The latch member 35 has an end catch
section 37 with a
triangular or rounded projection 39 that is sized and positioned to engage the
opening 27 in
the end 4 of the introducer needle 3 (in the case of the asymmetric needle,
the blunt end 16b).
As_pr.ey~ouslyeicplains r,~elenoe-now-id~FiGS::6A-iind-6BaIy_making the_two
spatulated sections 13 of the introducer needle 3 differ in size and shape
somewhat and by
enlarging the needle end 16a which passes through the patient's tissue and
which is sharper
than the other blunt end 16b, the intemal structure of the handle 5 can
rcceive only the
-24-
CA 02592617 2007-07-03
WO 2004/012579 PCT/US2003/024212
smaller blunt end l6b of the introducer needle 3. This prevents erroneous
insertion of the
sharper end 16a of the introducer needle 3 into the handle 5. Whereas the
blunt end 16b of
the introducer needle 3 received in the handle 5 has a generally rectangular
shape, the end
16a of the introducer needle 3 that first passes through the patient's body
has a triangular
shape suitable for dissecting tissue as it advances. Also, the blunt end 16b
of the introducer
-- ;... Pdle 3 =P+yed in the handle 5 hac a width W that is na_rrower than the
widt_h W' of the
other end 16a. Again, this difference is size and shape between the two ends
16a, 16b
prevents misinsertion of the introducer needle 3 in the handle 5.
[001411 A further benefit of this arrangement is that the differing
appearances of the
flat, spatulated sections 13 provides a visual cue which helps the surgeon
determine how to
mount the introducer needle 3 in the handle 5.
[001421 With reference now to FIGS. 3B and 4A, moving in the proximal
direction
away from the end catch section 37, the elongated latch member 35 has a pair
of projecting
rounded pivot arms 41 which serve as pivots that rest upon part of the
internal section of the
lower handle shell 6b, and a pushbutton 9. The end 43 of the elongated latch
member 35
located furthest from the end 4 of the introducer needle 3 curves downward
toward the
bottom of the lower handle she116b so that this end portion is bent when the
elongated latch
member 35 is held in the assembled handle 5. Bending the curved end 43 of the
elongated
latch member 35 generates a biasing force, which in turn is transferred via
the rounded pivot
arms 41 to the end catch section 37, thereby urging the projection 39 downward
and toward
the opening 27 in the end 4 of the introducer ncedle 3. This downward force
keeps the
. _- i, ures-the-needle tip 4 in the
handle 5. Preferably, the curved end 43 generates a progressive resistance to
applied force,
so that as force applied to the elongated latch member 35 increases, further
pressing of the
pushbutton 9 becomes more difficult.
-25-
CA 02592617 2007-07-03
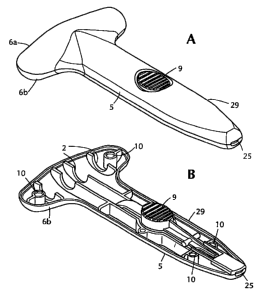
WO 2004/012579 PCT/US2003/024212
[00143] Altematively, as shown in FIG. SA, a separate spring 32 such as a
helical
spring can be mounted beneath the pushbutton 9 to oppose inadvertent downward
movement
of the pushbutton 9. As shown in FIG. 3B, this spring 32 also could be used
with the curved
end 43, for example, in case during the sterilization process, the curved end
43 permanently
deforms, which would otherwise limit the force that such a curved end 43 could
apply (other
- types-ofspri be used). Tiji way, the -r needle 3
is securely held in the handle 5 until release by the user.
[00144] Those skilled in the art will appreciate that as depicted in FIGS. 1
B, 3B and
4A-B, the handle 5 which receives elongated latch member 35 has suitably-
shaped internal
contours to accommodate the various structural components of the elongated
latch member
35 and introducer needle 3. Other schemes for securing the introducer needle
also could be
used.
[00145] Another preferred embodiment of a handle 5 in accordance with this
invention
will now be described with reference to FIGS. 5A and 5B. In this embodiment,
handle 5
includes an insert 12 having a slot 14 which is dimensioned to accept the
blunt end l6b of the
introducer needle 3. This insert 12 is preferably made of a durable and
dimensionally stable
material which does not yield or abrade under the stresses applied and
conditions experienced
during use of this invention, and thereby serves to reinforce the handle 5.
The insert 12 also
adds weight to the handle 5 and helps to counterbalance the weight of the
introducer needle 3
when the introducer needle 3 is joined to the handle 5. Preferably, the weight
of the insert 12
matches the weight of the introducer needle 3 so that the device balances
evenly in the
--sur$eon's-hand.,Byr way-af-nonlimiting-examplethe-inser-t 1-2-could-be-made-
ffom a
machined or molded piece of stainless steel, aluminum, alloy metal, high-
density plastic or
other suitable material that has been suitably sterilized.
-26-
CA 02592617 2007-07-03
WO 2004/012579 PCT/US2003/024212
[001461 Each shell 6a, 6b of the handle 5 has an internal structure
construeted to hold
the insert 12 securely; by way of non-limiting example, the insert 12 has
several recesses 18
which are dimensioned and disposed to receive posts 45 formed in the lower
shell 6b of the
handle 5. When the upper and lower shells 6a, 6b are joined together, the
posts 45 and
---recesses 18 cooperate to hold securely the insert 12 in position.
tch member
35 is biased by an abutting spring 32 so that the projection 39 presses
downward into the slot
or opening 27 formed in the tip of the introducer needle 3. As shown, the
spring 32 presses
the portion of the elongated latch member that is proximal to the projecting
rounded arms 41
upward, and so the elongated latch member rotates about the projecting rounded
arms 41 so
that the distal end 37 ofthe elongated latch mcmber 35, which has the
projection 39 engaging
the slot 27 formed in the end 4 of the introducer needle 3, is pressed
downward toward the
introducer needle 3.
[001481 It will be appreciated that the spring 32 or another suitable biasing
member
could be placed in a different location, for example, on the other side of the
elongated latch
member 35 in the area above and across from the projection 39.
[00149) To release the introducer needle 3 of any of the foregoing
embodiments, the
operator depresses the button 9 into the handle 5 with force sufficient to
overcome the biasing
force of the curved section 43 of the clongated latch member 35 and/or the
pressing applied
by the spring 32 to the. elongated latch member 35. The button 9 pivots
downward about the
projecting rounded arms 41, and the projection 39 is raised upward and out of
the opening 27
n e m the handle S.
[00150] It will be appreciated that the shape of the projection 39 is such
that when, as
shown in FIG. 3B, a introducer needle 3 is inserted into the handle 5, the
surface of the
projection 39 rides up onto the flat, spatulated section 13 of the end 4 of
the introducer needle
-27-
CA 02592617 2007-07-03
WO 2004/012579 PCT/US2003/024212
and is displaced upward above the advancing introducer needle 3. The
introducer needle 3
continues to advance inward until the tip 4 of the introducer needle 3 reaches
the end of the
chamber dimensioned to accommodate the introducer needle 3, and the opening 27
in the
introducer needle 3 is positioned beneath the projection 39, at which point
the projection 39 is
forced downward-into the opening 27 through the urging force-exerted by the
curved section
A'] _r t-_ 35. 1.T... 9= ~
~~ v~z~ , eerneed ~yjoined to the
handle 5, as depicted in FIGS. 3A-B and 9A-C.
[00151] Also by way of non-limiting example, pushbutton 9 and the opening 26
in the
top shell 6a in which it is received are arranged so that the button siurface
is flush with the
handle 5, and is positioned so that when the surgeon grasps the handle 5, the
pushbutton 9
falls between the surgeon's fingers. This helps to avoid inadvertent release
of the introducer
needle 3 from the handle 5.
[00152] Furthermore, the elongated latch member 35 is preferably constructed
so that
it only releases the introducer needle 3 when the pushbutton 9 is fully-
depressed; until then,
the introducer needle 3 remains securely held in the handle 5. This way, a
slight depressing
of the pushbutton 9 from routine handling will not trigger release of the
introducer needle 3.
Furthermore, the opening in which the pushbutton 5 sits is contoured so that
if the pushbutton
9 is inadvertently pressed by a hand or finger covering that opening, the
introducer needle 3
is not released. These two features combine to reduce the likelihood of
accidental introducer
needle release.
[00153] All of these features combine to render it unlikely that a surgeon
could
inadxrrtentlydepress the nushbutton 9 while4rsspjng-the-handle 5-
[00154] By way of non-limiting example, the upper and lower shells 6a, 6b of
handle 5
are preferably manufactured by injection molding using a suitable plastic
material. Any other
-28-
CA 02592617 2007-07-03
WO 2004/012579 PCT/US2003/024212
suitable manufacturing technique, such as machining of a plastic or metal
blank, also could
be employed.
[00155] It will be appreciated that the dimensions and configuration of the
handle shell
6a, 6b and any internal structure, such as the elongated latch member 35,
should be selected
so that the handle 5 can withstand the loads and torques experienced during
use to advance
introducer needle 3 and position the implant member 1.
[00156] The present invention also envisions the use of a handle 5 and
introducer
needle 3 which have been permanently joined together.
[00157] As part of the present invention, the introducer needle 3 and the ' T'-
shaped
handle 5 are used to position the implant member 1 in the patient's body. This
requires the
needle 3 to be joined to the implant member 1. This is accomplished using a
dual-ended
connector 7, such as that shown in FIGS. 7A-D, 8A-G, 9A-D and 10. Such
connectors 7
provide a permanent, snap-fit connection between introducer needles 3 and the
implant
member 1, and thereby ensure secure connection between those components during
passage
into the patient. "Permanent" means that it is not intended to be separated
and so it would be
difficult to manually separate a connector 7 from the introducer needle 3 or
the implant
member I after they have become permanently affixed (it does not, however,
require that it
be impossible to separate those parts). By providing a permanent connection,
there is also
less of a chance that a connector 7 could be left behind in the patient's body
following
completion of this procedure.
[00158] The ergonomically-designed handle 5 also could be straight, or a
combination
--of-straight-md-T-3shaped~'er- ptirnunt-gip-~uring-b-4. the abdentictal-sitd-
agit-al-approaches.
A T-shaped handle 5 may be generally preferred by doctors for a vaginal
approach, while a
straight handle (not shown) may be generally preferred for an abdominal
approach, and so a
handle 5 which allows for both types of grips may be preferred and more
practical. It will be
-29-
CA 02592617 2007-07-03
WO 2004/012579 PCT/11S2003/024212
understood that the precise manner in which the surgeon grips the handle 5 is
a matter of
individual preference, and that the gripping techniques disclosed herein are
by way of non-
limiting example.
[00159] Next, a number of different needles in accordance with this invention
will be
discussed.
, ion -13 of
the needle end 4 is adjacent to a flared region 47. This flared region 47,
owing to its size and
profile, facilitates passage of the introducer needle 3 into the patient's
body, and, after the
implant member 1 has been joined to the introducer needle 3 by a connector 7,
also facilitates
withdrawal of the introducer needle and accompanying introduction of the
connector 7 and
attached implant member 1 into the patient's body. Preferably, seen in a
direction
perpendicular to the direction=along which the needle end 4 is advanced into
the body (the
long axis of the introducer needle 3), the flared section 47 is somewhat
larger in cross-section
than the cross-section of the connector 7 that can be attached to the needle
end 4. The
connector 7 rides easily behind the flared section 47. Further, the shapes of
the connector 7
and the flared region 47 are complementary.
1001611 The present invention contemplates the use of needles with and without
the
flared section. Examples of needle with the flared section can be seen in
FIGS. 2, 3A-B and
4A-B. A needle having a flared section refers to a needle having a cross
stction at a given
position such that the connector which follows the needle rides in the
"shadow" of that given
area. In other words, the width of the given area in any particular direction
is at least as large
as tlie width-ofthe conn~Ar in the same direction..As..discussed in detail
below, the pn:sertt
invention discloses use of a needle having a flared section; seen in an end
view, each point on
the porimeter of the largest portion of the flared section lies on or outside
of the perimeter of
the largest portion of the connector which is drawn along by the needle.
-30-
CA 02592617 2007-07-03
WO 2004/012579 PCT/US2003/024212
[00162] Testing has showed that far less resistance is encountered over the
connector 7
and implant member I when using a needle having the flared section, as
compared to the use
of a needle without such a flared section (not shown). A puncture test was
conducted through
a layer of porcine abdominal fascia using both types of needles. Whereas the
needle with the
flared section required 2.7 lbs. of force to penetrate through the fascia, the
other type of
needle reqllired32 lbs nf fnrce tnT PnPtrate the fascia.
[00163] A second test was performed to evaluate the force over the connector 7
and
implant member I after the initial opening was made. The test consisted of
pulling each
needle assembled with the connector 7 and implant member I through a layer of
porcine
abdominal fascia in a simulated-use test fixture. This test simulated the
clinical use of the
device being pulled through the rectus fascia or endopelvic fascia of a
patient. The peak
force measured using the needle without a flared section was 3.6 lbs., whereas
and the peak
force using the needle with the flared section and connector was 1.2 lbs.
[00164] For the needle without the flared section, the force to pull the
connector 7 and
implant member I through (3.6 lbs.) is higher than the initial penetration
force (3.2 lbs.) For
the needle having the flared section 47 and the connector 7, the force to pull
the connector 7
and implant member I through (1.2 lbs.) is substantially lower than the
initial penetration
force (2.7 lbs.).
[00165] The general shape of needles which can be used with this invention
will now
be described.
[00166] As depicted in FIG. 2, the introducer needle 3' can be curved and
double-
= e3 can interchangeabiy-aceept-eitltec-the-handle 5
or a connector 7 to be described. The curved central portion 11 of the
introducer needle 3 is
preferably circular in cross-section, although other cross-sectional profiles
such as elliptical,
hexagonal, square or triangular also could be employed. The curvature of the
central portion
-31-
CA 02592617 2007-07-03
WO 2004/012579 PCT/US2003/U24212
11 is sufficient to enable close tracking along the posterior surface of the
patient's pubic bone
between the abdominal and vaginal incisions. Consequently, it may be
preferable to provide
a range of different introducer needles, collectively sized to cover a range
of different patient
body sizes.
1001671 Each end 4 of the double-ended introducer needle 3' is spatulated with
a thin,
- .qat desig~-to-prevideeleatrand atraumat' ~= , eunrig vrpiercing;-of the-
patient's tissue during insertion. Becaiuse these two ends 4 have the same
shape, each of the
needle ends 4 can interchangeably engage either the handle 5 or a connector 7.
Each end 4 of
the double-ended needle 3' has a generally-arcuate central section 11 leading
to a tip region
having a flat, spatulated section 13. The size and precise shape of the
spatulated section 13
can be selected to reflect the patient's anatomy. Preferably, the introducer
needle 3' (or 3) is
shaped to allow close tracking along the posterior surface of the pubic bone,
keeping the
needle tips 4 in the "zone of safety". The "zone of safety" is, generally, the
area behind the
posterior surface of the pubic bone between the upper and lower edges of the
pubic
symphysis. This area is relatively free of vasculature and other organs that
could be damaged
if the needle 3 were deviated too far posteriorly or laterally.
[00168] The flat, spatulated ends 4 provide a solid mounting surface for
engagement
with a slot 25 in the handle 5 by distributing the forces encountered during
the procedure over
a wide area inside the handle 5. Such forces may include compression, torque,
bending and
tension. The rounded needle tips 15 also serve to minimize unwanted
perforations of the
bladder and other vessels, while at the same time allowing the needle to
gently dissect the
~atie t issila~ needle advancPC intn the natielit's-16d"thczugh-here_the-
ends.4 of the
introducer needle 3' are preferably the same size and shape, this invention is
not to be so
limited; as already explained, different size and shape ends also could be
provided.
-32-
CA 02592617 2007-07-03
WO 2004/012579 PCT/US2003/024212
[00169] It also will be appreciated that the length, curvature and tip
arrangement of the
introducer needle 3' all affect the manner in which the introducer needle 3'
tracks during use,
and that this invention is intended to cover all such arrangements.
[00170] By way of non-limiting example, a curved introducer needle 3 according
to
this invention can subtend an obtuse angle, i.e., 98 , and have a bend radius
of 4.7 inches, or
can subtend a right angle, 90 , and have a 3.4 inch radius, or can subtend an
acute angle, i.e.,
60 , and have a 3.3 inch radius.
[00171] Again, all of these dimensions have been given by way of example only
and
not limitation. Other dimensions also could be used.
[00172] Also optionally, and with reference now to FIGS. 5A-B, the portion of
the
introducer needle 3 leading to the flat spatulated sections 13 could be
straight, so that a
straight section 20 is located between the curved section and at least one of
the needle ends 4.
Such straight sections 20 are presently thought to be of particular use with
an introducer
needle 3 having a right angle bend, and also could be used with other needle
configurations.
[00173] By way of nonlimiting example, and with reference to FIGS. 5A-C, the
introducer needle 3 can be constructed with an asymmetric geometry such that
the curved
section 22 is provided near the distal end, and the portion of the introducer
needle 3 located
between the surgeon and the curved portion 22 is longer than the portion of
the introducer
needle 3 projecting forward from the curved portion 22. This an-angement
provides added
working length at the proximal end of the introducer needle 3, which improves
handling,
while the shorter segment at distal end of the introducer needle 3 can better
conform to the
pnhic bone agit advancrc_ The jr~re~ced lengthof theTmxiinal end of the
intmducer needle
3 also permits the use of a longer handle 5, which may allow for more precise
positioning of
the introducer needle 3.
-33-
CA 02592617 2007-07-03
WO 2004/012579 PCT/US2003/024212
1001741 , Presently, it is thought to be preferable to round the needle ends 4
for
maximum safety. However, the ends could be sharp-edged or even pointed to
facilitate
penetration through the fascial layers during insertion.
[00175] Each end of the introducer needle 3 has an opening or slot 27
therethrough.
As depicted in FIGS. 2 and 6A-B, the openings 27 are preferably rectangular,
although other
, evals, uad-be-entpleyed-lvlsre-than one
opening 27 also could be provided in each end 4. These openings 27, as will be
explained in
greater detail below, are used to join one end 4 of the introducer needle 3 to
a handle 5, and
also to connect the other end 4 of the introducer needle 3 to the implant
member 1.
[001761 The introducer needle 3 can be made of any suitable biocompliant
material
such as stainless steel. If desired, the introducer needle 3 could be coated
with a low-friction
layer of material (not shown) such as polytetrafluoroethylene to reduce
insertion trauma.
[00177] Optionally, and with reference now to FIG. 5D, the introducer needle 3
could
be provided with a shrink-tubing sleeve. Such a sleeve would serve two
purposes; first, if
made of PTFE (Teflon ) or similar material, it could provide a very lubricious
surface to ease
passage of the introducer needle 3'through the body, while at the same time
preventing injury
to the body tissue. Secondly, the sleeve could be made in a very bright color
such as green or
blue to improve visibility during a cystoscopy to confirm bladder integrity.
Even if bladder
perforation is not observed, the bright color of the sleeve can be seen
through the thin bladder
wall confirming safe placement of the introducer needle 3.
[00178] As depicted in FIG. 5D, the sheath is tubular, with open ends;
however, it will
--be aporeciated that the distal end of the sheath could be closed to further
facilitate
advancement of the introducer needle I into the patient's body. If desired,
the closed end of
the sheath could be cut off once the sheath has entered and passed through the
patient's body,
for example, when it protrudes through an abdominal incision.
-34-
CA 02592617 2007-07-03
WO 2004/012579 PCT/US2003/024212
[00179] With reference now to FIG. 13, the connector 7 is used to obtain a
positive,
snap-fit connection between the introducer needle 3 and the implant member I
to ensure
secure attachment during passage of the introducer needle 3 and the implant I
into the
patient. Preferably, the connector 7 is flexible, and pennanent. Several
different
embodiments of connectors according to this invention now will be described.
___[00180]__ To minimjzc-tissue_trauma_during use, all of the surfaces of the
connector 7
are preferably tapered and/or rounded, and have a low-friction surface. The
connector 7 can
be made from a low-friction, biocompatible material, and, if desired, can be
surface treated or
coated to improve its properties.
[00181] To further minimize tissue trauma, it is preferable to have, as
depicted in
FIGS. 9A-D and 15A-C, the tips of the arms of each connector 7 which abut the
flat,
spatulated section 13 of the introducer needle 3 be shaped to conform to the
tapered end 4 of
the introducer needle 3 (in other words, these parts have complementary
shapes). Preferably,
the ends of the connector 7 that abut the flat, spatulated section 13 of the
introducer needle 3
have flexible tips that conform snugly to the end 4 of the needle 3. Also, the
arms of the
connector are preferably long enough so that they cover much of the flat,
spatulated section
13 of the introducer needle end 4 and come close to the flared region 47 of
the needle end 4.
[00182] FIGS. 7A-D depict a first embodiment of a connector 7 having limited
flexible
construction. This design allows for the connector 7 to pivot and bend freely
about certain
axes during passage into the body (rotation around the locking projection 57
and bending at
the mid joint or web 51) to better follow the curved path created by the
introducer needle 3.
~~~~nnectoi 7, -,'KWut a ve tca p ane.
Each side of the connector 7 is designed for attachment to either the
introducer needle 3 or
the implant member 1, and, since the connector 7 is symmetrical, the two sides
are
interchangeable. This means the surgeon, when joining the connector 7 to the
introducer
-35-
CA 02592617 2007-07-03
WO 2004/012579 PCT/US2003/024212
needle 3 or implant member 1, does not have to spend time choosing a
particular side of the
connector 7 for attachment.
[00184] In this connector 7, the two lower arms 53a, 53b on each side of the
connector
7 are joined directly to a central web 51. Each arm 53a, 53b, 55a and 55b can
have a
narrower region 56 which_serves as a living hinge. The living hinges 56 could
be molded
--disec ' 6taens-57-Wending
upward from the lower arms 53a, 53b toward opposing upper arms 55a and 55b,
respectively,
are generally cylindrical in shape (and, more preferably, are frusto-conical),
with a flared end
cap 59. Openings 61 arc formed at positions opposite to the projections 57.
Each opening 61
has a beveled inner surface 63 dimensioned to nxxive the end cap 59 of the
associated lower
arm 53a, 53b, and at least one slot 65. The slot 65 allows the beveled inner
surface 63 of the
opening 6I to deform sufficiently to receive and allow passage of the flared
end cap 59.
Once the flared end cap 59 passes completely through the opening 61, the
deformed inner
surface 63 of the opening 61 returns to its nonnal position, and the flared
end cap 59 cannot
be retracted therethrough. Although the flared end cap 59 may project somewhat
from the
flat back surface of the upper arm 55a or 55b, the rounded shape of the flared
end cap 59
means it still will pass smoothly through the patient's tissue during
insertion of the implant
member 1.
[00185] FIGS. 7C and 7D show the connector 7 when each pair of upper and lower
arms 53a, 53b, 55a and 55b are respectively brought together and locked by
engagement of
the flared end cap 59 with matching openings 61.
---J001,86j FIGS: 8A--and $B-sltuty-waltein1Mm eWiltien't of a connector 107
that is
similar to the connector 7 just described. In this arrangement, only the upper
anns 155a and
155b of the connector 107 are bendable about narrower regions 156 serving as
living hinges.
The lower arms 153a, 153b are fairly rigid, owing to their thickness and the
lack of hinge
-36-
CA 02592617 2007-07-03
WO 2004/012579 PCT/US2003/024212
areas, and they lie in a plane. A central web 151 extends upward perpendicular
to the plane
in which the lower arms 153a, 153b lie, and the upper arms 155a, 155b are
attached to this
central web 151. As shown in FIG. 813, the upper arms 155a, 155b are joined to
the central
web 151 by living hinges 156. Here, frusto-conical projections 157 extend from
the upper
anns 155a, 155b toward the opposing lower arms 153a, 153b, which have matching
openings
.-141-formed-1 ~madefrom abiesem-pat-ible-polyrneric
material. To simplify manufacture arid use, the connector 107 is preferably
formed as a
molded integral unit, but also could be made from separate components suitably
connected.
[00187] Also altematively, the connector 107 could be machined in its
entirety.
[00188) As shown in FIG. 8A, each opening 161 has a beveled inner surface or
countersunk portion 163 and counterbored portion 164, for reasons described
below.
[00189] The end of the projection 157 has a flared end cap 159 which is sized
and
positioned to engage and cooperate with the beveled edge 163 of the opposed
opening 161.
Preferably, at least one slot 167 is formed extending through the projection
157. This way,
when the arm 153a, 153b is moved toward the opposing arm 155a, 155b, the
beveled surface
169 on the end of the projection 157 strikes the beveled edge 163 of the
opening 161, urging
the divided portions of the projection 157 toward each other. As the divided
portions of the
projection 157 move inward, they can pass between the edges of the opening
161, until the
halves of the projection 157 extend outward from the bottom surface of the
elongated lower
arms 155a, 155b. The halves of the projection 157 are received in the
counterbored portion
164 of the opening 161. The counterbored portion 164 is preferably dimensioned
so that the
not proJec outwam m_--e up~er arm ~ I3--bis way, the
connector 107, when closed, still has a smooth, projection-free outer surface
which is easily
drawn through the patient's tissue during implant member insertion.
-37-
CA 02592617 2007-07-03
WO 2004/012579 PCT/US2003/024212
100190) The halves of the projection 159 then spring out and engage the back
surface
of the lower arms 155a, 155b, and prevent the projection 157 from being drawn
back through
the opening 161.
[00191] Accordingly, the connector 107 shown in FIGS. 8A and 8B provides a
more
rigid structure than the previous connector 7, and may be preferred inMew of a
particular
-~atient~ aaatofn5; er-irrviev-F of-Ote--sn ' .
[00192] FIGS. 9A-C depict yet another embodiment of a connector 207 similar to
that
shown in FIGS. 7A-D. In the embodiment depicted in FIGS. 9A-C, each pair of
arms 253a,
253b, 255a, 255b has two, rather than one, projections 257, each projection
257 again having
a flared end cap 259. The opposing ann 253a, 253b, 255a, 255b has openings 261
sized and
located to receive and securely hold the flared end caps 259. As before, the
arms 253a, 253b,
255a, 255b are attached by living hinges 256 or more flexible sections, to a
central web 251.
The tip portion 271 of each arm 253a, 253b, 255a, 255b is tapered in
thickness, and the tip
portions 271 all are angled slightly to approach one another. This slight
inward bend at the
ends of the connector 207 helps provide a compressed, snug fit when,snapped
onto the
introducer needle 3 or implant member 1. This way, when the connector 207 is
joined to the
implant member 1, the tip portions 271 of the amss 253a, 253b, 255a, 255b
squeeze the
implant member I somewhat. The tapered shape of the tip portions 271 also
facilitates,
movement of the connector 207 through body tissue.
[00193] The use of two projections 257 in each side of the connector 207
provides
several benefits. First, it improves the strength of the snap-lock by
distributing the loads over
-~ff>~greater area o e tQVA~ra3echons25]__Second, t e_dual_projectton design
improves the
connection to the implant member 1 by distributing the forces over two holes
in that member,
instead of one. Third, the dual projection design prevents rotation/pivoting
of the conncetor
207 on the needle 3. This may help prevent "kinking" of the connector 207 on
the needle 3 if
-38-
CA 02592617 2007-07-03
WO 2004/012579 PCT/US2003/024212
the movement of the introducer needle 3 is reversed. However, the connector
207 may still
flex in the center about the central web 251 along the longitudinal direction
to better conform
around the curved pubic bone during passage.
1001941 The dual projections 257 used in the connector 207 shown in FIGS. 9A-C
provide stronger connections between the implant member I and the connector
207 and the
207, ure of any
one projection 257. Also, using two projections 257 prevents rotation of the
implant
member I or introducer needle 3 about those projections 257 (in the case of
the introducer
needle 3 the projections 257 are preferably received in an elongated slot 27
just able to
accommodate the projections 257), which could happen if a single projection
were to be used.
This may prevent or at least reduce "kinking" of the connector 207 or the
implant member I
during placement in the body.
[001951 Although FIGS. 9A-C show that the projections 257 for one pair of arms
253a,
253b, 255a, 255b are located so as to extend upward and the projections 257 of
the other pair
of arms 253a, 253b, 255a, 255b extend downward (in other words, the
projections 257 face in
opposite directions), it will also be understood that the projections 257
could be positioned so
that they face in the same direction.
[001961 FIG. 9D depicts a further refinement of the connector 207 shown in
FIGS. 9A-
C. While the two connectors 207 are generally the same in appearance, the
connector 207
shown in FIG. 9D has, in addition to each pair of arms 253a, 253b, 255a, 255b
having two
projections 257 and matching openings 261, a set of opposing and interlocking
teeth 273a,
bdimensione an ispos o ma w en e c~ct;)Y-arrns_ 53a53b, 255a, 255b are
brought together. These teeth 273a, 273b can improve the connectoes bite into
the implant
member 1. On the introducer needle 3, these teeth 273a, 273b mesh together
inside the slot
27 and help prevent improper closure of the connector 207 on the introducer
needle (which
-39-
CA 02592617 2007-07-03
WO 2004/012579 PCTIUS2003/024212
now has a single elongated slot 27 that allows integration with both the
connector 207 and the
handle 5).
[00197] As shown, the upper arm 255a on the left side has a single tooth 273a,
and the
facing lower arm 253a has two teeth 273b. In this embodiment, when the
connector 207 is
closed, the one tooth 273a of the left upper arm 255a fits between the two
teeth 273b of the
-_ !P 'n' is j~ ~ a'~ the implant member 1, these
teeth 273a, 273b will bite into and thereby capture the implant member 1.
However, when
the connector 207 is joined to the needle end 4, which has an elongated slot
27 therein, the
teeth 273a, 273b will just close together without any material therebetween.
[00198J FIGS. 10 and I 1 A-B depict still another embodiment of a connector
207 in
accordance with this invention. This embodiment is substantially similar in
configuration to
the connectors 207 shown in FIGS. 9A-D, but differs in that the teeth 273a,
273b of FIG. 9A
have been replaced by a"+"-shaped boss or projection 275 (it should be
understood that any
other suitable shape boss also could be used, such as a hemispherical or
cylindrical boss in
place of the "+"-shaped projection 275). The "+"-shaped projection 275 is
located on one of
each of the two arms 253a, 255a or 253b, 255b making up each side of the
connector 207. As
shown in FIGS. 11A and 11B, the "+"-shaped projection 275 does not extend all
the way
from one arm to the other - rather,.the "+"-shaped projection 275 is about
half the height of
the gap between the opposing arms 253a and 255a or 253b and 255b. When the
opposed
arms on either side of the connector 207 are squeezed together, the "+"-shaped
projection 275
limits how close together the opposing arms 253a and 255a or 253a and 255b can
be pressed.
As shown in FIG. 11B, which depicts the "+"-shaped projection27Lbeiug-hormcd
as part of,
and extending upward from, the lower arm 255b, if the two opposing arms 253b,
255b are
pressed together by sufficient force, the upward-facing "+"-shaped projection
275 strikes the
upper arm 255b and prevents further compression. This keeps the two arms 253b,
255b
-40-
CA 02592617 2007-07-03
WO 2004/012579 PCTIUS2003/024212
separated by the height of the "+"-shaped projection 275. When the connector
207 is
attached to the implant member, the separation maintained between the two arms
253b, 255b,
becomes the height of the boss plus the thickness of the implant member.
[00199] The "+"-shaped projection 275 also helps to prevent improper
connection to
the introducer needle 3; for example, while a connector 7 such as that shown
in FIGS. 7A-B
could be connected sideways to an introducer needle 3, here the "+"-shaped
projection 275
will interfere with the needle 3 unless both of the connector's cylindrical
projections 257 are
aligned with the slot 27 in the needle 3.
1002001 It will also be appreciated that the "+"-shaped projection 257, since
it limits
inward movement of the facing arms 253a, 255a and 253b, 255b ("oversnapping"),
also can
control the pressure that the arms 253a, 255a and 253b, 255b apply to an
implant member I
held therebetween. This may avoid unnecessary material damage.
[00201] Preferably, the "+"-shaped boss 275 has rounded and blunt surfaces,
and it
does not bite or clamp down on the implant rnember I. Accordingly, this
structure should not
be viewed as a tooth.
[00202] FIGS. 51A and 51B show yet another connector configuration. This
connector 307 has a pair of upper and lower jaws 353a, 353b, 355a, 355b which
are linked
together by a length of flexible tubing 377. The length and stiffness of the
tubing 377 can be
chosen according to the properties required for the connector 307. Each upper
and lower jaw
section has upper and lower jaws 353a, 355a which come together at one side of
a center
body 351, and a barbed connector 3791ocated on the other side of the center
body 351. The
barbed connector 379 is damensi.onmd_sstthat.yvhen_it.is_inserted
into_the_flexible tubing 377,
the barbed connector 379 secures the upper and lower jaw sections 353a, 355a
against
backward movement.
-41-
CA 02592617 2007-07-03
WO 2004/012579 PCT/US2003/024212
[002031 With reference now to FIGS. 6A, 6B, 14A, 14B and 15A-C, aspects of
this
invention are depicted in which the needle tip 4 and the connector 7 are
designed with
complementary shapes such that the advancing introducer needle 3 passes
through the tissue
prior to movement of the connector 7 therethrough, as will now be described
(FIGS. 14A-B
depict the connector of FIG, 9D but, for-simplicity, the,numbering ofconnector
7 has been
---empleyed)-.-ne~~es aAaredsestie ssn-panmdisttlar-to the-needle's
axis, extends over at least the same acea as the connector 7, and, more
preferably, over a
somewhat wider area than the connector 7. The flared section 47 precedes the
connector 7
and implant member I through the tissue. The flared section 47 thereby reduces
the amount
of force required to create the implant passageway. As the passageway is
created by the
introducer needle 3, the connector 7 and implant member 1, which aro attached
to one end of
the introducer needle 3, follow the needle into the tissue channel. The
connector 7 and
implant member 1 are "shadowed" by the flared section 47 of the introducer
needle 3 during
passage through the tissue. This way, the tissue channel is formed without
substantial trauma
to the patient's tissue, and the tissue channel is large enough so that the
connector 7 and
implant member I can pass through without causing injury to the tissue and
without
difficulty.
[002041 As depicted in FIGS. 12, 17A-D and 20A-E, the implant member I is an
elongated strip of material about 30-50 cm long and 1-2 cm wide. In the
embodiments shown
in FIGS. 12, 17A-D, 20A and 20C-E, the implant member I has a center section
81 flanked
by ann portions 83a, 83b. Preferably, the implant member 1 is symmetrical. In
many cases
Me acm porti . ons8~mclude sLts 8$ tha~improve ihe iiii~ant member's anchoring
properties, whereas the center section 81 does not have such slits.
Alternatively, the edges 87
of the arms 83a, 83b could be smooth, scalloped, or even have irregular shapes
fonned
-42-
CA 02592617 2007-07-03
WO 2004/012579 PCT/US2003/024212
thereon. The tips 89 of the arm portions 83a, 83b are rounded, and each tip 89
has one or
more openings 91 therein, the purpose of which will be discussed elsewhere.
[00205] The center section 81 is preferably dimensioned so that, when the
implant
member I is positioned in the patient's body, the center section 81 helps to
distribute force in
the region of the urethra in a manner to provide a backboard or support that
enables urethral
closure when-abdominal pressure-incr-eases-occur: -
[00206] In one embodiment of this invention, each of the arm portions 83a, 83b
prcferably has a length sufficient so that when the implant member I is first
implanted in the
manner discussed below, the tips 89 of the arms 83a, 83b protrude'outward from
the patient's
body. Thus, the arms 83a, 83B should be sized for use with the largest
patients likely to
undergo this procedure. The protruding tips 89 of the arms 83a, 83b can be
manipulated by
the surgeon to properly position the implant member 1, and also to apply the
desired amount
of tension to the implant member 1.
[00207] Given these dimensional considerations, it may be preferable to
provide a
range of different sized implant members to better accommodate the
physiologies of different
sized patients. Implant member width, the length of the center section 81 and
of the arms
83a, 83b all could be varied to provide a number of different implant members
1. Implant
member shape and dimensions can be selected according to the holding force
desired.
[00208] The arms 83a, 83b of the implant member I shown in FIGS. 12, 13 and
22A
have "sawtooth" or "wave" shaped outer edges 87. This arrangement will help
anchor the
implant member 1 in the patient's tissue, and will secure the implant member I
against
unwan movemen
[00209] Other possible edge styles that allow for easy insertion in the
tapered
direction, but that also resist movement in the opposite direction include
uniform "saw-tooth"
edges 87 and smooth curved edges 87. Each edge style can either be deep or
shallow to
-43-
CA 02592617 2007-07-03
WO 2004/012579 PCT/US2003/024212
generate higher or lower amounts of self-anchoring force. The edges 87 can
also have
numerous small slits 93 to help generate additional anchoring ability and
possibly more
adjustability in the surrounding tissue through out-of-plane deformation of
the material
between the slits 93, as discussed in greater detail below. By way of further
non-limiting
example, a plain, straight-edged implant member I also could be used, whether
of constant
..-~at -- L-y~b .t:CCTiõent~idllTTfl-~7G-T-eg19111T1 U7Gu1GUll.
[00210] =-=A"n~iCmiiplant member I having an irregular edge 87 could support a
greater
force than an implant member I having a straight edge 87. Larger serrations
should provide
better holding power, but cannot be adjusted in position as easily; the
serrations or
projections 95 act as "ratchets", and a finely pitched ratchet, it will be
appreciated, can be
adjusted more precisely.
[00211] By way of non-limiting example, one configuration of the implant
member 1
is a 10-15 mm wide strip with directional texturing about 1-2 mm deep on each
side. The
spacing between each peak of the edge texture (the "teeth") 95 is preferably
in the range of 2-
mm. This spacing characteristic can provide maximum adjustability (an analogy
is to a
belt - closer spaced holes in the belt allow smaller and more precise
adjustments). Also, the
implant member I is preferably 30-50 cm in length, and has an untextured
center section 81
approximately 1-15 cm long, with 2-10 cm. being more preferable. Arm widths of
12 mm
and center section widths of 15 mm may be preferred.
[00212] It should be understood that as the number and size of the projections
(teeth)
95 increase, the force which the implant member I can withstand also
increases.
~i?02131- In one_e iment, ectons257on-esdge_of the_implant member I
could be 1.5 mm deep, 6 mm. apart in pitch, and the implant member 12 mm wide
at its
widest portion. Again, these dimensions are exemplary, and other dimensions
also could be
used.
-44-
CA 02592617 2007-07-03
WO 20041012579 PCT/US2003/024212
[00214] The use of inner slits 85, rather than sawtooth-shaped outer edges 87,
may be
preferred because an implant member I with inner slits 85 may be easier to
position than an
implant member with sawtooth-shaped outer edges 87. By virtue of the slits'
shape, the
implant member 1, as it is introduced into the patient's body, slides easily
through tissue,
__since the low force requiresi to.pull the implant_member.l behind the flared
section 47 of the
intmducer needle 3 meanc that the intP.nAl-sliu 85 will lie flat in the same
plane as the rest of
the implant member 1, and will not interfere with insertion of the implant
member 1.
[00215] The use of "V"-shaped slits 85, as depicted in FIGS. 17A, 17C,17D, 18A-
B
and 19A, and others, is presently prefen-ed. Implant members I constructed in
this manner
have a dynamic and centrally-located self-anchoring design. The self-anchoring
design has
series of V-shaped slits 85 (preferably identical in size and shape) arranged
along the central
axis of the implant member 1. These V-shaped slits 85 are cut in each arm 83a,
83b of the
implant member I and point towards the center support section 81 of the
implant member 1.
[00216] Unlike systems which rely on statically-formed geometry, such as the
saw-
tooth edges 87 discussed above, to create the self-anchoring force, this
configuration
incorporates a dynamic self-anchoring system which develops a progressively-
increasing
anchoring ability that.provides greater resistance to movement the more the
implant member
1 is stressed. By using a soft, natural tissue material, the implant member 1
can deform easily
when subjected to the stress and tension encountered during implantation. As
tension is
applied, the implant member ] stretches and buckles causing expansion and
opening of the
slits 85 to allow the surrounding patient tissue to compress inward through
the implant
-nember. -i. As the applied tension increases, the slits 85 begin to deflect
outward to create a
progressively greater anchoring force. The greater the deflection, the greater
the surface area
contacting the patient's tissue, and the better the anchoring force. If,
however, an excessive
amount of stress or tension is applied, the slits 85 buckle inward allowing
the implant
-45-
CA 02592617 2007-07-03
WO 2004/012579 PCT/US2003/024212
member 1 to slide gradually through the patient's tissue. This helps minimize
the possibility
that too much anchoring force will be generated by the implant member 1.
[00217] This self-regulated anchoring design creates the dynamic ability to
provide a
progressive anchoring force for the implant member 1. The static geometry-
based systems
cannotdevelop this progressive anchoring ability because the self-anchoring
features are
fix Ãunstienality and ability to self-adjust to
the tension being applied is limited.
[00218] As an added benefit of the centralized self-anchoring design, all edge
texturing
can be eliminated, leaving smooth, straight edges on the implant member 1.
This may be
helpful because edge texturing can create additional drag during implantation
(i.e. a higher
implantation force is required) which could cause additional trauma to the
surrounding tissue.
By centrally locating the self-anchoring mechanism on the implant member 1,
there is almost
no drag generated by the slits 85. The anchoring force is only generated when
the direction
of tension on the implant member I is reversed, exactly as is desired during
clinical use of the
implant member I as a sling.
[00219] With reference to FIGS. 17A and 20A-E, it should be noted that the V-
shaped
slits 85 on one side of the implant member I face in the opposite direction
from the slits 85
on the other side of the implant member I. This is done because the implant
member I is
introduced in the patient's body one arm at a time, with each arm 83a, 83b
being drawn
upward from beneath the area of the patient's urethra into the suprapubic
space toward the
abdomen. Thus, it is the direction in which each arm 83a, 83b of the implant
member I
advances into the body-durirfg placement that deterinines slit orientation.
[00220] In contrast to the foregoing implant member configuration, an implant
member 1 having outer sawtooth-shaped edges 87, as shown in FIG. 12 will be
more difficult
to position, because the sawtooth-shaped outer edges 87 of the implant member
I will tend to
-46-
CA 02592617 2007-07-03
WO 2004/012579 PCT6US2003/024212
resist any movement, whether forward or backward. To some extent, this
resistance to
movement can be controlled by altering the shape of the sawtoothed outer edges
87 - by
suitably tapering the teeth 95 so that, moving from the proximal end of the
tooth 95 to the
distal end of the tooth 95, the tooth 95 narrows inward, resistance to
rearward movement can
be increased and resistance to forward movement can be decreased.
f002211 Further, as shown in FIGS. 15A, 15C, 17A-D, 18A-B, 19A-E. 20A-E.22A-F
and 24A-C, internal slits 85 or perforations could be provided in at least
some portion of the
implant member's arms 83a, 83b to allow the patient's tissue to fold into the
interstitial spaces
formed by those slits 85 or perforations. This an-angement also facilitate
tissue ingrowth, and
increase strip flexibility, much like synthetic mesh.
[00222] Alternate designs for the dynamic, self-anchoring slits 85 can be
envisioned.
In these other designs, the shape of the slits 85 is altered, for example,
with an arrow design
(essentially a V having a bisecting slit in the middle of the V), a
semicircular slit design, a
rectangular slit, etc. all could be used. Some of these other configurations
will later be
discussed in detail.
[00223] By way of non-limiting example, the internal slits 85 could be V-
shaped,
arrow-shaped, curved, round, oval, square, triangular or irregular, and they
could be arranged
in a straight line, as depicted in FIGS. 19A-E and 22C-E, or in patterns such
as rows,
checkerboards, diagonal lines, or even randomly, as shown in FIGS. 24A-C and
26A. A
range of different size and pattern slits or perforations 85 could be used in
a single implant
member 1, and the intemal perforations also could be combined with various
edge details, or
Ined ene-te4.rw3+-the-ansheri-ng-pmper-desof&e-implant member 1.
[00224] Different arrangements of slits 85 could be combined with different
implant
member shapes. The middle urethral support section 81 can either be straight-
edged tissue
without holes, or it can be continuously textured over'the full length of the
implant member 1.
-47-
CA 02592617 2007-07-03
WO 2004/012579 PCT/1JS2003/024212
In addition, the middle urethral support section 81 could be wider than the-
textured arms 83a,
83b of the implant member 1 to provide a larger support area under the
urethra. The present
most'preferred option is a straight-edged, uniform width, non-textured support
section 81 to
help alleviate any concerns over erosion from the texturing details. In the
middle of the
urethral support 81, a small hole 97, visible in FIGS. 17A, 17B, 20A and 20C-
E, or notches
on the edges (not shown) could be provided to help identify the center of the
implant member
I for even positioning under the urethra. As shown in FIG. 17C, inwardly-
pointing triangles
9T also couid be used to define the center part of the implant member 1.
Altematively, a dye
mark (not shown) could be made across the center.
[00225] For example, FIG. 20A shows an implant member I of uniform width
having
V-shaped slits 85 disposed along its centerline that is presently prefenrcd. A
center region 81
of the implant member I does not have such slits, however, so that it can
better support the
patient's tissue. Also, this embodiment has a hole 97 formed at its center in
order to help the
surgeon determine when the implant member 1 has been properly positioned. Each
arm 83a,
83b has two openings 91 formed at its tip 89, and these openings 91 receive
the projections
157 of a connector 107 such as that shown in FIG. 9D. This arrangement also
could be used
with a connector 7 having a single projection 57 on each side, as shown in
FIG. 8A.
Alternatively, these holes could be omitted and they could be formed by the
surgeon using a
blade or scissor, or the could even be formed when the connector arms 53a,
53b, 55a, 55b are
closed together, the projections 57 serving as punches.
100226J In contrast, the implant member I depicted in FIG. 20B has slits 85
along its
entire lenath - here the sur$ms-?,n_identify__the_center of.the implant member
I by looking
for the region where the V-shaped slits 85 change their orientation. This
configuration may
allow for greater variation in the placement of the implant member I in the
patient's body.
-48-
CA 02592617 2007-07-03
WO 2004/012579 PCT/US2003/024212
[00227] The implant member 1 shown in FIG. 20C is generally similar to that
depicted
in FIG. 20A, differing in that the central section 81 of the implant member 1
is wider than the
arms 83a. 83b. Again, the central section 81 is solid, save for a central
opening 97 that helps
in determining when the implant member 1 is properly placed. The wider center
section 81
provides additional support for the patient's urethra.
[o0yZ8] The imelant membecl_showm-in-FIG.-2OD-has-asolad-center-section-81
with a
central positioning opening 97 and arms 83a, 83b that are wider than the
central section 81.
[00229] The implant member I depicted in FIG. 20E is similar to that shown in
FIG.
20A, but the arms 83a, 83b are shorter in length. The shorter arms 83a, 83b
anchor primarily
in the endopelvic fascia. An implant of this length also could be implanted
without the need
for an abdominal incision. Also, this implant member 1 could be used with
extensions
attached to the tips 89 of the arms 83a, 83b, as will be discussed later in
this description.
[00230] With reference now to FIGS. 18A-B, the V-shaped slits 85 formed in the
implant member 1 allow easy implantation of the implant member 1 in the
forward direction,
and the implant member I has a lower resistance to pull-through than a strip
having
sawtooth-shaped edges. FIG. 18A shows the implant member I in the frce state,
without any
tension applied thereto. The slits 85 arc closed and, when seen from the side,
the implant
member 1 is flat. However, as shown in FIG. 18B, when tension is applied along
the length
of the implant member 1, the slits 85 open so that portions of the implant
material extend
outward from the plane of the implant member 1.
[00231] With reference now to FIGS. 21A and 21B, the lateral edges 87 of the
slits 85
, re an orage from which to
suspend the implant member 1. When seen in the front view of FIG. 21A, the
implapt
member I is substantially curved and compressed at the position where it
passes through the
tissue. However, the portions above and below the tissue through which the
implant member
-49-
CA 02592617 2007-07-03
WO 2004/012579 PCT/US2003/024212
I passes are uncompressed, and the tension applied to the implant member I
causes the slit
regions to open up. The portions of the implant member 1 defined by the slits
bend outward
and, as seen in FIG. 21B, interfere with the tissue and increase the implant
member's
resistance to backward movement.
[00232] A similar design that is easy to pull forward but which resists
rearward
=_.-_xnavement is depictedin FIf'i.S._26A-B.---In-this-embodiment, the implant
member I has a
pattem of V-shaped slits 85 fonmed on its surface not in a line, but rather,
over substantially
the entire area of the implant member's ann 83. When in the untensioned state
shown in FIG.
26A, the slit portions lie flat. However, when tension T is applied to the
implant member 1,
as can occur during implantation or thereafter if there is an abdominal
pressure increase, and
as shown in FIG. 26B, portions of the implant member 1 project outward and
will help to
anchor the implant member I in the patient's tissue.
[00233] FIGS. 26C-E show other embodiments of an implant member I similar to
that
shown in FIGS. 26A-B, differing with regard to the shape and arrangement of
the slits 85. It
should be noted that the implant member I shown in FIG. 26C has a line of
triangular intemal
openings 86, as well as two adjacent lines of V-shaped slits 85.
[00234] FIGS. 22B-F and 24A-C show implant members 1 having intemal openings
86. As shown in FIGS. 22C-F, these openings 86 can be circular, triangular or
rectanguiar, or
even irregular (not shown). The openings 86 shown in FIG. 22C-F are arranged
along a line
parallel to the center axis of the implant member 1, while the openings 86
shown in FIG.
22B, 24A and 24C are arranged over substantially the entire width of the
implant member 1.
~ri-le-Oe-impiantzne GS. 22B=Eand24- have shaped outcr
edges 87, and the implant members I shown in FIGS. 22F, 24B and 24C have
straight outer
edges 87, it will be understood that the different opening shapes and
arrangements can be
used with either straight or irregular outer edges 87 as is desired. In other
words, and by way
-50-
CA 02592617 2007-07-03
WO 2004/012579 PCT/US2003/024212
of nonlimiting example, the implant members I shown in FIG. 22C could be
produced with
straight outer edges 87, and the implant members I shown in FIGS. 24B and C
could be
produced with sawtooth shaped outer edges 87.
[00235] It should be understood that although the designs depicted in FIGS.
17A-D,
18A-B, 19A-E and 20A-E all have a single row of slits 85, this invention is
not to be limited
to th at arran,gernent Multiple rows of slits 85 random arrangements of
slitsMand a_
combination of rows of slits 87 and a random arrangement of slits 85 all could
be employed
without departing from the present invention.
1002361 In a design having centerline openings 86 disposed along the length of
the
implant member 1, such as the design depicted in FIGS. 23A-B, the tissue will
tend to fold
over on itself during implantation, creating multiple ridges at the centerline
of the implant
member 1, helping to anchor the implant member I in the patient's tissue.
Owing to the
geometry of the openings 86 openings in this embodiment, the implant member I
can easily
advance into the patient's tissue, but when in place "locks" and resists
rearward tension.
[00237] Different opening shapes also could be combined; as depicted in FIG.
26C, the
implant member 1 could have both triangular openings 86 arranged along its
centerline, along
with triangular surface slits 85 arranged laterally to the centerline openings
86, and smooth
edges 87 for smooth and easy implantation. The triangular openings 86 and
triangular slits
85 operate in the manner already discussed to resist rearward tension.
[00238] Also by way of non-limiting example, an embodiment of an implant
member 1
having straight edges 87, yet having improved anchoring properties, is shown
in FIGS. 25A-
' , member-1 inward-extending slits
93 arranged preferably on both of the implant member's edges 87 (it will be
appreciated that
only one side of the implant member could be provided with such slits 93).
With reference to
FIG. 25A, when tension is not applied to the implant member 1, the edges 87 of
the implant
-51-
CA 02592617 2007-07-03
WO 2004/012579 PCT/US2003/024212
member 1 lie flat. However, as seen in FIGS. 25B and 25C, when the implant
member 1
passes through the patient's tissue and tension is applied to the implant
member 1, the edges
87 of the implant member I having slits 93 deform and flare outward and "lock"
into the
tissue, resisting the tension being applied. The implant member I"locks" into
the
-surrounding tissue because the-slits 93 allow-portions of the implant member
I to fold out
_u __ .,.e ___L_ .
'_ __ ut extend
into the patient's tissue, resisting backward force. This increases the
implant member's
resistance to backward movement.
[00239] As a further option, implant member 1 could have one or more openings
86
formed in arm portions 83a, 83b. By way of non-limiting example, such openings
86 could
be of geometric shape (i.e., round, square, triangular), or irregular, and
could be arranged in a
line, in a pattern, or irregularly. Embodiments of such implant members are
depicted in
FIGS. 22B-F and 24A-C. During implantation, the openings 86 do not interfere
with
insertion of the strip It will be appreciated that more than one opening shape
could be used on
a single implant member 1, and that opening size and pattern could be varied
to change the
strip's ability to resist backward tension. As discussed earlier with regard
to different slit
arrangements, this invention is not to be limited to the configurations shown
in the drawings.
Multiple rows of openings, random arrangements of openings, and a combination
of rows of
openings and a random arrangement of openings all could be employed without
departing
from the present invention, for example, as shown in FIGS. 24A-C.
1002401 By way of non-limiting example, the openings 86 in the implant member
1
s own.in FIU. could range in size m .
. mm._
23
[00241] The foregoing embodiments of this invention employ implant members
each
made from a single piece of material. This invention also envisions composite
implant
members that are assembled from several different picoes of material.
-52-
CA 02592617 2007-07-03
WO 2004/012579 PCT/US2003/024212
[00242] FIGS. 27-28G depict a range of different composite implant members
101.
Such implant members 101 can have a center section 181 made from one type of
material,
such as natural material, and anns 183a, 183b made of a different material,
such as synthetic
mesh, as shown in FIGS. 27-28G. Among the benefits of this arrangement is the
ability to
construct each of these sections using material which has the requisite
properties desired for
thp eMfinn wham is ucerisN+s mse.1+ arms 1 49i 1421. .. .. be ..ell'
w..LoringTanll Jaie central
natural material 181, if positioned under the urethra, reduces the potential
for erollslion and
infection.
[00243] The anms 183a, 183b can be attached to the center section 181 using
any
suitable technique now known or hereafter discovered. By way of non-limiting
example,
FIGS. 27, 28C and 28D show mesh arms 183a, 183b passing through slits 184
formed at the
ends of the center section 181 and doubling back over the body of the mesh
arms 183a, 183b.
'1le tip of the doubled section is then fastened to the body of the mesh
section 183a, 183b by
any suitable attachment technique, such as suturing, heat-bonding, ultrasonic
welding,
adhesive, stapling or riveting.
[00244] As depicted in FIG. 28B and 28E, the mesh arm 183a, 183b can be joined
to
the natural center section 181 using a rivet or snap-down connector 188.
[00245] FIG. 28F and 28G show still another embodiment, wherein the end of the
natural material center section 181 is "T" shaped, the mesh arm 183a or 183b
is placed onto
the cross-arm of the T. and the cross-arm of the "T' is folded back over the
mesh arm 183a,
183b, and is then secured, for example, by suturing or adhesive.
[ While the oregoing imp an member con gurations are suitable for
connection to the introducer needle 3 by a separate connector 7, the present
invention also
contemplates that the implant members 1 could be constructed with a suitable
integral
connector 407 for attachment to the introducer needle. Such an implant member
design
-53-
CA 02592617 2007-07-03
WO 2004/012579 PCTIUS2003/024212
allows the surgeon to complete the implantation procedure more rapidly, since
there is no
need for the surgeon to join the implant member to the connector.
[00247] Such a connector 407 can be thought of as a"halP' connector, since it
already
is joined to the implant member 1 and only needs to be attached to the
introducer needle 3.
[002481 One example of an implant member 401 having integral connectors 407
attached to the ends of the implant member 401 is shown in FIG. 39. As shown,
the ends 404
of the arm sections 483a, 483b have connectors 407 respectively attached
thereto. These
connectors 407 serve to join the implant member 401 to a needle (not shown),
which is used
to position the implant member 401 in the patient's body, as has already been
discussed. This
arrangement, it should be noted, is a composite, in which the central portion
481 of the
implant member 401 is made of one material, such as biocompatible natural
material, and the
arms 483a, 483b, to which the half-connectors 407 are joined, are made of a
different
material, such as synthetic mesh material.
[002491 Connectors 407 are generally similar in configuration and operation to
connectors 7, 107, 207 and 307 discussed above. They differ, however, in that
whereas the
connectors 7, 107, 207 and 307 are double-ended, connectors 407 are single-
ended. Thus,
connectors 407 arejaw-like in appearance. A projection 452 at the base of the
jaws 453, 455
is provided for attachment to the anns 483a, 483b of the implant member 401.
The
projection 452 can be attached to the arms 483a, 483b using any suitable
technique now
known or later discovered. By way of non-limiting example, thermal bonding
could be
employed.
--{00250] A-lso-by-way-of non-limiting example, the projection 452 could be
made frnm
two shorter jaws (not shown) having a suitable locking mechanism, such as an
interfering
flanged projection in one jaw and a mating opening in the other jaw, and which
can be
-54-
CA 02592617 2007-07-03
WO 2004/012579 PCT/US2003/024212
squeezed together with the arms 483a, 483b therebetween to securely join the
implant
member 401 to the projection 452.
[002511 The composite implant member 401 discussed above preferably has a
middle
urethra] support section 481 that is about 7-8 cm long. This size is, however,
mentioned only
by_way of example, and not limitation.
1002521 A number of other implant member configurations having inteQral
connectors
will now be discussed.
[00253] As shown in FIG. 40, an elongated connector 507 with an integral strap
540 is
depicted. This connector 507 has lower and upper arms 553 and 555 which are
substantially
similar in form and function to the connector arms 253a, 253b, 255a, 255b
shown in FIG. 9A-
C. These arms 553, 555 are integrally attached to one end of the flat strap /
connector body
540 having a plurality of holes 542 running therethrough (altematively, the
holes 542 could
be omitted). The other end of the connector body 540 is permanently attached
to the arm
portion 583 of the implant member 501 (in practice, a connector 507 will be
attached to each
of the two ends of the implant member 1). As shown in FIG. 40, this connection
is made by
suturing, but this invention is not to be limited to that arrangement. Any
other suitable
attachment technique, whether now known or hereafter discovered, could be
used, such as,
for example, adhesive bonding, ultrasonic welding, or mechanical
interconnection using a
fastener such as a rivet. This connector 507 could be made by any suitable
manufacturing
technique, such as molding.
[00254] Once the implant member 501 to which connector 507 is attached has
been
prsperly.-positiengd,-4he-exposediertion-af-the-conneczer-protruding above the
patient's
abdomen is removed by cutting the connector body where it is exposed. This
way, all of the
implant member 501, and a portion of the connector 507, the holes 542 of which
also
contribute to the anchoring function, remain in the body. If a very long
implant member 501
-55-
CA 02592617 2007-07-03
WO 2004/012579 PCT/US2003/024212
is used, it is conceivable the arms 583a, 583b of the connector will be
exposed and so would
have to be cut to detach the connector, although this would be less desirable
insofar as
implant material would be wasted.
[00255] FIG. 41 depicts still another example of an elongated connector. Like
the
embodiment shown in FIG. 40, this connector 507 also has lower and upper arms
553, 555.
Such a connector 507 could be formed in any suitable manner, such as by
molding. These
arms 553, 555 are integrally attached to a generally cylindrical connector
body 540 having a
plurality of spherical or conical enlargements 544 disposed along its length
(other shapes also
could be used). The precise shape and number of enlarged regions 544 is not to
be limited,
and, if desired, the enlarged regions 544 could be omitted altogether. The
other end of the
connector body 540 is enlarged and is permanently attached to the end of the
arms 583 of the
implant member 501. Again, this connection is shown as being made by suturing.
Any other
suitable attachment technique could be used, including the techniques just
described above.
[00256] Again, once implant member 501 is properly positioned in the body, the
exposed portion of the connector protruding above the patient's abdomen is
removed by
cutting the connector body where it is exposed. All of the implant member 501,
and a portion
of the connector 507, the holes 542 of which also contribute to the anchoring
function,
remain in the body. As already noted, if a very long implant member 501 is
used, it is
conceivable the arms 583a, 583b of the connector will be exposed and so would
have to be
cut to detach the connector, although this would be less desirable insofar as
implant material
would be wasted.
----[00257-]---An alternate-embodiment.,of-an-implant-member 201 according to
this
invention will now be discussed in connection with FIGS. 29-38. The implant
member 201 is
intended to handle more easily than other implant members, while still
applying the required
force to the body tissue being supported. As will now be explained in detail,
this implant
-56-
CA 02592617 2007-07-03
WO 2004/012579 PCT/US2003/024212
member 201 is preferably made of natural material, and is processed to improve
the material's
physical properties.
[00258] Among the materials which can serve as supports in female urinary
incontinence sling suspension procedures is acellular porcine dermal tissue.
Such dermal
tissue material must, however, be processed to render it biocompatible. One
scheme for
preparing biocompatible porcine dennal tissue is set forth in U.S. Patent No.
5,397,353 to
Oliver et al. and owned by Tissue Science Laboratories plc. Such material is
commercially
available as PelvicolTm implant material, distributed by C.R. Bard, Inc. of
Murray Hill, New
Jersey and produced by Tissue Science Laboratories PLC, of Aldershot,
Hampshire, United
Kingdom.
[00259] The material described in the'353 patent is particularly preferable
for use in
the present invention because such material is non-antigenic and is
recolonized and
revascularized by the host tissue. Also, this material, owing to cross-
linking, is non-
resorbable, meaning it is not processed and eventually absorbed by the
patient's body.
Consequently, a support made from this material will provide permanent
support, and in
contrast to a procedure using a support made from resorbable material, the
patient will not
have to undergo later surgery to replace the support. It should be understood
that other types
of natural materials also could be used.
[00260] Advantageously, PelvicolTm implant material has omnidirectional
strength
properties. Further, PelvicolTm implant material does not shed particles under
load, as mesh
material does. In this invention, the PelvicolTm implant material is
specifically designed to
providgfaruptimum-atclrorittg-attd~djusrability-iff ffie re s ascia at the
abdomen and/or
the endopelvic fascia near the urethra. These two tissue layers provide the
majority of the
anchoring force around the implant by virtue of the dense fibrous nature of
the fascia. Based
on simulated use testing, the PelvicolTm implant material creates an anchoring
force that is
-57-
CA 02592617 2007-07-03
WO 2004/012579 PCT/US2003/024212
comparable to and, in some cases, even better than that generated by pure
synthetic mesh
implanted in the fascia.
[00261) FIGS. 29 and 30 show in close-up how a slitted piece of processed
dermal
tissue 224 can expand in response to applied force.
[00262) As depicted in FIG. 29, implant member 201, which is incorporated into
a
---suitably-sha{ed-sl'mg; a".iscussrd-below,includw,$-numbe~ofsl-its-283-for-r-
ne-d-ther-ein.
Implant member 201 can be a flat piece of acellular dermal tissue 224,
preferably, porcine,
prepared in accordance with the'353 patent. Because no tension is being
applied to implant
member 201, slits 285 remain closed due to the inherent elasticity of the
material from which
implant member 201 is made.
[00263) Implant member 201 has a length (not shown in full in FIGS. 29 and 30)
running in the direction of axis Y, a width W extending in the direction of
axis Z, and
thickness T in the direction of axis X.
[00264) The thickness T is of interest because it affects how the material
"handles"; a
thin piece of material will be more supple than a thicker piece of material,
and so the thin
piece of material can better conform to the patient's anatomy. A thin piece of
material may
not, however, be able to support all loads applied. This means that the
thickness of the
material should be selected so that the material is sufficiently flexible, yet
is also strong
enough to support all forces that it may be subjected to.
[002651 By way of non-limiting example, the preferred thickness T is about 0.8-
2.0
mm; thinner material can be used but, depending upon the load applied, may
deform
-excessively or evenfail. Consequently, material thinnerthan about 0.8 mm
preferably will
not be used in most circumstances. Thicker material also can be used, although
it should be
understood that material greater than 2.0 mm may be too thick because it might
be noticeable
-58-
CA 02592617 2007-07-03
WO 2004/012579 PCT/US2003/024212
to the patient, and also might be so stiff that it is difficult for the
surgeon to work with. Here,
material thicker than about 2.0 mm preferably will not be used in most
circumstances.
[00266] The implant member 201 is preferably between 0.5-3 cm. in width (W),
and,
more preferably, between 1-2 cm. in width. When choosing the width of the
implant member
201, the patient's body size and the amount of force likely to be required can
be taken into
account. Higher force levels may =gsir th - usP of a u+ider or-thickepimplant-
member 201.
[00267] The implant member 201 extends in length along the direction of axis
Y.
Preferably, the implant member 201 is between 20-40 cm., more preferably,
between 30-40
cm., and even more preferably, 30 cm long when in the tension-free state.
[00268] It also will be appreciated that the implant member 201 could be
trimmed as
needed, whether because of the patient's anatomy or because less than the full
amount of the
implant member material is needed.
[00269) With continued reference to FIG. 29, the slits 285 formed in the
implant
member 201 are preferably arranged in a regular and repeating pattern. By way
of non-
limiting example, the slits 285 can be about 3.7 mm in length. As can be seen,
the slits 285 in
the implant member 201 are formed in rows that run in the direction of axis Z
and which
rows are parallel to the length of the implant member 201. Slits 285 are
arranged in a "row"
where those slits 285 are all line segments which lie on a single line. The
slits 285 are
preferably arranged in a staggered fashion; as shown in FIG. 29, altemating
rows of slits
285A and 285B are placed so that, moving in the direction of axis Y along the
length of the
implant member 201, the slits in rows 285A do not lie directly adjacent to and
in registry with
. ' 85iWarrggiven row 285A
one then encounters the solid material between the slits 285 in the adjoining
row 285B and
then the slit 285 in the next row 285A that follows the row 285B. The slits
285 can be
arranged so that the slits 285 in altemating (rather than adjacent) rows are
disposed in
-59-
CA 02592617 2007-07-03
WO 2004/012579 PCT/US2003/024212
registry. Staggered also can be construed more broadly to mean that the rows
of slits 285 are
arranged in any manner such that a slit 285 in one row does not lie alongside
and in complete
registry with a slit 285 in an adjacent row, meaning partial overlap of slits
285 is permitted.
[00270] Optionally, the ends 289 of the implant member 201 could be rounded
for
easier implantation.
1002711 't'~~ aFM~6MWA-aAd-AIIFI i*a.,, ~Fsl;*s 245w-in ~nnc prepetles-ofthe
implant member 201. As the number and/or length of the slits 285 increases,
the implant
member 201 will stretch more under a given load. An implant member 201 having
a large
number of slits 285 will be more pliable than an otherwise identical implant
member having a
lower number of slits, but the former implant member 201 may not be as strong
because of
the greater number of slits 285.
[00272] So too, slit size can be varied to control the elastic properties of
the implant
member 201. As larger slits 285 are formed, the implant member 201 will
stretch more under
a given load, and will not be able to withstand as large a maximum load before
failing.
[00273] This configuration provides the anchoring benefits which can be
obtained
when synthetic mesh is used, without the possibility of tissue abrasion, which
can occur with
synthetic mesh.
[00274] The slits 285 can be formed in the source material 224 using a skin
graft
mesher (not shown). Skin graft meshers are known and are currently used in
connection with
the treatment of burns. These devices allow a skin graft of a particular size
to be expanded so
as to cover a gr.eater area wound. Skin graft meshers are described in U.S.
Patent No.
--5-,M,-468,-No.-5;279,352 -and=No. 5396;279, al( assigne o Zimmer; Inc.,-of
Warsaw
Indiana., and No. 6,063,094, assigned to L.R. Surgical Instruments Ltd. of
Ofakim, Israel.
These devices use one or more bladed cylindrical cutters and a support carrier
to produce an
array of slits in the skin graft. The meshing ratio, also known as a slit
ratio, (i.e., 1.5:1, 3:1 or
-60-
CA 02592617 2007-07-03
WO 2004/012579 PCT/US2003/024212
6:1) refers to the approximate amount by which the graft expands; for example,
a 1.5:1
meshing ratio provides a graft that covers approximately 1.5 times the area of
the original
graft. Different cutters are used to produce different mesh ratios. In
general, as the mesh
ratio increases, so does the number (or length) of slits that are formed in
the greft.
[00275] Presently, a Zimmer Skin Graft Mesher is preferred. This device is
~anllfaGtUpedby-Zimmer, IAS
[00276) The present invention encompasses the use of slit ratios up to
approximately
6:1.
[002771 Alternatively, the slits 285 could be formed using a suitable die, or
even by
hand-slitting the source material 224 with a blade. Other cutting techniques,
such as water jet
or laser beam, also could be used.
[00278] A slit ratio of 1.5:1 is presently preferred because it results in an
implant
member 201 having both good strength and extensibility. As noted above, the
slit ratio refers
to the approximate amount by which the area of the resulting meshed graft is
increased. A
1.5:1 ratio graft therefore will cover approximately 150% of the area of the
source graft prior
to meshing. Ratios of 3:1 and 6:1 also could be used, depending upon the
amount of force
that will be applied to the implant 201. In deciding which meshing ratio to
use, it should be
understood that higher meshing ratios, while they allow the use of less
material, result in a
more elastic implant member 201 which may have difliculty supporting the
maximum loads
likely to be encountered. By way of non-limiting example, using a piece of
material 224 of
the preferred length of 30 cm., after meshing that material 224 could be
expanded under
[002791 As an alternative to slits 285, and as shown in FIGS. 22B-F, holes 86
could be
formed in the implant member 1. Holes 86 may enhance wound drainage (and so
reduce
wound dehiscence), but the elastic properties of the resulting implant member
I would not be
-61-
CA 02592617 2007-07-03
WO 2004/012579 PCT/US2003/024212
the same. Also, unlike slits 285, where virtually no material is removed from
the implant
member 201, to form holes 86 it is necessary to remove (and so waste) material
from the
implant member 1, since the holes 86 must be fonned by punching the implant
member I
with a die or cutter.
-[00280J As a fnrther altemative, slits 285 and holes 286 could be arranged in
a
gnerally alterna ing m insure ' 1e-. -
[00281J With reference now to'FIG. 30, the depicted implant member 201, which
includes an array of slits 285, is under tension from force applied in the
direction of arrow F.
The applied force, which is preferably spread over the ends of the implant
member 201 in
generally uniform fashion, causes the slits 285 to open. The open slits 285
result in
expansion of the implant member 201 by approximately its meshing ratio.
[00282] While the implant member 201 is under tension, the slits 285 define
openings
285'. Openings 285' provide at least two benefits. First, some of the
patient's tissue may
extend into at least some of the openings 285', and that can increase the
friction between the
implant member 201 and the patient's body. Depending upon the manner in which
the
implant member 201 is placed in the body, owing to this increased friction, it
may not be
necessary to suture the implant member 201 into place. Second, over the course
of time,
tissue will grow into the openings 285', and that will help to secure the
implant member 201
into place in the patient's body. Such ingrowth differs from ingrowth into the
microstructure
of the implant member 201; here, tissue will actually enter into and grow
through the open
slits 285 (openings 285) of the implant member 201 (which is not to say that
tissue also
'----cannot-grow into-the-mirrostructure, of-tht-implanx-member-1).--Second,
fluid exchange
through the implant member 201 is enhanced, since fluid and suspended and
dissolved
materials can pass through the openings 285'.
-62-
CA 02592617 2007-07-03
WO 2004/012579 PCT/US2003/024212
[00283] The precise shape of the openings 285' will be determined by both the
length
of the associated slit 285 and the magnitude of the force that is applied.
Seen in the direction
perpendicular to the Y-Z plane of FIGS. 29 and 30, the openings 285' are
approximately lcns-
shaped. In practice, the shape of the openings may differ without departing
from this
invention. - -
1fl028#]-~A-n-emfiodiment of this invention particularly suitable for use as
the support in
a urethral sling suspension procedure is depicted in FIGS. 31-33.
[00285] As shown in FIGS. 31 and 33, implant member 201 has an unmeshed
central
region 281 free of any slits. A first perforated arm region 283a haveng slits
285 is located on
one side of the central region 281, and a second perforated arm region 283b
having slits 285
is located on the other side of the central region 281. Consequently, the
central region 281 is
disposed between the perforated regions 283a, 283b. FIG. 33, it will be
appreciated, depicts
the implant member 201 of FIG. 31 when tension has been applied thereto, so
that the slits
285 open up.
[00286] As shown in FIGS. 32A-B, slits 285 are arranged in rows runnirig
across the
width of the implant member 201. The slits 285 in these rows can be disposed
in the manner
described above in connection with FIGS. 29 and 30.
[00287] When introduced into the patient's body, the implant member 201 is
positioned
sb that the central region 281 is located beneath and approximately centered
with respect to
the patient's urethra.
[00288] Because the central region 281, which does not have any slits, lies in
the
vicinity of the patient's urethra, the solid portion 281 of the implant member
201 can provide
greater support for, and help distribute force over, the patient's urethra.
Also, the smooth
surface of the solid portion 281 may be less likely to irritate the urethral
tissue than it would
if slits were formed therein.
-63-
CA 02592617 2007-07-03
WO 2004/012579 PCT/US2003/024212
[00289] To aid the surgeon in positioning implant member 201, a small circular
hole
297 can be formed at approximately the center of the central region 281.
Altematively, a
colored dot or line, or any other suitable visual or tactile indicia, could be
provided. This
way, the surgeon can easily position the implant member 201 by arranging the
implant
-member 201 so that-the opening (or colored region) 297, or other center-
indicator, is located
-beneaHror at leest flearthUret! ~a. --
(00290] In addition, the implant member 201 can (but need not) have one or
more
openings 291 formed at each of its tips 289. These openings 281 can serve as
attachment
points for an introducer needle or a connector such as that already described
and shown in
FIGS. 9A-D, which can be used to place the implant member 201 into the
patient's body in
the manner aheady described. While FIGS. 31 and 33 depict two openings 291 at
each tip
289 of the implant member 201 to accommodate a connector 107 such as that
shown in FIGS.
9A-D, which has two projections 157, and so help distribute the forces which
are applied to
the ends 289 of the implant member 201, just one opening 291 could be provided
at each end,
say, for use with the connector 107 shown in FIGS. 8A-B. Altematively, no
holes could be
provided, in which case the projections 157 on the arms 153a, 153b, 155a, 155b
of the
connector 107 would, as the connector arms 153a, 153b, 155a,155b are pressed
together with
the implant member 201 therebetween, pass through existing slits 285 in the
implant material
224, or would pierce solid portions of the implant member 201 and form such
holes.
[00291] FIGS. 32A-B show how the implant member 201 deforms and stretches in
response to applied force F.
[D11222]_EI~'i. 32A shows the imnlaxdme r 201,_inl.uding slitLZ85,~n~he
relaxed
state. Owing to the inherent elasticity of the material 224 from which implant
member 201 is
made, the slits 285 remain closed.
-64-
CA 02592617 2007-07-03
WO 2004/012579 PCT/US2003/024212
[00293] FIG. 32B shows the implant member 201 subjected to tensile force F
along its
length. Such force F could be applied to each end 289 of the implant member
201 over an
area or at one or more discrete points; uniform loading is preferred because
it is less likely to
apply excessive stress to any particular portion of the implant member 201.
The resulting
difference in shape between the unloaded and loaded implant member 201 can be
seen by
comparing FIGS. 32A and 32B.
[00294] The tensile force F causes the slits 285 to deform and change shape to
openings 285', which are approximately lens-shaped. Again, the precise shape
of the
openings 285' will depend upon the size and spacing of the slits 285 and the
properties of the
material 224 from which the implant member 201 is made.
[002951 It will be noted that, under load F, the arm portion 283a stretches
from length
Lt to length Lt'. The center portion 281 stretches from L2 to Id. The amount
of stretching of
the arm portion 283a is greater than that for the central portion, 281, owing
to the slits 253
(accordingly, (LI')/(LO >(L2')/(L2)) formed in the arm portion.
[00296] The applied tensile force F also may cause the implant member 201 to
"neck-
down" in width. By way of non-limiting example, it is thought that an implant
member 201
that is 2 cm. wide will, when loaded, narrow down to approximately 1.5 cm. in
width. This is
desirable because a strip 1.5 cm. wide is thought to be the optimal size for
use in the typical
patient's anatomy. These dimensions are given by way of example and not
limitation, and it
will be appreciated that other size implant members also could be provided.
[00297] The implant member 201 is preferably made from materia1224 which
retains
---its elasticityi and-so,-when tension -is-not applied-to theimplant-member
201, the inherent
resiliency of the material closes slits 285.
[00298] The slits 285 can be distributed uniformly throughout perforated arms
283a,
283b, as shown in FIGS. 31 and 33. Altematively, the slits 285 could be
distributed in an
-65-
CA 02592617 2007-07-03
WO 2004/012579 PCT/US2003/024212
asymmetric manner (not shown), for example, the implant member 201 can be
formed with
fewer slits 2$5 near the central region 281, and more slits 285 near the free
ends 289 of the
meshed ann section 283a, 283b. It is expected that with this configuration,
the strength of the
implant member 201 beneath the urethra and flexibility of the meshed arm
sections 283a,
283b will be increased:--- - -
s; it may be desirable to have the slits 285 in the implant
member 201 remain open cven when tension is not applied. One way to do this is
by first
forming the slits 283 in the implant member 201, applying tension to the
implant member 201
to cause the slits 285 to open and form holes 285', and then, while the
implant member 201 is
still under tension, applying cross-linking agent to, or carrying out a cross-
linking treatment
on, the implant member 201. This cross-linking will "set" the implant member
201 in its
defonmed shape so that even when tension is no longer applied the implant
member 201 will
retain its expanded arrangement and holes 285' will be maintained. This cross-
linking can be
effected in known manner, and so need not be described in further detail.
100300) With reference now to FIG. 35, another altemative embodiment of this
invention is shown. In this embodiment, the implant member 301 is formed with
slits 385
throughout substantially all of the length of the implant member 301. The ends
389 of the
implant member 301 can be left unmeshed to facilitate attachment of the
implant member 301
to the equipment used for placement of the implant member 301 in the patient's
body. In
FIG. 35, the ends 389 of the implant member 301 have holes 391 for use in
attaching the
implant member 301 to the equipment used for placement. This embodiment has a
single
-.~- - -- -
-miform port7ion-381-comparable-to-thc=nier-potti6n 281 of~hc preYious-e-
mtiodiment.
Because the portion of the implant member 301 underneath the urethra is
meshed, tissue
ingrown under the urethra could be improved.
-66-
CA 02592617 2007-07-03
WO 2004/012579 PCT/US2003/024212
[00301] FIGS. 36 and 37 depict a further embodiment of this invention. In this
embodiment, the implant member 401 has an elongated portion 481 similar to
that depicted in
FIG. 35, as well as an enlarged portion 482 located at the center of the
elongated portion 481.
These drawings differ in that FIG. 36 depicts an implant member 401 having
attachments
holes 491 at its ends 489.
---[00302] FIG. 37, which can be prepared by cutting off the tips of the arms
481, has no
openings at its tips. Thus, the ends 489 of the implant member 401 are meshed
and do not
have other openings for attachment; rather, some of the slits 485 are used as
attachment
points.
[003031 In each of these embodiments the elongated section 481 and the
enlarged
portion 482 have slits 485 formed therein. When tension is applied along the
length of the
elongated portion 481, the slits 485, open to form diamond shaped openings or
holes 485'. By
applying tension to the sides 480 of the enlarged portion 482, the slits 485
in the enlarged
portion 482 will open in the same manner. It will be appreciated that, owing
to the geometry
of the implant member 401, it may be preferable to apply force to the sides
480 of the
enlarged portion 482 by attaching each of those sides 480 at one or more
points to the
patient's tissue, since such force will serve to hold the slits 485 open and
thereby provide
benefits as set forth above.
[00304] Altematively, the implant member 401 could be subjected to tension and
thereby be deformed to open the slits 485 outside the body and then treated to
fix the implant
member 401 in its deformed position. One way to do this would be by a suitable
cross-
linkmg treatrnent~ as a y iseusse .
[00305] The enlarged portion 482 is positioned and dimensioned to lie beneath
the
urethra. Owing to the greater area covered by the enlarged portion 482, the
pressure applied
-67-
CA 02592617 2007-07-03
WO 2004/012579 PCT/US2003/024212
to the patient's tissue in the vicinity of the urethra can be reduced, since
the enlarged portion
482 distributes force over a larger region.
1003061 This implant member 401 is thought to be particularly suited for
cystocele
repair procedures or other surgical procedures involving the support of body
organs. If
desired, the enlarged portion 482 can be secured in place for such a procedure
by passing one
or more sutures through the enlarged portion 482 into the patient's tissue, or
usi nany other
suitable attachment technique now known or hereafter developed.
[003071 The enlarged portion 482 can be formed as an integral part of the
implant
member 401 (the entire strip will be formed from a single piece of suitable
material) or can
be attached to a separate elongated strip of material. The elongated portion
481 and enlarged
portion 482 can be joined together by suturing, biocompatible adhesive, or any
other suitable
technique now known or hereafter developed.
[00308] As shown in FIG. 37, the enlarged portion 482 can include a circular
opening
497 which visually assists the surgeon in finding the center of the implant
member 401, in the
manner already described above.
{00309] Although the foregoing embodiments of this invention employ acellular
dermal tissue, and, more preferably, acellular porcine dermal tissue, this
invention is not to be
limited thereto. Any other suitable material, whether natural or synthetic, or
even a
combination thereof, can be used. Other examples of suitable materials that
could be used
with this invention include allografts, xenografts and autografts, and
absorbable and non-
absorbable synthetic materials.
[00310] As a further altemate configuration, it-may be desirable not to have
slits along
the edges of the meshed sections so that the slits are only formed in the
center of the implant
member (not depicted). This will alter the elastic properties of the implant
member. Also,
one or more regions not having any slits and running along the length of the
implant member
-68-
CA 02592617 2007-07-03
WO 2004/012579 PCT/US2003/024212
could be provided. For example, the implant member could have an elongated
rectangular
region running parallel to the length of the implant member, in the direction
of axis Z (not
shown). The rectangular region could be arranged about the centerline of the
implant
member 1. If more than one rectangular region is used, they could be arranged
symmetrically
with regard to the longitudinal (as opposed to the transverse) centerline of
the implant
ryam{wr.
_
[00311] Although FIGS. 31-33 and 35-37 depict implant members 301 and 401 in
which slits 385 and 485 are formed in lines parallel to the long axis of the
implant member
301 and 401, respectively, this invention is not limited to those
arrangements. By way of
non-limiting examples, all of the slits could be formed, parallel to one
another, at any angle
between 0-180 to the implant member's longitudinal axis.
[00312] Nor must all of the slits be arranged in parallel to each other. With
reference
now to FIG. 34, and by way of non-limiting example, an implant member 501 can
be
constructed having rows of slits 585A oriented at a first angle and
alternating with other rows
of slits 585B oriented at a second angle relative to the longitudinal axis of
the implant
member 501. This results in a"herringbone" pattem of slits 585. Force will be
applied along
the long axis of the implant member 501, represented by arrow L. Further,
there may be
other situations where it is desirable to apply force to the implant member
501 at some other
angle. In that case, owing to the different orientations of the slits in rows
585A and 585B, the
implant member 501 may have different tensile properties along its length and
width
[00313] As a further variation, slits intersecting at right angles to form "+"-
shaped slits
---emid-be -arrangAin a grit~ pattem (not shown). As a still further
variation, in order to
increase isotropy of the implant member a second grid of "+"-shaped slits,
rotated by 45 ,
could then be interlaced with the first grid of slits (not shown). Other
arrangements of "+"-
shaped slits, or other shapes of intersecting slits, also could be used. Such
slits could be
-69-
CA 02592617 2007-07-03
WO 2004/012579 PCT/US2003/024212
formed in a single pass using correspondingly-shaped cutters or in multiple
passes, with slits
of one orientation being formed in one pass, slits in another orientation
being formed in a
different pass.
1003141 Another way to obtain an implant member with more uniform tensile
properties would be to form the slits in the implant member with a random
arrangement (not
3h15wfirSincetne siits-as-a-group-are-arranged-without-any-particular
preferred direction, the
resulting implant member should not elongate in any one direction more than
another (this
presumes the number of slits is sufficient to offset the effect of any one
slit).
[00315] Also by way of example only and not limitation, one side of the
implant
member could be formed with more or larger slits than the other in order to
provide
asymmetrical elastic properties (not shown). When placed in the patient's
body, the more
heavily perforated portion of the implant member will expand to a greater
degree than the
other portion of the implant member.
[003161 If desired, the slits also could be arranged in an asymmetrical
pattern (not
shown). This would affect the manner in which the implant member expands under
tension.
[00317] Also by way of example only and not limitation, one side of the
implant
member could be formed with more or larger slits than the other (not shown).
Then, when
placed in the patient's body, the more heavily perforated portion of the
implant member will
expand to a greater degree than the other portion of the implant member. In
other words,
differential slit arrangement can provide an implant member with asymmetric
properties.
[003181 A random arrangement of slits also could be employed - since the slits
are,
overall, arranged without a particular preferred direction, the resulting imp
ant mem r
should not elongate in any one direction more than another, provided the
number of slits is
large enough so that the effect of any one slit is not too great.
-70-
CA 02592617 2007-07-03
WO 2004/012579 PCT/US2003/024212
1003191 The implant member 301/401/501 prepared in this manner can be joined
to an
introducer needle using suitable connectors, whether separate or permanently
attached to the
implant arms, in the manner discussed earlier, for example, and as shown in
FIG. 38, which
shows such an implant member 301/401/501 in the non-tensioned state. Each
connector can
be attached to the introducer-needle, and-then to the tip of one of the arms
of the implant
metnber, and the introducer needle can then be used to draw that arm of the
implant member
into position in the patient's body.
[00320] Alternatively, a connector similar to that shown in FIG. 39 could be
permanently affixed to the tip of each arm of the implant member, in the
manner discussed in
connection with FIG. 39.
[00321] In a further embodiment of this invention, the implant member can at
least in
part be contained in a sheath of flexible material (not shown) having suitable
friction and
porosity properties, such as PTFE (Teflon ). The flexible material can be
joined to the
implant material, connected by passing a suture around the sheath to squeeze
the sheath and
implant therein against the base of the connector, or the implant material
could "float"
therein.
[00322] In still another embodiment of this invention, the implant material
could be
contained in the sheath and the sheath itself be pulled into position by the
introducer needle
attached thereto. Once in position the sheath could be removed, leaving the
implant material
exposed.
[00323] Turning now to FIGS. 13, 14A-B, 15A-C and 16A-D, the introducer needle
3,
~- ---. - -
_ connector_ _an imp antmem- er_ _according to_the prxaent invenrion_are shown
in various
stages of assembly. Those skilled in the art will appreciate that the
following discussion can
be applied to the different embodiments of this invention which have been
described.
-71-
CA 02592617 2007-07-03
WO 2004/012579 PCT[US2003/024212
[00324] FIG. 13 shows the introducer needle 3 securely joined at one end to
the handle
5. One end 89 of the implant member I is free, and the other end 89 is joined
to one end of
the connector 7. As better seen in FIGS. 14A and 16A, the other end of the
connector 7 is
being secured to the other end 4 of the introducer needle 3. The projection 57
in the
connector has begun to enter the opening 27 in the introducer needle end 4, as
the upper anm
-~$ has fle~yetreaehed-its clesed pesitien.
[00325] FIGS. 15A-C and 16A-C show both sides of the connector 7 joining the
introducer needle 3 to the implant member 1.
[00326] Again, it should be noted that in order to minimize tissue trauma
during use,
all of the surfaces of the connector 7 are preferably tapered and/or rounded.
[00327] In some instances it may be desirable to reduce the amount of material
required to fonn the body of the implant member, the body of the implant
member being the
portion of the implant member which remains in the patient's body after the
surgical
procedure is completed to support the patient's tissue.
[00328] For example, the processed natural material that can be used in
implant slings
such as that shown in FIGS. 31, 33 and 38 may be expensive, and so reducing
the amount of
material that is required will reduce the cost of the implant member.
[00329] The present invention reduces the amount of material used to form the
body of
the implant member by providing removable extensions made from less expensive
material at
the ends of the implant member body. The removable extensions, which provide
added
working length during implantation, are long enough so that they.allow the
surgeon to
posit,ion and tension the implant member in the same manner as lon eg r
strips, and these
extensions then can be removed at the conclusion of the implant procedure.
Long-them
anchoring still comes from the tissue implant.
-72-
CA 02592617 2007-07-03
WO 2004/012579 PCT/US2003/024212
[00330] While this aspect of the present invention is thought to be especially
suited for
use with processed natural materials, it is not to be limited thereto. Any
other suitable
biocompatible implant material could be employed.
[00331] One example of an implant member configuration having removable
extensions on the sides of a central body is depicted in FIGS. 42-45. In this
embodiment, the
implant member 601 consists of a middle urethral support section 681 and two
extension
loops 690. The middle urethral support section 681 can be made of any suitable
material,
such as the materials discussed earlier in connection with other embodiments
of this
invention. Presently, natural material is preferred, owing to its
conipatibility with body
tissue.
[00332J By way of non-limiting example, the middle urethral support 681 can be
about
30 cm. in length. Other size supports can be employed according to the needs
of any
particular surgery.
[00333) The extension loops 690, each of which passes through two holes 691 in
the
end 689 of the middle urethral support 681, can be made of any suitable
flexible material,
whether natural or synthetic, monofilament or multifilament, provided the
selected material
possesses suitable tensile strength, flexibility and biocompatibility.
Presently, synthetic
materials are preferred, and the extension loops 690 shown in FIGS. 42-45 are
tubes of
polyurethane or suture material, and any other suitable material also could be
used. The
loops 690 can be fonmed from solid filaments, intertwined braids or strands.
If made from
polymeric material, the extension loops 690 can be injection molded, extruded
or, if multi-
-strand woven.-If--made-Ãrom-meta-l,-the-eetension-Ioops-690- can be made from
wire.
[00334) With reference now to FIGS. 42-43C and 45, one extension loop 690 is
attached to each end 689 of the middle urethral support section 681 through
one or more
holes 691 formed in the middle urethral support section 681. FIGS. 42, 43B and
45 show an
-73-
CA 02592617 2007-07-03
WO 2004/012579 PCT/US2003/024212
embodiment in which the middle urethral support section 681 has two holes 6911
ying on a
line perpendicular to the long axis of the implant member 601. FIG. 43A
depicts an
embodiment in which the extension loop 690 passes through a single hole 691 in
the end 689
of the middle urethral support section 681. FIG. 43C shows an embodiment in
which the
extension loop 690 passes through two holes 691 that lie on a line parallel to
the axis of the
implan"nomber-60-1.-gros~~~t-hg-use of two holes 691 at each end 689 of the
middle
urethral support section 681 is preferred because the holes 691 better
distribute applied loads
than one hole 691. Thus, it also will be appreciated that more than two holes
691 could be
provided at each end 689.
[00335] One of the benefits of the composite implant member 601 is that after
the
implant member 601 has been properly positioned in the patient's body, the
connectors 607
and loops 690 can be detached, leaving only the middle urethral support
section 681 in place.
This is beneficial because it reduces the amount of foreign material in the
patient's body and
so allows for faster healing of the tissue channel wound formed during
placement of the
implant member. Thus, it may be preferable for the holes 691 in the middle
urethral support
section 681 to be somewhat larger in diameter than the extension loop 690
passing
therethrough, so that the loop filaments can slide through the holes 691
without binding,
which will help during placement of the implant member 601 in the patient's
body. This also
allow for easy removal of the extension loop 690, as discussed below.
[00336] FIG. 52 is a side cross-sectional view showing how the implant member
601
of FIG. 45 can be joined to a introducer needle 603 through a hole or slot 627
formed in the
infroducer needle 603. -- -
[003371 The configuration depicted in FIGS. 42, 43B and 45 is may be preferred
because, as shown in FIGS. 44A-B, when tension is applied to the extension
loop 690, the
implant member 601 changes shape from flat to somewhat curved. The curved tip
689 of the
-74-
CA 02592617 2007-07-03
WO 2004/012579 PCTIUS2003/024212
implant member 601 forms a tapcred nose section that allows for easier
implantation of the
implant member. The curving of the tip 689 of the implant member 601 also
encourages
flaring out of the slits 685 of the implant member 601, which improves the
implant membec's
anchoring ability.
[003381 One benefit of the embodiment depicted in FIGS. 42-45 is that it can
be
pesitiened-without-the-use-e~fate eenneetor,-provided a suitable proper
introducer
needle 603 is employed. FIG. 53A-B depicts one example of such an introducer
needle.
[00339] With reference now to FIGS. 53A-B, an introducer needle 603 that can
be
used to directly attach to the extension loop 690 of an implant member 601 as
shown in
FIGS. 42-45. The introducer needle 603 has a central body section 611 that is
generally
circular or oval cross-section, and a spatulated section 613 just proximal of
its tip 616. The
spatulated section 613 and tip 616 are shaped to allow for the dissection of
tissue by the
advancing tip 616. The tip 616 also has a"T'-shaped cavity 634 which receives
the
extension loop 690. As shown in FIG. 53A, the extension loop 690 passes into
the cavity 634
through the short leg 634a of the "T", and is then received in one of the two
anns 634b, 634c
of the'T'. The extension loop 690 is attached to the needle 603 prior to
passage into the
patient's body. The portion of the "T"-shaped cavity 634 into which the
extension loop 690 is
placed will depend upon whether the extension loop 690 is to be positioned by
advancing or
retracting the introducer needle 603. If the introducer needle 634 advances
forward to
position the implant member 601, then the extension loop 690 is placed in the
proximal leg of
the "T' 634b, and if the needle is retracted backward to draw the implant
member 601 into
plaoe i is placed in the distal part o e 634c. To avoid movement of the
captured
extension loop 690, the "T -shaped cavity 634 can be made slightly narrower
than the
extension loop 690, so that when the extension loop 690 is placed into the "T"-
shaped cavity
634 it is compressed and secured in place.
-75-
CA 02592617 2007-07-03
WO 2004/012579 PCT/US2003/024212
[00340] FIGS. 46A-B and 54 show how the introducer needle 603 of FIGS. 53A-B
is
used. As depicted in FIG. 54, the introducer needle 603, with the filament of
the extension
loop 690 held in the "T"-shaped cavity 634, is advanced from an incision in
the vicinity of the
urethra behind the pubic bone and upward until it emerges from an abdominal
incision. As
--shown in FIGS. 46A-B, the extension loop 690 can then be disengaged from the
"T"-shaped
-e is 3~ '.u tõe-intredtweer needle-603 then
can be backed out of the retropubic space, leaving just the extension loop 690
protruding
from the patient's abdomen. The extension loop 690 is then uscd to draw the
implant member
601 into position beneath the urethra. As shown in FIG. 47, the extension
loops 690 and the
central support 681 are dimensioned such that the extension loops 690 can be
cut at any point
and removed while the central support 681 remains beneath the abdominal wall,
anchored in
the surrounding host tissue.
[00341] It should be noted that the extension loop 690 shown in FIG. 54 is
long
enough so that even when the end of the extension loop filament held in the
introducer needle
603 that protrudes up from the abdominal incision, the urethral support has
not yet even been
drawn into the patient's body. This way, the extension loops 690 can be placed
in the
patient's body and used to adjust the position of the implant member 601 after
the introducer
needle 603 has been removed.
[00342] The surgeon then applies moderate tension to the two exposed extension
loops
690 to draw the urethral support 681 into position beneath the patient's
urethra and to apply
the required amount of pressure to the patient's tissue. At this point, the
ends of the urethral
snpport-681 still do not protrude out of the body from the abdominal
incisions, and the
proximal portion of the extension loops 690 remain within the body, as shown
in FIG. 47.
Altematively, if a longer urethral support 681 is used, the ends of the
support could protrude
from the abdominal incisions.
-76-
CA 02592617 2007-07-03
WO 2004/012579 PCT/US2003/024212
1003431 It is now desirable to remove the extension loops 690 so that the
abdominal
incisions can be closed. To do this, each extension loop 690 is cut at a
single point, as shown
in FIG. 57A. Since the filament is now severed, when tension is applied to the
associated
connector (not shown), the filament is pulled out from the hole(s) 691 in the
urethral support
681, as shown in FIGS. 57B-C, and is drawn outward from the patient's body,
the longer leg
gthroaghthe ope ' thra{-snpport-section 681
and out of the patient's body.
[00344] It also will be appreciated that it is undesirable to cut both
filament legs,
because then it will be less convenient to draw out the portion of the
filament that was
isolated by the two cuts.
1003451 The introducer needle 603 and handle 605 shown in FIG. 54 can be
joined
together permanently. By eliminating the latch mechanism of a movable handle,
cost can be
reduced and the device construction simplified.
[00346] FIGS. 55-56C depict an alternative configuration of an introducer
needle 703
that can be used to draw an implant member having an extension loop into place
in the
patient's body. As shown in FIG. 55, the introducer needle 703 has a generally
straight body
portion 736a leading to a curved portion 736b. A handle 705 having a
pushbutton 709 is
located at the proximal end of the body portion 736a. A movable conical tip
738 is located in
at the distal end of the needle 703, and a rod 746 connects the conical tip
738 to the
pushbutton 709. The pushbutton is biased by an elastic member such as a spring
(not shown)
so that it pulls the movable conical tip 738 backward toward the handle 705.
-100347] FIGS.s-show-how the-Fnovable-tip,3-8-ofthe-intnnducezne.edle 703 of
FIG. 55 is used to capture the extension loop 790 of an implant member 701
like that shown
in FIG. 45.
-77-
CA 02592617 2007-07-03
WO 2004/012579 PCT/US2003/024212
[00348] FIG. 56A depicts the movable conical tip 738 pulled backward into the
tip of
the curved portion 736b of the introducer needle 703 under the influence of
the elastic
member, as just discussed. The movable conical tip 738 preferably has at least
one and more
preferably two grooves 748 running from its tip to its rear, and these grooves
748 receive the
filaments of an attached extension loop 690 (not shown). The conical tip 738
also has an
erwordra-finger
blocks much of the opening 750 in the side of the movable conical tip 738).
The base of the
conical tip is attached to a flexible rod 746, which in tum is connected to
the biased
pushbutton 709.
[00349] Tuming now to FIG. 56B, the movable conical tip 738 has been shifted
forward in position until almost all but the proximal end of the movable
conical tip 738
projects forward from the distal end of the curved portion 736b of the
introducer needle 701.
The movable conical tip 738 is shifted forward by depressing the pushbutton
709 in the
handle 705 with force sufficient to overcome the biasing member (not shown).
The movable
conical tip 738 then advances so that the opening 750 in the side of the
conical tip 738 is
fully-exposed, and can now receive the filament of the extension loop 690.
[00350] Once the filament of the extension loop 690 is received in the intemal
recess
754 of the movable conical tip 738, the user can release the pushbutton 709.
The biasing
spring then ret.racts the movable conical tip 738 back to its original
position in the needle
body 736. Because the opening 750 in the movable conical tip 738 is covered by
the needle
body, 736, the filament of the extension loop 690 cannot escape from the
intemal recess 754.
Al~sn, the filament zf_the extensionloop -6201ies inthe~ oov -r c'748 forrn.ed-
in_the side of the
movable conical tip 738.
[00351] It is contemplated that this introducer needle 703 could be used for
both
abdominal and vaginal placement of the implant member. In the abdominal
approach, the
-78-
CA 02592617 2007-07-03
WO 2004/012579 PCT/US2003/024212
introducer needle 703 is driven downward from an abdominal incision, behind
the pubic
bone, and out beneath the urethral. The movable conical tip 738 is then
actuated by
depressing the pushbutton 709 to move the rod 746 forward, advancing the
movable conical
tip outward, to capture the extension loop of an implant member. The
introducer needle 703
is thcn retracted with the eztension loop attached until the extension loop
emerges from the
abdominal incision. e introducer needle 703 is disconnected rom e tmp ant
member and
then the extension loop is drawn upward by the surgeon to pull the middle
urethral support
into place. Then, the extension loop is cut and the loop is removed. This
procedure is
repeated on the contralaterai side of the body.
[00352] In a vaginal approach, the extension loop is first captured by the
needle tip 738
outside the body. Then, the introducer needle 703, with the attached extension
loop, is driven
inward beneath the urethra and upward around the pubic bone, until the movable
needle tip
738 and captured extension loop emerge from an abdominal incision. The
extension loop is
then released from the needle tip 738 and the needle 703 is withdrawn from the
patient's
body. Tension is applied to the extension loop to draw support section of the
implant
member into the proper position. After that, the extension loop is cut and
removed. Finally,
the procedure is repeated on the contralateral side of the body.
[00353] FIG. 48 depicts a variation of the implant member shown in FIG. 45. In
this
embodiment, each extension loop 890 has a connector 807 located at its distal
tip. This
connector 807 has at its distal end movable lower and upper arms 853, 855
which are in
appearanee and function the same as the upper and lower arms of the connectors
shown in
---
-~IG~S.-9A-D.-~i;se comrector897-isjoined-at-its-proximal-end-tohe-Mamettt of-
the extension
loop 890. The precise manner in which the connector 807 is joined to the
filament will be
deseribed later.
-79-
CA 02592617 2007-07-03
WO 2004/012579 PCT/US2003/024212
1003541 FIG. 49 shows how an implant member 801 as depicted in FIG. 48 having
extension loops 890 can be positioned in a patient. This configuration is
intended to be used
with an introducer needle 803 which can be removably attached to the handle
805, so that the
handle 805 can be used to guide the introducer needle 803 beneath the urethra,
upward
around-the pubic bone and out of the abdomen. If the introducer needle 803
used is
symme ca , the handie can en a c e e po ion o the in ou'cer needle 803
protruding from the abdomen and assist the surgeon in drawing the implant
member 801 into
the body.
[00355] With continued reference to FIG. 49, the connector 807 is attached to
the end
804 of an introducer needle 803 having an internal slot 827 in the end 804 by
bringing the
lower and upper anms 853 and 855 together. At least one and preferably two
projections 857
extend from one of the arms through the internal slot 827 and are received in
a matching
opening(s) 861 in the other arm (not shown). Then, when the introducer needle
803 is
retracted backward toward the patient's abdomen, the implant member 801 joined
thereto by
the connector 807 is drawn inward into place in the patient's body. The
surgeon moves the
implant member 807 into its final position by selective tensioning the
extension loops 890.
Once the implant member 801 is properly positioned, the extension loop 890 is
cut at one
place and the extension loop 890 is detached from the urethral support portion
(center
section) 881 of the implant member 801, which remains in place in the patienfs
body after
the surgery is complete.
[00356] FIGS. 50A-B depict one exemplary construction of a connector 807 that
can
~s~ ta jeirrth sion-leep-8904e-the-eenter-seetien-88-1.-'Ifie-
connector 807 shown in FIG. 50A has a single projection 857 and a matching
hole 861 in the
upper and lower arms 855, 853 respectively, and a central web 851, to which
the upper and
lower movable arms 855, 853 are joined by living hinges 856. The single
projection 857
-80-
CA 02592617 2007-07-03
WO 2004/012579 PCT/US2003/024212
allows for some rotation of the connector 807 once it is attached to a needle.
A clevis
structure 858 is attached to the other side of the central web 851. Then, as
seen in FIG. 50B,
the filament of the extension loop 890 is arranged to pass around the vertical
post 860 of the
clevis structure 858. Preferably, the filament of the extension loop 890
freely passes through
the clevis 858.
[00357] FIG. SOB depicts an alternate connector 807 having two projections 857
and
matching holes 861, as well as a"+"-shaped projection 862. These aspects of
this
embodiment are similar in construction and function to structure shown in FIG.
10, already
described. The two projections 857 prevent rotation of the connector 807 after
it is attached
to the needle (not shown). The clevis 858 used in this embodiment is the same
as that just
described with reference to FIG. 50A.
[00358] FIG. 50C depicts an alternative arrangement for joining the connector
807 to
the filament of the extension loop 890. In this arrangement, the connector 807
has a central
web 851 similar to that shown in FIGS. 50A-B. In place of the clevis, however,
there is a
panel 866 having a flat wall 866'. The two ends 868 of the extension loop
filament abut and
are joined to the flat wall using any suitable known attachment scheme, such
as press-fitting,
adhesive bonding, ultrasonic welding or any other suitable technique.
[003591 This configuration may be advantageous because the extension loop,
when cut
at a single point, remains attached to the connector 807, in contrast to the
clevis arrangement
of FIGS. 50A-B, where the extension loop 890 can slide freely out of the
connector 807.
Having a permanently attached extension loop 890 may prevent loss of the
filament in the
operating room.
[00360] The filament can be formed into the extension loop using any of a
number of
different techniques. FIGS. 58A-G show various ways to form extension loops.
FIG. 58A
shows a filament bonded to a sleeve bushing. FIG. 58B depicts a knotted
filament. As seen
-81-
CA 02592617 2007-07-03
WO 2004/012579 PCT/US2003/024212
in FIG. 58C, the filament is continuous (this could be done by butting the two
ends of the
filament together and melting or bonding them). FIG. 58D shows an intemal
connector
inserted into the ends of the filament. FIG. 58E depicts an ends connector
which receives the
two free ends of the filament. FIG. 58F shows a figure-8 shaped extension loop
formed by
---twistingthe oval loop, and FIG.-58G depicts a figure-8-shaped extension
loop formed by
a bring togetlrer oop--
1003611 Of these approaches, the use of an end connector may be of the most
interest
because it allows a length of tubing to be quickly formed into an extension
loop.
[00362] With reference now to FIGS. 59-60B, an end connector 970 is depicted
that is
suitable for attachment to the two ends 968 of a tubular filament to form an
extension loop
990. This connector 970, rather than the loop material, can be held in the
cavity 954 in the tip
904 of the introducer needle 903. The end connector 970 is generally U-shaped.
Each leg of
the U has a barbed extension 972 protruding therefrom that provides a
frictional fit with a
length of tubing fit thereon. Moving along either of the arms of the U and
away from the
curve of the U, the barbed extension has a cylindrical region 976a of first
width WI, a
tapered first barbed section 974a decreasing in width, followed by a
cylindrical region 976b
of second width W2, and a second barbed section 974b that also decreases in
width until it
reaches a blunt tip 978. As shown in FIG. 59, the wide end of each barbed
section 974a,
974b is wider than the width of the cylindrical region 976 to which it is
adjacent. This way,
the end of a length of elastic tubing can be advanced over the barbed sections
974a, 974b and
cylindrical regions 976 and will be deformed somewhat by the barbed regions
974a, 974b,
~ti~~~ w~~lthen-pxeventxhe..tuhing from-being-pulled baclQa~aidandawaKfrom the
connector
907.
-82-
CA 02592617 2007-07-03
WO 2004/012579 PCT/US2003/024212
[00363] The U-shaped connector 970 can be made from any suitable biocompatible
material such as plastic or metal, and preferably has a smooth and non-
irritating surface
finish. If desired, a low-friction coating could be applied.
100364J Also, the connection between the U-shaped connector 970 and the tubing
could be made by bonding or welding.
[00365] FIGS. 60A-and-60Bi-Hustrate-how-an-extension-toop-990formed using the
U-
shaped connector 970 of FIG. 59 can be captured at the tip 904 of an
introducer needle 903.
As shown, the introducer needle tip 904 has a "T"-shaped cavity 934 formed
therein. The
recess has legs which are of the right size to receive the curved poriion of
the U-shaped
connector 970. The U-shaped connector 970 passes through the base of the "T"-
shaped
cavity 934 and then sits one of the two ends of the crossbar of the 'T',
depending upon
whether the introducer needle 903 is being advanced into or withdrawn from the
patient's
body to position the implant member 901. As shown in FIG. 60 the introducer
needle 903
will be withdrawn from the patient's body to draw the implant member 901 into
place.
[00366] Alternatively, the extension loop 990 shown in FIG. 60A could be
formed by
joining the two ends of the filament together, say, by placing one loop end
inside the other.
[00367] It also should be understood that the extension loop 990 used in FIG.
60A
could be made from flat tape, solid cord, or any other suitable material.
[00368] An altemate needle tip configuration for capturing the U-shaped
connector is
depicted in FIGS. 61A-B. Here, the tip 1004 of the needle 1003 has an "H"
shaped opening
1027, the grooves forming the "H" being sized to securely receive the U-shaped
connector
1070. As shown in FIG. 61 B, the legs of the curved portion of the U-shaped
connector 1070
fit into the ends of the long legs of the "H". The curved portion of the U-
shaped connector
1070 runs from one long leg of the "H" around the solid piece separating that
leg from the
other long leg, and into the other leg (it will be appreciated that this
embodiment may work
-83-
CA 02592617 2007-07-03
WO 2004/012579 PCT/US2003/024212
best with a U-shaped connector 1070 made of compliant material). This
arningement
securely holds the U-shaped connector 1070 in place so that the introducer
needle 1003 can
be retracted, drawing the extension loop 1090 and attached urethral support
1081 into the
patient's body.
[00369] It will be appreciated that if the implant member 1001 is to be
positioned by
adv , rtheculroed-portitin-of the U-shaped connector
1070 can be attached in the same manner as discussed above to the other ends
of the long legs
of the "H" shaped opening in the needle tip 1004.
[00370] FIGS. 62A-B depict another embodiment of a U-shaped end connector 1170
that can be used to form an extension loop 1190. This U-shaped connector 1170
is generally
similar to that shown in FIG. 59, but in place of the open portion of the U
the connector 1170
carries a solid base portion 1192 from which extends a cylindrical projection
1194 having a
diameter D. The top 1196 of the projection 1194 is enlarged and has a diameter
D' that is
somewhat larger than diameter D. Thus, the top portion 1196 serves as a
flange.
[00371] The U-shaped connector 1170 shown in FIG. 62A is used with and is
received
by a needle 1103 having a slot 1127 formed therein as shown in FIG. 62B. The
slot 1127 is
generally rectangular, with rounded end portions and a curved opening 1198 at
its center.
The opening 1198 is slightly larger than the diameter D' of the top 1196 of
the projection
1194 on the U-shaped connector 1170. The rest of the slot 1127 has a width
that is slightly
wider than the diameter D of the cylindrical projection 1194 on the U-shaped
connector 1170,
but which is still narrower than the diameter D' of the top 1196 of the
projection 1194. This
ivav the il-chanert rnnnectnr 1170ran hr ioinyedto the intpdilGer needle 1103-
by-fitting the
projection 1194 into the curved opening 1198 of the slot 1127 and then moving
the U-shaped
connector 1170 along the length of the slot 1127 so that the cylindrical
portion 1194 rides in
the slot 1127 and is held in place because the flat, spatulated section of the
instrument 1113 is
-84-
CA 02592617 2007-07-03
WO 2004/012579 PCTIUS2003/024212
held between the top 1196 of the projection 1194 and the base 1192 of the U-
shaped
connector 1170.
[00372] Because the projection 1194 is cylindrical, it is possible for the
connector
1170 to rotate in a plane which is perpendicular to the plane that the needle
tip lies in.
100373] FIGS. 63A and 63B depict a modification of the embodiment shown in
FIGS.
62A--B: in thisstrvc , die - dly-,ectending-
rectangular projection 1294 or tab having an enlarged head region 1296. The
needle tip 1204
has a generally-rectangular slot 1227 of a given width with an enlarged
central opening 1298
that is dimensioned to receive the enlarged head region 1296 of the U-shaped
connector
1270. As with the previous embodiment, when the U-shaped connector 1270 is
moved along
the slot 1227, the flat, spatulated section 1213 of the introducer needle 1203
is held between
the solid base 1292 of the U-shaped connector 1270 and the enlarged head
region 1296.
Again, this secures the U-shaped connector 1270 to the needle.
[00374] Furthennore, the rectangular shape of the projection 1294 prevents
rotation of
the connector 1270 relative to the needle in a plane lying parallel to the
plane in which the
needle tip lies (by suitably adjusting the relative side of the tab and slot,
some degree of
rotation could be allowed).
[00375] Next, techniques for using this invention will be described.
[00376] The present invention can be used for implantation via either an
abdominal or
vaginal approach. Such versatility is a strong benefit of the invention, as it
provides surgeons
with the option of using whichever approach they feel most comfortable with.
---[0037q In-the-abdomiaal.appr.oachappropriate-anesthesia-is-chosen-
accor.ding-to the
physician's preference. Then, at least one small skin nick is made in the
abdominal wall at
the level of the pubic symphysis, just lateral to the midline if two nicks are
created. A small
incision is made in the anterior vaginal wall just below the urethral mcatus.
If not already
-85-
CA 02592617 2007-07-03
WO 2004/012579 PCT/US2003/024212
done, the handle is attached to the first introducer needle, and the assembly
is advanced into
the retropubic space via one of the abdominal incisions. The needle is further
advanced
downward until the needle tip is exposed at the vaginal incision. Next, a
cystoscopy is
performed to confirm bladder integrity. One end of the tissue implant is
connected to the
needle tip, preferably using the permanent snap-on tissue connector, and the
introducer is
. Thu te-is-tken-
disconnected from the first needle and attached to the second needle.
[00378] The steps starting with attachment of the handle to the needle through
withdrawal of the introducer from the abdominal incision with the tissue
implant attached are
repeated on the contralateral side using the second needle and connector. The
implant
member now forms a U-shaped loop beneath the urethra, and the ends of the U
are available
at the abdominal incisions.
[00379] At this point the implant member is positioned loosely under the
urethra by
either gently tightening the strip by pulling on the abdominal ends of the
implant or, if
necessary, by loosening the strip by pulling on the implant with a clamp at
the vaginal
incision. The textured design of the implant allows it to anchor itself in the
patient's own
tissue, eliminating the need for suturing.
[00380] Once the appropriate implant position is achieved, the abdominal ends
of the
implant are cut just below the level of the skin and all incisions are closed.
The introducer
needles and connectors are then discarded (although the needles could be
sterilized and
reused, that is not presently preferred).
[003811 ~~hGuld-bc~dgrstaed tha=r6.~~=ead~f~si~g~ sing-te-handle,-two-handles
could be provided, one for each of the introducer needles.
[00382] In the vaginal approach, appropriate anesthesia is chosen according to
the
physician's preference and at least one small skin nick is made in the
abdominal wall at the
-86-
CA 02592617 2007-07-03
WO 2004/012579 PCTIUS2003/024212
level of the pubic symphysis, just lateral to the midline if two nicks are
created. A small
incision is made in the anterior vaginal wall just below the urethral meatus.
The handle is
attached to the first introducer needle, and the introducer needle is
inserted, via the vaginal
incision, and advanced upward until the tip is exposed through the first
abdominal incision.
A cystoscopy is performed to confirm-bladder integrity and the handle is
disconnected from
ttie cedie-Onc end ofthe tissue-implan~is ~m~eeted-at~he vaginal-end of the
introducer via the permanent snap-on tissue connector, as shown and described
in FIGS. 7A-
10. The introducer is then used to draw the implant up to the first abdominal
incision. The
steps of attaching the handle to the introducer needle through using the
introducer to draw the
tissue implant up to the abdominal incision are then repeated using the second
needle and
connector on the patient's contralateral side. The implant member now forms a
U-shaped
loop under the urethra with the ends of the U available at the abdominal
incisions.
[00383] The implant member is positioned loosely under the urethra by either
tightening the strip with the abdominal ends of the implant or loosening the
strip by pulling
on the implant with a clamp at the vaginal incision. The textured design of
the implant
allows it to anchor itself in the patient's own tissue, eliminating the need
for suturing.
[00384] Once the appropriate position is achieved, the abdominal ends of the
implant
are cut just below the level of the skin and all incisions are closed. The
introducer needles
and connectors are then discarded (again, while the needles could be
sterilized for reuse, that
is not presently preferred).
[00385] Again, it should be understood that instead of using a single handle,
two
--'--handles could.be-.pravidedron e~e.dl+rs
[00386] Together, the components used in this invention provide a minimally
invasive,
simple technique that is easily learned and which requires little operative
time. The implant
member will offer the low complication rate and good tissue ingrowth of a
natural material,
-87-
CA 02592617 2007-07-03
WO 2004/012579 PCT/US2003/024212
while the texturing provides the self-anchoring properties of a synthetic
mesh, thereby
eliminating the need for sutures or other anchoring means.
[00387] Thus, while there have been shown and described and pointed out novel
features of the present invention as applied to preferred embodiments thereof,
it will be
:__ understood that various omissions and substitutions and changes in the
form and details of the
disclosed invention may made by those s in e art wtthout &part#tig*dm the
spirit
of the invention. It is the intention, therefore, to be limited only as
indicated by the scope of
the claims appended hereto.
[00388] It is also to be understood that the following claims are intended to
cover all of
the generic and specific features of the invention herein described and all
statements of the
scope of the invention which, as a matter of language, might be said to fall
therebetween.
-88-