Note: Descriptions are shown in the official language in which they were submitted.
1311899
- 2
MODULAR HOLLOW FLOOR PANELS WITH INTEGRAL DUCTING
Introduction
This specification describes a modular, hollow floor
panel which when laid over a structural sub-floor, allows
reticulation of electrical and communications cabling,
without significantly increasing the height of the
finished floor level.
It has a major application in automated office
buildings, where the extensive use of computing and
communications equipment has created a need to locate
cabling throughout open office areas, and it is an
alternative to the raised "access flooring" used in
computer areas which has a depth of several hundred
millimetres.
Prior Art
In current building practice the problem of
within-the-floor cable access to points on an open-plan
floor is solved by one of three methods:-
1. In-floor ducted grids, which are typically cast into
the floor slab, and consist of one-channel, two-channel or
three-channel duct grids linked by cross-over boxes, and
which have outlets provided at regular intervals.
Australian patent No. 521,913 iS an example of such a
system. The ducts must be relatively widely spaced, and
so the floor has limited cable-carrying capacity.
2. Cellular-floors, which utilise hollow cells built
into the floor slab. The cells are fitted with outlet
boxes at regular intervals and cables are fed along the
cells (or "raceways") from a "header trench" which sits
flush with the floor and is typically located along a wall
or a corridor. Examples are Australian patent no. 410,965
and U.S. patent no. 2,445,197.
These systems have a greater flexibility in the
location of outlets, but cable access between two adjacent
'J~
1311899
_ 3 _ 68588-48
points along the floor is only possible by routing the cable up
one cell, along the header trench, and down the adjacent cell.
Recent developments have included the system described in
Australian Patent specifications 569,179 and 571,311. (The former
describes a cellular raceway module.) This is a low-height floor
laid onto the structural slab, but is generically a cellular
floor of the type described above, and suffers the disadvantages.
3. Raised access floors, which conventionally consist of
600mm x 600mm deck panels supported at each corner on adjustable-
height pedestals. An example is Australian patent 462,745. Such
floors provide optimum accessibility and cable capacity, but are
expensive, and create difficulties because of their height. They
also require some form of cable guides to maintain order and to
segregate power, telephone and date services.
Description of the Invention
The purpose of this invention is to provide a low-
height access floor which will allow both lateral and longitudinal
cable access to any point on the floor, and which has integral
ducting which will provide continuous structural support to the
deck, and a means of segregating services, and a means for
creating orderly cable layouts.
The invention provides a modular panel, which in use
is laid in an extended array over a supporting sub-surface to
form a hollow floor, wall or ceiling suitable for reticulating
electrical, optic-fibre, hydraulic or other conduit, and which
comprises an upper load bearing deck which overlies structural
1311899
- 3a - 68588-48
support elements which form an interstitial duct zone between the
deck and a supporting sub-surface, the elements define a lower
duct zone which is partitioned by lateral ribs to form a set of
lateral ducts running from one side of the panel to the other, an
upper duct zone which is partitioned by longitudinal ribs to
form a set of longitudinal ducts running from one end of the panel
to the other, and, characterising the invention, a set of vertical
ducts which open onto the lower, lateral, ducts and into the
upper, longitudinal, ducts, each of the lateral, longitudinal
and vertical duct sets is composed of two or more sub-sets of
ducts and only corresponding ones of each sub-set of the lateral,
longitudinal and vertical ducts are in communication, each of the
lower, lateral, ducts being in communication with an upper,
longitudinal, duct of a corresponding sub-set through a vertical
duct of that corresponding sub-set.
The invention also provides a floor comprising an
extended array of modular panels in side-by-side and end-to-end
abutment, the floor being characterised in that each panel com-
prising an upper load bearing deck, bearing onto a plurality of
structural support elements which form an interstitial duct zone
between the deck and a supporting sub-surface, the structural
support elements defining an upper set of ducts extending lateral-
ly from one side of the panel to the other and so located within
the panel as to align with corresponding duct sets in abutting
panels, and a lower set of ducts extending longitudinally from
one end of the panel to the other end so located within the panel
1311~9
- 3b - 68588-48
as to align with corresponding duct sets in abutting panels,
the upper and lower sets of ducts being separated by wall means
which is formed with holes or knock-out panels allowing communi-
cation between the upper sets of ducts and the lower sets of
ducts.
Whereas the primary application of the invention is
to floors in buildings (and the descriptions herein assume this),
it should be understood that there are some situations where the
system can be used on walls or ceilings (for example in sound
studios) and so the invention is not limited to floor
applications.
The invention is now described with reference to the
drawings, in which:
Figure 1 is a plan view of one corner of a segmented
panel which has a single-level cavity for the purpose of carrying
service conduits;
Figure 2 shows a section A-A through figure l;
143 1 1899
Figure 3 is an isometric view of the panel shown in
figures 1 and 2;
Figures 4 and 5 show alternative cross-sections A-A
in which the panel is of composite construction;
Figure 6 is a plan view of one corner of a segmented
panel which has a single-level cavity for the purpose of
carrying services conduits, similar to the construction
shown in figure 1, but assembled from triangular segments;
Figure 7 shows a section A-A through figure 6;
Figure 8 shows an alternative cross-section B-B with
a floor finish in place;
Figure 9 is an isometric view of the panel shown in
figures 6, 7 and 8;
Figure 10 is a plan view of one corner of a segmented
panel which has triangular deck segments supported on a
moulded base;
Figures 11, 12 and 13 show alternative cross-sections
C-C through figure 10;
Figure 14 shows a relocatable floor panel with a
services outlet mounted on the deck;
Figure 15 shows a method by which the floor panel
system can be intergrated with in-floor outlet boxes;
Figure 16 shows a plan view of the corner of a panel
with interlocking keys on the sides and two levels of
cable cavities;
Figure 17 shows a cross-section D-D through figure 16;
Figure 18 shows an isometric view of cover strips to
protect the upwardly opening channels of the panel shown
in figures 16 and 17;
Figures 19 and 20 show plan views of panels which
have diagonal cable channels in addition to orthogonal
channels;
Figure 21 shows a part section through a panel with a
services outlet located beneath the deck surface;
Figure 22 shows a plan-view of the panel shown in
1311~9
- 5 -
figure 21;
Figure 23 shows an isometric view of a panel with two
sets of ducts, each perpendicular, and located one above
the other;
Figure 24 shows a plan-view of the construction shown
in figure 23;
Figure 25 shows a cross-section through a levelling
tray which can be used in conjunction with panels of the
type shown in figures 23 and 24;
Figure 26 shows an isometric view of a panel based
which has a series of upper ducts with continuous troughs,
which interconnect with ducts on the underside of the
panel base via vertical ducts located on each side of the
upper ducts;
Figures 27 and 28 show details of two methods of
connecting the deck to the base;
Figure 29 shows a detail of one method of fixing the
panel to the floor; and
Figure 30 shows an isometric view of a transition
piece to interconnect respective channels of adjacent but
orthogonally arranged panels according to figure 26.
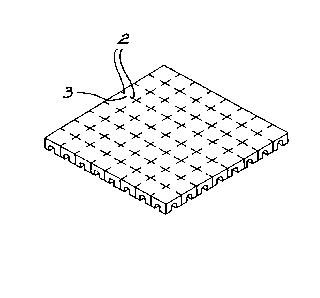
The panel can take a number of forms. The first type
of construction is illustrated in figures 1, 2 and 3, in
which:
Fig. 1 is a top view of a corner of the panel,
Fig. 2 is a cross-section of the panel at line A-A,
and
Fig. 3 is an isometric projection of the panel.
This panel has a flat upper surface, and the
underside is criss-crossed with a series of "vaults" (1)
which define channels through which the cabling may be
laid. The channels occur in at least two directions: a
first set of channels runs laterally from one side of the
panel to the other, and a second set of channels runs
longitudinally from one end of the panel to the other.
1311899
- 6 -
Diagonal and vertical channels are also possible, and
formations with these features will be described later.
Between the said vaults, there are slits (2) which divide
the panel into an array of rigid sub-elements in the form
of pedestals, which are inter-connected by small
cross-sections of material (3). This allows the panel to
flex and to accommodate undulations in the surface of the
structural sub-floor. The inter-connections are shown as
occurring on the upper surface of the panel, but they may
occur on the lower surface of the panel (see fig. 5) or at
any point on the sides of the pedestal sub-elements.
The vault size depends on the size of cable or
conduit to be accommodated, but is limited by the rigidity
of the bridge over the vault. In general a rigid
construction material will allow wider vault spans and
thinner bridge thickness (and hence thinner panel
thickness) but an inelastic construction material is more
susceptible to brittle fracture, noise transfer, and
rocking on an uneven sub-floor surface.
Figure 4 illustrates a variation in which a rigid
plate ~4) is incorporated in the upper surface of each
sub-element. The purpose of this is to increase the
load-bearing capacity of the sub-element, and is
applicable to panels formed from a semi-rigid base
material such as a rubber compound. The plate is
illustrated as being flat, but it may be ribbed, folded or
curved to increase its structural rigidity and to improve
the key to the base material. It may also be provided
with one or more holes to facilitate the passage of cables
through the surface of the panel.
As an extension of the concept illustrated in fig 4,
the upperbody of the panel may be constructed from a
strong and inelastic material, and the lower portion of
the legs constructed from a flexible material, thus
providing the panel with a flexible base. This is
1311~g9
illustrated in figure 5. In this construction the panel
may be divided into rigid sub-elements as before, but the
inter-connections between the segments may be provided
within the flexible base material.
The second type of construction is illustrated in
figures 6, 7, 8 and 9.
This second type of construction differs from the
first in that additional slits (5) are provided which
divide the panel into triangular sub-elements (6).
Triangular sub-elements have the advantage of
accommodating to an uneven sub-surface, and this type of
construction is applicable to the use of rigid materials
such as pressed steel, cast aluminium, or rigid plastics.
Figures 6 to 8 indicate construction from a cast or
moulded material such as aluminium or rigid plastic, in
which each triangular sub-element (6) has stiffening ribs
(7) along its deck edges. As with other constructions the
panel surface (or deck) may be provided with cable transit
holes (9).
The panel construction illustrated in figure 8 has
the floor finish (8) (in this case carpet) integral with
the panel. As the floor finishing element is continuous,
it can be utilised to inter-connect the panel
sub-elements, and so in this case the previously described
panel inter-connections (3) are not mandatory.
It is possible to form this type of panel in the
manner shown in figure 4, in which the panel is
constructed from a resilient material, and has rigid
stiffening plates incorporated in the upper surface of
each triangular sub-element. It is also possible to form
the panel in the manner of fig. 5 in which deck segments
constructed from rigid material are provided with flexible
feet.
A third type of construction is illustrated in
figures 10, 11, 12 and 13.
13118~9
- 8 -
This panel construction comprises a lower section
(10) with pillars (11) which locate and support a
removable upper section (12). The lower section may be
constructed from a rigid or a semi-rigid material such as
injection-moulded plastic, and it may be segmented to
allow it to adapt to undulations in the structural floor
surface. The deck, which must be rigid across the spans
between the pillars, may be continuous, or divided with
flexible connections along the joints between each pillar
(into for example square or triangular shapes), or it may
consist of discrete sub-elements which may be individually
removed or replaced.
In the example shown in figure 11 the removable deck
(12) is segmented into triangular sub-panels, each of
which have clips which interlock with the pedestals (11).
The deck segments are attached to a flexible membrane.
Figure 12 illustrates a slightly different form of
construction in which the upper surface ~12) of the panel
is pinned or screwed to the lower section of the panel.
Figure 13 shows an arrangement in which the deck
segments are formed with down-turns at each corner which
engage into the pillars, which are hollow.
It should be noted that figures 11, 12 and 13 merely
illustrate three examples by which the upper and lower
sections of the panel may be connected to one another. In
all of the constructions described in this specification
the deck may be attached to the base with other devices
such as keys, clips, adhesive or "velcro" strip; or the
upper section may be loose-laid onto the lower section
with optional horizontally engaging keys to prevent shear
between the upper and lower sections.
In use, the panels are laid on a structural
sub-floor, and cabling is reticulated within the vaults of
the panels from service points on the building structure
to the required location of the service outlet. At the
13118~9
g
required location of the service a fixed service point may
be provided, for instance by coring through the panel deck
to allow cable access, and attaching the outlet over the
panel and fixing it through to the structural sub-floor.
Alternatively the service outlet may be incorporated into
the panel itself. Figure 14 illustrates a panel which
incorporates a service outlet (13) and a length of cable
(14), which connects to a permanent service outlet. Such
a panel may be located at some distance from the permanent
service outlet, and can be attached permanently to the
floor or it can be made removable, and this will allow it
to be easily relocated.
Figure 15 illustrates a permanent services point
which is located within the structural floor and which can
be used in conjunction with the relocatable service panel
illustrated in figure 14. In fig 15, the services
connection points (15), (16) are located in a box (17)
sunk into the structural floor. The box is provided with
a rigid removable lid (17) which has cut-outs (18) at the
edges to allow passage of the services cables from the
panel vaults into the box itself.
In floor tiling systems of the type described
previously it may be desirable to interlock the panels, in
order to prevent vertical mis-alignment between adjacent
panels, and to prevent incorrect orientation in the case
of panels which have asymmetrical duct locations.
Figures 16 and 17 illustrate one means of achieving
interlocking between panels, in which the side faces of
the panels (19) have incorporated on them convex dimples
(20) alternated with concave dimples (21). The panels
will interlock if on abutting faces each convex dimple
aligns with a corresponding concave dimple.
Other forms of interlocking may be used to achieve
this purpose, for example male-female connections of the
form used to connect pieces in a jig-saw puzzle, or
1311899
- 10 -
alternate snap-in plugs and sockets, or hooks which extend
from alternate faces of each panel and engage in sockets
formed in the body of the panel.
The interlocking devices can be designed so as to
allow individual panels to be withdrawn from the body of
the floor, for example by flexing of the panel to achieve
a disengagement of the interlocking devices.
Alternatively, in the case of panels with a detachable
deck, the keys can be formed by offsetting the deck. The
panel can in this case be removed by first disengaging the
deck, and then extracting the base.
Figures 1 and 4 illustrated a panel which comprises
rigid sub-elements joined by thin connections (3~ which
will allow the panel to flex along the lines of the slits
(2). Figures 16 and 17 illustrate an arrangement in which
in addition to the slits (24), small channels (25) may be
formed in the upper surface of the panel, and this will
create an alternative location for cabling. These
channels should be narrow in cross-section to maximise the
support to the overlying floor finish, but of sufficient
size to allow the passage of small-diameter cable such as
telephone wiring or optical fibre. This will allow these
cables to be separated from cables underneath the panel by
the body of the panel itself.
The upper channels (25) may also be provided with
overhangs (25a) which will improve support to the floor
finish and which will retain and protect any cabling in
them.
Additionally the upper channels may be provided with
cover strips to protect the cabling and/or to support the
overlying floor finish. Figure 18 illustrates a segment
of one possible cover-strip arrangement, which allows
alternate cable troughs to carry different services, and
which provides physical separation of each service.
In this arrangement, the lower cover (26) - which may
1311899
- 11 .
for instance carry telephone cabling - has set-downs (27)
to allow the separated passage of another cable network -
for instance data - and which can be protected by an upper
cover (28). Note that the set-downs (27) will require the
channel (25) in the region of the channel intersections to
be deeper than in the areas away from the intersection (in
this case over the vaults).
Although figure 18 illustrates cover-stripping in a
grid arrangement, it is of course possible to form the
covers from simple extruded sections which can be cut to
cover the cables as required. They may be "U" shaped in
cross-section or they may for instance be flat (or
slightly bowed) strips which engage in grooves or ledges
on the sides of the channels.
The channels and the covers may be marked or coloured
to distinguish the various cable networks that they are
intended to contain.
Whilst figure 18 illustrates a two-channel cover
system, the principle can be extended to create three or
more separated channel networks. It is also possible to
delete the vaults (1) and the slits (24), so that all the
cable channels will be located on the upper side of the
panel. Although this will require the use of larger
channel widths and structurally rigid cover strips, the
arrangement will remove the need for access to the
underside of the panels, which may then be glued to the
floor.
The panel may be provided with channels on the
underside which are orthogonal to the sides of the panel,
or diagonal to the sides of the panel, or both. Figure 19
is a view of the underside of a panel with both orthogonal
channels (28) and diagonal channels (29) which intersect
in areas (30). Such a combination of channels allows
cables to be reticulated in various directions, at 45
increments. It also permits cables to be turned about a
1311~99
12 -
larger radius of curvature than would be possible if there
were no diagonal channels.
There is a trade-off involved in this arrangement
however - as the span of the vaults is increased, the span
over the intersection of the vaults (30) becomes quite
large, and this necessitates the use of thicker
cross-sections and more rigid materials in order to
achieve the required rigidity of the flooring surface.
One means of reducing the arch spans is illustrated
in figure 20, which is a plan view of a panel with an
alternative vault configuration. In this arrangement the
spacing between vaults has been increased, and both sets
of vaults have been offset so that no more than two
channels intersect at any one point. This decreases the
maximum spans over the vault sections and thus allows the
use of thinner panel cross-sections and softer material of
manufacture. Note that in this arrangement the channels
may be formed on either the underside of the panel or on
the upper side.
A "service panel" was previously described (figure
12) which incorporates a services outlet and which can be
located at any position on the floor. A variation to this
should be noted in which the service outlets are located
within the body of the panel. Figure 21 is a section
through part of such a panel, in which services outlets
(31) are located in a cavity (32) which may be covered by
a plate (33). With this and with the previously designed
panel the extension leads may be premanently wired into
the outlet, or they may be detachable via plug
connections. Considerations relating to these are
described below.
A services panel may also be designed to operate as
a secondary terminal, to which services outlet panels can
be connected. Figure 22 is a plan view of such a secondary
terminal panel, in which cabling (34) is brought into a
1311899
- 13 -
junction box (35), and thence to a connector (36), for
instance a female pin-connector. The junction box and
connectors may be integral with the panel or separate from
it, but it is preferable that they are contained within
S the thickness of the panel. Again with reference to figure
22, the secondary terminal panel may be provided with a
cavity (37~ in which plugs to the services outlet panel
are located. A removable segment or a cover-plate may be
used in or over this cavity when a services outlet panel
is not connected.
In order to comply with wiring regulations it may be
necessary to ensure that intermediate connections in the
wiring such as the connection at the secondary terminal to
the services outlet panel cannot be accidentally broken.
Nevertheless it is desirable to use a removable plug as
the means of connection, so that outlets may be relocated
without requiring the assistance of an electrician.
One means of securing the plug against accidental
disconnection is to make the connecting plug or plugs the
same size as the plug cavity (37); thus the abutting panel
(38) will prevent the plug from being withdrawn.
Alternatively, the connecting plugs may be screwed to the
junction box, or inserted in a vertical axis so that they
will be restrained by the panel itself or by the flooring.
Both the secondary terminal panel and the services
outlet panel may be provided with thermal detectors,
overload detectors and/or circuit breakers.
A critical need of the various licencing authorities
is that the various trunk cable networks within the
floor-space are physically separated from each other.
When the networks run only in one direction (for instance
perpendicular to the walls) and are thus parallel to each
other, separation can be achieved by physical spacing of
the panels, or by providing solid barriers between vaults
or groups of vaults, so that in effect the channels run in
1311899
only one direction. Such a "tunnel-vault" panel could
have a cross-section similar in principle to eg figure 2,
but of extruded construction.
One means of allowing different cable networks to
cross each other without passing through the same space is
to provide the "tunnel-vault" panel described above with a
second set of channels above the tunnel vaults, but at
right-angles to them. Figures 23 (isometric projection)
and 24 (plan view) show such a construction, which has
lower channels (40) and perpendicular upper channels (41),
which are connected by holes or knock-out panels (42). The
holes or panels can be arranged so that each upper channel
or group of channels can be uniquely linked to one or a
group of lower channels.
In these illustrations there are shown two upper
channels or ducts for every lower channel or duct. This
arrangement has the advantage that the spans of the
overlying deck are reduced, and it can be made thinner. A
2:1 ratio is not essential, however, a 1:1 or a 1:2 ratio
may be equally satisfactory from the point of view of
cable distribution.
This panel form can be constructed in a number of
ways, for example by attaching two extrusions at
right-angles, with permanent or removable connections. The
panel shown in figures 22 and 23 would be of
injection-moulded construction, with a separate deck (43).
This deck may be loose-laid or permanently attached or
removably attached, and it may be attached over its full
area or at the centre or for example along one edge. It
may also incorporate the floor finish. In the case of a
partially attached deck it may be provided with weakening
grooves (44) over the supports or at right-angles to them
which would enable it to flex upwards to provide access to
the upper channels. The deck may also be fabricated with
the upper channels (41) formed as vaults on its underside,
1311899
is -
so as to form two half-panels joined at the mid-line. This
may allow the panels to be fabricated entirely from
extruded sections.
The panel shown in figure 23 may be permanently or
removably attached to the sub-floor. It is advantageous to
glue it to the sub-floor around the centre of the panel,
and in this case grooves (44), (45) may be provided
through the walls of the lower vaults, to allow the panel
to be curled upwards so as to allow access to the lower
vaults from above.
Removable areas (46) may be provided in the walls of
the channels in non-structural areas to permit the passage
of cables from onè channel to the adjacent channel, to
improve flexibility and to permit larger radii of
curvature from the upper channels to the lower channels.
In the case of a panel comprising a rigid deck and a
injection-moulded base, it will be too rigid to adapt to
undulations in the sub-floor. Small irregularities may be
taken up by bedding the lower ribs in high-built adhesive
(46), but in the case of a very uneven sub-floor it may be
advantageous to seat the panels in levelling trays. Such
an arrangement is shown in figure 25, which shows a panel
(4B) seated in a levelling tray (47). The ribs of the
panel ~49) are held between ribs (50) on the levelling
tray, which provide support, and containment of levelling
compound (51).
In all of the arrangements described in this
document, the cabling may be introduced into the
sub-flooring systems in either of two ways - the cable may
be laid along its extended route, in which case the cable
route must be exposed by lifting the deck or lifting the
panel itself so that the cable can be laid, or
alternatively the cable may be fed along its intended
route, in which case the panel can remain undisturbed. The
first method allows greater flexibility and the use of
1~11899
- 16 -
smaller and shallower cable channels, but the second
method will minimise disruption to the room and the floor,
and will allow the use of broadloom carpet rather than
removable tiles.
The panel shown in figure 23 is fairly simple in
construction, but it is difficult to feed wires along the
upper channels, because of the natural tendency of the
wire to fall through the connecting hole into the lower
channel.
An improvement on this basic principle is shown in
figure 26, which shows a moulded panel base to be used in
conjunction with a removable deck, and perhaps with a
levelling tray as shown in fig. 25.
In this arrangement, sets of ducts are provided along
three axes at right-angles to each other. A lateral duct
set 51, 52, 53 lies along the underside of the panel base,
a longitudinal duct set 61, 62, 63 lies along the upper
side of the panel base at right angles to the lower ducts,
and the vertical duct set 71, 72, 73 extends from the
2Q lower duct set, on each side of the upper horizontal ducts.
Each duct set is made up of a number of sub-sets;
preferably three in number, to carry power, telephone and
data services respectively.
Where a vertical duct abuts an upper horizontal duct
of the same sub-set, an opening occurs between the two
ducts (which may take the form of a knock-out panel) ; but
where a ver~ical duct abuts an upper horizontal duct of a
different sub-set, no opening occurs.
Thus each lower duct sub-set is connected to the
corresponding upper duct sub-set via a vertical duct, and
by such selective interconnections a series of physically
separate duct networks are created.
In the example of figure 26 the upper duct (51) is
dedicated to power cabling, and inter-connects with lower
ducts of the same sub-set (61) via vertical ducts (71) to
- 17 -
create a power conduit grid. Similarly, duct sub-sets 52,
62, 72 form a telephone conduit grid, and duct sub-sets
53, 63, 73 form a data conduit grid.
It will be seen that in addition to the major
advantage of this arrangement that cables can be fed along
the upper ducts with less risk of deflecting into the
lower ducts, a number of further advantages accrue.
Firstly the arrangements provides regular access to each
lower duct to enable control of cable feeding without the
need to lift all or part of the panel. Secondly, the
arrangement allows greater turning radii, of the order
required for co-axial cables and optical fibre. Thirdly,
the vertical ducts provide superior access to services
outlets on the deck above the panel.
Although figure 26 shows three sets of ducts (for
power, telephone and data), this number may of course be
varied.
In addition, there may be several levels of
horizontal ducts. Advantages can be gained by providing
four layers of horizontal ducts, with the upper two layers
having narrow and closely spaced ducts to reduce distances
between possible services out-let points, and with the
lower two layers having wide ducts to maximise cable
carrying capacity and bending radii.
Alternatively the panel may be constructed with a level
dedicated to each service. This will remove the need for
dividing ribs, and will permit cables to be run in any
direction on their particular level, thus allowing shorter
cable runs.
By utilising the sides of the panel base shown in
figure 26, extending clips may be formed to attach the
floor decking to the panel. Figure 27 illustrates in
detail the clips (80) which may be provided on the edges
of the panel in figure 26. These clips can be disengaged
from the decking panel to allow its temporary removal, and
13118~9
- 18 -
if they are asymmetrical on each side (eg, of different
heights or in different relative locations) the decking
will be unable to be mis-oriented when it is replaced.
This will allow the decking to have pre-formed outlets, or
to be marked with the locations of the services ducts in
the panel underneath, so that services can be accessed
through drilled holes without the need to remove the panel.
Figure 28 shows an alternative method of attaching
- the deck to the base, in which the base has formed on it,
hollow upstands (84) which when a peg or screw (83) is
inserted into them, expand against the deck (82).
Other forms of attachment are also possible, such as
screw-fixing into the base, or variations of figure 28 in
which the peg (83) is formed integral with the upstand
(84), to create a form of "snap-lock".
Figure 29 shows a method of forming the base of the
ribs so as to increase the surface area of the tile which
bears onto the sub-floor, in which the rib has a foot
(85). It should be noted that in constructions which have
a foot or bearing pad, it is also possible to form
thickened ribs, or double ribs which then connect to each
side of the foot, rather than to the centre. These
constructions have the advantage of creating column-like
elements which are superior in transferring load from the
deck to the sub-floor.
Figure 30 shows a transition piece which enables one
area of floor which is laid with upper ducts running in
one direction to be connected with another section of
floor in which the upper ducts run at right-angles. It is
laid in a line along the junction of the two areas, and in
the orientation shown in figure 30, the lower edge of the
sloping trays (91) fits against the lower ducts (61),
(62), (63) of the floor panel. It can, however, be mounted
upside-down to create a joint-line along the adjacent face
of the panels.