Note: Descriptions are shown in the official language in which they were submitted.
~ 327382
WORK SPACE MANAGEMENT SYSTEM
AND CABINET T~EREFOR
TEIE FIE:LD OF THE INVENTION
The in~ention relates to work space management
system and cabinets which are integrated into such systems.
In one of its aspects, the invention selates to freestanding
cabinets adapted to integrate into a work space management
system comprised of frees~anding walls. In another of its
aspects, ~he invention relates to a work space management
system having a reestanding cabinet incorporated into a
freestanding wall and providing a return therefor.
BACX~ROUND OF THE INVENTION
Wall-mounted cabine~ that attach to a
freestanding wall are known~ For example, U.S. patents to
Kelley, 4,618,192, i~sued October 21J 1986 and Aylworth, Re.
28,994, reissued Octob~r 5, 1976 disclose a cabinet adapted
to mount to a ~reestanding wall by hook~ secured to the
cabin~t and engage vertical ~tandards mounted to the wall.
Freestanding cabinets having adju~table shelving are al80
known. U.S. patents to Bayleæ et al., 4,274,687 issued
June 23, 1981, Winkler, 4,174,4~6, issued November 13, 1979,
and Ribbens et al., 3,067,882, issued December 11, 1962 are
repre~entative o~ patents disclo~ing cabinets having
adjustable ~helving. For example, in Bayles et al., there
i~ a cabine~ having a back wall which includes vertical
slotted ~tandards and horizontal hanger rail~. Storage bins
are mounted onto the rails. Shelve~ are s~cured to ~he
upr~ght slotted standards in the conventional manner. The
storage b~ns have, at the back portions thereof, dep~nding
lip8 which ~ngage the rails.
K~lley et al~ in U.S. Patent 4,~85~255, issued
August 11, 1987, disclose~ and claims a work space
management syst~m in which rigid frames are sigidly
joined together at ~acing edge~ and wire management is
provided ~rom frame to frame at the bottom and mid-portions
thereof. It is usually desirable to configur~
,~
- .,,
1 327382
the walls at right angles to provide a return to give
lateral, binding moment stability to long runs Oe such
walls .
As here described, a workspace management
system and a cabinet therefor are provided. The work-
space management system ha~ a freestanding wall ~ormed
by rigid fxames rigidly joined together at face edges
thereof to define work spaces. The cabinet has a back
wall, first and second side walls, a top wall and a
lo bottom wall joined together to form an integral unit,
Means on one of the back wall and the side wall rigidly
join the cabinet to at least one edge face of the free-
s~anding wall to form a re~urn therefor.
The cabinet can be joined to a frame of a continuous
wall portion, or the cablnet can be joined to a ree
edge face of a terminal edge portion of the freestanding
wall. The cabinet back wall can form a portion of the
freestandinq wall so that the freestanding wall is
joined to a side wall of the cablnet or can form a
terminal end o~ the wall with the freestanding wall
belng ~oined to a back wall or a side wall o the
cabinet. Further, multiple cabinets can be connec~ed
together, side-to-sid~, back-to-back or side-to-back
w~th or without connections of frames. ~urther,
2s multiple cab~nets can be conneoted together ln over-
lapping relationship with or w~thout frame~ attached to
s~de or back wall~ thereof.
The ~o~ ning means for the frame-to-cabinet
connector~ and for the cabinet-to-cablnet connectors
preferably lnclude lndented channels in the cabinets and
pre~erably lnclude lndented channel9 in the frame free
edges. The cabinet lndented channels are located near
corner~ thereo~ ~nd are specially designed to lnteqrate
with the frames 50 that the reestandlnq wall faces and
3~ the side wall and back wall of the cabinets are coplanar
when the f rames are joined to the cabinets in a per-
pendlcular relat~onshlp to either of the side walls or
1 327382
the back wall.
The cabinets are further provided wi~h vertical
hanging 1ntelligenee w~th~n the cablnets so that shelves
and the like can be attached ~o the cabinets. This
vertlcal hanq~ng intel~engence lq preferably provided on
vertical fra~e members of the cabine~. Further, work
surfaces and the like can be at ~east partially
suspended from the cabinet back wall through the
indented channels and connector means. Wire management
o means are preferably provided on a lower portion near
the back wall to in~erface ~ith wire management at lower
portions o~ the freestanding walls.
The cab~net i5 preferably can~tructed of a rigid
framework formed of ~igid vertical frame members at the
corner of the cabinet and hor~zonal frame members posi-
tioned at upper and lower end~ of the vertica} frame
members. The walls are hung onto the rigid framework.
At least some o the rigid vertical frame members
preEerably have ~ertically spaced slots for receiving
bracket hooks to support shelve~ and the l~ke within the
cabinet. The rigid vertlcal erame members also have
openings ~n registry with the openings in the cabinet
lndented chann~ls.
~he cabinet and connectors provide a very versatile
cabinet which can function as a return for freestanding wall
frames and eliminate the necessity for such returns.
Further, the ver6atility of the cabinets perm1ts many
diff~rent configurations to 6Uit the user and significantly
enhances the variety of the work space management system
More particul~rly in accordance with a first aspect of
the invention there is provided, a cabinet for use in
combination with a frame having an edge face through which
said ~rames are ~oined together, said frames having at least
one opening: said cabinet comprising:
a back wall, first and second side walls, a top wall and
a bottom wall, all joined together to form an integral unit;
a oabinet indented channel extending vertically along at
least one of said back wall and said side walls;
-3a-
1 3~7~82
openings in a base bortion of said cabinet indented
channel;
a connector adapted to engage said channel openings in
said cabinet indented channel, to engage said frame opening
and to secure at least one of said frames to said cabinet.
In accordance with a second aspect of the invention
there is provided, a storage cabinet comprising:
a back wall, first and second side walls, a top wall and
a bottom wall, all joined together to form an integral unit;
lo a cabinet indented channel extending vertically along at
least one of the back wall and the side walls;
openings in a base portion of the cabinet indented
channel;
a connector adapted to removably mount in said cabinet
indented channel and to pass through said openings in said
indented channels of ~aid cabinet in registry with an
indented channel of another one of said cabinets to secure
two of said cabinets together in side-to-side, back-to-back
or side-to-back relationships.
In accordance with a third aspect of the invention there
is provided, a storage cabinet and work surface combination,
said storage cabinet comprising:
a bacX wall, ~irst and second ~ide walls, a top wall and
a bottom wall, all joined together to form an integral unit;
a cabinet inder,ted channel extanding vertically along at
least one or said back wall and said side walls:
openings in a base portion of said cabinet indented
channel;
said work surface has at least one leg at one end
thereof and means at another end thereof for mounting said
work surface at the other end to said back wall throu~h said
intended channel.
The embodiments of the invention will now be described
with reference to the accompanying drawings:
~RIEF ~SC~IPTION OF TH~ D~AWINGS
Reference will now be made to the drawings in which:
Figure 1 is a perspective view of a work space
management system embodying the invention;
Figure 2 is a front perspective view of a cabinet
embodying the invention;
'~
1 327382
Figure 3 is a rear perspective view of the cabinet
shown in Figure 2;
Figure 4 is an exploded perspective view of the
cabinet shown in Figures 2 and 3;
Figure 5 is a partial exploded view in section
taken along line 5-5 in Figure 4 and showing a back plate;
Figure 6 is a fragmentary perspective view of a
bottom portion of the cabinet mounted to wall panels and
showing junction covers;
Figure 7 is a partial side elevational view of a
lower rear portion of the cabinet and a wall panel abutting
the cabinet in perpendicular relationship thereto;
Figure 8 i8 an enlarged front elevational view of
a portion of a rear vertical frame member of Figure 4;
Pigure 9 is an enlarged sectional view taken along
line 9-9 of Figure 2;
Figure~ lOta) through lO(d~ are plan views of the
cabinet showing various top wall arrangements;
Figure 11 i~ a schematic plan view of the cabinet
showing a first arrangement of connection between the
cabinet and freestanding wzlls;
Figure 12 i8 a schematic plan view of the cabinet
showing a second arrangement of connection between the
cabinet and freestanding walls;
Figure 13 is a schematic plan view of the cabinet
showing a third arran~ement of connection between the
cabinet and freestanding wall~;
Figure 14 i8 a schematic plan view of a first
arrangement Qf a pair of cabinets in back-to-back
relationship and connected to a freestanding wall;
~igure 15 is a schematic plan view of a second
arrangement of a pair of cabinets in side-to-side
relationship and connected to a freestanding wall;
" `~9
~ 32738~
-- 5 --
Figures 16ta) throug~ 16(n) are schematic plan
views of o~her arran~ements that can be made be~ween one or
mcre cabinet~ and freestanding walls;
Figure 17 is a perspec~ive view of a freestanding
wall frame;
Figure 18 is a perspective exploded view of an
in-line connector used to connect a cabinet to a
.
freestanding wall;
Figure 19 is a plan view in section showing the
cabinet and a freestanding wall attaahed in the
confisurat~on of F~gure 12 by the i~-line connector of
Figure 18s
Figure 20 is a perspective view of a face
connectort
Figure 21 is an exploded plan view in section of
the wall and cabinet shown in Figure 13 and illustrating the
manner of mounting the face connector of ~igure 20;
Figure 22 i~ a perspective exploded view of a
centerline connectors
Figure 23 i~ an exploded plan view in section of a
portion of cabinets and freestanding wall shown in
Figure 15 and ~llu~trating the mounting of the centerline
connector of Figure 22 to the cabinets and the wallt
Figure 24 is a perspective exploded view of a pair
of back to-back connectors used to ~oin the cabinets
together in a back-to-back or side-to-side relationships
Figure 25 iQ an exploded plan view in section of
portions of a pair of c~binets and the back-to-back
connec~ors ~hown in Figure 24 illustrating the manner in
which the portions of the back walls opposite the wall shown
in Figure 14 can be ~oined by the back-to-back connector;
Figure 25(a) is a p2rspective vlew of a
mul~ipurpose connector~
~ 3273~
Figure 25~b~ is an exploded plan view in section
of the wall and cabinet shown in Figure 13 and illustrating
the manner of mounting the multipurpose connector;
Figure 25~c) is an exploded plan view in section
of portions of a pair o~ cabinets and the mul ipurpose
connector o~ Figure 25(a) and illustrating the manner in
which the portion of the back walls opposite the wall shown
in Figure 14 can be joined by the multipurpose connector;
Figure 26 is an enlarged partial front elevational
view of the cabinet of Figure 2 showing a locking means;
Figure 27 is a perspective view of the cabinet of
~igure 2 with the doors removed and showing the interior of
the cabinet having a first shelving arrangement;
Figure 28 is a perspective view of shelving which
is mountable into the interior of the cabinet shown in
Figure 30;
Fi~ure 29 is a front elevational view of ~he
cabinet of Figure 2 showing a second shelving arrangement;
Pigure 30 i8 a front elevational view of the
cabinet of Figure 2 showing a wardrobe embodiment;
Figure 31 is a front elevational view of the
cabinet of Figure 2 showing a combination wardrobe and
shelving embodiments
Figure 32 is an enlarged partial front elevational
view of the interior of the cabinet of Figure 2 having a
hanger rail;
Figures 33~a)-33(c) are plan views of the cabinet
of Figure 2 having a work surface mounted to a back wall
thereto and a pair of cabinet3 having a work surface mounted
to back walls or side wallæ theretos
~ igure 34 i8 a perspective view of the work
surface a~sembly of Figure 335
;.. ,
_7_ 1 327382
~ igure 35 i5 a perspective ~iew of a Eirst
connector used to connect the work surface assembly to
the cabinet in the manner shown in ~igure 33(a);
Figure 36 is a perspective view o a second
5 connector used to connect ~he work surface assembly to
~he pair of cabinets in the manner shown in Figures
33(b) and 33(c);
Figure 37 is a front elevational view o~ a
plurality of cabinets of Figure 2 connected by a fence
o arrangement; and
~ igure 38 is a f ront elevational view of a work
space management system showing a pair of connected
cabinets of Figure 2 having different heights and
widths.
DETAILED DESCRIPTION OF THE PREFERR<I~:~EMBODI~qENTS
...:Referring to the drawings and particularly to
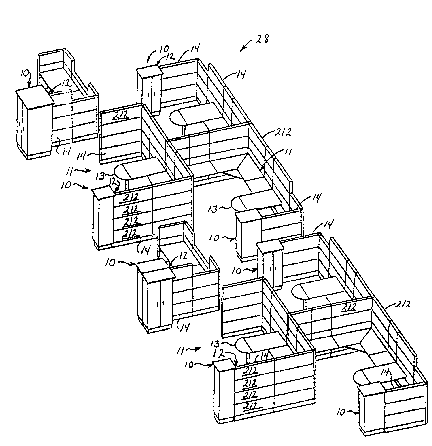
Figure 1, there i5 shown a storage cabinet 10 that can
be placed in a freestanding position or can be mounted
to other cablnets or to reestanding walls 14 comprisir~g
part of an office system or wor~ space management system
28 of a so-ca1led "modular" t~pe. One such ofice
sy~tem is dlsclosed in U.S. Patent No. 4,685,255 to
Kelley et al~, issued August 11, 1987, and manufa~tured
and sold under the trademark ETHOSPACE, by Herman
Miller, ~nc., of Zeeland, Michigan. The office system
may.comprise work spaces 11. The cabinet 10 has means
to be attached to other cabinets or to wall panels ln
variou~ arrangements to adapt the cablnet for use in
differlng work envlronmen~s.
. Referring to Figure~ 1 to 4, there is shown the
storage cabinet 10 comprlsinq a plinth 16, a back wall
20, slde walls '2, a ~air of front doors 26 mounted or
movement between an oDen and a closed posi~on, a plinth
top wall 52-servln~ as a cablnet bottom wall, and a
cabinet top wall 120. The walls and doors define an
~nterlor 24 used as a storaqe area. There are also side
wall channels 194 and back wall channel 196 that ~unc-
6~
i 1 327382
-- 8 --
tion as a part of a connection means 12 to removablyintegrate the cabinet to the workspace management system 28
comprising the freestanding walls 14, or to other cabinets
as will be hereinafter described in detail. There is also a
locking means 30 to lock the door~ in a closed position.
~he cabinet may al~o include an optional pocketing means 32
for storing the doors 26 within ~he cabinet when the doors
are in an open position.
As illustrated in Figures 4 and 5, the plinth
comprises a rectangular boxlike frame 34, a pair of
removable covers 36 mounted at rear corners of the frame, a
pair of nonremovable front and rear covers 38, 40 affixed to
back and fron~ walls 42, 44 of the frame9 respectively, and
a glide means 46 mounted on the bottom of the frame at front
and rear corners 48, 50. The glide means 46 functions to
suppcrt ~he cabinet and can be adjusted for leveling the
same. The plinth 16 ~unction~ to support the cabinet on the
floor.
The plinth frame 34 is preferably made of steel
and comprises the top 52 formed integrally with the front
wall 44. In addition, the frame comprises two generally
~-shaped side wall~ 54 rigidly ~astened a~ by welding to the
top 52 and Pront 44. As best seen in Figure 5, a plinth
~ide wall lower flange 70 has attached thereto a downward
extending flange 84 and an optional return portion 83
comprisiny flang~ 84 and a return flange 86 extending
par~llel to flange 700
A~ seen in Figure 5, ~he plinth back wall 42 i~
removably fastened to the side walls 54. Specifically,
screws 85 are thr~adably mounted through holes 81 in the
back wall 42 to brackets 87 that are welded to an inside
edge 8g of the side wall lower flange 70. A palr of cutouts
82 in the back wall 42 prevent interference with the side
wall flanges 84. The plinth back ~all i8 removable
~o as to permit wiring (not shown) to extend through
and be stored within the plinth frame. The plinth
has channel~ for accommodAting electrical wiring
~.~
1 327382
in the office system. An access means $6 comprising
cutouts 58 extending through rear edges 60 of the plinth
side walls 54 and rear corners 50 of the top wall 52 and
lateral edges 62 of the plinth back wall 42 provides access
to the above-stated wiring within the plinth 16 and the
interior portion 24 of the cabinet. The cutouts 58 further
register with wire management channels in the freestanding
walls baseline covers 78 (Fig. 6~.
A rear portion 64 of the plinth top wall 52
comprises two right-angle bends forming upwardly and
rearwardly extending flange portions 66, 6~. The lower
Z-shaped side wall flange 70 registers with a matching
cutout 72 at the bottom of the front wall 44. Upper
flanges 74 of the side walls and the rearward top wall
flange 68 are equal in height and function to support a
cabinet rectangular boxlike frame 18 as will be herein-
after described in detail. ~he side wall upper flange 74
terminates at a predetermined distance from the rear
portion of the plinth top wall. In this manner, the plinth
side wall~ 54, the top wall rearward flange 68 and the
plinth back wall 42 define a recess 76 which provides
clearance for a wall panel baseline cover 78 as shown in
Figure 7, as will hereinafter be described in detail. The
plinth top 52 functions as the cabinet bottom wall which
defines, in part, the cabinet interior storage area 24.
The glide means 46 comprises a plurality of feet
38, each having a threaded stud 90 to adjustably mount the
foot to a threaded bushing 92 in the bottom flange 70 of the
Z-shaped side wall 54. Specifically, as seen in Figure 5,
the bushing is vertically positioned at ach corner of the
side walls 54~ The fiange 70 may be reinforced with another
piece of metal stock. The stud 90 threadably mounts to the
bushing so the cabin~t can be leveled on an uneven floor.
'~5 As seen in Figure 4, the plinth front wall 44,
side walls and b~ck wall 54, 4~ are covered by the front and
rear nonremovable, aesthetic functioning covers 38,
~ 3~73~2
-- 10 --
40, respectively. The removable covers 36 comprise part of
the access means 56 and a~tach to the rear corner~ 50 of the
plinth frame in a snap-fit relationship a~ will be
hereinafter described in detail. The covers 36 cover a
portion of the back wall 42, the ~ide walls 54 and the
cutouts 58. The removable covers comprise two rectangular
portions 94, 96 set at right angles to match the geometry of
the plinth corners. The removable covers are placed over
the rear corners S0 to cover the cutouts 58 if it is not
desired to install electrical wiring in~o ~he cabinet lOo
The rear nonremovable cover 40 comprifies a
rectangular segment secured to the plinth back wall 42. The
front nonremovable cover 38 comprise~ a U-shaped segment
mounted to the plinth front and side walls. The covers 38,
40 the securely fastened as by an adhesive means to the
plinth. The removable and non-removable covers are
preferably made of a cast flexible polyvinyl chloride (PVC)
plastic material.
If the optional plinth return flange 86 i8 not
used~ a rectangular-shaped block (not shown3 may be
placed beneath the plinth lower ~ide wall flange 70 to
facilitate placement of the front nonremovable coYer 38.
The ~lock ~not shown~ may be made of any suitable material
such as metal, plastic, or wood and is mounted to the
cabinet by inserting the glide stud 90 through aperture~
located at each longitudinal end of the block. The block
functions to prevent the cover 38 ~rom curling beneath the
plinth flange 70 along the plinth slde walls 54.
As illustrated in Figure 6, there is a corner
~unction cover 98 and a colinear iunction cover 100
adapted to mount to the baseline of the cabinet-wall or
cabinet-cabine~ interfaces in the event the removable
covers are removed to accom~odate wirins ~not shown).
Speci~ically, the junction covers g8, 100 cover a ~ap
that would otherwise exist between the freestanding wall
baseline cover 78 and the plin~h rear plinth cover 40.
,.,~
"~ ~
1 327382
The corner junction cover 98 is U-shaped,
comprising upper and lower parallel leg portions 102,
104 and a bight portion 106. The cover 98 is mounted
within the plinth reces~ 76 and held in place between the
plinth 16, the baseline cover 78 and a ~loor 108 by
attacbing adhesive tape to and be~ween the cover 98 and the
baseline cover. The bight portion 106 is oriented
vertically. The corner junction cover g8 is u~ed at
locations where the plinth is perpendicular to an adjacent
freestanding wall 14 or cabinet such as where a corner of
the workspace management system 28 is formed. In this
manner, the corner junction cover 98 provides continuity
betwe~n the plinth 16 and the wall baseline cover 78 or
adiacent cabinet plinth cover 16.
As seen in Figure 6, the colinear junction cover
100 comprises a web portion 110, a pair of parallel
sides 112 one lateral side 114 extending perpendicular to
the web portion in the same direction relative thereto and a
plurality of fingers 115 having projections 117. The
colinear cover is used at locations where the wall 14 and
the cabinet 10 are colinear~ The function of the lateral
side 114 is to fill a gap that would otherwise exist between
the plinth rear non-removable cover 40 and the web portion
110 resulting from the reces6 of the cover 40 from the
surface of tha cabinet back wall 20~
The junction cover 100 is installed by a snap fit
meansO Specifically, the fingers 115 engage the cutouts 58
in the plinth frame back wall 42 or alternatively, engage
rear portions of the plinth side wall 54~ An alternate
means ~not shown) of mounting the cover 100 comprises
mechanically fastening as by screws the cover 100 to the
plinth back wall 42.
Similarly, the snap fit means ~or the removable
cov2rs 36 may comprise finger~ (not shown) which engage the
plinth frame 34. Alternatively, the removable covers 36 may
be mechanically fastened as by screws to the plinth frame.
" ~ .~
~ 327382
As illustrated in ~igur~ re ;~al~ag~TIent
means 79 ar~ provided behind the covers 78 and are
directly aligned with the cll~Out~. s~ at the si~es ~r
back wall of the cabinet. The wire management means 79
5 of the freestandlng walls 14 are more fully described in
the Kelley et al U.S. Patent 4,685,255.
As illustrated in Fiqure 4, che cabinet rurther
com~rises the boxlike frame 34 supporte~ on the plinth
top and side wall flanges 68, 74. The cabinet back and
lo side walls ~0, 22, a pair oE rear corner member~ 116,
doors 26, an upper reveal 118 and the cabinet top 120
are mounted to the framework 34 through screws as will
be described later.
The cabinet framework 18 comprises pairs of front
ve~tlcal members 122, rear vert~cal members 124, upper
tran-q~yerse cross ~e~.bers ;26, and upper Z-shaped in
cross section members 128. ~he front vertica~ members
12~ are rigidly fa-tened as by ~welding the plinth side
~wall upper .langes 74. The rear ve.tical members are
rigidly fas~ened to the flanqe 74 and the plinth tOp
.earwardly directed flanse 6~. The upper Z-shaped
members 128 are horizontally oriented and have upper and
lower ~langes 130, 132, respectively. The lower flange
i~ rigidly mounted to upper axial ends of its respective
vertlcal members 122 and 124. The cross member~ are
rigidly mounted to the Z-shaped membe~ upper flanges
130. The lower flange 132 oÇ each Z--lhaped member
t~rminates at a predetermlned distance from the member
rear edge 134. The Z-shaped members 128 and upper cross
members 126 provide lateral sUpport for the cabinet 10
and support the cabinet top 120 and the upper reve~l
118. The entire ramework Eunctions to provide struc-
tural rig~dity for ~he cabinet 10.
Each front vertlcal frame member 122 comprises
a U-shaped central portion 136 and bllateral flanges
138, 140. The bicht portion 137 of the U-~haped Dortion
136 has a vertically 3paced series of holes 139 for
.. .
1 327~
- 13 -
mounting thereto a cabinet side wall 22, the manner of such
mounting being described hereinafter in detail.
As best seen in Figures 4, 8 and 9, aach rear
vertical frame member 124 comprise~ a first leg 142
extending parallel with the cabinet ~ide wall 22, and a
second leg 144 set perpendicular to the first leg and
extending parallel with the cabinet ba~k wall 20. The first
leg 142 forms a step portion at an outer end 146 thereof,
engaging the cabinet side wall and providing additional
support to the side wall to resist externally imposed forces
exerted on the wall. The first leg also includes a
vertically spaced series of holes 148 and a serie~ of
vertically spaced openings 15G~ The holes 148 form a part
of the means for attaching the side wall 22 to the rear
vertical member i24 as will be hereinafter described in
detail. The openings 150 function to connect the cabinet 10
to a freestanding wall 14 or another cabine~ lOa as will
also be described later in detail~
The second leg 144 also includes a series of
vertioally ~paced holes 152 and a series of vertically
spaced openin~s 154. The holes 152 form a part of the means
for attaching the back wall 20 to the rear vertical member
124 as will be hereina~ter described in detail. The
openings 154 function to connect the cabinet 10 to a wall
panel 14 or another cabinet lOa as will also be described
later in detail. The second leg 144 has two step portions.
A first ~tep portion 156 includes a plurality of vertically
spaced hole 158 which ~unction to hang conventional
brackets within the cabinet 10 as is described later in
detail. A ~loping portion 160 adjacen~ the first step
portion 156 functions to guide the article hook means into
registry with the holes. A second step portion 162 at an
outer end 164 of the second leg 144 engages the cabinet back
wall 20 and functions to provide additional support for the
back wall to resist externally imposed forces on the wall.
1 327382
-- 14 --
AS seen in Figures 2-4 and 9, the cabinet back and
side walls 20, 22 comprise rectangular-shaped surfaces
preferably made of a textured metal skin and optionally
including a layer of soundproofing ~not shown). Vertical
ends 166 of each wall include two right-angle bends forming
a return portion 168. The return portions have a series of
vertically spaced holes 170 aligned with the holes 139, 148,
152 in the respective fron~ and rear vertical frame members
122, 124. Bolts 172 are used to connect the back and side
walls 20, 22 to the vertical frame members~ The back wall
20 has an upper flange 174 mechanically fastened to the
upper framework rear cross member rear edge 176 by bolts
~not shown) that extend through aligned holes (not shown~ in
the flange and rear cross member 126.
As illustrated in Figures 4 and 9, each corner
member 116 comprises a boxlike central member 178 having
first and second flange portions 180, 182, respectively.
The flanges are normal to one another and extend laterally
of the central member 178. Each ~lange has a series of
vertically spaced openings 184, 186, respectively, aligned
with the openings 154, 150, respectively, in the rear
vertical frame member 124. The flange 180 of each corner
member is positioned between the return portion 168 of back
wall 20 and the second leg 144 o~ the rear vertical frame
member. The ~lange 182 is positioned between the return
portion 168 of side wall 22 and the first leg 142 of the
rear vertical frame member 124. There is also a series of
v~rti~ally spaced notches 189 located along the corner
member flanges 180, and 182~ As seen in Figure 9, bolts 188
extend through the holes 148 in the leg 142, notches 189 in
flange 182, and holes 170 in the side wall return portion
168 to attach the side wall 20 and the corner membex 116
to the rear vertical frame member 124. In similar fa~hion,
bolts 1~7 extend through the holes 152 in the leg 144,
notches 189 in flange 180, and holes 170 in the back well
return portion 168 to attach the back wall 20 and the
9~
1 327382
- 15 -
corner member 116 to the rear vertical frame member 124.
As seen in Figure 9, the corner member side
wall 190, the corner member flange 182, and the re~urn
portion 168 of the sidewall 22 from the ~ide wall
S channel 194 having aligned openlngs 150, 18~ extending
therathrough. The corner member side wall 192, the
corner member flange 180, and the return portion 168 form
the back wall channel 196 having aligned openings 154,
184 extending therethrough.
Referring to Figure 4t a rectangular-shaped
counterweight 198 is ~ecurely fa~ten~d as by welding to and
between the rear vertical frame members 124 and the
flange 68 in the plinth top 52~ The counterweight,
preferably made of metal, provides stability ~or the
cabinet 10 by lowering its center of gravity.
As &een in Figure 4, ~urroundlng the upper
horizontal framework i~ the upper reveal 118 which provide~
an aesthetic covering for the upper portion of the cabinet
~rame. The reveal 118 comprises a front wall 200, a back
wall 202, a pair of side walls 204 and corner pieces 205.
The locking means 30 is interposed in the middle portion of
the reveal front wall. ~he reveal ~ront wall 200 CQmpriSes
first and ~econd portions 201, 203 betwean which is
interposed the lock 30. The front wall ha~ a rearward
extending horizontally oriented flange tnot shown) that
functions to mount the wall 200 to the cabinet cross
member 126 by any suitable mechanical mean~ such as screws.
A lock cover 151 may be mounted over the lock to furth~r
enhance th~ aesthetics of the cabinet 10. The cover 151 may
be mounted by any suitable mean~ ~uch a~ by having a cover
pin tnot shown) extend through th~ lock and retained
there~o by a pin retainer (not shown) mounted on
the pin portion, extending into the cabinet interior.
The reveal front wall 200 and lock cover 151 are
preferably made of an extruded pla~tic material.
1 327382
The reveal side walls 204 comprise a bottom
flange portion 153 mounted by pins (not ~hown) received
within mating holes in ~he lower flange 132 of the framework
upper Z-shaped member 128 and a nonremovable cover 155
mounted to the vertically oriented portion 157 of he Z-
shaped frame member 128 as hereinafter des~ribed in detail.
The side walls 204 are preferably made of an extruded
plastic material.
The reveal back wall 202 comprises a rectangular
strip mechanically fastened as by pins on screws to the rear
cabine~ frame cro~s member 126~ A raised ~entral portion
159 has a rectangular-shaped aperture 161 therethrough. The
aperture 161 functions to enable wiring ~not shown) to enter
the cabinet 10 from above. After wiring is fed into the
cabinet~ a rectangular-shaped access plug 163 is relea~ably
fastened by a ~nap fit means to co~er the aperture 161. A
pair of openings 165 in t~e acGess plug 163 enable the
wiring to extend into the cabine~ 10, the reveal back wall
i8 preferably made of steel, while the access plug is
preferably made of a plastic material.
~ eveal ~orner pieces 205 cover the upper edges 167
of the cabinet corner members 116 and the re~r corners of
the cabinet Z-shaped frame member 128. Pins (not shown)
extend beneath the corner pieces 205 and are releasably
mounted within receiving holes (not shown) in the upper
edge of the corner member 116.
The nonremovable reveal cover 155 functions as an
aesthetic covering for the reveal 118 and as a portion of
the reveal side walls 204. The reveal cover comprises ~
one-piece member preferably made of ca~t P~ material baving
the same appearance as the plinth covers 36, 38 and 40~ The
reveal cover 155 is bonded to the vertical portions o~ the
reveal front wall 200, back wall 202, and corner pieces 205
and to the vertical portion 157 o~ the ~-shaped frame
member 128.
The cabinet top 120 ~s rectangular in shape and
is securely fastened as by screws to the Z-shaped upper
.,. ~
~ 'J
~ 327382
- 17 -
frame member upper flange 130 as seen in Figure 4. As
illustrated in Figures lO(a)-lO~d), the top may be made to
oversail the cabinet and is preferably made of a material
such as fiberboard.
As shown in Figures 1-3, 11-16, and 29-31, the
cabinet 10 can be freestanding in a modular or non-modular
office arrangement if so desired. The cabinet can be used
to store articles, clothing, office accessories, etc.
Alternatively, the cabinet can-be integrated into a modular
workspace management system, such as that disclosed in the
above-referenced patent to Kelley and in U.S. Patent
No. 4,571,907 to Defouw et al., issued February 25, 1986.
Referring to Figures 1, 17 and 21, a typical
modular workspace management system 28 comprises a plurality
of individual freestanding walls 14 having rigid rectangular
frames 206, comprising hori20ntal frame members 207 and
vertical frame members 208. The frames are removably
fastened together at adjoining vertical frame memb~rs in
accordance with the joining system shown in the above-
referenced U.S. Patent No. 4,571,907. Electrical wiring
~not shown) can be ins alled within channels ~not shown) in
a lower portion of the fram~ 206. Wall tiles 212 removably
attach to the frames to complete the wall system in a manner
disclosed in the above-referenced Kelley et al. U.S. Patent
No. 4,685,255. Specifically, the wall tiles have clips and
hooks ~not shown) that mount to mating holes 210 and
slots 211 in the vertical frame member 208. A second set of
slots 213 is positioned along the corner of the vertical
frame member and curve to receive hooks for hanging shelves
or work surfaces. In addition, there are a pair of holes
21S in spaced relation~hip to each hole 210.
Th~ cabinet 10 attaches to the wall vertical
frame members 208 by the connection means 12.
Specifically, the connection means perm$ts the cabinet
10 to be integr~ted into the workspace management system
~ ~,
1 327382
- 18 -
28 so the cabinet back or ~ide walls 20, 22 ~orm part
thereof. As represen~atively illustrated in Figures 11
to 15, cabinets may be positioned so a freestanding 14 wall
is either parallel or perpendicular to the cabinet back
wall 2~. Wall~ 14 can connect to rear portions 214 of the
side wall~ 22 andior to outer portions 216 of the back
wall 20 as will be hereinaPter described in detail.
Referrin~ to Figures 14, 15, and 16(a)-16~c),
in addition to connecting to a wall, a plurality of
cabinets 10, lOa may be placed so their back walls 20,
20a, side walls 22, 22a or a combination of back walls
and ~ide walls are in an abutting position. Cabinets
may also be placed in a perpendicular orientation,
interfacing only at a rear corner 218 of each cabinet.
lS This capability allows cabinets to be simultaneously
connected to other cabinets and a wall. These arrange-
ments facilitate placement of cabinets 10 to suit a
varîety of work environments and workstations. For
example, the four-corner connection arran~ement in
Figure 16(c) could be used where there are four modular
work spaces in which it is de~ired that each work ~pace
be~equ~pped with a ~torage cabinet 10. As illustrated
in Figures 161i) and 16(1), a conventional wall corner
piece 219 disclosed ln ~he above-referenced U.S. Patent
No. 4,571,907 to DeFouw ~t al. may be necessary to
connect the cabinet 10 to a wall panel 14 or a s~cond
cabinet.
As seen in Figures 18-24, a variety of connec-
tor~ 220, 222, 224, 226 are provided for attaching a
cabinet 10 in a particular functional arrangement with
th~ wall 14 or other cabinets lOa. An in-line connector
220 shown in Figures 18 and 19 mounts a cabinet to a
wall wherein the cabinet is either interpos~d b~tween
two walls 14 connecting to the cabinet side wall, or a
wall 14 connecting to the cabinet back wall. A face
connector 222 ~llustr~ted in Figures 20 and 21, i~ used
to mount the cabinet to a wall 14 e~tendin~ parallel to
the cabine~ back wail 20. A cent~rline connector 224,
,~
1 327382
-- 19 --
~een in Figures 22 and 23, is used to connect two
cabinets ~o a wall 14. If the cabine~s are placed back
to back, the centerline connector attaches to cabinet
adjacent side walls 22, 22a. If the cabinets are placed
side to side, the centerline connector attaches to the
cabinet kack walls 20, 20a at adjacent cabinet back wall
channels 196, 196a. Finally, a back-to-back connector
226, illustrated in Figures 24 and 25, attaches ~wo
cabinets in either a back-to-back or side-to-~ide
arrangement. A multipurpose connector 223 illustrated
in Fi~ures 25(a)-25~c) can be used to replace the face
connector 222 or back-to-back connector 226. The
connection means 12 are removably mounted to a wall
channel 1~4 or 196 and either a freestanding wall
vertical frame member 208 or a wall channel 194a or 196a
of a second cabinet lOa.
Figure~ 18-19 show the in-line connector 220
that is used for mounting the cabinet to a freestanding
wall in the configurations representatively shown in
Figures 11-12. Specifically, the in-line connector
mounts a cabinet end-on to the wall 14. The connector
220 comprises a retainer 228, a collar 230, a block 232
and a bolt 270.
~he retainer 228 comprises an annular portion
234 having a 510t 236 extending laterally from a ba~e
238 of the annular portion to form a pair of spaced
bila~eral legs 240, lower ends of which are tapered and
include ~tep portions 242. ~he annular portion further
includ2s a longitudlnally extending ~ore 244 aligned
with the slot 236. The annular portion 234 i~ prefer-
ably made of $nj~ction molded plastlc ~such as nylon).
In additlon, the retainer 228 has two bilateral arms 246
on a first face 248 o~ the annular portion on opposi~e
~ide~ of the bore 244 and aligned with the leg-~ 240.
The arms 246 are generally rectangular in ~hape and have
a 810~ 250 extanding inwardly from an ou~side edge 252
of ~ach arm 246. The inner surface 251 of the arms can
1 327382
- 20 -
be tapered to guide a bolt 270 which is used to attach
the connec~or as described below.
The collar 230 comprises a rec~angular plate
254 having a central hole 256 with a diameter slightly
greater than that of the retainer annular portion 234,
and a pair of parallel spaced flange portions 258
extending inwardly from the plate 254. Each flange 258
has a slot 260 extending along a longitudinal edge
262. The collar 230 is preferably made of injection
molded pla tic ~such as nylon).
The block 232 is rectangular in shape and has
extending therethrough a partially threaded central hole
264 of a predete~mined diameter. A substantially
rectangular channel 266 is formed in and along a centxal
transverse axis of an outer face 268 of the block and is
in registry with a hole 264. The block is pre~erably
made of metal.
In mounting the cabinet 10 to the ~reestanding
wall 14 in the arrangements using the in-line connector
220, the connector is fir~t secured to the wall 14~ The
cabinet i8 then secured to the connector thro~h either
the cabinet back or side wall chan~el~ 196, 194,
respectively.
The installation of the in-line connector is
best seen in Figure 19. To in~tall the connector 220
the collar 230 is placed over the annual portion 234.
The block 232 i~ positioned within the legs 240 and is
held in place between the legs 240, the annular portion
234 and the ~tep portions 242 by a snap fit means~
Specifically, a pair of generally rectangular protru-
sions 253 on a second annular face 249 engage the
channel 266 in block 232 to retain the block to the
retainer 228. The block 232 is rotated ~o its longi-
tudinal axis is in a vertical orientation and can be
inserted into a rectangular hole 272 located on the edge
274 o~ the freestanding wall vertical fra~e member
208. The coll~r flanges 258 are positioned so they are
within a vertical channel 276 extending along the
1 327382
- 21 -
vertical frame member edge 274. The block 232 is
rotated ninety degrees by rotating the retainer arms 246
so the block longitudinal axis lies in a horizontal
plane.
As the arms 246 are rotated, protrusions
thereon (not shown) pass over indentations 278 on the
collar 230. The arm slots 250 permit the arms 24~ to
provide a leaf spring action as they ride over the
indentations 278. This action serves as a locking
function, securing the block 232 in a horizontal
orientation.
As illustrated in Figure l9, af~er the arms 246
are rotated, they are in a vertical orientation, thereby
allowing the arms to be positioned within the cabinet
wall channel. The bolt 270 is then inserted from the
inside of the cabinet, through the retainer 228 and in~o
the block 234 to ~ecure the cabinet to the freestanding
wall. Although Figure l9 illustrates the use of the
connector 220 to attach a cabinet side wall 22 to a wall
2~ 14, the connector can also be used to attach a cabinet
back wall 20 to a vertical frame member 208 of a free-
standing wall 14. A plurality of in-line connectors 220
can be a~tached to securely fasten the cabinet lO to the
wall panel 14.
A generally U-shaped plast$c channel cover 280
can be inserted into unuscd cabinet wall channels. 194,
196. Side portions 282 of the channel cover 280 are
dimensioned so ~hey provide a compression fit into tbe
unused cabinet wall channels. A channel cover web
portion 284 is radiused outwardly from the cabinet walls
20 or 22.
Figures 20-21 illustrate the ace connector 222
and the use thereof to mount the cabinet lO to ~he free-
standing wall panel 140 Specifically, ~he face connec-
tor is used when the cabinet back wall 20 is placed
parallel to the wall 14 as representatively seen in
F~gure 13. In this configuration, the cabinet back wall
replaces wall tile~ 212 on the side of the freestanding
1 327382
- ~2 -
wall that interface~ the cabinet. A plurality of face
connectors 222 can be used to securely join the cabinet
10 to the wall frame vertical member 208~ Æach ~onnec-
tor 222 comprises first and second rectangular plate
portions 286, 288 integrally formed and positioned
perpendicular to each other, and a lug 290. The second
rectangula~ portion 288 is placed a predetermined dis-
tance from an edge 292 of the first rectangular plate
portion 286. The lug 290 is also positioned a predeter-
mined distance from the edge 292, but is on a face 294
opposite the face 296 used by the second plate portion
288. A ~hreaded bore 298 extends through the ~irst
plate portion 286 and the lug 290. An elongated slot
300 extends along the second plate por~ion 288 at a
predetermined distance from an outer edge 302 of the
second plate. The face connector is preferably made of
metal.
- The application of the face connector 222 will
now be described. Referring to Figures 13 and 21, there
is seen the cabinet 10 mounted to the face 304 of a wall
fr~me 206. To in~tall the cabinet 10, the freestanding
w~ll tiles 212 are removed from the wall frame 206. A
~ace connector 222 i~ mounted to in~ide edge~ 306 of
each frame ve~tical member 208 at both upper and lower
~5 locations of the vertical member. Specificallyr connec-
tors 222 are fastened as by screw3 30~ to the vertical
members 208 by screw~ in regi~try with aligned holes in
the connector and the vertical member. Typically, four
connectors are used to secure the cabinet to the frame
206. After the connector~ 222 are at~ached to the wall
frame vertical member, th~ cabinet 10 i5 placed adjacent
wall frame 206r aligning each connector lug 290 so they
register with the cabinet back wall channels 196.
Screw~ 310 can then be in6erted through the channel
aligned opening~ 154, 184, ~nd into each connector
threaded bore 298, thereby securing the cabinet 10 to
the wall frame 206. The panel tiles 212 are then
replaced on the panel side 312 oppo~ite the side 304
, ~
;` 1 3~7382
- 23 -
interfacing the cabinet 10. In this configuration, the
plinth 16 recess can accommodate the wall baseline cover
78, as seen in Figure 7.
A centerline connector 224, illustrated in
Figures 22-23, is used for the configurations repre~
sentatively shown in Figure~ 14 and 15. In Figure 14,
~he back walls 20, 20a, of cabinets 10, lOa abut each
other. The freestanding wall 14 extends to and termi-
nates a~ tbe interface of the abutment. In Figure 15,
side walls 22, 22a of each cabinet 10, lOa abut each
other. The freestanding wall 14 extends to and termi-
nates at the interface of the abutment. ~ plurality of
connectors 224 can be used in vertically spaced
relationæhip to securely attach the cabinets together
lS and to connect the cabinets to the terminal end of the
freestanding wall 14
Referring to Figures 22-23, the centerline
connector is generally T-shaped, compri&ing a central
retainer portion 314, a rectangular blade portion 316
rotatably attached by a hinge 326 to the central
retainer portion, and a rectangular-shaped block 318.
T~e central portion 314 is rectangular in cross section
and has bilateral flanges 320 extending along the length
of the central portion. A bore 322, oriented perpendi-
cularly to the longitudinal axi~, i8 positioned at the
center of the central portion. A trough 324 extends
longitudinally along the central portion tc facilitate a
hinge 326.
The hinge 326 pivotally connects the blade por-
tion 316 ~o the central portion 314. The rectangular
blade portion 316 extends outwardly from the hinge
location in a directaon away from the central portion
314. ~n elongated hole 328 is located at a predeter-
mined di~tance from an outer edge 330 of the bl~de
portion 316. An elongated ~lot 332 located on the blade
portion 316 extends inwardly into the same ~nd i~ in
align~ent with the bore 322 in the central portion
314. A bolt 334 extends through the bor~ 322 and into
,~
.
1 327382
- 24 -
the block 318, the latter having a threaded hole 336
through its center. Scalloped corners 338 on the block
engage pins lnot shown) extending from the central
portion 314 to orient the block vertically when the bolt
is loosened. This facili~ates removal of the connector
224 from the wall panel vertical frame member 208.
During installation, rotation of the bolt 334 causes the
block 318 to rotate until non-scalloped corners 339 of
the block 318 abut the block pins ~not shown). By ~his
abutment, the block is oriented so it cannot be with-
drawn from the vertical frame member 208 after the
connector is installed as described below. To assure
that the block 318 will properly rotate with the bolt
334, the outermost or innermost thread of the threaded
lS hole 336 may be deformed slightly. However~ the amount
o~ de~ormation must be limited so the bolt 334 can
continue to be tightened or loosened after the block 318
engages the central portion pin~ ~not shown). The
centerline connector 224 is preerably made of a metal
such as aluminum.
The oper~tion of the c~nterline connector 224
will now be described. The bl~de portion 316 is rotated
50 it is adjacent one of th~ flange portions 320. The
connector 224 is secured to the freestanding wall
vertical frame member 208 with the bolt 334 and block
318 in a manner similar to that of the in-line connector
220 as described above. 5peci~ically, the bolt 334 is
inserted through the bore 322 and threaded in~o block
318. With the block oriented with its longitudinal axis
extending vertically, the centerline connector central
portion 314 is inserted into the freestanding wall
vertical frame member channel 276 80 the block 318
extends through the channel hold 272. The bolt 334 is
~ightened, thereby rotating the block ninety degrees so
the non-scalloped corners 339 enga~e the central portion
pins (not shown). In ~his positlonr th~ block ~18
cannot be wi~hdrawn from the channel hole 272. The
1 327382
centerline connector 224 is thereby fastened to the wall
vertical frame member 208.
The next step in attaching the centerline
connector 224 is to place two adjacent cabinets 10 and
lOa so their back walls 20, 20a or side walls 22, 2~a
can be secured togetherO Figures 14 and 23 illustrate
the use of the connector 224 to attach adjacent side
walls 22, 22a together. ~owever, the procedure i~
identical for connecting adjacent back walls 20, 20a a~
illustrated in Figure 15. As seen in Figures 14 and 23,
the two cabinets 109 lOa are placed so the side wall
channels 194, 194a are aligned and having the blade
portion 316 of the connector 224 positioned between the
side walls so the slot 328 aligns with channel openings
159 and 150a and flange openings 186 and 186a. A bolt
340 is inserted through aligned cabinet openings 150,
186, 150a, 186a and ~lot 328 and ~ecured with nut 342.
A plurality of centerline connectors 224 can be used in
vertical relationship to securely fa~ten the cabinets 10
and lOa and fLeestanding wall 14 together.
Di~a~sembly o~ the centerline connector 224 is
carried out ~y reversing the above-described steps.
When the bolt 334 i~ loosened, the block 318 rotates so
~he scalloped corners 338 engage the central portion
~5 pins (not shown). In this position the block 318 is
orlented vertically, thereby enabling the connector 224
to be withdrawn from the vertical frame member 20~.
The back-to-back connector 226 ~een in Figure
24-25 i~ used to connect two adjacent cabinet~ 10 and
lOa together without requiring the cabinets to be
mounted to a freestanding wall panel as representatively
illustrated in Figure 16~d)~ It can alsQ be used if the
cabinets are in a back-to-back arrangement having only
one wall 14 connected to th~ cabinet pair, as ~een in
Figure 14. Specifically, the connector 226 is used at
the pair of back wall channels on the opposite side of
the cabinets rom the free~tanding wall. The cabinets
may be attached in a back-to-back or 2 side-to-side
. ~
1 3273~2
- 26 -
orientation with the connector 226. The back~to-back
connector comprises a rectangular portion 344 and
resilient arms 352 forming a channel 346. The
rectangular portion 344 has a vertically oriented elon-
gated hole 348 in the center portion 350 and aligned
with the channel 346. The resilient arms 352 have an
outwardly canted portion 354 and an inwardly canted
portion 356. The channel arms 352 are dimensioned so
the connector 226 fits snugly by a compression fit in
the cabinet channels 194 or 196. The channel arms 352
function to hold the connector 226 in place during
attachment of the cabinets 10 and lOa. The back-to-back
connector i~ preferably made of a pla~tic ma~erial and
functions to prevent adjacent walls of the cabinets ~rom
scraping against each other. Specifically, the
rectangular portion 344 spaceæ the adjacent ~abinet
walls 20 and 20a, or 22 and 22a apart.
The operation of the back-to-back connec or 226
will now be described. In the back-to-back arrangement,
connector~ 226, 226a are placed in adjacent back wall
channels 196, 196a on each cabinet 10, lOa. In the
~ide-to-side arrangement, connectors 226, 226a are
placed in adjacent side wall channels 194, 194a on each
cabinet 10, lOa. As ~hown in Figure~ 24 and 25, adja-
cent connector~ 226, 226a form a pair. For each pair of
connector~, a bolt 358 i8 inserted from the ~nside of
the first cabinet 10, through aligned channel openîng~
150, 186 or 154, 184, through hole 348 in each connec-
tor 226, 226a and into the second cabinet lOa through
align~d cbannel openings 150a, 186a or 154a, 184a. The
bolt 358 is threaded onto a nut 360, thereby securing
the cabinets 10 and l~a together. ~ plurality of back-
tQ-back conn~ctors 226 can be used to 3ecurely fasten
the cabinet 10 and lOa together. Although Figure 25
~llustratQs the use of connector 226 for u~e with
adjacent back walls 20, 20a, the installation pro~edure
is identical or connecting ad~acent cabinet ~ide walls
22, 22a.
1 327382
Referring to Figure 25~a), the multipurpose
connector 223 provides an alternate connection means for
the face connector 222 or back-to-back connector 226.
The connector 223 comprises a gen~rally rectangular
shaped elastomeric pad having a central elongated hole
225 and a pair of circular apertures 227, 22g set in
coaxial relationship to the longitudinal axis of hole
225. The apertures 227, 229 are positioned near
opposite sides of hole 225 at a predetermined
location. A pair of colinear openings 231 are positioned
on opposite sides of aperture 227 at predetermined
locations and positioned so a line extending between
the centers of openings 231 is perpendicular to the
longitudinal axis of the elongated hole 225. One
face of the elastomeric pad connector 223 has attached
thereon a layer of adhesive.
Tc mount the multipurpose connector 223 as a
face connector, the connector 223 i~ positioned on the
wall panel vertical frame member 208 so the apertures
227, 229 align with vertical fram~ member holes 215 an~
80 the aperture 227 is located above aperture 229. rhe
adhesive serves to hold the connector in place.
A pilot hole tnot shown) i~ drilled through the
vertical frame member 208 by using the opening 231 that
is on the inside relative to the wall panel frame 206 as
a guide.
~s illustrated in Figure 25(b), after the
cabinet 10 i~ positioned adjacent to the wall panel
frame, a self-tapping screw 233 is inserted ~rom inside
the cabinet through the pilot hole to fasten the cabinet
to the wall frame. A plurality of connectors 223 may be
attached to both ver$ical frame members 208 to securely
fa ten the cabinet 10 to the frame 206.
In add~tion to functionîng as a connec~or
means, connector 223 operate~ to space the cabinet 10
from the wall panel frame 206 to avoid any scraping
damage to the cabinet ~ack wall 20~
.~
1 327382
- 28 ~
As ~een in Figure 25~c), the multipurpose
connector 223 also functions as a substitute for the
back-to-back connector 226. Specifically, the connector
223 is mounted over the side wall channel 194 or back
wall channel 196 of a first cabinet 10 with ~he adhesive
covered connector face holding the connector to the
cabinet. The connector is positioned so the elongated
hol~ 225 aligns with the applicable channel aligned
openings 150, 186 or 154, 184~ After a second cabinet
lOa is placed adjacent to the first cabinet, a bolt 359
is inserted through ~he alisned channel openings of the
first cabinet 10, through connector hole 225, and
through the aligned openings of the second cabinet lOa
and secured by a nut 361~
In addition to securing the cabinets together,
the connector 223 operates to ~pace the cabinets apart,
thereby preventing any scraping damage to the
interfacing ~abinet walls. A plurality of multipurpose
connector~ 223 may be used in each set of aligned
cabinet side wall channels 194, 194a or back wall
channels to securely fasten the cabinets together.
Another alternative em~odiment (not shown) for
the face connector 222 and back-to-back connector 226
comprises a layer of tape having adhe~ive on one face.
The tape has a thicknes~ of approximately 1~8 inch and a
width of approxima~ely 1/2 inch. As a means of
replacing the face connector 222r a strip of tape is
placed vertically along the cabinet back wall 20 near
each outer end thereof. The cabinet can then be secured
to the wall panel vertical frame members 208 by using
the cabinet channel opening~ as a guide to drill holes
in the frame member 208. Sel-tapping screws ~re then
inserted through the channel opening~ ~nd the wall frame
holes to ~ecure the cabinet to the wall frame. The tape
functions to space the cabinet 10 from the wall frame
206.
~ccsrding to thi~ alternative embodiment, the
back~to-back connector 226 can be replaced by placing a
~.~
1 327382
- 29 -
layer of tape on the cabinet so it extends vertically
near the outer ends of one of the inter~acing cabinet
walls. The cabinets are then placed adjacent to each
other. The adhesive serves to space the cabinets apart
so they are not subject to scraping damage. The
cabinets are secured together by installing bol~s 358
and nuts 360 as described above for the back-to-back
connector 226.
The front doors 26 are mounted to the cabinet
front vertical frame members 122. The doors are
rectangular in shape, having handles 362 located on
inner door edges 364. A conventional hinge means (not
shown) is used to rotatably mount the doors to the front
vertical rame members. The doors are preferably made
of a sheet metal or a wood laminated door having either
a honeycombed or a solid core construction.
The cabinet interior 24 serves as an enclosed
storage area and is adaptable to a variety of storage
needs. The ver~ically spaced holes 158 in the rear
vertical frame members 124 mount braGkets to enable
item~ such as shelving to be placed in the cabinet 10.
Adjustable shelving adaptable to insertion on
the cabinet back wall 20 is illustrated in Figures 27
and 29. A ~helf 450 comprises a base portion 452, two
side walls 454, and a plurality of downwardly depending
hooks 458 on an inner edge 460 of each shelf side wall
454. The shelf may further comprise a rear wall 456.
The holes 158 serve as mating ~lots for the shelf hooks
45a~ By thiæ hook and slot means, the shelves 450 can
be hung along the cabine~ back wall ~0~ An uppermost
shelf hook 462 i5 lar~er than the remaining hooks 458
and has a protruding portion 464. This feature facili-
tates the ea~e of inserting the shelf 450 into the holes
158. The protruding portion 464 engages the 810ping
portion 160 of the rear vertical from member 124 to
guid~ the uppermost hook ~62 into its mating hole 158.
The remaining hooks 458 can then be ea~ily inserted into
their mating hole~ 1$8. Figure 27 al~o illustrates the
1 327382
- 30 -
use of optional pocke~ing means 532 to pocket the doors
26 within the cabinet 10.
As seen in ~igures 27 and 2~, a plurality of
rows of square holes 466 located on the shelf base 452
and side walls 454 engage with downwardly depending
hoGks 467 on accessories such a a bookend 468 to hold
the acce~sories in place on the shelf 450. The shelves
450 may be fitted with tracks ~not shown) on the shelf
bottom surface to slidably mount wireform storage bins
~not shown) to the shelf bottom surface.
In an embodiment seen in Figure 27, a drawer
476 is slidably mounted on a pair of conventional drawer
slides (not shown~ mounted on the cabinet vertical frame
members 122, 124. The drawer 476 is uæed to hang file
folders or stores articles.
As illustrated in Figure 29, by adding an addi-
tional slotted rail 480 in the central portion 482 of
the baek wall 20, shelving 450 extending only partially
across ~he width of the cabinet 10 may be installed.
20 This configuration facilitate~ storage of long objects
such as a broom as well as placement of hanging storage
bins 484.
Embodiments displayed in Figures 30 and 31
reveal hanging rods 486 and fixed shelving 488 securely
fa~tened as by a bolt ~not shown) to the interior
portion 24 of the cabinet 10. A wardrobe cabinet
embodiment 490, shown in Figure 33, has a hanging rod
486 attached to the upper portions 492 of the cabinet
side wall inner ~aces 494 by means of conventional
3Q fasteners ~not shown).
A variation of the wardrobe embodiment has a
hanginy rod 486 and fixed shelving 488 as ~hown in
~igure 34. In thi~ embodiment r the hanging rod 486 is
attached by anysuitable mechanical means to and between
a cabin~t ~ide wall 22 and an upper portion 49a of a
shelving ~ide wall 500. The shelving is comprised of
the side wall 500r and vertically spa~ed shelve~ 502~
"
1 327382
- 31 -
~he cabinet side wall 22 not attached to the rod 486
functions as the second side wall fo~ the shelving 4880
The cabinet interior 24 can include hanger
rails 504 fitted onto the cabinet back wall 20 as illus-
trated in Figure 32. The hanger rail 504 is similar to thatdisclosed in the U.S. Patent No. 4,618,192 to Kelley
issued Octo~er 21, 1986. The rails 504 comprise
hooks (not shown) which are inæerted into the vertical
frame member holes 158. Articles such as hanging hooks
508 or bins 510 can be hung from the hanger rail 504.
An optional work surface 512, preferably made
of a wood veneer or laminate construction, removably
attaches to the cabinet 10 as illuætrated in Figure~ 33
to 36. Specifically, the work surface can be mounted to
the back wall channels 196 of a cabinet 10 as
illustrated in Figure 33ta), o~ to adjacent back wall
channels or side wall channels for a pair of cabinet~
10, lOa in a back-to-back or side-to-side configuration,
respectively, as illustrated in Figures 33(b) and ~G) .
An example work surface 512 i8 rectangular in shape and
i5 supported on the floor by two legs 514 mounted to an
outer end 516 of the work surface. The work surface 512
has securely mounted to and extending along the inner
~dge 520 thereof, a double channel member 52~. The
first channel 524 is open toward the top. The second
channel 526 is open toward the cabinet 10 ~nd co~prises
a pair U-shaped leg portions 528 and a straigh~ web
portion 530.
For the single cabinet attachment shown in
Figure 33Sa), the work surface 512 is mounted to the
cabinet 10 by a pair of fir~t work surface connectors
518 fastened to and between the work sur~2ce and the
cabinet b~ck w~ll channels 196. As illustrated in
Figure 35, the conne~tor 518 comprise~ a rectangular
metallic plate 532 with a flange 534 extending along one
end 536 thereof. An internally threaded stud 538
centared on the plate 532 and ~xtend~ng outwardly in a
direction opposite flange 534 is rigidly mounted ~o the
1 327382
plate. To secure the work surface 512 to the cabinet
10, a connector 518 is inserted within the second
channel 526 a~ each end thereof so each stud 538 extends
toward the cabinet and the flanges 534 engage the
channel web 530. The studs 538 are inserted into the
aligned openings 154, 184 in back channels 196, and are
secured in place by a threaded bolt ~not shown). In
this manner, the work surface 512 can be attached to the
back wall 20 of a cabinet 10.
For attachment of the work surface 512 to a
pair of cabinets 10 and lOa that are joined in a back
to-back or side-to-side confîguration, a second work
~urface connector 519 is used. As illustrated in Figure
36, the connector 519 comprises a rectangular plate 521
having a generally U-shaped cross member 523 rigidly
fastened at a first end 525 o~ the plate 521. The cross
member 523 i~ mounted so its longitudinal axis i8
perpendicular to the longitud$nal axis of the plate
521. Flanges 527 extend along the lateral edges 529 of
the cro~s member. Threaded holes 531 are positioned
near each corner of the plate 521. ~he holes 531 near
the first end 525 of plate 521 al50 extend through a web
portio~ 533 of the cross member 523.
To mount the work surface 512 to the cabinets
10 and lOa shown in Figures 33(b) and 33(c), the second
work surface connector 519 i8 slidably mounted to the
work surface 512. Specifically, the connector flanges
527 are slidably mounted within the U-shaped leq
portions 528 of the work surface double channel member
5~2. The threaded holes 531 of connector 519 are
aligned with the adjacent cabinet ~ack wall channels
196, l9~a for cabinets in the side-to-~ide configuration
of ~igure 33~b) or to adjacent cabinet side w~ll
channels 194, 194a in the back-to-back configuration of
Figure 33(c). Bolts 535 are inserted from each cabinet
through the openings in channels 1949 194a or 196, 196a
and into the connector threaded holes 531. Alterna-
tively, the second work ~urace connector 519 c~n be
1 327382
mounted to the cabinets prior to slidably mounting the
work surface 512 to the connector 519.
Referring to Figure 37, there is seen an
embodim~n~ displaying a plurality of cabinets 10 and
horizontal rails 626 comprising a fence arra~gement
628. Specifically, vertically spaced horizontal rails
626 mount to a plurality of cabinets 10. The horizontal
rails 626 are attached to the cabinets by having a
plurality of vertical members 630 securely mounted to
and between cabinet wall channels 194 or 196 and the
horizontal rails 626 by any ~uitable mechanical means.
Cabinets 10 may be manufactured having
different heights and widths as shown in Figure 38.
Therefore, cabinets can be arranged so they are higher,
shorter, or the ~ame height as adjacent frees anding
walls or cabinets.
Referring to all the drawings, the overall
operation of the cabine 10 wi11 now be described.
First, the type of functional arrangement between the
cabinet 10 and the freestanding wall 14 and~or sther
cabinets lOa is determined. If re~uired, wall tiles ~12
are removed and any necessary holes drilled in the free-
standing wall vertical frame member~ 208. Appropriate
co~nectors 220, 222, 2240 226 are selected for the
cabinet arrangement ~nd installed.
In summary, the cabinet 10 can be manufactured
in various sizes and can be fitted with various compo-
nents to perform a variety of functions. The cabinet
may be fitted with shelving, a slidable drawer, hanger
rails, wardrobe hanging rod~, electrical wiring to
operate accessories, a lock for locking cabinet doors
and an exterior work surface. In addition to being
incorporated into a workspace man~gement system? a
plurali~y of cabinets can be connected in a fence
arrangement.
A cabinet 10 can be attached to other cabinets
or to a freestanding wall 14 in a variety of functional
~rrangements by using an appropri~te connector. The in~
1 327382
- 34 -
line connector 220 attaches a cabinet 10 end-on to a
freestanding wall. The face connector 222 connects a
cabinet to a face 304 of a freestanding wall. The
centerline connector 224 attaches a pair of cabinets to
a freestanding wall. Finally, a back-to-back connector
226 connects two adjaoent cabinets.
While the invention has been described in
connection with the preferre~ embodiment, the invention
is not limited to that embodiment. To the contrary, the
invention extends to all reasonable varia~ions and
modifications and equivalents aæ are included within the
spirit and scope of the invention as defined by the
appended claims.
.
;~ ~