Language selection

Search

Patent 1336546 Summary

Third-party information liability

Some of the information on this Web page has been provided by external sources. The Government of Canada is not responsible for the accuracy, reliability or currency of the information supplied by external sources. Users wishing to rely upon this information should consult directly with the source of the information. Content provided by external sources is not subject to official languages, privacy and accessibility requirements.

Claims and Abstract availability

Any discrepancies in the text and image of the Claims and Abstract are due to differing posting times. Text of the Claims and Abstract are posted:

  • At the time the application is open to public inspection;
  • At the time of issue of the patent (grant).
(12) Patent: (11) CA 1336546
(21) Application Number: 1336546
(54) English Title: METHOD AND APPARATUS FOR PREPARING A SUSPENSION FOR MEASUREMENT
(54) French Title: METHODE ET APPAREIL DESTINES A LA PRESENTATION D'UNE SUSPENSION DEVANT ETRE MESUREE
Status: Expired and beyond the Period of Reversal
Bibliographic Data
(51) International Patent Classification (IPC):
  • G01N 1/28 (2006.01)
  • G01N 1/38 (2006.01)
  • G01N 21/85 (2006.01)
  • G01N 33/34 (2006.01)
(72) Inventors :
  • SODERLING, PETER (Sweden)
(73) Owners :
  • STFI
(71) Applicants :
  • STFI (Sweden)
(74) Agent: GOWLING WLG (CANADA) LLP
(74) Associate agent:
(45) Issued: 1995-08-08
(22) Filed Date: 1988-12-30
Availability of licence: N/A
Dedicated to the Public: N/A
(25) Language of filing: English

Patent Cooperation Treaty (PCT): No

(30) Application Priority Data: None

Abstracts

English Abstract


Method and apparatus for preparing a suspension for sample taking in a
measurement section formed as a gap. The suspension provided with
energy in a gap (10) immediately preceding the measurement section (11),
which is enabled by the gap (10) being formed between a part (9) of a
rotational body (4) and a part (5) surrounding it. These parts (9,5)
are movable in relation to each other.


Claims

Note: Claims are shown in the official language in which they were submitted.

THE EMBODIMENTS OF THE INVENTION IN WHICH AN EXCLUSIVE
PROPERTY OR PRIVILEGE IS CLAIMED ARE DEFINED AS FOLLOWS:
1. Method of preparing a suspension for sample taking in a
measurement section formed like a gap, characterised in that the suspension is
supplied with energy in a second gap immediately preceding the measurement
gap.
2. Method as claimed in claim 1, characterised in that energy is
supplied in the second gap which has width less than that of the measurement
section.
3. Method as claimed in claim 1 or 2, characterised in that energy is
supplied by the suspension being subjected to pressure and by the defining
surfaces of the second gap being caused to move relative each other.
4. Apparatus for carrying out the method in accordance with claim
1, for preparing a suspension for sample taking in a measurement section formed
like a gap, characterised in that immediately preceding the measurement gap
there is arranged a second gap which is formed between a part of a rotational
body and a part surrounding the body, said parts being movable in relation to
each other.
5. Apparatus as claimed in claim 4, characterised in that the second
gap between the parts has a width less than that of the measurement gap.
6. Apparatus as claimed in claim 5, characterised in that the
rotational body is implemented as an impeller with the part forming one side of
the second gap arranged at the peripheral outlet edge of the impeller.
7. Apparatus as claimed in claim 5, characterised in that width of the
measuring gap is about 1mm.

-5-
8. Apparatus as claimed in claim 7, characterised in that the part of
the rotational body and forming one side of the second gap, is formed with flutes
or ridges.
9. Apparatus as claimed in claim 8, characterised in that the
measurement gap together with the narrower second gap preceding it mutually
form an angle.
10. Apparatus as claimed in claim 9, characterised in that the part of
the rotational body forming one side of the second gap constitutes the curved
surface of a truncated cone, and in that the measurement gap lies in a plane
perpendicular to the rotational axis of the rotational body.

Description

Note: Descriptions are shown in the official language in which they were submitted.


-1- t336546
Method and Apparatus for Preparing a Suspension for Measurement
The present invention relates to a method and apparatus for preparing a
suspension for sample taking in a measurement section formed as a gap.
In handling suspensions, there is a need of continuously checking the
composition of a suspension, e.g. measuring size distribution in it,
separating different kinds of particles or measuring the concentration
of one kind of particle. Conventionally, in tbe techniq~e in question
here, an optical method ordinarily with the aid of photocells is used to
carry out this checking, monitoring or measurement of the suspension.
~rom the laboratory aspect, there are no substantial problems in such
measurement, even in the case where the particles flocculate easily, e.g.
in suspensions containing artificial or natural fibres. The problems
occur in the intermittent or continuous measurement of a suspension
directly in the industrial process, e.g. paper manufacturing. In these
cases there is a pressing requirement of being able to measure the fibre
concentration in such as papermaking stock. For this purpose it is at
present necessary to process and measure samples of the suspension taken
intermittently from the process. Measurement difficulties increase with
dense or concentrated suspensions, and in such cases it is very often
necessary to dilute the suspension before measurement. The measurement
process is at present distinguished by complicated apparatus, which
even so does not permit taking measurements directly in the process.
It is possible with the aid of the present invention readily to analyse,
either intermittently or continuously~the suspension being treated in
the process at the place and time required, thus to obtain a picture of
the appearance of the suspension at that moment. For this purpose the
invention has been given the distinguishing features disclosed in the
claims.
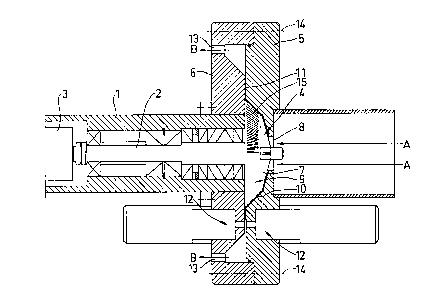
The invention will now be described in the form of an example, and with
reference to the drawing, schematically illustrating in section an
embodiment of the apparatus in accordance with the invention.
In the Figure, the numeral 1 denotes a casing, carrying via bearings a
shaft 2 driven by a motor 3. On the end of the shaft remote from the
, ~ ~`'`tf~

1 336546
2.
motor there is disposed an impeller 4 which, when driven by the motor,
rotates in a housing formed in two parts 5 and 6. Further to the shaft
bearings in the casing 1, the shaft is also sealed by suitably arranged
seals, although neither seals or bearings will be dealt with here, since
they are included in the known state of the art.
The impeller 4 is provided with blades 7 on its side facing towards an
inlet 8. The impeller 4 also has a peripheral part 9 formed as the
curved surface of a trucated cone. Together with the housing part 5
this peripheral part 9 forms a narrow gap 10. Similarly, when the parts
have been assembled with the aid of screws or the like, indicated by
the numeral 14, a second gap 11 is formed. This gap 11 is the measurement
gap of the apparatus, and can have a width of 1 mm for example. It will
be understood that it is in this measurement gap that measurement of the
sospension is performed. An optical measurement means is illustrated in
the Figure, and includes a light source and photocell, generally denoted
by 12.
In order to measure suspensions of different kinds, particularly in the
case where the suspension particles tend to flocculate, e.g in artificial
or natural fibre suspensions, it is necessary to disintegrate the
flocculations and distribute the fibres as uniformly as possible in the
suspension~if reliable measurement of desired parameters is to be possible.
However, it is not sufficient with this disintegration and uniform dis-
tribution; measurement must take place before flocculation reoccurs,
which can happen very rapidly, particularly with heavy concentrations.
The consequence of this has been that it has so far not been possible to
measure the suspension directly in a process, e.g. that of producing
paper pulp, and samples have had to be taken from the process for prep-
aration, dilution etc.
By the present invention it has become possible also to measure concen-
trated suspensions taken directly from the process, e.g. by the
suspension being drawn off via a shunt connection. Connection of the
apparatus into the process is not discussed in more detail other than
that a fibre suspension flows through the inlet 8 in the direction of
the arrows A in the Figure. The impeller 4 with its blades 7 urges the
suspension through the gap 10. In this gap the suspension has a relatively
'.~

1 336546
3.
high pressure and the fibres are sujected to beating and slushing,
which takes places immediately prior to the suspension reaching the
measurement gap 11. In the latter there is thus a homogenous suspension
in which the fibres are distributed optimally. A very good measurement
result is thus obtained. For the apparatus to function well, the gap
between the peripheral part of the wheel 4 and the housing part 5
should be narrower than the actual measurement gap 11. The suspension
leaves the housing 5,6 via peripherally distributed outlets 13, as
indicated by the arrows B.
The peripheral part of the impeller 4 can be smooth, or it can be
provided with a plurality of fine flutes or ridges, as indicated on one
half of the impeller and denoted 15.
A further supply of energy to the suspension for disintegrating floccu-lation is also acheived by the measurement gap 11 forming an angle to
the other gap 10 between the housing part 5 and impeller 4.
The measuring methods themselves as such do not form any part of this
invention, and measurement may concern such as size distribution of
particles, separation of different kinds of particles, concentration of
one kind of particle, photographing of particles etc. It will also be
understood that several measurement means can be distributed
round the housing and measurement gap 11, for registering different
parameters, if so desired. However, for the sake of simplicity only one
measurement means has been depicted on the drawing.
f~

Representative Drawing
A single figure which represents the drawing illustrating the invention.
Administrative Status

2024-08-01:As part of the Next Generation Patents (NGP) transition, the Canadian Patents Database (CPD) now contains a more detailed Event History, which replicates the Event Log of our new back-office solution.

Please note that "Inactive:" events refers to events no longer in use in our new back-office solution.

For a clearer understanding of the status of the application/patent presented on this page, the site Disclaimer , as well as the definitions for Patent , Event History , Maintenance Fee  and Payment History  should be consulted.

Event History

Description Date
Inactive: IPC expired 2024-01-01
Inactive: IPC from MCD 2006-03-11
Time Limit for Reversal Expired 2001-08-08
Letter Sent 2000-08-08
Grant by Issuance 1995-08-08

Abandonment History

There is no abandonment history.

Fee History

Fee Type Anniversary Year Due Date Paid Date
MF (category 1, 2nd anniv.) - standard 1997-08-08 1997-06-27
MF (category 1, 3rd anniv.) - standard 1998-08-10 1998-07-10
MF (category 1, 4th anniv.) - standard 1999-08-09 1999-07-13
Owners on Record

Note: Records showing the ownership history in alphabetical order.

Current Owners on Record
STFI
Past Owners on Record
PETER SODERLING
Past Owners that do not appear in the "Owners on Record" listing will appear in other documentation within the application.
Documents

To view selected files, please enter reCAPTCHA code :


To view images, click a link in the Document Description column. To download the documents, select one or more checkboxes in the first column and then click the "Download Selected in PDF format (Zip Archive)" or the "Download Selected as Single PDF" button.

List of published and non-published patent-specific documents on the CPD .

If you have any difficulty accessing content, you can call the Client Service Centre at 1-866-997-1936 or send them an e-mail at CIPO Client Service Centre.


Document
Description 
Date
(yyyy-mm-dd) 
Number of pages   Size of Image (KB) 
Abstract 1995-08-08 1 11
Representative drawing 2002-05-16 1 18
Cover Page 1995-08-08 1 16
Claims 1995-08-08 2 52
Description 1995-08-08 3 130
Drawings 1995-08-08 1 34
Maintenance Fee Notice 2000-09-05 1 178
Prosecution correspondence 1991-07-25 2 46
Prosecution correspondence 1994-09-09 1 33
Examiner Requisition 1994-08-09 2 70
Examiner Requisition 1991-04-11 1 51
PCT Correspondence 1995-04-28 1 42
Courtesy - Office Letter 1989-03-31 1 27