Note: Descriptions are shown in the official language in which they were submitted.
CA 02526149 2005-11-16
WO 2004/104754 PCT/US2004/015169
SYSTEM AND METHOD FOR MANAGING AN ENDOSCOPIC LAB
BACKGROUND OF THE INVENTION
Field of the Invention
The present invention relates generally to imaging systems and
workstations for medical applications, and particularly an system designed to
support the entry, by various users associated with an endoscopic laboratory,
of
information and data including the capture, processing and storage of
endoscopic
images during an endoscopic exam, and especially for managing workflow for all
user roles pertaining to the endoscopic laboratory, from registration and
scheduling
2 0 of patient information through pre-procedure, procedure and post-procedure
phases
through the generation of procedure notes via an integrated user interface.
Discussion of the Prior Art
2 5 There currently exists a prior art clinical information management
systems that manages patient examination data at different phases of patient
care.
Typically, however, for the case of endoscopic laboratories for
performing endoscopic procedures, a variety of system programs and interfaces
are
used to support the management of patient related examination information,
3 0 including a separate program that function to schedule patient's exams and
visits and
separate programs that capture examination related information at various
endoscopic procedure lifecycle stages, e.g., from pre-procedure through post-
CA 02526149 2005-11-16
WO 2004/104754 PCT/US2004/015169
procedure. At best, the cuxrent clinical management system platforms for
endoscopy
comprise a single media platform providing standard graphics features and
image
capture and presentation features.
Moreover, such prior art clinical information management systems do
not accurately support and manage the workflow of all users having roles
pertaining
to an endoscopic laboratory.
It would therefore be highly desirable to provide a clinical
information management system for an endoscopic lab with reporting features,
that
manages and organizes clinical information, endoscopic images and related
patient
data, at various levels of detail, for creating efficiencies and facilitating
functions
performed by users of endoscopic equipment, e.g., physicians, nurses,
clinicians,
schedulers, etc., based on their roles. Integral to this management system is
the
enablement of real-time data capture and presentation of endoscopic images and
related examination data (e.g., patient ID, practitioner information,
endoscope ID
type).
It would be highly desirable to provide an integrated interface for an
endoscopic laboratory that supports and manages the workflow of all users
based on
their different roles to access the database contents associated with those
roles and
further, a system that will automatically configure the interface screen
depending
2 0 upon the role of the person logged in to the system.
It would additionally be highly desirable to provide a clinical
information management system designed for the practice of endoscopy that
provides for the secure, remote access of patient and exam related information
by
physicians through a web-enabled interface.
SUMMARY OF THE INVENTION
Accordingly, it is an object of the present invention to provide a
novel clinical information management system designed for the practice of
3 0 endoscopy that supports and manages the workflow of all users having roles
pertaining to an endoscopic laboratory, and particularly, the execution of an
endoscopic procedure performed upon a patient, sequentially, through various
2
CA 02526149 2005-11-16
WO 2004/104754 PCT/US2004/015169
lifecycle stages associated with the endoscopic practice. Preferably, the
workflow
processes associated with these lifecycle stages are flexible enough to
support small,
independent endoscopic practices and endoscopic departments that are integral
to
large healthcare institutions.
Further, it is an object of the present invention to provide a clinical
information management system designed for the practice of endoscopy that
supports the flow of a patient and related information through the various
lifecycle
stages associated with the endoscopic practice, each stage representing a
grouping of
related activities. Thus, users of the system can, at appropriate points in
the
lifecycle, capture, process, and generate reports on all the required
endoscopy
information. The information captured at the different stages is managed by
the
system application and processed to create medical records, produce reports,
and
provide necessary information to perform exams, etc.
As a patient typically follows the lifecycle stages in sequential order:
from registration and scheduling of patient information through pre-procedure,
procedure and post-procedure phases of an endoscopic examination, the present
invention supports the entry, by various users associated with an endoscopic
laboratory, of information and data including the processing and storage of
endoscopic images captured during an endoscopic exam of a patient, for
association
2 0 with a patient record stored in a database, and facilitates the generation
of procedure
notes and other reports that include the stored images, all via an integrated
user
interface.
Further, according to the invention, the clinical information
management system designed for the practice of endoscopy facilitates the
tracking
2 5 of each patient's state (such as what stage of the process the patient is
in, what
information has already been captured, and which information is yet to be
captured)
and enables the basic lifecycle to be followed so that clinical staff can
ensure that all
required information is in place prior to implementing the next stage. Thus,
the
clinical information management system designed for the practice of endoscopy
3 0 according to the invention implements a set of business rules encouraging
a
particular order of activities based on the current state of the patient. Via
these rules,
3
CA 02526149 2005-11-16
WO 2004/104754 PCT/US2004/015169
the system incrementally captures all relevant information associated with the
patient and orchestrates interactions with all users including physicians,
nurses,
schedulers and system administrators while providing the services necessary to
perform all required actions.
The invention further supports the flow of a patient and related
information through the various phases associated with the endoscopic
practice,
which includes: scheduling, patient file management, pre-procedure, procedure,
and
post-procedure phases. The system interface is integrated, yet allows the
physician
to reduce the time associated with producing procedure notes. For example, it
provides alerts while incorporating annotated and labeled images into written
reports.
The invention further provides a multi-media platform for clinical
documentation. By integrating image capture and advanced graphics with an
endoscopic medical knowledge base, the system of the present invention
generates
complete Procedure Notes and related documents. The system further automates
the
endoscopy clinic by managing patient examination schedules and equipment
inventories while controlling "paper management."
The invention further provides for secure, remote access of patient
and exam related information by physicians through the integrated, web-enabled
2 0 system interface.
Thus, according to the preferred aspects of the invention there is
provided a system and method for managing information flow in an endoscopy
laboratory including a computer device, the laboratory adapted to enable users
to
perform endoscopic procedures upon patients, the method including: inputting
2 5 patient information and setting up schedules for endoscopic examinations
via the
computer device during a registration phase of care; inputting preparatory
examination information relating to the patient via the computer device prior
to
performing the procedure; inputting information during performance of the
procedure including the real time endoscopic image capture via the computer
device;
3 0 inputting information regarding the patient via the computer device after
4
CA 02526149 2005-11-16
WO 2004/104754 PCT/US2004/015169
perfoi~nance of the procedure; storing the input registration and scheduling
information, preparatory information, captured images obtained during the
procedure, and post-procedure information regarding the patient in database
records;
organizing presentation of information included in the database records and
managing access to the information and images stored in the database records
via an
integrated user interface associated with the computer device, the
presentation and
access controlled according to a user's role, wherein full support for the
full flow of
a patient and related information is provided through various phases
associated with
all users involved in an endoscope practice.
Advantageously, the based clinical information system designed for
the practice of Endoscopy enables physicians and other medical personnel to
utilize
clinical records created directly from their procedures. It enhances clinical
workflow, reduces time and cost, miniuaizes errors and enables interaction
among
disparate hospital information systems.
Moreover, the based clinical information system designed for the
practice of Endoscopy according to the invention enables reduced equipment
maintenance costs through the automation of equipment use and maintenance
tracking.
Further benefits include, the inclusion of procedure reports in the
2 0 organization's electronic medical record and, the automating the exchange
of
procedure and pathology information eliminating medical errors and paper-based
processes.
BRIEF DESCRIPTION OF THE DRAWINGS
2 5 The objects, features and advantages of the present invention will become
apparent to one skilled in the art, in view of the following detailed
description taken
in combination with the attached drawings, in which:
Figure 1 (a) illustrates an overview of an endoscopic examination system
according to the invention;
5
CA 02526149 2005-11-16
WO 2004/104754 PCT/US2004/015169
Figure 1(b) depicts generally the endoscopy lab for obtaining, processing and
displaying of real-time endoscopic images in which the comprehensive, clinical
information management system of the present invention is employed;
Figure 2 illustrates a high-level Registration and Scheduling business
worleflow diagram depicting functionality enabled by the system application
according to the invention;
Figure 3 illustrates a high-level Pre-Procedure clinical flow diagram
depicting functionality enabled by the system application according to the
invention;
Figure 4 illustrates a high-level Procedure clinical flow diagram depicting
functionality enabled by the system application according to the invention;
Figure 5 illustrates a high-level Post-Procedure clinical flow depicting
functionality enabled by the system application according to the invention;
Figure 6 illustrates a Home tab user interface according to the invention;
Figure 7(a) illustrates a Patient File tab user interface according to the
invention;
Figure 7(b) illustrates a Patient Demographics interface screen enabling
functionality for recording all patient demographics information;
Figure 7(c) illustrates Medical Alerts interface screen for association with a
patient to record a patient's medical condition;
2 0 Figure 7(d) illustrates a Patient Summary interface screen for viewing
insurance, contacts and scheduled visits information for a patient;
Figure 8(a) illustrates a Registration tab of a user interface according to
the
invention;
Figure 8(b) illustrates a New Visit interface screen according to the
2 5 invention;
Figure 8(c) illustrates a Modify Visit interface screen according to the
6
CA 02526149 2005-11-16
WO 2004/104754 PCT/US2004/015169
invention;
Figure 8(d) illustrates an Exam Detail interface screen according to the
invention;
Figure 8(e) illustrates a Lexicon interface screen according to the invention;
Figure 8(f) illustrates a Document Distribution interface screen according to
the invention;
Figure 9(a) illustrates a Pre Procedure tab of a user interface according to
the
invention;
Figure 9(b) illustrates a Patient Process interface screen according to the
invention;
Figure 9(c) illustrates a Consent Checlelist interface screen according to the
invention;
Figure 9(d) illustrates a Patient Assessment interface screen according to the
invention;
Figure 9(e) illustrates a Vitals and Meds interface screen according to the
invention;
Figure 9(f) illustrates a Physical Exam screen for a physician to perform pre-
procedure checks such as a physical examination according to the invention;
Figure 9(g) illustrates a pre-procedure summary information Screen display
2 0 of according to the invention;
Figure 10(a) illustrates a Procedure tab user interface according to the
invention;
Figure 10(b) illustrates a Pre-Procedure Summary interface screen according
to the invention;
2 5 Figure 10(c) illustrates an Equipment used interface screen according to
the
7
CA 02526149 2005-11-16
WO 2004/104754 PCT/US2004/015169
invention;
Figure 10(d) illustrates an endoscopic Image Capture interface screen
according to the invention;
Figure 10(e) illustrates a Pathology Request interface screen according to the
invention;
Figure 10(f) illustrates a Lexicon interface screen for the procedure
lifecycle
stage according to the invention;
Figure 10(g) illustrates a Print on Mavigraph interface screen according to
the invention;
Figure 10(h) illustrates a Document Distribution interface screen for the
procedure lifecycle stage according to the invention;
Figure 10(i) illustrates a Nursing Administration interface screen according
to the invention;
Figure 11(a) illustrates a Post-Procedure tab of a user interface screen
according to the invention;
Figure 11 (b) illustrates an ICU Synchronization interface screen according to
the invention;
Figure 11(c)(1) illustrates an Image Management interface screen according
to the invention;
2 0 Figure 11 (c)(2) illustrates the Other Exam feature displayed via the
Image
Management interface screen to enable image comparisons according to the
invention;
Figure 11(d) illustrates a Surgical Changes window according to the
invention;
2 5 Figure 11(e) illustrates a Recovery interface screen according to the
invention;
8
CA 02526149 2005-11-16
WO 2004/104754 PCT/US2004/015169
Figure 11 (f) illustrates a Recall Patient interface screen according to the
invention;
Figure 11(g) illustrates a Document Distribution interface screen for the
post-procedure lifecycle stage according to the invention;
Figure 12 illustrates an Analysis tab user interface according to the
invention;
Figure 13(a) illustrates a System Administration tab user interface screen
according to the invention;
Figures 13(b)(1) and 13(b)(2) illustrates a Clinical Staff user interface
screen
according to the invention;
Figure 13(c) illustrates a System Settings user interface screen according to
the invention;
Figure 13(d) illustrates an Application Flow user interface screen according
to the invention;
Figure 13(e) illustrates a Facility user interface screen according to the
invention;
Figure 13(f) illustrates a Node Settings user interface screen according to
the ..
invention;
Figure 13(g) illustrates a Video Settings user interface screen according to
2 0 the invention;
Figure 13(h) illustrates an AutoMask Settings user interface screen according
to the invention;
Figure 13(i) illustrates an Exam Type customization user interface screen
according to the invention;
2 5 Figure 13(j) illustrates a Reports Section customization user interface
screen
according to the invention;
9
CA 02526149 2005-11-16
WO 2004/104754 PCT/US2004/015169
Figure 13(k) illustrates a Phase of Care user interface screen according to
the
invention;
Figure 13(1) illustrates a Document Type user interface screen according to
the invention;
Figure 13(m) illustrates a Procedure Note template window and interface
used to generate new Procedure Notes according to the invention;
Figure 13(n) illustrates a Document template window used to generate new
Document types according to the invention;
Figure 13(0) illustrates an example Document template window for creating
a new document template from a previously created Document template according
to the invention;
Figure 14(a) illustrates a System Administration tab user interface displaying
a User List screen according to the invention;
Figure 14(b) illustrates a User Maintenance user interface screen according
to the invention;
Figure 14(c) illustrates a Role List user interface screen according to the
invention;
Figure 14(d) illustrates a Role Maintenance user interface screen according
to the invention;
2 0 Figure 14(e) illustrates a System Log utility user interface screen
according
to the invention;
Figure 14(f) illustrates a Scope Model list user interface screen according to
the invention;
Figure 14(g) illustrates a Scope list user interface screen according to the
2 5 invention;
Figure 14(h) illustrates a Scope Item user interface screen according to the
CA 02526149 2005-11-16
WO 2004/104754 PCT/US2004/015169
invention;
Figure 14(i) illustrates an Accessory Maintenance user interface screen
according to the invention; and,
Figure 14(j) illustrates an Equipment Category user interface screen
according to the invention.
DETAILED DESCRIPTION OF THE PREFERRED EMBODIMENT
The present invention is a comprehensive, real-time, interactive
clinical information management system designed for the practice of endoscopy.
It
includes integrated reporting features, that manages and organizes clinical
information obtained during phases of care relating to an endoscopic exam, and
endoscopic images and related patient data, at various levels of detail, for
creating
efficiencies and facilitating functions performed by users of endoscopic
equipment,
e.g., physicians, nurses, clinicians, etc.
Particularly, the clinical information management system designed
for the practice of endoscopy includes a web-browser interface that supports
all the
data acquisition and care-giving functions performed by users during patient
registration, pre-endoscopic procedure, endoscopic procedure and post-
procedure
phases of care.
2 0 The clinical information management system further includes the
ability to capture, process and record endoscopic images during a procedure
and
further includes an Image Management function enabling a user to annotate,
label,
import, export, and enhance the quality of images, including the ability to
manage,
record, and export live video clips and generate reports that include the
stored
2 5 images. Further to the aspect of image capture and display, the system
provides an
"auto-masking" feature that automatically selects an appropriate video mask
based
on a particular endoscope imager device being utilized by the health care
practitioner.
The clinical information management system designed for the
3 0 practice of endoscopy further includes a medical terminology "Knowledge
Base"
(KB) comprising keywords relating to the procedure, e.g., such as
gastrointestinal,
11
CA 02526149 2005-11-16
WO 2004/104754 PCT/US2004/015169
endoscopic and bronchoscopic terminology keywords. The keywords are captuxed
via a graphical user interface (GUI) before, during, and/or after a procedure.
The
keywords are made available for labeling images captured during an examination
to
be used in reports, auto-populating appropriate sections of a report such as a
Procedure Note, described further below, based on patient history, and
building
Procedure Note templates or models to auto-populate sections of information.
The
system also facilitates the use of custom terms that apply to a specific
department or
location. Thus, for example, during an exam, a user may select KB terms for a
procedure via a common user interface, which is employed wherever the user
needs
to locate or extract keywords. This also provides a consistent way to select
and use
terminology.
Overview of the system
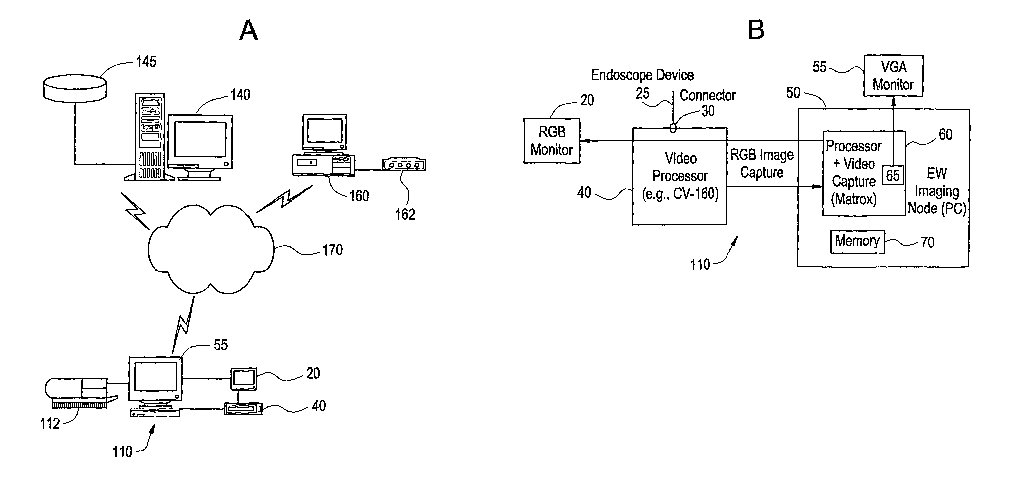
Figures 1 (a) and 1 (b) depict the hardware infrastructure comprising
various hardware devices and components required to either enable the
application,
hereinafter alternately referred to as the EndoWorksTM system (hereinafter "EW
system" manufactured by Olympus Corporation) that provides functionality for
automating the endoscopy lab by, to run, or to support the required business
functionality. As shown in Figure 1(a), the hardware infrastructure of the
invention,
includes an endoscopic workstation 110, a printer device 112 (e.g., a
Mavigraph
2 0 printer), an RGB monitor 20 and video processor 40. The user provides
inputs to
the workstation 110 via a keyboard, mouse interface, or the like. The
workstation
includes a second monitor, e.g., a VGA monitor 55, and implements a web
browser
interface that provides the necessary information during all phases of care
relating to
the endoscopic exam, and facilitates for users of endoscopic equipment, e.g.,
2 5 physicians, nurses or clinicians, the efficient capture, management,
organization and
presentation of endoscopic images and patient and examination data. The
workflow
processes associated with this aspect of the system are flexible enough to
support
small endoscopic practices in addition to endoscopic departments within large
healthcare institutions.
3 0 Figure 1 (b) is a block diagram depicting in greater detail, the
endoscopy lab 110 for supporting all EndoWorlcs application ftinctions
including the
12
CA 02526149 2005-11-16
WO 2004/104754 PCT/US2004/015169
capture, processing and displaying of real-time endoscopic images. As shown in
Figure 1(b), the system comprises an endoscope device 25 connected via a
connector
device 30 to the video processor device 40, for example, an Olympus CV-160
device. As mentioned the endoscopic device includes a solid state CCD imager
for
generating real-time frame image signals, e.g., simultaneously generated RGB
signals, which are processed by the video processor device to generate real-
time
video signals of the image for display on an RGB monitor 20. As shown the
video
processor is further connected to an imaging station or node 50, comprising a
personal computer (PC) or workstation, and including processor 60, video
display
driver 65, and memory 70 devices for capturing the real-time video image,
digitizing
the image for storage in memory 70, and for further displaying a scaled
version of
the image, for example, on both the RGB monitor 20 and a second monitor, e.g.,
a
VGA monitor device 55. In one embodiment, the processor implemented at the
imaging node 50 includes a frame grabber board and associated hardware drivers
that captures standard analog composite and Y/C video in NTSC/PAL formats from
the video processor 40 and, includes analog to digital converters for
capturing the
component RGB in the NTSC/PAL video formats. The captured field are stored in
a
main memory 70 of the imaging node. A graphics controller (not shown) provided
with the Matrox board is provided for handling VGA display output and includes
a
2 0 graphics overlay and video scaling.
While the system may function as a stand-alone system, the
workstation may have the additional capability of connecting to the
institution or
facility network, and, to support this, may be provided with an Ethernet 100
Base T
network interface card (NIC), or like equivalent, to provide network
connectivity.
2 5 The NIC drivers shall be compatible with Windows 2000 (or later version
OS) and
support the TCP/IP protocol. Thus, referring back to Figure 1 (a), the system
may
also include a network server 140 and database element 145 or like memory
storage
system for storing system application data records including patient records
and
associated patient data and image information. This server may be connected
via a
3 0 gateway application to various "external" systems such as a hospital
information
system where the gateway facilitates the transfer of certain healthcare
information
between the, system and other applications. For example, patient information
stored
in the system may be downloaded from or uploaded to external systems (e.g., a
13
CA 02526149 2005-11-16
WO 2004/104754 PCT/US2004/015169
legacy system) via a gateway interface. The workstation 110 may communicate
with the network server 140 via the Internet 170 or other network, such as a
LAN or
intranet. It is understood however, that the network server may function as a
web
server and a central repository for EndoworksTM system definitions and data
that is
shared by simultaneous users. Further, the network server shall be capable of
supporting a database manager. Additional processor capacity shall be required
for
additional concurrent users, and, a symmetric multiprocessor (SMP) computer
may
be implemented for supporting large numbers of simultaneous users. In such a
multiuser environment, multiple client workstations access the shared server
including centralized data, and appropriate serialization and locking
capabilities is
provided to ensure that concurrent access to data is enabled where reasonable,
and to
ensure the consistency of data that is being updated.
The workstation 110 may further communicate with a fax server 160,
for instance, for faxing reports via a fax modem 162.
Generally, the application's software instructions, including firmware
and microcode, may be stored in any type of program storage device or devices,
also
referred to as computer-readable media. The software is executed by a
processor in
a known manner to achieve the functionality described herein.
2 0 Clinical Flow
Figures 2-5 illustrate clinical flow diagrams that describe the most
common activities associated with the system and their relationship in time in
the
context of managing an endoscopic laboratory according to the invention.
Clinical
2 5 flow is based on patient flow, which relates to how a patient is processed
before,
during, and after an endoscopic procedure. The overall flow across all phases
of
care starts with an exam request and ends with the generation of a Procedure
Note,
the release of the patient, and the generation of a set of related reports.
User roles
are represented as horizontal bands in the figures.
3 0 ~ The registration and scheduling clinical flow 200 of Figure 2 includes
a collection of all the information necessary to set up a visit. It is
initiated through
an exam request made by either the patient, a surrogate for the patient, or a
referring
14
CA 02526149 2005-11-16
WO 2004/104754 PCT/US2004/015169
physician. The nurse and physician share the activity of preparing prep
instructions
and medical advice for the patient.
The Pre-Procedure clinical flow 300 of Figure 3 starts with the arrival
of the patient at the endoscopy facility and addresses all administrative and
medical
activities necessary to prepare the patient for the exam.
The Procedure clinical flow 400 of Figure 4 depicts the actual
examination that takes place during the Procedure phase of care. The system is
used
to capture images, record vital signs, and administer medications during this
stage.
The Post-Procedure clinical flow 500 of Figure 5 depicts the
activities that take place after the completion of an exam. These activities
include a
nurse continuing to monitor the patient's recovery, a nurse completing
discharge
instructions, releasing the patient, and preparing billing code reports, and a
physician
reviewing and editing the analysis of an exam by generating a Procedure Note.
A
physician signs the Procedure Note when it is complete. Afterward, management
reports, patient recall requests, and referral letters can be created and
distributed.
User Interface
The invention is now described in connection with a user interface
that permits the user to access specific features associated with managing an
2 0 endoscopic laboratory. It is understood that a user is an individual who
is authorized
access to the EndoWorksTM application through a system login comprising a user
ID
and a password. The user logs into a specific department, selected at login
time. A
user may liave access to one or more departments. When logging in to the
selected
department, the user is assigned a default facility. A user may be a specific
clinical
2 5 staff member, which in turn identifies the user's qualifications (role),
such as
physician, nurse, or scheduler, for the department. As will be described in
greater
detail herein, after successful authentication, the application (based on the
user's
privileges) authorizes the user to access specific functions associated with
the user's
role in the department. Other non-medical users also exist, such as system
3 0 administrators.
According to this aspect of the invention, the predefined application
layout or interface is based on user roles, i.e., actions that user performs
using the
CA 02526149 2005-11-16
WO 2004/104754 PCT/US2004/015169
system, including roles such as Physician, Nurse and scheduler, for example.
Facilities or medical departments use roles to give users access to different
options
within the application. For example, as described in greater detail herein, a
facility
can configure the system to allow a scheduler to access only the Patient
Registration
tab.
Once a user logs in the system, for example, by entering a user ID
and password, and depending on that user's role, that user may access the
feainres
associated with that user's role using the tabs located at the top of the
screen, with
each permitting access to a specific functionality.
I. Home tab 600 (Figure 6). The Home tab is the default home page,
and is pre-defined for each role. Preferably, based on a user's role in the
selected
department, a default homepage is generated predefined for that role by the
application, but it can be changed to another to suit the user's needs. The
most
common tasks that can be performed via the Home tab include: view Scheduled
Exams; Create a New Visit; view Pending Items; view Pathology Status; view
Unsigned Reports which enables an attending physician to view and sign
unsigned
Procedure Notes; Sign Reports, which enables a user to view unsigned Procedure
Notes for a specific physician and mark them as signed; Carbon Copies which
function automatically generates and sends a notification to the recipients
that a
2 0 document is available for them in the system when the user distributes a
document
to a medical provider, clinical staff, or contact via email. A recipient may
then log
on to the system and view a list of documents on the Carbon Copies screen; an
Intensive Care Unit (ICU) Synchronization, that ensures that the user's
imaging
station is not connected to the network server when the user performs an exam
in
2 5 ICU mode. When the user finishes the exam, the user must upload images and
data
from the workstation to the server repository. When the workstation is re-
connected
to the network, a series of simple commands will upload the data and images
captured during the exam. After the data is uploaded, the user uses the ICU
Synchronization option to synchronize images and data; and, a feature of
viewing
3 0 Recall Letters that enables a user to recall a patient for another
examination. As
mentioned, access to these tasks is based on the user's role. For example, if
the user
logs into the application as a scheduler, then the user would not see the Sign
Reports
menu option, since that option is reserved for the physician role.
16
CA 02526149 2005-11-16
WO 2004/104754 PCT/US2004/015169
II. Patient File tab 700 (Figures 7(a)- 7(d)) - allows a user to capture
information specific to the individual patient. This tab is used to record a
patient's
demographic information; a patient's medical alerts, GI/pulmonary, medication,
family, and social history information, and view a summary of the patient
information.
III. Registration tab 800 (Figures 8(a)-8(f)). This tab is used to: (a)
create and modify visit and/or exam information; (b) view past, current, or
future
schedules; (c) assign resources for an examination including procedure rooms
and
equipment; and (d) distribute registration documents.
IV. Pre-Procedure tab 900 (Figures 9(a)-9(g)). This tab is used to: (a)
record care plan information for a specific visit; (b) record medical alert
information; (c) record GI, pulmonary, family, and social history information,
(d)
manage physical examination, patient assessment, and physician check
information,
(e) manage prep status information for the patient; (f) manage consent
information
for a visit; (g) capture vital signs and medications administered before the
examination; (h) display a summary of selected Pre-Procedure information and
capture nurse handoff information; and (i) distribute Pre-Procedure documents.
V. The Procedure Tab 1000 (Figures 10(a)-10(i)). This tab is used to:
(a) capture images during an endoscopic procedure; (b) record live video
clips; (c)
2 0 record scope time used during an examination; (d) view images and
Procedure Notes
from a previous exam; (e) print images for an exam on a laser jet or a
Mavigraph
printer; (f) record nurse administration information; (g) record accessories
and
equipment used during an examination; (h) generate pathology requests; (i)
distribute procedure documents; and, (j) according to the present invention,
capture
2 5 vital signs and medications administered during the examination.
VI. The Post Procedure Tab 1100 (Figure 11 (a)-11 (g)) - After an
examination is completed, this tab is used to perform post-procedural tasks.
These
tasks include synchronizing images in the ICU mode, monitoring a patient's
vital
sign and medication information, managing captured images, and writing
Procedure
3 0 Notes. Images from a current procedure, e.g., image 1 and image 2, and
from a prior
procedure, e.g., image 3, image 4, and image 5, can be displayed together for
comparison. This tab is used to: (a) record patient recovery information; (b)
manage
images captured during an exam; (c) label, annotate, enhance, and print
images; (d)
17
CA 02526149 2005-11-16
WO 2004/104754 PCT/US2004/015169
import and export images to and from the current examination; (e) manage video
clips recorded during an examination; (f) write and sign Procedure Notes; (g)
capture patient recall information; (h) assess performance of a trainee
participating
in an examination; (i) capture patient survey information; (j) distribute Post-
Procedure documents; and (k) perform ICU synchronization.
VII. The Analysis Tab 1200 (Figure 12) - used to generate redefined
template-based management reports to satisfy end-user administrative reporting
requirements related to patient, procedure and facility management, efficiency
analysis, and resource utilization. This tab is used to generate: (a)
Continuous
Quality Improvement (CQI) reports; (b) efficiency reports; (c) equipment
analysis
reports; (d) procedure analysis reports; and (e) administration reports.
VIII. The Admin Tab 1300 (Figures 13(a)-13(0) and 14(a)-14(j)) -
used to perform administrator tasks and ensure the efficiency and security of
the
system. The system can be customized based on the needs and requirements of
the
facility, physician, and clinical staff. This tab is used to: (a) maintain
system data
(such as Patient ID type and department information); (b) maintain application
resource data (such as clinical staff and contact information); (c) perform
system
configuration (such as configure Mavigraph printer and video settings); (d)
customize how the application will flow and generate information (for example,
2 0 changing the order and location of menus within the application and
editing or
creating templates/models that are used to create Procedure Notes); (e)
customize
user-defined fields (such as other patient information and other visit
information);
(f) control access to or within the application (such as user and role
maintenance);
and (g) maintain equipment used during the procedure.
2 5 It should be understood that certain pages within the application are
provided with a "Next" option such as the "Next" button 723 indicated in the
Patient
file Tab screen 700 shown in Figure 7(a). Selection of the Next option will
initiate a
save of the data on the current page after a validation, and navigate the user
to the
next page within the current Phase Of Care (i.e., tab) according to the pre-
defined
3 0 order. Limiting the navigation within the current Phase Of Care is
valuable for the
user who conducts each procedure of different phase of care in a different
place.
18
CA 02526149 2005-11-16
WO 2004/104754 PCT/US2004/015169
Home Tab
With further respect to the homepage tab 600 such as shown in
Figure 6, a user may access the Scheduled Exams interface screen 620 by
selecting a
Scheduled Exams menu option 602 that initiates display of a list of scheduled
exams
and provides the ability to create a new visit and exam. Via the Scheduled
Exams
screen 620, a user may enter the facility name, date, or attending physician
to search
for an exam. A list 630 of scheduled exams will be displayed depending upon
the
search data input and details of an exam may be viewed by clicking a Details
icon
609 corresponding to the exam.
Via the Scheduled Exams tab, a user may create a new visit by
selecting the New Visit button 612 to access a New Visit screen, as will be
described
herein with respect to Figure 8(b), which enables the user to enter the
desired
information associated with the scheduling of a new visit for a patient. More
details
regarding the registration of patients will be explained in greater detail
herein.
Via the home page tab 600 of Figure 6, a user may access the
Pending Items interface screen by selecting a Pending Items menu option 604
2 0 enabling that user to view all pending tasks. Via a pending task interface
screen (not
shown), a user may search for a pending item based on task, date, or the
patient, and
further select a Task Details icon to view the task. From a Task dropdown a
user
may perform activities including, but not limited to: modifying a database
record,
deleting a database record, add a note, or delete a note.
2 5 Via the home page tab, a user may access a Pathology Status
interface screen (not shown) by selecting Pathology Status menu option 606
enabling a user to view the status of pathology requests or, search the
database for
an existing request by entering search criteria such as attending, date,
patient, or
request status. If the user is not an attending, a default list is not
displayed. The
3 0 user may additionally edit or delete existing pathology results. When a
pathology
result is deleted, all of the specimens associated with that record are
deleted. The
user may select an Edit Pathology Status icon to access the Pathology Result
screen
19
CA 02526149 2005-11-16
WO 2004/104754 PCT/US2004/015169
where a user may further edit the status of the request, review the request,
or delete
the request.
Patient File Tab
With further respect to the Patient File tab 700 (Figure 7(a)), the
information entered is captured and stored in a patient file that is the
repository for
all patient data required by different clinical staff. It manages the input
and
presentation of relevant historical data such as past tests and lab results,
medical
alerts, and medications currently prescribed for the patient. Thus, via the
interface
Patient File tab 700 (Figure 7(a)), the user may access Patient File menu
selection
options based on that user's role. Before any endoscopic exam or procedure is
performed, the user must register a patient. When registering a patient,
relevant
patient information may be captured including: Demographics, Medical alerts,
GI
history, Pulmonary history, Medication history, Social history, and Family
history.
Once the patient's information is entered, it does not have to be entered
again for any
other exam or procedure for that patient.
To add a New Patient Record via the Patient File tab, a user selects
the Patient Search menu choice 702 which causes for display the Patient search
2 0 screen 720 including a "new" button 722, that, when selected initiates
display of a
Patient Demographics screen to capture the new patient's information.
Including ID
Type, Patient ID, Last Name, and First Name, insurance and medical contact
information and enter any optional information, if necessary. As shown in
Figure
7(b), the Patient Demographics screen 730 includes icons enabling
functionality for
2 5 adding all patient demographics information including a new Insurance
Carrier (or
editing an existing one) and adding a new physician or editing the selected
physician.
Referring back to Figure 7(a), to modify an existing patient's record:
a user may first search for a patient by entering search criteria in search
entry fields,
3 0 and click a Details icon 709 where the Patient Demographic screen 730
shown in
Figure 7(b) is displayed. The user may then modify the information as desired.
The
user may view a summary of a patient's information by first accessing the
Patient
Search screen to search for a patient, click a Select icon 719 to select the
patient
CA 02526149 2005-11-16
WO 2004/104754 PCT/US2004/015169
which causes a display of a Patient Summary screen such as shown in Figure
7(d).
It should be understood that a patient record may be deleted from the Patient
Demographic screen shown in Figure 7(b) by selecting the delete button 739.
Further functionality enabled via the patient demographic screen 730
includes: assigning or adding a new patient ID to a selected patient by access
the
Patient Demographic screen for the patient and clicking a New button next to
the ID
Type; and, deleting a patient ID by clicking the Delete icon located to the
right of
the patient ID that is to be deleted.
Referring back to the patient file tab of Figure 7(a), the system
includes functionality for managing medical alert information, which is
associated
with a patient having a condition that requires special consideration. Via
selection
of the Medical Alerts option 704, there is initiated for display a Medical
Alerts
screen 740 such as shown in Figure 7(c). Via the Medical Alerts screen 740, a
plurality of medical alert categories can be selected from a Medical Alerts
dropdown
list 742. When a user sets a medical alert for a selected patient, a View
medical
alerts for the patient icon 759 is generated for display in the status bar
749. As long
as the patient is selected, the icon remains on the status bar. To view all
medical
alerts set for the patient, a user may select the View medical alerts for the
patient
icon 759. As shown in Figure 7(c), the Medical Alerts screen 750 includes two
2 0 sections: Medical Alerts and Notes. The Medical Alerts section is used to
record a
patient's medical condition and the Notes section is used to record relevant
or
detailed information regarding a patient's condition.
To add a medical alert record for a patient via the Medical Alerts
screen 740, the user first selects the required category of medical alerts
from the
2 5 Medical Alerts dropdown list, selects a Yes radio button to enable a
medical alert;
and, clicks a Select from Calendar icon 769 to enter the date in the Date
Recognized
field. A Select Date window appears where a user may select the date the
patient
was first diagnosed with the condition (related to the alert), and, enter
details of the
alert if the corresponding Details field is active. The user may also click a
New
3 0 button on the right of the Notes section, and enter notes related to the
medical alert
category.
Further functionality enabled via the Medical Alerts screen 740
shown in Figure 7(c) includes: removing a medical alert record and, deleting a
note.
21
CA 02526149 2005-11-16
WO 2004/104754 PCT/US2004/015169
Further, any comorbidity that requires special consideration in the
performance of an
endoscopic procedure is referred to as an alert. As will be described in
greater detail
herein, a system administrator may define system alerts at the system level
without
regard to facility or department. A system alert is a criteria for determining
whether
a medical alert item is to be set to indicate an alert, i.e., warrants a
system alert
display indication. If the patient in the context has one of the comorbidities
designated as an alert, for example, an allergy, the Medical Alerts icon 759
is
displayed in the status bar. A user may view system alerts set by the system
administrator via the Medical Alerts screen by clicking a System Alerts button
to
l 0 display the system-defined alerts for the selected category. The System
Alerts
window for the selected medical category is displayed for user viewing.
Referring back to the patient file tab of Figure 7(a), the system
further includes functionality for managing a patient's GI History Information
via a
GI History screen (not shown) by recording and editing information about a
l5 patient's past diagnoses, surgeries, and other procedures related to the
gastrointestinal system. The GI History screen is displayed when the user logs
in to
the application in the GI department. After selecting a patient via the
Patient Search
screen (Figure 7(a)), an authorized user may select the GI History menu option
706
to enable functionality for retrieving and displaying the patient's GI
History.
2 0 Functionality enabled via the displayed GI History screen includes: adding
a past
diagnosis by opening a Past Diagnosis window and entering the date, diagnosis,
organ, and comments about the patient's past diagnosis and, updating past
diagnosis
information where a date field, a certainty/disease status field, are provided
to enable
entry of the date and certainty/disease status information. Other
functionality via the
2 5 GI history screen includes: modifying a past diagnosis, deleting a past
diagnosis by
deleting an existing record; viewing a procedure note report associated with
the past
diagnosis; adding a past surgery record via Date, Surgery, Organ, and Comments
entry fields in a Past Surgery section and, modifying or deleting a past
surgery
record; and, adding a past procedure record via Date, Procedure, and Comments
3 0 entry fields in a Past Procedures section, modifying or deleting a past
procedure
record, and viewing a Procedure Note report associated with a past procedure.
Via the patient file tab of Figure 7(a), it should be understood that if a
user logs into a Bronchoscopy department of a hospital, for instance,
functionality
22
CA 02526149 2005-11-16
WO 2004/104754 PCT/US2004/015169
will be provided for managing a patient's Pulmonary History Records via a
Pulmonary History screen (not shown) by recording and editing information
about a
selected patient's previous pulmonary procedures; adding a pulinonary history
record; modifying a Past Procedure Record for Pulmonary History and deleting a
pulmonary history record; and, and viewing a Procedure Note report associated
with
a past pulmonary procedure.
Further, via the patient file tab of Figure 7(a), the system includes
functionality for managing a patient's medical medication history via a
Medication
History screen (not shown) by recording and editing information about a
patient's
current and past medications. The Medication History screen (not shown) is
displayed by selecting the Medication History menu option 708 to enable
functionality for retrieving and displaying a selected patient's Medication
History.
Functionality enabled via the Medication History screen includes:
adding a medication to the history record, for example, by entering either the
full
drug or brand name, or the first few letters of the name followed by a
wildcard in a
Search field, where a list of all medications matching the criteria will be
displayed
for selection in a Medication Search window. A user may further select a
Search
icon next to a Strength field to search for the strength of the medication. A
user may
then select the drug strength from a Drug Strength window (not shown) and
enter a
2 0 start date for the medication to the Date Started field and, enter a stop
date for the
medication to the Date Stopped field (if not a current medication). It is
understood
that a user may further delete a medication from patient's history record.
Referring back to the patient file tab of Figure 7(a), the system
includes functionality for updating a patient's Social History via a Social
History
2 5 screen (not shown) that enables a user to record information about the
social
behavior and legal considerations of a patient. The Social History screen is
displayed by selecting the Social History menu option 710 to enable
functionality
for retrieving and displaying a selected patient's Social History.
Functionality
enabled via the Social History screen includes: adding a Social History Record
for a
3 0 patient including entry of information relating to five areas: 1) Tobacco
use
including entry of the date the patient stopped using tobacco and the pack
years (i.e.,
the number of packs per day and the number of packs years); 2) Alcohol use
including entry of the date the patient stopped consuming alcohol and the
drink
23
CA 02526149 2005-11-16
WO 2004/104754 PCT/US2004/015169
years (i.e., the number of drinks per week and the number of drink years); 3)
IV
Drug use including entry of the date the patient stopped IV drug abuse and
detailed
information about the IV drug abuse; 4) living will information; and 5) a
power of
attorney, whereby a user may enter information via a DNR (Do Not Resuscitate)
Details field. It is understood that the user's Social History Record may be
fiu-ther
modified.
Referring back to the patient file tab of Figure 7(a), the system
includes functionality for updating a patient's Family History via a Family
History
screen (not shown) that enables a user to record information about the
occurrences
of cancer or other relevant family medical conditions. Preferably, there are
different
Family History screens for the Brooch and GI departments. The Family History
screen is displayed by selecting the Family History menu option 712 to enable
functionality for retrieving and displaying a selected patient's Family
History. To
add a GI cancer record, for instance, for a selected patient via the Family
History
screen, an Add button is provided adjacent to GI Cancer that is selected to
display a
GI Cancer window. From that window, a user may select the type of cancer from
the Type dropdown list, or select Other-Details, where a Details field is
provided to
enable the user to enter comments in the Details field. The user may further
click a
New button next to a Relation which enables the addition of a line to the
section,
2 0 where the user may select the relative from the Relation dropdown list and
enter the
age that the relative was diagnosed with the cancer.
Via the Family History screen, a user may fiu-ther add a non-GI
cancer record for a relation, or add a Brooch Cancer record of a patient's
relation.
Furthermore, another relevant family history record may be added (e.g., non-
cancer),
2 5 and further be deleted or modified.
Via the patient ale tab of Figure 7(a), further system functionality is
enabled for entering or modifying other patient information via an Other
Patient
Information screen (not shown) which is generated to enable the capture of
additional preset and user-defined data that relates to a patient by selecting
the Other
3 0 Patient Information menu choice 714 which enables functionality for
retrieving and
displaying a selected patient's other information.
24
CA 02526149 2005-11-16
WO 2004/104754 PCT/US2004/015169
Registration Tab
With fiufiher respect to the Registration tab 800 (Figure (a)),
functionality is provided that allows the user to create, modify or delete a
visit, or
create, modify or delete examinations) within a visit. Thus, after creating a
patient
record, the user may schedule an exam for a patient. It is understood that a
visit may
include a series of one or more procedures performed on a patient. The user
may
select "New Visit" and "Modify Visit" screens to schedule a patient visit or
modify
an existing visit. Thus, as shown in the Registration tab 800 of Figure 8(a),
to create
a new visit, a user will select the New Visit menu option choice 802 that
causes the
display of a New Visit screen 820 such as shown in Figure 8(b). Via the New
Visit
screen 820, a user may select the facility for the visit from the Facility
dropdown list
822 (a default is the facility to which the user is currently logged in);
enter the visit
ID in the Visit ID field 824 which is a unique facility-supplied identifier
for the
visit; click the Patient Search icon 825 next to the Patient field to select
the patient
or, return to the Patient Demographics window (Figure 7(b)) to create a new
record
for the patient if no patient record is found after the Patient Search; select
a
referring physician from the Referring dropdown list 826 that includes the
names of
all medical providers for the patient (The default value is the patient's
Primary Care
2 0 Physician); select a patient class from the Patient Class dropdown list
828; enter the
date of the visit in the Date field 830 (a default is the current date); click
a clock icon
832 to enter time of the visit (a default is the current time); and, click the
Add button
833 beside Exam if the user needs to add an exam for the visit in which an
Exam
Detail screen is displayed.
2 5 Referring back to the Patient File tab 700 (Figure 7(a)), subsequent to
creation of a patient visit record, a user may select a Patient Summary option
703
which causes display of a Patient Summary screen 750 shown in Figure 7(d)
which
displays all of a patient's demographics data captured when the patient's
record was
created or last modifted, and, from which a user may select the existing visit
from
3 0 the Visit Information section 766 of the screen. The user may fiu they
select a
Modify Visit icon 767 to initiate display of a Modify Visit screen which
provides
functionality for modifying an existing Visit Record or deleting a Visit
Record.
CA 02526149 2005-11-16
WO 2004/104754 PCT/US2004/015169
Referring back to the Registration tab of Figure 8(a), the system
includes functionality for enabling scheduling of an exam only after a visit
record is
created. To add an Exam to a visit, the user may access the Modify Visit
screen 830
shown herein in view of Figure 8(c), by selecting the Modify Visit menu option
804
from the Registration tab of Figure 8(a). In Figure 8(c), clicking the Add
button 832
next to Exam causes display of an Exam Detail screen 840, shown in Figure 8(d)
from which a user may enter an exam date in the Date field 842, a time of the
exam
in the Time field 844 and, select an exam type from the Exam Type dropdown
list
845. The attending physician may be selected from the Attending dropdown list
846. If the user wants to search for an attending or clinical staff, the
Clinical Staff
icon 848 may be selected to cause display of a Clinical Staff List window (not
shown) where a user may select a clinical staff from the list. If the clinical
staff is
not found in the list, the user may select a New Attending icon 849 that
displays a
Clinical Staff window (not shown) via which relevant information about the
clinical
staff may be entered. To edit an attending information, the user may select
the
attending and click the Edit Attending icon 850 that causes the Clinical Staff
window to be displayed via which the user may make the relevant changes. The
user will further be prompted to: enter accession number from the Accession
Number field 853; select room number from the Room dropdown list 866; select a
2 0 duration of the exam from the Duration dropdown list 868; select the
needed
resource type from the Available dropdown list 869; and, select the resource
needed
for the exam from the Available dropdown list 870. An arrow icon 855 may be
selected by the user to move the resource to the Assigned list box 875. For
example,
a user may desire to allocate a special accessory or endoscope to an exam, in
which
2 5 case the system may generate a Special Accessory/Scope required icon 878
for
display next to the exam in the Modify Visit screen 830 (Figure 8(c)).
Referring back to the Registration tab of Figure 8(a), the system
includes functionality for displaying the Scheduled Exams for the current day
via a
Scheduled Exam screen 880 which is the default screen displayed upon user
access
3 0 to the Registration tab 800. Via the Scheduled Exam screen 880, a user
may: select a
Schedule for Today icon 882, which when selected, causes display of the
current
day's schedule (a default view); select a Schedule for the Week icon 884,
which
when selected displays the schedule for a week (e.g., from Sunday to
Saturday).
26
CA 02526149 2005-11-16
WO 2004/104754 PCT/US2004/015169
Preferably, the week selected for display is controlled with the date
increment and
date decrement icons 885a, 885b that respectively, increments or decrements
the
date by the interval currently displayed on the schedule; select a schedule
for the
Month icon 887, which when selected displays the schedule for a month starting
with the first day of the selected month. The month selected for display is
also
controlled with the date increment and date decrement icons; select a
Scheduled icon
888, which when selected, indicates that the exam has been scheduled and has
not
been performed (appears under status); select a Performed icon (not shown),
which,
when selected, indicates that the exam has been performed (appears under
status);
select a Procedure Note Signed icon (not shown), which, when selected,
indicates
that the exam has been performed and the associated Procedure Note has been
signed (appears under status); select a Select this Exam icon 889 which, when
selected, enables a user to select exams, document, etc...; select a Modify
Visit icon
890, which when selected, enables a user to modify exams, document etc. . .;
and,
select a Select Date from Calendar icon, that causes the display of a calendar
used to
select a date.
Referring back to the Registration tab of Figure 8(a), the system
further provides a "Lexicon" function to select and organize terms from a
Knowledge Base. The Knowledge Base is a medical terminology database. When a
2 0 user, e.g., physician, fords something noticeable during an exam, the
Lexicon
function is used to record that observation. By selecting the left menu choice
806, a
Lexicon screen 895 is displayed such as shown in Figure 8(e) via which a user
may
pick terms (based on his/her observation) from the Knowledge Base which
comprises a frame 896 having terms stored logically in a tree format. From
this
2 5 structure, a user can select and use this information to write a Procedure
Note
comprising a plurality of sentences formed from selected keywords. More specif
the
Knowledge Base includes keywords, which are the medical terms that are the
basic
building blocks of the Knowledge Base; menus that organize keywords; and views
which are collections of menus and their associated keywords organized within
a
3 0 tree and are used navigate through the Knowledge Base and select
appropriate
medical terms or keywords. Particularly, each Knowledge Base term is called a
keyword. When a user selects a keyword or term from the right frame 896 (list
of
available terms), it appears in the left panel (list of selected terms). The
menus are
27
CA 02526149 2005-11-16
WO 2004/104754 PCT/US2004/015169
classifted into categories, called menu types, which comprise keywords that
are
similar in nature. For example, a size menu type would contain the keywords
small,
medium, and large. Preferably, a menu can be single-select, mufti-select, or
unique.
If a user selects a keyword from a single-select menu, other keywords within
the
menu are disabled. For example, if size of polyp is a single-select menu, a
user can
select only one size from the available sizes such as small, medium, or large;
if a
user selects a keyword from a mufti-select menu, the selected item is appended
to
the same level as any other keyword from the menu. For example, if the organ
is a
mufti-select menu and a user selects stomach as the first organ and duodenum
as the
second, duodenum appears at the same level as stomach; and, if a keyword is
selected from a unique menu, the user cannot select the keyword again. That
is,
when a user attempts to select the keyword again from the right panel, the
keyword
is highlighted in the left panel to indicate that it has already been
selected. For
example, the organ menu is unique, and the user selects stomach as the first
organ.
If that user selects stomach again in the right panel frame, the keyword
stomach in
the left panel is highlight to indicate that stomach has already been
selected.
The Lexicon arranges Knowledge Base content to different report
sections, based on phases of care. A facility determines which Report Sections
898
are to be available in the Lexicon screen for a Phase of Care. As shown in
Figure
2 0 8(e), the Lexicon screen 895 includes icons 897 for: initiating
functionality for
generating a report via the Lexicon screen 895; initiating functionality to
move up in
the Knowledge Base tree; initiating functionality to move down in the
Knowledge
Base tree; initiating functionality to add billing codes; and, initiating
functionality to
delete a keyword from the tree; and, icons 898 for: initiating functionality
to add a
2 5 new term from Knowledge Base; initiating functionality to move to the last
multi-
select menu in the left side; and, initiating functionality to move to the
previous
lceyword.
A grammar engine is implemented in cooperation with the Lexicon to
ensure proper sentence generation from the selected keywords.
3 0 Referring back to the Registration tab of Figure 8(a), the system
includes functionality for printing and distributing documents such as letter
to the
referrer and appointment letter via a Document Distribution screen 860 shown
in
Figure 8(f). Generated documents may be distributed via, email, or fax. A user
may
28
CA 02526149 2005-11-16
WO 2004/104754 PCT/US2004/015169
distribute a maximum of nine copies of a document which documents may be
previewed and edited prior to printing or distributing. A user may
additionally edit
the recipient list for each document type. Thus, after navigating to the
Registration
tab 800 in Figure 8(a) and selecting a particular exam, a user clicks on the
Registration Docs menu choice 808 to display a Document Distribution screen
860
shown in Figure 8(f). To edit or review a document, from the Document
Distribution screen 860, a user selects a template for the document from a
Template
dropdown list 861 and, clicks an Edit Document icon 862 corresponding to the
document that user needs to edit or review. The document will be displayed in
a
new window where the required changes may be made to the document. The user
will be further able to review, edit and print the document by selecting icons
from
the Document Distribution screen. With respect to recipients of the document,
there
are three types of recipients: a Contact, Medical Provider, and Clinical
Staff, and a
user may add or remove a recipient, via a recipient list. To edit recipient
list, a user
clicks a checkbox 863 associated with the document to be edited. A user may
then
click an Edit Recipient List icon 864 adjacent to the current recipient list
which
initiates functionality for displaying an Edit Recipient window (not shown).
Via this
window, a user may click Contact to modify a recipient other than a medical
provider or clinical staff. The Contacts List window is displayed with
categories of
2 0 recipients. Additionally provided is a Medical Provider to select a
medical provider
from the Medical Provider List window and a Clinical Staff that may be clicked
to
select a clinical staff from the Clinical Staff List window.
Thus, the system provides further functionality initiated by the user to
distribute a document via the Document Distribution screen (Figure 8(f)) by
clicking
2 5 a checlcbox on the left side of the document that is to be distributed and
selecting a
template for the document from the Template dropdown list, prior to clicking
Distribute. Further to this feature, the system provides additional
functionality for
distributing education documents to patients that inform them about procedures
or
findings. For example, if a user fords a polyp in the stomach of a patient,
and the
3 0 system has set an education trigger for the word "polyp," a document based
on an
education template is generated for that user to distribute to the patient.
Printing is
one of the many medium options available to distribute education documents. It
is
29
CA 02526149 2005-11-16
WO 2004/104754 PCT/US2004/015169
understood that, if the user's facility has not set an education trigger, no
education
document will be generated.
An education document may be distributed by a Document
Distribution screen by clicking the checkbox next to the document to be
distributed
and selecting a template for the document from the Template dropdown list and
a
number of copies that need to be printed from the Copies dropdown list.
Pre-Proceduretab
With further respect to the Pre-Procedure tab 900 (Figure 9(a)),
functionality is provided that allows the user to: retrieve scheduled exams;
search for
an exam; create a new visit;, review the schedule summary; record a pre-
procedure
call; search for a patient record; manage patient demographic information;
manage
medical alert information; manage GI history information; manage pulmonary
information; manage social history information; manage family history
information;
manage patient process information; manage consent checklist information;
manage
patient prep status information; manage patient assessment information; manage
physical exam information; manage vital sign and medication data; manage
physician check information; review/edit pre-procedure documents; review/edit
clinical lexicon data; review the pre-procedure summary; and, manage other
visit
2 0 information.
With respect to retrieving visit/exam information via the Pre-
Procedure interface screen 900 shown in Figure 9(a), a user may select the
scheduled exams menu choice 902 to initiate functionality for viewing the
details of
an exam such as its date, time, and location, the attending physician, and any
2 5 required resources; make changes to exam information (if required); add an
exam to
a patient visit (if an exam does not exist); and, add notes about the
condition of the
patient or any other information about the exam. Thus, when a patient comes to
the
endoscopic facility for a procedure, the patient's exam information is first
retrieved.
Via the. Scheduled Exams screen display 930 such as shown and described with
3 0 respect to Figure 9(a), a user may view a list of all exams scheduled at
the facility
(by default, scheduled exams are displayed for the current day), and review
the
scheduled exam information to: review allocated medical staff and equipment
CA 02526149 2005-11-16
WO 2004/104754 PCT/US2004/015169
resources; modify exam information (i.e. assign other resources); and add an
exam
to a patient's visit (if one does not exist). Particular functionality enabled
in this
phase of care, is the ability to enter notes about the condition of the
patient or any
other information relevant to the exam. That is, before a user enters pre-
procedure
data for a patient, a user may review the patient's schedule summary and
either
enter, view, or modify pre-procedure call information. Thus, via the Pre-
Procedure
interface in Figure 9(a), a user may select the Schedule Summary menu option
904
to initiate functionality for selecting an exam and view a summary of the pre-
procedure call for the selected exam, enter or modify pre-procedure call
information
for an exam.
During pre-procedure, a user may verify and record pertinent
information for a patient. Thus, by selecting a Patient Search option 906 from
the
pre-procedure screen, a Patient Search screen (not shown) is displayed to
search for
a patient in response to entry of search criteria (e.g., last name), and
verify or record
that patient's demographics (name, address, emergency contact, patient
insurance
coverage information, medical provider's information, etc.), a patient's
comorbidities and medical alert information such as shown and described with
respect to Figure 7(b). For example, if a patient is allergic to latex, this
medical
information may be recorded before the exam is performed on the patient. The
user
2 0 will further be able to verify or record the patient's GI history;
Pulinonary history;
Social history; and Family history. Such patient demographics information may
be
captured at the time of registration just prior to an exam via a Patient
Demographics
screen such as shown and described with respect to Figure 7(b) which may be
accessed in the pre-procedure phase to record or modify, for an existing
patient, non-
2 5 clinical patient data such as: Name; Address; Emergency Contact; Patient
Insurance
Coverage Information; Medical Provider Information; and other Information. A
new patient demographics record may additionally be created with new
demographic information captured.
Further, from the Pre-procedure screen 900 shown and described with
3 0 respect Figure 9(a), a Medical Alerts menu option 908 may be selected to
enable a
user to view, modify or remove information about a patient's comorbidities and
related medical history, as shown and described herein with respect to Figure
7(c),
and further record or delete any information in the Notes field 741.
31
CA 02526149 2005-11-16
WO 2004/104754 PCT/US2004/015169
Further, from the Pre-procedure screen 900, the GI History menu
option 910 may be selected to enable a user to view, modify or remove a
patient's
GI diagnosis information (or Pulmonary diagnosis information if the user is
logged
in the Broach department) relating to that patient's past surgery or
procedure.
Further, from the Pre-procedure screen 900, the Social History menu
option 912 may be selected to view, modify or remove that patient's past
social
history information or add a new record, and a Family History menu option 914
may
be selected to enable a user to view, modify or remove information relating to
that
patient's family history (e.g., Broach and GI Cancer, Non-GI Cancer, and Other
Relevant Family History) in order to maintain occurrences of cancer or other
relevant medical conditions within the patient's family. Preferably, there are
different family history screens for Broach and GI departments.
Besides managing patient-based information via the Pre-Procedure
tab 900 as described herein, a user may additionally manage exam-based
information. Thus, before performing a procedure, a user may capture relevant
patient care information by selecting the Patient Process menu option 915
which
causes display of a Patient Process interface screen 950 as shown in Figure
9(b)
enabling a user to create a patient process record including information such
as
arrival, registration, and pre-procedure times and, to create a care plan for
the patient
2 0 based on a patient class (e.g., inpatient, inpatient transfer, and
outpatient). If the
facility is to store any patient belongings, this information, in addition to
the location
of the belongings, is tb be recorded via this screen.
Thus, for a selected exam, a user may record or edit information via
the Patient Process Screen 950 including the patient's arrival date and time,
2 5 registration start and end times, and pre-procedure start and end times
and select a
patient's scheduled care plan class from the Current dropdown list 951. If the
user
selects Inpatient transfer, the department and unit in the From field 958 is
entered.
Select the current care plan (if different from scheduled plan) from the Care
Planned
dropdown list 952. A user may further enter information via the Patient
Process
3 0 Screen including other information relevant to care planned in the Details
entry field
953; select the planned disposition of the patient following the procedure
from the
Plan Specifics dropdown list 954; select the ID Bracelet, Vascular Bracelet,
or
Allergy Bracelet checkboxes (if applicable); enter the name and phone number
of
32
CA 02526149 2005-11-16
WO 2004/104754 PCT/US2004/015169
the person transporting the patient in the Contact and Phone fields (if
applicable);
select the In Waiting Room checkbox 955 if the person transporting the patient
is in
the waiting room; enter the location where the patient's belongings are being
stored
in the Default Location field 956; and, select a checkbox(s) for each
applicable
patient belonging. This automatically populates the associated Location field
with
the default location, however, a user may change the location if a belonging
had
been stored elsewhere.
Before performing any procedure, a user needs to ensure that the
patient has provided consent to perform the procedure. Thus, before performing
a
procedure, a user may select a Consent Checklist menu option 916 via the Pre-
Procedure tab 900 (Figure 9(a)) which causes display of a Consent Checklist
screen
960 as shown in Figure 9(c) enabling a user to record whether or not the
patient
gives consent for the procedures that will be performed. The user may modify
any
of the information but cannot delete the consent checklist record. Thus, for a
selected exam, a user may modify existing information or enter information via
the
Consent Checklist screen 960 including the consent checklist information by
selecting the Consent Form, Reviewed, Signed, and Witnessed radio button 961
if
the user has obtained signed consent. If the user has not obtained consent,
then
he/she may select the Not Obtained radio button 962. Selecting Not Obtained
2 0 disables the Explanation and Obtained For sections. The reason consent was
not
obtained may be selected from the Details dropdown list. If consent was
obtained, a
user may select the person from the Given To dropdown list to whom the consent
explanation is given and enter the name of the person to whom the explanation
is
given in the Names) field shown in Figure 9(c). The user may further indicate
the
2 5 methods) by which the explanation is given by selecting the appropriate
check box
(verbal, brochure, etc.) and, select the appropriate checkboxes to indicate
consent
was obtained for the Procedure, Sedation/Anesthesia, or Blood or Blood
Products.
To select all of these, click the Select All button. The user may fiu-ther
select the
appropriate checkboxes to indicate explanation was given for the potential
Risks,
3 0 Benefits, Limitations, and Alternatives or select all by clicking Select
All. The user
may fuxther select the person from whom consent was obtained from the Obtained
From dropdown list and enter the name of the person from whom consent was
obtained in the Names) field. The user may further enter the date and time the
33
CA 02526149 2005-11-16
WO 2004/104754 PCT/US2004/015169
consent was obtained in the Obtained On and Time fields, respectively, and
indicate
the name of the staff member who obtained the consent by selecting from the
Obtained By dropdown list shown in Figure 9(c). The user may further indicate
the
name of the staff member who witnessed the consent given by selecting from the
Witnessed By dropdown list and, select the Discharge instructions reviewed,
signed
and witnessed check box, if instructions were provided and accepted by the
patient.
The user may further enter the name of the staff member who reviewed the
discharge instructions with the patient and witnessed .the patient signing the
discharge instructions in the Name field and enter the date and time when the
discharge instructions were provided using the Date or time icon to populate
the
respective Date or time field or, by manually entering the date or time.
Furthermore,
the user may enter any other information in the Notes text entry box shown in
Figure
9(c).
Further, when preparing a patient for an exam, the user may use a
Prep Status screen to record information such as: NPO (nothing by mouth);
Bowel
preparation; Prep results and Current medications. Thus, before performing a
procedure, a user may select a Prep Status menu option 917 via the Pre-
Procedure
tab 900 of Figure 9(a), which causes display of a Prep Status screen (not
shown)
enabling a user to enter the prep status information in a database record.
There may
2 0 be different Prep Status screens for the Broach and GI departments and an
exam
must be selected before accessing the Prep Status screen. Via the Prep Status
screen, the user may select the appropriate NPO from the NPO dropdown Iist,
select
either the Taken or Not Taken radio button (GI only) for bowel preparation,
and,
select the appropriate prep result from the Bowel Prep Results dropdown list
(GI
2 5 only). The user may further enter any other information in the Other
Results field, if
appropriate (GI only). By clicking the history next to Current Medications, a
user
may view the patient's medication history via a Medication History screen (not
shown) and add new current medications) for the patient, if appropriate. To
add a
new medication via the Prep Status screen, an Add Medication screen is
displayed
3 0 that enables a user to enter the first few letters of the medication name
in the Drug ,
(Brand) Name search field to search for the medication that needs to be added.
The
user may additionally search by drug and/or brand names. By selecting search
icons, additional Search screens (not shown) may be displayed that enables a
user to
34
CA 02526149 2005-11-16
WO 2004/104754 PCT/US2004/015169
select the medication that is to be added, select a dosage and delivery
method. An
Update Medication History checkbox may be selected to add the medication to
the
medication history of the patient and, the start date of the medication.
Further, before performing a procedure, a user may select a Patient
Assessment menu choice 918 via the Pre-Procedure tab 900 of Figure 9(a), which
causes display of a Patient Assessment screen 970 as shown in Figure 9(d)
providing
functionality enabling a user to record information relevant to patient pain,
emotional status, learning needs, and IV initiation. The data captured on this
screen
is important when assessing the patient's overall condition and may be
modified via
the Patient Assessment screen. To record patient assessment information via
the
Patient Assessment screen 970, the user may select a value from the Pain Score
dropdown list 972, enter the location, quality, and/or duration of pain in the
Location/Quality/Duration field 974, enter relevant information in the
Measures to
Alleviate Pain field 976, enter relevant information in the Management Plan
field
977, select a radio button 978 representing the patient's Emotional Status.
The
available selections for Emotional Status include: Calm/Relaxed,
Anxious/Participates in Care, and Agitated/Unable to Participate in Care.
Further,
via the Patient Assessment screen 970, the user may select a radio button 975
corresponding to the patient's preferred learning method (e.g., seeing,
hearing, or
2 0 doing) and, enter the patient's preferred language in the Preferred
Language field.
The user may fuxther select a Needs Interpreter checkbox if the patient needs
an
interpreter, and, select one or more barriers to the patient's ability to
learn via
available checkbox selections for Vision, Hearing, Physical, Emotional, and
Cognitive reasons. Via the Patient Assessment screen 970, the user may set the
2 5 appropriate IV Type and Needle Gauge dropdown fields in a Venous Access
section
shown in Figure 9(d). A user may select system defaults for these, by clicking
a
Default button, or, if "other" choice is selected for Gauge, the user may
enter the
needle size iii the Specify field provided. The user may fmfiher select a site
of the IV
from the Site dropdown list, enter the start time of the IV in the Start Time
field,
3 0 select the name of the clinical staff member who started the IV from the
Administered By dropdown list, and, select an Existing IV checlcbox if an
existing
IV is used.
CA 02526149 2005-11-16
WO 2004/104754 PCT/US2004/015169
Before performing a procedure, a user may further select a Physical
Exam menu choice 920 via the Pre-Procedure tab 900 of Figure 9(a), which
causes
display of a Physical Exam screen (not shown) enabling a user to record
information
such as the patient's weight and height (a patient's estimated and actual
height and
weight in either inches or centimeters/pounds or kilograms (the system will
fill in
the other unit field by calculation)), general appearance (from a dropdown
list to
select the patient's appearance as either well or ill), nourishment (select
whether the
patient is well-nourished, poorly nourished, or emaciated from the dropdown
list),
stated age, appearance, color (select whether the patient's color is normal,
pallor,
jaundice, or rash from a dropdown list, for example), skin palpation (select
whether
the patient's skin palpation is warm, cold, dry, or diaphoretic from a
dropdown list,
for example), GI system function (for example, by clicking Yes/No radio
buttons for
the choices listed), and other information (such as I~arnovsky Status
information
from a dropdown list, for example) that is appropriate before the physician
begins
the exam. There are different Physical Examination screens for the GI and
Broach
departments and, a user must select an exam before accessing the Physical
Examination screen. The Physical Examination record for a patient may
subsequently be modified.
Before performing any procedure, it is advantageous to record the
2 0 patient's vital signs, medication information and intraprocedural
assessment
information. Thus, before performing a procedure, a user may select a Vitals
and
Meds menu choice 922 from the Pre-procedure tab 900 of Figure 9(a), which
causes
display of a Vitals and Meds screen 980 such as shown in Figure 9(e), enabling
a
user to enter a patient's vital and administered medication information.
2 5 Additionally, via the Vitals and Meds screen 980 display of Figure 9(e), a
user may
also record pre-procedure Aldrete scores to compare the patient. As shown in
Figure 9(e), the Vitals And Meds screen interface includes two tabs: a Vitals
And
Meds tab, and Assessment tab. The Vitals And Meds tab includes two displayed
sections: a Vitals which include, for example, rows for entry of information
for a
3 0 patient such as pulse rate, respiration, systolic, diastolic, OZ
saturation, quantity and
method of 02, and temperature, for example; and, Medications for a patient
including information about medications administered during the different
phases of
care. The Assessment tab includes the other two sections: Aldrete Scores which
are
36
CA 02526149 2005-11-16
WO 2004/104754 PCT/US2004/015169
scores for activity, respiration, circulation, consciousness, O~ saturation,
dressing,
pain, ambulation, fasting - feeding, and urine output; and, Intraprocedural
Assessments which include intraprocedural observations for the patient before
and
during an exam. This information comprises LOC (level of consciousness),
skin/circulation, rhythm strip, emotional status, pain, and notes.
As further shown in Figure 9(e), the vitals and weds interface 980
displays generated columns that are populated with values of the patient's
vitals data
at the time of each reading. That is, each column is created and associated
with an
instant of time (i.e., a "timestamp") as indicated. For each time new patient
vital
data is entered, a column is created in the right side portion of the
interface. To add
a column via the Vitals And Meds screen, a user may click an icon to initiate
functionality for causing the addition of a column associated with a current
time. A
column is thus added to the vital and coeds display with the current time. A
patient's
vitals and coeds information may be captured at different time-intervals.
However,
by default, a user will only see one column in the Vitals And Meds screen of
Figure
9(e). Therefore, the user may add more columns for different time intervals.
To add
multiple columns via the Vitals And Meds screen, a user may click an icon to
initiate functionality for causing the addition of multiple columns.
Particularly, an
add multiple columns window is displayed the user is able to click a Date icon
to
2 0 enter the date or, type it in manually. By default, the current date is
populated. The
user may further click the Time icon to enter the time or type it in manually.
By
default, the current time is populated. Further, the user is enabled to enter
the
interval and columns to the Interval and Columns fields (not shown). Thus, to
record a patient's vital information it is first required that a column is
available to
2 5 record the vitals values in the Vitals section of the Vitals And Meds tab.
If not, the
user will be prompted to add a column or add multiple columns. The values may
then be entered to any or all of the vitals (except 02) using a slider
interface entry
mechanism, spinners, or a text box.
It should be understood that further vitals and medication
3 0 information may be recorded via the Vitals and Meds interface during the
Procedure
phase of care. If any information was recorded during the pre-procedure phase
of
the examination, this information will be displayed in the screen during the
Procedure.
37
CA 02526149 2005-11-16
WO 2004/104754 PCT/US2004/015169
Before performing a procedure, it is necessary for the physician to
document liis/her review of a patient before an exam. Thus, a user may select
a
Physician Checks menu option 923 via the Pre-Procedure tab 900 of Figure 9(a),
which causes display of a Physical Exam screen 990 shown in Figure 9(f) that
enables a user to: select the Nurse Documentation Reviewed checkbox to
indicate
that the physician has performed a review of the nurse documentation; select
either
the Normal or the Abnormal radio buttons for each of the items listed in the
Focused
Physician Exam section displayed. To set the unselected radio buttons to
normal,
the user may click the Set Unselected To Normal button. This is useful because
in
may cases they are almost normal. If an item is set to Abnormal, the
corresponding
Details field is enabled to allow entry of information. The user may further:
select a
value from the ASA (American Society of Anesthesiologists) physical status
classification dropdown list; select an item from the Patient is suitable
candidate for
planned procedure with dropdown list; select an item from the Level of
Consciousness dropdown list; select the Emergency Equipment Available
checkbox,
if appropriate; select the Authorize Post-Procedure discharge when standard
criteria
are met checkbox, if appropriate; and, select the name of the clinical staff
member
who performed the physician checks from the Reviewed By dropdown list. This is
a
mandatory field and must be filled before the record can be saved. Further,
the user
2 0 must provide the date that physician checks were performed by entering the
date
manually or by using the Date icon and provide the time that physician checks
were
performed by entering the time manually or by using the Time icon.
Further, via the Pre-Procedure tab 900 shown in Figure 9(a), the user
may access the Lexicon function to select terms from the Knowledge Base as
2 5 described herein with respect to Figure 8(e). As described, the Lexicon
arranges the
Knowledge Base content into different report sections, based on Phases of
Care.
These report sections appear as tabs in the Lexicon screen, and for the Pre-
Procedure
phase of care, the report sections include "indications", Unplanned events,
and
codes. Thus, via the Lexicon, a user is provided with the ability to associate
Billing
3 0 Codes with selected Keywords. A user may use these codes in Procedure Note
and
thus to bill certain other medical institutions for services rendered. To
associate a
billing code with a selected keyword via the Lexicon screen, the user selects
the
keyword that the user wants to associate the billing code with, and selects a
type of
38
CA 02526149 2005-11-16
WO 2004/104754 PCT/US2004/015169
code set from a Code Set dropdown list (not shown). After entering the number
of
code that the user is searching for in the Number field, a user may enter
description
of the code in a Description field and the system will respond by displaying a
list of
billing codes based on the search criteria entered. If the user does not enter
any
search criterion, all the billing codes from the selected code set are
displayed from
which the user may select one or more billing codes.
Further, via the Pre-Procedure tab 900 shown in Figure 9(a), a user
may select a Pre-Procedure Summary menu choice 924 which causes display of a
Pre-Procedure Summary screen 995 shown in Figure 9(g) that enables a user to
record, review and/or edit a summary of pre-procedure and nurse handoff
information. This includes the status of the prep, consent, current
medications, and
abnormal findings from the physical examination. To record pre-procedure
summary information, the user accesses the Pre-Procedure Summary screen 995,
and selects either the Yes or No radio button to indicate whether the pre-
procedure
nurse's report has been provided. An Edit button may be clicked to display the
Capture Visit Times screen from which the user may enter the pre-procedure end
date and time using the Date and Time icons. The name of the prep nurse is
also
selectable from the Prep Nurse dropdown list, and the name of the procedure
room
nurse may be selected from the Room Nurse dropdown list. Any other relevant
2 0 information may be entered in the Nursing Notes field via this display. It
is
understood that the pre-procedure summary information may be modified via the
screen display of Figure 9(g).
Further, via the Pre-Procedure tab 900 shown in Figure 9(a), a user
may select a Pre-Procedure Docs menu choice 926 that causes display of a
2 5 Document Distribution screen (not shown) that enables a user to print and
distribute
documents related to pre-procedure information in a manner such as described
herein with respect to Figure 8(f). Generated documents may be distributed via
email or fax. The documents may be previewed and edited prior to printing or
distributing and, as described herein, the user may also edit the recipient
list for each
3 0 document type.
A user may also access an Other Visit Information screen (not
shown) via the Pre-Procedure tab 900 of Figure 9(a) to record custom pre-
procedure
visit information that is not yet captured in one of the other screens. Based
on the
39
CA 02526149 2005-11-16
WO 2004/104754 PCT/US2004/015169
requirements of the particular facility, the system can be used to record
specific
information if an exam is selected.
Proceduretab
With further respect to the Procedure tab 1000 (Figure 10(a)),
functionality is provided enables the user to: review the pre-procedure
summary;
modify patient visit information; record items used during the exam; manage
scope
information; capture images and record video clips; modify pathology and
specimen
information; record a patient's vital signs and medication information; view
other
exam information; update the lexicon; manage the printer (e.g., Mavigraph)
queue;
manage procedure documents; and, record and maintain nursing administration
information.
Before performing a procedure, a physician may need to view the
following information: the particulars of a scheduled exam to give the
physician
exam details; a Pre-Procedure summary to picture pre-procedure information
about
the patient; visit information if another visit/exam is required for the
patient;
Pathology record to view the result or lab tests; and, any equipment necessary
to
capture the information about the equipment used for the procedure. Thus,
according to functionality described herein with respect to Figure 8(a), a
user may
2 0 view the Scheduled Exams option via the procedure tab to view details of
exam, to
search for an exam, or to add a new visit.
Further, via the Procedure tab 1000, as shown in Figure 10(a), a user
may select the Pre-Procedure Summary menu choice 1001 which causes display of
the Pre-Procedure Summary screen 1020 shown and described herein with respect
to
2 5 Figure 10(b) that provides functionality enabling the automatic population
of a
synopsis of information obtained during the pre-procedure phase of care in the
display screen.
Further, via the Procedure tab 1000, a user may select the Modify
Visit menu choice 1002 that enables a user to schedule a patient visit and to
modify
3 0 an existing visit record as shown and described herein with respect to
Figure 8(c).
Further, via the Procedure tab 1000, the user may select the
Equipment Used menu option 1003 which causes display of an Equipment Used
CA 02526149 2005-11-16
WO 2004/104754 PCT/US2004/015169
screen 1030 such as shown in Figure 10(c). Via the Equipment Used screen 1030
a
user may record the information pertaining to equipment used in the
examination,
particularly by adding the media information in a displayed Media section, or,
click
a New button next to Accessory, to add a new entry in the Accessory section
which
enables a user to select an accessory category from a Category dropdown list
and
enter the item number and quantity. By clicking the Add button next to
Equipment,
an Equipment Detail screen (not shown) is displayed from which the user may
select
the accessory category from a Category dropdown list. If the user selects
Electrosurgical Generators from the Category dropdown list, for example, an
Electrocautery section is enabled via which a user may enter other equipment
information, e.g., a serial number, etc. All of the entered equipment
information in
the Equipment Used and equipment detail screen may be saved.
With respect to the performance of a procedure, during the actual
exam, a user may: manage scope information; capture images and record video
clips; modify pathology and specimen information; record a patient's vitals
and
medication information; view other exam information; manage a mavigraph
printer
queue; distribute documents; and, maintain nursing administration information.
Thus, via the Procedure tab 1000, a user may select the Image
Capture menu choice 1004 that enables generation and display of an image
capture
2 0 interface screen 1050 such as shown in Figure 10(d) that provides the user
with the
ability to: capture images and record video clips, modify and delete these
images,
and incorporate them into a report document. Tf an endoscope device to be used
is
not connected to the application, a warning message may be generated that the
device cannot communicate and the user prompted to ensure the scope device is
2 5 connected to the system.
Initially, via the Image Capture screen 1050, a user may add and
delete scope information via the Add Scope Information section 1052 of the
interface shown in Figure 10(d). Typically, an endoscope device employed
includes
an ID chip that provides information such as scope name, serial number, etc.
and
3 0 this data is sent to the EW system (e.g., imaging node) through the video
processor.
The system adds new scope information automatically when it receives this
data. If a
scope does not contain ID chip, the user may add the new scope information
manually. To add new scope information, a user may click New button on the
right
41
CA 02526149 2005-11-16
WO 2004/104754 PCT/US2004/015169
of Scope Information, click a Search icon and locate the scope type that needs
to be
added via a displayed Scope Model dropdown list (not shown). The user may
select
a scope model number and a serial number. The user may additionally select a
Time
icon 1053 to enter the current time or type it in manually, and, click on a
Calculate
Duration icon 1054 that initiates functionality for calculating the duration
and the
Total Duration time that the scope is being used.
During the procedure, in order to capture images, the user may click a
Pause icon in order to freeze the image. To capture an image, a user may click
a
Capture icon which initiates functionality for displaying the image in an
Images box
1055 such as shown in Figure 10(d). If a user double clicks the image, the
image is
generated for display in a further space as shown by the enlarged image 1056
in
Figure 10(d). If, during an exam, the scope device is disconnected, the user
must re-
initialize the system, e.g., reconnect the device to the system within the
Image
Capture screen. The system will automatically re-initialize or it may be
manually
reset.
With respect to image capture, the system provides three mask
settings: an automask, primary and secondary settings. A Toggle Mask function
is
provided that enables the user to toggle between these video settings. If a
system
administrator has applied the automask setting, then the user may either
switch
2 0 between these video settings, or select a new video setting. For example,
by
clicking a Toggle Mask button 1057 located next to a Mask dropdown list 1058,
the
automask settings will change to the primary settings. By clicking the Toggle
Mask °"'
button again, the primary settings will change to the secondary settings. When
a
scope is connected to the system, the default automask settings are applied.
The
2 5 user may change the default automask settings by selecting a setting from
a Mask
dropdown list.
To record video clips: a user may click a Record Clips icon 1059a
that enables functionality for recording a video clip and storing the clip for
later
playback via the hnage Management section 1055 or, delete Video Clips. With
3 0 further regard to deleting clips, by clicking the Delete Clips icon 1059b
all unsaved
video clips) are displayed in a screen (not shown) that enables a user to
select the
clips) to be deleted.
42
CA 02526149 2005-11-16
WO 2004/104754 PCT/US2004/015169
Further functionality enabled by the system during the performance
of an endoscopic procedure is the ability to capture and view pathology and
specimen information such as: Lab, Specimen, Cytology, and Biohazard details.
Thus, via the Procedure tab 1000 of Figure 10(a), a user may select the
Pathology
Request menu option 1005 that enables generation and display of a Pathology
Request screen 1060 for the selected exam such as shown in Figure 10(e). To
create
a pathology request record via the Pathology Request screen, the user selects
an Add
button to enable selection of a laboratory from a Lab dropdown list and enter
other
relevant information including the jar number, collecting method and specimen
information in a specimen section associated with a specimen record (not
shown).
During the course of the examination, a user may make further edits or
required
changes to the pathology request and specimen record, or add or delete records
via
the Pathology Request screen.
During the procedure, it is advantageous to record the patient's vital
signs, medication information and intraprocedural assessment information.
Thus, a
user may select a Vitals and Meds menu choice 1006 from the procedure tab 1000
in
Figuxe 10(a) which causes display of a Vitals and Meds screen (not shown)
enabling
a user to enter a patient's vital signs and administered medication
information via
the graphical user interface in the manner as described in greater detail
herein with
2 0 respect to Figure 9(e).
Further, via the Procedure tab 1000 shown in Figure 10(a), the user
may access the Lexicon function 1007 to select terms from the Knowledge Base
as
described herein with respect to Figure 8(e). One feature of the lexicon is
that the
Knowledge Base arranges content to different report sections based on the
phases of
2 5 care. A facility determines which Report Sections should be available in
the
Lexicon screen for a Phase of Care (endoscopic procedure lifecycle stage).
Thus, a
user will select a Report Section to display the llierarchal tree of items
(menus and
keywords) for the report section and current examination and the tree of the
lexicon
interface displays the available items. Thus, for example, if a physician
fords a
3 0 small polyp in the anterior wall of the antrum of stomach, the lexicon
screen will
result in the display 1065 as shown in Figure 10(f).
43
CA 02526149 2005-11-16
WO 2004/104754 PCT/US2004/015169
As mentioned, during the procedure phase of care, it is possible
manage the printer (e.g., Mavigraph) queue; manage procedure documents; and,
record and maintain nursing administration information.
Thus, via the Procedure tab 1000 of Figure 10(a), a user may select
the Mavigraph Printing menu choice 1008 that generates a Mavigraph Printing
screen (not shown) enabling a user to search for a printing queue for the
printer
device, e.g., a mavigraph, particularly by entering a facility and selecting a
printer.
Via this screen, a user may further print images for current exam, for
example, by
selecting the number of images a user needs to print on a page from the Images
per
Page dropdown list and selecting one or more print options from Annotations,
Enhancements, and Anatomical Diagram choices as shown in the print on
mavigraph interface screen 1070 shown in Figure 10(g).
Further functionality via this phase of care, includes the ability to
manage procedure documents, particularly by selecting a Procedure Docs menu
option 1009 via the Procedure tab 1000 which causes display of a Document
Distribution screen 1075 such as shown and described herein in further detail
with
respect to Figure 10(h). Via the Document Distribution screen 1075 a user may
review, edit, and print a document from the Document Distribution screen, and
further, select a recipient and cause the distribution of patient and exam
related
2 0 documents to the intended recipient (e.g., clinical staff), for example,
by print,
email, or FAX.
During the procedure, it is further advantageous to capture and
maintain nursing administration information. Thus, via the Procedure tab 1000
shown in Figure 10(a), a user may select the Nursing Admin menu choice 1010
that
2 5 enables generation and display of a Nursing Administration screen 1080 for
the
selected exam such as shown in Figure 10(i). Via the Nursing Administration
screen
1080, a user may click a button 1081 to display a Capture Visit Times screen
that
enables a nurse to enter a Room In date and time, a Procedure/Sedation Start
time, a
Procedure End time, and a Room Out date and time. The user may further enter
3 0 relevant Safety and Position information in respective displayed Safety
and Position
sections, and, select the present medical staff information from a Resource
dropdown list. By clicking a Scheduled button, a user may further enter the
medical
staff person who is assigned to the procedure in the Assigned textbox and,
further
44
CA 02526149 2005-11-16
WO 2004/104754 PCT/US2004/015169
enter information about the Room Nurse and Recovery Nurse in the Handover
section 1082.
Post-Procedure tab
With further respect to the Post-Procedure tab 1100 (Figure 11 (a)),
functionality is provided that allows the user to: synchronize images in ICU
mode;
manage exam images; print images on either mavigraph or laser printer; create
procedure notes for the exam; sign procedure notes; gather a patient's current
vitals
and medication information; prepare a patient recovery sheet; create a patient
recall
letter; perform a trainee assessment; distribute post procedure documents such
as
billing reports, Procedure Notes, and referral letters.
After performing a procedure, a physician may perform the following
operations: synchronize images in the ICU mode: manage images; review/edit
clinical Lexicon; generate Procedure Notes; record patient's current vital
signs and
medication information; prepare a recovery sheet for a patient; prepare recall
patient
letter; complete patient satisfaction survey; perform trainee assessment; and,
distribute post procedure documents.
According to functionality described herein with respect to Figure
11(a), when a user is performing an exam in ICU mode, his/her imaging station
is
2 0 not connected to the network server (see Figure 1(a)), i.e., is physically
disconnected
from the network. The application supports the capture of all necessary data,
perform the examination and store the information until reconnected to the
network.
The locally stored data is then uploaded to the server database. Thus, for
example,
when an exam is finished, the user must upload and synchronize images and data
2 5 from the workstation to the server repository. In one embodiment, when a
user re-
connects the workstation to the network and logs in to the system, the user
enters a
series of commands that will initiate functionality to upload and synchronize
the
data and images captured during the exam.
Thus, according to functionality described herein, a user may first
3 0 view the details of exams from the Scheduled Exams display by selecting
menu
CA 02526149 2005-11-16
WO 2004/104754 PCT/US2004/015169
option 1102 via the post-procedure tab 1100 of Figure 11(a) to view details of
exam,
to search for an exam, or to add a new visit.
Further, via the Post-Procedure tab 11(a) of Figure 11(a), a user may
select the ICU Synchronization menu choice 1104 which causes display of the an
ICU Synchronization screen 1130, such as shown in Figure 11 (b), to
synchronize
images in the ICU mode within the database. A user may select a node from a
Node
dropdown list that generates for display a list of exams on the selected node
that are
conducted in ICU Mode. After the user selects the exam to be synchronized, the
ICU Exam screen is displayed with a list of likely matches. The user will
search for
a scheduled exam, or retrieve a list of exams for display, based on user
search input,
if the exam is not in the list of matches. A user clicks the Synchronize This
Exam
icon next to the exam to be synchronized and initiates synchronization for the
selected exam. Entry into the Image Management screen within the Post
Procedure
tab will confirm whether the synchronization has been performed successfully.
If
the user does not find the exam to be synchronized, the user may create a new
visit
and thus add an exam to the visit.
Particularly, the user may, via the ICU Exam screen, select the
facility for the visit from the Facility dropdown list (e.g., the default
facility is the
facility to which the user is currently logged in); enter visit ID in the
Visit ID field.
2 0 A visit ID is a unique facility-supplied identifier for the visit; click a
Patient Search
icon next to a Patient field to display a Patient Search screen. If no patient
record is
found in the Patient Search field, a new record for the patient may be created
by
clicking a New Patient icon to display the Patient Demographics window having
functionality as described herein to assign a resource for synchronization.
The
2 5 images and data are synchronized to the repository and the ICU
Synchronization
screen is displayed again. To verify if the synchronization was successful,
the user
then navigates to the Image Management function by selecting the Image
Management menu choice 1106 that causes display of the Image Management
screen 1140 such as shown and described herein with respect to Figure 11 (c)
that
3 0 provides functionality for managing images captured during a procedure,
particularly: annotate images, label images or associate findings to an image;
display
details of an image; enhance the quality of images; import and export images;
view
46
CA 02526149 2005-11-16
WO 2004/104754 PCT/US2004/015169
other exam images; print images on either a mavigraph or laser printer; and
delete
images.
By selecting an import image button, a few exam images in a folder
may be imported in the current exam (by clicking an Import an hnage to the
current
exam icon 1141), using an import image function. By selecting an Export the
selected Image icon 1142, images) files are exported to a destination folder
including BITMAP, JPG or TIFF images, for example, using an image export
function, via the Image Management screen 1140 for storage.
To highlight or comment on certain critical areas of an image, a user
can add lines, circles, ellipses, arrows, and text as annotations, and
further, may also
change the color, shape, dimensions, and location of an annotation.
Annotations that
are created via the image management interface are stored as overlays, and do
not
affect the original image, and further can show or hide annotations. To
annotate an
image, for a selected exam, the Image Management screen 1140 of Figure
11(c)(1)
displays all the images captured during the selected exam from which a user
may
click select the image to annotate from an image list 1145.
By selecting an appropriate shape icon from a displayed annotation
menu 1147, a line, a rectangle, an ellipse, or a circle may be clicked and
dragged
onto the image, such as the exemplary annotation 1132 shown in the selected
image
2 0 1133 shown in Figure 11(c)(1). The selected shape will appear on the image
in
which a text message may be inserted via selection of a text icon, which is
dragged
to create a textbox on the image.
To move a shape in an image, a user selects a Selection Mode icon
1148 on the selected image, and clicks a previously-created annotation shape
that
2 5 he/she wants to move and drag to the desired location. The Selection Mode
icon is
used to switch back and forth from drawing a new image to selecting an
existing
one. To draw another shape, a user clicks the Selection Mode icon 1148 again
to
switch to Drawing Mode. The user may further delete a shape in an image.
To enhance an image a user selects a Enhance Image icon 1151 on
3 0 the selected image, which initiates display of an enhancements window (not
shown)
including mechanisms such as: a Zoom slider to change the size of the image,
if
desired, a Sharpness slider to change the sharpness of the image, if desired,
a
Contrast slider to change the contrast view of the image, if desired, and a
Brightness
47
CA 02526149 2005-11-16
WO 2004/104754 PCT/US2004/015169
slider to increase or decrease brightness of the image. The enhanced image may
be
reset by to its original setting by clicking a Reset button.
The user may further select functionality for showing or hiding an
annotation on a selected image by clicking the Show/Hide Annotation icon 1153,
and ftu-ther, initiate functionality for viewing Other Exam Images. If a
patient has
undergone a similar exam in the facility and the user wants to view images
from that
exam, an Other Exam dropdown list 1155 is provided to enable a user to select
image results from the other exam. As shown in the example image management
screen 1140' of Figure 11(c)(2), the other exam images are accessed and
generated
for display in an image list 1156 format simultaneously with the display of a
current
image list of captured images for user comparison.
Returning back to Figure 11(c)(1), via the interface, a user may
Magnify images from the other exam using the View Large Image icon next to the
Other Exam dropdown list, and further view Procedure Notes recorded for the
other
exam using the View the Procedure Note icon 1157. The title bar of the
Procedure
note may include the date and type of the other exam.
It is understood that, in situations when the user has no findings to
associate with an image, a user may label the image for future identification
via the
Image Management screen by clicking the Label all selected images from the
2 0 current exam icon 1158 to display a Label window in which a label may be
entered
in the label text entry pop-up textbox (not shown). Subsequently, the label
may be
modified or deleted via the Image Management screen.
The user may fiufiher delete all unlabeled images from the current
exam with just a click by selecting a Delete all unlabeled images from the
current
2 5 exam icon 1159 via the Access the Image Management screen 1140 of Figure
11(c)(1).
If the user captures images relating to specific findings and wants to
associate the findings description to the captured images, the Lexicon menu
option
1107 may be selected from the Image Management screen 1100 shown in Figure
30 11(c)(1) to enter a finding using the knowledge base section 1149. First,
for a
selected image, a Findings tab 1146 is selected from the displayed Knowledge
Base
section and a finding title is clicked from the displayed Knowledge Base tree.
The
finding information will be generated by and appear in the left side of the
48
CA 02526149 2005-11-16
WO 2004/104754 PCT/US2004/015169
Knowledge Base interface in the manner as described herein. Then, by clicking
the
Associate Findings icon 1160 from the image management screen shown in Figure
11(c)(1), the fording is associated with the selected image. When the user
associates
a fording to an image, the image is also marked for printing.
To disassociate a finding from an image, an image that has a fording
is selected and the Disassociate Findings icon 1162 is clicked by the user. It
is noted
that when a user disassociates a fording from an image, the image does not get
unmarked for printing.
The system of the invention provides an anatomical diagram to
document any surgical changes. When a user associates a fording that includes
a site
with an image, a dot is displayed corresponding to site of the finding. There
are
different surgical diagrams for different exam types. To view the surgical
diagram
the user clicks an image that is associated with a finding via the Image
Management
screen 1140 shown in Figure 11(c) and selects a Surgical Changes icon 1163 to
display the Surgical Changes window 1165 such as shown with respect to Figure
11 (d). Functionality is further provided to enable a user to annotate a
surgical
diagram by using the toolbar in the Surgical Changes screen for drawing
arrows,
circles, lines, rectangles, and solid rectangles in the selected image as
described
herein with respect to image capture. A user may additionally type and format
text,
2 0 move, hide, and delete annotations as described herein.
Returning to Figure 11(c)(1), if the user desires to print images for an
exam, the unages for printing must be first marked by clicking the Mark
selected
images for printing icon 1172 via the Image Management screen 1140 and printed
on a mavigraph or any other suitable printer (for example). Preferably, a
suitable
indication, such as a "P", as shown in Figure 11(c)(1) for example, is
provided in the
corner of a captured image that marks that image for printing. Subsequently, a
user
may click the Unmarlc selected image for printing icon 1173 to unmark an
image,
and remove the "P" indication on the top-right corner of the image. '
To print images on a mavigraph printer, the Mavigraph Printing
3 0 functionality is provided for adding a print job for the currently
selected mavigraph
printer. A user may print one or more print jobs, and reprint an existing
print job.
Thus, after marking the images to be printed in the Image Management screen, a
user may select the Mavigraph Printing menu option 1108 from the Image
49
CA 02526149 2005-11-16
WO 2004/104754 PCT/US2004/015169
Management screen of Figure 11(c)(1) which displays a Mavigraph Printer
dropdown list from which a mavigraph printer may be selected. It is understood
that, as described herein with respect to Figure 10(g), for the current exam,
an
Annotation checlcbox may be selected if the user wants to print images with
their
annotations; an Enhancements checkbox may be selected to print images with
their
enhancements in terms of sharpness, contrast, and brightness; and, an
Anatomical
Diagram checkbox may be selected to print the anatomical diagram for the exam.
Further functionality is provided for deleting a print job, clicking on the
checkbox
next to the print job to be deleted.
If video clips were recorded during the procedure, a user may manage
those clips via the Post Procedure tab, and particularly play and delete video
clips,
and save a video clip to another file. To play a video clip, via the Image
Management screen, a Video Clips icon 1176 may be selected to display the
Video
Clips List window where the user may further click a Preview icon (not shown)
to
play the video clips in a suitable viewer such as Windows Media Player, or,
delete
video clips. By clicking the Video Clips icon to display the Video Clips List
window, a Video clips) may be selected for deletion or be saved to another
File via
the Image Management screen, e.g., by clicking a Download icon and selecting a
destination file location.
2 0 As mentioned previously herein, a user may use the Lexicon function
to select terms from the Knowledge Base. For example, when it is desired to
record
procedure related information for the exam, the user may select the Lexicon
function
to record findings. The Lexicon arranges the Knowledge Base content into
different
report sections, based on Phases of Care, these report sections appearing as
tabs in
2 5 the Lexicon screen 1065 such as shown in Figure 10(f) including an
indications tab
1177a, a procedure tab 1177b, a findings tab 1177c, an unplanned events tab
1177d,
a recommendations tab 1177e, a summary tab 1177f, and a billing codes tab
1177g.
By clicking on a tab to see the Knowledge Base terms associated with the
report
section, a facility determines which report sections should be available in
the
3 0 Lexicon screen for a phase of care. A system administrator can make a
report
section available to appropriate phases of care via an Admin tab 1300.
Functionality
enabled via the Lexicon screen is described in greater detail herein. When the
user
picks or selects an available term (based on that user's findings) from the
right hand
CA 02526149 2005-11-16
WO 2004/104754 PCT/US2004/015169
side pane, it is copied to the left hand side pane that displays the selected
terms thus
logically build a comprehensive description of the exam. These selected terms
along with other exam data collected during various phases of care are used to
generate Procedure Note and other exam related documents.
One particular use of the Lexicon is the ability to associate Billing
Codes with selected keywords. These codes may be used in Procedure Note and
thus provides the ability to bill certain other medical institutions for
services. To
associate a billing code with a selected keyword the user accesses the Lexicon
screen portion 1179 such as shown in Figure 11 (a), selects the keyword
desired to be
associated with the billing code; clicks the Code icon 1180 and select a code
set
display option (not shown) from a displayed Select Billing Codes window (not
shown). After selecting a Code Set, a Code Sets window is displayed whereby
the
user may search for a billing code from this window. The user selects a type
of code
set from the Code Set dropdown list and, enters number of the code to be
searched
for in an optional Number field, or further enter a description of the code in
an
optional Description field. A list of billing codes based on the entered
search
criteria is displayed or, by default, all the billing codes from the selected
code set are
displayed if no search criteria is entered. A user from this list may then
click a
billing code to select it, or further select multiple billing codes.
2 0 As mentioned herein, a Procedure Note is documented information
about a specific exam and is used to document findings, diagnosis, medication,
recommendation, and other information such as past diagnosis; a user may
additionally use the Procedure Note function to manage images; view
information
such as images and Procedure Notes for other exams; select terms from the
2 5 Knowledge Base tree; generate report text; select billing codes; sign a
note; generate
different versions of a note; and discard or delete a note.
Via the Post-Procedure tab 1100 of Figure 11(a), a previously created
Procedure Note template configured in a manner as specified by a facility or a
physician to display captured information in a document, is selected. A system
3 0 administrator previously creates the Procedure Note template. Thus, for a
selected
exam a user selects a Procedure Note menu option 1109 via the tab 1100 of
Figure
11(a) and a Select Procedure Note Template screen (not shown) is displayed
that
enables a user to search for a Procedure Note template based on facility
and/or
51
CA 02526149 2005-11-16
WO 2004/104754 PCT/US2004/015169
physician name. A resulting list of Procedure Note templates is displayed that
are
selectable by a user.
As shown in Figure 11 (a), an example selected Procedure Note
screen 1190 is shown that includes three sections: an Image Strip 1145, to
manage
images for the current exam as described herein with respect to Figure
11(c)(1); a
Procedure Note Builder 1182 providing an interface for editing and generating
Procedure Note documentation; and, a Knowledge Base Interface 1179, to pick
Knowledge Base terms to generate a report.
As mentioned herein with respect to Figure 11 (a), a user may use the
Images section similar as a user would use the Image Management screen (Figure
11(c)(1)). The Image section of the Procedure Note screen buttons enables
functionality for: deleting selected images from the current exam; deleting
all
unlabeled images from the current exam; mark/unmark selected images for
printing;
viewing a larger image; labeling all selected images from the current exam;
deleting
the label from all selected images from the current exam;
associate/disassociating
findings; showing/hiding a menu or a strip; and, viewing images and Procedure
Notes for other exams associated with the selected patient.
A user may further use the Procedure Note function to select
Knowledge Base terms for an examination. Thus, the Knowledge Base section is
2 0 used to select terms and when a Note is created, the user may select a
Generate
Report icon 1192 to generate a report including sentences in the document
section.
The Generate Report icon is activated if changes are made to the selected
terms. If
any of the selected keywords are associated with a sentence model, the
sentence is
generated and populated in the displayed report within the specific Report
Section.
2 5 If a Use Organ Labels function has been previously activated for the exam
type, the
sentences for findings are prefixed with the name of the organ. For example,
if there
were a fording of "polyp" in "stomach" and the Use Organ Labels is set to Yes
for
the exam type, the sentence in the report would look like:
3 0 STOMACH: There was a polyp found in the stomach.
When a sentences are generated for findings, and if there is an image
associated with that finding, the image number appends at the end of the
finding.
52
CA 02526149 2005-11-16
WO 2004/104754 PCT/US2004/015169
For example, if there is a fording of polyp with "image 1" within stomach, the
finding sentence would appear like:
There was a polyp found in the stomach (1).
A keyword in the Knowledge Base may have a sentence model for
the Summary section associated with it. If a selected template has a Summary
section and a selected keyword has a summary sentence model, the summary
sentence for the keyword appears in the Summary section. For example, if a
polyp
is found in the stomach and a diagnosis of polyp, the summary sentence would
be:
Diagnosis - polyp
A further mentioned herein, a user may use the Procedure Note
function to select relevant billing codes for the exam. If a keyword has a
billing
code associated with it, a user would see all billing codes and descriptions
associated
with the keyword in response to selecting the Code icon 1180 and select
relevant
billing codes associated with a keyword for the current exam.
Further functionality enabled via the Procedure Note screen 1190 of
2 0 Figure 11 (a) includes: saving a Procedure Note by clicking Save; and,
signing a
Procedure Note if the Procedure Note text is completed. It is understood that
only
attending physicians for the examination can sign the Procedure Note. If a
Validate
& Sign Procedure Note setting is set to Yes, the physician will be asked to
validate
his/her user ID and password. Signing a note will lock the report from further
2 5 editing. It is further understood that signing a Procedure Note updates a
patient's
past procedure, past diagnosis, and past surgeries records; saving a Procedure
Note
As a Template, for example, for those situations where a user makes changes to
an
existing Procedure Note and wants to apply those changes to future Procedure
Notes. The modified Procedure Note may be saved as a template which can be
used
3 0 to generate future Procedure Notes. Thus, via the Procedure Note screen
1190 a
user may select the Save As button and assign a name to the template, select
either a
facility or physician name to assign an owner to the template.
53
CA 02526149 2005-11-16
WO 2004/104754 PCT/US2004/015169
It is understood that the time in which Procedure Notes are created is
reduced by: providing procedure reporting via the medical knowledge base
interface
that implements shortcuts for commonly used items; and, incorporating
annotated
and labeled images into the written reports. Further, the appropriate sections
of the
report may be auto-populated based on patient data previously gathered during
Pre-
Procedure, Procedure, and Post-Procedure phases.
As mentioned, once a Procedure Note is signed, it is locked and
cannot be edited. To make any changes to an existing, signed Procedure Note,
the
user must create a new version of the Procedure Note. The new version of the
Procedure Note is an exact copy of the current signed Procedure Note, without
regenerating any sentences or updating any database fields. To generate a new
version via the Procedure Note screen a user may clicks a New button and a new
version of the Procedure Note is generated.
A procedure note may further be deleted by clicking Discard via the
Procedure Note screen. Discarded Procedure Notes are stored in a Discard Bin,
where they can be viewed but not restored. A Procedure Note may be deleted as
long as the Note is not signed. Further functionality enabled via the
Procedure Note
screen includes functionality for creating a new exam follow-up request by
selecting
an Exam Follow-up icon 1198 from the Procedure Note screen. To create a new
2 0 exam follow-up request: A New Exam Follow-up window (not shown) is
displayed
in response that enables a user to: select an assignee from the Assigned To
section;
select the status of the request from a Status dropdown list; and click New if
the user
has any notes to enter. An exam follow-up request is generated, which the user
may
view from a Pending Items screen in the Home tab associated with that user.
2 5 Further, via the Post-Procedure tab 1100, a user may record the
current condition of a patient, and particularly: prepare a recovery sheet
based on the
patient's vitals and meds information; determine the level of service provided
to the
patient; record a patient satisfaction survey; access trainees, if any
trainees are
involved in the procedure; and distribute exam-related documents.
3 0 Thus, after performing the procedure, the user may record the
patient's vital information, administer any medication provided, note the
Aldrete
scores, and record intraprocedural assessment information to determine the
condition of the patient upon selection of the Vitals and Meds menu choice
1111
54
CA 02526149 2005-11-16
WO 2004/104754 PCT/US2004/015169
shown in Figure 11 (a). This functionality is implemented via the Vitals And
Meds
screen to record the data as shown and described herein with respect to Figure
9(e).
After a procedure is completed, the user may further use a Recovery
screen 1195 such as shown herein with respect to Figure 11 (e) to capture
recovery
data for a patient. The recovery sheet also serves as a discharge document,
where
the user enters arrival and departure times, post procedure discharge
information, the
last Aldrete score, the patient's venous details, etc. If the user needs to
call the
patient for a follow-up, the user may create a new post-exam follow up request
from
l0 this screen.
The user may prepare a recovery sheet from the Recovery screen
1195 as shown in Figure 11 (e) after selecting the Recovery menu choice 1112
from
the Post Procedure tab 1100 and selecting an exam. Via the Recovery screen, a
user
may further display the Capture Visit Times window where the user may enter a
Recovery Arrival date and time and a Time Out of Unit time and date. The user
may further select the relevant Authorize Post Procedure Discharge
information. In
one embodiment, a Last Aldrete Score section is populated automatically with
the
last Aldrete Score that was captured in the Vitals And Meds screen of Figure
9(e).
The user may further enter Venous Details. Further, by clicking a New button
in a
2 0 Post-Exam Call section (not shown), a user may setup a post call meeting
and select
an assignee for the post-exam call from the Assigned To section. To assign a
clinical staff, a Clinical Staff icon may be displayed and a clinical staff
selected from
a Clinical Staff Lists. A user may further select the status of the post exam
call from
the Status dropdown list. If it is a new call, the status would be Open. Other
2 5 information in the New Post Exam Call window may be populated from the
system
database. The user may further enter the Discharge Details and enter relevant
information in the Patient Belongings section. If there are no belongings to
return to
the patient, there will be No Belongings) to Return indication.
To recall a patient for another examination, the user must issue a
3 0 recall letter to the patient. A Recall Patient scr een may be used to add
an item to the
Recall Letter Queue to remind a patient of a follow-up examination. Recall
letters
are exam notifications which are generated and then sent to a patient. To add
an
item to Recall Letter Queue via the post-procedure screen, a user must
navigate to
CA 02526149 2005-11-16
WO 2004/104754 PCT/US2004/015169
the Post Procedure screen 1100 in Figure 11 (a), and, for a selected exam,
select
Recall Patient menu option 1113 to display the Recall Patient screen 1196 such
as
shown in Figure 11 (f). Via the Recall Patient Screen of Figure 11 (f), the
user may
select the facility where the patient is to visit, and enter the patient name
and enter
the return time in provided entry fields. The user then selects the exam for
which
the user wants to recall the patient from the Exam dropdown list, selects the
attending physician from the Attending dropdown list and enters any notes.
The user may view and print recall letters from the Recall Letters
screen in the Home tab shown in Figure 6. To print recall letters via the home
tab
600, a user selects Recall Letters menu option 607 to display the Recall
Letters
screen, and selects a facility from the Facility dropdown list (not shown).
Other
search input, if desired, may be entered as well. In response, the system
generates
for display a list of recall letters, sorted by patient return date. The user
may then
click a Details icon to view the details of the recall. The Recall Patient
screen is
displayed where the user may make changes to the recall, if desired. A Select
checkbox may be clicked to select a letter and subsequently printed.
It is understood that a recall letter may be selected and printed from a
Select Template pop-up window from which a user may select a recall letter
from
the Template Name dropdown list for printing.
2 0 The system provides a Patient Satisfaction Survey screen to capture
the patient's level of satisfaction on certain elements, such as procedure,
staff, exam
time, and overall visit. The ratings for each item include excellent, very
good, good,
fair, or poor. To record a patient's satisfaction details via the Post
Procedure tab
1100, for a selected exam, a user selects a Patient Survey menu option 1114 to
cause
2 5 display of the Patient Survey screen (not shown) wherein the user may
enter the
patient's satisfaction rating for each of a plurality of rating items
including
Endoscopist's manner, technical skills, patient's wait time, etc.
If a trainee is involved in a procedure, the user may use a Trainee
Assessment screen to access the performance record of a trainee. The
Intubation
3 0 and Therapeutic Maneuvers may also be assessed. To record trainee
assessment
information via the Post Procedure tab 1100 shown in Figure 11(a), the user
selects
a Trainee Assessment menu option 1115 to display a Trainee Assessment screen
(not shown). A trainee may be selected from the Trainee dropdown list and
56
CA 02526149 2005-11-16
WO 2004/104754 PCT/US2004/015169
Assessment information and the optional Intubation and Therapeutic Maneuvers
information may be entered.
In a situation where a user wants to distribute documents (such as
referral letters) to another physician or facility, a Document Distribution
function
may be implemented. The user may distribute post procedure documents such as
billing reports, Procedure Notes, discharge instructions, exam images, nurse
reports,
or referral letters, by email or fax. The user may further preview and edit
the
documents prior to printing or distribution, and further edit the recipient
list for each
document type. An exam must be selected to view the Document Distribution
screen.
To preview, edit, and distribute documents via the Post Procedure tab
1100 shown in Figure 11(a), the user selects Post Procedure Docs menu option
1116
to display a Document Distribution screen 1120 for a particular exam, such as
shown in Figure 11 (g). From this screen, a user may edit or review a document
by
accessing the Document Distribution screen, selecting a template for the
document
from the Template dropdown list 1121, and select an Edit Document icon
corresponding to the document that needs to be edited or reviewed. The
document
will be displayed in a new window where the required changes may be made. A
document may also be printed without distributing it via the Document
Distribution
2 0 screen.
A user may edit the recipients of a document from the Document
Distribution screen 1120 and particularly add and delete recipients from the
list via '
the Document Distribution screen. After selecting a document to be
distributed, a
user may select an Edit Recipient List icon 1122 adjacent to the document
which
2 5 causes for display an Edit Recipient window providing a contact choice to
add a
recipient other than a medical provider or clinical staff. The Contacts List
screen is
displayed with categories of recipients. An icon is provided to delete a
recipient.
To distribute a document, a user accesses the Document Distribution
screen 1120 of Figure 11(g), and clicks the checlcbox 1123 associated with the
3 0 document to be distributed. A template is selected for the document from a
Template dropdown list and the user may click Distribute via a selected media,
e.g.,
print on a default printer, or e-mail for the recipient to view.
57
CA 02526149 2005-11-16
WO 2004/104754 PCT/US2004/015169
Furthermore, education documents may be distributed to patients to
inform them about procedures or findings. For example, if the user's facility
has set
an education trigger for the word "polyp", then when a polyp is found in the
stomach
of a patient, a document based on an education template can be generated for
the
user to distribute to that patient. If the facility has not set an education
trigger, no
education document will be generated. An education document may be selected
via
the Document Distribution screen 1120 by selecting the document, clicking the
checkbox next to the document to be distributed, selecting the template for
the
document from the Template dropdown list, and selecting the number of copies
that
need to be printed.
Analysis tab
With respect to the Analysis tab, as shown in Figure 12, the EW
system provides menu selections for invoking a pre-defined queries for a
category
defined in the menu. When a user selects a report from the menu list and
pushes
execute button, the system invokes a pre-defined query and displays the
results
according to a pre-defined template. Predefined queries shown in the analysis
tab
1200 of Figure 12, for example, enable the generation of a statistics report
regarding
CQI (Continuous Quality Improvement). Other pre-defined queries may be invoked
2 0 to generate reports regarding efficiency, equipment analysis, procedure
analysis and
administration.
System Administration tab
With further respect to the System Administration tab 1300 (Figure
2 5 13 (a)), functionality is provided that allows a user having
administration privileges
to: maintain system data; maintain application resource data; manage patient
and
clinical staff information; customize application settings and functions;
manage user
and role information; configure facility, node, mavigraph, and video settings;
manage logs and queues; manage equipment information; modify the user-defined
3 0 screen. A system administrator is also responsible for configuring the
system to
58
CA 02526149 2005-11-16
WO 2004/104754 PCT/US2004/015169
maximize system performance; maintain the Knowledge Base by adding new
keywords, sentence models, and menu structures; record and maintain resource
information such as endoscopy equipment information and clinical staff
records; add
and remove users and assign appropriate privileges to each user; review system
and
activity logs for periodic administration and take corrective measures to
solve any
problems.
With respect to the administrator function of maintaining system
data, functions are provided that are accessible by a user having
administrative
privileges to perform the functions that allow the maintenance of system data.
Via
the system administration tab 1300, selection of the System menu option 1301
initiates display of a system screen such as shown in Figure 13(a), that
provides
functionality to enter, store, delete and/or modify system information stored
in the
database, including, but not limited to, the following: 1) Insurance Carner
information: by further selecting the Insurance sub-menu option 1302 shown in
Figure 13(a) functionality is enabled for creating, modifying, storing and
deleting of
carrier name, carrier code, and other insurance Garner information, including
an
active checkbox which is selectable to make the insurance carrier record
available to
the clinical staff; 2) Procedure Room information: by selecting the Procedure
Room
sub-menu option 1303 shown in Figure 13(a), functionality is enabled for
creating,
2 0 modifying, storing and deleting database records about the procedure rooms
(e.g.,
room names or room numbers) in the facility for storage in the system
database.
Adding procedure room information would enable clinical staff to allocate a
room to
an examination. Each procedure room is identified by its name and facility; 3)
Race
information: by selecting the Race system sub-menu option 1304 shown in Figure
2 5 13 (a), functionality is enabled for creating, modifying, storing and
deleting records
of race information such as American Indian, Native Alaskan, White or
Caucasian,
Asian, Black or African American, etc.; 4) Ethnicity information: by selecting
the
Ethnicity system sub-menu option 1305 shown in Figure 13(a), functionality is
enabled for creating, modifying, storing and deleting entries in a standard
list of
3 0 Ethnicities including, but not limited to: American, Australian, Canadian,
Caribbean,
Chinese, European, Hispanic, Indian, Japanese, etc. 5) Name Prefixes
information:
by selecting the Name Prefix system sub-menu option 1306 shown in Figure 13(a)
functionality is provided for enabling an administrator to create, modify,
store and
59
CA 02526149 2005-11-16
WO 2004/104754 PCT/US2004/015169
delete entries of defined name prefixes (and associated genders) that can be
assigned
to a person such as: Dr., Father, Miss, Mr., Mrs., Ms., etc.; 6) Academic
Degree
information: by selecting the Academic Degree system sub-menu option 1307
shown in Figure 13(a), functionality is enabled for creating, modifying,
storing and
deleting information relating to Academic Degrees that can be assigned to a
person
such as: D.O., L.P.N., M.D., M.S.N., R.N., etc.; 7) State/Provinces
information: by
selecting the State/Province system sub-menu option 1308 shown in Figure 13(a)
functionality is enabled for modifying, storing and deleting states/provinces
records
that are installed within the application or create new state/provinces (and
their
abbreviations). The application includes all 50 states, their corresponding US
post
office state abbreviations, and all Canadian provinces and territories; 8)
Country
information: by selecting the Country system sub-menu option 1309 shown in
Figure 13(a), functionality is enabled for modifying, storing, adding and
deleting
country names (e.g., USA and Canada) and their abbreviations or to add new
countries to the list; 9) Department information: by selecting the Department
system
sub-menu option 1310 shown in Figure 13(a), functionality is enabled for
modifying, storing creating and deleting Departments information (and
abbreviations). A department is a sub-organization or practice within an
institution
or facility that specializes in one or more medical areas, such as
Gastroenterology
2 0 (Gl~ or Bronchoscopy (Brooch). It provides services for one or more exam
types
(specialty), such as EGD or ERCP. Clinical staff can be qualified to perform
or
work in one or more departments and specific accessory equipment is associated
with the department. The system supports multiple departments with department
records established and maintained using the department maintenance function.
2 5 When a Department List screen is accessed, the defined departments are
displayed
alphabetically by name; 10) Patient Identifier Type information: by selecting
the
Patient Identifier Type system sub-menu option 1311 shown in Figure 13(a),
functionality is enabled for modifying, storing, creating or deleting the
Patient
Identifier Type information for a facility which is a code used to identify a
patient.
3 0 For example, the identifier code "MRN" is the default patient identifier
type. A
facility can create its own identifier type and edit, add, or delete
deparhnents via a
Patient Identifier Type screen. It is understood that a default patient
identifier type
must be set using the facility settings function. This unique patient
identification
CA 02526149 2005-11-16
WO 2004/104754 PCT/US2004/015169
can also be helpful if one facility decides to merge another; 11) Medical
Alerts
information: by selecting the System Alerts sub-menu option 1312 shown in
Figure
13(a) functionality is enabled for modifying, storing, creating or deleting
medical
alerts or comorbidities for a facility. As mentioned herein, the system is
programmed to notify the user of a patient comorbidity by means of a medical
alert.
System medical alerts are system level comorbidities identified by a facility.
If a
patient has a designated system medical alert, the medical alerts icon 759
such as
shown in Figure 7(c) is displayed in the status bar 749. This medical alerts
icon is
displayed and stays on the status bar whenever the concerned patient is
selected.
Medical staff can click on the medical alert icon to view a list of all
medical alerts
for the patient. There are 13 categories of medical alerts defined in the
system, e.g.,
allergy, coagulation, etc. Each category includes alerts that cannot be edited
or
changed.
As mentioned, a further function provided via the System
Administration tab 1300 (Figure 13(a)), is the maintenance of application
resource
data. With respect to the administrator function of maintaining application
resource
data, functions are provided that are accessible by a user having
administrative
privileges to perform functions such as: creating or modifying patient
information,
clinical staff information or contact information. Clinical staff is defined
as the
2 0 professional and certified medical personnel employed by or afftliated
with an
institution, facility, or clinic. Each clinical staff is associated with a
role defined in
the system. With respect to the maintenance of clinical staff, for example, a
member
can have the following roles for an exam type: attending physician, EGD,
Nurse,
and others such as ERCP. Only a clinical staff member with the proper
2 5 qualiftcations can perform the roles required for an exam type. The system
of the
invention supports the search for addition, modification, and deletion of
clinical staff
records.
Thus, via the system administration tab 1300 shown in Figure
13(b)(1) selection of the system Clinical and Patient menu choice 1315 enable
the
3 0 maintenance of these application resource data types by displaying a
Clinical Staff
List screen providing available clinical and patient sub-menu choices. After
selection of the Clinical & Patient menu option 1315, a user further selects
the
Clinical Staff sub-menu option 1316 which displays the Clinical Staff List
screen
61
CA 02526149 2005-11-16
WO 2004/104754 PCT/US2004/015169
(not shown) which enables the user to search for a clinical staff using one or
more
criteria entered in the search fields provided that include the following: a
Primary
function; a Facility; a Staff ID; and a first and last name of the medical
staff
member. To add a physician in the system via the Clinical Staff List screen,
user
may click a new button which enables display of a Clinical Staff screen 1340
as
shown in Figures 13(b)(1) and 13(b)(2) providing fields for entering
clinician's
personal information data such as: staff ID, a prefix, last name of the
physician and
first name, and, enabling selection of "Physician" from a Primary Function
dropdown list. Further functionality enabled via the Clinical Staff screen
includes
the ability to: assign a facility to the physician by selecting a facility
from the
Facility dropdown list (e.g., more than one facility may be assigned to the
physician); assign an academic degree to the physician by selecting a degree
from a
Degree dropdown list (e.g., more than one degree may be assigned to the
physician);
assign an exam to the physician by selecting an exam from an Exam dropdown
list;
and, select a role that the physician would be performing in the selected exam
from
the Role dropdown list. There are only three roles available - attending,
assisting,
and trainee, however, functionality is available to add another exam and role.
It is
understood that all exams may be assigned to the physician.
In the same manner as described with respect to adding a physician
2 0 into the system by creating a physician record, a nurse may be entered
into the
system by creating a nurse record. That is, before a nurse is assigned to an
exam,
the nurse's information must be added in the system that is accomplished via
the
Clinical Staff screen 1340 of Figures 13(b)(1) and 13(b)(2). To modify or
delete a
clinical staff member from the system, the administrator may access the
Clinical
2 5 Staff List screen, search for the clinical staff record to be modified,
click the Details
icon next to the clinical staff, and via the Clinical Staff screen, make the
desired
changes or click a Delete icon to delete the selected record.
Further, via the system administration tab 1300, selection of the
system Clinical & Patient menu option 1315, and further, the Contacts 1317 sub-
3 0 menu choice enables display of a Contacts List (not shown) enabling
addition of a
new contact such as a new pharmacy, or a new vendor. Thus, the system enables
the
facility to maintain contacts other than clinical staff, including but not
limited to:
Pharmacy; Billing; Pathology; Quality assurance; Biomedical department;
Medical
62
CA 02526149 2005-11-16
WO 2004/104754 PCT/US2004/015169
records; Outside physician office; Outside hospitals; Ambulance services;
Infection
control; Hospital contacts; Vendors and Regulatory agencies. Specifically, via
the
Contacts List screen, the administrator may enter a search query for an
existing
contact record. The existing contact record is brought up in a contacts screen
display (not shown) that enables a user to modify the contact information or
delete
the contact record.
The Configuration Management function of the present invention
maintains application configuration items including: System Settings, Node
Settings
for a specific node, Printer (e.g., Mavigraph) Settings, Video Settings, Auto
Mask
Settings, and Facility Settings. With respect to system settings, the system
may
further enable the set-up parameters for the system to record and display
data.
System settings are configured when the application is installed, but they can
be
changed at anytime via a System Settings screen. Particularly, via the
administration tab 1300, a user may select a Configuration menu choice 131 ~
to
display available configuration sub-menu options. A select System Settings sub-
menu choice 1320 is provided that, when selected, generates for display the
System
Settings screen 1350 such as shown in Figure 13(c).
Via the System Settings screen 1350 a user may modify the required
System Settings information by providing entry fields for entering system
2 0 parameters such as: Institution Name and Institution Logo which is an
image file
containing the institution's logo in formats such as BMP, JPEG or JPG, for
example;
SSNISIN Format which setting is used to specify the format for entering a
Social
Security Number (SSN) or Social Identification Number (SII~, depending on the
country (e.g., a default value is #<figref>-</figref>-where # is a number between 0 and 9);
2 5 a Phone Format setting used to specify the institution's phone number
entry format;
a Thousand Separator format setting that determines the separator used when
entering numbers over 999; a Decimal Separator setting that determines the
separator used in decimal numbers; a Time Format setting that determines the
time
format for the institution, and is a choice of Military or Standard time; a
Date
3 0 Format setting is used to specify the institution's date entry format; a
Compression
format setting that is used to specify the institution's preferred graphics
compression
format (e.g., a . default value is none (i.e., no compression); other
acceptable values
are loss less, high, medium, and low); and, a Language setting that is used to
specify
63
CA 02526149 2005-11-16
WO 2004/104754 PCT/US2004/015169
the predominant local language and which setting is used to determine the
value
displayed as the preferred language on the Patient Assessment screen.
As mentioned, a further function provided by the system is the
maintenance of the layout of the application based on a facility's
requirements. That
is, the system is a highly customizable application with the ability to decide
which
options that are to be made available to users. For example, the administrator
can
choose to allow or forbid a user in the nurse role to access the Procedure
Notes
section.
Thus, via the via the System Administration tab 1300 (Figure 13(c)),
the administrator may access the Application Flow configuration sub-menu
option
1322 which causes for display the available configuration options in an
Application
Flow screen 1355 such as shown in Figure 13(d). To modify the existing layout
via
the Application Flow screen 1355, the user may select a tab from the Tab
dropdown
list 1356 which provides all of the available sub-menu option choices in an
Available textbox 1357a, and provides all assigned options listed in an
Assigned
textbox 1357b. The user may then select options from the Available menu
choices
list that are to be assigned to users by clicking a Right Arrow icon to add
the
selected options to the Assigned list 1357a, or select options from the
Assigned list
to remove, and, click the Left Arrow icon to remove the selected options from
the
2 0 Assigned textbox 1357b.
The administrator may further add a new facility, customize a
facility's preferences and operating procedures from a Facility Settings
screen, and
also set system default options for the facility such as primary patient
identifier type,
default patient class, and IV type. Other settings that affect the operation
of the
2 5 application are not specific to the facility and are controlled through
the system
settings function. A Facility List screen is accessed via the Admin tab 1300
by
selecting the Facility Settings sub-menu option 1324 from the available
configuration options displayed. Upon selection of the Facility Settings menu
choice 1324, the Facility List screen is displayed (not shown) from which an
3 0 administrator is enabled to modify information by selecting the Details.
icon next to
a selected facility to be modified, or delete a particular facility. To add a
new
facility information in the system, the Facility List screen is accessed to
select a new
option which displays a Facility screen 13 60 such as shown in Figure 13 (e)
enabling
64
CA 02526149 2005-11-16
WO 2004/104754 PCT/US2004/015169
user entry of new facility information such as: name in a Name field; facility
abbreviation in the Abbreviation field; a state of the facility from the State
dropdown list; a country of the facility from the Country dropdown list; a
primary
patient identifier type for the facility from the Primacy Patient Identifier
Type
dropdown list; a default patient class from the Default Patient Class dropdown
list
(e.g., there are three options available - inpatient, inpatient transfer, and
outpatient);
an IV Type that is to be set as a default for the facility from the IV Type
dropdown
list; the new facility's work start time, end time, week start day, week end
day, and
interval information in the Hours of Operation section; and, a name and phone
number of the system administrator.
The administrator is further able to define node settings for nodes or
computers that the facility will use to perform exams. From a Node Settings
screen
1365, such as shown in Figure 13(fj, the administrator can: define node
settings such
as node name, physical address of the node, and communication port, set a
primary
video mask setting; set a secondary video mask setting; define a video
automask
setting; and, select a default mavigraph printer for the node. To access the
Node
Settings List screen, via the System Administration tab 1300 (Figure 13(c)),
the
administrator may select the Node Settings configuration sub-menu option 1325.
Upon selection of the Node Settings configuration option, a Node Settings List
2 0 screen is displayed (not shown) enabling a user to edit, add, or create
new node
setting records. When the Node Settings List screen is accessed, the defined
nodes
are displayed. From the Node Settings List screen, an administrator is enabled
to
modify information by selecting a Details icon next to a selected node to be
modified, or, delete a particular node. To add a new node information in the
system,
2 5 the Node Settings List screen is accessed to select a new option which
displays a
Node Settings screen 1365 such as shown in Figure 13(f) enabling user entry of
new
node information such as: name of the node in a Node Name field; a facility
from
the Facility dropdown list; a physical address of the node in a Physical
Address
field; an input type from the Input Type dropdown list; a COM port from the
COM
3 0 Port dropdown list; and other relevant information. Further, via the Node
Settings
screen 1365, a default mavigraph printer may be selected from the Default
Mavigraph dropdown list (a list of mavigraph printer is generated when a
mavigraph
printer device is added to the facility in the Mavigraph Settings screen as
described
CA 02526149 2005-11-16
WO 2004/104754 PCT/US2004/015169
herein), and, a default label is assigned to the printer in the Default
Printer field. Via
the Node Settings screen 1365, the administrator may further select a primary
video
setting for the node from a Primary Setting dropdown list 1366. The
administrator
may further select a secondary video setting from a Secondary Setting dropdown
list
1367 and, select an Apply Automask checkbox 1368 if an automask setting is to
be
enabled.
The administrator is fixrther able to add, modify and delete a printer,
e.g., a mavigraph printer, from a Mavigraph Printer List screen (not shown).
To
access the Mavigraph Printer List screen, via the System Administration tab
1300
(Figure 13(c)), the administrator may select the Mavigraph Settings
configuration
sub-menu option 1326 initiating display of the Mavigraph Settings List screen
enabling an administrator to add, modify and delete a mavigraph settings
record.
When a user accesses the Mavigraph Printer List screen, a list of mavigraph
primers
is displayed which may be further used to assign a default mavigraph printer
to a
node in the Node Settings screen. To add a new mavigraph settings record in
the
system, the Mavigraph Settings List screen is accessed to select a new option
which
displays a Mavigraph Settings screen (not shown) enabling user entry of new
printer
information such as: the name of the mavigraph printer in the Mavigraph Name
field, the location of the mavigraph printer, and the facility to which the
mavigraph
2 0 printer belongs from a Facility dropdown list. An Active checkbox may be
selected
to make the printer available for the clinical staff.
The administrator is further able to add, modify, and delete video
configuration settings, and configure mask settings that define how
information is
displayed on the RGB monitor via a Video Settings List screen. The user may
2 5 preview the video settings on the RGB monitor where the changes are
automatically
displayed. To access the Video Settings List screen, via the System
Administration
tab 1300 (Figure 13(c)), the administrator may select the Video Settings
configuration sub-menu option 1328. Upon selection of the Video Settings
configuration option 1328, a Video Settings List screen is displayed (not
shown)
3 0 enabling an administrator to view the currently defined video settings,
e.g., sorted
alphabetically by name. The administrator may delete a video configuration
(provided it is not associated with a node) and may further modify information
by
selecting a Details icon next to a selected video setting to be modified. To
add a
66
CA 02526149 2005-11-16
WO 2004/104754 PCT/US2004/015169
new video settings record, the Video Settings List screen is accessed to
select a new
option which displays a Video Settings screen 1370 such as shown in Figure
13(g)
enabling user entry of new video settings information such as: a name to the
video
configuration in the Name field; a video signal from the Video Signal dropdown
list;
and select an Active checkbox to make the configuration settings available to
users.
Further, via the Video Settings screen 1370, a user may assign top, left,
bottom, and
right mask settings for live video, thumbnail, and patient info in the Mask
Settings
section 1372.
The administrator is further able to edit, add, or create mask settings
for a specific video processor and chip-type combination via an Auto Mask
Settings
screen. When the screen is accessed, the defined auto mask settings, processor-
type,
chip-type, and defined video settings, are displayed and sorted by processor-
type. It
is understood that the combination of processor-type and chip-type must be
unique.
To access the Auto Mask settings screen, via the System Administration tab
1300
(Figure 13(c)), the administrator may select the Auto Mask settings
configuration
sub-menu option 1329. Upon selection of the Auto Mask settings configuration
option 1329, an Auto Mask settings screen (not shown) is displayed enabling a
user
to view the currently defined auto mask settings. Via this Auto Mask settings
screen, an administrator may delete an auto mask configuration and may further
2 0 modify information by selecting a Details icon next to a selected auto
mask setting
to be modified. To add a new auto mask settings record in the system, the Auto
Mask settings screen is accessed to select a new option which displays an Auto
Mask Settings screen 1375 such as shown in Figure 13(h) enabling a user define
a
new Auto Mask Setting by selecting a Processor Type, Chip Type, and Video
2 5 Settings from respective Processor Type, Chip Type, and Video Settings
dropdown
lists. It is understood that once defined, masks are automatically selected by
the
system based on the scope or processor being used.
As mentioned, a further function provided by the system is the ability
to customize certain aspects of how the application functions. These functions
3 0 include: the editing of Exam Type information; the editing of information
that
defines a Report Section; the maintenance of Report Sections included within
the
Phases of Care for the application; the management of Report Templates and of
67
CA 02526149 2005-11-16
WO 2004/104754 PCT/US2004/015169
Document Types; the editing or creating of templates for all documents; and,
the
maintenance of the system Knowledge Base.
Thus, via the System Administration tab 1300 (Figure 13(i)), the
administrator may access the Customization menu choice 1330 that causes for
display the available customization sub-menu options. Upon selection of the
Exam
Type sub-menu option 1331, an Exam Type List screen (not shown) is displayed
enabling a user to view the currently defined exam types. From this screen, a
user
may add, delete, and modify exam types, including, but not limited to:
Bronchoscopy, Colonoscopy, Esophagogastroduodenoscopy,
Esophagogastroduodenosopy/Colonoscopy,
Esophagogastroduodenosopy/Sigmoidoscopy, Cholangiopancreatography,
Endoscopy Retrograde, EGD/Sigmoidoscopy, Esophagoscopy, Sigmoidoscopy,
Ileoscopy, Liver Biopsy, Lower Endoscopy Ultra Sound, Paracentesis,
Enteroscopy,
and, Upper Endoscopy Ultra Sound, etc. Following each listed exam is an
abbreviation, associated department, and a Details icon. A current record may
be
deleted unless it is an application default or if it is referenced elsewhere.
To add a
new exam type record in the system, the Exam Type List screen is accessed to
select
a new option which displays an Exam Type screen 1380 such as shown in Figure
13(i) enabling an administrator entry of a new Exam type including information
2 0 such as: a name of the exam type in the Name field name; select a
department from
the Department dropdown list; assign an abbreviation to the exam type in the
Abbreviation field; click New next to Report Sections to add a new report
section;
select a report section from the Section dropdown list; click New next to the
Default
Medications to add a new medication including the entry of the drug name,
strength,
2 5 unit, and the route of the medication. As mentioned, an administrator is
further able
to add a Report Section to or remove a report Section from an Exam Type, and,
include an optional default medication to the exam type record.
As mentioned, a further function provided by the system is the ability
to edit information that defines a Report Section and maintain the Report
Sections
3 0 included within the Phases of Care for the application. Thus, via the
System
Administration tab 1300 (Figure 13(i)), the administrator may access the
Report
Sections menu option 1332, a Report Sections List screen (not shown) is
displayed
enabling a user to add, delete, and modify report sections types. As described
herein
68
CA 02526149 2005-11-16
WO 2004/104754 PCT/US2004/015169
with respect to Figure 10(f), report sections are used to generate Procedure
Notes for
a specific exam type. When the administrator creates a Procedure Note
template,
he/she may choose to include a few or all the report sections in it, and
further assign
these report sections to a phase of care and then use them in the Lexicon
screen as
tabs to record data. The user may create, modify, and delete report sections
from the
Report Section List screen. To add a new report section record in the system
database, the Report Sections List screen is accessed to select a new option
which
displays a Report Sections screen 1382 such as shown in Figure 13(j) enabling
an
administrator entry of a new Report Sections type including information such
as: the
name of the report section in the Name field; a display order for the report
section;
and, click the Active checkbox to make the report section available to users.
As mentioned, a further function provided by the system is the ability
to edit manage the four phases of care namely, Registration, Pre-Procedure,
Procedure, and Post-Procedure. These phases are illustrated as the
Registration, Pre-
Procedure, Procedure, and Post Procedure tabs in the application. There are
specific
report sections available that can be assigned to each phase of care. These
report
sections are used to generate a Procedure Note. As shown in Figure 13(k), the
Phase
of Care function is used to assign these report sections to a phase of care.
These
report sections are viewed as tabs 898 in the Lexicon screen as described
herein with
2 0 respect to Figure 8(e) and Figure 10(f), for example. Thus, for example,
the Lexicon
screen of the Registration tab includes the Introduction, Indications, and
Code report
sections. Via the Phase of Care screen, the administrator may configure the
Lexicon
screen of the Registration phase of care by adding or removing a report
section.
Thus, via the System Administration tab 1300 (Figure 13(i)), the
2 5 administrator may access the Phase of Care customization sub-menu option
1333
that causes the display of a Phase of Care List screen (not shown) enabling an
administrator to view the currently defined phases of care. From this Phase of
Care
List screen, an administrator may assign a report section record by clicking a
Details
icon next to one of the phase of care records. The Phase of Care screen 1383
such as
3 0 shown in Figure -13 (lc) is displayed in response, enabling a user to
select a report
section from the Default Report Section dropdown list, cliclc the Report
Sections
from the Available column 1376, assign or add the necessary report section,
and
cliclc the Right Arrow icon to add the report section to the Assigned column
1377.
69
CA 02526149 2005-11-16
WO 2004/104754 PCT/US2004/015169
In a like manner, the administrator may un-assign a report section record via
the
Phase of Care screen 1383 by clicking the Report Sections from the Assigned
column 1377 to remove it from a Phase of Care and click the Left Arrow icon to
remove the report section 1376 from the Phase of Care.
As mentioned, a further function provided by the system is the ability
to manage Report Templates and of Document Types. Document types are the
categorization of different documents required by clinical staff at different
phases of
care. These documents are generated by using document templates in the
application. A list of document types predefined in the system, include but
are not
limited to: an Appointment Letter, a Recall Letter, a Pre-Discharge
Instruction, a
Pathology Request, a Procedure Note, a Nurse Report, a Discharge Instruction,
a
Referral Letter, a Billing Report and Pathology Labels.
Thus, via the System Administration tab 1300 (Figure 13(i)), the
administrator may select the Docmnent Types customization sub-menu option 1334
that causes the display of a Document Type List screen (not shown), enabling a
user
to view the currently defined document types. From this Document Type List
screen, a user may: create/modify a document type; Assign the document to a
Phase
of Care; and assign the document type to an exam type. Further, a clinical
staff
member and/or a contact may be added as the document recipient. To add a new
2 0 document type record in the system database, the Document Type List screen
is
accessed to select a new option which displays a Document Type screen 1384
such
as shown in Figure 13(1) enabling an administrator entry of a new Document
Type
including information such as: a name for the document in a Document Type Name
field; and, a default number of copies desired to be printed at the time of
document
2 5 distribution; and enable system functions such as: the ability to enable
assignment of
a Phase of Care to the document type; the ability to select a phase of care
from the
Phase of Care dropdown list; the ability to add another phase of care; the
ability to
add an Exam Type; the ability to select an exam type from the Exam Type
dropdown list; the ability to add another exam type; the ability to add all
the exam
3 0 types; the ability to add a Clinical Staff recipient (e.g.~ a person such
as referring,
primary care physician, or nurse from the Person dropdown list; and, the
ability to
add a Contact Recipient, e.g., by selecting a category and person. By clicking
the
Active checkbox the new document type is available for the staff.
CA 02526149 2005-11-16
WO 2004/104754 PCT/US2004/015169
As mentioned, a further function provided by the system is the ability
to manage Report Templates. For example, to create a Procedure Note template
for
an exam type, a Report Template function is provided via a Report Template
Screen.
Via the System Administration tab 1300 (Figure 13(i)), the administrator may
select
the Report Template customization sub-menu option 1335 that causes the display
of
a Select Procedure Note Template screen (not shown) enabling a user to search
for a
procedure note template by selecting an exam type, facility, or physician
which
generates for display a list of Procedure note templates, based on the entered
search
criteria. If no criteria were entered, all records would be displayed. A New
Procedure Note Template is generated via the Select Procedure Note Template
screen by selecting a New option which causes for display a Procedure Note
Template window 1386 such as shown in Figure 13(m). From this template window
1386, the administrator may enter the name of the new Procedure Note in a Name
text field, and perform functions such as: selecting an exam type from the
Exam
Type dropdown list; select either the Facility Owner or Physician Owner radio
button to choose an owner of the procedure note template; and, select a
Facility or
Physician depending on the previous choice. A blank Procedure Note Template
frame 1385 is additionally generated for display as shown in Figure 13(m).
From
this interface, the administrator may select a report section from the Report
Section
2 0 tab 1391 as shown in Figure 13(m), and click Insert button to insert the
section in
the template in the right-hand pane 1392; and, further modify the text with
the text
tools found in the right pane. These steps may be repeated to create multiple
sections in the new Procedure Note template. The template record may then be
saved in the database. It is understood that a new version of an existing
template
2 5 may additionally be created. Further, from the originally displayed Select
Procedure
Note Template screen (not shown), the user may modify or delete a procedure
note
template.
It is understood that the document template functionality provided in
the system may be used to generate document templates for documents other than
3 0 Procedure Notes: These documents=include pathology labels, recall letter,
and
letters of referrers. From a Document Template Search screen (not shown), the
administrator may search for a document and create, modify, or delete a
document.
Thus, via the System Administration tab 1300 (Figure 13(i)), the administrator
may
71
CA 02526149 2005-11-16
WO 2004/104754 PCT/US2004/015169
select the Document Template customization sub-menu option 1336 that causes
the
display of a Document Template search screen enabling an administrator to
enter
search criteria such as such as document type, facility, and/or physician
which
generates for display a list of document type templates based on the entered
search
criteria.
A New document template is generated via the Select Document
Template screen by selecting a New option which causes for display a Document
Template window 1387, such as shown in Figure 13(n). From this template, the
administrator may enter the following information including, but not limited
to: the
Name in a text field; and perform functions such as: select an exam type from
the
Exam Type dropdown lists; select either the Facility Owner or Physician Owner
radio button to choose an owner of the document template; and, select a
Facility or
Physician from the appropriate dropdown list. A blank template may be
additionally
created.
The administrator may further select a report section from the Report
Section tab 1393 of the Document Template screen such as the example Document
Template screen 1389 as shown in Figure 13(0), click Insert button to insert
the
section in the template in the right pane; and, further modify the text with
the text
tools found in the right pane 1394. These steps may be repeated to create
multiple
2 0 sections in the document template. The template record may then be saved
in the
database, or create a new version of an existing template. It is understood
that, from
the Document Template Search screen (not shown) the user may modify or delete
a
document template.
As mentioned, a further function provided by the system is the ability
2 5 to control user access to or within the application or portions of the.
application.
These security functions include: User Maintenance - the ability to allow the
creation and modification of application user accounts; and, Role Maintenance -
the
ability to allow the creation and modification of user roles. Thus, via the
System
Administration tab 1300 (Figure 14(a)), the administrator may access the
Security
3 0 menu choice 1402 and select User security sub-menu option 1404 that
initiates the
display of a User List screen 1420, such as shown in Figure 14(a) enabling an
administrator to query the database for an existing user record such by
entering
72
CA 02526149 2005-11-16
WO 2004/104754 PCT/US2004/015169
search criteria, e.g., letters and wildcards. If no criteria is entered, the
pre-populated
User List screen is displayed with records displayed alphabetically by user
ID.
To add a New User ID, the user must have been defined as a clinical
staff or contact before an ID is assigned to a user. A new user record is
generated
via the User List screen 1404, by selecting a New option which causes for
display a
User Maintenance screen 1430 such as shown in Figure 14(b). From this screen,
the
administrator may enter a user ID in the User ID field, enter a password in
the
Password field; and select a user type from the User Type dropdown list. A
user
type can be either clinical staff or contact. The Search icon may be selected
to insert
a user's full name. If a contact is selected from the User Type dropdown list,
the
Contact List window is displayed and likewise, if a clinical staff is selected
from the
User Type dropdown list, the Clinical Staff List window is displayed where a
user
may be searched and selected. Alternatively, the name of the user may be
entered in
the User Name field. Further information for the new user record includes: the
selection of a facility for the user from a Facility dropdown list; selection
of the
Active checkbox to activate the user; and, the selection of a Role to be
assigned to
the user. To select a Role to be assigned, a department is selected from the
Department dropdown list and a role is selected from the Role dropdown list.
It is
understood that, from the User List screen 1420 (Figure 14(a)) the user may
modify
2 0 or deactivate a user record. With respect to modification, changes may be
made to
required fields except, for example, read-only fields, screen by searching for
a user
and selecting a details icon 1422. Further, a role may be assigned to a user,
and
fiu-ther, an assigned user role may be deleted by selecting a delete icon 1432
(Figure
14(b)).
2 5 As mentioned, a further function provided by the system is the ability
to manage roles. Each user created in the system must have an assigned role.
Based
on the role, a user would be able to use specific functions of the system
application.
Predefined roles may include, but are not limited to: Administrator, All,
BronchNurse, BronchPhysician, GINurse, GIPhysician, and, Scheduler.
3 0 The Role Maintenance function allows the administrator to create,
copy, modify, and delete roles for the application. Any role may be deleted
that is
not associated to a user and is not an application-defined role. Each user is
assigned
one role; which is associated with specific screens or functionality. The
selected
73
CA 02526149 2005-11-16
WO 2004/104754 PCT/US2004/015169
role gives the user access to these specific screens. The role data can be
changed
and saved while the role member is logged into the system. Every role has
access to
the system Home tab 600 (Figure 6). The role maintenance function may be used
to
add a new tab record by selecting a tab name from the dropdown lists and
Default
Tab Page fields. These fields are mandatory and cannot be left blank if this
function
is selected.
With respect to Role maintenance, via the System Administration tab
1300 (Figure 14(a)), the administrator may select the Role security sub-menu
option
1406 that causes the display of a Role List screen 1440, such as shown in
Figure
14(c) enabling an administrator to view the current roles, modify or delete
existing
roles, and add a new role. A new user Role is generated via the Role List
screen
1440, by selecting a New option which causes for display a Role Maintenance
screen 1450 such as shown in Figure 14(d). From this screen, the administrator
may
enter a name in the Role Name field and select a default tab page for the role
from
the Default Tab Page dropdown list. Any tab that is not to be assigned to the
role
may be deleted by clicking the Delete icon on the appropriate line. The
administrator may further select menu options from the Available textbox to
assign
to the role, and add the selected menu options in the Assigned textbox.
When the role maintenance function is accessed, the list of roles is
2 0 displayed as shown in Figure 14(c). An existing record may be modified as
required. To modify an existing role record, the Role List screen is accessed
and a
Details icon selected next to the record to be modified. The Role Maintenance
screen is displayed enabling an administrator to locate the field requiring
change and
enter a change or select the correct entry from the dropdown list, add a new
tab '
2 5 record, or select menu changes as necessary. A user may further copy a
record, all
the tabs and menu options from a previous role to a new role which requires
the
assignment of a name to the role. An existing role record may be deleted from
the
database via the Role List screen, as long as it is not associated to a user
and is not
an application-defined role.
3 0 As mentioned, a further function provided by the system is the ability
to maintain the system application. Utilities used to maintain the application
a
system log function to view and manage the log of application errors and
messages
generated by the application; an Activity Log function to manage the log of
74
CA 02526149 2005-11-16
WO 2004/104754 PCT/US2004/015169
application activity, a Mavigraph Queue function to manage the print queue for
a
Mavigraph printer, and, a Discarded Notes function to view a list of discarded
Procedure Notes, and an Unlock Function to unlock the locked functions of the
application.
Thus, via the System Administration tab 1300 (Figure 14(e)), the
administrator may access the Utilities menu choice 1502 providing the
described
system application functions as shown in Figure 14(e). Thus, with respect to
managing the system log, selecting the System Log utilities sub-menu option
1504
enables a user to search for a system log record using date, facility name,
user id,
and node name options and then view or delete the selected log. With respect
to
managing the Mavigraph Queue function, selecting the Mavigraph Printing
Utilities
sub-menu option 1506 enables generation of a Mavigraph Printing screen
provided
to allow the user to manage the mavigraph printers available in the facility,
and
particularly view all the mavigraph print queues and, delete a mavigraph print
queue
job(s). With respect to managing the Activity Log, selecting the Activity Log
Utilities sub-menu option 1508 enables generation of an Activity Log screen
provided to list the records made when a user reads or writes information in
the
application. These entries are stored with a date/time stamp, user ID, menu
name,
page, and access (read or write) and may be viewed or deleted. These entries
also
2 0 contain patient ID if there is a patient in the context. With respect to
the Discarded
Notes function, selecting the Discarded Notes Utilities sub-menu option 1510
enables generation of a Discarded Procedure Note screen provided to enable
viewing
of discarded procedure notes, however, prevents the deletion or editing of
Procedure
Notes) listed in the screen.
2 5 When a user closes the browser window instead of logging out of the
system, the last function used by the user gets locked. As mentioned, the
system
provides unlock functions to unlock the locked functions. There are three
types of
locks: 1) Exam related lock: Exam related lock locks the image capture, vitals
and
medication, nursing admin, equipment used, Lexicon, image manager, and
3 0 Procedure Note functions; 2) a Visit related lock: Visit related lock
locks contains
the recovery function; and 3) Function level loclc: Function level locks lock
contain
the ICU Synchronization, and the Knowledge Base maintenance functions. With
respect to Unlock Functions, selecting the Unlock Functions Utilities sub-menu
CA 02526149 2005-11-16
WO 2004/104754 PCT/US2004/015169
option 1512 enables generation of an Unlock Functions screen providing a list
of
unlock functions from which a user may select a function to unlock.
As mentioned, a further function provided by the system is the ability
to maintain the system equipment. Thus, inventory functions are used to track
items
used during procedures. These functions include: the maintenance of Scope
Model,
i.e., different types of scopes; the maintenance of actual scope items; the
maintenance of different types of equipment items (i.e. equipment and
accessories).
The Scope Model Maintenance function allows the administrator to
view and manage different types of scopes used by the application. The Scope
Model Maintenance screen displays a list of available scope models which are
defined by category and used for the following exam types: Bronchoscopy; EGD;
Esophagoscopy; Ileoscopy; ERCP; Enteroscopy; Sigmoidoscopy; Colonoscopy;
and, EUS (upper and lower).
Thus, via the System Administration tab 1300 (Figure 14(f)), the
administrator may access the Equipment menu choice 1602 providing a display of
available equipment options as shown in Figure 14(f). Thus, with respect to
managing Scope Models, the Scope Model equipment sub-menu menu option 1604
is selected to display a Scope Model List screen 1620 as shown in Figure
14(f), from
which a user may select a Scope Model Record, and view, modify, edit or delete
it.
2 0 To add a new Scope Model Record, a Scope Model data entry screen is
displayed in
response to selecting a New button, that enables entry of relevant scope data
(e.g., a
name, category and channel size, and use for a particular Exam type) in a
series of
fields and stored as a record in the database.
A Scope Item Maintenance screen may be further displayed enabling
2 5 an administrator to create, edit, and delete each of the individual scope
item entries.
The application displays a list of all scopes available to the user based on
the input
criteria. This function allows the administrator to search for a scope item by
entering the scope model, name, serial number, and facility. To access a Scope
Item
List, the administrator selects the Scope equipment sub-menu option 1606, a
Scope
3 0 List screen 1625 is accessed, as shown in Figure 14(g), from which the
administrator
is given the option to select the scope model in use (based on input criteria)
from a
list of all active scope models. Models are listed alphabetically by name and
records
in the list may be modified or deleted. The administrator may further create a
new
76
CA 02526149 2005-11-16
WO 2004/104754 PCT/US2004/015169
scope record by selecting the New button. This causes display of a Scope Item
screen 1630 as shown in Figure 14(h), that includes blank fields for entry of
scope
equipment data including: the Scope Model, sexial number of the Scope Model,
the
name of the scope in the Name field, the facility, and optionally, the
purchase date.
This equipment maintenance function also includes a repair history
record that provides details including, but not limited to: the scope's repair
date, by
whom, a repair description, and the cost of the repair. The administrator has
the
option to add, modify, or delete the repair history record. To add a new
repair
history record, a user first searches for a scope item or create a new scope
item
record and navigates to display a Repair History section as shown in Figure
14(h).
By selecting a New button, entry fields are provided to enter the date of
repair in the
Date field, enter the name of the company or person who repaired the scope
item in
the Repaired By field, enter a brief description about the repair in the
Description
field, and enter the cost of repair in the Cost field. An existing scope item
record
may be further modified or deleted from the database if it is not associated
with
other database records via the Scope List screen.
As part of the scope maintenance function, the system provides an
accessory category function that allows the user to view and manage different
types
of accessories that are used by the application. The default accessory
categories that
2 0 are provided with the application include, but are not limited to:
Aspiration,
Electrosurgical Knife, Injection Needles, Biopsy Needles, Endoscopic Mucosal
Resection (EMR), Ligating Device, Biliary Stents, ERCP Cannulae,
Lithotriptors,
Biopsy Forceps, Esophogeal Stents, Liver Biopsy Device, Clip Fixing Device,
EUS
Probes, Metal Stents, Coagulation Electrodes, Grasping Forceps, Microbiology
2 5 Brushes, Cytology Brushes, Guide Wire, Miscellaneous, Dilating Catheter,
Hemostasis Probes, Naso/Biliary Drains, Dilation Balloons, Hot Biopsy Forceps,
PEGIPEJ, Polypectomy Snares, Retrieval Balloons, Retrieval Basket,
Sphincterotomes, Spray Catheters, and Suturing Device.
Thus, with respect to managing Accessories, via the System
3 0 Administration tab 1300 (Figure 14(f)), the administrator may select the
Accessory
Category equipment sub-menu option 1608 to display a Accessory Category List
screen (not shown) from which a user may select and modify a current Accessory
Category record, create a new one, or delete the current record. After
deletion of a
77
CA 02526149 2005-11-16
WO 2004/104754 PCT/US2004/015169
current Accessory Category record, the application returns to the list
function. The
system further provides an optional function for the entry of model
information.
The user further has the option to add a new model or delete a model, as long
as
there are no accessory records associated with that model.
Further functionality includes the ability to view and manage the
accessories used by the system via an Accessory List screen (not shown) which
is
accessed by selecting the Accessories equipment sub-menu option 1610 as shown
in
Figure 14(f). From the displayed Accessory List screen (not shown), the user
may
create, modify, or delete an accessory entry and, fiuther, has the option to
delete the
current Accessory record as long as it has not been associated with an
examination;
after deletion the application displays the search function. When the
Accessory List
screen is accessed, the defined accessory entries are displayed and may be
sorted by
model and serial number, for example, in ascending order. It is understood
that the
combination of model and serial number must be unique. To add an accessory,
the
administrator selects a New button from the Accessory List screen that
initiates
display of an Accessory Maintenance data entry screen 1650, such as shown in
Figure 14(i) via which the administrator may enter all pertinent information
relating
to the new accessory item to be entered including: a category of the accessory
item
from a Category dropdown list, a facility for the item from a Facility
dropdown list,
2 0 an item name in an Item Name field, and, other optional information. An
Active
checkbox may be selected to make the item available to the clinical staff.
As part of the equipment maintenance function, the system fuxther
provides an equipment category function that allows the user to view and
manage
different types of equipment used by the application. The list of equipment
2 5 categories (name and settings type) predefined in the system include, but
are not
limited to: Cryotherapy generators, Curvilineareus unit, Electrocautery device
Electrosurgical generators, Fluorescence imaging unit, Fluoroscope, Heat probe
generators, and Laser devices.
Thus, via the System Administration tab 1300 (Figure 14(f)), the
3 0 administrator may select the Equipment Category equipment sub-menu menu
option
1612 to display an Equipment Category List screen (not shown) from which a
user
may edit, add, or create new equipment category records. An optional function
enables a user to enter model information. If this optional function is used,
the
78
CA 02526149 2005-11-16
WO 2004/104754 PCT/US2004/015169
fields shown as required are mandatory (e.g., model name) and are not left
blank. A
checlcbox may be fiu-ther provided to indicate if the model is reusable. The
user may
further have the option to add a new model or delete a model, as long as there
are no
clinical staff or equipment records associated with that model. To add an
equipment
category, the administrator selects a New button from the Equipment Category
List
screen that initiates display of an Equipment Category data entry screen 1660,
such
as shown in Figure 14(j) via which the administrator may enter all pertinent
information relating to the new equipment item to be entered including: a name
of
the equipment, an Exam Type to associate the equipment category with one or
more
exam types, and, other optional information. An Active checkbox may be
selected
to make the equipment item available to the clinical staff.
Further functionality includes the ability to view and manage the
equipment used by the application via an Equipment List screen (not shown).
Thus,
via the System Administration tab 1300 (Figure 14(f)), the administrator may
select
the Equipment sub-menu menu option 1614 which causes display of the Equipment
List screen (not shown) from which the user may create, modify, or delete an
equipment entry. The user further has the option to delete the current record
as long
as it has not been associated with an examination. When the Equipment List
screen
is accessed, the defined equipment entries are displayed and may be sorted by
model
2 0 and serial number in ascending order. It is understood that the
combination of
model and serial number must be unique. To add a new equipment maintenance
record, a user may access the Equipment List screen, and in response to
selecting a
new button option, the system generates an Equipment Maintenance screen (not
shown) from which the user may select a category from a Category dropdown
list,
2 5 select a facility from a Facility dropdown list, and, enter a serial
number of the
equipment in the Serial Number field, and enter other optional information.
Context Information
It is understood that, as a user navigates within the application,
3 0 certain contextual information (CI) is tracked. This information is used
as input to
many of the system application's functions. The CI consists of the following:
Department, User, Facility, Patient, Visit, and Examination.
79
CA 02526149 2005-11-16
WO 2004/104754 PCT/US2004/015169
Thus, for example, "Department" information is set when a user logs
in to the application and is not changed until the user logs out of the
application.
"User" information is additionally set when a user logs in to the application,
however, can be changed by logging out of the application. "Facility"
information
is set when a user logs in to the application based on the user's default
facility. The
current facility is updated to reflect the facility at which the visit is
taking place once
the user selects a visit (or an examination within a visit).
"Patient" information is set when a user selects either a patient using
a Patient File function, a visit from Scheduled Exaxns, or the Patient
Summary, or an
examination from Scheduled Exams, Patient Summary, Pending Items, or
New/Modify Visit. By defaults there is no patient in the CI when the user
first logs
in to the application. If there is currently a patient in the CI and a new
patient is
selected, the visit and examination information will be cleared from the CI.
System
functions using the patient that is currently in the CI, include but are not
limited to:
l5 Patient Summary, Patient Demographics, Patient Insurance Coverage, Medical
Alerts, Gastroenterolo,gy and Bronchoscopy, GI History, Pulmonary History,
Medication History, Social History, Family History, Gastroenterology and
Bronchoscopy, Unplanned Events Summary, Related Tests and Labs Summary, and
Other Patient Information. If one of the previous functions requiring a
patient in the
2 0 CI is accessed and there is no patient in the CI, the application
indicates that no
patient has been selected. The user shall then be redirected to the Patient
Search
function to select a patient.
"Visit" information is set when a user selects a visit for a patient
(Scheduled Exams, and Patient Summary) or saves a visit from New/Modify Visit.
2 5 When the visit is selected, the patient and the visit itself will be
placed into the CI.
If there is currently a visit selected, the examination information is cleared
from the
CI. System functions using the visit that is currently in the CI include, but
are not
limited to: Schedule Visit, Scheduler's Medical Alert Questions, Patient
Preparation
Instructions, Gastroenterology, Patient Preparation Instructions,
Bronchoscopy,
3 0 Appointment Letter, Schedule Summary, Patient Assessment, Patient Process,
Physical Exam, Gastroenterology and Bronchoscopy, Related Labs,
Gastroenterology and Bronchoscopy, Related Tests, Prep Status,
Gastroenterology
and Bronchoscopy, Vitals and Medications, Consent Checklist, Physician Checks,
CA 02526149 2005-11-16
WO 2004/104754 PCT/US2004/015169
Pre-Procedure Summary, Recovery, Patient Survey. If one of the above functions
requiring a visit in the CI is accessed and there is no visit in the CI, the
application
automatically indicates that no visit has been selected and the user is
redirected to
the Scheduled Exams function to select a visit.
Gateway Interfaces
As mentioned, in view of Figure 1 (a), the EndoworksTM system is
adaptable to interface to hospital systems, as well as other external systems
via
dedicated gateway interfaces such as: Health Level 7 (HL7), Digital Imaging
and
Communication in Medicine (DICOM), and generic Extensible Markup Language
(XML) Gateway interfaces. Thus, system of the invention results in improved.
administrative efficiency by supporting the flow of procedure information
between
the hospital, performing physician, referring physician, and patient through
extensive integration capabilities including: HL7 which is the standard that
currently
addresses the interfaces among various systems that send or receive patient
admissions, registration, discharge or transfer (ADT) data, queries,
resources, patient
schedules, orders, results, clinical observations, billing information,
medical records,
referral, and patient care; DICOM which provides a detailed specification
describing
2 0 the means of formatting and exchanging image, reporting, and patient
information;
and, XML which may be employed when data is distributed between the
EndoWorksTM system and other hospital systems using industry standard XML
formatting.
Further benefits provided by the EndoWorksTM system include
2 5 support for clinical studies and research whereby a 'study' may be
customized to
capture specific patient- and exam-related data over a period of time. Thus,
the
application supports user-definable clinical research studies and provide a
means of
compiling and publishing resultant data. Interfacility and intrafacility
studies are
additionally possible . The application permits customization of patient
selection
3 0 criteria, data collection forms, study duration, and number of patients to
include in
the study.
While there has been shown and described what is considered to be
preferred embodiments of the invention, it will, of course, be understood that
81
CA 02526149 2005-11-16
WO 2004/104754 PCT/US2004/015169
various modifications and changes in form or detail could readily be made
without
departing from the spirit of the invention. It is therefore intended that the
invention
be not limited to the exact forms described and illustrated, but should be
constructed
to cover all modifications that may fall within the scope of the appended
claims.
~2