Note: Descriptions are shown in the official language in which they were submitted.
CA 02601090 2007-09-13
WO 2006/099270
PCT/US2006/008861
- 1 -
ANKLE REPLACEMENT SYSTEM
Field of the Invention
The invention relates to ankle replacement
prostheses and systems, as well as associated surgical
instruments and procedures.
Background of the Invention
Until the early to mid 1970's, patients with
injured or diseased ankle joints commonly resulting from
rheumatism, or degenerative or traumatic arthritis, had
few options when their ankle joints failed. The most
common procedure to help these patients regain some use
of their ankle was obliteration of the joint by fusion, a
procedure that is still commonly Used today. Fusion,
however, rendered the ankle stiff and generally immobile
relative to the lower leg, resulting in limited use and
additional stresses on the knee and hip joints.
Probably the first reported use of total ankle
prosthesis was by Buckholz in 1969. The medical
community recognized that such ankle replacement led to
largely increased use of the ankle joint because the
replacement permitted ankle ranges of motion which
generally attempted to mimic the natural human joint.
Since that time, ankle replacement prostheses have become
increasingly common in use and improved in design.
There is, however, a need for a total ankle
CA 02601090 2007-09-13
WO 2006/099270
PCT/US2006/008861
- 2 -
replacement system that reduces the occurrence of
subsidence and aseptic loosening while retaining the
majority of the foot's natural motion. There is also a
need for a less invasive surgical method to install such
a device to provide improved healing and a decreased
failure rate.
Summary of the Invention
The invention provides orthopedic prostheses
and systems, as well as associated surgical instruments
and procedures.
One aspect of the invention provides a multi-
piece stem component for a prosthesis. The multi-piece
stem component is suitable for use in any surgical
procedure in which a stem is required for fixation of a
prosthesis, whether it is a total joint implant, fusion
(arthrodesis) implant, osteotomy fixation implant, or
fracture fixation implant. The multi-
piece stem
component configuration is ideally suited for securing
bone components together in a minimally invasive
procedure, in which a small surgical opening is used to
install large components. Two or more
small stem
components can be sequentially attached to one another in
situ to make a larger stem assembly. Representative tools
and methodologies for installing a multi-piece stem
component are also provided.
Another aspect of the invention provides
articulating artificial joint surfaces comprising
complementary ball-and-socket surfaces that not only
articulate, but also allow the artificial joint to rotate
about an axis. This makes possible more uniform wear of
the surfaces to maximize function and longevity of the
prostheses.
Another aspect of the invention provides
articulating artificial joint surfaces comprising
complementary ball-and-socket surfaces that not only
CA 02601090 2007-09-13
W02006/099270
PCT/US2006/008861
- 3 -
articulate and rotate about an axis, but also accommodate
fore and aft and lateral translation of the mating joint
surfaces relative to the native bone.
Another aspect of the invention provides
artificial articulating joint surfaces, each of which
comprises a saddle-shaped component. The saddle shape is
geometrically characterized as a swept arc, comprising a
surface defined by a first arc that is swept along a
second arc that is perpendicular to the first arc. The
geometry forms, for each surface, an elongated trough
that curves along an axis.
Another aspect of the invention provides a
prosthesis supporting an artificial joint surface that
can be assembled in a snap fit and/or interlocking
fashion that provides positive locking means without the
use of screws or other fasteners.
Another aspect of the invention provides a
prosthesis accommodating fitment of a plastic joint
surface made, e.g., from ultra high molecular weight
polyethylene.
Another aspect of the invention provides an
ankle replacement system that can be installed using
minimally invasive intramedullary guidance established
with respect to the major axis of the tibia by minimally
invasive access through the calcaneus, through an
incision in the bottom of the foot. Intramedullary
guidance along the axis of the tibia makes it possible to
make properly oriented bony cuts of the talus and tibia
through anterior access to the ankle joint. Proper
overall alignment of the total ankle system is achieved
in desired alignment and orientation with all the natural
axes of the native ankle joint it replaces, and improved
long term results are achieved.
Another aspect of the invention provides
prostheses, tools, and methodologies that make possible
CA 02601090 2012-11-16
75655-21
- 4 -
the installation of a total ankle system using minimally
invasive intramedullary guidance established with respect to
the major axis of the tibia. Desirably, minimally invasive
intramedullary guidance is established with respect to the
major axis of the tibia using fluoroscopic visualization.
Another aspect of the invention provides prostheses,
tools, and methodologies that make possible the installation of
a total ankle system using minimally invasive anterior access
to the ankle joint for making bony cuts and to install
prosthesis components.
Another aspect of the invention provides prostheses,
tools, and methodologies that make possible the establishment
of an in-line intramedullary path through the calcaneus, talus,
and tibia.
Another aspect of the invention relates to a
prosthesis, comprising: a first prosthesis stem component
sized and configured to be disposed in an intramedullary path,
the first prosthesis stem component including a first external
non-rotation feature disposed at a first internally threaded
female end; a second prosthesis component sized and configured
to be disposed in the intramedullary path, the second
prosthesis stem component including a first internal non-
rotation feature and a second external non-rotation feature at
a second internally threaded end that is disposed opposite a
first externally threaded male end; and a third prosthesis stem
component sized and configured to be disposed in the
intramedullary path, the third prosthesis stem component
including at least one of a second internal non-rotation
feature, wherein the first and second external non-rotation
features include at least one flat configured to be engaged by
CA 02601090 2012-11-16
75655-21
- 4a -
a tool for connecting the first, second, and third prosthesis
stem components to each other in situ.
Another aspect of the invention relates to a
prosthesis, comprising: a prosthesis stem, including: a first
stem component sized and configured to be installed in an
intramedullary path, the first stem component including a first
external non-rotation feature disposed at a first internally
threaded female end; and a second stem component sized and
configured to be installed in the intramedullary path, the
second stem component including a first internal non-rotation
feature disposed at a second internally threaded female end
that is disposed opposite a first externally threaded male end,
wherein the first external non-rotation feature includes a flat
configured to be engaged by a tool for connecting the first and
second stem components to each other in situ.
Other embodiments of the invention are set forth in
part in the description which follows, and in part, will be
obvious from this description, or may be learned from the
practice of the invention.
Description of the Drawings
Fig. 1 is an anatomic view of a human lower leg and
foot skeleton.
Fig. 2 is a perspective anatomic view of a total
ankle replacement system in which a tibial artificial joint
surface and a talar artificial joint surface are mutually sized
and configured for articulation to restore a range of motion
that mimics the natural joint, the system including a talar
CA 02601090 2012-11-16
75655-21
- 4b -
stem that supports the talar artificial joint surface and that
bridges the talus to the calcaneous.
Fig. 3 is a perspective anatomic view of a total
ankle replacement system in which a tibial artificial joint
surface and a talar artificial joint surface are mutually sized
and configured for
CA 02601090 2007-09-13
WO 2006/099270
PCT/US2006/008861
- 5 -
articulation to restore a range of motion that mimics the
natural joint, the system including a talar stem that
supports the -ta1ar artificial joint surface and that
projects from posterior to anterior of the ankle into the
anterior head of the talus, without bridging the talus to
the calcaneous.
Fig. 4A is a perspective exploded view of a
multi-piece tibial stem that, when assembled, is sized
and configured to support a tibial artificial joint
surface of a type shown in either Fig. 2 or Fig. 3.
Fig. 4B is an assembled side view of the
multi-piece tibial stem shown in Fig. 4A being installed
in a tibia and supporting a tibial artificial joint
surface in association with a talar artificial joint
surface.
Fig. 5 is an anatomic side view of a total
ankle replacement system comprising articulating ball-
and-socket artificial joint surfaces.
Fig. 6 is a side anatomic view of articulating
artificial joint surfaces that comprise complementary
ball-and-socket surfaces that not only articulate, but
also allows the artificial joint to rotate about the
tibial axis.
Fig. 7A is an exploded perspective view of
articulating artificial joint surfaces that comprise
complementary ball-and-socket surfaces that not only
articulate and rotate about the tibial axis, but also
accommodate fore and aft and lateral translation of the
mating joint surfaces relative to the tibia.
Figs. 73 and 7C are side anatomic view of
articulating artificial joint surfaces shown in Fig. 7A
when assembled and installed for use.
Figs. 8A, 8B, and 8C are the articulating
tibial and talar surfaces 22 and 24 are perspective views
of articulating artificial joint surfaces that each
CA 02601090 2007-09-13
W02006/099270
PCT/US2006/008861
- 6 -
comprise a saddle-shaped component, with arrows provided
in Figs. 8B and 8C showing the articulation of the
surfaces during up-and-down flexing of the foot (Fig. 8B)
and side-to-side flexing of the foot (Fig. 8C).
Fig. 9 is a perspective view of the saddle-
shaped talar artificial joint surface secured in a snap-
fit fashion to a talar stem having a configuration shown
in Fig. 3.
Fig. 10 is an exploded perspective view of the
saddle-shaped talar artificial joint surface and talar
stem shown assembled in Fig. 9.
Fig. 11 is an anatomic view that illustrates a
representative technique for drilling the anterior head
of the talus from a posterior joint entry to install a
talar stem of the type shown in Fig. 3 and Fig. 9.
Fig. 12A is a perspective exploded view of a
total ankle replacement system that includes a tibial
component that articulates with a talar component having
a talar artificial joint surface that can comprise a
plastic material, e.g., ultra high molecular weight
polyethylene, and that can be assembled in an
interlocking fashion on a talar stem.
Fig. 12B is a perspective assembled view of
the total ankle replacement system shown in Fig. 12A.
Fig. 12C is a section view taken generally
along line 12C in Fig. 12B.
Fig. 13 is a perspective exploded view of a
tibial component having a tibial artificial joint surface
that can comprise a plastic material, e.g., ultra high
molecular weight polyethylene, and that can be assembled
in a sliding snap fit fashion on a tibial stem, which is
shown to be a multi-piece stem of a type shown in Fig.
4A.
Fig. 14 is a perspective view of the underside
of a platform that forms a part of the tibial component
CA 02601090 2007-09-13
W02006/099270
PCT/US2006/008861
- 7 -
shown in Fig. 13, the platform accommodating a sliding
snap fit with the plastic tibial artificial joint
surface.
Figs. 15A, 15B, and 15C are side sections
views of the platform shown in Fig. 14 making a sliding
snap fit with the plastic tibial artificial joint
surface.
Figs. 15D, 15E, and 15F are perspective views
of an installation tool being manipulated to make the
sliding fit between the plastic tibial artificial joint
surface and the platform as shown in Figs. 15A, 15E, and
15C.
Fig. 16 is a side section view of the tibial
component shown in Fig. 13, after assembly.
Fig. 17 is a perspective view of the tibial
component shown in Fig. 13, after assembly, and in
articulation with a talar component.
Fig. 18 is a perspective anatomic view of a
native ankle joint, showing the three natural X, Y, and Z
axes of the joint.
Fig. 19 is a perspective view of an alignment
tool, which serves the task of aligning an ankle joint
with the tibia during a procedure which installs a total
ankle replacement system of a type shown in previous
figures.
Fig. 20 is an exploded perspective view of a
footholder assembly that forms a part of the alignment
tool shown in Fig. 19.
Figs. 21A and 21B are assembled perspective
views of the footholder assembly shown in Fig. 20,
showing its ranges of horizontal and vertical movement
that make possible horizontal and vertical alignment of
the leg and ankle joint radiologically.
Figs. 22A and 22B are, respectively, side and
end views of the footholder assembly shown in Figs. 21A
CA 02601090 2007-09-13
W02006/099270
PCT/US2006/008861
- 8 -
and 213, showing the range of vertical movement that
makes possible vertical alignment of the leg and ankle
joint radiologically.
Figs. 23A and 23B are, respectively, top and
end views of the footholder assembly shown in Figs. 21A
and 213, showing the range of horizontal movement that
makes possible horizontal alignment of the leg and ankle
joint radiologically.
Fig. 24 is a side view of representative tools
and methodologies, which serve the task of establishing
an in-line intramedullary path through the calcaneus,
talus, and tibia.
Fig. 25A is a top view of representative tools
and methodologies, which serve the purpose of
establishing anterior access to the ankle joint for the
purpose of making bony cuts in the talus and tibia to
clear a joint space for installation of the tibial and
talar prosethesis platforms.
Figs. 253 and 25C are side views of the
representative tools and methodologies shown in Fig. 25A
in use to make bony cuts in the talus and tibia to clear
a joint space for installation of the tibial and talar
prosethesis platforms.
Fig. 26 is a top perspective view of the tools
and methodologies shown in Fig. 25A in use to make bony
cuts in the talus and tibia to clear a joint space for
installation of the tibial and talar prosethesis
platforms.
Figs. 27A and 27B are side views of
representative tools and methodologies, which serve the
purpose of establishing an intramedullary passage within
the tibia, into which the stem component of the tibial
platform can be installed, making use of anterior access
through the cleared joint space formed using the tools
and methodologies of Figs. 25A, 253, 25C, and 26.
CA 02601090 2007-09-13
W02006/099270
PCT/US2006/008861
- 9 -
Figs. 28A to 28E show in perspective views
representative tools and methodologies, which serve the
purpose of establishing a talar-calacaneal passage
bridging the talus and calcaneus, in which the stem
component of the talar platform 20 be installed making
use of the anterior access through the cleared joint
space formed using the tools and methodologies of Figs.
25A, 25E, 25C, and 26.
Figs. 29A to 29D and Fig. 30 show in
perspective views representative tools and methodologies,
which serve the purpose of installing the multi-piece
tibial stem (as also shown in Figs. 4A and 4B) and
platform, the stem being assembled in situ in the
intramedullary passage formed within the tibia formed
using the tools and methodologies shown in Figs. 27A and
27B.
Fig. 31 shows in a side view the installation
of the calcaneal stem component into the passage bridging
the talus and calcaneus (see Fig. 28E) formed using the
tools and methodologies shown in Figs. 28A to 28E.
Fig. 32 shows in a side view the placement of
the talar artificial joint surface on the calcaneal stem
component installed using the tools and methodologies
shown in Fig. 31.
Fig. 33 shows in a side view the installation
of the tibial artificial joint surface on the platform
installed using the tools and methodologies shown in
Figs. 29A to 29D and Fig. 30.
Fig. 34 is a left side perspective view of a
representative installation platform to which a variety
of jigs, fixtures, reamers, and auxiliary platforms of
the form, fit, and function shown in Figs. 19 to 33 may
be rigidly and simply affixed to the sequence of tasks,
including (i) the alignment of the ankle joint with the
tibia, (ii) the establishing of an in-line intramedullary
CA 02601090 2007-09-13
W02006/099270
PCT/US2006/008861
- 10 -
path through the calcaneus, talus, and tibia; (iii) the
establishing of anterior access for the purpose of making
properly oriented bony cuts in the talus and tibia to
install the tibial and talar platforms; and (iv) the
installation of the tibial and talar platforms.
Fig. 35 is a right side perspective view of
the installation platform shown in Fig. 34.
Description of Preferred Embodiments
This description is divided into logical
sections for ease of disclosure. Section I introduces
the reader to the anatomy of the lower leg and ankle, to
set the anatomic backdrop of the total ankle replacement
systems and methods that will be described. Section II
provides structural descriptions of representative
embodiments of the tibial and talar-calcaneal components
of total ankle replacement systems and devices that have
the desired form, fit, and function. Section III provides
descriptions of representative embodiments of systems,
methods, and techniques useful for the implantation of
total ankle replacement systems and devices to achieve
their desired form, fit, and function.
Although the disclosure hereof is detailed and
exact to enable those skilled in the art to practice the
invention, the physical embodiments herein disclosed
merely exemplify the invention, which may be embodied in
other specific structure. While the preferred embodiment
has been described, the details may be changed without
departing from the invention, which is defined by the
claims.
I. Anatomy of the Lower Leg and Ankle
As Fig. 1 shows, the foot comprises fourteen
phalanges or toe bones 11 connected to the metatarsus
bones 13. There are also seven tarsal bones 14, of which
the talus 15 supports the tibia 16 and the fibula 18, and
the heel bone or calcaneus 17. Of the tarsal bones, the
CA 02601090 2007-09-13
W02006/099270
PCT/US2006/008861
- 11 -
talus 15 and the calcaneus 17 are the largest and are
adjacent to each other. The other tarsal bones include
the navicular 19, three cuneiforms 21, and the cuboid 23.
Total Ankle Replacement System
A. Overview
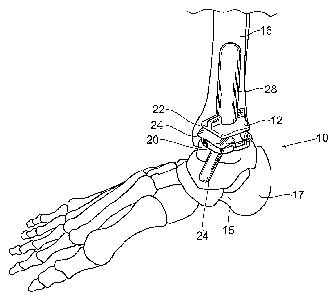
Fig. 2 shows a total ankle replacement system
10. Generally speaking, the system 10 includes a tibial
platform 12 that is sized and configured for installation
on the tibia 16. As also shown in Fig. 2, the tibial
platform 12 desirably includes a tibial stem 28. The
system also includes a talar platform 20 that is sized
and configured for installation on the talus 15. As also
shown in Fig. 2, the talar platform 20 includes a talar
stem 26.
The tibial platform 12 carries a tibial
artificial joint surface 22. The talar
platform 20
carries a talar artificial joint surface 24. The tibial
artificial joint surface 22 and the talar artificial
joint surface 24 are bearing surfaces mutually sized and
configured to articulate. The
articulating joint
surfaces 22 and 24 replace the natural ankle joint
surfaces, which are removed (as will be described later),
to restore a range of motion that mimics the natural
joint.
The joint surfaces 22 and 24 may be made of
various materials commonly used in the prosthetic arts
including, but not limited to, polyethylene, high
molecular weight polyethylene (HMWPE), rubber, titanium,
titanium alloys, chrome cobalt, surgical steel, or any
other total joint replacement metal and/or ceramic, bony
in-growth surface, sintered glass, artificial bone, any
uncemented metal or ceramic surface, or a combination
thereof. The joint
surfaces 22 and 24 may comprise
different materials. For example,
the tibial joint
surface 22 may comprise a plastic or other non-metallic
CA 02601090 2007-09-13
W02006/099270
PCT/US2006/008861
- 12 -
material, and the talar joint surface comprise a metallic
material. The reverse can be true, or the surfaces 22
and 24 may each comprise the same type of materials
(i.e., metal-metal or plastic-plastic).
B. Representative Embodiments.
The tibial platform 12, the talar platform 20,
and/or the articulating artificial joint surfaces 22 and
24 they carry may be variously configured and posses
various technical features. Representative examples of
configurations and features will now be described.
1. The Stems
a. The Talar Stems
The talar stem 26 may be variously sized and
configured. As shown in Fig. 2, the stem 26 bridges the
talus to the calcaneous. This stem 26 serves the dual
function of supporting the talar platform as well as
fusing the sub-talar joint, should that be necessary or
beneficial to the patient.
As shown in Fig. 2, the replacement system 10
incorporates many technical features disclosed in Reiley
US 6,663,669. For example, the talar platform 20 is fixed
to the calcaneus 17 and/or the talus 15, which can
increase the amount of bone available for fixation. The
fusion of the subtalar joint that the stem 26 provides
allows fixation of the talar platform 20 to both the
talus 15 and calcaneus 17. Alternatively, the subtalar
joint can be fused using any method common to those of
skill in the surgical arts including, but not limited to,
fusion with poly(methylmethacrylate) bone cement,
hydroxyapatite, a ground bone and marrow composition,
plates and screws, or a combination thereof.
The enlarged available bone base provides
prosthesis stability, and allows for anchoring of the
talar platform 20 with, for example, screws. This design
provides stabiliti and stress absorption for the overall
CA 02601090 2007-09-13
W02006/099270 PCT/US2006/008861
- 13 -
prosthetic ankle joint, and decreases the probability of
prosthesis loosening and subsidence.
Still, prosthesis systems with talar stems 26
that do not bridge the talus to calcaneous can also offer
stability, reliable fixation, and longevity. The talar
stem 26 shown in Fig. 3 does not bridge the talus to the
calcaneous. Instead, the stem 26 projects from posterior
to anterior of the ankle into the anterior head of the
talus. The talar head is a large bony component of the
talus, which offers a substantial bony structure to affix
the talar platform 20. The subtalar joint can be still
be fused separately, if desired, using any methods just
mentioned.
Any given talar stem 26 may be made of various
materials commonly used in the prosthetic arts including,
but not limited to, titanium, titanium alloys, tantalum,
chrome cobalt, surgical steel, polyethylene, absorbable
polymer, or any other total joint replacement metal
and/or ceramic, bony in-growth surface, sintered glass,
artificial bone, any uncemented metal or ceramic surface,
or a combination thereof. The talar stem 26 may further
be covered with various coatings such as antimicrobial,
antithrombotic, and osteoinductive agents, or a
combination thereof. These agents may further be carried
in a biodegradable carrier material with which the pores
of the surface of the talar stem 26 may be impregnated.
See U.S. Pat. No. 5,947, 893, which is incorporated
herein by reference. If desired, the talar stem 26 may be
coated and/or formed from a material allowing bony
ingrowth, such as a porous mesh, hydroxyapetite, or other
porous surface.
The talar stem 26 may be any size or shape
deemed appropriate and is desirably selected by the
physician taking into account the morphology and geometry
=
of the site to be treated. The physician is desirably
CA 02601090 2007-09-13
WO 2006/099270
PCT/US2006/008861
- 14 -
able to select the desired size and/or shape based upon
prior analysis of the moiphology of the target .bone(s)
using, for example,- plain film x-ray, fluoroscopic x-ray,
or MRI or CT scanning. The size and/or shape is selected
to optimize support and/or bonding of the stem 26 to the
surrounding bone(s). The stem 26 may be variable lengths
from 2 cm to 12 cm and variable widths from 4 to 14 mm.
In a representative embodiment, a talo-calcaneal stem 26
is approximately GS to 75 mm in length and approximately
7 to 13 mm wide. While in the disclosed embodiment the
stem has a circular cross-section, it should be
understood that the stem could formed in various other
cross-sectional geometries, including, but not limited
to, elliptical, polygonal, irregular, or some combination
thereof. In addition, the stem could be arched to reduce
and/or prevent rotation, and could be of constant or
varying cross-sectional widths.
The talar stem 26 may be with
poly(methylmethacrylate) bone cement, hydroxyapatite, a
ground bone composition, screws, or a combination
thereof, or any other fixation materials common to one of
skill in the art of prosthetic surgery.
As will be described in greater detail later,
the talar stem 26 may additionally have interlocking
components, along its length or at its top surface to
assemble the stem 26 in situ and/or allow other
components of the talar platform 20 to lock and/or fit
into the talar stem 26.
2. The Tibial Stem
Like the talar stem 26, the tibial stem 28 may
be made of any total joint material or materials commonly
used in the prosthetic arts, including, but not limited
to, metals, ceramics, titanium, titanium alloys,
tantalum, chrome cobalt, surgical steel, polyethylene,
absorbable polymer, or any other total joint replacement
CA 02601090 2007-09-13
W02006/099270
PCT/US2006/008861
- 15 -
metal and/or ceramic, bony in-growth surface, sintered
glass, artificial bone, any uncemented metal or ceramic
surface, or a combination thereof. The tibial stem 28
may further be covered with one or more coatings such as
antimicrobial, antithrombotic, and osteoinductive agents,
or a combination thereof. These agents may further be
carried in a biodegradable carrier material with which
the pores of tibial stem 28 may be impregnated. See U.S.
Pat. No. 5,947,893.
Also like the talar stem 26, the tibial stem
28 may be fixed into the tibia with
poly(methylmethacrylate) bone cement, hydroxyapatite, a
ground bone composition, screws, or a combination
thereof, or any other fixation materials common to one of
skill in the art of prosthetic surgery. In the
illustrated embodiment, the tibial stem 28 is fixed to
the tibia 16 with screws. If screws are used, they can
extend anteriorly, posteriorly, medially, laterally
and/or at oblique angles, or any combination thereof.
The tibial stem 28 may be variable lengths
from 20 mm to 300 mm and variable widths from 6 mm to 20
mm. In the preferred embodiment, the tibial stem 28 is
preferably at least 50 mm in length. Of course,
it
should be understood that the disclosed tibial stem 28
could be of virtually any length, depending upon the size
of the patient, his or her bone dimensions, and the
anticipated future mobility of the patient. In general,
a larger patient, having larger bones, with a high
anticipated mobility (i.e. he or she will be
walking/running around quite a bit) would desirably have
a longer stem 28 to provide increased stability and
broader distribution of stress to prevent subsidence,
loosening, and tibial osteolysis. If desired, the stem
28 can incorporate an anti-rotational feature such as
outwardly extending fins - for example, one or more fins,
CA 02601090 2007-09-13
W02006/099270
PCT/US2006/008861
- 16 -
0.5 to 25 cm long, 1 to 3 mm wide, sharp edges or dull,
located along the stem 28 - or a bow to the stem 28 - for
example, ranging from 1 to 10 degrees bow, anterior or
posterior or lateral, or some combination thereof.
Moreover, if desired, the surface of the tibial stem 28
can incorporate irregularities such as wedges or points,
desirably angled towards the knee, which inhibit and/or
prevent the tibial stem 28 from subsiding.
Alternatively, the width of the tibial stem 28 may vary
along the length of the stem 28, further inhibiting
and/or preventing rotation and/or subsidence.
As will be described in greater detail later,
the tibial stem 28 may additionally have interlocking
components along its length and/or at its lower surface
to allow assembly the stem 28 in situ and/or allow other
components of the tibial platform 12 to lock into the
tibial stem 28.
3. Multiple Piece Stem
Fig. 4A illustrates a multi-piece tibial stem
30 suitable for use in any surgical procedure in which a
stem is required for fixation of an implant, whether it
is a total joint implant, fusion (arthrodesis) implant,
osteotomy fixation implant, or fracture fixation implant.
In the illustrated embodiment, the stem 30 comprises a
top (i.e., superior) component 32, one or more mid
components 34, and a bottom (i.e., inferior) component
36. The top component 30 is desirably convex or domed to
facilitate advancement of the stem 30 in the direction of
the top component 32 within bone.
The multi-piece configuration is ideally
suited for securing bone components together in a
minimally invasive procedure. This configuration is also
ideally suited for minimally invasive surgeries in which
a small surgical opening is used to install large
components. This configuration allows a small surgical
CA 02601090 2007-09-13
W02006/099270
PCT/US2006/008861
- 17 -
opening to be used to install large components at
generally a right angle to or transverse the direction of
insertion of the individual stem components 32/34/36.
This aspect of the multi-piece stem 30 will be very
apparent after discussion of representative surgical
procedure later.
Two or more small stem components 32/34/36 can
be sequentially attached to one another in situ (see Fig.
4B) to make a larger stem assembly. For example, a top
component 32 may be joined with a bottom component 36.
Alternatively, one or more mid components 34 may be
placed between the top and bottom components 32 and 36 to
form a stem 30 of a desired length. The components
32/34/36 may be screwed together, as shown, or attached
with a Morse taper, one-quarter turn, or other fixation
means. Alternatively, the stem segments 32/34/36 can be
fitted together with a combination of Morse tapers and
threads, or with a combination of Morse tapers and
external pins or screws.
As will be described in greater detail later,
one or more of the components 32/34/36 may include an
internal hex 38 or other non-rotation configuration for
engagement with a driver or other tool to facilitate
advancement of the component 32/34/36 within bone and/or
to torque the component 32/24/36 into the adjacent
component 32/34/36, as shown in Fig. 4A. Similarly, one
or more of the components 32/34/36 may also include an
external hex 40 or other non-rotation configuration for
engagement with a wrench or other tool to grasp or
otherwise secure the component 32/34/36 during
installation.
As will be described in greater detail later,
each component 32/34/36 is desirably sized and configured
to be individually installed through a small incision,
e.g., a small anterior opening in the ankle. In this way
CA 02601090 2007-09-13
W02006/099270 PCT/US2006/008861
- 18 -
(see Fig. 4B), the individual components 32/34/36 can be
sequentially joined together in situ, e.g., within an
intramedullary path in the tibia (which has been reamed-
out in advance) and progressively advanced up the
intramedullary path, top component 32 first. The last or
bottom component 36 is sized and configured to attach to
a prosthesis (e.g., the tibial platform 12) that would
comprise the upper half of the ankle prosthesis.
The multi-piece configuration not only permits
installation using minimally-invasive procedures, but
provides a means to install long fixation members or
stems that might not be achievable if they were
constructed of a single piece.
While the long or extended length of the
multi-piece stem 30 is particularly well-suited for use
in the tibia, the multi-piece stem 30 could be used in
other long bones or in the talus as well.
4. The Articulating Artificial Joint
Surfaces
The articulating artificial joint surfaces 22
and 24 may be made of materials such as plastic (e.g.,
polyethylene), ceramic, or metal, or combinations thereof
(e.g., metal-backed plastic). They may possess various
configurations and articulate in different ways. Various
representative embodiments will now be described for
purpose of illustration.
a. Mating
Concave/Convex Surfaces
As shown in Fig. 5, the basic geometry of the
articulating surfaces 22 and 24 can form a ball-and-
socket joint. In this
arrangement, the articulating
surfaces 22 and 24 comprise mating concave and convex
surfaces. In one
arrangement, the tibial artificial
joint surface 22 comprises a concave dome, and the talar
artificial joint surface 24 comprises a convex dome that,
when installed, mates with the concave dome. This mimics
CA 02601090 2007-09-13
W02006/099270
PCT/US2006/008861
- 19 -
the configurations of the natural joint surfaces they
replace.
As Fig. 5 shows, the convex dome of the-talar
surface 24 can comprise a button-like structure that can
be installed in a reamed-out pocket within the talus 15,
without the use of a stem 26. The button-like structure
can be secured within the pocket without use of a stem 26
with poly(methylmethacrylate) bone cement,
hydroxyapatite, a ground bone composition, screws, or a
combination thereof, or any other fixation materials
common to one of skill in the art of prosthetic surgery.
To facilitate placement, the button-like structure can
include a peg 40 or similar appendage in lieu of a stem
per se.
In this arrangement, the tibial surface 22 is
secured to a stem 28 by a Morse taper connection that
does not permit movement of the surface 22 relative to
the stem 28.
b. Rotating Concave/Convex
Surfaces
Fig. 6 illustrates an embodiment in which the
articulating surfaces 22 and 24 comprise complementary
ball-and-socket surfaces that not only articulate, but
also allows the artificial joint to rotate about the
tibial axis. This makes possible more uniform wear of the
surfaces 22 and 24 to maximize function and longevity of
the prostheses.
Similar to the embodiment previously
described, the basic geometry of the articulating
surfaces 22 and 24 comprises a ball-and-socket joint. The
tibial artificial joint surface 22 comprises a concave
dome, and the talar artificial joint surface 24 comprises
a convex dome that, when installed, mates with the
concave dome.
The talar artificial joint surface 24 is
CA 02601090 2007-09-13
W02006/099270
PCT/US2006/008861
- 20 -
carried by a stem 26. The surface 22 is fixed to the
stem 26 by a Morse-taper connection, so that no relative
movement can occur between this surface 22 and the talus.
The tibial artificial joint surface 22 is
carried by a platform 12. The platform 12 is, in turn,
coupled to a tibial stem 28 by a Morse taper connection.
No rotation between the platform 12 and the stem 28 can
occur. However, the connection between the platform 12
and the joint surface 22 comprises a rotational fit.
This fit is achieved between a cylindrical collar 23
depending from the platform 46 that nests within a mating
trough 25 on the joint surface 22. This rotation fit
allows rotation of the surface 22 relative to the
platfoLm 12 about the axis of the stem 28 and thus about
the axis of the tibia, to which the stem 28 is fixed.
This rotational coupling more freely accommodates
rotation of the foot relative to the tibia, providing
enhanced mechanical equilibrium and stability.
c. Translating Surfaces
Figs. 7A, 7B, and 7C illustrate an embodiment
in which the articulating surfaces 22 and 24 comprise
complementary ball-and-socket surfaces that not only
articulate and rotate about the tibial axis, but also
accommodate fore and aft and lateral translation of the
mating joint surfaces relative to the tibia.
As in previous arrangements (see Figs. 7A and
7B), the tibial artificial joint surface 22 comprises a
cup or socket-like surface, and the talar artificial
joint surface 24 comprises a ball-like surface that, when
installed, mates with the cup-like surface of the tibial
artificial joint surface 22.
Also as in previous arrangements (still
referring to Figs. 7A and 7B), the talar artificial joint
surface 24 is carried by a stem 26. The surface 22 is
fixed to the stem 26 by a Morse-taper connection, so that
CA 02601090 2007-09-13
WO 2006/099270
PCT/US2006/008861
- 21 -
no relative movement can occur between this surface 22
and the talus.
The tibial artificial joint surface 22 is
carried by a platform 12. The platform 12 is, in turn,
coupled to a tibial stem 28 by a Morse taper connection.
No rotation between the platform 12 and the stem 28 can
occur. However, the connection between the platform 12
and the joint surface 22 comprises a loose, non-
interference fit between an oversized hole 42 in the
joint surface 22 and a lesser diameter tab 44 on the
platform 12. This loose coupling peimits relative lateral
(side-to-side) as well as anterior-to-posterior sliding
or translation between the platform 12 and the joint
surface 22 (see Fig. 7C), as well as intermediate ranges
of diagonal movement. The loose coupling also allows
rotation of the surface 22 relative to the platform 12
about the axis of the stem 28.
This loose coupling accommodates forward and
sideways translation of the foot relative to the tibia,
as well as rotation of the foot relative to the tibia.
This feature makes possible uniform wear and uses all the
surface area to the fullest extent to maximize function
and longevity of the prostheses. The translating ball and
socket type articulation provides mechanical equilibrium
and stability. The articulating spherical surfaces 22 and
24 maximize the contact area, thereby minimizing the
contact pressure. This minimizes local surface stresses,
in turn, minimizing wear on the joint and maximizing
joint longevity.
The ball joint maximizes joint mobility. It
accommodates the normal flexure of the ankle during
walking or running. It also allows for the normal side to
side rotation of the normal ankle.
d. Saddle Surfaces
Previous embodiments show, as the basic
CA 02601090 2007-09-13
W02006/099270
PCT/US2006/008861
- 22 -
articulating geometry, ball and socket joints. In Fig.
8A, the articulating tibial and talar surfaces 22 and 24
are-shown to each comprise a saddle-shaped component. The
saddle shape is geometrically characterized as a swept
arc (which is of constant radius in a preferred
embodiment), comprising a surface defined by a first arc
(which is of constant radius in a preferred embodiment)
that is swept along a second arc (which is also of
constant radius in a preferred embodiment) that is
perpendicular to the first arc. The geometry forms, for
each surface 22 and 24, an elongated trough that curves
along an axis.
As shown in Fig. 8A, the trough of the tibial
saddle surface 22 component nests within the trough of
the talar saddle surface 24. An interface is thereby
formed between the tibial and talar components of the
prosthesis. The articulation occurs along this interface
both along the curved axis of the trough, i.e.
accommodating up and down flexing of the foot (see Fig.
8B), as well as transversely within the tough, i.e.,
accommodating lateral (side to side) flexing of the foot
(see Fig. 8C).
The saddle interface provides the joint with
intrinsic stability, as the joint wants to assume a
position of stable static equilibrium. Some patients will
require a deep saddle trough because the surrounding soft
tissue supports for the ankle joint are compromised or
weak. Other patients may require a less deep saddle
trough because their joint has more supporting soft
tissue. A more shallow saddle trough provides increased
ability for the joint to rotate about the tibial axis,
which is desirable.
As Figs. 8A to 8C show, the saddle shaped
tibial surface 22 can be sized and configured to be fixed
to a tibial stem 28 in any of the manners previously
CA 02601090 2007-09-13
WO 2006/099270
PCT/US2006/008861
- 23 -
described. In Figs. 8A to 8C, the stem 28 can comprise
comprises a multi-piece stem 30 as earlier described and
as shown in Fig. 4A. The talar component is desirably
installed after the tibial component has been inserted
into the joint.
The talar component can be sized and
configured in various ways. In the embodiment shown in
Figs. 9 and 10, the talar platform 20 is secured to a
talar stem 26 having a configuration shown in Fig. 3,
i.e., the stem 26 does not bridge the sub-talar joint,
but projects from posterior to anterior into the anterior
head of the talus 15.
Fig. 11 illustrates a representative technique
for drilling the anterior head of the talus 15 from a
posterior joint entry to install the talar stem 26. A k-
wire 52 is used to pierce from within the joint, in an
anterior to posterior-lateral direction. The foot is
then placed in the dorsi-flexion position, as shown. A
conventional cannulated trocar (not shown) is placed over
the k-wire 52 and advanced to pierce the joint in a
posterior to anterior direction. A cannula 54 is passed
over the trocar, and the trocar is removed. The cannula
54 remains, establishing a percutaneous path to the talus
15. A cannulated drill 56 is placed over the k-wire 52
within the cannula 54. The anterior head of the talus 15
is drilled to the proper depth to receive the stem 26.
The stem 26 is inserted.
The talar platform 20 is secured to the stem
26 and nests on top of the talus 15, which has been
milled beforehand. As Fig. 10 best shows, the proximal
end 76 of the stem 26 includes a male hex 78, or other
non-rotation configuration, that nests in a female hex 80
on the bottom 74 of the talar platform 20. A cap screw
82, proceeding through the talar platform 20 into the
talar stem 26, affixes the stem 26 and platform 20
CA 02601090 2007-09-13
W02006/099270
PCT/US2006/008861
- 24 -
together.
In the illustrated embodiment, the saddle
shaped talar artificial joint surface 24 snaps into the
top of the talar platform 20 and rests in a load bearing
nest defined by the platform 20. A pair of opposing tabs
or protrusions 68 from both sides of the talar artificial
joint surface 24 nest in slots 70 in raised pillars 72 on
the talar platfolm 20, further ensuring that the surface
24 is well secured to the talar platform 20. The snap-
together interlocking configuration provides for easily
removal and replacement of the talar artificial joint
surface 24.
Before installing the surface 24, a sizing-
piece, made of plastic or other suitable biocompatible
material, can be slid into the joint space so the
physician can determine the proper thickness of material
to provide the proper joint distention. When the proper
size has been determined, the physician slides the actual
talar artificial joint surface 24 into the joint space
and snap-fits it onto the platform 20.
This arrangement makes it possible to install
and use a plastic joint surface on the talar side of the
prosthesis. For example, the talar artificial joint
surface 24 can be formed of a durable biocompatible
plastic, e.g., Ultra High Molecular Weight Polyethylene
(UHMWPE). Placement of a plastic component on the talar
side rather than on the tibial side provides the maximum
amount of plastic material available for strength and
wear properties, while at the same time allowing for the
minimal amount of bone removal.
Another representative embodiment of a plastic
talar-side component is shown in Figs. 12A and 12B. The
component shares many of the features of the component
just described. In addition, the joint surface 24 rests
on the platform 20 upon a pair of spacing leg plates or
CA 02601090 2007-09-13
WO 2006/099270
PCT/US2006/008861
- 25 -
spacers 58. The spacers 58 are placed under the talar
artificial joint surface 24 on opposing sides of the
surface 24 (see Fig. 12C). The spacers 58 include
upwardly arched sides that nest within tabs 59 extending
beneath the arched edges of the saddle-shaped joint
surface 24. A locking plate 60 fits on the platform 20
beneath the spacers 58 upon which the talar artificial
joint surface 24 rests. Flanges 66 projecting from sides
of the locking plate 60 lock into slots 61 on the talar
platform 20.
The thickness and configuration of the spacers
58 and plate 60 can be varied to accommodate individual
patient needs and anatomy. In a representative
embodiment, the spacers 58 and locking plate 60 are each
approximately 1-2mm thick.
The locking plate 60 is sized and configured
with a memory to serve as a spring-lock. All the
components of the talar assembly are frictionally locked
together, like a rubix cube, without the use of screws or
other mechanical fasteners.
The frictionally interlocking design provides
stability, as there are no induced forces tending to
drive the components from the joint space, because they
are all interlocked. The anterior-posterior and medial-
lateral forces on the talar component may be substantial,
but the talar joint surface 24 is trapped-locked within
the talar platform 20 sidewalls and securely held in
place.
The snap-together interlocking system just
described provides a positive locking means without the
use of screws or other means. The interlocking design
also provides the physician with a relatively simple
means to replace the talar artificial joint component 24
if it wears out. To replace the high-wear component 24,
the physician makes a small anterior opening in the ankle
CA 02601090 2007-09-13
W02006/099270
PCT/US2006/008861
- 26 -
to access the joint. The physician then removes the
locking plate GO and spacers 58 and withdraws the worn
component 24. A new component 24 is inserted and locked
into place.
5. Plastic, Snap Fit Tibial Component
A snap-fit assembly can also be incorporated
into a tibial component. As shown in Fig. 13, a tibial
platform 12 includes a tibial stem 30, which is shown to
comprise a multi-piece stem as earlier described and as
shown in Fig. 4A. In this
embodiment, the tibial
platform 12 and the stem 30 desirably comprise metal
parts.
The tibial platform 12 carries a tibial
artificial joint surface 22. The joint surface 22 is
desirable made from a durable biocompatible plastic,
e.g., Ultra High Molecular Weight Polyethylene (UHMWPE).
Desirably, the plastic selected for the joint surface 22
is resiliently deformable, meaning that it will
temporarily yield or bend in response to an applied
force, but it will not permanently deform, but rather
will return to its normal configuration when the force is
removed. With this feature, the joint surface 22 can be
sized and configured to be snap-fitted to the platform
12. It should be appreciated that alternative snap-fit
assemblies could comprise a metal joint surface 22 and a
resilient platform 12, or resilient platform 22 and a
resilient joint surface 12.
To secure the joint surface 22 to the platform
12, as Fig. 13 shows, the platform 12 includes oppositely
spaced, inwardly tapered side rails 90. The side rails
90 extend in an anterior to posterior direction along the
underside of platform 12. The tapered side rails 90 form
a channel 92 between them.
The topside of the artificial joint surface 22
(see Fig. 13) includes a tab member 94. The tab member 94
CA 02601090 2007-09-13
WO 2006/099270
PCT/US2006/008861
- 27 -
is sized and configured to nest within the channel 92, by
sliding the tab member 94 into the channel 92 in an
anterior to posterior direction, as Figs. 15A to 15C
show.
As Fig. 14 shows, the underside of the
platform 12 includes a shaped depression or notch 96 near
its anterior edge. Likewise, the topside of the
artificial joint surface 22 includes an upwardly
projecting lobe or detent 98 near its anterior edge. The
detent 98 is sized and configured to rest within the
notch 96.
More particularly, by applying force, the tab
member 94 is made to enter and slide within the channel
92 (see Fig. 15A). The upwardly projecting detent 98
will ultimately contact the anterior edge of the platform
12. As sliding force continues to be applied, the
anterior edge of the resilient artificial joint surface
22 will yield by bending (see Fig. 15B). The detent 98
will, as a result, ride under the anterior edge of the
platform 12 and slide along the underbody of the platform
12, until the notch 96 is encountered (see Fig. 15C).
When the notch 96 is encountered, the resilience of the
joint surface 22 will snap-fit the detent 98 into the
notch 96.
As Figs. 13 and 14 show, the underside of the
platform 12 desirably includes a stop flange 190 along
its posterior edge. The joint surface 22 includes a
mating proximal groove 192, which nests against the stop
flange 190 to prevent over-travel of the joint surface 22
relative to the platform when caused to slide in a
posterior direction. The engagement of the stop flange
190 and groove 92 is sized and configured to occur in
concert with the snap-fit engagement of the detent 98
within the notch 96.
As Figs. 15D to 15F show, an installation tool
CA 02601090 2007-09-13
W02006/099270
PCT/US2006/008861
- 28 -
300 can be provided to aid in sliding the joint surface
22 into fitment with the platform 12.
In the illustrated embodiment, the
installation tool 300 includes a body 302 defining a
channel 304 in which a manually operable plunger 306 is
carried for fore and aft sliding movement. With the
plunger 306 pulled back into its most-aft position (see
Fig. 15D), the joint surface 22 can be loaded into the
channel 304, detent 98-side first (the tab member 94
slides within side rails that line the channel 304). The
joint surface 22 is placed into abutment with the plunger
306 within the channel 304.
As Fig. 15E shows, the platform 12 is coupled
to the distal end of the body 302 (e.g., with a mounting
screw 312 carried on the distal end of the body 302 that
engages a threaded receptacle 314 on the platform 12,
along with an anti-rotational holding pin 308 on body 302
that fits within an aperture 310 on the platform 12). The
body 302 holds the channel 92 of the platform 12 in
alignment to accept the tab member 94 of the joint
surface 22.
As Fig. 15F shows, forward advancement of the
plunger 306 pushes the joint surface 22, expelling it
from the body channel 304 and into the platform channel
92, until the notch 96 and detent 98 engage (as Fig. 15C
shows). Disengaging the screw 312 from the receptacle 314
and pulling back on the tool 300 disengages the holding
pin 308 from the aperture 310, freeing the tool 300 from
the now-assembled tibial component.
When the tibial component is assembled (see
Fig. 16), the tab member 94 of the joint surface 22 is
captured within the side rails 90 of the platform 12; the
detent 98 if the joint surface 22 is captured within the
notch 96 of the platform; and the proximal groove 192 of
the joint surface 22 is captured within the stop flange
CA 02601090 2007-09-13
W02006/099270
PCT/US2006/008861
- 29 -
190 of the platform 12. As a result, the joint surface 22
is held securely within the platform 12, which is, in
turn; fixed in position by the stem 30. The joint surface
22 is thereby positioned for stable articulation with a
talar artificial joint surface 24 (see Fig. 17), which
is, in turn, fixed in position by a stem 26.
Implantation
A. Intramedullary Guidance
Desirably, the ankle replacement system 10 is
installed using minimally invasive intramedullary
guidance. Intramedullary guidance is established with
respect to the major axis of the tibia by minimally
invasive access through the calcaneus, through an
incision in the bottom of the foot.
Intramedullary
guidance along the axis of the tibia makes it possible to
make properly oriented bony cuts of the talus 15 and
tibia 16 through anterior access to the ankle joint.
Proper overall alignment of the total ankle system 10 and
improved long term results are achieved.
Using installation tools, systems, and methods
that incorporate intramedullary guidance, the total ankle
system 10 can be installed in desired alignment and
orientation with all the natural axes of the native ankle
joint it replaces. Fig. 18 shows these natural axes to
include the anterior to posterior axis (Y-horizontal
axis) of rotation of the ankle joint, the natural medial-
to-lateral axis (X-horizontal axis) of rotation of the
ankle joint, and the natural superior-to-inferior axis
(Z-vertical axis) of alignment of the ankle joint with
the major axis of the tibia. By establishing
and
maintaining proper alignment of the anterior to posterior
axis (Y-horizontal axis) of rotation, the ankle
replacement system 10 establishes and maintains the
desired degree of plantar-dorsi ("up and down") flexion
of the foot. By establishing and maintaining proper
CA 02601090 2007-09-13
W02006/099270
PCT/US2006/008861
- 30 -
alignment of the natural medial-to-lateral axis (X-
horizontal axis) of rotation, the system 10 establishes
and maintains the desired degree of inversion/eversion
("in and out") rotation of the foot. By establishing and
maintaining proper alignment of the natural superior-to-
inferior axis (Z-vertical axis) of alignment of the ankle
joint with the long axis of the tibia, the system 10 is
accurately oriented with respect to the central tibial
axis of the leg, so that intramedullary support can be
achieved by in line drilling of the calcaneous 17 and
talus 15 in a single drilling step using fluoroscopic
guidance.
B. Installation
Tools, Systems, and Methods
Representative installation tools, systems,
and methods will be described that are ideally suited for
use in ankle replacement procedures (i.e., the
installation of a prosthetic replacement for either or
both of the tibial and talar ankle joint surfaces), as
well as procedures involving fusions in an ankle
replacement procedure (e.g., subtalar fusions, pan-talar
fusions, or triple arthrodeses).
The representative installation tools,
systems, methods accomplish the tasks of (i) the
alignment of the ankle joint with the tibia, (ii) the
establishing of an in-line intramedullary path through
the calcaneus, talus, and tibia; (iii) the establishing
of anterior access for the purpose of making properly
oriented bony cuts in the talus and tibia to install the
tibial and talar platforms 12 and 20; (iv) the
installation of the tibial and talar platforms 12 and 20.
Representative embodiments of each of these
tasks and related tools, systems, and methods will now be
described.
1. Alignment of
the Ankle Joint With
the Tibia
CA 02601090 2007-09-13
W02006/099270
PCT/US2006/008861
- 31 -
Fig. 19 shows a representative alignment tool
100, which serves the task of the alignment of the ankle
joint with the tibia during a prosthesis installation
procedure. The alignment tool 100 includes a footholder
assembly 102 and a leg rest 104. The footholder assembly
102 includes a foot rest 106, to which the foot is
secured by a foot clamp 106 and heel clamps 108 during an
prosthesis installation procedure. The calf of the leg
is suitably secured to the leg rest 104. Together, the
footholder assembly 102 and the leg rest 104 hold the
foot and ankle relative to the leg during an installation
procedure.
As Fig. 19 shows, the footholder assembly 102
is sized and configured for pivoting, under control of
the physician, from a vertical or upright condition
(shown in solid lines in Fig. 19) toward a more
horizontal or tilted condition (shown in phantom lines in
Fig. 19). In the upright condition, the assembly 102
serves to hold the ankle joint in a desired orientation
with respect to the natural anterial-to-posterior and
medial-to-lateral axes. By establishing and maintaining
proper alignment of both the anterior/posterior and
medial/lateral axes, the ankle replacement system 10
establishes and maintains proper stress distributions
through the walking gait. The assembly 102 can be pivoted
in a controlled fashion to cause flexion of the ankle
joint, if and when desired during the installation
procedure. The footholder assembly 102 can be locked by
the physician in any desired orientation between the full
upright condition and full pivoted condition.
The footholder assembly 102 also allows the
ankle joint to be precisely oriented and maintained,
using fluoroscopy, in a desired alignment with the major
axis of the tibia. As Fig. 20 shows, the footholder
assembly 102 includes, in addition to the foot rest 106,
CA 02601090 2007-09-13
W02006/099270
PCT/US2006/008861
- 32 -
a back plate 112 and mid-plate 114, which is sandwiched
between the foot rest 106 and the back plate 112.
The mid-plate 114 is coupled to the foot rest
106 by sliding dovetail couplings 116 for up-and-down
(vertical) movement relative to the foot rest 106. A pair
of oppositely spaced alignment rods 118 is carried by the
mid-plate 114. The alignment rods 118 lay in the same
horizontal plane. The alignment rods 118 extend from the
mid-plate through vertically elongated slots 120 in the
foot rest 106, so that, in use (see Fig. 19) the rods 118
lay on opposite sides of the tibia in the medial-to-
lateral plane. Vertical movement of the mid-plate 114
moves the alignment rods 118 up-and-down in unison within
the slots 120 on opposite sides of the foot rest 106 (see
Fig. 21B).
The back plate 112 is coupled to the mid-plate
114 by sliding dovetail couplings 122 for side-to-side
(horizontal) movement relative to the foot rest 106. A
pair of oppositely spaced alignment rods 124 is carried
by the back plate 112. The alignment rods 124 lay in the
same vertical plane. The alignment rods 124 extend from
the back plate 112 above and below the foot rest 106, so
that, in use (see Fig. 19) the rods 124 lay on opposite
sides of the tibia in the anterior-to-posterior plane.
Horizontal movement of the back plate 112 moves the
alignment rods 124 side-to-side in unison above and below
the foot rest 106 (see Fig. 21A).
The back plate 112 also carries a bushing 126.
The bushing 126 extends through openings 128 in the mid-
plate 114 and foot rest 106 and terminates at or near the
plane of the foot rest 106 against which the bottom of
the foot contacts. The center
of the bushing 126
coincides with the intersection of the horizontal plane
of the rods 118 and the vertical plane of the rods 124.
The rods 118 and 124 are made of materials
CA 02601090 2007-09-13
W02006/099270
PCT/US2006/008861
- 33 -
that are visualized by fluoroscopy.
In use, the leg and foot are prepped for
surgery. The physician desirably makes an anterior
incision to gain initial access to the ankle joint. The
foot and lower leg are placed in the foot rest 106 and
leg rest 104. The physician estimates the ankle's axis of
dorsi-plantar rotation and visually aligns the ankle to
the axis of rotation of the alignment tool 100. The foot
rest 106 is adjusted to rotate the foot so that the big
toe is pointing essentially vertically. The forefoot and
heel are secured to the foot rest 106 with the clamps 108
and 110 already described. The leg rest 104 is adjusted
to the calf so that the tibia 16 is approximately
parallel to the floor. The foot and calf are desirably
aligned so that the anterior-posterior (A-P) line of the
talus's trochlea is essentially vertical.
As shown in Figs. 17A and 17B, a fluoroscopy
unit 130 is aligned to the medial-lateral rods 118. When
aligned, the rods 118 appear as one in fluoroscopy. The
physician moves the mid-plate 114 to align the rods 118
to the center axis (Z-axis) of the tibia 16. Suitable
manual or powered alignment controls (not shown) can be
provided for this purpose. When the desired medial-to-
lateral alignment of the rods 118 with the z-axis is
accomplished, the mid-plate 112 is locked to the foot
rest 106.
As Figs. 18A and 18B show, the fluoroscopic
unit 130 is moved ninety degrees to an anterior to
posterior position. The fluoroscopy unit 130 is aligned
to the anterior-to-posterior rods 124. When aligned, the
rods 124 appear as one in fluoroscopy. The physician
moves the back plate 112 to align the rods 124 to the
center axis (Z-axis) of the tibia 16. Suitable manual or
powered alignment controls (not shown) can be provided
for this purpose. When the desired medial-to-lateral
CA 02601090 2007-09-13
WO 2006/099270
PCT/US2006/008861
- 34 -
alignment of the rods 124 with the z-axis is
accomplished, the back plate 112 is locked to the foot
rest 106.
The pairs of rods 118 and 122 (respectively
horizontal and vertical) are used in concert to minimize
parallax with the fluoroscopy procedure. When the rods
118 and 122 both optically "blend" into one, signifying
alignment, true horizontal or vertical alignment of the
leg and ankle joint is achieved radiologically. For each
pair of rods, one rod can be fashioned to be
fluoroscopically distinguished from the other, e.g., one
rod can be grooved, while the other is smooth.
Once centering is complete, all guide rods 118
and 124 can be removed to allow unobstructed surgical
access to the ankle joint.
2. Establishing an In-line
Intramedullary Path Through the
Calcaneus, Talus, and Tibia
Fig. 24 shows representative tools 132 and
methodologies, which serve the task of establishing an
in-line intramedullary path through the calcaneus, talus,
and tibia. The tools 132 include a bottom foot cannula
134 which establishes an intramedullary guide path
through the calcaneus and talus that leads into the
tibia.
The bushing 126 on the back plate 112 is
slaved to alignment with the axis of the tibia by
alignment of the rods 118 and 124 to the same anatomic
target. Thus, after using the alignment tool 100 as just
described to align the ankle joint with the tibia, in
line drilling of the center of the ankle and tibia for
introduction of the bottom foot cannula 134 is made
possible, because the bushing 126 has been aligned, by
alignment of the rods 118 and 124, to achieve the desired
line-drilling position up through the bottom of the foot.
CA 02601090 2007-09-13
WO 2006/099270
PCT/US2006/008861
- 35 -
There are various minimally invasive surgical
techniques for introducing the bottom foot cannula 134.
In one representative embodiment, the bushing 126 is
temporarily separated from the back plate 112 (e.g., by
unscrewing) to provide access to the bottom of the foot.
The physician uses a scalpel to make an initial incision
in the bottom of the foot, and the bushing 126 is
replaced. A cannulated trocar loaded with a k-wire (not
shown) can be inserted through the bushing 126, into the
bottom of the foot, until the calcaneous 17 is contacted
and the k-wire is firmly set into the calcaneous 17. The
trocar can then be removed, and the k-wire lightly tapped
further into the calcaneous 17. In a representative
embodiment, the bushing 126 measures 6 mm in diameter,
and the cannulated trocar can be 6 mm loaded with a 2.4
mm k-wire. The physician can now operate a cannulated
first reamer (e.g., 6 mm) (not shown) over the k-wire up
into the calcaneous 17 and talus 15 approximately 30 mm.
The first reamer opens an access path for insertion of
the bottom foot cannula 134.
Withdrawing the first reamer and bushing 126,
the physician can now insert the bottom foot cannula 134
(as shown in Fig. 24). With the bottom foot cannula 134
in place, a second reamer 136 (e.g., 5 mm) can be
operated through the cannula 134 to drill approximately
another 100 mm through the talus 15 and up into the tibia
16. Fluoroscopy may be used, if desired, to verify the
accuracy of the drilled hole.
An intramedullary guide path has been
established through the calcaneus and talus leading into
the tibia. The presence of the bottom foot cannula 134
maintains the guide path in alignment with the axis of
the tibia.
3. Establishing
Anterior Access And
Making Bony Cuts in the Talus and
CA 02601090 2007-09-13
WO 2006/099270
PCT/US2006/008861
- 36 -
Tibia
Figs. 25A, 25B, 25C and Fig. 26 show
representative tools 138 and methodologies, which serve
the purpose of establishing anterior access to the ankle
joint for the purpose of making bony cuts in the talus
and tibia to install the tibial and talar platforms 12
and 20.
In the representative embodiment, the tools
138 include a cutting guide fixture 140 which is
installed and stabilized over the ankle joint in an
anterior position to the ankle joint. The cutting guide
fixture 140 is secured to an underlying frame 142 to
which the alignment tool 100 is also attached.
As Fig. 25A shows, the cutting guide fixture
140 includes a superior bone cutting blade guide 144 and
an inferior bone cutting blade guide 146.
The cutting guide fixture 140 also includes
apertures for receiving fixation pins 148 adjacent the
blade guides 144 and 146. In a representative embodiment,
the pins 148 can comprise 2.4mm Steinmann pins. A pair of
the pins 148 are drilled adjacent the superior blade
guide 144 into the tibia 16, and the other pair of the
pins 148 are drilled into the talus 15 adjacent the
inferior blade guide 146. To maximize operating field
space, the pins 148 may be cut flush at the fixture 140,
if desired. The operating field of the ankle joint is
thereby stabilized, as shown in Fig. 25A.
As Fig. 25A also shows, the cutting guide
fixture 140 also includes an aperture 150 for
establishing an anti-rotational notch. The physician can
form the anti-rotational notch, e.g., by using a drill
and lock collar (e.g. 4 mm) operated through the
aperture. As Fig. 25A shows, using fluoroscopy, the
bottom foot cannula 134 is kept in the foot, but out of
the way of superior blade guide 144 and the intended
CA 02601090 2007-09-13
WO 2006/099270
PCT/US2006/008861
- 37 -
location of the anti-rotation notch 150.
When establishing the anti-rotational notch,
the physician desirably notes from the drill the
approximate depth of the underlying bone. On the superior
and inferior saw blades 152 and 154 (see Figs. 20B and
20C), the physician notes the depth required based upon
the previously measured drill depth.
As Fig. 25B shows, the superior saw blade 152
is operated through the superior blade guide 144 to cut
the top surface of the tibia 16.
Retaining the bottom foot cannula 134 within
the foot while making bony cuts results an enhanced level
of accuracy, because there is essentially no relative
movement of the joint components during the drilling and
sawing operations. Considerable force is often exerted
upon the joint during drilling and sawing operations,
which can move the joint out of the desired orientation
for optimal prosthesis placement. The bottom foot
cannula 134 helps ensure the joint components maintain
the correct alignment relative to one another so that the
resulting cuts are more accurately positioned.
Using fluorospcopy, the bottom foot cannula
134 is then retracted out of the way of inferior blade
guide 146 (see Fig. 25C). As Figs. 20C and 21 show, the
inferior saw blade 154 is operated through the inferior
blade guide 146. The bottom surface of the talus 15 is
cut to the depth previously noted.
The bottom foot cannula 134 is reinserted into
the foot and both sides of the joint space are cut using
side saw blade guide slots 156 (see Fig. 25A).
The fixture 140 and pins 148 can now be
removed. With a rounded osteotome, the corner of the
joint space is cut out. The sides of the anti-rotation
notch are cleaned so that the sides are essentially
vertical. Loose bone pieces are removed and the cleared
CA 02601090 2007-09-13
W02006/099270
PCT/US2006/008861
- 38 -
joint space irrigated. Fig. 27A shows the cleared joint
space 158 and the anterior access it provides for the
insertion of other installation tools and the components
of the tibial and talar platforms 12 and 20.
4. Creating Passages for Stem
Components
In the illustrated embodiment, both tibial and
talar platforms 12 and 20 include respective stem
components. As previously described, these stem
components provide enhanced fixation and support to the
platforms. The creation of the passages for installation
of these stem components in the tibia and talus will now
be described.
a. Boring the Tibia for the
Tibial Stem
Figs. 27A and 27B show representative tools
160 and methodologies, which serve the purpose of
establishing an intramedullary passage within the tibia,
into which the stem component of the tibial platform 12
can be installed, making use of anterior access through
the cleared joint space 158.
In the representative embodiment, the tools
160 include a tibial stem driver 162 having a threaded
end and a tibial stem reamer 164, which can be removably
screwed onto the threaded end of the driver 162. The
installation of the bottom foot cannula 134 (previously
described) makes its possible to couple of the reamer 164
to the driver 162 using the anterior access that the
cleared joint space 158 provides. As shown in Fig. 27A,
the threaded end of a tibial stem driver 162 can be
inserted through the bottom foot cannula 134 to the
cleared joint space 158. As Fig. 27A
shows, the
physician has open anterior access here to insert the
tibial stem reamer 164 into the cleared joint space 158
and to screw the reamer 164 onto the driver 162.
CA 02601090 2007-09-13
W02006/099270
PCT/US2006/008861
- 39 -
The reamer 164 desirably includes a bullet-
shaped nose that fits within the previously formed 5 mm
passage in the tibia 16. Entering the
passage, the
reamer 164 enlarges the intramedullary tibial passage, as
Fig. 27B shows. A depth mark can be noted on the driver
162 so that the tibia 16 is reamed for another
approximately 70mm, as Fig. 27B shows.
The physician can retract the driver 162 and
the reamer 164 through bottom foot cannula 134 to expose
the reamer 164 with the joint space 158. There, the
physician can unscrew the reamer 164 from the driver 162
to withdraw the reamer 164 through the anterior access.
The driver 162 can be withdrawn from the bottom foot
cannula 134.
The intramedullary passage for installation of
the tibial stem has thereby been established.
b. Boring of the Talus and
Calcaneus for the Calcaneal
Stem
Figs. 28A to 28D show representative tools 166
and methodologies, which serve the purpose of
establishing a talar-calacaneal passage bridging the
talus and calcaneus. The stem component of the talar
platform 20 can be installed in the talar-calacaneal
passage. The tools 166 and methodologies operate by
anterior access through the previously-cleared joint
space 158.
In the representative embodiment, the tools
166 include a calcaneal drill pin fixture 168 (Fig. 28A)
and a companion calcaneal orientation fixture 170 (Fig.
28B). The drill
pin fixture 168 establishes the
anterior-to-posterior drill angle for formation of the
talar-calcaneal passage, into which the calcaneal stem is
eventually installed. The
orientation fixture 170
couples to the drill pin fixture 168 to aid in
CA 02601090 2007-09-13
W02006/099270
PCT/US2006/008861
- 40 -
establishing a desired medial-to-lateral orientation of
the drill path.
Prior to use of the drill pin fixture 168 (see
Fig. 28A), the footholder assembly 102 is pivoted out of
its upright condition to rotate the foot to maximum
plantar flexion. As Fig. 28A shows, the drill pin fixture
168 is installed into the flexed open joint space 158.
An orienting pin 172 is slid up the bottom foot cannula
134 and joined to an aperture in the pin fixture 168.
With the orientation pin in place, the bottom foot
cannula 134 can be withdrawn.
The orientation fixture 170 is coupled to the
pin fixture 168 (as Fig. 28B shows). In the illustrated
embodiment, the drill pin fixture 168 includes an
appendage 174 over which the orientation fixture 170
removably fits. The orientation fixture 170 includes a
symmetrical array of medial-lateral side arms 176, which
sweep in a curved path into a spaced apart facing
relationship at their terminal ends. Grasping the arms
176, the fixture 170 can be manipulated side-to-side or
rotationally. Such movement of the orientation fixture
imparts comparable movement to the pin fixture 168,
thereby changing the medial-to-lateral orientation of the
pin fixture 168 with respect to the calcaneus. The
orientation fixture 170 is manipulated to place the
terminal ends of the arms 176 in an equally spaced
orientation on either side of the calcaneous 17.
As shown in Fig, 23C, once the pin fixture 168
has been oriented, a pair of fixing pins 178 are inserted
into side holes pin fixture 168, to secure the pin
fixture to the talus 15.
As Fig. 28C also shows, the physician drills a
guide pin 180 into the center hole of the pin fixture
168, approximately 65mm into the calcaneus 17. In a
representative embodiment, the pin 160 comprises a 2.4mm
CA 02601090 2007-09-13
W02006/099270
PCT/US2006/008861
- 41 -
Steinmann pin. The fixing pins 178 and the pin fixture
168 can now be removed, leaving the guide pin 180 in the
calcaneous 17.
As Fig. 28D shows, a calcaneal reamer 182 is
inserted over the guide pin 180 and advanced
approximately 65mm into the calcaneous 17. The calcaneal
reamer 182 is withdrawn, leaving the formed passage P
(see Fig. 28E) into which the calcaneal stem will
eventually be inserted.
The footholder assembly 102 is pivoted back to
its original upright position. The bottom foot cannula
134 is reinserted.
In this representative way, the trans-talar-
calcaneal passage for installation of the calcaneal stem
can be established.
5. Installing the Tibial Stem and
Platform
Figs. 29A to 29D and Fig. 30 show
representative tools 184 and methodologies, which serve
the purpose of installing the tibial stem 30 and platform
12.
In the illustrated embodiment, the tibial
platform 12 is secured within the tibia 16 by a multi-
piece stem 30 of the type previously described, as.is
shown in Figs. 4A and 4B. In an earlier described
installation sequence, and as shown in Figs. 27A and 27B,
an intramedullary passage has been previously formed
within the tibia to receive the multi-piece stem
component 30.
In this installation sequence, as in
previously described sequences of the installation,
installation of the multi-piece stem component 30 takes
advantage of the anterior access provided to the cleared
joint space 158, as well as the calcaneal access provided
by the bottom foot cannula 134.
CA 02601090 2007-09-13
W02006/099270
PCT/US2006/008861
- 42 -
As Fig. 29A shows, the physician inserts the
top tibial stem component 32 into the joint space 158
through the previously formed anterior access. The tools
184 include a wrench 200 or other suitable tool. The
wrench 200 engages the exterior stem flats of the top
stem component 32, gripping the top stem component 32.
The top stem component 32 is advanced partially up into
the preformed tibial passage. The wrench 200 abuts
against the cut tibial bony surface, checking the
advancement of the top stem component 32 beyond the
superior confines of the cleared joint space 158.
As shown in Fig. 29B, a mid stem component
34A, is inserted through the anterior incision. The
tools 184 includes an intramedullary driver 186 that is
advanced through the bottom foot cannula 134 into the
cleared joint space 158. The driver 186 includes a male
hex fitting 188 at its distal end. The hex fitting 188
of the driver 186 mates with the internal female hex 38
inside the mid stem component 34A (the internal female
hex 38 is shown in Fig. 4A). With the wrench
200
engaging the top stem component 32 to keep it from
rotating, the physician twists the driver 186 to torque
the threaded male end of the mid stem component 34A into
the threaded female end of the top stem component 32.
This joins the top and mid stem components 32 and 34A.
Once tightened, the wrench 200 is switched from the top
stem component 32 to the stem flats of the mid stem
component 34A. The physician axially advances the driver
186 to push the top stem component 32 beyond the confines
of the cleared joint space 158 and up into the tibial
passage.
As Fig. 29C shows, the hex fitting 188 is
withdrawn from the mid stem piece 34A, and the driver 186
is withdrawn sufficient to permit the insertion of a
second mid stem component 34B through the anterior access
CA 02601090 2007-09-13
W02006/099270
PCT/US2006/008861
- 43 -
into the joint space 158. The sequence just described is
repeated. The hex fitting 188 of the driver 186 mates
with the internal female hex 38 inside the second mid
stem component 34B. With the wrench 200 engaging the
first mid stem component 34A to keep it from rotating,
the physician twists the driver 186 to torque the
threaded male end of the second mid stem component 34B
into the threaded female end of the first mid stem
component 34A. Once tightened, the wrench 200 is switched
to the stem flats of the second mid stem component 34B.
The physician axially advances the driver 186 to push the
first mid stem component 34A, proceeded by the top stem
component 32, beyond the confines of the cleared joint
space 158 and up into the tibial passage.
Additional mid stem components can be
installed in this fashion, depending upon the intended
final length of the stem 30.
In turn, when insertion of a bottom stem
component 36 is desired (this component is shown in Fig.
4A), the hex fitting 188 is withdrawn from the then end-
most assembled stem piece. The driver 186 is withdrawn
sufficient to permit the insertion of the bottom stem
component 36 into the anterior incision. As Fig. 29D
shows, the hex fitting 188 of the driver 186 engages the
internal female hex 38 inside the bottom stem component
36. With the wrench 200 engaging the end-most assembled
stem component (shown for purpose of illustration to be
the second mid stem component 34B), the physician twists
the driver 186 to torque the threaded male end of the
bottom stem component 36 into the threaded female end of
the first mid stem component 34A. The wrench 200 is
switched to the flats of the bottom stem component 36.
Using the driver 186, the physician axially advances the
assembled multi-piece stem 30 into the tibial passage,
beyond the confines of the cleared joint space 158.
CA 02601090 2007-09-13
WO 2006/099270
PCT/US2006/008861
- 44 -
In an alternative arrangement, the bottom stem
component 36 need not have an internal hex, in which case
the bottom stem component 36 may be torqued onto the then
end-most assembled stem piece using a threaded driver or
other suitable tool inserted into the joint space 158.
As Fig. 30 shows, holding the bottom stem
component 36 with the wrench 200, the physician inserts a
tibial platform 12 into the joint space. The physician
uses the driver 186, advanced through the bottom foot
cannula 134 to couple the tibial platform 12 to the
bottom stem component 36, e.g., by inserting a male Morse
fitting on the platform 12 into a corresponding female
fitting on the bottom stem component 36.
If desired, the platform 12 may be marked for
easy placement reference. For example, the face may be
marked ANT-R (for the right foot or ANT-L for the left
foot) to clearly indicate that the face is placed facing
anterior (not shown).
If desirable, bone cement may be applied to
the top of the tibial platform 12. The platform 12 is
then firmly pushed against the bottom of the tibia 16 to
push the stem 30 firmly into the tibia 16 and the anti-
rotation notch 150.
6. Assembly and
Installation of the
Talar/Calcaneal Stem and Talar
Artificial Joint Surface
As previously described, Figs. 28A to 28E show
representative tools 166 and methodologies, which serve
the purpose of establishing a passage P bridging the
talus and calcaneus (see Fig. 28E), into which the stem
component 26 of the talar platform 20 is installed. Fig.
31 shows the installation of the calcaneal stem component
31 into the passage P.
As Fig. 31 shows, the footholder assembly 102
is pivoted out of its upright condition to rotate the
CA 02601090 2007-09-13
WO 2006/099270
PCT/US2006/008861
- 45 -
foot to maximum plantar flexion. The physician selects
the appropriate angled talar/calcaneal stem 26. The stem
26 is inserted into the previously formed passage P in
the talus 15 and calcaneous 17.
A strike block assembly 204 is placed over the
proximal end of the stem 26. A protective cover (not
shown) may be provided for the proximal end of the stem
26, in which case the strike block assembly 204 is placed
over the cover. The block assembly 204 is struck to seat
the stem 26 firmly into the talus 15 and calcaneous 17.
It is desirable that the orientation of the
stem 26 and block 204 be essentially parallel to the
surface of the talus 15. A wrench 206 or other suitable
tool may be used to adjust the orientation if necessary.
The stem 26 is struck until the block 204 is flush to the
surface of the talus 15. The stem cover (if used) is
then removed.
As Fig. 32 shows, the wrench 206 is placed
under the fitting 208 on the proximal end of the stem 26.
The physician places the talar artificial joint surface
24 on the stem 26 in the desired orientation. Bone
cement may be applied to the bottom surface of the talar
artificial joint surface 24 if desired. The surface 24 is
set onto the stem 26 by striking a strike block 210 with
a mallet or other suitable tool (not shown). The block
210 then struck until the bottom of the surface 24 is
seated flush on the surface of the talus 15. The wrench
206 may then be removed.
7. Insertion of the Tibial Artificial
Joint Surface
The physician next determines the optimal
tibial artificial joint surface 22 using sizing blocks
(not shown).
As shown in Fig. 33, with the foot placed in
plantar flexion, and the surface 22 is placed into the
CA 02601090 2007-09-13
WO 2006/099270
PCT/US2006/008861
- 46 -
tibial platform 12, as represented by the arrow. If
desired, the surface 22 may be marked for easy placement
reference. For example, the face may be marked MED-R
(for the right foot or MED-L for the left foot) to
clearly indicate that the marking should be on the medial
side of the surface 22 (not shown).
The foot is then checked for proper
articulation. The incisions may then be irrigated and
closed.
a. A Representative Installation
Platform
Figs. 34 and 35 show a representative main
installation platform 212 to which a variety of jigs,
fixtures, reamers, and auxiliary platforms of the form,
fit, and function just described, may be rigidly and
simply affixed. These jigs, fixtures, reamers, and
auxiliary platforms have the form, fit, and function to
accomplish the sequence of tasks, as described, including
(i) the alignment of the ankle joint with the tibia, (ii)
the establishing of an in-line intramedullary path
through the calcaneus, talus, and tibia; (iii) the
establishing of anterior access for the purpose of making
properly oriented bony cuts in the talus and tibia to
install the tibial and talar platforms 12 and 20; (iv)
the installation of the tibial and talar platforms 12 and
20. Preferably,
these jigs, fixtures, reamers, and
auxiliary platforms are removable as desired, to allow
unobstructed surgical access to the ankle joint. The main
installation platform 212 is desirably designed to
facilitate cleaning and sterilization for re-use, though
some parts may be acceptable for single use only.
The design of the main installation platform
212 is such that a full range of leg sizes may be
accommodated through a series of adjustments, with final
alignment achieved with fluoroscopy, as will be described
CA 02601090 2007-09-13
W02006/099270
PCT/US2006/008861
- 47 -
later.
b. Removal of the Prosthesis
The described devices and methods provide for
easy replacement of the prosthesis should it be necessary
or desirable.
The previously made incision is reopened and
the foot is placed in plantar flexion. The talar
artificial joint surface 24 is removed by prying from
underneath with a flat screwdriver or other suitable
tool. In some
instances, the joint may need to be
distended (e.g., about 3 mm) to remove the surface 24.
If necessary, a small hole may be drilled in the surface
24 and a screw placed into the hole to aid in the
removal. The calcaneal stem can then be loosened and
removed with pliers.
To remove the tibial component, the bottom
foot cannula is reinserted. Remove the tibial tray, and
then insert the hex drive through the bottom foot cannula
and sequentially unscrew and remove the stem pieces.
Technical features have been disclosed that
include, singly or in combination:
(1) A multi-
piece stem component (see, e.g.,
Fig. 4A) suitable for use in any surgical procedure in
which a stem is required for fixation of an implant,
whether it is a total joint implant, fusion (arthrodesis)
implant, osteotomy fixation implant, or fracture fixation
implant. The multi-piece stem component configuration is
ideally suited for securing bone components together in a
minimally invasive procedure, in which a small surgical
opening is used to install large components. Two or more
small stem components can be sequentially attached to one
another in situ (see Fig. 4B) to make a larger stem
assembly. Representative tools and methodologies for
installing a multi-piece stem component are shown in
Figs. 29A to 29D.
CA 02601090 2007-09-13
WO 2006/099270
PCT/US2006/008861
- 48 -
(2) Articulating artificial joint surfaces
(see, e.g., Fig. 6) comprising complementary ball-and-
socket surfaces that not only articulate, but also allows
the artificial joint to rotate about an axis. This makes
possible more uniform wear of the surfaces to maximize
function and longevity of the prostheses.
(3) Articulating artificial joint surfaces
(see, e.g., Figs. 7A, 7B, and 7C) comprising
complementary ball-and-socket surfaces that not only
articulate and rotate shout an axis, but also accommodate
fore and aft and lateral translation of the mating joint
surfaces relative to the native bone.
(4) Artificial articulating joint surfaces
(see, e.g., Fig. 8A), each of which comprises a saddle-
shaped component. The saddle shape is geometrically
characterized as a swept arc, comprising a surface
defined by a first arc that is swept along a second arc
that is perpendicular to the first arc. The geometry
forms, for each surface, an elongated trough that curves
along an axis.
(5) A prosthesis supporting an artificial
joint surface that can be assembled in a snap fit and/or
interlocking fashion that provides positive locking means
without the use of screws or other fasteners (see, e.g.,
Figs. 9, 10, 12A, and 13).
(6) A prosthesis accommodating fitment of a
plastic joint surface made, e.g., from ultra high
molecular weight polyethylene.
(7) An ankle replacement system that can be
installed using minimally invasive intramedullary
guidance established with respect to the major axis of
the tibia by minimally invasive access through the
calcaneus, through an incision in the bottom of the foot.
Intramedullary guidance along the axis of the tibia makes
it possible to make properly oriented bony cuts of the
CA 02601090 2007-09-13
W02006/099270
PCT/US2006/008861
- 49 -
talus and tibia through anterior access to the ankle
joint. Proper overall alignment of the total ankle system
is achieved in desired alignment and orientation with all
the natural axes of the native ankle joint it replaces,
and improved long term results are achieved.
(8) Prostheses,
tools, and methodologies that
make possible the installation of a total ankle system
using minimally invasive intramedullary guidance
established with respect to the major axis of the tibia.
(9) Prostheses, tools, and methodologies that
make possible the installation of a total ankle system
using minimally invasive intramedullary guidance
established with respect to the major axis of the tibia
using fluoroscopic visualization.
(10) Prostheses, tools, and methodologies that
make possible the installation of a total ankle system
using minimally invasive anterior access to the ankle
joint for making bony cuts and to install prosthesis
components.
(11) Prostheses, tools, and methodologies that
make possible the establishment of an in-line
intramedullary path through the calcaneus, talus, and
tibia.
Other embodiments and uses of the inventions
described herein will be apparent to those skilled in the
art from consideration of the specification and practice
of the inventions disclosed. All documents referenced
herein are specifically and entirely incorporated by
reference. The
specification should be considered
exemplary only with the true scope and spirit of the
invention indicated by the following claims. As will be
easily understood by those of ordinary skill in the art,
variations and modifications of each of the disclosed
embodiments can be easily made within the scope of this
invention as defined by the following claims.