Note: Descriptions are shown in the official language in which they were submitted.
CA 02674537 2009-07-02
1
WO 2008/091062 PCT/KR2007/006581
Description
A MICROWAVE OVEN
Technical Field
Hi The present disclosure relates to a microwave oven, and more
particularly, to a
microwave oven including a pull-up door for opening and closing a cooking
chamber.
Background Art
[2] Microwave ovens are household appliances used to cook foods using
microwaves
and heat. Generally, a microwave oven includes a cavity assembly and a door.
The
cavity assembly includes a cooking chamber, and one side of the door is
rotatably
fixed to the cavity assembly. Thus, the cooking chamber can be opened or
closed by
pulling or pushing the other side of the door.
131 Some microwave ovens installed in furniture are designed to function
as a hood for
discharging smoke and fumes generated while food is cooked using a cooker
disposed
under the microwave oven. A display unit can be installed in a door of a
microwave
oven to receive commands from a user and display information about the
operation of
the microwave oven.
[4] However, such microwave ovens of the related art have disadvantages
as follows.
151 Since the cooking chamber is opened or closed by rotating the other
side of the door
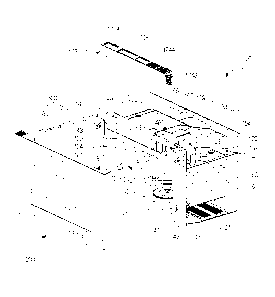
forward or backward, it is inconvenient to place articles at both sides of the
microwave
oven when the door pulled for opening the cooking chamber.
[6] Furthermore, the door is movable after it is pulled for opening the
cooking chamber.
Therefore, it is inconvenient to place food into the cooking chamber and take
the food
out of the cooking chamber owing to the movable opened door.
171 In the case of the microwave oven installed in furniture, a hinge
assembly used to
attach a door to a cavity assembly is disposed within the furniture.
Therefore, the
whole microwave oven should be first detached from the furniture to separate
the door
from the cavity assembly.
181 Furthermore, due to a passage formed in the cavity assembly of the
microwave
oven for discharging smoke and fumes, spaces for other electric components are
in-
sufficient.
191 Moreover, the microwave oven should be first detached from the
furniture when
repairing or replacing electric components or other components of the
microwave
oven.
[10] Meanwhile, a door of a microwave oven can be overheated while food is
cooked in
a cooking chamber. Therefore, a user can be injured when holding the door, and
a
display unit installed in the door can be damaged by heat.
CA 02674537 2014-02-27
50514-44
2
Disclosure of Invention
Technical Problem
[11] Embodiments provide a door for a microwave oven, the door
being designed so
that surrounding spaces of the door can be efficiently used.
[12] Embodiments also provide a door for a microwave oven, the door being
designed so that food can be placed into and taken out of the microwave oven
more easily.
[13] Embodiments also provide a door for a microwave oven, the door
being
designed so that components can be repaired or replaced more easily.
Technical Solution
[14] In one embodiment, there is provided a microwave oven comprising; a
cavity
assembly in which a cooking chamber is disposed; a door configured to
selectively open and
close the cooking chamber; a service opening disposed at a side of a front
surface of the cavity
assembly and communicating with an electric component room, the electric
component room
being disposed at an upper portion of the cavity assembly to accommodate a
plurality of
electric components; an inlet portion formed in a front upper side of the
cavity assembly, to
allow air used to cool the door; an outlet portion formed in a front upper
side of the cavity
assembly, to discharge air from the cavity assembly; and an opening/closing
bracket
configured to selectively open and close the service opening, the
opening/closing bracket, the
inlet portion and the outlet portion being selectively exposed according to a
position of the
door, wherein the service opening is disposed at the front surface of the
cavity assembly and
spaced apart from the inlet portion and outlet portion, and the electric
components of the
electric component room can be repaired or replaced through the service
opening once
exposed by opening the door.
[15] In another embodiment, there is provided a microwave oven
having a cavity
assembly in which a cooking chamber is disposed and a door configured to
selectively open
and close the cooking chamber, characterized in that the microwave oven
comprises: a vent
CA 02674537 2014-02-27
50514-44
2a
grill disposed at a predetermined portion of a front surface of the cavity
assembly to guide air
circulated in the cavity assembly and discharged from the cavity assembly; a
service opening
disposed at the other portion of the front surface of the cavity assembly and
communicating
with an electric component room, the electric component room being disposed at
an upper
portion of the cavity assembly to accommodate a plurality of electric
components; an inlet
portion formed in a front upper side of the cavity assembly, to allow air used
to cool the door;
an outlet portion formed in a front upper side of the cavity assembly, to
discharge air from the
cavity assembly; and an opening/closing bracket configured to selectively open
and close the
service opening, the opening/closing bracket being selectively exposed
according to a position
of the door, wherein the service opening is disposed at a different side of
the front surface of
the cavity assembly and spaced apart from the inlet portion and outlet
portion, and the electric
components of the electric component room can be repaired or replaced through
the service
opening once exposed by opening the door.
Advantageous Effects
[16] The present disclosure provides efficient use of surrounding spaces of
a
microwave oven, easy loading and unloading of food to and from a cooking
chamber of the
microwave oven, each detachment of a door of the microwave oven, a
sufficiently large room
for an electric component room of the microwave oven, easy repair and
replacement of
components of the microwave oven, reliable protection for a display unit of
the door, and
reliable prevention of accidents.
3
WO 2008/091062 PCT/KR2007/006581
Brief Description of the Drawings
[17] Fig. 1 is an exploded perspective view illustrating a microwave oven
according to a
first embodiment.
[18] Fig. 2 is a perspective view illustrating an assembled state of the
microwave oven
according to the first embodiment.
[19] Fig. 3 is a vertical sectional view illustrating a latch board
according to the first
embodiment.
[20] Fig. 4 is a perspective view illustrating a door support bracket
according to the first
embodiment.
[21] Fig. 5 is a perspective view illustrating an air barrier according to
the first
embodiment.
[22] Fig. 6 is a perspective view illustrating a vent grill and a lead wire
cap according to
the first embodiment.
[23] Fig. 7 is a vertical sectional view illustrating an assembled state of
the vent grill and
the lead wire cap according to the first embodiment.
[24] Fig. 8 is an exploded perspective view illustrating a door according
to the first
embodiment.
[25] Fig. 9 is a front view illustrating the door according to the first
embodiment.
[26] Figs. 10 to 12 are partial perspective views for explaining procedures
for attaching
the door to a cavity assembly of the microwave oven according to the first
embodiment.
[27] Figs. 13 to 17 are views for explaining how the door of the microwave
oven is
opened according to the first embodiment.
[28] Figs. 18 to 20 are views illustrating exemplary flows of air in the
microwave oven
according to the first embodiment.
[29] Fig. 21 is a side view illustrating a door support device of a
microwave oven
according to a second embodiment.
[30] Fig. 22 is a partial perspective view illustrating a door support
device of a
microwave oven according to a third embodiment.
[31] Fig. 23 is a perspective view illustrating a cam hinge of a microwave
oven
according to a fourth embodiment.
[32] Figs. 24 and 25 are perspective views illustrating how the cam hinge
operates when
a door of the microwave oven is opened and closed according to the fourth
embodiment.
Best Mode for Carrying Out the Invention
[33] A microwave oven will now be described in detail with reference to the
ac-
companying drawings according to a first embodiment.
CA 02674537 2009-07-02
4
WO 2008/091062 PCT/KR2007/006581
[34] Fig. 1 is an exploded perspective view illustrating a microwave oven
according to a
first embodiment, and Fig. 2 is a perspective view illustrating an assembled
state of the
microwave oven according to the first embodiment. Fig. 3 is a vertical
sectional view
illustrating a latch board according to the first embodiment, and Fig. 4 is a
perspective
view illustrating a door support bracket according to the first embodiment.
Fig. 5 is a
perspective view illustrating an air barrier according to the first
embodiment, and Fig.
6 is a perspective view illustrating a vent grill and a lead wire cap
according to the first
embodiment. Fig. 7 is a vertical sectional view illustrating an assembled
state of the
vent grill and the lead wire cap according to the first embodiment, and Fig. 8
is an
exploded perspective view illustrating a door according to the first
embodiment. Fig. 9
is a front view illustrating the door according to the first embodiment.
[35] Referring to Figs. 1 to 9, a cooking chamber 111 is formed in a cavity
assembly 100
of the microwave oven (hereinafter, also referred to as a microwave oven). The
cooking chamber 111 is a room for cooking food and is selectively opened and
closed
by a door 200.
[36] A plurality of inlet holes 113 (refer to Fig. 20) is formed in a side
portion of the
cooking chamber 111, and a plurality of outlet holes 115 (refer to Fig. 20) is
formed in
the topside of the cooking chamber 111. The inlet holes 113 are formed in the
right
side of the cooking chamber 111 when viewed in Fig. 20 for introducing air
into the
cooking chamber 111. When viewed in Fig. 20, the outlet holes 115 are formed
in a
right edge portion of the topside of the cooking chamber 111 away from the
inlet holes
113 for discharging air from the cooking chamber 111.
[37] An inlet portion 121 and an outlet portion are formed in a front upper
side of the
cavity assembly 100. The inlet portion 121 is formed in one side of the front
upper side
of the cavity assembly 100 (the right side of the front upper side of the
cavity assembly
100 when viewed in Fig. 1). The inlet portion 121 allows air used to cool the
door 200
to be introduced into the cavity assembly 100. The outlet portion includes a
first outlet
123 and a second outlet 124. The first outlet 123 is formed in the other side
of the front
upper side of the cavity assembly 100 opposite to the inlet portion 121. That
is, the first
outlet 123 is formed in the left side of the front upper side of the cavity
assembly 100
when viewed in Fig.l. The second outlet 124 is formed in a center portion of
the front
upper side of the cavity assembly 100 between the inlet portion 121 and the
first outlet
123. Air is discharged from the cavity assembly 100 through the first outlet
123.
Smoke and fumes, which are generated from food cooked on a cooker disposed
under
the microwave oven and introduced into the cavity assembly 100, are discharged
from
the cavity assembly 100 through the second outlet 124 when a vent fan assembly
166
(described later) operates.
[38] A terminal opening 125 is formed in the front upper side of the cavity
assembly 100
CA 02674537 2009-07-02
5
WO 2008/091062 PCT/KR2007/006581
between the first outlet 123 and the second outlet 124. A terminal housing
(not shown)
is coupled to the cavity assembly 100 through the terminal opening 125. The
terminal
housing protrudes forward from the cavity assembly 100. A terminal (not shown)
may
be connected to the terminal housing to transmit power and various signals to
a display
unit 260 of the door 200.
[39] A service opening 127 is formed in a portion of the front upper side
of the cavity
assembly 100 opposite to the outlet portion. That is, the service opening 127
is formed
at the right of the inlet portion 121. A capacity 155 (described later) can be
replaced
through the service opening 127. Thus, the size and shape of the service
opening 127
are determined based on the size of the capacity 155. The
[40] service opening 127 can be selectively opened and closed by an
opening/closing
bracket 129. The opening/closing bracket 129, that is the service opening 127,
is
exposed when the door 200 rotates to open the cooking chamber 111. In other
words,
the service opening 127 is formed in a portion of the cavity assembly 100 that
makes
contact with a rear surface of the door 200 when the cooking chamber 111 is
closed by
the door 200.
[41] Door support brackets 131 are disposed in both sides of the front
surface of the
cavity assembly 100, and a detailed view of the door support bracket 131 is
shown in
Fig. 4. The door support brackets 131 support the door 200 and allow rotation
of the
door 200. Each of the door support brackets 131 has a L-shaped cross section
and is
vertically elongated. When assembled, front surfaces of the door support
brackets 131
make tight contact with both sides of a front inner surface of the cavity
assembly 100.
A fixing rib 132 is formed on a rear surface of the door support bracket 131.
When
assembled, the fixing rib 132 is fixed to a top surface of the cavity assembly
100. The
door support bracket 131 includes a hinge bracket 133 and a hinge cover 137.
[42] The hinge bracket 133 is formed on a front upper portion of the door
support
bracket 131. When assembled, the hinge bracket 133 protrudes forward from a
lateral
side of the front surface of the cavity assembly 100. The hinge bracket 133 is
U-shaped
with an opened top and protrudes forward from the lateral side of the front
surface of
the cavity assembly 100 when the door support bracket 131 is coupled to the
cavity
assembly 100. Here, the protruded length of the hinge bracket 133 from the
cavity
assembly 100 is adjusted such that a predetermined portion (i.e., a coupling
hole 136)
of the hinge bracket 133 is exposed to the outside when the microwave oven is
installed in furniture above a cooker.
[43] The hinge bracket 133 includes hinge grooves 134 in both sides. The
hinge grooves
134 are vertically formed in top surfaces of both sides of the hinge bracket
133. The
hinge grooves 134 receive a hinge pin 228 (described later). The hinge pin 228
can be
inserted into the hinge grooves 134 from the top of the hinge bracket 133.
CA 02674537 2009-07-02
6
WO 2008/091062 PCT/KR2007/006581
[44] A coupling flange 135 is disposed at the hinge bracket 133. The
coupling flange
135 can be formed by cutting a horizontally elongated bottom portion of the
hinge
bracket 133 into a rectangular shape and bending the cut portion into an L-
shape. The
coupling hole 136 is formed in a top surface of the coupling flange 135 for
fixing the
hinge cover 137 to the hinge bracket 133. The coupling hole 136 formed in the
top
surface of the coupling flange 135 is exposed to the outside when the
microwave oven
is installed in furniture.
[45] The hinge cover 137 is disposed at a top portion of the door support
bracket 131
above the hinge bracket 133. When the door support bracket 131 is coupled to
the
cavity assembly 100, the hinge cover 137 protrudes forward through a lateral
side of a
front upper portion of the cavity assembly 100. The hinge cover 137 is U-
shaped and
has a downwardly opened side. The hinge cover 137 is rotatable on its rear
edge. Thus,
when the hinge pin 228 is inserted into the hinge grooves 134, the hinge cover
137 can
be rotated down to securely hold the hinge pin 228 in the hinge grooves 134.
[46] For this, hinge pin openings 138 are formed in both lower sides of the
hinge cover
137. The hinge pin openings 138 can be formed by partially cutting both lower
sides of
the hinge cover 137 into a downwardly sloped shape. When the hinge cover 137
is
rotated down, the hinge pin 228 inserted in the hinge grooves 134 is inserted
into the
hinge pin openings 138.
[47] After the hinge cover 137 is rotated down (i.e., when the hinge pin
228 is inserted
into the hinge pin openings 138), the hinge bracket 133 is disposed inside the
hinge
cover 137. In this state, both upper sides of the hinge bracket 133 make tight
contact
with inner surfaces of the hinge cover 137.
[48] A penetration hole 139 is formed through a top surface of the hinge
cover 137.
After rotating down the hinge cover 137 to hold the hinge pin 228 in the hinge
grooves
134 of the hinge bracket 133, a screw (S) (refer to Fig. 12) can be fixed to
the coupling
hole 136 of the hinge bracket 133 through the penetration hole 139 of the
hinge cover
137 to prevent movement of the hinge cover 137. For this, when the hinge cover
137 is
rotated down (i.e., when the hinge cover 137 holds the hinge pin 228 in the
hinge
grooves 134), the penetration hole 139 of the hinge cover 137 is aligned with
the
coupling hole 136 of the hinge bracket 133. Thus, the penetration hole 139 of
the hinge
cover 137 as well as the coupling hole 136 of the hinge bracket 133 is exposed
to the
outside when the microwave oven is installed in furniture.
[49] Spring fixing portions 141 protrude forward from both front sides of
the cavity
assembly 100. The spring fixing portions 141 are located under the hinge
covers 137
when the door support brackets 131 are coupled to the cavity assembly 100. Gas
springs 300 (refer to Fig. 1) are fixed to the spring fixing portions 141. The
spring
fixing portions 141 are fixed to the door support brackets 131 disposed in the
cavity
CA 02674537 2009-07-02
7
WO 2008/091062 PCT/KR2007/006581
assembly 100 and protrude forward from both front sides of the cavity assembly
100
by a predetermined length. Each of the spring fixing portions 141 includes a
horizontal
spring fixing protrusion 143.
11501 Latch slots 145 are disposed at both sides of a lower front surface
of the cavity
assembly 100. The latch slots 145 can be formed by partially cutting out both
sides of
the lower front surface of the cavity assembly 100 into a horizontally
elongated
rectangular shape. The latch slots 145 receive latch protrusions 281 (refer to
Fig. 8).
11511 A latch board 146 is disposed in the cavity assembly 100 at a
position cor-
responding to the latch slot 145, and a detailed view of the latch board 146
is shown in
Fig. 3. The latch board 146 includes an actuation lever 147, a pair of latch
switches
148, and a pair of torsion springs 149. When the door 200 is closed, the
actuation lever
147 locks the latch protrusion 281 inserted in the latch slot 145 to hold the
door 200 in
closed position, thereby preventing undesired opening of the cooking chamber
111.
When the actuation lever 147 is moved backward along an upwardly sloped path
by
the latch protrusion 281 inserted into the latch slot 145, the latch switches
148 are
turned on. When the actuation lever 147 is moved forward along the sloped
path, the
latch switches 148 are turned off. The latch switches 148 are turned on or off
by the
actuation lever 147 to start or end the operation of the microwave oven. One
end of the
torsion spring 149 is fixed to the actuation lever 147, and the other end of
the torsion
spring 149 is fixed to the latch board 146. Thus, the actuation lever 147 can
be moved
forward along the sloped path by an elastic force of the torsion spring 149.
That is,
when the latch protrusion 281 is drawn back from the latch slot 145, the
actuation lever
147 is automatically moved forward along the sloped path by the torsion spring
149.
11521 A smoke inlet portion 151 is formed in a bottom surface of the cavity
assembly 100.
Smoke and fumes generated from food cooked on a cooker disposed under the
microwave oven are introduced into the cavity assembly 100 through the smoke
inlet
portion 151 by operation of the vent fan assembly 166. A filter (not shown)
can be
disposed on the smoke inlet portion 151 for collecting particles and pollutant
substances from the smoke and fumes.
11531 An electric component room 153 can be disposed at an upper lateral
portion of the
cavity assembly 100 behind the inlet portion 121. In Fig. 1, the electric
component
room 153 is disposed at the upper right side of the cavity assembly 100. The
electric
component room 153 contains various electric components such as a magnetron
154
and a capacitor 155. Such electric components disposed in the electric
component
room 153 are used to generate microwaves for cooking foods. An opening 157 is
formed in a bottom surface of the electric component room 153. Air used to
cool the
electric components of the electric component room 153 is guided to the
cooking
chamber 111 through the opening 157.
CA 02674537 2009-07-02
8
WO 2008/091062 PCT/KR2007/006581
11541 A cooling fan assembly 159 is disposed in a front upper portion of
the cavity
assembly 100 close to the inlet portion 121. The cooling fan assembly 159 is
used to
generate airflows for cooling the door 200, cooling the electric components of
the
electric component room 153, and removing moisture, gaseous fatty substances,
and
odors generated from food cooked in the cooking chamber 111. A suction portion
of
the cooling fan assembly 159 is disposed close to the inlet portion 121, and a
discharge
portion of the cooling fan assembly 159 is disposed toward the electric
component
room 153. In Fig. 1, the discharge portion of the cooling fan assembly 159 is
disposed
backward.
11551 An air barrier 161 is disposed between a front upper portion of the
cavity assembly
100 and the electric component room 153. The air barrier 161 is a border
structure
between the electric components of the electric component room 153 and the
cooling
fan assembly 159. An airflow generated by operation of the cooling fan
assembly 159
is guided to the electric components of the electric component room 153 by the
air
barrier 161. As shown in Fig. 5, the air barrier 161 can be formed of a metal
and have a
rectangular shape having a predetermined length.
11561 The air barrier 161 includes an air supply opening 162 to guide air
discharged from
the discharge portion of the cooling fan assembly 159 to the electric
component room
153. The air barrier 161 further includes a guide 163 to efficiently guide air
from the
air supply opening 162 to the electric components of the electric component
room 153,
particularly, to the magnetron 154 of the electric component room 153. In the
current
embodiment, the guide 163 is formed by cutting a portion of the air barrier
161 into a
rectangular shape to form the air supply opening 162 and bending the cut
portion
toward the magnetron 154.
11571 The air barrier 161 further includes a component mount portion 164 on
one side.
The component mount portion 164 is formed by bending a portion of the air
barrier
161 several times toward the front surface of the cavity assembly 100. A
component
installation hole 165 is formed in the component mount portion 164. The
component
installation hole 165 is formed by cutting out a portion of the component
mount
portion 164 corresponding to the service opening 127 of the cavity assembly
100 into a
shape corresponding to a component (e.g., the capacitor 155 of the electric
component
room 153) to be installed in the component installation hole 165.
11581 The vent fan assembly 166 is disposed in a rear side of a top portion
of the cavity
assembly 100 behind the second outlet 124. Smoke and fumes introduced into the
cavity assembly 100 from food cooked on a cooker disposed under the microwave
oven are discharged forward from the cavity assembly 100 by operation of the
vent fan
assembly 166. For this, an inlet portion of the vent fan assembly 166 faces
both sides
of the cavity assembly 100, and an outlet portion of the vent fan assembly 166
faces a
CA 02674537 2009-07-02
9
WO 2008/091062 PCT/KR2007/006581
front side of the cavity assembly 100 (i.e., the second outlet 124 of the
cavity assembly
100).
[59] First and second air guides 167 and 168 are disposed at the top
portion of the cavity
assembly 100 between the second outlet 124 and the vent fan assembly 166. Each
of
the second air guides 167 and 168 extends at the top portion of the cavity
assembly 100
in a front-to-back direction to form a vent passage 169 for discharging smoke
and
fumes from the cavity assembly 100 through the second outlet 124 when the vent
fan
assembly 166 operates.
[60] In Fig. 1, the first air guide 167 is disposed at the right of the
vent passage 169
between the electric component room 153 and the vent fan assembly 166.
Practically, t
[61] he first air guide 167 separates the electric component room 153 and
the vent fan
assembly 166. The first air guide 167 is L-shaped and covers lateral and rear
sides of
the electric component room 153. The first air guide 167 is sloped leftward
toward the
second outlet 124 so that the cross sectional area of the vent passage 169
decreases as
it goes toward the second outlet 124. In other words, the vent passage 169 is
narrowed
by the electric component room 153.
[62] A first air duct 171 is disposed at a side of the cavity assembly 100.
Air introduced
into the cavity assembly 100 by the cooling fan assembly 159 to cool the
electric
components of the electric component room 153 is guided to the cooking chamber
111
by the first air duct 171. For this, the first air duct 171 is disposed at a
right side of the
cavity assembly 100 under the electric component room 153 and is connected to
the
inlet holes 113 and the opening 157.
[63] A second air duct 172 is disposed at a side of the top portion of the
cavity assembly
100. Air circulating in the cooking chamber 111 is guided to the first outlet
123 by the
second air duct 172. The second air duct 172 is disposed at a left side of the
top portion
of the cavity assembly 100 above the cooking chamber 111 and communicates with
the
outlet holes 115 and the first outlet 123.
[64] A vent grill 173 is disposed at a front portion of the cavity assembly
100 cor-
responding to the inlet portion 121 and the first and second outlets 123 and
124. The
vent grill 173 guides air to the inlet portion 121 of the cavity assembly 100.
Furthermore, the vent grill 173 guides air discharged through the first and
second
outlets 123 and 124.
[65] As shown in Fig. 6, the vent grill 173 has a transversely elongated
polyhedral shape.
The vent grill 173 includes a suction passage 174, a first discharge passage
175, and a
second discharge passage 176. The suction passage 174 is formed in the vent
grill 173
and corresponds to the inlet portion 121 of the cavity assembly 100. The first
and
second discharge passages 175 and 176 are formed in the vent grill 173 and
correspond
to the first and second outlets 123 and 124 of the cavity assembly 100. That
is, the
CA 02674537 2009-07-02
10
WO 2008/091062 PCT/KR2007/006581
suction passage 174 and the first discharge passage 175 are formed in both
sides of the
vent grill 173, and the second discharge passage 176 is formed in a center
portion of
the vent grill 173 between the suction passage 174 and the first discharge
passage 175.
When the vent grill 173 is installed on the front portion of the cavity
assembly 100, the
terminal housing is disposed in the first discharge passage 175.
[66] A pair of compartment ribs 177 is disposed in the vent grill 173 to
define the
suction passage 174 and the first and second discharge passages 175 and 176.
That is,
the suction passage 174 and the first and second discharge passages 175 and
176 are
defined by inner surfaces of the vent grill 173 and both sides of the
compartment ribs
177.
[67] The suction passage 174 guides air to the inlet portion 121 of the
cavity assembly
100. The vent grill 173 includes first and second suction grills 174A and 174B
and a
suction opening 174C. The first suction grill 174A is disposed on a top
portion of the
suction passage 174, and the second suction grill 174B is disposed on a side
portion of
the suction passage 174. The suction opening 174C is disposed on a rear
portion of the
suction passage 174. The first suction grill 174A is disposed at a right top
side of the
vent grill 173, and the second suction grill 174B is disposed at a right
lateral side of the
vent grill 173 close to the first suction grill 174A. The suction opening 174C
is
disposed at a right rear side of the vent grill 173 close to the second
suction grill 174B.
Air used to cool the door 200 or outside air is introduced into the suction
passage 174
through the first and second suction grills 174A and 174B. The suction opening
174C
communicates with the inlet portion 121 of the cavity assembly 100 such that
air can
flow from the suction passage 174 to the cavity assembly 100 through the
suction
opening 174C and the inlet portion 121.
[68] The second discharge passages 175 and 176 are configured to guide air
and fumes
discharged from the cavity assembly 100 through the second outlets 123 and
124. The
front side of the vent grill 173 is sloped in an upwardly extended shape such
that air
and fumes can be smoothly guided upward from the cavity assembly 100 by the
second
discharge passages 175 and 176. The vent grill 173 includes a first discharge
hole
175A at a top surface of the first discharge passage 175, and a first
discharge opening
175B at a rear surface of the first discharge passage 175. The first discharge
hole 175A
is disposed at a left top surface of the vent grill 173, and the first
discharge opening
175B is disposed at a left rear surface of the vent grill 173 corresponding to
the first
discharge hole 175A. Air guided along the first discharge passage 175 is
discharged
through the first discharge hole 175A. The first discharge opening 175B
communicates
with the first outlet 123 of the cavity assembly 100 so that air can flow from
the cavity
assembly 100 to the first discharge passage 175 through the first outlet 123
and the
first discharge opening 175B.
CA 02674537 2009-07-02
11
WO 2008/091062 PCT/KR2007/006581
[69] The vent grill 173 further includes second discharge holes 176A at a
top surface of
the second discharge passage 176, and second discharge openings 176B at a rear
surface of the second discharge passage 176. The second discharge holes 176A
are
disposed at a top center portion of the vent grill 173 between the second
suction grill
174B and the first discharge hole 175A. The second discharge openings 176B cor-
responding to the second discharge holes 176A are disposed at a rear center
portion of
the vent grill 173 between the first suction grill 174A and the first
discharge opening
175B. Smoke and fumes, which are discharged from the cavity assembly 100 and
guided along the second discharge passage 176, are discharged through the
second
discharge holes 176A. In the current embodiment, a pair of second discharge
holes
176A is provided. The second discharge openings 176B communicate with the
second
outlet 124 such that smoke and fumes discharged from the cavity assembly 100
can be
guided to the second discharge passage 176 through the second outlet 124 and
the
second discharge openings 176B.
[70] A pair of fixing ribs 178 is disposed on a rear edge portion of the
top surface of the
vent grill 173. The fixing ribs 178 protrude backward from the rear edge
portion of the
vent grill 173 by a predetermined length. The fixing ribs 178 include
penetration holes
178A. When attaching the vent grill 173 to the cavity assembly 100, screws are
fixed
to the front side of the cavity assembly 100 through the penetration holes
178A.
[71] A lead wire opening 179 is formed in a left side of the vent grill 173
close to the
first discharge passage 175. Referring to Fig. 7, a lead wire (W) is connected
to the
door 200 through the lead wire opening 179 to connect the display unit 260 of
the door
200 to the terminal coupled to the terminal housing. The lead wire opening 179
can be
formed to a predetermined depth by cutting out a left portion of the vent
grill 173.
[72] A lead wire cap 181 is detachably attached to the first discharge
passage 175. The
lead wire cap 181 separates the lead wire (W) from a portion of the first
discharge
passage 175 where air discharged from the cavity assembly 100 flows. In
detail, air
discharged from the cavity assembly 100 to the first discharge passage 175
flows in the
lead wire cap 181, and the lead wire (W) is disposed in a wire accommodation
gap 182
defined between the first discharge passage 175 and the lead wire cap 181.
[73] The lead wire cap 181 has a polyhedral shape with opened top and rear
sides. When
the lead wire cap 181 is attached to the first discharge passage 175, front
and lateral
surfaces of the lead wire cap 181 are spaced a predetermined distance from
front and
lateral surfaces of the first discharge passage 175 (i.e., from inner surfaces
of the vent
grill 173 and the compartment ribs 177). The lead wire cap 181 can be
detachably
attached to the first discharge passage 175 by inserting the lead wire cap 181
into the
first discharge passage 175 through the first discharge hole 175A. The lead
wire cap
181 includes fixing tabs 183 and a rib grip 184 at a front upper portion. The
fixing tabs
CA 02674537 2009-07-02
12
WO 2008/091062 PCT/KR2007/006581
183 protrude forward from the front upper portion of the lead wire cap 181,
and the rib
grip 184 extends upward from the front upper portion of the lead wire cap 181.
When
the lead wire cap 181 is inserted into the first discharge passage 175, the
fixing tabs
183 are hooked by a top portion of the vent grill 173 at the first discharge
hole 175A so
that the lead wire cap 181 can be securely held in the first discharge passage
175. The
lead wire cap 181 can be detached from the first discharge passage 175 after
moving
the fixing tabs 183 away from the top portion of the vent grill 173 using the
rib grip
184.
[74] The door 200 for opening and closing the cooking chamber 111 is
rotatably
attached to the cavity assembly 100 in a manner such that the door 200 can be
rotated
up and down on its upper edge portion. Referring to Fig. 8, the door 200
includes a
door panel 210, a doorframe 220, a choke cover 230, a front member such as a
front
cover 240 and a front glass 250, the display unit 260, and a door handle 270.
[75] The door panel 210 has a rectangular shape and is a base structure of
the door 200.
The door panel 210 includes a see-through opening 211. A user can see the
inside
cooking chamber 111 through the see-through opening 211 without having to open
the
door 200. The see-through opening 211 can be formed by cutting a center
portion of
the door panel 210 into a rectangular shape.
[76] A display opening 213 is formed in the door panel 210 under the see-
through
opening 211. The display unit 260 is exposed through the display opening 213.
The
display opening 213 can be formed by cutting a portion of the door panel 210
located
under the see-through opening 211 into a rectangular shape.
[77] An interference preventing portion 215 is formed on a top end of the
door panel
210. The interference preventing portion 215 is formed to prevent interference
between
the door 200 and the vent grill 173 when the door 200 is rotated up or down on
its
upper edge portion to open or close the cooking chamber 111. The interference
preventing portion 215 can be formed by cutting a top end portion of the door
panel
210 into a shape corresponding to the vent grill 173.
[78] Inlet holes 217 and outlet holes 219 are formed in the topside of the
door panel 210.
The inlet holes 217 allow inflow of outside air to a door cooling passage 201
(refer to
Fig. 9). The outlet holes 219 allows outflow of air from the door cooling
passage 201.
The inlet holes 217 are disposed at one side of the topside of the door panel
210 such
that the inlet holes 217 is close to the first discharge hole 175A of the vent
grill 173
when the door 200 is attached to the cavity assembly 100. The outlet holes 219
are
disposed at a side of the interference preventing portion 215 away from the
inlet holes
217. That is, the outlet holes 219 are disposed at the other side of the
topside of the
door panel 210 away from the inlet holes 217.
[79] The doorframe 220 is disposed at a rear side of the door panel 210. A
plurality of
CA 02674537 2009-07-02
13
WO 2008/091062 PCT/KR2007/006581
chokes 221 disposed on edge portions of the doorframe 220. The chokes 221
prevent
leakage of microwaves from the cooking chamber 111. An opening portion 223 cor-
responding to the see-through opening 211 of the door panel 210 is formed in a
center
portion of the doorframe 220.
[80] An interference preventing portion 225 is formed on a top end of the
doorframe
220. The interference preventing portion 225 can be formed by cutting a top
end
portion of the doorframe 220 into a shape corresponding to the interference
preventing
portion 215 (i.e., corresponding to the vent grill 173).
[81] A pair of hinge flanges 227 is disposed at each lateral side of the
doorframe 220.
The hinge flanges 227 are spaced a predetermined distance from the lateral
side of the
220. The hinge pin 228 is horizontally disposed between the hinge flanges 227.
Practically, the door 200 rotates on the hinge pin 228. When the door 200 is
attached to
the cavity assembly 100, the hinge pin 228 is inserted in the hinge grooves
134 and the
hinge pin openings 138 of the door support bracket 131.
[82] Spring fixing pins 229 are disposed on both sides of the doorframe 220
under the
hinge flanges 227. The spring fixing pins 229 are used to fix the gas springs
300 (refer
to Fig. 300). When assembled, the spring fixing pins 229 are inserted into
side portions
of spring accommodation portions 235 (described later) and disposed in the
spring ac-
commodation portions 235.
[83] The choke cover 230 is disposed at a rear side of the doorframe 220.
The choke
cover 230 is disposed at an opposite side to the door panel 210 with respect
to the
doorframe 220. The choke cover 230 forms a rear outer surface of the door 200.
The
choke cover 230 includes a see-through opening 231 corresponding to the see-
through
opening 211 of the door panel 210 and the opening portion 223 of the doorframe
220.
The see-through opening 231 can be formed by cutting out a center portion of
the
choke cover 230 into a rectangular shape.
[84] An interference preventing portion 233 is formed on a top end of the
choke cover
230. Like the interference preventing portion 215 of the door panel 210 and
the in-
terference preventing portion 225 of the doorframe 220, the interference
preventing
portion 233 can be formed by cutting a top end portion of the choke cover 230
into a
shape corresponding to the vent grill 173.
[85] The spring accommodation portions 235 are disposed on both sides of
the choke
cover 230. When the door 200 closes the cooking chamber 111, the gas springs
300 is
disposed in the spring accommodation portions 235. Each of the spring ac-
commodation portions 235 has a vertically elongated hexahedron shape. The
spring ac-
commodation portions 235 can be formed by recessing side portions of the choke
cover 230 toward the doorframe 220.
[86] Latch holes 237 corresponding to the latch slots 145 of the cavity
assembly 100 are
CA 02674537 2009-07-02
14
WO 2008/091062 PCT/KR2007/006581
formed in both sides of the choke cover 230. When assembled, the latch
protrusions
281 are inserted into the latch holes 237 and protruded backward. The latch
holes 237
can be formed by cutting out side portions of the choke cover 230 into a shape
cor-
responding to the latch protrusions 281. The latch holes 237 have a
predetermined
width corresponding to the width of the latch protrusions 281.
[87] The front cover 240 is disposed at a front side of the door panel 210.
Practically, the
front cover 240 forms the front exterior of the door 200. The front cover 240
can be
formed of a metal. In the current embodiment, the front cover 240 is
approximately U-
shaped with an opened top to enclose the see-through opening 211 and the
display
opening 213 of the door panel 210.
[88] The front glass 250 forms the front exterior of the door 200 together
with the front
cover 240. For this, the front glass 250 is disposed at a position
corresponding to the
see-through opening 211 and the interference preventing portion 215 of the
door panel
210. That is, the front glass 250 covers the see-through opening 211 and the
in-
terference preventing portion 215 of the door panel 210.
[89] The display unit 260 is used to receive various operational commands
and display
various information about operation of the microwave oven. The display unit
260 is
surrounded by the door cooling passage 201. The display unit 260 includes a
main
printed circuit board substrate 261, a backlight printed circuit board
substrate 263, a
reflector 265, a display cover 267, and a display glass 269.
[90] When assembled, the main printed circuit board substrate 261 is
disposed in a
portion of the door 200 corresponding to the display opening 213 of the door
panel
210. That is, the main printed circuit board substrate 261 is disposed between
the door
panel 210 and the doorframe 220. A display device 262 is disposed on a front
surface
of the main printed circuit board substrate 261. The display device 262 is
exposed
through the display opening 213 of the door panel 210 and displays various in-
formation about operation of the microwave oven. A vacuum fluorescent display
(VFD), which uses radiation of a fluorescent material caused by a low-speed
electron
ray, can be used as the display device 262. The display device 262 is fixed to
the main
printed circuit board substrate 261 using a fixing bracket 262A. The main
printed
circuit board substrate 261 includes a plurality of electric components (not
shown) for
operation of the display unit 260. The lead wire (W) (refer to Fig. 9) is
connected to
the main printed circuit board substrate 261 through the lead wire opening 179
of the
vent grill 173.
[91] The backlight printed circuit board substrate 263 is disposed in the
door 200 at a
front side of the main printed circuit board substrate 261. That is, the
backlight printed
circuit board substrate 263 is disposed between the door panel 210 and the
main
printed circuit board substrate 261. A plurality of light emitting diodes (not
shown) is
CA 02674537 2009-07-02
15
WO 2008/091062 PCT/KR2007/006581
disposed on a front side of the backlight printed circuit board substrate 263.
The light
emitting diodes emit light to illuminate buttons 266 (described later). The
backlight
printed circuit board substrate 263 includes a display opening for receiving
the display
device 262.
[92] The reflector 265 is disposed in the door 200 between the door panel
210 and the
backlight printed circuit board substrate 263. The reflector 265 reflects
light emitted
from the light emitting diodes of the backlight printed circuit board
substrate 263. The
buttons 266 are disposed on a front side of the reflector 265 that is exposed
through the
display opening 213 of the door panel 210. The buttons 266 can be touch-screen
buttons for receiving operational commands. Like the backlight printed circuit
board
substrate 263, the reflector 265 includes a display opening.
[93] The display cover 267 disposed at a front side of the reflector 265.
Characters or
symbols are printed on the display cover 267 for indicating functions of the
buttons
266. A film coated with a conductive indium tin oxide (ITO) compound can be
used as
the display cover 267 to allow the buttons 266 to operate as touch-screen
buttons for
receiving operational commands. Like the backlight printed circuit board
substrate 263
and the reflector 265, the display cover 267 includes a display opening.
[94] The display glass 269 is disposed at a front side of the display cover
267 and forms
a portion of the front exterior of the door 200. For this, the display glass
269 has a
rectangular shape corresponding to the shape of the display opening 213 of the
door
panel 210 and is disposed on the display opening 213 of the door panel 210.
[95] The display unit 260 is assembled as a single module and is fixed to
the rear surface
of the door panel 210. In other words, the main printed circuit board
substrate 261, the
backlight printed circuit board substrate 263, the reflector 265, the display
cover 267,
and the display glass 269 are assembled into the display unit 260
independently of
other components of the door 200, and then the display unit 260 is fixed to
the rear
surface of the door panel 210.
[96] The door handle 270 is used when a user rotates the door 200. The door
handle 270
can have a hollow rod shape and be transversely disposed on the front cover
240. Both
ends of the door handle 270 are fixed to the door panel 210 through the front
cover
240.
[97] The pair of latch protrusions 281 is disposed between the door panel
210 and the
choke cover 230. The latch protrusions 281 are inserted into the latch holes
237 and
protrude backward from the door 200. When the door 200 is rotated down to
close the
cooking chamber 111, the latch protrusions 281 lock the door 200 in the closed
position. The latch protrusions 281 are horizontally arranged. Each of the
latch
protrusions 281 includes a latch hole for selectively receiving the actuation
lever 147
of the latch board 146.
CA 02674537 2009-07-02
16
WO 2008/091062 PCT/KR2007/006581
[98] The door cooling passage 201 is formed in the door 200. The door
cooling passage
201 is formed to cool the door 200, particularly, the display unit 260.
Substantially, the
door cooling passage 201 is formed by the door panel 210 and the choke cover
230.
The door cooling passage 201 is formed in the door 200 into an approximate U-
shape
with opened tops. The opened tops of the door cooling passage 201 are
connected to
the inlet holes 217 and the outlet holes 219 of the door panel 210.
[99] A handle cooling passage 271 (refer to Fig. 9) is formed in the door
handle 270.
The handle cooling passage 27 us formed to cool the door handle 270. Both ends
of the
handle cooling passage 271 are connected to the door cooling passage 201.
Thus, some
air flows from the door cooling passage 201 to the handle cooling passage 271.
[100] The pair of gas springs 300 support the door 200 with respect to the
cavity assembly
100 when the cooking chamber 111 is opened. When the door 200 is at a position
between fully closed and opened positions, the gas springs 300 apply a torque
to the
door 200 for closing or further opening the cooking chamber 111 based on a
reference
position between the fully closed and opened positions of the door 200. For
example,
the reference position can be a middle position between the fully closed and
opened
positions of the door 200 (refer to Fig 15). In this case, when the door 200
is at a
position above the reference position, the gas springs 300 apply a torque to
the door
200 to rotate the door 200 up to the fully opened position. When the door is
at a
position below the reference position, the gas springs 300 apply a torque to
the door
200 to rotate the door 200 down to the fully closed position.
[101] Referring to Fig. 1, each of the gas springs 300 includes a cylinder
310 in which gas
is filled, and a piston rod 320 inserted into the cylinder 310. The piston rod
320 is
linearly movable by pressure of the gas filled in the cylinder 310. One end of
the piston
rod 320 is inserted into one end of the cylinder 310. The other end of the
piston rod
320 is rotatably supported on the rear surface of the door panel 210, and the
other end
of the cylinder 310 is rotatably supported on the front surface of the cavity
assembly
100. In detail, the other end of the cylinder 310 is rotatably supported on
the fixing
protrusion 143 of the cavity assembly 100, and the other end of the piston rod
320 is
rotatably supported on the spring fixing pin 229 of the door panel 210.
[102] When the door 200 is closed (i.e., when the cooking chamber 111 is
closed), the gas
springs 300 are disposed in the spring accommodation portions 235 of the door
200.
When the door 200 is fully rotated down to close the cooking chamber 111, the
front
surface of the cavity assembly 100 and the rear surface of the door 200 are
not spaced
apart from each other owing to the gas springs 300.
[103] An exemplary operation of the microwave oven will now be described in
detail with
reference to the accompanying drawings according to the embodiment.
[104] First, procedures for installing the door 200 to the cavity assembly
100 will now be
CA 02674537 2009-07-02
17
WO 2008/091062 PCT/KR2007/006581
described according to the first embodiment.
[105] Figs. 10 to 12 are partial perspective views for explaining
procedures for installing
the door 200 to the cavity assembly 100 according to an embodiment.
[106] For example, the cavity assembly 100 is installed in furniture (not
shown) above a
cooker (not shown). In this state, as shown in Fig. 10, the door 200 is moved
toward
the cavity assembly 100 in a manner such that the hinge pin 228 can be moved
down
into the hinge grooves 134. Here, the coupling hole 136 of the hinge bracket
133 is
exposed to the outside of the furniture.
[107] Thereafter, as shown in Fig. 11, the hinge cover 137 is rotated down
to securely
hold the hinge pin 228 in the hinge grooves 134. Here, when the hinge cover
137 is
rotated down, the hinge pin 228 is inserted into the hinge pin openings 138
from
bottoms to tops of the hinge pin openings 138. Then, the penetration hole 139
of the
hinge cover 137 is vertically aligned with the coupling hole 136 of the hinge
bracket
133.
[108] In this way, detachment of the hinge pin 228 can be prevented using
the hinge cover
137. Thereafter, as shown in Fig. 12, a screw (S) is fixed to the coupling
hole 136 of
the hinge bracket 133 through the penetration hole 139 of the hinge cover 137.
By this,
the hinge cover 137 can be securely fixed, and thus detachment of the hinge
pin 228
can be reliably prevented.
[109] As explained above, the coupling hole 136 of the hinge bracket 133,
and the
penetration hole 139 of the hinge cover 137 are exposed to the outside of the
furniture.
Therefore, the door 200 can be attached to the cavity assembly 100 without
having to
separate the cavity assembly 100 from the furniture.
[110] Next, it will be described how the door 200 of the microwave oven is
opened
according to the first embodiment.
[111] Figs. 13 to 17 are views for explaining how the door of the microwave
oven is
opened according to the first embodiment.
[112] Referring to Fig. 13, when the door 200 is closed (i.e., when the
cooking chamber
111 is closed), the rear surface of the door 200 is in contact with the front
surface of
the cavity assembly 100. In this state, the latch protrusion 281 is in the
latch slot 145,
and the actuation lever 147 is accommodated in the latch protrusion 281. Thus,
the
latch protrusion 281 is not freely released from the latch slot 145.
[113] Meanwhile, when the latch protrusion 281 is inserted into the latch
slot 145, the
actuation lever 147 is pushed by the latch protrusion 281 so that the latch
switches 148
can be turned on. Then, an operational command can be input using the buttons
266 of
the display unit 260 to operate the microwave oven according to the input
operational
command for cooking food in the cooking chamber 111.
[114] After the food is cooked in the cooking chamber 111, the cooking
chamber 111 can
CA 02674537 2009-07-02
18
WO 2008/091062 PCT/KR2007/006581
be opened by rotating up the door 200. For example, a user can pull the door
handle
270 in an upwardly curved direction to rotate up a lower end of the door 200
about the
hinge pins 228 so as to open the cooking chamber 111 as shown in Fig 14. At
this
time, the latch protrusions 281 are released from the latch slots 145. After
the latch
protrusions 281 are released from the latch slots 145, the actuation lever 147
moves
back to its initial position by a force applied to the actuation lever 147
from the torsion
springs 149.
[115] Until the door 200 is rotated up to a predetermined position (e.g.,
the middle
position between fully closed and opened positions), the gas springs 300 apply
a
reverse torque to the door 200 to rotate down the door 200 back to the fully
closed
position. Thus, unless the user pulls the door handle 270 in an upwardly
curved
direction to the predetermined position, the lower end of the door 200 may
rotate down
about the hinge pins 228 to the closed position to close the cooking chamber
111.
[116] However, if the user pulls the door handle 270 above the
predetermined position,
the lower end of the door 200 can be rotated upward about the hinge pins 228
to the
fully closed position. Referring to Fig. 15, the door 200 is positioned above
the middle
position between fully closed and opened positions. In this state, the gas
springs 300
apply a torque to the door 200 to rotate the lower end of the door 200 upward
about the
hinge pins 228 so as to fully open the cooking chamber 111.
[117] Therefore, as shown in Fig. 16, although the user does not pull the
door handle 270
after the door 200 is positioned above the middle position, the door 200 can
be rotated
upward to open the cooking chamber 111. Referring to Fig. 17, the door 200 is
rotated
upward to the fully opened position. That is, the cooking chamber 111 is fully
opened.
[118] After the cooking chamber 111 is opened in this way, cooked food can
be taken out
of the cooking chamber 111, or non-cooked food can be placed into the cooking
chamber 111. Here, since the gas springs 300 apply a torque to the opened door
200 in
an upward direction, the door 200 is not freely moved from the opened position
so that
loading and unloading of food into and from the cooking chamber 111 can be con-
veniently carried out without interruption by the door 200.
[119] After loading food into the cooking chamber 111 or unloading food
from the
cooking chamber 111, the user can close the cooking chamber 111 by pushing the
door
200 downwardly to the closed position. The closing of the cooking chamber 111
can
be carried out in a reverse order as compared with the opening of the cooking
chamber
111. That is, when a user pushes the door handle 270 forward and downward, the
door
200 starts to rotate down about the hinge pins 228. After the door 200 is
rotated down
below the middle position between the fully closed and opened position (refer
to Fig.
15), the gas springs 300 apply a torque to the door 200 to rotate down the
lower end of
the door 200 about the upper end of the door 200. Therefore, although the user
does
CA 02674537 2009-07-02
19
WO 2008/091062 PCT/KR2007/006581
not push the door handle 270 after the door 200 is positioned below the middle
position, the lower end of the door 200 can be rotated down about the upper
end of the
door 200 to close the cooking chamber 111.
[120] Next, exemplary airflows in the microwave oven will be described
according to the
first embodiment.
[121] Figs. 18 to 20 are views illustrating exemplary flows of air in the
microwave oven
according to the first embodiment.
[122] When the microwave oven start to operate, the cooling fan assembly
159 sucks air
into the door cooling passage 201 through the inlet holes 217 of the door 200
as shown
in Fig. 18. While flowing along the door cooling passage 201, the air cools
the door
200, particularly, the display unit 260.
[123] Some of the air flows from the door cooling passage 201 to the handle
cooling
passage 271 to cool the door handle 270. Thereafter, the air flows back to the
door
cooling passage 201. After the air is used to cools the door 200 and the door
handle
270, the air is discharged from the door cooling passage 201 through the
outlet holes
219 of the door 200.
[124] Referring to Fig. 19, the air discharged from the door cooling
passage 201 through
the outlet holes 219 is introduced into the suction passage 174 of the vent
grill 173
through the first suction grill 174A. Then, the air flows from the suction
passage 174 to
the cavity assembly 100 through the suction opening 174C of the vent grill 173
and the
inlet portion 121 of the cavity assembly 100. As well as the air used to cool
the door
200 and introduced into the cavity assembly 100 through first suction grill
174A, other
outside air can be introduced into the cavity assembly 100 through the second
suction
grill 174B of the vent grill 173.
[125] The air introduced into the cavity assembly 100 is directed to the
electric
component room 153 through the air supply opening 162 of the air barrier 161
to cool
electric components such as the magnetron 154 and the capacitor 155. Here, the
guide
163 of the air barrier 161 guides the air to the electric components.
Thereafter, the air
is guided to the first air duct 171 through the opening 157.
[126] The air guided to the first air duct 171 flows into the cooking
chamber 111 through
the inlet holes 113 of the cooking chamber 111 as shown in Fig. 20. Then, the
air flows
from the cooking chamber 111 to the second air duct 172 through the outlet
holes 115.
Here, while passing through the cooking chamber 111, the air absorbs moisture,
gaseous fatty substances, and odors generated from food cooked in the cooking
chamber 111. The air containing such substances is guided from the second air
duct
172 to the first discharge passage 175 of the vent grill 173 through the first
outlet 123
of the cavity assembly 100. Then, the air is discharged from the first
discharge passage
175 through the first discharge hole 175A. Here, the air discharged from the
cavity
CA 02674537 2009-07-02
20
WO 2008/091062 PCT/KR2007/006581
assembly 100 to the first discharge passage 175 is guided upward through the
first
discharge hole 175A.
[127] Meanwhile, as shown in Fig. 19, when the vent fan assembly 166
operates, smoke
and fumes generated from food cooked on a cooker disposed under the microwave
is
introduced into the cavity assembly 100 through the smoke inlet portion 151
(refer to
Fig. 1). Then, the smoke and fumes flow along the vent passage 169 and are
guided to
the second discharge passage 176 of the vent grill 173 through the second
outlet 124 of
the cavity assembly 100. The smoke and fumes are discharged upward from the
second
discharge passage 176 through the second discharge holes 176A of the vent
grill 173.
[128] When the capacitor 155 is damaged or broken, the capacitor 155 can be
replaced
with a new one without having to separate the cavity assembly 100 from the
furniture.
In detail, the service opening 127 (i.e., the opening/closing bracket 129) can
be
exposed by rotating the door 200 upward on the hinge pins 228 to open the
cooking
chamber 111. Thereafter, the opening/closing bracket 129 can be separated from
the
cavity assembly 100 to open the service opening 127. Then, the capacitor 155
installed
in the component installation hole 165 of the air barrier 161 can be detached
through
the service opening 127, and a new capacitor 155 can be installed in the
component in-
stallation hole 165. After replacing the capacitor 155, the opening/closing
bracket 129
is attached to the front of the cavity assembly 100 to close the service
opening 127. In
this way, replacing of the capacitor 155 can be completed.
[129] Although embodiments have been described with reference to a number
of il-
lustrative embodiments thereof, it should be understood that numerous other
modi-
fications and embodiments can be devised by those skilled in the art that will
fall
within the scope of the disclosure, the drawings and the appended claims.
[130] For example, although the spring accommodation portions are formed in
the rear
surface of the door in the above-described embodiment, the spring
accommodation
portions can be formed in the front surface of the cavity assembly in other em-
bodiments. Furthermore, a damping member can be disposed at a lower portion of
the
front surface of the cavity assembly or a lower portion of the rear surface of
the door in
order to reduce shocks and noises when the door is rotated to close or open
the cooking
chamber of the cavity assembly.
Mode for the Invention
[131] A microwave oven will now be described in detail with reference to
the ac-
companying drawings according to other embodiments.
[132] Fig. 21 is a side view illustrating a door support device of a
microwave oven
according to a second embodiment, and Fig. 22 is a partial perspective view
illustrating
a door support device of a microwave oven according to a third embodiment.
CA 02674537 2009-07-02
21
WO 2008/091062 PCT/KR2007/006581
[133] In the embodiment shown in Fig. 21, hinge brackets 410 (one shown in
Fig. 21) are
disposed at both sides of a front upper portion of a cavity assembly (not
shown) to
support a door (not shown) with respect to the cavity assembly in a manner
such that a
lower end of the door can be rotated upward and downward about an upper end of
the
door. A hinge groove 420 is formed in a leading end of the hinge bracket 410.
The
hinge groove 420 is opened backwardly. Thus, the leading end of the hinge
bracket
410 can be U-shaped.
[134] Opening/closing members 430 (one shown in Fig. 21) are disposed at
both sides of
an upper end portion of the cavity assembly close to the hinge brackets 410.
The
opening/closing members 430 are vertically movable. The opening/closing member
430 selectively opens and closes the hinge groove 420. For this, the
opening/closing
member 430 has a side portion making contact with the hinge bracket 410 and is
vertical movable to close and open the hinge groove 420 selectively. The
opening/
closing member 430 disposed at the upper end portion of the cavity assembly
does not
overlap the hinge groove 420.
[135] Elastic members (not shown) are disposed at both sides of the upper
end portion of
the cavity assembly to apply an elastic force to the opening/closing members
430 to
move the opening/closing members 430 upwardly. For example, coil springs can
be
vertically disposed as the elastic members. After the opening/closing member
430 is
moved up to close the hinge groove 420, the opening/closing member 430 is not
freely
moved down owing to the elastic member, and thus the closed state of the hinge
groove 420 can be reliably maintained.
[136] A pair of hinge flanges 440 is disposed at each lateral side of an
upper rear portion
of the door. The hinge flanges 440 are spaced a predetermined distance from
the lateral
side of the upper rear portion of the door. The predetermined distance is at
least greater
than the sum of the thicknesses of the hinge bracket 410 and the
opening/closing
member 430.
[137] The hinge flanges 440 protrude backward from the lateral side of the
upper rear
portion of the door, and a hinge pin 450 is horizontally disposed between the
hinge
flanges 440. The hinge pin 450 is disposed in the hinge groove 420 by
inserting the
hinge pin 450 into the hinge groove 420 from the back of the hinge groove 420.
Practically, the hinge pin 450 is a rotation center of the door rotatably
attached to the
cavity assembly.
[138] In the current embodiment, the door can be rotatably attached to the
cavity
assembly as follows. First, the door is moved toward the cavity assembly to
place the
hinge pin 450 above the opening/closing member 430. Next, the door is moved
down
to push the opening/closing member 430 with the hinge pin 450.
[139] Then, the opening/closing member 430 is moved down by the hinge pin
450, and
CA 02674537 2009-07-02
22
WO 2008/091062 PCT/KR2007/006581
the hinge pin 450 makes contact with the hinge bracket 410. In this state, the
door is
moved forward to insert the hinge pin 450 into the hinge groove 420. When the
hinge
pin 450 is inserted into the hinge groove 420, the hinge pin 450 departs from
the
opening/closing member 430 such that the opening/closing member 430 can be
lifted
by the resilience of the elastic member to close the hinge groove 420. Since
the
opening/closing member 430 closes the hinge groove 420, the hinge pin 450
inserted
into the hinge groove 420 is not freely released from the hinge groove 420.
[140] In the embodiment shown in Fig. 22, hinge brackets 510 are disposed
at both sides
of a front upper portion of a cavity assembly (not shown). The hinge brackets
510
protrude forward from both sides of the front upper portion of the cavity
assembly.
Each of the hinge brackets 510 includes a hinge hole (not shown).
[141] A door (not shown) is attached to the cavity assembly in a manner
such that a lower
end of the door can be rotatable about an upper end of the door. A pair of
hinge flanges
520 is disposed at each lateral side of a rear upper portion of the door. The
hinge
flanges 520 are spaced a predetermined distance from the lateral side of the
rear upper
portion of the door. The hinge flanges 520 protrude backward from the rear
upper
portion of the door.
[142] A hinge pin 530 is disposed on one of the hinge flanges 520. The
hinge pin 530
protrudes horizontally from one of the hinge flanges 520 toward the other of
the hinge
flanges 520. A leading end of the hinge pin 530 is spaced a predetermined
distance
from the other of the hinge flanges 520. When assembled, the hinge pin 530 is
hor-
izontally inserted in the hinge hole of the hinge bracket 510.
[143] After inserting the hinge pin 530 into the hinge hole of the hinge
bracket 510, a
closing member 540 is inserted between the leading end of the hinge pin 530
and the
other of the hinge flange 520. The closing member 540 prevents the hinge pin
530
from freely departing from the hinge hole of the hinge bracket 510.
[144] A microwave oven will now be described in detail with reference to
the ac-
companying drawings according to a fourth embodiment.
[145] Fig. 23 is a perspective view illustrating a cam hinge of a microwave
oven
according to a fourth embodiment.
[146] In the current embodiment, a cooking chamber (not shown) disposed in
a cavity
assembly (not shown) is closed and opened using a door (not shown), and a pair
of
cam hinges 600 (one shown in Fig. 23) is used to attach the door to the cavity
assembly
in a manner such that a lower end of the door can be rotated about an upper
end of the
door.
[147] The cam hinges 600 apply a torque to the door in a direction for
opening the door or
closing the door according to the angular position of the door. In other
words, the cam
hinges 600 apply a torque to the door in different directions based on a
reference
CA 02674537 2009-07-02
23
WO 2008/091062 PCT/KR2007/006581
angular position of the door. For example, when the door is positioned above
the
reference regular position, the cam hinges 600 apply a torque to the door in a
pre-
determined direction to rotate up the lower end of the door about the upper
end of the
door so as to open the cooking chamber. When the door is positioned below the
reference regular position, the cam hinges 600 apply a torque to the door in
an opposite
direction to rotate down the door for closing the cooking chamber.
[148] For this, each of the cam hinges 600 includes a long cam housing 610,
a hinge
protrusion 620, a rotation cam 630, a movable cam 640, and an elastic member
650.
One end portion of the hinge protrusion 620 is inserted in an end of the cam
housing
610, and the other end portion of the hinge protrusion 620 protrudes from the
end of
the cam housing 610. The rotation cam 630 is disposed in the cam housing 610
and is
rotatable on the hinge protrusion 620. The movable cam 640 is disposed in the
cam
housing 610 and is movable in a length direction of the cam housing 610. The
elastic
member 650 elastically supports the movable cam 640. The hinge protrusions 620
of
the cam hinges 600 are oriented such that the hinge protrusions 620 protrude
from the
cam hinges 600 in opposite directions.
[149] The cam housing 610 forms the exterior of the cam hinge 600. The cam
housing
610 has a hollow cylindrical shape having a predetermined length. A hinge hole
611 is
formed on the end of the cam housing 610 to receive the hinge protrusion 620.
[150] The hinge protrusion 620 is inserted in the hinge hole 611. A portion
of the hinge
protrusion 620 protrudes outward from the cam housing 610, and the other
portion of
the hinge protrusion 620 is disposed in the cam housing 610. When assembled,
the
portion of the hinge protrusion 620 protruding from the cam housing 610 is
inserted in
a hinge hole (not shown) of the cavity assembly and functions as a rotation
center of
the door. When the door attached to the cavity assembly rotates, the hinge
protrusion
620 rotates relative to the cam housing 610.
[151] The rotation cam 630 is disposed at the other portion of the hinge
protrusion 620
disposed in the cam housing 610. When the hinge protrusion 620 rotates upon
the
rotation of the door, the rotation cam 630 also rotates together with the
hinge
protrusion 620. The rotation cam 630 includes a cam groove 631 on a side
opposite to
the hinge protrusion 620. The cam groove 631 can be formed by recessing a
portion of
the rotation cam 630 into a predetermined shape.
[152] The movable cam 640 is moved in a length direction of the cam housing
610 by the
rotation of the rotation cam 630. A cam protrusion 641 is formed on a side of
the
movable cam 640 facing the rotation cam 630. That is, the cam protrusion 641
faces
the cam groove 631. The cam protrusion 641 can be formed by protruding a
portion of
the movable cam 640 into a shape corresponding to the shape of the cam groove
631.
[153] The elastic member 650 applies an elastic force to the movable cam
640 to push the
CA 02674537 2009-07-02
24
WO 2008/091062 PCT/KR2007/006581
movable cam 640 against the rotation cam 630. The elastic member 650 is longi-
tudinally disposed in the cam housing 610. A coil spring can be used as the
elastic
member 650. In this case, one end of the coil spring may be supported on an
end of the
cam housing 610 opposite to the hinge protrusion 620, and the other end of the
coil
spring may be supported on the movable cam 640.
[154] An exemplary operation of the ventilation hooded microwave oven will
now be
described in detail with reference to the accompanying drawings according to
the
fourth embodiment.
[155] Figs. 24 and 25 are perspective views illustrating how the cam hinge
600 operates
when the door of the ventilation hooded microwave oven is opened and closed
according to the fourth embodiment.
[156] When the cooking chamber of the cavity assembly is closed by the door
(i.e., when
the door does not rotate relative to the cavity assembly), the cam protrusion
641 is in
the cam groove 631, and the rotation cam 630 and the movable cam 640 are fully
in
contact with each other as shown in Fig. 23. Therefore, the rotation cam 630
does not
freely rotate so that the door can be reliably held in the closed position,
and the closed
state of the cooking chamber can be reliably maintained.
[157] When a user pulls the door in an upwardly sloped direction, the lower
end of the
door is rotated upward about the hinge protrusion 620. Therefore, as shown in
Fig. 24,
the hinge protrusion 620 is rotated clockwise, and thus the cam protrusion 641
of the
movable cam 640 departs from the cam groove 631 of the rotation cam 630.
[158] The elastic member 650 pushes the movable cam 640 toward the rotation
cam 630.
Therefore, if the user stops pulling of the door before the cam protrusion 641
fully
departs from the cam groove 631 (i.e., before the door rotates about the hinge
protrusion 620 by more than a predetermined angle), the cam protrusion 641 of
the
movable cam 640 is moved back into the cam groove 631 of the rotation cam 630
by
the elastic member 650. That is, the lower end of the door rotates down about
the hinge
protrusion 620, and thus the cooking chamber is closed again.
[159] However, if the user does not stop pulling of the door until the door
rotates about
the hinge protrusion 620 by more than the predetermined angle, the cam
protrusion 641
fully departs from the cam groove 631, and thus the top surface of the cam
protrusion
641 makes contact with the bottom surface of the rotation cam 630. Therefore,
although the elastic member 650 pushes the movable cam 640 toward the rotation
cam
630, the rotation cam 630 is not rotated owing to, for example, a frictional
force
between the top surface of the cam protrusion 641 and the bottom surface of
the
rotation cam 630. That is, the door does not freely rotate down about the
hinge
protrusion 620 to close the cooking chamber.
CA 02674537 2009-07-02
25
WO 2008/091062 PCT/KR2007/006581
Industrial Applicability
[160] According to the present disclosure, the door for the microwave oven
has good
industrial applicability owing to the following advantages.
[161] In the present disclosure, the cooking chamber can be opened and
closed by rotating
up or down the lower end portion of the door about the upper end portion of
the door.
Therefore, after rotating up the door to open the cooking chamber, left and
right outer
spaces of the ventilation hooded microwave oven can be freely used, thereby
increasing efficiency in utilization of the space of a kitchen where the
ventilation
hooded microwave oven is placed.
[162] Furthermore, when the cooking chamber is opened, the opened door is
stably
supported by the gas springs or the cam hinges. Therefore, loading and
unloading of
food into and from the cooking chamber are not hindered by the door. Thus, the
ventilation hooded microwave oven can be conveniently used.
[163] In addition, electric components of the electric component room can
be repaired or
replaced through the service opening formed in a front side of the cavity
assembly.
Therefore, rapid repair and simple maintenance of the ventilation hooded
microwave
oven can be possible.
[164]
CA 02674537 2009-07-02