Note: Descriptions are shown in the official language in which they were submitted.
CA 02679004 2014-04-14
WO 2008/119003 PCT/US2008/058361
SYSTEM AND METHOD FOR FLOOR COVERING INSTALLATION
Cross-Reference to Related Applications
[0001]
Deleted
Field of the Invention
[0002]
Embodiments of this invention relate to systems and methods for installing
floor
coverings, particularly including carpet tile and other modular floor
coverings.
Background of the Invention
[0003] Floor
coverings have been in use since before recorded human history. The first
such materials were undoubtedly animal skins or plant materials like leaves or
stems. Later,
floor coverings were manufactured, such as by weaving or knotting a variety of
naturally
occurring fibers, including sisal and wool. Beginning in the twentieth
century, such fiber-
faced floor coverings began to be manufactured from man-made fibers as well.
[0004] While
the first floor coverings were limited in size to the size of an animal skin,
later floor coverings expanded to cover entire room floors. Such "wall-to-
wall" installations
of "broadloom" floor covering came into wide-spread use in the twentieth
century.
Paradigm installations of such materials utilize one or a small number of
pieces of
broadloom carpeting to cover entire room floors. This type of wall-to-wall
floor covering is
generally attached to the floor in some manner.
[0005] Later,
modular floor coverings utilized smaller, uniform size modules or tiles in
both solid surface floor coverings such as vinyl tiles and in textile-faced
floor coverings,
usually called carpet tiles. As
explained in U.S. Patent Application Publication
2004/0258870 for "Re-Configurable Modular Floor Covering," filed August 11,
2003
tiles may be installed as area rugs that do not cover the entire
flooring surface. However, the vast majority of tiles are used in wall-to-wall
installations.
Tiles have traditionally been installed in aligned rows and columns, with the
edges of each
tile aligned with the edges of adjacent tiles ("conventional carpet tile
installation method").
= Conventional carpet tile has historically been a product that sought to
mimic the appearance
1
CA 02679004 2014-04-14
WO 2008/119003 PCT/US2008/058361
of broadloom carpet and to hide or at least de-emphasize the fact that the
product was
modular. Achieving this result has required, at minimum, that carpet tiles or
modules be
placed in a flooring installation with the same orientation that the modules
had at the time
they were produced (i.e., monolithically). However, textile face modular
flooring designers
have recently begun to design flooring and flooring installations that do not
seek to mask, but
rather celebrate, the modularity of the flooring. For instance, while still
installed in aligned
rows and columns, modules are installed "quarter-turned" with each tile
position rotated 900
relative to each adjacent tile. Moreover, carpet tiles have been developed
that can be
installed "randomly" without regard to position or rotational orientation as
described in U.S.
Patent No. 6,908,656.
[0006] Modules are not always installed in aligned rows and columns,
however. For
example, tiles are also installed in aligned columns that do not form aligned
rows of modules
so that a column of tiles appears shifted up or down relative to adjacent tile
columns ("ashlar
installation method"). In other installations, tiles are installed in aligned
rows that do not
form aligned, but rather staggered, columns (" brick-laid installation
method").
[0007] While the floor covering modules are generally of relatively
substantial size and
weight, which facilitates maintenance of the modules in the positions they are
placed when
the floor covering is assembled, it is desirable to provide a means for
further resisting
module movement. This has traditionally been accomplished by attaching the
modules to the
underlying flooring surface in a variety of ways.
[0008] Modules are often glued to the floor by first applying a layer of
adhesive to the
underlying flooring surface and then positioning the tiles on top of the
adhesive. With this
method, adhesive typically contacts the entire surface area of the underside
of the flooring
modules, which increases material costs and often leads to difficultly in re-
positioning the
tiles if they are positioned incorrectly. This is a particular problem during
installation of
patterned modules that must be matched at the seams. Moreover, when the tiles
are
eventually removed, glue remains on the flooring surface and that glue
sometimes retains
portions of the removed tiles. The glue (and any flooring materials held by
the glue) must be
removed from the floor to create a smooth surface before installing new tiles.
This adds both
cost and time to the installation process.
2
CA 02679004 2009-08-20
WO 2008/119003 PCT/US2008/058361
[0009] Modules may also be installed by pre-applying adhesive to the entire
underside (or
any part) of the module. For example, adhesive may be applied in a relatively
narrow strip
across each module underside and covered, prior to module installation, by a
plastic film or
paper strip that is peeled off just before module placement. Again, however,
this method
involves attaching the modules directly to the floor and can result in the
consequent
drawbacks discussed above.
[0010] Modules have also be installed using double-sided adhesive tape,
whereby one
side of the tape is positioned on the back of the module and the other side of
the tape is
positioned on the floor to thereby secure the module to the floor. Double-
sided tape has also
been positioned between and along the entirety of adjacent carpet and carpet
tile edges.
However, as with adhesive, double sided tape can be unforgiving with respect
to tile re-
positioning and can also leave a residue on the floor upon removal of the
tiles. Moreover,
the tape has a low tensile strength and is relatively inelastic and
consequently is apt to stretch
and not regain its shape. This can result in the gaps formed between adjacent
tiles.
[0011] In addition to direct attachment to the floor, modules have also
been indirectly
attached to the underlying flooring surface, such as with mechanical fasteners
or adhesive
covered pads. For example, hook and loop fasteners have been used whereby a
sheet of
either the hook or the loop is secured to the floor and the other of the hook
or the loop is
provided on the back of the modules. The hook or loop on the modules then
engages the
hook or loop on the floor to secure the modules to the floor. Pads covered
with adhesive
have also been used. For example, a foam pad pre-coated on both sides with a
releasable
adhesive has been used. During installation, release paper is removed from
both sides of the
pad to expose the adhesive, and the pad is attached to the floor. Carpet tiles
are then
positioned on top of the pad and held in place by the adhesive. While these
systems and
methods may improve the installers' ability to re-position the tiles, they
significantly increase
the material cost of the installation. Moreover, with these installation
methods, the tiles are
more likely to move relative to each other and thereby create gaps in the
installation.
[0012] Other installation methods exist whereby the tiles are neither
directly nor
indirectly attached to the floor. For example, one-sided adhesive tape, such
as duct tape, has
been used to secure adjacent tiles together. The tiles are positioned face
down and the tape is
secured along the entirety of the adjacent edges of the tiles. The tiles must
then be carefully
3
CA 02679004 2009-08-20
WO 2008/119003 PCT/US2008/058361
turned over to expose their wear surfaces without breaking the connection
between adjacent
tiles. This method requires a significant amount of time to position the tape
on the tiles as
well as a significant material investment to tape adjacent tile edges together
along the
entirety of the seams. Moreover, such adhesive tape is relatively flimsy,
making it
challenging to position the tape as desired on the underside of tiles, and, as
with double-sided
adhesive tape, suffers from low tensile strength and inelasticity, rendering
it likely to
permanently stretch when subjected to stress and thereby create permanent gaps
between
adjacent tiles.
[0013] Regardless of the method of installation, tiles are often
inadvertently installed over
surfaces that have a high moisture content and a high pH. If the carpet tile
is installed
directly over high-moisture content flooring, then an undesirable smell may
result due to
moisture trapped between the floor surface and the tile. Traditionally, to
combat this
problem, a sealant has been applied to the floor surface before adhering the
tile to the floor.
[0014] Moreover, carpet tiles have been manufactured with a cushion
backing, which is
desirable for comfort. Traditionally, the cushion layer is attached directly
to the carpet tile so
that, if the carpet tile is later removed or replaced, the cushion is
necessarily removed with
the tile.
[0015] While methods for installing floorcoverings exist, a need exists for
a system and
method that reduces both the time and material costs needed to install modules
into a stable
floorcovering.
Summary of the Invention
[0016] Embodiments of this invention addresses the problems of previous
modular
flooring installation methods by providing systems and methods that reduce the
time and
material costs required to install a floor covering. Connectors are used to
join adjacent floor
covering units. The connectors are particularly useful in installing modular
floor covering
units ("tiles"). In one embodiment, the connectors include a film and an
adhesive layer
coated on one side of the film. To install tiles using the connectors, a first
tile is placed on
the floor at a position determined by conventional tile installation methods.
A connector is
positioned so that the adhesive layer faces upward and does not contact the
floor. The
connector is typically positioned so that only a portion of the adhesive layer
adheres to the
4
CA 02679004 2009-08-20
WO 2008/119003 PCT/US2008/058361
underside of the tile, leaving the remainder of the connector extending from
the underside of
the tile. Tiles are then positioned adjacent the first tile so that a portion
of the connector
adheres to the adjacent tiles. In this way, the connectors span the adjacent
edges of the
adjacent tiles. The tiles are assembled on a underlying floor surface without
the need to
attach them to the floor surface. Rather, the tiles are linked to each other
with the
connectors, so that the tiles create a floor covering that "floats" on the
underlying floor
surface.
[0017] The connectors need not be positioned along the entirety of the
adjacent edges nor
even across all adjacent tiles edges in the installation. Rather, the
connectors are sized so
that, when positioned in the installation, they do not extend along the entire
length of the
adjacent edges. Moreover, while any number of connectors may be used at any
number of
locations between adjacent tiles, the benefits of this invention may be fully
realized by
placing the connectors in strategic locations within the assembly (such as at
some of the
comers where four tiles meet). This is in contrast to prior installation
methods that required
stabilizing material be placed along the entirety of adjacent tiles edges so
that all adjacent
tiles edges in the installation were stabilized.
[0018] The size and relatively minimal number of connectors needed to
stabilize a tile
installation can result in a significant reduction in material costs from
prior tile installation
methods. Moreover, use of the connectors significantly reduces tile
installation time by
obviating the need to prep a floor prior to installation. Instead of the
installer applying a
layer of adhesive to the floor and then retracing his steps to position the
tiles on the adhesive
layer, with the connectors, the installer positions and secures as he goes.
Moreover, given
the releasable adhesive used on the connectors and the limited surface area of
the tiles that
contacts the connectors, the tiles can easily be re-positioned if necessary.
Furthermore,
because the tiles do not interact with the underlying floor, they are easily
removable from the
floor and leave the underlying floor with little or no residual adhesive upon
such removal.
Consequently, the floor does not require refinishing before it is recovered
with another
floorcovering.
[0019] Additionally, the connectors can be adapted to conduct electricity.
When the
conductive connectors are secured to the tiles, electrical continuity is
maintained through
adjacent tiles. This makes it possible to conduct electricity through the
tiles for use with
CA 02679004 2009-08-20
WO 2008/119003 PCT/US2008/058361
security systems, voice and data transmission, electromechanical membranes,
tracking and
location monitoring, wayfinding (e.g., when a person walks on the floor, the
floor is
illuminated in some manner by which to assist the person to find his/her way),
and many
other alternatives.
[0020] Installation can be expedited through use of a dispenser that holds
connectors and
that preferably also produces individual connectors in a ready-to-grasp
fashion. The
dispenser may have a mechanism for separating the connectors from a release
layer or from
other connectors. The dispenser may be secured to an installer's belt and leg
and may
include connectors in a roll, connectors on a roll of release material,
connectors on fan-
folded release material, or individual connectors, as examples. The dispenser
may be
refillable or designed for single use.
[0021] Preferably the dispenser has a housing for release material in a
strip bearing
connectors at successive intervals along the length of the strip. The
dispenser also has an
opening for presenting connectors to the user and may also have an actuator
for controlling
the release and presentation of a connector through the opening to the user.
The dispenser
also may have one or more attachment members such as a belt loop or leg strap
for securing
the dispenser to the user. During carpet installation, the dispenser is
secured to the carpet
installer using an attachment member so that the installer may move around the
room to
install carpet tiles using the dispensed connectors. To acquire a connector,
the carpet tile
installer moves the actuator to cause a connector to be released from the
release material and
presented through the opening where it may be easily grasped. The connector
may then be
attached to one or more carpet tiles. Another embodiment provides a dispenser
with a
housing having an opening for connectors to exit and an actuator actuated by
hand
movement from a first position to a second position that is closer to a
desired location on the
floor surface and closer to the opening than the first position. The dispenser
opening may be
within hands reach of the second position of the actuator, so that a first
portion of a user's
hand can contact the opening and the same time a second portion of the user's
hand contacts
the actuator in its second position. This allows a user to easily grasp a
connector presented
from the opening after moving the actuator from the first position to the
second position.
[0022] In another embodiment of the invention, a stack of connectors each
having adhesive
on one side are bonded or otherwise attached together. The individual
connectors in the
6
CA 02679004 2009-08-20
WO 2008/119003 PCT/US2008/058361
stack of connectors may be bonded or attached together in a variety of ways.
For example,
the adhesive on the adhesive side of one connector may be releaseably attached
to an
adjacent connector's opposite side that may be coated with a release coating
to prevent the
adhesive from forming a permanent or hard-to-detach bond. Generally, the
adjacent
connectors in a stack are oriented in a similar direction and aligned. As
another example, a
release layer may separate the adjacent connectors, with the adhesive layer of
a first
connector attached to a release material and the opposite side of a second
connector also
attached to the release material. As yet another example, the stack of
connectors may be
successive connectors attached on a single strip of release material folded
such that adjacent
connectors on the strip overlap one another in the stack, i.e. fan folded
release material. A
stack of connectors may also be included within a dispenser that assists a
user in removing
an individual connector from the stack of connectors.
During carpet installation, a carpet
installer may use a stack of connectors by removing an individual connector
from the stack
and attaching it to the underside of the carpet edge.
[0023] Another embodiment of the invention provides a connector having a film
with a layer
of water-based or synthetic polymer-based adhesive on one side. The adhesive
may have
low or no volatile organic content and may be plasticizer resistant.
[0024] Another embodiment of the invention provides for an intermediate
substrate between
the connected tiles and the underlying flooring surface. For example, a film
and/or cushion
may be positioned on the floor prior to tile installation. The film and/or
cushion is preferably
moisture resistant and serves as a barrier to prevent moisture present in the
existing floor
from contacting the tiles. The film and/or cushion thus eliminates the need
for traditional
sealants and barrier coatings. The cushion additionally provides comfort
underfoot and
eliminates the need to use cushion back carpet tiles. Rather, hard back carpet
tiles may be
installed over the cushion to impart the desirable cushioning characteristics.
If the tile
becomes soiled or worn, it can be removed without removing the cushion. In
this way, the
cushion can remain on the floor and be reused.
[0025] Yet another embodiment of an intermediate substrate provides a cushion
composite
suitable for carpet-on-carpet installation, where new carpet tiles are placed
on top of existing
carpet tiles or wall-to-wall carpeting. The new tiles can be installed using
the connectors
described above. This embodiment provides for the temporary or permanent
replacement of
7
CA 02679004 2009-08-20
WO 2008/119003 PCT/US2008/058361
carpeting at reduced cost, as the current tiles or carpet need not be removed
prior to
installation of the new carpet tiles. Additionally, the new tiles can be
removed without
damage to the existing tiles or wall-to-wall carpeting.
[0026] Regardless of the type of intermediate substrate used (if any), in one
embodiment all
of tiles placed atop the intermediate substrate are connected together using
the connectors
disclosed herein. In this way, none of the layers in the installation are
connected to any other
layer in the installation (e.g., the intermediate substrate is not connected
to the floor and the
carpeting or tiles are not connected of the intermediate substrate). In this
way, the flooring
may be easily removed without requiring clean-up and preparation before
installation a
subsequent floorcovering.
[0027] The connector may have alignment indicia for facilitating installation
of carpet tiles.
Such indicia include markings, colors, and objects such as crosshairs, lines,
dots, blocks, and
multi-color segments and quadrants.
[0028] Another embodiment of the invention provides a method of installing
carpet tile using
connectors with adhesive on one side. An installer places a carpet tile in or
near its desired
installation position on a floor surface with the underside of the tile
resting on the floor
surface. The installer uses one hand to lift an edge, corner, or other portion
of the tile and the
other hand to attach a connector adhesive side up to the edge or other part of
the underside of
the portion of the tile such that an exposed portion of the connector extends
beyond the edge
of the tile. The installer then places a second tile adjacent the first and
attaches the underside
of the second tile to the exposed portion of the connector. A dispenser may
provide the
connector to the installer with the adhesive side up and in a location
convenient to the
portion of the carpet tile to which the connector is to be attached.
Brief Description of the Drawings
[0029] FIG. 1 is perspective view of one embodiment of a connector and
release layer of
this invention.
[0030] FIG. lA is perspective view of one embodiment of a conductive
connector.
[0031] FIG. 2 is a perspective view of another embodiment of connectors and
a release
layer of this invention.
8
CA 02679004 2009-08-20
WO 2008/119003 PCT/US2008/058361
[0032] FIG. 3 is a top plan view of yet another embodiment of connectors of
this
invention.
[0033] FIG. 4 is a schematic view of one embodiment of a connector
dispenser of this
invention.
[0034] FIG. 5 is a bottom plan view of an installation of tiles pursuant to
this invention.
[0035] FIG. 6 is a bottom plan view of a subset of the tiles of FIG. 5.
[0036] FIG. 7 is a bottom plan view of another installation of tiles
pursuant to this
invention.
[0037] FIG. 8 is a bottom plan view of a subset of the tiles of FIG. 7.
[0038] FIG. 9 is a side schematic view of an embodiment of a connector of
this invention
attached to a tile edge.
[0039] FIG. 10 is a perspective view of a connector dispenser.
[0040] FIG. 11 is an exploded perspective view of the connector dispenser
of FIG. 10.
[0041] FIG. 12 is a side view of the connector dispenser of FIG. 10.
[0042] FIG. 13 is a side view of the connector dispenser of FIG. 10 with
the front cover
of the housing removed.
[0043] FIG. 14 is a side view of the drive pack of the connector dispenser
of FIG. 10.
[0044] FIG. 15 is a front view of the drive pack of the connector dispenser
of FIG. 10.
[0045] FIG. 16 is a cross-sectional view of an embodiment of a film
positioned between a
carpet tile and a flooring surface.
[0046] FIG. 17 is a cross-sectional view of an embodiment of a film and a
cushion
positioned between a carpet tile and a flooring surface.
[0047] FIG. 18 is a cross-sectional view of an embodiment of a cushion
positioned
between a carpet tile and a flooring surface.
[0048] FIG. 19 is a cross-sectional view of an embodiment of a cushion
composite of this
invention.
[0049] FIG. 20 is a cross-sectional view of the cushion composite of FIG.
19 positioned
between existing carpet or tile and a new carpet or tile.
[0050] FIG. 21 is a top plan view of a radio frequency transponder
embodiment of a
connector.
9
CA 02679004 2009-08-20
WO 2008/119003 PCT/US2008/058361
Detailed Description of the Drawings
[0050] Embodiments of this invention relate to systems and methods for
installing floor
covering. One of skill in the art will understand that the systems and methods
described
herein may be used in a variety of floor covering installations. However,
applicants have
found the connectors described herein particularly useful in any type
installation (including
wall-to-wall and area rug installations) of modular floor covering units
(hereinafter referred
to as "tiles"). The tiles may be of various colors and textures in a range of
sizes and
shapes. For example, individual tiles may be in a shape that simulates wood
planking or
shapes of ceramic and other tiles, including, but not limited to, hexagons,
squares,
rectangles, triangles and other shapes. In addition, the tiles may be provided
in a variety of
textures. Tiles of this invention may typically be conventional carpet tile
with textile faces
(including, but not limited to, tufted, bonded, and printed faces), but could
also be other
modular materials, including woven and nonwoven textile flooring, solid vinyl,
ceramics,
leather, or any other suitable material. The tiles are preferably installed on
a generally
smooth surface, including, but not limited to plywood, laminates, linoleum,
vinyl tile,
hardwoods, and concrete. However, as discussed below, the tiles may be
installed on an
intermediate substrate, including pad and broad loom carpet, located between
the tiles and
the underlying floor.
[0051] FIG. 1 illustrates one embodiment of a connector 20 of this
invention. The
connector 20 includes a film 22 and an adhesive layer 24 coated on one side of
the film 22.
A release layer 26 is placed on top of the adhesive layer 24 to protect the
underlying
adhesive. In use, the release layer 26 is removed from the connector 20 to
expose the
adhesive layer 24. As will be described in more detail below, the connector 20
is then
positioned so that the adhesive layer 24 contacts the underside of adjacent
tiles to span the
adjacent edges of the tiles and thereby connect the tiles together to form a
floor covering.
In this way, the tiles are assembled on a underlying flooring surface without
the need to
attach them to the floor surface, so that the tiles create a floor covering
that "floats" on the
underlying floor surface.
[0052] The film 22 may be of any suitable material, but, to facilitate
rapid flooring
installations in accordance with this invention, is preferably made of a
material that is
relatively stiff so that a connector positioned partly in contact with the
underside of a tile
CA 02679004 2009-08-20
WO 2008/119003 PCT/US2008/058361
will project beyond the edge of the tile in roughly the same plane as the
underside of the
tile. This facilitates proper positioning of the projecting connector portion
to make
appropriate contact with an adjacent tile. This is typically greater stiffness
than most
adhesive tapes that will significantly curl or droop down from an underside of
a tile to
which a portion (but not all) of a length of such adhesive tape is attached.
At the same
time, the film 22 from which connectors of this invention are made should be
sufficiently
flexible to facilitate handling the connectors in a roll if desired and to
permit the connectors
to conform to floor or tile irregularities.
[0053] The film 22 should also resist shrinkage, which can result in
buckling of
adjacent tiles, and exhibit a relatively high tensile strength to resist
stretching under foot
traffic and rolling loads. For example, materials that exhibit a tensile
strength between
160-270 mega Pascals ("MPa") in the machine direction and 165-210 MPa in the
cross-
machine direction have been found particularly suitable for this application.
Moreover, the
percentage by which the material may be elongated or stretched before breaking
should
also be relatively high to prevent connector breakage and failure when
subjected to tensile
stresses. For example, it is preferable, but not required, that the material
used be capable of
being stretched 120-200% of its machine direction dimension and 150-170% of
its cross-
machine direction dimension before breaking.
[0054] Polymeric materials, paperboard and other materials including
textiles and
metals that are suitably stiff, thin, strong, water-resistant and inexpensive
may also be used
for film 22. However, the film 22 is preferably a synthetic polymer material,
such as a
polyolefin, a polyamide, or a polyester, and more preferably polyethylene
terephthalate
("PET") polyester. These materials are relatively cheap, will conform to the
underlying
floor in use, and will resist corrosion. While not necessary, it is preferable
that the film
material be recyclable.
[0055] The film 22 preferably has a thickness between .0005 and .015
inches, inclusive,
and more preferably between .003 and .01 inches, inclusive, and even more
preferably is
.005 inches. The film 22 may also have, but does not have to have, a primer
coat (not
shown in the figures), such as a coating of acrylic, applied to the same side
on which the
adhesive layer 24 is to be applied to promote adhesion between the film 22 and
the
adhesive layer 24. The film 22 may be corona treated on one or both sides to
increase
11
CA 02679004 2009-08-20
WO 2008/119003 PCT/US2008/058361
surface tension and promote adhesion between the film 22 and the adhesive 24
without the
use of adhesion promoting coatings.
[0056] The film 22 may be any shape, including, but not limited to, a
circular shape or
any rectilinear shape such as a square or triangular. A square shape is
suitable for most
installations. Moreover, the size of the film 22 can depend on the size of the
tiles being
installed. However, as a general rule, the surface area of the film 22 can be
as little as 1%,
and preferably between 2-5%, of the surface area of the tiles for which the
connectors are
intended to be installed. It has been found that a connector surface area over
nine square
inches does not meaningfully contribute to the stability of an installation of
18 inch square
or 50 centimeter square tiles. Thus, connectors 20 desirably should be, but do
not have to
be, no larger than about three inches by three inches square to conserve
materials and limit
expense.
[0057] While the adhesive layer 24 can be any adhesive that exhibits
certain attributes
desirable for use in this invention, the specific type or amount of adhesive
used in the
connector may often depend on the tile with which the connector 20 is intended
for use.
Some carpet tiles have backings containing plasticizer to increase flexibility
and/or change
other characteristics of the backing. Plasticizer has a tendency to migrate
and may migrate
into certain connector adhesives. This migration may weaken the adhesive
properties of
the connectors making them less effective. Water-based adhesives (rather than
solvent
based adhesives) with little or no volatile organic content ("VOC") may be
plasticizer
resistant and are thus generally preferable in cases where plasticizer
migration resistance is
desirable (i.e., in installations of carpet tiles containing plasticizer).
Acrylic adhesives,
including those sold by 3M under the identification numbers 9465, 6032, 6035,
and 6038,
and in particular 9465 (which is primarily an acrylate terpolymer) and 6032 (a
tackified
acrylate copolymer), are suitable. Moreover, the adhesive 24 preferably, but
not
necessarily, is resistant to water and typical carpet cleaning detergents. It
is also preferable
to use a releasable adhesive.
[0058] The adhesive layer 24 in all connectors 20 should adhere well to the
back of the
tiles. However, the adhesion to the tile should not be so strong as to prevent
removal and
repositioning of the tile relative to the connector 20, if necessary. If the
bond strength
between the tile and the adhesive (i.e., the amount of force required to
separate the
12
CA 02679004 2009-08-20
WO 2008/119003 PCT/US2008/058361
adhesive layer 24 from the tile backing, which can be measured using the ASTM
D-3330
test (commonly referred to as the "90 degree peel test")) is too strong, the
adhesive layer 24
will peel from the film and remain with the tile, thereby destroying the
connector. Thus,
the bond strength between the adhesive layer 24 and the tile should not be
stronger than
that between the adhesive layer 24 and the film 24.
[0059] The bond strength is preferably between 5-100 ounces/inch,
inclusive, at room
temperature. The preferable bond strength may depend on the tile backing. For
example,
the bond strength between the adhesive and hardback tiles, such as, for
example, those
made from PVC, polyurethane, or polyolefin, is preferably about 50-70
ounces/inch. The
bond strength between the adhesive and tiles having a textile backing, such as
for example
a woven polypropylene or felt backing, is preferably about 10-60 ounces/inch.
Moreover,
the bond strength between the adhesive and cushion back tiles is preferably
about 40-60
ounces/inch, and the bond strength between the adhesive and bitumen backed
tiles is
preferably about 10-20 ounces/inch. It is preferable that the bond strength
between a tile
and the adhesive at elevated temperatures remain within +/- 15% of the bond
strength at
room temperature.
[0060] The amount of adhesive (i.e., the thickness of the adhesive layer)
provided on
each connector 20 can depend both on the size of the connector 20 as well as
the tile to be
used with the connector 20. However, it is preferable that, while the amount
of adhesive
should enable the connector sufficiently to contact and engage the underside
of the tile to
achieve the bonding strengths set forth above, it should not be so much that
the adhesive
migrates beyond the interface of the connector 20 and tile to contact the
underlying floor.
In this way, the floorcovering installation will remain unsecured to the
underlying floor to
facilitate the eventual removal of the modular units. A connector 20 with an
adhesive
thickness about .0005-.010 inches, and more preferably about .002-.008 inches,
has been
found suitable for most applications.
[0061] For tiles having a woven or knitted textile backing, more adhesive
will typically
be necessary to penetrate the cavities formed in the backing and thereby
provide sufficient
interfacial contact between the tile and adhesive. Connectors having an
adhesive layer 24
that is about .005-.008 inches thick is preferable for tiles having textile
backings. For tiles
having a relatively flat or shallow embossed backing surface, such as hard
back tiles, less
13
CA 02679004 2009-08-20
WO 2008/119003 PCT/US2008/058361
adhesive, preferably with a thickness in the range of .002-.003 inches, may be
used.
[0062] All of the adhesives contemplated for use on the connectors should
also have
sufficient sheer strength to prevent the tiles from moving relative to the
connectors or each
other and thereby creating gaps between adjacent tiles after installation.
[0063] Although not shown in the figures, it is possible to provide a logo
or other
design elements on the connectors 20. For example, a logo may be inked on the
side of the
film on which the adhesive is to be applied. In this way, the ink, which
typically has a high
VOC content, is trapped between the film and the adhesive, preventing any
undesirable
emissions from the ifflc. Moreover, when the connector is positioned on the
release paper,
the logo is also protected by the film. This prevents the logo from being
accidentally
scratched off or otherwise removed from the connector.
[0064] It may be useful to print or otherwise provide on the connectors
alignment
indicia (not shown in the figures) for facilitating installation of the tiles.
The installer then
need only align the tile edges (or other portions of the tiles) with the
indicia to ensure that
the connectors are optimally placed between adjacent tiles. Any indicia that
would convey
to the installer where the tiles should be placed on the connectors can be
used. For
example, connectors can be provided with crosshairs, divisional lines parallel
and
transverse to the edges of the connectors, dots, blocks, etc. Moreover,
different portions of
the connectors can be colored (such as by dividing the connectors into
quadrants and
imparting a different color to each quadrant) to indicate proper carpet tile
positioning.
[0065] Chemical sensors may be placed on the connectors 20 to monitor the
moisture
content of the underlying floor. If the moisture content rises above a pre-
determined level,
the sensor transmits a wireless signal. In this way, the moisture content of
the floor can be
monitored and remedial measures specifically directed to the problem areas
taken.
[0066] Moreover, pressure sensors may also be associated with the
connectors 20. For
example, if someone falls on the floor, the pressure sensor would alert a
control system
(such as via wireless signaling) that the pressure on a given area of the
floor has exceeded
the pre-determined level. The sensor thereby acts as a guide to the precise
location of
elevated pressure. Such technology could be particularly useful in homes for
the aged or
hospitals, where caregivers need constant assurance that their charges are
safe (i.e., have
not fallen and cannot get up).
14
CA 02679004 2009-08-20
WO 2008/119003 PCT/US2008/058361
[0067] In yet another embodiment, the connectors can be equipped as radio
frequency
identification ("RFID") tags by including radio frequency transponders. A
radio frequency
transponder is any kind of radio transmitter and/or receiver that is activated
when it
receives a radio frequency signal. The transponders can be incorporated within
or
otherwise attached to a connecter in any manner. One or more transponders may
be
imprinted on one or more connectors used in an installation, as examples, a
transponder
could be imprinted on either side of the film or on an inlay that is attached
to the film of a
connector. It is not necessary, however, to have a transponder on every
connector in an
installation. Various configurations may be used including those depicted in
the Figures.
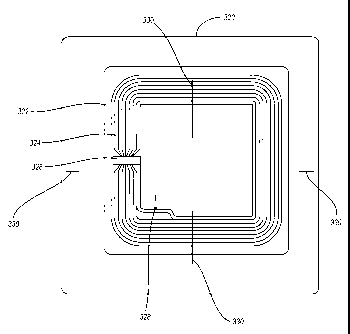
[0068] FIG. 21 is a top plan view of a radio frequency transponder
embodiment of a
connector 320. The connector 320 may comprise a film with an adhesive layer
that
incorporates or otherwise attaches to a sheet 322 that contains or otherwise
has one or more
radio frequency transponders. Alternatively, the components of a transponder
may be
directly incorporated or otherwise attached on the connector film. In certain
embodiments,
a radio frequency transponder is attached to the connector film, meaning that
the radio
frequency transponder is directly or indirectly (e.g., as part of a sheet 322
or through any
other intermediates) connected to or positioned adjacent to the connector
film. The sheet
322 may further comprise a layer of adhesive or a face (paper or polymer) with
a layer of
adhesive. The radio frequency transponder comprises a coupling element 324
that is
bonded to or otherwise used with an integrated circuit chip 328. The coupling
element 324
may comprise a conductive material like copper or aluminum shaped as a coil or
that
otherwise acts as an antenna. The radio frequency transponder may also
comprise a bridge
326 that connects the ends of the coupling element 324 to complete a loop and
form a
circuit. The integrated circuit chip 328 is an electronic microchip that may
be readable
and/or writable.
[0069] While FIG. 21 depicts a High Frequency ("HF") transponder
incorporated in a
connector 220, an ultra high frequency ("UHF") transponder or any other type
of
transponder could be used instead, for example, the connector 220 could
comprise a
transponder that has a single layer of conducting material or that extends
from opposite
sides of an integrated circuit chip to form shapes that are mirror images of
each other.
Radio transponder components may be inlayed, printed, or incorporated as part
of a
CA 02679004 2009-08-20
WO 2008/119003 PCT/US2008/058361
connector in any other manner. Radio transponder components may be passive,
MEM
passive, semi-active, active, or employ any other information technique. The
components
may or may not include batteries and/or software to control efficiency. One or
more of the
radio frequency transponder components may comprise metal, organic polymers,
or any
other material. Radio transponder components may include, but are not limited
to, RFID
components manufactured by Alien Technology Corporation, Avery Dennison
Corporation,
Texas Instruments Incorporated, Omron Corporation, and UPM Raflatac, among
others.
[0070] Alignment indicia 330 (including, but not limited to, crosshairs,
lines, dots,
blocks, and multi-color segments and quadrants) may be provided on the
connector 320 to
provide guidance for an installer wishing to position the connector 320 at a
corner or edge
of a carpet tile. A connecter may be positioned at a corner, at an edge, or
simply on the
back of a tile. In a multi-tile installation, some connectors may span the
edges of adjacent
tiles and others may simply be placed on the tile backs, i.e., each attaching
to a single tile.
[0071] Connectors comprising radio frequency transponders offer RFID
capability and
may be positioned in any arrangement while installing a flooring surface. The
connectors
may be positioned to create an intelligent floor covering that has embedded
components
regularly spaced from one another. For example, the connectors may be
regularly spaced,
juxtaposed tile corners of the tiles, as shown in FIGs. 5, 6, 7, and 8. One
benefit of certain
embodiments is the creation of an array of regularly spaced radio frequency
transponders that
can send, store and/or receive information without requiring any additional
installation beyond
what is already required to use the connectors to secure the tiles. Such an
array may be used to
create a x-y grid or other map of the regularly arrayed components. For
example, a robotic
device may be moved over the grid to identify the relative positions of the
tags to one
another. These relative positions may used to map out the positions of the
transponders in
the array. A map may also be created if connectors are positioned irregularly.
A map may
be generated, for example, using a simulation localization and mapping
("SLAM")
technique. In any case, such a map may be used with or incorporate a floor
plan and/or a
mapping program so that the radio transponder mapping can be used to identify
the physical
location of one or more radio transponder readers. As a radio transponder
reader moves
around, it can record the sequence of radio transponders it reads and send
(for example, via
wireless transmission) this information to a tracking station that monitors
the real-time location
of the equipment or person carrying the reader. In a multi connector
installation, the radio
16
CA 02679004 2009-08-20
WO 2008/119003 PCT/US2008/058361
frequency transponders of the different connectors may operate on the same or
different
frequency. For example, in one embodiment, the transponders in an installation
range from
low to high frequency. Information may be sent on different channels, each
associated with a
particular radio frequency transponder component. A radio frequency reader may
further
comprise a writer that sends information that is recorded on one or more of
the radio frequency
transponders. For example, it could send information identifying that
vacuuming has occurred
or the date that vacuuming has occurred. As another example, it could send
position
information relating to the relative or map position of the transponder
receiving the
information, e.g., x,y or x,y,z coordinates. This information could be
provided when the
transponder is read by other reading devices.
[0072] Generally, connectors equipped with radio transponders can
facilitate a number
of broad functions, including tracking, verification, tracing, positioning,
and authenticating.
By way only of example, connectors equipped with RFID technology can be used
to locate
the position of people, items, or equipment, for example tracking the location
of a
firefighter or firefighting equipment. They could also be used to track
traffic patterns of
people or equipment or to guide equipment to precise locations to perform
specific
functions.
[0073] In one application, the radio frequency transponders serve a mapping
function to
guide equipment equipped with a radio frequency component reader. For example,
a
reader can be placed on a vacuum cleaner or other cleaning machine. The reader
may be
programmed with a sequence of unique transponder numbers that are on the
connectors in
a room. When a robotic vacuum is so programmed and activated, the radio
frequency
transponders on the connectors in the room may be read by the robotic vacuum's
reader
and used to guide the vacuum towards the connectors in the order that the
connectors'
transponder numbers appear in a programmed sequence. In this way, the entire
floor can
be automatically cleaned or otherwise maintained. The transponder numbers of
connectors
positioned in higher traffic areas can appear more often in the sequence to
ensure that those
areas are cleaned more thoroughly. A variety of radio transponder readers may
be used
including readers offered by APSX, LLC and Skyetek, Inc.
[0074] In another embodiment, other types of robots are equipped with a
reader. The
reader can be programmed with a sequence of transponder numbers so as to lead
the robot
to various locations. For example, the reader on a robot in a hospital can be
programmed
17
CA 02679004 2009-08-20
WO 2008/119003 PCT/US2008/058361
to guide the robot along a designated path so that the robot can deliver
medicines to rooms
and perform other tasks. In addition to radio frequency transponder equipped
connectors
providing a map that a robot can follow to reach a desired location, the
connectors can help
to precisely position the robot (or other non-manually driven equipment). For
example, if a
robot needed to recharge at a power supply, a connector with a transponder
could be
positioned directly adjacent the power supply. In this way, the connector
would guide the
robot to and properly position the robot relative to the power supply for
recharging.
[0075] In another embodiment, a shopping cart may be equipped with a
reader. The
shopper may indicate the products desired, and the radio frequency
transponders on the
connectors lead the cart to the desired locations in the store. Reading
devices can be used in
a variety of other contexts, including but not limited to in shopping malls,
museums,
hospitals, entertainment venues, and in conjunction with or otherwise
facilitating global
positioning systems.
[0076] Transponders can also be used to monitor the location and/or
movement of
equipment. In one embodiment, hospital equipment is equipped with a reader.
The
location of each piece of equipment in the hospital can be determined when its
reader reads
a connector transponder number, which is different from the other connector
transponder
numbers. In another embodiment, movement of equipment, such as a vacuum, can
be
monitored to determine whether an area has been cleaned or not. For example,
the reader
on a vacuum (either manually or robotically driven) can either store (to be
downloaded at a
later time) or transmit (via wireless communication) to a control system the
connector
transponder numbers that it reads in a room. If a transponder number on a
connector in the
room is not read, then the vacuum obviously did not clean in the vicinity of
the connector.
In this way, information about the cleaning history of a room can be recorded.
[0077] In a similar manner, the transponders on the connectors and
transponder readers
on shopping carts and/or baskets can be used to gather information about
traffic flow in a
store. In this way, information about where people go in the store, how long
they stay in
certain areas, etc. is gathered and can be used for a variety of purposes,
including designing
the store lay-out to better accommodate traffic flows and customer demand.
Similarly, a
reader equipped shopping cart could include a display that presents
advertisements and
other information to the shoppers based on the areas where they are, where
they have gone,
18
CA 02679004 2009-08-20
WO 2008/119003 PCT/US2008/058361
and/or the areas they have lingered.
[0078] A radio frequency transponder equipped flooring surface provides a
variety of
potential benefits. In addition to facilitating maintenance monitoring,
equipment and person
locating, and robotic navigation, among the other things described herein, it
may be used to
provide additional safety and security benefits in a home, workplace, or other
facility.
[0079] A radio frequency transponder and/or other RFID components may be
imprinted
directly on or as part of a modular tile, for example RFID components made of
metal, polymer,
organic polymer, or any other material could be directly printed on the back
surface of modular
tiles or any other component material. In one embodiment, radio frequency
transponders are
imprinted on one or more of the modular tiles near an edge or corner of each
tile. When the
tiles are installed, connectors may be positioned to adhere to the modular
tiles in locations that
covers or otherwise protect the radio frequency transponders.
[0080] A floorcovering installation may also be equipped with both sensors,
such as
chemical or pressure sensors, and radio frequency transponders. The sensors
may record
information to the radio transponders and the information may be harvested by
a radio
transponder reading device, for example as part of maintenance program. For
example, a
sensor may detect moisture content information and record that information at
a nearby radio
transponder. A connector can comprise one or more sensors and/or one or more
radio
transponder components.
[0081] FIG. lA illustrates an embodiment of a connector having conductive
properties
(hereinafter referred to as a "conductive connector"). The entirety of this
disclosure should
be understood to apply to conductive connectors 150 as well as connectors 20.
[0082] As with the connector 20 described above, the conductive connector
150
includes a film 156 and an adhesive layer 154 on one side of the film 156. The
conductive
connector 150 additionally includes a conductive component 152 secured to the
film 15.
For example, the conductive component 152 may be secured to the film 15 with
adhesive.
Alternatively, the conductive component 152 may be secured to the film 15
using any
converting process, including, but not limited to, lamination, molding,
ultrasonic welding,
etc. In this particular embodiment, the conductive component 152 is a
rectangular strip
(e.g., 1 inch in width) of conductive material, such as copper foil, that runs
across the width
of the conductive connector 150. While this embodiment shows a rectangular
conductive
component 152 of copper foil positioned in the center of a conductive
connector 150, one
19
CA 02679004 2009-08-20
WO 2008/119003 PCT/US2008/058361
of skill in the art will understand that the conductive component can be made
from any
conductive material, can be of any shape and size, and can be positioned
anywhere on the
connector as long as, when positioned to connect adjacent tiles, electrical
continuity can be
maintained between adjacent tiles. Moreover, the conductive component could be
on the
adhesive side 154 of the film 156 as shown, or on the opposite side (provided
means for
ensuring conductivity between the underside of the tile and the conductive
element are
provided).
[0083] The conductive connectors 150 can be used to connect adjacent tiles
together, as
described above. Most carpet tiles contain conductive materials, such as
inorganic fillers
like carbon, calcium oxide, calcium carbonate, barium sulfate, etc. Thus, when
a
conductive connector 150 is used to secure adjacent tiles together such that
the conductive
component 152 contacts both tiles, an avenue is provided by which electricity
can be
transmitted across adjacent carpet tiles to form a conductive surface. The
formation of a
conductive surface allows for the transmission of electricity across the
floor. This
electricity can be harnessed for a variety of applications.
[0084] For example, in one embodiment, the conductive connector 150 can be
an
electromechanical film made of a piezoelectric material that produces an
electric charge
when pressure is exerted on it (i.e., when someone is walking on the tiles). A
device can
then receive and process the emitted signal and provide an alert to those
monitoring the
device that a person is walking on the tiles. This type of device has
significance for
security purposes and can enable, for example, the monitoring of access to a
restricted
room. Based on the signal that is produced when a person steps on the carpet
tile, it is
possible to identify who is walking on the carpet based on the person's gate.
The system
can then determine whether the person has access to the restricted area or if
the person is an
intruder. Moreover, because walking on the carpet tiles generates electricity,
it is
contemplated that such electricity can be harnessed and used to meet a
building's energy
needs. It is conceivable that a building could eventually become self-
sustaining in terms of
its energy needs using this technology.
[0085] In another embodiment, the conductive connector 150 allows
transmission of
electricity across the floor for voice and data communication. When the entire
floor
surface is linked together in a conductive fashion, the conductive connectors
can serve as
CA 02679004 2009-08-20
WO 2008/119003 PCT/US2008/058361
an antenna for transmitting or receiving information. Alternatively, the
conductive
connectors can function as a shield to prevent stray wireless signals from
entering or
leaving an area.
[0086] Returning to FIG. 1, the release layer 26 may be any material
compatible with
the adhesive such that the release layer 26 does not adhere to the adhesive to
prevent its
removal from the connector. Kraft paper having a low energy coating, such as a
polymer
coating (e.g., polymeric silicone), on at least one side has been found to be
particularly
suitable in this application. However, release materials suitable for use in
this invention
are widely commercially available, such as from 3M, and readily known to one
of ordinary
skill in the art.
[0087] The connectors 20 are preferably provided to the installation site
as individual
units already entirely or partially cut into the desired shape and size to be
used in the
installation. While each connector 20 may be manufactured separately,
economies of
manufacture may be achieved by first manufacturing a sandwich of film 22,
adhesive layer
24, release layer 26 larger than the intended connector size, and then cutting
the connectors
20 from that sandwich. The adhesive layer 24 can be coated onto the desired
film 22, after
which the release layer 26 is positioned in contact with the adhesive layer 24
to form the
sandwich. In another manufacturing embodiment, the adhesive layer 24 is first
applied to
the release layer 26, after which the film 22 is positioned onto the release
layer 26 to form
the sandwich.
[0088] The resulting sandwich may obviously then be cut into connectors 20
of the
desired shape and size. However, a number of connectors 20 is preferably
provided on a
single release layer 26. For example, multiple pre-cut or perforated
connectors 20 may be
positioned consecutively along a strip of release layer 26. For ease of
handling and
storage, this strip can be rolled so that the connectors are positioned on the
outside (see
FIG. 2) or inside of the roll or folded between consecutive connectors 20 into
an accordion
shape. Moreover, a number of connectors 20 may be provided on a sheet of
release layer
26. The film 22 may be provided with perforations 28 (see FIG. 3) or may be
fully cut into
the desired connector shape and size for ease of removal from the release
layer 26 (not
shown) during installation. The ideal number of connectors 20 provided on a
strip or sheet
of release material will obviously vary depending on the size of the
installation.
21
CA 02679004 2009-08-20
WO 2008/119003 PCT/US2008/058361
[0089] Provision of the connectors 20 on a strip or sheet of release
material has been
found to facilitate removal of the connectors 20 from the release layer 26 and
thus reduce
installation time. With respect to connectors 20 provided on a strip of
release material (as
shown in FIG. 2), installation can also be expedited through use of a
connector dispenser
that holds at least one rolled or accordion folded strip of connectors 20 and
that preferably
also provides a mechanism for separating the connectors 20 from the release
layer 26. The
dispenser, which, for example, may be fashioned as a backpack or mounted on
the
installer's belt, preferably includes structure for supporting at least one
roll of connectors
20 (and preferably more).
[0090] In one embodiment of such a dispenser (see FIG. 4), a roll of
release material
bearing connectors 20 is housed in a box 30 made from any sufficiently-rigid
material,
such as, for example, plastic, metal, or cardboard. The box preferably
includes three
openings 32, 34, 36 through which the strip of release material is fed. The
strip of release
material is fed through the first opening 32, at which opening is positioned a
projection 38.
The release material is then fed back into the box 30 through a second opening
34 and out a
third opening 36. In use, the installer pulls on the release material strip
extending from the
third opening 36. This, in turn, advances from the roll portions of the
release layer 26
bearing connectors 20. As the release layer 26 extends over the projection 38,
the
connector 20, which is relatively rigid, is unable to conform to the shape of
and travel over
the projection 38. Instead, the connector's leading edge disengages from the
release layer
26, after which the installer can easily grip the disengaged edge to remove
the connector 20
fully from the release layer 26. Obviously, the more connectors the dispenser
is able to
support, the fewer times the installer must re-load the dispenser during
installation. This
can be especially beneficial during large installations.
[0091] In another embodiment of such a dispenser (see FIGs. 10-13), the
dispenser 70
includes a housing 72 that holds connectors on a roll of release material 74.
An actuator 76
is moved from an upper location or starting position down along the path of a
slot 78 in the
housing to trigger the release of a single connector from the roll of release
material 74.
The dispenser 70 separates a connector from a release material and produces an
individual
connector in a ready-to-grasp fashion such that the user's exposure to the
adhesive side of
the connector is limited. Specifically, the housing 72 has an opening 80 for
presenting
22
CA 02679004 2009-08-20
WO 2008/119003 PCT/US2008/058361
connectors in a location near the final location of a user's hand after moving
the actuator
76 along slot 78 to trigger the release of the connector. Thus, moving the
actuator 76 from
a starting position to a finishing position along the linear path of slot 78
causes an
individual connector to be released (or partially released) from the release
material and
presented through the opening 80 to the user in a convenient location for the
user's hand to
grasp. Once the user's hand releases the actuator 76, the actuator 76 returns
to its starting
position at the top of the slot 78. The starting position of the actuator 76
is preferably
located in a convenient location for the user, such that when the dispenser 70
is attached to
the user's anatomy the actuator 76 will be located convenient to the user's
hand, limiting
the amount of movement necessary for a user to grasp and move the actuator 76.
[0092] The dispenser 70 may be secured to the installer's belt with belt
loop 82 and to
the installer's leg with a strap (not shown) through openings 84 in a leg
mount 86 attached
to the housing 72. The leg mount 86 has a curved shape and is formed of a
relatively
flexible material (e.g., rubber) such that when a strap through openings 84 is
tightened
around an installer's leg, the leg mount 86 forms a cushion conforming to the
shape of the
leg between the leg and the housing 72. Alternatively, the leg mount 86 and
housing 72
may be one piece. The dispenser may have a variety of attachment members
(e.g., belt
loops, openings for straps, straps, clips, etc.) for securing the dispenser to
a user.
[0093] FIG. 11 is an exploded perspective view of the connector dispenser
70. The
drive pack 88 with rotating chain 90 is attached to a drive member (shown in
FIGs. 14-15)
that drives take-up roller 96 and a drive member (also shown in FIGs. 14-15)
that drives
meter roller 98. These rollers 96, 98 are also attached and rotate on take-up
rod 92 and
meter roller rod 94, respectively. One or both of these rods may use a
ratcheted slip clutch
to allow one to be overdriven with respect to the other. When assembled and in
use, upon
movement of the actuator 76 along slot 78, the rotating chain 90 of the drive
pack 88
rotates and causes both take-up roller 96 and meter roller 98 to rotate. This
causes the
release layer 104 to travel around pin 116, which in turn causes the
relatively flexible
release material to bend around the curve of the pin 116 and the relatively
stiff connectors
to release from the release material and protrude through opening 80.
Tensioning device or
capstan assembly 102 fits adjacent to meter roller 98 when assembled. The
tensioning
23
CA 02679004 2009-08-20
WO 2008/119003 PCT/US2008/058361
device 102 is a pair of spring loaded rollers designed to push against meter
roller 98 and in
use keeps the release material 104 tightly up against meter roller 98.
[0094] The roll of release material 74 fits on spindle or peg 106 with the
release
material 104 extending to a tip portion 108. When the dispenser is assembled,
the roll of
release material 74 is loaded by inserting the roll 74 on peg 106 and feeding
the release
material 104 on an appropriate pathway through the dispenser 70 ending with
tip 108
attached to take-up roller 96. Tip 108 may attach to take-up roller 96 by
inserted tip 108
into slot 110 of take-up roller 96, using an adhesive on tip 108 to adhere the
tip 108 to the
perimeter of take-up roller 96, or by any other suitable technique.
[0095] When a roll 74 is properly inserted within a dispenser 70, a first
connector on
the roll 74 may be ready to be presented. This first connector may be spaced a
predetermined distance from the tip 108, such that when the tip 108 is
inserted in the slot
110 of take-up roller 96, the first connector is in an appropriate position.
In other words,
the first connector is positioned on the release material following a leader
and tip 110
portion of predetermined length. Subsequent connectors are spaced along the
release
material 104 throughout the remainder of the roll 74. In most cases, the
distance between
connectors along the strip of release material will be relatively constant
amongst the
connectors.
[0096] After the actuator 74 causes the first connector to be presented
from opening 80,
the release material 104 has advanced so that the next connector is ready to
be presented.
Thus, the dispenser 70 is self aligning because movement of the actuator 74
will usually
advance the release material 104 slightly more than the length of one
connector putting the
next connector to be presented in proper position. Adjustment screw 112 allows
a user to
fine tune or otherwise adjust the initial position of the actuator thus
lengthening or
shortening the distance the actuator is moved. This change is reflected in a
change in the
amount of release material 104 movement along the path when the actuator is
moved from
initial position to ending position.
[0097] FIG. 13 is side view of the connector dispenser 70 with the cover
removed that
further illustrates the path of the release material 104. As shown, the path
of the release
material 104 begins at roll 74, extends along curved portion 114 to a sharp
bend around
free rotating rod 116 located near opening 80, extends between meter roller 98
and the
24
CA 02679004 2009-08-20
WO 2008/119003 PCT/US2008/058361
tensioning device 102 up to the perimeter of take-up roller 96. In use,
movement of the
actuator 76 causes both the take-up roller 96 and the meter roller 98 to
rotate predetermined
amounts. This rotation, in turn, causes the release material 104 to advance a
predetermined
distance along the path described above. Generally, the release material will
advance a
sufficient distance to allow a connector on the release material 104 to detach
or partially
detach from the release material 104 and protrude from opening 80 for the user
to grasp
and use.
[0098] FIG. 12 is a side view of the connector dispenser 74 with the cover
on.
Generally, the dispenser housing will have two parts that allow the housing to
be opened
for loading and unloading of rolls of connectors on release material. The two
parts may be
connected together by a hinge and open in clamshell fashion. A latch 118
secures the two
parts of the housing 72 together allowing a user to quickly and easily reload
the dispenser
70 when needed. The positioning of the latch also allows a user to reload the
dispenser 70
without detaching the dispenser 70 from its position on the user's body.
[0099] FIG. 14 and 15 illustrate the drive pack 88 of the connector
dispenser 70. The
actuator of the 76 of the dispenser is attached to a lifflc of the chain 90
within the drive pack
88 so that movement of the actuator 76 along actuator path 78 causes rotation
of the chain
90 along its path within the drive pack 88. Rotation of the chain 90 in turn
causes rotation
of meter roller drive member 118 and take-up roll drive member 120. As
described above,
rotation of these drive members 118, 120 and their associated drive rollers
96, 98 causes
the movement of the release material 104 within the dispenser 70. One or both
of the drive
members may utilize a ratcheting member to ensure that the drive member
rotates only in
one direction, i.e. the direction corresponding to forward movement of the
release material
104 along its path within the dispenser 70. The drive members 118, 120 may
attach to their
respective rollers 96, 98 in any suitable way. For example, the drive members
may have
six point hex profiles that mate with twelve point hex sockets on the rollers.
This six point
to twelve point connection facilitates alignment of these components together
during
assembly or during repositioning of a cover of the dispenser 70 after
reloading.
[00100] Also, as the chain moves with the movement of the actuator, spring
drive
members 122 rotate causing a spring (not shown) inside spring casing 100 to
coil and retain
energy. After the user moves the actuator 76 from its starting position to its
finishing
CA 02679004 2009-08-20
WO 2008/119003 PCT/US2008/058361
position and releases his hand from the actuator, the spring uncoils causing
the chain 90 to
rotate in the opposite direction and thus causing the attached actuator 76 to
return to its
starting position along path 78. Tensioning device 124 keeps the chain 90
secure in its path
within drive pack 88. Casing 126 encases the internal parts of the drive pack
88.
[00101] Several alternative dispenser designs are possible. For instance, the
dispenser
may be altered for a variety of locations. In addition to being secured to a
user's belt and
leg, a dispenser may be strapped between the user's knees, mounted to the
user's arm or
wrist, warn as a backpack, strapped across a user's shoulders, or attached to,
secured to,
hung off, or touching any suitable part of the user's anatomy. Typically, the
location of the
dispenser will provide the user convenient access to the connectors being
dispensed.
[00102] Alternatively, the dispenser may be used separately from the user's
anatomy.
For example, the dispenser may rest on the floor or may be attached to a
kneeler upon
which the user kneels. The dispenser may hang from the ceiling or walls or may
be
attached to a zip line. The dispenser may also be part of or include some or
all of the
packaging in which the dispenser is shipped. As other alternative, the
dispenser may
dispense more than one connector at a time or may dispense a grid of connected
dispensers.
[00103] The release of the connector from the release material may also be
accomplished
by alternative means than those described above. In addition to causing
release by passing
the release material around a sharp bend, a variety of other mechanisms are
contemplated.
For example, release may be triggered by the user grasping a connector and
removing it
from the release material. In such cases the dispenser may dispense the
release material
with the connector attached for the user to remove. For example, the dispenser
may
contain a stack of fan folded release material having one connector on each
folded portion.
An opening in such a dispenser allows a user to grasp and remove release
material
containing a connector and then remove the connector and discard the release
material.
[00104] As another example, a dispenser may have a continuous roll of
connectors
without any release material. Such a dispenser may have cutting member near
the opening
to break-of a predetermined or user-determined amount of the connector roll
for use as an
individual connector. The backing of a roll of connectors that is rolled
without release
material as a backing may have a release coating.
26
CA 02679004 2009-08-20
WO 2008/119003 PCT/US2008/058361
[00105] As another example, connectors may be stacked within a dispenser
individually,
such that each connector has release material covering all or a portion of its
adhesive side,
so that it will not stick to the other connectors in the stack. The release
material may have
a weak adhesive on it so that the adjacent connectors in the stack are held
together in a
stack (i.e. the weak adhesive removeably sticks to the non-adhesive side of
adjacent tiles).
[00106] As yet another alternative, the connectors may be stacked within the
dispenser
so that the adhesive side of each connector attaches to the adjacent
connector. For
example, a siliconated or polyflorinated release coating such as an acrylic,
polyolefin,
polyamide, or polyester may be applied to the non-adhesive side of each tile
so that the
adhesive sides of adjacent tiles may be removeably attached to the non-
adhesive sides.
[00107] Stacks of connectors may be used with or without a dispenser. In some
cases, it
may be convenient for an installer to simply hold a stack of connectors
removing one
connector at a time for use. The connectors in the stack may be attached in a
variety of
ways such as those described above.
[00108] A dispenser of the present invention may also be configured to
dispense
connectors directly onto the carpet tile without a user touching the
connector. For
example, the dispenser may have a corner into which a carpet tile corner may
be placed.
Once the carpet tile is in place, the dispenser is activated by the user or
automatically by
sensing the presence of the tile to dispense a connector on the tile corner. A
similar design
may be used to directly attach a connector to the edge (rather than corner) of
a carpet tile.
Alternatively, the dispenser may be designed to roll under a carpet tile
corner as the carpet
tile is resting on the floor. Once in the proper position, the dispenser
dispenses a connector
directly onto the carpet tile. The rolling action may also cause the dispenser
to eject a
connector.
[00109] The dispenser of the present invention may also be configured to
advance
release material holding connectors in a variety of ways. In addition to an
actuator that the
user controls, the advancement of the release material may be controlled by
the user pulling
on the release material, the user pulling on the connector, an electric motor,
user motion
(e.g., the user rocking side to side on a kneeler), or by any other suitable
technique or
device.
27
CA 02679004 2009-08-20
WO 2008/119003 PCT/US2008/058361
[00110] A dispenser according to the present invention will typically, but not
always,
dispense connectors in an orientation convenient to the user or carpet tile
installer.
Preferably, the connectors will be dispensed adhesive side up so that the user
is not
required to flip or rotate the connector before applying or positioning it.
The dispenser
may also have a counter and display for tracking and displaying the number of
connectors
remaining on the release material. The dispenser may have an opening so that a
user can
see the remaining connectors held within.
[00111] In another embodiment of this invention, the release material 26 may
be omitted
entirely. Rather, the connectors 20 can be stacked on top of each other, with
the adhesive
layer 24 of one connector 20 contacting the film 22 of the connector 20
positioned above it
in the stack. The installer then simply peels a connector 20 from the stack
during
installation.
[00112] In one method of installing tiles using the connectors, a first tile
is placed on the
floor at a position determined by conventional tile installation methods. A
connector 20 is
peeled from the release layer 26 (or from a stack of connectors 20) and
positioned so that
the adhesive layer 24 faces upward away from the underlying floor. The
connector 20 is
positioned so that only a portion of the adhesive layer 24 adheres to the
underside of the
tile, leaving the remainder of the connector 20 extending from the underside
of the tile. A
tile or tiles are then positioned adjacent the first tile so that a portion of
the connector 20
adheres to the adjacent tile(s). In this way, the connector spans the adjacent
edge(s) of the
adjacent tile(s).
[00113] Any number of connectors 20 may be used to connect adjacent tiles in
an
installation. However, to create a stable floor covering, the connectors need
not be
positioned along the entirety of the adjacent tile edges nor even across all
adjacent tile
edges. Rather, unlike adhesive tape that has been used to secure adjacent
tiles together
along the entirety of adjacent tile edges, the connectors 20 of this invention
need only
extend along a very limited length of the adjacent edges. For example, the
tiles of a floor
covering installation where only 5%-10% of adjacent tile edges are stabilized
with
connectors 20 have been found to exhibit planar stability (measured by the
cupping and/or
curling of the tiles) and dimensional stability (measured by the skewing of
the tiles), as
28
CA 02679004 2009-08-20
WO 2008/119003 PCT/US2008/058361
well as the ability to retain their relative positions in the installation
when subjected to foot
traffic, rolling traffic, and stresses applied during cleaning and
maintenance.
[00114] FIG. 5 shows one embodiment of a conventional installation (i.e., in
aligned
columns and rows) of tiles. For ease of discussion, the positioning of the
connectors is
discussed relative to a basic unit 40 of four tiles 41-44, as shown and
arranged in FIG. 6.
Tiles 41-44 are preferably connected with a central connector 46 at the comers
where they
intersect. Moreover, the corner of each tile diagonal from the center
connector 46 is also
connected to adjacent tiles with a connector 20. In this way, only a total of
two tile
connectors (the center connector 46 plus a quarter of a connector at each of
the four
diagonal tile comers) need be used to install the basic unit 40 of four tiles
41-44. Breaking
this down even further, each of the four tiles 41-44, draws its stability
from, on average,
only one half of the surface area of a connector.
[00115] FIG. 7 illustrates possible connector placement in a brick-laid tile
installation (or
ashlar installation if FIG. 7 is rotated ninety degrees). For ease of
discussion, the
preferable positioning of the connectors 20 is discussed relative to a basic
unit 60 of four
tiles 61-64, as shown and arranged in FIG. 8. As with tiles 41-44, a total of
only two tile
connectors (1/2 of a connector per each tile) need be used to install the
basic unit 60 of four
tiles 61-64.
[00116] FIGS. 5-8 illustrate a few of only countless connector placement
possibilities for
installing tiles. Connectors 20 may be positioned at any location between
adjacent tiles,
and thus any given tile in the installation may contact a portion of as few as
one connector
and as many as feasible given the size of the tile and of the connectors 20.
In addition to
placement at the comers of intersecting tiles, connectors 20 may be positioned
to span the
adjacent edges of only two tiles. Moreover, different shaped or sized
connectors 20 may be
useful in a single installation. For example, in addition to the rectangular
connectors
shown in FIG. 5, triangular-shaped connectors may be useful at the border of
an
installation, such as where the tiles abut a wall.
[00117] In addition to on-site placement of the connectors 20, it is also
possible to pre-
position the connectors 20 at desired locations on the tiles during
manufacture. For
example, the release material 26 on the connectors 20 may be perforated.
During
manufacture, a portion of the release material 26 can thus be removed along
the perforation
29
CA 02679004 2009-08-20
WO 2008/119003 PCT/US2008/058361
to expose a portion of the adhesive layer 24. That portion of the connector 20
can then be
adhered to the underside of the edge of a tile 50 as discussed above (see FIG.
9). The
adhesive on the remainder of the connector 20 is still protected by the
remaining release
material 26. To prevent the connector 20, which extends from tile 50, from
interfering
with packaging of tile 50 for shipment, it may be preferable to bend the
connector 20 along
the perforation back (in direction A) so that the underside of the connector
20 is flush with
itself. During installation, the installer need only extend the connector 20
from the edge of
tile 50, remove the remaining release layer 26 and install the tiles 50 as
discussed above.
[00118] Because the tiles are not attached to the floor, they need not be
placed directly
on an underlying flooring surface. Rather, the connectors 20 of this invention
work equally
well with tiles positioned on an intermediate substrate positioned between the
tiles and the
floor. Such intermediate substrates can serve to protect the floor from
damage, such as
might be caused by liquids spilled on the tiles that escape through the tile
seams.
Additionally, the intermediate substrates can serve as a barrier to moisture
present in the
existing floor and thereby eliminate the need for sealants and barrier
coatings. Because the
intermediate substrate does not need to be adhered to the flooring surface, it
is removable
with minimal cleanup and replacement cost.
[00119] One embodiment of an intermediate substrate is a sheet or film 202
that may be
positioned on the floor 206 prior to tile installation and thus between the
floor 206 and the
tiles 200, as shown in FIG. 16. The film 202 can be made from any suitable
material and is
preferably, but not necessarily, non-porous and non-permeable to moisture. In
addition,
the film 202 preferably is insensitive to highly alkaline conditions and
preferably does not
emit volatile organic compounds in excess of 350 micrograms/cm2. The film 202
is
preferably, but not necessarily, flexible to conform with irregularities in
the floor 206. The
film 202 can be made from any number of materials, including polymeric
materials such as
polyethylene, polypropylene, or PVC. A suitable film 202 can also contain, but
is not
limited to, certain polyolefins, polyesters, polyamides, and cellulose-based
polymers.
[00120] Although the film 202 can be of any thickness, in one embodiment the
thickness
is between about 1/1000 inch to about 40/1000 inch and more preferably between
about
2/1000 inch to about 10/1000 inch. Preferably, but not necessarily, the
underlayment film
has antimicrobial properties in its natural state, but if not, the film can
be, but does not have
CA 02679004 2009-08-20
WO 2008/119003 PCT/US2008/058361
to be, treated with antimicrobial chemical agents to prevent the growth of
bacteria or other
microbiological organisms. Additionally, the flammability of the underlayment
film will
preferably not have a negative effect on the flammability or smoke generating
rating of the
tile.
[00121] It may be desirable to increase the coefficient of friction on at
least one side of
the film 202 to impart anti-skid properties to the film 202. Preferably, but
not necessarily,
the coefficient of friction of at least one side of the film 202 is greater
than 0.55. For
example, a side of the film 202 may be manufactured from resin materials with
tacky
surface characteristics. For example, the film 202 can have a relatively
smooth side (side
208 in FIG. 16) and an opposite side with a higher coefficient of friction
(side 206 in FIG.
16). The film 202 can be positioned so that side 206 is positioned towards the
floor 204.
When so positioned, friction between the floor 204 and side 206 of the film
202 prevents
the film 202 (and thus the carpet or carpet tiles positioned thereon) from
moving relative to
the floor 204, even with heavy foot traffic or other movement on the above-
positioned tiles.
While side 208 may also be provided with surface characteristics to increase
its coefficient
of friction, it is preferably relatively smooth so as to prevent the film 202
from sticking to
the tile 200 or other underlayment.
[00122] In an alternative embodiment, an intermediate substrate between the
tiles and the
floor is a cushion or foam pad positioned on the floor before tile
installation. The cushion
provides comfort underfoot and can eliminate the need to use cushion back
carpet tiles.
Rather, hardback tiles can simply be installed on an underlying cushion pad.
Additionally,
the cushion serves as a barrier to moisture present in the existing floor.
[00123] The cushion can be made from any natural or synthetic material, or
blends
thereof that provides a cushioning effect, such as compressive, resilient
composites. For
example, the cushion can be made from foam, rubber, cork, and woven, felted,
and
nonwoven fabrics. The cushion can be made from virgin or recycled polymeric
material
and is preferably, but not necessarily, made from 100% recycled materials. If
the cushion
underlayment is a foam material, the foam can be open or closed cell foam and
can be
made from any suitable polymer, including but not limited to,
polyvinylchloride,
polyurethane, and polyolefins. The woven, nonwoven, or felted cushions may be
made
from natural or synthetic materials, including, but not limited to, wool,
cotton, flax, hemp,
31
CA 02679004 2009-08-20
WO 2008/119003 PCT/US2008/058361
kenaf, sugarcane, and other naturally occurring cellulosic derivatives or
polyamides,
polyesters, polyolefins, and blends thereof. If non-woven, the cushion can be
formed by
needle punching with or without bonding agents or by a spun-bonding process.
If woven,
the cushion can be formed via weaving, knitting, etc. The cushion can be
reinforced with
fibers (e.g., fiberglass) for dimensional stability and added tear strength.
While not
necessary, the cushion preferably has the same characteristics as the film 202
(e.g.,
moisture resistant, low VOC content, conforms to floor, etc.)
[00124] Depending on the moisture resistant properties of the cushion, it may
be
desirable to install the cushion with the film 202. In the embodiment of FIG.
17, the film
202 is placed directly on the floor surface 204. A cushion 210 is then placed
on top of the
film 202 and the tile 200 is placed on top of the cushion 210. Adjacent tiles
can be held in
place using the connectors 20, which can optionally be conductive connectors
150, as
described above.
[00125] In another embodiment shown in FIG. 18, the cushion 210 is used
without the
film 202. In this embodiment, the cushion 210 is placed directly on the floor
surface 204.
The tile 200 is then placed on top of the cushion 210. Adjacent tiles then can
be secured
together with connectors 20 or conductive connectors 150, as described above.
As with
film 202, it may be desirable to impart a higher coefficient of friction to at
least one side of
the cushion 210 to prevent relative movement between the cushion and film (see
FIG. 17)
or cushion and floor (see FIG. 18).
[00126] The cushion 210 can be of any thickness. It is preferable, however,
that the
cushion's thickness does not exceed the thickness of the tile backing so that,
when
compressed, the cushion does not compress below the tile backing so as to
cause a tripping
hazard.
[00127] Regardless of the type of intermediate substrate used (if any), in one
embodiment all of tiles placed atop the intermediate substrate are connected
together using
the connectors disclosed herein. In this way, none of the layers in the
installation are
connected to any other layer in the installation (e.g., the intermediate
substrate is not
connected to the floor and the carpeting or tiles are not connected of the
intermediate
substrate). In this way, the flooring may be easily removed without requiring
clean-up and
preparation before installation a subsequent floorcovering.
32
CA 02679004 2009-08-20
WO 2008/119003 PCT/US2008/058361
[00128] Yet another embodiment of an intermediate substrate is a cushion
composite
particularly well-suited for installing new carpet or carpet tiles over
existing wall-to-wall
carpeting or carpet tiles without having to remove the existing carpeting or
carpet tiles.
[00129] One embodiment of a cushion composite 216 is illustrated in FIG. 19.
In the
embodiment shown in FIG. 19, the cushion composite 216 includes a semi-rigid
layer 220
attached to a cushion 226. "Semi-rigid" means any structure that has some
flexibility such
that it can bend to some degree. Cushion 226 may have, but does not have to
have,
characteristics similar to those disclosed above relative to cushion 210. The
semi-rigid
layer 220 may be made out of any material. A synthetic polymeric material,
such as
polyolefin, polyamide, or polyester, may be particularly suitable in this
application.
[00130] The semi-rigid layer 220 has a first side 222 and a second side 224.
The second
side 224 is provided with gripping components, such as teeth 218, that project
from second
side 224. While the teeth 218 are disclosed as being integrally-formed with
the semi-rigid
layer 220, they need not be. Rather, the gripping components may be fixed in
any way
(such as with adhesive, fasteners, clips, or any other chemical or mechanical
fixation
means) to the second side 224 of the semi-rigid layer 220.
[00131] The first side 222 is attached to cushion 226. If cushion 226 is pre-
formed, the
semi-rigid layer 220 can be molded onto the pre-formed cushion 226.
Alternatively, if a
foam material is used to make the cushion 226, the foam can be deposited
directly onto the
first side 222 of a pre-formed semi-rigid layer 220. Alternatively, the
cushion 226 and
semi-rigid layer 220 may each be pre-formed and subsequently adhered or
otherwise
affixed together.
[00132] As shown in the embodiment of FIG. 20, the cushion composite 216 can
be
placed on top of existing carpet or tiles 212. Preferably, the cushion
composite 216 is
positioned so that the gripping components 218 penetrate into a portion of the
existing
carpet or tiles 212 to prevent relative movement between the cushion composite
216 and
existing carpet or tile 212. The new carpet or carpet tile 214 is then placed
on top of the
cushion 226.
[00133] Use of the cushion composite 216 allows new carpet or carpet tile to
be
positioned over existing carpet or tiles without first removing the existing
carpet or tiles.
The new carpet tiles can then be secured together with the connectors 20 or
conductive
33
CA 02679004 2009-08-20
WO 2008/119003 PCT/US2008/058361
connectors 150, as described above. In the embodiment shown in FIG. 20, none
of the
layers (i.e., the existing carpet or tile 212, the cushion composite 216, and
the new carpet or
carpet tile 214) are affixed to each other. Thus, the installation of new
tiles need not be
permanent but rather can be easily removed. Moreover, the gripping components
218 are
preferably, but not necessarily, designed so as not to damage the face of the
existing carpet
or tiles. Thus, an installation of new tiles can be removed without altering
the appearance
or usability of the existing carpet or tiles.
[00134] The connectors of this invention improve upon current tile
installation systems
and methods. The connectors use both less material and cheaper materials than
traditional
installation systems. Moreover, use of the connectors significantly reduces
tile installation
time (by as much as 60% of the time for adhesive systems) by obviating the
need to prep a
floor prior to installation. Rather than applying a layer of adhesive to the
floor and then
retracing his steps to position the tiles on the adhesive layer, with the
connectors, the
installer positions and secures as he goes. Moreover, given the releasable
adhesive used on
the connectors and the limited surface area of the tiles that contacts the
connectors, the tiles
can easily be re-positioned if necessary. Furthermore, because the tiles do
not interact with
the underlying floor, they are easily removable from the floor and leave the
underlying
floor pristine upon such removal. Consequently, the floor does not require
refinishing
before it is recovered with another floorcovering.
[00135] The embodiment described above is illustrative and non-limiting. Many
variations of the structures illustrated in the drawings and the materials
described above are
possible and within the scope of this invention as defined in the claims.
34