Note: Descriptions are shown in the official language in which they were submitted.
CA 02737132 2011-04-13
MULTIPLE BRAND ICE BEVERAGE DISPENSER
BACKGROUND OF THE INVENTION
1. Field of the Invention
The present invention relates to beverage dispensers and, more particularly,
but not
by way of limitation, to configuring of beverage dispenser flavors.
2. Description of the Related Art
In the industry of beverage dispensing, dispensers are typically regarded as
vehicles
for the larger beverage firms to use in the promotion of sales. Beverage
dispensers on the
market are typically allocated based on volume. This process lends itself to
locking in on a
beverage firm and its product base. All major beverage firms have a product
base which
may include several high volume products, or major brands and several lower
volume
products, or minor brands. These different major and minor brands usually have
the same
size labels because dispensers currently produced by the manufacturers have a
product
valve scheme. In this product valve scheme, the dispenser width is usually
evenly split
between the number of valves and their associated labels. As such, major
brands usually
have the same amount of label space as the minor brands, unless flavors are
duplicated on
the dispenser. This process does not really increase consumer visibility for
the major
brands. This is usually accomplished through a marquis or other signage, which
usually
highlights one flavor.
Furthermore, most dispensers are mechanically driven, and typically, cannot
change the number of brands without making hardware changes. Therefore, it
would be
advantageous to have a dispenser that would be easily configurable, thereby
allowing the
customers to independently react to major vs. minor brand marketing and
visibility.
SUMMARY OF THE INVENTION
In accordance with the present invention, a beverage dispenser for dispensing
beverage drinks includes a touch panel assembly, removable fittings in a
carbonator, and a
carbonator pump assembly that is removable from a front of the dispenser. The
touch
panel assembly includes a light source for backlighting a user interface and
providing the
dispenser with a visual presence. The touch panel assembly further includes a
controller,
and an electrode board having electrode traces that generate electrode fields.
Interruptions
in the electrode fields are discernable by the controller, and interpreted as
a user input for
dispensing of a beverage drink.
Interpretation of the interruptions in the electrode fields is configurable,
such that
two adjacent electrodes may be interpreted as a single flavor choice. In this
arrangement,
CA 02737132 2011-04-13
2
major brands may receive an increased frontal display and activation area on
the touch
panel assembly. Configuring of the touch panel assemblies may be accomplished
manually
or automatically through the use of the controller.
The removable fittings in the carbonator each include an orifice through which
water
to be carbonated must pass to enter the carbonator tank. The ability to remove
the fittings
allows for cleaning operations and carbonator tuning operations to be
conducted on-site-
The invention further includes a method for removing the fittings for
replacement or
service.
The carbonator pump assembly is integral to the dispenser. The carbonator pump
assembly is located in a front portion of the beverage dispenser, and is
removable for
service from the front of the beverage dispenser. A method for removing the
carbonator
pump assembly is also disclosed.
It is, therefore, an object of the present invention to provide a beverage
dispenser
with a backlit touch panel assembly to provide the dispenser with a visual
presence.
t5 It is further an object of the present invention to provide a beverage
dispenser with a
touch panel assembly having configurable electrode traces and a controller to
interpret an
interruption in an electrode field generated by the electrode traces as a user
input.
It is yet further an object of the present invention to provide a carbonator
with
removable fittings, the fittings each including an orifice through which water
to be
carbonated must pass.
It is still yet further an object of the present invention to provide a
beverage
dispenser with an integral carbonator pump assembly, accessible from a front
portion of
the beverage dispenser.
Still other objects, features, and advantages of the present invention will
become
evident to those of ordinary skill in the art in light of the following.
BRIEF DESCRIPTION OF THE DRAWINGS
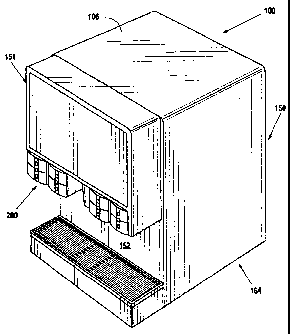
Figure 1 provides an isometric view of a dispenser.
Figure 1 a provides a cross section of a dispenser.
Figure lb provides a front view of a dispenser.
Figure 2 provides an isometric view of a cold plate assembly.
Figure 2a provides an isometric view of a carbonated water circuit.
Figure 2b provides an isometric view of the rear side of a cold plate assembly
according to the preferred embodiment.
Figure 2c provides an exploded view of an orifice housing according to the
preferred
CA 02737132 2011-04-13
3
embodiment.
Figure 2d is a cross section view of the cold plate assembly.
Figure 2e is a detail view of the orifice housing.
Figure 2f is a method flowchart for removing the carbonator orifices.
Figure 2g is a detail view of removable fittings according to a second
embodiment.
Figure 3 provides a cross section of a monoprobe assembly according to the
preferred embodiment.
Figure 3a provides a detail view of the monoprobe cross section view.
Figure 3b provides a detail view of a probe tip.
Figure 3c is a method flowchart of the operation of the monoprobe in the
preferred
embodiment.
Figure 4 provides an isometric view of a carbonator pump assembly according to
the
preferred embodiment.
Figure 4a is a method flowchart for the removal of the carbonator pump
assembly
according to the preferred embodiment.
Figure 5 provides an exploded view of the touch panel and related connections.
Figure 6 is an exploded view of the touch panel assembly.
Figure 6a provides an unlit touchpad embodiment.
Figure 6b provides an overview of the different bezel configurations.
Figure 7 illustrates the relationship of the switch module to the solenoids
and power
supply.
Figure 8 provides an overview of touch pad locations.
Figure 8a illustrates the relationship between electrodes and sensing areas.
Figure 8b shows a layout of the user interface areas on a touch panel
assembly.
Figure 8c illustrates the flavor configurations that are supported by the
preferred
embodiment.
Figure 9 shows other possible touch pad configurations.
Figure 9a provides a method flowchart for dispensing a drink.
Figure 10 illustrates the front of a touch pad assembly.
Figure 1 Oa provides a method flowchart for passive configuration of touch pad
assemblies using a menu structure.
Figure I Ob 1 and 10b2 provide a method flowchart for passive configuration of
touch
pad assemblies using a manual selection.
Figure I Oc provides a method flowchart for active configuration of sensing
valves.
CA 02737132 2011-04-13
4
Figure 11 illustrates a multi-panel/single controller control scheme.
DETAILED DESCRIPTION OF THE PREFERRED EMBODIMENT
As required, detailed embodiments of the present invention are disclosed
herein;
however, it is to be understood that the disclosed embodiments are merely
exemplary of
the invention, which may be embodied in various forms. It is further to be
understood that
the figures are not necessarily to scale, and some features may be exaggerated
to show
details of particular components or steps.
The invention at hand is a dispenser design that addresses service issues on
dispensers including carbonator pump servicing and the configuring of major
vs. minor
brand soft drinks and flavorings. The new design provides access to the
carbonator motor
and pump assembly from the front of the dispenser and an easily configurable
conversion
from major to minor brands as well as minor to major brands and flavorings.
The system
also provides for backlighting of the user interface panels through the use of
LEDs. The
interface panels and valve hardware complement each other to provide a modular
panel
setup, thereby providing further flexibility in the setup of the dispenser.
As shown in Figure 1, a dispenser 100 is a processor controlled beverage
dispenser
whereby a customer is allowed to approach the machine and make a selection
from an
interface panel. In this preferred embodiment, the user may dispense ice,
water, beverages,
flavorings and the like. The dispenser 100 includes a housing 150, a plurality
of touch
panel assemblies 200, a merchandiser 151, a splash plate 152 and a wrapper
164. The
touch panel assemblies 200 are located on a front 105 of the dispenser 100 for
access by
consumers. The merchandiser 151 is located above the touch panel assemblies
200 for
visual recognition. The splash plate 152 further closes out the front 105 of
the dispenser
100. The remaining sides are closed out through the use of the wrapper 164. A
lid 106
closes out the top portion of the dispenser 100.
The housing 150 includes a cold plate assembly 153, a carbonator pump assembly
154, an ice reservoir liner 155, an ice paddlewheel 156, a paddlewheel shroud
157 and
foam 158. The ice reservoir liner 155, having an interior cavity 165, rests on
the cold plate
assembly 153. The reservoir liner 155 and the cold plate assembly 153 are
housed in the
interior of the dispenser housing 150, therein creating a cavity between the
assembly and
the housing 150. The cavity is filled with foam 158 for insulating purposes.
The interior
cavity 165 of the reservoir liner 155 is used to store ice for dispensing. As
shown in
Figures la-lb, the ice paddlewheel 156 is mounted in the interior cavity 165
and is
connectable to a motor 106 that rotates the paddlewheel 156. A lower portion
of the ice
CA 02737132 2011-04-13
paddlewheel 156 is surrounded by a shroud 157, therein. forcing ice toward the
paddlewheel 156 for dispensing. The paddlewheel 156 rotates to move ice to a
dispensing
port 108 that passes through the liner 155 and the dispenser housing 150. This
operation is
activated by depressing an ice dispensing lever 174 located on the front 105
of the
5 dispenser 100.
The cold plate assembly 153 includes a plurality of concentrate tubes 160, an
uncarbonated water circuit 162 and a carbonated water circuit 163, all of
which are
disposed into the cold plate 159 for chilling product before dispensing. The
cold plate
assembly 153 further includes a cast-in-place carbonator tank 161 as disclosed
in U.S.
4. el -
Patent 6,574,981, entitled Beverage Dispensing with Cold Carbonation, filed on
September
24, 2001, The concentrate
tubes 160, having an inlet 180 and an outlet 181, are connectable to
concentrate sources
through a barb fitting 182. The barb fitting 182 is accessible from the front
105 of the
dispenser 100 for servicing and connection. The concentrate tubes 160 extend
upward and
bend to enter a front face 175 of the cold plate 159. The concentrate tubes
160 then make
multiple passes in the interior of the cold plate 159 to provide adequate
cooling length for
the expected flowrates. The concentrate tubes 160 then exit the cold plate 159
and turn
.
upward along the vertical plane until they reach the touch panel assemblies
200 where they
extend horizontally. The concentrate tube outlet 181 then connects to a fluid
passage 191
of a backblock 176. The backblock 176 contains a fluid passage 191 to connect
the
concentrate tube 160 to a dispensing valve 177, for mixing with water or the
like.
The uncarbonated water circuit 162 is used to deliver water from a water
source to
the two innermost dispensing valves 178 for dispensing. The uncarbonated water
circuit
162, in this preferred embodiment, includes a plain water tube 179 having a
plain water
tube inlet 183 and a plain water tube outlet 184. Inside of the cold plate
159, the
uncarbonated water circuit 162 includes manifolds and serpentine coils, two
each in this
preferred embodiment, leading to two riser tubes 186. The riser tubes 186 exit
the cold
plate 159 and attach to backblocks 176 which, in turn, attach to the plain
water dispensing
valves 178_ The plain water inlet 183 includes a barb fitting 190 and is
connectable to a
3o water source. The barb fitting 190 is located near the front 105 of the
dispenser 100 for
servicing and connection.
The carbonated water circuit 163 begins outside of the cold plate 159, near
the front
105 of the dispenser 100. The carbonated water circuit 163 includes an inlet
tube 173, a
carbonator pump assembly 154, carbonator pump outlet tube 194, a check valve
195, an
CA 02737132 2011-04-13
6
extension tube 196 and a cold plate entry tube 197. The inlet tube 173
contains an inlet
198 and an outlet 199. The inlet 198 contains a barb fitting 172 for
connection to a water
source. The barb fitting 172 is located near the front 105 of the dispenser
100 for servicing
and connection. The outlet 199 of the inlet tube 173 connects to the
carbonator pump
assembly 154.
The carbonator pump assembly 154 includes a pump 170 connectable to a motor
171, and a mounting bracket 167. The pump 170 includes an inlet port 168 and
an outlet
port 169. The outlet 199 of inlet tube 173 connects to the pump inlet port
168. The outlet
port 169 of the pump 170 is connectable to a first end 251 of the pump outlet
tube 194. A
second end 252 of the pump outlet tube 194 connects to an inlet port 107 of
the check
valve 195. An outlet port 253 of the check valve 195 is connectable to an
entrance port
254 of the extension tube 196. An exit port 255 of the extension tube 196 then
connects to
the cold plate assembly 153 through the cold plate entry tube 197. The cold
plate entry tube
197 extends downward and bends to enter the front face 175 of the cold plate
159.
1s Inside of the cold plate 159, the cold plate entry tube 197 is then split
into multiple
serpentine circuits 109, four in this preferred embodiment, that make several
passes within
the cold plate 159 to ensure adequate length is available for the heat
transfer rates and the
expected flowrates. The serpentine circuits 109 are then manifolded to a rear
header pipe
111. The rear header pipe 111 then connects to a pair of orifice supply pipes
112, each of
which connects to an orifice housing 258 located on the back side of the
carbonator tank
161 and the cold plate 159.
In this preferred embodiment, the orifice housing 258, having a first side 259
and a
second side 286, is permanently mounted to the carbonator tank 161, such that
the second
side 286 mates with a water stream entry port 287 of the carbonator tank 161.
The orifice
housing 258 contains a first aperture 260 passing from the first side 259
through to the
second side 286. The first aperture 260 aligns with the entry port 287 of "the
carbonator
tank 161. The first aperture 260 has two different diameters, a plug diameter
261 and an
orifice diameter 262, each of which is threaded. The orifice housing 258 has a
second
aperture 263 to accept the orifice supply pipe 112. The second aperture 263
passes from an
outer surface 288 through to the first aperture 260.
A removable fitting 264, having an orifice 265, a major diameter 267 and a
minor
diameter 266, fits inside of the first aperture 260 of the orifice housing
258, wherein the
external threads of the minor diameter 266 engage the internal threads of the
orifice
diameter 262 to secure the removable fitting 264 inside of the orifice housing
258. The
CA 02737132 2011-04-13
7
orifice 265 therein aligns with the entry port 287 and the first aperture 260
of the orifice
housing 258. A slot 268 is located on the top surface of the removable fitting
264 for
installation and removal with a screwdriver. A plug 269, having a threaded
portion 271
and a flange 272, is used to seal off the carbonated water circuit 163 by
mating the external
threads of the threaded portion 271 to the internal threads of the plug
diameter 261 of the
first aperture 260 of the orifice housing 258. The fluid path is sealed
through the use of an
o-ring 270 and an o-ring groove 273 in the flange 272 of the plug 269.
It should be clear to one skilled in the art that variations of this
embodiment may
exist, including an embodiment wherein the fitting 264 is removably attached
to the entry
port 287 of the carbonator tank 161. In the simplest embodiment, as shown in
Figure 2g, a
carbonator tank 161 includes an entry port 287 having internal threads, a
fitting 264 having
a first end 113 and a second end 114, and an orifice supply pipe 112. The
first end 113 of
the fitting includes external threads suitable for mating with the internal
threads of the
entry port 287. The second end 114 of the fitting 264 includes a protrusion
115 for mating
with the orifice supply pipe 112. Sealing may be accomplished through the use
of an o-
ring 116 or a flare connection. Various methods of mechanical restraint known
to those
skilled in the art may be employed to secure the orifice supply pipe 112 to
the fitting 264,
such as flare nuts, or the like. This arrangement allows water to be
carbonated to flow
from the orifice supply pipe 112, and through the orifice 265 of the fitting
264 to enter the
carbonator tank 161.
In this preferred embodiment, the fittings 264 are removable and replaceable.
Removal of the fittings 264 may be necessary in a carbonator tank 161 tuning
situation,
such as a high altitude environment, abnormally high or low ambient water
temperature or
obstruction of the orifice 265.. Changing of the orifice 265 size can have a
dramatic effect
on in-line carbonation, and ultimately, in-cup carbonation. Removable fittings
264 are
important in an integrally cast in place carbonator tank 161, as the failure
of the carbonator
tank 161 in an integral unit could result in catastrophic failure of the
dispenser 100.
Removal of the fittings 264 for adjustment or servicing is completed from the
rear
of the dispenser 100_ As shown in Figure 2f, the removal procedure commences
with
depressurizing the carbon-dioxide circuit, step 26. Next, step 27, the water
circuits are
depressurized. The wrapper 164 must be removed from the dispenser 100 to
access the
plug 269 as shown in step 28. The removal procedure continues with removal of
the
threaded plug 269 from the orifice housing 258 with the use of either a wrench
or standard
tool as shown in step 29. Once the plug 269 is removed, the fitting 264 may be
removed
CA 02737132 2011-04-13
8
from the orifice housing 258 by placing a screwdriver in the slot 268 and
turning the
orifice housing counter-clockwise, step .30. At this point, the fitting 264
may be either
substituted or cleaned, step 31. Upon substitution or cleaning, the fitting to
be used is
installed as shown in step 32. Next, step 33, the plug 269 is installed.
Installation of the
plug 269 should include the use of teflon tape or thread sealant to ensure no
leaks are
present in the pressurized circuit. The service agent may now reinstall the
wrapper 164,
step 34. After installation of the wrapper 164, the water circuits may be
pressurized, step
35. The final step, step 36, includes pressurizing the carbon dioxide gas
circuit.
From the orifice housing 258, water to be carbonated passes through the
removable
fitting 264 into the carbonator tank 161. The carbonator tank 161 is disposed
in the cold
plate 159. The carbonator tank 161 includes a top pipe 274, a bottom pipe 275
and two
side pipes 276, all of which are hollow. The ends of the pipes 274, 275 and
276 are
connected together to form a hollow rectangular structure. The carbonated
water circuit
163 further includes a pair of carbonated water outlets 277, a post-chill
circuit having a
serpentine coil 285, a post-chill manifold 278, and a carbonated water riser
tube 279 for
each dispensing valve 177. After carbonation, the carbonated water exits the
carbonator
tank 161 through the two carbonated water outlets 277 and enters the post-
chill manifold
278. From the post-chill manifold 278, the carbonated water enters the
carbonated water
riser tubes 279. The riser tubes 279 extend upward, connecting to the
backblocks 176.
The backblocks 176 connect to the dispensing valves 177, therein completing
the
carbonated water circuit 163.
The carbonator tank 161 further includes a gas inlet pipe 280, a guide tube
363, a
probe fitting 281 and a probe assembly 282. A first end 283 of the gas inlet
pipe 280 is
connectable to a carbon-dioxide supply. A second end 284 of the gas inlet pipe
280 is
connectable to the top pipe 274 of the carbonator tank 161 to feed carbon-
dioxide gas to
the top pipe 274 of the carbonator tank 161. The gas side of the carbonator
system is
pressurized to approximately seventy to eighty pounds per square inch. The
guide tube
363 is rigidly mounted within the carbonator tank 161, and is coaxial with the
probe fitting
281, therein providing the probe assembly 282 with a location to enter the
interior of the
carbonator tank 161 and take resistance measurements in the carbonator tank
161. The
guide tube 363 is open on both ends to allow water and carbon dioxide to flow
in either
direction. The guide tube 363 further includes a plurality of drain/fill ports
370 to
minimize uneven draining between the drain tube 363 and the carbonator tank
161. The
probe fitting 281, having a first inner diameter 341 and a second inner
diameter 342, is
CA 02737132 2011-04-13
9
designed to accept the probe assembly 282.
In the preferred embodiment, the resistance measurements taken by the probe
assembly 282 are used by a microcontroller to discern between the presence of
liquid or
gas at the sample point. The probe assembly 282 includes a fitting end 294 and
a probe tip
end 295. The fitting end 294 includes a probe body 296, a pair of o-rings 297,
an insulator
343, a reference wire 344, a probe wire 345 and a probe 353. The probe body
296 is of a
conductive material. In this preferred embodiment, the probe body 296 is made
of stainless
steel. The probe body 296, having a shape complementary to the probe fitting
281, also
includes a pair of o-ring grooves 347 on an outer body diameter 348 for
receiving the pair
of o-rings 297. The probe body 296 further includes a pocket 349 for engaging
the
reference wire 344, wherein the reference wire 344 is in direct contact with a
perimeter 350
of the pocket 349. The probe body 296 further includes a full depth diameter
351 that
engages a chamfer 352 between the first inner diameter 341 and the second
inner diameter
342 of the probe fitting 281. The probe 353 extends through the probe body 296
axially in
the installed position. The insulator 343 is disposed around the probe 353 in
the probe
body 296, such that the probe 353 is electrically isolated from the probe body
296. The
probe 353 is further covered by an insulation 354, extending to the probe tip
end 295,
however, a probe tip 355 is exposed. The probe tip end 295 includes the probe
tip 355, a
second insulator 356 and the insulation 354. The second insulator 356 centers
the probe tip
355 in the guide tube 363.
On assembly, the probe tip end 295 of the probe assembly 282 is inserted into
the
guide tube.363 of the probe fitting 281. The outer body diameter 348 of the
probe body
296, then slides into the first inner diameter 341 of the probe fitting 281,
and then slides
into the second inner diameter 342 of the probe fitting 281 until the full
depth diameter 351
engages the chamfer 352 between the first inner diameter 341 and the second
inner
diameter 342 of the probe fitting 281. The first inner diameter 341 further
includes an
internal thread 357 for engaging a probe retaining nut 298 having an external
thread 358.
Once the dispenser 100 is assembled, the cold plate assembly 153 and the
carbonator tank 161 are at a ten degree angle from the horizontal. In this
position, the
water level at the probe tip 355 represents a low level fill line 359. A high
level fill line
360 is derived by running the carbonator pump 170 for a predetermined amount
of time, in
this preferred embodiment, five point four seconds, after the water level
reaches the probe
tip 355. The amount of carbonated water below the low level fill line 359 is
known as a
reserve volume 361. The high level fill line 360 dictates a maximum fill. The
volume
CA 02737132 2011-04-13
between the high level fill line 360 and the low level fill line 359 is known
as a stroke
volume 365. The volume above the high level fill line 360 is known as a head
volume 362.
The head volume 362 is filled with carbon-dioxide gas. .
Figure 3c provides the operations of the probe under normal conditions. As
shown
5 in step 445, the microcontroller samples the resistance measurements taken
between the
ground wire 344 and the probe tip 355 at a predetermined interval, in this
preferred
embodiment, every ten milliseconds. The microcontroller has a registry of
resistance
values associated with a gas reading (carbon dioxide) and a liquid (carbonated
water)
reading. Once a gas reading is obtained, the microcontroller proceeds to step
446, where
10 the next sample is analyzed to determine if it also is a gas reading. If
the sample is also a
gas reading, the microcontroller proceeds to step 447, where a counter is
increased by one.
The microcontroller proceeds to step 448, where the count is analyzed to
determine if three
consecutive gas samples have been obtained. If the three samples are gas
readings, then
the microcontroller proceeds to step 449, wherein the microcontroller provides
power to a
relay that activates the carbonator pump motor 171 for five point four
seconds. The
microcontroller then clears the count, step 450, and returns to step 445 where
it continues
to monitor the resistive measurement samples. If there are not a gas reading
in step 446,
then the microcontroller proceeds to step 450 for clearing the count, and then
on to step
445, where it continues to monitor the resistive measurement samples. Use of
this process
minimizes the chance of erratic readings due to splashing or entrapped
bubbles.
In summary, the carbonated water circuit 163 begins as uncarbonated water
coming
from a water source. Water enters into the inlet tube 173, moves into the
inlet port 168 of
the carbonator pump 170 where it is pressurized to approximately one hundred
and twenty
pounds per square inch. The water then moves out of the outlet port 169 of the
carbonator
pump 170, into the pump outlet tube 194 and into the inlet of the check valve
195. Once
past the check valve 195, the water cannot travel backwards to contaminate a
water supply.
The water then exits the check valve outlet port 253, goes through the
extension tube 196
and enters the cold plate entry tube 197 located in the cold plate assembly
153. Once
inside of the cold plate 159, the water is split into four serpentine circuits
109, brought
back to two tubes 110 and into the rear header pipe 111. Once in the rear
header pipe 111,
the water is forced into the orifice supply pipes 112 and into the orifice
housing 258 where
it is forced through the removable fittings 264 and into the part of the
carbonator tank 161
pressurized with carbon-dioxide. The water is then carbonated, and settles to
the bottom of
the carbonator tank 161. Upon demand, the carbonated water is drawn through
the outlet
CA 02737132 2011-04-13
11
tubes 277 and enters the serpentine coils 285 of the post-chill circuit. The
carbonated
water then enters the post-chill manifold 278 and is then distributed to the
carbonated
water riser tubes 279 leading to the dispensing valves 177. From the riser
tubes 279, the
carbonated water passes through the backblocks 176 to the dispensing valves
177 for
consumption.
In this preferred embodiment, the carbonator pump assembly 154 is mounted
inside
of the dispenser 100 in previously unrecoverable cooling volume. The mounting
location
is accessible from the front 105 of the dispenser 100. The carbonator pump
assembly 154
includes a pump 170, a motor 171 and a bracket 167. The bracket 167 includes a
plurality
of threaded studs 289, and is connectable to a motor mounting bracket 292. The
studs 289
pass through a hole pattern in the motor mounting bracket 292 and are secured
with a
washer 290 and a locknut 291. The bracket 167 connects to the dispenser
housing 150
with a set of four screws 166. Mounting the carbonator pump assembly 154
inside of the
dispenser 100 volume minimizes the quantity of hoses that must be plumbed in a
dispenser
installation. With an integral carbonator pump assembly 154, only a single
water source
line needs to be plumbed for the carbonated water circuit 163. Further
advantages include
the elimination of finding an external power source for a remote carbonator or
the
necessity to run a power line from a dispenser to a remote carbonator. In the
integrated
carbonator 161 scheme, the carbonator pump assembly 154 receives power
directly from
the dispenser 100.
While this preferred embodiment has been shown with a carbonated circuit 163
and
an integral carbonator pump assembly 154, it should be clear, to one skilled
in the art, that
the dispenser 100 may be outfitted to dispense uncarbonated drinks or a
mixture of both
carbonated and uncarbonated. In the case of uncarbonated drinks, the dispenser
could be
outfitted with a boost pump. Integration of the boost pump into the dispenser
provides cost
benefits, as well as installation benefits. In cases where both carbonated and
uncarbonated
drinks are served, the dispenser may require both a boost pump and a
carbonator pump. In
cases where abnormally low or erratic water pressures exist, the dispenser
will further
require a boost pump and/or an accumulator.
Removal of the carbonator pump assembly 154 is accomplished from the front 105
of the dispenser 100, therein simplifying servicing of the dispenser 100. As
shown in
Figure 4a, removal of the carbonator pump assembly 154 commences with step
421,
disconnecting the electrical power to the dispenser I00. The next step, step
422 includes
removing the splash plate 152. The service agent must then depressurize the
carbon-
CA 02737132 2011-04-13
12
dioxide lines as shown in step 423. Next, step 424, the carbonated water
circuit 163 is
depressurized. Electrical connections may now be disconnected, step 425. The
pump inlet
tube 173 may now be disconnected from the pump inlet 168 and the pump outlet
tube 194
may now be disconnected from the pump outlet 169 as shown in step 426. In step
427, the
four screws 166 holding the carbonator pump assembly 154 to the dispenser
housing 150
are removed, therein separating the carbonator pump assembly 154 from the
dispenser 100.
At this point, step 428, either the motor 170 or the pump 171 are serviceable.
In
order to remove the motor 170, the service agent proceeds to step 429, and
removes the
locknuts 291 and washers 290 from the carbonator pump assembly 154. Next, the
service
agent must loosen the securing ring 293 as shown in step 430, therein freeing
the motor
170 from the carbonator pump assembly 154 as shown in step 431. If the service
agent
desires to replace the pump 171 after removing the carbonator pump assembly
154 from
the dispenser 100 in step 427, the agent would then proceed to step 441 and
loosen the
securing ring 293, therein freeing the pump from the assembly as shown in step
442.
The serviced component or new replacement must be mated to the old assembly,
step 432, and the securing ring 293 is tightened as shown in step 433. Step
434 includes
installing the serviced carbonator pump assembly 154 into the dispenser 100
with the four
screws 166. The pump inlet tube 173 and the pump outlet tube 194 are installed
in step
435. Electrical connections to the carbonator pump assembly 154 may now be
reconnected, step 436. The carbonated water circuit 163 is then pressurized as
shown in
step 437, and the carbon-dioxide circuit is pressurized as shown in step 438.
The final
steps, step 439 and 440, call for reinstalling the splash plate 152 and
reconnecting the
electrical power to the dispenser 100, respectively.
The dispenser 100, in this preferred embodiment, uses a touch panel assembly
200
for each valve. In this preferred embodiment, there are four multi-flavor
nozzles and four
touch panel assemblies 200. The touch panel assemblies 200 are removable and
are
connected to the dispenser 100 through two- harnesses 210. The harnesses 210
and
connectors 215 connect the touch panel assembly 200 to an interface panel 220
located
underneath a merchandiser 221. The touch panel assembly 200 is restrained from
movement through the use of four fasteners and the working area of the touch
panel
assembly 200 is defined by a bezel 205.
The touch panel assembly 200 includes a back panel 301, a valve board 311, a
light
separator/reflector 340, an electrode board 321, a front panel 331 and decals
334 as shown
in Figure 6. The back panel 301 is an injection molded part having a bottom
surface 302,
CA 02737132 2011-04-13
13
snap features 305, screw mounts 304 and four sides 303 producing an enclosure
for valve
board 311. The valve board 311 is a printed circuit board 319 outfitted with a
microcontroller 312, sensing chips 313, LEDs 314 and harness connectors 315.
The light
separator/reflector 340 is an injection molded piece that fits between the
valve board 311
and the electrode board 321. The light separator/reflector 340 is designed to
separate the
light streams from each of the LED 314 groups, and provide definitive lines
between lit
and unlit areas of the user interface 333. Upon installation, the valve board
311 is mounted
on the interior portion of back panel 301 with four screws 316 through
mounting holes
317. Harness connections 315 for connectors 215 are configured such that they
pass
through the bottom surface 302 of back panel 301.
The electrode board 321 is a thin fiberglass board which houses the electrode
traces
323 of the touch panel assembly 200. The front panel 331 is an injection-
molded part
having a user interface panel 333 and snap features on the outer sides 335.
The electrode
board 321 mounts near inner surface 332 of the front panel 331 to ensure close
proximity
to the user interface panel 333. The electrode board 321 has an electrical
connection 322,
which attaches to the valve board connection 318 for switch activation
signals. Upon
assembly, the front panel 331 and the electrode board 321 are an integral
unit. The
electrical connection 322 must be attached to the valve board connection 318
prior to
mating the front half of the unit to the back panel 301 housing the valve
board 311. Once
connections have been made, the front panel 331 may be snapped onto the open
portion of
back panel 301 using snap features 305 and 335 to form one touch panel
assembly 200.
Decals 334 must be installed on the touch panel assembly 200 before the bezel
205 is
installed.
In the assembled form of touch panel assembly 200, LED's 314 located on valve
board 311 are located behind electrode board 321. In this position, once
powered up, the
LEDs 314 are visible from the user interface 333 side of the touch panel
assembly 200.
The LED 314 light passes through the light separator/reflector 340 and the
thin yellow
fiberglass electrode board 321, which appears clear during viewing by a
consumer. Other
electrode board materials may be used, including clear or translucent mylar,
and/or indium-
tin oxide (ITO). Fiberglass was chosen for the preferred embodiment because it
is readily
available, inexpensive, and because it acts as a diffuser, masking the traces.
The LED's
314 provide a low cost, easily available source for valve specific lighting.
In operation, the
LED's 314 can provide a visual draw to the valve or dispenser by flashing or
turning on
and off in a prescribed routine. Illustratively, the microcontroller 312 may
include
CA 02737132 2011-04-13
14
instructions that activate the LED's in at a prescribed time and in a
prescribed sequence to
attract consumers to the dispenser 100. Further deviations of this attribute
may include a
proximity sensor to trigger the activation of a lighting sequence or display,
when a field of
the proximity sensor is penetrated.
While this preferred embodiment has been shown as a lighted dispenser 100, an
unlit
embodiment may be achieved by not outfitting the dispenser with LEDs 314, or
using an
alternate method of mounting a circuit panel 335. As shown in Figure 6a, a
circuit panel
335 may be mounted in an opaque molded plastic housing 336 with a label 334.
The
alternate arrangement provides a method of minimizing the number of components
and
manufacturing costs associated with lighted dispensers.
The assembled touch panel assembly 200 can now be snapped into a bezel 205.
The
addition of the bezel 205 further defines the working area of the user
interface panel 333.
Bezel 205 configurations can vary with changing products and additives such as
flavorings.
Figure 6b provides a sample of bezel 205 configurations for the touch panel
assembly 200
for dispenser 100. These examples can support either a 2,3, or 4 brands with
up to three
additional additives.
The touch panel assembly 200 is an independent device capable of controlling
solenoids separately or simultaneously. All driving Field Effect Transistors
(FET's) are
part of the touch panel assembly 200; therefore the touch panel assembly 200
is controlling
the solenoids. Figure 7 provides a diagram showing connection of the touch
panel
assembly 200 with a bezel 205 to power supply 420 and solenoids 410. Power
supply 420,
in this preferred embodiment, supplies 24VDC voltage to drive the solenoids
410, and also,
if required, a 16VDC power supply may be employed to drive the LED's 314.
Multiple
touch panels 200 could be operated through the power supply 420 only if no
other control
between touch panels 200 was desired, such as synchronized lighting, and/or
limiting the
number of valves in simultaneous operation to be disclosed in later
paragraphs.
Up to nine solenoids 410 can be operated by touch panel assembly 200 on
dispenser 100 as follows: 4 brands, 3 bonuses, I soda (sparkling water)
solenoid 410, and I
plain water (soft water) solenoid 410. Touch panels 200 can operate 6
solenoids 410
simultaneously, including 1 brand, up to 3 bonuses, and both the soda and
plain water
solenoids 410, to yield a "mid-carb" drink. In most cases, however, only one
or two
bonuses flavor solenoids 410 would be used with one brand and either one of
the water
solenoids 410. Use of this system provides a means for a very simple one or
two nozzle
beverage dispensing unit, including up to eight brands and 6 bonus flavors,
which is
CA 02737132 2011-04-13
powered by a power supply 420. The extra cost and complexity of having a multi
nozzle
controller board is then eliminated.
The dispenser 100 uses touch panel assemblies 200 to sense a touch on the
panel
and then to activate product valve solenoids 410 for soft drink dispensing.
The touch panel
5 assemblies 200 are approximately 5" x 5" in size, and have nine distinct
touch areas 501 to
allow for independent activation shown in Figure 8. The touch areas 501 are
defined by
the placement of seven sets of traces 502 on the electrode board 321. In this
preferred
embodiment, there is one sensing chip per trace 502; however, there are chips
available
that can control multiple traces 502. When activated, the traces 502 produce
electrode
10 "sensing" fields 505 as shown in Figure 8a. Sensing fields 505 beyond the
seven are
obtained through overlapping the electrode "sensing" fields 505 as shown in
Figure 8a to
produce the eighth and nine electrode "sensing" fields 506 and 507 to provide
greater
flexibility in configuration of the user interface 333.
The nine distinct touch areas 505, 506, 507 have the flexibility to control 2,
3, or 4
15 different soda flavors, and three bonus or additive flavors, such as
vanilla, lemon, or cherry
as shown in Figure 8b. The larger touch areas are typically used as soda brand
buttons
508, and the smaller elliptical areas are typically used as bonus or additive
flavor and water
buttons 509. Various configurations can be obtained by activating different
touch pads.
Figure 8c shows the user interface in the fully assembled configuration for
the 2, 3, or 4
flavor configurations in this preferred embodiment. The touch pad
configurations are not
limited to those identified in this disclosure, as the design is flexible and
can support
different layouts of touch sensor areas and touch pads including those
represented in Figure
9.
In operation, a consumer is able to dispense multiple types of drinks from the
same
touch panel assembly 200, as described in the method flowchart of Figure 9a.
In step 2, a
consumer desiring to dispense a drink from dispenser 100 must place a cup on a
drip tray
underneath a desired nozzle. In step 3, the consumer has an option as to his
next step. If
the consumer wishes to have just a brand of soda, he jumps to step 6, where he
pushes and
holds the desired brand button 508. The microcontroller senses the touch on
the touch
panels in step 7, and activates the solenoids for the soda/water and the
corresponding
brand, step 8. When the consumer is satisfied with the amount of beverage
dispensed, he
stops pressing the brand touch pad, step 9, and the microcontroller
deactivates the
solenoids 410, as shown in step 10. At which point the consumer retrieves his
drink, step
11. If the consumer desires a brand drink with bonus flavor(s), he would
depress and
CA 02737132 2011-04-13
16
release up to three of the desired bonus flavor buttons 509, as described in
step 4. The
microcontroller senses these touches step 5, and waits for the consumer to
press a brand
button on the touch panel assembly 200. The consumer then touches and holds
the desired
brand button 508 on the touch panel 200, step 6, where the microcontroller
senses the
touch, step 7, and activates the proper bonus(es), syrup, and soda/water
solenoid, step 8.
Once the consumer is satisfied with the amount drink in his cup, he stops
pressing the
brand button 508, step 9, where the microcontroller senses the lack of touch
and
deactivates the solenoids, step 10. The consumer can now retrieve his drink
from the cup
rest, step 11.
Portion controlled drinks could also be dispensed by using the bonus buttons
509 as
either Cup Size indicators (one button being a "Small" sized drink, another a
"Medium"
sized drink, and the third as a "Large" sized drink), or as one of the buttons
being used as a
toggle switch between a standard (non-portion controlled, as described in the
aforementioned paragraph), small, medium, and large dispense modes. The
benefit of the
latter arrangement would be the ability to still have up to 2 bonus flavors
added to a portion
controlled drink (one would be used as the portion control switch). Different
modes could
be indicated by specific flashing sequences. As an example: no flashes
indicates a standard
dispense routine, "fast" flashes (on the order of once every quarter second)
could indicate a
small dispense routine, "medium" flashes (every half second) could indicate a
medium
sized dispense, and a slow flash sequence (once every second) could indicate a
large sized
dispense. The routines could scroll through each of the modes, so as to return
to the
original routine with enough subsequent toggles-
The dispenser 100 may be set to operate two distinct ways, namely, in an
"Active"
and a "Passive" mode. In the "Active" mode, the software is able to determine
which
solenoids are required for certain flavor configurations. In this scheme,
there is no
software change required to change the flavor configurations, since the
software will make
the configuration change automatically. In the "Passive" mode, the user can
define touch
panel assembly 200 configurations, by manually telling the software which are
major and
minor buttons.
A touch panel assembly 200 has a side "A" 701 and a side "B" 702 as shown in
the
front view of Figure 10. Upon installation or when serviced, if
reconfiguration is desired,
the touch panel assembly 200 must be configured to determine whether the side
"A" 701 or
side `B" 702 of the touch panel will be used as major brand areas or minor
brand areas.
Prior to configuration, the operator may prompt the dispenser 100 to display
the current
CA 02737132 2011-04-13
17
configuration of the touch pad assemblies 200. LED's 314 can indicate the
current
configuration of the entire dispenser 100 by flashing together, as a major, or
in sequence,
as two minor brands. This feature may be toggled in the menu structure.
In the "Passive" configuration mode, reconfiguration is accomplished through a
software routine as described in the method flowcharts of Figures 1 Oa and I
Ob. Figure 7a
provides the interactive steps involved in using a menu structure to manually
configure the
dispenser 100. In this process, a display and a controller board are used to
prompt the
operator for selections from a menu display. As shown in step 15, the operator
selects a
menu called "NOZZLE CONFIGURATION." The microcontroller then prompts the
operator to select a nozzle number from the menu in step 16. The operator
selects a nozzle
number, step 17. The microcontroller then prompts the operator to pick either
an "A" or a
"B" side as shown in step 18. The operator, in step 19, then picks either the
"A" or "B"
side for configuring. In step 20, the microcontroller then prompts the
operator to select a
touch area 505, 506, 507 for configuring. The operator then picks a touch area
505, 506,
507 for configuring, step 21. In step 22, the microcontroller configures the
selected touch
area 505, 506, 507 and then prompts the operator for additional touch area
505, 506, 507
configurations, step 23. If additional touch areas 505, 506, 507 on the same.
touch pad will
require configuring, the microcontroller returns to step 20. If no other touch
pad changes
are required, the microcontroller will move to step 24, and prompt the
operator for
additional nozzle configuration changes. If additional nozzle changes are
required, then
the operator will indicate "yes," and the microcontroller will return to step
16. If no other
nozzle needs configuring, the microcontroller will then move to step 25 and
exit the setup
menu.
Figure I Ob provides a second method for major or minor brand configuration.
This
process begins with a prompt from the microcontroller for the user to select a
side to be
configured, specifically, an "A" side 701 or a "B" side 702 as shown in step
52. In step 53,
the user then selects a side of the touch panel assembly 200 to be configured
by touching
one of the touch panels on the user interface. Once a side is selected, the
microcontroller
will prompt for either a major brand (1) or a minor brand (2) configuration in
step 54. The
operator must now select either a "1" for a major brand or a "2" for a minor
brand as
disclosed in step 55.
If the operator chooses a major brand, the microcontroller will move to step
56 and
prompt the user for a major brand location. The operator will be required to
touch the
desired touch pad in step 57. At this point, the microcontroller will be
awaiting a touch
CA 02737132 2011-04-13
signal from the pad as shown in step 58, or an indication in a MENU. If only
touch pad I
is touched or selected, it will dispense the major brand, steps 59 and 62,
upon activation
from touch pad 1. If only touch pad 2 is touched as in step 60, then the major
brand will be
dispensed upon activation from touch pad 2. Finally, if the operator touches
both touch
pad I and touch pad 2, then the major brand will be dispensed upon activation
of both
touch pads I and 2 as shown in steps 61 and 62.
Similarly, if the operator chooses a minor brand 2'in step 55, the
microcontroller
will prompt the operator for a minor brand location as shown in 63. The
operator will
touch a pad in step 64, and the microcontroller will be looking for a touch
signal from the
touch panel assembly 200 in step 65. If only touch pad I is touched as in step
66, then the
dispenser will dispense the minor brand upon activation from touch pad I as in
step 69. If
only touch pad 2 is touched as in step 68, then the minor brand will be
dispensed upon
activation of touch pad 2 as shown in step 71. Finally, if both touch pads 1
and 2 are
touched, the dispenser will dispense nothing as shown in steps 67 and 70.
Further operations required for dispenser configuration include setup of
decals 334
that reside in the front bezels 205 for both the major and minor brands. Setup
of the decals
334 usually takes place after configuration of the touch pad assemblies 200
shown in steps
52 through 71 and steps 15 through 25. In step 72 of Figure I Ob, the front
bezel 205 must
be removed to allow removal of existing decals 334 as shown in step 73. If the
touch pad
assembly 200 is being reconfigured, then existing decals 334 must be removed.
Step 74
provides for installation of new decals 334 followed by installation of a
proper major or
minor brand bezel 205. For a minor brand, setup of the decals 334 follows the
procedure
as discussed in steps 76-79. After valve configuration, the front bezel 205
must be
removed to access the decal mounting area as in step 76. If the operator is
reconfiguring,
the existing decals 334 must be removed as shown in step 77. With any decals
334
removed, the operator can now install the minor brand decals 334 discussed in
step 78.
Finally, the operator will be required to install a "two-minor brand" bezel
205.
Figure l0c provides a method flowchart for configuration in the active mode.
Once
the microcontroller is powered up in step 80, low voltage "sense" signals are
sent out for
brands 1 and 2 of side A (Figure 10) as shown in step 81. The low voltage
sense signals
will not activate the solenoids 410; they are exclusively for monitoring and
configuration
purposes. In step 82, the microcontroller then determines how many senses were
obtained.
If no return senses were obtained from side A, the microcontroller moves on to
send sense
signals to brands 3 and 4 (side B) step 85. If one sense is obtained, the
touch panel is
CA 02737132 2011-04-13
19
configured as a major brand step 83, and the microcontroller will move on to
step 85,
where it sends a sense signal to brands 3 and 4 (side B). If the
microcontroller receives
two sense signals as shown in step 84, the touch panel will be configured as
minor brands,
and the microcontroller will then proceed to step 85, where the
microcontroller will begin
to send sense signals to brands 3 and 4 (side B). In step 86, the
microcontroller evaluates
the sense signal responses to determine how to configure the touch panel
assemblies 200.
If only one sense signal is received, side B is configured as a major brand as
shown in step
87 and moves to step 89. If two sense signals are received, the
microcontroller configures
side B as minor brands in step 88 and then moves to step 89. If no sense
signals are
received in step 86, the microcontroller moves to step 89 where it determines
if both
brands I and 2 (side A) and brands 3 and 4 (side B) received a zero reading in
response to
the sense signal output. If neither brands I and 2 (side A), nor brands 3 and
4 (side B)
received a reading, the valve will be configured as uninstalled in step 90,
and will then
move on to the next valve in step 92. If at least one signal was received in
step 89, a "NO"
answer to "NEITHER RECEIVED?" the microcontroller proceeds to step 91. If both
signals are received, the microcontroller moves to the next valve in step 92.
If one of the
two signals was NOT received in step 91, then there must be a solenoid
disconnected, or
one of the wires broken, resulting in a "SOLENOID ERROR" message being
displayed
step 93. The microcontroller would then go to step 92, and proceed to the next
valve.
Regardless of the method used for configuring, the operator will be required
to
setup the decals for the dispenser 100 after the touch areas have been
configured. This
setup process is the same as for passive configuration of the dispenser 100.
In step 40 of
Figure I Ob, the front bezel 205 must be removed to allow removal of existing
decals 334 as
shown in step 41. If the touch panel assembly 200 is being reconfigured, then
existing
decals 334 must be removed. Step 42 provides for installation of new decals
334 followed
by installation of a proper major or minor brand bezel 205 as shown in step
43. For a
minor brand, setup of the decals 334 follows the procedure as discussed in
steps 44-47.
After valve configuration, the front bezel 205 must be removed to access the
decal
mounting area as in step 44. If the operator is reconfiguring, the existing
decals 334 must
be removed as shown in step 45. With any decals 334 removed, the operator can
now
install the minor brand decals 334 discussed in step 46. Finally, the operator
will be
required to install a "two-minor brand" bezel 205 as discussed in step 47.
Another embodiment of this invention may include a multiple touch panel-single
controller 800 setup as shown in Figure 11. In this scenario, a multi-panel
controller 801 is
CA 02737132 2011-04-13
connectable to a power supply 420 and multiple touch panel assemblies 200. The
touch
panel assemblies 200, in turn, are connected to multiple solenoids 410 to
provide a unified
dispensing arrangement. With this type of arrangement, the multi-panel
controller 801 is
able to oversee and regulate the operations of the touch panel assemblies 200
to optimize
5 the dispensing functions or other operations including valve specific or
dispenser 100 wide
lighting routines. The multi-panel controller 801, typically, limits the
number of
simultaneous dispenses to two, in order to assure adequate cold plate
performance. The
multi panel controller 801 may also control dispenser 100 specific operations
including ice
management, carbonator probe detection, and ice agitation.
10 Due to the modularity of the foregoing system, dispensers 100 may be as
simple as
a power supply 420 coupled with a touch pad assembly 200 to control a single
nozzle
tower dispenser. When utilizing the multiple touch panel-single controller 800
scheme, the
electronic setup allows the same multi-panel controller 801 to be used, as
well as the same
touch panel assemblies 200 in varying quantities, four for up to a 16 flavor
dispenser, five
15 for an up to twenty flavor dispenser, and so on. Further benefits of the
modularity include
the reduction of hardware associated with the dispensing nozzles. In a modular
setup, the
same components can be used repeatedly, thereby reducing overhead and
inventory in the
production environment.
Although the present invention has been described in terms of the foregoing
20 preferred embodiment, such description has been for exemplary purposes only
and, as will
be apparent to those of ordinary skill in the art, many alternatives,
equivalents, and
variations of varying degrees will fall within the scope of the present
invention. That
scope, accordingly, is not to be limited in any respect by the foregoing
detailed description;
rather, it is defined only by the claims that follow.