Note: Descriptions are shown in the official language in which they were submitted.
CA 02745670 2011-07-07
MEDICAL CLAMP
BACKGROUND OF THE INVENTION
1. Field of the Invention
[0001] The present invention relates to medical instruments, and, more
particularly, to medical
clamps.
2. Description of the Related Art
[0002] Control of postpartum hemorrhage is as old as humanity but it is still
a major health
problem in first, second, and third world countries. Postpartum hemorrhage is
the greatest cause,
and thus the most significant cause, of maternal morbidity and mortality in
the world.
Postpartum hemorrhage is one of the most common and devastating complications
of childbirth.
Uterine Atony is the most common cause of this hemorrhage (75-85%). Currently,
uterotonic
drugs such as pitocin, methergine, and other drugs are used in an attempt to
encourage the uterus
to contract and to slow the bleeding. If the drugs are not effective, then a
cascade of events are
put into action to try to save the life and hopefully the reproductive
capabilities of the parturient.
A multidisciplinary approach to control hemorrhage and to maintain the
parturient's blood
volume and blood pressure is instituted.
[0003] What is needed in the art is a way to more effectively control
postpartum hemorrhage.
SUMMARY OF THE INVENTION
[0004] The present invention provides a way to more effectively control
postpartum
hemorrhage.
[0005] The invention in one form is directed to a medical clamp, including: a
lower arm
assembly; an upper arm assembly pivotally connected to the lower arm assembly,
the lower arm
assembly and the upper arm assembly being configured for clamping relative to
one another; and
a belt connected to the lower arm assembly and the upper arm assembly and
configured for
forming a loop therebetween.
[0006] The invention in another form is directed to a method of using a
medical clamp, the
method including the steps of: providing a lower arm assembly and an upper arm
assembly;
connecting pivotally the upper arm assembly to the lower arm assembly;
connecting a belt to the
lower arm assembly and the upper arm assembly; forming a loop, using the belt,
between the
lower arm assembly and the upper arm assembly; and clamping the lower arm
assembly and the
1
CA 02745670 2011-07-07
upper arm assembly relative to one another.
[0007] An advantage of the present invention is that, in one form, it is
directed to a uterine
clamp, which can be called the Staggs Uterine Compression Clamp, or simply the
clamp. The
uterine clamp of the present invention is advantageously a handheld manual
reusable instrument
that can mechanically apply compressive pressure to the myometrium of the
uterus and
ultimately decrease blood loss due to the uterine atony during postpartum
hemorrhage.
[0008] Another advantage is that the primary function of the uterine clamp is
to quickly and
temporarily control hemorrhage from the atonic uterus in the immediate
postpartum period by
mechanically compressing the myometrium of the uterus. The use of the device
advantageously
does not preclude the use of other methods of controlling hemorrhage such as
uterotonic drugs.
The compression of the myometrium is advantageously accomplished by two
methods. The first
is a set of upper and lower jaws (i.e., the upper and lower arm assemblies,
below) designed to
securely hold the uterus and compress the lower uterine segment. A second
method of
compression is an elastic strap (which is referred to as a belt, below) that
is longitudinally
oriented to compress the fundus of the uterus. This advantageously gives a
more global
compression to the myometrium and can quickly slow bleeding and prevent
further blood loss.
A secondary function of the uterine clamp advantageously is to retract the
uterus during a
Caesarean section. Using a conventional technique, the surgical assistant
grasps the uterus and
retracts the uterus out of the pelvis to give the surgeon a better view of the
transverse uterine
incision that was performed to remove the fetus and placenta; this maneuver is
ergonomically
difficult for the assistant. But, the uterine clamp of the present invention
advantageously allows
this retraction (and holding) of the uterus to occur with greater efficiency
and less effort.
[0009] Yet another advantage of the present invention is that it provides a
new way to rapidly
control blood loss during postpartum hemorrhage caused by uterine atony.
[0010] Yet another advantage of the present invention is that it provides a
rapid and effective
adjunct to the usual procedures to control hemorrhage. Using the clamp
according to the present
invention does not preclude the other standard and aggressive measures that
are usually
performed.
[0011] Yet another advantage of the present invention is that it provides
another way to slow
or to stop the bleeding and, thus, provides another tool to save the life of
the parturient.
[0012] Yet another advantage of the present invention is that it can be
manufactured using
standard manufacturing methods.
2
CA 02745670 2011-07-07
BRIEF DESCRIPTION OF THE DRAWINGS
[0013] The above-mentioned and other features and advantages of this
invention, and the
manner of attaining them, will become more apparent and the invention will be
better understood
by reference to the following description of embodiments of the invention
taken in conjunction
with the accompanying drawings, wherein:
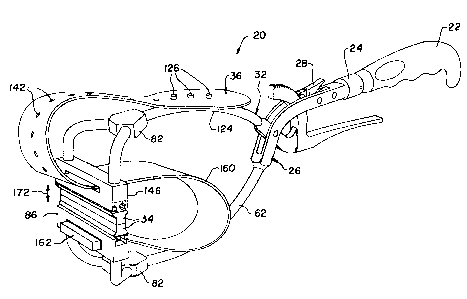
[0014] Fig. 1 is a perspective view of the uterine compression clamp according
to the present
invention;
[0015] Fig. 2 is a perspective view of the uterine compression clamp of Fig.
1, with the
grippers being exploded from the remainder of the clamp, but without the belt;
[0016] Fig. 3 is an exploded, perspective view of the uterine compression
clamp of Fig. 1,
without the grippers or the belt;
[0017] Fig. 4 is a side view of the uterine compression clamp of Fig. 1;
[0018] Fig. 5 is an exploded, perspective view of the lower arm assembly of
the uterine
compression clamp of Fig. 1, without the gripper;
[0019] Fig. 6 is an end view of the lower tip sub-assembly of the uterine
compression clamp of
Fig. 1;
[0020] Fig. 7 is a cross-sectional view of the lower tip of the uterine
compression clamp of Fig.
1, the cross-section being taken along line 7-7 of Fig. 6;
[0021] Fig. 8 is an exploded, perspective view of the upper arm assembly of
the uterine
compression clamp of Fig. 1, without the gripper;
[0022] Fig. 9 is a side view of a gripper of the uterine compression clamp of
Fig. 1;
[0023] Fig. 10 is an end view of a gripper of the uterine compression clamp of
Fig. 1;
[0024] Fig. 11 is a perspective view of the belt of the uterine compression
clamp of Fig. 1; and
[0025] Fig. 12 is a partially exploded, perspective view of another embodiment
of the uterine
compression clamp according to the present invention, with certain parts being
broken away.
[0026] Corresponding reference characters indicate corresponding parts
throughout the several
views. The exemplifications set out herein illustrate embodiments of the
invention, and such
exemplifications are not to be construed as limiting the scope of the
invention in any manner.
DETAILED DESCRIPTION OF THE INVENTION
[0027] Referring now to the drawings, and more particularly to Figs. 1-11,
there is shown a
first embodiment of a uterine compression clamp 20 according to the present
invention. Clamp
3
CA 02745670 2011-07-07
20 (which can generally be referred to as a medical clamp) generally includes
a handle 22, a post
24, a lower arm assembly 26, a release lever 28, a torsion spring 30, an upper
arm assembly 32,
two grippers 34, and a belt 36. In general, grippers 34 of clamp 20 can be
selectively opened and
closed, as indicated by double-arrow 172 in Fig. 1. Further, in general, belt
36 of clamp 20 can
be tightened so as to compress at least a part of uterus 166, as indicated by
arrow 176 in Fig. 4.
[0028] Handle 22 is used by a medical professional (such as an
obstetrician/gynecologist, or,
more generally, a surgeon, or other operating or delivery room personnel) to
hold clamp 20.
Handle 22 includes a body 38 and a distal end 40 including a cylindrical
projection 42. Body 38
can include a geometry that is ergonomically efficient relative to the hand of
a medical
professional. Body 38 can include a core and a material molded over the core.
By way of
example and not by way of limitation, the core can be formed of a metal such
as 304 stainless
steel (DIN 1.4301) and have a finish as molded, and the material bonded over
the core can be
elastosil silicone. Distal end 40 can be a metal (as stated relative to the
core) and can be formed
integral with the core or can be connected to the core. The metallic core and
distal end (whether
formed integrally or separately) can be made using one or more machining
operations, such as
lathe machining and/or a milling machining operation (for example, blind hole
44 can be formed
using a milling machine). Cylindrical projection 42 can include blind hole 44
extending
transversely through projection 42; blind hole 44 can have a chamfered entry,
have a generally
cylindrical extension, and have a flat bottom. Projection 42 is received by
post 24. Blind hole
44 has a cylindrical shape and can extend more than fifty percent through
projection 42. Aside
from hole 44, handle 22 can be substantially similar on the portion that is
not visible in the
figures as that portion which is visible in the drawings. By way of example
and not by way of
limitation, distal end 40 can be formed of a metal such as 304 stainless steel
(DIN 1.4301) and
have a finish that is polish satin. All metal components of handle 22 can be
passivated prior to
assembly per ASTM A-967.
[0029] Post 24 serves as a transition piece between handle 22 and lower arm
assembly 26.
Post 24 includes a proximal end (toward handle) and a distal end (toward
grippers). The
proximal end includes a receiver 46 having a blind hole formed therein, the
blind hole (not
shown in the drawings) of receiver having a cylindrical shape and extending
from a proximal
face of receiver 46 (facing towards handle 22) longitudinally in a distal
direction, the blind hole
of receiver 46 being at least approximately centered in the proximal face of
receiver 46. The
blind hole of receiver 46 matingly receives projection 42 of handle 22; the
blind hole of receiver
4
CA 02745670 2011-07-07
46 can be drilled (and be cone-shaped at the distal end of the blind hole that
is not necessarily
completely filled by projection 42 of handle 22). Receiver 46 also includes a
through-hole 50
extending transversely from an exterior surface of receiver 46 to the blind
hole in receiver 46. A
cross pin 48 attaches receiver 46 of post 24 with projection 42 of handle 22;
more specifically,
after projection 42 is positioned in blind hole 50 of receiver 46, blind hole
44 of projection 42
and through-hole 50 (which holds cross pin 48) of receiver 46 are aligned, and
cross pin 48 is
inserted through this through-hole 50 of receiver 46 and into blind hole 44 of
projection 42 so as
to secure handle 22 and post 24 together. Aside from hole 50, post 24 can be
substantially
similar on the portion that is not visible in the figures as that portion
which is visible in the
drawings. By way of example and not by way of limitation, cross pin 48 can be
0.125 inches x
0.275 inches and be formed of a metal such as 303 stainless steel. Through-
hole 50 through
receiver 46 can be formed by drilling. After inserting cross pin 48, cross pin
48 can be fuse
welded in position, and cross pin 48 and/or the fuse weld can be polished
flush with post 24 and
passivated. By way of example and not by way of limitation, post 24 can be
formed of a metal
such as 17-4 PH stainless steel (condition H900) or DIN 1.4021 (heat treat and
temper Re 42-
48), and post 24 can have a satin finish and be passivated. Post 24 can be
made using one or
more machining operations, such as lathe machining and/or a milling machining
operation (for
example, holes 48, 50, 54 can be formed using a milling machine). The distal
end of post
includes a projection 52 with a through-hole 54 extending transversely through
projection 52 of
post 24. Projection 52 of post 24 is secured to a proximal end of a base 60 of
lower arm
assembly 26 using a pin 56. More specifically, pin 56 is inserted through two
proximal holes 58
of base 60 of lower arm assembly 26 and also through hole 54 of projection 52
of the distal end
of post 24.
[00301 Lower arm assembly 26 includes a base 60, a rod 62, and a tip sub-
assembly 64. As
shown in Fig. 5, base 60 includes two walls which run parallel to one another,
each of these
walls including two holes 58, 66 on the proximal end of base 60 and an
additional hole 68 on the
distal end of base 60. Holes 58 oppose one another. Holes 66 oppose one
another. Holes 68
oppose one another. As discussed above, pin 56 extends through holes 58 of
base 60 and hole 54
of post 24 to thereby attach post 24 to base 60 of lower arm assembly 26.
Another pin 56
extends through holes 66 of base 60 and also through a hole 108 of release
lever 28 to thereby
attach release lever 28 (which can also be called a trigger) to base 60. Pins
56 in holes 58 and 66
can be substantially identical. By way of example and not by way of
limitation, pins 56 can be
5
CA 02745670 2011-07-07
0.1875 inches x 0.500 inches, and can be formed of a metal such as 18-8
stainless steel. Pins 56
can be laser welded to base 60 at each of the respective holes 58, 66, and the
laser weldment
and/or pins 56 can be polished flush with base 60. A pivot pin 72 extends
through holes 68 of
base 60 and also through a corresponding through-hole 74 of a base 76 of upper
arm assembly 32
to thereby attach base 60 of lower arm assembly 26 to base 76 of upper arm
assembly 32. By
way of example and not by way of limitation, pivot pin 72 can be formed of a
metal such as a
wear resistant stainless steel, such as Nitronic 60, and can have a satin
finish; the longitudinal
ends of pivot pin 72 can be chamfered. Pivot pin 72 can be laser welded to
base 60 of lower arm
assembly at each of the respective holes 68, and the laser weldment and/or
pivot pin 72 can be
polished flush with lower base 60. The distal end of base 60 of lower arm
assembly 26 includes
material which has a blind hole 78 formed therein which opens at the distal
face of base 60; blind
hole 78 can have a chamfered entry, have a generally circular cross-section,
and have a flat
bottom. Blind hole 78 receives a proximal end of rod 62 of lower arm assembly
26 to thereby
connect base 60 and lower rod 62 together. Base 60 can be substantially
similar on the portion
that is not visible in the figures as that portion which is visible in the
drawings. At the
connection of the proximal end of lower rod 62 and blind hole 78 of base 60,
base 60 and lower
rod 62 can be TIG (tungsten inert gas welding) welded together; an appropriate
filler can be used
at this connection. This weldment can be polish blended, and the weld areas
can be passivated.
Base 60 of lower arm assembly 26 has generally a U-shape formed by the
parallel walls (which
are the legs of the U, albeit curved legs) and a junction 80 in which blind-
hole 78 is formed, the
walls being attached to each other only by way of junction 80 at the distal
end of base 60. By
way of example and not by way of limitation, base 60 of lower arm assembly 26
can be formed
of a metal such as 17-4 PH stainless steel (condition H900) or DIN 1.4021
(heat treat and temper
Rc 42-48), and the finish can be a satin finish. Lower base 60 can be
passivated. Lower base 60
can be formed by using a casting operation, by using a metal injection molding
procedure, and/or
by using one or more machining operations such as a milling machining
operation and/or one or
two wire Electrical Discharge Machining (EDM) operations. Lower rod 62 is a
longitudinally
extending lower rod but yet generally has a U-shape. Rod 62 of lower arm
assembly 26 can be
solid throughout and generally have a circular cross-section. Lower rod 62 can
be substantially
similar on the portion that is not visible in the figures as that portion
which is visible in the
drawings. By way of example and not by way of limitation, lower rod 62 can be
formed of a
metal such as 17-4 PH stainless steel (condition H900) or DIN 1.4021 (heat
treat and temper Rc
6
CA 02745670 2011-07-07
42-48), and the finish can be a satin finish. Lower rod 62 can be passivated.
Lower rod 62 can
be formed using a lathe machining operation and then shaped by bending.
[0031] Tip sub-assembly 64 of lower arm assembly 26 includes a coupler 82, two
curved
lateral arms 84, and a tip 86. Coupler 82 (which can also be referred to as a
union) includes three
blind holes 88 and 90, and can otherwise be solid throughout. One hole 88 of
coupler 82
matingly receives and is thereby attached to the distal end of lower rod 62.
Hole 88 can have a
chamfered entry, have a generally cylindrical extension, and have a cone-
shaped bottom, the
point of the cone extending away from the opening of hole 88. Two holes 90 of
coupler 82
matingly receive and are thereby attached respectively to the proximal ends of
lateral arms 84.
Each hole 90 can respectively have a flat bottom away from the openings of
holes 90. Each hole
90 can have a chamfered entry, have a generally cylindrical extension, and
have a flat bottom.
Holes 88, 90 of coupler 82 can be generally directed towards each other and
thus towards a
center of coupler 82. Coupler 82 can be slightly arc-shaped about a
longitudinal axis centered
and running through hole 88, the arc shape being open facing upwardly
generally towards upper
arm assembly 32. By way of example and not by way of limitation, coupler 82
can be formed of
a metal such as 17-4 PH stainless steel (condition H900) or DIN 1.4021 (heat
treat and temper
Rc 42-48), and the finish can be a satin finish. Coupler 82 can be passivated.
Coupler 82 can be
made using a machining operation such as a milling machining operation.
Coupler 82 can be
TIG welded to distal end of lower rod 62 by way of hole 88. Each lateral arm
84 can be solid
throughout. Coupler 82 can be TIG welded to proximal ends of lateral arms 84
respectively by
way of the two holes 90. The distal ends of each lateral arm 84 attaches to a
lateral portion of
lower tip 86 to thereby provide lateral support to lower tip 86. More
specifically, the lateral side
portions of the bottom surface of lower tip 86 include two blind holes 92
which matingly receive
the distal ends of each lateral arm 84 of tip sub-assembly 64. Lateral arms 84
provide lateral
strength to lower tip 86. The distal ends of each lateral arm 84 can each
include a through-hole
188, the position of through-holes 188 being approximately shown in Fig. 5.
Lateral arms 84 can
be solid throughout. Lateral arms 84 are substantially similar to one another.
By way of
example and not by way of limitation, each lateral arm 84 can be formed of a
metal such as 17-4
PH stainless steel (condition H900) or DIN 1.4021 (heat treat and temper Rc 42-
48), and the
finish can be a satin finish. Each lateral arm 84 can be passivated. Lateral
arms 84 can be
formed using a lathe machining operation and then shaped by bending, holes 188
optionally
being formed by a milling machining operation. Each blind hole 92 of lower tip
86 can have a
7
CA 02745670 2011-07-07
chamfered entry, have a generally cylindrical extension, and have a flat
bottom. Lower tip 86 is
coupled with, and extends transversely relative to, lower rod 62. More
specifically, lower tip 86
includes a distal face 94 and a proximal face 96, each of which extends
generally transversely to
a longitudinal axis of clamp 20 (the longitudinal axis extending through
handle 22 and post 24
and distally therefrom). Distal face 94 includes a transversely extending
channel 98. Lower tip
86 includes a slot 100 (which can be called a lower slot) which forms a
through-hole through
lower tip 86 running from channel 98 to proximal face 96 of lower tip 86.
Stated another way,
lower slot 100 extends from proximal face 96 of lower tip 86 to channel 98 of
distal face 94 of
lower tip 86. Belt 36 extends all of the way through lower tip 86 from the
distal side of lower tip
86 to the proximal side of lower tip 86 by way of channel 98 and slot 100.
Slot 100 can flare
outwardly (i.e., chamfered) starting near proximal face 96 and terminating at
proximal face 96 to
thereby increase the cross-sectional area of slot 100 near proximal face 96.
Channel 98 can be
used to at least partially receive stop 162 of belt 36. Lower tip 86 also
includes a female dovetail
102 (which can also be referred to as a receiving slot or as a T-slot) for
matingly receiving a
male dovetail (which can also be referred to as a T-section) of a respective
gripper 34. Female
dovetail 102 (the T-slot 102) can be formed, at least in part, by breaking the
edges of T-slot 102
at both ends of lower tip 86 so that T-slot 102 does not have any sharp edges,
as sharp edges
could tear into or otherwise damage a respective gripper 34 received by T-slot
102. Female
dovetail 102 extends the transverse width of lower tip 86; in this way, a
respective gripper 34 can
be slid into female dovetail 102 from either lateral side of lower tip 86.
Lower tip 86 includes
through-holes 180 which pass through blind holes 92 from distal face 94 to
proximal face 96;
holes 180 can be formed by a milling machining operation. Other than channel
98 formed in
distal face 94 of lower tip 86, the proximal and distal faces 94, 96 of lower
tip 86 are
substantially identical. Further, the transverse sides of lower tip 86 are
substantially identical.
By way of example and not by way of limitation, lower tip 86 can be formed of
a metal such as
17-4 PH stainless steel (condition H900) or DIN 1.4021 (heat treat and temper
Rc 42-48), and
the finish can be a satin finish. Lower tip 86 can have a 63 Ra surface
finish. Lower tip 86 can
be passivated. Lower tip 86 can be formed using a milling machining operation
(to include
channel 98) and slot 100 and T-slot 102 can be formed using a wire EDM
operation. Each
weldment (lower rod 62 to coupler 82; coupler 82 to each lateral arm 84) can
use an appropriate
filler, can be polished, and each such weld area can be passivated. Two cross-
pins 182 can be
used to secure a respective lateral arm 84 to a respective blind hole 92 of
lower tip 86; for
8
CA 02745670 2011-07-07
example, a cross-pin 182 is inserted from either distal face 94 or proximal
face 96 to the
opposing distal face 94 or proximal face 96 using hole 180 in lower tip 86 and
hole 188 of lateral
arm 84 after the distal end of lateral arm 84 is positioned in blind hole 92
and holes 180 and 188
are aligned. After pinning holes 180 and 188 of lower tip 86, cross pins 182
can be laser welded
to holes 180 and/or holes 188, and both sides of lower tip 86 can be polished
flush relative to this
laser weidment. By way of example and not by way of limitation, cross pins 182
can be formed
of a metal such as DIN 1.4021 or 420 stainless steel. Lower arm assembly 26
further includes a
lower gripper 34 attached to lower tip 86; lower gripper 34 is discussed
further below.
[0032] Release lever 28 includes a loop 106 which defines a through-hole 108.
Release lever
28 is secured to base 60 of lower arm assembly 26 by way of a pin 56 through
hole 108 of loop
106 and opposing holes 58 of base 60 of lower arm assembly 26. Release lever
28 further
includes a pressing section 110, a stop portion 112, and a channel 114.
Pressing section 110 is
configured for being pressed down by the surgeon (i.e., by the thumb of the
surgeon) to release
stop portion 112 from the grooves between the teeth 116 of upper arm assembly
32. Stop portion
112 is configured for being lodged between teeth 116 so as to lock upper arm
assembly 32 in
place relative to lower arm assembly 26. Stated another way, release lever 28
is used to
selectively engage or release stop portion 112 relative to teeth 116 so that
grippers 34 can be
moved toward or away from each other to selectively clamp the uterus 166
therebetween or to
release the hold on uterus 166 from therebetween. Channel 114 is formed
between pressing
section 110 and stop portion 112 of release lever 28. Channel 114 receives an
arm 118 of torsion
spring 30. By way of example and not by way of limitation, release lever 28
can be formed of a
metal such as 17-4 PH stainless steel (condition H900) or DIN 1.4021 (heat
treat and temper Rc
42-48), and the finish can be a satin finish. Release lever 28 can have a 63
Ra surface finish.
Release lever 28 can be passivated completely.
[0033] Torsion spring 30 includes a loop 122 and two arms 118, 120, one arm
118 projecting
generally upwardly, the other arm 120 projecting back towards handle 22 (more
specifically,
back to post 24). Pin 56 extends through not only through-holes 66 in base 60
of lower arm
assembly 26 but also through loop 122 of torsion spring 30 and loop 106 of
release lever 28 to
secure both release lever 28 and torsion spring 30 to base 60. The arm 118
projecting generally
upwardly lies in channel 114. The arm 120 projecting back towards post lies
against post, such
as against a distal face of projection 52 of post 24 or against the top face
(which is shown in Fig.
3 as being slanted upwardly running in a proximal direction of the top face)
of projection 52 of
9
CA 02745670 2011-07-07
post 24; this top face (which is slanted) of post 24 can have an angle of 15 ,
20 , 25 , or 30 , or
whatever degree of slant is deemed suitable. Torsion spring 30 biases release
lever 28 into a
locked position against the grooves between teeth 116. The surgeon's pressure
(such as thumb
pressure) on pressing section 110 of release lever 28 can overcome this
biasing pressure of
torsion spring 30 to release lever 28 from teeth 116. Once release lever 28 is
released from teeth
116, the surgeon can selectively open or close clamp 20. Similarly, squeezing
proximal
projection 130 of upper arm assembly 32 may be able to cause stop portion 112
of release lever
28 to move downwardly (in a clockwise direction when viewing Fig. 4) along
upper projection
134 of upper arm assembly 32. When pressing section 110 of release lever 28 is
pressed down to
release stop portion 112 from teeth 116, the placement of stop portion 112 on
upper projection
134 of upper arm assembly 32 can be adjusted, such as by moving stop portion
112 in a counter-
clockwise direction (viewed in Fig. 4) along upper projection 134 of upper arm
assembly 32 by
moving proximal projection 130 of upper arm assembly 32 away from handle 22
(stop portion
112 can also be moved in a clockwise direction (viewed in Fig. 4) along upper
projection 134
when pressing section 110 is pressed downwardly so as to release stop portion
112 from teeth
116). This adjustment using release lever 28 causes grippers 34 to selectively
spread apart or
move closer together relative to one another and thereby to clamp or release
tissue (i.e., that of
the uterus 166); stated another way, clamp 20 can be selectively opened and
closed in this
manner. Teeth 116 enable grippers 34 to be locked into place in predetermined
positions relative
to one another. Torsion spring 30 can be a McMaster Can product, such as
product 9287K28
and be a type 302 stainless steel.
[0034] The upper arm assembly 32 includes an upper base 76, a rod 124, a
plurality of pins
126, and a tip sub-assembly 128. Upper arm assembly 32 is pivotally connected
to lower arm
assembly 26, lower arm assembly 26 and upper arm assembly 32 being configured
for clamping
relative to one another. The upper base 76 includes a proximal projection 130
serving as a piece
which can be gripped by the surgeon along with handle 22 and selectively moved
towards handle
22 as proximal projection 130 is squeezed by the surgeon or moved away from
handle 22;
double-arrow 174 shows the directions in which proximal projection 130 can be
moved. Upper
base 76 also includes a distal end projection 132 which connects to upper rod
124 of upper arm
assembly 32, distal end projection 132 including a female dovetail 136 for
receiving a male
dovetail projection 138 of the proximal end of upper rod 124 of upper arm
assembly 32 (male
dovetail projection 138 can be slidingly received by female dovetail 136
during assembly of
CA 02745670 2011-07-07
clamp 20). Distal end projection 132 further includes through-hole 74 for
receiving pivot pin 72,
pivot pin 72 thereby connecting lower and upper arm assemblies 26, 32 together
and allowing
lower and upper arm assemblies 26, 32 to pivot relative to each other to
selectively clamp and
release an object, such as a uterus 166. Upper base 76 further includes an
upper projection 134
which is generally arched and includes a plurality of teeth 116, teeth 116
being configured for
serving as stops to hold release lever 28 in place selectively at
predetermined positions. Teeth
116 can be formed by a wire EDM operation, the finish of the teeth can be such
that a glass bead
blasting can be used to remove an EDM scale within the teeth. Upper base 76
can be
substantially similar on the portion that is not visible in the figures as
that portion which is
visible in the drawings. By way of example and not by way of limitation, base
76 of upper arm
assembly 32 can be formed of a metal such as 17-4 PH stainless steel
(condition H900) or DIN
1.4021 (heat treat and temper Rc 42-48), and the finish can be a satin finish.
Upper base 76 can
be passivated. Upper base 76 can be formed by using a casting operation, by
using a metal
injection molding procedure, and/or by using one or more machining operations
such as a
milling machining operation and/or one or two wire EDM operations. At the
connection of the
proximal end of upper rod 124 and distal end projection 132 of upper base 76,
upper base 76 and
upper rod 124 can be TIG welded together where the male and female dovetails
136, 138 (of
upper rod 124 and distal end projection 132 of upper base 76, respectively)
connect to one
another; an appropriate filler can be used at this connection. This weldment
can be polish
blended, and the weld areas can be passivated. Upper rod 124 is a
longitudinally extending
lower rod but yet generally has a U-shape. Rod 124 of upper arm assembly 32
can be solid
throughout and generally have a circular cross-section. The proximal end of
upper rod 124
includes male dovetail projection 138, which is received during assembly by
female dovetail
projection 136 of distal end projection 132 of upper base 76. By way of
example and not by way
of limitation, upper rod 124 can be formed of a metal such as 17-4 PH
stainless steel (condition
H900) or DIN 1.4021 (heat treat and temper Rc 42-48), and the finish can be a
satin finish.
Upper rod 124 can be passivated. Upper rod 124 can be formed using a lathe
machining
operation and then shaped by bending; pin holes 140 can be formed in upper rod
124 using a
milling machining operation; and male dovetail 138 of upper rod 124 can
optionally be formed
by a wire EDM operation. Upper rod 124 includes three pin holes 140 spaced
apart along upper
rod 124; upper rod 124 can have more or less pin holes 140. Pin holes 140 can
be through-holes
extending from a top-dead centerline of upper rod 124 to a bottom-dead
centerline of upper rod
11
CA 02745670 2011-07-07
124. Pin holes 140 can have a stepped configuration. Each pin hole 140 can
have a circular
cross-section, and the stepped configuration of each pin hole 140 can have a
greater diameter in
substantially the top half of pin hole 140 and a lesser diameter in
substantially the bottom half of
pin hole 140 (the top half being that portion of upper rod 124 to which belt
36 is attached by way
of pins 126); the step of each pin hole 140 can be positioned at about midway
along the diameter
of upper rod 124. Viewed from the side and where each of pin holes 140 are
positioned, upper
rod 124 can have a slight divot on the top surface and an even smaller divot
on the bottom
surface. Upper rod 124 includes a plurality of pins 126 projecting generally
upwardly from
upper rod 124. Pins 126 can thus have a mating stepped configuration relative
to pin holes 140,
each of pins 126 having a top portion diameter which is greater than a bottom
portion diameter,
the top portion with the greater diameter having a greater length than the
bottom portion having a
smaller diameter. Besides the stepped diameter of pin 126, each pin 126 has a
generally
cylindrical shape (as do through-holes 140 matingly receiving pins 126). Pins
126 extend above
the top surface of upper rod 124 so that belt holes 142 can be secured over
pins 126 and thereby
belt 36 can be held to upper rod 124. By way of example and not by way of
limitation, pins 126
can be formed of a metal such as 17-4 PH stainless steel (condition H900) or
DIN 1.4021 (heat
treat and temper Re 42-48), and the finish can be a satin finish. Pins 126 can
have a 63 Ra
surface finish. Pins 126 can be passivated. Pins 126 can be bonded to holes
140 and/or can form
an interference fit or press fit with holes 140. Pins 126 can be laser welded
to the top surface of
upper rod 124 where pins 126 project above the top surface of upper rod 124 to
receive belt holes
142. These weldments can be polished and passivated. Further, pins 126 can be
TIG welded to
the bottom surface of upper rod 124 all around the bottom of holes 140, and
these weldments can
be polished and passivated; more specifically, these weldments to the bottom
surface of upper
rod 124 can be polished flush with the bottom surfaced of upper rod 124. Thus,
pins 126 serve
to hold belt 36 using belt holes 142, as described below. Upper rod 124 can be
substantially
similar on the portion that is not visible in the figures as that portion
which is visible in the
drawings.
[00351 Tip sub-assembly of upper arm assembly includes another coupler 82, two
curved
lateral arms 144, and a tip 146. Coupler 82 of tip sub-assembly 128 of upper
arm assembly 32 is
substantially identical to coupler 82 of tip sub-assembly 64 of lower arm
assembly 26, but the arc
of the upper coupler 82 is open downwardly generally towards lower arm
assembly 26. Hole 88
of coupler 82 of upper arm assembly 32 matingly receives and is thereby
attached to the distal
12
CA 02745670 2011-07-07
end of upper rod 124. Holes 90 matingly receive and are thereby attached
respectively to the
proximal ends of lateral arms 144. Coupler 82 of upper arm assembly 32 can be
TIG welded to
the distal end of upper rod 124 by way of hole 88. Each lateral arm can be
solid throughout.
Coupler 82 of upper arm assembly 32 can be TIG welded to the proximal ends of
lateral arms
144 respectively by way of the two holes 90. The distal ends of each lateral
arm 144 attaches to
a lateral portion of upper tip 146 to thereby provide lateral support to upper
tip. More
specifically, the lateral side portions of the upper surface of upper tip 146
include two blind holes
148 which matingly receive the distal ends of each lateral arm 144. Lateral
arms 144 provide
lateral strength to upper tip 146. The distal ends of each lateral arm 144 can
each include a
through-hole 188, the position of through-holes 188 being approximately shown
in Fig. 8.
Lateral arms 144 can be solid throughout. Lateral arms 144 are substantially
similar to one
another. By way of example and not by way of limitation, each lateral arm 144
can be formed of
a metal such as 17-4 PH stainless steel (condition H900) or DIN 1.4021 (heat
treat and temper
Re 42-48), and the finish can be a satin finish. Each lateral arm 144 can be
passivated. Lateral
arms 144 can be formed using a lathe machining operation and then shaped by
bending, holes
188 optionally being formed by a milling machining operation. Each blind hole
148 of upper tip
146 can have a chamfered entry, have a generally cylindrical extension, and
have a flat bottom.
Upper tip 146 is coupled with, and extends transversely relative to, upper rod
124. More
specifically, upper tip 146 includes a distal face 150 and a proximal face
152, each of which
extends generally transversely to the longitudinal axis of clamp 20. Upper tip
146 includes a slot
154 (which can be called an upper slot) which forms a through-hole through
upper tip 146
running from distal face 150 to proximal face 152 of upper tip 146. Stated
another way, upper
slot 154 extends from proximal face 152 of upper tip 146 to distal face 150 of
upper tip 146.
Slot 154 can flare outwardly (i.e., chamfered) starting near proximal face 152
and terminating at
proximal face 152 to thereby increase the cross-sectional area of slot near
proximal face; slot 154
can similarly flare (i.e., chamfered) relative to distal face 150. Belt 36
extends all of the way
through upper tip 146 from proximal face 152 of upper tip 146 to distal face
150 of upper tip 146
by way of slot 154. Upper tip 146 also includes a female dovetail 156 (which
can also be
referred to as a receiving slot or as a T-slot) for matingly receiving a male
dovetail 104 of a
respective gripper 34. Female dovetail 156 extends the transverse width of
upper tip 146; in this
way, a respective gripper 34 can be slid into female dovetail 156 from either
lateral side of upper
tip 146. Female dovetail 156 (the T-slot 156) can be formed, at least in part,
by breaking the
13
CA 02745670 2011-07-07
edges of T-slot 156 at both ends of upper tip 146 so that T-slot 156 does not
have any sharp
edges, as sharp edges could tear into or otherwise damage a respective gripper
34 received by T-
slot 156. Upper tip 146 includes through-holes 184 which pass through blind
holes 148 from
distal face 150 to proximal face 152; holes 184 can be formed by a milling
machining operation.
The proximal and distal faces 150, 152 of upper tip 146 are substantially
identical. Further, the
transverse sides of upper tip 146 are substantially identical. By way of
example and not by way
of limitation, upper tip 146 can be formed of a metal such as 17-4 PH
stainless steel (condition
H900) or DIN 1.4021 (heat treat and temper Re 42-48), and the finish can be a
satin finish.
Upper tip 146 can have a 63 Ra surface finish. Upper tip 146 can be
passivated. Upper tip 146
can be formed using a milling machining operation and slot 154 and T-slot 156
can be formed
using a wire EDM operation. Each weldment (upper rod 124 to coupler 82 of
upper arm
assembly 32; coupler 82 of upper arm assembly 32 to each lateral arm 144) can
use an
appropriate filler, can be polished, and each such weld area can be
passivated. Two cross-pins
186 can be used to secure a respective lateral arm 144 to a respective blind
hole 148 of upper tip
146; for example, a cross-pin 186 is inserted from either distal face 150 or
proximal face 152 to
the opposing distal face 150 or proximal face 152 using hole 184 in upper tip
146 and hole 188
of lateral arm 144 after the distal end of lateral arm 144 is positioned in
blind hole 148 and holes
184 and 188 are aligned. After pinning holes 184 and 188 of upper tip 146,
cross pins 186 can
be laser welded to holes 184 and/or holes 188, and both sides of upper tip 146
can be polished
flush relative to this laser weldment. By way of example and not by way of
limitation, cross pins
186 can be formed of a metal such as DIN 1.4021 or 420 stainless steel. Upper
arm assembly 32
further includes an upper gripper 34 attached to upper tip 146; upper gripper
34 is discussed
further below.
[0036] Grippers 34 are used to contact and clamp therebetween a lower uterine
segment 168.
Figs. 9 and 10 show one gripper 34, each gripper 34 being at least
substantially similar to one
another. Thus, lower gripper 34 and upper gripper 34 (lower gripper 34 being
associated with
lower arm assembly 26 and upper gripper 34 being associated with upper arm
assembly 32) are
substantially identical to one another. Upper and lower grippers 34 are
configured for clamping
therebetween a lower uterine segment 168. It is understood that Fig. 10 shows
either the
proximal or the distal end view of gripper 34, both end views being
substantially similar to one
another. Further, it is understood that Fig. 9 shows either lateral side view
of gripper 34, both
lateral side views of gripper 34 being substantially similar to one another.
Gripper 34 includes a
14
CA 02745670 2011-07-07
male dovetail 104 which mates with a corresponding female dovetail slot 102,
156 of either tip
86, 146 of lower and upper arm assemblies 26, 32. Male dovetail 104 of
grippers 34 can be slid
into female dovetails 102, 156 of lower and upper tips 86, 146 and prevented
from sliding out of
female dovetails 102, 156 by way of a friction fit (i.e., by way of a
stickiness of grippers 34
provided by the silicone); it is understood that grippers 34 can be removed
from tips 86, 146 and
replaced with a new set of grippers 34. Gripper 34 also includes a contact
portion 158. Contact
portion 158 serves to clamp a portion of the uterus 166 between respective
contact portions 158
of opposing grippers 34. Fig. 4 shows opposing grippers 34 with their
respective contact
portions 158 clamping a portion (such as a lower uterine segment 168) of
uterus 166
therebetween (grippers 34 and uterus 166 are not necessarily shown
proportionally to size).
Grippers 34 of clamp 20 can meet and be at least substantially parallel when
grippers 34 are
assembled on clamp 20 and clamp 20 is closed. By way of example and not by way
of
limitation, each gripper 34 can be formed of a material such as a silicone
rubber, such as Wacker
407/70 (i.e., Elastosil R 407/70) or Wacker 407/70A and have a gloss finish
(U.S. provisional
application 61/361,994 listed material for the gripper therein as 917TK, which
is a supplier
number for a blended material having silicone rubber as base material).
Additives such as a
color pigment and/or a radiopaque substance can be provided to gripper 34
material so that
gripper 34 has a certain color (i.e., black) and so that gripper 34 is
viewable by way of, for
example, an X-ray machine. For example (and not by way of limitation), a
supplier's material
(i.e., A70018BLK1 of supplier Medical Elastomer Development) containing 1%
black pigment
and 5% barium sulfate can be added to the aforementioned Wacker material, or
the gripper 34
material itself can include these components in such overall proportions.
Gripper 34 can be
secured to a respective T-slot 102, 156 using a friction fit between gripper
34 and the respective
T-slot 102, 156 (a press fit between gripper 34 and the respective T-slot 102,
156 is not
necessarily used). Gripper includes a slot 70 which receives a portion of
lower and upper tips
86, 146 to hold gripper 34. Gripper 34 can be made by heating up the material
of gripper 34 and
shooting the heated material through an extrusion tool and thereby extruding
the gripper 34 (each
piece can be extruded to size, or, if necessary, the process can include
cutting the material to size
after extrusion). Alternatively, gripper 34 can be made by injection molding.
When clamp 20 is
closed, grippers 34 can provide a substantially even amount of pressure across
the length of
grippers 34, or can, alternatively, provide more pressure in the regions of
the lateral sides. When
clamp 20 is closed, grippers 34 meet and are parallel relative to one another.
CA 02745670 2011-07-07
[00371 Belt 36 is connected to lower arm assembly 26 and upper arm assembly 32
and is
configured for forming a loop 160 between lower arm assembly 26 and upper arm
assembly 32.
Figs. 1, 4, and 11 show belt 36 of uterine clamp assembly 20 of the present
invention. Belt 36
includes a body 164 with a plurality of through-holes 142. Through-holes 142
are spaced apart
relative to one another. Fig. 11 shows that belt 36 can include twenty through-
holes 142, but it is
understood that belt 36 can include more or less such through-holes. Holes 142
are positioned
over pins 126 and thereby lock belt 36 in predetermined positions. The
plurality of holes 142 are
thus configured for being selectively attached to the plurality of pins 126
and thereby for
adjusting a size of loop 160, loop 160 being configured for compressing a
portion of a uterus
166, that portion being generally a fundus 170 of uterus 166. Belt 36 also
includes a stop 162.
Stop 162 is positioned on one end of belt 36. Stop 162 is positioned adjacent
channel 98 (and
can be at least partially received by channel 98) and serves to prevent the
end of belt 36 which
has stop 162 from passing through lower slot 100 of lower tip 86 of lower arm
assembly 26.
Body 164 of belt 36 extends through lower slot 100 and through upper slot 154.
Belt 36 can be
elastic and can be made of, for example, rubber. Further, by way of example
and not by way of
limitation, belt 36 can be formed of a material such as silicone rubber, such
as Momentive Tufel
94605 (which is understood to be a low volatile extrusion heat cured rubber),
and have a matte
finish (U.S. provisional application 61/361,994 listed material for the belt
therein as 917TL,
which is a supplier number for a blended material having silicone rubber as
base material).
Additives such as a color pigment and/or a radiopaque substance can be
provided to belt 36
material so that belt 36 has a certain color (i.e., black) and so that belt 36
is viewable by way of,
for example, an X-ray machine. For example (and not by way of limitation), a
supplier's
material (i.e., A60017BLK1 of supplier Medical Elastomer Development)
containing 1% black
pigment and 5% barium sulfate can be added to the aforementioned Momentive
material, or the
belt 36 material itself can include these components in such overall
proportions. Belt 36 can be
made using a transfer molding process. By way of example and not be way of
limitation, belt 36
can be approximately 1.56 inches in width, 20 inches in length, and 0.062
inches in thickness
(the thickness referencing body 164, not stop 162), and stop 162 can have an
approximately
square cross-section).
[0038) Fig. 4 shows belt 36 in a solid line and shows uterus 166 schematically
in broken lines.
Belt 36 is shown with stop 162 being stopped by lower tip 86, belt 36
proceeding through slot
100 of lower tip 86 (in a distal to a proximal direction), then into the space
between lower and
16
CA 02745670 2011-07-07
upper rods 62 and 124 and encircling uterus 166 (in broken lines), belt 36
then proceeding
through slot 154 of upper tip 146 (in a proximal to a distal direction), then
to the outside of upper
tip sub-assembly 128 and upper rod 124 and proceeding along upper rod 124 in a
distal to a
proximal direction, belt 36 then being selectively seated over pins 126 in
three of belt holes 142.
The tightness of belt 36 over uterus 166 can be selectively tightened or
loosened by the surgeon
by adjusting which belt holes 142 pins 126 are inserted therethrough. Uterus
166 is shown
schematically being clamped between grippers 34. It is understood that in use
the portion of
uterus 166 nearer pivot pin 72 is the fundus 170 of uterus (that portion of
uterus 166 which is
opposite or remote from the opening of the uterus 166, the opening of uterus
166 not being
shown in Fig. 4) and that lower uterine segment 168 of uterus 166 is nearer
grippers 34 (the
opening of uterus 166 can be to the left of grippers 34 in Fig. 4). To tighten
belt 36 around
uterus 166 (and thereby to compress uterus 166 more), the end of belt 36
opposite stop 162 is
pulled toward handle 22 and then belt 36 is seated onto pins 126 using belt
holes 142 which are
closer to stop 162.
[00391 Regarding one option for assembling clamp 20, drill and crosspin post
24 with cross pin
48. Fuse weld cross pin 48 relative to post 24 and/or projection 42 of handle
22, and polish flush
cross pin 48 relative to post 24. Insert the resultant assembly into base 60
of lower arm assembly
26, base 60 and lower rod 62 already having been attached together. Insert
release lever 28 and
torsion spring 30. Clip arms 118, 120 of torsion spring 30 to length. Pin
using two pins 56; laser
weld pins 56 relative to base 60, and polish flush. Insert the already
assembled upper rod 124
and upper base 76 of upper arm assembly 32 into the resultant assembly. Insert
pivot pin 72;
laser weld both sides of pivot pin 72 relative to base 60 of lower arm
assembly 26, and polish
flush. Attach tip sub-assembly 128 of upper arm assembly 32 to upper rod 124;
properly locate
and orient; TIG weld all around the connection between this tip sub-assembly
128 and upper rod
124; and polish this weldment. Attach tip sub-assembly 64 of lower arm
assembly 26 to lower
rod 62; properly locate and orient; TIG weld all around the connection between
this tip sub-
assembly 64 and lower rod 62; and polish this weldment. Slidably insert a
respective gripper 34
into each of tips 86, 146 and position in T-slots 102, 156. When forming the
parts of clamp 20,
all burrs and sharp edges should be removed unless otherwise specified. Clamp
20 must operate
smoothly when assembled. All parts of clamp 20 (except possibly belt 36 and
grippers 34) can
be made of a metal. Parts can be passivated during assembly at appropriate
times. Alternatively,
all parts of clamp 20 can be assembled together but for grippers 34, belt 36,
handle 22, and cross
17
CA 02745670 2011-07-07
pin 48. This sub-assembly can be passivated as a unit (such passivation can
occur, for example,
using a bath). Then, handle 22 can be attached to post 24 using cross pin 48,
and cross pin 48
can be laser welded in place, as discussed above; this weldment can be wipe
passivated. Further,
to the extent that any laser etching is performed after such a main
passivation step (for example,
to provide such information as the lot code, a drawing number, a logo), the
parts laser etched can
be wipe passivated after such etching. Any or all of the materials of clamp 20
can be
biologically inert and corrosion resistant.
[00401 In use, clamp 20 can be used relative to a Caesarean section delivery
of a baby, such as
a human baby. As indicated above, clamp 20 can be used to prevent life-
threatening bleeding
following delivery of the baby by applying pressure to the uterus 166.
Optionally, clamp 20 can
be used to retract uterus 166 from the pelvis of the patient, for example,
following the delivery of
the baby via the Caesarean section delivery. Alternatively, uterus 166 can be
retracted from
pelvis and essentially laid on the abdomen of the patient by way of the hands
of the operating
room personnel (and thus not by way of clamp 20). Belt 36 is threaded first
through lower slot
100 (in a distal to a proximal direction) and then through upper slot 154 (in
a proximal to distal
direction). Stop 162 prevents belt 36 from being pulled all of the way through
lower tip 86.
Grippers 34 are selectively opened and closed using release lever 28 and upper
projection 134 of
upper arm assembly 32. Clamp 20 is positioned about uterus 166 with belt 36
positioned in slots
100, 154 and proceeding circumferentially around uterus 166 at or near fundus
170 of uterus
166. Optionally, grippers 34 can be clamped to the lower uterine segment 168;
the clamping of
grippers 34 can be positioned upward (that is, toward fundus 170 and away from
the natural
opening (not shown) of uterus 166) from the transverse uterine incision
(indicated by point 178
in Fig. 4) used to remove the baby and the placenta from uterus 166 (further,
to the extent that an
additional incision is used to release the water, then grippers 34 can be
similarly placed upward
relative to this incision). Release lever 28 is secured to the grooves between
teeth 116. Belt 36
can be tightened to provide the desired degree of compression of belt 36 on
uterus 166. Belt 36
is secured to pins 126 through belt holes 142. Optionally, clamp 20 can be
oriented anterior and
inferior towards the bladder. Lower rod 62 can be oriented generally adjacent
the patient's body,
while upper rod 124 is oriented generally away from the patient's body.
Further, grippers can be
generally directed inferior relative to patient's body. Clamp 20 can be
clamped onto uterus
during the procedure, such as when suturing the transverse uterine incision
and generally
preparing the uterus to be positioned back in the patient's body. Grippers 34
can be clamped
18
CA 02745670 2011-07-07
onto lower uterine segment so as to pinch blood flowing in uterus, such as
arterial blood flow,
and thereby to have minimal blood flow in uterus. By way of example and not by
way of
limitation, grippers 34 can be clamped in place for approximately 10-30
seconds. Further, belt
36 can be initially secured in place relative to pins 126 to provide a desired
amount of
compression about uterus (initially, this amount of compression could be
little to no
compression, depending upon the circumstances). If uterus 166 is not found to
contract, then
belt 36 can be tightened to provide additional compressive forces to uterus
166. The transverse
uterine incision 178 can then be sutured. Again, if uterus 166 is not
contracting to a sufficient
degree, belt 36 can be tightened even further. To remove clamp 20 from uterus
166, release
lever 28 can be depressed to release release lever 28 from the grooves between
teeth 116.
Proximal projection 130 of upper arm assembly 32 can be moved away from handle
22 to
separate grippers 34 from one another and to thereby release the hold on
uterus 166. Further,
belt 36 can be pulled off of pins 126 to loosen belt 36 around uterus 166.
[00411 Fig. 12 shows an alternative embodiment of the uterine compression
clamp of the
present invention. This clamp has the reference number 200. Clamp 200
functions in principle
like clamp 20 and includes parts having substantially similar geometry as
clamp 20, except as
shown in Fig. 12. Thus, several parts are omitted from Fig. 12. Further, clamp
200 can be made
of substantially similar material and in substantially similar ways as clamp
20. Fig. 12 shows
lower arm assembly 202 and upper arm assembly 204 of clamp 200, assemblies
202, 204 being
exploded from one another. Further, certain parts of lower arm assembly 202
are shown
exploded from each other. Lower arm assembly 202 includes lower base 206,
lower rod 208,
and lower tip 210. Lower base 206 includes opposing holes 212 for receiving a
pin for securing
a post, opposing holes 214 for receiving a pin for securing a torsion spring
and a release lever,
and opposing holes 216 for receiving a pivot pin to pivotally couple lower and
upper arm
assemblies 202, 204 together. Lower rod 208 directly connects to lower tip
210. Lower rod 208
can conceivably be TIG welded to a blind hole of lower tip 210, and an
appropriate filler and a
polish blend can be used relative to this TIG weldment; alternatively, lower
rod 208 can be
attached to lower tip 210 using a cross pin arrangement and laser welding as
described relative to
clamp 20. Lower tip 201 includes a channel 218, a slot 220 for receiving a
belt, and a T-slot 222
for receiving a gripper. Upper arm assembly 204 includes an upper base 224, an
upper rod 226,
and an upper tip 228. Upper base 224 includes a through-hole 230 for receiving
the pivot pin, as
well as additional features similar to clamp 20. Upper rod 226 receives a
plurality of pins 232
19
CA 02745670 2011-07-07
for connecting to the belt. Upper rod 226 directly connects to upper tip 228.
Upper rod 226 can
conceivably be TIG welded to a blind hole of upper tip 228, and an appropriate
filler and a polish
blend can be used relative to this TIG weldment; alternatively, upper rod 226
can be attached to
upper tip 228 using a cross pin arrangement and laser welding as described
relative to clamp 20.
Upper tip 228 includes a slot 234 for receiving the belt, and a T-slot 236 for
receiving a gripper.
[0042] The present invention further provides a method of using a medical
clamp 20. The
method includes the steps of: providing lower arm assembly 26 and upper arm
assembly 32;
connecting pivotally upper arm assembly 32 to lower arm assembly 26;
connecting belt 36 to
lower arm assembly 26 and upper arm assembly 32; forming a loop 160, using
belt 36, between
lower arm assembly 26 and upper arm assembly 32; and clamping lower arm
assembly 26 and
upper arm assembly 32 relative to one another. Lower arm assembly 26 includes
a
longitudinally extending lower rod 62 and a lower tip 86 which is coupled with
and extends
transversely relative to lower rod 62, upper arm assembly 26 including a
longitudinally
extending upper rod 124 and an upper tip 146 which is coupled with and extends
transversely
relative to upper rod 124. Lower tip 86 includes a proximal face 96, a distal
face 94 including a
channel 98, and a lower slot 100 extending from proximal face 96 of lower tip
86 to said channel
98 of distal face 94 of lower tip 86. Upper tip 146 includes a proximal face
152, a distal face
150, and an upper slot 154 extending from proximal face 152 of upper tip 146
to distal face 150
of upper tip 146. Lower arm assembly 26 includes a lower gripper 34 attached
to lower tip 86
and upper arm assembly 32 includes an upper gripper 34 attached to upper tip
146, the method
further including clamping a lower uterine segment 168 between upper gripper
34 and lower
gripper 34. Belt 36 includes a stop 162 and a body 164 with a plurality of
holes 142. The
method further includes positioning stop 162 adjacent channel 98 and extending
body 164
through lower slot 100 and upper slot 154. Upper rod 124 includes a plurality
of pins 126
projecting therefrom, the method further including attaching selectively
plurality of holes 142 to
plurality of pins 126 and thereby adjusting a size of loop 160, and
compressing, using loop 160, a
portion (for example, a fundus 170) of a uterus 166. The alternative
embodiment of Fig. 12 can
be used in a similar manner.
[0043] While this invention has been described with respect to at least one
embodiment, the
present invention can be further modified within the spirit and scope of this
disclosure. This
application is therefore intended to cover any variations, uses, or
adaptations of the invention
using its general principles. Further, this application is intended to cover
such departures from
CA 02745670 2011-07-07
the present disclosure as come within known or customary practice in the art
to which this
invention pertains and which fall within the limits of the appended claims.
21