Note: Descriptions are shown in the official language in which they were submitted.
CA 02759694 2016-08-17
SYSTEM AND METHOD FOR IDENTIFYING A LANDMARK
Cross Reference to Related Applications:
[0001] This application claims priority to U.S. Provisional Application
Serial No.
61/173,069, filed on April 27, 2009.
BACKGROUND
Technical Field:
[0002] This disclosure relates to identification of blind landmarks on
orthopaedic implants.
Description of the Related Art:
[0003] The interlocking nail has significantly widened the scope for
intramedullary (IM)
fixation of long bone fractures. Anchoring an IM nail to a bone makes the
construct more
stable longitudinally and stops rotation of the nail within the bone. A
typical IM nail fixation
surgery involves a combination of j igs, x-ray imaging, and manual "eye-
balling" to locate
and drill the distal screw holes and to install the screws in the screw holes.
[0004] In IM nail fixation surgery, an IM nail is inserted into the canal
of a fractured long
bone in order to fixate the fractured ends together. Typically, the proximal
locking is
performed first and is usually carried out with a jig. Nail deformation during
intramedullary
insertion, however, may make a jig inaccurate for the distal screws. In fact,
the positioning of
the distal locking screws and alignment of the drill for the drilling of the
distal screw holes is
the most time consuming and challenging step of the implantation procedure.
The two main
reasons for failure in distal locking are (1) incorrect entry point on the
bone and (2) wrong
- I
CA 02759694 2011-10-21
WO 2010/129141
PCT/US2010/030784
orientation of the drill. If either of these problems occurs, then the drill
will not go through
the nail hole. An inaccurate entry point also compounds the problem as the
rounded end of
the drill bit often slips, damaging healthy bone rendering it difficult to
place another drill hole
next to the inaccurate hole. Inaccurate distal locking may lead to premature
failure with
breakage of the nail through the nail hole, breakage of the screw, or the
breaking of the drill
bit within the bone.
[0005] Manual techniques are the most common and accepted techniques for
sighting the
distal screw holes. The majority of manual distal targeting techniques employ
a guide
bushing or cylindrical sleeve that guides the drill. The mechanisms of
aligning the guide
bushing and keeping it in place differ. There are cases where the surgeons use
a guide
bushing cut in half longitudinally or a full guide bushing to help steady the
drill bit. In either
situation, the surgeon will incise the patient and insert the drill through
the incision. Manual
techniques are based primarily on the surgeon's manual skill and make use of
radiographic x-
ray imaging and mechanical jigs.
[0006] Another method for achieving this on long nails is by using a technique
called
"perfect circles" with the aid of a C-shaped arm. This is where the patient
and the C-arm are
oriented such that when viewing the implant fluoroscopically the hole through
which the
screw is to pass appears to be in the shape of a circle. If the C-arm is not
perpendicular to the
hole then the hole appears oblong or even absent.
[0007] A need exists for an improved system and method for accurately and
dependably
targeting landmarks of a medical implant. Further, a need exists for
accurately positioning
the distal locking screws and aligning the drill for the drilling of the
distal screw holes. Still
- 2 -
CA 02759694 2011-10-21
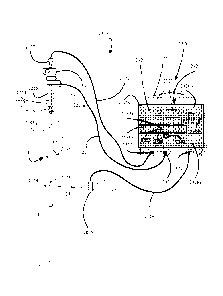
WO 2010/129141
PCT/US2010/030784
further, a need exists for an improved system for targeting landmarks whereby
the
components may be easily sterilized or autoclaved and reused again.
SUMMARY
[0008] In a general aspect, a system for identifying a landmark includes a
field generator
for generating an electromagnetic field and a landmark identifier. The field
generator and the
landmark identifier are disposed in a common housing, and the field generator,
the landmark
identifier, and the common housing are autoclavable. The system also includes
an
orthopaedic implant located within the electromagnetic field, and the
orthopaedic implant
includes at least one landmark. A first magnetic sensor is spaced apart from
the at least one
landmark by a set distance, and a processor compares sensor data from the
first sensor and
landmark identifier and uses the set distance to calculate the position of the
landmark
identifier relative to the at least one landmark.
[0009] Implementations may include one or more of the following features. For
example,
the landmark is selected from the group consisting of a structure, a hole, a
void, a boss, a
channel, a detent, a flange, a groove, a member, a partition, a step, an
aperture, a bore, a
cavity, a dimple, a duct, a gap, a notch, an orifice, a passage, a slit and a
slot. The
orthopaedic implant may be an intramedullary nail. The orthopaedic implant has
an outer
surface and an inner surface forming a cannulation, and the first sensor is
mounted to a distal
portion of a probe that extends into the earmulation. The common housing in
some
implementations also accommodates a drill motor, the drill motor being
coupleable to a drill
bit. The housing may include a drill sleeve. The housing may be disk-shaped.
The drill
extends normally outward from the disk-shaped housing. The system can also
include an
- 3 -
CA 02759694 2011-10-21
WO 2010/129141
PCT/US2010/030784
insertion handle removably coupled to the orthopaedic implant. An adjustable
stop can be
coupled to the implant and includes a slot through which the probe extends.
The adjustable
stop includes a clamp mechanism to hold the probe in a fixed position. The
probe may
include a plurality of spaced apart markings, and the adjustable stop includes
a clamp
mechanism to hold the probe in a fixed position on a marking or between two
markings.
[0010] In another general aspect, identifying a landmark includes providing an
orthopaedic
implant assembly having an orthopaedic implant having at least one landmark,
implanting the
orthopaedic implant assembly in a patient, and placing a probe in the implant.
The probe
includes an electromagnetic sensor. Identifying the landmark further includes
generating an
electromagnetic field that encompasses the sensor and landmark, identifying
the at least one
landmark using a landmark identifier, installing a transfixion element in the
at least one
landmark, and removing the probe. The landmark identifier is disposed in an
autoclavable
housing.
[0011] Implementations may include one or more of the following features. For
example,
the landmark is selected from the group consisting of a structure, a hole, a
void, a boss, a
channel, a detent, a flange, a groove, a member, a partition, a step, an
aperture, a bore, a
cavity, a dimple, a duct, a gap, a notch, an orifice, a passage, a slit and a
slot. The
orthopaedic implant may be an intramedullary nail. The orthopaedic implant has
an outer
surface and an inner surface forming a carmulation, and identifying a landmark
further
includes mounting the first sensor to a distal portion of a probe that extends
into the
cannulation. The field generator and landmark identifier are disposed in a
common
autoclavable housing and identifying the landmark also includes autoclaving
the housing.
- 4 -
CA 02759694 2011-10-21
WO 2010/129141
PCT/US2010/030784
The field generator and landmark identifier are disposed in a common
autoclavable housing
that may also accommodates a drill motor, the drill motor being coupled to a
drill bit, and
identifying a landmark further comprises autoclaving the housing and drill.
The housing may
include a drill sleeve. The housing may be disk-shaped. Identifying a landmark
also includes
removably coupling an insertion handle to the orthopaedic implant and/or
clamping the probe
in a fixed position. The probe comprises a plurality of spaced apart markings
and the probe is
clamped in a fixed position on a marking or between two markings.
100121 In another general aspect, a system for identifying a landmark includes
an
autoclavable housing accommodating a field generator for generating an
electromagnetic
field, a landmark identifier, and a drill motor. An orthopaedic implant is
located within the
electromagnetic field and the orthopaedic implant has at least one landmark. A
probe
includes a first electromagnetic sensor and is placed within the orthopaedic
implant and
spaced apart from the at least one landmark by a set distance. A processor is
also included
for comparing sensor data from the first sensor and landmark identifier and
for using the set
distance to calculate the position of the landmark identifier relative to the
at least one
landmark. The first electromagnetic sensor is coupled to the processor via the
probe.
[00131 In another general aspect, a kit for identifying landmarks on medical
implants
includes an autoclavable housing accommodating a field generator for
generating an
electromagnetic field, and a landmark identifier. A plurality of orthopaedic
implants are also
included, one of which is located within the electromagnetic field. Each
orthopaedic implant
includes at least one landmark. A plurality of probes, each including an
electromagnetic
sensor, is included. One of the probes selected based on a size of the implant
disposed in the
- 5 -
CA 02759694 2011-10-21
WO 2010/129141
PCT/US2010/030784
electromagnetic field. The selected probe is placed within the implant in the
electromagnetic
field and spaced apart from the at least one landmark by a set distance. A
processor is
included for comparing sensor data from the first sensor and landmark
identifier and for using
the set distance to calculate the position of the landmark identifier relative
to the at least one
landmark, wherein the first electromagnetic sensor is coupled to the processor
via the probe.
[00141 In another general aspect, a system for targeting a landmark of an
orthopaedic
implant includes an autoclavable housing, a field generator disposed within
the housing for
generating an electromagnetic field, a first electromagnetic sensor for
disposition at a set
distance from the landmark that generates sensor data in response to the
generated
electromagnetic field, and an element removably coupled to the housing, the
element defining
a longitudinal axis that represents one axis of the generated magnetic field.
The system is
configured to use the one axis of the generated electromagnetic field to
determine the position
of the element relative to the landmark.
[0015] Implementations may include one or more of the following features. For
example,
the system can include a first probe having a proximal portion and a distal
portion, the first
electromagnetic sensor disposed on the distal portion of the probe, a
retractable probe
including the first electromagnetic sensor, or a retractable probe including
the first
electromagnetic sensor and a housing containing at least a portion of the
retractable probe. A
second electromagnetic sensor disposed on the proximal portion of the first
probe can also be
included. The system can include a second probe having a proximal and a distal
portion and
a third electromagnetic sensor disposed on the distal end of the second probe,
where the
second probe is longer than the first probe. The system can also include a
processor for
- 6 -
CA 02759694 2011-10-21
WO 2010/129141
PCT/US2010/030784
comparing the sensor data from the first electromagnetic sensor and the
element and using the
set distance to calculate the position of the element relative to the
landmark. The system can
include an adjustable stop that is connectable to the orthopedic implant. The
adjustable stop
can include a slot through which the first or the second probe extends and
includes a
clamping mechanism to hold the first or second probe in a fixed position. The
first or the
second probe can include a plurality of spaced apart indicators such that the
clamping
mechanism can be selectively set to hold the first or second probe in a fixed
position at an
indicator or between indicators. A handle can be removably coupled to the
orthopedic
implant. The autoclavable housing can be disk-shaped. The element can include
one of a
drill guide, a drill sleeve, a drill, a drill nose, a drill barrel, a drill
chuck, and a fixation
element. The orthopedic implant can include one of an intramedullary nail, a
bone plate, a
hip prosthetic, a knee prosthetic, a spinal prosthetic, and a shoulder
prosthetic. The first or
the second probe can be coiled or bent prior to placement into the orthopedic
implant. The
first electromagnetic sensor includes a proximal end and a distal end. The
distal end of the
first electromagnetic sensor is connected to a proximal end of the orthopedic
implant such
that the first electromagnetic sensor is spaced apart a set distance from at
least one landmark
disposed in a proximal region of the orthopedic implant. At least the housing
and the element
are reusable. The housing is made from one of ceramic, silicone, polypropylene
(PP),
polycarbonate (PC), polymethylpentene (PMP), PTFE resin, or polymethyl
methacrylate
(PMMA or acrylic).
[0016] In another general aspect, an apparatus for targeting a landmark of an
orthopaedic
implant includes an insertion handle removably attachable to the orthopaedic
implant, an
adjustable stop comprising an actuator, and a probe comprising a sensor and a
plurality of
- 7 -
CA 02759694 2011-10-21
WO 2010/129141
PCT/US2010/030784
markings to assist in placing the probe and sensor at a desired location with
respect to the
orthopaedic implant.
[0017] Implementations may include one or more of the following features. For
example,
the adjustable stop includes a mating portion such that when the stop is
connected to the
insertion handle, the stop is located or fixed within three degrees of
freedom. The insertion
handle is attached to the orthopaedic implant through use of a cannulated
bolt.
[0018] In another general aspect, a kit for targeting a landmark of an
orthopaedic implant
includes a proximal targeting probe comprising a tape body and a sensor
included within or
on the tape body at a predetermined distance from a reference point of the
tape body. The
proximal targeting probe includes a first indicator that indicates that the
proximal targeting
probe is to be used for targeting proximal landmarks of an orthopaedic
implant. The kit also
includes a distal targeting probe that includes a tape body that is longer
than the tape body of
the proximal targeting probe and a sensor included within or on the tape body
of the distal
targeting probe at a second predetermined distance from a second reference
point of the target
body of the distal targeting probe. The distal targeting probe includes a
second indicator that
indicates that the distal targeting probe is to be used for targeting distal
landmarks of the
orthopaedic implant.
[0019] Implementations may include one or more of the following features. For
example,
the first indicator includes a color-coded grip and the second indicator
includes a color-coded
grip that is a different color than the first indicator. The first indicator
includes a color-coded
grip and the second indicator includes a color-coded grip that is a different
color than the first
indicator. The proximal targeting probe includes a cable for carrying a signal
from the sensor
- 8 -
CA 02759694 2011-10-21
WO 2010/129141
PCT/US2010/030784
included within or on the tape body of the proximal targeting probe to a
control unit, and the
distal targeting probe includes a second cable for carrying a second signal
from the sensor
included within or on the tape body of the distal targeting probe to the
control unit. The
sensors included within or on the tape bodies of the proximal and distal
targeting probes are
connected to one or more Programmable Read-Only Memory microchip that
identifies
whether the proximal and distal targeting probes are used for proximal or
distal targeting.
The tape bodies of the proximal and distal targeting probes include one or
more bends to bias
at least a portion of the tape bodies against a wall of the orthopaedic
implant.
[0020] In another general aspect, a probe for use in targeting a landmark of
an orthopaedic
implant includes a housing, a retractable or extensible body disposed within
the housing. The
body is configured to form a generally straight shape when extended from the
housing. A
sensor is disposed within the body and is positionable at a first location for
targeting a
proximal landmark of the orthopaedic implant. The sensor is positionable at a
second
location for targeting a distal landmark of the orthopaedic implant. The body
comprises one
of layered, flexible stainless steel spring bands, resilient plastics, or
rubber tubing or sheeting.
The body includes a plurality of nested segments of tubing that can extend and
retract by
sliding within adjacent tubing segments.
[00211 In another general aspect, an apparatus for targeting a landmark
located in a
proximal end of an orthopaedic implant includes an insertion handle and a
sensor disposed
within or on the insertion handle at a predetermined distance from a proximal
locking
aperture formed in the orthopaedic implant when the insertion handle is
attached to the
- 9 -
CA 02759694 2011-10-21
WO 2010/129141
PCT/US2010/030784
orthopaedic implant. The sensor is passive or electrically powered. The sensor
is mounted in
a housing that is unitary or integral with the insertion handle.
[0022] The disclosed methods and apparatuses include several advancements.
First, the
disclosed methods and apparatuses can operate independently of fluoroscopy and
eliminate
the necessity of X-ray devices for targeting of transfixion elements, thereby
reducing the
exposure of users and patients to radiation. Second, disclosed methods and
apparatuses allow
a user to lock the driving-end of the implant before locking the non-driving
end of the
implant. In other words, the disclosed methods and apparatuses do not require
use of an
implant cannulation that requires proximal locking prior to distal locking.
[0023] Other advantages and features will be apparent from the following
detailed
description when read in conjunction with the attached drawings.
BRIEF DESCRIPTION OF THE DRAWINGS
[0024] FIG. 1 illustrates a system for identifying a landmark.
[0025] FIG. 2 is a sectional view of an orthopaedic implant of FIG.1.
[0026] FIG. 3 is a partial sectional of the implant of FIGS. 1 and 2
illustrating the sensor
mounting.
100271 FIG. 4 is a partial sectional view of another sensor mounting in an
implant.
[0028] FIG. 5 is a sectional view of the sensor and implant illustrated in
FIG. 4.
[0029] FIG. 6 illustrates another orthopaedic implant assembly.
[0030] FIG. 7 is a partial plan view of a removable lead.
- 10 -
CA 02759694 2011-10-21
WO 2010/129141
PCT/US2010/030784
[0031] FIG. 8 is a top view of the orthopaedic implant assembly illustrated in
FIG. 6.
[0032] FIG. 9 illustrates a landmark identifier that includes a drill sleeve.
[0033] FIG. 10 is a partial and sectional view illustrating two point contacts
of an implant.
[0034] FIG. ills another partial sectional view illustrating point contacts in
another
implant.
[0035] FIG. 12A is a partial and sectional view of an implant illustrating a
crimp electrical
connection.
[0036] FIG. 12B is a partial exploded view illustrating the electrical
connection in a
disclosed implant.
[0037] FIG. 12C is a side view of the electrical connection illustrated in
FIG. 12B.
[0038] FIG. 12D is a partial exploded illustrating the electrical connection
in another
disclosed implant.
[0039] FIG. 13A is a partial perspective and exploded view illustrating
alternative
mechanisms for aligning a disclosed orthopaedic implant and a disclosed
insertion handle.
[0040] FIG. 13B is a partial perspective and exploded view illustrating
alternative
mechanisms for aligning a disclosed orthopaedic implant and an electrical
connection.
[0041] FIG. 14 is a partial side view illustrating a connection of the
insertion handle to the
orthopaedic implant.
[0042] FIG. 15 illustrates another system for identifying a landmark.
[0043] FIG. 16 is a schematic illustration of view selection criteria.
- 11 -
CA 02759694 2011-10-21
WO 2010/129141
PCT/US2010/030784
[0044] FIG. 17 is a flowchart illustrating view selection during a fixation
surgery.
[0045] FIG. 18 is a schematic illustration of another method of aligning a
landmark
identifier.
[0046] FIG. 19 is a schematic illustration of another disclosed method of
aligning a
landmark identifier.
[0047] FIG. 20 illustrates a disclosed monitor with exemplary views.
[0048] FIG. 21 illustrates another disclosed landmark identifier.
[0049] FIG. 22 is a partial view another disclosed insertion handle.
[0050] FIG. 23 illustrates another disclosed system for identifying a
landmark.
[0051] FIG. 24 is a partial view of yet another disclosed insertion handle.
[0052] FIG. 25 illustrates another disclosed system for identifying a
landmark.
[0053] FIG. 26 is a partial cross-sectional view of an intramedullary nail.
[0054] FIG. 27 illustrates a packaging for a disclosed implant.
[0055] FIG. 28 illustrates a method of connecting a landmark identifier system
to a
network.
[0056] FIG. 29 illustrates yet another disclosed system for identifying a
landmark.
[0057] FIG. 30 is a flow chart for using a disclosed landmark identifying
system.
[0058] FIG. 31 is another flow chart for using a disclosed landmark
identifying system.
[0059] FIG. 32 is a schematic illustration of tracking drill depth.
- 12 -
CA 02759694 2011-10-21
WO 2010/129141
PCT/US2010/030784
[0060] FIGS. 33A and 3313 are also schematic illustrations of tracking drill
depth.
[0061] FIG. 34 is a partial illustration of a disclosed device for tracking
drill depth.
[00621 FIG. 35 is a perspective view of another insertion handle.
[0063] FIG. 36 is a top perspective view of an adjustable stop.
[0064] FIG. 37 is a bottom perspective view of the adjustable stop illustrated
in FIG. 36.
[0065] FIG. 38 is another illustrating system calibration.
[0066] FIG. 39 is a perspective view of another landmark identifier housing a
field
generator and a drill sleeve and that may be sterilized or subject to an
autoclave procedure.
[0067] FIG. 40 is a side view of the landmark identifier/field generator/drill
sleeve of FIG.
39 making contact with a bone.
[0068] FIG. 41 is a perspective view of the landmark identifier/field
generator/autoclavable housing of FIG. 39 coupled to a screw driver
attachment.
[0069] FIG. 42 is a plan view of an insertion handle, adjustable stop and
probe.
[0070] FIG. 43 is a perspective view of an exemplary adjustable stop to hold a
probe in a
desired position.
[0071] FIG. 44 is a perspective view of another exemplary adjustable stop.
[0072] FIG. 45 is a perspective view of an intramedullary nail, an insertion
handle, an
adjustable stop, and a probe.
[0073] FIG. 46 is a perspective view of another intramedullary nail, an
insertion handle, an
adjustable stop, and a probe.
- 13 -
CA 02759694 2011-10-21
WO 2010/129141
PCT/US2010/030784
[0074] FIG. 47 is a perspective view of two probes for use in targeting
landmarks of an
implant.
[0075] FIG. 48 is a perspective view of another probe for use in targeting
landmarks of an
implant.
[0076i FIG. 49 is a sectional view of a retractable probe.
[0077] FIG. 50 is a perspective view of an intram.edullary, an insertion
handle, and an
adjustable stop.
[0078] FIG. 51 is an illustration of a system for targeting a landmark of an
implant.
[0079] FIG. 52 is an illustration of a device for use in calibrating the
system of FIG. 51.
[0080] FIGS. 53-62 are illustrations of adjustable stops.
[0081i It should be understood that the drawings are not necessarily to scale
and that the
disclosed implementations are sometimes illustrated diagrammatically and in
partial views.
In certain instances, details which are not necessary for an understanding of
the disclosure or
which render other details difficult to perceive may have been omitted. It
should be
understood, of course, that this disclosure is not limited to the particular
implementations
illustrated herein.
DETAILED DESCRIPTION
[0082] Referring to the accompanying drawings in which like reference numbers
indicate
like elements, FIG. 1 illustrates one disclosed system 10 for identifying a
landmark. The
system 10 may include a processor 12, a magnetic field generator 16, a
landmark identifier
- 14 -
CA 02759694 2011-10-21
WO 2010/129141
PCT/US2010/030784
18, and an orthopaedic implant assembly 28. The system 10 may also include a
monitor 14
electrically connected to the processor 12 and an insertion handle 40
removably attached to
the orthopaedic implant assembly 28. The processor 12 is depicted as a desktop
computer in
FIG. 1 but other types of computing devices may be used. As examples, the
processor 12
may be a desktop computer, a laptop computer, a personal data assistant (PDA),
a mobile
handheld device, or a dedicated device. The magnetic field generator 16 is a
device available
from Ascension Technology Corporation of 107 Catamount Drive, Milton Vermont,
U.S.A.;
Northern Digital Inc. of 103 Randall Drive, Waterloo, Ontario, Canada; or
Polhemus of 40
Hercules Drive, Colchester Vermont, U.S.A. Of course, other generators may be
used. As
examples, the field generator 16 may provide a pulsed direct current
electromagnetic field or
an alternating current electromagnetic field. The system 10 may also include a
control unit
(not shown) connected to the magnetic field generator 16. The control unit
controls the field
generator 16, receives signals from small mobile inductive sensors, and
communicates with
the processor 12, either by wire or wirelessly. The control unit may be
incorporated into the
processor 12 either through hardware or software.
[00831 The system 10 is a magnetic position tracking system. For illustrative
purposes, the
system 10 may include a magnetic field generator 16 comprised of suitably
arranged
electromagnetic inductive coils that serve as the spatial magnetic reference
frame (i.e., X, Y,
Z). The system 10 may also include small mobile inductive sensors, which are
attached to
the object being tracked. It should be understood that other variants could be
easily
accommodated. The position and angular orientation of the small mobile
inductive sensors
are determined from its magnetic coupling to the source field produced by
magnetic field
generator 16.
- 15 -
CA 02759694 2011-10-21
WO 2010/129141
PCT/US2010/030784
[00841 It is noted that the magnetic field generator 16 generates a sequence,
or set, of here
six, different spatial magnetic field shapes, or distributions, each of which
is sensed by the
small mobile inductive sensors. Each sequence enables a sequence of signals to
be produced
by the small mobile inductive sensors. Processing of the sequence of signals
enables
determination of position and/or orientation of the small mobile inductive
sensors, and hence
the position of the object to which the small mobile inductive sensor is
mounted relative the
magnetic coordinate reference frame which is in fixed relationship to the
magnetic field
generator 16. The processor 12 or the control unit may use the reference
coordinate system
and the sensed data to create a transformation matrix comprising position and
orientation
information.
10085] The landmark identifier 18 is used to target a landmark, such as a
landmark on the
orthopaedic implant assembly 28. The landmark identifier 18 may include one or
more small
mobile inductive sensors or may include the field generator. The landmark
identifier 18 has a
second sensor 20. The landmark identifier 18 may be any number of devices. As
examples,
the landmark identifier may be a device that includes a structure that
provides a user with an
understanding of the location and orientation of a hidden landmark. For
example, the
landmark identifier can include a drill guide, a drill sleeve, a drill, a
drill nose, a drill barrel, a
drill chuck, or a fixation element. In some implementations, the structure can
be a housing
having an opening, or other structure that indicates the location and
orientation of a landmark.
In FIG. 1, the landmark identifier 18 is a drill sleeve and includes a sensor
20, whereas in
FIG. 39, the landmark identifier 2016 includes a housing 2020 having a central
aperture and
includes a magnetic field generator (not shown) in the housing 2020. The
landmark identifier
18 may include one or more of a serrated tip 22, a tube 24, and a handle 26.
The tube 24 also
-16-
CA 02759694 2011-10-21
WO 2010/129141
PCT/US2010/030784
may be referred to as a bushing, cylinder, guide, or drilling/screw placement
guide. The
second sensor 20 is oriented relative to an axis of the tube 24. The tube 24
may receive a
drill. This offset of the sensor 20 from the tube 24 allows the position and
orientation of the
tube to be located in space in six dimensions (three translational and three
angular) relative to
the magnetic field generator 16 and/or another sensor in the system. The
processor 12 may
need to be calibrated to adjust for the offset distance of the second sensor
20. The landmark
identifier 18 and the field generator 16 may be combined into a single
component. For
example, the field generator 16 may be incorporated within the handle 26.
[0086] The orthopaedic implant assembly 28 may include an implant 30 and one
or more
small mobile inductive sensors. The orthopaedic implant assembly 28 includes a
first sensor
32. In FIG. 1, the implant 30 is in the form of intramedullary nail but other
types of implants
may be used. As examples, the implant may be an intramedullary nail, a bone
plate, a
shoulder prosthetic, a hip prosthetic, or a knee prosthetic. The first sensor
32 is oriented and
in a predetermined position relative to one or more landmarks on the implant
30. As
examples, the landmark may be a structure, a void, a boss, a channel, a
detent, a flange, a
groove, a member, a partition, a step, an aperture, a bore, a cavity, a
dimple, a duct, a gap, a
notch, an orifice, a passage, a slit, a hole, or a slot. In FIG. 1, the
landmarks are transfixion
holes 31. The offset of the first sensor 32 from the landmark allows the
position of the
landmark to be located in space in six dimensions (three translational and
three angular)
relative to the magnetic field generator 16 or another sensor in the system,
such as the second
sensor 32. The processor may need to be calibrated to adjust for the offset
distance of the
first sensor 32.
- 17 -
CA 02759694 2011-10-21
WO 2010/129141
PCT/US2010/030784
[0087] The first sensor 32 and the second sensor 20 are coupled to the
processor 12. This
may be accomplished by wire or vvirelessly. The first sensor 32 and the second
sensor 20
may be a six degree of freedom sensor configured to describe the location of
each sensor in
three translational axes, generally called X, Y and Z and three angular
orientations, generally
called pitch, yaw and roll. By locating the sensor in these reference frames,
and knowing the
location and orientation of each sensor, the landmark identifier 18 may be
located relative to
the landmark on the implant 30. In one particular implementation, the
information from the
sensors allows for a surgeon to plan the surgical path for fixation and
properly align a drill
with a blind fixation hole 31. The sensors 32, 20 are six degrees of freedom
sensor from
Ascension Technology Corporation of 107 Catamount Drive, Milton Vermont,
U.S.A.;
Northern Digital Inc. of 103 Randall Drive, Waterloo, Ontario, Canada; or
Polhemus of 40
Hercules Drive, Colchester Vermont, U.S.A. Of course, other sensors may be
used.
[00881 The first sensor 32 may be attached to the implant 30. For example, the
first sensor
32 may be attached to an outer surface 37. In FIG. 1, the implant 30 may also
include a
groove 34 and a pocket 36 (best seen in FIG. 2). The groove 34 and pocket 36
are located in
a wall of the implant 30. The first sensor 32 is intended to be attached to
the implant 30 and
installed in a patient for the service life of the implant 30. Further, the
orthopaedic implant
assembly 28 may include a cover 38 to cover the pocket 36 and/or the groove
34. The cover
38 may be substantially flush with the external surface 37 of the implant 30.
Accordingly,
the implant 30 may include a second opening 39 (see FIG. 2) to receive the
cover 38.
[0089] The first sensor 32 may be tethered to leads for communication and
power. The
leads, and the sensor, may be fixed to the implant 30. A lead 50 may be used
to connect the
- 18 -
CA 02759694 2011-10-21
WO 2010/129141
PCT/US2010/030784
first sensor 32 to the processor 12 or the control unit. The lead 50 may be
made from
biocompatible wire. As an example, the lead 50 may be made of DFT wire
available from
Fort Wayne Metals Research Products Corp., 9609 Indianapolis Road, Fort Wayne,
Indiana
46809. DFT is a registered trademark of Fort Wayne Metals Research Products
Corp. A first
connector 52 may be used to place the lead 50 relative to the implant 30. A
second connector
54 may be used to connect the lead 50 to another device, such as the processor
12, the control
unit, or the insertion handle 40.
[00901 The first sensor 32 may be fixed in the pocket 36 using a range of high
stiffness
adhesives or polymers including epoxy resins, polyurethanes, polymethyl
methacrylate,
polyetheretherketone, UV curable adhesives, silicone, and medical grade
cyanoacrylates. As
an example, EPO-TEK 301 available from Epoxy Technology, 14 Fortune Drive,
Billerica,
Massachusetts 01821 may be used. The lead 50 may be fixed in the groove in a
similar
manner. These types of fixation methods do not adversely affect the
performance of the
electrical components. Thereafter, the cover 38 may be placed on the implant
30 and welded
in-place. For example, the covers may be laser welded to the implant.
100911 The monitor 14 may be configured to display the position and
orientation of the
first sensor 32 and the second sensor 20 so that the display may show a
surgeon both sensor
positions and orientations relative to one another. The processor 12 may send
positional data,
either by wire or wirelessly, to a user interface, which may graphically
display the relative
positions of the landmark identifier and the implant on the monitor. The view
displayed on
the monitor 14 may be oriented relative to the landmark identifier so that the
surgeon may
visualize the user interface as an extension of the landmark identifier. The
user interface also
- 19-
CA 02759694 2011-10-21
WO 2010/129141
PCT/US2010/030784
may be oriented so that the surgeon may view the monitor simultaneously with
the surgical
field.
[0092] The insertion handle 40 may be used for installation of the orthopaedic
implant
assembly 28 and also may be used to route the leads from the first sensor 32.
For example,
the insertion handle 40 may route both communication and power leads between
the implant
30 and the processor 12.
[0093] In FIG. 1, the landmark identifier 18 and the insertion handle 40 each
include a
communications module 21, 25 for wirelessly transmitting data from the sensor
20, 32 to the
processor 12, but those skilled in the art would understand that other
methods, such as by
wire, may be used. The second connector 54 plugs into the communications
module 25.
Alternatively, and as is explained in greater detail below, the implant 30 and
the insertion
handle 40 may have mating electrical contacts that form a connection when the
components
are assembled such that the first sensor 32 is connected to the communications
module 25.
[0094] The implant 30 may include a communications circuit and an antenna for
wireless
communication. Power for the first sensor 32 and/or the communications circuit
may be
positioned within the insertion handle 40. For example, a battery may be
placed within the
insertion handle 40 for transferring power to the first sensor 32 and/or other
electronics.
Alternatively, the communications circuit, the antenna, and the battery may be
located within
the insertion handle 40 and each of these may be tethered to the first sensor
32. In yet
another implementation, the implant 30 may include a coil to inductively power
the
communications circuit and communicate data from the first sensor 32. The
power source
may be a single source mode or may be a dual mode AC/DC.
- 20 -
CA 02759694 2011-10-21
WO 2010/129141
PCT/US2010/030784
[0095] In use, the orthopaedic implant assembly 28 is installed in a patient.
For example,
in the case of internal fixation, the intramedullary nail is placed within an
intramedullary
canal. Optionally, the user may use transfixion elements, such as screws, to
first lock the
proximal end of the intramedullary nail. An operator uses the targeting device
18 and the
first sensor 32 to identify the landmarks. For example, in the case of
intramedullary nail
fixation, a surgeon uses the targeting device 18 to identify the blind
transfixion holes 31 and
drill through the holes 31 for placement of a transfixion element.
[0096] FIG. 2 further illustrates the implant 30 as illustrated in FIG. 1. The
implant 30
may include the first sensor 32, the longitudinal groove 34, the pocket 36,
the cover 38, and
the second opening 39. As examples, the cover 38 may be comprised of gold or
titanium foil.
The implant 30 may include an inner surface 35 that forms a cannulation 33.
The outer
surface of the implant 30 is shown at 37.
100971 FIG. 3 illustrates an implementation of the first sensor 32. The first
sensor 32 may
include two coils cross-layered to one another and having an angle a.
[0098] FIGS. 4 and 5 illustrate another implementation of the first sensor 32.
The first
sensor may include two coils generally orthogonal to one another in order to
establish the
orientation and position in the six degrees of freedom. A first coil may be
oriented along the
length of the implant 30. The second coil may be oriented either wrapped
around the
circumference of the implant, for example in a groove, or along the radius of
the implant 30.
In addition, while the coils may be perpendicular to one another, other
orientations may be
used, although the mathematics may be more complex. Further, the coils may be
oriented
spirally around the implant 30. Such an orientation may allow two coils to be
placed
-21-
CA 02759694 2011-10-21
WO 2010/129141
PCT/US2010/030784
perpendicular to each other with both coils placed along both the length of
the implant and
along the circumference of the implant 30.
10099] FIGS. 6-8 illustrate a second implementation of the orthopaedic implant
assembly
60. The orthopaedic implant assembly 60 may include the implant 30. In FIG. 6,
the implant
30 includes landmarks in the form of transfixion holes 31. The implant 30 may
include a
longitudinal internal groove 66 and a removable lead 64. In FIG. 8, a diameter
of the
longitudinal groove 66 is shown as intersecting with the earmulation33;
however, in other
implementations, the diameter of the longitudinal internal groove is contained
between the
outer surface 37 and the inner surface 35. The removable lead 64 may include
the first sensor
32 at its distal end portion 65. The first sensor 32 is located a known offset
from the
landmarks 31. The implant in FIGS. 6-8 is comprised of biocompatible material,
and may be
a metal alloy or a polymer. The longitudinal groove 66 may be machined or
molded in place.
101001 In use, the implant 30 with the removable lead is installed in a
patient. For
example, in the case of internal fixation, the intramedullary nail is placed
within an
intramedullary canal. Optionally, the user may use transfixion elements, such
as screws, to
first lock the proximal end of the intramedullary nail. Because of the
location of the
longitudinal groove 66, the removable lead 64 does not interfere with locking
the proximal
end of the intramedullary nail. An operator uses the targeting device 18 and
the first sensor
32 to identify the landmarks 31. For example, in the case of intramedullary
nail fixation, a
surgeon uses the targeting device 18 to identify the blind transfixion holes
31 and drill
through the holes 31 for placement of a transfixion element. After the implant
30 is secured,
the operator removes the removable lead 64 and it may be discarded.
- 22 -
CA 02759694 2011-10-21
WO 2010/129141
PCT/US2010/030784
[0101] A method for identifying a landmark is disclosed. The method may
include
providing an orthopaedic implant assembly having an orthopaedic implant with a
longitudinal
groove and a removable lead or probe having an electromagnetic sensor attached
thereto
situated within the longitudinal groove. The orthopaedic implant includes a
proximal end
portion, a distal end portion, and at least one landmark on the distal end
portion. The method
includes implanting the orthopaedic implant assembly in a patient. Then,
transfixion
elements in the proximal end portion are installed. At least one distal
landmark is identified
using a landmark identifier. A transfixion element is installed in the at
least one distal
landmark. The removable lead or probe may then be removed. The situation of
the
removable lead or probe within the longitudinal groove allows for proximal
locking of the
implant prior to distal locking.
[0102] FIG. 9 illustrates the landmark identifier 18 of FIG.1. The landmark
identifier 18
may include the sensor 20, the serrated tip 22, the tube 24, and the handle
26. A drill 90 has
markings 92 that interact with a marking sensor 19 adjacent the tube 24. The
interaction is
similar to a pair of digital measuring calipers in that the position between
the markings 92
and the sensor 19 equate to a distance. This distance can be used to determine
the depth of
the drill into the bone and ultimately the length of the bone screw that will
be inserted into the
drilled hole. Distance, or drill depth, readings are only obtainable when the
markings 92 and
the sensor 19 are in close proximity to each other, i.e. the drill 90 is
inside the tube 24.
Exemplary measurement devices are illustrated in U.S. Pat. No. 6,675,491 and
U.S. Pat. No.
7,253,611. The marking sensor 19 is connected to the communications module 21.
Alternatively, the marking sensor 19 may be connected by wire to the processor
12. In FIG.
- 23 -
CA 02759694 2011-10-21
WO 2010/129141
PCT/US2010/030784
9, the communications module 21 may include a third connector 23 for
electrical connection
to the processor 12.
[01031 FIGS. 10-12 illustrate exemplary methods of electrically connecting the
implant 30
to the insertion handle 40, which has corresponding electrical contacts. In
FIG. 10, biasing
elements 72 bias contacts 70 toward the insertion handle 40. In FIG. 11, the
implant 30 has
elastomeric electrical contacts 74. In FIG. 12A, wires extending between the
lead 50 and
another component are crimped together at junction 76. In one method, the
wires are torn
free and separated at the junction 76 after installation of the orthopaedic
implant assembly 28.
In yet another method, the wires are cut above the junction 76 after
installation of the
orthopaedic implant assembly 28. In FIGS. 12 B and C, two flex boards 53 are
soldered
together one or more pads 57 to connect a wiring harness 55 to the sensor. The
wire harness
55 may be mounted to the insertion handle 40 or within a cannulation of the
insertion handle
40. In the depicted implementation, four pads 57 are soldered together.
Locking tabs 59 are
sandwiched between the implant 30 and the insertion handle 40 to withstand
abrasion and
tension associated with the implant insertion. Once the insertion handle 40 is
removed, the
wire harness 55 can be pulled such that all non-biocompatible materials are
pulled with it. In
FIG. 12D, rings 61, 63 are connected during manufacturing. After implantation,
both rings
61, 63 are removed by pulling on a jacketed wire 67.
101041 Referring now to FIGS. 13A and 138, the implant 30 and/or the insertion
handle 40
may include one or more alignment features 44 and mating notch 80 or alignment
pin 46 and
mating hole 82. The insertion handle may be configured to align with an upper
surface of the
implant. In one implementation, the insertion handle may have a key configured
to mate to a
- 24 -
CA 02759694 2011-10-21
WO 2010/129141
PCT/US2010/030784
slot on the implant. Other alignment guides may be used. In addition, the
guide may have an
electrical connector configured to mate to an electrical connector on the
implant. The
connection between the guide and the implant may be spring loaded to ensure
electrical
contact between the electrical connectors. In order to avoid shorting the
connection between
the guide and the implant, the electrical connector may be insulated. As
another example of
electrically connecting the insertion handle to the implant, the electrical
connectors may
include a post and slip rings. The rings may be located on the implant, and
the posts located
on the insertion handle. The posts are biased to contact the rings. In such an
implementation,
the angular location of the insertion handle 40 relative to the axis of the
implant is not fixed.
This would allow the insertion handle 40 to be positioned to the implant
irrespective of
angular position.
101051 In another implementation shown in FIG. 1313, the implant 30 and/or the
insertion
handle 40 may include one or more alignment pin 47 and mating hole 83. The
alignment pins
47 may be spear tip pins designed to engage a single time and when removed,
the pins grip
portion of the implant to remove all non-biocompatible materials with them.
[01061 Any of the electrical connectors above may include a memory storage
device (not
shown) for storing offset values for sensor calibration.
101071 Referring now to FIG. 14, the implant 30 and the insertion handle 40
may be sized
such that space remains available for the first connector 52 even when the
components are
assembled or mated. As an example, the system for identifying a landmark may
be used to
target blind screw holes of an implanted intramedullary nail. The
intramedullary nail is
implanted in the patient. The electromagnetic field generator is activated.
The processor
- 25 -
CA 02759694 2011-10-21
WO 2010/129141
PCT/US2010/030784
receives signals from the sensor mounted to the intramedullary nail and from
the sensor
mounted to the landmark identifier, such as a drill sleeve. A computer program
running on
the processor uses the information of the at least two sensors and graphically
display them in
relative position on the monitor. A surgeon moves the landmark identifiers
into position
using feedback provided by the processor. When the landmark identifier is in
the proper
location, the surgeon drill through bone and the intramedullary nail to create
a screw hole.
The processor may provide feedback as to the depth of the drilled hole. The
surgeon may
then place a screw through the drilled hole to affix the blind hole of the
intramedullary nail.
[0108] Provided feedback information may be selected from the group consisting
of
audible, visual, and tactile. The audible feedback may be output through a
speaker,
headphones, ear buds, or an ear piece. The audible feedback signal may be
transmitted over
wire or wirelessly using radio frequency or terrestrial data transmission. The
visual feedback
may be output through a cathode ray tube, a liquid crystal display, or a
plasma display.
Visual feedback devices may include, as examples, a television monitor, a
personal digital
assistant, or a personal media player. The visual feedback signal may be
transmitted over
wire or wirelessly using radio frequency or terrestrial data transmission. The
tactile feedback
may be output through gloves, instruments, or a floor mat. The tactile
feedback signal may
be transmitted over wire or wirelessly using radio frequency or terrestrial
data transmission.
[0109] FIG. 15 illustrates a system 110 for identifying a landmark in another
implementation. The system 110 may include a processor 112, a landmark
identifier 118,
and an orthopaedic implant assembly 128. The system 110 may also include a
monitor 114
and an insertion handle 140.
-26 -
CA 02759694 2011-10-21
WO 2010/129141
PCT/US2010/030784
[0110] The landmark identifier 118 is used to target a landmark. The landmark
identifier
118 may include a second sensor 120. In FIG. 15, the landmark identifier 118
is a drill sleeve
with a serrated tip 122, a tube 124, and a handle 126. The second sensor 120
is oriented
relative to an axis of the tube, which may receive a drill. This offset of the
sensor from the
tube allows the position of the tube to be located in space in six dimensions
(three
translational and three angular) relative to the transmitter or another sensor
in the system.
The processor may need to be calibrated to adjust for the offset distance of
the second sensor
120.
[0111] The orthopaedic implant assembly 128 may include an implant 130 and a
magnet
132. The magnet may be a permanent magnet or an electromagnet. The magnet 132
is
oriented in a predetermined position relative to a landmark on the orthopaedic
implant 130.
This offset of the magnet from the landmark allows the position of the
landmark to be located
in space in six dimensions (three translational and three angular) relative to
the transmitter or
another sensor in the system, such as the second sensor. The processor may
need to be
calibrated to adjust for the offset distance of the magnet 132. As with the
implant 30 of FIG.
1, the implant 130 may also include a pocket 136 and a cover 138. In the case
of an
electromagnet, a lead 150 connects to the magnet 132 and is contained within a
groove 134.
[0112] As an example, the system for identifying a landmark may be used to
target blind
screw holes of an implanted intramedullaiy nail. The intramedullary nail is
implanted in the
patient. The processor receives signals from the sensor mounted to the
landmark identifier,
such as a drill sleeve. A computer program running on the processor uses the
information of
the sensor and graphically displays the sensor in relative position to the
magnet on the
-27-
CA 02759694 2011-10-21
WO 2010/129141
PCT/US2010/030784
monitor. A surgeon moves the landmark identifiers into position using feedback
provided by
the processor. When the landmark identifier is in the proper location, the
surgeon drill
through bone and the intramedullary nail to create a screw hole. The processor
may provide
feedback as to the depth of the drilled hole. The surgeon may then place a
screw through the
drilled hole to affix the blind hole of the intramedullary nail.
[0113] FIG. 16 illustrates a method for selecting views corresponding to
landmark
identifier position. The view displayed on the monitor is dependent upon the
location of the
landmark identifier relative to the implant. The diameter of the implant is
broken into sectors
or fields. In FIG. 16, the diameter is broken down into three fields: (A) 135
to 225 ; (B) 00
to 135'; and (C) 225 to 360 . The initial view is based upon landmark
identifier orientation
relative to the implant. As the user moves landmark identifier toward or away
from the
implant, the monitor display zooms in or out on the selected field.
[0114] FIG. 17 is a flowchart for view selection and display of one landmark.
The process
may be repeated for multiple landmarks. The processor 12 uses the
transformation matrix in
the following process steps. In step 200, landmark identifier position is
computed relative to
the implant based upon the positions of the relevant sensors, and the landmark
closest the
landmark identifier is selected for display. In step 210, a global view is
defined showing the
whole implant with the selected landmark oriented for proper viewing. A global
view is
analogous to viewing the implant at a distance. In step 220, there is a
decision whether there
are multiple landmarks having the same orientation. If yes, then in step 230,
the processor
calculates which landmark is nearest to the landmark identifier position and
selects it for
viewing. If no, in step 240, a local view is defined and centered upon the
selected landmarks.
- 28 -
CA 02759694 2011-10-21
WO 2010/129141
PCT/US2010/030784
A local view is analogous to viewing the implant in close proximity. In some
implementations, it may be desirable to hide the landmark identifier when the
local view is
defined. In steps 250, 260, and 270, the processor 12 identifies the distance
from landmark
identifier to the landmark and depending upon the decision made, either hides
or renders the
landmark identifier. In step 250, the distance from landmark identifier to the
landmark and a
comparison is made between the calculated distance D and set variables Toobai
and ILooal. If
D > TGlobal3 then the global view is selected in step 260 and the processor
proceeds to step
285. If D < TLocal, then the local view is selected and centered upon the
landmark in step 270.
Thereafter, the processor proceeds to step 275. In optional step 275, the
landmark identifier
is hidden. Otherwise, an intermediate camera position is calculated based upon
the distance
D to enable a smooth transition from global view to a local view in step 280.
In step 285, the
landmark identifier is shown. In step 290, the scene with selected camera
position is
rendered.
[0115] FIG. 18 is a schematic illustrating a first alternative method of
aligning the
landmark identifier. A computer program running on the processor may be used
to take the
information of the at least two sensors and graphically display them in
relative position (the
second sensor relative to the first sensor) on the monitor. This allows the
user to utilize the
system to guide the placement of the landmark identifier. In the case of
drilling a blind
intramedullary nail hole, the system guides the user in placement of the drill
sleeve and
subsequently drilling accurately thru the hole in the intramedullary nail. The
graphical user
interface may include an alignment guide for each of the degrees of freedom. A
minimum
alignment level may be set such that the surgeon continues to orient the
landmark identifier
until each of the degrees of freedom meets the minimum alignment level for an
effective
- 29 -
CA 02759694 2011-10-21
WO 2010/129141
PCT/US2010/030784
placement of the landmark identifier. The example of FIG. 18 shows an instance
where the
placement in the Y-direction meets the minimum required tracking placement.
However,
none of the other translational or rotational meets the minimum requirements.
While the
magnitudes of tracking are illustrated as bar graphs, other graphical
representations, such as
color coding, may be used.
[0116] FIG. 19 is a schematic illustrating a second alternative method of
aligning the
landmark identifier. In this implementation, a graphical interface using a
plurality of LEDs to
position the drill may be placed upon the landmark identifier, such as a drill
sleeve. By using
the LEDs to trajectory track the drill, the surgeon may align the drill with
the blind fixation
hole. The trajectory may additionally use secondary displays to add more
information to the
system. For example, for affecting the magnitude of adjustment, the trajectory
may include
flashing LEDs so that high frequency flashing requires larger adjustments
while low
frequency flashing may require smaller adjustments. Similarly, colors may add
information
regarding adjustments to alignment.
101171 FIG. 20 illustrates a monitor with exemplary views. A first portion 500
indicates
the distance the drill is on each side of the implant. This may provide the
user with a better
understanding of drill depth and alert the user when to stop when appropriate
drill depth has
been achieved. The second portion 510 provides the user with alignment
information. As an
example, drill depth data may be obtained using the implementation illustrated
in FIG. 9.
101181 FIG. 21 illustrates an alternative implementation of the landmark
identifier. The
landmark identifier is configured to display, with LEDs, the position and
trajectory
information for proper alignment. The size of the LEDs may display additional
information
-30-
CA 02759694 2011-10-21
WO 2010/129141
PCT/US2010/030784
regarding the magnitude of required adjustment. The trajectory light may
display a simple
on/off toggle between an aligned trajectory and a mal-aligned trajectory. As
another
example, the trajectory LED may be color coded to suggest the magnitude of
necessary
adjustment for proper alignment.
[0119] FIG. 22 illustrates a first alternative implementation of the insertion
handle 700.
The insertion handle 700 may include an arcuate slot 710. The arcuate slot
limits the
movement of the landmark identifier 18, 118 within the operating space. In the
case of
identifying a blind screw hole, the arcuate slot limits the movement of the
drill sleeve for fine
adjustment of its position. The insertion handle 700 may include a carriage
712 that receives
the landmark identifier and rides in the slot 710.
101201 FIG. 23 illustrates the system for identifying a landmark in a third
implementation.
In this implementation, the orthopaedic implant 800 is a bone plate and the
insertion handle
810 is a little guide affixed to the bone plate. The inductive sensor is
placed on the surface of
the orthopaedic implant 800 relative to one or more landmarks. The guide 810
may allow a
landmark identifier 818 to translate and/or rotate relative to the guide to
properly align the
landmark identifier with a landmark 802, such as a fastener hole. In addition,
where multiple
fixation holes are on the implant, then additional guide holes 812 on the
guide 810 may help
approximate the position of the additional fixation holes.
[0121] FIG. 24 illustrates a second alternative implementation of the
insertion handle. The
insertion handle 900 may include fine adjustment in landmark identifier 918
positions
through the use of small servomotors 920, 922, 924. The servomotors 920, 922,
924 may
-31 -
CA 02759694 2011-10-21
WO 2010/129141
PCT/US2010/030784
adjust the orientation and position of the landmark identifier 918. Control of
the servos may
be automatic or may be controlled by a surgeon.
[0122] FIG. 25 illustrates a bone 100 and another system 1010 for identifying
a landmark.
The system 1010 may include a control unit 1012, a field generator 1014, a
landmark
identifier 1016, an intramedullary nail 1024, and a probe 1029. The landmark
identifier 1016
also may be referred to as a targeter. The control unit 1012 may be included
as part of the
processor described above or may be a separate unit. The intramedullary nail
1024 is inserted
into the bone 100, and the intramedullary nail 1024 has a hole or landmark
1028. The field
generator 1014 is electrically connected to the control unit 1012. An
insertion handle 1022 is
removably attached to the intramedullary nail 1024. The insertion handle 1022
and/or the
intramedullary nail 1024 may be formed with a cannulation. The insertion
handle 1022 may
include a third sensor 1032.
10123] The landmark identifier 1016 may include a second sensor 1020. The
landmark
identifier 1016 may guide a drill bit 1018, and the drill bit 1018 may be
connected to a drill
(not shown). The second sensor 1020 may be connected to the control unit 1012,
either by
wire or wirelessly. The field generator 1014 may be included in or on the
landmark identifier
1016, in which case, the second sensor 1020 may be omitted.
101241 The probe 1029 may include a wire 1030, a tape 1034, and a stop 1036.
The tape
1034 may be about 0.125 inch wide by about 0.060 inch thick 300 series
stainless steel fish
tape available from Ideal Industries, Inc. of Sycamore, Illinois. However,
those of ordinary
skill in the art would understand that other materials and other sizes may be
used. For
example, any narrow band of polymer, composite material, or metal may be used
as the tape
-32-
CA 02759694 2011-10-21
WO 2010/129141
PCT/US2010/030784
1034, but it may be preferred to use a non-ferrous metal. The tape 1034 may be
coiled before
placement into the intramedullary nail 1024. Coiling of the tape 1034 may
cause it to have a
natural curvature. The tape 1034 may have, in some implementations, a
rectangular
geometry that assists in orienting the tape as it is placed into a cannulation
of the
intramedullary nail 1024. An oval, square, or circular geometry also may be
used. The wire
1030 may be operatively connected to the tape 1034. For example, this may be
accomplished
through the use of an adhesive or fastener. The tape 1034 may include
graduations or detents
to indicate a depth of the tape as it is inserted into the implant.
[0125] A first sensor 1026 is connected to the control unit 1012, either by
wire or
wirelessly. The first sensor 1026 is connected through the use of the wire
1030 and a
connector 1038. The connector 1038 may be omitted. The first sensor 1026 may
be
connected to a distal end of the tape 1034, and the stop 1036 may be connected
to a proximal
end of the tape 1034.
[0126] The probe 1029 may include a sensor housing (not shown) to house the
first sensor
1026. The sensor housing may be attached to the tape 1034. The sensor housing
may be
made of a non-ferrous material, such as a polymer, a composite, or a metal.
The sensor
housing may include an appropriate strain relief to shield the wire 1030 from
stresses. The
sensor housing may be constructed and arranged to be large enough to hold the
first sensor
1026 but small enough to fit through the cannulation of the insertion handle
or the implant.
__ Further, the sensor housing may be constructed and arranged to be long
enough to allow
passage through intramedullary nail bends, intramedullary nail bow, and/or
bends in relevant
instrumentation. Geometry of the leading and trailing faces of the sensor
housing may be
- 33 -
CA 02759694 2011-10-21
WO 2010/129141
PCT/US2010/030784
designed such that the sensor housing does not catch or snag on the
cannulation of the
instrumentation or implant.
[0127] The stop 1036 may be used to control the placement of the sensor 1026
and probe
1029. If the tape 1034 is a fixed length and the distance is known from the
end of the
insertion handle to the hole 1028, repeatable placement of the first sensor
1026 may be
achieved. The tape 1034 may be of sufficient length such that the sensor 1026
is aligned with
the hole 1028, adjacent the hole 1028, or offset from the hole 1028. As
discussed below, the
probe 1029 may be used to position the sensor with the hole 1028 or other
landmark.
[0128] The insertion handle 1022 may be omitted. In such a case, a different
tape length
may be selected such that the stop 1036 engages a portion or end of the nail
1024.
[0129] FIG. 26 is a partial detailed view of the intramedullary nail 1024, the
sensor 1026,
and the hole 1028. The sensor 1026 may be aligned with the hole 1028, adjacent
the hole
1028, or offset from the hole 1028. The sensor 1026 is generally adjacent to
the hole 1028.
[0130] In use, the intramedullary nail 1024 is placed into the bone 100. The
insertion
handle 1022 may be attached to the intramedullary nail 1024. The probe 1029 is
fed through
the cannulation of the insertion handle 1022 and into the cannulation of the
intramedullary
nail 1024 until the stop 1036 engages the insertion handle 1022. In one
particular
implementation, the wire 1030 is connected to the control unit 1012, and the
sensors 1026,
1020, and 1032 are calibrated using the control unit 1012. The probe 1029 may
be removed
after calibration. If so, the third sensor 1032 and a transformation matrix
may be used to
identify the relative position of the second sensor 1020 and hence landmark
identifier 1016.
Optionally, the user may use transfixion elements, such as screws, to first
lock the proximal
- 34 -
CA 02759694 2011-10-21
WO 2010/129141
PCT/US2010/030784
end of the intramedullary nail. An operator uses the landmark identifier 1016
and the first
sensor 1026 to identify the landmarks 1028. For example, in the case of
intramedullary nail
fixation, a surgeon uses the landmark identifier 1016 to identify the blind
transfixion holes
and drill through the holes for placement of a transfixion element.
101311 FIG. 27 illustrates a packaging implementation. In general,
intramedullary nails
must be sterilized before implantation. If the sensor is installed in the
intramedullary nail
prior to serialization, the sensor may lose its calibration during the
serialization process,
particularly if the sterilization process involves radiation. For example,
gamma radiation may
be used to sterilize hermetically sealed components, such as the sensor. The
implementation
depicted in FIG. 27 illustrates a way to maintain the sterilization of the
intramedullary nail
while allowing for recalibration of the sensor. The package FIG. 27 may
include a first
package 1040, a second package 1042, a first connector 1044, a second
connector 1046, and a
cable 1048. In the depicted implementation, a sensor (not shown) and
intramedullary nail
1024 are located within the first package 1040. Alternatively, the probe 1029
and the sensor
are located within the first package 1040. In yet another example, only the
sensor is located
within the first package 1040. A memory device (not shown) may be connected to
the
sensor. The memory device may be used to store a calibration transformation
matrix (xi, yl,
zl, x2, y2, z2) as well as other data, such as length and size of the
intramedullary nail or the
probe. The memory device may be mounted to or placed on the intramedullary
nail 1024 or
the probe 1029. The first connector 1044 is electrically connected, but
removably attached,
to the second connector 1046. The first connector 1044 is also electrically
connected to the
sensor or the memory device. The first package 1040 maintains the
sterilization of the device
held within. The cable 1048 is electrically connected to the second connector
1046 and a
-35-
CA 02759694 2011-10-21
WO 2010/129141
PCT/US2010/030784
storage device (not shown). The calibration for the sensor is downloaded from
the storage
device and transmitted through the connectors 1044, 1046 to the sensor or the
memory
device. The calibration step may be performed during manufacturing of the
system or
immediately prior to implantation of the implant.
[01321 FIG. 28 illustrates a method of connecting the system 1010 to a
network. FIG. 28
illustrates a network 1060, a computing device 1050, the cable 1048, the
second connector
1046, the first connector 1044, and the intramedullary nail 1024. In the
depicted
implementation, a sensor (not shown) is located within the intramedullary nail
1024.
Alternatively, the sensor may be attached to the probe 1029 or freestanding.
The
intramedullary nail 1024 may be wrapped in packaging, such as the first
package 1040 and/or
second package 1042 but this is not always the case. A memory device (not
shown) may be
connected to the sensor. The memory device may be used to store a calibration
transformation matrix (xl, yl, z1, x2, y2, z2) as well as other data, such as
length and size of
the intramedullary nail or the probe. The memory device may be mounted to or
placed on the
intramedullary nail 1024 or the probe 1029. The network 1060 maybe a local
area network
or a wide area network. The computing device 1054 is connected to the network
1060. The
network communication may be encrypted. The cable 1048 connects the computing
device
1054 to the sensor or the memory device through the use the connectors 1044,
1046. In this
way, the sensor calibration may be downloaded from the computing device 1054
and/or the
network 1060. While the depicted implementation illustrates the sensor within
the
intramedullary nail, this is not always the case. The sensor may be attached
to the probe or
freestanding. The memory device may be located within the control unit, and
the control unit
is connected to the network to download the calibration data.
- 36 -
CA 02759694 2011-10-21
WO 2010/129141
PCT/US2010/030784
101331 FIG. 29 illustrates a system 1110 for identifying a landmark in a
fourth
implementation. The system 1110 may include a control unit 1112, a field
generator 1114, a
landmark identifier 1116, an intramedullary nail 1124, a drop 1136, and a
probe 1129. The
control unit 1112 may be included as part of the processor described above or
may be a
separate unit. The intramedullary nail 1124 is inserted into the bone 100, and
the
intramedullary nail 1124 has a hole or landmark 1128. The field generator 1114
is connected
to the control unit 1112, either by wire or wirelessly. In the depicted
implementation, an
insertion handle 1122 is removably attached to the intramedullary nail 1124.
The insertion
handle 1122 and/or the intramedullary nail 1124 may be formed with a
cannulation. The
insertion handle 1122 may include a third sensor 1144. The drop 1136 may
include a fourth
sensor 1139.
101341 The landmark identifier 1116 may include a second sensor 1120. The
landmark
identifier 1116 may guide a drill bit 1018, and the drill bit 1018 may be
connected to a drill
(not shown). The second sensor 1120 may be connected to the control unit 1112,
either by
wire or wirelessly. The field generator 1114 may be included in or on the
landmark identifier
1116, in which case, the second sensor 1120 may be omitted.
10135] The probe 1129 may include a wire 1130, a tape 1134, and a stop 1136.
As shown
below, the probe may be more unitary in structure as well. The tape 1134 may
have, in some
implementations, a rectangular geometry that assists in orienting the tape as
it is placed into a
cannulation of the intramedullary nail 1124. The wire 1130 may be operatively
connected to
the tape 1134. For example, this may be accomplished through the use of an
adhesive or
fastener. A first sensor 1126 is connected to the control unit 1112, either by
wire or
- 37 -
CA 02759694 2011-10-21
WO 2010/129141
PCT/US2010/030784
wirelessly. The first sensor 1126 is connected through the use of the wire
1130. In some
implementations, a detachable connector may be used. The first sensor 1126 may
be
connected to a distal end of the tape 1134, and the stop 1136 may be connected
to a proximal
end of the tape 1134. The stop 1136 may be used to control the placement of
the sensor
1126. If the tape 1134 is a fixed length and the distance is known from the
end of the
insertion handle to the landmark 1128, repeatable placement of the first
sensor 1126 may be
achieved. The tape 1134 may be of sufficient length such that the sensor 1126
is aligned with
the landmark 1128, adjacent the landmark 1128, or offset from the landmark
1128.
[0136] In use, the intramedullary nail 1124 is placed into the bone 100. The
insertion
handle 1122 may be attached to the intramedullary nail 1124. The probe 1129 is
fed through
the insertion handle 1122 and into the intramedullary nail 1124 until the stop
1136 engages
the insertion handle 1122. In one particular implementation, the wire 1130 is
connected to
the control unit 1112, and the sensors 1126, 1120, and 1132 are calibrated
using the control
unit 1112. The probe 1129 may be removed after calibration. If so, the third
sensor 1132
and/or the fourth sensor 1139 and a transformation matrix may be used to
identify the relative
position of the second sensor 1120 and hence targeter 1116. Optionally, the
user may use
transfixion elements, such as screws, to first lock the proximal end of the
intramedullary nail.
An operator uses the landmark identifier 1116 and the first sensor 1126 to
identify the
landmarks 1128. For example, in the case of intramedullary nail fixation, a
surgeon uses the
landmark identifier 1116 to identify the blind transfixion holes and drill
through the holes for
placement of a transfixion element.
- 38 -
CA 02759694 2011-10-21
WO 2010/129141
PCT/US2010/030784
[0137] FIG. 30 illustrates a first method for using the system to identify a
landmark. The
method begins at step 1210. In step 1212, the sensor is placed in the nail. In
step 1214, the
insertion handle is connected to the nail, and the drop is attached to the
insertion handle. In
step 1216, the control unit is connected to the sensor. In step 1218, the
sensor is calibrated.
In step 1220, the sensor is aligned with the hole. In step 1222 the sensor
position is recorded
through the use of the control unit. In step 1224, the sensor is removed from
the nail. In step
1226, the nail is implanted into the bone. In step 1228, the hole is drilled
using the targeter.
The method stops in step 1230.
[0138] FIG. 31 illustrates a second method for using the system to identify a
landmark. In
step 1310, the tracking system is turned on. In step 1312, the intramedullary
nail is inserted
into bone. In step 1314, the probe 1129 is inserted into the intramedullary
nail canal at a
predetermined location and orientation using the stop 1136 and detents spaced
along a length
of the probe 1129. In step 1316, there is a decision whether the
intramedullary nail needs to
be locked proximally before distally. If yes, then in step 1326 the drop is
attached to the nail.
In step 1328, an offset is calculated between the probe and the drop. In other
words, a
transformation matrix is created. Alternatively, the drop is not connected to
the
intramedullary but instead a sensor mounted in the insertion handle is used to
calculate an
offset. In step 1330, the probe is removed from the nail. In step 1334, the
nail is locked
proximally. This may be accomplished through the use of the landmark
identifier, a
mechanical jig, or by manual operation. In step 1336, the landmark identifier
is used to target
the drill. In step 1338, the hole is drilled for the distal screw. In step
1340, the
intramedullary nail is locked distally. On the other hand, if the decision is
to lock distally
first, then in step 1318 the landmark identifier and probe are used to target
the drill bit. In
- 39 -
CA 02759694 2011-10-21
WO 2010/129141
PCT/US2010/030784
step 1320, the hole is drilled for the distal screw. In step 1322, the
intrarnedullary nail is
locked distally. In step 1324, the probe is removed from the intramedullary
nail. In step
1324, the intramedullary nail is locked proximally. This may be accomplished
through the
use of the landmark identifier, a mechanical jig, or by manual operation.
[01391 FIG. 32 illustrates a system for measuring depth of drill bit
placement. The system
1400 may include a stator 1410 and a slider 1412. The stator 1410 and the
slider 1412 form a
capacitive array that can sense relative motion. Moving the stator 1410 and
the slider 1412 in
a linear relation relative to one another causes a voltage fluctuation that
can be interpreted
and used to determine the distance traveled. In some implementations, an
electronic
measuring circuit (not shown) and the slider 1412 may be housed inside the
landmark
identifier, and the drill bit may be specially constructed to have the stator
1410 along outer
surface so that the stator 1410 and the slider 1412 are in very close linear
proximity to each
other. The linear movement of the drill bit stator 1410 induces a voltage in
the receiving
slider 1412 which is interpreted by the electronic measuring circuit as a
distance
measurement. The distance measurement may be sent to the control unit and/or
displayed on
the monitor. Capacitive sensors are highly susceptible to moisture, and so
some
implementations may be made to prevent liquids, such as bodily fluids, from
traveling
between the stator 1410 and the slider 1412. 0-rings or some other similar
form of wipes can
be incorporated within the landmark identifier in order to keep the drill bit
substantially
moisture free.
101401 FIGS. 33A and 33B illustrate another system for measuring depth of
drill bit
placement. The system 1500 may include a reflective code wheel or strip 1510,
a lens 1512,
-40-
CA 02759694 2011-10-21
WO 2010/129141
PCT/US2010/030784
and an encoder 1514. The lens 1512 focuses light onto bar of the code strip
1510. As the
code strip 1510 rotates, an alternating pattern of light and shadow cast by
the window and
bar, respectively, falls upon photodiodes of the encoder 1514. The encoder
1514 converts
this pattern into digital outputs representing the code strip linear motion.
The encoder is an
Avago Technologies AEDR-8300 Reflective Optical Encoder available from Avago
Technologies of 350 W Trimble Road, San Jose, California. Alternatively, the
Avago
Technologies ADNS-5000 One Chip USB LED-based Navigation System may be used.
The
encoder and its supporting electronics may be mounted inside the landmark
identifier so that
its input region is oriented toward a "window" in the landmark identifier
cannulation.
Markings, such as dark colored concentric rings or bright reflective rings,
may be added to
the drill bit in order to enhance the visibility of the bit to the encoder.
These markings could
also be used to denote the starting zero point for measurement. As the drill
bit moves linearly
within the landmark identifier, the encoder measures the movement of the drill
bit. The
distance measurement may be sent to the control unit and/or displayed on the
monitor.
[0141] FIG. 34 illustrates yet another system for drill depth measurement. The
system
1600 utilizes a Linear Variable Differential Transformer (LVDT) 1612. An LVDT
is a type
of electrical transformer used to measure linear displacement. The LVDT 1612
may include
a plurality of solenoid coils 1618 placed end-to-end around a tube 1610, which
is the
landmark identifier in the depicted implementation. In FIG. 34, the center
coil is the primary
coil and the outer two coils are the secondary coils. A cylindrical
ferromagnetic core 1610,
such as the drill bit, slides along the axis of the tube. An alternating
current 1614 is driven
through the primary coil, causing a voltage to be induced in each secondary
proportional to
its mutual inductance with the primary. A pickup sensor 1616 measures the
magnitude of the
- 41 -
CA 02759694 2011-10-21
WO 2010/129141
PCT/US2010/030784
output voltage, which is proportional to the distance moved by the core (up to
its limit of
travel). The phase of the voltage indicates the direction of the displacement.
Because the
sliding core does not touch the inside of the tube, it can move without
friction, making the
LVDT a highly reliable device. The absence of any sliding or rotating contacts
allows the
LVDT to be completely sealed against the environment. The distance measurement
may be
sent to the control unit and/or displayed on the monitor.
[0142] FIGS. 35-37 illustrate an insertion handle 1700 (FIG. 35) and an
adjustable stop
1800 (FIGS 37-38). The insertion handle 1700 a stem 1710 that connects to an
implant, such
as an intramedullary nail (not shown), at an end portion 1712. The insertion
handle 1700
may include a quick connect 1716 for attachment to a drop, proximal targeting
device, or
some other instrument or apparatus. The insertion handle may include a top
portion 1714,
which may include a hole and/or an alignment feature. The adjustable stop 1800
may include
a slot 1810, an alignment member 1812, and a fastener hole 1814.
[0143] In FIGS. 35-37, the adjustable stop 1800 may be removably attached to
the top
portion 1714 of the handle 1700. The adjustable stop may be integrally formed
with the
insertion handle 1700. In yet other implementations, the adjustable stop may
be permanently
attached to the insertion handle 1700. The alignment member 1812 fits within
an alignment
feature of the top portion to prevent rotation of the adjustable stop. A
fastener (not shown)
may be placed through the fastener hole 1814 to attach the adjustable stop to
the insertion
handle 1700. The tape 1034, 1134 may be placed through the slot 1810, through
the stem
1710, and into the intramedullary nail cannulation. The slot 1810 may have a
shape to match
the geometry of the tape and/or probe 1129 to aid in its insertion or to
prevent rotation of the
- 42 -
CA 02759694 2011-10-21
WO 2010/129141
PCT/US2010/030784
tape. The tape 1034, 1134 or probe 1129 may include markings, graduations, or
detents to
indicate an appropriate depth for the given nail length. The adjustable stop
1800 may include
a locking mechanism (not shown) to temporarily lock the tape 1034, 1134 at a
particular
depth. In its simplest form, the locking mechanism may be a fastener that
frictionally
engages the tape 1034, 1134.
101441 FIG. 38 illustrates a method for calibrating the system for identifying
a landmark.
Calibration is necessary for accuracy. The method begins at step 1900, which
may include
powering up the system. In step 1910, the probe and the landmark identifier
are removed
from packaging, if any, and scanned. The drop is also scanned. Scanning may
include
reading a bar code using a bar code reader. Scanning causes the system to
retrieve offset
sensor values that correspond to the bar code from a look up table in step
1912. The look up
table may be local or accessed over a network, such as the Internet.
Alternatively, the probe
and the landmark identifier may include a serial number or other unique
identifier, and the
unique identifier is used in conjunction with the look up table to retrieve
offset sensor values.
The offset sensor values are stored in local memory of the system in step
1914. In step 1916,
the user places the probe relative to the implant and attempts to track a
landmark using the
landmark identifier in step 1916. In step 1918, there is a decision whether
the calibration is
correct. If so, the method ends in step 1920. Otherwise, new offset values are
retrieved in
step 1912.
[0145] FIG. 39 illustrates an implementation combining a landmark identifier,
a field
generator and a drill sleeve. The handheld landmark identifier 2016 houses an
electromagnetic field generator (not shown) which may include one or more
induction coils
- 43 -
CA 02759694 2011-10-21
WO 2010/129141
PCT/US2010/030784
or other elements to create a suitable electromagnetic field or fields. The
electromagnetic
field generator is mounted in or on an autoclavable material and encapsulated
in a silicone
housing body 2018 that may be easily sterilized, and which is removably
engageable with a
tool. The relative orientation and position of the induction coils or elements
in the landmark
identifier 2016 may be selected to optimize the balance between the qualities
and strength of
the electromagnetic field or fields and their interaction with the sensor and
the weight, size,
form factor and ergonomics of the identifier 2016. At least three induction
coils (not shown)
may be mounted in or on the autoclavable material.
[01461 The autoclavable material allows the landmark identifier 2016 to be
sterilized or
autoclaved multiple times without degradation of the autoclavable material,
internal
components, or operational performance. For example, the housing 2018 includes
an internal
body or mounting structure (not shown) on which the coils and/or other
electromagnetic field
generating components are mounted. The internal body is formed of a material
that does not
adversely interfere with a generated electromagnetic field and which can be
subjected to
sterilization processes, including autoclaving. For example, the internal body
can be formed
from a glass-reinforced epoxy laminate, such as a NEMA grade G-11 glass
reinforced epoxy
laminate (VETRONITE G11) or equivalent. The internal body is surrounded by a
first
covering 2018a formed from a first material, such as an overmolding of VMQ
silicone
material 471385C available from Minnesota Rubber & Plastics, 1100 Xenium Lane
N.,
Minneapolis, MN 55441. The housing 2018 also includes a second covering 2018b
that may
provide an additional layer of protection or insulation at an outer edge of
the housing 2018.
The second covering 2018b may be formed from a second material, such as an
overmolding
of VMQ silicone material #71325C available from Minnesota Rubber & Plastics,
1100
- 44 -
CA 02759694 2011-10-21
WO 2010/129141
PCT/US2010/030784
Xenium Lane N., Minneapolis, MN 55441. The housing 2018 also includes a
coupling
member 2018c that passes through the internal body and that engages one or
more attachable
components. The coupling member 2018c may be formed from polysulfone, such as
a
GEHR PPSU polyphenylsulfone RAL 9005 Black (Solvay Radel R-5500) or
equivalent, and
can be at least partially covered by the first covering 2018a.
[0147] The particular landmark identifier 2016 illustrated in FIG. 39 may also
include a
removable drill sleeve attachment 2020 and a drill sleeve 2022 with a serrated
tip 2024,
though different components and constructions can be included as mentioned
elsewhere. The
sleeve attachment 2020 and drill sleeve 2022 can be formed as a single unit or
as separate
units connected to each other by adhesives or other connection means known to
one skilled in
the art. For illustration purposes, the sleeve 2022 as illustrated in FIG. 39
is a drill sleeve, but
it can also be a larger size sleeve such as a screw driver sleeve or other
sleeves as selected by
the surgeon, or other components as disclosed herein. To change sleeves or
other
components, the surgeon unscrews the sleeve attachment and replaces it with
another sleeve
attachment of choice and its corresponding sleeve.
101481 Unlike the landmark identifier 18 illustrated in FIG. 9, the landmark
identifier 2016
depicted in FIGS. 39-40 does not require the second sensor 20 illustrated in
FIG. 9 because
the origin of the global space (the area in which the electromagnetic field is
generated) can be
defined within the landmark identifier 2016. One axis of the global space co-
ordinate system
can be the longitudinal axis of the drill sleeve or other component 2022. In
that situation, the
other two axes of the global space co-ordinate system can be defined by planes
orthogonal to
that longitudinal axis and to each other. Advantages of incorporating the
field generator into
- 45 -
CA 02759694 2011-10-21
WO 2010/129141
PCT/US2010/030784
the landmark identifier 2016 include a smaller size field generator because it
can be brought
into the local working space (area which may include the landmarks such as
implant holes
that are to be targeted for screw placement) therefore requiring a smaller
electromagnetic
field. The global space and local working space become the same or at least
correspond more
closely spatially when the landmark identifier 2016 with its field generator
brought into the
vicinity of the landmark, implant or probe sensor (not shown). Because the
electromagnetic
field size requirement is smaller, the induction coils within the field
generator can be smaller
which therefore reduces the size and weight of the handheld field generator to
make it more
manageable for handheld usage. A light may be provided in an area of the
landmark
identifier/field generator/drill 2016, such as the area 2025 to indicate to
the user that power is
being supplied to the landmark identifier/field generator/drill 2016. In FIG.
41, the drill
sleeve 2022 has been removed and the landmark identifier 2016 has been engaged
with a
screw driver 2100 for fixing the implant to the bone. As shown in Fig. 41, the
housing 2018
of the landmark identifier 2016 may include one or more indentations 2018d for
finger
placement to allow the user to comfortably place his or her hand around the
landmark
identifier 2016. In the implementation depicted in Fig. 41, there are six
indentations.
Additionally, the texture and dimension of an exterior surface of the housing
2018 can be
configured allow a user to comfortably and securely grip the housing 2018.
Additionally, or
alternatively, the landmark identifier 2016 can be attachable to a tool, such
as a housing of
the screw driver 2100.
[0149] The material selection for the landmark identifier 2016 of FIG. 39
which houses the
field generator can be optimized for weight and stability after multiple
autoclave cycles. Any
autoclavable material can be used, and the materials are preferably non-
magnetic or weak
- 46 -
CA 02759694 2011-10-21
WO 2010/129141
PCT/US2010/030784
magnetic to avoid or minimize interference with the electromagnetic fields.
Exemplary
materials include ceramic, autoclavable polymers such as polypropylene (PP),
polypropylene
copolymer (PPC0), polycarbonate (PC), polymethylpentene (PMP),
polytetrafluoroethylene
(PTFE) resin, polymethyl methacrylate (PMMA or acrylic), ethylene
tetrafluoroethylene
(ETFE), ethylene chlorotrifluoroethlyene (ECTFE), fluor ethylene propylene
(FEP),
polyether imide (PEI), perfluoroalkoxy (PFA), polyketone (PK), polyphenylene
oxide (PPO),
polysulfone (PSF), polyvinyl chloride (PVC), polyvinylidene fluoride (PVDF),
silicone, or
thermoplastic elastomers (TPE), and still other autoclavable materials which
will be apparent
to those skilled in the art, including combinations of the above.
[0150] FIG. 42 illustrates another insertion handle 2122, an adjustable stop
1801, a probe
2129 and a sensor 2126 located within or on a body 2129a of the probe 2129.
The insertion
handle 2122 is removably attached to an orthopaedic implant, such as an
intramedullary nail.
The probe 2129 includes a cable 2130 and a connector 2131 for connection to a
processor for
use in targeting landmarks of the intramedullary nail, or other implant. The
probe 2129 also
includes a grip 2132 that secures the cable 2130 to the body 2129a to prevent
tension forces
applied to the cable 2130 from damaging the sensor 2126 and/or the electrical
connection
between the sensor 2126 and the cable 2130. The adjustable stop 1801 and an
alternative
stop 1803 are also illustrated in FIGS. 43 and 44. The stop 1801 and the stop
1803 each
include a push button actuator 1802. The stop 1801 includes a thumb wheel 1806
that is used
to turn a threaded bolt 1807 for attaching the stop 1801 to an insertion
handle while the stop
1803 includes a knob clamp 1804 that is also connected to a threaded bolt 2531
(FIG. 58).
The probe 2129 may be equipped with detents or markings to assist the user in
placing the
probe 2129 and sensor 2126 in the correct position.
- 47 -
CA 02759694 2011-10-21
WO 2010/129141
PCT/US2010/030784
[0151] The system may include different stops, such as stops 1801, 1803,
depending upon
the particular surgical approach contemplated. For example, the surgical
approach in the case
of retrograde placement of an intramedullary nail may utilize the stop 1801,
whereas
antegrade place placement of an intramedullary nail may favor use of the stop
1803. Other
surgical approaches may yet require other variations.
[0152] Now referring to FIG. 45, the adjustable stop 1803, an insertion handle
2123, and
the probe 2129 are illustrated in an assembled configuration attached to an
intramedullary
nail 2125. A distal portion 2124 of the insertion handle 2123 is attached to a
proximal head
2126 of the intramedullary nail 2125. The insertion handle 2123 is connected
to the
intramedullary nail 2125 through the use of a cannulated bolt (not shown).
Alternatively, the
insertion handle 2123 can be connected to the intramedullary nail 2125 using a
quick-connect
mechanism, or other attachment device.
[0153] The adjustable stop 1803 is attached to a proximal surface 2127 of the
insertion
handle 2123. The adjustable stop 1803 has a complimentary mating portion such
that when
the stop 1803 is connected to the insertion handle 2123, the stop 1803 is
located or fixed
relative to the insertion handle 2123 within three degrees of freedom. The
probe 2129 is
inserted through a hole 1805 of the adjustable stop 1803, through the distal
portion 2124 of
the insertion handle 2123, through the cannulated bolt, and into a cannulation
(not shown) of
the intramedullary nail 2125. The probe 2129 includes the sensor 2126 (FIG.
42) located
proximate a distal end (not shown). The sensor 2126 (FIG. 42) is electrically
connected to
the cable 2130 that includes the connector 2131 for transmitting signals from
the sensor 2126
(FIG. 42) to a control unit (not shown).
-48 -
CA 02759694 2011-10-21
WO 2010/129141
PCT/US2010/030784
[0154] FIG. 46 shows the adjustable stop 1801, the insertion handle 2122, and
the probe
2129 in an assembled configuration attached to an intramedullary nail 2155.
The adjustable
stop 1801 is mounted to a proximal surface 2147 of the insertion handle 2122
by rotating the
thumb wheel 1806 to thread the bolt 1807 (FIG. 43) into a threaded connection
(not shown)
formed in the insertion handle 2122. The adjustable stop 1801 has a
complimentary mating
portion such that when the stop 1801 is connected to the insertion handle
2122, the stop 1801
is located or fixed relative to the insertion handle 2122 within three degrees
of freedom. A
distal portion 2144 of the insertion handle 2122 is attached to a head 2156 of
the
intramedullary nail 2155. For example, the insertion handle 2122 is connected
to the
intramedullary nail 2125 through the use of a cannulated bolt (not shown). The
probe 2129 is
inserted through a hole 1808 of the adjustable stop 1801, through the distal
portion 2144 of
the insertion handle 2122, through the cannulated bolt, and into the head 2156
of the
intramedullary nail 2155.
[0155] Now referring to FIG. 47, a proximal targeting probe 2161 and a distal
targeting
probe 2171 are illustrated. The proximal targeting probe 2161 includes a tape
body 2163 and
a sensor 2165 disposed within or on the tape body 2163 at a predetermined
distance D1 from
a reference point R1 of the body 2163. The proximal targeting probe 2161 also
includes a
color-coded grip 2167 that indicates that the probe 2161 is to be used for
targeting proximal
landmarks of an orthopaedic implant, such as the intramedullary nail 2155 of
FIG. 46 and a
cable 2169 for carrying a signal from the sensor 2165 to a control unit (not
shown). The
distal targeting probe 2171 includes a tape body 2173 that is longer than the
body 2163 of the
proximal targeting probe 2161. A sensor 2175 is included within or on the tape
body 2173 at
a second predetermined distance D2 from a reference point R2 of the body 2173.
The distal
- 49 -
CA 02759694 2011-10-21
WO 2010/129141
PCT/US2010/030784
targeting probe 2171 also includes a color-coded grip 2177 that is a different
color than the
grip 2167 and that indicates that the probe 2171 is to be used for targeting
distal landmarks of
an orthopaedic implant, such as the intramedullary nail 2155 of FIG. 46. A
cable 2179 is
included to transmit a signal from the sensor 2175 to a control unit (not
shown). The tape
body 2163 of the proximal targeting probe 2161 and/or the tape body 2173 of
the distal
targeting probe 2171 may have, in some implementations, a rectangular geometry
that assists
in orienting the tape body as it is placed into a cannulation of the
intramedullary nail. An
oval, square, or circular geometry also may be used. In some implementations,
the tape body
2163 and the tape body 2173 may be a hollow metal tube. Instead of color-coded
grips, in
some implementations, each of the sensors 2165 and 2175 is connected to a
Programmable
Read-Only Memory (PROM) microchip that stores the calibration offset values
and also
stores an identifier that identifies whether the probe is used for proximal or
distal targeting.
In that way, when the sensors 2165 and 2175 are both connected to a processor,
such as the
processor 2327 of FIG. 51, the processor automatically identifies the type of
targeting
contemplated and may display such information on a display device, such as the
display
2326.
101561 The tape body 2163 and the tape body 2173 may include one or more bends
to bias
at least a portion of the tape body 2163 and the tape body 2173 against the
wall of the
cannulation of the orthopaedic implant. Biasing a portion of the tape body
against the wall of
the cannulation increases the repeatability of locating the sensors 2165 and
2175 relative to
landmarks. Alternatively, the probes 2161 and/or 2171 could be formed having
dimensions
approximately equal to dimensions of the cannulation of the intrarnedullary
nail or other
-50-
CA 02759694 2011-10-21
WO 2010/129141
PCT/US2010/030784
implant with which they are intended to be used so that the proper location of
the sensor
within the carmulation can be repeatably achieved.
[0157] With reference to FIG. 48 and as an alternative to the pair of probes
illustrated in
FIG. 47, a targeting probe 2181 can be used to target both distal and proximal
landmarks of
an orthopaedic implant. The probe 2181 is tubular and made from a non-magnetic
metal,
such as stainless steel. The probe 2181 includes a tape body 2183, a first
sensor 2185
disposed within a distal portion of the tape body 2183 and a second sensor
2186 disposed
within a proximal portion of the tape body 2183. The first sensor 2185 is
located at a
distance D3 from a reference point R3 of the body 2183, which may be formed as
a notch or
detent, and the second sensor is located at a second distance D4 from the
reference point R3.
[0158] In use, the first sensor 2185 is used to target a distal landmark of an
orthopaedic
implant, such as a distal locking aperture of an intramedullary nail, and the
second sensor
2186 is used to target a proximal landmark of the orthopaedic implant, such as
a proximal
locking aperture of the orthopaedic nail. In some implementations, the
construction of the
probe 2181 can be similar to the distal targeting probe 2171 (FIG. 47), with
the addition of
the second sensor 2186. The probe 2181 also includes a grip 2187, which can be
color-coded
to be distinguishable from the distal targeting probe 2171, and to indicate
that the probe 2181
can be used to target both distal and proximal landmarks of an implant. As
discussed above,
each of the sensors 2185 and 2186 can be connected to a PROM or other storage
device that
stores reference values for use in determining a position of a landmark
identifier, such as the
landmark identifier 2016, relative to a landmark of an implant. The PROMs also
store
-51 -
CA 02759694 2011-10-21
WO 2010/129141
PCT/US2010/030784
identifiers that allow a processor to determine whether a received signal was
generated by the
distal sensor 2185 or the proximal sensor 2186.
[0159] Another alternative probe 2191 is illustrated in FIG. 49. The probe
2191 includes a
housing 2192 and a retractable/extensible body 2193 that can be coiled within
the housing
2192. A sensor 2195 disposed within the body 2193 can be positioned at a first
position P1
for targeting a proximal landmark of an implant, and can be positioned at a
second position
P2 for targeting a distal landmark of an implant. In some implementations, the
body 2193
can be formed as a concave metal strip that tends to maintain a generally
straight shape when
extended from the housing, but can also be coiled within the housing 2192. For
example, the
body 2193 may consist of layered, flexible stainless steel bi-stable spring
bands that, when
straightened, create tension within the springy metal bands to maintain a
generally straight
orientation, but coil within the housing 2192 when the tension is relieved.
However, other
types of materials can be used to form the body, including resilient plastic
or rubber tubing or
sheeting. Another alternative is to form the body 2192 from nested segments of
tubing that
can extend and retract by sliding within adjacent tube segments. The probe
2191 can include
a rotary encoder, an optical device, or other measuring device or method to
determine a
length of the body 2193 that is currently extending from the housing 2192. The
determined
length can be used to determine whether the sensor 2195 is positioned at a
desired position,
such as the first position P1 or the second position P2.
[0160] Now referring to FIG. 50, the adjustable stop 1801 is mounted to an
alternative
insertion handle 2210. The insertion handle 2210 includes a body 2211 that is
engaged with
the head 2156 of the intramedullary nail 2155 (also shown in FIG. 46). As an
example, a
- 52 -
CA 02759694 2011-10-21
WO 2010/129141
PCT/US2010/030784
cannulated bolt (not shown) may be used to connect the insertion handle 2210
to the head
2156. The insertion handle 2210 includes a sensor 2213 for use in targeting a
proximal
landmark of the nail 2155, such as a proximal locking aperture 2157. The
sensor 2213 is
located within or on the body 2211 at a predetermined distance D5 from the
proximal locking
aperture 2157 when the insertion handle is attached to the nail 2155. The
sensor can be
passive, or electrically powered by an internal battery (not shown) or an
external power
supply (not shown). The sensor 2213 may be mounted in a compartment that is
unitary or
integral with the body 2211, such as the exterior compartment 2216.
Alternatively, the
sensor 2213 can be located in an internal compartment 2213a, shown in FIG. 51.
The
insertion handle 2210 is made of plastic, but other materials could
alternatively be used.
[0161] The adjustable stop 1801 is used with a probe, such as the probe 2129
(FIG. 46), for
targeting distal landmarks of the nail 2155, such as a distal aperture 2159
(FIG. 51). As
described above, the adjustable stop 1801 can be attached to the insertion
handle 2210 by a
bolt 1807 (FIG. 43) that engages a threaded bore 2215 that is aligned with a
longitudinal
through hole of the insertion handle 2210 (not shown) that allows the probe to
pass through
the insertion handle 2210 and into the cannulation 2155a (FIG. 51) of the nail
2155. The
adjustable stop 1801 also includes an arm 1809 that engages the body 2211 to
prevent
rotation between the adjustable stop 1801 and the insertion handle 2210.
[0162] Although not illustrated, the adjustable stop 1803 (shown in FIG. 45)
can also be
used with an insertion handle that includes an embedded sensor for targeting
proximal
landmarks of an implant.
- 53 -
CA 02759694 2011-10-21
WO 2010/129141
PCT/US2010/030784
[0163] In use, an orthopaedic implant, such as the intramedullary nail 2155,
is implanted
into bone. The insertion handle 2210 may be connected to the orthopaedic
implant before or
after implantation. Thereafter, a landmark identifier can be used for
targeting of the proximal
landmarks of the orthopaedic implant.
[0164] In some implementations, the distal landmarks are targeted prior to the
proximal
landmarks. As before, the insertion handle 2210 may be connected to the
orthopaedic implant
before or after implantation. The stop 1801 or the stop 1803 is connected to
the insertion
handle 2210. A probe is inserted into the stop, through the insertion handle
2210, and into
the orthopaedic implant, such as the nail 2155. The distal landmarks are
targeted, transfixion
elements are placed in the distal landmarks to hold the orthopaedic implant,
the probe is
removed, and then the proximal landmarks are targeted.
[0165] Now referring to FIG 51, a system 2300 for targeting a blind landmark
of an
orthopaedic implant is illustrated. The system 2300 includes the adjustable
stop 1801, the
probe 2171, and the insertion guide 2210 assembled and connected to the
intramedullary nail
2155, which is implanted in a bone B that includes a fracture F. The
intramedullary nail 2155
includes a distal aperture 2159 that extends through the intramedullary nail
2155 and is
configured to receive a locking fastener (not shown). The probe 2171 is
received through an
aperture or the adjustable stop 1801, through a cannulation 2210a of the
insertion handle
2210, and within a eannulation 2155a of the intramedullary nail 2155. The
probe 2171 is
received within the stop 1801 such that the sensor 2175 is positioned at a
known distance
from the distal aperture 2159. The known distance may range from zero to about
102
millimeters from the sensor 2175 to the distal aperture 2159 or other
landmark. In other
- 54 -
CA 02759694 2011-10-21
WO 2010/129141
PCT/US2010/030784
implementations, the known distance may range from about two millimeters to
about twenty-
five millimeters or from about three millimeters to about ten millimeters. In
the depicted
implementation, the known distance is about five millimeters.
[01661 The system 2300 also includes a tool, such as a drill 2310 that
includes a drill bit
2311. The landmark identifier 2016 is engageable with the drill 2310 and/or
the drill bit 2311
such that a position and orientation of the landmark identifier 2016 can be
used to determine
a position and orientation of the drill 2310 and/or the drill bit 2311. For
example, the housing
of the landmark identifier 2016 can include a friction fit engagement with the
drill 2310, a
strap, or other securing mechanism to at least temporarily secure the landmark
identifier 2016
to the drill 2310. In other implementations, the landmark identifier 2016 can
be integrated
with the drill 2310, or other tool. In some implementations, the drill sleeve
(not shown) may
telescope to allow the user to place the tip of the drill sleeve against a
patient and also allow
the user to move the drill bit in a longitudinal direction for drilling.
[0167] A targeting system 2320 is operable to provide an indication to a user,
such as a
surgeon, of the relative position of a tool, such as a drill 2310 that
includes a drill bit 2311,
relative to the distal aperture 2159. The targeting system 2320 includes a
housing 2321, a
first sensor port 2322, a second sensor port 2323, a field generator port
2324, a display device
2325, and a processor 2327. The first sensor port 2322 is configured to
receive a connector
of the cable 2179 of the probe 2171 such that the targeting system 2320
receives signals
generated by the sensor 2175. The second sensor port 2323 is configured to
receive a
connector of a cable 2214 that is connected to the sensor 2213 of the
insertion handle 2210
such that the targeting system 2320 receives signals generated by the sensor
2213. The field
- 55 -
CA 02759694 2011-10-21
WO 2010/129141
PCT/US2010/030784
generator port 2324 is configured to receive a connector of a cable 2019 of
the landmark
identifier 2016 such that the targeting system 2320 transmits signals via the
cable 2019 to
control the operation of the field generator of the landmark identifier 2016.
The display
device 2325 is operable to output a display of a graphical user interface 2326
that includes a
representation of the position and orientation of the drill 2310 relative to a
location and
orientation of a landmark of the intramedullary nail 2155, such as the distal
aperture 2159,
the proximal aperture 2157 (FIG. 50), or another landmark.
101681 The processor 2327 is operable to receive signals from the distal
sensor 2175 and/or
the proximal sensor 2213, and to determine, based on the received signal(s), a
current
position and orientation of the landmark identifier 2016 relative to a
selected landmark of the
intramedullary nail 2155. For example, a feature of a signal received from the
distal sensor
2175, such as one or more induced electrical currents, can be used by the
processor 2327 to
determine a distance of the landmark identifier 2016 from the sensor 2175, as
well as an
orientation of a magnetic moment of a field generated by the landmark
identifier 2016. For
example, the sensor 2175 can transmit a signal indicative of a current value
and an identifier
that indicates which of a plurality of induction coils produced the associated
current value.
The processor 2327 can compare the received current values with reference
values associated
with each of the induction coils to determine differences between the received
values and the
reference values. The reference values can be values of induced current
associated with a
reference field generation signal, a reference position, and a reference
orientation of the
landmark identifier 2016. The processor 2327 uses these determined differences
between the
received and reference values to determine a difference in position and
orientation of the
landmark identifier 2016 from the reference position and orientation based on
any determined
- 56 -
CA 02759694 2011-10-21
WO 2010/129141
PCT/US2010/030784
difference in the magnetic field generated by the landmark identifier 2016
from the reference
field. Based on the difference in position and orientation of the landmark
identifier 2016 and
the reference position and orientation, a current position and orientation of
the landmark
identifier 2016 relative to the sensor 2175 can be determined by the processor
2327.
[01691 The current distance and orientation of the landmark identifier 2016
relative to the
sensor 2175 are used by the processor 2327 to determine the current distance
of the landmark
identifier 2016 from the distal aperture 2159 and the current relative
orientation of the
magnetic moment of the generated magnetic field relative to a central through-
axis of the
distal aperture 2159. For example, the processor 2327 determines the current
distance and
relative orientation of the landmark identifier 2016 relative to the distal
aperture 2159 based
on a known position and orientation of the distal aperture 2159 relative to
the distal sensor
2175. The processor 2327 also determines a current position of the drill 2310,
including the
drill bit 2311, from the distal aperture 2159 as well as a current orientation
of the drill 2310
and the drill bit 2311 relative to the central through-axis of the distal
aperture 2159 based on
a known position and orientation of the drill 3210 and the drill bit 2311
relative to the
location of the landmark identifier 2016 and the magnetic moment of the field
generated by
the landmark identifier 2016. In the case of the landmark identifier 2016, a
longitudinal axis
of the drill bit 2311 is coaxial with the magnetic moment of the magnetic
field generated by
the landmark identifier 2016.
[0170] The graphical user interface 2326 is generated by the processor based
on the
determined current position and orientation of the drill 2310 and the drill
bit 2311 relative to
the distal aperture 2159, or based on a current position and orientation of
another tool relative
- 57 -
CA 02759694 2011-10-21
WO 2010/129141
PCT/US2010/030784
to another landmark. The graphical user interface 2326 includes a first
portion 2326a that
includes an intramedullary nail image 2155b that represents the intramedullary
nail 2155 and
includes a distal aperture image 2159a that represents the distal aperture
2159. The first
portion 2326a of the graphical user interface 2326 also includes an
orientation indicator 2330
that includes a first circle 2331, a second circle 2333, and a line 2335 that
intersects the
centers of each of the first circle 2331 and the second circle 2333. The line
2335 provides an
illustration to the user of the current orientation of the drill bit 2311
relative to the central
through axis of the distal aperture 2159. Particularly, when the first circle
2331 and the
second circle 2333 are both disposed entirely within the distal aperture image
2159a, then the
longitudinal axis of the drill bit 2311 is co-axial with the central through
axis of the distal
aperture 2159, as shown in FIG. 51. The graphical user interface 2326 also
includes a second
portion 2326b that includes intramedullary nail image 2155b and a drill bit
image 2331b.
The current position and orientation of the drill bit 2311 relative to the
intramedullary nail
2155 is illustrated in the second portion 2326b of the graphical user
interface 2326.
[0171] In use, the probe 2155, the insertion handle 2210, the adjustable stop
1801, the
landmark identifier 2016, the drill 2310, and the drill bit 2311 can be
sterilized, such as by
autoclaving, if one or more of the components is not sterile. When sterile,
the probe 2155 is
connected with the first sensor port 2322 of the targeting system 2320 and the
insertion
handle 2210 is connected with the second sensor port 2323 of the targeting
system 2320. The
processor 2327 detects the connection of the distal sensor 2175 and the
proximal sensor 2213
and can optionally cause a display of an indication of the proper (or
improper) connection of
the probe 2155 and the insertion handle 2210 and/or an indication of the
proper (or improper)
operation of the distal sensor 2175 and the proximal sensor 2213. Similarly,
the landmark
- 58 -
CA 02759694 2011-10-21
WO 2010/129141
PCT/US2010/030784
identifier 2016 is connected with the field generator port 2324, and the
processor can detect
the connection of the landmark identifier 2016 and cause a display of the
proper (or
improper) connection of the landmark identifier 2016 and/or the proper (or
improper)
operation of the field generator of the landmark identifier 2016. The sensor
2175 is
connected to a Programmable Read-Only Memory (PROM) microchip that stores the
calibration values and also stores an identifier that identifies the sensor
2175 as a distal
targeting sensor. When the sensor is connected to the processor 2327, the
processor 2327
automatically identifies the type of targeting contemplated and may display an
indication on
graphical user interface 2326 that a sensor of the identified type is
connected.
[0172] The insertion handle 2210 is engaged with the intrarnedullary nail 2155
and the
adjustable stop 1801 is engaged with the insertion handle 2210. The probe 2155
is then
inserted in the adjustable stop 1801 and positioned at a desired location. The
button 1802 is
manipulated to allow the probe 2155 to be adjusted, and the button 1802 is
released to clamp
the probe 2155 in a desired position. For example, the probe 2155 can be
inserted until a
reference mark, such as a printed mark or a detent or other structure of the
probe 2155 is
correctly positioned relative to a reference portion of the adjustable stop
1801. The
positioning of the probe 2155 locates the distal sensor 2175 in the correct
position relative to
the distal aperture 2159.
[0173] A drill sleeve 2022 is selected and engaged with the drill sleeve
attachment 2020 of
the landmark identifier 2016. For example, one of a short drill sleeve and a
long drill sleeve
is selected. An indication of the selection is input to the targeting system
2320, such as by
interaction with a menu 2326c of the graphical user interface 2326.
Additionally, an
-59-
CA 02759694 2011-10-21
WO 2010/129141
PCT/US2010/030784
indication of the specific intramedullary nail 2155, insertion handle 2210,
adjustable stop
1801, and/or probe 2171 is input to the targeting system 2320, if not
automatically recognized
by the targeting system 2320 and/or to confirm the specific intramedullary
nail 2155,
insertion handle 2210, adjustable stop 1801, and/or probe 2171.
[0174] The accuracy of the targeting system 2320 is checked before
implantation of the
intramedullary nail 2155 by placing the landmark identifier 2016 directly over
the distal
aperture 2159 of the intramedullary nail 2155, which can be done by inserting
the tip 2024 of
the drill sleeve 2022 within the distal aperture 2159. If the second circle
2333 is shown
within the distal aperture image 2159a, and if the orientation of the line
2335 corresponds to
the orientation of the drill sleeve 2022, then the targeting system 2320 is
accurate. If the
targeting system is not accurate, the input indications of selected
components, and/or the
position of the probe 2171 are checked. If no errors are found, then the
targeting system
2320 is recalibrated, as described below with reference to FIG. 52.
[01751 When the components are assembled and checked as described above, the
intramedullary nail 2155 is implanted in the bone B. When the intramedullary
nail 2155 is
located in the desired position, the tip 2024 of the drill sleeve 2022 is
placed over the distal
aperture 2159. When the landmark identifier 2016 is brought near the sensor
2175, a signal
generated by the sensor 2175 is received by the processor 2327, and one or
more signal
feature, such as a current value, and an identifier are used by the processor
to determine that
distal targeting is being attempted, and the targeting system 2320 enters a
distal targeting
mode. Locating the tip 2024 relative to the distal aperture 2159, which is
hidden within the
bone B, is performed by a user by making reference to the graphical user
interface 2326 in
- 60 -
CA 02759694 2011-10-21
WO 2010/129141
PCT/US2010/030784
the distal targeting mode, and is confirmed when the first circle 2331 and the
second circle
2333 are located within the distal aperture image 2159a.
[0176] An incision is made in the skin at the location of the distal aperture
2159. The drill
sleeve 2022 is then inserted into the incision down to the bone B. The
landmark identifier
2016 is then manipulated by a user to arrange both the first circle 2331 and
the second circle
2333 completely within the distal aperture image 2159a and, while maintaining
the position
and orientation of the landmark identifier 2016, the drill bit 2311 is
inserted through the drill
sleeve 2022 and a user drills through the bone B, through the distal aperture
2159, to the
cortex on the far side of the bone B. A desired drill depth can be achieved by
the user by
referring to the second portion 2326b, or by comparing one or more reference
marks included
on the drill bit 2311 to a reference portion of the landmark identifier 2016.
[0177] The drill bit 2311 is then removed and a locking fastener (not shown)
is engaged
with the bone B and the distal aperture 2159 through the drill sleeve 2022,
again maintaining
the first circle 2331 and the second circle 2333 within the distal aperture
image 2159a. A
desired depth of insertion of the locking fastener can be achieved by a user
by referring to the
second portion 2326b of the graphical user interface 2326, or by comparing a
reference
marking on a fastener driving tool (not shown) to a reference portion of the
landmark
identifier 2016.
[0178] In addition to engaging the locking fastener with the distal aperture
2159, the
targeting system 2320 can be used to target a proximal landmark of the
intramedullary nail
2155. For example, before or after engaging the locking fastener with the
distal aperture
2159 and the bone B, a user can select the sensor 2213 from the menu 2326c or
move the
- 61 -
CA 02759694 2011-10-21
WO 2010/129141
PCT/US2010/030784
landmark identifier 2016 within a predetermined distance of the sensor 2213,
which causes
the targeting system 2320 to enter a proximal targeting mode and output a
display of the
relative position and orientation of the drill 2300 and/or the drill bit 2016
relative to a
proximal landmark of the intramedullary nail 2155, such as the proximal
aperture 2157 (FIG.
50). A user can then engage a fastener or other tool or implant with the
proximal landmark in
a mariner similar to that described above with respect to drilling through the
distal aperture
2159 and/or engaging the locking fastener with the distal aperture 2159.
101791 As mentioned above, a proximal landmark can be targeted using the
targeting
system 2320 and the sensor 2213 before or after targeting a distal landmark,
such as the distal
aperture 2159. Particularly, a proximal landmark can be targeted before
insertion of the
probe 2171 within the adjustable stop 1801, the insertion handle 2210, and/or
the
intramedullary nail 2155. The proximal landmark can also be targeted after
removal of the
probe 2171, or while the probe 2171 is inserted within the adjustable stop
1801, the insertion
handle 2210, and/or the intramedullary nail 2155. For example, as discussed
above, the
probe 2171 can be inserted through a portion of the intramedullary nail 2155
that does not
interfere with engagement of the drill bit 2311 or the fastener with a
proximal aperture or
other proximal landmark. Additionally, if the probe 2171 is inserted into the
cannulation
2155a and the proximal aperture also passes through the cannulation 2155a, the
cannulation
2155a can be large enough to simultaneously acconunodate both a fastener or
the drill bit
2311 and the probe 2171. For example, the probe 2171 can be dimensioned to be
disposed in
a gap between the drill bit 2311 and an inner wall of the intramedullary nail
2155 that defines
the cannulation 2155a. Similarly, the probe 2181 (FIG. 48), which has both the
distal sensor
2185 and the proximal sensor 2186, can be inserted in the cannulation 2155a
and both distal
- 62 -
CA 02759694 2011-10-21
WO 2010/129141
PCT/US2010/030784
and proximal landmarks of the intramedullary nail 2155 can be targeted without
removal or
adjustment of the probe 2181.
[0180] Alternatively, a proximal landmark of the intramedullary nail 2155 can
be targeted
using the targeting system 2320 and either the sensor 2175 of the probe 2171
or the sensor
2165 of the probe 2161 (FIG. 47). For example, after engaging the locking
faster with the
distal aperture 2159, the probe 2171 can be adjusted using the adjustable stop
1801 to secure
the sensor 2175 in a predetermined location relative to one or more proximal
landmarks of
the intramedullary nail 2155. The menu 2326c can then be used to select a
proximal
targeting mode such that the targeting system 2320 is operable to display a
position and
orientation of the drill 2310 and/or the drill bit 2311 (or other tool or
implant) relative to the
proximal landmark(s). Similarly, and particularly where it is undesirable to
have a portion of
the probe 2171 extending a distance from the adjustable stop 1801, the probe
2161 can be
connected to the targeting system 2320 and inserted in the adjustable stop
1801 such that the
sensor 2165 is located in a know location relative to one or more proximal
landmarks of the
intramedullary nail 2155. In either case, one or more proximal landmarks of
the
intramedullary nail can then be targeted using the targeting system 2320, as
described above.
In other implementations, the proximal landmark(s) can be targeted before the
distal aperture
2159 using the prone 2171 or the probe 2161.
[0181] Now referring to FIG. 52, a calibration member 2340 is attached to the
landmark
identifier 2016 and the intramedullary nail 2155 for use in calibrating the
targeting system
2320. For example, if the accuracy of the targeting system 2320 is checked
before inserting
the intramedullary nail 2155 and errors are found, the targeting system 2320
can be re-
- 63 -
CA 02759694 2011-10-21
WO 2010/129141
PCT/US2010/030784
calibrated. In use, the calibration member 2340 is engaged with the landmark
identifier 2016.
Then a tip 2341 is inserted into the distal aperture 2159 until a reference
portion (not shown)
of the calibration member 2340 abuts the intramedullary nail 2155. Re-
calibration of the
targeting system 2320 can then be achieved by interaction with the menu 2326c
of the
graphical user interface 2326. For example, a "re-calibrate" option may be
selected from the
menu 2326c, which causes the targeting system 2320 to transmit a driving
signal to the field
generator of the landmark identifier 2016 and to store as reference values any
current values
received from the sensor 2175 of the probe 2171. The graphical user interface
2326 can
display an indication of a successful re-calibration of the targeting system
2320.
[0182] Now referring to FIGS. 53-57, details of the adjustable stop 1801 are
illustrated.
The adjustable stop 1801 includes a housing 2401 that includes a clamp member
slot 2402.
A clamp member 2411 is received within the clamp member slot 2402 and is
biased by a
spring 2413. The clamp member 2411 is retained within the housing 2401 by pins
2415. The
clamp member 2411 also includes an actuator slot 2417, a linkage aperture
2418, and a probe
aperture 2419.
[0183] The button 1802 includes an actuating shaft 2421 and an actuating slot
2423. The
actuating shaft 2421 is received within an aperture 2405 of the housing 2401
and is biased
against insertion into the housing by a spring 2425. When assembled, the
actuating shaft
2421 is received in the actuator slot 2417 of the clamp member 2411 and is
retained in the
housing 2401 by a linkage pin 2427 that is inserted into the actuating slot
2423 of the
actuating shaft 2421 through an opening 2403 of the housing 2401 and through
the linkage
aperture 2418 of the clamp member 2411. In use, when the button 1802 is
depressed against
- 64 -
CA 02759694 2011-10-21
WO 2010/129141
PCT/US2010/030784
the biasing force of the spring 2425, the linkage pin 2427 is moved within the
actuating slot
2423 which pushes the clamp member 2411 against the spring 2413 to allow a
probe to be
inserted into the hole 1808 and through the probe aperture 2419. When the
probe is inserted
and the button 1802 is released, the springs 2413 and 2425 cause the clamp
member 2411 to
bear against the probe to maintain the position of the probe within the hole
1808.
[0184] The thumb wheel 1806 is received within a thumb wheel slot 2407 of the
housing
2401 and the bolt 1807 is threaded into a threaded aperture 2431 of the thumb
wheel 1806
through a bolt aperture 2409 of the housing 2401. After the bolt 1807 is
threaded into the
bolt aperture 2431, a pin 2433 is inserted through an aperture 2435 (FIG. 56)
of the thumb
wheel 1806 and into a slot 2437 (FIG. 56) of the bolt 1807 to retain the bolt
1807 in
engagement with the thumb wheel 1806.
[0185] Now referring to FIGS. 58-62, details of the adjustable stop 1803 are
illustrated.
The adjustable stop 1803 includes a housing 2501 that includes a clamp member
slot 2502.
A clamp member 2511 is received within the clamp member slot 2502 and is
biased by a
spring 2513. The clamp member 2511 is retained within the housing 2501 by pins
2515. The
clamp member 2511 also includes an actuator slot 2517, a linkage aperture
2518, and a probe
aperture 2519.
101861 The button 1802 includes an actuating shaft 2421 and an actuating slot
2423. The
actuating shaft 2421 is received within an aperture 2405 of the housing 2401
and is biased
against insertion into the housing by a spring 2525. When assembled, the
actuating shaft
2421 is received in the actuator slot 2517 of the clamp member 2511 and is
retained in the
housing 2501 by a linkage pin 2527 that is inserted into the actuating slot
2423 of the
- 65 -
CA 02759694 2011-10-21
WO 2010/129141
PCT/US2010/030784
actuating shaft 2421 through an opening 2503 of the housing 2401 and through
the linkage
aperture 2418 of the clamp member 2511. In use, when the button 1802 is
depressed against
the biasing force of the spring 2525, the linkage pin 2527 is moved within the
actuating slot
2423 which pushes the clamp member 2511 against the spring 2513 to allow a
probe to be
inserted into the hole 1805 and through the probe aperture 2519. When the
probe is inserted
and the button 1802 is released, the springs 2513 and 2525 cause the clamp
member 2511 to
bear against the probe to maintain the position of the probe within the hole
1805.
[0187] A threaded bolt 2531 of the clamp knob 1804 is threaded into a bolt
aperture 2509
of the housing 2501 to secure the adjustable stop 1803 to an insertion handle.
10188] System calibration may be accomplished during manufacturing, after
distribution,
or immediately preceding implant implantation. The calibration step is
analogous to
registration in computer assisted surgery. Calibration may be needed for
different reasons.
For example, sensor calibration may be needed to correct for manufacturing
tolerances. The
system may be designed based upon a computer-aided-design model, and
calibration is used
to accurately place the sensors relative to one another. The processor or the
control unit may
include software to generate X, Y, Z, pitch, yaw, and roll offset values to
locate the sensors in
a global coordinate system or simply placement relative to one another. The
system may be
manufactured and calibrated during manufacturing and assigned a unique
identifier, such as a
serial number, color code, bar code, or REID tag. If the system needs to be re-
calibrated, the
unique identifier may be used to retrieve the offset values, either locally or
over a network.
Further, the unique identifier may be used to retrieve other data, such as the
size of the
intramedullary nail or the length of the intramedullary nail and/or the probe.
- 66 -
CA 02759694 2011-10-21
WO 2010/129141
PCT/US2010/030784
[0189] The systems for identifying a landmark may be used for other purposes
beyond
targeting blind screw holes of an implanted intramedullary nail. These
include, but are not
limited to, targeting blocking screws and aligning guide pins. In one
procedure, blocking
(poller) screws can be inserted into the bone directly outside and tangent to
the nail or rod.
Targets are shown as two lines on the screen on opposing sides of the nail,
such as anterior-
posterior or medial-lateral, and offset from the nail at a distance, for
example, 2.5mm. The
surgeon aligns the landmark identifier to one of the lines as determined by
anatomical side
where he or she wishes to place the blocking screw. Other symbols or indicia
such as dots,
bull's-eyes or combinations thereof can be used as targets shown on the
screen. For this
application, devices that are insertable in the medullary canal and
instrumented with a sensor
or sensors can be used as a means to target blocking screws, including but not
limited to, a
probe, a reducer or an awl. The depicted systems for identifying a landmark
can also be used
to align or center a guide pin in both A-P and M-L planes for placement of a
lag screw in the
proximal portion of a femoral nail. An exemplary implementation of this system
may include
a sensor placed with known orientation and location relative to and in the
insertion handle
and/or drill guide and/or alignment jig which is removably attached to the
proximal portion of
the femoral nail.
101901 While FIG. 1 illustrates a pocket for affixing the first sensor to the
implant, other
structure and/or methods may be used to affix these items together. For
example, probes of
varying length may be used to place the first sensors in the appropriate
position as illustrated
in FIG. 42. The adjustable stops 1801, 1803 of FIGS. 41-42 may be used to
precisely
position the sensor 2126 in the implant 30.
- 67 -
CA 02759694 2016-08-17
[0191] While only certain implementations have been set forth, alternatives
and
modifications will be apparent from the above description to those skilled in
the art. These
and other alternatives are considered equivalents and within the scope of this
disclosure and
the appended claims.
- 68 -