Note: Descriptions are shown in the official language in which they were submitted.
CA 02769921 2012-02-28
INSERT WALL ANCHOR FOR A GRAB BAR
TECHNICAL FIELD
This invention relates to a bar or other accessory that is utilized in
bathrooms,
such as a grab bar for example, and more specifically the invention relates to
an insert
wall anchor and a rotatable mounting plate that can provide multiple mount
configurations to secure one of many different grab bars to a wall with the
same insert
wall anchor.
BACKGROUND OF THE INVENTION
Grab bars are utilized in bathroom applications to provide support for an
individual during exit or entry in a bathtub or shower, for example. Typical
grab bars
include a body member that is spaced apart from, and parallel to, a wall. The
grab bar
has end mounts that extend toward the wall such that the grab bar can be
mounted to
the wall. Anchor assemblies are mounted to a wall structure that forms the
shower
enclosure or tub surround, and the end mounts of the grab bar are then
attached to the
anchor assemblies.
Behind the wall structure is a plurality of studs that extend in a vertical
direction from a floor to a ceiling. Sheetrock panels are attached to the
studs to form
the wall structure that provides an enclosed space for a tub or shower. Tiles,
fiberglass structures, etc., are then attached to the sheetrock panels to
provide a
waterproof tub and/or shower area with an aesthetically pleasing appearance.
One feature that requires consideration during mounting is a projection
dimension. The body member of the grab bar has a wall facing side and a front
facing
side that is opposite the wall facing side. The projection dimension of the
grab bar,
i.e. a gap between the wall facing side of the body member and a wall mount
surface
of the enclosure, must be tightly controlled to satisfy industry standards.
The grab bars must be positioned within the tub and shower areas such that
they can be easily grabbed by individuals during exit or entry, for example.
When
positioning the grab bars on the wall of the enclosure, it would be ideal that
the
anchor assemblies be able to be aligned with one of the wall studs; however
this is not
always possible. In some mounting configurations only one of the anchor
assemblies
1
CA 02769921 2012-02-28
may be aligned with a stud, or sometimes, none of the anchor assemblies can be
aligned with a stud.
Traditional anchor assemblies for these mounting configurations have
presented some challenges. For example, when one end of the grab bar is
mounted to
a stud and the other end is mounted only to sheetrock, the projection
dimension can be
adversely affected at one end due to height variations between the two
different
mounting configurations.
Further, with traditional configurations, the anchor can fall behind the wall
during installation. As such, the anchor cannot be removed and re-used if
needed.
Additionally, different anchor configurations are needed to mount different
types of
grab bars.
Thus, there is a need to provide a common anchor assembly that can be used
to easily mount many different types of grab bars to a wall without adversely
affecting
the projection dimension for grab bars having different types of mounting
structure.
Further, the anchor assembly should not require any special tools, and should
be
configured to prevent mounting components from falling behind the wall during
installation, as well as overcoming the other challenges presented by
traditional
designs discussed above.
SUMMARY OF THE INVENTION
A grab bar or other accessory is attached to a bathroom structure, such as a
wall of a shower enclosure or tub surround for example, with an anchor
assembly and
a mounting plate that can support many different types of grab bars.
In one example, the anchor assembly includes a vertical support beam, an arm
having a hub portion and an arm portion, and a mounting plate that is coupled
to the
arm. The arm portion is received within a slot formed within the vertical
support
beam. A spring is attached to the vertical support beam and cooperates with
the arm
portion to hold the arm in place during installation. The mounting plate
includes a
plurality of hole locations spaced radially outwardly from a center opening.
The
mounting plate is rotatable to position the plurality of hole locations at one
of many
different desired mount positions for a variety of grab bars.
In one example, the mounting plate includes a tubular extension on a rear
facing side. The tubular extension and hub portion of the arm are snapped
together
2
CA 02769921 2012-02-28
such that the mounting plate is held in place but still able to freely rotate
on the hub
portion.
In one example method of assembly, the mounting plate is rotated on the hub
portion until the plurality of hole locations is in the desired mount position
and then
the grab bar or accessory is attached. This allows many different types of
grab bars to
be mounted to a wall using a common anchor assembly. Further, rotating the
mounting plate to the desired position allows the grab bar to be positioned at
any
desired angle.
These and other features of the present invention can be best understood from
the following specification and drawings, the following of which is a brief
description.
BRIEF DESCRIPTION OF THE DRAWINGS
Figure 1. is a schematic view of a wall stud, enclosure wall, grab bar, and
mounting assembly.
Figure 2 is a schematic side view showing a projection dimension between an
enclosure wall surface and a grab bar.
Figure 3 is an exploded view of an anchor assembly.
Figure 4 is a perspective view of a vertical support beam for the anchor
assembly.
Figure 5 is a front view of the vertical support beam of Figure 4.
Figure 6 is a perspective view of a spring for the anchor assembly.
Figure 7A is a perspective assembled view, as seen from the rear, of one
example of the anchor assembly of Figure 3.
Figure 7B is a perspective assembled view, as seen from the front, of a
similar
anchor assembly with another example of a flange arm assembly.
Figure 8 is a cross-sectional view of the flange arm assembly, vertical
support
beam, and spring.
Figure 9 is an exploded view of another example of an anchor assembly
including an arm and mounting plate with multiple mount configurations.
Figure 10 is a cross-sectional view of the anchor assembly of Figure 9 when
assembled.
3
CA 02769921 2012-02-28
Figure 1 I is a front perspective view of the mounting plate of Figure 10 with
fasteners installed.
Figure 12 is a front view of the anchor assembly of Figure 9 mounted to a wall
structure.
Figure 13 is a top view of the assembly of Figure 10.
Figure 14 is a side perspective view of the assembly of Figure 10.
Figure 15 is a rear perspective view of the assembly of Figure 10.
DETAILED DESCRIPTION OF THE PREFERRED EMBODIMENT
Figure 1 shows a grab bar 10 for attachment to a bathroom wall surface 1.2 of
a
wall structure 14, such as a tub surround/shower enclosure. The shower
enclosure can
be made from fiberglass or types of materials suitable for bathroom
environments
could also be used. The grab bar 10 extends between first 16 and second 18
ends.
Mounting assemblies 20 are positioned near each of the first 16 and second 18
ends
such that the grab bar 10 can be secured to the wall surface 12. In the
example shown
in Figure 1, the grab bar 10 is a generally straight configuration; however,
the grab
bar 1.0 could include one or more angled portions or could have a non-linear
configuration, such as an oval, triangular, or round shape for example.
Further, while
two mounting assemblies 20 are shown, it should be understood that a single
mounting assembly could be used, or additional mounting assemblies could be
used,
depending upon the overall configuration of the grab bar.
In one example, the mounting assemblies 20 are not aligned with structural
member spaced behind the wall structure 14, such as a wall stud 22. The
mounting
assemblies 20 are configured such that they can be used to secure the grab bar
10 to
this "hollow" wall configuration. In some mounting configurations, one of the
first
16 and second 18 ends could be aligned with the wall stud 22 while the other
of the
first 16 or second 18 ends is not aligned with a wall stud 22. The subject
mounting
assembly 20 provides an easy mount structure for a non-stud mount that does
not vary
a projection dimension when the grab bar 10 is installed with an opposite end
being
mounted to a wall stud 22.
The grab bar 10 can be made from any of various types of body structures,
such as hollow or solid body structures for example, and includes a wall
facing side
24 (Figure 2) and a front facing side 26 that is opposite the wall facing side
24. Each
4
CA 02769921 2012-02-28
mounting assembly 20 is associated with the wall facing side 24 near the first
16 and
second 18 ends as shown; however, the mounting assemblies 20 could be
positioned
at other locations on the grab bar body itself. When installed, the wall
facing side 24
is spaced apart from the wall surface 12 by a projection dimension D as shown
in
Figure 2. Industry standards require that this projection dimension D be set
and
maintained at a specified dimension.
The subject mounting assembly 20 includes an anchor assembly 30, shown in
Figure 3, which provides for easy, adjustable installation without special
tools, in
addition to providing the desired projection dimension D. The subject mounting
assembly 20 also includes a base flange portion 32 that is associated with the
grab bar
10 and which fits over the anchor assembly 30 as known. The anchor assembly 30
is
configured such that the base flange portion 32 abuts against the wall surface
12 to
maintain the projection dimension D.
In one example, the anchor assembly 30 includes a flange arm assembly 34, a
vertical support beam 36, a spring 38, and a threaded insert 40. The vertical
support
beam 36 and flange arm assembly 34 are shown schematically in Figure 2; and
the
entire anchor assembly 30 is shown in detail in Figure 3.
The flange arm assembly 34 includes a base portion 42 that abuts against the
wall surface 12 and an arm portion 44 that is received within the vertical
support
beam 36. In one example, the base portion 42 and the arm portion 44 are
integrally
formed together as a single-piece component. In one example, the single-piece
component is made from a plastic material; however, other types of materials
could
also be used.
The base portion 42 has a flange 46 that has a diameter that is larger than a
diameter of an opening 48 (Figure 2) formed in the wall surface 12. In one
example,
the flange 46 is 4 mm thick and interfaces with a corresponding 4 mm bore
formed
within a back portion of the grab bar mount portion (not shown). By designing
the
grab bar to accommodate the full thickness of this flange 46, one anchor can
be used,
when stud mounting on an opposing end is possible, without changing the
overall
projection dimension D at either end.
The flange arm assembly 34 is fit through a slot 50 formed within the vertical
support beam 36. In one example, the slot 50 comprises a T-shaped slot through
which the arm portion 44 is inserted. A steel roll pin 52 connects the flange
arm
5
CA 02769921 2012-02-28
assembly 34 to the vertical support beam 36. In the example shown in Figure 3,
the
arm portion 44 includes a downwardly extending distal end 54 that includes a
hole for
receiving the pin 52. The pin 52 prevents the arm portion 44 from being pulled
out of
the vertical support beam 36.
As discussed above, the flange 46 of the base portion 42 is sized such that it
is
larger than the opening 48 in the wall surface 12. The base portion 42
increases
slightly in diameter from a forward face as the diameter approaches a mounting
surface at a rear of the flange 46. This creates a slight frictional fit
between the
anchor assembly 30 and the grab bar 10 to ensure vertical orientation of the
anchor
assembly 30 during the installation phase. Directly behind the flange 46 is a
reduced
diameter portion 56 that closely matches the diameter of the opening 48 in the
wall
surface 12. The purpose of this reduced diameter portion 56 is to distribute
any
downward forces exerted on the grab bar 10 over as large an area as possible.
The outer peripheral surface 58 of the flange 46 comprises a knurled or
textured surface. This surface facilitates rotation of the entire anchor
assembly 30
when needed. This will be discussed in greater detail below.
Another example of a flange arm assembly 200 is shown in Figure 7B.
Instead of providing an arm portion 44 with a downwardly extending distal end
54,
the arm portion 202 is substantially straight and includes a boss 204 with a
hole to
receive the pin 52. The remaining portion of the flange assembly 200 is
similar to
that described above.
The anchor assembly 30 also includes a fastener 60 that is inserted through an
opening 62 in the base portion 42 of the flange arm assembly 34, and which is
threaded into the threaded insert 40. The fastener 60 cooperates with the
threaded
insert 40, vertical support beam 36, and flange arm assembly 34 to pull the
vertical
support beam 36 against a rear surface 64 (Figure 2) of the wall structure 14.
This
will be discussed in greater detail below.
The vertical support beam 36 is shown in greater detail in Figures 4 and 5. In
one example, the vertical support beam 36 is formed as an extruded component
from
a suitable aluminum material; however, other materials and forming processes
could
also be used. The vertical support beam 36 comprises a C-channel having a base
portion 66 and first 68 and second 70 legs extending outwardly from opposing
edges
of the base portion 66 to form the C-shape. A first rib 72 extends inwardly
from an
6
CA 02769921 2012-02-28
inner wall surface of the first leg 68 and a second rib 74 extends inwardly
from an
inner wall surface of the second leg 70. The first 72 and second 74 ribs
extend
inwardly toward each other and are separated by a gap. A first groove 76 is
formed
between the base portion 66 and the first rib 72 and a second groove 78 is
formed
between the base portion 66 and the second rib 74.
A first rib or protrusion 80 is formed on an end of the first leg 68 that
extends
outwardly beyond the first rib 72. A second rib or protrusion 82 is formed on
an end
of the second leg 70 that extends outwardly beyond the second rib 74. The
first 80
and second 82 protrusions extend in a direction that is generally common with
the
first 68 and second 70 legs. The first 80 and second 82 protrusions increase
the
overall strength of the vertical support beam 36 and ensure that allowable
limits of the
material are not exceeded under normal use.
The base portion 66 of the vertical support beam 36 includes the slot 50 that
receives the arm portion 44 of the flange arm assembly 34. As shown in Figure
5, this
slot 50 has a T-shape comprising a widened portion 50a and a narrowed portion
50b.
This shape facilitates insertion and retention of the arm portion 44 within
the vertical
support beam 36. Further, in one example, the arm portion 44 is comprised of a
non-
circular cross-section, which prevents the flange arm assembly 34 from being
able to
rotate relative to the vertical support beam 36 during installation.
The base portion 66 of the vertical support beam 36 also includes a spring
slot
84 used to lock the spring 38 in place on the vertical support beam 36. In the
example
shown, the spring slot 84 is rectangular in shape; however, other shapes could
be
used.
The base portion 66 also includes an opening 86 to receive the threaded insert
40. In the example shown, the opening 86 comprises a circular opening;
however,
other shapes could also be used.
The vertical support beam 36 extends from a first end 88 to a second end 90.
The slot 50 for the arm portion 44, the spring slot 84, and the opening 86 for
the
threaded insert 40 are located near the first end 88. In the example shown,
the spring
slot 84 is positioned on one side of the slot 50 for the arm portion 44, and
the opening
86 for the threaded insert 40 is positioned on an opposite side of the slot
50.
The first 88 and second 90 ends of the vertical support beam 36 include first
88a and second 90a tapered surfaces. This minimizes the profile height of the
vertical
7
CA 02769921 2012-02-28
support beam 36 when it is inserted through the opening 48 in the wall surface
12. It
should be understood that while tapered surfaces are shown, rounded ends or
other
types of reduced area end portions could also be used.
The spring 38 is shown in greater detail in Figure 6. In one example, the
spring 38 is made from sheet metal; however, other suitable materials could
also be
used. The spring 38 comprises a generally flat spring body 92 with first 94
and
second 96 upwardly turned edges or seams that extend along opposing sides of
the
spring body 92. The first 94 and second 96 upwardly turned edges are slidably
received within the first 76 and second 78 grooves of the vertical support
beam 36.
An upper edge 98 extends along the spring body 92 between the first 94 and
second
96 upwardly turned edges and a lower edge 100 extends along the spring body 92
between the first 94 and second 96 upwardly turned edges.
A lock tab 102 is formed along the lower edge 100. The lock tab 102 extends
at an oblique angle relative to the spring body 92. The spring body 92 is slid
along
the first 76 and second 78 grooves until the lock tab 102 snaps into the
spring slot 84
of the vertical support beam 36. This securely locks the spring 38 in position
on the
vertical support beam 36. The spring 38 is also held in position on an
opposite end by
the insertion of the threaded insert 40.
The threaded insert 40 includes a base portion 110 (Figure 3) and a post
portion 112 that extends outwardly from the base portion 1.10. The post
portion 112
includes a threaded opening 114 that receives the fastener 60. The threaded
insert 40
is installed through the open channel of the vertical support beam 36, and the
post
portion 112 is inserted through the opening 86. The base portion 110 is formed
with a
slight eccentric, i.e. the base portion 110 is non-circular. When the threaded
insert 40
is installed and rotated into place, the eccentric allows the insert 40 to
lock into place
by engagement with wall surfaces of the grooves 76, 78 of the vertical support
beam
36.
The spring 38 serves as a movable and re-usable retention device. This is
accomplished primarily by first 104 and second 106 curved surfaces that hold
the
flange arm assembly 34 from movement by exerted spring pressure. A slot 108 is
formed within the upper edge 98 of the spring body 92. The first 104 and
second 106
curved surfaces extend along opposing edges of the slot 108, and are spaced
inwardly
of the first 94 and second 96 upwardly turned edges. The arm portion 44 is
received
8
CA 02769921 2012-02-28
within the slot 108 such that the first 104 and second 106 curved surfaces
engage
opposing sides of the arm portion 44 to hold the arm portion 44 in place, as
shown in
Figure 8.
Installation of the anchor assembly 30 will be discussed with reference to
Figures 7A and 7B. The flange arm assembly 34 and the spring 38 are secured to
the
vertical support beam 36 as described above. The post portion 112 of the
threaded
insert 40 is inserted into the opening 86 and is rotated until the
eccentricity of the base
portion 110 locks the threaded insert into place on the vertical support beam
36.
Thus, an assembly of the vertical support beam 36, the spring 38, the threaded
insert
40, and the flange arm assembly 34 is provided.
To install this assembly through the opening 48 in the wall surface 12, the
vertical support beam 36 is orientated in a generally horizontal position with
the
flange arm assembly 34 lying flat against the vertical support beam 36. This
flattened
assembly is then pushed through the opening 48 in the wall surface 12. Once
the
vertical support beam 36 is fully through the opening 48, with the flange 46
of the
flange arm assembly 34 located on an opposite side of the wall structure 1.4
from the
vertical support beam 36, the vertical support beam 36 returns to a vertical
orientation. The knurled surface of the flange 46 is gripped and rotated,
which
correspondingly rotates the entire assembly. The entire assembly is rotated
until the
second end 90 of the vertical support beam 36 is positioned vertically above
the first
end 88.
The fastener 60 is inserted through the opening 62 in the base portion 42 of
the
flange arm assembly 34 and is threaded into the opening 114 of the post
portion 112.
The threaded engagement draws the vertical support beam 36 support beam
securely
against the wall structure 14. Once the anchor assembly 30 is securely and
properly
installed, grab bar end mounts can be fit over the flange 46 and the grab bar
10 can be
secured in place with set screws as known.
The subject anchor assembly 30 is configured to be non-permanent, i.e. the
anchor assembly 30 can be removed and re-used as needed. This is an advantage
over
prior designs which had major components fall behind the wall structure once
the
attachment fastener and/or flange assembly was removed. Due to the use of the
flange 46, which abuts against the wall surface 12, in combination with the
spring 38,
the anchor assembly 30 is easily removed. To remove the anchor assembly 30,
the
9
CA 02769921 2012-02-28
fastener 60 is removed, which allows the base portion 42 of the flange arm
assembly
34 to be pulled away from the wall surface 12. This releases the spring
retention
pressure and allows the vertical support beam 36 to lay flat. With the
vertical support
beam 36 in this position, pulling the flange arm assembly 34 further forward,
further
collapses the assembly to reduce the profile height such that the vertical
support beam
36 can follow right behind the flange arm assembly 34 through the opening 48.
Further, the flange height of the flange 46 is configured such that it is
recessed
behind the grab bar mount flange. As such, the anchor assembly 30 does not add
any
height to the overall projection of the grab bar 10, which is a significant
improvement
compared to prior designs.
Also, the recessed flange feature minimizes costs to the end user. The
recessed flange feature allows stud mounting on one side and anchor mounting
on the
other side, which. allows the end user to purchase only one anchor assembly. A
less
expensive lag screw mount can be used for the stud mounting end. With prior
designs, the different mount schemes at each end resulted in different
projection
dimensions at each end.
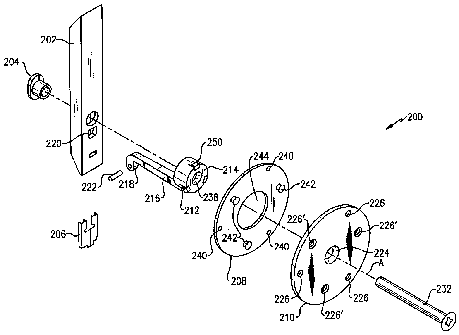
Another example of an anchor assembly 200 for a grab bar or other accessory
is shown in Figures 9-15. The anchor assembly 200 includes a vertical support
beam
202, a threaded insert 204, and a spring 206 that are configured similarly to
those
same structures as described above. The anchor assembly 200 also includes a
gasket
208, mounting plate 210, and an arm 212 that is similar to the arm shown in
Figure 3,
but which does not include the knurled portion.
The arm 212 includes a hub portion 214 at one end and an arm portion 216
that extends to a downwardly extending distal tip 218. The arm portion 216
extends
through a slot 220 in the vertical support beam 202 and is held in place with
a pin 222
similar to that as shown in Figure 3. The spring 206 grips opposing sides of
the arm
portion 216 as described above.
The mounting plate 210 comprises a generally circular shaped flange that
includes a center opening 224 that defines a central axis A of the mounting
plate 210.
The mounting plate 210 includes a plurality of hole locations 226 that are
radially
spaced from the center opening 224. The mounting plate 210 is rotatable to
position
the hole locations 226 at a desired mount position/desired angle orientation
that
corresponds to a mount position of one of many different types of grab bars.
CA 02769921 2012-02-28
The mounting plate also includes a plurality of gasket holes 226'. The gasket
208 includes a plurality of mount holes 240 and a plurality of posts 242 that
are
radially spaced from a center opening 244. The posts 242 are inserted into the
gasket
holes 226' of the mounting plate 210 to secure the gasket 208 to the mounting
plate
210. This also aligns the mount holes 240 of the gasket 208 with the plurality
of hole
locations 226 of the mounting plate 210. Once the mounting plate 210 is
rotated to
the desired position, fasteners 228 (Figure 11) can be inserted into the hole
locations
226 to secure the grab bar or accessory to the anchor assembly 200. The
fasteners
228 are configured such that distal ends of the fasteners remain free from
contact with
a wall surface 230 when the grab bar is installed.
Thus, this configuration provides versatility such that the anchor system and
mounting plate 210 can be reused with another grab bar having a different
mount
configuration. Further, the mounting plate 210 provides versatility in that
one
common anchor assembly 200 can be used with many different types of grab bars
by
simply rotating the mounting plate 21.0 to the desired orientation.
As shown in Figure 9, a central fastener 232 is inserted through the center
opening 224 in the mounting plate 210 and is threaded into the threaded insert
204 in
a manner as described above to secure the mounting plate 210 to the vertical
support
beam 202. The gasket 208 is positioned between the wall surface 230 and the
mounting plate 210 for sealing purposes.
On a rear facing side 234, the mounting plate 210 includes a tubular extension
236 that receives the hub portion 214 of the arm 212, as shown in Figure 10.
The
connection between the mounting plate 210 and the hub portion 214 comprises a
snap-fit connection. In one example, the hub portion includes a plurality of
snap-
tangs 250 that are snapped into pockets 252 formed within the tubular
extension 236.
This connection holds the mounting plate 210 on the arm 212 but allows the
mounting
plate 210 to rotate freely on the hub portion 21.4 to achieve the desired
angular/mount
position.
A method of installing the anchor assembly 200 for a bathroom grab bar or
other accessory includes the following steps: The arm 212 is coupled to the
vertical
support beam 202. The mounting plate 210 is coupled to the hub portion 214 of
the
arm 212. The arm and vertical support beam are inserted through an opening in
the
wall surface 230. The mounting plate 210 is rotated on the hub portion 214 to
11
CA 02769921 2012-02-28
position the plurality of hole locations 226 at a desired mount position, and
the central
fastener 232 is then inserted through the center opening 224 to secure the arm
212,
mounting plate 210, and vertical support beam 202 to the wall.
Further, as discussed above, the gasket 208 and mounting plate 210 are
connected to each other by inserting the posts 242 within the gasket holes
226'. Once
the mounting plate 210 is rotated on the hub portion 214 to the desired mount
orientation, the fasteners 228 are inserted into the plurality of hole
locations 226 to
secure the grab bar or accessory to the anchor assembly 200. The fasteners 228
are
configured such that they do not contact the wall surface 230 once installed.
As discussed above, the mounting plate 210 is designed for use with many
different types of grab bars and uses the hole locations 226 on the rotatable
mounting
plate to support these various types of grab bars produced by different
manufacturers.
The mounting plate 210 can be rotated on the arm and turned 360 degrees if
necessary
to allow a user to mount the grab bar at any angle. This anchor system can be
used on
both sides of the grab bar for dual mount purposes. Further, this anchor
system
allows the user to un-mount the grab bar and pull out the wall anchor from the
wall
without losing any parts such that the wall anchor can be reused at a
different
location. Also, the anchor system allows the user to upgrade or change the
grab bar or
accessories by simply un-mounting the bar or accessory, taking out the anchor,
switching (unsnapping) the mounting plate, and reinstalling the anchor system
with a
new product.
Although a preferred embodiment of this invention has been disclosed, a
worker of ordinary skill in this art would recognize that certain
modifications would
come within the scope of this invention. For that reason, the following claims
should
be studied to determine the true scope and content of this invention.
12