Note: Descriptions are shown in the official language in which they were submitted.
CA 02782563 2012-06-29
TITLE
[0001] Tool for testing downhole tubing
FIELD
[0002] This relates to a tool used to test downhole tubing, such as production
tubing.
BACKGROUND
[0003] When production from a well driven by a pump slows, it is necessary to
determine
whether the production tubing is leaking, or whether the pump, such as a
progressive cavity
pump, is failing.
[0004] Typically, the tubing is tested by pulling the rods from the tubing and
using an
inspection truck to check the integrity of all the tubing joints. This process
is slow as they can
only pull so fast to get good readings, and weak joints have been missed even
with this
method. This process is relatively time consuming and expensive. Prior to this
approach, the
production tubing would be checked by pulling all the tubing and production
pump from the
well, then putting a plug and tubing drain on the bottom. The tubing would be
run in ten
joints at a time and pressure tested with water. If it did not fill, it would
be pulled back up
until the leak was located. The tubing would be run it ten joints at a time,
and the few bad
joints would be replaced. The drain plug was generally blown to speed up the
re-pulling of
the tubing string.
SUMMARY
[0005] There is provided a tool for testing a tubular member that has a shaft
with a fluid
passageway connecting at least one first port and at least one second port. A
sealing element,
which may be a sealing sleeve, seals against the tubular member. The shaft is
movable
relative to the sealing element between an open position in which the at least
one first port is
in fluid communication with the at least one second port and a closed position
in which the
sealing element closes the at least one first port. An anchor secures the
sealing element
relative to the tubular member to permit the shaft to move from the open
position to the closed
position.
CA 02782563 2012-06-29
2
[0006] In an aspect, the sealing element has an inner cavity. The shaft
extends into the
sealing element such that, in the closed position, the at least one first
fluid port is positioned
within the inner cavity.
[0007] In an aspect, the cavity has a first axial stop surrounding the shaft
and the shaft has
a second axial stop within the cavity. The second axial stop engages the first
axial stop when
in the open position. The shaft may also have a third axial stop positioned
outside the inner
cavity. The third axial stop engages the first axial stop when the shaft is in
the closed position.
[0008] In an aspect, the anchor is released as the shaft is moved from the
closed position
to the open position.
[0009] In an aspect, when the shaft is in the open position, the at least one
first port is
open above the sealing element and the at least one second port is open below
the sealing
element.
[0010] There is provided a method of testing a tubular that includes the steps
of providing
a tool as described above. The tool is positioned in a tubular to be tested
with the tool in the
closed position such that the sealing element seals against the tubular. Fluid
is pumped into
the tubular above the tool with the fluid being retained above the tool by the
sealing element.
Retention of fluid within the tubular is observed to determine whether the
tubular is defective.
Once the test is complete, the shaft is moved to the open position to allow
the fluid to drain
from above the tool.
[0011] Other aspects will be apparent from the description and drawings.
BRIEF DESCRIPTION OF THE DRAWINGS
[0012] These and other features will become more apparent from the following
description in which reference is made to the appended drawings, the drawings
are for the
purpose of illustration only and are not intended to be in any way limiting,
wherein:
CA 02782563 2012-06-29
3
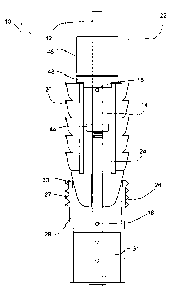
FIG. 1 is a front elevation view, in section, of a tool for testing a tubular
member
in the closed position.
FIG. 2 is a front elevation view, in section of the tool for testing a tubular
member
in the open position.
FIG. 3 is a front elevation view, in section, of an alternate version of the
tool for
testing a tubular member in an intermediate position between the open and
closed
positions.
DETAILED DESCRIPTION
[0013] A tool for testing downhole tubing generally identified by reference
numeral 10,
will now be described with reference to FIG. 1 through 3.
Structure and Relationship of Parts:
[0014] Referring to FIG. 1, tool 10 has a shaft 12 with an internal fluid
passageway 14
that runs between a first port 16 and a number of second ports 18. It will be
understood that
there may be more than one first port 16 (as shown in FIG. 3), or more than
one second port
18 (as shown in FIG. 1). Ports 16 and 18 are preferably formed in the sidewall
of shaft 12,
but may also be formed in the end of shaft 12, as shown in FIG. 3. Fluid
passageway 14
connects first and second ports 16 and 18 and when open, is intended to permit
fluid to pass
through, either as tool 10 is descending through liquid, or as liquid is being
drained.
Accordingly, as will be understood from the discussion below, ports 16 and 18
are preferably
close to the operational components of tool 10.
Referring to FIG. 1, tool 10 also has a sealing element, such as a sealing
sleeve 20, that seals
against a tubular member 22. Sealing sleeve 20 is intended to hold fluid above
tool 10 and
preferably has a series of cup-shaped sealing elements that collapse against
fluid pressure
from below, but expand when fluid pressure from above is applied. Fluid
passageway 14 acts
as a bypass around sealing sleeve 20 when open. In the depicted example,
sealing sleeve 20
has an inner cavity 24 through which shaft 12 extends. Shaft 12 moves relative
to sealing
sleeve 20 between an open position shown in FIG. 2, in which first port 16 is
in fluid
communication with second port 18, and a closed position shown in FIG. 1, in
which sealing
CA 02782563 2012-06-29
4
sleeve 20 closes first port 16 by positioning first port 16 within inner
cavity 24 of sealing
sleeve 20. Alternatively, sealing sleeve 20 may be designed to close port 16
directly in the
closed position. In the open position shown in FIG. 2, fluid is permitted to
bypass sealing
sleeve 20, which is useful if there is fluid below tool 10 as it is being
inserted into tubular
member 22. Referring to FIG. 1, in the embodiment shown, first port 16 is open
above
sealing sleeve 20 and second ports 18 are open below sealing sleeve 20 when
shaft 12 is in the
open position. As shown, there are more second ports 18 than first ports 16.
This helps keep
the tool in the open position when being inserted into tubular member 22. For
example, if
tool 10 encounters fluid, the fluid will enter ports 18, which will increase
the pressure within
shaft 12 and at first port 16, which urges tool 10 to remain in the open
position. Tool 10 may
also be designed to reduce the fluid pressure applied to sealing sleeve 20,
such as by using
sloped member 33, which may be further reduced in cross-sectional area by
being quartered,
etc. Once tool 10 is properly positioned, first port 16 is closed by moving
shaft 12 down
relative to sealing sleeve 20 and opened again by moving shaft 12 up relative
to sealing sleeve
20.
[0015] Referring to FIG. 1 and 2, an anchor 26 secures sealing sleeve 20
relative to
tubular member 22 to permit shaft 12 to move from the open position to the
closed position.
As depicted, anchor 26 comprises a set of friction surfaces 27 carried on
resilient arms 29 and
attached to a block 31. This example is designed to be engaged by a downhole
component,
such as a pump, that will stop block 31. As the rest of tool 10 travels
downward, friction
surfaces 27 are pushed outward by a sloped member 33 carried above sleeve 20
that engages
friction surfaces 27 and resilient arms 29. In this way, friction surfaces 27
engage tubular
member 22, and apply a force to secure sleeve 20 in place. It will be
understood that other
types of anchors 26 may also be used. For example, there may be an anchor that
extends to
surface that can be secured by an operator (not shown). The depicted anchor 26
is released by
pulling up on shaft 12, which removes sloped member 33 from engagement with
resilient
arms 29, allowing them to return to their original position. However, before
sloped member
33 is disengages, moving shaft 12 up will cause first port 16 to open,
allowing fluid to drain,
or begin draining. The upward movement of shaft 12 will eventually cause nut
44 to engage
stop 48 and move sealing sleeve 20 and sloped member 33 upward. The downward
CA 02782563 2012-06-29
movember of shaft 12 is limited by the engagement of upper stop 46 as it
engages stop 48.
Nut 44 also may be used to place a limit on how far shaft 12 can move
downward.
[0016] The movement of shaft 12 may also be controlled by other elements. For
5 example, referring to FIG. 1, an upper stop 46 is positioned at a lower end
of shaft 12, which
may be welded or threaded on. As mentioned previously, shaft 12 also carries a
nut 44, which
is used to attach sections of piping together to form shaft 12 during
assembly. It will be
understood that shaft 12 may also be attached in other ways, and a different
stop may be used
instaed of nut 44. Positioned between upper stop 46 and nut 44 is a stop 48
that is attached to
sealing sleeve 20. The upward movement of shaft 12 is limited by contact
between stop 48
and nut 44, while the downward movement of shaft 12 is limited by contact
between stop 48
on sealing sleeve 20 and upper stop 46 on shaft 12. The example shown in FIG.
1 and 2 is
assembled by attaching upper stop 46 to shaft 12, and inserting shaft 12
through stop 48,
which is able to move along shaft 12, with nut 44 below stop 48. Sealing
sleeve 20 is then
placed over shaft 12 and threaded onto stop 48. A sloped member 33 is attached
to sealing
sleeve 20 and an upper section of shaft 12 is threaded into nut 44. Anchor 26
is then placed
below sloped member 33 on shaft 12. As can be seen, shaft 12, sealing sleeve
20 and anchor
26 are all able to move independently relative to the other components.
[0017] Another example is shown in FIG. 3, where inner cavity 24 has a first
axial stop
28 surrounding shaft 12 and shaft 12 has a second axial stop 30 within inner
cavity 24.
Second axial stop 30 engages first axial stop 28 when shaft 12 is in the open
position. Shaft 12
has a third axial stop 32 outside of inner cavity 24 which engages first axial
stop 28 when
shaft 12 is in the closed position.
[0018] The example of tool 10 shown in FIG. 3 is assembled by positioning
shaft 12
inside sealing sleeve 20. A nut 34 is positioned over shaft 12, then threaded
on to the threaded
end 36 of shaft 12. In this manner, shaft 12 is allowed to move axially within
sealing sleeve
20, and is retained by nut 34 carried by shaft 12 and a cap nut 38 carried by
sealing sleeve 20.
Sealing sleeve 20 may have an opening 40 that may be used as a drain or may be
threaded to
allow a nipple or other tool to help guide the tool 10 as it is inserted into
a tubing string.
CA 02782563 2012-06-29
6
[0019] It will be understood that the assembly and arrangements of components
may be
varied to achieve the same results. The dimensions may be modified depending
on the
intended size of tubing to be tested and the preferences of the user.
[0020] Referring to FIG. 1, shaft 12 has a fluid passage 14 that is blocked
when shaft 12
is retracted within sealing sleeve 20, and provides a fluid passageway 14
through shaft 12 and
sealing sleeve 20 when shaft 12 is pulled out from sealing sleeve 20. First
fluid port 16 in
shaft 12 can be seen in FIG. 2, and the retracted, closed position can be seen
in FIG. 1.
[0021] An example of the use of the tool 10 will now be given. In the example
given, the
tool 10 is used to test production tubing connected to a progressive cavity
pump that has
experienced a reduction in its production flow. It will be understood that the
tool 10 may also
be used in other similar situations. Referring to FIG. 2, tool 10 is inserted
into tubular
member 22. It is preferred that tool be inserted in the open position to allow
fluid in tubular
member 22 to easily flow through tool while tool 10 is being moved downwards.
Anchor 26
is set as tool 10 contacts the pump, which allows tool 10 to be closed. Once
closed, fluid is
pumped into tubular member 22 for a pressure test. If tubular member 22 fills
and remains
full, it can be presumed that the pump has failed, as there is no apparent
failure in tubular
member 22. The pump can then be pulled from up from downhole and repaired or
replaced.
If, however, tubular member 22 fails to fill properly, one can assume that the
pump has not
failed, or at least that there is a failure in tubular member 22. In that
situation, tubular
member 22 can be pulled up until the fluid level in the production tubing is
reached, which
will be at a failure. That section of tubular member 22 is then repaired or
replaced.
[0022] Once the testing is complete, the tool 10 is retrieved by pulling
upward on shaft 12
to the open position to open fluid passageway 14. This allows the fluid to
drain from tubular
member 22. Shaft 12 is continued to be pulled up to release anchor 26. Once
the fluid has
drained, tool 10 can be easily pulled out of tubular member 22. Tool 10 is
designed to be
opened and retrieved using an overshot tool on a sandline cable as this
equipment is
commonly available. However, it will be understood that other techniques or
equipment may
CA 02782563 2012-06-29
7
also be used to control and retrieve tool 10.
[0023] In this patent document, the word "comprising" is used in its non-
limiting sense to
mean that items following the word are included, but items not specifically
mentioned are not
excluded. A reference to an element by the indefinite article "a" does not
exclude the
possibility that more than one of the element is present, unless the context
clearly requires that
there be one and only one of the elements.
[0024] The following claims are to be understood to include what is
specifically illustrated
and described above, what is conceptually equivalent, and what can be
obviously substituted.
The scope of the claims should not be limited by the preferred embodiments set
forth in the
examples, but should be given the broadest interpretation consistent with the
description as a
whole.