Note: Descriptions are shown in the official language in which they were submitted.
CA 02790173 2012-08-16
WO 2011/103043 PCT/US2011/024680
HURRICANE TIE FASTENER AND METHOD OF USE
BACKGROUND OF THE INVENTION
1. TECHNICAL FIELD
The present invention is related generally to fasteners. More particularly,
the
invention is related to a fastener for securing two structural members to one
another
which are typically used in the framework of a house or other building.
Specifically,
the present invention is related to a fastener used to secure a truss to a
wall
structural member such as a wall stud.
2. BACKGROUND INFORMATION
In the construction industry, it is common to use fasteners typically made of
sheet metal for securing structural members to one another. In addition, there
are
various governmental standards or building codes which require certain
structural
members to be secured to one another in order to help guard against damage
caused by seismic activity, hurricanes, tornados or other high velocity wind
storms.
One particular area of concern are the trusses used to support a roof.
Fasteners are
typically required to secure the truss to the wall stud or wall structural
member to
which the truss is mounted adjacent one of its ends.
One of the common fasteners in use for this purpose is shown in Fig. 1 and is
manufactured and/or sold by the Simpson Strong-Tie Company Inc. underthe name
Simpson Strong-Tie . This fastener has a very simple construction, and is
formed of
a single piece of sheet metal which is bent to form two flat vertical plates
which are
perpendicular to one another. The upper plate has holes formed therein through
which nails are driven to secure the plate to a truss. The lower plate also
has holes
formed therein through which nails are driven to secure the fastener to the
wall stud
or other wall structural member. The two plates are joined at a vertical
intersection.
In essence, this fastener is essentially an angle iron formed from sheet metal
with
holes formed therein. Although this fastener works well for securing the truss
to the
wall, installation of the fastener has some drawbacks. These fasteners are
invariably
secured to the truss and wall stud either with a nail gun or the slower use of
a
1
CA 02790173 2012-08-16
WO 2011/103043 PCT/US2011/024680
hammer to pound the nails. In the former situation, particularly because the
fastener
is relatively small, the installer must hold the fastener in place with one
hand just
inches from the firing end of the nail gun, which the installer holds with the
other
hand. As will be readily appreciated, this presents a substantial potential
danger to
the hand holding the fastener. If a hammer is used, the installer must hold
both the
fastener and a nail in one hand while hammering with the other hand. This
makes it
difficult to properly position the fastener and is rather awkward as well.
Thus, there is
a need for an improved fastener for securing a truss to a structural wall
member or
stud.
BRIEF SUMMARY OF THE INVENTION
The present invention provides a hurricane tie fastener for use with a truss
having a bottom, the fastener comprising an upper vertical plate which has a
rear
portion, first and second vertical parallel sides which extend forward from
the rear
portion and a bottom edge; a lower vertical plate which is perpendicular to
the upper
plate, which extends outwardly from adjacent the rear portion of the upper
plate in a
first direction so that the second vertical side generally faces the lower
plate, and
which has a bottom edge which is lower than the bottom edge of the upper
plate; a
first through hole formed in the upper plate; a second through hole formed in
the
lower plate lower than the bottom edge of the upper plate; a horizontal arm
extending
outwardly from adjacent the bottom of the upper plate in a second direction
opposite
the first direction; a leg extending upwardly from the arm; a truss-receiving
space
between the upper plate and the leg having a top entrance opening adapted to
receive the bottom of the truss when the fastener is moved upwardly relative
to the
truss.
The present invention also provides a method comprising the steps of
positioning a hurricane tie fastener at a non-securing position adjacent a
first vertical
surface of a wall structural member and a bottom of a truss which is mounted
on the
wall structural member and extends outwardly therefrom with first and second
opposed vertical side surfaces extending upwardly from the bottom
perpendicular to
the first vertical surface; moving the fastener upwardly from the non-securing
position
to a securing position in which the bottom of the truss is received in a
channel
2
CA 02790173 2012-08-16
WO 2011/103043 PCT/US2011/024680
formed in the fastener and so that first and second truss-engaging members
engage
the truss respectively along the first and second vertical side surfaces to
hold the
fastener to the truss in a self-supporting manner; nailing the fastener to the
first
vertical surface of the wall structural member in the securing position; and
nailing the
fastener to the first vertical side surface of the truss in the securing
position.
The present invention further provides a method comprising the steps of
stamping a flat piece of sheet metal into a configuration comprising an upper
plate
section having a bottom, a lower plate section which extends laterally
outwardly from
the upper plate section and downwardly beyond the bottom of the upper plate
section, and a vertically elongated finger which has a first end secured to
the bottom
of the upper plate section and extends downwardly therefrom in cantilever
fashion to
a second end and so that the finger and lower plate section define
therebetween a
vertically elongated slot with a bottom entrance opening; bending the upper
and
lower plate sections relative to one another to form therebetween a vertical
intersection from which the lower plate section extends outward in a first
direction
perpendicular to the upper plate section; bending the finger adjacent the
first end so
that a first portion of the finger forms a horizontal arm extending outwardly
from
adjacent the bottom of the upper plate section in a second direction opposite
the first
direction; bending the finger distal the first end so that a second portion of
the finger
forms a leg which extends upwardly from the arm and whereby the second end of
the
finger forms a top end of the leg; forming at least one first hole in the
upper plate
section; and forming at least one second hole in the lower plate section which
is
lower than the at least one first hole.
BRIEF DESCRIPTION OF THE SEVERAL VIEWS OF THE DRAWINGS
A preferred embodiment of the invention, illustrated of the best mode in which
Applicant contemplates applying the principles, is set forth in the following
description
and is shown in the drawings and is particularly and distinctly pointed out
and set
forth in the appended claims.
Fig. 1 is a perspective view of a prior art fastener.
Fig. 2 is a perspective view of the hurricane tie fastener of the present
invention as viewed from the front right and looking somewhat downwardly.
3
CA 02790173 2012-08-16
WO 2011/103043 PCT/US2011/024680
Fig. 3 is a perspective view of the fastener of Fig. 2 as viewed from the
front
left and looking somewhat downwardly.
Fig. 4 is a front elevational view of the fastener of the present invention.
Fig. 4A is an enlarged front elevational view of the encircled portion of Fig.
4.
Fig. 4B is similar to Fig. 4 and illustrates various dimensions of the
fastener.
Fig. 5 is a left side elevational view of the fastener of the present
invention.
Fig. 5A is similar to Fig. 5 and shows several of the dimensions of the
fastener.
Fig. 6 is a top plan view of the fastener of the present invention.
Fig. 7 is a front elevational view of a stamped piece of sheet metal showing
the outline of the major components of the fastener prior to being bent into
its final
configuration.
Fig. 8 is a right side elevational view of the fastener of the present
invention
and illustrates the method of installing the fastener to secure a truss to a
wall stud.
Fig. 9 is a front elevational view of the fastener in its installed position.
Fig. 10 is an enlarged front elevational view of the encircled portion of Fig.
9.
Similar numbers refer to similar parts throughout the drawings.
DETAILED DESCRIPTION OF THE INVENTION
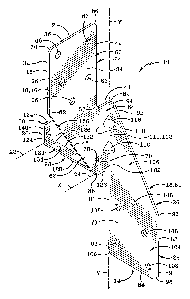
The fastener of the present invention is shown generally at 10 in Fig. 2.
Fastener 10 in the exemplary embodiment is a unitary structure typically
formed from
a single piece of sheet metal which is bent and otherwise manipulated, as will
be
described further below. Fastener 10 is particularly configured for use in
securing a
truss to a wall structural member or stud. Fastener 10 has a top 12 and a
bottom 14
defining therebetween a vertical or longitudinal direction, a front 16 and a
back 18.
Fastener 10 also has a first or left side 20 and second or right side 22
defining
therebetween an axial direction. Fastener 10 includes a vertical first front
upper plate
24, a vertical second lower back plate 26 which extends perpendicularly
outwardly
from plate 24 in a first direction, an arm 28 which extends perpendicularly
outwardly
from plate 24 in a second direction opposite the first direction, and a leg 30
which
extends upwardly from arm 28.
4
CA 02790173 2012-08-16
WO 2011/103043 PCT/US2011/024680
Top plate 24 has a first or left vertical flat side 32 and an opposed second
or
right flat vertical side 34 parallel to side 32. Side 32 thus faces to the
left and side 34
faces to the right so that sides 32 and 34 face away from one another. Plate
24 has
a horizontal upwardly facing top edge 36 which defines top 12 and serves as
the
uppermost portion or surface of plate 24 and fastener 10. Plate 24 also
includes a
downwardly facing generally horizontal bottom edge 38, a forward facing front
edge
40, a rearward facing vertical back edge 42, and an upwardly facing horizontal
intermediate edge 44 which is spaced downwardly from top edge 36 and upwardly
from bottom edge 38. Front edge 40 includes a vertical upper edge segment 46
and
an angled lower edge segment 48. The front of top edge 36 and top of vertical
edge
segment 46 intersect one another at a convexly curved top front corner 50
which
points or faces upwardly and forward. Vertical edge segment 46 extends down to
a
lower end which intersects the top of lower edge segment 48 at a convex corner
or
vertex 52 such that edge segments 46 and 48 define therebetween an obtuse
angle.
Lower edge segment 48 thus angles downward and rearwardly to a lower end which
meets the front of bottom edge 38 at a convexly curved lower corner or vertex
54.
The back end of top edge 36 intersects the top end of back edge 42 at a
convexly
curved corner 56 which points or faces upwardly and rearwardly. The lower end
of
back edge 42 intersects the front of intermediate edge 44 at a concavely
curved
corner 58 which faces upwardly and rearwardly.
Plate 24 thus includes an upper section 60 which is generally rectangular as
viewed from the side and a lower section 62 which is generally triangular as
viewed
from the side and includes a rear or rearmost portion 64 of plate 24 which is
rearward
of back edge 42 and extends from bottom edge 38 to intermediate edge 44. In
the
exemplary embodiment, five circular nail-receiving through holes are formed in
plate
24 in the upper section 60 thereof extending from first side 32 to second side
34.
Each of holes 66 is at a different height and has a diameter typically on the
order of
about 5/32 inch plus or minus about 1/32 inch although this may vary. The two
rearmost holes are vertically aligned with one another while the other three
holes are
spaced forward thereof and at different distances from the front vertical edge
40.
A tooth 68 is formed on upper plate 24 adjacent bottom edge 38. Tooth 68 in
the exemplary embodiment is defined by a V-shaped slit 70 and has a triangular
first
5
CA 02790173 2012-08-16
WO 2011/103043 PCT/US2011/024680
or left side 72, a triangular second or right side 74 (as viewed from the
side), and a
sharp downwardly facing tip 76 extending from first side 72 to second side 74.
In the
exemplary embodiment, tooth 68 is formed by a stamping process such that tooth
68
adjacent its upper end is bent so that first side 72 extends outwardly to the
left away
from second side 34 of plate 24 beyond left vertical side 32 while second or
right side
74 of tooth 68 extends inwardly from vertical side 34 to the left or generally
towards
leg 30. While tip 76 of tooth 68 is a sharp point in the exemplary embodiment,
and
the bottom of tooth 68 is narrower than the top of tooth 68 as viewed from the
side, it
may also be formed as a substantially square or rectangular tooth as viewed
from the
side with a horizontal tip. Alternately, a horizontally elongated ridge-like
tooth may be
formed which extends outwardly beyond vertical surface 32. The sharp tip 76 is
generally preferred in that it provides an enhanced grip on the truss, as
detailed
further below.
Lower back plate 26 has a first or front flat vertical side 78 and defines the
frontmost surface or portion of plate 26, and a second or back flat vertical
side 80
which is parallel to side 78 and defines the rearmost surface or portion of
plate 26
and fastener 10. Sides 78 and 80 are perpendicular to sides 32 and 34 of top
plate
24. Plate 26 has a horizontal upwardly facing top edge 82 which serves as the
uppermost surface or portion of plate 26 and is at the same height as and
coincident
with intermediate edge 44 of first plate 24. Bottom plate 26 has a horizontal
downwardly facing bottom edge 84 which serves as the lowermost portion of
lower
plate 26 and fastener 10. Plate 26 also has a vertical first or left side edge
86 which
extends downwardly from adjacent bottom edge 38 and one end of arm 28 and
faces
to the left generally toward arm 28 and leg 30. Edge 86 is parallel to sides
32 and 34
and in the exemplary embodiment is substantially coplanar with side 34. Edge
86
serves as the leftmost edge or portion of lower plate 26 whereby all or nearly
all of
plate 26 is disposed to the right or in the first direction beyond sides 32
and 34 of
upper plate 24, as well as arm 28 and leg 30. Plate 26 has an opposed second
or
right side edge 88 which faces to the right away from first plate 24, arm 28,
and leg
30. Side edge 88 includes a vertical lower edge segment 90 and an angled upper
edge segment 92. Lower edge segment 90 serves as the rightmost edge or portion
of lower plate 26 and thus the portion thereof which extends furthest from
plate 24,
6
CA 02790173 2012-08-16
WO 2011/103043 PCT/US2011/024680
arm 28 and leg 30 in the first direction. The right end of top edge 82 and the
upper
end of angled edge segment 92 intersect at a top corner or vertex 94 which is
adjacent side 34 of first plate 24, is generally convex and points or faces
upwardly
and to the right away from first plate 24. Edge segment 92 angles from corner
94
downwardly and to the right or away from plate 24 so that its lower end
intersects the
upper end of vertical edge segment 90 at a convex corner or vertex 96 which
points
or angles upwardly and to the right generally away from arm 28 and leg 30. The
lower end of vertical edge segment 90 intersects the right end of bottom edge
84 at a
right bottom corner 98 which is convex and points or faces downwardly and to
the
right generally away from plate 24, arm 28, and leg 30. The left end of bottom
edge
84 intersects the lower end of vertical edge 86 at a rounded convex corner or
vertex
100 which points or faces downwardly and to the left away from the second side
edge 88. The upper end of side edge 86 intersects bottom edge 38 of upper
plate
24 at a concave corner 102 which faces generally downwardly and transitions
into
the back edge of arm 28.
Lower plate 26 thus has a lower section 104 which is generally rectangular
and an upper section 106 which is generally triangular as viewed from the
front. In
the exemplary embodiment, five circular nail-receiving through holes 108 are
formed
in second plate 26 primarily in lower section 104 in a similar but inverted
pattern
relative to holes 66 in plate 24 and extend from front side 78 to back side
80. Holes
108 are lower than the bottom edge 38 of plate 24 and also lower than arm 28
and
leg 30.
Upper section 106 of lower plate 26 is rigidly secured to lower section 62 of
upper plate 24 along rearmost portion 64 thereof at a vertical right angle
bend or
intersection 110. Intersection 110 extends from top 82 of lower plate 26 to
bottom 38
of upper plate 24 and the top of edge 86. Vertical intersection 110 lies along
or has
a vertical Axis Y which is at or adjacent the intersection of the two planes
respectively
defined by side 34 of upper plate 24 and front side 78 of lower plate 26.
Intersection
110 has a concave inner front surface 112 which is arcuate as viewed from
above
and a convex outer back surface 114 which is also arcuate as viewed from above
and generally parallels inner surface 112. Vertical side 34 of plate 24 and
vertical
front side 78 of lower plate 26 meet at vertical front surface 112 of
intersection 110.
7
CA 02790173 2012-08-16
WO 2011/103043 PCT/US2011/024680
Similarly, the vertical side 32 of upper plate 24 and back vertical side 80 of
rear plate
26 meet at the outer back surface 114 of vertical intersection 110.
A pair of horizontal vertically spaced braces 116 interrupts intersection 110
and its front and back surfaces 112 and 114, breaking them into top, middle,
and
lower segments. Each brace 116 is generally horizontal and curved from top to
bottom as viewed horizontally along a line intersecting each of surfaces 34
and 78 at
a 45-degree angle. Top and bottom plates 24 and 26 together have a V-shaped
configuration as viewed from above or below such that sides 34 and 78 define
therebetween a V-shaped channel 118 as viewed from above or below. Sides 34
and 78 and inner surface 112 thus face channel 118 while sides 32 and 80 and
outer
surface 114 face away from channel 118. Braces 116 extend into channel 118 so
that their convexly curved surfaces bound channel 118. Braces 116 have
concavely
curved surfaces which communicate with respective portions of outer surface
114
which are respectively above and below the given brace and also communicate
with
side 32 of first plate 24 and back side 80 of second plate 26. These concave
surfaces of the braces 116 define respective concavities or indentations 120.
Horizontal arm 28 has a first end 122 which is rigidly secured to the bottom
edge 38 of top plate 24 and extends horizontally therefrom in a cantilever
fashion in
a direction opposite bottom plate 26 to a second distal or terminal end 124
which is
distal bottom edge 38. Numeral 122 also denotes a horizontal bend or
intersection
having a horizontal Axis X1 which is thus perpendicular to Axis Y and
intersects or is
adjacent Axis Y. The first end or bend 122 is also adjacent the bottom of
vertical
intersection 110, concave corner 102 and the top of edge 86. First end 122 is
also in
the exemplary embodiment directly below and adjacent tooth 68 and slit 70. Arm
28
has a flat horizontal upwardly facing top surface 126, a flat horizontal
downwardly
facing bottom surface 128, and front and back vertical edges 130 and 132 all
of
which extend from adjacent first end 122 to adjacent second end 124 and are
horizontally elongated there between. Edges 130 and 132 extend from top
surface
126 to bottom surface 128. Horizontal bend or intersection 124 is parallel to
and at
substantially the same height as bend 122 and thus has an Axis X2 which is
parallel
to and at substantially the same height as Axis X1 and spaced to the left.
8
CA 02790173 2012-08-16
WO 2011/103043 PCT/US2011/024680
Leg 30 has a lower end also denoted at 124 which is rigidly secured to and
extends upwardly from second end 124 in a cantilever fashion to a terminal
upwardly
facing top end or edge 134. Leg 30 has a first or left side 136 (Fig. 4B)
which faces
away from first end 122 of arm 128 and plates 24 and 26. Leg 30 has a second
or
right opposed side 138 which in particular faces side 32 as well as more
generally
end 122 and plates 24 and 26. Although leg 30 is generally vertical and is
shown as
substantially vertical in the figures, it typically tapers upwardly and
outwardly to a
small degree away from vertical surface 32 of plate 24 to facilitate receiving
the
bottom of a truss when fastener 10 is moved upwardly around the bottom of the
truss. Thus, first and second sides 136 and 138 are generally vertical and
parallel to
vertical side 32 of plate 24 although they typically taper upwardly and away
from side
32 to a small degree. Leg 30 has vertical front and back edges 140 and 142
(Fig. 6)
which extend from first side 136 to second side 138 and which are respectively
continuous and coplanar with front and back edges 130 and 132. A tooth 144
(Figs.
3, 4) is formed on leg 30 and defined by a V-shaped slit 146 extending from
side 136
to side 138. Inasmuch as leg 30 has dimensions which are not all that much
larger
than tooth 144, tooth 144 is adjacent top 134, bottom 122, front and back
edges 140
and 142, and left and right sides 136 and 138 of leg 30. Tooth 144 has a first
or left
side 148 (Fig. 4A) and second or right side 150 such that side 148 faces in a
similar
manner as side 136 and second side 150 faces in a similar manner as second
side
138. Tooth 144 has a sharp bottom tip 152 which points downwardly. Similar to
tooth 68, tooth 144 is bent a small degree adjacent its top end relative to
leg 30 such
that tip 152 projects beyond segment side 138 of leg 30 toward tooth 68 and
first
side 32 of plate 24. Thus, left side 148 of tooth 144 angles downwardly and
inwardly
relative to surface 136 while right side 150 also angles downwardly and to the
right or
towards the bottom edge 38 of plate 24 and end 122 of arm 28. Side 138 of leg
30
and the lower portion of vertical side 32 of plate 24 define therebetween a U-
shaped
channel 154 as viewed from the front. Channel 154 has a top entrance opening
156
through which the bottom of the truss enters channel 154 during upward
movement
of fastener 10 to mount fastener 10 thereon. Second side 150 and tip 152 of
tooth
144 thus project beyond second side 138 of leg 30 into channel 154. Likewise,
first
9
CA 02790173 2012-08-16
WO 2011/103043 PCT/US2011/024680
side 72 and tip 76 of tooth 68 project beyond vertical side 32 of plate 24
into channel
154.
Although the various dimensions of fastener 10 may vary, the dimensions of
the exemplary embodiment are now provided with reference to Figs. 4B and 5A.
Top
edge 36 and bottom edge 84 define therebetween a height H1 which is on the
order
of about 6 inches. Top edge 36 and bottom edge 38 define therebetween a height
H2 of upper plate 24 which is about 3 3/4 inches. Top edge 36 and corner 52
define
therebetween a height H3 of the upper section of plate 24 which is about 1.5
inches.
Top edge 82 and bottom edge 84 define therebetween a height H4 of lower plate
26
which is about 3 3/4 inches and thus about the same as height H2. Bottom edge
84
and corner 96 define therebetween a height H5 of lower section 104 which is
about
1.5 inches and thus about the same as height H3. Top surface 126 and bottom
surface 128 of arm 28 define therebetween a height H6 of arm 28 which is the
same
as the thickness of the sheet metal from which fastener 10 is formed and is
typically
no more than about 1/4 inch. Usually, the thickness or gauge of the sheet
metal
used to form fastener 10 is in the range of about 12 to 20 gauge and typically
within
the range of about 14 to 18 gauge although this may vary. Leg 30 has a height
H7
which is defined between the top surface 126 of arm 28 and top edge 134 of leg
30.
In the exemplary embodiment, height H7 is about 3/8 inch and is preferably not
much
more than this in order to avoid contact with the truss clip or truss gusset
which
secures the top and bottom cords of the truss to one another, as discussed
further
below. Tooth 68 and tooth 144 each have height H8 defined between the
respective
top of the tooth and the bottom tip of the tooth. Height H8 is typically about
5/32
inch. Tooth 144 is spaced upwardly from the top surface 126 of leg 28 so that
tip
152 of tooth 144 and surface 126 define therebetween a distance or height H9
which
is about 1/8 inch in the exemplary embodiment. Tooth 68 is also spaced
upwardly
from arm 28 such that its tip 76 and top surface 126 of arm 28 define
therebetween a
height H10 which is typically about 1/4 inch.
The total width of fastener 10 is illustrated at width W1, which is defined
between vertical edge segment 90 and first or left side 136 of leg 30 adjacent
top
edge 134 as measured horizontally. Lower plate 26 has a maximum horizontal
width
W2 defined between edge 86 and edge segment 90. Upper plate 24 has a
CA 02790173 2012-08-16
WO 2011/103043 PCT/US2011/024680
horizontal width W3 defined between first and second sides 32 and 34, which is
the
same as the thickness of the sheet metal from which fastener 10 is formed, and
thus
the same as height H6 of arm 28. The combination of arm 28 and leg 30 have a
horizontal width W4 defined between side 32 of upper plate 24 and first side
136 of
leg 30 adjacent top edge 134. Width W4 is typically about 1 5/8 inches. The
truss
receiving space or U-shaped channel 154 has a horizontal width W5 defined
between side 32 of upper plate 24 and second side 138 of leg 30. width W5 is
typically about 1 1/2 inches. Leg 30 has a horizontal width W6 defined between
first
and second sides 136 and 138 thereof. Width W6 is the same as the thickness of
the sheet metal from which fastener 10 is formed and thus is the same as width
W3
and height H6. Each of teeth 68 and 144 also has a width defined between its
first
and second sides which is the same as width W6.
Fastener 10 has a total horizontal depth D1 defined between vertical edge
segment 46 and back side 80 of lower plate 24. Depth D1 is the sum of the
depth
D2 of upper plate 24 and depth D3 of lower plate 26. Depth D2 is defined
between
vertical edge segment 46 of upper plate 26 and front side 78 of lower plate
26.
Depth D3 is defined between front and rear sides 78 and 80 of lower plate 26
and is
the same as the thickness of the sheet metal from which fastener 10 is formed
whereby depth D3 is the same as width W3, width W6 and height H6. Upper
section
60 of top plate 24 has a horizontal depth D4 defined between vertical edge
segment
46 and back edge 42. Each of arm 28 and leg 30 has a horizontal depth D5
wherein
depth D5 of arm 28 is defined between the front and back edges 130 and 132
thereof, and the depth D5 of leg 30 is defined between the front and back
edges 140
and 142 thereof. Depth D5 is typically about 3/16 inch. Each of teeth 68 and
144
has a maximum width which is defined at the top or base portion of the
respective
tooth between the upper ends of the respective V-shaped slit 70 or 146. Depth
D6 is
typically about 3/32 inch. Thus, in the exemplary embodiment, depth D5 is only
two
times depth D6. Each of arm 28 and leg 30 is spaced forward from front side 78
of
lower plate 24 a short distance such that front side 78 and either of back
edge 132 of
arm 28 or back edge 142 of leg 30 define therebetween a distance or depth of
D7
which is typically about 1/8 to 3/16 inch. Depth D7 is thus about the same as
depth
D5 although it may be somewhat less or somewhat larger.
l1
CA 02790173 2012-08-16
WO 2011/103043 PCT/US2011/024680
While the heights, widths and depths noted above may vary somewhat, it is
clear that the ratio between some of these dimensions will fall within certain
ranges.
As noted above, height H2 and height H4 are typically about the same, as are
height
H3 and height H5, although these dimensions may certainly vary. While height
H2 of
upper plate 24 and height H7 of leg 30 may also vary, height H7 is clearly
less than
height H2 and typically far less. In the exemplary embodiment, height H7 is
about
1/10 of height H2. Thus, height H7 is no more than 1/2 height H2, no more than
1/3
height H2 and so on, such that height H2 is no more than 1/4, 1/5, 1/6, 1/7,
1/8 or 1/9
of height H2. Similar fractions or ratios may be calculated from the
measurements
given above with regard to the various heights, widths and depths of the
components
of fastener 10, which Applicant reserves the right to claim without specifying
every
detail within the Specification in order to prevent providing an overly
lengthy and
exhaustive list of such fractions or ratios.
A method of making the fastener of the present invention is now described.
Fig. 7 shows an initial stage of the formation of fastener 10. A stamping
machine or
press will stamp a flat piece of sheet metal in order to create the smaller
piece of flat
sheet metal (shown in Fig. 7) having a configuration which includes an upper
plate
section which is represented at 24 in Fig. 7 and which ultimately becomes the
upper
plate 24 illustrated in the earlier figures. This stamping process also
produces a
lower plate section which is represented at 26 in Fig. 7 and which ultimately
becomes
the second or lower plate 26 illustrated in the earlier figures. This stamping
process
also produces a straight vertically elongated finger 158 which is secured to
the
bottom 38 of the upper plate section that extends vertically downwardly
therefrom to
a lower terminal end represented at 134 in Fig. 7. The stamping process thus
also
produces a straight vertically elongated slot 160 defined between finger 158
and the
lower plate section 26. Slot 160 has a closed upper end defined by the bottom
38 of
the upper plate section 24 and a bottom entrance opening 162. End 134 and
entrance opening 162 are adjacent the lower end 84 of the lower plate section
26 at
this stage. The stamping process also typically forms holes 66 and 108 as well
as
the V-shaped slits 70 and 146, thereby respectively defining teeth 68 and 144.
At
this stage, finger 158 is directly below the upper plate section 24 while
tooth 144 is
spaced substantially downwardly from tooth 68. Tooth 68 points downwardly
while
12
CA 02790173 2012-08-16
WO 2011/103043 PCT/US2011/024680
tooth 144 points upwardly. This stamping step may also bend the teeth 68 and
144
slightly rearwardly along their respective bases such that the respective tips
of the
teeth extend rearwardly a short distance from the backside of the upper plate
section
24 and the finger 158. Thus, the configuration shown in Fig. 7 may be produced
by a
single stamping step. However, the holes of 66 and 108 may be formed in a
separate stamping step or may, for example, be drilled. In addition, a
separate
stamping step may be used to form the V-shaped slits 70 and 146. A different
step
may also be used in order to bend teeth 68 and 44 if desired.
In the configuration shown in Fig. 7, each of finger 158 and slot 160 have a
height H11 defined between lower end 134 or bottom entrance opening 162 and
the
upper end of the finger or slot, which is at or adjacent bottom 38 of upper
plate 24.
Height H11 is about the same as the total of height H7 (Fig. 4B) of leg 30
plus
horizontal width W4 or horizontal width W5, whereby height H11 in the
exemplary
embodiment is typically on the order of about 1 7/8 - 2 inches. The left and
right
edges of finger 158 define therebetween a horizontal width which is denoted at
D5 in
Fig. 7, and is thus the same as the depth D5 of arm 28 and leg 30, as
illustrated in
Fig. 5A. The vertical right edge 132, 142 of finger 158 and the left vertical
edge 86 of
lower plate 26 define therebetween a horizontal width W7 which is generally on
about the same order as the width or depth D5 although it may be somewhat
smaller
or larger. Width W7 is typically in the range of about 1/8 to 1/4 inch and is
generally
kept to a minimum in order to minimize the amount of scrap material left over
after
the stamping process. It is also noted that finger 158 is secured to the
bottom 38 of
plate 24 adjacent edge 86 of lower plate 26. Although upper plate 24 could be
formed such that bottom 38 extended outwardly to the left substantially
further than
in the exemplary embodiment whereby finger 158 could also be spaced further
away
from lower plate 26, the configuration of the exemplary embodiment helps
eliminate
the production of scrap metal during the forming process and also allows arm
28 to
be generally centrally located relative to the primary structures of fastener
10, namely
near the vertical intersection between the upper and lower plates 24 and 26.
Fig. 7 illustrates in dashed lines the bend lines along which the stamped
piece
of sheet metal is bent in order to form the finished fastener 10. More
particularly, the
upper and lower plate sections 24 and 26 are bent about vertical bend line 131
in
13
CA 02790173 2012-08-16
WO 2011/103043 PCT/US2011/024680
order to form vertical intersection or bend 110 with the lower plate section
extending
perpendicularly outward from the upper plate section in a first direction. It
may also
be said that the lower plate section 26 is bent along line 131 relative to the
upper plate
section and finger 158. Thus, if lower plate section 26 were held in a
stationary
position, the upper section 24 and finger 158 would move pivotally forward and
to the
right during the bending along line 131 relative to lower section 26. After
the bending
of the two plates to form vertical intersection 110, a sufficient force is
applied by
impact or pressing in the areas along the outer portion of intersection 110 in
order
form indentations 120 (Figs. 3, 5) to form braces 116. Finger 158 is also bent
along
horizontal bend line B2 so that finger 158 extends perpendicularly in the
opposite
direction from the lower plate 26 so that the finger 158 is horizontal. The
finger is
then further bent distal the end or bend 122 along horizontal bend line B3 in
order to
form horizontal bend 124 so that the terminal end portion of finger 158
ultimately
becomes leg 30 with the lowermost terminal end of finger 158 becoming the top
or
uppermost edge or end 134 of leg 30. In addition, the left edge 140 of the
lower
portion of finger 158 in the pre-bent configuration of Fig. 7 become the front
edge
140 of leg 30 while the right edge 142 of the lower portion of finger 158 in
the pre-
bent configuration becomes the back edge of leg 30. Further, the portion of
finger
158 between bent lines B2 and B3 becomes the horizontal arm 28 such that the
left
edge 130 of this portion of finger 158 becomes the front edge of arm 28 and
the right
edge 132 of this portion of finger 158 becomes the back edge of arm 28. In
addition,
the front and back surfaces of the lower portion of finger 158 respectively
become
the left and right sides or surfaces 136 and 138 of leg 30 while the front and
back
vertical surfaces of the portion of finger 158 between lines B2 and B3
respectively
become the bottom and top surfaces 128 and 126 of arm 28. In the pre-bent
configuration, vertical edge 132, 142 of finger 158 faces vertical edge 86 of
the lower
plate section 26 to define therebetween slot 160. Other relationships will be
evident
from the figures.
The use or installation of fastener 10 is illustrated in Figs. 8-10. Before
describing this process, a brief description is first given of the structural
members
with which fastener 10 is used. Fig. 8 illustrates in part a portion of a
truss 164
mounted atop a wall structural member 166. Truss 164 includes a horizontal
lower
14
CA 02790173 2012-08-16
WO 2011/103043 PCT/US2011/024680
chord and an angled upper chord 170 which is seated atop the outer end of
lower
chord 168 and angles upwardly therefrom toward a peak of the truss typically
formed
adjacent the peak of the roof. Truss 164 has opposed vertical side surfaces
172A
and 172B. A pair of truss plates 174 secure the upper and lower chords to one
another along the respective side surfaces 172 A and B. Each truss plate 174
includes a flat vertical plate 176 and multiple nail-like spikes 178 typically
formed by
stamping a piece of sheet metal such that spikes 178 are bent perpendicular
and
horizontally outwardly from plate 174 to leave behind respective elongated
slots 180
which are through holes formed through plate 174. As is well known in the art,
the
spikes 178 of the respective truss plate 174 are forced into the typically
wooden
chords of the truss through the respective surface 172 so that the truss
plates rigidly
secure the upper and lower chords to one another. Lower chord 168 has a
horizontal downwardly facing surface which serves as a bottom 182 of the
truss. The
wall to which the truss is to be secured typically includes a plurality of
laterally
spaced vertical wall studs 184 (only one shown) with one or more horizontal
wall
studs, such as lower and upper horizontal wall studs 186 and 188 seated atop
the
vertical wall studs 184 and secured thereto. Wall structural member 166
includes a
vertical surface 190 which is perpendicular to bottom surface 182 as well as
vertical
side surfaces 172 of the truss.
Fig. 8 shows the fastener 10 in dashed lines in an uninstalled, unmounted or
non-securing position while the solid lines show fastener 10 in an installed,
mounted
or securing position. In order to install fastener 10, the user will position
fastener 10
at the non-securing position adjacent vertical surface 190 and below and
adjacent
the bottom 182 of the truss. This typically means that the back surface 80 of
lower
plate 26 is moved into position in contact with vertical surface 190 below the
truss
with channel 154 directly below the bottom 182 of lower chord 168. Fastener 10
is
then moved upwardly to the installed or securing position. This upward
movement is
typically a simple linear vertical motion (Arrow A) which involves a sliding
engagement between back side 80 and vertical surface 190, as well as a sliding
engagement between left side 32 of upper plate 24 and a vertical surface 192
of
truss plate 174 which is parallel to surfaces 172.
CA 02790173 2012-08-16
WO 2011/103043 PCT/US2011/024680
During this upward movement of fastener 10, the bottom 182 of the truss is
received through entrance opening 156 into channel 154 until the top 126 of
horizontal arm 28 engages bottom 182 and thus stops or limits the upward
movement of fastener 10. During this upward movement, leg 30 and the lower
portion of upper plate 24 serve as truss-engaging members which slidably
engage
the truss respectively along the opposed vertical side surfaces 172 adjacent
bottom
182. In the exemplary embodiment, these truss-engaging members include teeth
68
and 144, which not only slidably engage the vertical surfaces 172, but also
dig into or
scratch the surfaces 172 such that tips 76 and 152 are forced inwardly beyond
the
respective surfaces 172 in a barb-like fashion which makes it more difficult
to remove
fastener 10 downwardly thereafter. Although it is preferred that the truss-
engaging
members include teeth such as teeth 68 and 144, fastener 10 may be formed such
that width W5 (Fig. 4B) of channel 154 is slightly smaller than the width of
the truss in
order that the bottom of the truss is wedged into channel 154 along vertical
surfaces
or the like other than teeth 68 and 144. In any case, the truss-engaging
members
are sufficient to grip the side surfaces 172 such that the bottom of the truss
is
wedged therebetween in a manner which allows fastener 10 to be self-supporting
in
the secured position. In other words, the engagement between fastener 10 along
leg
30 and along the lower portion of upper plate 24 entirely supports fastener 10
on the
truss so that the installer is free to use both hands for the remainder of the
installation, which involves nailing the fastener 10 to the wall structural
member 166
and truss 174 via a plurality of nails 194.
Arrow B in Fig. 8 represents a hammer or nail gun for installing the nails 194
respectively through lower plate 26 via respective holes 108, as well as the
force
applied to the nails and the movement of the nails from an unsecured to a
secured
position. Similarly, Arrow C in Fig. 9 represents a hammer or nail gun used to
install
nails 194 through top plate 24 via respective holes 66, as well as the force
end
horizontal movement of the nails from an unsecured to secured position. The
nailing
of fastener 10 via the various nails 194 completes the installation of the
given
fastener 10, which thus secures the truss 174 to the Wall structural member
166.
As previously noted, horizontal arm 28 abuts the bottom 182 of a truss in
order to stop the upward movement of fastener 10 prior to the installation of
nails
16
CA 02790173 2012-08-16
WO 2011/103043 PCT/US2011/024680
194. Not only does arm 28 serve as a stop which limits the upward movement of
fastener 10 relative to the truss, it also serves as a positioning member
which
properly positions fastener 10 in the securing position prior to the nailing
process.
Conveniently, this self-positioning aspect provided by arm 28 eliminates one
of the
problems with the prior art clip shown in Fig. 1. More particularly, leg 28
positions
fastener 10 during the installation process so that no portion of the upper
plate 24
extends downwardly lower than bottom 182 of the truss. In using the prior art
fastener shown in Fig. 1, it is easy for the installer to accidentally
position the prior art
fastener improperly so that a portion of the upper plate does extend
downwardly
lower than the bottom of the truss a sufficient distance to become an obstacle
to
installing sheetrock or other wall panels during the finishing of the wall. In
other
words, if the upper plate 24 extends downwardly far enough below the bottom of
the
truss, it will interfere with positioning the top of the wall panel. In order
to properly
install the wall panel, the prior art fastener would either have to be
repositioned or the
wall panel would have to be modified. Repositioning the prior art fastener is
clearly a
hassle and relatively time consuming. As a result, installers often will
resort to cutting
or breaking the sheetrock or other wall panels along the top in order to
provide a
place for the interfering portion of the prior art fastener to be received
such that the
wall panel may be installed. This process is also relatively time consuming
and adds
to the risk of damaging the wall panel beyond the ability to be used.
As shown in Figs. 9 and 10, when fastener 10 is in the securing position, leg
30, including the tooth 144, are out of contact with the truss plate 174 which
extends
along the same side 172B of the truss. In the exemplary embodiment, leg 30 is
thus
sufficiently short so that its uppermost end 134 is lower than the bottom or
lowermost
portion of the corresponding plate 176 of truss plate 174. Thus, the
relatively
minimum height H7 (Fig. 4B) of leg 30 is typically intended to keep leg 30 out
of
contact with the truss plate while also minimizing the amount of material used
in
order. to provide the truss-engaging function noted above. In the exemplary
embodiment, tooth 68 is also sufficiently low enough to engage the truss along
surface 172A below the corresponding truss plate 174.
It is noted that the present Specification has provided several instances of
negative limitations although this has not been done exhaustively. For
instance, it
17
CA 02790173 2012-08-16
WO 2011/103043 PCT/US2011/024680
was previously indicated that leg 28 positions fastener 10 during the
installation so
that no portion of the upper plate extends downwardly lower than bottom 182 of
the
truss. Similarly, it may be said that only lower plate 26 and arm 28 extend
lowerthan
bottom 182 when fastener 10 is installed, or that only lower plate 26 extends
lower
than the bottom of arm 28, or that no portion forward of the front surface of
lower
plate 26 extends lower than the bottom surface of leg 28. This Specification
has also
previously identified certain surfaces or edges which, for example, serve as
the
uppermost, lowermost or frontmost portions of the fastener or of a given
component.
This description also was not exhaustive. Thus, for instance, front edge 130
may
also be described as the frontmost edge or portion of leg 28 while rear edge
132 may
also be described as the rearmost edge or portion of leg 28. Similarly, the
Specification is not exhaustive in specifying every distinction such as leg 30
extends
horizontally the furthest from upper plate 24 in a direction opposite from the
direction
in which lower plate 26 extends from upper plate 24. Similarly, the
Specification is
not exhaustive in its description of specifying that fastener 10 is free of
components
extending outwardly from various edges or surfaces in various directions.
However,
Applicant reserves the right to claim these types of limitations which are
evident from
the figures if necessary to define over any prior art references of which the
Applicant
is currently unaware. This may include the ability to claim, for instance,
that fastener
10 is free of a vertical or horizontal flat wall or plate extending forward
from front
surface 78 of lower plate 26 or rearwardly from rear surface 80 of lower plate
26.
The fastener 10 of the present invention and its method of use thus facilitate
the positioning of the fastener for joining a truss to a wall structural
member as well
as substantially enhancing the safety of the installer. Fastener 10 also
provides
these improvements at a low cost while using only a minimum amount of material
in
order to provide the positioning and self-supporting structure previously
described.
In the foregoing description, certain terms have been used for brevity,
clearness, and understanding. No unnecessary limitations are to be implied
therefrom beyond the requirement of the prior art because such terms are used
for
descriptive purposes and are intended to be broadly construed.
Moreover, the description and illustration of the invention is an example and
the invention is not limited to the exact details shown or described.
18