Note: Descriptions are shown in the official language in which they were submitted.
CA 02816592 2013-05-24
ONE-PIECE HANDLE ASSEMBLY
BACKGROUND
[0001] The present disclosure relates to surgical instruments and, more
particularly, to a one-
piece handle assembly for use with a surgical instrument.
Technical Field
[0002] Electrosurgical instruments, e.g., endoscopic forceps, are well
known in the medical
arts and typically include a housing, a handle assembly including a movable
handle, a shaft and
an end effector assembly attached to a distal end of the shaft. The end
effector includes jaw
members configured to manipulate tissue (e.g., grasp and seal tissue).
Typically, the endoscopic
forceps utilizes both mechanical clamping action and electrical energy to
effect hemostasis by
heating the tissue and blood vessels to coagulate, cauterize, seal, cut,
desiccate, and/or fulgurate
tissue. Usually, one or more driving mechanisms, e.g., a drive assembly
including a drive
element, is utilized to cooperate with one or more components operatively
associated with the
handle assembly to impart movement to one or both of the jaw members. To
facilitate
positioning the jaw members about tissue, the endoscopic forceps sometimes
includes a rotating
assembly. The rotating assembly is usually operably coupled to the shaft and
configured such
that rotation of the rotating assembly rotates the shaft including the jaw
members thereon in a
predetermined direction, e.g., approximately 1800 in either a clockwise or
counterclockwise
direction.
100031 Within the shaft are multiple coaxial tubes in communication with
the end effector
components and the corresponding actuators/linkages in the handle assembly.
For example a
- 1 -
CA 02816592 2013-05-24
blade wire may be present inside the shaft, and is in communication with the
handle assembly
and a knife blade container within the end effector for cutting tissue.
[0004] The handle assembly is generally of a rigid structure containing a
handle, trigger, and
switches therein for moving the end effector assembly, knife deployment, and
electrosurgical
activation of the end effector assembly.
SUMMARY
[0005] In accordance with one aspect of the present disclosure, a one-piece
handle assembly
and a method of assembling the one-piece handle assembly. The one-piece handle
assembly
includes an outer tube connected to a fixed jaw and an inner tube connected to
a moveable jaw.
The inner tube is installed within the outer tube. The surgical instrument
assembly further
includes a handle body over molded onto the outer tube and a handle grip
connected to the
handle body. The handle grip controls movement of the moveable jaw by moving
perpendicular
to a shaft axis about a fulcrum. The one-piece handle assembly further
includes a knife plunger
for controlling activation of a knife rod assembly. The one-piece handle
assembly is void of any
welds, adhesives, or fasteners to complete the final assembly of the one-piece
handle assembly.
[0006] In accordance with another aspect of the present disclosure, a
method for assembling
a surgical instrument includes the steps of attaching a fixed jaw to an outer
tube and overmolding
a handle body to the outer tube. The method further includes the step of
inserting a grip pivot pin
to connect a handle grip to the handle body. The grip pivot pin includes a cam
surface. The
method further includes the step of and connecting a moving jaw to the fixed
jaw while engaging
an inner tube to control the moving jaw.
- 2 -
CA 02816592 2013-05-24
[0007] The method may further include that the fixed jaw is connected to
the moving jaw
using an end effector pivot pin at pivot point between the fixed jaw and the
moving jaw.
[0008] Alternatively or in addition, the method may include the steps of
overmolding a
bushing to the inner tube and sliding a jaw spring over the inner tube,
wherein a proximal end of
the jaw spring contacts the bushing. The method may also include the steps of
sliding the inner
tube through a spring cartridge bore in a spring cartridge and sliding the
inner tube into the outer
tube.
[0009] Alternatively or in addition, the method may include the steps of
sliding a knife
plunger through a handle body bore in the handle body and aligning a cross
bore on the knife
plunger with an assembly bore in the handle body. The method may also include
the steps of
aligning a relief slot on the handle grip with the assembly bore and inserting
an assembly pin into
the assembly bore to engage the knife plunger and the handle grip. Further,
the method may
include the steps of attaching a knife retainer to a knife rod and sliding a
knife spring over the
knife rod and against a knife retainer to create a knife rod assembly. The
method may also
include inserting a knife guide into the inner tube and inserting the knife
rod assembly into a
proximal end of the knife guide.
[0010] Alternatively or in addition, the method may include the step of
attaching a plunger
cap to the knife plunger.
[0011] Alternatively or in addition, the method may include the steps of
compressing the
bushing distally prior to inserting the assembly pin and releasing the
compression after inserting
the assembly pin.
- 3 -
CA 02816592 2013-05-24
100121 Alternatively or in addition, the method may include the step of
aligning two flanges
on the plunger cap with two flat surfaces on the handle body, when inserting
the assembly pin.
[0013] Alternatively or in addition, the method may include that the two
flanges limit
rotation of the knife plunger about an axis defined therethrough.
[0014] Alternatively or in addition, the method may include the step of
aligning the spring
cartridge with assembly bore, when inserting the assembly pin.
[0015] Alternatively or in addition, the method may include the step of
preventing the knife
plunger from travelling distally except for when the fixed jaw and the
moveable jaw are in a
closed position.
[0016] Alternatively or in addition, the method may include the steps of
routing electrical
wires from the fixed jaw and the moveable jaw through the surgical instrument
and providing a
cable to connect the surgical instrument to a generator.
[0017] In accordance with another aspect of the present disclosure, a
surgical instrument
assembly includes an outer tube connected to a fixed jaw. The outer tube
having a longitudinal
axis defined therethrough. The surgical instrument assembly further includes
an inner tube
connected to a moveable jaw. The inner tube is coaxially-disposed the outer
tube. The surgical
instrument assembly further includes a handle body over molded onto the outer
tube and a
handle grip connected to the handle body. The handle grip controls movement of
the moveable
jaw by moving perpendicular to a shaft axis about a fulcrum.
- 4 -
CA 02816592 2013-05-24
[0018] According to another aspect of the present disclosure, the surgical
instrument
assembly is devoid of any welds, adhesives, or fasteners to complete the final
assembly of the
surgical instrument assembly.
[0019] According to a further aspect of the present disclosure, the fulcrum
is a bore defined
in the handle body configured to receive a grip pivot pin.
[0020] According to another aspect of the present disclosure, the surgical
instrument includes
a knife guide inserted within the inner tube, a knife plunger installed within
the handle body; and
a knife rod assembly inserted within the knife guide and the knife plunger,
wherein the knife
plunger controls activation of the knife rod assembly.
[0021] According to a further aspect of the present disclosure, the knife
rod assembly
includes a knife rod and a knife rod retainer
[0022] According to another aspect of the present disclosure, the knife
plunger includes two
flanges separated by a distance approximately equal to an outer width of the
handle grip, the two
flanges configured to prevent the knife plunger from rotating about the
longitudinal axis defined
within the handle body and the outer tube.
[0023] In another aspect, a method of assembling a surgical instrument
assembly includes
the step of connecting an outer tube to a fixed jaw. The outer tube includes
an axis defined
therethrough. The method further includes the step of connecting an inner tube
to a moveable
jaw. The inner tube is coaxially-disposed within the outer tube. The method
further includes the
steps of overmolding a handle body onto the outer tube and connecting a handle
grip to the
handle body. The handle grip controls movement of the moveable jaw by moving
perpendicular
to a shaft axis about a fulcrum.
- 5 -
CA 02816592 2013-05-24
[0024] The method may further include the steps of inserting a knife guide
within the inner
tube and installing a knife plunger within the handle body. The method may
further include the
step of inserting a knife rod assembly inserted within the knife guide and the
knife plunger. The
knife plunger controls activation of the knife rod assembly. The method may
also include the
step of attaching a plunger cap to the knife plunger.
[0025] Alternatively or in addition, the method may include the step of
routing electrical
wires through the inner tube and the outer tube to the movable jaw and the
fixed jaw. The
electrical wires configured to connect to a generator.
[0026] As used herein, the term "distal" refers to the portion that is
being described which is
further from a user, while the term "proximal" refers to the portion that is
being described which
is closer to a user.
BRIEF DESCRIPTION OF THE DRAWINGS
[0027] Various embodiments of the present disclosure are described herein
with reference to
the drawings wherein:
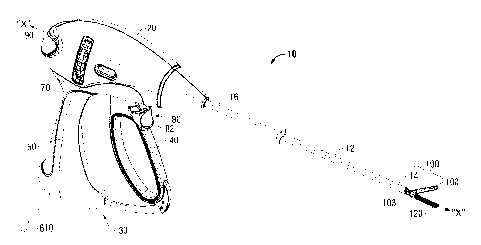
100281 Fig. 1 is a front_ perspective view of an endoscopic surgical
instrument configured for
use in accordance with the present disclosure;
[0029] Fig. 2 is an external, perspective view of an endoscopic surgical
instrument with a
one-piece handle assembly configured for use in accordance with the present
disclosure;
[0030] Fig. 3 is an external, perspective view of a one-piece handle
assembly configured for
use in accordance with the present disclosure;
- 6 -
CA 02816592 2013-05-24
[0031] Fig. 4 is an internal perspective view of the one-piece handle
assembly of the
assembly shown in Fig. 3;
[0032] Fig. 5 is a top, perspective view of the one-piece handle assembly
of the assembly
shown in Fig. 3;
[0033] Fig. 6 is a detailed view of the assembly bore within the one-piece
handle assembly;
and
[0034] Fig. 7 is a flow chart for assembling a one-piece hand assembly
according to the
present disclosure.
DETAILED DESCRIPTION
[0035] Embodiments of the present disclosure are described in detail with
reference to the
drawing figures wherein like reference numerals identify similar or identical
elements.
[0036] Fig. 1 depicts a forceps 10 for use in connection with endoscopic
surgical procedures.
The endoscopic forceps 10 is provided defining a longitudinal axis "X-X" and
including a
housing 20, a handle assembly 30, a rotating assembly 70, a trigger assembly
80, an activation
switch 90, and an end effector assembly 100. Forceps 10 further includes a
shaft 12 having a
distal end 14 configured to mechanically engage end effector assembly 100 and
a proximal end
16 that mechanically engages housing 20. Housing 20 contains the internal
working components
of the forceps 10 which are not described herein but which may be found in
commonly-owned
U.S. Patent No. 7,156,846, the entire contents of which are hereby
incorporated by reference
herein.
- 7 -
CA 02816592 2013-05-24
[0037] End effector assembly 100 is shown attached at a distal end 14 of
shaft 12 and
includes a pair of opposing jaw members 110 and 120. Jaw members 110, 120 are
moveable
between a spaced-apart position and an approximated position for grasping
tissue therebetween.
End effector assembly 100 is designed as a unilateral assembly, i.e., where
jaw member 120 is
fixed relative to shaft 12 and jaw member 110 is moveable about a pivot 103
relative to shaft 12
and fixed jaw member 120. However, end effector assembly 100 may alternatively
be
configured as a bilateral assembly, i.e., where both jaw member 110 and jaw
member 120 are
moveable about a pivot 103 relative to one another and to shaft 12.
[0038] With continued reference to Fig. 1, forceps 10 also includes
electrosurgical cable 610
that connects forceps 10 to a generator (not shown) or other suitable power
source, although
forceps 10 may alternatively be configured as a battery powered instrument.
Cable 610 includes
a wire (or wires) (not explicitly shown) extending therethrough that has
sufficient length to
extend through shaft 12 in order to provide energy to at least one of the jaw
members 110 and
120 of end effector assembly 100. Trigger 82 of trigger assembly 80 may be
selectively
depressed to advance a knife (not shown) between jaw members 110, 120 to cut
tissue grasped
therebetween. Activation switch 90, on the other hand, is selectively
activatable to supply
electrosurgical energy to one (or both) of jaw members 110, 120, as will be
described in greater
detail below.
[0039] With continued reference to Fig. 1, handle assembly 30 includes
fixed handle 50 and
a moveable handle 40. Fixed handle 50 is integrally associated with housing 20
and handle 40 is
moveable relative to fixed handle 50. Rotating assembly 70 is rotatable in
either direction about
a longitudinal axis "X-X" to rotate end effector 100 about longitudinal axis
"X-X." Moveable
handle 40 of handle assembly 30 is ultimately connected to a drive assembly
(not shown) that,
- 8 -
CA 02816592 2013-05-24
together, mechanically cooperate to impart movement of jaw members 110 and 120
between the
spaced-apart position and the approximated position to grasp tissue disposed
between jaw
members 110, 120. As shown in Fig. 1, moveable handle 40 is initially spaced-
apart from fixed
handle 50 and, correspondingly, jaw members 110, 120 are in the spaced-apart
position.
Moveable handle 40 is depressible from this initial position to a depressed
position
corresponding to the approximated position of jaw members 110, 120.
100401
Referring to Figs. 2-6, forceps 200 includes a one-piece handle assembly 207
(See
Fig. 2), a shaft 12, and end effector 100. The one-piece handle 207 assembly
includes a handle
body 220 and a handle grip 205. An assembly pin 250 (See Fig. 3) and a grip
pivot pin 215 (See
Fig. 3) connect the handle grip 205 to the handle body 220. The grip pivot pin
215 is placed
within the grip pivot pin bore 217 on the handle grip 205 and the grip pivot
bore 218 on the
handle body 220. Grip pivot pin 215 includes offset cam surfaces 251 therein
that match fulcrum
bores (not shown) within the grip pivot pin bore 217 and 218. As the user
moves the handle grip
205 perpendicular to axis A-A to control moveable jaw 110, the mating fulcrum
bores and cam
surfaces 251 prevent axial motion of the grip pivot pin 215 along axis B-B
(See Fig. 5). The
offset cam surfaces 251 assist in closing the jaw members 110 and 120, and
therefore
significantly reduce fatigue. Additionally, the width of the handle grip 205
is substantially
constrained to nest into a matching cavity 204 in the handle body 220 to
constrain the handle
grip 205 to planar fulcrum rotation perpendicular to axis A-A.
10041]
The grip pivot pin 215 further includes a cross bore 216 that allows passage
of inner
tube 230 therethrough (See Fig. 4). The diameter of the cross bore 216 is in
close tolerance to
the outside diameter of the inner tube 230, which prevents rotation of grip
pivot pin 215 along
axis B-B. Furthermore, keeping the diameter of the cross bore 216 in close
tolerance to the
- 9 -
CA 02816592 2013-05-24
outside diameter of the inner tube 230 locks the cam surfaces 251 of grip
pivot pin 215 into
position.
[0042] The assembly bore 273 is through-bored perpendicular to the shaft
axis (axis E-E)
through handle body 220. The assembly bore 273 closely matches the outer
diameter of the
assembly pin 250. The assembly bore 273 on the handle body 220 may be
configured so that the
assembly bore 275 on the handle grip 205 and the assembly bore 273 on the
handle body 220 do
not normally align. The assembly bore 275 may be configured with a relief slot
253 (See Fig. 6)
to allow for installation of the assembly pin 250 through assembly bore 275
(on handle grip 205)
and assembly bore 273 (on handle body 220) and then allow for translation of
the assembly pin
250 within assembly bore 275.
[0043] The assembly pin 250 includes offset cam surfaces 251 (See Fig. 6)
that match cam
slots 276 within assembly bore 275 on the handle grip 205. As the handle gip
205 is moved
perpendicular to axis A-A and about the fulcrum (grip pivot pin bore 217), the
assembly pin 250
is translated along the tube axis D-D (See Fig. 6) a distance at least
sufficient enough to open and
close the jaws 110 and or 120 (See Fig. 1). Additionally, the mating cam slots
and cam surfaces
prevent axial movement motion of the assembly pin 250 along axis C-C.
[0044] Assembly pin 250 further includes a cross bore 279 bored
perpendicular to axis C-C
to allow a knife guide 265 to pass through. The tolerance of the cross bore
279 is closely
matched to the outer diameter of the knife guide 265 to prevent rotation of
the assembly pin 250
along axis C-C. Assembly pin 250 further includes a flat tab 252 (See Fig. 6)
manufactured at
each end of the assembly pin 250. The flat tabs 252 correspond to slots in the
handle body 220
and the knife plunger 240 to further prevent rotation of the assembly pin 250
along axis C-C.
- 10-
CA 02816592 2013-05-24
Additionally, the flat tabs 252 prevent rotation of the knife plunger 240 and
assembly pin 250
about axis E-E.
10045] The handle body 220 includes a handle body bore 222 along the shaft
axis (axis E-E)
that closely matches the outer diameter of the knife plunger 240. The handle
body bore 222 is
counter-bored to a depth corresponding to the travel distance of a knife rod
270, where the
counter-bore limits the travel of the knife plunger 240.
[00461 The knife plunger 240 is generally cylindrical in shape with two
flanges 241
projecting proximally. The flanges 241 closely match the handle body bore 222
in the handle
body 220 to align coaxially the knife plunger 240 along the shaft axis (axis E-
E). The flanges
241 are separated by a width in close tolerance to the outer width of the
handle grip 205. The
flanges 241 also include a cross-bored through hole or flange opening 282. The
flange opening
282 is in close tolerance to the outside diameter of the assembly pin 250. The
knife plunger 240
includes slots 242 on both sides that allow movement of the assembly pin 250
within the
assembly bore 235. The slots 242 add in limiting rotation of the knife plunger
240 about axis E-
E.
100471 The knife plunger 240 further includes one or more mechanisms or
mechanical inter-
engaging components that are engaged to attach a plunger cap 245 at the
proximal end 246 of the
knife plunger 240, which may include a screw, indent, etc. The plunger cap 245
may be snap fit,
threaded, or attached in another suitable method to facilitate installation
and/or removal from the
knife plunger 240. The plunger cap 245 includes a coaxial counter bore (not
shown) at the distal
end 246 to facilitate pushing of the knife rod 270 against the plunger cap
245. Axial forces
applied along tube axis (axis E-E) to the plunger cap 245 cause extension of
the knife 122.
-11 -
CA 02816592 2013-05-24
[00481 The knife plunger 240 further includes a knife plunger bore 244
disposed along the
axis E-E, where the diameter of the knife plunger bore 244 is in close
tolerance to the outside
diameter of a knife retainer 255. The knife retainer 255 is captured in a
groove defined in the
knife rod 270 and pulls the knife rod 270 proximally during storage of the
knife 122 by reacting
with a knife spring 260. The knife spring 260 is held in compression between
the proximal end
face of the knife guide 265 and distal side of knife retainer, which causes a
constant separating
force between the knife guide 265 and the plunger cap 245.
[0049] Additionally, a cam blocking function (not shown) may be included
within the handle
assembly 207 to prevent distal travel of the knife plunger 240 except for when
the jaws 110, 120
are fully closed. The geometry of the cam blocking function within handle grip
205 interferes
with the flanges 241 on the plunger cap 240 to prevent movement of the flanges
241 at all but the
fully closed position of the jaws 110, 120.
100501 As best shown in Fig. 5, installed within the handle grip 205 is a
spring cartridge 235.
The spring cartridge 235 includes a square bar 233 (see Fig. 4) of sufficient
length to house a jaw
spring 285. The width of the spring cartridge 235 closely matches a milled
slot 206 defined
within the handle grip 205 to prevent rotation or transverse translation of
the spring cartridge 235
relative to the shaft axis (axis E-E). The spring cartridge 235 includes a
hollow cavity 234,
where the diameter of the hollow cavity 234 is in close tolerance to the
outside diameter of the
jaw spring 285 and the outer diameter of an inner tube bushing 280. At a
distal end 237 of the
spring cartridge 235, the spring cartridge 235 includes a cartridge bore 239
defined therein where
the diameter of the cartridge bore 239 is in close tolerance to the outside
diameter of an inner
tube 230. The proximal end 238 of the spring cartridge 235 includes a
cartridge cross bore 236
defined therein, where the diameter of the cartridge cross bore 236 is in
close tolerance to the
- 12 -
CA 02816592 2013-05-24
outside diameter of the assembly pin 250. The jaw spring 285 is compressed
against an inner
wall 239 the distal end 237 of the spring cartridge 235.
[0051] The shaft 12 includes an outer tube 225 and the inner tube 230. The
inner tube
includes a retaining ring and groove (not shown) at the proximal end of the
inner tube 230 to
provide a stop feature and facilitate assembly. The outer tube 225 is rigidly
attached to the rigid
jaw 120. The inner tube 230 is selectively translative and operatively
connects to the moving
jaw 110. To close moving jaw 110, a user rotates handle grip 205 about grip
pivot pin bore
(fulcrum) 218, which results in proximal translation of assembly pin 215. The
movement of
assembly pin 215 is because of handle grip 205 cam slot 276 relationship (See
Fig. 6). The
proximal translation of the assembly pin 215 causes proximal translation of
the spring cartridge
235 because the spring cartridge 235 is coupled to the assembly pin 215. The
proximal
translation of the spring cartridge 235 causes compression of jaw spring 285.
The compression of
jaw spring 285 causes proximal translation of inner tube bushing 280, which
results in proximal
translation of inner tube 230 to which moving jaw 110 is attached thereto.
[0052] Fig. 7 is a flow diagram of a process 700 for assembling a one-piece
hand assembly
200. The process 700 starts at step 705 with an assembler attaching a fixed
jaw 120 to an outer
tube 225 at step 710. Next at step 715, the handle body 220 is overmolded onto
the outer tube
225. Next the handle grip 205 is aligned with the handle body 220 in such a
way that the grip
pivot pin bore 218 in the handle body 220 and grip pivot pin bore 217 the
handle grip 205 are
aligned. The grip pivot pin bore 218 functions as a fulcrum when the handle
grip 205 is moved
perpendicular to axis A-A. Then at step 720, the grip pivot pin 215 is
inserted within grip pivot
pin bore 218 and grip pivot pin bore 217 to connect the handle grip 205 to the
handle body 220.
-13-
CA 02816592 2013-05-24
[0053]
Next at step 725, the inner tube bushing 280 is overmolded to the inner tube
230. The
inner tube bushing 280 may also be overmolded after the handle body is
overmolded to the outer
tube 225. Then at step 730, the assembler slides the jaw spring 255 over the
inner tube 230,
where the proximal end of the jaw spring 255 contacts the inner tube bushing
280. Next the
inner tube 230 is slid through the spring cartridge bore 239 at step 735. Then
the inner tube 230
is slid into the outer tube 225 from the proximal end of the handle body 220
and through the
cross bore 216 in the grip pivot pin 215 at step 740. Next at step 745, the
moving jaw 110 is
connected to the fixed jaw 120 with a pivot pin 111 while engaging inner tube
jaw operating
features.
100541
Then at step 750, the knife plunger 240 is slid through the handle body bore
222 in
the handle body 220. Next at step 755, the cross bore 242 is aligned within
the flanges 241 on
the knife plunger 240 with the assembly bore 273 on the handle body 220. At
step 760, the relief
slot 253 is aligned on the handle grip 205 with assembly bore 273 on the
handle body 220.
While compressing the inner tube bushing 280 distally, the assembler inserts
the assembly pin
215 into the assembly bore 273, 275 at step 765, which engages the cross bore
242 in the knife
plunger 240 and the spring cartridge 235. Inserting the assembly pin 215 also
aligns the flanges
241 with the flat tabs 208 on the handle grip 205. The assembler then releases
the compression
applied to the inner tube bushing 280. Next at step 770, the assembler
attaches the 'aide retainer
255 to the knife rod 270. At step 775, the knife spring 260 is slid over the
knife rod 270. Next,
the knife guide 265 is inserted into inner tube 230 at step 780. The knife rod
assembly, including
the knife spring 260, knife retainer 255 and knife rod 270, is slid into the
proximal end of the
knife guide 265 at step 785. The process 700 ends at step 795 after the
assembler attaches
- 14 -
CA 02816592 2013-05-24
plunger cap 245 to the knife plunger at step 790. The process 700 does not
include any welds,
adhesives, or fasteners in completing the final assembly of the one-piece
handle assembly 200.
[0055] Additionally, the assembler routes any electrical wires 211 to
electrical connector 210
through the one piece handle assembly 200 during assembly or after completing
assembly.
Optimally the electric wires 211 are placed within the assembly 200 as
appropriate tube 225,
230, guide 265, or rod 270 is installed and termination of the electric wires
211 is done last.
Electrical wires 211 from jaw members 110 and 120 may be routed between outer
tube 225 and
inner tube 230, the inner tube 230 and knife guide 265, the knife guide 265
and the knife rod
270, and/or through the use of a hollow knife rod 270. All entry and exit
points for the electrical
wires 211 may be suitable slotted into these components. Alternatively,
through the selection of
conductive and/or insulative materials, these components may themselves be
used for
electtical/RF current transfer in combination with termination wiring. One or
more passageways
(not shown) are molded into handle body 220 to allow for termination of the
electrical wires 211
to snap in electrical connector 210.
100561 From the foregoing and with reference to the various figure
drawings, those skilled in
the art will appreciate that certain modifications can also be made to the
present disclosure
without departing from the scope of the same. While several embodiments of the
disclosure
have been shown in the drawings, it is not intended that the disclosure be
limited thereto, as it is
intended that the disclosure be as broad in scope as the art will allow and
that the specification be
read likewise. Therefore, the above description should not be construed as
limiting, but merely
as exemplifications of particular embodiments. Those skilled in the art will
envision other
modifications within the scope and spirit of the claims appended hereto.
- 15-