Note: Descriptions are shown in the official language in which they were submitted.
CA 02829730 2015-07-14
IMPLANTS AND PROCEDURES FOR TREATMENT OF
PELVIC FLOOR DISORDERS
RELATED APPLICATIONS
[0001] NOT APPLICABLE
BACKGROUND OF THE INVENTION
[0002] Pelvic floor disorders are a class of abnormalities that affect the
pelvic region
of patients, and they afflict millions of men and women. In women, for
example, the
pelvic region includes various anatomical structures such as the uterus, the
rectum, the
bladder, and the vagina. These anatomical structures are supported and held in
place
by a complex collection of tissues, such as muscles and ligaments. When these
tissues
are damaged, stretched, or otherwise weakened, the anatomical structures of
the pelvic
region shift and in some cases protrude into other anatomical structures. For
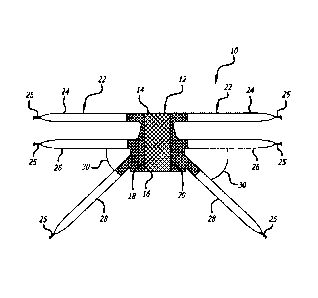
example,
when the tissues between the bladder and the vagina weaken, the bladder may
shift
and protrude into the vagina, causing a pelvic floor disorder known as
cystocele. Other
pelvic floor disorders include vaginal prolapse, vaginal hernia, rectocele,
enterocele,
uterocele, and/or urethrocele.
[0003] Pelvic floor disorders often cause or exacerbate urinary
incontinence (UI).
One type of Ul, called stress urinary incontinence (SUI), affects primarily
women and is
often caused by two conditions¨intrinsic sphincter deficiency (ISD) and
hypermobility.
These conditions may occur independently or in combination. In ISD, the
urinary
sphincter valve, located within the urethra, fails to close (or "coapt")
properly, causing
urine to leak out of the urethra during stressful activity. In hypermobility,
the pelvic floor
is distended, weakened, or damaged. When the afflicted woman sneezes, coughs,
or
otherwise strains the pelvic region, the bladderneck and proximal urethra
rotate and
descend. As a result, the urethra does not close with sufficient response
time, and urine
leaks through the urethra.
¨1 ¨
CA 02829730 2013-10-15
[0004] Ul and pelvic floor disorders, which are usually accompanied by
significant
pain and discomfort, are often treated by implanting a supportive sling or
mesh in or
near the pelvic floor region to support the fallen or shifted anatomical
structures or more
generally, to strengthen the pelvic region by promoting tissue in-growth.
Often,
treatments of stress incontinence are made without treating the pelvic floor
disorders at
all, potentially leading to an early recurrence of the stress incontinence.
[0005] Existing systems, methods, and kits for treatment typically apply
delivery
devices to position a supportive surgical implant into a desired position in
the pelvic
region. However, some of these systems and methods require a medical operator
to
create multiple incisions and deliver the implant using complex procedures.
Moreover,
many existing surgical implants are not suitably sized or shaped to properly
fit within a
patient and treat pelvic floor disorders. Accordingly, medical operators and
patients
need improved systems, methods, and surgical kits for the treatment of pelvic
floor
disorders and/or urinary incontinence.
SUMMARY OF THE INVENTION
[0006] The present invention provides improved methods and devices for
supporting
pelvic organs in the treatment of conditions such as incontinence and various
pelvic
floor disorders including but not limited to cystocele, enterocele and
rectocele.
[0007] Devices of the present invention include implants having soft,
flexible support
bodies and anchor arms that are sturdy and durable.
[0008] Other devices of the present invention include introducers that
allow an
implant to be deeply implanted so as not to cause damage to the pelvic floor
and to
preserve the natural length of the vagina.
[0009] Methods of the present invention include the use of multiple
implants for
treating multiple disorders, including treating pelvic floor disorders and
incontinence.
¨2¨
CA 02829730 2013-10-15
BRIEF DESCRIPTION OF THE DRAWINGS
[0010] Figure 1
is a plan view of an embodiment of an anterior implant of the
present invention;
[0011] Figure 2 is a perspective view of an embodiment of a sleeve of the
present
invention;
[0012] Figure 3
is a plan view of an embodiment of a posterior implant of the present
invention;
[0013] Figure 4
is a plan view of an embodiment of an introducer of the present
invention;
[0014] Figure 5 is a side view of the introducer of Figure 4;
[0015] Figure
5a is an elevation of a preferred embodiment of an introducer of the
present invention;
[0016] Figure 6
is a perspective view of an attachment device of the present
invention;
[0017] Figure 7
is a top view of introducers used in accordance with the present
invention;
[0018] Figures
8-21 are a series of illustrations depicting various steps in a method of
placing an anterior implant of the present invention; and,
[0019] Figures
22-26 are a series of illustrations depicting various steps in a method
of placing a posterior implant of the present invention.
¨3¨
CA 02829730 2013-10-15
DETAILED DESCRIPTION OF THE PREFERRED EMBODIMENT DEVICES
Anterior Compartment Implant
[0020]
Referring to Figure 1 there is shown an embodiment of an anterior
compartment implant 10 of the present invention that provides both anchoring
and
support to the bulbar urethral complex of a male patient or the bladder and
the vagina
including the apex of the vagina of a female patient. The implant 10 generally
includes
a body 12 that has a first end 14 and a second end 16 opposite the first end
14.
Preferably, the body 12 is a flat panel formed of a mesh material that extends
to side
extents 18 and 20.
[0021] The
implant 10 also includes arm portions 22 that extend outwardly from the
body 12 on either side of the side extents 18 and 20. The side extents 18 and
20 can
extend out laterally to the arms 24, 26, and 28. The arm portions of the
implant 10 of
Figure 1 collectively include a plurality of arms that can be divided by
function into three
pairs: first pair 24, second pair 26 and third pair 28.
Preferably, the arm portions 22
are cut from flat panels formed of a mesh material. The arm portions 22 may be
formed
separately from the body 12 and then attached thereto using sutures, adhesive,
heat
treatment or a variety of other techniques. Preferably, however, the arm
portions 22 are
formed in conjunction with the body 12 (hereinafter "unibody construction")
such that
subsequent attachment is not necessary and risks associated with attached arm
portions (separation, frayed edges, ridges, etc.) are eliminated. More
preferably, the
meshwork of the implant 10 has more than one zone, each zone having the
ability to be
constructed of a different filament diameter, stitch pattern, mesh density, or
any
combination of the three, such that the body 12 is macroporous, supple, and
flexible,
while the mesh of the arm portions 22 is more supportive while also
macroporous. In a
most preferred embodiment, the multiple zone concept is incorporated into the
unibody
construction concept.
[0022] For example, one preferred embodiment includes a mesh body panel 12
that
is formed by knitting filaments having a diameter of approximately 3 mils into
a relatively
¨4¨
CA 02829730 2013-10-15
open, porous pattern. The arm portions 22 are formed by knitting filaments
having a
diameter of approximately 6.5 mils in a pattern that is tighter than the
pattern used in
knitting the body 12. Other size filaments are also within the scope of the
invention, the
nature of the invention being that the body panel 12 has smaller diameter
filaments as
compared to arm portions 22. The arm portions 22 are knitted together with the
body 12
such that the implant 10 has a unibody construction.
[0023] Because
the body 12 is constructed of mesh, the shape of the body 12 is
easily modifiable by simply cutting the body 12 to a desired shape. Hence, if
a patient is
smaller than average, the body 12 may be reduced, for instance, by trimming
the first
end 14 and/or the second end 16. In order to provide confidence that an
appropriate
size is attained prior to surgery, templates may be provided based on certain
patient
size criteria, that allows the body 12 to be trimmed to a corresponding size.
For
example, a template for a patient having a certain height or weight may be
used to
approximate a size and shape for a desired implant body 12 that should
correspond to
the patient anatomy. Other patient criteria, such as pelvic bone width, may be
used as
an entering argument for template selection.
[0024] The three pairs of arms 24, 26 and 28 of the implant 10 make the
implant 10
ideally suited as an anterior compartment implant and provide apical support.
Each arm
preferably includes a suture (e.g., string, cord, line, wire, rope, metal,
etc.) loop 25 at its
end for attachment to an introducer. The first pair of arms are generally
flush with the
first end 14 of the body 12 and extend directly out therefrom. The second arms
26 are
adjacent, and generally parallel to the first arms 24. In place, the first and
second pairs
of arms 24 and 26 are routed through the obturator fossa and up into the
dermis where
they are anchored. The third arms 28 are adjacent to and extend at an angle 30
to the
second arms 26. The third pair of arms 28 are designed for passage through the
ischiorectal fossa for apical suspension and the angle 30 is chosen for
anatomical
placement without folds. Alternatively, the arms 28 can be trimmed for
attachment to
the sacrospinous ligament for apical suspension. The angle 30 is preferably a
non-zero
angle, is more preferably between 30 and 60 degrees and is shown as being
approximately 45 degrees.
¨5¨
CA 02829730 2013-10-15
[0025] The arms 24, 26 and 28 are all relatively slender and long. The width
of the
arms is sufficient to provide structural support, yet thin enough to pass
through tissue
without undue effort. The widths of arms 24, 26 and 28 are preferably between
0.1 and
2 cm, more preferably between 0.5 and 1.5cm and even more preferably
approximately
1 cm. In the embodiment of implant 10 shown in Figure 1, the arms 24, 26 and
28 have
a preferred width of 1.1cm. The length of the arms 24, 26 and 28 are long
enough to
pass through the incisions and out of the body. As they are trimmed in a final
step of
the implantation, the length needs simply be long enough to allow ease of
installation.
In the embodiment of Figure 1, the arms 24, 26 and 28 are each longer than 15
cm,
closer to 19cm, and have 5cm long tapered ends to aid in installation.
[0026] Sleeves 32, such as the one shown in Figure 2, that are sized to fit
over the
arms 24, 26 and 28 and constructed of a smooth, slippery material, may be
applied over
the arms 24, 26 and 28 to further assist in passing the arms through tissue
incisions and
help reduce the spread of any infection from one part of a patient to another.
These
sleeves are then removed after the arms have been passed through the tissue
such that
tissue ingrowth may occur.
Posterior Compartment Implant
[0027] Referring to Figure 3 there is shown an embodiment of a posterior
compartment implant 40 of the present invention that provides both anchoring
and
support to the pelvic structures of a male patient or the rectum, perineum,
vagina and
the apex of the vagina of a female patient. The implant 40 generally includes
a body 42
that has a first end 44 and a second end 46 opposite the first end 44.
Preferably, the
body 42 is a flat panel formed of a mesh material that extends to side extents
48 and 50.
[0028] The
implant 40 also includes arm portions 52 that extend outwardly from the
body 42 on either side of the side extents 48 and 50. The side extents 48 and
50 can
extend out laterally to the arms 54 and 56. The arm portions 52 of the implant
40 of
Figure 3 collectively include a plurality of arms that can be divided by
function into two
pairs: first pair 54 and a second pair 56. Preferably, the arm portions 52 are
cut from
flat panels formed of a mesh material. The arm portions 52 may be formed
separately
from the body 42 and then attached thereto using sutures, adhesive, heat
treatment or a
¨6¨
CA 02829730 2013-10-15
variety of other techniques. Preferably, however, the arm portions 52 and the
body 42
are of unibody construction such that subsequent attachment is not necessary
and risks
associated with attached arm portions (separation, frayed edges, ridges, etc.)
are
eliminated. More preferably, the meshwork of the implant 40 has more than one
zone,
each zone having the ability of being constructed of a different filament
diameter, stitch
pattern, mesh density, or a combination of all three, such that the body 42 is
macroporous, supple, and flexible, while the mesh of the arm portions 52 is
more
supportive while also macroporous. In a most preferred embodiment, the
multiple zone
concept is incorporated into the unibody construction concept.
[0029] For example, one preferred embodiment includes a mesh body panel 42
that
is formed by knitting filaments having a diameter of approximately 3 mils into
a relatively
open, porous pattern. The arm portions 52 are formed by knitting filaments
having a
diameter of approximately 6.5 mils in a pattern that is tighter than the
pattern used in
knitting the body 42. Other size filaments are also within the scope of the
invention, the
nature of the invention being that the body panel 42 has smaller diameter
filaments as
compared to arm portions 52. The arm portions 52 are knitted together with the
body 42
such that the implant 40 has a unibody construction.
[0030] Because
the body 42 is constructed of a flat mesh, the shape of the body 42
is easily modifiable by simply cutting the body 42 to a desired shape. Hence,
if a patient
is smaller than average, the body 42 may be reduced, for instance, by trimming
the first
end 44 and/or the second end 46. In order to provide confidence that an
appropriate
size is attained prior to surgery, templates may be provided based on certain
patient
size criteria, that allows the body 42 to be trimmed to a corresponding size.
For
example, a template for a patient having a certain height or weight may be
used to
approximate a size and shape for a desired implant body 42 that should
correspond to
the patient anatomy. Other patient criteria, such as pelvic bone width, may be
used as
an entering argument for template selection.
[0031] The two
pairs of arms 54 and 56 of the implant 40 make the implant 40 ideally
suited as an posterior compartment implant. Each arm preferably includes a
sutured
(e.g., string, cord, line, wire, rope, metal, etc.) loop 55 at its end for
attachment to an
¨7¨
CA 02829730 2013-10-15
introducer. The first pair of arms are generally flush with the first end 44
of the body 42
and extend directly out therefrom. In place, the first arms 54 are routed
through the
ischiorectal fossa and up into the dermis and exit via pararectal incisions
where they are
anchored, with the first end 44 sutured to the apex of the vagina to provide
apical
support. The second arms 56 extend at an angle 60 to the first arms 54. The
second
arms 56 are designed to anchor the implant to the perineum and pass through
pararectal incisions and the angle 60 is chosen for anatomical placement
without folds.
The angle 60 is preferably a non-zero angle, is more preferably between 30 and
90
degrees and is shown as being approximately 75 degrees.
[0032] The arms 54 and 56 are all relatively slender and long. The width of
the arms
is sufficient to provide structural support, yet thin enough to pass through
tissue without
undue effort. The widths of arms 54 and 56 are preferably between 0.1 and 2
cm, more
preferably between 0.5 and 1.5cm and even more preferably approximately 1 cm.
In the
embodiment of implant 10 shown in Figure 3, the arms 54 and 56 have a
preferred width
of 1.1cm. The length of the arms 54 and 56 are long enough to pass through the
incisions and out of the body. As they are trimmed in a final step of the
implantation, the
length needs simply be long enough to allow ease of installation. In the
embodiment of
Figure 3, the arms 54 and 56 are each longer than 10 cm, with the first arms
54 closer
to 19cm and the second arms 56 closer to 15 cm. The arms 54 and 56 may have
tapered ends to aid in installation.
[0033] Sleeves 32, such as the one shown in Figure 2, that are sized to fit
over the
arms 54 and 56 and constructed of a smooth, slippery material, may be applied
over the
arms 54 and 56 to further assist in passing the arms through tissue incisions
and help
reduce the spread of any infection from one part of a patient to another.
These sleeves
are then removed after the arms have been passed through the tissue such that
tissue
ingrowth may occur.
[0034]
Examples of other devices and methods used to treat disorders are
described in U.S. Application No. 11/674,962 entitled Implantable Sling For
The
Treatment Of Incontinence And Method Of Using The Same, filed February 14,
2007;
U.S. Application No. 11/119,446 entitled Implantable Sling For The Treatment
Of
¨8¨
CA 02829730 2013-10-15
Incontinence And Method Of Using The Same, filed April 30, 2005 and U.S.
Application
Serial No. 11/552,484 entitled Implantable Sling For The Treatment Of Male
Incontinence And Method Of Using The Same filed on October 24, 2006.
[0035]
Materials suitable for use in constructing the implants 10 and 40 of the
present invention may include either synthetic materials, such as surgical
mesh and the
like, natural tissues, such as tissues harvested from either animal,
cadaverous source or
the patient themselves, and/or combinations of synthetic and natural
materials. One
embodiment of the present invention incorporates a colored mesh, such as a
blue mesh,
to improve the ease of locating the mesh during placement or removal and any
subsequent surgical procedures. Additionally, the arms or the tips of the
implants 10
and 40 may be color coded to allow the surgeon to identify each arm and the
appropriate placement without confusion in a reproducible fashion.
[0036]
Referring to Figures 4 and 5, there is shown an introducer 70, more
specifically an inferior transobturator introducer 70, of the present
invention. The
introducer 70 generally includes a shaft 72 and a handle 74. The shaft 72 has
a
substantially straight portion, a transition portion and a curved portion. The
shaft 72 is
shaped to allow a deep pass that reaches the ischial spine or other anatomical
structure
to provide good apical support and to preserve the depth of the vagina after
the implant
is in place. In a preferred embodiment, the deep pass reaches the ischial
spine which in
a average size patient would be a distance of 7-10 cm. The shaft 72 has a
distal end 76
that includes a slot 78 shaped to receive a suture loop 25 of the implant 10.
The
introducer 70 has a new and innovative shape. However, it is to be understood
that
prior introducers may also be used with the method and devices of the present
invention.
[0037] Figure
5a shows just one specific embodiment of a shaft 72 of introducer 70.
The shaft 72 has a diameter of 3.5mm and has a substantially straight portion
80 that is
2.28 cm long, 1.54 of which extends from the handle 74. The shaft 72 has a
transition
portion 82 that includes two curves 83 and 84. The first curve 83 has a radius
of 7.14
cm and extends in a distal direction 2.04 cm. The second curve 84 has a radius
of 5.34
cm and extends in a distal direction 1.42 cm. The curved portion 85 includes
three
¨9¨
CA 02829730 2013-10-15
curves; a first curve 86 having a radius of 2.05 cm and extends distally 1.93
cm, a
second curve 87 having a radius of 1.39 cm and extending distally 0.83 cm, and
a third
curve 88 having a radius of 4.66 cm and extending distally 0.31 cm. The distal
end 76 is
the distal most part of the third curve 88.
[0038] Figure 6 shows an attachment device 90 of the present invention. The
attachment device 90 includes a distal forked tip 92 that has two tines 94,
each of which
has a slot 96. A suture loop 25 or 55 may be placed through the slots 96 and
the
attachment device 90 can then be used to extend the reach of the physician to
assist in
attaching an arm of an implant to an introducer, as will be described in more
detail
below. Not only is the physician's reach extended, but using the slender
attachment
device 90 rather than reaching manually with the hand or forcing an introducer
towards
the introitus, reduces the risk of tearing fascia that supports the pelvic
structures.
IMPLANT METHODS
[0039] The implants of the present invention may be used separately or
together,
based on the needs of the patient. They may also be used in connection with a
sling
implant for the treatment of treat urinary incontinence.
Anterior Compartment Implant
[0040] Referring to Figures 7-21 one method of placing an anterior
compartment
implant 10 as contemplated for use in the present invention is illustrated
that includes a
surgical procedure as follows. In Figure 7, the preferred instruments are
gathered and
sterilized, if necessary. They include (from left to right), the suture
attachment device
90, the inferior transobturator introducer 70, a posterior introducer 100
(prior art), a right
helical obturator introducer 110 (prior art) and a left helical obturator
introducer 120
(prior art). One skilled in the art will realize that other introducers, such
as hook
introducers, suprapubic introducers, or transvaginal introducers may be
substituted,
especially for the helical obturator introducers 110 and 120.
[0041] The patient is given local, general, spinal, or epidural anesthetic.
Pre and
intra-op and post-op antibiotics are recommended. If the patient is female,
she is placed
¨ 10 ¨
CA 02829730 2013-10-15
in dorsal lithotomy stirrups and standard sterile preparations are performed.
Vaginal
retraction for access and view are recommended. A weighted speculum and
lateral
retraction will make the procedure easier to perform. Sterile saline, diluted
local
anesthetic with epinephrine, diluted vasopressin, or other solution should be
injected
underneath the vaginal mucosa for aqua dissection and to help with hemostasis.
The
injection can be done from at or below the mid urethra all the way to the
lateral sidewalls
and vaginal apex.
[0042] A
midline incision in the anterior vaginal wall should be made starting 1 cm
below the urethral meatus and extend it to approximately 2-3 cm short of the
cuff or
cervix. The vaginal mucosa should be dissected away from the bladder laterally
to the
vaginal sidewalls, and levator ani, and obturator internus, to the ischial
spines on both
sides and all the way to the apex or cervix. In one embodiment of the
procedure of the
present invention, three or more interrupted sutures are placed next to the
apex of the
vagina. These sutures will later be attached to the implant 10 second end 16
for apical
support.
[0043] The
obturator fossa is located and identified. It lays beneath the adductor
longus and is generally at the level of the clitoris, and is underneath the
crural folds.
The thumb is used externally and index finger used internally to identify the
obturator
fossa. A 1 cm incision is made along the superior medial edge of the obturator
fossa at
the level of the inferior portion of the clitoris for a first arm 24 of the
implant 10. A
second 1 cm incision is made at the inferior border of the obturator fossa 2
cm lateral
and 3 cm below the first incision for a second arm 26 of the implant 10. The
incisions
may be expanded with a small clamp if needed. These steps are repeated on the
opposite obturator fossa.
[0044]
Referring to Figure 8, the tip 74 of the inferior transobturator introducer 70
is
inserted into the inferior medial groin incision (lower incision) to puncture
through the
obturator membrane and direct the introducer tip towards the ischial spine or
vaginal
apex. The tip
74 of the introducer 70 is identified through palpation and punched
through the obturator internus muscle with gentle rotation and pressure. The
vaginal
index and/or middle fingers are used to guide the introducer tip through the
fascial wall
¨11 ¨
CA 02829730 2013-10-15
to exit proximally at the vaginal apex above the ischial spine. The introducer
70 is
rotated to externalize the introducer tip 74 at the introitus. However, in a
preferred
embodiment the introducer 74 is not guided to the introitus rather it is left
deep within the
pelvis to preserve the pelvic support structures, as shown in Figure 9.
[0045] As
illustrated in Figure 10, next a second arm 26 of the implant 10 is
identified and the loop 25 is placed through the notch 78 of the inferior
introducer 70.
Preferably, the sutures 25 are loaded onto the introducer 70 using the
attachment
device 90. Using the attachment device 90 obviates the need to pull the tip of
the
introducer 70 back toward the finger tips, potentially tearing the pelvic
floor support
structures.
[0046] As
illustrated in Figure 11, once the suture loop is loaded onto the inferior
introducer 70, the inferior introducer 70 is reverse rotated and retracted
while a reverse
traction pull is placed on the suture loop. The introducer 70 and second arm
26 are then
pulled through the obturator fossa and out the skin incision while care is
given to ensure
the second arm 26 does not twist during or after placement. These steps are
then
repeated on the opposite side (Figure 12). Traction is applied to the second
arms 26 to
position the implant 10 and body 12 of the implant 10 into the proper
location, preferably
as close to the vaginal apex as possible. Preferably, the implant 10 is
tension free and
there are no ridges palpable.
[0047] The tip
of a right helical introducer 110 is next inserted into the superior groin
incision (upper incision) to puncture through the superior medial aspect of
the obturator
membrane and the introducer tip is directed towards the level of the bladder
neck
(Figure 13). The tip of the introducer 110 is identified through palpation and
punched
through the obturator internus muscle with gentle rotation and pressure. The
vaginal
index and/or middle fingers may be used to guide the introducer tip through
the fascial
wall to exit at the level of the bladder neck. The introducer is then rotated
to externalize
the introducer tip at the introitus (Figure 14). Care is taken not to hug the
pubic ramus.
Doing so will make passage of the introducer and the arms more difficult.
[0048] Next, as
seen in Figures 15-16, a first arm 24 of the implant 10 is identified
and a loop 25 of a suture is placed through the notch of the helical
introducer 110 or
¨ 12 ¨
CA 02829730 2013-10-15
other altemative introducers apparent to one skilled in the art. The
right helical
introducer 110 is then reverse rotated and retracted as reverse traction pull
is placed on
the suture loop 25. The introducer 110 and the first arm 24 are pulled through
the
obturator fossa and out the skin incision taking care that the first arm 24
does not twist
during or after placement. These steps are repeated on the opposite side of
the patient.
[0049] As
illustrated in Figure 17, traction is applied to the first arms 24 to position
the implant 10 into the proper location such that the body 12 is substantially
near the
bladder neck, supporting the bladder without tension. Traction is applied as
necessary
to the first and second arms 24 or 26 to flatten out any significant folds of
the implant 10
material and to ensure complete reduction of the anterior compartment defects.
Excess
implant 10 material may be trimmed. Cystoscopy should be performed to confirm
bladder integrity.
[0050]
Thereafter, the apex of the vaginal vault can be sutured to the second end
16 of the implant 10. The third arms 28 may be trimmed and attached to the
sacrospinous ligament for apical suspension if desired. Instructions on the
apical
suspension using a intravaginal slingplasty approach via the ischiorectal
fossa are
described in further detail in the paragraph below.
[0051] It is
recommended that a rectal probe is used to place the rectum away from
the posterior introducer during an intravaginal slingplasty. The vaginal index
and middle
fingers are important to ensure prevention of damage to the bowel or bladder.
In one
preferred embodiment of the procedure of the present invention, a intravaginal
slingplasty approach, two small 1 cm pararectal incisions are made
approximately 2-3
cm lateral and 2-3 cm posterior to the anal opening.
[0052] Referring to Figure 18, a posterior introducer 100 is positioned
with the handle
vertical and the introducer tip horizontal and parallel to the pelvic floor.
The introducer
tip is then inserted into one of the pararectal incisions and aimed lateral,
away from the
rectum, and towards the ischial spine. The tip of the introducer 100 is next
passed
through the ischiorectal fossa traveling lateral to the posterior wall of the
rectum until the
introducer tip nears the ischial spine. The handle moves downward to direct
the
introducer tip upwards approximately 1-2 cm anterior to the ischial spine. As
seen in
¨ 13 ¨
CA 02829730 2013-10-15
Figure 19, the tip of the introducer 100 is guided by vaginal finger/s to
direct the
introducer tip through the levator ani, past the vaginal wall incision, and
out towards the
introitus to externalize it. Care is taken not to tear the pelvic tissues
during this
maneuver.
[0053] Next, as
illustrated in Figure 20, a third arm 28 of the implant 10 is identified
and a loop of a suture is placed through the notch of the posterior introducer
100. The
posterior introducer 100 is gently retracted, following its curve, as a
reverse traction pull
is placed on the suture loop 25. The introducer 100 and the third arm 28 are
pulled
through the ischiorectal fossa and out the pararectal skin incision, making
sure the third
arm 28 does not twist during or after placement. These steps are repeated on
the
opposite side of the body, resulting in the configuration illustrated in
Figure 21.
[0054] Next,
the apex of the vagina may be sutured to the second end 16 of the
implant 10 with the previously placed apical sutures. The cervix may also be
sutured to
the implant 10 to prevent the prolapse of the cervix, uterus, and vaginal
vault. The
vagina is pushed to its maximal depth with the examining fingers and given
gentle
traction on the third arms 28 to remove any slack. If necessary, interrupted
sutures may
be placed to attach the body 12 of the implant 10 to the levators and to
remove excess
slack. Sutures should be placed at least 1 cm from the edges of the body 12 of
the
implant 10. Once satisfied with the implant 10 placement, all arms 24, 26 and
28 of the
implant 10 are trimmed below the level of the skin and the incisions are
closed. Groin
and buttock incisions can be closed with skin glue and vaginal incisions can
be closed
using a running stitch.
Posterior Compartment Implant
[0055] A method
of placing a posterior compartment implant 40 as contemplated for
use in the present invention is illustrated in Figures 22 ¨ 26 and includes a
surgical
procedure as follows. Only a posterior introducer 100 (Figure 7) is needed for
this
procedure.
[0056] A
patient is given local, general, spinal or epidural anesthetic. Pre and intra-
op and post-op antibiotics are recommended. Pre-op bowel prep is recommended.
The
¨ 14¨
CA 02829730 2013-10-15
patient is placed in dorsal lithotomy stirrups and standard sterile
preparation is
performed. Vaginal retraction for access and view are recommended, as it will
make the
procedure easier to perform.
[0057] Sterile
saline, diluted local anesthetic with epinephrine, diluted vasopressin,
or other solution is injected underneath the vaginal mucosa for aqua
dissection and help
with hemostasis. The injection can be done from the perineum and introitus all
the way
to the lateral sidewalls and vaginal apex. A midline incision is made in the
posterior
vaginal wall starting at the introitus and extended to approximately 2-3 cm
short of the
vaginal cuff or cervix. The vaginal mucosa is dissected away from the rectum
laterally
to the vaginal sidewalls, and levator ani, and to the ischial spines on both
sides and to
the sacrospinous ligaments bilaterally.
[0058] Three or
more interrupted sutures may be placed to the apex of the vagina.
These are preferably approximately 1 to 2 cm apart. These will later be
attached to the
implant 40 for apical support and to prevent an enterocele from forming.
[0059] It is
recommended that a rectal probe be used to place the rectum away
from the posterior introducer 100 during the intravaginal slingplasty. The use
of vaginal
index and middle fingers are important to ensure prevention of damage to bowel
or
bladder. Two small 1 cm pararectal incisions are made approximately 2-3 cm
lateral
and 2-3 cm posterior to the anal opening. The posterior introducer 100 is
positioned
with the handle vertical and the introducer tip horizontal and parallel to the
pelvic floor.
[0060]
Referring to Figure 22, the introducer 100 is now inserted into one of the
pararectal incisions and aimed lateral, away from the rectum, and towards the
ischial
spine. The tip of the introducer 100 is passed through the ischiorectal fossa
traveling
laterally to the posterior wall of the rectum until the tip of the introducer
100 nears the
ischial spine. The handle moves downward to direct the introducer tip upwards
approximately 1-2 cm anterior to the ischial spine. The introducer tip is
guided by
vaginal fingeris to direct the introducer tip through the levator ani, past
the vaginal wall
incision, and out towards the introitus to externalize it (Figure 23). Care is
taken not to
tear the pelvic tissues during this maneuver.
¨ 15 ¨
CA 02829730 2013-10-15
[0061] Referring to Figure 24, a first arm 54 of the implant 10 is
identified and a
suture loop 55 is placed through the notch of the posterior introducer 100.
The posterior
introducer 100 is gently retracted, following its curve, as a reverse traction
pull on the
suture loop is applied. The introducer 100 and the first arm 54 are pulled
through the
ischiorectal fossa and out the pararectal skin incision, making sure the first
arm 54 does
not twist during or after placement. These steps are repeated with the other
first arm 54
on the opposite side of the patient.
[0062] The apex of the vagina may be sutured to the first end 44 of the
implant 40
with the previously placed apical sutures. If the patient has a uterus and
cervix, the
cervix may also be sutured to the implant 40 to prevent the prolapse of the
cervix,
uterus, and vaginal vault. Gentle traction is applied to the first arms 54 of
the implant 40
into the desired position to ensure that the implant 40 and body of the
implant 42 are
centered, making sure the implant 40 lays flat and tension-free. The second
arms 56
may be trimmed off and the second end 46 of the implant 40 can be trimmed and
sutured to the perinea! body.
[0063] If the second arms 56 are not trimmed off and are used as anchors,
the
following procedure may be employed: The tip of the posterior introducer 100
is
inserted into two small 1 cm pararectal incisions approximately 2-3 cm lateral
and 2-3
cm posterior to the anal opening and it is pointed towards the vaginal
introitus (see
Figure 25). The introducer tip is passed lateral to the anal sphincter and
rectum, using
fingers in the vagina to guide the introducer tip through the posterior
vaginal wall incision
at the perineal body and to externalize the tip at the introitus.
[0064] Next, as illustrated in Figure 26, a second arm 56 of the implant 40
is
identified and a loop of a suture 55 is placed through the notch of the
posterior
introducer 100. The posterior introducer 100 is gently retracted, following
its curve, as a
reverse traction pull is placed on the suture loop to prevent it from falling
out of the
notch. The introducer 100 and the second arm 56 are pulled through the
pararectal skin
incision, making sure the second arm 56 does not twist during or after
placement.
These steps are repeated on the opposite side of the patient.
¨16--
CA 02829730 2015-07-14
[0065] The
vagina is then pushed to its maximal depth with the examining fingers
and gentle traction is placed on the first arms 54 and the second arms 56 to
remove any
slack and to ensure the implant 40 and body 42 of the implant 40 is centrally
located
and laying flat. The second end 46 of the body 42 should be positioned right
over the
perineal body. Trimming of excess lateral and distal implant 40 material can
now be
performed if needed.
[0066]
Interrupted sutures may be placed to attach the lateral mesh to the levator
ani and to remove excess slack but still maintaining a tension-free repair.
Keeping the
vagina to its full depth while suturing the lateral edges of the body 42 to
the levator ani is
ideal. The implant 40 should lay flat over the rectum and/or enterocele with
minimal
tension. In one preferred embodiment of the present invention, an average of
three
interrupted sutures per side is used. Preferably, sutures should be placed at
least 1 cm
from the edges of the body 42 of the implant 40. The section of the implant 40
placed
over the perineal body should be the last section of the implant 40 sutured
securely with
three interrupted sutures. This will prevent a rectocele or enterocele from
protruding
over the perinea! body. Once satisfied with the implant 40 placement, all arms
54, 56 of
the implant 40 are trimmed below the level of the skin and the incisions are
closed.
Pararectal incisions can be closed with skin glue and vaginal incisions can be
closed
using a running stitch.
[0067] As
stated above, one aspect of the present invention is that a posterior
compartment implant and an anterior compartment implant in accordance with the
disclosure above can be joirtly used to treat multiple pelvic floor disorders
simultaneously. In addition, an implant for treatment of urinary incontinence
could also
be included in such an operation. For
example, a urinary incontinence sling
commercialized under the name DesaraTM by the assignee of the present
application
could also be introduced into the patient during the same treatment using the
posterior
and anterior compartment implants disclosed herein.
[0068]
Although the invention has been described in terms of particular
embodiments and applications, one of ordinary skill in the art, in light of
the teaching,
can generate embodiments and modifications. For example, it will be clear to
one of
¨ 17 ¨
CA 02829730 2015-07-14
ordinary skill in the art how to apply the inventive concepts disclosed herein
to the
treatment of multiple pelvic support conditions for both male and female
patients.
¨ 18 ¨