Note: Descriptions are shown in the official language in which they were submitted.
- 1 -
SYSTEM AND METHOD OF DENTAL IMPLANT AND INTERFACE TO
ABUTMENT FOR RESTORATION
PRIORITY CLAIM AND CROSS REFERENCE TO RELATED APPLICATIONS
[0001] This application claims priority to U.S. Provisional Application
No.
61/502,091, filed on June 28, 2011.
TECHNICAL FIELD
[0001] This disclosure relates to restorative dental implants and
abutments and related
tools for the assembly and disassembly of the same.
BACKGROUND
[0002] Single tooth restorations present the unique requirement that
they must be
supported non-rotationally on an underlying abutment. When a prepared natural
tooth is the
underlying abutment, this requirement is met in the normal course of preparing
the abutment
with a non-circular cross-section. Likewise, when the underlying abutment is a
post fitted
onto an implant, this requirement is met by preparing the post with a
noncircular cross-
section. This latter scenario can be more complicated due to the added
connection between
the implant and the abutment.
100031 Typically, a dental implant is implanted into the bone of a
patient's jaw and
comprises a socket, e.g., a bore, which is accessible through the overlying or
surrounding
gum tissue for receiving and supporting one or more attachments or components
which, in
turn, are useful to fabricate and support the prosthodontic restoration.
Dental implant
procedures may use a variety of implanting modalities, for example, blade,
threaded implant,
or smooth push-in implant.
[0004] While numerous design iterations have been marketed, overall
there have been
three generations of the implant-abutment interface within these assemblies:
an external hex
implant, an internal connection implant, and a vertical connection assembly.
The external
hexagonal implant design has a hexagonal shape (or another anti-rotation
feature) protruding
out of the implant and the corresponding abutment has a female hexagonal
receptacle. There
is a surface below the hexagonal protrusion on which the abutment is seated.
The hexagonal
protrusion acts to constrain the abutment from rotating around the
longitudinal axis as well as
preventing movement on the plane coincident with the implant seating surface.
CA 2838676 2018-08-01
CA 02838676 2013-12-05
WO 2013/003408 PCT/US2012/044308
- 2 -
Unfortunately, such an interface has virtually no stability until the screw is
introduced and
fully seated between the abutment and the implant. The screw is essentially
the sole
component resisting bending forces.
[0005] In contrast, the internal connection implant design has a hexagonal
female
member (or other anti-rotation feature) extruded into the implant, and the
corresponding
abutment has a male hexagonal protrusion. The abutment is seated on the same
surface as the
external hexagonal design, the only difference being that the anti-rotation
feature on the
implant is located below this surface. The benefit of this system is that it
has intrinsic
stability without the screw, and then experiences increased stability once the
screw is
introduced and fully seated. The system responds in a more unified manner to
bending
forces. While this system has advantages over the external hex implant, the
disadvantage
(which applies to the external hex as well) is that it is prone to leak at the
implant-abutment
interface (seating surface) due to "lifting" of the abutment under load that
may create an
intermittent gap resulting in bacteria penetration and subsequent crestal bone
loss.
[0006] Another alternative interface is an internal/vertical connection
implant
assembly where the abutment sits "vertically" within the implant assembly and
is supported
by the internal sidewalls. In addition to this vertically interfacing aspect,
many abutments
contain a male anti-rotation feature at the bottom and the corresponding
implants have a
female receptacle (similar to the internal connection implant design). The
main benefits of
this design are that the two components effectively wedge together, creating a
seal
impenetrable to bacteria and the abutment receives added lateral support from
the implant
due to interaction of the abutment sidewalls with the interior surfaces of the
implant.
However, such designs suffer from vertical location variability. The accuracy
of the fit of the
final implant restoration (i.e., crown) is largely dependent on the ability to
reliably transfer
the location of the implant throughout the multiple steps involved in
fabricating the
restoration. The currently marketed vertical connection implant systems are
susceptible to
significant vertical location variability, and subsequent customer
dissatisfaction. Location
variability is undetectable until the very last step in the restorative
process when the patient
receives their restoration where it becomes apparent the restoration is too
high or too low
relative to the original tooth. For example, due to the required manufacturing
tolerances,
each time an abutment (or other male part) is mated with an implant (or other
female part) the
initial vertical position is destined to change. Further, once the parts are
mated and torque is
CA 02838676 2013-12-05
WO 2013/003408 PCT/US2012/044308
- 3 -
applied to the screw attaching the abutment to the implant, there is relative
motion (or vertical
displacement) between the male and female components. The magnitude of this
motion is
dependent on multiple variables, including but not limited to the screw
torque, the surface
finishes, and the component specifications.
[0007] Known vertical implant systems therefore still allow the lateral
movement of
the abutment in relation to the implant thus causing the possibility of
misalignment. It would
be desirable to have an abutment implant interface that eliminates vertical
location
variability. As the vertical connection implant assembly becomes accepted, it
is necessary to
develop a system that maintains the benefits of this type of design, yet
eliminates the known
vertical location variability problem. It would also be desirable for a system
to create seals
between the abutment and implant. The increase in seals in a contemplated
system may
result in adhesion between the implant and the abutment. Therefore it would be
desirable for
a removal system to assist in the removal of an abutment that adheres to an
implant due to an
improved interface.
BRIEF SUMMARY
[0008] An aspect of the present disclosure is an abutment for use in
conjunction with
a dental implant. The abutment includes a stem and a post opposite of the
stem. An interior
bore is formed through the stem and the post. An interface section is formed
between the
post and the stem. The interface section has an annular radially curved
exterior surface
proximate to the post. The annular radially curved exterior surface interfaces
with the dental
implant.
[0009] Another disclosed aspect is a dental implant for use in conjunction
with an
abutment. The implant includes a cylindrical body having an interior bore
formed between a
distal end and a proximal end. An abutment interface is located on the
proximal end of the
cylindrical body. The interface includes a radial annular interior surface
bordering the
interior bore. An anti-rotational cavity is formed in the interior bore
proximal to the
interface.
[0010] Another disclosed aspect is a dental restoration system including an
abutment
and an implant. The implant attaches to a jaw bone of a patient. The implant
includes a
cylindrical body having an interior bore formed between a distal end and a
proximal end. An
abutment interface is located on the proximal end of the cylindrical body. The
interface
includes a radial annular interior surface circumferentially bordering the
interior bore. An
CA 02838676 2013-12-05
WO 2013/003408 PCT/US2012/044308
- 4 -
anti-rotational cavity is formed in the interior bore proximal to the
interface. The abutment
includes a stem and a post opposite the stem. An interior bore is formed
through the stem
and the post. An interface section is located between the post and the stem.
The interface
section has an annular radially curved exterior surface proximate to the post.
The radially
curved exterior surface interfaces with the abutment interface of the dental
implant.
[0011] Another aspect of the disclosure is an abutment for use in
conjunction with a
dental implant. The abutment includes a stem and a post opposite the stem. An
interior bore
is formed through the stem and the post. An interface section is located
between the post and
the stem. The interface section has an exterior surface proximate to the post.
The exterior
surface terminates into a circular flat surface. The post extends from the
circular flat surface.
An annular groove is cut into the circular flat surface to allow compliant fit
of the interface
section with a mating interface surface of the implant.
[0012] Another aspect of the present disclosure is an abutment removal tool
system
for removing an abutment from an implant. The abutment includes an interior
bore extending
therethrough having a groove and an interface in contact with a corresponding
interface on
the implant. An abutment removal insert has a cylindrical end insertable into
a groove
formed in the interior bore of the abutment. An abutment removal tool screw is
insertable
within the abutment removal insert. The abutment removal tool screw includes a
grip end
and an opposite end. The opposite end causes the abutment removal insert to
contact the
abutment. The grip is rotatable to cause the opposite end to create force
against the implant
to cause the abutment to be detached from the implant.
[0013] Another aspect of the present disclosure is an implant driver tool
for imparting
rotational force to a dental implant including an exterior threaded force and
an interior bore
having an anti-rotational cavity and a counter bore. The implant driver tool
includes a shaft
having a proximal end and a distal end including a driver section mateable
with the anti-
rotation cavity of the implant for driving the implant into bone. The implant
driver tool
includes an end attached to the driver section for contact with the counter
bore to hold the
driver tool to the implant. A grip section is coupled to the proximal end of
the shaft.
[0014] The foregoing and additional aspects and implementations of the
present
disclosure will be apparent to those of ordinary skill in the art in view of
the detailed
description of various embodiments and/or aspects, which is made with
reference to the
drawings, a brief description of which is provided next.
CA 02838676 2013-12-05
WO 2013/003408 PCT/US2012/044308
- 5 -
BRIEF DESCRIPTION OF THE DRAWINGS
[0015] The foregoing and other advantages of the present disclosure will
become
apparent upon reading the following detailed description and upon reference to
the drawings.
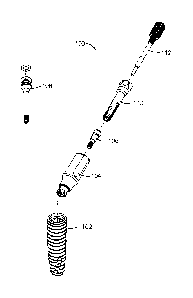
[0016] FIG. 1 is an exploded perspective view of an implant and abutment
dental
restoration system including an implant, an abutment, an insert screw, an
implant driver, a
removal tool, and a removal tool screw;
[0017] FIG. 2A is a perspective view of the dental implant with a vertical
abutment
interface shown in FIG. 1;
[0018] FIG. 2B is a side view of the implant shown in FIG. 2A;
[0019] FIG. 2C is a cross-section side view of the implant shown in FIG.
2A;
[0020] FIG. 2D is a view of the distal end of the implant shown in FIG. 2A;
[0021] FIG. 3A is a perspective view of the abutment with a vertical
implant interface
shown in FIG. 1;
[0022] FIG. 3B is a side view of the abutment shown in FIG. 3A;
[0023] FIG. 3C is a cross-section side view of the abutment shown in FIG.
3A;
[0024] FIG. 3D is a front view of the abutment shown in FIG. 3A;
[0025] FIG. 4A¨B are perspective side cutaway views of the initial contact
and final
contact between abutment and implant in FIG. 1 when seating the abutment in
the implant;
[0026] FIG. 4C-4E are side cutaway views of seating an alternate abutment
in an
alternate implant with a stop member for vertical location;
[0027] FIG. 5A¨C are side cutaway views of the contacts between the abutment
and
implant in FIG. 1 in the process of seating the abutment in the implant;
[0028] FIG. 6A is a perspective view of an alternate design for the
abutment with a
groove in the interface to facilitate fit into an implant;
[0029] FIG. 6B is a side view of the abutment shown in FIG. 6A;
[0030] FIG. 6C is a cross-section side view of the abutment shown in FIG.
6A;
[0031] FIG. 6D is a close up perspective view of the groove on the
alternate design
for the abutment shown in FIG. 6A
[0032] FIG. 7A is a side view of the alternate abutment design in FIG. 6A
in contact
with an implant;
[0033] FIG. 7B is a stress diagram of the abutment in FIG. 6A in contact
with the
implant;
CA 02838676 2013-12-05
WO 2013/003408 PCT/US2012/044308
- 6 -
[0034] FIG. 8A is a perspective view of the implant driver tool shown in
FIG. 1;
[0035] FIG. 8B is a side view of the implant driver tool shown in FIG. 8A;
[0036] FIG. 8C is a close up view of the implant driver tool shown in FIG.
8A
showing the members of the tip;
[0037] FIG. 9A is a perspective view of the abutment removal tool screw
shown in
FIG. 1;
[0038] FIG. 9B is a side view of the abutment removal tool screw shown in
FIG. 9A;
[0039] FIG. 9C is a front view of the abutment removal tool screw shown in
FIG. 9A;
[0040] FIG. 10A is a perspective view of the abutment removal tool insert
shown in
FIG. 1;
[0041] FIG. 10B is a side view of the abutment removal tool insert shown in
FIG.
10A;
[0042] FIG. 10C is a cross-section side view of the abutment removal tool
insert
shown in FIG. 10A;
[0043] FIG. IOD is a front view of the abutment removal tool insert shown
in FIG.
10A;
[0044] FIG. 10E is a back view of the abutment removal tool insert shown in
FIG. 1;
[0045] FIG. 11A¨E are steps of the process of using the abutment removal
tool
implant and implant driver in FIG. 1 in separating the abutment from the
insert;
[0046] FIG. 12A is a perspective view of an alternate implant driver tool
with a
friction fit tapered nose;
[0047] FIG. 12B is a close up view of the implant driver tool shown in FIG.
12A
showing the fiction fit tapered nose of the tip;
[0048] FIG. 12C is a close up view of the implant driver tool shown in FIG.
12A
showing the fit taper nose with a bore;
[0049] FIG. 12D is a front view of the tip of the taper nose in FIG. 12C;
[0050] FIG. 13A is a perspective view of an alternate implant driver tool;
[0051] FIG. 13B is a side view of the implant driver tool shown in FIG.
13A;
[0052] FIG. 13C is a close up view of the implant driver tool shown in FIG.
13A
showing the members of the tip; and
[0053] FIG. 13D is a front cross-section view of the tip of the implant
driver tool
shown in FIG. 13A from the perspective of the lines 13D-13D' in FIG. 13C.
CA 02838676 2013-12-05
WO 2013/003408 PCT/US2012/044308
- 7 -
[0054] While the invention is susceptible to various modifications and
alternative
forms, specific embodiments have been shown by way of example in the drawings
and will
be described in detail herein. It should be understood, however, that the
invention is not
intended to be limited to the particular forms disclosed. Rather, the
invention is to cover all
modifications, equivalents, and alternatives falling within the spirit and
scope of the invention
as defined by the appended claims.
DETAILED DESCRIPTION
[0055] FIG. 1 is an exploded perspective view of the implant and abutment
installation system 100 including an implant 102, an abutment 104, an abutment
screw 106,
and an implant driver tool 108. FIG. 1 also shows a removal system for the
abutment 104
including an abutment removal insert tool 110, and an abutment removal tool
screw 112. The
components shown in FIG. 1 are used in dental restorative processes. As is
known, the
implant 102 is implanted into the bone of a patient's jaw. The implant driver
tool 108 is used
to fix the implant 102 into the bone. The abutment 104 may be a standard part
or customized
to replace the patient's tooth and is attached to the implant 102. The
abutment 104 is fixed to
the implant 102 via the abutment screw 106, which may be installed via a screw
driver tool.
In cases where the abutment 104 must be removed from the implant 102 and
cannot be
readily removed by hand (after the abutment screw 106 is removed), the
abutment removal
insert tool 110 is used in conjunction with the removal tool screw 112 to
remove the
abutment 104 without displacing and or rotating the implant 102.
[0056] The implant 102 is further detailed in FIGs. 2A-2D where FIG. 2A is
a
perspective view of the implant 102, FIG. 2B is a side view of the implant
102, FIG. 2C is a
cross-section side view of the implant 102, and FIG. 2D is a view of the
distal end of the
implant 102. The implant 102 comprises a proximal end 202, a distal end 204
opposite the
proximal end 202 and at least one thread 206 disposed therebetween for
screwing the implant
102 into the bone of a patient. The proximal end 202 includes an interface 208
adapted to
guide the abutment 104 in FIG. 1 when seating the abutment 104 in the implant
102. The
implant 102 also includes an interior bore 210 that extends distally from the
proximal end
202 toward the distal end 204. The interior bore 210 includes a first anti-
rotation cavity 214
and a second anti-rotation cavity 216 distal of the first anti-rotation cavity
214. The interface
208 is concentrically located around the interior bore 210 and is proximal to
the first anti-
rotation cavity 214. A counter bore 212 is formed between the two cavities 214
and 216.
CA 02838676 2013-12-05
WO 2013/003408 PCT/US2012/044308
- 8 -
[0057] As shown in detail in FIG. 2C, the two cavities 214 and 216 are
separate,
distinct and slightly spaced apart, and are connected with a series of
concentric steps
including the counter bore 212. Other arrangements, however, are equally
suitable, such as,
for example, where the cavities are adjacent with a tapered transition, or
spaced apart and
connected by one or more cavities. As will be explained below, the counter
bore 212 is
fabricated at a narrower diameter than the first cavity 214 to assist in
fixing an implant driver
tool such as the implant driver tool 108 in FIG. 1 to the implant 102.
[0058] Focusing on FIGs. 2C and 2D, the first anti-rotation cavity 214 of
implant 102
includes a multi-sided socketed interior surface 220. The socketed interior
surface 220 has a
plurality of obtuse interior angles in a double hexagonal shape, but other
socket shapes may
be used. The second anti-rotation cavity 216 includes a threaded interior
surface 222 that
accepts the abutment screw 106 in FIG. 1.
[0059] For some applications, at least one of the anti-rotation cavities
214 and 216 is
adapted to mate with a conventional driving tool, for example, a tool with a
working end
comprising a square, a pentagon, a hexagon, an octagon, etc. Some tools are
described in
detail such as the implant driver tool 108 shown in detail in FIGs. 8A-8C and
the implant
driver tool 1200 shown in detail in FIGs. 12A-12B. The cavities 214 or 216 may
also be
used to hold the abutment 104. However, the other cavity may be adapted to
mate with an
abutment stem having a predetermined shape other than the cavity that holds
the driving tool.
[0060] The interface 208 is cylindrically shaped having an interior surface
ending in a
radially curved annular inner surface 230 proximate the first anti-rotation
cavity 214. The
annular inner surface 230 transitions to a flat circular vertical stop surface
232 that borders
the first cavity 214. As will be explained below, the radially curved inner
surface 230 and the
vertical stop surface 232 function to guide the abutment 104 and prevent
vertical location
variability of the abutment 104 relative to the implant 102. The contact of
the inner surface
230 and the vertical stop surface 232 of the interface 208 also form seals to
prevent gaps in
the interface between the implant 102 and the abutment 104.
[0061] FIG. 3A-3D are views of the abutment 104 shown in FIG. 1 where FIG.
3A is
a perspective view of the abutment 104, FIG. 3B is a side view of the abutment
104, FIG. 3C
is a cross-section side view of the abutment 104, and FIG. 3D is a front view
of the abutment
104. The abutment 104 comprises a post 302 and a stem 304 extending in a
relative
downward direction from the post 302. The stem 304 includes a locking portion
306 adapted
CA 02838676 2013-12-05
WO 2013/003408 PCT/US2012/044308
- 9 -
to be positioned in the first anti-rotation cavity 214 when the abutment 104
is positioned in
the implant 102. Accordingly, the locking portion 306 has a multi-sided
exterior surface 308
that is adapted to rotationally-lockingly engage the interior multi-sided
socketed surface 220
of the first anti-rotation cavity 214 in FIG. 2C, wherein the abutment 104 is
prevented from
rotating relative to the implant 102.
[0062] The abutment 104 includes a transitional section 310 between the
post 302 and
the stem 304. The transitional section 310 is roughly conical in shape with a
larger end
connected to the post 302 and an opposite smaller end connected to the stem
304. The
smaller end of the transitional section 310 mates with the interface 208 of
the implant 102 in
FIGs. 2A-2D. The transitional section 310 includes an outer surface that has a
curved shape
from the larger end with the larger diameter closest to the post 302 to the
opposite end with a
smaller diameter connected to the stem 304. A radially shaped annular outer
surface 320
terminates at the smaller end of the transitional section 310. The outer
surface 320 forms a
circular vertical stop surface 322 forming the bottom of the transitional
section 310 from
which the stem 304 protrudes. The circular vertical stop surface 322 includes
a circular
groove 324 that is cut into the transitional section 310. The circular groove
324 in this
example is cut to a depth of approximately 0.012 inches. The circular groove
324 may be cut
to a depth of 0.010 to 0.020 inches or deeper or shallower if desired.
[0063] In the abutment 104, a through-bore 326 extends through the post
302, the
stem 304, and the transitional section 310 to allow the abutment screw 106
shown in FIG. 1
to be inserted therein. The abutment screw 106 is inserted into the through-
bore 326 in the
abutment 104 to threadably engage the threads of the interior surface 222 of
the implant 102
as shown in FIG. 2C. The through-bore 326 also includes a groove 328 that is
formed to
roughly mate with the abutment removal insert tool 110 as will be explained
below.
[0064] In FIG. 1, the abutment screw 106 includes a screw head adapted to
mate with
a driving tool (not shown) with a screw head such as an Allen wrench, a square
driver, a flat
head screwdriver, a Phillips screwdriver, etc. After the abutment 104 is
placed in the
implant102, the abutment screw 106 is inserted in the through-bore 326 of the
abutment 104
and the cavity 216 of the implant 102. The driving tool is used to tighten the
abutment screw
106 by engaging the threaded interior surface 222 of the cavity 216. After the
abutment
screw 106 threadably engages the implant 102, the abutment screw 106 acts to
retain the
abutment 104 in the implant 102.
CA 02838676 2013-12-05
WO 2013/003408 PCT/US2012/044308
- 10 -
[0065] The combination of the radially shaped annular outer surface 320 and
the
vertical stop surface 322 allows for a seal between abutment 104 and the
implant 102. The
vertical stop surface 322 prevents vertical location variability of the
abutment 104 relative to
the implant 102. The insertion of the abutment 104 in the implant 102 may be
shown with
reference to FIGs. 4A-4B and 5A-5C. FIGs. 4A-4B are perspective side cutaway
views of
the initial contact and final contact between abutment 104 and implant 102 in
FIG. 1 while
FIG. 5A¨C are side cutaway views of the contacts between the abutment 104 and
implant 102
in the process of locating the abutment 104 on the implant 102. For
convenience of
illustration, the groove 324 has been omitted from FIGs. 4A-4B and FIG. 5C. As
shown in
FIG. 4A and 5A, the radially shaped outer surface 320 is inserted into the
interface 208 of the
implant 102 when the stem 304 is inserted in the cavity 214. The radially
shaped outer
surface 320 initially contacts the radially curved inner surface 230 of the
interface 208. The
abutment 104 is inserted into the implant 102 until the vertical stop surface
322 contacts the
flat vertical stop surface 232 bordering the cavity 214 as shown in FIGs. 4B
and 5B.
[0066] The radial interface 322 and the vertical stop surface 232 eliminate
location
variability from abutment 104 being seated in the implant 102. As may be seen
in FIGs. 4
and 5, the vertical stop surface 232 of the implant 102 is connected to the
radially curved
inner surface 230. All the components in the restorative process requiring
vertical location
control use the vertical stop surface 232 for vertical location, so there is
no error accumulated
throughout the restorative process using the implant 102 and the abutment 104.
During the
restorative process involving the fabrication of the abutment 104, there is no
contact with the
radially curved sidewalls of the surface 320 for certain components because no
seal is
required. This is achieved in intermediate steps of the restorative process
for these
components by removing the radial interface on intermediate components such as
the
impression coping and the implant analog, thus ensuring that the abutment 104
contacts the
vertical stop in the final assembly and prevent distortions from sidewall
contact when using
the intermediate components. Thus, the radially curved inner surface 230 of
the implant 102
interfaces with the radially shaped outer surface 320 of the abutment 104, but
the vertical
position of the finish location is controlled by the radial interface 322 in
contact with the
vertical stop surface 232. This interface results in a first radial seal on
the radially shaped
outer surface 320 of the abutment 104 in contact with the radially curved
inner surface 230 of
the implant 102 as shown in FIG. 5C. A second horizontal seal on the bottom of
the
CA 02838676 2013-12-05
WO 2013/003408 PCT/US2012/044308
- 11 -
transitional section 310 is formed via the contact of the radial interface 322
of the abutment
104 with the vertical stop surface 232 of the implant 102.
[0067] The radial interface 322 and the vertical stop surface 232 shown in
FIG. 4A-
4B and FIG. 5A-5C may be used with non-curved interfaces. FIG. 4C shows an
implant 400
with a standard conical interface having a vertical stop surface 402
contacting an abutment
450. FIG. 4D is a close up view of the interface between the implant 400 and
the abutment
450 prior to connection of the components while FIG. 4E is a close up view of
the interface
between the implant 400 and the abutment 450 when a seal has been established.
The
abutment 450 has a radial interface 452 that provides contact with the
vertical stop surface
402. The vertical stop surface 402 eliminates location variability from the
abutment 450
being seated in the implant 400. In this example, the abutment 450 has a
standard conical
interface surface 454 while the implant has a conical inner surface 404. As
may be seen in
FIGs. 4C and 4E, the vertical stop surface 402 of the implant 400 is connected
to the conical
inner surface 404. All the components in the restorative process requiring
vertical location
control use the vertical stop surface 402 for vertical location, so there is
no error accumulated
throughout the restorative process using the implant 400 and the abutment 450.
During the
restorative process involving the fabrication of the abutment 450, there is no
contact with the
conical surface 454 for certain components because no seal is required. This
is achieved in
intermediate steps of the restorative process for these components by removing
the radial
interface on intermediate components such as the impression coping and the
implant analog,
thus ensuring that the abutment 450 contacts the vertical stop surface 402 of
the implant 400
in the final assembly and prevent distortions from sidewall contact when using
the
intermediate components. Thus, the conical inner surface 402 of the implant
400 interfaces
with the conical surface 454 of the abutment 450, but the vertical position of
the finish
location is controlled by the vertical stop 402. A seal on the bottom of the
transitional section
of the abutment 450 is formed via the contact of the radial interface 452 of
the abutment 450
with the vertical stop surface 402 of the implant 400. In this example, the
angle of the
conical inner surface 402 of the implant 400 is approximately 16 degrees while
the angle of
conical surface 454 of the abutment 450 is approximately 20 degrees. The
lateral forces are
concentrated at the top edge of the implant 400 on the conical inner surface
404 in order to
aid in seating the abutment 450 in the implant 400. The contact between the
conical inner
CA 02838676 2013-12-05
WO 2013/003408 PCT/US2012/044308
- 12 -
surface 404 and the conical interface surface 454 also create another seal in
addition to the
seal between the radial interface 452 against the vertical stop surface 402.
[0068] A further benefit of better compliance is realized via the groove
324 on the
abutment 104 shown in detail in FIGs. 3A-3D. The groove 324 allows a more
compliant
interface of the abutment 104 with the implant 102. Due to the groove 324, the
interface
formed by the radially curved surface 320 of the transitional section 310 has
built in
flexibility to compress into the groove 324 to allow the radially curved
surface 320 to better
conform to the radially curved inner surface 230 of the implant 102 and in
turn increase the
seal contact area between the abutment 104 and the implant 102. This
flexibility is achieved
by removing material from the cross-section of transitional section 310 of the
abutment 104
to form the groove 324. Further, because the abutment 104 is compliant with
the implant
102, the design may be manufactured more robustly, as the system will work
under a wider
range of tolerance configurations.
[0069] The use of a groove such as the groove 324 shown in FIG. 3A¨D in the
interface of the abutment 104 may be used with conventional interfaces for
vertical implant
connection of abutments to any implant similar to the implant 102 in FIG. 1.
For example,
FIGs. 6A-6D are views of an abutment 600 having a conventional conical tapered
interface
but using the groove feature. FIG. 6A is a perspective view for the abutment
600 with a
groove into the interface to the implant, FIG. 6B is a side view of the
abutment 600 shown in
FIG. 6A, FIG. 6C is a cross-section side view of the abutment 600 shown in
FIG. 6A, and
FIG. 6D is a close up perspective view of the groove on the alternate design
for the abutment
600 shown in FIG. 6A.
[0070] The abutment 600 comprises a post 602 and a stem 604 extending in a
relative
downward direction from the post 602. The stem 604 includes a locking portion
606 adapted
to be positioned in the first anti-rotation cavity 214 of the implant 102 when
the abutment 104
is positioned in the implant 102. The locking portion 606 has a multi-sided
exterior surface
608 that is adapted to rotationally-lockingly engage an interior multi-sided
socketed surface
such as the surface 220 of the first anti-rotation cavity 214 in FIG. 2C,
wherein the abutment
600 is prevented from rotating relative to the implant.
[0071] The abutment 600 includes a transitional section 610 between the
post 602 and
the stem 604. The transitional section 610 mates with an exterior surface of
the implant. The
transitional section 610 includes an outer surface that generally slopes from
a greater
CA 02838676 2013-12-05
WO 2013/003408 PCT/US2012/044308
- 13 -
diameter closest to the post 602 to a smaller diameter close to the stem 604.
A conically
shaped outer surface 620 terminates into a circular vertical stop surface 622.
The circular
vertical stop surface 622 includes a circular groove 624. The circular groove
624 permits
built in flexibility to allow the abutment 600 to better conform to the
corresponding shaped
inner surface of the implant and in turn increase the seal contact area
between the abutment
600 and the implant.
[0072] FIG. 7A is a side view of the abutment 600 in FIG. 6A in contact
with an
implant 700 and FIG. 7B is a stress diagram of the abutment 600 in contact
with the implant
700. In this example, the implant 700 is similar to the implant 102, except
that the implant
700 has a conventional conical interface surface 702. As may be seen in FIGs.
7A and 7B, a
further benefit of better compliance is realized via the groove 624 on the
abutment 600 which
has a conventional conical interface surface 610. The inset portion of FIG. 7A
is an extreme
close up of the groove 624 cut into the transitional section 610. The groove
624 allows a
more compliant interface of the abutment 600 with the implant 700. Due to the
groove 624,
the interface formed by the conically shaped outer surface 620 of the
transitional section 610
has built in flexibility to compress into the groove 624 to allow the
conically shaped outer
surface 620 to better conform to the conically sloped interface inner surface
702 of the
implant 700 and in turn increase the seal contact area between the abutment
600 and the
implant 700. This flexibility is achieved by removing material from the cross-
section of
transitional section 610 of the abutment 600 to form the groove 624. Further,
because the
abutment is compliant with the implant 700, the design may be manufactured
more robustly,
as the system will work under a wider range of tolerance configurations. FIG.
7B shows
compressive areas of stress 710 which are compressed from the conical sidewall
702 of the
implant 700 pushing into the conically shaped outer surface 620 of the
abutment 600.
[0073] FIG. 8A is a perspective view of the implant driver tool 108 shown
in FIG. 1
and FIG. 8B is a side view of the implant driver tool 108. The implant driver
tool 108 is
adapted to mate with the first anti-rotation cavity 214 of the implant 102.
When the implant
driver tool 108 is mated with the implant 102, the driver tool 108 may be
rotated to drive the
threaded exterior surface 206 of the implant 102 into the bone. The implant
driver tool 108
includes a first end 800 and a working end 802 that is adapted to fit within
the bore 210 of the
implant 102 in FIG. 2C. The first end 800 is a grip section that includes a
wrench interface
804 that is spaced from a conical transition section 806 to form an annular
groove 808. A
CA 02838676 2013-12-05
WO 2013/003408 PCT/US2012/044308
- 14 -
resilient ring, such as an 0-ring 810, is seated in the annular groove 808 to
help retain the
implant driver tool 108 in proper engagement with a torque wrench. The implant
driver tool
108 has a shaft 812 having a proximal end coupled to the grip section of the
first end 800 and
a distal end that forms the working end 802. The distal end of the shaft 812
includes a
hexagonal male geometry driver section 820 adapted to mate with the socketed
interior
surface 220 of the anti-rotation cavity 214 of the implant 102. The contact
between the driver
section 820 and the socketed interior surface 220 of the implant 102 allows
the transition of
torque force from the driver tool 108 to the implant 102.
[0074] The wrench interface 804 of the implant driver tool 108 in this
example has a
four sided exterior surface to interface with a torque wrench that may be used
to provide
torque to turn the implant driver tool 108 and thereby the implant 102 to
engage the threads
on the exterior surface 206 with the bone to seat the implant 102. In order to
maintain sterile
conditions, the implant 102 is generally packed in a sterile package. The
driver section 820
includes an end that is inserted in the bore 210 of the implant 102 to allow a
user to hold the
combined driver tool 108 and attached implant 102. The user may therefore use
the implant
driver tool 108 to move the implant 102 into the desired location in the bone
without
contacting the implant 102. FIG. 8C is a close up view of the end of the
driver section 820 of
the implant driver tool 108 shown in FIG. 8A showing a series of
circumferential tips 822
extending from the exterior edge of the driving portion 820 of the working end
802. The
diameter of the tips 822 in FIG. 8C are aligned with the counter bore 212 in
the implant 102
to provide frictional contact thereby fixing the driver tool 108 to the
implant 102.
[0075] The seal created by the interface 208 of the implant 102 with the
abutment 104
creates the possibility of binding the abutment 104 to the implant 102 once
assembled. In
certain circumstances, such as replacement due to damage to the restoration,
the abutment
104 requires removal from the implant 102. In some cases, the abutment 104
adheres to the
implant 102 due to the sealing surfaces of the interface and cannot be removed
manually.
The abutment removal tool components 110 and 112 may then be used to insure
that the
abutment 104 may be removed without damaging or displacing the implant 102 if
the
abutment 104 remains adhered to the implant 102. As will be explained below,
the abutment
removal tool screw 112 is used in conjunction with the abutment removal insert
tool 110 to
engage the groove 328 within the through bore 326 of the abutment 104 as shown
in FIG. 2C.
The abutment removal tool screw 112 forces the abutment removal insert tool
110 into the
CA 02838676 2013-12-05
WO 2013/003408 PCT/US2012/044308
- 15 -
groove 328 in the bore 326 of the abutment 104. The abutment removal tool
insert 110 is
prevented from rotating by securing the insert 110 by a wrench that causes the
screw 112 to
push against the bottom of the inside of the implant 102 when the abutment
removal tool
screw 112 is turned. The resulting downward force applied by the screw 112
against the
implant 102 frees the abutment 104 from the implant 102.
[0076] The abutment removal tool screw 112 is shown in FIGs. 9A-9C where
FIG.
9A is a perspective view of the abutment removal tool screw 112, FIG. 9B is a
side view of
the abutment removal tool screw 112, and FIG. 9C is a front view of the
abutment removal
tool screw 112. The abutment removal tool screw 112 includes a proximal end
902 and a
distal end 904. The proximal end 902 includes a grip section 906 that includes
a ridged outer
surface that allows a grip for turning the abutment removal tool screw 112.
The grip section
906 may also be mated with a torque imparting tool such as a wrench to turn
the abutment
removal tool screw 112. The grip section 906 is connected to a thread section
908 that
includes exterior threads 910 that may be engaged with a threaded interior
surface of the
abutment removal insert tool 110 shown in FIGs. 10A-10E. The thread section
908 is
connected to a shaft 912 that extends to the distal end 904.
[0077] FIGs. 10A-10E show the abutment removal insert tool 110 where FIG.
10A is
a perspective view of the abutment removal insert tool 110, FIG. 10B is a side
view of the
abutment removal insert tool 110, FIG. 10C is a cross-section side view of the
abutment
removal insert tool 110 along the line 10C-10C' in FIG. 10B, FIG. 10D is a
front view of the
abutment removal insert tool 110, and FIG. 10E is a back view of the abutment
removal
insert tool 110. The abutment removal insert tool 110 includes a distal end
1000 and a
proximal end 1002. A multi-sided interface 1004 is formed on the distal end
1000 to provide
an interface for a wrench. A cylinder 1006 extends from the distal end 1000 to
the proximal
end 1002. The cylinder 1006 forms an interior bore 1008. Two long notches 1010
are cut
from the proximal end 1002 and two short notches 1012 are cut from the
proximal end 1002
over part of the length of the cylinder 1006. An annular protrusion 1014
extends out from the
cylinder 1006 at the members formed by the notches 1010 and 1012. The end of
the interior
bore 1008 on the proximal end 1002 includes an interior threaded surface 1020.
[0078] The process of removing the abutment 104 from the implant 102 using
the
abutment removal tool screw 112 and the abutment removal insert tool 110 is
shown in FIGs.
11A-11E. FIG. 11A shows the abutment 104 and the implant 102 prior to
connecting the
CA 02838676 2013-12-05
WO 2013/003408 PCT/US2012/044308
- 16 -
abutment 104 to the implant 102 via the screw 106. FIG. 11B shows the abutment
104 has
been assembled to the implant 102 with an abutment screw 106. If it is desired
to remove the
abutment 104, the abutment screw 106 is removed with a driver tool such as a
screwdriver.
After the abutment screw 106 is removed, the abutment 104 is stuck to the
implant 102 due to
excessive side contact and/or interference from the interface described above
with reference
to FIGs. 4 and 5. As explained above, the abutment removal insert tool 110 in
conjunction
with the abutment removal tool screw 112 are used to remove the abutment 104
from the
implant 102.
[0079] FIG. 11C shows the placement of the abutment removal insert tool 110
in the
abutment 104. The protrusions 1014 at the distal end 1000 of the abutment
removal insert
tool 110 shown in FIG. 10A engage the groove 328 within the through-bore 326
of the
abutment 104 shown in FIG. 3C. The abutment removal tool screw 112 is inserted
in the
interior bore 1008 of the abutment removal insert tool 110 and through the
through-bore 326
of the abutment 104. The insertion of the abutment removal tool screw 112 in
the interior
bore 1008 of the abutment removal insert tool 110 forces the protrusions 1014
against the
groove 328 thereby fixing the abutment removal insert tool 110 to the abutment
104.
[0080] FIG. 11D shows the resulting placement of the abutment removal tool
screw
112 into the abutment removal insert tool 110. The exterior threads 910 of the
thread section
908 engage the interior threaded surface 1020 of the abutment removal insert
tool 110. The
distal end 1000 of the removal tool screw 112 is inserted through the interior
bore 1008 of the
abutment removal insert tool 110 to the implant 102.
[0081] FIG. 11E shows the abutment removal insert tool 110 held with a
wrench 1100
so that it and/or the implant 102 cannot rotate. A user then may grip the grip
section 906 of
the abutment removal tool screw 112 to turn the abutment removal tool screw
112. The distal
end 1000 of the abutment removal tool screw 112 will contact the internal
aspect of the
implant 102. The resulting contact to the implant 102 will then apply a
vertical force to the
abutment 104 in relation to the implant 102 as further torque is applied to
the abutment
removal tool screw 112 translated through the thread section 908 to the
interior threaded
surface 1020 of the abutment removal insert tool 110. The abutment removal
tool screw 112
is turned until the abutment 104 is freed from the implant 102.
[0082] Alternate designs may be made for each of the components shown in FIG.
1.
For example, a different shaped driver tool may be used for the driver tool
108 such as the
CA 02838676 2013-12-05
WO 2013/003408 PCT/US2012/044308
- 17 -
driver tool 1200 shown in FIGs. 12A and 12B, where FIG. 12A is a perspective
view of the
implant driver tool 1200 and FIG. 12B is a close up view of the implant driver
tool 1200
shown in FIG. 12A. The implant driver tool 108 includes a first end 1202 and a
working end
1204 that is adapted to fit within the bore 210 of the implant 102. The first
end 1202 includes
a wrench interface 1206 that is spaced from a shaft 1208 to form an annular
groove 1210. A
resilient ring, such as an 0-ring (not shown) is seated in the annular groove
1210 to help
retain the implant driver tool 1200 in proper engagement with a torque wrench.
The working
end 1204 of the implant driver tool 1200 has a hexagonal male geometry driving
portion
1220 adapted to mate with the socketed interior surface 220 of the anti-
rotation cavity 214 of
the implant 102.
[0083] FIG. 12B is a close up view of the implant driver tool 1200 shown in
FIG.
12A showing a friction fit tapered nose 1222 that replaces the tips 822 shown
in FIG. 8C.
The tapered nose 1222 fits within the counter bore 212 of the implant 102 and
serves to hold
the implant driver tool 1200 to the implant 102 to allow a user to manipulate
the implant 102
while maintaining sterility of the implant 102. The advantage of the shape of
the tapered
nose 1222 is ease of manufacture of the implant driver tool 108.
[0084] The implant driver tool 1200 shown in FIGs. 12A-12B may have
alternative
features of the tip to engage the implant to provide torque to the implant
102. An alternative
tapered nose section 1250 is shown FIG. 12C which is a close up view of the
tapered nose
1250 of the implant driver tool shown in FIG. 12A and FIG. 12D is a front view
of the tip of
the alternate tip configuration in FIG. 12C. Like elements are labeled with
like element
numbers in FIGs. 12C and 12D. The working end 1204 of the implant driver tool
has a
hexagonal male geometry driving portion 1220 adapted to mate with the socketed
interior
surface 220 of the anti-rotation cavity 214 of the implant 102. The
alternative tapered nose
1250 has a circular bore 1252 as shown in FIG. 12D. The circular bore 1252
provides a
reduction of the cross-sectional moment of inertia and reduces the stifffiess
of the tapered
nose 1250 to decrease excessive contact between the tip and the implant 102.
[0085] FIG. 13A is a perspective view of an alternative implant driver tool
1300 that
may be used instead of the implant driver tool 108 shown in FIG. 1. FIG. 13B
is a side view
of the implant driver tool 1300. The implant driver tool 1300 is adapted to
mate with an anti-
rotation cavity in an implant. When the implant driver tool 1300 is mated with
the implant,
the driver tool 1300 may be rotated to drive a threaded exterior surface of
the implant into the
CA 02838676 2013-12-05
WO 2013/003408 PCT/US2012/044308
- 18 -
bone. The implant driver tool 1300 includes a first end 1310 and a working end
1312 that is
adapted to fit within the bore of an implant. The first end 1310 is a grip
section that includes
a wrench interface 1314 that is spaced from a conical transition section 1316
to form an
annular groove 1318. A resilient ring, such as an 0-ring 1320, is seated in
the annular groove
1318 to help retain the implant driver tool 1300 in proper engagement with a
torque wrench.
The implant driver tool 1300 has a shaft 1322 having a proximal end coupled to
the grip
section of the first end 1310 and a distal end that forms the working end
1312. The distal end
of the shaft 1322 includes a hexagonal male geometry driver section 1330
adapted to mate
with a socketed interior surface of the anti-rotation cavity of the implant.
The contact
between the driver section 1330 and the socketed interior surface of the
implant allows the
transition of torque force from the driver tool 1300 to the implant.
[0086] The wrench interface 1314 of the implant driver tool 1300 in this
example has
a four sided exterior surface to interface with a torque wrench that may be
used to provide
torque to turn the implant driver tool 1300 and thereby the implant to engage
the threads on
the exterior surface with the bone to scat the implant. In order to maintain
sterile conditions,
the implant is generally packed in a sterile package. The driver section 1330
includes an end
that is inserted in the bore of the implant to allow a user to hold the
combined driver tool
1300 and attached implant. The user may therefore use the implant driver tool
1300 to move
the implant into the desired location in the bone without contacting the
implant.
[0087] FIG. 13C is a close up view of the end of the driver section 1330 of
the
implant driver tool 1300 shown in FIG. 13B. FIG. 13D is a close up front view
of the driver
section 1330 along the line 13D-13D' in FIG. 13C. The driver section 1330 has
six tabs 1332
that extend out from the body of the driver section 1330. The six tabs 1332
are formed
between sidewalls 1334 that contact similar surfaces in the socketed interior
surface of the
implant to connect the driver 1300 with the implant. The tabs 1332 are
inserted in slots that
arc formed on the socket interior surface that provide additional contact
between the driver
1300 and the implant. The driver section 1330 therefore has six points of
contact in the form
of the sidewalls 1334 as well as additional contacts from the six tabs 1332
contacting
corresponding slots in the socket portion of the implant.
[0088] While particular implementations and applications of the present
disclosure
have been illustrated and described, it is to be understood that the present
disclosure is not
limited to the precise construction and compositions disclosed herein and that
various
CA 02838676 2013-12-05
WO 2013/003408 PCT/US2012/044308
- 19 -
modifications, changes, and variations can be apparent from the foregoing
descriptions
without departing from the spirit and scope of the invention as defined in the
appended
claims.