Note: Descriptions are shown in the official language in which they were submitted.
CA 02873697 2016-05-10
CAMERA DOLLY
BACKGROUND OF THE INVENTION
[0002] Video, television, and motion picture cameras must often be
positioned in a
particular way for a video or film sequence. The camera must also move to
follow an
action sequence or obtain a desired cinematographic effect. Generally, all
movement of
the camera must be uniform and smooth without any bumping, rocking, tilting,
vibration
io or other movement that will cause the recorded images to jump when
viewed on a
screen. A camera dolly or camera dolly is used to provide smooth camera
movement.
[0003] Conventional camera dollies and pedestals have steering systems
which
positively steer the wheels of the dolly via the operator turning a steering
bar or handle.
Steering and positioning the dolly may be challenging, even for an experienced
operator, because precise positioning and timing is often required. Many
camera dollies
having a steering transmission which allows the dolly to be steered in either
a crab
mode or a corrective mode. The ability to shift between steering modes can
help the
camera dolly operator move the dolly as desired. Still, improved camera
dollies are
needed and engineering design challenges remain in designing camera dollies.
CA 02873697 2014-12-05
BRIEF DESCRIPTION OF THE DRAWINGS
[0004] In the drawings the same element number indicates the same
element in
each of the views.
[0005] Fig. 1 is a perspective view of a camera dolly.
[0006] Fig. 2 is a perspective view of the base of the camera dolly of Fig.
1 shown
separately.
[0007] Fig. 3 is a side view of the column of the camera dolly of Fig.
1 shown
separately.
[0008] Fig. 4 is an exploded perspective view of the base shown in
Fig. 2, with the
to steering chains removed for clarity of illustration.
[0009] Fig. 5 is a perspective view of one of the leg assemblies of
the base as
shown in Fig. 4.
[0010] Fig. 6 is a side view of the leg assembly of Fig. 5 in the
caster position, with
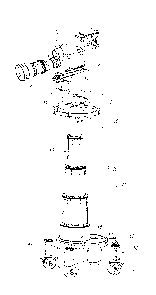
components omitted for purpose of illustration.
[0011] Fig. 7 is a perspective view of the leg assembly shown in Fig. 6.
[0012] Fig. 8 is a side view of the leg assembly of Fig. 5 in the
steer position, with
components omitted for purpose of illustration.
[0013] Fig 9 is a perspective view of the leg assembly shown in Fig.
8.
[0014] Fig. 10 is an exploded perspective view of the entire leg
assembly shown in
Fig. 5.
[0015] Fig. Ills an exploded perspective view of the leg assembly
shown in Fig.
10 with the axle frame separated from the riser, and with components omitted,
for
purpose of illustration.
- 2
CA 02873697 2014-12-05
A
[0016] Fig. 12 is a perspective view of the cam lock shown in Figs.
1, 2, 5 and 10.
[0017] Fig. 13 is a perspective view of the steering transmission
shown in Fig. 4.
[0018] Fig. 14 is an exploded perspective view of the steering
transmission shown
in Fig. 13.
[0019] Fig. 15 is a perspective view of the top sprocket assembly shown in
Fig. 14.
[0020] Fig. 16 is an exploded perspective view of the top sprocket
assembly
shown in Fig. 15.
[0021] Fig. 17 is a perspective view of the middle sprocket assembly
shown in Fig.
14.
to [0022] Fig. 18 is an exploded perspective view of the middle sprocket
assembly
shown in Fig. 17.
[0023] Fig. 19 is a top perspective view of the bottom sprocket
assembly shown in
Fig. 14.
[0024] Fig. 20 is a bottom perspective view of the bottom sprocket
assembly
is shown in Figs. 14 and 19.
[0025] Fig. 21 is an exploded perspective view of the bottom sprocket
assembly
shown in Figs. 19 and 20.
[0026] Fig. 22 is a top perspective view of the differential shown in
Fig. 14.
[0027] Fig. 23 is a bottom perspective view of the differential shown
in Figs. 14 and
20 22.
[0028] Fig. 24 is an exploded perspective view of the differential
shown in Fig. 14,
22 and 23.
- 3 -
CA 02873697 2014-12-05
[0029] Fig. 25 is top, rear and right side view of the base shown in
Figs. 2 and 4,
with components removed for clarity of illustration.
[0030] Fig. 26 is top, front and left side view of the base shown in
Figs. 2 and 4,
with components removed for clarity of illustration.
[0031] Fig. 27 is a perspective view of an alternative dolly design.
[0032] Fig. 28 is a partial section view of the steering handle and
transmission of
the dolly shown in Fig. 27.
[0033] Fig. 29 is a perspective view of the steering transmission of
the dolly shown
in Figs. 27-28.
lc, [0034] Fig. 30 is an enlarge section view of the steering handle
and steering
transmission shown in Fig. 28.
[0035] Fig. 31 is an exploded perspective view of the steering
transmission shown
in Figs. 28-30.
[0036] Fig. 32 is an exploded perspective view of an alternative
handle which may
be used with the dolly shown in Figs. 1-31.
[0037] Fig. 33 is an assembled perspective view of the handle shown in
Fig. 32.
[0038] Fig. 34 an enlarged perspective view of components of the
handle shown in
Figs. 32 and 33.
[0039] Fig. 35 is an enlarged perspective view of internal components
of the
handle shown in Figs. 32 and 33.
[0040] Fig. 36 is an exploded perspective view of a tracking or push
bar.
[0041] Fig. 37 is an enlarged perspective view of the pin fitting on
the push bar
shown in Fig. 36.
- 4 -
CA 02873697 2016-05-10
[0042] Fig. 38 is a perspective view of an adjustable height steering
handle.
[0043] Fig. 39 is an exploded side view of the steering handle shown
in Fig. 38.
[0044] Fig. 40 is a perspective view of components of the steering
handle shown in
Figs. 39 and 40.
[0045] Fig. 41 is a side view of the shift rod shown in Fig. 39.
[0046] Fig. 42 is an exploded side view of the shift rod assembly
shown in Fig. 39.
[0047] Fig. 43 is a perspective view of the shift frame shown in Fig.
38.
[0048] Fig. 44 is a perspective view of the slide lock shown in Fig.
38.
[0049] Fig. 45 is a perspective view of a lower end of a leg of the
push bar shown
in Fig. 36 and a received tube on a dolly chassis.
DETAILED DESCRIPTION OF THE DRAWINGS
[0050] As shown in Fig. 1, a camera dolly 30 includes a base 50 which
rolls on
wheels . A telescoping column 44 may be removably supported on or in the base
50,
with a tank 48 at the lower end of the column 44 positioned within a ring 60
of the base
50. The column may be provided as described in U.S. Patent Nos. 5,197,700;
5,516,070 or 5,820,088. Similarly, various alternative telescoping columns,
including
electrically powered and mechanically weight compensated columns may be used.
The
base 50 may alternatively be used with a fixed height column or riser, for
example with
the base 50 having a flat closed top deck with no ring 60. That is the base 50
may
alternatively be used as a camera dolly, with a boom arm, seating accessories,
etc.
[0051] In a typical set up as shown in Fig. 1, a swing head 32 is
mounted on the
column platform 46. A pan-tilt head 34 is attached onto the swing head 32, and
a
- 5 -
CA 02873697 2014-12-05
camera 36 having a lens 38 is attached to the pan-tilt head 34. Of course the
type of
heads used on the dolly, if any, will vary depending the on use contemplated.
[0052] Fig. 2 shows the base 50 with the column 44 removed. As shown
in Fig. 3
the column 44 may be removed from the base 50 and used alone. The base 50
modified to cover or omit the central opening within the ring 60, may also be
used alone,
or used apart from any column.
[0053] Referring to Fig. 4, the base 50 may be constructed with a top
plate 80
supported on sprocket housings 90 position near the corners of a bottom plate
82, with
side plates 84, a rear plate 88 and a front plate 86 forming an enclosed
chassis 58. As
lo shown in Fig. 2, the outside cylindrical surface of each of the sprocket
housings 90 may
have relieved sections or slots to allow the plates 84, 86 and 88 to fit near
flush, with the
sprocket housings 90 providing structural attachment for the plates 84, 86 and
88, as
well as for the top and bottom plates. Each of the four sprocket housings 90
may have
the same design, except for the positions of the chain slots 92 further
described below.
[0054] Turning now to Figs. 4-11, a leg assembly 96 is provided near each
corner
of the chassis 58. As shown in Fig. 11, each leg assembly 96 may include a
riser 108
having an externally threaded upper end, optionally with a key way 122 in the
inner
cylindrical wall of the riser 108. The riser may be joined to a cup 110. An
axle frame
124 has a disk 126 rotatably positioned within the cup 110, with an offset arm
128
joined to the bottom side of the disk 126, at an off center position. Axles
130 on the arm
128 may extend down at a slight angle. Each leg assembly 96 is rotatable about
a
steering axis SA extending centrally and vertically through the leg assembly
96.
- 6 -
CA 02873697 2014-12-05
[0055] Referring still to Fig. 11, a retainer ring 134 and bolts 138
may retain the
disk 126 within the cup 110. A fastener, such a pin or bolt may be used to
temporarily
allow rotational movement between the axle frame and the riser, to shift
between
normal and caster mode configurations. The drawings show a thumbscrew 140
threaded into one side of the cup 110 for this purpose. When the thumbscrew
140 is
loosened, the axle frame 124 can be rotated within the cup 110, to change the
alignment between the riser 108 and the offset arm 128.
[0056] As shown in Fig. 11, a hardened axle sleeve 132 may be pressed
onto
each axle 130, with a wheel 148 mounted on inner and outer bearings 144 and
146 on
io the axle 130. ' A wheel bolt 152 and cap 150 may be used to secure the
wheel 148 in
place. As shown in Fig. 10, a brake assembly 160 may be provided on each leg
assembly 96, or more typically on the rear left and rear right leg assemblies.
If used,
the brake assembly 160 may be provided with a brake arm 162 pivotally attached
to the
axle frame 124, with a spring 166 pushing the brake arm 162 up and away from
the
wheels 148. A brake lever 170 having a cam surface is pivotally attached to
the head of
a bolt 164 via a pin 164, with the bolt 164 threaded into the axle frame 124.
With the
lever 170 in the up position, the spring 166 holds the arm 162 up and out of
contact with
the inner surface 154 of the wheels 148, so that the wheels roll freely. The
brake is
actuated by pushing the lever 170 down causing the bottom surface of the lever
170 to
forcibly contact the inner surface 154 of the wheel 148, preventing the wheel
from
rolling. The lever 170 may be foot-operated.
[0057] Referring to Figs. 5, 10 and 12, a lower bearing 112, a sleeve
114, a leg
sprocket 104, an upper bearing 116 and a pressure plate 118 are provided on
the riser
- 7 -
CA 02873697 2014-12-05
108. During assembly a cam lock 120 is threaded down onto the top end of the
riser
108 to a position where it securely holds together the components on the riser
108. A
cross bolt 142 is then tightened clamping the split collar of the cam lock 120
onto the
riser 108. Referring to Fig. 10, with the tabs or levers 156 of the cam lock
120 in the
down position, the cam lock 120 presses the pressure plate 118 down clamping
the
inner races of the bearings 112 and 116 against the sprocket 104, locking the
sprocket
104 to the riser 108. Turning movement of the sprocket 104 then necessarily
rotates
the entire leg assembly 96 during use. With the levers 156 in the up position,
the
sprocket 104 is released, allowing the leg assembly 96 to rotate independently
of the
to sprocket 104.
[0058] The four leg assemblies 96 may have the same design, except for
the
vertical position of the leg sprocket, and with the rear leg assemblies also
shown with
brakes 160. Although wheel pairs are shown in the drawings, the base may also
be
designed with a single wheel on each leg assembly. As used here, wheel set
means a
single wheel or dual wheels as shown. Fig. 5 shows the rear left leg assembly
having
leg sprocket 104. The other leg sprockets are the rear right sprocket 106 on
the rear
right leg assembly, the front leg sprockets 102 on the left and right front
leg assemblies.
[0059] Turning to Figs. 13, 14, 25 and 26, the base 50 may be provided
with a
steering system generally designated 52 having a steering transmission 100 and
chains
connecting transmission sprocket assemblies 188, 220 and 240 in the
transmission 100
with the leg sprockets 102, 104 and 106 on the leg assemblies 96. The
transmission
100 may be contained within a housing 180 having a cap 182 extending up
through an
- 8 -
CA 02873697 2014-12-05
opening at a rear central position of the top plate 80 of the base chassis 58,
with side
plates 210 of the housing 180 bolted onto the bottom plate 82.
[0060] The steering transmission may have an axle 222 passing
centrally through
top, middle and bottom sprocket assemblies. As shown in Figs. 14 and 18, the
axle is
rigidly attached to a shaft 184 via an axle pin 224. The top end of the shaft
184 may
extend up through the cap 182, as shown in Figs. 1 and 13. Referring back to
Fig. 16,
bearings 192 on or in the top sprocket assembly 188 allow the top sprocket 190
to
rotate freely on the axle 222, and allow the shaft 184 to rotate freely within
the
transmission housing 180.
[0061] Referring to Figs. 15 and 16, the top sprocket assembly 188 has a C-
plate
194 rigidly attached to a top sprocket 190 via bolts 214 and/or pins 212. An
arm 196 is
pivotally attached to the top sprocket 190 on a pivot pin 198. Referring to
Figs. 17 and
18, in the middle sprocket assembly 220, a middle sprocket 226 is rigidly
attached to
and rotates with the axle 222. Similar to the top sprocket assembly 188, in
the middle
sprocket assembly 220 a C-plate 232 is rigidly attached to the bottom surface
of the
middle sprocket 226, and an arm 228 is pivotally pinned or attached the bottom
surface
of the middle sprocket 226. A sprocket through slot 234 in the middle sprocket
226
extends generally radially outwardly from near the axle 222 to near the teeth
on the
outer circumference of the sprocket 226.
[0062] As shown in Fig 20, the bottom sprocket 246 is rotatably mounted on
bearings 248 on the axle 222 so that it can rotate free of the axle. As shown
in Fig. 19 a
contoured roller slot 244 is provided in the top surface of the bottom
sprocket 246.
Referring to Figs. 14 and 22-24, a differential 200 is provided between the
top and
- 9 -
CA 02873697 2014-12-05
middle sprockets. The differential 200 may include a slider 204 which slides
in a slot
216 in a differential plate 202. The axle 222 extends through a central
clearance
opening in the slider 204, holding the slider 204 in a central position while
allowing the
axle 222 to rotate relative to the slider 204, and allowing the differential
plate 202 to shift
into off-center positions. A roller pin 206 rigidly attached to the outer end
of the arm
196, extends down through the sprocket slot 234 in the middle sprocket 226 and
through a clearance hole in the outer end of the arm 228, with a roller 208
rotatably
attached onto the lower end of the pin 206 positioned in the roller slot 244
in the top
surface of the bottom sprocket 246. The shape of the roller slot 244 which
provides
to corrective steering, may be determined directly based on the lateral
wheelbase or
spacing between the steering axis of the left side and right side leg
assemblies, by
sequentially plotting points that provide steering geometry as shown in Fig.
47A of U.S.
Patent No. 6,520,642.
[0063] Turning back to Fig. 14, a fork ring 266 has shift pins 268
projecting up
is through holes in the bottom sprocket 246. A fork 250 has rollers 252
positioned within a
groove in the fork ring 266. A shaft 254 attached to the fork 250 has a lead
screw 256
engaged with a fork lever 258. Turning the fork lever 258, e.g., 1/4 turn,
lifts and lowers
the fork 250, moving the fork ring 266 into an up position, where the shift
pins 268
extend into holes in the middle sprocket 226, and moving the fork ring 266
into a down
20 position, where the shift pins 268 are withdrawn from the middle
sprocket 226. Lock
pins 270 extend down from the bottom surface of the fork ring 266. With the
fork ring
266 in the down position, the lock pins project into openings in the bottom
plate 82,
locking the fork ring 266, and the bottom sprocket 246, so that they cannot
rotate. With
- 10-
CA 02873697 2016-05-10
the fork ring 266 in the up position the lock pins 270 are withdrawn from the
openings in
the bottom plate so that the fork ring 266 and the bottom sprocket 246 are
free to rotate.
[0064] Camera dollies often have steering systems to provide
corrective steering
or crab steering, or both. Optionally a round steering mode may also be
included. The
steering geometry and principles of these steering modes are described in U.S.
Patent
No. 6,520,642.
[0065] As shown in Figs 25 and 26 the steering system 52 has a crab
chain 280, a
left chain 282 and a right chain 284. The crab chain 280 extends continuously
around
the front sprockets 102 on the left and right front leg assemblies 96 and also
around the
bottom sprocket 246 of the steering transmission. The left chain 282 extends
continuously around the left rear sprocket 104 and around the top sprocket 190
of the
steering transmission 100. The right chain 284 extends continuously around the
right
rear sprocket 106 and around the middle sprocket 226 of the steering
transmission 100.
Idlers 94 are provided to maintain the chains appropriately tensioned and
positioned.
As shown in Figs. 25 and 26, the front sprockets 102 are both at a low
vertical position
on the leg assembly 96, the right rear sprocket 106 is at an intermediate
vertical position
and the left rear sprocket 104 is at a high vertical position. The chains 280,
282 and
284 are at corresponding vertical positions, to provide clearance between
them.
[0066] The steering system 52 is engaged by locking the cam locks 120.
At each
leg assembly 96, locking the cam lock 120 clamps the sprocket 102, 104 or 106
of the
leg assembly to the riser 108 so that they both rotate together. The wheels
are aligned
in the straight ahead position before locking the cam locks 120. The steering
bar 70 is
inserted into the shaft 184 with the key 72 in the keyway 122, so that
rotating the
-11-
CA 02873697 2014-12-05
steering bar 70 rotates the shaft 184 and the axle 222. The leg assemblies 96
are in
the normal position as shown in Figs. 8 and 9, with the axles 130 on the
centerline of
the riser 108.
[0067] For crab steering, where all of the wheel sets are steered to
the same
angle, the shift lever 258 is turned to move the fork ring 266 into the up
position. The
lock pins 270 are withdrawn from the openings in the bottom plate 82, or other
fixed
element, so that the bottom sprocket can freely rotate. Turning movement of
the
steering bar turns the axle 222 and the middle sprocket 226. Since the shift
pins 268
lock the bottom sprocket 246 to the middle sprocket 226, turning the steering
bar 70
to rotates the bottom sprocket which drives the crab chain, causing both
front wheels to
steer to the same angle. At the same time, the right rear sprocket 106 is also
steered to
the same angle as the front wheels via the middle sprocket driving the right
chain 284.
Similarly, the top sprocket 190 is rotated along with the middle sprocket 226
via the
connection between them formed by the pivoting arms 196 and 228 and the pin
206.
The top sprocket drives the left chain 282 and the left rear sprocket 104 also
to the
same steering angle, so that all four wheel sets are steered to the same
angle.
[0068] For corrective steering, the shift lever 258 is rotated to move
the fork ring
266 into the down position. The fork ring 266 and the bottom sprocket 246 are
locked
against rotation via the lock pins 270 engaged into holes in the bottom plate
82 or other
fixed structure. This locks the front wheel sets into the straight ahead
position. Turning
the steering bar 70 turns the axle 222 which drives the middle sprocket 220,
causing the
right rear sprocket 106 and the right rear wheel sets to a first steering
angle. The top
sprocket 190 is driven through the differential 200 to a corrected steering
angle via the
- 12 -
CA 02873697 2014-12-05
roller 208 moving in the roller slot 244. The left rear sprocket 104 and the
left rear
wheel sets are consequently steered to a corrected steering angle. The base 50
therefore achieves corrected steering so that the wheels track precisely with
little or no
slipping or skidding as the base moves in a curved path.
[0069] The base 50 may also be steered by inserting the steering bar 70
into the
riser 108 or any one of the four leg assemblies 96. This allows the operator
to steer the
base 50 from any one of five different positions. The steering bar 70 is very
quickly and
easily inserted and removed since no screw thread or other fittings are used.
Rather
the steering bar 70 is simply inserted and turned to engage the keyway. The
shift lever
258 may also have a third position where the axle 222 is locked out against
rotation,
thereby locking all of the wheels at a fixed steering angle, typically at the
straight ahead
steering angle.
[0070] The steering system 52 is disengaged when the operator wants to
use the
base 50 as a caster mode dolly, which is simply pushed and not steered. The
cam
is locks 120 are released or unlocked, by lifting the levers 156, allowing
the leg assembly
96 to rotate independently of the sprocket 102, 104 or 106. The thumb screw
140 on
each leg assembly 96 is loosened. The axle frame 124 is turned 1/2 turn, from
the
normal position shown in Figs. 6 and 7 to the caster or offset position shown
in Figs. 8
and 9. The thumb screws 140 are retightened. The wheels then act as caster
wheels,
allowing the base 50 to be pushed in any direction. The offset of the wheel
axles 130
from the riser 108 is shown as dimension CC in Fig. 6, with dimension CC
typically
ranging from about 3/4 to 1/1/4 inches. The dolly may optionally be
temporarily lifted up
-13-
CA 02873697 2014-12-05
off of the ground to un-weight the leg assemblies, to make it easier to rotate
the axle
frames 124 when configuring the dolly for caster movement.
[0071] The base 50 may be compact and lightweight, so that it may be
used in
confined spaces and be easily lifted and carried by one or two people. For
example, in
one design the base has a width and length of about 20 inches and weighs about
40
pounds. The base 50 may also be designed so the wheel sets are spaced apart by
16
inches, to allow the base to operate on narrow track. As shown in Fig. 1, the
camera 36
may be positioned on the column with the lens 38 aligned with an axis AA
passing
through the front wheels. Alternatively the camera 36 may be positioned so
that the
io center of the camera coincides with the center of rotation of the base
50 during
corrective steering.
[0072] Although chains and sprockets are shown and described, they may
of
course be replaced by belts and pulleys, and especially tooth belts. As used
here,
reference to chains and sprockets includes belts and pulleys. The specific
design of the
disk 126 rotatable within the cup 110 to achieve caster offset is provided as
an example.
Caster offset may alternatively be achieved in other ways using cams, linear
tracks,
arms similar to arm 128 but having a pivotable joint, arms 128 having dual
sets of axles,
one set for steering and one for caster operation, etc. These are collectively
referred to
here as a caster fitting, i.e., a component that allows switching between
normal and
caster positions. The claims below encompass these alternatives as well. The
terms
sprocket and chain in the claims include use of pulleys and belts. The terms
rotatable
and rotatably refer to turning movement, which may be greater than or less
than 360
degree movement. The steering transmission 100 may be replaced with various
other
- 14 -
CA 02873697 2014-12-05
types of steering transmissions, for example as described in U.S. Patent No.
6,520,642,
or steering transmissions providing similar steering functions using gears,
cams, levers,
or other elements.
[0073] Figs. 27-31 show another embodiment 300 having a steering
transmission
310 shiftable between crab and corrective steering modes using an alternative
handle
312. The caster wheel elements shown in Figs. 5-9 may be omitted in the dolly
300
shown in Figs. 27-32. They may also be omitted in the dolly 30 shown in Figs.
1-2.
Where either dolly 30 or 300 does not include the caster wheel elements, a
straight
kingpin 302 as shown in Fig. 27 may be used at each corner of the dolly 30 or
300. In
this case, referring to Fig. 6, the arm 128 is permanently axially aligned
with the riser
108, and the cup 110, disk 126 and thumbscrew may be omitted. Either dolly 30
and
300 may also be provided with a push bar 306, and with risers 108 or kingpins
having a
capped or closed off top 304, as shown in Figs. 27-28.
[0074] Camera dollies are ordinary used primarily in crab steering
mode, as this
allows the camera to be moved and positioned as desired, without angulating
the lens,
i.e., crab movement does not change the azimuth angle of the lens. Generally,
with
camera dollies, corrective steering is used only as needed to turn a corner,
or for dolly
alignment. This occasional use tends to be brief, with dolly operator retuning
to crab
steering mode after brief and intermittent use of corrective steering mode.
The dolly 300
allows for improved filming or video recording by simplifying shifting between
steering
modes. Via use of a spring, solenoid or other actuator, an axial force may be
maintained
on the steering transmission components that effect steering mode shifting, to
hold the
steering transmission into a first (typically crab mode) steering mode. The
user may shift
-15-
CA 02873697 2014-12-05
the steering transmission into a second steering mode (typically corrective
mode) by
pressing on a plunger on a steering handle on the dolly, or via an equivalent
movement
such as turning, twisting or pulling on a component linked to the steering
transmission.
[0075] In the example of this concept shown in Figs. 28-31, the dolly
300 has a
spring 322 which may be supported on a cover 320 attached to a bottom surface
of the
bottom plate 82. Specifically, as shown in Fig. 31, a shift frame 330 has a
spring plate
332 connected to a roller ring 336 by posts 334. The spring 322 pushes up on a
spring
plate 332. Comparing Fig. 31 with Fig. 14, in the dolly 300 the shift frame
330 may be
used in place of the shift fork 250 and shift lever 258. As shown in Fig. 31,
rollers 338
on the roller ring 336 may be positioned to roll within the channel or slot of
the fork ring
266.
[0076] A spring rod 324 may extend up through the sprocket assemblies
240, 220
and 188 of the steering transmission 310, with the lower end of the spring rod
324
attached to the spring plate 332 of the shift frame 330. The spring 322
constantly exerts
is an upward force on the shift frame 330 and on the shift rod 324.
[0077] Referring to Figs. 28 and 30, the handle 312 has a handle bar
360 attached
onto the top end of a hollow handle tube 358. The lower end of a shift rod 356
within the
handle tube is attachable to the spring rod 324 optionally via a threaded
coupler 340.
The upper end of the shift rod 356 is attached to a plunger 362 extending
through the
handle bar 360. In the example shown the plunger 362 is permanently attached
to the
upper end of the shift rod via screw threads. However, the plunger 362 may
alternatively
rest on top of the shift rod, with the plunger 362 optionally separable from
the shift rod.
A cone 364 on the lower end of the handle tube 358 may be configured to engage
into a
- 16 -
CA 02873697 2014-12-05
. .
complimentary receiver 346 rotatably supported on a bearing 348 within the
transmission housing 182. The receiver 346 may be attached to the axle 222 via
a pin
350.
[0078] In use, during steering the dolly 300 operates in the same way
as the dolly
30. The handle 312 is inserted into the steering transmission 310 with the
cone 364
engaging into the receiver 346, and with a key 72 on the cone engaging a
keyway 122
in the receiver, or vice versa. The lower end of the shift rod 356 may then be
threaded
into the coupler 340 by turning the plunger 362. In some designs, the coupler
340 and
this step may be omitted, so that the lower end of the shift rod 356 simply
rests on top of
to the spring rod 324. Turning the handle bar 360 turns the handle tube 358
and the cone
364. With the handle 312 installed, turning the handle bar 360 turns the axle
222, with
the steering transmission 310 providing the same steering functions as the
steering
transmission 100.
[0079] Since the spring 322 constantly exerts an upward force on the
shift frame
330, the steering transmission 310 is automatically constantly maintained in
the crab
steering mode. The dolly 300 is shifted into corrective steering mode via the
operator
pressing down on the plunger 362, when the steering system is at the zero or
180
degree position. The downward movement of the plunger 362 moves the shift rod
356,
the spring rod 324 and the shift frame 330 down, against the upward force of
the spring
322. These elements shift vertically but do not rotate. The rollers 338 on the
shift frame
330 pull the fork ring 266 down, shifting the transmission into corrective
steering mode.
As described above relative to the dolly 30, the fork ring 266 moves up or
down during
shifting and rotates with the bottom sprocket assembly.
- 17 -
CA 02873697 2014-12-05
[0080] The dolly 300 will remain in the corrective steering mode while
the dolly
operator holds the plunger 362 down. When the dolly operator releases the
plunger
362, the dolly 300 automatically shifts back to the crab steering mode when
the steering
system is turned to the zero or 180 degree positions, i.e., when the wheels
are straight
and the angular orientations of the shift pins 268 align with shift pin holes
in the sprocket
assemblies.
[0081] The spring 322 may be selected to exert an upward force on the
spring rod
324 that is only nominally higher than the combined weight ( about 1 kg or 2
lbs.) of
the vertically moving components of the steering transmission 310. This allows
the
io plunger to be pressed down using a very light touch. The dolly operator
can then hold
the steering system in the corrective mode with minimal hand effort. In some
designs
the receiver 346 may be provided with a split collar and a locking bolt, or
similar
clamping mechanism, to positively clamp or lock the handle 312 onto the dolly
300, if
desired. The geometric steering angle correction provided by the differential
may
is optionally be provided by a cam and/or lever design, without using the
differential shown
in the drawing.
[0082] As shown in Fig. 28, the spring 322 may be replaced with, or
supplemented
by, a solenoid 370 positioned to drive the spring rod up or down. This allows
the dolly to
be shifted between steering modes via a switch instead of via the plunger. The
switch,
20 which may be located on the handle bar 360, may be electrically or
wirelessly linked to
the solenoid 370. As the solenoid 370 is ordinarily used only intermittently,
it may be
powered by a relatively compact battery. Use of the solenoid also allows the
dolly to
remain in either steering mode without the operator holding the plunger down,
or taking
-18-
CA 02873697 2014-12-05
any other action. Except as described above, the dolly 300 may have the same
design
and operation as the dolly 30.
[0083] Turning to Figs. 32-35, the dolly may be provided with an
adjustable height
handle 374. The handle 374 may include a handle block 384 attached to the top
end of
an outer tube 376, with a handle bar 386 on the handle block 384. The bottom
end of
the outer tube 376 may be provided with longitudinal slots 380 forming tabs
408, with
external threads provided above the slots 380. A lower tube 404 can
telescopically slide
within the outer tube 376. A key 382 on the outer tube may extend into a key
slot 406 in
the lower tube 404, so that tubes 376 and 406 necessarily rotate together. A
hand nut
io 400 may be captive on the lower tube 404 and positioned to screw onto
the threads 378
on the outer tube 376.
[0084] As shown in Figs. 32 and 35, a plunger 390 is rigidly attached
onto the
upper end of an inner tube 392, and a split collet 394 is attached to a lower
end of the
inner tube 392. The inner tube 392 extends through a turnbuckle sleeve 396
positioned
above the split collet 394. The sleeve 396 has a left hand thread at one end
and a right
hand thread at the other end, so that turning the inner tube 392 causes the
collet 394 to
move into or out of the sleeve 396. The spring rod 324 and the shift rod 356
shown in
Fig. 28 are replaced with a hexagonal (or other geometric shape) shift rod 398
that
cannot rotate within the collet 394. The cap 182 of the transmission housing
shown in
Fig. 31 may be threaded, with the handle 374 then attached via a threaded
collar 402
captive on the lower tube 404.
[0085] In use, the height of the handle 374 may be adjusted by
loosening the hand
nut 400 to allow the outer tube 376 to slide up or down over the lower tube.
The shift rod
- 19-
CA 02873697 2014-12-05
398 must stay connected to the plunger 390 to allow for shifting of the
steering
transmission, regardless of the handle height adjustment. This is achieved via
operation
of the collet 394. As shown in Figs. 32 and 35, turning the plunger counter
clockwise
pushes the collet 394 out of the sleeve 394, allowing the fingers of the
collet to flare
outwardly sufficiently to allow the collet 394 to slide over the shift rod
398. With the hand
nut 400 loosened, the outer tube 376 may be telescopically pulled up or pushed
down to
position the handle 386 at a desired height. The loosened collet 394
correspondingly
slides up or down on the shift rod 398.
[0086] With the handle 386 at the desired height, the hand nut 400 is
tightened
to causing the tabs 408 to clamp inwardly onto the lower tube 404, locking
the handle 386
in a fixed vertical position. The plunger 390 is rotated clockwise drawing the
collet 394
into the sleeve 396 causing the collet fingers to clamp inwardly onto the
shift rod 398.
The shift rod is then rigidly reconnected to the plunger, allowing the plunger
to operate
as described above, regardless of the adjusted height of the handle bar.
Although the
collet and shift rod may have a round cross section, a hexagonal or other
polygon
shape may provide a more secure attachment between them.
[0087] As shown in Fig. 34, in an alternative design, the plunger 390
may be
replaced with a handle as shown for example in U.S. Patent No. 6,520,642,
where
twisting the handle bar positively drives the inner tube 392 up or down to
effect shifting.
In this design, a rack and pinion mechanism may be used to convert the rotary
movement of the handle bar into linear movement of the inner tube. Since the
shift rod
need only move about 10 mm to effect shifting, a shift fork 410 in the handle
block 384
- 20 -
CA 02873697 2014-12-05
may be pivotally attached to the top end of the inner tube 392 to similarly
allow rotary
movement of the handle bar to shift the steering transmission.
[0088] Fig. 36 shows an alternative push or tracking bar 500 which is
similar to the
push bar 306 shown in Fig. 27, but with the push bar 500 having adjustable
height. The
push bar 500 may include a slightly V-shaped horizontal arm 502 having a pin
fitting
504 at the center or apex. Referring also to Fig. 37, the pin fitting 504 has
upwardly
projecting pins 506 and a recess 508 having a curvature matching a steering
bar 530,
shown in Fig. 39, adapted to be used with the push bar 500. A pair of legs is
attached to
the arm 502, with each leg having an upper segment 512 telescopically inserted
into or
to over a lower segment 514. The lower segment 514 may include tabs and
slots, similar
to the steering bar shown in Fig. 32. The height of the handle bar arm 502 may
be
adjusted by loosening the locking collars 510, moving the arm 502 to the
desired height,
and then re-tightening the locking collars 510, similar to the operation of
the locking
collar 400 as described above relative to Fig. 32. The lower end of each leg
of the push
is bar 500 may include a tapered conical section 518 and a head 522, as
shown in Fig. 36.
[0089] Turning to Figs. 38 and 39, an adjustable height steering
handle 530 has a
horizontal handle bar 532 attached to a slot tube 534. Fig. 40 shows one
example of
this attachment using a stud 540 threaded into an upper end of the slot tube
534, with
the stud 540 also threaded into a fitting 538 joined to the handle bar 532,
and an insert
20 542 secured within the handle bar 532. A slot 536 in one side of the
slot tube 534
extends up from the lower end of the slot tube to an intermediate position on
the slot
tube 534.
- 21 -
CA 02873697 2014-12-05
[0090] Referring still to Fig. 39, the lower end of the slot tube 534
fits into the upper
end of a base tube 580, with a key 590 on the base tube projecting into the
slot 536 of
the slot tube 534. The key 590 rotationally locks the slot tube 534 to the
base tube 580,
while allowing the slot tube 534 to telescopically slide axially or vertically
relative to the
base tube. The upper end of the base tube 580 may have slots 584 forming tabs
586,
similar to the slots and tabs shown in Fig. 32. A collar 578 around the slot
tube 534
having a tapered inner surface may be threaded onto screw threads 582 on the
base
tube 580. Tightening the collar 578 forces the tabs radially inwardly to clamp
onto the
slot tube to prevent axial movement between the slot tube 534 and the base
tube 580,
1() to fix the handle bar 532 at a desired height. The lower end 588 of the
base tube 580
may have a conical taper and a key 72 to fit into a receiver 346 of the
steering
transmission 310. The keys 72 and 590 may be provided in different forms, or
they may
be replaced by similar anti-rotation devices such as clamps, pins, cams, etc.
[0091] As shown in Fig. 39, a shift rod assembly 560 is contained
within the slot
is tube 534 and the base tube 580. Referring also to Figs. 41 and 42, a
shift cap 546 on
top of the handle bar 532 is attached onto the threaded upper end of a
connector 564
=
projecting through the insert 542. A set screw 562 may be threaded into the
connector
564 for factory calibration. A clamp tube 565 is threaded onto the lower end
of the
connector 564. A support ring 554 is positioned on the slot tube 534 above the
collar
20 578, as shown in Fig 38, with the support ring 554 having one or more
magnets 548 and
a pattern of holes 550 on the bottom surface of the support ring 554 matching
the size
and pattern of the pins 506 on the pin fitting 504. One or more magnets 552
may also
- 22 -
CA 02873697 2014-12-05
be provided on the lower surface of the handle bar 532. If used, the magnets
hold the
support ring 554 at the top end of the slot tube 534, adjacent to the handle
bar 532.
[0092] Referring once again to Figs. 42 and 43, the shift rod assembly
560 may
include a plunger 602 and a centering ring 604 at the upper end of a shift rod
566. The
shift cap is attached to the stud 562 which may rest on top of the plunger
602, without
being attached to the plunger 602. The shift rod 566 extends through the clamp
tube
565. A rod insert 568 having a head 576 may be attached onto the lower end of
the shift
rod 566. The plunger and/or the head may of course alternatively be formed
directly on
or made part of the shift rod. The head 576 may be the same as the heads 522
on the
push bar 500.
[0093] A clamp 570 is attached to the lower end of the clamp tube 565.
The clamp
has fingers 572 which can flex in or out radially. A group of elastic bands or
0-rings 574
are positioned around the fingers to bias the fingers 572 inwardly, causing
the fingers to
squeeze down onto the shift rod 566. The shift rod 566 may have a relatively
long
is central section 606 having a uniform diameter, and a lower ramp section
594 flaring
outwardly to a lower groove 596, and a mirror image upper ramp section 600
flaring
outwardly to an upper groove 598, as shown in Fig. 41.
[0094] As shown in Figs. 43-45, a slide lock 612 may be provided on
the bottom
surface of the spring plate 332 of the shift frame 330. As shown in Fig 44,
the slide lock
612 may have a slot plate 614 having a semi-circular slot at one end and a
finger tab
616 at the other end, with the finger tab 616 perpendicular to the slot plate.
The slide
lock 612 is held onto the spring plate 332 via a bracket 618. Referring
momentarily to
Fig. 38, a cutout or window may be provided in the cover 320 to provide
clearance for
- 23 -
CA 02873697 2014-12-05
the slide lock 612. As shown in Fig. 45, slide locks 612 may similarly be
provided on the
underside of the bottom plate 82 in alignment with an opening through push bar
receiving tubes 620.
[0095] Referring to Figs. 27 and 36, the push bar 500 may be quickly
installed onto
the dolly 300 by inserting the lower segments 514 into the receiver tubes 620
on the
chassis. The receiver tubes may have an internal conically tapered surface
complementary to the tapered surfaces 518 on the legs of the push bar 500. As
shown
in Fig. 45, after the legs are fully seated, the head 522 of each leg is
positioned below
the bottom plate 82. The slide locks 612 are then pushed inwardly with the
slot plates
io engaging the heads 522, to prevent the legs from being pulled out from
the receiver
tubes 620. Since the legs cannot be pulled out without withdrawing the slide
locks, the
push bar 500 may also be used to lift and carry the dolly 300. The height of
the bar 502
may be adjusted by loosening the locking collars 510, raising or lowering the
bar 502,
and then retightening the locking collars. Thus, the push bar 500 may be
quickly
is installed, adjusted to a desired height, and removed, without using
tools. The push bar
500 also eliminates the need for providing the dolly 300 with multiple push
bars having
different heights. The push bar 500 may be used with or without the steering
handle
530.
[0096] Turning to Figs. 38, 39 and 43, the steering handle 530 is
installed by
20 placing the tapered end 588 into the receiver 346 of the transmission as
discussed
above relative to Fig. 30. The head 576 of the shift rod 566 extends below the
spring
plate 332 and is engaged by moving the slide lock 612 inwardly. Referring to
Fig. 43,
- 24 -
CA 02873697 2014-12-05
this locks the shift rod together with the spring plate 332. The steering
handle 530
therefore cannot be inadvertently pulled out of the receiver 346.
[0097] The upper end of the slot tube 534 fits within the recess 508
in the pin fitting
504 fixed to the bar 502. The magnets 548 and 552 hold the support ring 554 up
above
the pins 506. The steering handle 530 may be temporarily attached to and
supported by
the push bar by pushing the support ring 554 down onto the pin fitting, with
the pins 506
moving into the holes in the bottom of the support ring. This allows the user
to push
firmly on the steering handle 530 with minimal deflection of the steering
handle. The
user can then securely steer and push the dolly using only the steering
handle, if
lo desired.
[0098] The shift rod 566 is in the up position and the transmission
300 is by default
in the crab steering mode via the transmission spring 332 as described above.
Turning
the bar 502 about the vertical central axis of the slot tube correspondingly
turns the slot
tube 534 and the base tube 580 which is keyed to the slot tube, which turns
the receiver
346 to steer the dolly 300. The shift rod 566 and the shift cap 546 may remain
fixed in
place and need not move during steering.
[0099] To shift from crab to corrective steering mode, the user
presses down on
the shift cap 546. This movement also presses the shift rod 566 down, shifting
the
steering transmission into the corrective mode steering. The steering system
will then
remain in the corrective steering mode for as long as the user continues to
press down
on the shift cap 546, or for as long as the steering system remains out of the
zero or
180 degree wheel angle position. If the user releases the shift cap 546, the
transmission
- 25 -
CA 02873697 2014-12-05
spring 582 will push the shift rod 566 back up and the transmission will
return to the
crab steering mode, once the dolly wheels are steered to a zero or 180 degree
position.
[00100] The height of the steering handle 530 may be adjusted by
loosening the
collar 578 and sliding the slot tube 534 further into and out of the base tube
580, and
then retightening the handle. As this occurs however, the effective length of
the shift rod
566 must also change to allow steering mode shifting at any handle height,
while the
actual length of the shift rod 566 is of course fixed. To maintain the ability
to shift
between steering modes with the handle bar 532 at any height, the clamp 570 is
adapted to grip the shift rod 566 at any position within its range of travel.
The shift cap
o 546, the connector 564, the clamp tube 565 and the clamp 570 are attached
to each
other and move as single assembly when the shift cap 546 is pressed down or
released
from the down position.
[00101] As the handle bar 532 is pulled up for example to raise the
handle bar
height, the clamp moves up with the handle bar, with the fingers 572 sliding
over the
is shift rod 566. Regardless of the height selected, the clamp squeezes on
the shift rod
566 with sufficient force to transmit vertical shift movement of the shift cap
546 to the
shift rod 566. Pressing or releasing the shift cap 546 therefore shifts the
steering
transmission with the handle bar 532 at any height. The number, size and type
of elastic
or 0-rings 574 used may be varied to allow the clamp 570 to operate as
described
20 above, without also creating excessive resistance to raising or lowering
the handle bar
532. The clamp 570 may be replaced by similar devices providing sufficient
clamping
force on the shift rod 566 to allow shifting at any handle bar height
position, including
spring and friction types of devices. Although the shift cap 546 is shown as a
round disk,
- 26 -
CA 02873697 2014-12-05
it may be replaced by equivalent shift actuators, such as a bar or a lever.
The shift cap
546 in whichever form selected, may also be relocated to a position at one or
both sides
of the handle bar 532, or to a position on the slot tube below the handle bar.
[00102] The lower and upper grooves 596 and 598 shown in Figs. 41 and
42
provide detent positions corresponding to a full up and a full down handle bar
position.
As the user moves the handle bar into either the full up or full down
position, the groove
provides a tactile indication that a stop position has been reached, as the
fingers 572
move radially inwardly into the groove 596 or 598. The groove also provides
increased
holding force since the fingers must be moved radially outwardly against the
tension of
the 0-rings 574 before the handle bar 532 can be moved out of the full up or
full down
position. As the central section 606 of the shift rod 566 has a smaller
diameter than the
ends, the clamp 570 slides over the central section 606 with less clamping
force than at
the ramps 594 and 600. The increased resistance to movement at the ends of the
range
of travel of the handle bar helps to provide smoother movement. Additional
grooves and
is ramps may provide at intermediate positions along the length of the
shift rod to provide
intermediate detent positions, if desired.
[00103] Engageable as used here means movable into contact or
engagement with
an element or assembly to perform a function, and also removable from that
element,
for example as for temporary use to achieve a specific dolly movement or
similar
function. Attached or attached to means mechanically connected directly or
indirectly
through one or more intervening elements. In sliding engagement with, relative
to the
shift rod, means engaged with sufficient force (about 4-25 N or 1-6 lbf) so
that actuation
of the shift cap 546 shifts the transmission, while also allowing for
telescoping
- 27 -
CA 02873697 2016-05-10
movement of the slot tube with a force not greater than about 45, 90 or 135 N
( 10, 20
or 30 lbf).
[00104] Thus, a novel camera dolly has been shown and described. The
scope of
the claims should not be limited by the preferred embodiments set forth above,
but
should be given the broadest interpretation consistent with the description as
a whole.
- 28 -