Note: Descriptions are shown in the official language in which they were submitted.
CA 02903754 2015-09-09
- 1 -
TRIGGER DEVICE FOR A SEMI-AUTOMATIC HANDGUN
BACKGROUND OF THE INVENTION
The invention relates to a trigger device for a semi-automatic handgun,
comprising a locking element swivel-mounted around a first axis having an
effect
on a trigger element via a locking face and a shot limitation device, which
has a
control element with at least two locking positions for a locking face or
control
face defining a pawl around a second axis.
From EP 0 362 188 A2, a trigger mechanism for automatic handguns is known,
which allows continuous fire with a certain number of rounds. The number of
rounds is defined by the shot limitation device. It is virtually impossible to
deliberately interrupt or dose the number of rounds before firing the total
predefined number of rounds within a burst.
Specification DE 1 129 873 B describes a shot limiter for automatic weapons,
which is actuated by the movement of the lock and allows a geared member to
be advanced by one cog for each shot, which causes an interruption after a
certain number of shooting actions, by triggering a mechanical connection in
the
trigger mechanism. An actuating lever activated by the lock is designed as an
integral element and guided through guideways and return elements in such a
way that it switches the cogs of the geared member with its catch due to a
compound pushing and pivoting motion. Furthermore, a latch is provided, which
retains the geared member, which is under the influence of an elastic member,
after each shifting of the same. After the trigger has been engaged, a pre-set
number of rounds is released completely automatically, wherein the shot
sequence cannot be interrupted by the shooter.
DE 655 334 C describes a device for automatic interruption of the free-flow
fire
of automatic weapons, wherein a certain number of rounds can be pre-set before
triggering a volley of shots. In addition, there is just one single pressure
point for
each shot sequence, wherein the predefined number of consecutive shots is
triggered after pressing the pressure point without the shooter having the
chance
of an interruption to the shots.
The described devices are well-known multi-trigger systems, as constitutes a
three-shot automatic for example. The multi-triggers are a trigger system,
with
which an adjustable or predefined shot rate, for example a three-shot
automatic
- three shots consecutively - is automatically discharged by the system. The
time between the first, second and third shot is identical and predefined by
the
trigger system. To trigger this procedure, one single pressure point is
overcome,
CA 02903754 2015-09-09
- 2 -
whereupon three or more shots are fired. This procedure cannot be interrupted
as it is a fully-automated process and, consequently, a fully-automated weapon
system.
SUMMARY OF THE INVENTION
The object of the invention is to provide a trigger device for handguns, which
allows a limited and precisely metered firing for rapid-fire sequences.
This is achieved in such a way that the control element is formed by a sear
arranged in the path of action between a trigger and the trigger element,
which
exerts an influence on the trigger element through the pawl and the locking
element, wherein the second axis is preferably spaced from the first axis,
wherein the pawl is swivel-mounted on the locking element around the second
axis.
In doing so, a pressure point of the trigger is assigned to each shot, so that
the
shooter can interrupt the shot sequence at any time between the two pressure
points. This allows the shooter to have precisely metered firing with quick-
fire
sequences, wherein the firing can be deliberately interrupted by the shooter
within a shot sequence at any time.
The trigger element can be formed by a striker or a firing pin holding
element.
It is particularly advantageous if the pawl is designed as a two-armed lever,
whose first lever arm forms an initial contact face cooperating with the
control
face of the control element and the second lever arm forms a second contact
face cooperating with a control face of the trigger element.
The sear can be formed operatively connected with the trigger and separate to
this. Preferably the sear is operatively connected with the trigger through a
transmission element that is preferably designed as a single-sided
transmission
lever, wherein the trigger can be operatively connected with the transmission
element via a pressure nose. Through the dimensioning of the lever arms of the
transmission lever and the pressure nose, the trigger forces and trigger
points
can be designed very flexibly. As an alternative to a multi-part design, it is
also
possible to design the sear as a single piece with the trigger. This makes it
possible to keep the number of parts very low.
For example, the sear can be slidably mounted in a housing. The housing can be
the actual housing of the handgun, a gripstock or the frame of an exchangeable
module for the handgun. However, it is particularly advantageous if the sear
is
swivel-mounted in a housing, wherein the trigger element and the sear are
CA 02903754 2015-09-09
- 3 -
preferably swivel-mounted around the same pivot point. This also makes it
possible to retrospectively install and retrofit the trigger device in
accordance
with the invention in established handguns.
A very compact structure can be achieved if the locking element is swivel-
mounted on the sear. However, it is also conceivable that the locking element
is
swivel-mounted in the housing.
The control element preferably has at least one toothed segment with at least
two locking teeth defining the locking positions. The pawl latches into one of
the
locking teeth when the trigger element moves. Alternatively, it can also be
provided that the control element has a sliding guide with at least two
locking
deflectors defining the locking positions, wherein a sliding block is
preferably
assembled on the first lever arm, which is forcibly guided in the sliding
guide.
To use the available space optimally, it can be advantageous if the sear is
designed to have multiple parts, wherein the sear preferably has a first
toothed
segment non-rotatably connected with the trigger and a second toothed segment
non-rotatably connected with the control element, which is in tooth meshing
with
the first toothed segment.
BRIEF DESCRIPTION OF THE DRAWINGS
The invention will be explained in more detail below by reference to the non-
restrictive drawings, which schematically show as follows:
Fig. 1 shows a trigger device in accordance with the invention for a
handgun in a first embodiment in a first position of the trigger;
Fig. 2 shows said trigger device in a second position of the trigger;
Fig. 3 shows said trigger device in a third position of the trigger;
Fig. 4 shows said trigger device in a fourth position of the trigger;
Fig. 5 shows a trigger device in accordance with the invention for a
handgun in a second embodiment;
Fig. 6 shows a trigger device in accordance with the invention for a
handgun in a third embodiment;
Fig. 7 shows a trigger device in accordance with the invention for a
handgun in a fourth embodiment;
CA 02903754 2015-09-09
- 4 -
Fig. 8 shows a trigger device in accordance with the invention for a
handgun in a fifth embodiment in an angled view;
Fig. 9 shows said trigger device in an angled view with removed control
element;
Fig. 10 shows said trigger device in an angled view with removed sear;
Fig. 11 shows said trigger device in an original position;
Fig. 12 shows said trigger device in the original position with removed
sear;
Fig. 13 shows said trigger device in an original position with removed
control element;
Fig. 14 shows said trigger device with fire discharge from the first tooth
position;
Fig. 15 shows said trigger device with fire discharge from the first tooth
position with removed sear;
Fig. 16 shows said trigger device with fire discharge from the first tooth
position with removed control element;
Fig. 17 shows said trigger device fired from the first tooth position;
Fig. 18 shows said trigger device fired from the first tooth position with
removed sear;
Fig. 19 shows said trigger device fired from the first tooth position with
removed control element;
Fig. 20 shows said trigger device with fire discharge from the second tooth
position;
Fig. 21 shows said trigger device with fire discharge from the second tooth
position with removed sear;
Fig. 22 shows said trigger device with fire discharge from the second tooth
position with removed control element;
Fig. 23 shows said trigger device fired from the second tooth position;
Fig. 24 shows said trigger device fired from the second tooth position with
removed sear;
CA 02903754 2015-09-09
- 5 -
Fig. 25 shows said trigger device fired from the second tooth position with
removed control element;
Fig. 26 shows said trigger device with fire discharge from the third tooth
position;
Fig. 27 shows said trigger device with fire discharge from the third tooth
position with removed sear;
Fig. 28 shows said trigger device with fire discharge from the third tooth
position with removed control element;
Fig. 29 shows said trigger device fired from the third tooth position;
Fig. 30 shows said trigger device fired from the third tooth position with
removed sear, and
Fig. 31 shows said trigger device fired from the third tooth position with
removed control element.
DETAILED DESCRIPTION OF EMBODIMENTS
Functionally-identical elements are labelled in the embodiments with the same
reference signs.
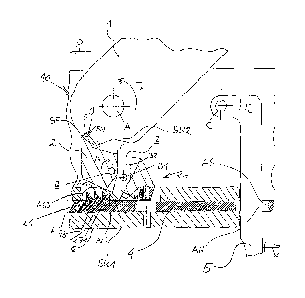
The trigger devices 10 for a handgun shown in the embodiments each have a
trigger element 1, a locking element 2, a pawl 3, a sear 4 and a trigger 5. A
housing is labelled using reference numeral 6. This can be the housing of the
handgun, a gripstock or the frame of a replaceable module for the trigger
device
10. In the latter case, the module for the trigger device can be used
interchangeably in the gripstock of the handgun. In the embodiments, the
trigger
element 1 is formed by a striker swivel-mounted around a pivot point A in
housing 6, which is pre-stressed counterclockwise by a spring (not shown in
closer detail), as is implied by arrow FA. The trigger 5 is swivel-mounted
around a
pivot point C in housing 6 and pre-stressed in a clockwise direction by a
spring
force Fc.
With the described trigger devices 10, semiautomatic fire and quick-fire
sequences (QSF) can be realized, and possibly also sustained fire (fully
automatic). The setup of these types of firing is not part of the invention
and is
therefore not explained in further detail. In the following, only the quick-
fire
sequence will be described.
CA 02903754 2015-09-09
- 6 -
To realize the quick-fire sequence function, the trigger device 10 has a shot
limitation device 20, which is formed by a control element 21, the locking
element 2 swivel-mounted around a first axis B and the pawl 3. The locking and
control faces AS1, AS2, AS3 of the control element 21 define at least two
locking
positions a, b, c for the pawl 3. Each locking position a, b, c defines a
pressure
point for trigger 5. During a trigger movement of the trigger 5, the locking
positions a, b, c defined by the locking or control faces AS1, AS2, AS3 result
in
several pressure points.
The locking or control faces AS1, AS2, AS3 of the control element 21 can be
formed by locking teeth 71, 72, 73 of a toothed segment 7 (Fig. 1 to Fig. 6)
or
sliding deflectors 81, 82 of a sliding guide 8 of sear 4 (Fig. 7). The locking
element 2 is prestressed in a counterclockwise direction into that in Fig. 5
to Fig.
7 by a spring force FB in Figs. 1 to 4. Due to the spring load, self-locking
occurs
between trigger element 1 and locking element 2. The pawl 3 engaging in the
locking positions a, b, c of the locking or control faces AS1, AS2, AS3 is
designed
as a two-sided lever with a first lever arm 31 and a second lever arm 32 and
swivel-mounted in the locking element 2 around a second axis Bl. When pivoting
the locking element 2, the second axis B1 experiences a rotary motion around
the first axis B.
For the quick-fire function, the following locking faces are important:
SK1 First contact face of pawl 3
SK2 Second contact face of pawl 3
AS1, AS2, AS3 Locking or control faces of locking teeth 71, 72, 73 or the
sliding deflectors 81, 82 of sear 4
SP Control face of trigger element 1
S Locking face of trigger element 1
SN Locking face of locking element 2
Furthermore, the contact faces between trigger 5 and sear 4 are labelled with
AS
or AH.
Arrow P highlights the direction of shooting of the handgun.
In the following, the trigger process will be explained on the basis of the
first
embodiment shown in Fig. 1 to Fig. 4. Figs. 1 to 4 show various stages of the
trigger process.
In this first embodiment, the sear 4 is formed as a displaceably mounted
slider
or as a rod in housing 6. The first axis B for the swivel-mounted bearing of
locking element 2 is designed to be fixed within the housing.
CA 02903754 2015-09-09
- 7 -
I - Standby mode (Fig. 1).
The trigger element 1 is held in the fully-tensioned position by locking
element 2.
The trigger element 1 is in its tensioned standby position, wherein the
locking
faces S or SN of the trigger element 1 and the locking element 2 are in
contact.
The spring-loaded sear 4 is in the far-left standby position of Fig. 1. The
spring-
loaded trigger 5 is in its standby position.
II - Pressure point (Fig. 2)
The shot-triggering procedure begins:
The trigger 5 is moved by the shooter in the direction x against the spring
force
Fc in Fig. 1, wherein it is pivoted counterclockwise around pivot point C. The
trigger 5 makes contact with the contact face AH on the contact face AS of
sear
4. The trigger 5 and sear 4 begin to move together in the direction x. In
further
consequence, the locking face AS1 of the first tooth 71 meets the first
contact
face SK1 of the pawl 3. The pawl 3 can be spring-loaded in the direction of
control faces AS1, AS2, AS3 (i.e. in a counterclockwise direction in Fig. 1 to
Fig. 4). The locking element 2 is moved from its standby position, in a
counterclockwise direction. Due to the shape of the corresponding locking
faces
AS1 and SK1, a rotary movement of the locking element 2 occurs around the
first axis B.
III - Trigger moment (Fig. 3)
The locking element 2 is rotated around the first axis B in a counterclockwise
direction via the sear 4 due to the continuous force effect of the shooter on
the
trigger 5, wherein the locking face S of the locking element 2 slides radially
to
the outside along the locking face SN of the latching recess 9 of the trigger
element 1 in an counterclockwise direction in relation to the first axis B,
until the
locking faces S and SN lose their mutual contact (see Fig. 3). The spring-
loaded
trigger element 1 now begins to turn in a counterclockwise direction through
the
spring force FA and subsequently encounters the firing pin (not shown), which
executes the energy transfer on the percussion cap.
IV - Triggering for the 2nd or 3rd shot (Fig. 4)
As part of the rotary movement of the trigger element 1 around the pivot point
A, the control face SP of trigger element 1 comes into contact with the second
contact face SK2 of pawl 3. The pawl 3 begins to rotate around the second axis
B1 in the clockwise direction, wherein the first contact face SK1 of pawl 3
slides
along to the locking face AS1 of the first locking tooth 71, until it is
released. Due
CA 02903754 2015-09-09
- 8 -
to a backward movement of a breech (not shown) in X direction, the trigger
element 1 is rotated clockwise around pivot point A against the spring force
FA.
Due to the spring load of locking element 2, this is pressed against the
trigger
element 1 in the clockwise direction. If the movement of the trigger element 1
clockwise exceeds the locking face SN of locking element 2, the locking
element
2 pivots back into the latching recess 9. As soon as the breech moves in the
opposite direction in the direction of the barrel, the trigger element 1 is
moved in
the counterclockwise direction by the spring force FA, wherein the locking
faces S
and SN of locking element 2 or of trigger element 1 come back to be positioned
on top of each other. The trigger element 1 is now back in its tensioned
standby
position.
If the shooter operating the handgun exerts another tightening on the trigger
5,
then the sear 4 is shifted further in the X direction, wherein the first
contact face
SK1 makes contact with the locking face AS2 of the second tooth 72 and the
locking element 2 is rotated by the sear 4 around the first axis B in a
counterclockwise direction and is moved radially outwardly from the latching
recess 9, so that the released trigger element 1 is rotated by the spring
force FA
in a counterclockwise direction and in further consequence the energy transfer
on the percussion cap can be executed for the second shot by hitting the
firing
pin. In a similar way, after the end of the cycles for the first and second
shots,
the cycle for the third shot can be initiated through the locking face AS3 of
the
third locking tooth 73.
Should the trigger process be interrupted by the shooter, wherein the trigger
5
remains in its position or moves around the pivot point C in a
counterclockwise
direction in the direction of its standby position, then the sear 4 is
returned to its
standby position by spring force, wherein the pawl 3 is force-controlled due
to its
design and rotated in the clockwise direction around pivot point B1 and slides
over the locking faces AS3 to AS1.
Fig. 5 shows a second embodiment of a trigger device 10, which is different to
the first embodiment in Fig. 1 to Fig. 4 in that the sear 4 now forms a
housing
for the locking element 2 - the locking element 2 is now pivot-mounted around
the first axis B directly in sear 4. The sear 4 itself can be swivel-mounted
around
pivot point A. This makes it possible to retrofit the entire trigger device 10
without further reconfiguration work in existing handguns. Furthermore, this
embodiment is different to that of Fig. 1 to Fig. 4 in that the control face
SP and
locking face S of trigger element 1 can coincide. The sear 4 can be directly
controlled by trigger 5. It is also possible to mount the trigger 5 directly
on sear
4 or to design this to be integral therewith.
CA 02903754 2015-09-09
- 9 -
By contrast, Fig. 6 shows another embodiment, which is different to that shown
in Fig. 5 in that the triggering of the sear 4 occurs by the trigger through a
transmission element 11, which is formed here as a one-sided transmission
lever. Through the appropriate dimensioning of the lengths of the lever arms
of
the transmission lever, transmissions or reductions and consequently different
angles of rotation of the trigger 5 or the sear 4 can be realized. The
necessary
trigger forces can be adjusted through the size and position of an actuating
nose
5a provided on the trigger 5. The actuating nose 5a can also be designed as a
separate element, wherein different leverage forces and consequently different
trigger resistances can be realized through the provision of different
mounting
points.
Furthermore, Fig. 7 shows an embodiment, in which the control element 21 of
the shot limitation device 20 has a sliding guide 8 with at least two sliding
deflectors 81, 82 defining the locking positions a, b. Each of the locking
positions
a, b defines the pressure point for a single firing during the quick-fire
function
within a trigger movement of the trigger 5. In the example shown in Fig. 7,
two
cartridges per trigger movement would be ignited with the quick-fire function,
as
two control faces AS1, AS2 are available which extend upwardly in an angled
manner. On the first lever arm of the pawl 3, a sliding block 3a is fitted,
which is
forcibly guided into the sliding guide 8. The sliding block 3a can be fixed or
rotatably - for example designed as a roller - connected with the pawl 3. Upon
pressing the trigger 5, the sear 4 begins to rotate in a clockwise direction
due to
the direct effect of the trigger 5 as described on the basis of Fig. 5 on the
sear 4
or the indirect effect of the trigger 5 as described in Fig. 6 via the
transmission
element 11. The sliding block 3a, a component of the pawl 3, moves along the
sliding guide 8 until the sliding block 3a meets the first inclined control
face AS1;
on the basis of the work angle of the first control face AS1, static friction
occurs
between the sliding block 3a and the control face AS1, whereby the locking
element 2 begins to rotate around the pivot point B fixed to the housing
through
the continuous application of force. The pivot point B1 is - as with the
previously
described embodiments - connected with the locking element 2. The pressure
point that is typical for the weapon occurs when the sliding block 3a strikes
the
first sliding deflector 81. After the trigger element 1 has been released from
the
locking element 2, the trigger element 1 moves in a clockwise direction.
In the contact range with the pawl 3, the trigger element 1 has a recess la,
with
which the pawl 3 is sometimes forcibly triggered. Due to the application of
force
of the recess la of the trigger element 1, the first lever arm 31 of the pawl
3
moves "upwards" in the direction of the trigger element 1, i.e.
counterclockwise
in Fig. 7. The trigger element 1 is moved backwards into the starting position
CA 02903754 2015-09-09
- 10 -
after triggering the first shot by the breech (not shown) of the handgun. Due
to
the continuous application of force on the trigger 5 and the subsequent rotary
movement of the sear 4, the pawl 3 moves "downwards" in a clockwise direction.
In the lower area of the sliding guide 8 - shown in Fig. 7 - the sliding block
3a
meets the second upwardly inclined control face AS2 - from this point the
described process is repeated.
If the triggering process is interrupted and the trigger 5 is disengaged, the
sliding block 3a moves back along the sliding guide 8 into its starting
position.
This is possible as the trigger element 1 in the lower section, in Fig. 7 left
of
recess la, is released. As a result, there is only a one-sided forced control
of
pawl 3. A movement of the pawl 3 counterclockwise at the exact interruption of
the shot sequence is possible during a trigger movement in any pressure point.
Fig. 8 to Fig. 31 show a trigger device 10 in accordance with the invention in
a
fifth embodiment, wherein the sear 4 is designed to consist of multiple parts
and
has two toothed segments 4a, 4b with meshing teeth. The first toothed segment
4a is non-rotatably connected with the trigger 5. The second toothed segment
4b
is non-rotatably connected with the control element 21. The first axis B for
the
rotary movement of locking element 2 rotary axis B and pivot point C of
trigger 5
coincide. The second axis B1 for the swivel movement of the pawl 3 is found on
the locking element 2 at a distance from the first axis B. The pawl 3 is
designed
as a single-armed lever and is prestressed by the spring 33 in the direction
of
the control element 21. The control element 21 also has several teeth 71, 72,
73
in this embodiment, which interact with the pawl 3.
In Fig. 11 to Fig. 31, the various phases I - VII of the trigger are shown.
I - Starting position (Fig. 11 to Fig. 13)
The trigger element 1 is held in the fully-tensioned position by locking
element 2.
The trigger element 1 is in its tensioned standby position, wherein the
locking
faces S or SN of the trigger element 1 and the locking element 2 are in
contact.
The sear 4 and the spring-loaded trigger 5 are in their standby position.
II - Firing of 1st tooth (Fig. 14 to Fig. 16)
The shot-triggering procedure begins:
The trigger 5 is moved by the shooter in the direction x against the spring
force
Fc in Fig. 1, wherein it is pivoted clockwise around pivot point C. The
trigger 5 is
non-rotatably connected with the first toothed segment 4a and begins to move
against the spring resetting force Fc around the first axis B together with
said
CA 02903754 2015-09-09
- 11 -
segment. In further consequence, the locking face AS1 of the first tooth 71 of
the control element 21 meets the first contact face SK1 of pawl 3. The locking
element 2 is moved from its standby position in a clockwise direction in Fig.
14 to
Fig. 16. Due to the shape of the corresponding locking faces AS1 and SK1, a
rotary movement of the locking element 2 occurs around the first axis B.
III - Fired 1st tooth (Fig. 17 to Fig. 19)
The locking element 2 is rotated around the first axis B in a clockwise
direction
via the sear 4 due to the continuous force effect of the shooter on the
trigger 5,
wherein the locking face S of the locking element 2 slides radially to the
outside
along the locking face SN of the latching recess 9 of the trigger element 1 in
a
clockwise direction in relation to the first axis B, until the locking faces S
and SN
lose their mutual contact (see Fig. 17 to Fig. 19). The trigger element 1
stressed
by the spring 34 now begins to turn around pivot point A in a clockwise
direction
through the spring force FA of spring 34 and subsequently meets the firing pin
(not shown), which executes the energy transfer on the percussion cap.
The pawl 3 lies flat on trigger element 1 or is supported thereon.
If one considers the contact surface lb of the trigger element 1 for the pawl
3 in
the "trigger element tensioned" state (Fig. 14 to Fig. 16) and "trigger
element
fired" (Fig. 17 to Fig. 19), it can be determined that the radius of the
contact
surface lb changes from "tensioned" to "fired" - i.e. becomes larger. This
leads
to the consequence that the pawl 3 is rotated somewhat counterclockwise, with
a
shot direction towards the right. This is technically necessary as
coordination
between the faces of locking element 2 - trigger element 1 and pawl 3 -
control
element 21 is difficult to coordinate in terms of time or mechanics and a
"tilting"
of the pawl 3 protects the components and reduces frictional force.
IV - Firing of 2nd tooth (Fig. 20 to Fig. 22)
Due to a backward movement of a breech (not shown) in X direction, the trigger
element 1 is rotated counterclockwise around pivot point A against the spring
force FA. Due to the spring load of locking element 2, it is pressed against
the
trigger element 1 in the clockwise direction. If the movement of the trigger
element 1 counterclockwise exceeds the locking face S of locking element 2,
the
locking element 2 pivots back into the latching recess 9 - the locking face S
of
locking element 2 comes back into contact with the locking face SN of trigger
element 1. As soon as the breech moves in the opposite direction in the
direction
of the barrel, the trigger element 1 is moved in the clockwise direction by
the
spring force FA, wherein the locking faces S and SN of locking element 2 or of
CA 02903754 2015-09-09
- 12 -
trigger element 1 come back to be positioned on top of each other. The trigger
element 1 is now back in its tensioned standby position.
The trigger 5 is moved by the shooter further in the direction x against the
spring
force Fc, wherein it is pivoted clockwise around pivot point C. The trigger 5
begins to move against the spring resetting force Fc around the first axis B
together with the first toothed segment 4a. In further consequence, the
locking
face AS2 of the second tooth 72 of the control element 21 encounters the first
contact face SK1 of pawl 3. The locking element 2 is moved from its standby
position, in a clockwise direction in Fig. 20 to Fig. 22. Due to the shape of
the
corresponding locking faces AS2 and SK1, a rotary movement of the locking
element 2 occurs around the first axis B.
V - Fired 2nd tooth (Fig. 23 to Fig. 25)
The locking element 2 is rotated around the first axis B in a clockwise
direction
via the sear 4 due to the continuous force effect of the shooter on the
trigger 5,
wherein the locking face S of the locking element 2 slides radially to the
outside
along locking face SN of the latching recess 9 of the trigger element 1 in a
clockwise direction in relation to the first axis B, until the locking faces S
and SN
lose their mutual contact (see Fig. 23 to Fig. 25). The spring-loaded trigger
element 1 now begins to turn around pivot point A in a clockwise direction
through the spring force FA and subsequently meets the firing pin (not shown)
again, which executes the energy transfer on the percussion cap.
VI - Firing of 3rd tooth (Fig. 26 to Fig. 28)
Due to the backward movement of the breech in the X direction, the trigger
element 1 is rotated counterclockwise around pivot point A against the spring
force FA. Due to the spring load of locking element 2, it is pressed against
the
trigger element 1 in the clockwise direction. If the movement of the trigger
element 1 counterclockwise exceeds the locking face S of locking element 2,
the
locking element 2 pivots back into the latching recess 9 - the locking face S
of
locking element 2 comes back into contact with the locking face SN of trigger
element 1. As soon as the breech moves in the opposite direction in the
direction
of the barrel, the trigger element 1 is moved in the clockwise direction by
the
spring force FA, wherein the locking faces S and SN of locking element 2 or of
trigger element 1 come back to be positioned on top of each other. The trigger
element 1 is now back in its tensioned standby position.
The trigger 5 is moved by the shooter further in the direction x against the
spring
force Fc, wherein it is pivoted clockwise around pivot point C. The trigger 5
begins to move against the spring resetting force Fc around the first axis B
CA 02903754 2015-09-09
- 13 -
together with the first toothed segment 4a. In further consequence, the
locking
face AS3 of the third tooth 73 of the control element 21 meets the first
contact
face SK1 of pawl 3. The locking element 2 is moved from its standby position
in a
clockwise direction in Fig. 26 to Fig. 28. Due to the shape of the
corresponding
locking faces AS3 and SK1, a rotary movement of the locking element 2 occurs
around the first axis B.
VII - Fired 3rd tooth (Fig. 29 to Fig. 31)
The locking element 2 is rotated around the first axis B in a clockwise
direction
via the sear 4 due to the continuous force effect of the shooter on the
trigger 5,
wherein the locking face S of the locking element 2 slides radially to the
outside
along the locking face SN of the latching recess 9 of the trigger element 1 in
a
clockwise direction in relation to the first axis B, until the locking faces S
and SN
lose their mutual contact (see Fig. 23 to Fig. 25). The spring-loaded trigger
element 1 now begins to turn around pivot point A in a clockwise direction
through the spring force FA and subsequently meets the firing pin (not shown)
again, which executes the energy transfer on the percussion cap.
Should the trigger process be interrupted by the shooter, wherein the trigger
5
remains in its position or moves around the pivot point C counterclockwise in
the
direction of its standby position, then the sear 4 is returned to its standby
position by spring force, wherein the pawl 3 is force-controlled due to its
design
and rotated in the clockwise direction around pivot point B1 and slides over
the
locking faces AS3 to AS1.