Note: Descriptions are shown in the official language in which they were submitted.
CA 02916365 2015-12-29
ACCESSIBLE PEDESTRIAN PUSHBUTTON STATION
CROSS-REFERENCE TO RELATED APPLICATIONS
[0001] This application claims the benefit of U.S. provisional
application number
62/098,831 entitled "Accessible Pedestrian Pushbutton Station," filed December
31, 2014, the
contents of which are incorporated herein by reference.
FIELD OF THE INVENTION
[0002] The present invention relates generally to traffic devices and,
more particularly
but without limitation, to accessible pedestrian pushbutton stations.
BRIEF DESCRIPTION OF THE DRAWINGS
[0003] The accompanying drawings, which are incorporated into and form a
part of the
specification, illustrate one or more embodiments of the present invention
and, together with this
description, serve to explain the principles of the invention. The drawings
merely illustrate a
preferred embodiment of the invention and are not to be construed as limiting
the scope of the
invention.
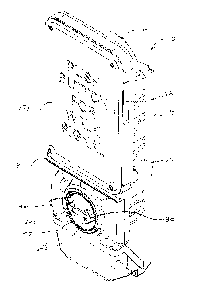
[0004] Figure 1 is a right frontal perspective view of a fully assembled
pushbutton station
made in accordance with a preferred embodiment of the present invention.
[0005] Figure 2 is a front elevational view of the pushbutton station
of Figure 1.
[0006] Figure 3 is a front elevational view of the pushbutton station
of Figure 2 with the
sign plate removed.
[0007] Figure 4 is a longitudinal sectional view of the pushbutton station
taken along line
4-4 of Figure 2.
[0008] Figure 5 is an enlarged view of the circular area designated as
"5" in Figure 4.
[0009] Figure 6 is an enlarged view of the circular area designated as
"6" in Figure 2.
[0010] Figure 7 is a side elevational view of the plunger.
CA 02916365 2015-12-29
[0011] Figure 8 is an enlarged view of the circular area designated as
"8" in Figure 4.
[0012] Figure 9 is a plan view of the pushbutton station of Figure 1.
[0013] Figure 10 is an enlarged view of the circular area designated
as "10" in Figure 5.
[0014] Figure 11 is an upper right frontal perspective view of the
casting back.
[0015] Figure 12 is a lower right frontal perspective view of the casting
back.
[0016] Figure 13 is a front elevational view of the casting back.
[0017] Figure 14 is a rear elevational view of the casting back.
[0018] Figure 15 is a left side elevational view of the casting back.
[0019] Figure 16 is a right side elevational view of the casting back.
[0020] Figure 17 is a plan view of the casting back.
[0021] Figure 18 is a bottom elevational view of the casting back.
[0022] Figure 19 is an upper right frontal perspective view of the
casting front.
[0023] Figure 20 is a lower right frontal perspective view of the
casting front.
[0024] Figure 21 is a front elevational view of the casting front.
[0025] Figure 22 is a rear elevational view of the casting front.
[0026] Figure 23 is a left side elevational view of the casting front.
[0027] Figure 24 is a right side elevational view of the casting
front.
[0028] Figure 25 is a plan view of the casting front.
[0029] Figure 26 is a bottom elevational view of the casting front.
[0030] Figure 27 is an upper right frontal perspective view of the casting
rear mount.
[0031] Figure 28 is a lower right frontal perspective view of the rear
mount.
[0032] Figure 29 is a front elevational view of the rear mount.
[0033] Figure 30 is a rear elevational view of the rear mount.
- 2 -
CA 02916365 2015-12-29
[0034] Figure 31 is a left side elevational view of the rear mount.
[0035] Figure 32 is a right side elevational view of the rear mount.
[0036] Figure 33 is a plan view of the rear mount.
[0037] Figure 34 is a bottom elevational view of the rear mount.
[0038] Figure 35 is a front elevational view of the casting front cover or
user access
panel.
[0039] Figure 36 is a bottom elevational view of the user access
panel.
[0040] Figure 37 is a rear elevational view of the user access panel.
[0041] Figure 38 is a lower right rear perspective view of the user
access panel.
[0042] Figure 39 is a lower right front perspective view of the user access
panel.
[0043] Figure 40 is a plan view of the user access panel.
[0044] Figure 41 is a left side elevational view of the user access
panel.
[0045] Figure 42 is a right side elevational view of the user access
panel.
[0046] Figure 43 is a front perspective view of the plunger.
[0047] Figure 44 is a rear perspective view of the plunger.
[0048] Figure 45 is a rear elevational view of the plunger.
[0049] Figure 46 is a side elevational view of the plunger.
[0050] Figure 47 is a front elevational view of the plunger.
[0051] Figure 48 is a cross sectional view of the plunger taken along
the line 48-48 in
Figure 47.
[0052] Figure 49 is a rear elevational view of the lower retaining
disk.
[0053] Figure 50 is a front elevational view of the lower retaining
disk.
[0054] Figure 51 is a side elevational view of the lower retaining
disk.
- 3 -
CA 02916365 2015-12-29
[0055] Figure 52 is a sectional view of the lower retaining disk taken
along line 52-52 in
Figure 50.
[0056] Figure 53 is a lower right front perspective view of the lower
retaining disk.
[0057] Figure 54 is an upper right front perspective view of the lower
retaining disk.
[0058] Figure 55 is a front elevational view of the upper retaining disk.
[0059] Figure 56 is a rear elevational view of the upper retaining
disk.
[0060] Figure 57 is side elevational view of the upper retaining disk.
[0061] Figure 58 is a sectional view of the upper retaining disk taken
along line 58-58 of
Figure 56.
[0062] Figure 59 is a lower right rear perspective view of the upper
retaining disk.
[0063] Figure 60 is an upper right rear perspective view of the upper
retaining disk.
[0064] Figure 61 is a front elevational view of the spring actuator,
the rear view being
identical thereto.
[0065] Figure 62 is a right side elevational view of the spring
actuator, both sides being
identical.
[0066] Figure 63 is a lower right frontal perspective view of the
spring actuator.
[0067] Figure 64 is a rear elevational view of the strain relief
cover.
[0068] Figure 65 is a front elevational view of the strain relief
cover.
[0069] Figure 66 is a bottom elevational view of the strain relief
cover.
[0070] Figure 67 is a plan view of the strain relief cover.
[0071] Figure 68 is a left lower front perspective view of the strain
relief cover.
[0072] Figure 69 is a left upper front perspective view of the strain
relief cover.
[0073] Figure 70 is a right side elevational view of the strain relief
cover.
- 4 -
CA 02916365 2015-12-29
[0074] Figure 71 is a left side elevational view of the strain relief
cover.
[0075] Figure 72 is a sectional view of the strain relief cover taken
along the line 72-72
in Figure 65.
[0076] Figure 73 is a sectional view of the strain relief cover taken
along the line 73-73
in Figure 65.
[0077] Figure 74 is a bottom front perspective view of the strain
relief cover.
[0078] Figure 75 is a top front perspective view of the strain relief
cover.
[0079] Figure 76 is a rear elevational view of the strain relief cover
with the spring
actuator installed.
[0080] Figure 77 is front (inside) elevational view of the strain relief
cover with the
spring actuator installed.
[0081] Figure 78 is a bottom elevational view of the strain relief
cover with the spring
actuator installed.
[0082] Figure 79 is a plan view of the strain relief cover with the
spring actuator
installed.
[0083] Figures 80A-80C are sequential parts of an exploded perspective
view of the
assembled pushbutton station.
DETAILED DESCRIPTION OF THE PREFERRED EMBODIMENT(S)
[0084] APS (accessible pedestrian signal) pushbutton systems assist
visually impaired
persons to cross a signal-controlled intersection and other pedestrian
crossings. A raised arrow
on the unit indicates the direction of crossing that is controlled by the
unit. The unit has a
pushbutton that is pressed by the pedestrian who wishes to cross. In response
to pressure on the
pushbutton, circuitry in the unit provides signals in a non-visual format such
as audible (e.g.
- 5 -
CA 02916365 2015-12-29
sounds, tones, verbal messages, etc.) or vibro-tactile (e.g. vibrating raised
pushbutton surface)
formats. For example, the unit will cause the pushbutton to vibrate to
indicate that it is safe to
cross the intersection.
[0085] APS units may be mounted on poles or posts and, thus,
versatility in mounting
structures is advantageous. It is also useful for the crossing direction arrow
to be reversible as
this facilitates placement of the unit. Piezo based activation of the
pushbutton is preferred, but
such devices are subject to damage from impacts. The speakers in APS systems
convey various
audible signals and more frequently verbal messages. In order for pedestrians
to hear these
messages clearly, especially at a noisy intersection, good sound projection is
important. The
present invention provides improvements relating to these and other important
features of APS
pushbutton stations.
[0086] An APS unit includes circuitry that controls the various
functions of the unit. For
example, an APS unit will include a circuit board inside the housing to
interact with pushbutton
assembly and the speaker. The circuitry may also control remote devices, such
as a beacons or
external speakers. The circuitry is referred to herein as the "signal control
assembly," and
suitable systems are commercially available and so are not shown or described
herein in detail.
One particularly preferred signal control assembly for use in the present APS
pushbutton station
is shown and described in U.S. Patent No. 8,665,115 issued on March 4, 2014,
and entitled
"Accessible Pedestrian Signal System," which patent is incorporated herein by
reference.
[0087] Turning now to the drawings in general and to Figures 1-4 in
particular, there is
shown therein an accessible pedestrian signal pushbutton station constructed
in accordance with
a preferred embodiment of the present invention and designated generally by
the reference
number 10. The pushbutton station 10 is mountable to a vertical support (not
shown), such as a
- 6 -
CA 02916365 2015-12-29
pole, post or wall. The station 10 generally comprises a housing 12 and a rear
mount 14 that
attaches the station 10 to the vertical support.
[0088] The housing 12 defines an enclosure to contain the various
components and may
include a front 18 and a back 20 that are bolted together with a main seal 22
(Fig. 80C) between.
The station 10 comprises a pushbutton assembly 24 that includes a plunger 26
supported in a
plunger space 28 (Figs. 19-22) formed in the front 18 of the housing 12. A
crossing direction
arrow 30 is attached to the front of the pushbutton assembly 24.
[0089] The plunger 26 is shown in Figures 7 and 43-48. The plunger 26
comprises a
head 36 with a front 38 and a back 40. The head 36 forms the "button" that is
accessed by the
pedestrian. As indicated, the crossing direction arrow 30 is attached to the
front 38 of the
plunger head 36. Preferably, the arrow 30 is removably and reversibly attached
to the plunger
head 36. To that end, a pair of screw bores 42a and 42b may be formed in the
front 38 of the
head 36. An elongate stem 46 extends rearward or inwardly relative to the
housing 12 from the
back 40 of the plunger head 36. A resilient stem bumper 48 (Figs. 4, 5, & 10)
is attached to the
free end 50 of the stem 46. The stem 46 has a longitudinal axis X, as seen in
Figure 7. A slot 54
is formed in the front 38. The slot 54 is sized to receive a flat head screw
driver. At least one
and preferably a plurality of tabs or detents, such as the four detents 58,
are provided on the
back 40 of the plunger head 36.
[0090] As shown in Figure 6, 19, and 20, the plunger space 28 in the
front 18 of the
housing 12 is defined partly by an annular flange 60 (see also Fig. 5) with an
outwardly facing
surface that includes at least one and preferably a plurality of detent
receiving notches designated
collectively at 62. In the preferred embodiment, there are at least as many
detent receiving
notches as there are detents on the back 40 of the plunger head 36. More
preferably, as shown,
=
- 7 -
CA 02916365 2015-12-29
there are twice as many detent receiving notches, such as the eight detent
receiving notches 62.
As best seen in Figures 7 and 46, the detents 58 have downwardly converging
sloped sides and a
flat bottom. Likewise, the detent receiving notches 62 preferably have a
corresponding shape,
that is, these notches have outward diverging sloped sides and a flat bottom.
[0091] Now it will be apparent that, using a flat head screw driver in the
slot 54 to urge
the plunger head 36 to the right or left (clockwise or counter-clockwise), the
detents 58 on the
back 40 of the plunger head 36 will ride up the sloped sides of the notches
62, which in turn
raises or withdraws the plunger head slightly. This allows the plunger head 36
to be positioned
so that the attached arrow can point in several different directions,
including right, left, up, down,
and at angles therebetween. After the plunger head 36 is positioned as
desired, the arrow 30 is
simply reattached using the screws 64a and 64b (Figs. 1-3).
[0092] Now it will be apparent that, in the preferred pushbutton
assembly 24, the
plunger 26 is mounted in the plunger space 28 of the housing 12 for axial
reciprocal movement
and for rotational movement. More specifically, the plunger 26 may be movable
between a fixed
position and an adjustment position. In the fixed or locked position, the
detents 58 on the rear 40
of the plunger head 36 are received in the detent receiving notches 62 in the
plunger space 28 so
that rotation without axial movement is prevented. In the adjustment position,
the detents 58 are
withdrawn from and above the detent receiving notches 62 so that rotation of
the plunger head 36
is permitted.
[0093] The pushbutton assembly 24 also preferably includes a spring
assembly
designated generally at 70. The spring assembly 70 may include at least one
spring and
preferably includes two counter biased springs including a first inner spring
72 and a second
outer spring 74. As used herein, "inner," "inwardly," "rear," and "rearward,"
each refers to a
- 8 -
CA 02916365 2015-12-29
structure or motion being closer to the back 20 of the housing 12 and further
from the front 18 of
the housing. As used herein, "outer," "outwardly," "forward," and "forwardly,"
each refers to a
structure or motion being closer to the front 18 of the housing 12 and further
from the back 20 of
the housing.
[0094] The inner spring 72 is an annular spring supported inside the
plunger space 28.
The inner spring 72 is configured to produce an inwardly biasing force on the
plunger 26, that is,
the inner spring is configured to be compressed when the plunger moves
outwardly (when
rotated as described above) and then to axially bias or urge the plunger
inwardly toward the
housing 12. To that end, the annular inner spring 72 may be captured between
an inner retaining
-- ring or disk 76 and an outer retaining ring or disk 78, as seen in Figure
5.
[0095] The inner retaining disk 76, shown in detail in Figures 49-54,
is captured between
the back of the spring 72 and a stop 80 (Fig. 5) near the end 50 of the stem
46. The stop 80 may
take the form of a C-shaped "poodle ring," as seen best in Figure 80B. The
back of the spring 72
is received in a groove 82 in the front of the disk 76. The outer retaining
disk 78, shown in
-- Figures 55-60, is captured between the top of the spring 72 and the back or
rear surface of the
coil, which is part of the electromagnet assembly described hereafter. Thus,
the outer ring 78
cannot move outwardly from the position shown in Figure 10. The top of the
spring 72 is
received in a groove 86 in the back of the outer disk 78. The upper annular
spring 74 is captured
between the back 40 of the plunger head 36 and the outer surface of the flange
60. A silicone
-- washer 88 may be interposed between the outer surface of the flange 60 and
the bottom of the
spring 74 to provide a seal around the stem 46 of the plunger.
[0096] As shown in Figures 5 and 10, the plunger 26 is mounted for
reciprocal axial
movement to produce a vibrating effect perceptible to the pedestrian. To that
end, an electro-
- 9 -
CA 02916365 2015-12-29
magnet assembly 90 is included. The permanent magnet 92 is supported on the
stem 46 under a
shoulder 94 (Figs. 7, 44, & 48). An 0-ring 96 is disposed between the bottom
of the magnet 92
and the groove 98 (Figs. 50 and 52) on the front of the inner retaining disk
76. The coil 102 is
fixed between the back of the flange 60 and the inner edge of the outer
retaining disk 78. Thus,
the plunger 26 and inner retaining disk 76 will move when the coil 102 is
energized. The
uppermost point of travel is when the inner spring 72 reaches maximum
compression; the upper
retaining ring 78 is fixed relative to the housing 12. The lower most point of
travel occurs with
the detents 58 abut the bottom of the detent receiving notches 62 compressing
the upper
spring 74. Of course, during normal operation as the plunger reciprocates, the
bidirectional
travel does not reach these maximum structural limits.
[0097] Now it will be apparent that the spring assembly 70 supports
the plunger 26 for
axial reciprocal movement bidirectionally from a neutral position inwardly
toward the
housing 12 and from the neutral position outwardly from the housing. The outer
spring 74
generally is captured between the fixed housing 12 and the moving plunger head
36, and the
inner spring 72 is captured between the housing and the free end 50 of the
stem 46. When the
plunger 26 moves outwardly, the inner spring 72 is compressed, creating a
biasing force in the
opposite or inward direction. When the plunger 26 moves inwardly, the outer
spring 74 is
compressed, creating a biasing force in the opposite outwardly direction.
Ideally, the outwardly
biasing force of the outer spring 74 is about equal to the inwardly biasing
force of the inner
spring 72. This balances the plunger 26 in a neutral position between its
uppermost and
lowermost points. At neutral buoyancy, the plunger/an-ow location or
orientation is locked into
position.
- 10-
CA 02916365 2015-12-29
[0098] As mentioned previously, a piezo assembly is a preferred
mechanism for
registering an inward movement of the plunger 26 when pressed by a pedestrian
and
communicating this event to the signal control assembly. The preferred
embodiment of the
present pushbutton station 10 includes a switch for activating the signal
control assembly in
response to pedestrian input, and a preferred switch device is the piezo
assembly designated
generally at 110 seen best in Figure 10. In order to reduce the likelihood
that hard impacts will
damage the piezo element, the preferred assembly 110 provides for offset and
indirect actuation
of the piezo element 112. This offset piezo actuation design accommodates
assembly tolerances
as well as protecting the piezo element. Additionally, because the movement of
the plunger is
amplified, the pushbutton is more sensitive to the pedestrian's touch.
[0099] As seen in Figure 10, the piezo element or bender 112 is
supported in the
housing 12 and positioned a distance laterally from the stem bumper 48. The
piezo bender 112 is
operatively connected to the signal control assembly, which includes a printed
circuit board 114
("PCB") mounted inside the housing 12. (The wiring is omitted to simplify the
illustration.) The
PCB 114 may be arranged vertically in the housing 12. At the bottom, the PCB
is secured
between a horizontal seal 111 and the main seal 22, as best shown in Figures
5, 10 and 80A. The
top of the PCB is secured between the back of the speaker 162 and the housing
12, with a foam
disk 115 compressed between back of the speaker 162 and the front of the PCB,
as shown in
Figures 4, 8 and 80C.
[0100] Inward movement of the stem bumper 48 is transferred to the piezo
bender 110 by
a pressure transfer member 116 that includes an elongate spring actuator 118.
In its preferred
form, the spring actuator member has a first end 120 and a second end 122. The
preferred
pressure transfer member 116 is shown in more detail in Figures 61-63. The
spring actuator 118
- 11 -
CA 02916365 2015-12-29
has a stem bumper contact point 124 (Figs. 61 & 63) that is axially aligned
with and supported a
distance from the stem bumper 48 so that axial movement of the plunger 26 into
the engaged
position causes the stem bumper to press on the stem bumper contact point 124,
as shown in
Figure 10.
[0101] An offset bumper 128 (Fig. 10) is supported on the second end 122 of
the spring
actuator 118 so that it is displaced a distance laterally from the stem bumper
contact point 124.
The pressure transfer member 116 is supported in the housing 12 so that the
offset bumper 128 is
axially aligned with and supported a distance from the piezo bender 112. Due
to the shape and
flexibility of the spring actuator 118, pressure from the stem bumper 48 on
the stem bumper
contact point 124 is transferred to the offset bumper 128, which in turn
presses on and actuates
the piezo bender 112. More preferably, the spring actuator 118 is configured
so that, when the
plunger 26 is moved to the engaged position, the pressure exerted by the stem
bumper 48 on the
stem bumper contact point 124 will cause the offset bumper 128 to move axially
a greater
distance than the stem bumper 48 moved the stem bumper contact point 124.
Thus, there is no
direct pressure on the piezo bender 112, yet pressure applied to the plunger
26 transferred to the
central stem bumper 48 creates an amplified but indirect movement of the
offset bumper 128.
[0102] One suitable way to support the pressure transfer member 116 in
the housing is
mount the member in a strain relief cup or cover that also supports the piezo
element 112. A
preferred strain relief cover is shown in Figures 64-79 and designated
generally by the reference
number 130. The strain relief cover 130 may be generally cylindrical with ears
132a and 132b
for attachment to the inside of the housing 12. At the bottom rear of the
cover is a piezo
recess 132 circumscribed by an annular piezo support shoulder 138 configured
to receive the
- 12-
CA 02916365 2015-12-29
piezo bender element 112. Strain relief tabs 134a and 134b on the back of the
cover guide the
wires (not shown) through the wiring notch 136 at the top of the cover 130.
[0103] With continued reference to Figures 61-63, to generally conform
to the shape of
the inside of the cover 130, the pressure transfer member 116 may be provided
with a curved
base or spine 140 curving over the first end 118 of the member 116 with an
outwardly extending
mounting tab 142. Thus, the spring actuator 118 projects transversely from the
curved spine 140.
Additionally, the pressure transfer member 116 may include first and second
side projections 144
and 146, one extending from the spine 140 on each side of the spring actuator
118 and being
generally parallel thereto. Thus, the spring actuator 118 and the side
projections 144 and 146
form three finger-like projections on the spine 140. Mounting tabs 148 and 150
are formed on
the ends of the side projections 144 and 146.
[0104] The three tabs 142, 148, and 150 (Figs. 61-63) are used to
secure the pressure
transfer member 116 inside the strain relief cover 130. A slot 154 formed in
the top of cover 130
receives the mounting tab 142 on outside edge of the spine 140, as best seen
in Figures 64, 67,
68,72, and 74. Slots 156 and 158 in the sides of the cover 130 receive the
mounting tabs 148
and 150, respectively, as seen in Figures 64-66, 69, and 75. In this way, the
spring actuator 118 is
suspended between the stem bumper 48 and the piezo bender 112 as best seen in
Figure 10.
[0105] Now it will be appreciated that the plunger 26, the housing 12,
and the spring
assembly 70 are cooperatively configured to limit the inward travel of the
plunger when
reciprocating in response to the electromagnet 90 to a maximum reciprocating
distance that is
less than the distance that would result in a damaging impact on the piezo
element, that is, the
maximum impact distance. Preferably, the maximum reciprocating distance is
less than about
0.005 inch and the maximum impact distance is greater than about 0.015 inch.
More preferably;
- 13 -
CA 02916365 2015-12-29
the maximum reciprocating distance is between about 0.002 inch and about 0.004
inch and the
maximum impact distance is about 0.020 inch.
[0106] In some instances, the signal control assembly will respond to
the pedestrian's
pressing of the pushbutton 26 by causing audible tones or verbal messages to
be output by the
station 10. Thus, a speaker 160 is provided in the housing 12, as seen in
Figures 4 and 80C. The
diaphragm 162 (Fig. 4) of the speaker 160 is positioned behind a perforated
concave central
area 166 in the upper portion of the housing front 18. The back surface of the
housing front 18,
seen in Figure 22, has a circular ring 167 with a groove to receive a
watertight seal 169 that seals
to the peripheral edge 171 on the diaphragm 162.
[0107] The front 18 of the housing 12 may include a larger area 168
surrounding the
perforated central area 166 that is setback slightly from the front surface
170 of the housing, as
seen in Figures 19-24. This setback area 168 provides a recess for receiving a
cover plate such
as the sign plate 174 (Figs. 1&2). The distance in front of the surface of the
setback region 168
behind the sign plate 174 forming a resonance chamber therebetween.
[0108] The front 18 of the housing 12 may further define more deeply
setback bilateral
side vent recesses 180 and 182, one on each side of the perforated central
area 166 and
continuous therewith. These side vents 180 and 182 are configured to vent
sound generated by
the speaker 160 as it exits the central perforated area 166. While the fan
shape shown is
preferred, the recesses 180 and 182 may be shaped differently. In most
instances, protective
sound screens or grills 184 and 186 are mounted in the recesses 180 and 182.
When necessary,
either of these recesses 180, 182 can be dampened or baffled to reduce or
block sound emission.
For example, a baffle (not shown) such as a foam wedge or other insert may be
inserted in one or
both of the recesses 180, 182 between the housing front 18 and the sign plate
174.
- 14-
CA 02916365 2015-12-29
[0109] Having described the housing 12 and its components, the
articulated mounting
assembly for the pushbutton station 10 will be explained. The rear mounting
system of the
present invention supports the housing 12 for pivotal movement relative to the
rear mount 14. In
the most preferred embodiment, the pivotal connection allows for a full thirty
degrees (30 ) of
articulation about the vertical axis. From the center position, the housing 12
can articulate
fifteen degrees (15 ) to the left or the right. This mounting system allows
for a more accurate
installation of the unit and safer pedestrian use because it ensures that the
station 10 can be
parallel to the walkway.
[0110] In the preferred embodiment, the mounting assembly is sold as a
component of
the station 10. However, it will be understood that the articulating mount
assembly could be sold
separately. The mounting assembly comprises mounting plate, such as the rear
mount 14, shown
in detail in Figures 27-34. The rear mount 14 may have a curved or angled rear
surface 190. In
this way, the rear mount 14 can be secured to a flat surface, such as one of
the sides of a multi-
sided (polygonal) pole. Then, if the front of station 10 is not parallel to
the cross walk, the
housing 12 can be rotated slightly on the rear mount 14 until it is parallel.
Additionally, the rear
mount 14 is also provided with one or more slots, such as the upper and lower
mounting slots
194 and 196, shown in Figures 27-30. These slots accommodate installation
errors and facilitate
simple but accurate positioning of the station 10. Even if the mounting bolts
or other connectors
(not shown) are incorrectly positioned or imperfectly aligned on the vertical
support, the slots
194 and 196 allow for slight vertical and horizontal movement of the mounting
plate.
[0111] The specific configuration of the pivotal connection between
the housing 12 and
the rear mount 14 may vary. In the preferred embodiment, there are two housing
support
shelves 202 and 204 forwardly from the front surface 206 of the rear mount 14
projecting
- 15 -
CA 02916365 2015-12-29
rearward from the back of the housing back 20. Extending rearward from the
back 208 of the
housing back 20 are two overhangs 210 and 212 positioned to be hung on the
shelves 202
and 204, respectively, as best seen in Figures 4 and 8, forming joints 220 and
222.
[0112] To permit rotation, a pivot pin 226 connects the shelf 202 and
overhang 210. A
locking screw 228 connects the shelf 204 and the overhang 212. See Figures 4
and 80A. Still
further, the joints 220 and 222 may be providing mating serrations to allow
for multiple
rotational positions. To that end, the upper surface of the shelf 202 is
formed with radially
extending serrations 232 and the upper surface of the shelf 204 is formed with
similar
serrations 234. Mating serrations 236 and 238 (Fig. 14) are formed on the
undersides of the
overhangs 210 and 212, respectively. Thus, when mounting the station 10, the
housing 12 can be
lifted slightly and rotated left or right to the desired position. Then, upper
and lower serrations
lock the housing into this position when it is lowered back into position.
[0113] After hanging the housing 12 and positioning it as desired, the
locking screw 228
is secured from the bottom of the housing 12. An access cover 240, shown in
Figures 35-42,
may then be attached over the lower end of the housing.
[0114] As shown and described herein, the structures that attach the
housing 12 to the
rear 14 are integrally formed in the housing back 14. This is ideal as it
simplifies assembly and
installation. However, it will be appreciated that the articulating mount
assembly could be
separate and may include a separate adapter or bracket that attaches the rear
mount structure to
the back of a separate pushbutton station housing.
[0115] As used herein, "front" refers to the side of a component that
faces the pedestrian
user and "rear" refers to the side of the component that faces away from the
user. The side
- 16 -
CA 02916365 2015-12-29
referred to as "left" refers to the user's left, and similarly the side
referred to as "right" refers to
the user's right.
[0116] The embodiments shown and described above are exemplary. Many
details are
often found in the art and, therefore, many such details are neither shown nor
described herein.
It is not claimed that all of the details, parts, elements, or steps described
and shown were
invented herein. Even though numerous characteristics and advantages of the
present inventions
have been described in the drawings and accompanying text, the description is
illustrative only.
Changes may be made in the details, especially in matters of shape, size, and
arrangement of the
parts within the principles of the inventions to the full extent indicated by
the broad meaning of
the terms of the attached claims. The description and drawings of the specific
embodiments
herein do not point out what an infringement of this patent would be, but
rather provide an
example of how to use and make the invention. Likewise, the abstract is
neither intended to
define the invention, which is measured by the claims, nor is it intended to
be limiting as to the
scope of the invention in any way. Rather, the limits of the invention and the
bounds of the
patent protection are measured by and defined in the following claims.
- 17 -