Note: Descriptions are shown in the official language in which they were submitted.
CA 02922324 2016-02-29
ROOF INTEGRATED PHOTOVOLTAIC SYSTEM
TECHNICAL FIELD
This disclosure relates general to solar energy and more specifically to roof
mounted solar panel arrays for generating electricity from sunlight.
BACKGROUND
Generating electricity from sunlight has been possible for many years through
the
use of photovoltaic (PV) cells and panels. PV panel assemblies have been
mounted on
the roofs of residential homes, but historically such installations have been
considered
by many to be unsightly and bulky. More recently, so-called "solar shingles"
have been
available, but these have not tended to be completely successful, particularly
with
respect to the difficulty of installation and performance issues related to
shading or dirt
accumulation on the PV panels of the shingles. A need exists for a PV system
for the
roof of a residential home that is not unsightly, that makes use of highly
efficient solar
cell technology, that includes shade management to maximize performance when
some
panels are shaded or dirty, that is integrated with the roof, and that, in
addition to
generating electricity, provides a roof deck covering that is at least as
reliable and long
lasting as traditional shingles. It is to the provision of a system that meets
these and
other needs that the present invention is primarily directed.
1
CA 02922324 2016-02-29
SUMMARY
Briefly described, a roof integrated photovoltaic system comprises a plurality
of
PV panel assemblies that can be arranged in an array on a roof deck to produce
electricity when exposed to sunlight. Each PV panel assembly has a rectangular
solar
panel, left and right end couplers, top edge couplers, and bottom edge
couplers. A
support rib may be disposed on the back of each PV panel assembly to provide
support
for the solar panel and form a cable tray to contain and guide electrical
wiring and
electrical connectors so that the wiring and connectors do not rest on the
roof deck.
Alternatively, a cable support may be formed without also serving to support
the solar
panel. To install an array, a worker first attaches a starter bar to the roof
deck. Next, a
lowermost course of PV panel assemblies is installed by sliding PV panel
assemblies
together end-to-end along the starter bar causing the end couplers to engage,
lock, and
seal together. Each PV panel assembly is fastened to the roof deck along its
top edge
and is electrically interconnected with previously installed panels to
aggregate the
electrical output produced by the several panels thereby increasing the power
rating of
an array with each panel assembly that is installed.
With regard to electrical interconnection of the panels, each PV panel
assembly
in one embodiment incorporates a micro-inverter that converts the direct
current (DC)
output naturally produced by the solar collectors of the panel when exposed to
sunlight
into an alternating current (AC) output. An AC output for each panel assembly
provides
numerous advantages including, for instance, its low voltage compared to
traditional DC
systems and consequent safer installation, its ready compatibility with the
public electric
2
CA 02922324 2016-02-29
grid, its readiness for immediate use to power electrical appliances, and the
ability of the
micro-inverters to be interconnected with simple parallel connections to
increase the
power capacity of an installation of PV panel assemblies. Other advantages of
a
microinverter associated with each panel assembly include the anti-islanding
features of
inverters insuring that installers are not connecting "live" wires during
installation, the
integrated shade management system of microinverters such that one shaded
panel
does not affect the output of all other panels connected to it, and the
ability to track and
monitor each PV panel assembly of an installed system, which is not possible
with prior
art DC systems.
There is no need for an installer to worry about combined parallel and serial
connections of panels to produce a desired voltage and current capacity. All
electrical
connections when using microinverters according to one embodiment of the
present
invention are parallel. Microinverter termination also is much easier and
straight
forward because it follows the same wiring conventions as typical home
electrical
service and standard subpanels and breakers can be used. Finally, a PV system
of the
present invention is easily scalable simply by adding additional PV panel
assemblies
and perhaps a corresponding breaker in the subpanel. The aggregated AC output
of
the array can be coupled directly to the public electrical grid or otherwise
used to power
AC appliances within a home.
In some cases, it may be desirable that each assembly produce DC power rather
than AC power. In such cases, the micro inverter may be replaced with a module
known as a power optimizer, which manages DC power produced by the individual
panel assemblies and the array wired together. Micro inverters (AC) and power
3
CA 02922324 2016-02-29
optimizers (DC) are members of a category of electrical energy control modules
referred
to as a Module Level Power Electronics module or MLPE. The term MLPE when used
herein is intended to encompass both micro inverters and power optimizers and
any
other type of electrical power management module that may now exist or be
discovered
in the future.
To form a next higher course of PV panel assemblies, a worker slides PV panel
assemblies down the roof deck into engagement with the back edges of a
previously
installed course of panel assemblies. This causes the front edge couplers of
the next
higher course to engage and lock with the back edge couplers of the previously
installed
course of PV panel assemblies. At the same time, the front edge of the panel
being
installed overlaps the back edge of the previously installed panels and forms
a seal to
prevent water leakage between courses of panels during rainstorms. Thus, the
panels
of the array are sealed along both their vertical seams and their horizontal
seams to
prevent leakage onto the roof deck below. The PV panel assemblies of the next
higher
course are electrically interconnected together and to the course below so
that each
course of PV panel assemblies is aggregated to increase the power capacity of
the
array. Additional courses are added as described until a PV panel array of the
desired
size and power capacity is obtained.
As part of the installation of a PV array of the present invention, various
flashing
components are incorporated to flash the tops, sides, bottoms, and other areas
of the
array. These flashing components direct rainwater onto the top of the array
and shed
the water down and away from the array making an installed array double as a
watertight roofing material in addition to producing electrical energy.
4
81795291
An alternate embodiment of a roof integrated PV system also is disclosed. The
alternate embodiment makes use of a frameless solar collector and an extruded
aluminum framing system that receives and surrounds the frameless collector to
form a
PV panel assembly. In this alternate embodiment support feet are provided
separately
from the PV panel assembly and are installed at spaced intervals along the
back rail of
the frame. The feet, which may be provided in different heights, support the
back of a
PV panel assembly on a roof and provide for attaching the PV panel assembly to
a roof
deck. A special foot is configured to receive a module level power module
associated
with the PV panel assembly. The front, back, and side rails of the frame are
configured
ler to interface with rails of a like panel in an array of panels to form
water tight and/or
water managing junctions. A starter bar installed along the lower edge of an
installed
array secures the lower edge to the roof and provides for ventilation beneath
the
installed PV panel array.
Some embodiments disclosed herein provide a roof integrated photovoltaic
system comprising: a plurality of solar panel assemblies each comprising a
frameless
solar collector module having a first end, a second end opposite the first
end, a front
edge, and a back edge with each frameless solar collector module being
received within
a frame, the first end of the frameless solar collector module received in a
first end rail,
the second end of the frameless solar collector module received in a second
end rail,
the front edge of the frameless solar collector module received in a bottom
rail, and the
back edge of the frameless solar collector module received in atop rail; each
of the first
end rail and second end rail being profiled to define an inwardly facing
elongated
channel within which a corresponding end of the frameless solar collector
module is
received; the bottom rail being profiled to define an inwardly facing
elongated channel
within which the front edge of the frameless solar collector module is
received; the top
rail being profiled to define an inwardly facing elongated channel within
which the back
edge of the frameless solar collector module is received; a profile of the
first end rail
further defining a first flange that projects outwardly along a top edge of
the first end rail;
a profile of the second end rail further defining a second flange that
projects outwardly
below a top edge of the second end rail; the first flange of at least one
solar panel
assembly located above and covering the second flange of a like solar panel
assembly
when the at least one solar panel assembly and the like solar panel assembly
are
moved together to engage the first end of the at least one solar panel
assembly with the
5
Date Recue/Date Received 2023-02-03
81795291
second end of the like solar panel assembly in an end-to-end relationship; a
containment structure on the second flange forming a drain channel for
receiving,
containing, and draining rainwater that may seep between the at least one
solar panel
assembly and the like solar panel assembly when the at least one solar panel
assembly
and the like solar panel assembly are engaged in the end-to-end relationship;
an in-
turned lip depending from a distal edge of the first flange, the in-turned lip
configured to
engage and slide over the containment structure of the second flange when the
at least
one solar panel assembly and the like solar panel assembly are slid together
in end-to-
end relationship to couple the at least one solar panel assembly and the like
solar panel
assembly together; and a starter bar securable to a roof deck for supporting
the front
edges of solar panel assemblies of a lowest course of solar panel assemblies
in the
photovoltaic system.
Some embodiments disclosed herein provide a roof integrated photovoltaic
system comprising: a plurality of solar panel assemblies each comprising a
solar
collector module having a first side edge, a second side edge opposite the
first side
edge, a front edge, and a back edge, a first side rail extending along the
first side edge
of the solar collector module, a second side rail extending along the second
side edge
of the solar collector module, a front rail extending along the front edge of
the solar
collector module and having a front-most edge, and a back rail extending along
the
back edge of the solar collector module; each of the first side rail and
second side rail
being profiled to define a receiving feature within which a corresponding side
edge of
the solar collector module is received; the front rail being profiled to
define a receiving
feature within which the front edge of the solar collector module is received;
the back
rail being profiled to define a receiving feature within which the back edge
of the solar
collector module is received; the first side rail being further profiled to
define a first
flange that projects away from the solar collector module; the second side
rail being
further profiled to define a second flange that projects away from the solar
collector
module; the first flange of at least one solar panel assembly at least
partially overlying
the second flange of a like solar panel assembly when the at least one solar
panel
assembly and the like solar panel assembly are engaged in a side-to-side
relationship;
a containment structure on the second flange forming a drain channel
configured to
receive, contain, and drain rainwater that may seep between the at least one
solar
panel assembly and the like solar panel assembly when the at least one solar
panel
5a
Date Recue/Date Received 2023-02-03
81795291
assembly and the like solar panel assembly are engaged in the side-to-side
relationship; the front rail being further configured to define a downwardly
extending wall
terminating in an up-turned wind hook, the up-turned wind hook being displaced
reanNardly from the front-most edge of the front rail.
Thus, a roof integrated PV system is now provided that meets the above
mentioned and other long felt needs in the industry. The system will be better
appreciated and understood upon review of the detailed description set forth
below
taken in conjunction with the accompanying drawing figures, which are briefly
described
as follows.
5b
Date Recue/Date Received 2023-02-03
CA 02922324 2016-02-29
BRIEF DESCRIPTION OF THE DRAWINGS
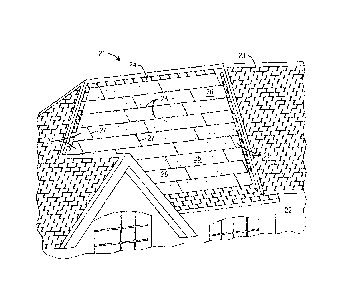
Fig. 1 is a perspective view of a residential home with a roof integrated PV
system according to one aspect of this disclosure.
Fig. 2 is a perspective view of a PV panel assembly configured according to
one
aspect of the disclosure.
Fig. 3 is an exploded perspective view of the PV panel assembly of Fig. 2
illustrating various components of the PV panel assembly.
Figs. 4A-4C illustrate one embodiment of front and back edge couplers and show
sequentially the coupling together of the back edge couplers of one panel with
the front
edge couplers of a panel assembly in a next higher course of panel assemblies.
Figs. 5A-5C illustrate one embodiment of left and right end couplers and show
sequentially the coupling together of a left end coupler with a right end
coupler during
installation of PV panel assemblies in end-to-end relationships.
Fig. 6 is a perspective view showing left and right end couplers engaged and
.. locked together and illustrates the sealing gaskets compressed within the
locked
together couplers.
Fig. 7 is a top plan and partially transparent view of an array of PV panel
assemblies according to one embodiment of the disclosure illustrating
electrical
connections between the micro inverters of the panels.
Fig. 8 is a bottom perspective view of a portion of the array of Fig. 7
illustrating
the support rib of this embodiment and its various features for containing and
restraining
electrical cables and electrical connectors.
6
CA 02922324 2016-02-29
Fig. 9 is an edge view of the front edge portion of a lowermost course of a PV
array illustrating use of a starter strip coupler for the lowermost installed
course of PV
panel assemblies.
Fig. 10 is a perspective view of a PV panel assembly of the lowermost course
showing its connection to the starter strip coupler along the front edge of
the array.
Fig. 11 illustrates several variations of dummy panels for filling gaps at the
ends
of an installed array of PV panel assemblies according to one embodiment of
the
disclosure.
Fig. 12 is a perspective view of a section of the edge of an installed array
of PV
panel assemblies showing a dummy panel filling a gap formed by offset PV panel
assemblies.
Fig. 13 is a perspective view illustrating connection of a dummy panel to the
right
end coupler of a PV panel assembly.
Fig. 14 is an enlarged perspective view illustrating one embodiment of a right
end
counter flashing for flashing the PV array to the roof on the right edge of
the PV array.
Fig. 15 is a perspective view of illustrating one embodiment of a left end
step
flashing and counter flashing for flashing the array to the roof on the left
end of the PV
array.
Fig. 16 is an enlarged perspective showing the connection of the left end
counter
flashing of Fig. 12 to the left end coupler of a PV panel assembly.
Fig. 17 is a side view along the back edge of a PV array illustrating one
embodiment of flashing for the back edge of the array.
7
CA 02922324 2016-02-29
Fig. 18 is a perspective view of a rear corner of a PV array illustrating one
embodiment of a corner flashing component for flashing the array to the roof
at its back
corners.
Fig. 19 is a perspective view of a PV panel assembly configured according to
an
alternate embodiment.
Fig. 20 is a perspective view of an array of PV panel assemblies of Fig. 19
installed on a roof.
Fig. 21 is a perspective view illustrating an alternate embodiment of left and
right
end couplers.
Fig. 22 is and end view illustrating an alternate embodiment of the top and
bottom edge couplers.
Figs. 23a through 23e are end views illustrating the five aluminum extrusions
used to fabricate the left and right end couplers and the top and bottom edge
couplers
of Figs. 21 and 22.
Fig. 24 is a perspective view showing a portion of an installed PV panel array
and
illustrating alternate PV panel assemblies and some of the flashing components
used to
prevent water penetration beneath the panel assemblies.
Fig. 25 illustrate nine (9) formed metal components that are used to fabricate
all
needed flashing components for a PV system installation such as that shown in
Fig. 24.
Fig. 26 shows in sequence (a-k) the installation of various flashing
components
and particularly the inside corner flashing component shown in Fig. 25,
Fig. 27 illustrates a set of faux PV panels according to an alternate
configuration
for creating an aesthetically pleasing edge along an installed PV panel array.
8
CA 02922324 2016-02-29
Figs. 28a and 28b illustrate a faux panel construction according to an
alternate
embodiment.
Fig. 29 illustrates in more detail the various faux panel configurations
showing
the relationship of their supports to their various shapes.
Fig. 30 is a perspective view of a roof integrated PV system array according
to an
alternate embodiment of the invention.
Fig. 31 is a perspective cross section illustrating a starter bar according to
the
alternate embodiment.
Fig. 32 is a perspective cross section illustrating a bottom course of panel
assemblies of the array mounted to the starter bar of Fig. 31.
Fig. 33 is a front perspective view of a single panel assembly according to
the
alternate embodiment with the solar module removed for clarity.
Fig. 34 is a rear perspective view of the panel assembly of Fig. 33 with the
solar
module in place and illustrating the rear support feet according to the
alternate
embodiment.
Fig. 35 is a cross sectional view showing an alternate embodiment of a bottom
frame profile extrusion according to the alternate embodiment.
Fig. 36 is a cross sectional view showing an alternate embodiment of a top
frame
profile extrusion according to the alternate embodiment.
Fig. 37 is a cross sectional view showing an alternate embodiment of a left
frame
profile extrusion according to the alternate embodiment.
Fig. 38 is a cross sectional view showing an alternate embodiment of a right
frame profile extrusion according to the alternate embodiment.
9
CA 02922324 2016-02-29
Fig. 39 is a perspective view showing a rear support foot according to the
alternate embodiment of the invention.
Figs. 39a-39c are cross sections of rear support feed of different heights for
use
with the alternate embodiment.
Fig. 40 is a rear perspective view of a panel assembly of the alternate
embodiment showing a plurality of the feet of Fig. 39 attached to the rear
frame profile
extrusion.
Fig. 41 is a detailed perspective cross section showing a preferred method of
attaching the feet to the rear frame profile.
Figs. 41a ¨ 41c show in sequence a preferred method of attaching a foot to the
top rail of a frame.
Fig. 42 is a perspective view showing a special foot configured to accept
mechanical fastening hardware for attaching a module level power electronics
(MLPE)
device to the foot according to the alternate embodiment.
Fig. 42a illustrates in more detail the attachment of an MLPE to the special
foot
designed to accept the MLPE.
Fig. 43 is a perspective view showing attachment of the right frame profile
extrusion to the bottom frame profile extrusion at the bottom right corner of
a module
according to the alternate embodiment.
Fig. 44 is a perspective view showing attachment of the left frame profile
extrusion to the bottom frame profile extrusion at the bottom left corner of a
module
according to the alternate embodiment.
CA 02922324 2016-02-29
Fig. 45 is a perspective view showing attachment of the left frame profile
extrusion to the top frame profile extrusion at the top left corner of a
module according
to the alternate embodiment.
Fig. 46 is a perspective view showing attachment of the right frame profile
extrusion to the top frame profile extrusion at the top right corner of a
module according
to the alternate embodiment.
Fig. 47 is a perspective view showing the bottom edge of a module assembly of
an upper course in an array connected to and overlapping the top edge of a
module
assembly of a next lower course in the array according to the alternate
embodiment.
Fig. 48 is a perspective cross section showing the left edge of a module of an
array overlapping the right edge of an adjacent module of the array according
to the
alternate embodiment.
Figs. 49a-49d are a sequence showing an alternate foot and technique for
attaching the alternate foot to the back frame extrusion profile of a solar
module.
DETAILED DESCRIPTION
Referring now in more detail to the drawing figures, wherein like reference
numerals indicate like parts throughout the several views, Fig. 1 illustrates
a residential
home 22 having a roof 23 with a roof integrated photovoltaic system 21
installed
thereon according to one embodiment of the present invention. The roof
integrated
photovoltaic system 21 comprises a plurality of PV panel assemblies 26 mounted
to the
roof to form a PV array. The panels, when installed, define front-to-back edge
connections 28 and end-to-end connections 27, which will be described in more
detail
11
CA 02922324 2016-02-29
below. Dummy panels 29 may be installed along the edges of the PV array to
fill gaps
along the edges of the array so that the array presents a neater appearance on
the roof.
The PV panel assemblies may include corresponding micro-inverters that convert
the
original DC voltage produced by the solar cells of the PV panel assemblies to
an AC
voltage. The AC outputs of the micro-inverters of the PV panel assemblies are
electrically connected together to result in an aggregated AC voltage and
power rating
of the array and this aggregated AC voltage may be electrically connected to
the public
electrical grid or otherwise used by a homeowner to power home appliances.
Figs. 2 and 3 show one of the PV panel assemblies of this embodiment in its
assembled configuration (Fig. 2) and in an exploded configuration (Fig. 3). In
these
figures, a solar panel comprises a field of solar cells 31 surrounded and
supported by a
frame 32, which may be an aluminum C-channel frame. Most of the field of solar
cells
is cut away in Figs. 2 and 3 to reveal components of the system beneath the
solar
panel. In practice, the field of solar cells is dark and opaque and faces
upwardly to be
exposed to sunlight and thereby generate electricity. The solar panel in this
embodiment is a commercially available product that may be obtained from a
variety of
sources such as, for example, TSMC Solar of San Jose, CA and STION of San
Jose,
CA. The solar panel is generally rectangular in shape and has a right end
33, a left
end 34, a front edge 36, and a back edge 37.
A right end coupler 38 is fixed to and extends along the right end 33 of the
solar
panel and a left end coupler 39 is fixed to and extends along the left end 34
of the solar
panel. As detailed below, the right and left end couplers are configured to
lock together
and form a seal when two PV panel assemblies are urged together in an end-to-
end
12
CA 02922324 2016-02-29
relationship with each other. A gasket 45 (Fig. 3) is associated with the
right end
coupler 38 and a gasket 49 (Fig. 3) is associated with the left end coupler
39. As
discussed below, the gaskets 45 and 49 are configured to form a seal against
water
penetration along an end-to-end connection of PV panel assemblies in a PV
array.
Front edge couplers 41 are attached at the front edge 36 of the solar panel
and
project generally downwardly therefrom. In the illustrated embodiment, the
front edge
couplers do not extend along the full length of the front edge 36 but instead
comprise
two spaced apart couplers as shown. Back edge couplers 42 are attached at
spaced
intervals along the back edge of the solar panel and project generally
downwardly
therefrom. The front edge couplers 41 and the back edge couplers 42 are
configured
as detailed below to lock together when two PV panel assemblies are urged
together in
a front-edge-to-back-edge relationship. A seal strip 43 along the back edge of
the solar
panel carries an elongated gasket 44 (Fig. 3) that forms a seal against water
penetration along a front-edge-to-back-edge connection of PV panel assemblies,
as
discussed in more detail below.
A micro-inverter 51 is mounted beneath the solar panel and its inputs are
electrically connected to the DC output of the solar panel. The micro-inverter
51
converts the DC voltage produced by the solar panel to AC voltage at its plug
52. The
AC voltage output of the micro-inverter is coupled through a splitter 53 to an
electrical
cable 54 that extends beneath and along the length of the solar panel. The
electrical
cable 54 terminates at the right end of the solar panel in a male electrical
connector 56
and terminates at the left end of the solar panel in a female electrical
connector 57. Of
course, the locations of the male and female electrical connectors can be
reversed or
13
CA 02922324 2016-02-29
otherwise changed from that shown and described herein with the same or
equivalent
results.
In this embodiment, a support rib 46 is attached to the bottom of the solar
panel
and extends therealong from the right end 33 to the left end 34 of the solar
panel. The
support rib 46 extends downwardly from the solar panel a distance sufficient
to rest on a
roof deck below and thereby provide structural support to the solar panel when
the PV
panel assembly is installed on a roof. A cable tray is formed between spaced
apart
walls of the support rib 46 and is configured to enclose electrical cables of
the PV panel
assembly so that they do not rest directly on a roof deck below. The cable
tray may
have ends that define tabs 47. Further, the support rib 46 is formed with
various clips
48 that function to clip the electrical connectors and cables of the system to
the bottom
of the solar panel, again preventing them from resting directly on a roof deck
below.
Retaining the cables and connectors above the roof deck is important because
cables
and connectors resting directly on the roof deck can become chafed over time
and
thereby represent an electrical hazard.
Figs. 4A ¨ 40 illustrate in more detail one embodiment of the front edge and
back
edge couplers of the system and how they lock together when two PV panel
assemblies
are urged progressively together in a front-edge-to-back-edge relationship.
The PV
panel assembly on the left (26L) in these figures is a previously installed PV
panel
assembly of a lower course of PV panel assemblies and the PV panel assembly on
the
right (26R) is a PV panel assembly of a next higher course. PV panel assembly
261.
has back edge 37 to which a set of back edge couplers 42 are fixed with rivets
or other
appropriate fasteners. The seal strip 43 extends along the back edge 37 of the
PV
14
CA 02922324 2016-02-29
panel assembly 26L and carries gasket 44, which may be a spaghetti gasket, a
string
gasket, or other appropriate compressible gasket.
The back edge coupler 42 defines a rearwardly extending projection 97 that
rests
on a roof deck 50. The PV panel assembly is secured to the roof deck with
screws or
other appropriate fasteners 80 that extend through the back edge couplers and
into the
roof deck below. The rearwardly extending projection 97 further defines an
inclined
ramp 81 along its back edge and a slot 79 inboard of the ramp 81. PV panel
assembly
26R has a front edge 36 and a set of front edge couplers 41 mounted just
beneath and
inboard of the front edge 36. Each front edge coupler is formed to define a
forwardly
.. facing tongue 78 sized to be received within the slot 79 of a back edge
coupler 42.
Fig. 4A shows the PV panel assembly 26R being slid down the roof deck 50 in
the direction of arrow 82 toward the back edge of the PV panel assembly 26L.
In Fig.
4B, the PV panel assembly 26R has moved closer to the PV panel assembly 26L
and
the tongue 78 of the front edge coupler 41 has engaged the projection 97 of
the back
edge coupler 97. Further, the tongue 78 is seen riding up the ramp 81 of the
back edge
coupler in the direction indicated by arrow 82 as the PV panel assembly 26R is
urged
toward the PV panel assembly 26L. In this regard, the tongue 78 may be thought
of as
a ramp follower. This, in turn, causes the front edge of the solar panel of
the assembly
26R to rise progressively upwardly as indicated by arrow 83. The front edge
continues
to rise until the bottom of the front edge is elevated slightly above the top
of the back
edge of PV panel assembly 26L when the tongue 78 reaches the top of the ramp
81.
Fig. 4C illustrates that as the tongue of the front edge coupler moves beyond
the
land at the top of the ramp 81, the tongue 78 falls downwardly into the slot
79 of the
CA 02922324 2016-02-29
back edge coupler, where the tongue is captured. The downward motion of the
tongue
causes the front edge of the PV panel assembly 26R to move downwardly until
its
underside engages and compresses the gasket 44. The motion of the tongue and
the
front edge is illustrated by arrows 84 and 86 in Fig. 4C. This forms a seal
against water
.. leakage along the horizontal interface between the two PV panel assemblies.
In
addition, an overlap is formed between front edge of the PV panel assembly 26R
and
the back edge of the PV panel assembly 261_ to define a water shed, which
promotes
cascading and further inhibits leakage of water during rain.
It will be seen from the forgoing that a course of PV panel assemblies can
easily
be installed above a previously installed course of PV panel assemblies by
sliding the
PV panel assemblies of the new course into front-edge-to-back-edge engagement
with
the panels of the previously installed course and urging them together. This
causes the
two panels to lock together and form a seal along their interface. The new
panel can
then be secured to the roof deck with a screw as shown at 80 in Figs. 4A-40 in
preparation for a next higher course of PV panel assemblies or back flashing.
The
locations along the back edge of the five back edge couplers 42 (Fig. 3) and
the
locations along the front edge of the two front edge couplers 41 facilitate
staggered
installation of PV panel assemblies from course to course. More specifically,
the PV
panel assemblies of a higher course can be shifted right or left during
assembly relative
to PV panel assemblies of a lower course until their front edge couplers align
with
different pairs of back edge couplers on the panels of the lower course. In
this way, the
seams between the panels of the higher course are shifted and do not align
with those
of the panels of the lower course, rather like traditional asphalt shingles.
16
CA 02922324 2016-02-29
Figs. 5A ¨ 5C illustrate the joining together of two (a first and a second) PV
panel
assemblies of this embodiment in a side-to-side relationship while installing
a PV array
according. In Fig. 5A, the right end 33 and left end 34 of two like PV panel
assemblies
are shown being moved toward one another as indicated by arrow 88. A right end
coupler 38 is attached to the right end 33 with appropriate fasteners and
extends along
the right end 33 of the first PV panel assembly. Similarly, the left end
coupler 39 is
attached to the left end 34 with appropriate fasteners and extends along the
left end 34
of the second PV panel assembly.
The right end coupler 38 is preferably formed of extruded aluminum or other
appropriately rigid material and is profiled to define a vertical leg 68 that
is fixed to the
right end 33 of its solar panel and a horizontal leg 69 projecting from the
bottom of the
vertical leg 68. The top of the vertical leg 68 is slightly offset to define
an elongated
flange 99 that is sized to receive the gasket 45 associated with the right end
coupler 38.
The gasket in the preferred embodiment has an upstanding fin, but this gasket
may take
on a variety of different substitute shapes that obtain the same result. A
wall projects
upwardly from the end of the horizontal leg 69 and is formed to define a
sealing surface
73 at its lower extremity and a locking tab 71 at its upper extremity. The
locking tab 71
defines a ramped top surface 72. A structural rib 67 may be formed along the
right end
coupler if desired to improve its rigidity and strength,
The left end coupler 39 also is preferably formed of extruded aluminum and has
a vertical leg 61 that attaches to the left end of the solar panel with rivets
or other
appropriate fasteners. The vertical leg 611s offset along its bottom edge to
define an
elongated flange 98 sized to receive the gasket 49 associated with the left
end coupler
17
CA 02922324 2016-02-29
39 and having an upwardly extending fin 109. A horizontal leg 63 projects from
the top
of the vertical leg 61 and is profiled with a locking tab 64 projecting
downwardly from its
underside. The locking tab 64 defines a ramped bottom surface 66. A structural
rib
also may be formed along the bottom side of the horizontal leg 63 to add
rigidity and
strength to the left end coupler. The gasket 49 is received onto and held in
place by the
flange 98 and, in the preferred embodiment, is formed with an upwardly
projecting fin,
although other gasket configurations are possible.
Fig. 5B shows the two PV panel assemblies being urged closer together in an
end-to-end relationship. The ramped bottom surface 66 of the left end coupler
has
engaged the ramped top surface 72 of the right end coupler and is riding up
the ramped
surface 66 in the direction of arrow 75. In this regard, the ramped bottom
surface 66
may be thought of as a ramp follower. This, in turn, causes the horizontal leg
63 of the
left end coupler to move progressively upwardly in the direction of arrow 65,
which
generally elevates it above the gasket 45. Further, in Fig. 5B, the left end
coupler
gasket 49 is seen just beginning to engage with the sealing surface 73 of the
right end
coupler.
In Fig. 5C, the two PV panel assemblies have been urged further toward one
another such that the locking tab 64 of the left end coupler has moved just
beyond the
locking tab 71 of the right end coupler. At this point, the locking tab 64 of
the left end
coupler drops downwardly until its end is in a confronting relationship with
the end of the
locking tab 71 of the right end coupler, as shown at 92 in Fig. 5C. As this
occurs, the
left end coupler likewise dropps down so that the fin 89 of the gasket 45
becomes
compressed against the bottom of the vertical leg to form a seal against water
18
CA 02922324 2016-02-29
penetration. At the same time, gasket 49 is compressed against the sealing
surface 91
of the right end coupler to form a seal against water penetration along this
interface.
Fig. 6 is a perspective view of two PV panel assemblies coupled together in an
end-to-
end relationship as just described and illustrates perhaps better the
relationships of the
various components of the couplers and their relationships to one another.
The sensation to an installer when installing PV panel assemblies end-to-end
in a
course is that when the end of one panel is urged into engagement with the end
of an
adjacent panel, a satisfying click-lock occurs. This tells the installer that
a proper
coupling together and sealing of the panels along their ends has been
obtained. Each
PV panel assembly is attached with screws to the roof deck as illustrated
above when it
has been properly installed in end-to-end relationship with a like PV panel
assembly,
thus progressively forming a course of PV panel assemblies.
When forming a course of PV panel assemblies above a previously installed
course, an installer first slides an initial PV panel assembly down into a
front-edge-to-
back-edge engagement with panels of the previously installed course as
described
above. Preferably, but not necessarily, the initial panel is staggered
relative panels in
the previously installed course so that their end seams do not align. When the
initial PV
panel assembly is urged against the lower course, the installer again receives
a
satisfying click-lock confirmation that the couplers have fully engaged. This
panel is
then secured to the roof deck. The next PV panel assembly is slid down
adjacent to the
first and, once locked front-edge-to-back-edge with panels of the course
below, is slid
sideways into engagement with the just installed PV panel assembly. This locks
the two
panels both to the panels of the course below and in an end-to-end
relationship with
19
CA 02922324 2016-02-29
each other. Successive courses of PV panel assemblies are installed in this
way until
the PV array is complete.
As the PV panel assemblies are installed, the outputs of their micro-inverters
are
connected electrically to those of previously installed PV panel assemblies of
the array.
Some possible connections are illustrated in Fig. 7, where several PV panel
assemblies
26 are shown in an array. As a step in the installation of a PV panel assembly
in end-
to-end relationship with a like PV panel assembly, the male electrical
connector on the
right end of one of the panel assemblies is connected to the female electrical
connector
on the left end of the other one of the panel assemblies. This connects the
outputs of
the micro-inverters of the two panel assemblies electrically in parallel. As
the micro-
inverter outputs of successive PV panel assemblies are added, the power rating
of the
installation is progressively increased.
For connecting the PV panel assemblies of one course to the PV panel
assemblies of an adjacent course, one of two adapter cables may be used: a
male-to-
male adapter cable 111 or a female-to-female adapter cable 112. Male-to-male
adapter
cables are cables with a male electrical connector on each end and, similarly,
female-to-
female adapter cables are cables with a female electrical connector on each
end. As
can be seen in Fig. 7, male-to-male adapter cables are used to connect courses
of PV
panel assembles together on the left side of an array of panels because the
left end PV
panel assemblies of each course has a female electrical connector 57.
Conversely,
female-to-female adapter cables are used to connect one course of PV panel
assemblies to an adjacent course on the right side of the array, where the end
panels of
adjacent courses each have male electrical connectors 56. The PV panel
assemblies
81795291
are electrically connected sequentially as they are installed such that all
electrical
connections are completed at the end of the array installation and the full
power rating
of the array is established.
Fig. 8 illustrates perhaps better the cable management aspects of the PV panel
assembly of this embodiment. Here, the underside of a portion of a PV array is
illustrated and shows a first PV panel assembly 1, a second PV panel assembly
2, a
third PV panel assembly 3, and a forth PV panel assembly 4 interconnected as
described above. Micro-inverters 51 are attached to the bottoms of the PV
panel
assemblies and support ribs 4T span the lengths of the panels and also form
cable trays
beneath each panel. The AC output of each micro-inverter 51 is connected via a
junction 53 to a power cable 54. The junction 53 is held in place to the
bottom side of
each assembly by clips 25 that are formed on the support rib 47'. The power
cable 54
extends within the cable tray from one end of each PV panel assembly to the
other and
terminates at one end in a male electrical connector 56 and at the other in a
female
electrical connector 57.
Each end of each power cable projects a sufficient distance from the ends of
its
PV panel assembly to allow two PV panel assemblies to be connected together
electrically as they are installed on a roof deck in an end-to-end
relationship. This is
illustrated at the junction of PV panel assemblies 1 and 4 in Fig. 8. To
connect the PV
panel assemblies of one course of PV panel assemblies to those of an adjacent
course,
adapter cables are used as mentioned above. Fig. 8 illustrates two alternative
connections of this type. To connect the course of PV panel assemblies in
which PV
panel assembly 1 resides to a next higher course in which PV panel assembly 2
21
Date Recue/Date Received 2022-05-20
81795291
resides, adapter cable 93 is used. Adapter cable 93 terminates at each of its
ends in a
male electrical connector 56 and these male connectors connect to the female
electrical
connectors 57 at the ends of PV panel assemblies 1 and 2. This connects the
two
courses of PV panel assemblies together electrically.
Alternatively, an adapter cable 94 can be used in the same way to connect PV
panel assembly 3 of a next lower course of PV panel assemblies to the course
of PV
panel assemblies in which PV panel assembly 1 resides. The connections proceed
in a
sinuous manner from course to course at opposite edges of an installed array
of PV
panel assemblies so that the AC outputs of all of the PV panel assemblies of
the array
is aggregated to be directed to the public electrical grid or otherwise used.
As illustrated
in Fig. 8, the cable tray and its various clips 25, 48, etc. as well as clips
such as clips 30
and 41 at the edges of the PV panel assembly retain the cables and the
connectors
beneath the PV panel assemblies and above a roof deck below. This prevents
direct
contact between the electrical components and the roof deck, which in turn
prevents
potential chafing and damage to these components.
When installing an array of PV panel assemblies in courses, an initial or
lowermost course must be installed along a lower part of a roof deck first, to
which
higher courses are installed as detailed above. Figs. 9 and 10 illustrate in
side and
perspective views respectively a preferred structure for installation of the
lowermost
course of PV panel assemblies. More specifically, a starter strip coupler 101
is first
installed along the roof. The starter strip coupler 101 is configured on its
upslope side
to form a shape that is essentially the same as the shape of the projection 97
(Fig. 46)
of the back edge connectors 42. It defines a slot 102 sized to receive the
tongue 78 of
22
Date Recue/Date Received 2022-05-20
CA 02922324 2016-02-29
front edge couplers 41 of PV panel assemblies and a ramp 105. The front edge
of the
starter strip coupler 101 is simply flat rather than being configured for
attachment to the
back edge of a PV panel assembly. This forms an aesthetically pleasing nosing
for the
array of PV panel assemblies. A groove in an upper surface of the starter
strip coupler
carries a gasket 106.
As with front-edge-to-back-edge couplings of PV panel assemblies in adjacent
courses, the lowermost course of PV panel assemblies is formed by sliding PV
panel
assemblies down the roof deck and urging them into engagement with the starter
strip
coupler 101. This causes the tongues 78 of the front edge couplers to move
upwardly
as they ride up the ramp 105 and then downwardly as the engage within the slot
102 of
the starter strip coupler, as indicated by arrow 103. This, in turn, causes
the front edge
36 of the PV panel assembly to move up and then down as indicated by arrow 104
in
Fig. 9. As a result, the underside of the front edge of the PV panel assembly
comes to
rest on and compresses the gasket 106 forming a seal against water penetration
along
.. the front edge of the PV panel assembly.
Once a first PV panel assembly of the lowermost course in installed and
attached
to the roof deck via screws through its back edge couplers, a next adjacent PV
panel
assembly of the initial course can be installed. This is accomplished by
sliding the next
adjacent PV panel assembly downwardly to engage with the starter strip coupler
101
and then sliding the PV panel assembly sideways to urge its end into
engagement with
the end of the already installed PV panel assembly. This causes the ends of
the PV
panel assemblies to lock and seal as described above. Each PV panel assembly
of the
23
CA 02922324 2016-02-29
lowermost course is installed sequentially in this way until the lowermost
course of PV
panel assemblies is complete.
When installation of an array of PV panel assemblies is complete, the array
likely
will have left and right edges that are not straight and aligned and may
instead define
gaps. This is because the courses of the array may have offset panels at their
ends
and some courses may have fewer PV panel assemblies than others. In these
instances, it may be desirable to fill the gaps along the edges of an
installed PV array
with dummy panels that do not produce electricity but are made to mimic the
appearance of the PV panel assemblies of the array. For instance, dummy panels
29 in
Fig. 1 are seen to fill irregularly shaped gaps along the left and right edges
of a PV array
atop a roof so that the edges of the completed installation are parallel or
somewhat
parallel with the edge contours of the roof. Figs. 11-13 illustrate such dummy
panels
and how they may be coupled to the ends of PV panel assemblies to fill gaps
along the
edges of the array. Six variations of dummy panels 121, 122, 123, 124, 125,
126 and
127 are shown in Fig. 11. Each variation has an upper surface 128 that is
fabricated to
mimic the look of an active PV panel assembly. This upper surface may be
formed of a
variety of materials including, for example black PVC foam. Front edge
couplers 131
are installed beneath the front edges 129 of the dummy panels just as they are
for the
active PV panel assemblies. Similarly, back edge couplers may be attached
along the
back edges of the dummy panels. In this way, dummy panels may be installed in
an
array in the same way that active PV panel assemblies are installed.
An end coupler 132 is attached along one end of each dummy panel. For
example, in Fig. 11, the end couplers 132 are attached along the left ends of
the dummy
24
CA 02922324 2016-02-29
panels. In this way, the dummy panels can be coupled to a free right end of a
PV panel
assembly along the edge of a PV array. Variations of dummy panels with
couplers
along their right ends also are available for filling gaps along the left edge
of an installed
PV array on a roof. The right ends of the dummy panels in Fig. 11 may be
provided
with or configured to accept a variety of structures such as step flashing and
counter
flashing to provide flashing and/or water sealing. Fig. 12 shows a dummy panel
121
filling a gap along the right edge of an installed PV panel array. Its end
coupler 132 is
shown secured to the right end coupler of PV panel assemb1y137 with its back
edge
being overlapped by solar panel 138 and its front edge overlapping PV panel
assembly
139. It can be seen that the dummy panel 121 fills a gap along the edge of the
installation and mimics the look of an active photovoltaic panel so that the
edge
installation appears straight and neat. Step flashing 139 interleaves with
adjacent
roofing shingles in the traditional manner and counter flashing 140 drapes
over the step
flashing. This provides a reliable barrier against migration of rainwater
beneath the
dummy panel and the array.
Fig. 13 shows one embodiment of a dummy panel left end coupler 132 and how
it couples to a right end coupler 38 of an active PV panel assembly. The dummy
panel
end coupler 132 may be made of a resilient material such as extruded plastic
or
extruded or rolled aluminum and has a vertical leg 141 that attaches to and
extends
along the left end of a dummy panel 121. A horizontal leg 142 projects from
the top of
the vertical leg 141 and terminates in a rolled-under edge 146. A flange 143
projects
downwardly and rearwardly from the rolled-under edge 146 and the flange 143
preferably can be flexed slightly due to the resiliency of the material from
which the
CA 02922324 2016-02-29
coupler is made. When installing a dummy panel to an end of an active PV panel
assembly, the dummy panel is urged into engagement with the end of the PV
panel
assembly. This causes the flange 143 to flex as it rides up the ramp 72 of the
right end
coupler and to spring back to the position shown in Fig. 13 when the ramp 72
is cleared.
Alternatively, the dummy panel can be pivoted in place at the junction between
its
coupler and the coupler of the PV panel assembly. In either event, the dummy
panel is
coupled in end-to-end relationship with the active PV panel assembly and
compresses
the gasket 144 to form a seal. When installed, dummy panels appear to be part
of a PV
array and fill unsightly gaps along the edges of the PV array to form the neat
clean
aligned edge shown in Fig. 1.
Once the PV panel assembly array is installed with its dummy panels forming an
aligned or otherwise neat edge along each side of the array, water barriers
are required
along the top edge of the array and along the left and right sides of the
array. One way
to accomplish this is through the use of flashing and counter flashing as
illustrated in
Figs. 14-18. In the illustrated embodiments, one flashing component comprises
step
flashing. Step flashing is well known in the roofing industry and generally
means L-
shaped flashing members 171, preferably made of aluminum, that have one leg
that is
placed beneath the end of each course of adjacent roofing shingles and anther
leg that
extends up the side of the PV panel array. The step flashing members generally
are
installed progressively as roofing shingles are installed next to a PV array
and, as they
are installed; their second legs may be abutted against and/or secured to
flanges 47
along the ends of the PV panel array. The step flashing members 171 of higher
courses partially overlap step flashing members 171 of a next lower course.
This forms
26
CA 02922324 2016-02-29
a cascade effect and, along with the shingles with which the step flashing
members are
interleaved, prevents water from entering beneath the array at its ends.
When the step flashing members 171 are installed along the edges of a PV
array, counter flashing is then preferably installed that overlaps the step
flashing
members 171 to enhance resistance to water penetration. Since the right ends
of the
PV panel assemblies and dummy panels bear right end couplers and their left
ends
bear left end couplers that are different from the right end couplers, unique
right and left
counter flashing members are used along respective edges of the installed
array. Fig.
14 illustrates one embodiment of a counter flashing strip that can be used at
the
exposed right ends 33 of PV panel assemblies and dummy panels. As described
above, these exposed right ends carry right end couplers 34 having locking
tabs 71 and
a gasket 45. A counter flashing member 151, which may be fabricated of
aluminum or
other appropriate material, is formed with a vertical leg 152 terminating
along its bottom
edge in an outwardly projecting foot 153. The outwardly projecting foot is
located to
overly the previously installed step flashing members 161and roofing shingles
below. A
horizontal leg 156 projects inwardly from the upper edge of the vertical leg
152 and
terminates at a rolled-under edge 157. A flange 158 depends from beneath the
horizontal leg 156 and carries an upturned locking tab 159 at its lower end.
The counter flashing member 151 can be installed on a right end coupler 34 as
shown with the locking tab 159 of the counter flashing ,e,ber lodged beneath
the locking
tab 71 of the right end coupler. This compresses the gasket 45 as shown and
forms a
water seal along the rolled-under edge 157 of the counter flashing member.
Preferably,
gasket 49 is positioned to bear against the step flashing members 161 as well,
thereby
27
CA 02922324 2016-02-29
enhancing a seal along the step flashing members and the right end of the PV
array.
When a counter flashing member or members is installed on the exposed right
end of a
PV panel array overlapped with previously installed step flashing, the counter
flashing
and step flashing forms a barrier that prevents rainwater from entering
beneath the PV
panel array. Because of its effectiveness, step flashing and counter flashing
are
commonly used along the intersection of a wall or chimney and the shingled
deck of a
roof.
Figs. 15 and 16 illustrate one embodiment of counter flashing for use along
the
left edge of an installed PV array. Here, step flashing members 171 are shown
previously installed along the edge of the array and positioned by the
flashing support
flanges 47. While not shown, it will be understood that the step flashing
members are
each disposed beneath the end shingle of a course of roofing shingles adjacent
the PV
array. The counter flashing members 172 may then be installed on the exposed
left
ends of each PV panel assembly and dummy panel in such a way that they drape
over
the vertical legs of the step flashing members 171. The end of each PV panel
assembly
along an edge of the PV array receives a corresponding counter flashing member
172
with the counter flashing members of lower courses being overlapped slightly
with those
of upper courses. As perhaps best illustrated in Fig. 16, the left edge
counter flashing
strips 172 are formed with a vertical outer wall 177 that terminates at its
upper extent in
a rolled edge 178. A vertical inner wall 180 projects downwardly from the
rolled edge
and is spaced from the outer wall 177 to define a vertical slot 185. The
counter
flashing member 172 is further formed to define an internal trough 181 inboard
of the
vertical inner wall 180. An angled locking tab 179 is configured to wedge
behind the
28
CA 02922324 2016-02-29
locking tab 64 of the left end coupler 39 to hold the counter flashing member
172 in
place. When installed, the slot 185 may at least partially receive the
vertical legs of the
previously installed step flashing members 171 as shown in Fig. 16.
The counter flashing strip 172 connects to the left end coupler 39 of a
corresponding PV panel assembly and is locked in place by the locking tab 179.
At the
same time, the gasket 49 is compressed against the inner wall of the trough
181 as
shown to form a moisture seal at this location. Water that may leak beneath
the left end
coupler 39 and the counter flashing member 172 falls into the trough 181 and
is directed
downwardly to the lower end of the array where it can be safely expelled.
Further the
counter flashing members extend downwardly to overlie and cover the previously
installed step flashing members 171 thus forming a water shed that insures
against
windblown rain seeping behind the step flashing members and onto a bare roof
deck
below.
Figs. 17 and 18 illustrate one possible structure for flashing along the top
edge
and at the top corners of an installed PV array according to one embodiment.
In Fig.
17, the back edge 191 of an installed PV array is shown with its back edge
coupler 42
being fastened to a roof deck 50 with screws 80 or other appropriate
fasteners. A
lowermost course of shingles 192 extends along and is spaced from the back
edge of
the array. A flashing strip 193 extends from beneath the lowermost course of
shingles
192 away from the roof deck and rests atop the PV panel assemblies along the
back
edge of the array. The flashing strip 193 may be attached to the deck 50
beneath the
roofing shingles with roofing nails or other appropriate fasteners. Likewise,
the flashing
strip may be attached to the seal strip 43 with screws, adhesive, or other
fasteners so
29
CA 02922324 2016-02-29
that the flashing strip compresses the gasket 44 of the seal strip 43 forming
a seal
against windblown rain. Rainwater that is shed down the roof shingles 192 is
directed
by the flashing strip 193 to the upper surfaces of the PV panel assemblies of
the top
course. From there, the rainwater cascades down the faces of the PV panel
assemblies
of the array without leaking at the vertical or the horizontal joints of the
PV panel
assemblies because of the sealed interfaces described above.
As shown in Fig. 18, the top corners of the installed PV array may be covered
with a molded or formed corner cap 194 that covers the ends of the top
flashing strip
193. The corner cap 194 also covers the upper ends of step flashing and
counter
flashing members along the ends of the uppermost PV panel assemblies. In this
way,
water is prevented from seeping beneath the assembly at the top corners
thereof.
Figs. 19-29 illustrate an alternate embodiment of the invention that is
modified
somewhat in its details from the just described embodiment and includes
additional
novel features. However, many other details of this alternate embodiment are
not
significantly different from those of the previously described embodiment.
Where this is
the case, such details will not be described in depth a second time in the
discussion of
the alternate embodiment that follows.
Fig. 19 shows a PV panel assembly 201 that incorporates a commercially
available solar panel 204 (shown transparent in Fig. 19 for clarity) having a
peripheral
frame. A left end coupler 202 is attached along the left end of the PV panel
and a right
end coupler 203 is attached along the right end of the panel. Five spaced
apart top
edge couplers 206 are attached along the top edge of the PV panel and a pair
of bottom
edge couplers 207 is attached in spaced relationship along the bottom edge of
the PV
CA 02922324 2016-02-29
panel. A cable tray 208 is attached beneath the PV panel and is configured to
support
and facilitate management of the various electrical cables of the assembly.
More
specifically, in this embodiment, the cable tray 208 comprises a left panel
209 and a
right panel 211. The left and right panels extend from the top edge to the
bottom edge
of the PV panel. A relatively narrow central panel 212 spans the left and
right panels
and all of the panels are perforated to reduce amount of material used, to
reduce weight
of the assembly, and to promote ventilation beneath the assembly. Unlike the
prior
embodiment, the cable tray of this embodiment does not rest on a roof deck to
provide
support for the PV panel assembly, but rather serves merely as a cable
management
feature and to keep the various cables of the assembly raised above a roof
deck.
A micro-inverter 213 is mounted beneath the solar panel 204 and receives DC
input from the solar panel via input cables 223. AC output from the micro-
inverter is
directed through output cable 222 to splitter 221 and onto main AC cable 214.
The
main AC cable 214 is terminated at its left end with a female (or male)
electrical
.. connector and is terminated at its right end with a male (or female)
electrical connector
(not visible). The main AC cable 214 may be secured with clips 218 and 219
integrated
into the PV panel assembly. Excess cable at the left and right ends of the
main cable
214 is snaked up (or down) through a bend 217 that is supported on a
respective one of
the end panels 209 and 211. The width of the end panels 209 and 211 is
selected to
.. accommodate the rather large minimum bend radius of the main AC cable 214,
which
typically is rather thick. Significantly, the left and right ends of the main
cable 214 can
be reoriented if needed so that the electrical connector can extend upwardly
as shown
on the right in Fig. 19 or downwardly as shown on the left in Fig. 19. To
change the
31
CA 02922324 2016-02-29
direction, an installer need only manipulate the end portion of the cable 214
so that it
bends in the opposite direction atop the end panel of the cable tray. This may
be
necessary, for instance, when connecting one course of PV panel assemblies to
a next
higher or next lower course or in other instances.
Fig. 20 illustrates an installation or array 228 of PV panel assemblies 201 of
Fig.
19 on a roof 227. As with the prior embodiment, the PV panel assemblies are
coupled
together end-to-end and the courses of PV panel assemblies are coupled
together top-
to-bottom in manners described in more detail below. The panel assemblies 201
may
be installed in an aligned array as shown in the top two courses of PV panel
assemblies
in Fig. 20; in a staggered array as shown in the bottom two courses of Fig.
20; or in
other arrangements determined by a contractor. Fig. 20 also shows various
flashing
components for preventing migration of rainwater beneath the installation 228.
These
include, for example, top flashing 229, step flashing 231, counter flashing
232, inside
corner flashing 233 among other flashing components. These flashing components
will
be described in more detail below. It will be noted that the installation of
Fig. 20 does
not include faux panels filling gaps at the ends of the installation. Such
faux panels are
described in more detail below and may be used by a contractor to fill gaps at
the end-
of a PV panel assembly installation and thereby provide a cleaner looking
array on a
roof.
Fig. 21 is a perspective end view showing two PV panel assemblies coupled
together end-to-end and illustrates an alternate and enhanced embodiment of
the left
end and right end couplers that differs from those of the previously described
embodiment. The left end coupler 238 is shown attached to the left end 236 of
a first
32
CA 02922324 2016-02-29
solar panel and the right end coupler 246 is attached to the right end 237 of
a second
solar panel. The couplers preferably are made of extruded aluminum, but other
materials such as steel or plastic may be substituted to obtain similar
results. The left
end coupler 238 comprises a vertical leg 239 that is attached to the left end
236 with
rivets or other appropriate fasteners (not visible). A horizontal leg 241
projects from the
vertical leg 239 to a distal edge 240 located adjacent the right end 237 of
the second
solar panel. A ramp 242 projects at an angle downwardly and inwardly beneath
the
distal edge 240. The left end coupler 238 is further formed with a T-channel
member
245 that extends inwardly from the vertical leg 239 and is configured to
secure a
compressible bulb gasket 243. A groove adjacent and extending along the upper
edge
of the vertical wall 239 is shaped to receive a bead gasket 244, which forms a
seal
between the left end coupler 238 and the left end 236 of the solar panel.
The right end coupler 246 is configured with a vertical leg 248 attached to
the
right end 237 of the second solar panel with rivets 250 or other appropriate
fasteners. A
.. bead gasket 249 is disposed in a groove extending along and adjacent the
upper edge
of the vertical leg and forms a seal against the vertical leg and the right
end 237 of the
solar panel. A horizontal leg 247 projects outwardly from the lower edge of
the vertical
leg to an edge. A support leg 252 extends upwardly from the horizontal leg 247
intermediate its ends and supports an angled ramp surface 253 and an
upstanding tab
254 along the distal end of the ramp surface 253. A fin or wiper gasket 251 is
secured
in a T-slot formed with and extending along the vertical leg 248 of the right
end coupler
246 and extends upwardly at an angle therefrom. In Fig. 21, the left and right
end
couplers are shown coupled together joining and sealing between the two PV
panel
33
CA 02922324 2016-02-29
assemblies. More specifically, the bulb gasket 243 of the left end coupler is
shown
compressed against the upper surface of the horizontal leg 247 of the right
end coupler
forming a seal at that location. The wiper gasket 251 is seen to be bent and
bearing
against the ramp 242 thereby forming a seal at that location.
During installation, two PV panel assemblies are coupled together end-to-end
with the left and right end couplers in a manner similar to that used for the
end couplers
of the previous embodiment. More specifically, the left and right ends of two
PV panel
assemblies are urged together by an installer. As the ends draw nearer, the
ramp 242
first engages and begins to ride up the tab 254 raising the left end 236 of
the first panel
relative to the right end 237 of the second panel. The tab 254 may thus be
thought of
as a ramp follower. At some point, the ramp 242 clears the tab 254 and drops
down to
engage the angled ramp surface 253 thereby providing a confirming "click"
sound and
feel to the installer. The edge of the ramp 242 then rides progressively down
the angled
extension leg to the position shown in Fig. 21. This, in turn, brings the bulb
gasket 243
progressively into engagement with the vertical leg 247 of the right end
coupler 246 and
progressively moves the ramp 242 into compressive or bending engagement with
the
wiper gasket 251. Seals are thus formed at the locations of the bulb gasket
243 and the
fin gasket 251 against migration of rainwater through the junction of the two
PV panel
assemblies. Even if a perfect seal is not formed by the fin gasket 251, any
water that
breaches the seal will simply fall into the channel below to be shed
downwardly to the
bottom edges of the panel assemblies from where it can cascade down the array.
Fig. 22 illustrates alternate embodiments of the top and bottom edge couplers
for
coupling panels together in a top-to-bottom relationship that include
additional and novel
34
CA 02922324 2016-02-29
features. As with the prior embodiment, a plurality of top edge couplers are
attached in
spaced relationship (see Fig. 19) along the top edge of each panel assembly.
Similarly,
a pair of spaced apart bottom edge couplers 264 is attached along the bottom
edge of
each panel assembly. Each top edge coupler 263 comprises a rearwardly
extending
base 266 and a sloped ramp 267. Unlike the prior embodiment, the top edge
connectors of this embodiment are further formed to define a V-shaped ground
wire
channel 268 with grounding screw 269 that threads into the ground wire
channel. The
back edge coupler 263 is formed with a U-shaped portion 272 that defines a
cable race
to aid in routing cables of the system beneath a panel installation and may be
fastened
.. to an underlying roof deck with screws 277.
Each bottom edge coupler 264 attaches with appropriate fasteners such as
rivets
270 to the bottom edge of a solar panel and extends downwardly therefrom. The
lower
extent of each bottom edge coupler 264 is configured to define a tongue 271
with the
illustrated shape, which is somewhat different than the configuration of the
tongue in the
.. previous embodiment. A separate top edge extrusion 259 is attached with
appropriate
fasteners to the extreme top edge of the PV panel assembly and extends the
entire
length thereof. The top edge extrusion 259 carries an upwardly projecting
wiper gasket
274 and a bead gasket 276, and the bead gasket 276 compresses against and
forms a
seal along the extreme top edge of its solar panel. A bulb gasket 273 extends
along the
entire length of and depends from the bottom edge of each PV panel assembly.
Two PV panel assemblies are coupled together in a top-to-bottom relationship
in
substantially the same way as with the prior embodiment. That is, a lower
course of PV
panel assemblies are installed in end-to-end relationship on a roof deck as
described
CA 02922324 2016-02-29
above by coupling them together end-to-end and screwing each assembly to the
roof
deck through its top edge couplers. In the present embodiment, a copper ground
wire
may then be inserted through the V-shaped ground wire channels 268 of the
exposed
top edge connectors 263 and the grounding screws 269 tightened onto the ground
wire
to make a secure electrical connection. This ground wire attaches to at least
one top
edge connector of each PV panel assembly of an installation and provides a
separate
and redundant system ground for the installation to enhance safety. AC power
cables
of the system can then be routed through selected ones of the cable races 272
of the
exposed top edge couplers to help hold them in place for interconnecting
courses of PV
.. panel assemblies together electrically.
A PV panel assembly of a next higher course is then slid down the roof toward
PV panel assemblies of the lower course with each bottom edge connector of the
panel
assembly aligned with a selected corresponding top edge connector of one or
more PV
panel assemblies of the lower course. The two bottom edge couplers of each PV
panel
.. assembly are space to align with corresponding ones of the five top edge
couplers of
the next lower course to form a variety of possible offsets between panels of
adjacent
courses. For example, panels in adjacent courses may be offset relative to
each other
by one quarter, one third, or one half the width of a panel assembly. As the
panel
assemblies are urged together top-to-bottom, the tongues 271 of the bottom
edge
couplers of the upper panel assembly ride up the ramps 267 of the top edge
couplers of
the lower panel assembly(s). This elevates the bottom edge of the upper panel
assembly above the top edge of the lower panel assembly. The tongues 271 then
crest
the ramp 267 and slide down the other side to the position shown in Fig. 22.
This
36
CA 02922324 2016-02-29
provides a confirming "click-lock" sound and feel to the installer. More
importantly,
however, it causes the bottom edge of the upper PV panel assembly to drop down
into
overlapping relationship with the top edge of the lower PV panel assembly.
This
motion, in turn, compresses the bulb gasket 273 between the two edges to form
a
primary seal. Simultaneously, the fin seal 274 is engaged and bent down
between the
bottom edge of the upper PV panel assembly and the top edge extrusion 259.
This
forms a secondary seal between the two PV panel assemblies to provide further
assurance against rainwater leakage between panels.
Figs. 23a through 23e illustrate perhaps more clearly the separate extrusion
profiles of each of the just described end and edge couplers. Fig. 23a shows
the profile
of a right end coupler 246 and Fig. 23b shows the profile of a left end
coupler 238. The
separate back edge extrusion 259 is shown clearly in Fig. 23c. Fig. 23d
illustrates the
profile of the bottom edge couplers 264 while Fig. 23e shows the profile of
the top edge
couplers 263 with their V-shaped ground wire channels and cable races. Of
course,
variations of the profiles may well be imagined and implemented by the skilled
artisan
without departing from the invention embodied in these particular example
profiles.
Fig. 24 illustrates alternate embodiments of some of the various flashing
components used to prevent rainwater migration beneath a PV panel
installation. In this
figure, an upper right corner of an installation of vertically aligned PV
panel assemblies
279, 281 is shown. Top flashing 282 extends from beneath a course of shingles
280
above the installation to a position overlying the uppermost edge of the PV
panel
assembly installation. Unlike the prior embodiment, the top flashing of this
alternate
embodiment has an exposed front edge 283 that is formed with an array of
louvers 284
37
CA 02922324 2016-02-29
forming a ventilation grid along the uppermost edge of the assembly. It has
been found
that substantial heat can be generated below a PV panel assembly installation.
The
ventilation grid formed by the array of louvers 284 promotes convective flow
of this
heated air beneath the installation for cooling. As an alternative, the heat
developed
beneath a PV panel assembly installation may be harvested with heat exchangers
or
other devices disposed beneath the assembly and harvested heat may be stored
as, for
example, hot water for use by a consumer.
Referring again to Fig. 24, a straight corner flashing component or corner cap
286 is shown covering the upper right corner of the installation and is formed
with a side
skirt that forms a counter flashing extending down the edge of the straight
corner
flashing component. Also shown in Fig. 24 are step flashing components 287
installed
in the traditional way beneath successive courses of shingles with the hidden
vertical
legs of the step flashing shown behind the counter flashing in phantom lines.
A right
end counter flashing component 288, described in more detail below, is
attached along
the edges of the PV panel assemblies and each has an outside skirt that
overlies the
vertical legs of the step flashing components 287 thus forming counter
flashing. Caps
289 may be snapped or otherwise installed in the ends of the counter flashing
components 288 if desired. As with the prior embodiment, rainwater is shed up
and
over the PV panel assembly installation and is shed away from edges and
corners of
the installation. It has been found that properly installed flashing
components
substantially prevent rainwater from penetrating beneath a PV panel assembly
installation. Any water that may seep beneath the assembly is shed down the
roof and
38
CA 02922324 2016-02-29
beneath the forward edge of the installation by an underlayment membrane
beneath the
installation.
Fig. 25 shows an array of various flashing and faux panel components of the
system of this embodiment that may be formed or extruded from metal or other
appropriate material. More specifically, component 291 is a top angled corner
flashing
component for flashing the top corner of a PV panel assembly installation that
forms an
angle rather than the straight corner shown at 286 in Fig. 24. Component 292
have an
outer edge 293 is an example of a faux panel for filling gaps at the ends of a
PV panel
assembly installation, as will be described in more detail below. Component
294 is a
support rib for mounting to the bottom of a faux panel to support the panel on
a roof
deck. Component 296 is a right end counter flashing member such as that shown
in
Fig. 24 at 288. Component 297 is a lower inside corner flashing member for
flashing
lower inside corners of an installation, as described in more detail below.
Component
282 is a top flashing member having an elevated forward edge 283 and
ventilation
louvers 284. Component 298 is a step flashing member and component 299 is an
inside corner flashing member. Finally, component 301 is a left end counter
flashing
member for counter flashing the left-most edge of a PV panel or faux panel.
The right
end counter flashing 296 and the left end counter flashing 301 are formed with
features
that interlock with the right end and left end couplers 203 and 202 (Figs. 19,
21, and 22)
at respective ends of PV panel assemblies to counter flash the edges of a PV
panel
assembly installation.
Fig. 26 shows a sequence of 11 frames (a-k) illustrating progressively the
installation of numerous flashing components to flash a gap at an end of a PV
panel
39
CA 02922324 2016-02-29
assembly installation when faux panels are not to be used to fill the gap. In
frame a,
304 is a right-most end PV panel assembly of an already installed lower course
of PV
panel assemblies and 303 is the right-most PV panel assembly of an upper
course of
PV panel assemblies. It can be seen that the PV panel assembly 304 extends
further to
the right than PV panel assembly 303 thereby defining a gap along the right-
most edge
of the installation. Another course of PV panel assemblies is to be installed
above the
course of which panel assembly 303 is a member, and it too will extend further
to the
right to define the upper edge of the gap. A first step in the installation
method is to
install a length of top flashing 282 along the top edge of the PV panel
assembly 304.
Next (frame b) an AC cable adapter 307 is routed from panel 303 and positioned
to be
electrically connected to the AC cable of the next higher course of PV panel
assemblies.
When this cable adapter has been connected and positioned, a lower inside
corner
flashing member 308 (frame c) is attached at the lower inside corner of the
gap covering
the end of the top flashing 282 and extending up the end of panel assembly
303.
In frame d, a length of step flashing 298 is laid atop the upper portion of
the lower
inside corner flashing 308 and in frame e, a course of shingles 309 is
installed against
the panel 303 covering the step flashing 298 and the upper edge of the top
flashing 282.
In frame f, another piece of step flashing 298 is installed against the PV
panel assembly
303 overlying the headlap portion of shingle 309 as is typical when installing
step
flashing during a roofing installation. In frame g, another course of shingles
110 is
installed against the PV panel assembly 303 overlying the step flashing 298
and an
additional course of shingles 111 is installed above the course 110 to extend
beneath
CA 02922324 2016-02-29
the next higher course of PV panel assemblies. The AC cable is routed atop
this course
of shingles.
Next, in frame h, an upper inside corner flashing 299 is installed at the top
corner
of PV panel assembly 303 overlying the shingles. In frame i, a starter bar 312
is
installed on the shingles covering the top flap of the upper inside corner
flashing 299
and oriented coextensively with the top edge of PV panel assembly 303. This
starter
bar will provide support for a PV panel assembly of the next higher course
that extends
beyond the right end of panel assembly 303. In frame j, right end counter
flashing 296
is fastened to the right end coupler of the PV panel assembly 303 and extends
downwardly over the vertical legs of the step flashing and corner flash ings
to provide
counter flashing along the end of the panel 303. Finally, in frame k, a PV
panel
assembly 306 of the next higher course is installed so that the front edge of
this
assembly is partially supported atop PV panel assembly 303 and the other
portion is
supported atop the starter bar 312. The gap is thus fully flashed and
waterproofed.
It is believed that contractors and installers may wish to fill gaps along
ends of
PV panel assembly installations with faux panels as detailed below so that the
just
described installation method to flash gaps will not be required.
Nevertheless, the
invention includes these flashing components and this flashing technique, in
the event
faux panels are not to be used.
Fig. 27 illustrates the use of faux panels to fill gaps along ends of PV panel
assembly installations to provide a more pleasing appearance along the ends of
the
installations. Faux panels are non-functioning panels that are colored to look
like and
blend in with the functioning PV panel assemblies. In the illustrated
embodiment, a
41
CA 02922324 2016-02-29
limited selection of faux panel shapes are provided that will suit the great
majority of
requirements to straighten out ends of PV panel installations that extend at
three
common roof angles. These three angles correspond to the three most common
valley
angles on roofs. Faux panels to fill gaps along straight end installations
also are
provided. The selected faux panel configurations are illustrated at the top of
Fig. 27 and
it will be seen that there is a right up and right down and a left up and left
down version
of each of the three configurations, in addition to rectangular faux panels.
More
specifically, there is a right up quarter panel 316, a right up third panel
317 and a right
up half panel 318. Terminology like "right up quarter" refers, for example, to
the fact
that a panel so designated is for the right end of a PV panel assembly
installation where
the angle extends up the roof and the upper edge of the faux panel is a
quarter of the
length of a full PV panel assembly.
With continuing reference to the upper images of Fig. 27, further selected
configurations of faux panels include left up quarter panels 323, left up
third panels 324,
and left up half panels 325. In a similar way, the selected faux panel
configurations
include left down quarter panels 319, left down third panels 321, and left
down half
panels 322. Corresponding right down quarter panels 326, right down third
panels 327,
and right down half panels 328 are also included in the selected
configurations. The
selected configurations finally include rectangular faux panels including a
rectangular
third panel 329, a rectangular quarter panel 331, (not shown) a rectangular
half panel
and a rectangular full panel.
Images a through I in Fig. 27 illustrate various configurations of PV panel
assembly installations that can be obtained using the selected configurations
of faux
42
CA 02922324 2016-02-29
panels discussed above. In these figures, roof valleys of various angles are
illustrated
by reference numeral 341. Image a illustrates a quarter offset pattern
installation
wherein the panel assemblies of one course of PV panel assemblies are offset
by a
quarter of the length of a panel assembly from panel assemblies of adjacent
courses.
This example shows an installation with one straight end on the left and one
angled end
on the right adjacent the roof valley 341. Along the right end, gaps are
filled with right
down quarter panels 326 and the gaps along the left side are filled with
rectangular
quarter faux panels 331. Image b shows a parallelogram installation with two
angled
ends installed between two roof valleys 341. Again, the PV panel assemblies of
the
.. installation are offset by a quarter of a panel and the resulting gaps on
the right are filled
with right down quarter panels 326 while the gaps along the left end are
filled with left
up quarter panels 323.
Image c shows a trapezoid PV panel assembly installation where the
installation
is disposed between two downwardly extending roof valleys 341. Again, the PV
panel
assemblies are offset by a quarter panel and the resulting gaps along the
right end are
filled with right down quarter panels 326 as before. Two rectangular quarter
panels 331
(or one rectangular half panel) fills the excess gap along the middle course
of PV panel
assemblies to even the gaps and left down quarter faux panels 319 fill the
remaining
gaps to provide a straight left end. Image d shows an installation where the
PV panel
assemblies of each course are offset by one third the length of an assembly
relative to
each other. Resulting gaps on the right are filled with rectangular third faux
panels 329
and resulting gaps on the left are filled with left down third faux panels to
result in a neat
straight end for the installation.
43
CA 02922324 2016-02-29
Image e shows a parallelogram installation with PV panel assemblies offset by
one third the length of a panel assembly. Here, the angled right end gaps are
filled with
right down third faux panels and the gaps on the left end are filled with left
down third
faux panels. Image f shows a trapezoidal installation with PV panels offset by
a third
the length of a panel. Here, the gaps along the right end of the installation
are filled with
right down third faux panels. On the left, excess gap width is filled with
rectangular third
faux panels and remaining gaps are filled with left down third faux panels.
Images g
through I show the same three examples except with the PV panel assemblies of
each
course being offset by half the width of a panel assembly to produce even more
acute
angles along the ends of the installation. In image g, the left end gaps are
filled with left
up half faux panels and the excess gap on the straight right side is filled
with two
rectangular quarter panels (or one rectangular half panel). Image h shows the
parallelogram installation with PV panel assemblies offset by half the length
of an
assembly. Here, the right end gaps are filled with right up half faux panels
while the left
end gaps are filled with left down half faux panels.
Image i shows a PV panel assembly installation between two roof valleys of
different angles and illustrates the diversity of the faux panel system of the
invention.
Again, the PV panel assemblies are offset by half. Along the left end of the
installation,
gaps are filled with left up half faux panels. However, on the right edge,
excess gap
portions are filled with rectangular panels and the remaining gaps are filled
with right
down quarter faux panels to form an end with a different angle than that of
the left end.
Images j and k show two possible configurations that obtain rectangular
installations of
PV panel assemblies, the left image being a running bond brick pattern with
the right
44
CA 02922324 2016-02-29
being a stacked bond pattern. Finally, image I shows an installation of PV
panel
assemblies where no faux panels are used and gaps are left unfilled. As
mentioned
above, such an installation requires rather complex flashing to seal it
against migration
of rainwater.
Figs. 28a and 28b show in more detail the construction of the faux panels of
the
present embodiment. Fig. 28a shows the faux panel with its metal panel portion
opaque
to match the appearance of adjacent PV panel assemblies. Fig. 28b shows the
same
faux panel with its panel portion rendered as transparent in the drawing to
reveal
structures beneath the faux panel. The faux panel 340 has a panel portion made
of
formed metal or other appropriate material that has a top portion 338 painted
or
otherwise treated to resemble a PV panel assembly. The faux panel 340 is bent
to
define a bottom edge portion 338 and also is bent along its angled side to
form an
integrated counter flashing 329. A right end coupler 246, which is the same as
the right
end couplers of PV panel assemblies, is attached with rivets or other
fasteners along
the right end of the faux panel. Similarly, a top edge coupler extrusion 259
is attached
to and extends along the top edge of the faux panel and bears fin gasket 274
as shown
in detail in Fig. 22. A bottom edge coupler 264 is attached to the bottom edge
338 of
the faux panel and a bulb gasket 273 extends beneath the bottom edge.
Referring to
Fig. 28b, a set of support ribs 331, 332, 333, and 334 of appropriate lengths
are
attached beneath the top panel 338 and are sized and configured to rest atop a
roof
deck on which the faux panels are installed to provide structure and support
for the faux
panels.
CA 02922324 2016-02-29
When installing a faux panel such as panel 340, it is coupled to adjacent PV
panel assemblies in the same way that these panel assemblies are coupled to
each
other. This is because the faux panels 340 bear the same end and edge couplers
as
the functioning PV panel assemblies. Since the angled end of a faux panel
always
-- extends along the end of an entire PV panel assembly installation, step
flashing can be
installed along this end simply by sliding step flashing components beneath
the integral
counter flashing 329 of the faux panel with shingle courses overlapping the
step flashing
as is customary in shingle installation. Fig. 29 shows various faux panel
configurations
from the undersides thereof to illustrate one preferred placement and sizing
of the
-- support ribs beneath the faux panels. Other configurations and positioning
may be
used, of course, and the illustrated ones are exemplary only. Each faux panel
has at
least one support rib that is formed with a top tab extending beyond the top
edge of the
faux panel. This provides a fastening tab for the faux panels, which are
fastened to a
roof deck with screws or other fasteners driven through the fastening tabs.
Figs. 30-49 depict an alternate embodiment of a roof integrated PV system and
these figures will now be referred to in describing the alternate embodiment.
Referring to Fig. 30, a roof mounted PV system 401 comprises an array of
individual PV panel assemblies 402 installed on a roof. The PV panel
assemblies 402
are arranged side-by-side to form courses and each higher course overlaps the
top
-- edge of PV panel assemblies in a lower course. A starter bar 404 is
attached to the roof
deck along the bottom of the array and secures the bottom edges of the lower
course of
PV panel assemblies to the roof. Flashing 406 is installed along the top of
the array and
provides both water sheading and ventilation in a manner very similar to the
flashing of
46
CA 02922324 2016-02-29
the first embodiment described above. Flashing and counter flashing 407 is
installed
along the edges of the array to prevent rainwater from penetrating beneath the
array
from the sides, also in a manner very similar to the flashing and counter
flashing of the
first embodiment.
Each PV panel assembly includes a frame, which may be made of extruded
aluminum, and a frameless solar collector module 403 mounted within and
supported by
the frame. A frameless solar collector module will be referred to hereinafter
as a "solar
laminate" for clarity. In Fig. 30 some of the PV panel assemblies are shown
with their
laminate removed to reveal underlying components of the system. These include,
for
example, feet 408 that support the back edges of the PV panel assemblies and
attach
them to the roof, and MLPEs 409 and their associated wiring 410 and 411, all
of which
are described in more detail below. The MLPEs are interconnected via their
wiring to
aggregate the electrical energy produced by all of the PV panel assemblies of
the array.
Fig. 31 shows a section of the starter bar 404 in more detail. The starter bar
404,
which preferably is an aluminum extrusion, is formed with a top surface 412
from which
a downwardly tapered nose 413 extends to a forward drip edge 414. A downturned
stop 419 depends from and extends along the rear edge of the top surface 419.
Support legs 416 extend downwardly from the top surface 412 and the nose 413
and
terminate at their lower ends at a mounting foot 417. Holes 415 are formed
through the
mounting foot to receive fasteners such as screws that secure the starter bar
to the
underlying roof deck.
Preferably, the support legs 416 are machined to form ventilation openings 418
that allow cooling air to flow through the ventilation openings beneath a PV
array.
47
CA 02922324 2016-02-29
When installing an array of PV panel assemblies on a roof, a plurality of
starter bar
sections are first secured to the roof end-to-end to form a long starter bar.
The resulting
starter bar performs the functions of (1) defining where the PV array will be
positioned
on a roof, both vertically and horizontally; (2) mechanically locking the
first course of PV
panel assemblies to the structure; (3) providing for the intake of cool air
beneath the
system for passive cooling of the system; (4) shedding water from the top of
the panel
array to the roof below; and (5) providing aesthetic to the front edge of the
array.
The first course of PV panel assemblies is coupled to the starter bar and
secured
to the roof as illustrated in Fig. 32. More specifically, the bottom rail 431
of each PV
panel assembly 402 is slid down over the upper support surface 412 until the
stop 419
engages a wall 432 of the bottom rail. An upturned "wind hook" 433 of the
bottom rail
then resides beneath the support surface 412 and forward of the stop 419. This
forms a
mechanical attachment that prevents the forward edge of the PV panel assembly
from
moving upwardly and detaching from the starter bar. With the bottom rail of a
PV panel
assembly engaged with the starter bar as described, the PV panel assembly can
be slid
to the left as indicated by the arrow in Fig. 32 until the left end rail 423
of the assembly
engages and couples with the right end rail 422 of a like PV panel assembly
already
installed. The PV panel assembly can then be secured to the roof with
fasteners driven
through the feet along its top edge, whereupon the next PV panel assembly of
the
lowermost course can be installed in the same way.
Fig. 33 shows the frame of a PV panel assembly with the solar laminate
removed. The frame comprises a right end rail 422, a left end rail 423, a
bottom rail
431, and a top rail 424. The rails are connected together at their ends,
preferably with
48
CA 02922324 2016-02-29
corner keys, for form the rectangular frame of the assembly. In practice, the
frame is
assembled around a solar laminate, the edges of which are received in and
supported
by the members of the frame. Support feet 408, which are provided separately
in a
preselected size, are attached at spaced intervals along the top rail 424 and
extend
.. downwardly therefrom. In this regard, at least some of the feet may be
located along
the top rail 424 so that they align with and can be secured to a roof rafter
rather than the
roof deck. This provides greater lift resistance and reduces the number of
feet needed
to secure a PV panel assembly to the roof.
A special foot 501 is configured to receive mounting hardware for securing an
MLPE associated with the PV panel assembly. When so mounted, the MLPE will
reside
beneath a PV panel assembly of a next higher course of panel assemblies and be
covered thereby. Input wiring 410 connects via electrical couplers 427 to the
junction
box of the solar laminate. Output wiring 411 terminates in electrical couplers
426 and
allows for electrical connection of each PV panel assembly to all other panel
assemblies
of an installed array. Fig. 34 shows the panel assembly of Fig. 33 from the
top and
includes the solar laminate 403 mounted in the frame of the assembly. Visible
in this
figure are the mounting flanges of the feet 408 and the special foot 501 to
which an
MLPE 409 and its wiring 410 and 411 are mounted. The electrical coupler 426 at
the
right end of the PV panel assembly also is visible in Fig. 34.
Figs. 35-38 illustrate preferred profiles of the various extruded rails that
make up
the frame of this embodiment. Fig. 35 shows the profile of the bottom rail 431
of the
frame. The bottom rail 431 is formed with a bed 436 upon which a solar
laminate 403
sits when the frame is assembled around the laminate. A flange 437 extends
upwardly
49
CA 02922324 2016-02-29
along the front edge of the bed and a return 438 extends inwardly along the
top edge of
the flange 437. Together, the bed 436, flange 437, and return 438 form a
channel 439
sized to receive and secure the bottom edge of a solar laminate 403 as shown.
A
bearing strip 432 extends downwardly from the bed 436 and an upturned wind
hook 433
extends along the lower edge of the bearing strip. The upturned wind hook 433
and the
bearing surface 432 form a channel 434. An inner wall 441 projects downwardly
along
the inside edge of the bed 436 and a lower wall 442 connects between the
bottom edge
of the inner wall 441 and the bearing surface 432. The inner wall 441, lower
wall 442,
bearing surface 432, and bed 436 together define a rectangular keyway 443 that
extends along the inside of the bottom rail 431.
Fig. 36 shows a preferred profile of the top rail 424 of the frame. The top
rail 424
is formed with a bed 444 on which a solar laminate 403 sits. A V-shaped
projection
extends downwardly from the bed 444 at its midsection and a rear wall 447
extends
along the rear edge of and perpendicular to the bed 444 as shown. A return 448
extends inwardly along the top edge of the rear wall 447 and together with the
rear wall
and the bed defines in inwardly facing channel 449 sized to receive and secure
the top
edge of a solar laminate 403 as shown. A headlap strip 445 projects rearwardly
along
the top edge of the rear wall 447 and terminates in a stop 430. The rear edge
portion of
the headlap strip 445 is formed to receive a flexible fin seal that projects
upwardly and
at a forward angle.
A floor 451 extends inwardly along the bottom edge of the rear wall 447 to an
upturned lip 435 and an intermediate wall 452 extends between the bed 444 and
the
floor 451. Together, the bed, rear wall, floor, and intermediate wall define a
rectangular
CA 02922324 2016-02-29
keyway 453 that extends along the length of the top rail 424. An attachment
flange 450
projects rearwardly and at an angle along the bottom edge of the rear wall 447
and is
positioned for attachment of feet to the top rail 442 of the frame as
described in more
detail below.
Fig. 37 shows a preferred profile of the left end rail of the frame, The left
end rail
423 is profiled to form an outside wall 456, an inside wall 457, a bottom wall
458, and a
top wall 459. These walls together define a rectangular keyway 461 that
extends along
the length of the left end rail. The top wall 459 also defines a bed 461 upon
which a
solar laminate may sit when mounted in the frame of a PV panel assembly. A
return
462 extends inwardly along the top edge of the outside wall 456 and, with the
outside
wall 456 and the bed 461, defines a channel 463 sized to receive and secure
the left
edge of a solar laminate mounted within the frame. A flange 464 projects
outwardly
along the top edge of the outside wall 456 and terminates in an in-turned lip
466. An
opposing upturned lip 455 extends along the bottom edge of the outside wall
456 and
.. together with the outside wall 456 defines an elongated channel. The left
end rail is
configured to couple with the right end rail (Fig. 38) to form a water
managing interface
as described in more detail below.
Fig. 38 shows a preferred profile of the right end rail of the frame. The
right end
rail is profiled with and outer wall 471, an inner wall 472, a bottom wall 473
and a top
.. wall 474. Together, these walls define a rectangular keyway 476. The top
wall 474 also
defines a bed upon which the right edge of a solar laminate 403 sits. An
inwardly
extending return 477 extends along the top edge of the outer wall 471 and
together with
the bed and the outer wall defines a channel 478 sized to receive and secure
the right
51
CA 02922324 2016-02-29
edge of the solar laminate 403 as shown. A flange 479 projects outwardly from
the
outer wall 471and terminates in a J-shaped edge 481. The flange 479 and the J-
shaped edge 481 together define a drain channel 482 for containing and
draining
rainwater that may seep between two PV panel assemblies coupled together end-
to-
end.
Fig. 39 shows a preferred embodiment of a support foot 408 for supporting the
back edge of a PV panel assembly and attaching the assembly to the roof. The
foot
408, which preferably is cut from an aluminum extrusion, is formed with a
mounting
plate 484 provided with holes 486 for receiving fasteners such as screws for
securing
the foot to a roof deck. A rear wall 487 extends upwardly at a slight angle
from the
mounting plate 484 and a forward wall 488 extends upwardly and at an angle
from the
inner end of the mounting plate 484. A bridge wall 491 extends between the top
edge
of the rear wall 487 slightly downwardly to connect to the forward wall 488. A
mounting
flange 489 extends rearwardly from the top edge of the forward wall and
together with
the bridge 491 defines a structure that allows the foot to be attached to the
back rail of
the frame, adjusted in position along the back rail as needed, and secured in
place with
an appropriate fastener, such as a self-treading bolt or a spring clip.
Figs. 39a through 39c illustrate various possible sizes or heights for the
foot. As
mentioned above, the feet are supplied separately and secured along the top
rail of the
frame of a PV module assembly in the field. The height of the feet required,
such as
those illustrated in Figs. 39a through 39c, is directly related to the type of
MLPE
selected for a particular installation, as each type of MLPE has its own space
tolerance
and cooling requirements. In use, a customer can select the type of MLPE
desired and
52
CA 02922324 2016-02-29
feet of the corresponding height for the selected MLPE can be supplied for the
installation. For example, in an optimized scenario where a smart module is
integrated
into the junction box of the solar laminate, the lease amount of space is
required below
the panels of an array and the shortest feet can be used. Where an MLPE
requiring
large spaces between itself and surrounding surfaces for ventilation purposes,
high feet
are required. The smallest height possible in a particular scenario is
desirable since the
system height above the roof deck is reduced and the installation appears more
integrated, and possesses higher aesthetic value.
Figs. 40 and 41 illustrate one technique for attaching feet along the length
of the
top rail of a PV panel assembly frame according to the invention. In Fig. 40,
several
feet 408 are mounted at spaced intervals along the top rail of the assembly
frame and
extend downwardly to be secured to a roof deck below via their mounting plates
484. In
one embodiment, each foot is secured to the top rail of the frame with a self-
taping bolt
492 threaded through the attachment flange 450 of the top rail and threaded
through the
outside wall 487 of the foot. This forms both a secure attachment and a
reliable
electrical or grounding connection.
Fig. 41 illustrates the attachment of the feet in more detail. The mounting
flange
489 of the foot is seen to be wedged within the channel 454 of the back rail
between the
V-shaped projection 446 and the surface 435. Thus, the mounting flange 489
cannot
escape from the channel 454. To install a foot, the mounting flange is first
inserted into
the channel 454 and the foot is pivoted upwardly until its rear wall 487 moves
behind
the attachment flange 450. Self-taping bolts 492 can then be threaded though
the
attachment flange 450 and through the rear wall 487 of the foot to fix the
foot to the top
53
CA 02922324 2016-02-29
rail of the frame. This installation sequence is illustrated in Figs. 41a
through 41c, which
show a foot being attached to the back rail of the frame.
Figs. 42 and 42a illustrate a preferred embodiment of a special foot 501
configured to receive mounting hardware for securing an MLPE module to the
foot. In
addition to the features of the standard foot, the special foot 501 includes
an upstanding
rear wall 502 having a 1-slot 503 formed and extending along its top edge. The
T-slot is
sized to receive and hold the head 505 of a bolt 504 with the threaded shaft
of the bolt
extending upwardly from the T-slot. A washer 506 and nut 507 can be used to
fasten
the mounting flange of an MLPE to the T-slot to secure the MLPE in place. A
star
washer 510 is disposed between the mounting flange of the MLPE and the T-slot
to
insure a reliable electrical connection between the MLPE and the frame. The
head of
the bolt can be slid to any desired position along the T-slot before being
tightened to
accommodate various types of MLPE modules. Fig. 42a illustrates the T-slot and
bolt in
an exploded perspective to show the various components more clearly. A
grounding
clip 596 also may be secured to or adjacent the T-slot to receive a system
grounding
wire 597.
Figs. 43 through 46 illustrate a preferred technique using corner keys for
attaching the ends of the rails together when assembling the frame around a
solar
laminate. The use of corner keys to fasten metal and other extrusions together
is well
known in manufacturing and so need not be described in great detail here. A
general
description of Figs. 43-46 is desirable. Fig. 43 shows the joining of a right
end rail 422
and a bottom rail 431 at their ends with a serrated corner key 511 to form the
bottom
right corner of a frame.
54
CA 02922324 2016-02-29
The legs of the corner key are slightly larger than the interior dimensions of
the
keyways and each leg is pressed into its respective keyway. This forms a
friction fit and
also creates an electrical bond between the two rails. For added securement,
the rails
may be peened; i.e., the aluminum of the rail may be punched inwardly with a
tool to
form a divot in the region of the serrations of the keyway to lock the two
rails together.
In Fig. 43, the corner key 511 is shown already pressed into the bottom rail
43 and the
right side member is shown being moved toward the corner key 511 onto which is
will
be pressed. This sequence is not limiting however and other sequences for
attaching
the rails may be chosen. For example, the top and bottom rails may be slid
onto the top
and bottom edges of a solar laminate and the right and left rails slid onto
the right and
left edges of the laminate until the corner keys fully engage within their
keyways.
Figs. 44 ¨ 46 simply show the other three corners of the frame being created
by
securing ends of rails with corner keys as described. Fig. 44 illustrates the
left end rail
423 being joined to the bottom rail 431 to form the lower left corner of the
frame. Fig. 45
shows the joining of the left end rail and the top rail to form the upper left
corner of the
frame and Fig. 46 shows the formation of the right upper corner of the frame.
Fig. 47 shows the overlapping attachment between a PV panel assembly 402 of
a lower course of panel assemblies and a PV panel assembly 402 of a next
higher
course of panel assemblies. The lower PV panel assembly is shown already
secured to
a roof deck. The bottom rail 431 of a PV panel assembly of a next higher
course is slid
onto the head lap strip 445 of the top rail 424 of the lower PV panel assembly
until the
bearing surface 432 engages the stop 430. In the process, the wind hook 433 of
the
upper PV panel assembly slides under the headlap strip 445 and locks the
bottom edge
CA 02922324 2016-02-29
of the upper panel assembly mechanically to the top edge of the lower panel
assembly.
Simultaneously, the fin seal 428 is deformed by the weight of the upper PV
panel
assembly and forms a water seal between the two panel assemblies. If water
does
manage to breach this seal in, for example, a blowing rainstorm, it is
collected in the
channel 434 formed by the wind hook. With the two panels joined together, the
upper
panel is secured to the roof deck and the installation continues with
additional PV panel
assemblies.
Fig. 48 illustrates the joining together in end-to-end relationship of two PV
panel
assemblies 402. The left PV panel assembly 402 is first secured to a roof
deck. Next,
the right PV panel assembly is slid onto the top of a PV panel assembly in a
lower
course, or onto the starter bar if the first course is being installed. The
right PV panel
assembly 402 is then slid to the left as indicated by arrow 519 until its left
end rail 423
couples with the right end rail 422 of the left PV panel assembly 402. More
specifically,
the flange 464 of the right PV panel assembly moves over the flange 479 of the
left PV
.. panel assembly until the rails of the two assemblies engage one another.
The side-by-side joining of the two PV panel assemblies forms a seam 469
between the two rails and the seam is not directly sealed. However, any
rainwater that
may seep through the seam is collected in the channel 482 and directed
downwardly to
be expelled at the bottom edge of the PV installation. The in-turned lip 466
of the right
.. PV panel assembly opposes the J-shaped edge 481 of the left PV panel
assembly. The
right PV panel assembly can be secured to the roof deck below and installation
of
additional PV panel assembles proceeds in the same way.
56
CA 02922324 2016-02-29
Figs. 49a ¨ 49d show in sequence the attachment of a foot 408 to the top rail
424
of a PV panel assembly with an alternate securement in the form of a spring
clip 497. In
this embodiment, the spring clip 497 achieves mechanical securement of the
foot to the
PV panel assembly and also creates an electrical bond between the two
components.
.. The spring clip 497 is designed as shown such that when the interlock
flange 489 is slid
beneath the V-shaped projection 446 (Fig. 49a) and the foot is pivoted
upwardly as
indicated by the arrows in Figs. 49b and 49c, the clip grasps the attachment
flange 450
and thereby secures the foot to the PV panel assembly (Fig. 49d). More
specifically,
the spring clip 497 engages and slides onto the attachment flange 450 of the
back rail of
the PV panel assembly.
The spring clip 497 has sharp barbs that penetrate the aluminum of the foot
and
of the attachment flange to scrape and penetrate the finishing layer of these
components, thus forming an electrical connection and a strong securement. In
the
field, an installer can easily attach the feet at desired locations along the
top rail to
correspond, for instance, to locations of underlying roof rafters. Further,
the feet can
easily be removed by pulling back on the spring clip and rocking the foot in
the opposite
direction. The spring clip itself is integrated into the foot by being wedged
within a
channel formed along the back top edge of the foot. This allows for quick and
easy
installation of the feet in the field.
The invention has been described herein within the context and in terms of
preferred embodiments and methodologies that represent the best modes known to
the
inventors of carrying out the invention. However, the embodiments presented
above
and in the drawing figures are not intended to represent requirements or
limitations of
57
CA 02922324 2016-02-29
the invention that they embody, but are presented only as exemplary
embodiments of
the underlying invention. Many additions, deletions, and modifications, both
subtle and
gross, may be made to the embodiments of the invention presented herein
without
departing from the scope of the invention embodied in the particular
embodiments and
defined by the claims hereof.
58