Note: Descriptions are shown in the official language in which they were submitted.
CA 02937208 2016-07-27
INSTALLATION BRACKET FOR USE WITH PRE-HUNG INTERIOR
AND EXTERIOR DOORS, AND WINDOWS
FIELD OF THE INVENTION
=
The present invention relates to an improved installation bracket. In
particular, this invention
relates to an improved installation bracket that can be used with pre-hung
interior and exterior
doors, and windows.
BACKGROUND OF THE INVENTION
In the construction of doorways, windows, and other structural openings, it is
commonplace to
provide a jamb about the inner edge thereof for finishing the otherwise rough
edge of the
opening and for supporting a door or window therewithin.
In order to produce a properly sized, squared opening such as a doorway, it is
therefore necessary
to dispose each of the members of the jamb in a proper position with respect
to one another,
regardless of their relationship to the surrounding framing members. The gaps
between the
framing members and the jamb are then filled with wooden shims. The shims are
usually tapered
wooden members, such as wooden shingles, to afford a measure of
"adjustability." Individual
shims, and combinations thereof, are painstakingly fitted between the framing
and the jamb until
it is found that the jamb is plumb, and at a predetermined distance from the
opposing jamb
member. Then nails are driven through the jamb and the shims, into the
supporting framing. If all
goes well, the nailing does not substantially disturb the placement of the
jamb. At this point,
protruding pieces of wedge, if any, must be cut off flush with the edge of the
jamb. Finally, the
surrounding molding must be fitted and nailed to the periphery of the opening.
Numerous efforts have been directed toward the simplification of door and
window installation.
One mounting means which has been proposed is depicted in U.S. Pat. No.
3,614,846 --
Donnelly et al. This mounting bracket comprises a metal strap which is screwed
transversely
1
=
CA 02937208 2016-07-27
across the back of a two-piece door jamb. The strap is perforated in order to
weaken it at those
points which are expected to correspond with wall thickness; during
installation, the ends of the
strap are bent at right angles to the jamb so as to lie on either side of the
wall which defines the
jamb opening. The ends of the strap are then nailed in place and the molding
applied thereover in
conventional fashion.
However this involves a complicated knock down two piece jamb assembly kit and
installation.
The door casing is attached to the jamb when being shipped and this makes it
impossible to nail
the bracket when installing because it's under the casing.
It is therefore an object of the present invention to provide an improved jamb
mounting
assembly.
It is also an object to provide an infinitely adjustable jamb bracket
adaptable to walls and jambs
of many different sizes.
SUMMARY OF THE INVENTION
Briefly stated, in accordance with one aspect of the invention, the foregoing
objects are achieved
by providing an installation bracket for securing a jamb in spaced relation to
an edge member of
a rough opening in a structure, the installation bracket having a middle
section, a first end and a
second end; the middle section having a plurality of spaced-apart mounting
apertures for
receiving bracket mounting screw means; a pair of holes located in vertical
relationship with one
another and equal distance from one of the ends between the middle section and
each end; each
end including a pair of alignment notches and a generally elliptical
adjustment slot located mid-
way between each pair of alignment notches, the alignment notches being used
to align the
installation bracket in relation to a vertical plumb line drawn with a level.
For interior doors, each end of the installation bracket is bent at a
generally right angle at the two
holes and adjustment mounting screws are used in the adjustment slot to attach
through the
2
CA 02937208 2016-07-27
gypsum wall board and into the framing stud. For exterior doors, and windows,
only one end of
the installation bracket is bent.
Some of the advantages of the invention include:
1. The provision of three jamb mounting holes allows for more strength and
rigidity.
2. The installation bracket has an adjustment slot at both ends for a more
accurate installation.
3. The use of screws with the adjustment slots allows for better adjustment of
the bracket.
4. As there is no right or left side to bracket the user can't accidentally
install the bracket upside
down.
5. The installation bracket has alignment notches which enable the user to
align the installation
bracket using a level and drawing a vertical line that is referred to as a
plumb line.
6. The installation bracket has chamfered corners for safety.
7. The installation bracket can be made of different lengths for different
wall thickness without
changing the bracket design.
8. The installation bracket can be installed on a one piece door jamb which is
the conventional
way that pre hung doors are manufactured today.
9. The installation bracket is simplistic, quick and efficient.
BRIEF DESCRIPTION OF THE DRAWINGS
Embodiments of the invention will now be described with reference to the
accompanying
drawings in which
FIG. 1 is a top view of the installation bracket according to the present
invention;
FIG. 2 is a right side view of the installation bracket of FIG. 1;
FIG. 3 is an end view of the installation bracket of FIG. 1;
3
CA 02937208 2016-07-27
FIG. 4 is a perspective view of the installation bracket of FIG. 1 wherein the
ends of the
installation bracket have been bent for use with a pre-hung interior door;
FIG. 5 is a front view showing the use of the installation bracket with a pre-
hung interior door;
FIG. 6 is a detailed view showing the placement of the installation bracket
with a pre-hung
interior door of FIG. 5;.
FIG. 7 is a top view showing the use of the installation bracket with a pre-
hung interior door
along the lines A-A of FIG. 5;
FIG. 8 is a front view showing the use of the installation bracket with a pre-
hung exterior door;
FIG. 9 is a top view showing the use of the installation bracket with a pre-
hung exterior door
along the lines B-B of FIG. 8;
FIG. 10 is a front view showing the use of the installation bracket with an
exterior window;
FIG. 11 is a top view showing the use of the installation bracket with an
exterior window along
the lines C-C of FIG. 10;
DESCRIPTION OF A PREFERRED EMBODIMENT
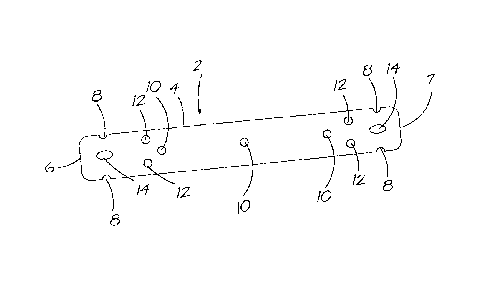
Referring to Figure 1, there is shown an installation bracket 2 which has a
middle section 4, a
first end 6 and a second end 7. The installation bracket 2 is advantageously
formed from metal
plate material.
The middle section 4 has a plurality of spaced-apart mounting apertures 10 for
receiving bracket
mounting screws 24 (not shown). Preferably one mounting aperture 10 is located
at a mid-point
4
CA 02937208 2016-07-27
of the installation bracket 2 with two mounting apertures 10 spaced equally
apart from the
mounting aperture 10 at the mid-point.
Between the middle section 4 and first end 6 are a pair of holes 12 in
vertical relationship with
one another and at an equal distance from the first end 6. Between the middle
section 4 and
second end 7 are a corresponding pair of holes 12 in vertical relationship
with one another and at
an equal distance from the second end 7.
First end 6 and second end 7 include a pair of alignment notches 8 and a
generally elliptical
adjustment slot 14 located mid-way between each pair of alignment notches 8.
Alignment
notches 8 are used to align the installation bracket 2 in relation to a
vertical plumb line which is
drawn with the aid of a level.
Figure 2 is a left side view of the installation bracket 2 of Figure 1 while
Figure 3 is an end view
of the installation bracket 2 as seen from the first end 6.
Referring to Figure 4, there is shown a perspective view of the installation
bracket 2 wherein first
end 6 and second end 7 have been bent at a generally right angle at the two
holes 12.
Referring to Figure 5 there is shown a pre-hung interior door 16 which is
positioned inside a
jamb 18 and attached to. the jamb 18 along one edge by means of a plurality of
door hinges 28.
Referring to Figure 6 there is shown a detailed view of the installation
bracket 2 in place. The
installation bracket 2 is placed against the jamb 18 of the interior door 16.
Between the jamb 18
and the wall (not shown) there is a rough frame opening 20.
a) Interior door
Referring to Figure 7 there is shown a typical wall construction for a pre-
hung interior door 16
including a framing stud 38 and gypsum wallboard 40 disposed at either side
thereof. Framing
CA 02937208 2016-07-27
stud 38 extends vertically to form one edge of a wall opening, the gypsum
wallboard 40
terminating approximately flush with the inner edge of the framing stud 38. A
jamb 18, which
may, for instance, comprise a wooden door jamb is disposed some distance away
from the
framing stud 38 in order to allow room for trueing the jamb 18. The jamb 18 is
affixed to the
adjacent wall structure by means of one or more installation brackets 2.
Preferably six
installation brackets 2 are used. A plurality of fasteners such as bracket
mounting screws 24
attach each installation bracket 2 firmly to the back surface of jamb 18.
Adjustment mounting
screws 22 are driven through the extremities and adjustment slot 14 of each
installation bracket 2
to secure them tightly through the gypsum wallboard 40 and into the framing
stud 38. Casing 36
is applied in the usual manner to cover the extending elements of the
installation bracket 2
mounting assembly, and to conceal the rough frame opening 20 between the jamb
18 and wall
structure.
Each installation bracket 2 is placed against the jamb 18 of the interior door
16 such that the two
holes 12 are spaced equally with the edge of the jamb 18. Bracket mounting
screws 24 are used
with the mounting apertures 10 to secure the installation bracket 2 to the
jamb 18.
Using a level, a vertical plumb line is drawn on the gypsum wallboard 40
approximately 1/4" from
the rough frame opening 20 from top to bottom. This ensures that each
installation bracket 2 is
installed correctly.
On the hinge side of the jamb 18, three installation brackets 2 are installed
to the jamb 18 (one at
each hinge), using the three mounting apertures 10 and 1/2" x #8 bracket
mounting screws 24.
Using the holes 12, the installation bracket 2 is aligned and centered to the
jamb 18. The other
three installation brackets 2 are installed on the opposite side. The
installation bracket 2 which is
installed in the center is located 2" above the door latch.
First end 6 is bent at a generally right angle at the two holes 12 on the
hinge side on the interior
door 16. The interior door 16 is placed in the opening. The second end 7 on
the other side of the
6
CA 02937208 2016-07-27
interior door 16 is bent to hold the interior door 16 in place. A spacer 26 is
placed under the jamb
18 to represent the thickness of the finished floor.
Starting at the top door hinge 28, the installation bracket 2 is fastened
using the adjustment slot
14 and 2" x #8 adjustment mounting screws 22, lining up the alignment notches
8 on the 3/4''
plumb line on the gypsum wallboard 40. Working from top to bottom, each
installation bracket 2
is installed by lining up.the alignment notch 8 and the plumb line, driving
the adjustment
mounting screws 22 flush to the gypsum wallboard 40. The interior door 16 is
now level.
Continuing on the opposite side, (the door latch side) the desired gap (proper
or equal space) is
left between the top and side of interior door 16 and jamb 18. Continuing on
the other side of the
interior door 16, the jamb is kept square with the wall. Casing 36 is now
ready to be installed.
b.) Exterior door
Referring to Figure 8 there is shown an exterior door 17 which is positioned
inside a jamb 18 and
attached to the jamb 18 along one edge by means of a plurality of door hinges
28.
Referring to Figure 9 there is shown a typical wall construction for an
exterior door 17 including
a framing stud 38, gypsum wallboard 40 and exterior wall sheathing 42 thereof.
Framing stud 38
extends vertically to form one edge of a wall opening, the gypsum wallboard 40
terminating
approximately flush with the inner edge of the framing stud 38. A jamb 18,
which may, for
instance, comprise a wooden door jamb is disposed some distance away from the
framing stud
38 in order to allow room for trueing the jamb 18. The jamb 18 is affixed to
the adjacent wall
structure by means of onc or more installation brackets 2. Preferably six
installation brackets 2
are used. A plurality of fasteners such as bracket mounting screws 24 attach
each installation
bracket 2 firmly to the back surface of jamb 18. Adjustment mounting screws 22
are driven
through one end 6 and adjustment slot 14 of each installation bracket 2 to
secure them tightly to
the framing stud 38. Gypsum wall board 40 is installed in the usual manner to
cover the
7
CA 02937208 2016-07-27
extending elements of the installation bracket 2. Casing 36 is applied in the
usual manner to
conceal the rough frame opening 20 between the jamb 18 and wall structure.
Each installation bracket 2 is placed against the jamb 18 of the exterior door
17 such that the
holes 12 are recessed the thickness of gypsum wallboard 40. Bracket mounting
screws 24 are
used with the mounting apertures 10 to secure the installation bracket 2 to
the jamb 18.
Using a level, a vertical plumb line is drawn on the framing stud 38
approximately 3/4" from the
rough opening from top to bottom. This ensures that each installation bracket
2 is installed
correctly.
On the hinge side of the jamb 18, three installation brackets 2 are installed
to the jamb 18 (one at
each hinge), using the three mounting apertures 10 and 1/2" x #8 bracket
mounting screws 24
provided. The other three installation brackets 2 are installed on the
opposite side. The
installation bracket 2 which is installed in the center is located 2" above
the door latch (not
shown).
First end 6 is bent at a generally right angle at the two holes 12 on the
hinge side on the door.
The exterior door 17 is placed in the opening. The second end 7 remains flat
and un-bent.
Starting at the top door hinge 28, the installation bracket 2 is fastened
using the adjustment slot
14 and 2" x #8 adjustment mounting screws 22 provided, lining up the alignment
notches 8 on
the 3/4" plumb line on the framing stud 38. Working from top to bottom, each
installation
bracket 2 is installed by lining up the alignment notch 8 and the plumb line,
driving the
adjustment mounting screws 22, through adjustment slot 14 flush to the framing
stud 38. The
exterior door 17 is now level.
Continuing on the opposite side, (the door latch side) the desired gap (proper
or equal space) is
left between the top and side of exterior door 17 and jamb 18. The gypsum wall
board 40 is now
ready to be installed. The casing 36 is applied to cover the rough frame
opening 20 and jamb 18.
8
=
CA 02937208 2016-07-27
Figure 9 also shows the relative positioning of the exterior wall sheathing
42, brick 44, exterior
brick mold 46 and insulation 48.
c) Exterior window
Referring to Figure 10 there is shown an exterior window 34 which is
positioned inside a jarnb
18.
Referring to Figure 11 there is shown a typical wall construction for an
exterior window 34
including a framing stud 38, gypsum wallboard 40 and exterior wall sheathing
42 thereof.
Framing stud 38 extends vertically to form one edge of a wall opening, the
gypsum wallboard 40
terminating approximately flush with the inner edge of the framing stud 38. A
jamb 18 is
disposed some distance away from the framing stud 38 in order to allow room
for trueing the
jamb 18. The jamb 18 is affixed to the adjacent wall structure by means of one
or more
installation brackets 2. Preferably six installation brackets 2 are used. A
plurality of fasteners
such as bracket mounting screws 24 attach each installation bracket 2 firmly
to the back surface
of jamb 18. Adjustment mounting screws 22 are driven through one end 6 and
adjustment slot
14 of each installation bracket 2 to secure them tightly to framing stud 38.
Gypsum wall board 40 is install in the usual manner to cover the extending
elements of the
installation bracket 2. Casing 36 is applied in the usual manner to conceal
the rough frame
opening 20 between the jamb 18 and wall structure.
Each installation bracket 2 is placed against the jamb 18 of the exterior
window 34 such that the
holes 12 are recessed the thickness of gypsum wallboard 40. Bracket mounting
screws 24 are
used with the mounting apertures 10 to secure the installation bracket 2 to
the jamb 18.
Using a level, a vertical plumb line is drawn on the framing stud 38
approximately 1/4" from the
rough opening from top to bottom. This ensures that each installation bracket
2 is installed
correctly.
9
CA 02937208 2016-07-27
On each side of the jamb 18, installation brackets 2 are installed to the jamb
18 of the exterior
window 34. Using the three mounting apertures 10 and 1/2" x #8 bracket
mounting screws 24
provided. An installation bracket 2 is installed in the top-center of the
exterior window 34 and
another installation bracket is installed in the bottom-center of the exterior
window 34.
First end 6 is bent at a generally right angle at the two holes 12 on the
exterior window 34. The
exterior window 34 is placed in the opening. Spacers 26 are used to leave an
even space at the
top and bottom of the exterior window 34.
Starting at the top, the installation bracket 2 is fastened using the
adjustment slot 14 and 2" x #8
adjustment mounting screws 22 provided, lining up the alignment notches 8 on
the 3/4" plumb
line on the framing stud 38. Working from top to bottom down, each
installation bracket 2 is
installed by lining up the alignment notch 8 and the plumb line, driving the
adjustment mounting
screws 22, through adjustment slot 14 flush to the faming stud 38. The
exterior window 34 is
now level.
Second end 7 of the installation bracket 2 remains flat and un-bent.
The scope of the claims should not be limited by the preferred embodiments set
forth in the
examples, but should be given the broadest interpretation consistent with the
description as a
whole.
CA 02937208 2016-07-27
=
List of Reference Numerals
2 installation bracket
4 middle section
6 first end
7 second end
8 alignment notch
mounting apertures
12 holes
14 adjustment slot
16 interior door
17 exterior door
18 jamb
rough frame opening
22 adjustment mounting screw
24 bracket mounting screw
26 spacer
28 door hinge
door stop
32
34 exterior window
36 casing (doors & windows)
38 framing stud
gypsum wall board
42 exterior wall sheathing
44 brick
46 exterior brick mold
48 insulation
11