Note: Descriptions are shown in the official language in which they were submitted.
CA 03121204 2021-05-27
WO 2020/113133
PCT/US2019/063794
- 1 -
STRUCTURAL DESIGN PRINCIPLES FOR
DIAGONAL BRACINGS IN TRUSS AND BEAM SUPPORT SYSTEMS
CROSS-REFERENCE TO RELATED APPLICATIONS
[0001] This
application claims priority to and benefit of U.S. Provisional Patent
Application Serial No. 62/772,174, filed on November 28, 2018, which is hereby
incorporated
by reference herein in its entirety.
STATEMENT REGARDING FEDERALLY SPONSORED RESEARCH
[0002] Some
aspects of the present disclosure were made with government support, under
NSF Grant No. DGE-1144152 and NSF Grant No. DRMEF-1533985 awarded by the
National
Science Foundation (NSF), and the government shares rights to such aspects of
the present
disclosure.
FIELD OF THE INVENTION
[0003] The
present invention relates generally to a structural element, and, more
particularly, to a diagonal bracing in beam and truss support systems.
BACKGROUND OF THE INVENTION
[0004]
Structural bracings are typically used in beam and truss support systems
commonly
employed in buildings, bridges, aerospace applications, automotive
applications, and power-
transmission application. Additionally, structural bracings are further used
in numerous other
macro-scale and micro-scale examples."
[0005] For
example, dating back to the 1800s, architects Ithiel Town and Colonel Long
introduced complementary and simple designs for diagonal bracings in square
grid lattices.
Although simple, these early designs have historically proven to be effective
in supporting
beam structures. Based on that early success, there has been very limited
research and little
deviation from these old designs in modern engineering structures. As a great
disadvantage,
in present days the load-carrying capacity of these old designs has reached
its limits. Thus, for
example, weight presently limits strength and/or height of structures. In
another example,
weight limits lengths of structures without support, in applications such as
bridges.
[0006] Thus,
there is a need for providing a structural element that increases strength
without increasing weight, and that prevents or reduces the above and other
problems.
CA 03121204 2021-05-27
WO 2020/113133
PCT/US2019/063794
- 2 -
SUMMARY OF THE INVENTION
[0007]
According to one embodiment of the present disclosure, a structural lattice
includes
a rectangular base defined by four periphery beams, and two non-diagonal beams
that divide
the rectangular base in four quadrants. The structural lattice further
includes a diagonal
reinforcement strut system overlaid on the rectangular base and having at
least two intersecting
sets of diagonal beams forming an open-and-closed cell architecture.
[0008]
According to an implementation of this embodiment, one of the two intersecting
sets of diagonal beams is a first set of diagonal beams, which includes first
beam that is parallel
to a second beam. According to a configuration of this implementation, the
first beam and the
second beam are symmetrically positioned over one of the four quadrants.
According to
another configuration of this implementation, another one of the two
intersecting sets of
diagonal beams is a second set of diagonal beams, the second set of diagonal
beams including
a respective first beam that is parallel to a respective second beam.
According to one example
of this configuration, the first set of diagonal beams intersects the second
set of diagonal beams
at a perpendicular angle. According to another example of this configuration,
the respective
first beam and the respective second beam are symmetrically positioned over
one of the four
quadrants. According to an optional aspect of this example, the first beam and
the second beam
of the first set of diagonal beams are symmetrically positioned over a same
one of the four
quadrants as the respective first beam and the respective second beam of the
second set of
diagonal beams.
[0009]
According to another implementation of this embodiment, at least one of the
four
quadrants is an open cell having an equilateral octagon shape. The equilateral
octagon shape
is defined by two of the four periphery beams, the two non-diagonal beams, and
four beams of
the at least two intersecting sets of diagonal beams. According to yet another
implementation
of this embodiment, the rectangular base and the diagonal reinforcement strut
system form at
least a structural portion of a building, abridge, an aerospace structure, an
automotive structure,
or a power transmission structure. According to yet another implementation of
this
embodiment, the diagonal reinforcement strut system is welded to the
rectangular base.
[0010]
According to another embodiment of the present disclosure, a periodic
structural
lattice has a plurality of non-diagonal reinforcing struts forms a base
structure of the periodic
structural lattice. The base structure is defined by a base periphery, and the
plurality of non-
diagonal reinforcing struts have a first volume of material. The periodic
structural lattice
further has a plurality of diagonal reinforcing struts coupled to the base
structure and having a
predetermined cross-sectional geometry that forms open and closed cells with
the plurality of
CA 03121204 2021-05-27
WO 2020/113133
PCT/US2019/063794
- 3 -
non-diagonal reinforcing struts. The plurality of diagonal reinforcing struts
have positive and
negative slopes relative to the plurality of non-diagonal reinforcing struts.
The plurality of
diagonal reinforcing struts is spaced apart at predetermined intervals within
the base periphery
and has a second volume material. The first volume of material and the second
volume of
material are less than a total volume of the periodic structural lattice that
includes the open and
closed cells.
[0011] According to one implementation of this embodiment, the plurality of
non-diagonal
reinforcing struts have a round cross-section. According to another
implementation of this
embodiment, the plurality of non-diagonal reinforcing struts have a square
cross-section.
[0012] According to yet another implementation of this embodiment, the base
periphery
has four periphery beams forming a rectangular shape. According to a
configuration of this
implementation, the four periphery beams have a round cross-section. According
to another
configuration of this implementation, the four periphery beams have a square
cross-section.
[0013] According to yet another implementation of this embodiment, the
plurality of
diagonal reinforcing struts includes a first pair of parallel beams and a
second pair of parallel
beams. The first pair of parallel beams intersects the second pair of parallel
beams at a
predetermined angle. According to a configuration of this implementation, the
predetermined
angle is 900
.
[0014] According to yet another implementation of this embodiment, the
positive and
negative slopes are formed by perpendicularly intersecting pairs of the
plurality of non-
diagonal reinforcing struts. According to yet another implementation of this
embodiment, the
base structure and the plurality of diagonal reinforcing struts form a
repeating sub-unit of at
least a structural portion of a building, a bridge, a crane, an aerospace
structure, an automotive
structure, or a power transmission structure.
[0015] Additional aspects of the invention will be apparent to those of
ordinary skill in the
art in view of the detailed description of various embodiments, which is made
with reference
to the drawings, a brief description of which is provided below.
BRIEF DESCRIPTION OF THE DRAWINGS
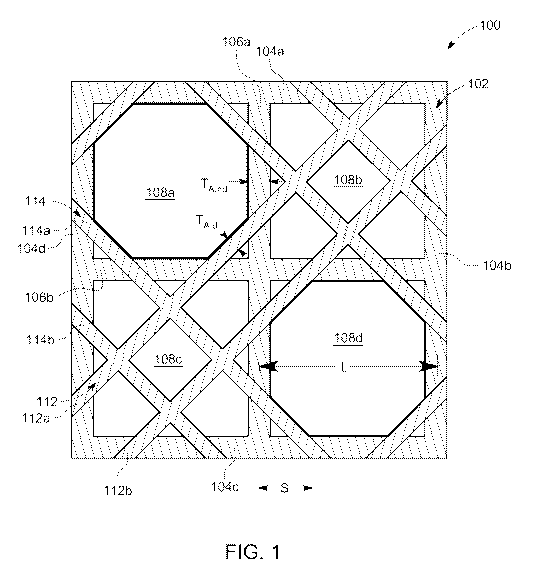
[0016] FIG. 1 shows a planar idealization of a Design A structure.
[0017] FIG. 2A shows another illustration of a Design A of a lattice
structure.
[0018] FIG. 2B shows a Design B of a lattice structure.
[0019] FIG. 2C shows a Design C of a lattice structure.
[0020] FIG. 2D shows a Design D of a lattice structure.
CA 03121204 2021-05-27
WO 2020/113133
PCT/US2019/063794
-4-
100211 FIG. 2E shows an experimental setup (top row) and deformations
(bottom row) for
the different Designs A-D illustrated in FIGs. 2A-2D.
[0022] FIG. 2F shows a chart with results from experiments using the
experimental setup
illustrated in FIG. 2E, as well as numerical finite element simulations.
[0023] FIG. 3A shows a chart with structural stiffness as a function of
loading angle for
different designs.
[0024] FIG. 3B shows a chart with effective buckling stress as a function
of loading angle
for different designs.
[0025] FIG. 3C shows a buckling mode for Design A at an angle of 0 degrees.
[0026] FIG. 3D shows a buckling mode for Design B at an angle of 0 degrees.
[0027] FIG. 3E shows a buckling mode for Design C at an angle of 0 degrees.
[0028] FIG. 3F shows a buckling mode for Design D at an angle of 0 degrees.
[0029] FIG. 4A shows a chart with an optimal value of critical buckling
load for a varying
number of diagonals.
[0030] FIG. 4B shows a chart with experimental stress-strain curves for 3
independently
tested samples of Design A, Optimum Design, and respective simulations.
[0031] FIG. 5A shows experimental deformation from 3-point bending applied
in each of
Designs A-D.
[0032] FIG. 5B shows a chart with results from an experimental reaction
force vs. an
applied displacement with simulations results overlaid.
[0033] FIG. 6A shows dimensions for Design A in a circular cross-section
configuration.
[0034] FIG. 6B shows dimensions for Design A in a rectangular cross-section
configuration.
[0035] FIG. 7A shows dimensions for Design C in a circular cross-section
configuration.
[0036] FIG. 7B shows dimensions for Design C in a rectangular cross-section
configuration.
[0037] FIG. 8 is a table that shows three-dimensional ("3D") printed
samples caliper
measurements.
[0038] FIG. 9 is a table that shows 3D printed samples expected values.
[0039] FIG. 10A shows Design A simulation deformation overlaid with
respective
experimental results.
[0040] FIG. 10B shows Design B simulation deformation overlaid with
respective
experimental results.
CA 03121204 2021-05-27
WO 2020/113133
PCT/US2019/063794
-5-
100411 FIG. 10C shows Design C simulation deformation overlaid with
respective
experimental results.
[0042] FIG. 10D shows Design D simulation deformation overlaid with
respective
experimental results.
[0043] FIG. 11A shows a chart with normalized critical effective buckling
stress for a 3x3
representative-volume element ("RVE") finite size structure including a region
of first 6 critical
modes.
[0044] FIG. 11B shows a chart with normalized critical effective buckling
stress for a
10x10 RVE finite size structure including a region of first 6 critical modes.
[0045] FIG. 12A shows a structure with 1 diagonal and no separation
parameter.
[0046] FIG. 12B shows the structure of FIG. 12A with 2 diagonals with one
separation
parameter given by Si.
[0047] FIG. 12C shows the structure of FIG. 12A with 3 diagonals with one
separation
parameter Sz.
[0048] FIG. 12D shows the structure of FIG. 12A with 4 diagonals and 2
diagonal
separation parameters Si, S2.
[0049] FIG. 12E shows the structure of FIG. 12A with 5 diagonals and 2
separation
parameters S2, S3.
[0050] FIG. 13 is a table that shows finite structure buckling load
optimization optimum
parameters.
[0051] FIG. 14 is a table that shows infinite structure buckling load
optimization optimum
parameters.
[0052] FIG. 15A shows an optimal value of critical buckling load for a
varying number of
diagonals for an infinite structure.
[0053] FIG. 15B shows resulting deformed geometries for optimal infinite
designs,
illustrated in FIG. 15A, including geometries from one to four diagonals.
[0054] FIG. 16A is a chart that shows a critical buckling strain for
varying spacing between
diagonals and select loading angles.
[0055] FIG. 16B is a chart that shows the normalized structural linear
elastic effective
stiffness of the geometry as the mass ratio X, is varied for select loading
angles.
[0056] FIG. 16C is a chart that shows the critical buckling strain of the
geometry as a mass
ratio 2, is varied for select loading angles.
CA 03121204 2021-05-27
WO 2020/113133
PCT/US2019/063794
-6-
100571 FIG. 17A is a chart that shows normalized linear elastic effective
stiffness for
different designs as a result of a varying loading angle for a structure with
circular cross-
section.
[0058] FIG. 17B is a chart that shows a critical buckling strain for the
varying loading angle
of FIG. 17A for a structure with circular cross-section.
[0059] FIG. 17C is a chart that shows results of a nonlinear simulation
with circular cross-
section for a finite size structure matching that of an experimental setup as
in FIG. 2E.
[0060] FIG. 18A is a chart that shows a critical buckling strain for
varying spacing between
diagonals for a circular cross-section geometry for select loading angles.
[0061] FIG. 18B is a chart that shows the normalized effective structural
stiffness of the
circular cross-section geometry of FIG. 18A, as the mass ratio X, is varied
for select loading
angles.
[0062] FIG. 18C is a chart that shows a critical buckling strain of the
circular cross-section
geometry of FIG. 18A, as the mass ratio X, is varied for select loading
angles.
[0063] FIG. 19A shows a chart with simulation results for a 3-point bend
test.
[0064] FIG. 19B shows a schematic illustrating deformation of each geometry
at the
displacement provided at the end of the plot illustrated in FIG. 19A.
[0065] FIG. 19C shows simulation results of a distributed load test.
[0066] FIG. 19D shows a schematic illustrating deformation of each geometry
at the
displacement provided at the end of the plot illustrated in FIG. 19C.
[0067] FIG. 20A shows a chart with simulation results for a simple
cantilever beam point
bend test.
[0068] FIG. 20B shows a schematic illustrating deformation of each geometry
at a
displacement provided at the end of the plot illustrated in FIG. 20A.
[0069] FIG. 20C shows a chart with simulation results of a distributed load
cantilever beam
test.
[0070] FIG. 20D shows a schematic illustrating deformation of each geometry
at a
displacement provided at the end of the plot illustrated in FIG. 20C.
[0071] FIG. 21A shows a chart with simulation results for a simple slender
structure
compression test.
[0072] FIG. 21B shows a schematic illustrating deformation of each geometry
at a
displacement provided at the end of the plot illustrated in FIG. 21A.
[0073] FIG. 21C shows a chart with plot quantitative results of a
distributed load
throughout every level of the structure associated with FIG. 21B.
CA 03121204 2021-05-27
WO 2020/113133
PCT/US2019/063794
-7-
100741 FIG.
21D shows a schematic illustrating deformation of each geometry at a
displacement provided at the end of the plot illustrated in FIG. 21C.
[0075] FIG.
22A is a schematic illustrating a first instance of a diagonal spacing
variance
surveyed during an optimization for a lattice design.
[0076] FIG.
22B is a schematic illustrating a second instance of a diagonal spacing
variance
surveyed during the optimization of the lattice design of FIG. 22A.
[0077] FIG.
22C is a schematic illustrating a third instance of a diagonal spacing
variance
surveyed during the optimization of the lattice design of FIG. 22A.
[0078] FIG.
22D is a schematic illustrating a fourth instance of a diagonal spacing
variance
surveyed during the optimization of the lattice design of FIG. 22A.
[0079] FIG.
22E is a schematic illustrating a fifth instance of a diagonal spacing
variance
surveyed during the optimization of the lattice design of FIG. 22A.
[0080] FIG.
22F is a schematic illustrating a sixth instance of a diagonal spacing
variance
surveyed during the optimization of the lattice design of FIG. 22A.
[0081] FIG.
22G is a schematic illustrating a seventh instance of a diagonal spacing
variance surveyed during the optimization of the lattice design of FIG. 22A.
[0082] FIG.
22H is a schematic illustrating an eighth instance of a diagonal spacing
variance surveyed during the optimization of the lattice design of FIG. 22A.
[0083] FIG.
221 is a schematic illustrating a ninth instance of a diagonal spacing
variance
surveyed during the optimization of the lattice design of FIG. 22A.
[0084] FIG.
23A is a schematic illustrating a first instance of a mass ratio variance
surveyed
during the optimization of the lattice design of FIG. 22A.
[0085] FIG.
23B is a schematic illustrating a second instance of a mass ratio variance
surveyed during the optimization of the lattice design of FIG. 22A.
[0086] FIG.
23C is a schematic illustrating a third instance of a mass ratio variance
surveyed during the optimization of the lattice design of FIG. 22A.
[0087] FIG.
23D is a schematic illustrating a fourth instance of a mass ratio variance
surveyed during the optimization of the lattice design of FIG. 22A.
[0088] FIG.
23E is a schematic illustrating a fifth instance of a mass ratio variance
surveyed
during the optimization of the lattice design of FIG. 22A.
[0089] FIG.
23F is a schematic illustrating a sixth instance of a mass ratio variance
surveyed during the optimization of the lattice design of FIG. 22A.
[0090] FIG.
23G is a schematic illustrating a seventh instance of a mass ratio variance
surveyed during the optimization of the lattice design of FIG. 22A.
CA 03121204 2021-05-27
WO 2020/113133
PCT/US2019/063794
-8-
100911 FIG. 23H is a schematic illustrating an eighth instance of a mass
ratio variance
surveyed during the optimization of the lattice design of FIG. 22A.
[0092] FIG. 231 is a schematic illustrating a ninth instance of a mass
ratio variance
surveyed during the optimization of the lattice design of FIG. 22A.
[0093] FIG. 24A is a schematic showing a first compression of a first
lattice design.
[0094] FIG. 24B is a schematic showing a second compression of the first
lattice design of
FIG. 24A.
[0095] FIG. 24C is a schematic showing a third compression of the first
lattice design of
FIG. 24A.
[0096] FIG. 25A is a schematic showing a first compression of a second
lattice design.
[0097] FIG. 25B is a schematic showing a second compression of the second
lattice design
of FIG. 25A.
[0098] FIG. 25C is a schematic showing a third compression of the second
lattice design
of FIG. 25A.
[0099] FIG. 26A is a schematic showing a first compression of a third
lattice design.
[00100] FIG. 26B is a schematic showing a second compression of the third
lattice design
of FIG. 26A.
[00101] FIG. 26C is a schematic showing a third compression of the third
lattice design of
FIG. 26A.
[00102] FIG. 27A is a schematic showing a first compression of a fourth
lattice design.
[00103] FIG. 27B is a schematic showing a second compression of the fourth
lattice design
of FIG. 27A.
[00104] FIG. 27C is a schematic showing a third compression of the fourth
lattice design of
FIG. 27A.
[00105] While the invention is susceptible to various modifications and
alternative forms,
specific embodiments have been shown by way of example in the drawings and
will be
described in detail herein. It should be understood, however, that the
invention is not intended
to be limited to the particular forms disclosed. Rather, the invention is to
cover all
modifications, equivalents, and alternatives falling within the spirit and
scope of the invention
as defined by the appended claims.
DETAILED DESCRIPTION
[00106] While this invention is susceptible of embodiment in many different
forms, there is
shown in the drawings and will herein be described in detail preferred
embodiments of the
CA 03121204 2021-05-27
WO 2020/113133
PCT/US2019/063794
- 9 -
invention with the understanding that the present disclosure is to be
considered as an
exemplification of the principles of the invention and is not intended to
limit the broad aspect
of the invention to the embodiments illustrated. For purposes of the present
detailed
description, the singular includes the plural and vice versa (unless
specifically disclaimed); the
words "and" and "or" shall be both conjunctive and disjunctive; the word "all"
means "any and
all"; the word "any" means "any and all"; and the word "including" means
"including without
limitation."
[00107]
Referring to FIG. 1, a planar idealization illustrates a periodic structural
lattice 100
that has a base square-grid 102 defined by four periphery beams 104a-104d,
which form a
peripheral edge of the structural lattice 100. The base square-grid 102
further has two non-
diagonal beams 106a, 106b that intersect each other perpendicularly at
midpoints of respective
periphery beams 104a-104d such that the base square-grid 102 has four open
base-cells 108a-
108d. In this example, the open base-cells 108a-108d are square shaped and are
equal to each
other. The non-diagonal beams 106a, 106b have a non-diagonal thickness TA,nd
and the open
base-cells 108a-108d each have a cell length L. According to one example, the
non-diagonal
beams 106a, 106b are reinforcing struts having a first volume material, and
are part of a
structural portion, such as a building, a bridge, a crane, an aerospace
structure, an automotive
structure, or a power transmission structure. For clarity, the four periphery
beams 104a-104d
are also considered to be non-diagonal beams.
[00108]
Structurally, the base square-grid 102 is overlaid with a diagonal
reinforcement strut
system 110, which includes at least two intersecting sets of diagonal beams
112, 114 forming
an open-and-closed cell checkerboard-like architecture. A first set of
diagonal beams 112 has
a pair of parallel beams that includes a first beam 112a and a second beam
112b. A second set
of diagonal beams 114 has a respective pair of parallel beams that include a
first beam 114a
and a second beam 114b. Each diagonal beam 112, 114 has a diagonal thickness
TA,d and is
spaced at a diagonal spacing S.
[00109] The
design of the structural lattice 100 is a new, more material-efficient design,
for
diagonal bracings in beam and truss support systems commonly employed in
buildings,
bridges, aerospace, automotive, cranes, and power transmission applications.
In addition, other
applications of the structural lattice 100 include numerous other macro-scale
and micro-scale
examples, as at least some advantages of the present disclosure are
independent of the selection
of material or scale of respective structure.
[00110] With the implementation of this new design, the respective structure's
strength
(through buckling resistance) is increased by approximately 30% over currently
used
CA 03121204 2021-05-27
WO 2020/113133
PCT/US2019/063794
- 10 -
engineering designs. In addition to theoretical and numerical simulation, the
disclosure below
describes constructed designs that were mechanically evaluated to demonstrate
significant
advantages over their traditionally used engineering counterparts (for
example, as illustrated in
FIGs. 3A-3F).
[00111] The structural lattice 100 introduces a double diagonal support system
in which the
alignment of S/L (diagonal spacing/cell length) is such that all lengths of
the beams 106, 108
create an equilateral octagon for the squares 108a, 108d that do not contain
diagonal beams.
Although some of the examples described below illustrate the thickness of the
diagonals TA,d
being half of the thickness of the non-diagonals TA,nd, the thicknesses
illustrate only one
example of the mass allocation possible for the disclosed lattice design.
[00112] The
structural lattice 100 is beneficial at least because, while only slightly
increasing design complexity, it obtains a stronger and more robust lattice
structure while using
the same volume of material. One exemplary application for the structural
lattice 100 is to
build taller, more slender structures, such as high-rise buildings. In this
application, the weight
of the support structure is typically a limiting factor as how tall a high-
rise can be built. Re-
allocating the mass of the structural lattice 100, the same amount of material
used in typical
engineering now provide a significantly higher strength using the design
principles of this
disclosure.
[00113] The
design configurations of this disclosure for the structural lattice 100 are
generally advantageous over previous design configuration, and would have been
considered
counterintuitive in accordance with previous design thought for several
reasons. For example,
according to previous design configurations, the structural lattice 100 would
have been
considered to contain additional material, and, thus, would not have been
considered to be
economically advantageous. As such, the previous design configuration would
have allocated
additional material to existing truss elements. In contrast to the previous
design configurations
and previous design thought, advantageously, the structural lattice 100 does
not contain
additional material and is economically advantageous.
[00114] According to another example of a previous design configuration, it
has been
previously widely accepted that triangular lattices provide a strong mechanism
for stability. In
contrast to previous triangular lattices, advantageously, the structural
lattice 100 designs of the
present disclosure include non-triangular elements (thus, rendering the
presently disclosed
designs as undesirable based on previous design thought).
[00115] According to yet another example of a previous design configuration,
very little
attention has been devoted to buckling strength of lattices. Much of previous
constriction code
CA 03121204 2021-05-27
WO 2020/113133
PCT/US2019/063794
- 11
s kept well under the buckling strength of a design. Instead, a lot of
attention has been
previously devoted to the stiffness of a structure. In addition to focusing on
stiffness,
advantageously, the present disclosure focuses on the buckling strength of a
design.
[00116] Referring generally to FIGs. 2A-2F, different designs A-D are
considered in the
analysis disclosed below. Each of the designs A-D illustrated in FIGs. 2A-2D
are variations
based on the structural lattice 100 described above. Referring to FIG. 2E, an
experimental
setup shows 0% applied strain (top row) and 6% applied strain (bottom row) to
a representative
model for each of the four designs A-D. Referring to FIG. 2F, experimental
(solid lines) stress-
strain curves for 3 independently tested samples of each design are shown, as
well as the
overlaid numerical (dashed lines) non-linear results. The close agreement
between the
experimental and numerical results convey that the model is accurately
capturing the physical
behavior observed experimentally.
[00117] To understand mechanical benefits of the disclosed structural
architecture, the
performance of a disclosed design is compared to that of three other two-
dimensional ("2D")
lattices, all based on a square architecture with edge lengths L and
comprising struts with
rectangular cross-sections and depth H large enough to avoid any out-of-plane
deformation.
More specifically, the comparison is made relative to Design A, Design B,
Design C, and
Design D. Design A, which is illustrated in FIG. 2A, and includes horizontal
and vertical
elements with thickness TA,nd = 0.1L and two sets of parallel double diagonals
with thickness
TA,d = 0.05L located at a distance S = L/(V2 + 2) from the nodes (as
illustrated in FIG. 2A).
Design B, which is illustrated in FIG. 2B, is similar to Design A but only
contains a single
diagonal with thickness TB,d = 0.1L crossing each of the closed cells. Design
C, which is
illustrated in FIG. 2C, is similar to bracings found in modern structural
engineering and
contained a crossed set of diagonal beams with thickness TC,nd = 0.05L in
every cell. Lastly,
Design D, which is illustrated in FIG. 2D, has no diagonal reinforcement and
horizontal and
vertical elements with thickness TD,nd = 0.1L(1 + 1H2). All four designs share
the same
total volume and that for Designs A, B, and C the ratio between the volume of
the diagonals
and non-diagonals struts is identical.
[00118] The mechanical response under uniaxial compression is compared along
the vertical
elements of the four lattices described above in reference to Designs A-D.
Samples with 6x6
tessellations of square cells with L = 1.5 cm and H = 4 cm are fabricated with
a Connex500
multi-material 3D printer (Stratasys, Eden Prairie, Minnesota, United States)
from a Shore A
95 durometer digital elastomer (FLX9795-DM) and are compressed uniaxially
using a single
CA 03121204 2021-05-27
WO 2020/113133
PCT/US2019/063794
- 12 -
axis Instron (Model 5969) with a 50 kN load cell (as illustrated in FIG. 2E).
Two key features
emerge from the stress-strain curves reported in FIG. 2F. First, all designs
with diagonal
reinforcement (i.e., Designs A-C) are characterized by a nearly identical
initial elastic response,
indicating that the different diagonal reinforcement designs do not impact the
structure's initial
overall stiffness. Design D, as expected, exhibits a higher initial stiffness
because of its thicker
vertical and horizontal elements. Second, all curves show a clear maximum load
bearing
capacity, with Design A accommodating the highest load. Because such maximum
corresponds to the onset of buckling, it is inferred that Design A displays
the highest critical
buckling stress between the considered designs. Furthermore, as illustrated in
FIG. 2E, in all
three designs with diagonals the post-buckling behavior results in a
homogeneous pattern
transformation throughout the sample. Differently, for Design D the critical
mode has a much
larger wavelength than the size of a square unit cell and results in a post-
buckled shape
qualitatively similar to that of a compressed buckled beam.
[00119] As shown in FIG. 2F, close agreement exists between the numerical and
experimental results, confirming the accuracy of the analyses. Next, the
finite element model
is extended to explore the effect of additioonal loading direction.
[00120] Referring generally to FIGs. 3A-3F, a structure mechanical response is
illustrated.
FIG. 3A shows a chart with the structural stiffness for the different designs
as a function of
loading angle. The chart is generated using periodic infinite RVE arranged in
a 10 by 10 unit
with periodic boundary condition. FIG. 3B shows a chart with effective
buckling stress for a
finite (non-periodic) 10 by 10 unit-cell structure. FIGs. 3C-3F show a
buckling mode for
Design A-D at 00 loading angle. A 10x10 unit cell periodic structure is used
to capture the
macroscale behavior of Design D.
[00121] In FIG.
3A, the evolution of the effective stiffness, E, is reported as a function of
the loading angle 0. The stiffness of all structures containing diagonal
reinforcement is
virtually identical for any loading angle, further confirming that the
structural stiffness is nearly
entirely governed by the amount of material allocated along the loading
direction. As a result,
Design D, in which all of the material is allocated to the non-diagonal
elements, has the highest
stiffness for 0 = 00, but has almost negligible load-bearing capacity for 0 =
45 , where the only
contribution to its stiffness comes from the minimal bending resistance of the
joints.
[00122] Next, the effect of 0 on the buckling behavior of Designs A-D is
investigated. The
effective critical buckling stress (dcr) of Design A is higher than the other
diagonally reinforced
designs (namely Design B and Design C) for all values of 0 (FIGs. 3 D and 3E).
CA 03121204 2021-05-27
WO 2020/113133
PCT/US2019/063794
- 13 -
[00123] Having demonstrated the benefits of Design A compared to Designs B-D,
a question
is whether there exists a different diagonally reinforced square lattice
design with even higher
critical buckling stress. To answer this question, an optimization problem
identifies the number
of diagonals, N, their distance from the nodes of the square lattice Si (with
i = 1, 2, .., N), as
well as the ratio between diagonal and non-diagonal elements X, = Vnd/Vd (Vnd
and Vd being the
volume of the non-diagonal and diagonal elements, respectively) that result in
the highest
buckling stress. Particularly, finite size structures are considered that are
composed of 3x3
RVEs and that focus on uniaxial compression parallel to the non-diagonal
elements (i.e. 0 =
00) while constraining the total volume of the RVE to match that of the
designs considered in
FIGs. 2A-2F. The objective function Z = aõ is maximized using finite element
simulations.
For each set of inputs identified by optimization algorithm, a finite element
buckling analysis
is conducted to obtain acr and, therefore, evaluate the objective function Z.
Note that seven
separate optimizations are conducted, each considering a fixed integer number
of diagonal
elements N, ranging from one to seven (N = E [1, 7]). Based on the high
strength of lattices
reinforced by diagonals aligned at a 45 , in all the runs it is assumed that
all diagonals are
oriented at 45 with respect to the non-diagonal members and that Vd and Vnd
are distributed
equally among the diagonal and non-diagonal elements, respectively.
Furthermore, to ensure
the symmetry, it is assumed that S2i-1 = 52i (i = 1, 2, ..., N/2) if N is an
even number and Si = 0
and S2i-1 = S2i (i = 2, 3, ..., (N ¨ 1)/2) for off values of N.
[00124] Referring generally to FIGs. 4A and 4B, charts shows critical buckling
load
optimization results. Referring specifically to FIG. 4A, a chart shows the
optimal value of
critical buckling load for varying number of diagonals. Geometries in this
optimization
analysis are defined to match that of the experimental setup in order to
optimize a realistic
structure found in modern lattice applications. The shade for each point in
this graph represents
the optimal mass ratio X, parameter output by the optimization algorithm for
that configuration.
[00125] Referring specifically to FIG. 4B, a chart shows the experimental
(solid lines)
stress-strain curves for 3 independently tested samples of each design, as
well as the overlaid
numerical (dashed lines) non-linear results comparing both Design A and the
Optimization
Design. In FIG. 4B, the Optimization Design has proven slightly better than
Design A.
Additionally, the chart of FIG. 4B shows the highest aõ identified by the
optimization
algorithm for all considered number of diagonals N. Remarkably, it is
determined that the
highest aõ is only 9.55% higher than that of Design A and occurs for a design
similar to Design
A (with two diagonals located at a distance Si = Sz = 0.1800L from the nodes
and volume is
CA 03121204 2021-05-27
WO 2020/113133
PCT/US2019/063794
- 14 -
distributed so that X, = 0.6778). As such, this numerical prediction, which is
validated by
experimental results (illustrated in FIG. 4B) indicates that Design A is
exceptionally close to
that providing the highest critical stress.
[00126] Referring generally to FIGs. 5A and 5B, an experiment provides bridge
loading
experimental and numerical results. The experimental results are from 3-point
bend testing of
11 cell (5.5 unit cell) array aligned horizontally. In FIG. 5A, the
deformation of the structure
at 6appi/L = 0.45 is illustrated for each of the four Designs A-D. In FIG. 5B,
a chart shows the
experimental reaction force vs. applied displacement and its equivalent
nonlinear finite element
result.
[00127] However, the superior mechanical performance of Design A is not
limited to this
loading condition. To demonstrate this important point, in FIGs. 5A and 5B
results are
presented for tessellation of 11 x 2 square cells loaded in 3-point bending.
Both experiments
and finite element simulations indicate that Design A is stiffer and can
withstand higher loads
by approximately 15% over a larger range of applied displacements,
illustrating the potential
benefit of incorporating such design in suspended structures. Finite element
simulations are
further used to evaluate the performance of Designs A-D in 5 other loading
regimes with results
identified in FIGs. 19A-21D. For all of the loading cases considered, it is
found that Design A
is able to withstand significantly higher loads than any of the other
structures ¨ making it the
best candidate to realize load bearing structures for a variety of
applications.
[00128] Design A is experimentally compared to other common diagonally
reinforced
square lattices (Design B-C) and to the non-diagonally reinforced lattice
(Design D), all with
the same total mass. It is determined, based on the comparison, that Design A
provides a
superior mechanism for withstanding uniaxial loads prior to the onset of
buckling.
Furthermore, by simulating these designs using finite element analysis Design
A has proven
superior buckling performance not only in uniaxial compression but also in
every other possible
loading direction. Additionally, by using optimization tools to survey the
design space it is
determined that Design A is nearly identical to the design providing the
highest critical stress
under uniaxial compression. Finally, by expanding the numerical simulations, a
wide spectrum
of loading conditions are analyzed and Design A proves to maintain robustness
for a large
number of conditions considered. Therefore, the results presented here
indicate that by
intelligently allocating material within a square lattice, a structure is
achieved that is at least
15% stronger without the need for adding more material or reduce its
stiffness. The mechanical
properties of Design A has the implication to improve square lattice designs
found in modern
infrastructure such as bridges and buildings, as well as small scale lattice
applications.
CA 03121204 2021-05-27
WO 2020/113133
PCT/US2019/063794
- 15 -
DESIGN EXAMPLES
[00129] In this study, four different lattice configurations (Designs A, B, C,
and D) are
constrained to deform in an in-plane setting only. In an effort to conduct a
fair performance
comparison between the different designs, all four lattices are characterized
by containing the
same total volume of material and a fixed volume ratio between non-diagonal
and diagonal
elements. Two different shapes are considered for the cross-section of the
struts: circular and
rectangular. For the circular cross-section case, the diameters are Da,nd and
Da,d of the non-
diagonal (i.e. horizontal and vertical) and diagonal struts in the a-th
design, respectively, and
out-of-plane buckling is neglected. For the rectangular cross-sections, the
depth H and in-plane
thickness Ta,nd and Teo are selected to avoid out-of-plane deformation (i.e.,
the depth over
thickness ratio is selected to be sufficiently large). Finally, it is
important to note that the
slenderness of the non-diagonal members in the a-th design E [A, B, C] is
chosen as
Da nd n Ta nd
= 1-1 and = n (51)
for the case of circular and rectangular cross-section. The disclosure below
further describes
in detail the unit cells for four different designs, and provides the
derivations for each geometry
cross-section characteristics.
[00130] Referring generally to FIGs. 6A and 6B, a unit cell is illustrated for
Design A. This
design consists of a square grid reinforced by a double diagonal support
system. FIG. 6A
shows dimensions of this design considering a circular cross-section, and FIG.
6B shows
dimensions of this design considering a rectangular cross-section. In both
cases, the horizontal
and vertical non-diagonal struts have a total length 2L, in which Li = L2 and
all Si = S. For
FIG. 6A, considering a circular cross-section, the non-diagonal diameter is
denoted as DA,nd
and it is assumed that DA,nd/L = 0.1, and the diagonal elements have a
diameter DA,d = 2DA,nd.
For FIG. 6B, considering a rectangular cross-section, the non-diagonal
thickness is denoted as
TA,nd and it is assumed that TA,nd/L = 0.1, and the diagonal elements have a
thickness TA,nd =
2TA,d. For all rectangular cross-section elements, the depth H is assumed to
be equal and large
enough to constrain any out-of-plane deformation.
[00131] Design A consists of a square grid reinforced by a double diagonal
support system
(as illustrated in FIGs. 6A and 6B). As for the case of Design A, the diagonal
elements are
assumed to form an octagonal opening on every other cell, so that they
intersect the horizontal
and vertical struts at a distance AL = L/(J2 + 2) from the nodes, where L
denote the length
of the vertical/horizontal struts.
CA 03121204 2021-05-27
WO 2020/113133
PCT/US2019/063794
- 16 -
[00132] CIRCULAR CROSS-SECTION ¨ If it assumed that the cross-section of all
struts
is circular, the projected area and volume for the non-diagonal (AA,nd and
VA,nd) and diagonal
(AAA and VA,d) members is given by
AA,nd ¨ 8LDA,nd; (S2)
2
VA,nd = 81- (ndTr = 2l-TrA,d; (S3)
AAA = 8V2LDA,d; (S4)
and
Di d
VA,d= EIN/a = 2V7LriD2". (S5)
[00133] Because the projected area ratio of the non-diagonal to diagonal
elements in Design
A has been measured to be
AA nd 1 A
= 1.4'; (S6)
AA,d
by substituting eq. (S2) and eq. (S4) into the equation above it is determined
that for Design A
DA,nd = 1.4V7DAA 2DA,d. (S7)
[00134] Substitution of eq. (S7) into eq. (S3) and eq. (S5) yields
"And 2LnDi And
¨ =
VAd 2 Ai 2 LTEDA,d
and
VA,T = VA,nd VA,d = 2TEL (Dind 1771)3d) = 2TELDind (1 + ; (S9)
where VA,T indicates the total volume of the unit cell for Design A.
[00135] Finally, it is important to note that in this study Design A is used
as the base model,
and thus constrain the total volume of all the other unit cell designs with
circular cross-section
to be equal to that of Design A, namely,
1
VccA Vcc,nd = VA,T = 2TELDitnd (1 + ; (S10)
with a = B, C and D. For Designs B and C, which include diagonal elements, the
volume ratio
of the non-diagonal to diagonal elements is constrained to be the same as in
Design A
'and = VA,nd 2A/2; (S11)
Va,d VA,d
CA 03121204 2021-05-27
WO 2020/113133
PCT/US2019/063794
- 17 -
with a E B and C.
[00136] RECTANGULAR CROSS-SECTION ¨ If it is assumed that the cross-section of
all
struts is rectangular, the projected-area for the non-diagonal (AA,mi) and
diagonal (AA,d)
members is given by
AA,nd ¨ 8LTA,nd (S12)
and
AAd = EW2LTAA, (S13)
where TA,nd and TA,d are the non-diagonal and diagonal in-plane strut
thickness for Design A,
respectively. Because for Design A And/Act 1.4, it follows that
TA,nd = 2TA,d. (S14)
[00137] Finally, also for the case of rectangular cross-section Design A is
the base model,
and thus the total volume is constrained of all the other unit cell designs
with rectangular cross-
section to be equal to that of Design A, namely,
VAT = Vco Vamd = 8LH(TAnd V7TAD) = 8LHTAnd (1 ; (S15)
with a E B, C and D. Moreover, for Designs B-C, which include diagonal
elements, the volume
ratio of the non-diagonal to diagonal elements is constrained to be the same
as in Design A,
Va nd
= V7; (S16)
Vcc,d
with a E B and C.
[00138] Referring generally to FIGs. 7A and 7B, a unit cell is illustrated for
Design C. This
design consists of a square grid with all cells being reinforced by diagonal
trusses passing
through the nodes. FIG. 7A shows dimensions of this design considering a
circular cross-
section, and FIG. 7B shows dimensions of this design considering a rectangular
cross-section.
In both cases, the horizontal and vertical non-diagonal struts have a total
length 2L, with Li =
L2. For FIG. 7A, considering a circular cross-section, the non-diagonal
diameter is denoted as
Dc,nd and, as with Design A, it is assumed that Dc,nd/L = 0.1, and the
diagonal elements have a
CA 03121204 2021-05-27
WO 2020/113133
PCT/US2019/063794
- 18 -
diameter Dc,d. = Dc,nd/2. For FIG. 7B, considering a rectangular cross-
section, the non-diagonal
thickness is denoted as Tc,nd and it is assumed that Tc,ndlL = 0.1, and the
diagonal elements
have a thickness Tc,nd = 2Tc,d. For all rectangular cross-section elements,
the depth H is
assumed to be equal and large enough to constrain any out-of-plane
deformation.
[00139] CIRCULAR CROSS-SECTION ¨ For this design with circular cross-section,
the
volume of the non-diagonal and diagonal members of the unit cell are given by:
VC,nd = VA,nd = 2 liriDnd (S25)
and
VC,d = VA,d ¨ 2VariD3,,d, (S26)
respectively. Using the constraints provided by eq. (S10) and eq. (S11), the
following formulas
are obtained:
Dc,nd = DA,nd, (S27)
and
Dc d 1
= (S28)
DC,nd 2
[00140] RECTANGULAR CROSS-SECTION ¨ For this design with circular cross-
section,
the volume of the non-diagonal and diagonal members of the unit cell are given
by
Vc,nd = 8LTc,ndfl (S29)
and
VC,d = 8V21_,Tc,d1-1. (S30)
[00141] Using the constraints provided by eq. (S15) and eq. (S16), as well as
the above
volumes, the following formulas are obtained:
Tc,nd = 2Tc,d, (S31)
and
CA 03121204 2021-05-27
WO 2020/113133
PCT/US2019/063794
- 19 -
TC,nd = TA,nd. (S32)
[00142] Referring to FIG. 8, a table shows caliper measurements averaged over
the three
separate 3D specimens tested for each design. The units provided are in [mm]
and [kg], for
lengths and weights, respectively. Because these are square samples, there are
2 overall sample
lengths provided, one that is along the testing direction and one that is
perpendicular to the
testing direction. Measurements are made at both along the top face as well as
the bottom face
of the structure. As expected, the top face dimensions are generally smaller
than the bottom
face due to 3D printing layer depositions. All measurements are conducted
prior to testing the
samples.
[00143] Referring to FIG. 9, a table provides the expected baseline
measurements. These
are the defined parameters for the 3D printed geometries. The units provided
are in [mm] for
all lengths.
TES TING
[00144] Each of the specimens is 3D printed using a Conex500 multi-material 3D
printer.
Each of the specimens is printed in parallel along with the print-head
direction as to minimize
material anisotropy between specimens. During the fabrication process, a
photosensitive liquid
precursor (the 3D printer ink) is deposited in a voxel-by-voxel fashion. The
3D printed
specimens are placed individually on an Instron 5969 with standard compression
plates on a
50kN load cell. While similar results are obtained regardless of whether the
models are loaded
parallel or perpendicular to the print direction, for experimental consistency
all tests are
performed with models oriented parallel to the print direction.
[00145] Referring to FIGs. 10A-10D, a deformation is overlaid with
experimental results.
Specifically, FIGs. 10A-10D show the deformed finite element results overlaid
on top of
pictures taken of the deformed experimental specimen. The close agreement
between the
experiments and simulations suggests that the finite element simulations are
accurately
capturing the physical deformation of the specimens.
[00146] Referring to FIGs. 11A and 11B, charts show results of a finite size
geometry square
cutting. FIG. 11A shows the normalized critical effective buckling stress for
a 3x3 RVE finite
size structures for all loading angles. FIG. 11B shows the normalized critical
effective buckling
stress for a 10x10 RVE finite size structures for all loading angles. The
shaded part in FIGs.
11A and 11B represents the lowest 6 buckling modes range. Both of these plots
provide a clear
indication on the superior performance of Design A when comparing to Designs C-
D.
CA 03121204 2021-05-27
WO 2020/113133
PCT/US2019/063794
- 20 -
OPTIMIZATION ANALYSIS
[00147] In an
effort to identify lattice configurations resulting in large critical loads, a
Python implementation was used of the Covariance Matrix Adaptation Evolution
Strategy
(CMA-ES). CMA-ES is an evolutionary algorithm that is used to solve
optimization/inverse
problems by iteratively solving several forward problems to adjust a
covariance matrix of the
solution. Since it is a derivative free algorithm, CMA-ES is well suited for
optimization
problems of high dimensionality and non-linear parameter topology, such as the
examples
disclosed in the present disclosure.
[00148] Referring generally to FIGs. 12A-12E, a schematic depicts separation
parameters
for optimization analysis. This schematic shows the separation parameters for
optimization
geometry at different levels of complexity, up to five diagonals with
distances are denoted by
Si. FIG. 12A shows the structure with 1 diagonal and no separation parameter.
FIG. 12B shows
the structure with 2 diagonals with one separation parameter given by Si. FIG.
12C shows the
structure with 3 diagonals with one separation parameter S2. FIG. 12D shows
the structure
with 4 diagonals and 2 diagonal separation parameters Si,S2. FIG. 12E shows
the structure
with 5 diagonals and 2 separation parameters S2, S3. For each set of even
diagonals, the
distance Si is the same from the center for both sides.
[00149] In this study CMA-ES is used to identify
= the number of diagonals, N;
= the volume ratio of non-diagonal to diagonal members, X, = Vncl /Vd; and
= the separation between each even set of diagonals, Si (see Fig. S14).
[00150] The
result is a lattice structure with the largest critical load. For such
optimization
problem, the number of optimization variables increases with the number of
diagonals
incorporated in the model (i.e. the total number of parameters are 1 + ¨21 (N
¨ (N mod 2)) for
a given optimization instance with N number of diagonals). Note, for
simulations with odd
number of diagonal reinforcements, only an even number of diagonals are
separated while
keeping one diagonal going through the non-diagonal junction in order to
ensure geometry
symmetry (as illustrated in FIGs. 12A-12E).
[00151] The
algorithm's initial values are chosen to be in the center of the design space,
namely, X, = 1 and diagonal separation for the even set of diagonals Si = 0.5
* L. The covariance
matrix is initialized uniformly with standard deviation (a) half of the domain
space, which are
normalized to remain between 0 and 1. The optimization is run for uniaxial
loading condition
in the direction parallel to the vertical elements.
CA 03121204 2021-05-27
WO 2020/113133
PCT/US2019/063794
- 21 -
[00152] For the optimization results described above, the critical buckling
load of a finite
size structure is maximized using a single objective target function. However,
an equivalent
analysis is performed to maximize the critical buckling stress (illustrated in
FIGs. 15A-15B)
of an infinite periodic structure as the target response. The resultant
parameter values from the
optimization for the finite size structure presented in FIGs. 4A-4B can be
found in FIG. 13.
The resultant parameter values from the optimization for infinite periodic
optimization are
identified in the table of FIG. 14 for the stress optimization.
[00153] Referring to FIG. 13, a table shows optimization of a finite structure
buckling load.
Specifically, the table shows output parameters from the analysis necessary to
construct each
optimum structure.
[00154] Referring to FIG. 14, a table shows optimization result parameters of
a buckling
load for an infinite periodic structure. Specifically, the table shows output
parameters from the
analysis necessary to construct each optimum structure.
[00155] Referring to FIGs. 15A and 15B, critical buckling load optimization
results are
illustrated for an infinite periodic structure. FIG. 15A shows the optimal
value of critical
buckling load for a varying number of diagonals. For all simulations, the
total mass of the
structure is maintained constant while the mass-ratio is allowed to vary.
Furthermore, the
diagonal separation for each pair of even diagonals is allowed to vary
together ensuring half
symmetry of the structure at all times. The optimization is run under a
uniaxial loading
condition. The shade of each point represents the optimal mass ratio X.
parameter for that
configuration. FIG. 15B shows the resulting deformed geometries for designs
including one
to four diagonals. The shaded areas in each structure represent the scale-less
deformed
displacement as a result of buckling.
[00156] MASS RATIO DERIVATION FOR ARBITRARY NUMBER OF DIAGONALS
¨ To parameterize the numerical model, a determination is made how to allocate
mass between
diagonals and non-diagonals when the number of diagonals is increasing. To
obtain this
derivation, a number of initial assumptions are made, namely:
= in-plane geometry is uniform, the in-sectional dimension H is a constant;
= all diagonals elements have the same dimension;
= all non-diagonal elements have the same dimension; and
= area of overlapping beam crossing is negligible and unaccounted.
[00157] To begin this analysis, the individual total volume of the non-
diagonal and diagonal
members is computed as
CA 03121204 2021-05-27
WO 2020/113133
PCT/US2019/063794
- 22 -
vna
¨ = 8Tr,d; and (S39)
LH
11 = 4V2NTd. (S40)
LH
[00158] In the above equations, H is the in-plane thickness dimension, and N
is the number
of diagonals considered. Using this information, the total volume of the
entire unit cell
structure VT is computed, namely:
VT Vnd
+ 8Tnd + (S41)
[00159] Thus, the mass ratio is rewritten as:
Vnd AtTl.nd
(S42)
Vd NTd
[00160] Using eq. (S41), the following expression is obtained:
vt
Td (
= N4V7 4Tnd). (S43)
[00161] Using eq. (S42), the following expression is obtained:
ANI'd
Tnd = (S44)
[00162] Inserting eq. (S43) into eq. (S44) the following equation is
obtained:
_ 1 A VT
(S45)
Ind ¨ 8 1+A LH=
[00163] Using this and the equation for k, the expression for Da is obtained,
namely:
Td= 1 vt
(S46)
8 N(1+A) LH=
[00164] Using Design A as a reference, the total volume VT is determined.
Specifically, the
following is used:
Tnd = 0.1L & Td =T11a/2 = 0.05L (S47)
to solve for
CA 03121204 2021-05-27
WO 2020/113133
PCT/US2019/063794
- 23
= 0.8L + 0.4V2L. (S48)
LH
[00165] Thus inserting this into eq. (S46) and eq. (S45), the following is
obtained:
Tnd = a. 0.1a,); and (S49)
2 1+X
1 1
Td = v2 N(1+X) 0.2 L + O.1\/L). (S50)
PARAMETER EXPLORATION
[00166] To survey the design space of the double diagonal construction,
parametric
simulations are explored for 2 variables: diagonal separation and mass ratio.
For each of these
separate analyses, the Design A geometry is maintained as the base geometry
and only the
respective variable is varied.
[00167] Referring generally to FIGs. 16A-16C, charts show plots for
rectangular cross-
section parameter exploration. For each of these plots, a single parameter is
varied while
maintaining the base Design A geometry constant. The dashed vertical line
indicates Design
A's value for that parameter. FIG. 16A shows the critical buckling strain for
varying spacing
between diagonals. FIG. 16B shows the structural stiffness of the geometry as
the mass ratio
X is varied. FIG. 16C shows the critical buckling strain of the geometry as
the mass ratio X. is
varied.
[00168] RECTANGULAR CROSS-SECTION ¨ This section shows the results when using
a rectangular cross-section for the truss members. From FIG. 16A, it is
apparent that there
exists an optimum for the diagonal separation that occurs when the spacing
between diagonals
are approximately 0.2 of the horizontal distance between vertical struts. This
optimum value
also persists when varying the loading angle. From FIG. 16B, it can be seen
that the linear
stiffness is symmetrically and almost purely dependent on the mass ratio
allocated to diagonal
versus non-diagonal elements. Comparing this figure to FIG. 18B, it is
determined that even
the design cross-section does not change the linear stiffness behavior. FIG.
16C shows that
there exists two optimum mass ratios, one where more material is allocated to
the diagonal and
one where there is more material allocated to non-diagonals.
[00169]
Referring generally to FIGs. 17A-17C, circular cross-section results are
illustrated.
FIG. 17A shows the linear elastic stiffness for the different designs as a
result of varying
loading angle. All structures except for the design without diagonal
reinforcement (Design D)
CA 03121204 2021-05-27
WO 2020/113133
PCT/US2019/063794
- 24 -
have the same stiffness. FIG. 17B shows the critical buckling strain for
varying loading angle.
For all angles, Design A outperforms other diagonally reinforced designs
(Design B-C). FIG.
17C shows the results to a nonlinear simulation with circular cross-section
for a finite size
structure matching that of the experimental setup. The nonlinear simulation is
composed of
three steps: (i) obtaining the critical buckling deformation via a
perturbation analysis;
(ii) applying an imperfection in the shape of the critical buckling
deformation onto the
geometry; (iii) performing a large deformation nonlinear simulation on the
perturbed geometry.
For all results presented, the geometries are constrained to in-plane
deformation only. These
results show that the two-diagonal benefit persists beyond a square beam cross-
section as long
as deformations are constrained to remain in-plane.
[00170]
Referring generally to FIGs. 18A-18C, circular cross-section results are
illustrated.
For each of the represented plots, a single parameter is varied while
maintaining the base
Design A geometry constant. The dashed vertical line indicates a Design A's
value for that
parameter. FIG. 18A shows the critical buckling strain for varying spacing
between diagonals.
FIG. 18B shows the structural stiffness of the geometry as the mass ratio X,
is varied. FIG. 18C
shows the critical buckling strain of the geometry as the mass ratio k is
varied.
[00171] CIRCULAR CROSS-SECTION ¨ The results presented here complement those
disclosed above and show that the structural benefit for the Design A persists
when using a
different cross-section for the structure. For varying loading angles, it is
determined that all of
the diagonally reinforced designs provide the same stiffness, but Design A
consistently
provides the best resistance to buckling. For this cross-section the findings
are consistent with
Design A, and as illustrated in FIGs. 18A-18C, the overall behavior has second
order
differences illustrated in FIG. 18A, no change illustrated in FIG. 18C, and a
large difference in
relative magnitude illustrated in FIG. 18C. Furthermore, it is determined that
by using a
rectangular cross-section the mass ratio is tuned to achieve an overall
structure with higher
critical buckling strength.
SLENDER STRUCTURE EXPLORATION
[00172] Referring generally to FIGs. 19A-19D, results illustrate a bridge
setting with finite
element non-linear large scale simulation. For all cases presented in FIGs.
19A-19D,
consideration is made to a long realization of each design consisting of 11
cells (5.5 unit cells).
FIG. 19A shows quantitative results for a 3-point bend test. In this case a
point displacement
is applied to the top center of the structure while the bottom outside corners
have constrained
horizontal (x) and vertical (y) displacements. The normalized reaction force
is plotted as a
function of the displacement for the different geometries. FIG. 19B shows the
deformation of
CA 03121204 2021-05-27
WO 2020/113133
PCT/US2019/063794
- 25 -
each geometry at the displacement provided at the end of the plot. The lines
in this plot provide
a measure of the normalized Von Misses stress of the structure. FIG. 19C shows
quantitative
results of a distributed load test. In this case a distributed load is applied
across the top of the
structure while the bottom outside corners have constrained x and y
displacements. The
normalized total reaction force is plotted as a function of the displacement
for the different
geometries. FIG. 19D shows the deformation of each geometry at the
displacement provided
at the end of the plot. The lines in this plot provide a measure of the
normalized Von Misses
stress of the structure.
[00173] Referring generally to FIGs. 20A-20D, results illustrate a cantilever
beam setting
with finite element non-linear large scale simulations. For all cases
presented FIGs. 20A-20D,
consideration is made to a long realization of each design consisting of 11
cells (5.5 unit cells).
FIG. 20A shows quantitative results for a simple cantilever beam point bend
test. In this case
a point displacement is applied to the bottom right of the structure while the
left edge of the
structure is fixed. The normalized total reaction force is plotted as a
function of the
displacement for the different geometries. FIG. 20B shows the deformation of
each geometry
at the displacement provided at the end of the plot. The lines in this plot
provide a measure of
the normalized Von Misses stress of the structure. FIG. 20C shows quantitative
results of a
distributed load cantilever beam test. In this case a distributed load is
applied across the top of
the structure while the left edge of the structure is fixed. The normalized
total reaction force
is plotted as a function of the displacement for the different geometries.
FIG. 20D shows the
deformation of each geometry at the displacement provided at the end of the
plot. This plot
provides a measure of the normalized Von Misses stress of the structure.
1001741 Referring to FIGs. 21A-21D, results illustrate a slender structure
compression
setting with finite element non-linear large scale simulations. For all cases
presented FIGs.
21A-21D, consideration is made to a long realization of each design consisting
of 11 cells (5.5
unit cells). FIG. 21A shows quantitative results for a simple slender
structure compression test.
In this case a displacement is applied to the right edge of the structure
while the left edge of
the structure is fixed. The normalized total reaction force is plotted as a
function of the
displacement for the different geometries. FIG. 21B shows the deformation of
each geometry
at the displacement provided at the end of the plot. The lines in this plot
provide a measure of
the normalized Von Misses stress of the structure. FIG. 21C shows quantitative
results of a
distributed load throughout every level of the structure. In this case a
distributed load is applied
across each level of the structure while the left edge of the structure is
fixed. The normalized
total reaction force is plotted as a function of the displacement for the
different geometries.
CA 03121204 2021-05-27
WO 2020/113133
PCT/US2019/063794
- 26 -
FIG. 21D shows the deformation of each geometry at the displacement provided
at the end of
the plot. The lines in this plot provide a measure of the normalized Von
Misses stress of the
structure.
FURTHER OPTIMIZATION ASPECTS
[00175] Referring to FIGs. 22A-22I and 23A-23I, results are illustrated based
on an
optimization algorithm that surveys multi-dimensional design space and that
chooses which set
of parameters creates the strongest design. The optimization algorithm decides
where to place
each set of diagonal lines and how much material should be allocated to the
diagonal lines and
to the non-diagonal lines.
[00176] In FIGs. 22A-22I, the optimization analysis moves sets of diagonal
beams 112, 114
apart and then back together to show various exemplary design configurations.
Specifically,
respective beams 112a, 112b of two sets of first diagonal beams and respective
beams 114a,
114b of two sets of second diagonal beams move away from each other to show
various sizes
of open spaces for a respective design configuration. The change in position
of the beams is
helpful in providing an optimal configuration for a desired application, as a
function of at least
strength and weight.
[00177] In FIGs. 23A-23I, instead of movement, each of a first pair of
parallel beams 112a,
112b and a second pair of parallel beams has a varying thickness that
progressively increases
and then decreases. For brevity and clarity, reference numerals are only used
in FIGs. 23A-
231 for two of the respective pairs, but it is understood that other pairs
also have a varying
thickness, as illustrated. The change in thickness of the beams is helpful in
providing an
optimal configuration for a desired application, as a function of at least
strength and weight.
[00178] The analysis provided by the optimization algorithm also increases the
number of
beams. The illustrated results show that by having two diagonals, the
strongest practical
structure is achieved. Therefore, using this type of design is helpful for
engineers to sustainably
construct taller buildings and longer bridges without having to use additional
resources.
[00179] Referring to FIGs. 24A-24C, 25A-25C, 26A-26C, and 27A-27C, results
from four
different geometries are illustrated. Each of the geometries is constructed
with a 3x3 network,
and then extruded to form a finite size structure. Using rapid prototyping
technology, such as
three-dimensional (3D) printing and laser cutting, realistic and precise
physical models are
build resembling each of the geometries. After building the physical models, a
mechanical
compression device is placed on each physical model. As the physical models
are compressed,
the resulting deformation provide a way to measure the amount of weight that
each structure
can handle before failure.
CA 03121204 2021-05-27
WO 2020/113133
PCT/US2019/063794
- 27 -
[00180] Each of these embodiments and obvious variations thereof is
contemplated as
falling within the spirit and scope of the claimed invention, which is set
forth in the following
claims. Moreover, the present concepts expressly include any and all
combinations and
subcombinations of the preceding elements and aspects.