Note : Les descriptions sont présentées dans la langue officielle dans laquelle elles ont été soumises.
CA 02249948 1998-10-13
BP #10547-002
BERESKIN & PARR CANADA
Title: BONE IMPLANT
Inventors: Dr. Robert P. CARMICHAEL
Dr. George K. B. SANDOR, Donald R. JOHNSON
CA 02249948 1998-10-13
-1-
Title: BONE IMPLANT
FIELD OF THE INVENTION
The present invention relates to the field of methods and
devices for reconstructive surgery in the bones of mammals. In particular,
the invention relates to surgery in connection with the bones of mammals
to rebuild bone tissue. A particular application of the invention is the
creation of a bone implant for use where anchoring and rebuilding of the
bone is desired such as in reconstructive surgery of jaw bones. The
invention will be discussed in the context of dental prostheses, although
1 0 the technique and mechanism is applicable on a much broader scale.
BACKGROUND OF THE INVENTION
Osseointegration is defined clinically as the process whereby
clinically asymptomatic rigid fixation of alloplastic materials is achieved
and maintained in bone during functional loading. Discussion of this
1 5 process is set out in the paper of Albrektsson, T. A multicenter report on
osseointegrated oral implants. The Journal of Prosthetic Dentistry. Vol. 60,
No. 1, pp. 75-84, 1988.. Typical dental implants, when osseointegrated in
the upper or lower jaw, provide stable anchorage for dental prostheses.
One of the factors limiting the success of osseointegration is the quantity of
2 0 host bone stock available at a given site. If a site has inadequate host
bone
it may not be possible to use typical implants, alternatively, the site will
require augmentation. Need to generate bone volume may arise from
different circumstances. The bone may have been inadequately formed at
birth and thus there is a need to build up bone tissue to bring the bone
2 5 structure closer to the norm. Bone may also have been lost as a result of
trauma, disease or other factors. Sites with inadequate bone volume have
heretofore been augmented in a variety of ways:
with autogenous bone grafted from a distant site in the body;
with freeze-dried allogeneic bone from a bone bank, or
3 0 with bone substitutes such as coral granules or hydroxyapatite
CA 02249948 1998-10-13
_2_
Crystals.
Autogenous bone grafts have no risk of rejection or viral
infection and provide vital progenitor cells. However, they usually require
a general anesthetic and are accompanied by some degree of morbidity
which may be unacceptable to the mammal involved, particularly where
the patient is human. Freeze-dried bone is easily available but is
unpredictable in its behaviour because it is devoid of vital progenitor cells,
bone morphogenic protein, and other factors such as TG beta. It also carries
with it the risk of viral transmission. Bone substitutes have similar
problems.
Thus, in many cases there is a need to generate adequate bone
volume at a particular site in the body. The present invention deals with a
method and equipment to generate bone volume at a particular site.
While the technique is applicable to increasing bone volume at any site in
1 5 the body, the need for increased bone volume often arises in connection
with the jaw of a human being. Where teeth have been lost through
trauma, there is often accompanying damage in the upper or lower jaw
bone. In many such cases, it will be desirable to use dental implants to
anchor dental prostheses.
2 0 Heretofore, bone grafting, irrespective of source, has been
carried out either prior to or concurrently with the placement of a dental
implant when it is necessary to build up tissue of the upper or lower jaw.
In either case, the procedure usually employs a membrane such as that
sold under the trade mark GORTEX in a process called guided bone
2 5 regeneration (GBR). While most configurations of bony defects are
amenable to augmenting with GBR, it is widely acknowledged that defects
in a jaw bone which are vertical in nature, in particular, are difficult to
overcome.
A process called distraction osteogenesis was first described by
3 0 Codivilla in 1904. The technique became popularized and was studied
extensively by Ilizarov beginning in 1951. See in particular, the following
publications of Ilizarov which also describe the work of Codivilla. Ilizarov,
CA 02249948 1998-10-13
-3-
G.A. The tension-stress effect on the genesis a: ~:7rowth of tissues: Part 1.
The influence of stability of fixation and soft t;saue preservation. Clinical
Orthopaedics and Related Research. Nr. 238, pp. '_'~9-285, 1989 and Ilizarov,
G.A., The tension-stress effect on the genesis an:~ growth of tissues: Part
II.
The influence of the rate and frequenc~.~ of distraction. Clinical
Orthopaedics and Related Research. Nr. 239, pp. 263-285, 1989. In this
process, growth of bone and healing of bone defects can be stimulated by
pulling apart, or distraction, of bone segments. luzarov discovered that a
cortical osteotomy, or corticotomy, which pre~~ ~rnes the bone's medullary
1 0 blood supply and preserves the overlying pe~iosteum, when combined
with slow distraction, permitted bone lengthening without a bone graft.
More recently work has been carried ou: ;:m dogs. This work has
demonstrated that a vertical defect of a residual alveolar ridge of a jaw
bone can be corrected using osseointegrated screw-shaped dental implants
1 5 to anchor a distraction device. Block, M.S., Chang, A., and Crawford, C.
Mandibular alveolar ridge augmentation in the dog using distraction
osteogenesis. The Journal of Oral and Maxillo~ acial Surgery. Vol. 54, pp.
309-314, 1996. Furthermore, screw-shaped den~~t: implants alone have been
employed to elevate a rectangular osteotom- ,:reated in the jaw bone of
2 0 dogs Ueda, M., Sawaki, Y., and Oda, T. Ridge a z~ nmentation by
distraction
osteogenesis using osseointegrated implants. ~~= ~ uact. The International
Journal of Oral and Maxillofacial Implants. ~jc~. 13, Nr. 2, pp. 289 - 290, .
1998.
The foregoing references describe two separate and distinct
2 5 procedures; firstly, osseointegration and sec~mclly, the augmentation of
bony defects by distraction osteogenesis. Morec»~er, during the movement
of bone in the direction of distraction, as disclosed in this prior work, the
implant is continuously turned in the segmen; bone being moved, with
integration of the implant occurring only a-ter distraction has been
3 0 completed.
The use of dental implants in jaw tones where there is no
need to augment the existing bone structure is now well-known. Various
CA 02249948 1998-10-13
-4-
forms of implant have been created which rely on the growth of bone
tissue in and around the implant to create a long lasting, mechanical
union between the implant and the natural supporting bone. It is well-
known that two primary bonding mechanisms can effect such
osseointegration. These are microscopic bonding between the bone tissue
and the implant surface and macroscopic ingrowth of bone into interstices
of the implant to create a mechanical locking effect. One recent patent
discussing such implants is U.S. patent 5,766,009 issued June 16, 1998
entitled Elastically Stabilized Endosseus Dental Implant.
1 0 Thus, there is now a body of knowledge relating to the use
and integration of dental implants. Some work has been done in the field
of distraction osteogenesis. The two fields have been worked in
independently.
Accordingly, within the field of orthopaedics it would be
desirable to have a device which enables osteogenesis to occur by
distraction to rebuild bone tissue at a particular site. It would also be
desirable to have a distraction device which may serve as an anchor for a
prostheses following completion of the distraction osteogenesis. This
would reduce risk, discomfort and overall cost to the patient.
2 0 SUMMARY OF THE INVENTION
The present invention provides a kit of assemblable
components for implantation into the bone of a mammal for use in
distraction osteogenesis. The kit comprises a fixture, a footing and a
distracter, the fixture including a longitudinally extending body portion
2 5 with a proximal end and a distal end, the body portion having an exterior
surface adapted for contact and integration with bone tissue, the body
portion having a generally longitudinally extending bore extending from a
proximal opening adjacent the proximal end to a distal opening adjacent
the distal end. The footing includes a proximal surface and a distal surface.
3 0 The distracter comprises a generally rod-shaped body including a distal
end
and a proximal end, and the proximal end of the distracter is adapted to
CA 02249948 1998-10-13
-5-
bear against the footing. There are first and second engaging means on the
fixture and the distracter respectively for adjustably locating the fixture
relative to the distracter.
In a preferred embodiment the kit also includes an obturator.
In a further preferred embodiment, the kit includes an obturator and a
retaining screw.
BRIEF DESCRIPTION OF THE FIGURES
Figure 1 is a cross-sectional view of an assembly of
components of a dental implant ready for initial implantation and made
1 0 in accordance with a preferred embodiment of the invention illustrating
three component parts;
Figure 2 illustrates one of the components of the assembly of
Figure 1;
Figure 3 illustrates a second component of the assembly of
1 5 Figure 1;
Figure 4 illustrates a third component of the assembly of
Figure 1;
Figure 5 illustrates a component for use with the components
of Figures 2 and 3;
2 0 Figure 6 illustrates a further component for use with the
components of Figures 2 and 3;
Figure 7 illustrates the assembly of Figure 1 when placed in a
jaw bone;
Figure 8 illustrates the site of the surgical procedure to be
2 5 performed after placement of the device as shown in Figure 7;
Figure 9 illustrates the assembled components of Figures 2, 3
and 5 at the beginning of the distraction stage;
Figure 10 shows the components of Figure 9 at the
completion of the distraction stage;
3 0 Figure 11 shows the components of Figure 10 after removal of
the component of Figure 5;
CA 02249948 1998-10-13
-6-
Figure 12 illustrates the use of the component of Figure 6
following the distraction procedure, and
Figure 13 illustrates the use of the components of Figure 12
after healing is completed.
The preferred embodiment illustrated in the drawings is
intended for use as a dental implant to be placed in either the upper or
lower jaw. The structure and method involved in this invention however
may be used in any bone of any mammal where it is desired to rebuild
bone using the procedure of distraction osteogenesis. Accordingly, the
1 0 orientation of the device is not restricted. For purposes of describing
the
preferred embodiment illustrated herein, the terms "distal", "proximal"
and "direction of distraction" will be used to indicate relative orientation
and movement of the parts. The term "proximal" will be used with
reference to the bone involved while the term "distal" will be used to
1 5 describe that surface or direction which is remote from the centre of the
bone.
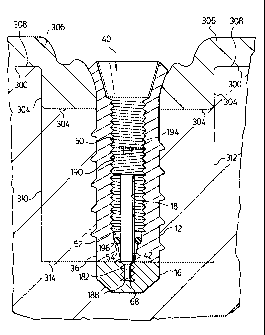
Figure 1 illustrates a cross section of an assembly of the device
in accordance with this embodiment of the invention, the assembly being
connected together in the configuration ready for implantation into the
2 0 jaw bone. As shown in Figure 1, the orientation is such that the assembly
can be considered to be ready for implantation in a lower jaw and the
direction of distraction will be vertically upwardly in these figures. It will
be realized after appreciating this invention however, that the direction of
distraction need not be vertical and may be in any direction relative to the
2 5 bone being augmented, depending upon the surgeon's needs and the
ongoing use to be made of the remaining implant.
The assembly shown in Figure 1 generally at 10 comprises a
fixture 12, a retaining screw 14 and a footing 16. The fixture 12 is shown in
cross-sectional view in Figure 2. The footing 16 is illustrated in cross-
3 0 section in Figure 3 and the retaining screw 14 is illustrated in cross
section
in Figure 4.
Figure 5 illustrates a distracter 18 in cross section for use with
CA 02249948 1998-10-13
_7_
the fixture 12 and the footing 16.
Figure 6 illustrates an obturator 20 in cross section for use
with the fixture 12.
The fixture 12 has a body portion 30 having an external
surface 32. The body portion is generally cylindrical having a central axis
34. The body portion 30 has a proximal end 36 and a distal end 38. The body
portion 30 has a generally centrally located bore 40 substantially centered
on axis 34. The bore 40 extends substantially through the body portion 30 of
the fixture 12 from a proximal opening 42 at the proximal end 36 to the
1 0 distal opening 44 at the distal end 38. The bore 40 includes a distal
tapered
surface 46 which tapers inwardly from the distal opening 44 toward the
axis 34. The bore 40 also has a proximal tapered surface 48 which tapers
outwardly from the proximal opening 42 with respect to the axis 34.
The bore 40 of the fixture 12 further includes a first
1 5 interengaging means 50 for adjustably locating the fixture 12 with respect
to the distracter 18. In addition, the first interengaging means 50 for
adjustably locating the fixture relative to the distracter may also be used to
locate the fixture 12 relative to the retaining screw 14.
As shown in the preferred embodiment in Figures 1 and 2,
2 0 the first interengaging means 50 for adjustably locating the fixture
relative
to the distracter comprises a helical thread extending a substantial portion
of the length of the bore 40.
The bore 40 of the fixture 12 further includes a cylindrical
surface 52 which merges with the tapered surface 48 at a land 54.
2 5 The fixture 12 has a proximal surface 56. As shown, the
surface 56 is preferably planar but may have other shapes as desired.
The external surface 32 of the fixture 12 is adapted to promote
osseointegration of the fixture 12 with surrounding bone tissue of the
mammal. The surface may be treated in various ways to promote the
3 0 osseointegation. This may be done by micro etching the surface or in any
other way as is commonly used with prior dental implants and the like. In
this case the surface is provided with a rib 58 which projects outwardly
CA 02249948 1998-10-13
_$_
from the surface 32 relative to the axis 34. The rib 58 advantageously
comprises a spiral which extends down the body portion 30 to form what is
in effect a thread extending substantially over the length of the body
portion 30. The thread thus provides a mechanical fixation for ingrowth of
bone and more secure integration of the fixture 12 with the bone.
The footing 16 is illustrated in cross-section in Figure 3. The
footing 16 has a distal surface 60 which is preferably planar and a proximal
surface 62. The footing is substantially saucer-shaped and is substantially
symmetrical about a central axis 64. The footing 16 comprises a bore 66
which is generally concentric with axis 64. The bore 66 extends
longitudinally inwardly from the distal surface 60 but does not penetrate
proximal surface 62. The bore 66 has a bottom surface 68. The bore 66
comprises a threaded surface 70 for engagement with the retaining screw
14.
1 5 The retaining screw 14 is illustrated in Figure 4. The retaining
screw 14 has a generally elongate body which is generally symmetrical
about a substantially centrally located axis 80. The retaining screw 14 has a
proximal end 82 and a distal end 84. At the proximal end 82, the retaining
screw 14 comprises a threaded surface 86. The threaded surface 86 has
2 0 threads which are complimentary to the threaded surface 70 of the footing
so that the threaded surface 86 will be received within the threaded surface
70 of the footing. In addition, the retaining screw 14 includes a tapered
portion 87 adjacent the threaded surface 86. The tapered portion 87 is
tapered complimentary to the tapered surface 48 of the fixture 12 so that in
2 5 use a seal will be obtained between surfaces 48 and 87 for purposes
explained below. When the retaining screw 14 is fully inserted into the
fixture 12 the threaded surface 86 of the retaining screw 14 projects through
the proximal opening 42 of the fixture 12.
Adjacent the distal end 84 of the retaining screw 14, is an
3 0 interengaging means 90. The interengaging means 90 comprises a thread
which extends along the exterior surface of the retaining screw 14 at the
distal end 84. The diameter and configuration of the interengaging means
CA 02249948 1998-10-13
-9-
90 cooperates with the first inter engaging means 50 of the fixture 12. Thus,
the threads 50 and 90 comprise first and second interengaging means on
the fixture 12 and on the retaining screw 14 respectively, for adjusting the
relative location of the retaining screw 14 relative to the fixture 12.
At the distal end 84 of the retaining screw 14 there is generally
planar surface 92. A socket 94 is located in the planar surface 92 with the
socket being substantially centrally located with respect to the axis 80.
The socket 94 may be shaped in any convenient configuration
to receive a tool so that the retaining screw 14 may be rotated by means of a
1 0 tool inserted into the socket 94. Socket 94 may be a simple slot for use
with
a blade type screwdriver. Preferentially however, the socket is polygonal
shaped such as either hexagonal or octagonal and the tool used to rotate
the socket may be in the nature of an Allan key or the like.
To create the assembly shown in Figure 1, the retaining screw
1 5 14 is placed within the bore 40 of the fixture 12. The thread 90 will
interengage with the thread 50. A tool is then inserted in socket 94 and the
retaining screw rotated relative to the fixture 12. Rotation is continued
until the proximal end 82 passes through the proximal opening 42.
Rotation is continued until the tapered surface 87 seals against the tapered
2 0 surface 48 of the fixture 12. At that point, a few of the threads 86 of
the
retaining screw 14 project beyond the proximal surface 56 of the fixture 12.
The footing 16 may then be placed against the retaining screw 14. By
rotation of the footing relative to the fixture 12 the threaded surface 70 of
the footing 16 will engage with the threaded surface 86 of the retaining
2 5 screw 14. The footing 16 is rotated relative to the retaining screw until
the
distal surface 60 is located substantially adjacent to and preferably in
contact with the proximal surface 56 of the fixture 12. This completes the
assembly as shown in Figure 1, there being no substantial space between
the proximal surface 56 of the fixture 12 and the distal surface 60 of the
3 0 footing 16. In the assembled configuration, axes 34, 64 and 80 are
aligned.
Figure 5 illustrates the distracter 18. The distracter 18 has a
generally rod-shaped body and is generally symmetrical about a central axis
CA 02249948 1998-10-13
-10-
180. T'he distracter 18 has a proximal end 182 and a distal end 184.
Adjacent the proximal end 182 of the distracter 18 is a bearing
surface 188. The distracter 18 comprises a generally cylindrical portion 186
having a diameter D extending to adjacent the proximal end 182 of the
distracter 18. At the proximal end 182, the distracter 18 includes a
cylindrical surface 187 of reduced diameter as compared to diameter D. The
reduced diameter of surface 187 is such that the cylindrical surface 187 may
pass into the bore 66 of the footing 16 without engaging the threaded
surface 70 of the footing. The axial length of cylindrical surface 187 is
1 0 greater than the depth of the bore 66 so that the bearing surface 188 of
the
distracter may bear against the bottom surface 68 of the footing 16.
Adjacent the distal end 184 of the distracter 18 there is second
interengaging means 190 comprising a thread cut into the exterior surface
of the distal end 184. The configuration of the thread 190 is complimentary
to thread 50 of the fixture 12. The distal end 184 also includes a
substantially planar surface 192. The planar surface 192 defines a socket 194.
The distracter 18 also includes an o-ring 196. The o-ring may
be made from silicone. The o-ring 196 has an internal diameter just
slightly smaller than the diameter D of the distracter 18 so that the o-ring
is
2 0 snugly received on the cylindrical portion 186 of the distractor 18. At
the
initial stage of use the o-ring 196 is installed on surface 186 slightly
axially
remote from the reduced cylindrical surface 187. The exterior diameter of
o-ring 196 is large enough that the o-ring will engage cylindrical surface 52
and land 54 of the fixture 12 when the distracter is inserted into the fixture
2 5 12. This forms a seal for purposes which will be explained below.
In use, the interengaging means 190 of the distracter comprise
second interengaging means for engaging with first interengaging means
50 of the fixture 12. Thus, the threads 190 engage the threads 50 for
adjustably locating the fixture 12 relative to the distracter 18.
3 0 Figure 6 illustrates the obturator 20. The obturator 20 is
substantially symmetrical about an axis 234. The obturator includes a
proximal end 236 and a distal end 238. Adjacent the proximal end 236 of
_ CA 02249948 1998-10-13
-11-
the obturator 20 there is a proximal tapered surface 248 which tapers
inwardly toward the axis 234. The obturator is a substantially solid body,-
with a proximal surface 242. Adjacent the distal end 238 of the obturator 20
is an interengaging means 252. The interengaging means 252 is in the form
of a thread. The configuration of the thread 252 is complimentary to thread
50 of the fixture 12.
Also adjacent the distal end 238 of the obturator 20 there is a
substantially planar surface 260. The substantially planar surface 2ii0
defines a socket 262 for receiving a tool to rotate the obturator 20.
1 0 The obturator 20 may be installed in the fixture 12 as shown
in Figure 12. In order to install the obturator 20 in the fixture 12, the
obturator 20 is passed through the distal opening 44 of the fixture 12. The
obturator 20 is passed downwardly along the bore 40 of the fixture 12 until
such time as the thread 252 begins to engage the thread 50 of the fixture 12.
1 5 Then by rotating the obturator 20 relative to the fixture 12 by means of a
tool inserted in socket 262, the obturator 20 may be rotated and caused to
pass downwardly in the bore 40. The obturator 20 will progress axially
along the bore 40 until the proximal tapered surface 248 engages the
proximal tapered surface 48 of the fixture 12. Preferably, proximal tapered
2 0 surface 48 of the fixture 12 is what is referred to as a Morse Taper. This
is a
taper having an effective angle of approximately 8° relative to the
axis 34.
Corresponding proximal tapered surface 248 of the obturator 20 is thus
tightly driven against the tapered surface 248 forming a complete seal
between the surfaces 48 and 248.
2 5 It is preferable that proximal surface 242 of the obturator 20 be
either flush with the proximal surface 56 of the fixture 12 when the
tapered surfaces 248 and 48 are in contact with each other. However, in
order to provide tolerances it is more preferable that the proximal surface
242 extend in the proximal direction beyond the proximal surface 56 of the
3 0 fixture 12 for reasons which will be discussed subsequently.
Figures 7 through 12 illustrate the use of the components
shown in Figures 1 through 6 by a surgeon for the process of augmenting
CA 02249948 1998-10-13
-12-
bone.
Figure 7 illustrates the assembly of Figure 1 having been
implanted in the jaw bone of a human patient in which there is a need for
augmentation of bone. In Figure 7 a surface of the bone is illustrated at 300.
The dotted line 302 illustrates what would be the desired profile of the
bone. The line 304 illustrates the profile of bone which is deficient from
the desired thickness. The surface 304 may differ from the desired surface
302 for any number of medical conditions. The bone may have been
chipped or fractured as a result of impact or other trauma, a portion of the
1 0 bone may have been required to be removed surgically by reason of disease
or other similar condition, or alternatively, the desired bone configuration
may not have existed from birth. Whatever the reason for the deviation
from the norm, the surgeon desires to augment the bone tissue and to
create a solid bone with a surface substantially aligning with line 302 of
1 5 Figure 7. In order to achieve this, the components shown in Figures 2
through 5 may be utilized to achieve the desired bone augmentation.
The first step is the assembly of the fixture 12, the retaining
screw 14 and the footing 16 into the configuration as shown in Figure 1. As
explained previously, the distal surface 60 of the footing 16 is desirably in
2 0 contact with the proximal surface 56 of the fixture 12. This may be done
in
the initial manufacturing facility so that the assembly can be presented to
the surgeon in a sterile package ready for installation in a desired opening.
The surgeon then creates the desired opening in the bone of
the patient. Depending upon the osseointegration mechanism desired, the
2 5 bone may be configured accordingly. If the osseointegration is to be
achieved by use of the rib 58 in the form of a thread as shown on the
fixture 12 in Figure 2, then the bore drilled in the bone by the surgeon will
be similarly threaded to receive the rib. Once the assembly of the fixture 12,
the retaining screw 14 and the footing 16 is placed within the bone, a
3 0 healing cap 320 is placed within the fixture 12. The healing cap has a
proximal end 322 and a distal end 324. Adjacent the proximal end 322 of
the healing cap 320 there is a thread 350. The thread 350 of the healing cap
CA 02249948 1998-10-13
-13-
320 engages the thread 50 of the fixture 12.
The healing cap 320 includes a tapered surface 346
intermediate the proximal and distal ends of the healing cap. The distal
end 324 of the healing cap 320 defines a distal surface 352. The distal
surface
352 defines a socket 354. The socket 354 is intended to receive a tool for
rotating the healing cap 320 relative to the fixture 12. Accordingly, once the
assembly of the fixture 12, the retaining screw 14 and the footing 16 has
been surgically inserted in the bone, the healing cap 320 is passed into the
bore 40 of the fixture 12. A tool is inserted into the socket 354 and the
1 0 healing cap rotated. The healing cap then seals the distal opening 44 of
the
fixture 12 by bringing tapered surface 346 of the healing cap into contact
with the distal tapered surface 46 of the fixture 12. The appropriate layers
overlying the bone, namely the mucosa 306 and the periosteum 308 are
then placed by the surgeon adjacent the healing cap. When the assembly as
1 5 shown in Figure 7 is completely installed, the proximal surface 62 of the
footing 16 bears against the bottom of the cavity made by the surgeon in
the jaw bone. The wound is then temporarily closed and permitted to heal.
The normal healing pace typical of other dental implants is then allowed
to occur. Osseointegration then occurs between the bone and the external
2 0 surface 32 of the fixture 12 as well as the proximal surface 62 of the
footing
16. For most human patients this would require a healing period from
four to six months. During this period no distraction osteogenesis occurs.
During the period of osseointegration it is desirable that no
bodily fluids enter the surgical implantation site through the fixture. The
2 5 bore 40 of the fixture 12 is sealed during this healing phase by the
interaction of tapered surfaces 48 and 87 of the fixture 12 and the retaining
screw 14. In addition, the bore 40 is sealed at the distal end by tapered
surface 346 of the healing cap 320 and tapered surface 46 of the fixture 12.
Similarly, it is desirable that fluids from the implantation site do not enter
3 0 between surfaces 60 and 56 of the footing 16 and fixture 12 respectively.
For
this reason, the footing 16 is tightened on threaded surface 86 of the
retaining screw in the initial assembly at the manufacturing facility so that
CA 02249948 1998-10-13
-14-
the two surfaces are in intimate contact.
When the surgeon determines that sufficient osseointegation
of the fixture 12 and the footing 16, have occurred, the surgeon is then
ready to commence the distraction osteogenesis process. In order to carry
out the distraction osteogenesis, the surgeon then opens the original site of
implantation so as to have access to the site where bone augmentation is
desired. The surgeon then performs a corticotomy as shown in Figure 8.
The lines marking the cuts made in the bone are shown in Figure 8 as 310
and 312 on either lateral side of the implant. The lines 310 and 312 are
1 0 laterally displaced on either side of the fixture 12 as desired for the
required
bone augmentation. In addition, a proximal cut is made along the line
indicated by 314 in Figure 8.
Once the corticotomy has been performed, the healing cap 320
is removed and the retaining screw 14 is removed from the footing 16 and
1 5 from the fixture 12 by rotating the retaining screw 14. In order to remove
the screw, a tool is inserted into the socket 94 of the retaining screw 14. As
the retaining screw is turned it will turn in the threads 50 of the fixture 12
and the threads 70 of the footing. To permit this to occur the threads 70
and the threads 50 have the same pitch. Because of the osseointegration
2 0 process, the fixture 12 and the footing 16, which by this time have become
integrated with the bone, do not rotate. The retaining screw 14 however
has been maintained in place throughout the healing process after the
initial implantation procedure. This ensures that the footing 16 remains in
contact with the fixture 12 and aligned so that the bore 66 of the footing
2 5 and the bore 40 of the fixture remain exactly aligned.
Figure 9 illustrates the commencement of the distraction
procedure. In order to commence the distraction procedure, the distracter
18 is placed within the fixture 12. A tool is inserted into the socket 194 of
the distracter 18. The distracter 18 is then placed within the bore 40 with
3 0 the proximal end 182 approaching the proximal end 36 of the fixture 12.
Rotation of the distracter 18 engages the thread 190 with the thread 50 of
the fixture, thus causing the distracter 18 to pass downwardly along the
CA 02249948 1998-10-13
-15-
bore 40. As the distracter advances along the bore 40, the proximal end 182
passes through the proximal opening 42 of the fixture 12 toward the
footing 16. The distracter continues to advance along the bore 40 of the
fixture 12 until the bearing surface 188 of the distractor bears against the
footing 16. In the preferred embodiment, the proximal end 182 of the
distractor 18 enters into the bore 66 and contacts the bottom surface 68 of
the bore of the footing. Because the footing 16 is osseointegrated with the
bone, the distracter 18 cannot move downwardly as it will then bear
against the footing which is firmly integrated into the bone tissue. Further
1 0 turning of the distracter will not result in any movement in the direction
of distraction between the distracter 18 and the footing 16. However,
because the thread 50 of the fixture 12 and the thread 190 of the distracter
18 remain engaged, further rotation of the distracter 18 relative to the
footing 16 and the fixture 12 results in the fixture moving in the distal
1 5 direction relative to the footing 16. Movement of the fixture 12 relative
to
the footing 16 then establishes the direction of distraction. When the
distracter 18 is shipped from the manufacturing facility, preferably the o-
ring 196 will have been installed as shown in Figure 5. Alternatively, the
surgeon will install the o-ring 196. When the distractor 18 is installed in
2 0 the fixture 12, the o-ring 196 will bear against surface 52 at the land
54.
Following the corticotomy, the fixture 12 is firmly integrated
in a segment of bone which is defined by the corticotomy cuts 310, 312 and
314.That segment of bone cannot rotate relative to surrounding tissues.
Thus, the segment of bone into which the fixture 12 is integrated will be
2 5 caused to move in the direction of distraction.
As illustrated in the work of Illizarov referred to above, it is
known that new bone tissue will generate along the incision cut 314 as
well as along the cuts 310 and 312. Final bone healing will not occur along
cuts 310 and 312 as, through the procedure, movement is occurring along
3 0 these cuts faster than healing will occur and the healing will occur when
movement or distraction no longer occurs and the bone is held in a
stabilized position.
CA 02249948 1998-10-13
-16-
To perform the distraction osteogenesis, the distracter 18 is
rotated on a regular basis a small amount. This may involve turning the
distracter 18 a small amount (such as one turn) on a daily basis so that the
separation from the cut 314 is increased by an amount of about 1 /2 to 1
mm on a daily basis.
The fixture 12 and the bone segment in which it is embedded
are thus caused to move in the direction of distraction a total amount as
determined by the surgeon. As the fixture 12 moves away from the footing
16, body fluids can flow between surfaces 60 of the footing 16 and 56 of the
1 0 fixture to generate new bone growth. It is desirable that those fluids not
enter into the bore 40 of the fixture as necrosis may occur and it is
desirable
that no bacteria or other fluids pass down through the bore 40 into the site
of bone regeneration. The o-ring 196 provides the desired seal. The healing
cap 320 may also be reinstalled each day to assist in sealing. As the fixture
1 5 12 rises in Figure 9 relative to the distracter 18, the o-ring 196 remains
in
contact with surface 52 and the land 54 of the fixture. The o-ring is rolled
along the cylindrical surface 186 of the distracter.
Figure 10 illustrates the procedure when the desired amount
of distraction has occurred. As shown in Figure 10, the surface of the bone
2 0 segment integrated with the fixture 12 has been moved to approximate the
line 302 shown in Figure 7. Depending upon the length of travel along the
direction of distraction, one or more distracters of different length may be
used. If significant travel in the direction of distraction relative to the
length of the fixture 12 is desired, it may be desirable or necessary to use a
2 5 number of distracters. In each case the length of the cylindrical portion
186
suits the amount of distraction travel and distance from footing 16 as
required.
The procedure of distraction osteogenesis is completed as
shown in Figure 10. The next step in the procedure is to allow healing to
3 0 occur at the side edges of the distracted bone segment. Healing will
naturally occur as long as no movement occurs between the distracted
segment and the surrounding bone. To promote proper healing, the
_ CA 02249948 1998-10-13
-17-
distracted segment is stabilized. This may be done using the distracter 18 or
by external support such as a bridge. Thereafter, the distracter 18 and the o-
ring 196 are removed as shown in Figure 11. With removal of the
distracter 18 there will remain a cylindrical void 200 in the newly formed
bone which has been created during the osteogenesis process.
During the osteogenesis phase body fluids will surround the
cylindrical portion 186 of the distracter 18. Obviously, it is not desirable
to
have any osseointegration occur along the surface 186 of the distracter 18.
Accordingly, this surface is as smooth as possible and the distracter 18 is
1 0 made from a material which will be tolerated by the body but which does
not promote osseointegration. Advantageously, the distracter may be
made from stainless steel.
In order to prevent infection in the bone from occurring, the
obturator 20 is then placed within the fixture 12. By and large, it is
desirable
1 5 to ensure that bodily fluids do not have an easy path into the interior of
the bone which has been generated by the distraction process. Thus, it is
desirable to seal the proximal opening 42 of the fixture 12 on completion of
the distraction procedure. To accomplish this, a tool is inserted into a
socket 262 of the obturator 20. The obturator 20 is then passed along the
2 0 bore 40 of the fixture until the thread 252 of the obturator 20 engages
the
thread 50 of the fixture. The obturator 20 is then rotated to pass along the
bore 40 until the tapered surface 248 engages with the proximal tapered
surface 48 of the fixture 12. The Morse Taper then creates a permanent seal
preventing the passage of any fluids through the bore 40 into the newly
2 5 generated bone. This is shown in Figure 12.
With the passage of time, the cylindrical void 200 in the
regenerated bone which is created by removal of the distracter 18, will be
filled in spontaneously with bone tissue. In addition, the bore 60 of the
footing 16 will be filled in by bone tissue.
3 0 The void 200 which was formerly occupied by the cylindrical
portion 186 of the distractor is surrounded by newly created bone tissue.
This void will thus develop bony tissue relatively readily. It is desirable
CA 02249948 1998-10-13
-18-
however that there be no void extending into the bore of the fixture 12
when the obturator 20 is installed within the bore 40 of the fixture. Thus,
desirably the obturator is dimensioned so that when the tapered surface
248 of the obturator engages with tapered surface 48 of the fixture 12, the
proximal surface 242 of the obturator extends axially outwardly of the bore
40. Thus, the surface 242 of the obturator 20 will be below the surface 56 of
the fixture 12. Thus, prior to filling in of the void 200, the obturator 20
will
project slightly into the cylindrical void 200. This will ensure that there is
no void adjacent the distal opening 42 which might otherwise be a possible
1 0 site for potential necrosis.
Upon completion of the osteogenesis procedure, the fixture
12 may remain in place having been firmly integrated in the bone tissue.
The sides of the segment of bone which has been moved in the direction
of distraction which were originally created by the cuts along lines 310 and
1 5 312 will become healed to adjacent bone with the passage of time. The
fixture 12 remains in place where it can now be used to serve as an anchor
for whatever may be desired. In the case of augmentation of a jaw bone as
shown in Figure 13, it may be desirable or necessary to provide a prosthesis
400 which is anchored to the jaw bone. The prosthesis is manufactured
2 0 with a thread 450 which can engage with the thread 50 of the fixture 12.
The material from which the various components are
manufactured is a matter of choice. It is intended that the fixture 12 and
the obturator 20 remain permanently in the body in most situations. Thus,
these should be manufactured from materials which are suitable for
2 5 osseointegration and which will be tolerated by the body on a long term
basis. Such materials include titanium, or titanium alloys.
There will be no access to the footing 16 after completion of
the osteogenesis process. Thus, the footing 16 may be manufactured from a
material similar to the fixture 12, that is a material which promotes
3 0 osseointegration and which can be tolerated by the body on a long term
basis such as titanium or titanium alloy. Alternatively, the footing may be
manufactured from a material which may be biologically absorbed by the
CA 02249948 1998-10-13
-19-
body. Such materials include calcium carbonate and polylactic/polyglycolic
acid polymer known as PGLA.
The retaining screw 14 will not be osseointegrated with the
body and for the most part will not be in contact with bodily fluids. The
retaining screw may thus be manufactured from any material which will
be tolerated by the body over the period of several months between the
original implantation and the commencement of the distraction process.
Such materials include titanium, titanium alloy, stainless steel and gold
alloy.
1 0 It is desirable that there is as little integration between the
distracter and surrounding bone as possible. The distractor is, however,
subject to contact by bodily fluids, particularly at the site of osteogenesis.
The distracter does, however, have certain structural requirements as it
effectively provides the jacking connection between the footing and the
1 5 fixture. The distracter may advantageously be manufactured from stainless
steel or gold alloys.
While the invention has been discussed in the context of the
preferred embodiment it will be apparent that various modifications may
be made. In particular, the interengaging means of the fixture and the
2 0 various components need not be in the form of a single thread but could
be in other forms such as multiple threads, bayonet and slot connectors,
pins and holes or gears and racks. The components may be made of
various materials which are acceptable to the body of the mammal. Other
types of sealing means including gaskets, serpentine seals and other types
2 5 of seals may be employed to seal the bore of the fixture as indicated. The
shape of the components may be varied. The scope of the invention is not
limited to the embodiment shown herein, but rather by the scope of the
attached claims.