Note: Descriptions are shown in the official language in which they were submitted.
- 1 31 8393
This invention relates to a photometric device.
Lighting and the spectral sensitivity thereto oE life fonms
are closely linked, for example, liyhting and human vision are closely
linked. Interior r~oms and exterior rvadways are illuminated for
discernment. Surprisingly however, this link between lighting and
vision is technically weak. The ability to relate visual responses to
a given lighting condi~ion suffers on two counts. First, the
scientific understanding of visual response is rudimentary, although
perhaps functional for some applications. Human visual processing is
more ccmplex than any co~putational mcdel available. For example, it
cannot be explained how a mother's face can be recognized from
different perspectives and under different lighting geometries or
spectral compositions. ~owever, simple respones can be predicted
fairly accurately (reaction times or magnitude estimations) to visual
stDnuli of different contrast or size. Thus, for some practical
applications, how these responses will be improved or degraded under
different illumination levels or lighting gecmetries can be predicted
once ~e can specify the stimulus conditions.
A seconcl limita-tion is an inability to easily specify the
visual stimulus. Therefore, even with a satisfactory mLdel of vision,
visual responses to realistic ~aterials cannot be predicted because
current technology seriously restricts the ability to accurately
specify the visual stimulus. Many hours are required to acquire the
information necessary to describe, for example, the visibility of even
a single letter. It is not trivial to specify its luminance, its size
or indirect technic~es are rec~ired to make even these rneasurements,
see, for example, Rea, M.S., Ouellette, M.J., and Pasini, I., Contrast
measurer~ents in the laboratory and the field, Pr~ceedings of the 2Ist
1 31 8393
Session of the C~mmission Tnternationale de l'Eclairage, venice, 1987.
This technical limitation has impeded prcxgress in lighting.
Indeed, there has been little reason to extend the understandirg of the
links between lighting and vision because there have been no technical
means of acquirirg the information necessary to make this link.
Importantly too, the tools have not been readily available for
processing information according to a visual performance model.
There is a need for an image acquisition and an image
processing device whereby a relationship between lighting and spectral
sensitivity thereto of life forms (e.g. humans and plants) is
obtainable.
According to the present invention there is provided a
photometric device, comprising;
a~ a video camera having a pixel sensor array and known pixel value
output signals, relative to a black reference zero light value s~orage
element in the sensor array, in response to the spatial - light
intensity information being viewed by the camera, the camera having a
low geometric distortion,
b) filter means on the variable aperture lens for, in operation,
transforming the ca~era spectral sensitivity to match a known spectral
sensitivity,
c) an image acquisition board oonnected to the output from the camera
and having a spatial resolution closely related to that of the camera,
the board having a dc restoration circuit for c~rrecting any drift in
the camera output signal, a pixel value proclrc~m~able qain a~ fset
amplifier, and means for storing the pixel values in digitial form in a
fra~e ~emory spatial array,
1 31 8393
d) a video target viewer connected to the camera, and
e) means connectecl to the output of the image acquisition board for
c~mputing visual angle, and scaling the pixel output signals for
computing contrast from the absolute value in relation t~ a
predetermined light intensity received by the camera, and providing a
substantially constant and linear relationship capability between the
input luminanoe and pixel value output signals over substantially the
entire pixel sensor array and the light range of operation.
The video camera may have a variable aperture lens and the
predetermined light intensity received by the camera may be determined
by the setting of the variable aperture lens.
The filter means may be a V-lambda' filter for, in operation,
producing a photopic response by the device.
The filter means may be a V-lambda' filter for, in operation,
producing a scotopic response by the device.
The filter means may be one of a plurality of different
filter means which are used sequentially to filter different
wavelengths, and the means connected to the output of the image
acquisition board may, in operation, deduce colour information from the
filtered wavelengths.
In this specification light intensity means the level of
electrc~agnetic flux received by an object.
The spectral sensitivity (responsivity) of the object may be
modelled through filters and the inherent spectral sensitivity of the
detector so that the intensity of light on that object can be correctly
measured. The ohject may, for example, he animal thuman~, vegetable
(plants and trees) or mineral (artifacts).
In the acc~npanying drawin~s which illustrate by way of
example, an emh~diment of the present invention;
~ 31 8~93
-- 5 --
Figure 1 is a diagrammatic view of a photometric device,
Figure 2 is a diagra~matic view of the device shown in Figure
1 being used in tests to verify the present invention,
Figure 3 is a graph of the linearity res~nse plotted as the
response value against luminance, for the device shown in Figure 1 with
the camera aperture at f/16 and without using a luminance oorrection
filter,
Figure 4 is a similar graph to that of Figure 3 but with the
camera aperture at f/2 and with the luminance filter attached.
Figure S is a graph of the spectral sensitivity of the device
shown in Figure 1 shown as relative distribution plotted against
wavelength, with the luminance filter attached,
Figure 6 is a graph of the relative luminance response,
of the device, shown in Figure 1, relative to another cc~mercially
available photometric device, and plotted as a ratio against light
source,
Figure 7 is a graph of the mcdulation transfer function in
horizontal and vertical directions, plotted as modulation against the
cycles/frame, for the device shown in Figure 1, and
Figure 8 is a graph of the camera field size in the
horizontal and vertical directions, in degrees of the device shown in
Figure 1, plotted as a function of the focal length of the camera
lens.
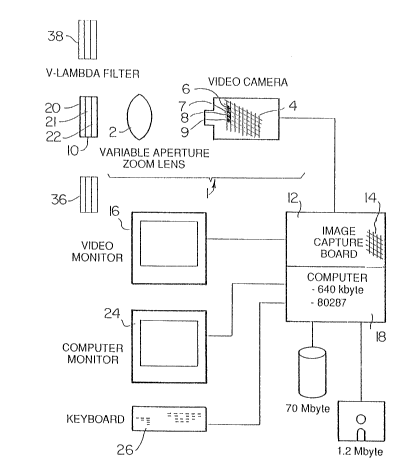
In Figure 1 there is shown a photometric device, comprising;
a) a video camera generally designated 1 having, in this embodiment,
a variable aperture lens 2, a pixe:L sensor array, a portion of ~lich is
shown and designated 4, and known pixel value output signals, relative
to a hlack reference zero light value storage elements, four of wh:ich
are shown and desiynated 6 to 9, in the sonsor array ~, in response t:o
1 3~ 8393
1 - 6 -
the spatial - light intensity information being viewed by the camera 1,
the camera 1 haviny a low ge~metric distortion,
b) filter means 10 on the variable aperture lens 2 for, in operation,
transforming the camera spectral sensitivity to match a known spectral
sensitivity,
c) an image acquisition board, generally designated 12, connected to
the output frcm the canera l and havin~ a spatial resolution closely
related to that of the camera 1, the board 12 having a dc rest~ration
circuit for correcting any drift in the camera output signal, a pixel
value programmable gain and offset amplifier, and means for storing
the pixel values in digital form in a frame memory spatial array, a
portion of which is shown and designated 14,
d) a video target viewer 16 connected to the camera, and
e) means, in the form of a programmed oamputer 18, connected to the
output of the image acquisition board f~r computing visual angle, and
scaling the pixel output signals for computing contrast from the
absolute value in relation to a predeter~ined light intensity received
by the camera 1, and providing a substantially constant and linear
relationship capability between the light input and pixel value output
signals over substantially the entire pixel sensor array and the light
range of operation.
The predeternined light intensity received by the camera 1 is
determined in this e~odiment by the setting of the variable aperature
lens 2. ~lowever in other embodiments this ~ay achieved, hy for
example, using spectrally neutral values.
In tests to verify the present invention the video camera 1
was on RCA model TC-lOl charge-coupled (CCD) video camera. The CCD
camera was used because of its inherent linearity and lower g~-~metric
1 31 83q3
distortion. Another reason for choosing this camera was because it was
possible to modify the camera to obtain the accurate spatial - light
data requ;red.
The camera contained a 532 horizontal by 504 vertical element
t9 mm by 6.5 mm) interline transfer CCD sensor. The sensor array 4 was
a silicon based semiconductor that collects photons at discrete
locations, called storage elements, and converts these photon oounts
into an electrical signal. Images were produced from 250, 920 storage
elements, 510 horizontal by 492 vertical. (As will be discussed later,
however, only 480 vertical lines were used since this is the maximum
vertical resolution with the memory spatial array 14 of the image
acquisition board 12. Ihe manufacturer guaranteed that there were no
more than six defective stora~e elements in the sensor array 4.
As has been previously stated, storage elements, such as
those designated 6 to 9, in the sensor array 4 were not used as part of
the image but were used as "black" reference values. Because the
output of the CCD camera was te~nperature dependent, these "black"
elements 6 to 9 were used to define the zero light value and thus set
the output values for the picture elements, or pixels. In this way,
data generated by the cc~nera 1 ~as minimally affected by temperature
variations. ~Ll tests were performed, however, at a ro~n te~perature
of 21 degrees C.
Since the camera was intended for oo~mercial video
applications, the sensor array was sampled at 9.~6 M~lz an~ the signaLs
fran the storage elements were output according t~ the ~S-170
television standard. This standard requires a cornposite signal
containing hoth image and synchronization signals having a 1 V peak-
t~-peak arnplitude into a 75Q l~ad.
~ 31 ~393
1 - 8 -
Except for the following three m~difications, the camera was
utilized as delivered from the factory. First, the infra-red (IR)
blocking filter, anterior to the sensor array, was removed since its
transmission characteristics were unknown, Second, an adjustment was
performed inside the camera to establish a linear rlelationship between
input light (luminance) and output. ~hus, if output = input Y, then by
this modification Y = 1. With Y = 1 there was equaL brightness
resolution over the entire (unsaturated) image at the expense of a
larger dynamic range within a given image. Finally, the auto~atic gain
control (~GC) was disabled so that the input/output relationship would
be constant over the full range of scene light (luminances).
Adjustments for different scene light (luminances) were accomplished
with a variable aperture lens 2.
m e variable aperture lens 2 was that marketed as a Cbsmicar
2/3 inch, f/1.8, 12.5 to 75 n~ multi-refractive element zoom lens, and
was equipped with a standard C mount. A zoom lens was employed because
it afforded closer inspection of small targets without moving the
camera. The lens 2 was equipped with standard apertures from f/1.8 to
f/22 with a detent at each f stop. The lens focal length was
continously variable from 12.5 to 75 mm, although for target size
calculations it was always set by the operator to one of six labeled
values (12.5, 15, 20, 30, 50, or 75 mm). Focal distances ranged fr~m 1
m to infinity.
The spectral sensitivity of the camera (without the IR
blocking filter) was specified by the manufacturer. rhese data were
used to design the filter means 10 in the forrn of a V-larnbda Eilter
package that would convert the camera's spectral sensitivity to that of
the CIE standard ~server. l~e filter package c~rnprised three glass
~ 3 1 83q3
filters 20 to 22, details of which are given in the following Table 1.
Table 1
Filter Glass Type Glass Thickness
Schott BG38 3.30 mm
21 Schott K~3 4.00 mm
22 Corning 3307 3.16 mm
With this filter package~ the response of each pixel in the
sensor array 4 to the electro~agnetic spectrum,was related to
luminance. The output from the camera 1 was calibrated in units of
nits, or cd/m2. A filter mount (not shown) was specially constructed
for this correction filter package and fixed anterior to the first
tefractive element of the zcom lens 2.
The image acquisition board 12 used was that marksted by
Imaging Technology Inc. as PCVISIO~plus M which was an image
acquisition board for a PC/AT personal o~mputer. Although several
image acquisition boards were ccmmercially available, this product was
chosen because the spatial resolution was very close to that provided
by the CCD camera 1, and any greater resolution by the board could not
have been utilized and, any less would have degraded that available
~rom the camera 1. Except for a change in the mel~ry buffer addresst
the image acquisition board 12 was used as delivered from the factory.
The ~oard 12 could accept tw~ RS~170 video signals and several
synchronization signals. Video siJnals frcm the camera 1 were passed
1 31 ~393
-- 10 --
to an dc restoration circuit in the board 12 which corrected fvr any
drift in the video signal level. The signal then went to a
programmable gain and offset amplifier and on to an 8-bit analog-to-
digital (A/D) converter. The A~D converter digitized the video signal
and stored the pixel values in the frame memory 14, which was organized
as tw~ frame buffers of 512 x 480 pixels each. The output digital-
to-analog (D/A) converters could be connected to either of the frame
buffers and used to reconstruct the RS-170 video signal for display on
the video target viewer 16.
Ihe video target viewer or monitor 16 was a Panasonic WV-5410
monochrcme monitor and it was connected as shown to view the images
acquired by the camera 1 and processed by the image acquisition board
14. Only a monochrosne, or black-and-white, monitor was required
because the luminance data contained no aolor information. This
particular rnonitor was chosen because it had a desirable underscan
feature which allowed all of the acquired image to be displayed on the
screen.
The monitor served essentially as a view-finder for the
system operator. The images displayed on the screen were not intended
to be acurate representations of the luminance values stored in the
computer 18. Indeed, the monitor has non-linear characteristics anc3
could not be used for this purpose. Therefore, the monitor was only
used for locating targets of interest and to set the general exposure
level for the camera 1.
Ihe ima~e acquisition board was snous~ted inside the aotnputer
18 which was an IBM PC/AT campatible c~mputer and included an 80287
rnath aoprocessor. Other aonventional hardware of the ccmputer 18
includeY3 disk drives, a rnonitor 24, an~l a keyb~arcl 2fi. ~ tnouse was
1 3 1 8393
-- 11 --
used as an optional feature in conjunction with the ImageActionplusTM
software.
To facilitate calibration, several software packages were installed on
the personal computer 18. All software was run und~r the MS-DGS V3.20
operating system.
The main piece of soEtware used throughout the calibration
was ImageActionplusTM, which was produced by the image acquisition
board manufacturer (Imaging Technology Inc.~. This progran ca~e with
~ouse and menu support and oould easily acquire, manipulate and process
images.
A MicrosoftTM C compiler, RS/lT and Lotus 1-2-3 were used
to perform some calibration calculations. A diagnostic program
PCPLUSCD was used to verify the correct operation of the hardware.
ITEX PCplus , a library of routines for creating user programs, was
also used.
An ~mportant part of the linear response system was to
establish a correct zero value. Without a fixed zero value it would
have been impossible to perform arithmetic ~anipulations of the data
and retain accurate values.
As stated earlier, the camera 1 utilized s~me storage
elements in the sensor array to correct for temperature variations.
These storage elements, on each of the 492 horizontal lines of the
array, were used as reference "black" values to maintain a constant
black-level in the entire inage.
The image acquisition board 14 employed two features to
further ensure correct zero values, a dc restoration circuit and a
programmable zero offset adjustrnent. The dc restoration circuitry
correctecl for any drift in the black-level si~nal fr~n the camera 1.
i
1 31 83~3
1 - 12 -
The programmable offset adjustment set the output hlack signal voltage
to corresp~nd to a particular input signal. m e purpose of this
adjustment was to fine-tune the response level and, although irrelevant
for this application, to permit non-standard video siqnal inputs.
In principle, every pixel should always have generated zero
output in darkness. ~npirically, however, captured dark images (iOe.,
with the lens cap on) produced variations in pixel values of five or
more counts. These variations were likely due to thermal effects and
nonuniformities in the CCD camera response. With the programmable
offset of the board adjusted to 73 the average pixel count in the dark
was about seven counts. Thus no pixel value ever dropped to or below
zero. With this zero offset setting positive values were associated
with the true dark values for every one of the approximately 250,000
pixels. In each subsequent image acquired the positive value
representin~ the dark value was substracted frcm the corresponding
pixel value in the image. In this way the largest dynamic range of
voltage could he assigned to the scene luminance in the acquired images
without introducing a low luminance "clipping" non-linearity.
All calibrations weré perfor~ed with this offset setting.
Once set, this value was intended to be maintained in non-volatile
~emory. Some difficulty was experienced with this feature, however, so
in the application software the offset value was always reset to 73
prior to image acquisition.
Thirty~two dark images were acquired and averaged to give a
black "correction image" u5ed for calibrating subsequent image
measurements. m e majority of pixels in this image had co~mts ranging
between three and nine with a mode of seven. Interertin~ly, thi~ dark
image was oomposed of five equally wide horizontal bands diEfering by
1 3 1 ~393
1 - 13 -
one count in luminance; the brightest band was in the center of the
image falling off symmetrically to the top and bottom. The dark image
was found to be likely to change with temperature and so new dark
images were obtained prior to i~age acq~lisition of actual scenes.
With the video ca~era and image board modifications described
above, together with the V-lambda correction filter 10 on the objective
lens 2, the output video signal was linearly related to the number of
photons impinging on each photosite. That is, the output of ~he system
was linearly related to scene luminance between noise and response
saturation. The slope of the linear function relating scene light
(luminance) to system output could be changed, however, by a
programmable gain amplifier in the input section of the image
acquisition board 14. This modification set the- amplification of the
RS-170 composite signal. The gain could be adjusted from 0.67 to 1.33
in 100 steps. Large values increased the resolution at the expense of
dynamic range between noise and saturation and vice versa.
Consequently, a middle gain value was preferred for most applications.
The factory setting of 50 was found satisfactory in this regard; this
value was reset before each image acquisition.
The CCD sensor array was inherently linear. Coupled with the
video camera 1 and image processir.g board 14, however, non-linearities
between input and output could be produced. Tests were therefore
performed to ensure that data produced by the system, after the syste~
modification described above accurately scaled light (luminance)
infor~ation in the visual scene.
In Figure 2, similar parts to those shown in Figure l are
designated by the same reference numerals and the previo~s description
is relied ~on to describe them.
I
1 31 ~3'33
l - 14 -
Figure 2 shows the way that the camera 1 oE the device showr
in Figure 1 was used in tests to verify the present invention.
In Figure 2 there is shown an optical bench 28, a calibrated
light source 30, a regulated dc electrical power supply 32 and a
calibrated bari~im sulfate reflectance standard 34.
In the tests, the light (luminance) of the reflectance
standard 34 at different distances frc~i the source 30 was calculated
using the inverse square law. m us, it was possible to produce
precisely known luminance values for measurement by the device shown in
Figure 1. (These expected values were verified with a light
(luminance~ photometer).
Figure 3 shows the data obtained with a camera aperture of
f/16 and the linear equation best fitting thosé data using a lsast
squares criterion. The V-lairbdia filter 10 was removed for this test to
increase sensitivityO The filter 10 has no effect on the linearity of
the system as long as the spectral power distribution of the source
does not change, as was the case for this test. These data establish
2~ then, that the device shown in Figure l responds linearly to changes in
scene light (luminance), in the response range between noise and
saturation.
ALljustments to the exposure of the sensor array 4 must be
made for different brightness levels in the visual scene. Since the
automatic gain control in the camera 1 was disconnected, the sensor
array exposure was controlled by varying the lens aperture of lens 2.
Although the system retained its response l;nearity (betwecn noise anc
saturation) with these changes, the slope of the response curve changec
by factors related to the areas of the lens apertures of the lens 2.
1 31 8397)
-- 15 --
Thus, if the slope of the response curve was 1.0 for a given f stop,
then reducing exposure by one stop (nominally a factor of 2) produced a
response curve slope of 0.5 with the new aperture.
Under the experimental setup shown in Figure 2, the areas of
the different apertures of the lens 2 were deduced. With a fixed
amount of light falling on the reflectance standard 34, c~ltput from the
(linear) device shown in Figure 1 was measured for tw~ successive
aperture settings demarcated by the lens aperture detents. The ratios
of outputs frcn successive aperture settings are presented in the
following Table 2. Depending upon the sensitivity range, measurements
were made with and without the V-lambda filter 10. All measurements
were obtained from pixels in the oe nter of the captured images. By
restricting the measurement area to the center ~f the image, vignettir.g
(response falloff at the image edges) was avoided. ~Vignetting was a
problem with this system and is discussed in detail later~O The ratios
for different aperture settings were different from the expected values
of 2Ø These values were considered accurate to within about 3%.
This uncertainty is caused by mechanical inconsistency in the aperture
mechanism.
1 31 83~3
1 - 16 -
Table 2 The relative areas of ~successive f stops
Aperture Ratios
Ratio
1.8 1.02
2,0 1.77
2.8 1.89
4.0 1.84
5.6 1,95
8.0 2.12
15 11.0 2.22
16.0 2.01
22.0 - -
Ib determine the response function for the device shown in
Figure 1 with every aperture under actual operating conditions (i,e.,
when measuring luminance), it was necessary to obtain data with the
V-lambda correction filter 10 in place. Figure 4 shows response data
with the V-lamkda correction filter 10 in place with an aperture of
f/2, again using the experimental setup shown in Figure 2. These data
are also described well by a straight line of slope 1.095, thus
providing a gain of 0.913 od/m2 per count (system response value) for
the f/2 aperture Using the ratios in Table 2, it was then possible to
determine the gain values for every other aperture with the V-lambda
1 31 83q3
l - 17 -
correction fi1ter ln in place. It should be noted~ however, that with
a 3~ uncertainty for a given aperture value, some accumulated error
possibly occurs when using the ratios in rrable 2.
It was necessary to evaluate the spectral response of the
device shown in Figure l with the V-lambda correction filter lO
attached. It was thought that the filter lO would make the spectral
sensitivity of the device shown in Figure l exactly equal to V-lambda.
The spectral response of the device shown in Figure 1 is given in
Figure 5 and this was compared to that of a high q~1ality Pritchard
laboratory photometer whose spectral sensitivity is documented to be
very close .o V-lam~da. A comparison between the two devices was
performed using a variety of c~mmercially available light sources, each
havin3 different spectral power distributions. -Since the device shown
in Figure l was designed for use in actual environnents, this procedure
was thought to be sufficient for estimating error ~agnitudes for most
lighting applications.
Eight light sources having different spectral compositions
were selected: incandescent (I), high pressure sodium (HPS), low
pressure sodium (LPS), metal halide (MH), mercury (M), cool-white
fluorescent (CWF), warm white fluorescent lWWF), and vita-liteTM
fluorescent (VLF). Using the standard 0-45 degree photometric geometry
(Wyszecki and Stiles, 1982), these sources illuminated, in turn, a
barium sulfate plate which was viewed, again in turn, by the t~
photometric devices from a distance of about l m.
Figure 6 shows the ratio of the camera output to the
Pritchard luminance values, normalized for the incandescent source.
All camera values were obtained with an aperture ~f f/2.8 except that
1 31 8393
l - 18 -
for incandescent lamp which was taken at f/2. To minimiYe potential
errors from vignetting only the pixels from the central area of image
were considered.
The differences between the output fr~m the device shown in
Figure l and ~he Pritchard device were found to be small, never
exceeding 8%. It should be noted,-however, that those light sources
with mercury line emissions (254, 313, 365, 405, 436, 5~6 and 728 nm)
were associated with the largest error. m is error may be due to
improper W blocking for the V-lambda filter 10 or using "typical"
spectral sensitivity data rather than that for the particular camera l;
this may be corrected by using filters. Correction factors taken from
Figure 7 can be used to minimize these small errors while acquiring
image illuminated by sources with mercury line emissions.
The device shown in Figure l should ideally produce the same
response for the same scene luminance anywhere in the image. In order
to check for any inconsistencies in pixel responses to the same scene
luminance, it was necessary to develop a technique tha~ would provide
equal scene luminances throughout the captured image.
Images were acquired of the interior of a l m integrating
sphere, illuminated with either a lO0 or 300 W incandescent ~amp. The
camera lens 2 was aimed at the opposite interior wall of the sphere and
defocussed during image acquisition to minimize the effects of paint
imperfections. I`hirty-tw~ images were acquired and averaged to further
reduce the impact of these imperfections.
Using this technique it was detenmined that the cc~mera lens. 2
produced vignetting. Thus, more light from the equal-lumiance scene
reaches the center of the focused image than the edges. C~nsequently,
1 31 8393
- 19 - -
points of equal luminance in a ~scene did not create equal pixel
responses throughout the i~age. The magnitude of lens vignetting
depended on the aperture setting and the z~om lens focal length. In
the device shown in Figure 1, 9 lens apertures and 6 focal lengths were
employed. Without correction the same visual scene produced 54
different sets of luminance data, one for each comb;nation of lens
aperture and zoom lens focal length. It was found that vignetting
could be overcome to a large degree through software manipulation.
This was not an ideal solution, and proper optical ccmponents can be
incorporated into the device shown in Figure 1. Fifty-four calibration
images, based upon an average of thirty-two images of the hemisphere
wall, were obtained and stored for subsequent image corrections. By
multiplying each acquired image by the inverse of its respective
calibration image, the same scene luminance produced the same pixel
response throughout the image for any aperture and zoom focal length.
As with other optical devices, errors can be created by dust
and dirt on the optical co~ponents. These errors are particularly
noticeable with the device shown in Figure 1. Dust particles on the
lens 2 and sensor array surface cause circular dark spots in the image.
The larger the aperture the larger the spot diameter; the closer the
particle to the sensor array 4, the sharper the image. The luminance
of the areas shaded by the dust were of the order of 3% darker than
unshaded areas. Before calibration the optical components were
thoroughly cleaned, but, unfortunately, it was impossible to remove all
of the dust. Thus, the calibration images record these occasional
spots. Gonsequently small errors, of approximately 3~, were observe~
in some areas of the scene if between calibration and suhsequent image
1 31 839~
1 - 20 -
acquisition the location of the spots had changed, the spots were
removed, or more dust accumulated on the optical oom~nents.
The image quality of any optical device depencls upon its
refracting (and reflecting) elements as well as the spatial re~solution
of the photosensitive mediumO Imaging syste~s could be characterized
by the modulation transfer function ~MTF) which describes how well each
spatial frequency ~luminance cycles per distance) cou:Ld be resolved.
As for all i~aging systems, there is a loss in image fidelity
with the device shown in Figure 1 at higher spatial frequencies. In
other w~rds, the image contrast of small details was less than it
actually was in the visual scene. Ignored, these losses produced
errors in measured contrast and, consequently, calculated levels of
visual performance. Importantly, these losses also found in
conventional optical photometers, but are rarely if ever reported.
Therefore, such losses must be considered for every op-tical system.
To adequately define the spatial frequency response of the
device shown in Figure 1 it was necessary to perform measurements in
both the horizontal and vertical directions because the camera array 4
and imaging board 2 were not isotropic. To minimize aliasing in the
horizontal direction there was an electronic filter for the video
signal in the input stages of the image acquistion board 4. It had a 3
d~ cutoff frequency (70% of maximum) of 4.2 MHz. Since the horizontal
scanning rate was 63.5 ~sec/line, the 3 d~ cutoff frequency of 4.2 MHz
li~ited the resolution to 270 cycles/frane in that direction. T~ avoid
aliasing, the sampling theorem required that the video signal be
sampled at the Nyguist rate, i~e., at a rate hhich is twice the highest
frequency contained in the video signal. The line-by-]ine sampling
rate of 512 pixels/line was approximately twice the filter cutof~
131~3~
1 - 21 -
frequency of 270 cycles/frane as required by the sampling theorem.
There was no corresponding filter in the vertical direction, so
aliasing was to be expected.
Normally, the MT~ is specified in terms of cycles per degree
subtended by the target. Since the device s'nown in Figure 1 was
equipped with the zoom lens 2 it was necessary to define the MTF in
terms of cycles per image frame. This was the number of cycles
subtended by the active area of the sensor array 4 in the horizontal or
vertical direction. (The horizontal direction was larger than the
vertical ~y a factor of about 4/3.)
The target used in the tests was a periodic stimulus
comprised of 48 dark bars on 203 mm wide white paper. The target was
produced with a 300 dot per inch laser printer. A bar stimulus was
used instead of the ~ore conventional sine wave stimulus because it was
easier to produce~ and provides simi]ar results. The stimulus was
placed 1585 mm from the plane of the camera sensor array for the
horizontal line measurements and 2092 mm for the vertial line
measurements. The zoon lens 2 was used to vary the spatial frequency
of the target on the sensor array 4. The target was illu~inated with
ambient rocm lighting from cool-white fluorescent luminaires. The
V-lambda filter 10 was removed to achieve greater sensitivity at a lens
aperture of f/2.
All acquired images were offset corrected and measurenents
were taken only in the center of the image to avoid vignetting. The
maximum and minimum pixel values over several cycles were ~asueed~
Contrast (C), as defined in equation 1, was calculated and n~xlulation,
relative t~ the observed contrast at the lowest measured spatial
1 31 8393
1 - 22 -
frequency (C = 0.89 at 28 cycles/frane), was p].otted as a function of
cycles per frame in F`igure 8.
C = (Ib - Lt)/~Lb + Lt) (1)
where, Lb = average l~ninance of the white paper
Lt = average luminance of a dark bar
Figure 7 shows that er.rors occured in measuring the
luminances of targets smaller than 58 cycles/fra~e. Ib know where
measur~nent errors ~Duld occur with the device shown in Figure 1, it
was found that the actual size of target must ~e related to the size of
the image frame for a given focal length. The number of cycles/degree
in the target can be related to the number of cycles displayed in a
frame and the focal length of the lens by equation 2:
cycles/frame = cycles/~egree * k/f (2)
~
where k = degrees * mm~frame
= 420 in the horizontal direction
and = 320 in the vertical direction
f = focal length of lens, in ~n~ ¦
These values of k were detennined ~npirically frcm the lens
focal length, the number of cycles/degree in the bar stimulus, a~l the
nu~ber of cycles displayed in an image frame.
13183q3
-- 23 --
11~ avoid this problern with the device shown in Figure 1, it
was deduced that objects must fill at least 2~i of the irnaging frame 14.
This was determined fran the data in Figure 7 which showed that the
lurninances of objects having a fundamental frequency greater than 58
cycles per frame (either vertically or horizontally) will be
attentuated by the high frequency cut off. At rr~XirnUTn zoc~n (focal
length of 75 Tnrn) the (vertical) image frame covers 4.3 degrees (Figure
9). Ihus, objects 0.086 degrees (5 minutes of arc) or larger were
found to have negligible luminance attentuation due to the high spatial
frequency cut shown in Figure 7. This lirnit is better than that for
most conventional luminance photaneters. Values for other focal
lengths may be determined frc~n the data in Figure 8 where the field deg
are plotted against the focal length of the camera 1. A macro lens
will be affixed to the camera 1 for rneasurements of still smaller
objects.
In some embodiments of the present invention the sensor array
4 could rapidly scan a visual scene to produce a t~dimensional image.
In other embodirnents of the present invention the filter
means 10 may be one of a plurality of different filter means 10, 36 and
38 which are used sequentially to deduce colour information. For
exarnple, long, mediurn and short wave filters 10, 36 and 38
respectively, could be used sequentially to deduce colour inforrnation.
It is within the scope of the present invention to use more
than one camera 1, filter 10 and bnage capture board 12 in the device
in order to obtain colour infonnatlon.
E~nbodiments oE the present invention may be used, for
example, to aJign lamps in reflectors, to measure different light
intensities ~r h~rticultural purl~ses at different pasitions in,
1 ~ 1 83'33
1 - 24 -
for example, greenhouses in order to adjust the lighting tvwards
uniformity throughout the greenhouse, Eor measuring the different light
intensities in studios to enhance photographic and television
reproductions, and for tneasuring differen~ light intensities to imprave
the visibilities of, for example, roads or airpvrt runways.
The following are the relevant pages of a user's manual that
has been compiled for the device shown in Figure 1. The particular
form of the device shown in Figure l is referred to in these pages as
the CapCalc systen, and the manual is based vn tests carried out with
this system.
The following trademarks are used in these pages;
IBM and I~M personal computer AT are registered trademarks of
Intsrnational Business Mhchines Corporation~
PCVISIONplus is a registered trademark of Imaging Technology Inc.
R Q is a registered trademark of RCA Cbrporation.
COSIMICAR is a registered trademark of ASAHI Precision Company Ltd.
PANOSONIC is a registered trademark of Panasonic Cbrporation.
1 31 8393
- 2s -
1.O Pr~gram Overvie~
1.1 Introduction to VersloQ l.O Qf System
CapCalc stands for Capture a~d Calculate- The CapCalc system
accurately measures a large number of luminances and quickly
performs lighting analyses on those data. The system is a
synthesis of state of the art components including a solid state
Charged Couple Device ~CCD) video camera with a photopic spectral
correction filter, and a personal computer with a digital image
processing board. The capability and potential for the system
make it valuable for a wide range of application.
The calibrated video camera acquires luminance data much like the
typical spot luminance meter, but unlike a spot meter, it
simultaneously resolves an entire scene into approximately
250,000 luminance measurements. These data are then stored by
the digital image processing board.
There are other important aspects of the visual scene made
available for evaluation by use of the video camera. Not only is
a large number of luminance values available, but their precise
spatial relation is maintained. Therefore, the acquired image
also allows for the determination of object size, shape,
contrast, and viewing distance within the visual scene.
The personal computer dramatically reduces the time required to
understand and evaluate lighting analyses. Currently, the
software calculates Relative Visual Performanre (RVP). However,
the menu driven software will be expanded to perform other
procedures. Selection and learning of the various procedures are
made easy by using help screens. Any information required from
the user is prompted for and checked by the software upon entry
so that mistakes are detected. In short, the system is a
practical tool for both ligh~ing application and educa~ion.
This system is also a tool for research. The convenient ability
to capture and have access to such a complete array of luminance
values within an image has never been possible before. Issues
regarding brightness, size, and shape will be easier to
investigate. Having this information available will facilitate a
more complete understanding of human response to light and
lighting.
This manual discusses how to use the capabilities which are
currently available with the CapCalc system. Although evory
att~mpt ha~ bean made to produce a fail ~afe Sy8~m, the National
~e~earch Counc~1 Canada a~ume3 no re~ponsibility for the
validity, accuracy, or applicability of a~y of thn reJults
obtained from the use of CapCalc. However, any comments,
suggestions or errors encountered in either the results or the
documentation should be brought to our attention.
- 26 - 1 3 1 ~3~3
1.2 Syst~m Capabilities
CapCalc is an e~tensive measurement and analysis system. The
software is designed and docu~ented for ease of use. Menu driven
activities permit complete flexibility and control of the system
capabilities. Its major capabilities include:
a. with the use of a calibrated video camera and digital image
processing board, an image is quickly acquired, digitized,
and stored as approximately a quarter million luminance
values. The reader should refer to Appendix A where a
technical report is provided which discusses the camera and
computer.
b. All image and luminance information can be saved on disk
under a user specified image file name for future use. This
information can also be easily retrieved or erased.
c. Portions of the image can be isolated by placing a user
specified rectangular frame around ~he area of interest. The
details of the image within the frame can be more easily
observed by scaled enlargement (magnification).
d. The user can scan an image with a cursor observing the
luminance at any desired pixel location.
e. The resolution of luminances within the framed area of an
image can be reduced. This process is used for converging
luminances of a similar level~ and wil~ be explained in more
detail later. The visual result produced on the image by
doing so, is a contouring of the luminances to a new
specified number of steps. This is helpful for purposes of
separating areas of the image, such as target and back~round
for calculations.
f. Relative Visual Performance (~VP) can be calculated for any
user specified target, background, and size within an image,
as well as determining the consequences of observer age in
the investigation. The results are immediately displayed to
the user. The reader should refer to Appendix B where three
technical reports are provided which explain RVP.
g. On-line documentation is available to help the user during
system use. This is user documentation which can be
displayed on the computer screen for assisting in system
use. Status lines are a~so located at the bottom of the
screen to inform the user of current activities and errors
encountered by the system.
1.3 What You Need to ~e CapCalç System
To insure proper system operation and complete use of all the
features and capabilities of the CapCalc system, you should have
the following:
131$~93
- 27 ---
1.3.1 Personal Compu~er and Configuration
IBM Personal Computer AT, or fully compatible microcomputer
configured as below:
- IBM AT System ~nit with at least one 1.2Mbyte high-density
dis~ette drive and a 20Mbyte hard disk
- Expanded memory to 640K with DOS Version 3.0 or higher
- 80 column monitor
- 80287 Numerical Data Processor chip: "Coprocessor"
~Optional but strongly recommended)
1.3.2 Calibrated Video Camera and Video Monitor
- RCA Solid State CCD Video Camera model TC100 (electronically
modified for luminance measurement). The camera should
always be mounted on a tripod or other riqid device.
- COSMICAR TV ZQOM LENS (fitted with additional optical filter
for luminance measurement) 12.5mm - 75mm 1:1.8. The lens
cap should be kept on the lens when the camera is not being
used.
- Panasonic WV-5410 black and white vidéo monitor. Any RGB or
black and white video monitor of equal specification will
suff1ce (refer to Panasonic WV-5410 Operation Instruction
manual for specifications)
1.3.3 Digital Image Processing Board
- Imaging Technology's PCVISIONplus Frame Grabber and cable
that connects it to the calibrated camera and display video
monitor.
- Imaging Technology's PCVISIONplus Frame Grabber User's Manual
(this is necessary for installation of Frame Grabber board
and other video equipment)
The combination of camera, lens, and digital image processing
board have been calibrated at the National Research Council
Canada, and delivered to you along with this manual, and the
Frame Grabber manual. Due to the unique characteristics of each
camera, lens, and processing board, the results of calibration
for each system are slightly different. These differences are
compensated for by unique calibration factors which are used by
your system software. For this reason, your system is qiven a
unique number which is recorded at the beginninq of this manual.
~ 3 1 ~3~3
- 28 -
The serial n~mber for each of these system components is also
recorded for your reference. Only these components should be
used with your CapCalc system software to insure accurate
luminance measurement.
1.3.4 User's Manual and Master Program Diskettes
- CapCalc user's manual and master program diskettes. The
following diskettes comprise the CapCalc system software:
- CapCalc System Software ((`C1)
- CapCalc Run Data 1 (CC2)
- CapCalc Run Data 2 (CC3)
- CapCalc Run Data 3 (CC4)
- A sufficient number of blank high-density diskettes for
master program diskette back-up and image file and luminance
information storage.
1.4 Gettin~_Started
The CapCalc user's manual, and system software provide all of the
information needed to operate the CapCalc system successfully and
to have it become a useful tool for luminance measurement and
analysis applications. The following sections provide
instructions to help you set up the system and get started.
1.4.1 Backing up Master Program Diskéttes
The master program diskettes included as part of the CapCalc
system package contain the software and run data which is used by
the software. They must be carefully protected to insure against
loss or damage to the software. Therefore, before attempting to
install the software onto the computer ha~d disk and run CapCalc,
it is important that you do the following:
1) The four master diskettes have been tested prior to
shipment. If you suspect that any of the master disket~es
you received have been damaged, contact the National
Research Council Canada immediately.
2) Make a copy of each CapCalc master diskette which you have
received. To make the necessary copies the master diskette
should be copied to an empty directory on the C drive.
Then, a blank, formatted high density diskette should be
placed in the A drive and all files from the chosen
directory on the C drive, copied to the A drive. This
should be repeated for each master diskette. This set
should be labeled as the "back-up-version", while the master
set should be saved in a safe place where it will not be
damaged.
1 3 1 8393
- 2~ -
No~e: All disketteS used to bac~-up the master program diskettes
should be double--sided and high-density.
The CapCalc system software must be operated from the hard disk
of the IBM AT. For an explanation of the system software
installation on the hard disk, please refer to the next section.
1.4.2 Installation of Software onto Hard Disk
Due to the disk space necessary to store image file and luminance
information, the CapCalc system software has been designed to run
on an IBM AT that includes a hard disk. The recommended
arrangement for installing the CapCalc software involves placing
all of the contents of the system software dlskettes in~o a
single subdirectory on the hard disk. This subdirectory is
assumed to be named "C~PCALC". To perform this you need to do
the following:
S~ep 1: With the computer on and at the <C> prompt, initialize
subdirectory CAPCALC by typing "MRDIR \CAPCALC".
Step 2: Successively insert each of the CapCalc system software
diskettes into drive A, and type "COPY A:*.* C:\CAP~LC".
After all files have been copied to this subdirectory, the
installation of CapCalc on the haxd disk is complete.
Each time you wish to run the CapCalc system software you should
be in the CAPCALC subdirectory. To get to the CAPCALC
subdirectory, type "CD \CAPCALCI-
1.4.3 Installation of Video Equipment
The PCVISIONplus Frame Grabber is a video digitizer and framememory capable of digitizing the standard RS-170/330 video signal
received from the calibrated camera. The digitized image is then
stored in a frame memory on the Frame Grabber. This image is
simultaneously displayed on the video monitor.
The PCVISIONplus Frame Grabber must be placed into the IBM AT
expansion slot to allow the CAPCALC system software to perform
the various image analysis processing. In order to perform the
proper configuration and installation of the PCVISIONplus Frame
Grabber, the reader is directed to the PCVISIONplus Frame Grabber
User's Manual which accompanies the Frame Grabber. Chapters 2-3
of the Frame Grabber User's Manual contain the information
necessary to perform this task. Chapter 3 will also explain how
the video camera and monitor are connected to the Frame Grabber,
which completes the process of installing the video equipment.
Note the address of the frame grabber must be c~anqed to D0000.
I
~.
- 131~3q~
1.4.4 Additional Diskettes
In addition to t~e floppy diskettes to which you copy the CapCalc
system software diskettes, yo~ may want to keep handy additional
blank formatted diskettes to store image file and luminance
information. The image file and luminance information can take
considerable disk space (approximately 500~), so for your own
hard disk maintenance purposes, you may wish to store old files
and information to floppy diskettes.
1.4.5 ~sing This Manual
The remaining chapters of this manual contain inEormation
concerning the operation of the CapCalc system. Chapter 2
discusses the concept and control of menus, as well as describing
the online help and status lines which further aid in making
effective and efficient use of the system. Chapter 3 describes
in more detail each main menu and sub-menu activity. A step by
step example of how to use the CapCalc system can be found in
Chapter 4. The Appendices contain various technical information,
reports, and references for a deeper understanding of the system.
It is recommended that you carefully continue through all of the
information in the following chapters. Once you are familiar
with the structure, terminology, and use of the system, this
manual will take on the role of a reference document, and will
find only occasional use.
2.0 CAPCALC SYSTE~ SOFTWAR~ TECENIQU~S
Luminance measurement and analysis with the CapCalc system is
performed with the supplied equipment and software. The system
software gives step by step instructions on what the user must do
with thc equipment to acquire and analyze the luminances. All of
the activities to perform the steps are arranged as menu items.
This chapter will introduce the CapCalc system software
initialization, structure, and techniques for use of the system.
It will discuss how you are able to move around within the
software to perform the task of interest, and some features that
will facilitate this process~
Note: All information in this manual which appears on the screen
will be shown in bold print to help distinguish the screen
display from descriptive text.
~ 3 1 83~3
2.1 Preparing Your IBM PQrsonal Compu~er AT
To begin a session ~ith the CapCalc system, your IaM AT must first
be on and at the system prompt within the CAPCALC subdirectory of
the hard disk. Be sure that your video equipment is plugged in
and turned on. You may want to check the date and time Xept by
your computer so that all files on the diskette directory will be
properly recorded. To initialize the system software, type
CAPCALC after the <C:\CAPC~LC> prompt. The program title will
appear in a window. A window is a rectangular area on your
screen, usually bounded by a border, which is used for various
applications. Such applications will become apparent as you move
along through this manual. The instructions "~it ~nter" will be
printed at the bottom center of the window border.
2.2 Introducing the Main Menu and Sub-Menu
After you have read the title window, press the ~nter] key to
move ahead to the following main menu:
Acquire File Frame Calculata ~xit
A menu is a special application of a window which consists of a
list of items. Each menu item performs a special function or
activity, and is selected by typing the first character of the
item or moving the highlight bar with the c~rsor arrow keys
~],[~],[~],~]) to the desired item and pressing the [Enter~
key. To leave the CapCalc system software and return back to
DOS, the user selects the Exit item. The main menu in CapCalc
consists of items displayed in a single-row multiple-column
formatted window. For example, select the main menu item
"~cquire". Upon selection of this item, the user is branched to
another window containing a sub-menu as follows:
Acquiro File Frame Calculate ~xit
Long
Short
Refre~h
N11mbQ r
Clear
Zeroing
A sub-menu is a special type of menu which consists of activities
relating to the previous menu item it has branched from. The
control of a sub-menu is just like a standard menu. The user
presses the [E~c] key to return to the item of the previous menu.
The sub-menus in CapCalc consist of activities dlsplayed in a
multiple-row single-column formatted window. For example, select
the sub-menu activity "Number". This acti~ity performs a
specific function, so upon selec~ion the user is branched to ye~
another window containing the following instructions:
1 31 8393
- 32
Select number of imago~ to be ~eraq~d. 2
18
32
The user can perform the instructions to accomp:Lish the selected
activity or return to the previous menu by pressing the ~Esc~
~ey. The purpose of this exercise has been to :Lntroduce the
structure of, and techniques for moving around within, the
software. At this time it is not intended to perform any
activities, so please hit the ~sc] key twice to return back to
the main menu. By the same method, one can observe sub-menu
activities associated to the other main menu item. The selection
of main menu item ~Exit~ will terminate the session with the
CapCalc system software, and return to DOS.
2.3 On-line Documentation and Status lines
In addition to the help provided by this user's manual, there are
two more convenient forms of assistance as follows:
1) The user can obtain online documentation by pressing the
[F1] function key. This documentation is a reduced version
of the information in the manual. Pressing the ~1] key
will bring a window onto the bottom of the screen. In it
will be d~cumentation concerning the area of the software
where the user is located. In most cases the explanation is -~
larger than will fit into the provided window. However, the
user can scroll to various parts of this documentation by
using the cursor arrow keys. Pressing the iE~c~ key removes
this window and returns control of the menu system to the
user.
2) The two status lines at the bottom of the screen also supply
helpful information. The first line keeps a current status
of the file and path with which the user is worklng. The
file is the name associated to the image and luminance
information. A path is used to search a specified directory
for a file. The second line is a shor~ explanation of the
particular activity where the user is located, and is also
used for error and warning messages when encountered by the
system software. The behaviour of these two status lines
will be illustrated in Chapter 3.
3.0 D~TAILS OF TE~ M~IN MEN~ AND S~B-MæNU ACTIVITI~S
This chapter will cover the details of each main menu item and
related sub-menu actlvities. It will cover the purpose of and
user response to each activity. All of the activities have
instructions which are displayed on the screen. However, the
~ 31 ~3q3
explanations given here are more complete- A status line at the
bottom of the screen gives a short explanation of the activity in
which the user is currently involved. Should the user need a
more detailed information, the online help is available at any
time by pressing [F1].
3.1 g~gLuire
The luminance measurement process involves the selection of a
scene with the camera and acquiring its image using the Acquire
main menu item. To acquire an image it is necessary first to
select a scene with the desired visual detail and then to adjust
the zoom and aperture setting.
The zoom setting is used to increase the spatial resolution
within the image. The system software keeps track of the
original size for calculation purposes. Therefore the user is
responsible for supplying this zoom information to the CapCalc
system at image acquisition time. This information is maintained
with the image. The losses of small spatial detail within the
final image are due to the optical and the elec~ronic imaging
process. These losses are reduced if one moves closer to the
object of interest to increase its size. The same effect can be
produced by zooming in on the object. Essentially, objects of
interest should fill 2% or more of a captured frame to avoid
losses in spatial detail.
The final image is produced in several steps. First, an initial
image of the scene is produced by focusing on the photosensitive
CCD array within the camera. The dimensions of this array are
510 columns by 992 rows. Second, every discrete element of this
array integrates the luminous portions of the image which falls
onto it and converts them into a digital signal. Third, the
digital image is transformed in~o the standard RS-170 analog
video signal for transportation to the Frame Grabber within the
IBM AT. The Frame Grabber then constructs a digi~al image for
storage in the frame memory by digitizing the analog signal.
This frame memory consists of an array with dimensions of 512
columns, by 480 rows. Notice tha~ the array dimensions of the
Frame Grabber do not match those of the OCD sensor. Therefore,
information will be lost in the digitizing process to reconstruct
the final digital image stored on the Frame Grabber.
The lens aperture is used to control the exposure of the CCD
array. Therefore, the measured luminance levels must be scaled
by the aperture setting to obtain the true luminance information
within the scene. For this reason the camera is calibrated as a
function of aperture setting and the user is responsible for
supplying this information to the CapCalc system at time of image
acquisition. This information is maintained along with the
lmage.
1318393
The dynamic range of the camera is defined by the following
system characteristics:
1) the maximum signal which can be tolerated by the sensor, and
2) the minimum signal it can resolve above the electronic noise
(dark current). Electronic noise is an unclesirable
electrical disturbance of random amplitude and frequency
which constitutes an irreducible limit on signal-resolving
capability.
As mentioned above, the aperture is used to scale the scene
luminance within this range. It is important to point out the
following consequences of doing so:
1) If the aperture setting i5 such that parts of the image are
above the dynamic range of the camera, then those portions
are assigned the maximum luminance value and are refexred to
as "saturated."
2) If the aperture setting is such that parts of the image are
below the dynamic range of the camera, then those portions of
the image are indistinguishable from black (or noise).
Under some circumstances, the luminance range of a scene is
greater than that which can fit inside the range of the camera at
a single aperture. Therefore, one of the following two
conditions will arise:
1) In order to keep parts of the image from going dark, you
must allow part of the image to remain saturated.
2) In order to ~eep parts of the image from being saturated,
you must allow parts of the image to remain dark.
In either case you are sacrificing the ability of the system to
generate accurate luminance data, because information is lost
through saturation or noise. It is for this reason that multiple
aperture image construction is available with the CapCalc system.
This is a sub-menu activity of Acquise.
Due to the noise of the system, it is also necessary to perform
the two following sub-menu activities to generate accurate
luminances:
1) To improve reliability of a final image it is best to average
the results of multiple images.
2) To estimate the noise level (dark current) produced by the
system, an image is captured with the lens cap on. This
zero level image is then subtracted from all subsequent
images (without the lens cap) to scale the image luminances
above the noise.
13183~3
~5
The noise stabilizes considerably once the system components have
been on for at least one hour. The system components are on if
the computer is turned on and the carnera is plugged in. If the
green LED on the back of the camera is illuminated, then the
camera is on.
Upon selection of the Acquira main menu item, the user is branched
to the sub-menu of activities which give instructions to perform
these functions.
3.1.1 Long
The ~ong sub-menu activity permits the user to acquire an image
using multiple apertures, which takes lonqer to perform than the
Short activity (section 3.1.2). As discussed above, this process
permits the accurate acquisition of an image which has luminances
in the scene greater than the dynamic range of the camera.
Note: It is important that the image be static and the camera not
move during this entire process for two reasons:
1) The final image data are constructed from portions of
multiple images captured at different aperture settings.
2) Successive imaqes at each aperture setting may be created by
averaging multiple images (section 3.1.4).
Upon selection of the Long activity the user is branched from the
sub-menu to a window with the following message:
Select image o~ interest.
This instructs the user to position the camera on the scene of
interest. The image can be observed on the ~ideo monitor. The
camera should always be mounted in a stationary position, usually
on a tripod. Once satisfied with an image, you can select it by
pressing any key. Another window will appear on the screen with
the following message:
12.5
Select zoom setting from lan4. 15.0
20.0
30.0
~0 . O
75.0
This informs the user to set the zoom setting on the lens to a
position which produces the best spatial resolution of the image
without losing any area of interest within the image. The
setting must line up with one of designated focal lengths of
12.S, 15.0, 20.0, 30.0, 50.0, or 75.0 mm as shown on the lens
barrel. This information is need by the software to comp~te the
actual size information wit~in the image. Once the zoom has been
1 3 1 8393
- 36 _
set, the user should select the appropriate focal length from the
above window using the arrow cursor keys and hitting the [~ter~
key. Another window will appear on the screen with the following
message:
Set aparture to 1.8
This informs the user to set the aperture at the position of
highest exposure (aperture is fully open). Once the user does
this, a window will temporarily appear to the screen with the
following message:
Procassing . . . .
The system is acquirinq an image or multiple images, (section
3.1.4) at the 1.8 aperture settin~, subtracting the zero level
~see section 3.1.6), and storing the information. After the
processing is complete, if there is no saturation in the image,
the user will be informed with a new instruction indicating the
process in compiete (below). If there is saturation within the
image, then these portions of the image will begin flashing black
and white, and another window will appear with the following
message:
Flashing areaq are saturatad.
To meas~re higher luminancs~, -Qet
aperture to 2.0 and hit C~NT~R>.
To accept plcture as is, hit <~SC>.
This permits more of those portions of the image that were
saturated at aperture setting 1.8 to come within the dynamic
range of the camera. After hitting [~nter], the software will
once again acquire an image ~or multiple images) and subtract the
zero level, but this time considering only those areas that have
now been reduced below saturation. This process will continue
through successive aperture settings ~2.8, 4, 5.6, 8, 11, 16, ?2)
until no part of the image is saturated. Hitting C~SC] at any
time terminates this sequence, leaving some saturation within the
image ~This implies that the saturated areas are of no interest
to the user). Once the acquisition process has ended, a window
will appear with the following message:
Long capture pha~e completed.
Sel ect an apertslre ~etting for ~hich
you ara comfortable uith the imaga
Much of the image may go dark in order to bring all areas below
saturation. For this reason, these instructions permit the user
to select the preferred aperture setting which produces the best
image for viewing. This information must also be maintained by
the software. So once the aperture has been set, hitting any key
will display another window to the screen with the following
instructions:
~ 3 1 ~3q7~
- ~7 -
1.8
Select ~p~rture setting from lens. 2.0
2.8
4.0
5.6
~.0
11.0
16.0
22.0
The user then selects the appropriate aperture setting from the
above menu which matches the setting on the lens barrel. This is
done by use of the arrow cursor keys, then hitt:ing the [Enter~
key. Once this is done, the user is returned to the sub-menu.
This last step in no way affects the stored data from the ~ony
image acquisition process.
3.1.2 Short
The Short sub-menu activity is exactly like the ~vng activity
(section 3.1.1), except the image is acquired with only one
aperture setting. This requires a shorter period of time than
the Long activity ~section 3.1.1). The luminance range within a
scene may be beyond the dynamic range of the camera, in which
case the user must consider the unfavorable circumstances of
saturation and noise described above ~section 3.1).
Upon s~lection of the Short activity the u~ér is branched from
the sub-menu to a window with the following message:
Select image of intQre8t.
Once satisfied with the image ~he user continues pressing any
key. A window with the following message will appear:
12.5
Solect 200m Setting ~rom lens. 15.0
20.0
30.0
~0.0
This informs the user to set the zoom to line up with one of the
designated focal lengths shown on the lens barrel. The user then
selects the appropriate focal length from the above menu using
the arrow cursor keys, then hitting the tEnter~ key. Another
window will appear on the screen with the following message:
13183{~3
- :3~ -
1 ,~
Sslect ~perture sotting from lena. 2.0
2.8
~1 .0
5.6
8.~
11.0
16.~
22.0
This informs the user to set the aperture on the lens to the
desired position. Once again, the user should select an aperture
setting that is the best balance for lost image due to saturation
and noise. Flashing black areas of the image designate the
saturated portion of the image. The user then selects the
appropriate aperture setting from the above menu using the arrow
cursor keys, then hitting the [~nter] key. Once the user does
this, a window will temporarily appear on the screen with the
follow message:
Proces~ing . . . . . .
The system is acquiring an image or multiple images, section
3.1.4) at the selected aperture setting, subtracting the zero
level ~section 3.1.6), and storing the information. The user is
then returned to the sub-menu.
1 3~ 83~3
_ 3(l_-
3.1.3 Refresh
The Refre~h sub-menu activity displays on the monitor the image
which has the current image status (sections 3.2, 3.2.1 and
3.2.2) at the bottom of the screen. The image on the video
monitor can be modified by performing any one of a number of sub-
menu activities (section 3.3). It can also be completely cleared
from the screen (section 3.1.5). Therefore, this activity is
helpful to return to an unmodified display of the image.
3.1.4 Number
The Number sub-menu activity allows the user to select the number
of images to be averaged during the Long (section 3.1.1), Short
(section 3.1.2), and 7exoing (section 3.1.6) sub-menu activities.
The purpose of averaging is to reduce the error associated with
the electronic noise of the system (section 3.1). It is also
important ~o men~ion that the time necessary to perform the
averaging process increases with number. Under circumstances
where a high order of accuracy is necessary, the user is
recomm~nded to use a high number. Acquiring 32 images takes
approximately five minutes. For preliminary applications the
user may find one image to be sufficient; this takes
approximately twenty seconds to complete.
Upon selection of the Number activity the user is branched from
the sub-menu to a window containing the following message:
Seloct numbQr of images to bo avoraged. 2
16
3~
The user should select the desired number of images needed for
his application using the arrow cursor keys and then hit the
t~nter] key.
3.1.5 Clear
The Clear sub-menu activity allows the user to clear the video
monitor to a completely black screen~
3.1.6 Zeroing
The Zeroing sub-menu activity allows the user to acquire a dark
image ~with the lens cap on) which is subtracted from acquired
images using the Long and Short sub-menu activities ~sections
3.1.1 and 3.1.2). Although this image does not change very much
with time or environmental conditions, it is recommended that
- 4() - 1 31 83~3
this activity be performed at the begirlning of each sessiOn to
account for any small transient characteristic associated with
the system. The camera and computer should have been turned on
for at least one hour before the activity is performed.
When this activity has been selected the user is branched from
the sub-menu to a window with the following message:
Place lens cap on camera.
After the user places the lens cap and hits [Enter], another
window will appear on the screen with the following message:
Proces3ing . . . . . .
This informs the user that an image ~or multiple imaqes) is being
acquired and averaged to generate a dark image.
3.2 File
The File main menu item permits the user to name, store, retrieve,
and erase images from the disk. It also allows for the selection
of a path to the directory in which these operations are
performed. Every image is stored under a single file name for
future use. The current file and pa~h status line at the bottom
of the screen is used to display the file that has most recently
been stored or retrieved and the directory in which it resides.
Prior to performing any storage or retrieval activity, the current
file and path status line has the following appearance:
Current file : < none > Current path : C:~C~PCALC
<none~ signifies that no image has been stored or retrieved
during this working session with CapCalc. However, if an image
has been acquired and not yet stored it will be considered the
current file until it has been stored or the session has been
terminated. This allows the user to perform the Refreah activity
(section 3.1.3) on an image that has not yet been stored. The
current path status is always considered to be to the directory
from which the system software was initiated unless otherwise
changed by the Path activity (section 3.2.4). Upon selection of
the File main menu item the user is branched to a sub-menu of
activities which give instructions on how to perform these
functions.
3.2.1 Save
The Save sub-menu activity permits the user to store an ac~uired
image to disk for future use. Upon selection of this activity, a
window appears on the screen with the following prompt:
~nter File Name: .VMI
!
1 31 8393
- 41 -
The user is responsible for typing in a file name within the input
field and hitting the ~nter] key. The image is stored with this
file name. The file name must be a legal DOS file narne. The
extension of .VMI is automatically added to the file name for the
purpose of file housekeeping. It is necessary that all image
files maintain this extension in order to be recognized by the
system. The system also determines whether a duplicate file name
has been entered and issues a warning message in the status line
at the bottom of the screen if this is the case. This prevents
copying over the file information that was previously stored under
the same name. Once a file name has been successfully entered the
current file and path status line at the bottom of the screen
changes to reflect the name. For example, suppose the name
FILENAME were typed into the above input field and ~nter] was
hit. The current file and path status line would change to the
following:
Curront file : FIL~NAM~ Current path : C:\CAPC~LC
It is also possible to store an image to any subdirectory by
using the Path activity ~section 3.2.4).
3.2.2 Read
The Read sub-menu activity allows the user to retrieve previously
stored images. Upon selection of this activity a window appears
with an alphabetically ordered list of image file names wi~hin
the directory specified by the current pat~ (section 3.2.4). This
is shown by the following example:
afile b~ilo cfile dfile
efile ~file gfile
The us~r selects the image file by using the arrow cursor keys
and then pressing the t~ter~ key. The system retrieves the
stored image for display and further analysis. The current file
and path status line also changes to reflect the selected file
name. For example, imagine that bfile was selected, the current
file and status line would display the following:
Current file : bfile Current path : C:\CAPCALC
It is also possible to retrieve an image from a different
directory ~y using the Path sub-menu activity (section 3.2.4).
3.2.3 Erase
The Eraso sub-menu activity allows the user to erase previously
stored images. ~pon selection of this activity a window appears
with an alphabetically ordered list of image file ~lames withirl
".) 1 3 1 ~3~
the directory specified by the current path (section 3.2.
This is shown by the following example:
afile bfil~ cfile dfilo
efile ffil~ gfile
The user selects the image file by using the arrow cursor keys
and then pressing the [Ent~r] key. As an example, let us assume
that bfile was selected. The system then displays the following
query:
ERASE BFILE.VMI (Y/N~ ? ~ N >
This allo~s the user a final opportunity to check the file name
which was selected. The user types a Y or y and hits the [~nter
key to continue with the erasing process. Otherwise, just
hitting rEnter~ will return the user to the sub-menu without
erasing any information.
It is also possible to erase an image from a different directory
by using the Path su~-menu activity (section 3.2.4).
3.2.4 Path
The sub-menu activity Path allows the user to select a directory
in which file information can be stored, retrieved, or erased
(sections 3.2.1, 3.2.2, 3.2.3). Vpon selection of this activity a
window appears with the following prompt:
Na~ path : C:\PATENAMæ
This allows the user to select a new directory in which the Save
~see section 3.2.1), Read ~see section 3.2.2), and Fraqe ~see
section 3.2.3) activities will be performed. Prior to selection
the prvmpt displays the path which is maintained in the current
file and path status line at the bottom of the screen. Before the
use of this activity the current path will be to the directory
from which the system software was initiated~ The user modifies
the path by typing the desired path over the one displayed and
then hitting the [~ter~ key. By doing this the current file and
path status line at the bottom of the screen will change to
represent the newly selected path. If a path is typed that does
not exist the user will be given an error message in the status
line at the bottom of the screen and prompted again.
3.3 Frame
The main menu activity Frame permits the user to locate a
rectangular frame around an area of interest within the image.
Only this area will be considered in subsequent analysis. The
cursor arrow keys perform a coarse movement for the frame and its
edges, moving in steps of S pixels each time a cursor key is
I
j~ - 1 31 8393
struck. For fine movement of one pixel steps the Shift key is
held down with simultaneous use of the cursor keys. This area
can also be magnified for ease of use. The process of
magnification does not affect the act~al si~e and luminance
information about the scene used for calculation. Upon selection
of the Frame main menu item, the user is branched to a sub-menu
of items which give instructions on how to perform these
functions.
3.3.1 Locate
The Loc~te sub-menu activity permits the user to position the
rectangular frame in the general area of interest on the image.
This process is viewed on the video monitor. Upon selection of
this activity a window appears on the screen with the following
message:
~v~e frame ~ith cursor ~oys.
A rectangular frame will appear on the video monitor, and the
user can move this frame with the cursor arrow keys. The frame
will appear either in the position where it was last located if
removed by the ~ido activity ~section 3.3.4), or in the center of
the video screen if Locate had not been used earlier in the
session. The right arrow cursor key will move the rectangle to
the right, while the other arrow cursor keys perform related
operations. The system software will not permit moving the frame
past the physical limits of the screen.
3.3.2 Expand
The Expand sub-menu activity allows the user to enlarge the
rectangular frame in order to incorporate the area of interest
within the image. Upon selection of this ac~ivity a window will
appear on the screen with the following message:
Enlarge rame with cursor key~.
The rectangular frame which is located on the video monitor can be
enlarged by use of the cursor arrow keys. The right cursor arrow
~ey will move the right edge of the frame to the right while
keeping the left edge stationary This will cause the top and
bottom edges of the frame to stretch. The other arrow cursor keys
perform related operations. The system software will not permit
enlarging the frame passed the physical limits of the screen.
3.3.3 Reduce
The Reduce sub-menu activity permits the user to shrink the
rectangular frame to incorporate the area of interest within the
image. Upon selection of this activity, a wirldow will appears on
the screen with the ~ollowing message:
131~393
Reduce ~rame with cur~or key~.
The rectangular frame which is located on the video monitor can
be reduced by use of the arrow cursor keys. The right cursor
arrow key will move the left edge of the frame to the right while
keeping the ri~ht edge stationary. This will cause the top and
bottom edges of the frame to shrink. The other arrow cursor keys
perform related operations. The system software will permit
frame reduction to zero pixels wide or high.
3.3.4 ~lide
The Hide sub-menu activity permits the user to remove the
rectangular frame from the image. ~pon selection of this
activity, the rectarlgular frame located on the video monitor will
disappear. To make the frame reappear in the same location the
user must perform the Locate activity (section 3.3.1).
3.3.5 Magnify
The Magnify sub-menu activity permits the user to increase the
size of the framed portion of the image. The size is increased
by multiple integer factors of the original size. Upon selection
of this activity, a window appears on the screen with the
following prompt:
Magnification Factor (l~
The user is prompted to specify a desired integer value between 1
and 10 within the input field. This value will be used to scale
the framed portion of the lmage. The actual target sizes are
maintained in memory for calculations. The framed image is
simply magnified for user convenience. Performing a
magnification on an image can permit a closer look at the details
within the frame. This activity will not permit magnification of
a frame larger that the video monitor screen. It will warn the
user if this is the case, and perform the largest magnification
possible. It will also move the image within the boundary of the
video screen if magnification is performed near the video screer,
border. A magnified frame can be returned to the original size
by performing the Magnify activity again specifying a value of 1.
i
3.4 Calculation
The Calculate main menu item permits the user to perform analyses
on the acquired image. Currently, the user is permitted to
calculate Relative Visual Performance (RVP). To facilitate
analysis the user can contour target images and measure
luminances within the image.
31 ~393
The system can only display image luminances in 255 steps of grey
on the video monitor. However, the ratio of lurninances stored in
memory can be much greater that 255 to 1. For this reason pixels
of identical appearance on the monitor may have different
luminance. The ability to move a cursor over the image to
de~ermine the actual luminance at each pixel location is
possible. The cursor arrow keys perform a coarse movement,
moving it in steps of 5 pixels each time a cursor key is struck.
For fine movement of one pixel steps the Shift key is held down
with simultaneous use of the c~rsor keys. A glohal x-y
coordinate system with origin (0,0) at the upper left hand corner
of the video monitor is used. The unit of measure for the
coordinate system is the pixel, so x ranges horizontally from O
through 511, and y vertically from O through 479.
It may be helpful under some circumstances to pool luminances of
nearly the same level. This process is much like averaging and
may be helpful in separating the areas representing ~ask and
background while performing RVP calculations. The luminances
within the scene can be resolved into a user selected number of
equally spaced steps other than 255. The luminance for each new
step is found by performing a pixel weighted average of the
original scene luminances. A pixel weighted average is found by
summing thè pixel luminances and dividing by the total number of
pixels. All of the pixels in the step are then displayed at the
luminance determined from the pixel weighted average. This
process produces luminance contours on the video image.
Upon selection of the Calculate main menu item the user is
branched to a sub-menu of activities which give instructions on
how to perform the these functions.
3 9 ~
3. 9 .1 RVP (Relative Visual Performance~
The RVP sub-menu activity permits the calculation of Relative
Visual Performance (RVP) for a visual task. RVP is a visual
performance model based on the research of Dr. Mark Rea and his
colleagues at the National Research Council Canada. (For more
technical information regarding the research and development of
this work the reader is encouraged to read the reference in
Appendix B). This calculation requires four pieces of information
obtainable from the imaye which are:
1) target luminance,
2) background luminance,
3) adaptation luminance,
4) and target size.
These four pieces of information are independent variables in the
model for determining RVP. The target and background luminances
are determined by the user selecting pixels within the framecl
area of the image. Adaptation luminance is determined by taking
the average luminance of the entire image, which requires no user
specification. The target size is determined from the number of
pixels selected by the user to represent the target. This
information is used to calculate the solid visual angle subtended
by the target. The actual size information of the image is
maintained in memory from the user defined zoom setting.
Therefore, the Framo main menu item ~section 3.3~ is used prior
to using the RVP activity in order to specify an area of interest
which is the visual target and its backgro~nd. A fifth
independent variable which is not obtainable from the image file,
is the age of the observer. Upon selection of this sub-menu
activity, the user is branched to another sub-menu of activities
which give instructions on how to specify the required variables.
3.4.1.1 Target
The Target sub-menu activity permits the user to specify the
target luminance within the framed portion of the image. The
Framo main menu item (section 3.3) should be used prior to this
activity to specify a frame which completely encloses that
portion of the image which is to be considered the target for the
RVP calculation. To fur~her distinguish between which luminances
are target and background it may be helpful to generate a contour
using the Contour activity (section 3.4.3). This will resolve
the luminance into fewer steps, making a more distinct separation
between areas which are considered to be target and background
within the frame. Upon selection of the ~arget activity, the
user is branched to a window containing instructions as shown in
the following example:
Locate cursor on target and hit ~nter>
x - 245 y = 115 Luminance = 16.14
!
!
3 q ~
The c~rsor is placed at the center of the frame, and the
luminance with respect to the global coordinate system is
displayed. The ~ser is instructed to move the cursor to that
position which is the target and then hit ~nter]. All of the
pixels of the same luminance value within the frame will turn
black. These pixels will be considered the target. The user can
perform this process several times. Each time, a new pixel
weighted average luminance is produced for the target and the
si~e of the target will increase. When the user is satisfied
with the area to be considered as the target, st:rikin~ the <~SC>
key will terminate the Target activity.
3.4.1.2 Background
The Background sub-menu activity permits the user to specify the
background luminance within ~he framed portion of the image. The
Frame main menu item (section 3.3) should be used prior to th.is
activity to specify a frame which completely encloses that
portion of the image which is to be considered the target for the
RVP calculation. The area surroundiny the target, and within the
frame, can be considered as the background. It may be helpful to
generated a contour using the Contour activity (section 3.4.3~.
This will resolve the luminances into fewer steps, making a more
distinct separation between areas which are considered to be the
background and the target. Upon selection of the Background
activity the user is branched to a window containing instructions
as shown in the following example:
Locate cur~or on background and hi~ OEnter>
x = 255 y = 105 ~umi~ance - 2~.14
The cursor is placed at the center of the frame and the luminance
with respect to the global coordinate system is displayed. The
user is instructed to move the cursor to that position which is
to be considered the background and then hit ~nter]. All of the
pixels of the same luminance value within the frame will turn
white. These pixels will be considered as the background. The
user can perform this process several times. Each time, a ne~
pixel weighted average luminance is produced for the background.
When the user is satisfied with the area that will be considered
as the background, striking the <ESC> key will terminate the
Background activity.
-- 'Y - 1 31 83q3
3.4.1.3 Age
The Age sub-menu activity permits the user to specify the age
used in the RVP calculation. Studies have shown that
characteristics of the visual system deteriorate after age 20.
The reader is referred to Appendix B for references regarding the
results of age on the visual system and its treatment in RVP
calculations. Therefore, if the user wishes to consider the
effects of age, he can do so by using this activity. Upon
selection of the Age activity the user is branched to a window
containing the following prompt:
~ge (20-65): 20
The user can retain the assumed age of 20 or type another age
between 21 and 65 in the input field. After the assumed observer
age has been specified the user strikes the ~nter] key. If the
user specifies an age which is not within the limits (20 to 65),
the system will issue a warning message in the status line at the
hottom of the screen.
3.4.1.4 Process
The Proce-qs sub-menu activity is used to perform the actual RVP
calculation once the size, target luminance, background
luminance, and age information have been specified. This
information is specified by using the Frame (section 3.3), Target
(section 3.4.1.1), Background (section 3.4.1.2~, and Age (section
3.4.1.3) activities, respectively. Upon selection of the Proce~
activity a window flashes to the screen with the following
message:
Proce~si~g . . . .
This informs the user that the RVP calculations are being
performed. When the calculation is complete, a window appears
containing information as shown in the following example:
Task luminance (cd/~^2) : 90.89
Background luminance (cd/m^2~ : 135.30
Adaptation Luminance (cd/m^2) : 155.71
Observer age (yearq) : 20
Contraqt : 0.328
Solid angle (x10-3 sr) : 0.0120
Relati~s visual performancs : 0.879
This displays the results of the RVP calculation and the
independent variables obtained from the user and the image. If
in the process of calculation the software encounters a variable
that has not been specified or that is out of range due to the
limits of the RVP model, a warning message wou1d occupy this
window instead. The software will warn the user of the problem
and inEorms the user oE an as~sumed value which will be used to
I
4~~ ` l 31 83q3
complete the calculation. The system software provides easy
access to any activity for variable modification.
3.4.2 Luminance
The Luminanee sub-~enu activity permits the user to scan the
image with a cursor to view the luminance of any pixel (section
3.4). Once the Luminaneo activity is selected the user is
branched to a window which contains information as shown in the
following example:
x = 245 y = 115
Lumina~ce = 16.14
A eursor is placed at the center of the image, and the global
eoordinates and luminance are displayed in the window. The arrow
eursor keys are used to move the eursor on the video moni~or.
Stri~ing ~he ~ESC~ key will terminate this proe~ss.
3.4.3 Contour
The Contour sub-menu aetivity permits the user to reduce the
number of luminanee steps within the framed portion of the image.
The image whieh is viewed on the video monitor can only be
resolved in~to 256 grey levels. However, due to the use of the
Long aetivity, a seene may be eaptured whieh has a maximum to
minimum luminanee ratio mueh greater than 256 to 1. Pixel values
whieh are displayed as the same grey level ~ay, in faet, have
different luminanees. This situation ean be observed using the
Luminance activity ~section 3.4.2) to eompare pixels. If a
preeise luminanee is not neeessary, the number of luminanee steps
ean be redueed by the Contour activity. This ean be helpful as a
proeess for eonverging luminanees that are elose to the same
value. Performing a eontour of 256 would be the equivalent of
eapturing an image by using one aperture setting. Upon selection
of the Contour aetivity the user is branched to a menu containing
the following instructions:
2~6
Soloct he number of contours. 128
64
32
lS
CLR
co 1 31 8393
This informs the user to select the desirable number of contour
levels for the image. The user selects a contour level by using
the arrow cursor keys and then pressin~ the [Erlter] key.
Selectinq CLR causes the image to return to the original state
with no contours. After selecting a contour value, the image
inside the box is contoured, and the user is branched back to the
previous sub-menu.
3.5 Exit
The Exit main menu item permits the user to terminate the CapCalc
session. It should be noted that any unsaved image file will be
lost. There are no sub menu activities associated to this
activity, so upon selection, the user will simply be ret~rned to
DOS.
4.0 A Step by S~ep Example
This Chapter takes the user through an example of the CapCalc
system. Although there are many interior and exterior
applications for the system, the following example has been
chosen to demonstrate how task, background, size, and age
influence Relative Visual Performance. This example will
facilitate learning the system. This example assumes the user
has performed the installation procedures discussed in Chapter 2.
The user should always ~urn on the system a~d let it warm up for
one hour prior to image acquisition. Turning on the system means
turning on the computer and making sure that the camera is
plugged. If the green LED located at the back of the camera is
illuminated then the came~a is on. The Long and Short activities
are used within the system software to perform image and
luminance information acquisition. The warm-up time of the
system is necessary to stabilize the electronic noise. For more
details regarding the operating specifications of the camera
refer to the technical material in Appendix A.
While the system is warming up place a suitable task in the
camera's field of view. For example, place the report by Wright
and Rea ~1984) on the floor and position it so that the bar-leaf
logo in the upper left hand corner of the document is in the
centre of the camera field. The camera should be placed on a
tripod no closer than one meter from the task. The camera will
be aimed and focused on the task and one meter is the closest
distance for doing so.
After the system is warmed up the software is ready to be
initiated. This is done by first changing directories to that
which contains the system software. To do this type
CD C:\CAPCALC after the system prompt ~C:\~. Once this is clone,
type CAP-CAIC to begin the session. The sof~ware will load,
-` 131~393
- S1 -- -
execute, and display on the monitor a window with the following
software title and information:
VISI~I~ITY METER
National Research Council Canada
Montreal Road, sldg M-24
~ersion l.OO
Copyright (C) NRC/IRC 1987.
~11 rights reserved.
After reading the above hit Enta~ to continue to a window
containing the followinq main menu:
Acqyire File ~rams Calculate ~xit
The next step is ~o acquire the image and luminance information.
To acquire an image select the ~cqu1re item by using the arrow
cursor keys and hitting t~nter]. This will branch control to the
sub-menu of activities as shown which permit the acquisition of
an image:
Long
Short
R~fre~h
Number
Clear
Zaroi~g
The scene in which we are interested is that of the supplied task
placed on the floor. However, two steps must be performed prior
to acquiring an image of this scene. Step one is the selec~ion
of the number of images to be averaged by using the ~umber sub-
menu activity. Use the arrow cursor and ~ter key to do this.
The following ins~ruction is displayed in a window:
Select number of image~ to be avsraged 2
18
32
Select the value ~ by using the cursor arrow keys and hitting
l~nter]. Step two is the acquisition of a dark image by using
the Zeroing sub-menu activity. ~se the arrow cursor keys and
[~nter] key to do this. The following instruction are displayed
in a window:
Place lens cap on camera.
13183q3
52 -
Acquire the dark image by hitting any key. This will take
approximately 90 seconds. This imaqe will be used to adj~st for
the dark, or ~ero, level of all images acquired by using the Long
and Short activities. Now that these two steps are complete the
image of interest can be acquired.
Acquire the image by selecting the Sb~rt sub menu activity. The
differences between choosing the Long or Short activity are
described in more detail in Chapter 3. The following
instructions will appear in a window:
Solect imaga of intorest.
At this time the camera image is displayed on the ~ideo monitor.
The camera should be aimed and zoomed such that the paper
containing the sample task just fills the entire screen of the
video monitor. Thxee steps must be accomplish to achieve a
proper image of the scene. Firstly, the zoom setting should be
such that one of the lines associated with the focal lengths of
12.5, 15, 20, 30, 50, or 75 is aligned with the stationary line
on the barrel of the lens. Secondly, the aperture should be set
such that one of the aperture numbers 1~8, 2, 2.8, 9, 5.6, 8, 11,
16, or 22 lines up with the stationary line on the barrel of the
lens. The detents help lock the setting on an appropriate
position. The aperture setting should be at a position where the
image does not go completely black or completely white. Thirdly,
a crisp image is achieved by properly focusing the camera. Once
these steps are completed the information concerning zoom (focal
length) and aperture setting must be enterea into the software.
By hitting the Entsr key, CapCalc asks for the zoom lens focal
length in a window containing the following instruction:
~2.5
Select zoom aetting f rom l ens 15 . O
20.0
30.0
50.0
75.0
Once again use the cursor and ~EnterJ keys to select the correct
value. The value selected should correspond to the focal length
setting on the camera lens. Upon selection CapCalc asks for the
lens aperture setting in a window containing the following
instructions:
1.8
Select aporture sotting from len~. 2.0
2.
4.0
5.6
8.0
11 .0
16.0
!
i
131~3q3
- 5~ _
Once again, the value selected should correspond to the aperture
setting on the camera lens. Upon selection of the appropriate
value the system will begin the image acquisi~ion process. The
following message will appear in a window on the screen:
Proce~qing . . .
This warns the user that eight images are being acquired and
averaged. This procesS will take approximately 90 seconds. It
is critical that the camera and scene remain stationary while
this message is on the screen. When this message disappears from
the screen, the image has been successfully acquired.
The image can now be saved to disk by using the File main menu
item. To return to the main menu hit the ~sc key. For security,
and in the event of a power failure, the image should be saved
immediately. Select the File main menu item by using the arrow
cursor and ~nter keys. The following list of sub-menu activities
will appeax in a window:
Sa~e
Read
Erase
Path
Select the Save sub-menu activity by using the cursor arrow keys
and hitting Enter. The following instruction will appear in a
window:
Enter File Name: .VMI
An appropriate file name should be entered into the input field
provided. Up to eight alpha-numeric characters can be used in
this file name. The image lu~inar~ce will be saved ~o disk under
this file name. It is recommended that the file name EXAMPL~ be
typed in. Once the name has been typed in and the ~t~r key hit,
the status line at the bottom of the screen will read the
following:
Current ile : EXAMPLR . VMI Current path : C:\CAPCALC
This line is helpful for keeping track of what image file is
displayed on the video monitor and in what directory it is saved
on disk. It should be mentioned that the current path status is
always to the directory from which the system software was
initiated unless changed by use of the Pat~ activity.
To verify that the Save activity behaved correctly the Read
activity can be used. Upon selection of the Read activity a
window will appear with an alphabetically ordered listing of the
image and luminance information files in the current directory.
If no other image or luminance information has beerl previously
saved, and the Save activity behaved properly, ~he window will
contain the following name:
1 31 83q3
",
~XA~LE
Any image file in this window can be retrieved by using the arrow
cursor keys and hitting [Enter]. Since we do not ~ant to read in
the image, hit E~c to return to the previous sub~menu.
Now that the image has been acquired and saved to disk, the next
step is to perform an RVP analysis. However, to perform an RVP
analysis, an area of interest must be determined within the
image. The area of interest contains the visual target and the
immediately surrounding background. This area is defined by
using the Frame main menu item. Once again, hit E~c to return to
the main menu and select the Frame main menu item by using the
arrow cursor keys and hit [Enter]~
Upon selection of the Frame main menu item a window will appear
with the following sub-menu activities:
Locate
Expand
Reduce
~ide
Mag~ify
The first three activities (~ocato, Expand, and Raduco) are used
to position a rectangular frame around the area of interest. The
forth activity (~ido) is used to remove the frame from the image,
and the last (Magnify) to enlarge the area of interest. Some of
these activities will be used to locate the frame around the bar-
leaf logo target on the ~right-Rea document.
First, select the Locata activityO A window will appear on the
screen with the following message:
Move frame ~ith cursor key~.
Use the cursor arrow keys to locate the rectangular frame around
the black bar target. The cursor arrow keys perform a coarse
movement for the frame, moving it in steps of 5 pixels each time
a cursor key is struck. For fine movement of one pixel s~eps,
the Shift key is held down with simultaneous use of the cursor
keys. Once satisfied with the location hit the Esc key to return
to the previous sub-menu activity. Second, use either the E~pand
or Reducc activity to surround the target such that the frame
just encloses it and a small part of the background. Once again,
use of the Shift keys permit fine movement of the edges of the
frame. Third, now that the area of interest has been defined,
the Magnify activity is selected to make it easier to see.
Return to the previous sub-menu by hitting ~sc, and select the
Magnify activity. A window appears on the screen with the
following message:
Magni~ication Factor (1-10): 1
1 31 83~3
,s
Type a number between 2 and l0 over the nu~ber 1 which resides in
the inp~t field, then hit [Entar~. Notice that the image area
including the frame has been scaled to a larger size by the
factor specified. This permits a better look at the visual
details within the frame without affecting the target size in
memory used in later RVP calculations. The original size can be
obtained by selecting the Magnify activity again and specifying a
factor of l. For the example leave the framed area magnified.
To perform the RVP calculations, return to the main menu by
hitting Esc and select the Calculate main menu item. A window
will appear on the screen with the following sub--menu of
activities:
RVP
~uminanco
Contour
As seen in this sub-menu one of the available activities is RVP.
This activity will be used momentarily, but first, some time
should be spent investigating the Luminance and Contour
activities.
Select the Luminance activity. This activity permits the
scanning of the image to observe the pixel luminances that make
up the image. Upon selection a window appears on the screen with
luminance and pixel location information. The location is
determined by the cursor displayed on the image. The global
coordinate origin is at the top-left corner of the screen. The
x-axis is horizontal, and the y~axis is vertical. The following
is an example of this information:
x = 267 y = 20~
Luminance = 101.15
Use the arrow cursor keys to move the cursor around within the
framed area. Notice how there are slight variations in luminance
from pixel to pixel on the target and the background. Once again
the Shift key can be used to fine cursor movements. For purposes
of calculating RVP the user must specify which of the pixels
within the frame are task, and which are background. This can
become very tedious if many luminances (pixels) need to be
selected. Under many circumstances, individual pixel selection
is too precise, especially if the variation between luminances is
small. For this reason the Contour activity is available to
converge luminances of similar values. Observe this contouring
process by hitting ~8C to return to the previous sub-menu and
selecting Contour.
Upon selec~ion of Contour a window will appear with the
following:
1 31 8393
,j~
256
Sel~ct tha number o~ contour~. 128
64
~2
16
('I.R
Select 8 by using the cursor arrow keys and hitting [~nter]. Pay
attention to what happens to the image area within the frame on
the video display. The resolution of luminances within this area
has been decreased to 8 steps. The system software has done this
by finding the range of maximum to minimum luminance within the
frame dividing it into B equally spaced steps, and finding
the pixel weighted a~erage luminance within each step. The new
luminances are then displayed. This process can be thought of as
converging the luminances of a higher resolution to a specified
lower level of precision. Repeat this process at various contour
levels to observe this behaviour. Once satisfied with a level of
contours select the ~VP sub-menu activity.
Upon selection of the RVP sub-menu activity another window will
appear with yet another list of sub-menu activities as follows:
Target
Background
~ge
Process
The first three activities (Target, Bac~ground, ~ga) allow for
the input of information necessary to perform the RVP
calculations. The last activity (Proces~) is selected to
perform the calculations based on the information input during
the first three activities and display the results. To start,
select the Target sub-menu activity.
Upon selection of the Tasgat sub-menu activity a window appears
on the screen with instructions on how to select the area within
the frame which you want to consider as the target. The
following is an example of such instructions:
Locate cursor o~ targat a~d hit ~nter>
x = 327 y c 206 Luminance = 19.69
Use the cursor arrow keys to position the cursor within the frame
and select those pixels which you wish to consider as the target.
Upon selectlon, of a this pixel and all other pixels of the same
luminance are displayed as black to signify that they are also
considered as part of the taskO This is done so to avoid the
tedious process of selecting each pixel which comprises the task.
The Contour activi~y also expedites this process. Notice that
~7 - 1 31 8393
you can select as many luminances as necessary to define which
area of pixels determines the task. For purposes of calculatiOn,
a single task luminance is generated by performing a pixel
weighted average over all those pixels which were selected. The
process of terminating l~minance selection for the target is done
by hitting <ESC~. It is the sum of all of the pixels which
turned black that determines the area of the tarc~et. Each time
the Target activity is selected the process starts from the
beginning, so that at any time the ~ser can get a fresh start.
The Background sub-menu activity is selected next. This process
is very similar to that for the Target sub-menu activity. Upon
selection of this activity similar instructions will occur,
however, this time the selected pixels determine the background
within the framed area. Notice that when pixels are displayed in
white. Once again, the same process for calculating a pixel
weighted average is performed for the background and it is
terminated by hitting ~SC>.
The Age sub-menu activity is selected once the user is satisfied
with the target and background input information. Upon selectlon
of this sub-menu activity a window appears on the screen with the
following prompt:
Age (20-65): ~0
This age is used in performing the RVP calculation. The 20 which
is displayed can be used or the user can modified the age by
typing in a number from 21 to 65 and hitting [~nter]. For the
time being, leave the age as displayed at ~. The consequences
of age on RVP can be inves~igated later.
The information necessary to perform the RVP calculation has now
been input. The Proces~ sub-menu activity should now be
selected. Upon selection of this sub-menu activity the
information which is used for the calculations is checked to see
if it is within certain boundary conditions. These boundary
conditions are those which are intrinsic to the model upon which
the calculations are based. If any information is outside these
boundaries, a window appears with a warning message describing
which information is beyond a limit and what value will be used
in the calculations instead. The XVP calculations are then
performed and the results are displayed in a window as shown in
the following example:
Target luminanco (cd/~2) : 23.61
Background luminance (cd/m^2) : 98.46
Adaptation l~minance (cd/m^2) : ~1 95
Observer aga (years) : 20
Contra3t : 0.760
Solid angle (x10-3 sr) : 0.0115
Relative viaual performance : 0.9~1
~7
~,
-- - 1318393
To obtain a better understanding of RVP and the results of these
calculations, the user is encouraged to read the literature
referenced in Appendix B.
This completes the example of the use of the CapCalc system to
perform an RVP calculation. It is recommended that the user
continue the session to become more familiar with the influences
of age, size, and target and background luminance on RVP.
This example should not be used as a substitute for the manual.
The details provided throughout this manual permit a better
understanding of the CapCalc system and its use.
1 3~ 8393
- 59
APPENDIX A
Microsoft GW-~ASIC User's Guide and ~ser's Reference
Microsoft MS-DOS User's Guide and User's Reference
Panasonic WV-5410 Operating Instructions
PCVISIONplus Frame Grabber User's Manual
Roland Printer PR-1212A Operating Instructions
I/O PLUS III ~ser's Manual
Multi-Compatible Keyboard User's Manual
Roland DG Character Display Owner's Manual
TC100 and TC100x series cameras Installa~ion and Operating
Instructlons
Imaging Technology Incorporated Installation Note (87-01)
PCVISION Plus Toolbox 1.2 Customer Release Notes
1318393
- 6()-
APPENDIX B
Age, A Human Factor in Lighting, by G.A. Wright & M.S. Rea,
Proceedings of the 1984 International Conference on Occupational
Ergonomics, Toronto, Ont. May 7-9, 1984, Vol.l, Research Reports
and Case Studies, p. 508-512.
Visual Performance Using Reaction-Times, by M.S. Rea and M.J.
Ouellette, prepared for the National Lighting Conference,
Cambridge, U.K., 1988, in press.
Practical Implications of a New Visual Performance Model, by M.S.
Rea, Lighting Research and Technology, Vol. 18, No. 3, 1986.