Note: Descriptions are shown in the official language in which they were submitted.
~o~n~~~~~.
TITLE- COI~iBIi~IRI) vA~.'ilE ~30DUL~R CONTR~L PANEL
This invention relates generally to fluid controls
and more particularly to a combined valve modular control panel.
BACKGROUND
Conventional valve modular control panels have a
plurality of individual valve modules to deliver high pressure
gas to devices such as nitrogen gas springs often used in
stamping operations to yieldably hold a clamping ring of a die
assembly. One such modular control panel is disclosed in U.S.
Patent 4,$38,527. The modules in these conventional control
panels usually require two separate valves, generally operate
independently of one another and without a master gas pressure
inlet or master bleed control and without the capability of
readily increasing or reducing the number of valve modules in
the panel.
SOI~1MARY
The valve modular control panel of this invention
combines one or more individual valve modules with a gas supply
module and a bleed module in an integrated system for the metered
distribution, monitoring and exhausting of high pressure gas.
Each valve module is individually controlled preferably by a
single valve mechanism. The supply module supplies gas to all
of the valve modules in the panel. All of the valve modules
are bled through the bleed module. The panel can be expanded
or contracted to include any number of valve modules. The
modules are clamped together preferably by a series of nuts and
tie rods, the number of which is determined by the number of
modules in the panel. A protective shield is also provided for
the panel which can be adjusted in size depending upon the
number of modules in the panel.
Objects, features and advantages of this invention
are to provide a combined valve modular control panel in which
each valve module is individually controlled, which has a supply
module for supplying high pressure gas to all of the valve
modules in the panel, which has a bleed module for bleeding all
of the valve modules, which can be expanded or contracted to
include any number of valve modules, which has an adjustable
protective shield to protect the valve modules and their gages
from damage, which is adjustably clamped together by a unique
series of nuts and tie rods designed to accommodate whatever
number of modules may be desired, and is rugged, durable,
--2'
reliable, of simplified design and of relatively economical
manufacture and assembly.
BRIEF DESCRIPTIOFT DF THE DRATdIleIGS
These and other objects, features and advantages of
the invention will be apparent from the following detailed
description, appended claims and accompanying drawings in which:
Figure 1 is a top view of a combined valve modular
control panel constructed in accordance with the invention, but
omitting a protective shield.
Figure 2 is an elevational view of the combined valve
modular control panel shown in Figure 1 with a protective shield.
Figure 3 is an end view looking in the direction of
the arrow ~ in Figure 2, showing the protective shield in phantom
lines in raised position.
Figure 4 is an end view looking in the direction of
the arrow 9 in Figure 2.
_3_
2~J~"1~3~.
Figure 5 is a side view taken generally on the line
5--5 in Figure 3.
Figure 6 is an enlarged sectional detail of a portion
of Figure 5.
Figure 7 is a fragmentary sectional view taken on the
line 7--7 in Figure 5.
Figure 8 is a sectional view of one of the valve
modules, taken on the line 8--8 in Figure 1.
Figures 9 and 10 are fragmentary sectional views
similar to Figure 8 but showing the parts of the valve assembly
in different positions.
DETAIi.ED DESCR~PTIU~7
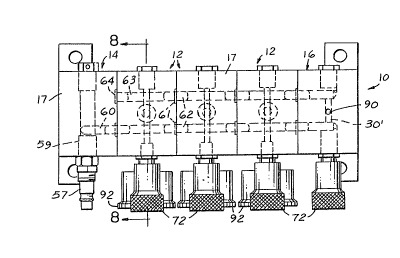
Referring now more particularly to the drawings, there
is shown a combined modular contral panel 10 having a plurality
of valve modules 12, a supply module 14 and a bleed module 16.
These modules 12, 14 and 16 have generally rectangular bodies
17 in end-to-end abutting relation with adjacent flat surfaces
in flush surface-to-surface contact.
-4-
The modules 12, 14 and 16 are releasably secured
together by nuts 18 and tie rods 20 (See Figures 5 and 7). Each
module has a pair of parallel holes 22 and 23 passing from end-
to-end therethrough with a counterbore at one end. The holes 22
of the modules are aligned with each other, as era the holes
23. The nuts 18 are disposed in each hole 22 and 23 of each
module with their heads 24 seated against shoulders 26 at the
bottom of the counterbores. The counterbores in the holes 22
arid 23 of modules 12 and 14 are at the same end of the holes.
The counterbores in the holes of module 1~ are at the opposite
end of the holes. A tie rod 20 extends between adjacent modules
and threads into the nuts in the holes in its adjacent modules.
Although three valve modules 12 are shown, it is clear that
valve modules may be added to the panel and secured into the
assembly by providing them with nuts and tie rods similar to
the nuts 18 and tie rods 20 already described. Valve modules
also may be removed from the assembly.
Referring to Figures 8 - 10, each valve module has a
through bore from front to back to provide a central valve
chamber 30, and counterbores 32 and 34 at each end of the valve
chamber. Counterbare 32 is sealed by a plug 36 threaded therein,
and an O-ring 38. A tubular valve rod guide 40 threads into
the counterbore 34 and has a O-ring 42 to seal the counterbore.
~~~3~'"e'(.1°~..
A cup 44 is seated in a recess 46 in the inner end of
the valve rod guide 40. Ports 48 are formed in the side wall of
the cup. An O-ring 50 is disposed in a reduced extension at
the base of recess 46. An annular seal S2 and retainer 53
surround one end of valve chamber 30 and are pressed into a
recess at the base of the counterbore 34.
A cup 54 is seated in a recess 56 in the inner end of
plug 36. Ports 56 are formed in the side wall of cup 54. An
annular seal 58 and a retainer washer 59 surround the opposite
end of valve chamber 30 and are pressed into a recess at the base
of the counterbore 32.
A supply passage 60 runs through all three valve
modules 12, terminating at one end in supply module 14 and at
the other end in bleed module 16. As shown in Figures 1 and 6,
the supply passage is sealed at the interface between modules by
O-rings 61, each O-ring surrounding a split pin 62 in the passage
extending across each interface to align adjacent modules. The
supply passage communicates with the interior of cup 44 in each
valve module through ports 48. High pressure gas is delivered
to the supply passage 60 from a fitting 57 through a passage 59
in supply module 14. Preferably fitting 57 is a male quick
disconnect with a one way check~valve which prevents discharge
of gas when the supply conduit is disconnected.
_6_
A bleed passage 63 runs through all three valve modules
12 and terminates in bleed module 16. The bleed passage is
closed at one end by a seal 64 carried by supply module 14 and
is sealed at the interface between modules by 0-rings 61, each
0-ring surrounding a split 62 pin in the passage extending
across each interface to align adjacent modules. The bleed
passage communicates with the interior of cup 54 in each valve
module through ports 56.
Eaeh valve body also has a passage 65 leading :From
the valve chamber 30 to a hose fitting 66 for delivering fluid
under pressure, as for example nitrogen gas to a gas spring used
in a stamping operation.
Each valve module 12 has a valve mechanism 67, with
a valve rod 68 which slides axially in valve rod guide 40.
Valve rod 68 extends through a hole in the base of cup 44 and
through valve chamber 30. The 0-ring 50 seals against the valve
rod 68. Valve rod 68 has spools 69 and 70 which are axially
spaced apart a distance less than the distance between the
annular seals 52 and 58 at opposite ends of the valve chamber
30, The spools 69 and 70 are of substantially the same diameter
as the valve chamber 30 and slide within the valve chamber.
The spools 69 and 70 have tapered inner ends 71 and 72 for
precise metering of gas flow through the valve chamber. The
section of the valve rod between the spools 69 and 70 is smaller
in diameter than the spools to provide a passage between them
through the chamber 30.
In the Figure 9 position of the valve rod 68, the
spaols 69 and 70 engage the seals 58 and 52, to seal the valve
chamber 30 from the cups 44 and 54 and from the supply passage
60 and bleed passage 63. In the Figure 8 position of the valve
rod, the spool 69 moves into the cup 54 and out of engagement
with seal 58, while spool 70 remains in sealing engagement with
seal 52. Thus the valve chamber 30 is open to the bleed passage
63 but communication with the supply passage 60 is closed. In
the Figure 10 position, the spool 69 sealingly engages seal 58
while spool 70 moves out of engagement with seal 52 and into
cup 44. In this position, the valve chamber 30 is open to the
supply passage 60 but communication with the bleed passage 63
is closed. The valve rod 68 has an enlarged abutment 73 which
provides a positive stop limiting longitudinal movement of the
valve rod by contact with the bottom of counterbore 34 in the
Figure 8 position and contact with the bottom of cup 44 in the
Figure 10 position.
An external knob or handle 72 is threaded on the valve
rod guide 40. The valve rod 68 extends through a center hole in
the handle and is connected to the handle by C-rings 74 received
_o_
in grooves in the rod which permit relative rotation between
the handle and the valve rod but constrain them to move axially
as a unit. The handle has an axially extending bore 75 off-
set from its axis of rotation for axially slidably receiving
an elongated indicator pin 76. The pin has an enlarged head
78 slidable in a counterbore 80 and adapted to project through
the inner end of the knob for engagement with an annular collar
82 on the valve rod guide 40. The pin is urged in an inward
direction by a compression coil spring 84 to maintain the head
of the pin in sliding contact with the collar.
The end 86 of the pin indicates the position of the
valve rod 68 and hence the mode of operation of the valve i.e.
bleed, closed or fill. Referring again to Figure 8 - 10, it will
be noted that in the Figure 8 bleed position of the valve rod,
the end 86 of the pin projects beyond the outer end of the
handle. In the Figure 9 closed position, the end of the pin
in flush with the outer end of the handle. In the Figure 10
fill position, the end of the pin is entirely inside the handle,
spaced inwardly of the outer end thereof.
A bleed outlet 90 in the bleed module 16 is open to
the atmosphere and communicates with a valve chamber 30° in
bleed module 16. Valve chamber 30' in bleed module 16 is
controlled by a valve mechanism which is identical to 'the valve
mechanism for valve modules 12. Figures 9 and 10, which are
sections showing the valve mechanism 67 far the valve modules
12, are also illustrative of the valve mechanism for bleed
module 16, and differ only in that the bleed module 16 has a
bleed outlet 90 (see Figure ~) instead of the passage 65. The
valve mechanism for bleed module 16 is operable in one position
to seal the valve chamber 30' from both the supply passage 60
a
and the bleed passage 63. In a second position, the valve
mechanism will open communication between the valve chamber 30'
and the supply passage while cutting off communication to the
bleed passage. This enables the supply passage 60 to be
exhausted, insuring that all gas in the panel is vented before
a module is added or removed. In a third position, communication
between the valve chamber 30' and the bleed passage 90 is opened
while cutting off communication to the supply passage. In the
third position, all valve modules in the bleed mode can be vented.
An external pressure gage 92 is secured to each valve
module 12 and communicates through passage 95 with passage 65
to provide an indication of gas pressure in the gas spring or
other device connected to the module through the fitting 66.
The other end of passage 95 is closed and sealed by a threaded
plug 97 and 0-ring 99. If desired, to limit maximum pressure to
a safe valve a rupture disc, relief valve, or the like can be
installed in lieu of plug 97. If desired, the locations of plug
-10-
~a.~'~r'~~~~.
97 and fitting 66 can be switched to connect the gas spring to
the back of the module rather than its bottom.
As shown in Figures 1 - 4, protective shield 94
protects the individual valve modules 12 and their external
operating knobs 72 and gages 92 from damage. Shield 94 has two
elongated plates 96 and 98 which overlap and are releasably
secured together over the tops of the modules by fasteners 100.
The plates each have a plurality of equally longitudinally
spaced apart fastener-receiving holes 101 so that the length
of the shield may be adjusted depending on the number of modules
in the panel. The plates 96 and 98 have flanges 102 extending
over the outer ends of the end-most modules 14 and 16 and pivoted
thereto by pins 104 threaded into nuts 18 in holes 22 on the
outside faces of modules 14 and 16. Figure 3 shows the shield
in its raised position and Figure 4 shows the shield in its
lowered position. Pins 104 threaded into nuts 18 in holes 23
on the outside faces of modules 14 and 16 extend through slots
108 in the flanges 102 to limit pivotal movement of the shield
beyond the positions shown in Figures 3 arid 4 and releasably
secure it in any desired position.
In use, high pressure gas is supplied through inlet
fitting 57 by the supply passage 60 to all of the valve modules
12. The valve mechanisms 67 regulate the amount of gas entering
_11-
s~~i~~'~~~.
the valve chamber 30 of each valve module, independently of the
other valve modules. The valve chamber 30 of each valve module
may also be sealed off from bath the supply and bleed passages
or ported to the bleed passage, independently of the others.
The knob indicator pin 76 for each valve module indicates the
position of the valve mechanism 67 for its valve module. The
valve mechanism 67 for the bleed module 16 can be set to
simultaneously vent all the valve modules in the bleed mode.
It can also exhaust the supply passage to insure that all gas
in the panel is vented before a module is added to or removed
from the panel.
-12-