Note: Descriptions are shown in the official language in which they were submitted.
~` r
` --`` 2~1~0~6
23792-116
The present invention relates to a vacuum clamping plate
that is particularly well suited for holding non-magnetic work
pieces on the tables of metal-cutting tools so that work can be
done on the work pieces.
DE-PS 38 38 988 describes a vacuum clamping plate which
is in the form of a rectangular block with a square base. In the
top of the vacuum clamping plate there is an orthogonal grid of
grooves between which there are elevations of equal height that
are in the shape of small table mountains. The tops of the eleva-
tions are flat and all the elevations lie in a common plane that
forms the supporting surface for the work piece that is to be cut
by the machine.
Inside the vacuum clamping plate there is a chamber that
is connected through a plurality of bore holes with the grooves in
the top of the vacuum clamping plate so as to provide a flow path.
In addition, there are additional openings on the side of the
vacuum clamping plate, through which a vacuum source can be con-
nected to the chamber in the vacuum clamping plate through control
valves.
In order that the work pieces can always be installed in
the same place in the clamp plate when there are a number of
identical work pieces that have to be machined in sequence, stops
are provided and these can be adjusted and held in position on the
clamping surface of the vacuum clamping plate. These stops are
secured with the help of T-groove bolts and T-grooves that run
around the outer edge of the vacuum clamping plate. This prevents
breaks in the groove pattern by the attachment means that have an
~ ` 2 1 ~ 6
23792-116
additional positive locking effect. Such interruptions (breaks)
would adversely affect the sealing of the work piece to the top of
the vacuum clamping plate, or complicate this process unnecessar-
ily .
In addition, the stops, too, are provided with a grid of
grooves in order to provide lateral support for the work piece
that is to be machined.
The known vacuum clamping plate is supplied in a size
that is established by the manufacturer. It cannot be configured
with different dimensions so as to satisfy varying demands.
Proceeding from this, it is the task of the present
invention to create a vacuum clamping plate that can be matched to
particular requirements in a modular fashion or in the manner of
building blocks, in order that it can be adapted both to small as
well as to large machine tools.
The present invention provides a vacuum plate having at
least two clamping p]ate sections that can be assembled in a modu-
lar fashion and each of which comprises: a top that is provided
with a grid of grooves defining elevations that form a supporting
surface for a work piece; an underside that is spaced apart from
the top by a distance that is the same in all clamp plate sec-
tions; side walls that extend between the top and the underside; a
chamber located within the clamping plate section and connected
through at least one channel with the grooved grid; connecting
passages leading from said chamber to each side wall to enable
interconnection of the chambers clamp plate sections that are
connected to each other, so as to pxovide for a flow or to connect
21~4~8~
.
23792-116
a vacuum source to the vacuum clamp plate; and a valve that is
located in said channel that leads to the top, said valve in-
cluding a valve operating element that extends above the work
piece support surface to be opened by a work piece when put in
position thereon, with at least one T-groove that opens from the
top and extends adjacent to one said side wall and at least one
coupling element adapted to rigidly connect at least two clamp
plate sections.
Because the new vacuum clamping plate consists of at
least two sections that can be assembled in a modular fashion, and
which are matched to the special requirements demanded by enlarge-
ment, vacuum clamping plates can be assembled to almost any
desired size. The user of the vacuum clamping plates is no longer
restricted to a size that is established by the manufacturer and
which is too small for some applications, and too large for other
applications. In addition, this saves the user considerable
costs, for the price of the vacuum clamping plate is determined to
a very large extent from the size of the clamping surface that
incorporates the grid pattern.
In order to permit modular assembly, each clamping plate
has connecting passages or channels in the side wall(s) that are
provided for connecting additional clamping plate sections, so
that the vacuum can pass from one section to the other. This
makes it possible to eliminate costly coupling by way of external
hoses or pipes.
In addition, installing the work pieces is very simple
because each section of the clamping plate incorporates at least
2 ~
23792-116
one valve through which the groove grid is connected to the
chamber within the interior of the section of clamping plate. The
valve has an operating element that is activated or opened when
the work piece is positioned on the clamping plate. This means
that when there is no work piece in position, the valve is auto-
matically closed and there are no leaks that could have an adverse
effect on the vacuum or, for example, allow cooling liquid to be
drawn into the vacuum system. On the other hand, however, the
user is not compelled to open or close openings in the groove grid
beneath the work piece, as may be required. This means that oper-
ating errors are precluded.
This form of automatic connection of the particular
groove grid to the vacuum system is particularly important since,
because of the division of the overall vacuum clamping plate into
individual clamping plate sections, the groove pattern cannot, of
necessity, continue beyond the border between two adjacent clamp-
ing plate sections, but must at this point be provided with a con-
tinuous strip of a height equal to the elevations that are divided
up by the groove pattern. Only in this way is it possible to
generate individual vacuum fields that form the total vacuum
clamping plate, the borders of which are as close as possible to
the border between two adjacent sections of clamping plate. In
any other case, the vacuum surface would be unnecessarily small,
which would have an adverse effect on its holding power because,
in vacuum clamping systems, holding power is proportional to the
surface upon which the vacuum acts~
``` 21~8~
23792-116
In addition, this rail prevents errors that occur if the
user attempts to install the necessary rubber sealing strip across
the border between two clamping plate sections. The join between
two adjacent vacuum clamping plates, which is not air-tight, would
then of necessity result in leaks, which could have a dangerous
effect on the vacuum beneath the work piece.
When the vacuum clamping plate is assembled from clamp-
ing plate sections, particularly favourable conditions result if
an hexagonal shape is used as the basic shape. This permits any
enlargement of the effective surface of the clamping plate that is
assembled from these, without any gaps.
A further improvement can be achieved if clamping plate
sections that are used, especially, at the edge of the vacuum
plate that has been assembled in a modular fashion and which are
pentagonal, in that one side is suitable for connection to a hexa-
gonal base, whereas the distance between two side walls that are -
parallel to each other corresponds to the distance between two
side walls on the base pattern of the clamping plate sections that
are parallel to each other. In this way, it is possible to con-
struct a rectangular vacuum clamping plate despite a basic pattern
that is essentially hexagonal, and once again there are additional
T-grooves at the edges of the assembled vacuum clamping plate, in
order to bolt on stops for positioning or securing the work piece
that is installed, without placing any additional load on the
vacuum by so doing.
The chamber that is provided within the clamping plate
section consists, in the simplest case, of a circular recess into
~ 21~8~
23792-116
which a shoulder extends radially in order that a cover for the
chamber can be sealed in position with the help of the shoulder.
Then, the individual connecting channels radiate out from the
chamber. In addition, this arrangement entails the advantage that
the cover can be manufactured from a material that is different
from the material used for the base body of the clamping plate
section. In order to save weight, it is preferred that the base
body consist of a light metal so that the vacuum clamping plate
can be secured in a simple manner on a magnetic clamping plate
with the help of a cover that is manufactured from ferro-magnetic
material, which is of particular advantage when used on grinding
machines.
It is made easier to couple the clamping plate sections
if the bores in which the connecting channels end at the particu-
lar side walls are located at the approximate mid-point of the
diagonals of the rectangular side walls or, in the case of penta-
gonal plates, on the long side walls at a distance from the corner
that equals the distance of these drillings from the corners in
the case of hexagonal clamping plate sections.
A further simplification can be achieved if these bores
are stepped bores in which sealed pipe sections can be inserted in
order to connect adjacent clamping plate sections mechanically and
so as to provide a flow. This eliminates the need for additional
retaining elements that secure the clamping plate sections to each
other, and this is particularly important in the case of those
clamping plate sections which have small side surfaces that lie on
the edge of the vacuum clamping plate that has been assembled, in
::
- ` 2 ~ 6
23792-116
the case of large vacuum clamping plates. In the event that
height adjustment by way of the inserted pipe sections cannot pro-
vide for sufficiently small tolerances, one or more precision
bores to accommodate precision pins can be made in the side walls.
These then secure the assembled clamping plate sections only
against moving in the direction parallel to the side walls, where-
as security vertical to the particular side walls is effected, as
described, by the pipe sections through which the vacuum chambers
are connected to each other.
In the simplest case, the pipe sections are fixed in the
bores with bolts, preferably threaded pins, that are screwed in
from the underside of the clamping plate section. The pointed end
of this works in conjunction with the grooves in these pipe sec-
tions and presses the pipe sections against the bottom of the
stepped bore. At the same time, the sealing can be effected very
simply at this point if the O-rings provided for this purpose are
not to be chambered in the grooves of the pipe sections.
Developments of the present invention constitute the
objects of the secondary claims.
Embodiments of the present invention are shown in the
drawings appended hereto. These drawings show the following:
Figure 1: a perspective view of two clamp plate
sections that are unassembled;
Figure 2: a cross-sectional exploded view of the con-
nection between two adjacent clamp plate sections as shown in
figure 1;
`' 211 ~8~
, ,
23792-116
Figure 3: another basic form of the clamp plate section
that can be used in conjunction with the clamp plate section shown
in figure 1, in perspective view;
Figure 4: a plan view of a further combination of clamp
plate sections shown unassembled;
Figure 5: a connecting piece that can be inserted in a
clamp plate section and used to connect an external vacuum source,
in side view;
Figure 6: a cross-section through one of the grooves in
the groove grid.
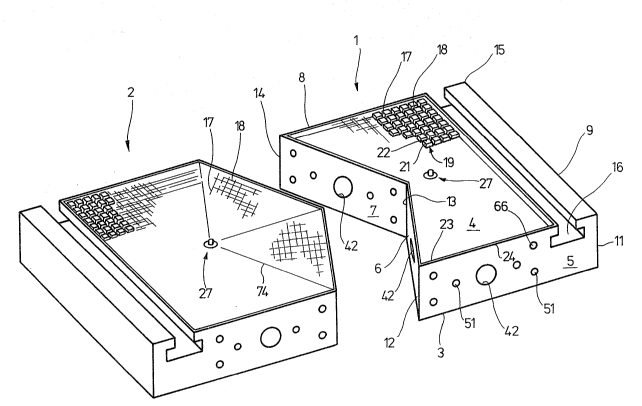
Figure 1 shows two clamp plate sections 1 and 2 that can
be assembled to form a vacuum clamp plate. Apart from a different
base outline, the two clamp plate sections 1 and 2 have the same
structure, for which reason the parts that correspond to each
other bear the same reference numbers and the following descrip-
tion of the drawing is based exclusively on clamp plate section 1.
The clamping plate section 1 has an essentially flat
underside 3 that faces away from the observer, and an upper sur-
face 4 that is parallel to and spaced apart from this. Between
the upper side 4 and the lower side 3, at right angles to both
these, there extends a total of five side surfaces 5, 6, 8 and 9
that are joined at the corners 11, 12, 13 and 15. The angle sub-
tended between the side surfaces 8 and 9 and the corner 15 is 90,
like the angle subtended between the side surfaces 5 and 6 at the
corner 11. In contrast to this, the angle between the sides 3 and
6 or between the side surfaces 7 and 8, respectively, at the
corners 12 and 14 is in each instance 60, so that the angle at
~ - `` 2 1 ~ 6
23792-116
the corner 13 is 240, i.e., what results at this point is a con-
cave indented area in the clamp plate section 1. The side sur-
faces 3...9 are flat, smooth surfaces without any projections.
In the upper surface 4, adjacent to the side surface 9
and parallel to this there is a T-groove 16 that is open at the
top and which passes through the side surface 5 and the side
surface 8.
On the side of the T-groove 16 that is remote from the
side surface 9 there is a grid of equal grooves in the top 4, this
being formed from a group of grooves 17 and a group of grooves 18.
The grooves 18 are spaced equidistantly apart and are parallel to
the side surfaces 5 and 8, whereas the grooves 17, which are
similarly spaced equidistantly apart, are parallel to the side
surface 9. This results in small elevations 19 that are in the
form of truncated pyramids and with a square base shape that are
defined by a total of small four side surfaces 21 and a similarly
square top surface 22. All the top surfaces 22 are in a common
plane, that also contains the surface areas that are on the edges
of the T-groove 16 at the top 4. These top surfaces 24 form the
actual supporting surface for a work piece that is to be clamped.
But the grooves 17 and 18 do not extend as far as the
side surfaces 5, 6, 7 and 8, and they also end at a distance from
the edge of the T-groove 16, and this results in a narrow strip 23
that frames the field of the truncated pyramid-shaped elevations
19 completely, as a closed polygon, without any breaks. The top
of this strip 23, each of whose side walls are formed from the
surfaces of the appropriate side walls 5...9 that lie on the out-
9 .~
2 1 1 ~
23792-116
side of the clamp plate section 1, is once again in the plane of
the top surfaces 22. In other words, the top 4 that in and of
itself is flat, has grooves 17 and 18 that pass through it, and is
thus divided into small surface areas.
At its mid-point, between the side surfaces 5 and 8, and
also at the approximate mid-point between the corners 13 and the
widest part of the T-groove 16, the upper side 4 incorporates a
bore 26, as can be seen in figure 2, and this leads downwards into
a chamber 25. There is a valve 27 in this bore 26. This valve 27
consists essentially of an outer cylindrical valve housing 28 that
has a fine thread on its outer peripheral surface (not shown in
the drawings), with which it can be screwed into a thread in the
bore 26 so as to form a gas-tight seal. Within the valve housing
28 there is a bore 31 that tapers down to the top 4 through a
conical shoulder 32 to a cross-section 33 that is of smaller dia-
meter. An essentially cylindrical valve closing element 34, which
can move longitudinally, is accommodated in the bore 33; at its
mid-point this has an annular collar 35. This annular collar 35
presses an O-ring seal 36 against the truncated conical shoulder
32 in order to close the flow path from the bore section 33 to the
bore 31.
The valve closing element 34 continues upwards through
the annular collar 35 to a cylindrical peg 37, the unattached end
of which extends slightly above the plane defined by the top 4.
A compression spring 38 acts against the lower side of
the annular collar 35 and at the other end of this is supported in
an annular washer 39 that is pressed into the bore 31.
2~4~6
23792-116
In order to improve the flow of gas through the open
valve 27, the valve closing element 34 incorporates a blind bore
41 beneath the annular collar 35, and a transverse bore 41a passes
through this below the annular collar 35.
Thus, the bore 26 forms a channel through which the top
4 can be connected to the chamber 25 through the valve 27, so as
to provide a flow and so that it can be closed. In addition, the
chamber 25, which is closed off to the underside 3 by a flat cover
40 that can be bolted on, is connected by another channel to the
side surfaces 5, 6, 7, and 8. The opening of each such connecting
channel is formed by an associated opening 42. The connecting
channel that leads away from the opening 42 consists of a stepped
bore 43 that either opens out directly into the circular chamber
25 or runs radially to this, or opens out into a second auxiliary
bore (not shown herein) and which, in its turn, leads to the
chamber 25. As an example, the bores 43 that extend from the two
side surfaces 5 and 8 open out directly into the chamber 25,
whereas the stepped bores 43 that extend from the side surfaces 6
and 7 open out into a bore (not shown herein) that is closed off
by the stopper (not shown herein) that is made startlng from the
side surfaces S, 8, respectively. All that is important is that
the area of the particular bore 43 that is immediately adjacent to
the opening 42 is of the form that can be seen in figure 2. Thus,
next to the opening 42, the bore 43 consists of a section 44 of
large diameter that becomes a bore section 46 that is of smaller
diameter at a flat annular shoulder 45. The distance between the
11
2~14~8~
. . ~
23792-116
annular shoulder 45 and the opening 42, i.e., from the associated
side surfaces 5...8 is in each instance always identical.
A threaded bore 47 opens into the bore section 44 from
the underside 3. The bore 47 accommodates a threaded pin 49 that
has a tip 48.
The position of the openings 42 in each of the side
surfaces 5...8 is so selected that if two clamp plate sections 1,
2 lie with their side surfaces against and even with each other,
the openinys 42 and the bores 43 that extend at right angles from
these surfaces will register with each other. This means that the
mid-point of the opening 42, for example, in the side surface 7,
lies at the point of intersection of the diagonals of the rect-
angular side surface 7. As a consequence, the opening 42 in the
side surfaces 3 or the side surface 8, respectively, is at the
same distance from the adjacent corners 12 or 14 as the opening 42
in the side surface 6 or 7 from this corner 12 or 14.
In addition, next to each opening 42, symmetrically
distributed, there are two precision bores 51 (Fig. 1) in which
precision pins (not shown herein) are inserted, with scarcely any
free play.
In order to couple clamp plate sections 1, 2 to each
other there are connecting elements 52 that consist of an essen~
tially cylindrical section of pipe 53. The pipe section 53 is
stepped down at both end faces so that a cylindrical connector
piece 54 of smaller diameter results, the outside diameter of
which equals the inside diameter of an O-ring that is centered ~ :
thereon and which is shorter than the thickness of the O-ring 55.
---." 211~8~
.
23792-116
Spaced from the face surfaces, the cylindrical base
body 53 (whose outside diameter matches the inside diameter of the
counterbore 44) incorporates two trapezoidal section annular
grooves 56, the relative positions of which is described in detail
in the following description.
Openings 42 that are not required are sealed off by
plugs (not shown) that have the external shape of a "half" coup-
ling piece 52 and which are not in the form of pipes, like the
coupling piece 52, but are solid.
The connector piece 58 that is shown in figure 5 is used
to connect the clamp plate section 1, or a vacuum plate assembled
therefrom, to a vacuum source. If this is the section that sits
in the counterbore 44, this is the same shape as the "half" coup-
ling piece 52, for which reason the same reference numbers are
used. In place of the other half of the coupling piece 52, on the -
appropriate face end 59 there is a threaded section 61 that be-
comes a nipple 62 of smaller diameter. A bore 63 passes through
the whole of the coupling piece 58.
As is shown in figure 1, the clamp plate section 1
differs from the clamp plate section 2 only insofar as the angle
of the side surfaces 6 and 7 at the corner 13 is not 240, but
rather 120, which means that the corner 13 does not extend out- ~;
wards and is not set back, inwards, as in the clamp plate section
1. Accordingly, the inside angle at the corners 12 and 14 is not
60, as before, but rather 120. Finally, in the sectors that are
defined by the corners 12 and 13 and the valve 27 or 13 and 14 and
the valve 27, the grooves 17 run at right angles to the particular
13
211 40 8 ~
23792-116
side walls 7 or 6, whereas the grooves 18 are parallel to the side
walls 6 or 7.
Apart from the pentagonal clamp plate sections 1 and 2
shown in figure 1, in the new embodiment of a vacuum clamp plate,
figure 3 shows a hexagonal clamp plate section 65, the base out-
line of which is in the form of a regular hexagon. This clamp
plate section 65 is also defined by an upper surface 4 and an
under surface 3 that is parallel to the upper surface 4. The
thickness of the clamp plate section 25, i.e., the distance of the
upper surfaces 22, formed on the top 4, from the under surface 3
is exactly the same size as in the clamp plate sections 1 and 2
shown in figure 1. What is different, apart from the different
corner angles, is simply the fact that on all side surfaces 510
that are equal to each other, there are openings 42 from which
stepped bores 42 lead into the chamber 25 that is located inside
the clamp plate section 65.
The clamp plate sections 1, 2, and 65 described above :
can be assembled as follows to form a vacuum clamp plate of almost
any size:
It is assumed that only the two clamp plate sections l
and 2 shown in figure 1 are coupled to each other. To this end,
cylindrical precision pegs are inserted into the precision :~
bores 51, for example in the side surface 7. As can be seen in
figure 2, the coupling piece 52 with an O-ring 55 inserted i9
plugged into the opening 42 in this same side surface and the
threaded pin 49 is tightened. The tip of this pin 48 passes into
the groove 56 when tightening the threaded pin 49 presses the
. 14
21~4~8~
23792-116
coupling piece 52 against the adjacent shoulder 45 because of the
interaction between the tip 48 and the appropriately inclined
groove 46. This compresses the O-ring 55 between the coupling
piece 52 and the annular shoulder 45, so as to form a seal. At
the same time, there is positive locking between the clamp plate
section 1 and the coupling piece 52 that is inserted into the side ~ :
wall 7. This position is shown in the right-hand section of
figure 2.
The opening 42 in the side wall 6 is sealed off in a
similar way by a plug which, as described above, looks like a
"half" coupling piece 52 and which is solid. After the insertion
of this plug into the opening 42 the plug does not project beyond ~:
the particular side surface 6. Next, in the case of the clamping
plate section 2, the opening 42 in the side wall 7 ~with the side ~.
wall in the position shown in figure 1, it lies opposite the clamp
plate section 2) is closed in the same way as described with
respect to clamp plate section 1. In contrast to this, the open-
ing 42 in the side wall 6 (which lies opposite the side surface 7 .~-
in the clamp plate section 1) remains open.
To the extent that the two clamp plate sections 1 and 2
have been prepared, the clamp plate section 2 with the as yet un-
closed opening 42 is slid onto the coupling piece 52 that extends
from the side surface 7 and this then passes into the appropriate
stepped bore 42. At the same time, the two precision pins that .
have been inserted slide into the associated precision bores S1 in
clamp plate section 2.
21~4~6
23792-116
Figure 2 shows the side surfaces 6 and 7 that are
opposite each other directly before they are joined together. As
soon as this has been done, as has been described above, the
threaded pin 49 is screwed into the associated threaded bore 47
from below in order to secure the coupling piece 52 in the other
clamp plate section 2 so as to form a positive fit and to press it
against the appropriate annular shoulder 52. After the threaded
pin 49 has been tightened, the two clamp plate sections 1 and 2
are connected positively and mechanically to each other and in
addition, there is a flow connection between the two chambers 25
of the two clamp plate sections 1 and 2 through the coupling piece
52. The position of the grooves 56 and the length of coupling
piece 52 are such that when the threaded pins 49 are tightened it
is ensured, on the one hand, that the O-rings 55 are clamped be-
tween the clamp plate sections 1 and 2 and the coupling piece 52.
On the other hand, in this position, the side surfaces 6 and 7 of ;~
the two clamp plate sections 1 and 2 abut one against the other,
with no gap. Then, the projecting corner of clamp plate section 2
moves into the set-back corner 13 of clamp plate section 1. This
results in a vacuum clamp plate that is of rectangular shape, with
the upper side 4 and the lower side 3 of the two clamp plate sec-
tions 1 and 2 aligned with each other. In the same way, the side
surface 5 makes a smooth transition without any irregularities
into the side surface 8 of the other clamp plate section 1 or 2.
In the event that this has not been done before, all the
openings 42 except one that are incorporated in the side surfaces
5 and 8 can now be sealed so as to be gas-tight by plugs, as has
16
` 2~4~g6
23792-116
been described above. The connector piece shown in figure 5 is
inserted into only one of the openings 42, in the same way as has
been described above in connection with the coupling piece 52.
Now, in known manner, a line that leads to a vacuum source can be
connected to this connector piece.
The vacuum clamping plate that has been prepared thus is
now secured to the table of a machine tool, for example, by clamp-
ing shoes or a magnetic clamp plate.
In order to secure a work piece to the vacuum clamp ;
plate, a rubber cord is inserted into the groove 17, 18 of the two
clamp plate sections 1 and 2, this corresponding to the outside
shape of the work piece that is to be clamped. Because of the ~ ;
joint between the two clamp plate sections 1 and 2, however, the
total surface of the work piece is divided into two fields, with
one field being on one clamp plate section and the other field
being on the other clamp plate section. The enclosing strip 23
simplifies the insertion of the seal at the point of contact
between the two clamp plate sections 1 and 2. When this is done,
all that has to be ensured is that each field that is enclosed by
a sealing cord encloses the valve 27 that is located therein. If
the work piece is now placed on the vacuum clamp plate, it presses
the valve closing element 28 down by the pin 33 which means that
the flow connection between the underside of the work piece and
the vacuum chamber 25 is established. The vacuum source that is
connected to the clamp plate sections 1 and 2 can now become
effective in order to draw the work piece down onto the top 4 and
secure it there. Because of the fact that not only the positive
17
' 21~0g~
23792-116
mechanical connection between the clamp plate sections 1 and 2 is
produced by the coupling piece 52, but that the flow connection is
also established therebyj the same vacuum is effective in all the
vacuum chambers 25 of all the clamp plate sections 1 and 2, with-
out any external and additional lines having to be connected.
In the event that a vacuum plate as in figure 1 is to be
assembled from only clamp plate section 1 and 2 is too small, it
is possible, without any difficulty, to install additional clamp
plate sections 1 and 2 next to the clamp plate sections 1 and 2,
which is to say on the side surfaces 5 and 8; when these two addi-
tional clamp plate sectïons 1 and 2 are then connected to each
other as has been described above. The connection to the clamp
plate sections 1 and 2 shown in ~igure 1 is then best effected
through coupling pieces 52 that are inserted both in the side
surface 5 and in the side surface 8 in order to form the largest
number of positive connections. At the same time, the flow
connection is also established in each instance.
Not only is an extension in the direction parallel to
the longitudinal extent of the T-groove 16 possible, but it is
also possible to effect a widening, to which end, in the simplest
embodiment, the configuration shown, for example, in figure 4 is
used. In this case, two clamp plate sections 1 are combined with
a clamp plate section 65. The mechanical connection at the points
of contact is effected in the manner described heretofore, in con-
nection with figure 1. When this is done, the advantage of the
system that is based on the hexagonal basic pattern, as is shown
in the figures, lies in the fact that in most applications the
18
~ 211408~
23792-116
point of contact between adjacent clamp plate sections is not
parallel to the work pieces that, as a rule, are rectangular, but
are at an angle of 120 or 160. In the case of thin wall parts,
down to wall thicknesses of approximately 0.5 mm, during metal
cutting operations, the points of contact between adjacent clamp
plate sections that are parallel to the work piece edges are
clearly seen as variations in wall thickness because the work
piece is not drawn down by the vacuum at the point of contact. At
the point of contact, the work piece can spring upwards between
adjacent seal sections; at the wall thicknesses quoted above, and
when this happens, for example, in aircraft construction, when
they are milled from a single piece, this will result in visible
changes in wall thickness. For this reason, the strip 32 is to be
kept as narrow as possible, for example, less than half the width
of the top surfaces 22.
As has been shown in practice, a suitable compromise
between the size of the clamp plate section and the number of
clamp plate sections required to construct a vacuum clamp plate
results if the length of the side surfaces 6 and 7, measured be-
tween two adjacent corners, is approximately 70 mm, when even a~ athickness of the clamp plate section, as measured between the
upper and the lowsr side, of 40 mm, sufficient rigidity will be
achieved, especially since the vacuum chamber 25 within the clamp
plate sections 1, 2, or 65 does not have an adverse effect on
torsional stiffness.
In order to save weight, the base body of the clamp
plate section 1, 2, or 65 is preferably of aluminum, for which
19
: `` 2 ~ 6
23792-116
reason the cover 40, with which the vacuum chamber 25 is closed
off so as to be air-tight, consists of an appropriately thick
circular steel plate that can be bolted onto a shoulder 66 that
projects into the chamber 25l in order that, should it be neces-
sary, the vacuum clamp plate that is composed of clamp plate
sections can be secured to a magnetic clamping plate.
The T-grooves 16 that extend on the outer side are used
as described in DE-PS 38 38 988.
When it is important to hold the work piece in the area
of the side surfaces 6, 7, 5, or 8, as well, threaded bores 66
that are in the form of blind bores can be used in these side sur-
faces, and the stop rails 67 that are shown in figure 3 can be
screwed onto these. On one side, these stop rails 67 have pegs 68
which extend upwards at their approximate mid-points and extend
beyond the top 4. If, in contrast to this, the rails are mounted
in the other position, in which the pegs 68 extend downwards,
their whole length extends beyond the top 4. This case is shown
in figure 3 on the side wall 6, whereas the case with the pins 68
pointing up is shown in conjunction with the side surface 5.
In order to improve the retention of the sealing cord in
the grooves 17 and 18, these grooves 17 and 18 can be provided
with a cross-section as is shown in figure 6, in which they are
undercut slightly in the vicini.ty of the bottom 69 of the groove.
The cross-section of the grooves 17 and 18 consists of a section
71 that has parallel sides and which is set back somewhat relative
to the upper sides 4 or the top surfaces 22 and which makes a
transition to become a rounded shoulder 72 towards the top sur-
21 ~ 3~08~
23792-116
face 22. At the lower end of the section 71 there is a slight
recess 73 in which the side wall of the groove is set back by
approximately 0.1 mm to 0.3 mm relative to the parallel sides of
the section 71. The sealing cords normally used are of closed-
cell foam rubber, and because of this they display a tendency to
remain in the grooves 17, 18 even if there are no forces pressing
the seal into the grooves 17 and 18. In addition, it has been
found to be useful if the effective surface area measures approxi-
mately 3 x 3 mm and the width of the groove at the widest point
similarly amounts to approximately 3 mm because of the rounded
shoulders 72. Because of this, good contact pressure is achieved
as a result of the vacuum and on the other hand, however, the top
surfaces 22 are largely prevented from being pressed into the thin
walled work pieces. For this reason, there are no grooves that
run in the direction of these lines even if the groove fields
merge into each other, as indicated by the thin continuous lines
74. Because of these, under unfavourable circumstances, there
would be top surfaces 22 which would fail to have the desired area
of 0.9 cm2. On the other hand, there must be no lack of such
under-sized elevations 19 in the transition areas because reten-
tion of the sealing cord would then be adversely effected.
21