Note: Descriptions are shown in the official language in which they were submitted.
2~~~~j
ELECTRICAL POWER SUPPLY
The present invention relates to an electrical
power supply. The invention is particularly useful with
respect to AC/DC power supplies for energizing relatively
small load devices, such a small suction/compressor pump
motors, and is therefore described below with respect to
this application.
An object of the present invention is to provide a
power supply.of the foregoing type having a number of
advantages as will be set forth more particularly below.
According to the present invention, there is
provided a power supply for energizing a load device with
DC,~comprising: an AC socket for connection to an AC
supply; rectifier means for rectifying the AC and for
supplying DC voltage to the load; a battery compartment for
receiving a chargeable storage battery; a charging circuit
for charging the storage battery with the rectified AC; a
manual switch for connecting the load device either to the
rectified AC from the AC source or to the battery; anal a
control circuit for connecting the battery to the load
'device when the manual switch is closed and the AC socket is
not connected to an AC source, and for disconnecting the
battery from the load device and connecting it to the
charging circuit when the AC socket is connected to an AC
source and the manual switch is open.
Fig. 1 is a black diagram illustrating one form of
power supply constructed in accordance.with the present
invention;
Fig. 2 is an electrical circuit diagram more
particularly illustrating the construction of one form of
power supply in accordance with the present invention;
Fig. 3 diagrammatically illustrates the packaging
of the power supply within a small portable housing for use
with a portable compressor or suction pump.
2~'~~'~J
2
Fig. 4 is an elevational view illustrating the
rear side of the housing of Fig. 3;
and Fig. 4a is a fractional view of Fig. 4
illustrating a second position of a protective shutter
mounted on the housing.
The power supply illustrated in the drawings is
particularly useful for connection to either an AC source or
a DC Source for supplying DC voltage to an electrical motor
for driving a small suction/compressor pump. Thus, the
block diagram illustrated in Fig. 1 shows the motor M as
being supplied either via an AC input connector 2 or a DC
input connector 4. When supplied via the AC input connector
2, the AC is passed through an RFI (radio frequency
interference) filter circuit 6, and a rectifier 8 to a
switching and conversion circuit 10. The latter circuit is
controlled by a control circuit 12 so as to provide, to a
second rectifier circuit 14, an AC output of a frequency
higher than the AC input 2 and having a duty cycle
controlled by the control circuit 12. The second rectifier
circuit 14 applies DC voltage to the electrical motor M via
a manual switch SW1.
The circuit illustrated in Fig. 1 further includes
a battery BAT which is selectively charged from the second
rectifier 14 under the control of a battery charging circuit
16. The arrangement is such that the battery is connected
to the electric motor M when the manual switch SW1 is closed
and the AC input 2 is not corxnected 'to the circuit, whereas
the battexy is disconnected from the electric motor M and is
connected to the second rectifier circuit.14, sa as to be
charged thereby, when the AC input 2 is connected to the
circuit and the manual switch SW1 is open. An indicator
circuit 20 Indicates the condition of the battery BAT.
The DC input ~ to the circuit illustrated in
Fig. 1 is also controlled by the manual swatch SW1. As will
be described more particularly below with respect to Fig. 2,
the electrical circuit includes an electrical interlock
effective to automatically disconnect the electrical motor M
g _
from the second rectifier circuit 14 whenever the DC source.
4 is connected to the circuit. The circuit also includes a
mechanical interlock, in the form of a protective shutter as
will be described more particularly below with respect to
Figs. 4 and 4a, which is effective to permit only the AC
input connector 2 or the DC input connector 4 to be
accessible for connection to the circuit at any one time.
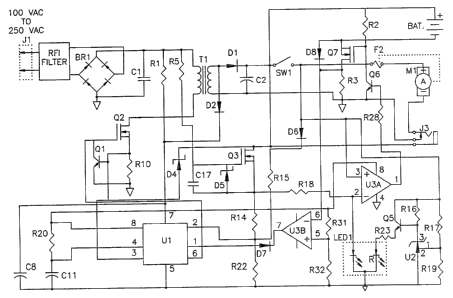
Fig. 2 is a circuit diagram more completely
illustrating the construction of the circuit schematically
shown in Fig. 1, particularly the construction of the
elements within blocks 10, 12, 14, 16 and 18 in Fig. 1.
As shown in Fig. 2, the AC input connector 2 is in .
the form of an AC socket J1 connectable to an AC supply,
such as the household AC mains supplying 110 or 220 volts AC
at 50 or 60 Hz. The AC input is applied first to a filter
RFT (radio frequency interference), corresponding to filter
6 in Fig. 1, and then to a bridge rectifier ER1,
corresponding to rectifier 8 in Fig. 1, having an output
which is smoothed by a capacitor C1. For economy purposes,
capacitor C1 is small so that it does not completely
smoothen the voltage ripple from the rectifier. Also,
capacitor C1 has a very low impedance so that it allows high
~ourrent switching without introducing significant impedance
losses.
The switching and conversion circuit 10
illustrated in Fig. 1 includes a flyback transformer T1 in
Fig. 2 whose primary winding is controlled by a switching
circuit including transistors Q1 and Q2. Transistor Q2
converts the output from rectifier 8 to AC of a frequency
substantially higher than that of the AC supply (e. g.,
250 KHz) which is applied to the primary of transfaraner T1.
Transistor Q1, in combination with resistor R10, provides
current limiting and short circuit protection fox
transformer T1; thus, if the current through resistor R10 is
excessive, the voltage across it exceeds the base voltage
far transistor Q1 turning it on, and in turn connecting the
i .3 '..
- 4 -
gate drive of transistor Q2 to ground to thereby interrupt .
the current conducted through transistor Q2.
Transistor Q2 is controlled by a. PWM (Pulse width
modulation) controller U1 to switch the primary winding of
transformer T1 at a predetermined frequency ~e.g., 250 ICHz),
but for a duty cycle (i.e., the ratio between the on time
and off time of transistor Q2 during each cycle) controlled
by the PWM controller U1. The output of the secondary
winding of transformer T1 is thus controlled by controller
U1 ,
Transformer T1 operates in the '°flyback" mode.
Thus, when transistor Q2 is turned on, transformer T1
stores the energy, and when transistor Q2 is turned off, the
energy is discharged through the diode D1 to an output
capacitor C2. This output applied to capacitor C2 is
utilized for energizing motor M, or for charging the battery
BAT.
The current through transistor Q2 is controlled by
controller U1 via its input terminal 3 which is connected to
the puncture of resistor R10 and the base of transistor Q1,
to thereby control the duty cycle of transistor Q2 to limit
the current and to provide short circuit protection for
transformer T1.
The circuit illustrated in ~'ig. 2 further includes
means for isolating the battery BAT when 'the circuit is
connected to an AC supply via its AC socket J1, and manual
switch SW1 is turned on to energize the electrical motor M.
This is accomplished by a comparator U3a which senses a high
voltage on the * terminal of the electrical motor M, such
that when this terminal goes positive,~a transistor Q6 is
turned on. This in turn turns off a transistor Q7, thereby
opening the negative terminal of the battery BAT so that the
battery is unable to discharge.
The battery BAT is charged to a higher voltage
than that supplied to the motor M by the AC power supply.
Thus, the AC power supply supplies motor M with 12.5 volts,
but battery BAT is charged to 13.7 volts. The foregoing
- 5 -
arrangement, isolating the battery BAT when the manual
switch SW1 is turned on and the circuit is connected to the
AC supply viu AC socket J1 to energize the motor M, thus
prevents the discharging of the battery in view of its
higher voltage, and also prevents overtaxing of the
switching power supply by having it drive the motor as well
as charge the battery.
Diode D8 routes the charging current to resistor
R3 and thereby allows the battery BAT to charge even when
transistor Q7 is turned off, Resistor R3 is a current
sensing resistor. It controls the battery charging current
to prevent battery damage or over-demand of the switching
power supply. This is accomplished by comparator U3b. This
comparator is normally referenced to a voltage pre-set by
resistors R31 and R32. When the current charging the
battery BAT exceeds the pre-set limit, the voltage across
resistor R3, introduced at terminal 6 of comparator U3b,
causes the comparator output 7 to go negative. This output
of the comparator is applied via diode D7 to terminal 1 of
controller U1, which causes the controller to reduce the
duty cycle of transistor Q2 to the transformer T1, thereby
reducing the current through the transformer.
The battery BAT will not be charged when the
manual switch SW1 is closed and the AC power supply is
driving the motor M. This operation is accomplished by
dropping the voltage present at capacitor C2 from 13.7
volts, which is the voltage necessary to charge the battery
BAT, to 12.5 volts, which is the voltage for drawing the
motor M both when powered by the battery,BAT, or by the AC
power supply when AC is voltage is present at the AC socket
2. When the manual switch SW1 is turned off, and there is
na AC power supplied from the AC socket J'1, no power is
supplied to terminal 8 of comparator U3a, so that its output
terminal 1 is at ground level. This keeps transistor Q6
turned off and allows the battery voltage at the ~r terminal
of battery BAT to tuxn on transistor Q7 via resistor R2.
- 6 _ ~ ~ e~ ~ ~e ~ .~.~
The illustrated circuit further includes a two-
color light indicator LED1. Indicator LED1 is energized to
display a green color via transistor Q3, diode D5 and
resistor R18,~when power is being supplied to the motor M ar
to the battery BAT. However, when the motor is operated
from the battery BAT, and the battery is low, indicator LED1
is energized to display a red color. This is accomplished
by transistor Q5 which is controlled by reference device U2.
Thus, resistors R17 and R19 provide a predetermined
reference voltage at terminal 1 of reference device U2 such
that the reference device conducts all the current from
resistor R16 to ground. However, a drop in the voltage of
battery BAT below the predetermined level, while the manual
switch SW1 is turned on, lowers the voltage at terminal 1 of
reference device U2, rendering it non-conductive, such that
all the current through resistor R16 is then applied to the
base of transistor Q5 causing it to conduct. This energizes
LED1 via resistor R23 to cause LED1 to display the red
color, thereby indicating a low battery condition.
The PWM controller U1 controls the duty cycle of
transistor Q2 to maintain an output voltage of 13.7 volts at
the positive terminal of the battery BAT to effect charging
of the battery. This voltage is fed back to terminal 2 of
the PWM controller U1 via transistor Q3 and resisters R1~
and R22, which provide the proper feedback voltage to the
internal comparator of the PWM controller. Any rise of
voltage at terminal 2 of controller U1 will result in its
reducing the duty cycle of the driver transistor Q2 to
maintain a fixed reference.
When switch SW1 is closed and the motor M1 is
energized, it is desirable to have the motor driven by 12,5
volts, and not the 13.7 volts used for charging the battery
BAT. The reason for this is to avoid excessive power usage
:resulting from both charging the battery and energizing the
motor; another reason is to have the motor driven at the
same voltage when operated from a battery or from the AC
power source in order to produce consistent output. This is
- 7
accomplished by providing an additional feedback route from.
the motor M1, via diode D6 and resistor R15 to terminal 2 of
the PWM controller U1. This feedback voltage at terminal 2
is thus higher for 13.7 volts, and the U1 controller drive
transistor Q2 so as to maintain 12.5 volts at the positive
terminal of the motor M1.
Capacitor C11 and resistor R20, connected
respectively to terminals 4 and 8 of controller U1, control
the frequency of an internal oscillator, and thereby the
switching power supply frequency.
Input terminal 7 to controller U1 is connected via
resistor R1 to the output of bridge rectifier BR1; and input .
terminal 5 of the controller is connected to the same
circuit via capacitor C8. When no power is introduced via
the AC socket J1, transistor Q3 completely isolates the
battery BAT to prevent battery discharge. Resistor R1
allows for charging capacitor C8 until the voltage of the
capacitor is sufficient for the controller U1 to operate.
When this occurs, controller U1 is supplied .from the
transformer T1 output through diode D2 connected to input
terminal 7 of the controller.
The electrical circuit illustrated in Fig. 2
further includes a thermal protective fuse F2 mounted on the
reverse side of the printed circuit board, i.e., opposite tn
the side carrying the electrical components illustrated in
Fig. 2. Fuse F2 is located so as to be in proximity to the
motor M in order to enable it to sense the motor
temperature. The fuse thus provides protection for motor
overheating, or for a locked rotor, in:a very simple and low
post manner as compared to the techniques commonly used for
providing this protection, to disconnect the motor from the
power supply in case of an excessive temperature rise in the
motor.
When the power supply is connected to a DC source
9, the plug applying the DC power is received within DC
socket J3. This disconnects the ground lead of the entire
cixcuit, so that closing the manual switch SW1 will power
- . ~1~'J
- g -
the motor M from the power available only at the DC socket .
J3. The illustrated arrangement thus produces an electrical
interlock effective to automatically disconnect the motor M
from the AC socket J1 whenever the DC socket J3 is connected
to a DC supply.
Tn addition to the above electrical interlock
protection, the described device also includes mechanical
protection against connecting both the AC socket J1 and the
DC socket J3 at the same time to a power supply. Thus, the
two sockets J1 and J3 are mounted in close proximity to each
other at the rear side of the housing 20 for the power
supply. Pivotally' mounted between the two sockets J1 and J3
is a protective shutter 22 which can be pivotted to one
position making only one socket accessible, or to a secand
position making only the other socket accessible. Thus,
when shutter 22 is pivotted to the position illustrated in
Fig. 4, it makes the AC socket J1 accessible and blocks the
DC socket J3; but when pivotted to the position illustrated
in Fig. 4a, it makes the DC socket J3 accessible and blocks
access to the AC socket J1.
A11 the above-described electrical components
shown in Fig. 2 of the drawings, except for the battery BAT,
a.re mounted on an L-shaped printed circuit board 24
(Fig. 3), which snuggly fits within the housing 20. The two
sockets J1, J3 are directly mounted to the printed circuit
board and project through openings in the housing 20, as
shown in Fig. 4. xn addition, the manual switch SW1 is also
directly mounted to the printed circuit board and projects
through an opening 26; similarly, the light indicator L~D1
is mounted directly to the printed circuit board and
projects through an opening 2S formed in the housing 20. As
shown in Fig. 3, the battery compartment 30 is of
rectangular configuration and is nested into the puncture of
the two xight-angle legs of the L-shaped printed circuit
board 24. Such an arrangement provides a very compact
package. xt also exploits the electrical components for
_ g _
mounting the printed circuit board to tine housing, thereby .
obviating the need for extra mounting hardware.
zt will be seen that the power supply illustrated
in the drawings provides a number of important advantages,
including the following:
1. It provides a fixed DC voltage (12 volts) when
connected to any AC supply mains, between 90 and 250 volts,
and a slightly higher voltage (13.7 valts DC) far charging
the battery BAT (e. g., a lead acid battery);
2. It controls the battery charging voltage and
current, and it does not charge the battery when the
electrical motor is operated from the AC supply;
3. Tt lowers the supply voltage from (13.7 volts
to 12.5 volts) when the electric motor is running on the AC
supply, thereby enabling the motor to operate at the same
power level and voltage when operated either on an external
AC supply or on the internal battery;
4. It provides a two-color light indicator (LED1)
to indicate the condition of the device, and also to
indicate a low battery condition;
5. Tt automatically disconnects the battery when
the motor is being run on the AC supply mains, to prevent
'draining the battery when it is completely charged;
6. It permits connecting the device to a DC
supply, via the DC socket J3 (e.g., connected to an
automobile cigarette lighter or the like) without the risk
of voltage spikes causing damago to the internal supply
electronic circuit, this being accomplished by providing a
complete disconnection of the electronic circuit when the DC
socket is connected to a DC supply;
7. 2ts pivotal shutter 22 prevents connecting the
DC socket J3 to a DC supply when the AC socket J1 is
connected to an AC supply, thereby blocking access to the
internal circuitry, and preventing the possibility of an
electrical shock when the AC socket is connected to the AC
supply.
2~.~~~..'.'
_ 10 _
8. Its thermal protective fuse F~, mounted on the
printed circuit board sa as to be located in proximity to
the electric motor M, prevents an excessive temperature rise
in the motor;
9. Its RFI filter 6 at the AC inlet prevents
transmission of electromagnetic interference signals;
10. Its mounting of the manual switch SW1, the twa
sackets J7 and J3, and 'the indicator lamp LED1 directly to
the printed circuit board enables using these elements also
for mounting the printed circuit board to the housing, and
thereby provides a compact and simpler construction which
obviates the need for extra electrical wiring and mounting
hardware; arid
11. Its printed circuit board of L-shape and
nested with the battery compartment further increases 'the
compactness of the overall design.
All the foregoing advantages make the described
device particularly suitable for small, portable
suction/compressor pumps.