Note: Descriptions are shown in the official language in which they were submitted.
W095/~g PCT~S94/069~
-- ~153~15
FRONT END APPARATUS AND METHOD
.,
Technical Field-Industrial ApPlicability
This invention relates to automated "front end"
apparatus, that is, apparatus for pipette manipulation,
sample collection and dispensing and the like in clinical
laboratory systems.
Background Art
Several types of automated front end apparatus
are known. There are those illustrated and described in,
for example, U.S. Patents: 4,794,085; 4,478,094; and,
4,780,833; European patent publications: 0,169,071;
0,273,128; and, 0,341,438; and, Patent Cooperation Treaty
publication WO 91/16675. No representation is intended
hereby, nor should any such representation be inferred,
that this listing is a complete listing of the relevant
prior art or identifies the most pertinent prior art.
Disclosure of Invention
According to an aspect of the invention, air is
supplied from an air supply through a disposable pipette
tip. With no obstructions in the path from the supply
through the pipette tip, air will flow freely and little
back pressure will be measured by a pressure transducer
located upstream from the pipette tip in an air supply
circuit. The tip is lowered toward the surface of a liquid
by a robotic arm. As the pipette tip contacts the surface
of the liquid, the liquid blocks airflow and the pressure
sensed by the transducer increases. This increase signals
that the pipette tip has located the liquid level. The
pipette tip is lowered beneath the liquid level and a
vacuum source is then coupled to the air supply circuit.
The liquid is drawn into the pipette tip. The transducer
measures a negative pressure (a partial vacuum). The
W095/~9 _ PCT~S94/069~
21~3~
measured pressure depends on air flow rate, liquid
viscosity and a number of other secondary factors. If flow
rate and these other factors are known, viscosity and
change in viscosity can be measured. A clot or gel in the
liquid at the pipette tip produces a relatively larger
increase in the partial vacuum and hence the clot or gel is
detected. There are a number of factors such as pipette
tip orifice diameter, liquid flow characteristics, wetting
action, flow rates, robotic arm speed, and the like, which
affect the processes and can be used to describe the
processes more accurately.
Brief DescriPtion of Drawinqs
The invention may best be understood by referring
to the following description and accompanying drawings
which illustrate the invention. In the drawings:
Fig. 1 illustrates a fragmentary perspective view
of a system constructed according to the present invention;
Fig. 2 illustrates a block diagram of certain
details of the system illustrated in Fig. 1;
Fig. 3 illustrates a sectional side elevational
view of a detail of the system illustrated in Fig. 1;
Figs. 4a-4j illustrate in more detail and in
block and schematic form certain details of the block
diagram illustrated in Fig. 2;
Fig. 5 illustrates a fragmentary perspective view
of the detail illustrated in Fig. 3, along with certain
other related details of the system illustrated in Fig. 1;
Fig. 6 illustrates the architecture and
interaction of several software tasks for controlling a
system constructed according to the present invention;
Figs. 7-11, 12a-b, 13, 14, 15a-b, 16a-b, 17-23,
24a-b, 25-41, 42a-b, 43-58, 59a-b, 60a-b, 61-70, 71a-b,
72a-b, 73a-b, 74a-b, 75, 76a-b, 77a-b, 78-80, 81a-b, 82-90,
91a-b, 92, 93, 94a-c, 95, 96a-b, 97a-b, 98a-b, 99a-b, 100,
W095/~9 PCT~S94/069~
2153~I5
101, 102a-b, 103a-b, 104, 105, 106a-c, 107, 108a-b, lO9a-b,
110, 111, 112a-b, 113, 114, 115a-b, 116, 117, 118a-b,
ll9a-c, 120a-c, 121a-c, 122a-c, and 123-137 illustrate
flowcharts and related diagrams useful in understanding the
software tasks illustrated in Fig. 6;
Fig. 138 illustrates a top plan view of the
system illustrated in Fig. 1;
Fig. 139 illustrates a top plan view of the
detail illustrated in Fig. 3, along with certain other
related details of the system illustrated in Fig. l;
Fig. 140 illustrates a bottom plan view of a
detail of the system illustrated in Fig. 1;
Fig. 141 illustrates a sectional side elevational
view of a detail of the system illustrated in Fig. 1;
Fig. 142 illustrates a top plan view of a detail
of the system illustrated in Fig. 1; and,
Fig. 143 illustrates a sectional side elevational
view of a detail of the system illustrated in Fig. 1.
20 Modes for CarrYing Out the Invention
Referring now to Fig. 1, air is supplied from a
syringe pump 10 through a disposable pipette tip 11. With
no obstructions in the path from pump 10 through the
pipette tip 11, air flows freely and little back pressure
25 will be measured by a pressure transducer 12 (Fig. 2)
located upstream from the pipette tip 11 in the syringe
pump 10 circuit 14. Syringe pump 10 illustratively is a
39450 syringe pump available from Hamilton Company, P.O.
f Box 10030, Reno, NV 89520-0012. The tip 11 is lowered
toward the surface 16 (Fig. 3) of a liquid 18 by an arm 20.
As the pipette tip 11 contacts the surface 16 of the liquid
18, the liquid 18 blocks airflow and the pressure sensed by
the transducer 12 increases. This increase signals that
the pipette tip 11 has located the surface 16. The pipette
tip 11 is then lowered beneath the surface 16 and the
WO95/00829 PCT~S94/069~
2153~15
--4--
syringe pump lo draws a partial vacuum in circuit 14.
Liquid 18 is drawn into the pipette tip 11. The transducer
12 measures the partial vacuum. The measured partial
vacuum depends on air flow rate through circuit 14, liquid
18 viscosity and a number of other secondary factors. If
these factors are known, viscosity and change in viscosity
can be measured. A clot or gel, illustrated in broken
lines at 24, in the liquid 18 at the pipette tip 11
produces a relatively larger increase in the partial vacuum
than the liquid 18 flow in the absence of the clot or gel
24 produces, and hence the clot or gel 24 is detected.
An electrical system useful for performing the
method of the invention is illustrated in Figs. 2 and 4a-j.
The following schematic and block circuit diagram
descriptions identify specific integrated circuits and
other components and in many cases specific sources for
these. Specific terminal and pin names and numbers are
generally given in connection with these for completeness.
It is to be understood that these terminal and pin
identifiers are provided for these specifically identified
components. It is to be understood that this does not
constitute a representation, nor should any such
representation be inferred, that the specific components or
sources are the only components available from the same or
any other sources capable of performing the necessary
functions. It is further to be understood that other
suitable components available from the same or different
sources may not use the same terminal/pin identifiers as
those provided in this description.
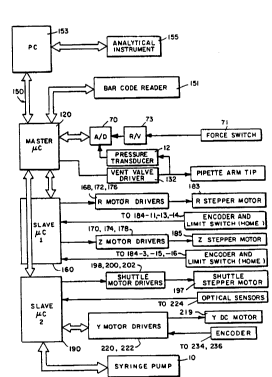
The system block diagram is illustrated in Fig.
2. The system comprises a master microcontroller (~C) 120
which interfaces through an RS232C interface 150 with a bar
code reader 151, and with a personal computer 153 which
controls a laboratory analytical instrument 155 such as the
Boehringer Mannheim ES300 analyzer. A system analog-to-
W095/~g PCT~S94/069~
-
2153~1S
--5--
digital converter 70 provides input values from a force
switch 71 through a resistance-to-voltage (R/V) converter
73, and from a vacuum/pressure transducer 12 to ~C 120.
Based upon these values, ~C 120 controls a vent valve
driver 132. ~C 120 also controls an arm 20 R (angle)
stepper motor 183 through R motor drivers 168, 172, 176,
and an arm 20 Z (elevation) stepper motor 185 through Z
motor drivers 170, 174 and 178, both through a first slave
~C 160. Motion of the R and Z motors 183, 185,
respectively, is confirmed through R and Z motor motion
encoders whose motion signals are returned to the system
through components 184-11, -13, -14 and 184-3, -15, -16,
respectively. ~C 120 also controls a specimen tube rack
300 (Fig. 5) shuttle 302 stepper motor 195 through shuttle
motor drivers 198, 200 and 202, and a Y (radius) DC
servomotor 197 through Y motor drivers 220 and 222, both
through a second slave ~C 190. Motion of the shuttle motor
195 is confirmed through a shuttle optical sensor 224.
Motion of the Y motor 217 is confirmed through a Y motor
motion encoder whose motion signals are returned to the
system through components 234, 236. The second slave ~C
190 also controls the syringe pump 10 through RS232
interface 150.
Referring now to Fig. 4a, the pressure transducer
12 of the system illustrated in Figs. 1-2 comprises a
Honeywell Microswitch Division type 176PC07 differential
pressure transducer 12, pin 1 of which is coupled to the V,
voltage supply, pin 3 of which is coupled to the system
ground and pins 4 and 2 of which are coupled to the non-
inverting (+) input terminals of two difference amplifiers34, 36, respectively, of a National Semiconductor type
LM324 quad difference amplifier. The inverting (-) input
terminals of amplifiers 34, 36 are joined by a 10 Kn
resistor. The output terminals of amplifiers 34, 36 are
coupled through respective 100 Kn resistors to their -
W095/~9 PCT~S94/069
2 153~15 -6-
input terminals. The output terminals of amplifiers 34, 36
are also coupled through respective 100 Kn resistors to the
- and + input terminals, respectively, of an LM 324
difference amplifier 38. The output terminal of amplifier
38 is coupled through a parallel RC circuit including a 47
Kn resistor and a .l~F capacitor to its - input terminal.
Supply voltage is provided to the V, terminal of
transducer 12 from a +12VDC supply coupled to terminal 40-1
of a connector 40, a National Semiconductor type LM78L05
five volt regulator integrated circuit 42 and a type LM 324
difference amplifier 24. The +12VDC supply at terminal 40-
1 of connector 40 is coupled through a .l~F capacitor to
ground and terminal 40-4 of connector 40. Terminal 40-1 is
also coupled to the V~ terminal of IC regulator 42. A .l~F
capacitor is coupled across the V0 terminal of regulator 42
and ground. A 2.4 Kn resistor is coupled between the V0
terminal of regulator 42 and the + input terminal of
amplifier 44. The cathode of a National Semiconductor type
LM 385-2.SV zener diode 46 is coupled to the + input
terminal of amplifier 44, and its anode is coupled to
ground. The output terminal of amplifier 44, in addition
to being coupled to the V, terminal of transducer 12, is
coupled to ground through series 100 Kn resistors 48, 50.
The junction of resistors 48, 50 is coupled to the - input
terminal of amplifier 44.
The circuit illustrated in Fig. 4a provides both
low gain and high gain output signals. The high gain
output signal, appearing at terminal 40-3 of connector 40,
is provided from the output terminal of a type LM 324
difference amplifier 52 through a 10 Kn resistor. The +
input terminal of amplifier 52 is coupled through a 10 Kn
resistor to the anode of zener diode 46. The - input
terminal of amplifier 52 is coupled through a 10 Kn
resistor to the output terminal of amplifier 38. The
output terminal of amplifier 52 is coupled to its - input
W095/~9 PCT~S94/069~
- 21S3~15
. .
--7--
terminal through a parallel RC circuit including a 100 Kn
resistor and a .l~F capacitor. A circuit including the
series string of a 100 Kn resistor, a 10 Kn potentiometer
54 and a 100 Kn resistor is coupled between the output
S terminal of amplifier 44 and ground. The wiper of
potentiometer 54 is coupled to the + input terminal of a
type LM 324 difference amplifier 56 connected in unity gain
buffer configuration. The output terminal of amplifier 56
is coupled through a 100 Kn resistor to the + input
terminal of amplifier 38. The output terminal of amplifier
38 is coupled through a 10 Kn resistor to the low gain
output terminal, terminal 40-2, of connector 40. The +SVDC
level at the output terminal of amplifier 44 is coupled to
the + input terminal of an LM 324 difference amplifier 58.
lS +12VDC is coupled through a 10 Kn resistor to the - input
terminal of amplifier 58. The - input terminal of
amplifier 58, the low gain terminal 40-2 of connector 40,
and the high gain terminal 40-3 of connector 40 are coupled
through respective lN4148 diodes 60, 62, 64 to the output
terminal of amplifier 58.
The low gain and high gain pressure signals from
connector 40 are applied to an INput terminal 5 and an
INput terminal 6, respectively, of a Microlinear type
ML2258 analog-to-digital converter (A/D) 70 with multiplex
capability (Fig. 4b). Although both high gain (for liquid
level sensing) and low gain (for liquid aspiration and
dispensing) capabilities are provided, only the high gain
input is used in the illustrated embodiment. Although some
- aspirate and dispense signals will saturate the high gain
pressure transducer 12 output in this embodiment, the
output will ultimately come out of saturation and return to
a meaningful level. +35 VDC is coupled through series
69.8Kn, 1% and lOKn resistors to ground. The junction of
these two resistors is coupled to INput terminal 1 of A/D
70. +12VDC is coupled through series 30Kn, 1% and lOKn
W095/~829 ~CT~S94/069~
21S3 41S -8-
resistors to ground. The junction of these two resistors
is coupled to INput terminal 2 of A/D 70. System Vcc and
+5VAccessory voltage supplies are coupled through
respective series lOKn voltage dividers to ground and the
junctions of the lOKn resistors in these voltage dividers
are coupled respectively to INput terminals 3 and 4 of A/D
70.
+2.5VDC is coupled to the + input terminals of
two LM324 difference amplifiers 76, 78. +2.5VDC is
regulated by an LM385 2.5V zener diode 80 coupled across
the + input terminals of amplifiers 76, 78 and ground. A
.l~F capacitor is coupled in parallel with zener diode 80.
A 2.4Kn resistor is coupled from the + input terminals of
amplifiers 76, 78 to Vcc. The output terminal of amplifier
76 is coupled to the base of a type 2N3944 NPN transistor
82. The collector of transistor 82 is coupled to +12VDC
and its emitter is coupled to the Vcc and REF + terminals of
A/D 70. Feedback is provided to the - input terminal of
amplifier 76 from its output terminal through a .OOl~F
capacitor, and from the emitter of transistor 82 through a
lOKn resistor. A lOKn resistor is coupled between the -
input terminal of amplifier 76 and ground.
The output terminal of amplifier 78 is coupled
through a lOKn resistor to the base of a type 2N3904 NPN
transistor 84. The collector of transistor 84 is coupled
through a lOKn load resistor to +12VDC and its emitter is
coupled through a lOKn feedback resistor to ground. The
emitter of transistor 84 is coupled to the - input terminal
of amplifier 78. The collector of transistor 84 is coupled
to the + input terminal of an LM324 difference amplifier
86. The output terminal of amplifier 86 is coupled through
a lOKn resistor to the base of a type 2N3906 PNP transistor
88. The emitter of transistor 88 is coupled directly to
the - input terminal of amplifier 86 and to +12VDC through
a 127K, 1% resistor. The collector of transistor 88 is
W095/~g PCT~S94/069~
-
2153115
coupled to the + input terminal of an LM324 difference
amplifier 90 configured as a unity gain buffer.
A microswitch (not shown) on the pipette chuck
- for signalling contact of the pipette tip 11 with, for
example, the bottom of a tube or test cup, is coupled
through a lOKQ resistor across the input terminals of
amplifier 90. A .Ol~F capacitor is coupled across the +
input terminal of amplifier 90 and ground. The output
terminal of amplifier 90 is coupled through a lOKn resistor
to INput terminal 7 of A/D 70. A 5.1 volt zener diode 92
protects INput terminal 7, and a 2.2~F, 16V tantalum
capacitor is coupled across INput terminal 7 and ground.
The Address 0 - Address 2 and Data Bus 0 - Data Bus 7
output terminals of A/D 70 are coupled to the A0-A2 and D0-
D7 lines, respectively, of the system bus.
System reset is achieved through a reset circuit93 including a manual reset button 94, one terminal of
which is coupled to ground and the other terminal of which
is coupled to the CLear input terminal of a type 74HC74
flip-flop 96. The Q input terminal of flip-flop 96 forms
the HC74/Q line of the system bus. The Q output terminal
of flip-flop 96 forms the X74Q line of the system bus. The
MASTER/Tl line of the system bus is coupled to the CLocK
input terminal of flip-flop 96.
Reset can also be achieved by default. lOHz
clock signals are applied to the A input terminal of a type
74HC393 eight bit binary counter 100. The QC output
terminal of counter 100 is coupled to the A input terminal
of a 74HC393 counter 102 to configure the pair as a divide-
by-32 counter, so that every 3.2 seconds a reset signal
appears on the QD output terminal of counter 102. The lOHz
clock signals are provided at the output terminal of a type
LM339 difference amplifier 105. The + input terminal of
amplifier 105 is coupled to the junction of two lOKn
resistors, the other terminal of one of which is coupled to
WO9~/~9 PCT~S94/069~
2153415
--10--
Vcc and the other terminal of the other of which is coupled
to ground. The - terminal of amplifier 105 is coupled
through a 4.7~F tantalum capacitor to ground. Respective
lOKn feedback resistors are coupled between the output
terminal of amplifier 105 and its + and - input terminals.
5K resistance couples the output terminal of amplifier 105
to Vcc
The QD output terminal of counter 102 is coupled
through a lN4148 diode to the - input terminal of an LM339
difference amplifier 104. A parallel RC circuit including
a lMn resistor and a .l~F capacitor is coupled across the -
input terminal of amplifier 104 and ground. The + input
terminal of amplifier 104 is coupled to +2.5VDC. Its
output terminal is coupled through a lMn pull-up resistor
to Vcc and through a 2.2~F, 16V tantalum capacitor to
ground. The output terminal of amplifier 104 is also
coupled through a lN4148 diode 106 to the normally
ungrounded terminal of reset button 94. The anode of diode
106 is also coupled to the - input terminal of an LM339
difference amplifier 108. The cathode of diode 106 is also
coupled to the output terminal of an LM339 difference
amplifier 110. The + input terminal of amplifier 108 is
coupled through a lOOKn resistor to +2.5VDC. Its output
terminal is coupled through a lMn feedback resistor to its
+ input terminal. The - input terminal of amplifier 110 is
coupled to +2.5VDC. The + input terminal of amplifier 110
is coupled through a lORQ, 1% resistor to +12VDC and
through a 3.74Kn, 1% resistor to ground.
The output terminal of amplifier 108 is coupled
through a lOKn pull-up resistor to Vcc and forms the Master
RESET signal source for the system. It is also coupled
through a series lMn resistor 114 and .l~F capacitor 116 to
the MASTER/Tl line of the system bus. The MASTER/Tl line
is pulled up to Vcc through a lOKn resistor. The junction
W095/~829 PCT~S94/069~
21~3,~1 ~
of resistor 114 and capacitor 116 is coupled to the CLeaR
input terminals of counters 100, 102.
An Intel 8032 8 bit master microcontroller (~C)
- 120 (Fig. 4c) handles, via interface 150, all communication
with the personal computer 153 which operates the
laboratory instrument 155. ~C 120 also utilizes an RS232
bidirectional interface to control the system's bar code
reader 151. The two additional slave ~Cs 160, 190 are
controlled by ~C 120 via bidirectional communication. The
force sensor 71, 73, pressure transducer 12 and vent valve
driver 132 are also monitored by ~C 120. Liquid levels and
clots are detected by ~C 120 through A/D converter 70 from
pressure transducer 12. More specifically, liquid level is
detected by execution by ~C 120 of the following steps.
The vent valve driver 132 opens the vent valve and syringe
pump 10 aspirates air. Vent valve driver 132 then closes
the vent valve and syringe pump 10 expels air as the
pipette tip 11 is lowered toward the sample surface 16.
The pressure increases slightly when tip 11 reaches the
sample surface 16. The arm 20 stops moving in response to
this slight increase in pressure. Vent valve driver 132
opens the vent valve and the air remaining in the syringe
pump is expelled. Vent valve driver 132 then closes the
vent valve, the arm 20 is lowered below the surface 16,
lowering the tip 11 an amount determined by the volume of
the sample to be aspirated, and the sample is aspirated.
Clots are detected by the presence of abnormally low
negative pressure (abnormally high vacuum) during sample
aspiration.
~C 120 has its P0.0 - P0.7 terminals coupled
respectively to the D0-D7 lines of the system bus. Its
P1.0-P1.7 terminals are coupled to the Master Input/Output
REQuest 1, Master BUSY 1, MIOREQ2, and MBUSY2 lines of the
system bus, the input terminal of a Sprague type UDN2508
high line driver inverter 122, the input terminal of a
WO95/~9 PCT~S94/069~
2~S3 41S -12-
Sprague type ULN2003 low line driver inverter 124, the
MP1.6 line of the system bus, and a terminal 126-1 of a
debugging connector 126, respectively. Series loKn
resistors 128, 130 couple the input terminals of inverters
122, 124 and the junction of resistors 128, 130 is
maintained at Vcc. The output terminal of inverter 122 is
coupled to the input terminal of a type ULN2003 inverter
132, the output terminal of which sinks current through a
vent valve operating solenoid (not shown) coupled to a
terminal 134-2 of a connector 134. Terminal 134-1 of
connector 134 is coupled to +12VDC and a lN4148 flyback
diode is coupled across terminals 1, 2 of connector 134.
The output terminal of inverter 124 sinks current from
~12VDC through a lKn resistor and a red status indicator
LED (not shown) coupled across terminals 136-3, 136-4 of a
connector 136. The output terminal of a type ULN2003
inverter 138 sinks current from ~12VDC through a lKn
resistor and a green status indicator LED (not shown)
coupled across terminals 136-1, 136-2 of connector 136.
An Atmel EEPROM 140 has its A0-A12 and D0-D7
terminals coupled to the system bus A0-A12 and D0-D7 lines,
respectively. The CE and OE terminals of EEPROM 140 are
coupled to the MCS0 and ReaD lines, respectively, of the
system bus. The WriteEnable terminal of EEPROM 140 is
coupled to one terminal of an EEPROM enable slide switch
141, the other terminal of which is coupled to the WR
terminal of ~C 120. The WE terminal of EEPROM 140 is also
coupled to V~ through a 10Kn pull-up resistor. A
Waferscale, Inc, type PSD311 microcontroller interface 142
has its PA0-PA7 and AD8/A8-AD15/A15 terminals coupled to
the system bus A0-A15 lines, respectively, and its AD0/A0-
AD7/A7 terminals coupled to the system bus D0-D7 lines,
respectively. The ReaD, WritE, Program Store ENable, and
Address Latch Enable/P terminals of ~C 120 are coupled to
W095/0W~9 PCT~S94/069~
21S311 5
-13-
the ReaD, WRite VPP, PSEN, and Address Latch Enable
terminals, respectively of ~C interface 142. The PB0-PB7,
A16/CS8-A18/CS10, and A19/CSI terminals of ~C interface 142
are coupled to the MCS0-MCS10 lines, respectively, of the
S system bus. The TXD, RXD INTerrupt 1, T0 and T1 terminals
of ~C 120 are coupled to the Master Transmit, Master
ReCeiVe, BARCODE, BUSY and MASTER/Tl lines, respectively,
of the system bus. The RESET terminals of ~C120 and ~C
interface 142 are coupled to the system RESET line. The
INTerrupt 0 terminal of ~C 120 is coupled to the IWT
terminal of a Standard Microsystems 8lC17 universal
asynchronous receiver-transmitter (UART) 144.
- The Xl Terminal of ~C 120 is coupled to the
OUTput terminal of an ECS, Inc., type OECS-110.5-1-AlOlA
lS 11.0592 MHz five volt clock oscillator 146. This terminal
forms the CLOCK terminal of the system bus. The OUTput
terminal of an ECS, Inc., type OECS-51-1-AlOlA 5.0688 MHz
five volt clock oscillator 148 (Fig. 4d) forms the CLocK
terminal of the system bus. The D0-D7 lines of the system
bus are coupled to the D0-D7 lines, respectively, of UART
144. The WRite, ReaD, RS, ChipSelect and CLocK terminals of
UART 144 are coupled to the WR, ~, A0, MasterChipSelectl
and CLK lines of the system bus. The IO terminal of UART
144 is coupled to the HC74/Q line of the system bus. The
TX and RX terminals of UART 144 are coupled to the TlIN and
RlOUT terminals, respectively, of a Maxim type MAX238 RS232
driver 150 with on-board +5VDC-to-+and-12VDC supplies. The
T2IN, R20UT, T3IN and R30UT terminals of driver 150 are
coupled to the MTX, MRCV, Slave 2 Transmit and Slave 2
ReCeiVe lines, respectively, of the system bus. Respective
4.7~F, 25V capacitors are coupled across the Cl+ and Cl-
terminals, the C2+ and C2- terminals, the V+ and Vcc
terminals, and ground and the V- terminal of driver 150.
Signals to and from a bar code reader 151 coupled across
- -
WOg5/00~9 PCT~S94/069
-14-
terminals 152-1 and 152-2 of a connector 152 are
transmitted on Bar Code Transmit 1 and received on Bar Code
Receive 1 at terminals TlOUT and RlIN, respectively, of
driver 150. Bar code reader 151 illustratively is an LS-
20-I0024A bar code reader available from Symbol
Technologies, Inc., 116.T Wilbur Place, Bohemia, NY 11716-
3300. Bar code reader 151 is controlled by ~C 120 through
the RS232 bidirectional interface 150.
All communication with the PC 153 which controls
the operation of the Boehringer Mannheim ES 300 analyzer
155 to which the illustrated system is attached passes
through the T20UT-R2IN serial data port and connector
terminals 154-1 and 154-2, respectively, of which T20UT and
R2IN of driver 150 are coupled. The syringe pump 10 of the
system is driven through connector terminals 156-1 and 156-
2 which are coupled respectively to terminals T30UT and
R3IN of driver 150.
Control of the angle R through which the pipette
tip-carrying arm 20 is swept from its 0 home position and
the elevation Z of the tip 11 carried by arm 20 above the
work surface is effected through a first Intel 8032 slave
~C 160 and Waferscale, Inc., PSD311 ~C interface 162. See
Fig. 4e. ~C 160 monitors and controls the R-drive
utilizing a half-step driver 168, 172, 176 and motor 183
for movement and an encoder coupled to connectors 184-11, -
13 and -14 for position feedback. ~C 160 also controls the
Z-drive utilizing a half-step driver 170, 174, 178 and
motor 185 for movement and an encoder coupled to connectors
184-3, -15 and -16 for position feedback. The home, or
reference, position for the arm 20 is set by R and Z limit
switches coupled to connectors 182-11 and 182-3,
respectively.
The PB0-PB7 and A16/CS8-A18/CS10 terminals of ~C
interface 162 are coupled to the SlCS0-SlCS10 lines,
respectively, of the system bus. The AD0/A0--AD7/A7
W095/~9 PCT~S94/069~
2153~15 , -
-15-
terminals of ~C interface 162 are coupled to the SlD0-SlD7
lines respectively, of the system bus. The AD8/A8--
AD15/A15 terminals of ~C interface 162 are coupled to the
- SlA8-SlA15 lines, respectively, of the system bus. The
P0.0-P0.7 terminals of ~C 160 are coupled to the SlD0-SlD7
lines, respectively, of the system bus. The P2.0-P2.7
terminals of ~C 160 are coupled to the SlA8-SlA15 lines,
respectively, of the system bus. The RD terminals of ~C
160 and ~C interface 162 are coupled together. The WR
terminal of ~C 160 is coupled to the WR VPP terminal of ~C
interface 162. The PSEN terminal of ~C 160 is coupled to
the PSEN terminal of ~C interface 162. The Address Latch
Enable/P terminal of ~C 160 is coupled to the ALE terminal
of ~C interface 162. The TXD terminal of ~C 160 is coupled
to a terminal 164-1 of a connector 164 which is used in
debugging the system. Terminal 164-2 of connector 164 is
coupled to ground. Terminal X1 of ~C 160 is coupled to the
system CLOCK line. The INTerrupt 0, INTerrupt 1, T0 and T1
terminals of ~C 160 are coupled to the system MIOREQ1,
XRZ/INTerrupt, XDZ2 and XDZ1 lines, respectively. The
Pl.0-P1.7 terminals of ~C 160 are coupled to the system
MBUSY1, RLIMIT, ZLIMIT, RSTEP0, ZSTEP0, RZENable, XDR1 and
XDR2 lines, respectively. The RXD terminal of ~C 160 is
coupled to the system RZDIRection line. The RESET
terminals of ~C 160 and ~C interface 162 are coupled to the
system RESET line.
Referring to Fig. 4f, the system RSTEP0, ZSTEP0,
RZEN and RZDIR lines control the R and Z stepper drive
motors through type UDN2508 inverters 168, 170, 172, 174,
176 and 178. The RSTEP0 line is coupled to the input
terminal of inverter 168. The ZSTEP0 line is coupled to
the input terminal of inverter 170. The RZEN line is
coupled to the input terminals of inverters 172, 174. The
RZDIR line is coupled to the input terminals of inverters
W095/~829 PCT~S94/069
-16-
176, 178. The RSTEP, ZSTEP, RENable, ZENa~le, RDIRection
and ZDIRection control signals to the R and Z stepper
motors appear at the output terminals of inverters 168,
170, 172, 174, 176 and 178, respectively. These signals
are conveyed through terminals 180-7, 180-3, 180-5, 180-1,
180-8 and 180-4, respectively, of a connector 180 to the R
and Z stepper motors.
Signals indicating R and Z stepper motor activity
are returned through a connector 182 to the system. The
force sensor signal applied to amplifier 90 appears across
terminals 182-1 and 182-2. The RLIMIT signal appears
across terminal 182-11 and ground, which is provided at
terminals 182-19 and 20. The ZLIMIT signal appears across
terminal 182-3 and ground. The R1, R2, Z1 and Z2 signals
appear across terminals 13-16, respectively, and ground.
~12VDC is supplied to the R and Z stepper motor sensor
circuits from terminals 182-17 and 18. Respective lOOKn
pull-up resistors are coupled between terminals 182-11 and
182-3 and V~. Respective lOOKn pull-down resistors are
coupled between terminals 182-13--16 and ground.
Respective lOOKn resistors are coupled between terminals
182-11, 3, and 13--16 and the input terminals of respective
74HC14 inverters 184-11, 3 and 13--16. Respective .OOl~F
capacitors are coupled between the input terminals of
inverters 184-11, 3 and 13--16 and ground. The output
terminals of inverters 184-11, 3 and 13--16 are coupled to
the system RLIMIT, ZLIMIT, XR1, XR2, XZ1 and XZ2 lines,
respectively.
A second Intel type 8032FA slave ~C 190 and
associated Waferscale, Inc., type PSD 311 ~C interface 192
(Fig. 4g) control the Y-axis movement of the pipette 11
radially inwardly and radially outwardly along the arm 20.
~C 190 and its associated interface 192 also control the
movement of the shuttle 302 which sequentially transports
the tube racks 300 into position for removal of specimens
WO95/~9 PCT~S94/069~
2153~15
-17-
from the respective test tubes 304-1--304-10 carried by
them for analysis by the ES300 analyzer 155 to which the
illustrative system is attached. ~C 190 monitors and
controls shuttle motor drivers 198, 200, 202 and Y motor
drivers 220, 222. The P0.0-P0.7 terminals of ~C 190 and
the AD0/A0-AD7fA7 terminals of ~C interface 192 are coupled
to the system bus S2D0-S2D7 lines, respectively. The P2.0-
P2.7 terminals of ~C 190 and the AD8/A8-AD15/A15 terminals
of ~C interface 192 are coupled to the system S2A8-S2A15
lines, respectively. The RD and RD terminals, the WR and
WR VPP terminals, the PSEN and PSEN terminals, and the
Address Latch Enable/P and ALE terminals, of ~C 190 and ~C
interface 192, respectively, are coupled respectively to
each other. The PA0-PA5 terminals of ~C interface 192 are
coupled, respectively, to the system XPoWeRDoWn 1,
XPoWeRDoWn 2, XDONE 1, XDONE 2, XRESET 1 and XRESET 2
lines. XDONE 1 and XDONE 2 and terminal PA6 of ~C
interface 192 are coupled through respective 10Kn pull-up
resistors to Vcc. Terminal PA6 is also coupled to the input
terminal of a 74HC14 inverter 194, the output terminal of
which is coupled to the input terminal of a 74HC14 inverter
196. The output terminal of inverter 196 provides the
system RESET signal. The PB0-PB7 and A16/CS8-A18/CS10
terminals of ~C interface 192 are coupled to the system
S2CS0-S2CS10 lines, respectively. The RESET terminals of
~C 190 and ~C interface 192 are coupled to the system M
RESET line.
The TXD and RXD terminals of ~C 190 are coupled
to the system S2TX and S2RCV lines, respectively. The X1
terminal of ~C 190 is coupled to the system CLOCK line.
The INTerrupt 0, INT1, T0 and T1 terminals of ~C 190 are
coupled to the system MIOREQ2, XYIT, XDY1 and XDY2 lines,
respectively. The P1.0-P1.4 terminals of ~C 190 are
coupled to the system MBUSY2, BARCODE,
YENable, YCounterClockWise and YClockWise lines,
WO9~/~9 ~CT~S94/069
-18-
respectively. The P1.2-Pl.7 terminals of ~C 190 are
coupled through respective 10Kn pull-up resistors to Vcc.
Terminals P1.5-P1.7 are also coupled to the input terminals
of respective type ULN2003 inverters 198, 200, 202.
Terminal P1.7 is also coupled to a terminal 206-1 of a
connector 206. Terminal 206-2 of connector 206 is coupled
to ground. Connector 206 is used in system debugging. The
output terminals of inverters 198, 200, and 202 supply the
system SHuttle STEP, SHuttle ReSeT and SHuttle DIRection
signals, respectively.
The firmware imbedded in the EPROMS of ~C
interfaces 142, 162 and 192 is described in detail in
Appendix A hereto.
The YEN terminal of ~C 190 is coupled to the -
input terminal of a type LM339 difference amplifier 208.
See Fig. 4h. The series combination of a 10Kn resistor
210, a 6.8Kn resistor 212 and a 2.4Kn resistor 214 is
coupled between Vcc and ground. The approximately +2.4VDC
level at the junction of resistors 210, 212 is coupled to
the + input terminal of amplifier 208. The approximately +
.625VDC level at the junction of resistors 212, 214
provides TTL thresholds to the + input terminals of two
type LM 339 difference amplifiers 216, 218. The output
terminal of amplifier 208 is coupled directly to an input
terminal, pin 1, of an SGS type L293E bridge driver
amplifier 220 and through a 10Kn pull-up resistor to Vcc.
An input terminal, pin 2, of amplifier 220 is coupled to
the system XYCW line. An output terminal, pin 3, of
amplifier 220 provides the signal to the system YDRIVECW
line. An output terminal, pin 4, of amplifier 220 is
coupled through a 10Kn resistor to the - input terminal of
amplifier 216 and through a 3.3n resistor to ground. A
.l~F capacitor is coupled across the - input terminal of
amplifier 216 and ground. The system XYCCW line is coupled
to an input terminal, pin 9, of a type L239E amplifier 222.
W095/~829 21 5 3 ~15 PCT~S94/069~
--1 9-- ~
An output terminal, pin 8, of amplifier 222 provides the
signal to the system YDRIVECCW line. Respective lN4148
diodes are coupled between ground and the output terminals,
- pins 3 and 8 respectively, of amplifiers 220, 222 and
between these terminals and +7VDC to clamp the voltages on
these terminals between - .6V and +7.6V.
An output terminal, pin 7, of amplifier 222 is
coupled through a lOKn resistor to the - input terminal of
amplifier 218 and through a 3.3n resistor to ground. A
.l~F capacitor is coupled across the - input terminal of
amplifier 218 and ground. The output terminals of
amplifiers 216, 218 are coupled through respective loKn
pull-up resistors to Vcc. These terminals provide the
XYLIMIN signal and XYLIMOUT signal, respectively, to the
system.
The tube racks 300 each support up to ten test
tubes 304-1--304-10 carrying specimens to be analyzed by
the ES300 analyzer 155 to the front end of which the system
of the present invention is coupled. The locations of tube
racks are initially established during set-up of a
particular system and are thereafter detected by optical
detector 223-R, such as a Motorola type H22B1 slotted opto
switch. The outputs of optical detector 223-R as well as
optical detectors 223-1--223-10 which predict the positions
of tubes 304-1--304-10 in a respective tube rack 300, enter
the system of the present invention through a connector 224
(Fig. 4i), terminals 224-1 and 224-2 of which supply +12VDC
to the tube rack and tube position indicating apparatus 225
coupled to connector 224. Terminals 224-13--224-3 return
from optical detectors 223-R and 223-1--223-10 signals
indicating the locations of the tube racks and tubes in the
tube racks. These signals are coupled to the junctions of
respective lOOKn resistors 226-13--226-3 and 228-12--228-3.
The remaining terminals of resistors 226-13--226-3 are
coupled to ground. The remaining terminals of resistors
W095/~9 PCT~S94/069
20-
228-13--228-3 are coupled to the input terminals of
respective 74HC14 inverting amplifiers 230-13--230-3. The
input terminals of inverters 230-13--230-3 are also coupled
through respective .001~F capacitors to ground. The output
terminals of inverters 230-13--230-3 are coupled to the
system XRACK and XTUBE 1--XTUBE 10 lines, respectively.
The Y drive motor includes a position encoder
having two output terminals which provide signals
identified in the system as YENCODERA and YENCODERB. See
Fig. 4h. The YENCODERA signal line is coupled to ground
through a 100Kn resistor and to the input terminal of a
type 74HC14 inverter 234 through a looKn resistor. A lOOpF
capacitor is coupled across the input terminal of inverter
234 and ground. The YENCODERB signal line is coupled to
ground through a 100Kn resistor and to the input terminal
of a type 74HC14 inverter 236 through 1 100Kn resistor. A
100pF capacitor is coupled across the input terminal of
inverter 236 and ground.
Two Xylinx, Inc., type XC2018-50PC84C
programmable gate arrays 241, 242 are coupled as
illustrated in Fig. 4j to the system lines. Pin numbers
for gate arrays 241, 242 and system line names are as
illustrated. ~C 160 is controlled by ~C 120 through the
system bus and programmable gate array 241. ~C 190 is
controlled by ~C 120 through the system bus and
programmable gate array 242. ~C 190 programs the gate
arrays 241, 242 when the system is initialized.
System power is provided through a connector 244
across terminals 244-1 and 244-2 of which 13VAC is
maintained. See Fig. 4h. A full wave bridge rectifier 246
comprising four type lN5400 diodes 246-1--246-4 is coupled
across terminals 244-1 and 2. 3300~F of capacitance 248
with a working voltage of 25V is coupled across bridge 246.
+12VDC is supplied across capacitance 248. The +5VDC and
V~ supplies are provided by National Semiconductor type
WO95/OW29 PCT~S94/069~
- 2153415
-21-
LM7805 five volt regulators 250, 252, the V~ and ground
terminals of which are coupled across capacitance 248. l~F
tantalum capacitors are coupled across the V0 and ground
terminals of regulators 250, 252. +5ENCoder voltage is
provided by a Motorola 78L05 voltage regulator 254, the V
and ground terminals of which are coupled across
capacitance 248 and the V0 terminal of which is coupled to
the system YENCODER +5V line. A l~F tantalum capacitor is
coupled across the V0 and ground terminals of regulator 254.
+7VDC is provided by a Motorola type LM317 programmable
voltage regulator 256, the V~ terminal of which is coupled
to +12VDC. A 2Kn resistor is coupled between the ADJust
terminal of regulator 256 and ground. A 332n resistor is
coupled across the ADJ and VO~ terminals of regulator 256.
l~F tantalum capacitors are coupled across the V~ terminal
of regulator 256 and ground and across the VO~ terminal of
regulator 256 and ground.
A Lytron 1430 seven segment display 270 is
provided for system diagnostic purposes. See Fig. 4f.
Each of the seven segment terminals is coupled through a
respective lKn resistor to the output terminal of a
respective type ULN2003 inverter 272-1--272-7. The DisPlay
reset terminal of display 270 is coupled through a lKn
resistor to the output terminal of a type ULN2003 inverter
272-8. The input terminals of inverters 272-1--272-7 are
coupled, respectively, to the system XLD0-XLD6 lines. The
input terminal of inverter 272-8 is coupled to the output
terminal of a type 74HC14 inverter, the input terminal of
which is coupled to the system M RESET line.
In the following descriptions of the flow charts
of the software that runs the system, ALCO is the acronym
for the software task responsible for sending command to
the system, and returning any responses. ALER is the
acronym for the system software error correction task.
ALPR is the acronym for the system's main software control
W095/~9 PCT~S94/069~
'; i
~3~ 22-
task. CAAL is the acronym for the software task
responsible for the internal calibration of the system.
INAL is the acronym for the software task responsible for
initialization and end-of-load sequence. TIPS is the
acronym for the software task responsible for finding a
pipette tip 11 in a tip rack and installing the thus-
located tip 11 on the pipette chuck. These software tasks
are all in the PC 153 and control the system, sometimes
referred to in the flow diagrams as an Autoloader system.
The language of this software is C. TWIN is the acronym
for the software in the PC 153 that controls the ES300
analyzer 155. TWIN is written in a combination of C and
ZIM languages.
During a pipette sequence, all of the samples
which are on the shuttle, and have been marked for use in
the current analytical run, will be moved from the primary
tubes in the various racks to respective sample cups on the
ES300 analyzer's sample rotor. During a scanning sequence,
the shuttle is moved through one complete cycle, so that
the entire contents of the shuttle can be read by the
barcode reader 151, and stored in the PC 153's database.
The shuttle transports up to fifteen tube racks at a time
for scanning and pipetting operations. The system uses the
syringe pump 10 to aspirate samples from the primary tubes
carried in the tube racks, and to dispense those samples
into the sample cups. A tip rack holds disposable pipette
tips 11 that are installed on a pipette chuck supported on
the robotic arm 20. Two racks of ninety-six tips 11 each
can be placed on the system at once. A tube racks holds
ten primary tubes, and can be placed on the shuttle for
loading of sample cups from the tubes carried by the tube
rack.
Fig. 6 illustrates the relationships among the
six specialized tasks that are responsible for controlling
the system hardware. Each task is a separate program
W095/~g PCT~S94/069~
- 2153~15
written in C and communications among different tasks use
the QNX message passing facility. The main control task is
ALPR. This task is responsible for managing the scanning
and pipetting operations. The commands required to perform
an operation are passed to ALCO which is almost a direct
copy of the existing TWIN task RUCO, and is responsible for
direct communication with the system hardware. If an error
occurs during command processing, ALER, another task, is
given control so that the error can be repaired or reported
back to ALPR. One task, TIPS, is specialized only for the
installation of pipette tips 11 onto the chuck on the
system arm. INAL is responsible for initialization of the
system and for moving the system into a rest position when
it is not in use. CAAL is invoked for performing
calibration operation for service. CAAL is not used in
normal operation, and can only be accessed by service
personnel. CAAL is started by ZIM code, performs its
operations, and is then removed from memory. The ZIM code
communicates with ALPR through the task ALSC which provides
a convenient interface between the C and ZIM codes. The
following discussion details the various modules which make
up each task.
ALPR is the central administrative task for
system operations. ZIM code can send QNX messages to ALPR
to begin major operations, such as scanning the entire
shuttle, or pipetting from all of the primary tubes. Once
started, ALPR is assumed to be fully capable of completing
the desired operation without assistance from ZIM code.
ALPR does use ZIM PLI functions to gain access to entity
sets. ALPR is the task that initiates communication
- between the tasks INAL and ALER. ALPR does not communicate
with TIPS or CALL. Like all other system tasks, ALPR
communicates with ALCO.
The main functions of ALPR are scanning and
pipetting. ALPR also has other important functions, such
W095/~9 PCT~S94/069~
~53 4~S -24-
as permitting service commands to be sent directly to the
system. Figs. 7a-b illustrate a flowchart of the overall
operation of ALPR. Each individual ALPR message option has
its own flowchart and description of operation. Figs. 8a-b
illustrate the messages supported by ALPR and processed by
main().
When the SCAN_ALL_TUBES message is received, ALPR
changes from WAIT STAT mode to SCAN mode. Figs. 9a-b
illustrate how this is done. Before a shuttle scan can be
performed, the system must be initialized. A check is made
to see if initialization is required. If there are errors,
the mode will revert back to WAIT_STAT. Otherwise, ALSW
will indicate that a shuttle scan is in progress. During
the scan, messages that would stop the scan before it is
completed can still be received by ALPR.
Once scan mode is entered, ALPR main() loop, scan
mode will administer the functions that read shuttle rack
and tube barcodes. ~igs. 10a-b and lla-b illustrate the
scan flowcharts. If an unrepairable SYSTEM or FATAL system
error occurs, the mode will be changed from SCAN to
WAIT_STAT. This will terminate the scan. If an
irreparable NON_FATAL error occurs, the sample will be
skipped, but the scan will not be terminated. During the
scan, the tube rack number, tube position, and tube barcode
(patient sample I.D.) are added to ALPO. ZIM code monitors
ALPO and removes the data as it is needed. Once the entire
shuttle has been scanned, the mode is set to WAIT_STAT, and
the scan terminates.
If an ALPR main () loop, PIPETTE message is
received by ALPR, the flowchart illustrated in Figs. 12a-c
will be executed. If needed, the system will be
initialized first, and then the ES300 analyzer 155. If
initialization is successful, pipetting operations will
begin, starting with the pipette tip 11 in the number 1
location in tip rack 1. This will ensure that if the user
W095/~9 PCT~S941069~
2ls3gl5
.i , .,
-25-
has replenished the tip 11 supply, the run will begin with
the first tip 11, instead of continuing from where the last
run concluded.
After initialization, the main loop in ALPR will
execute the flowcharts in Figs. 13a-b and 14a-b repeatedly
with every pass through the main loop. During pipetting,
ALPR can still receive messages. Until the end of the
shuttle is reached, barcode data from the system, and
sample data from SAMP, is passed to get_action() to
determine if a sample can be pipetted. When the entire
shuttle has been checked, ALPR_stat is set to WAIT_STAT,
which terminates pipetting. If there is a serious enough
error, pipetting will be stopped and the error will be
recorded in ALSW. Minor errors will cause an individual
sample to be skipped, but will not interfere with pipetting
of the rest of the samples.
If get_action() determines that a sample can be
pipetted, transfer_manager() is used to administer the
fluid transfer from the primary tube to the sample rotor on
the ES300 analyzer 155. Inside transfer_manager(),
Pip_status in SAMP is set to `E' in case a power failure
interrupts pipetting. When power is restored, the `E'
marks the sample. If pipetting proceeds normally,
Pip_status will be set to `Y' as illustrated in Fig. 14b.
Referring to Figs. 15a-b, the main function of
ALPR transfer_manager() is to orchestrate proper aspiration
and dispense volumes for samples larger than lOOO~L. An
array is filled with volumes for ASP and DS1 commands based
on the aspiration volume in SAMP. Unless the volume is
over lOOO~L, the array will always have 0 volumes for DS1
- stored.
For volumes over lOOO~L, the volume is divided by
two and subtracted from the original volume to obtain one
of the volumes to aspirate. The difference left over
becomes the second volume. This technique produces only
W095/0W~9 PCT~S94/069~
~5 -26-
whole ~L volumes to aspirate, fractional volumes are not
possible. The first aspirate volume becomes the second DSl
volume, the "previously dispensed" volume.
Because the PC 153's TWIN software does not
support volumes over 2000~L, any larger volume is set equal
to 2000~L. Once the array is filled, transfer_sample()
performs the fluid transfer.
With reference now to Figs. 16a-c, ALPR
transfer_sample() is responsible for calling the functions
that transfer a single sample volume from a tube in the
tube rack to the sample cup on the ES300 analyzer. In
addition, if errors are reported during the transfer, this
function detects them and returns. If the start of a new
run is detected, transfer_sample() tries to install tip
number one from rack number 1, instead of the next tip in
line from the preceding run. In case of some errors, ALER
causes a tip to be removed and a fresh tip to be installed.
Transfer_sample() detects this and updates ALSW as
required.
The function install_tip() is used for tip
installation. See Fig. 17. Because it is necessary to try
to install tip number one out of sequence, there are two
functions called by install_tip(), alpr_next() for typical
tip installations (see Fig. 18), and alpr_tipl() for
installing tip one from rack one at the start of the run
(see Fig. 19). Since a tip installation can fail at any
time if a tip is missing from the rack location being
searched, ALER assumes responsibility and uses TIPS to try
to find and install a tip. If the search is successful,
the next tip to be installed must be recorded in ALSW.
This is done by both TIPS and ALPR. By using different
functions for typical installations and for tip number one,
it is possible to keep track of which tip was installed in
all cases. For the special tip number one case,
alpr_tipl() saves what was in ALSW before trying to install
wo gs/~g 215 3 415 PCT~S94/069~
-27-
tip one. If TIPS installs a tip because there was no tip
one available, alpr_tipl() can compare the original ALSW to
the new value to see if they are different. If they are
different, then ALSW has already been updated by TIPS. If
they are the same, then there was no TIPS activity and
alpr_tipl() saves tip number two in ALSW as the next tip to
use. alpr_next() does not have to detect TIPS activity and
store an out-of-sequence number. It does have to detect
when the last possible tip will be installed and to wrap
the tip count around to tip one in ALSW.
Referring to Fig. 20, ALPR try_tip() is used by
alpr_next() and alpr_tipl() to install a tip. It uses the
specified tip number to put the arm 20 over the tip, and
then uses IPT to try to install. A failure to install a
tip will be handled by ALER.
ALPR set_rotor() uses the supplied sample rotor
position to translate a new position for system use. See
Fig. 21. In order for the arm to be able to dispense into
the correct sample cup, a different ES300 analyzer rotor
position must be specified so that the sample cup needed
will be accessible by the arm. This is done by using
rotor_array[] to find the corresponding coordinate needed.
Once the new position is available, the ES300 analyzer
command is constructed and transmitted using AL_Dispatch().
Errors from the ES300 analyzer cannot be corrected by ALER,
so if any are detected by set_rotor(), the pipetting
operation is canceled by setting ALPR_stat to WAII_STAT.
ALPR asp_setup() (see Fig. 22), perf_asp() (see
Fig. 23), and perf_dsl() (see Figs. 24a-c) issue system
commands and check for errors. During perf_dsl() the arm
- must move over the sample cup for dispense. The array
rotor_array[] is used to translate a supplied rotor
position into an arm horizontal position. Other than this
special operation, the functions primarily issue a fixed
W095/00829 PCT~S94/069~
~53 4~S -28-
sequence of commands while checking for errors and early
returns.
ALPR conv_al_ret() is used to minimize the need
to call AL_Dispatch() and convert the return to integer
form for error checking. See Fig. 25. conv_al_ret()
performs both of these functions for the caller. However,
it is still necessary for the caller to specify the index
for the command control parameters.
The decision to pipette a sample depends on
system information and SAMP information. ALPR get_action()
sorts the combinations and either returns an error code, a
skip code, or the code to pipette. There are two major
decision groups: the system was able to supply a barcode
from the current tube; and, no barcode was found for a
particular rack and tube position. Compare Fig. 26, Fig.
27a-b.
If the system has supplied a barcode, then SAMP
can be searched to find the same barcode. If pip_status
and Ld_status in SAMP show that the same sample can be
pipetted, then get_action() will return PIPETTE. If no
barcode is available, SAMP cannot be searched by barcode
number. Instead it is searched based on the rack and tube
position. If a matching rack and tube position is found in
SAMP, and the SAMP flags permit it, then get_action() will
return PIPETTE.
In addition to the two sections in get_action()
for SAMP searches, there are functions used by get_action()
to do the actual work. For barcode number searches, the
functions primary_id() and secondary_id() are used. See
Figs. 28-29. For rack searches, primary_rack() and
secondary_rack() are used.
The first time a search is made for a barcode
number, the function primary_id() is used. If SAMP shows
that the sample cannot be pipetted, another search is
performed to find another SAMP record with the same barcode
W095/~9 PCT~S94/069~
- 21S3115
-29-
number. This is done using secondary_id(). secondary_id()
- uses the ZIM NEXT search method and must be preceded by a
FIRST search method. This is done by primary_id(). NEXT
searches stop when the barcode number criteria fail to
match another SAMP record.
primary_rack() and secondary_rack() searches are
somewhat more complicated because, unlike an id number
search, there is no unique key to use for the search.
primary_rack() uses the FIRST search method to find the
first instance of the rack number in SAMP. See Figs. 30
and 31. Since there is only a one-in-ten chance that this
is the correct tube location (recall that there may be as
many as ten tubes in a rack), it is usually necessary to
NEXT search until matches for both the rack and tube
numbers are found. Even though primary_rack() finds a
match, that may not be the only instance of that rack and
tube location. If the sample from the first successful
search cannot be pipetted, secondary_rack() is used to
find, if available, another occurrence of the same rack and
tube. See Fig. 32. If such other occurrence is found,
this sample can also be pipetted.
ALPR get_next_barcode() is used for both scanning
and pipetting operations. See Figs. 33, 34 and 3S.
However, because of the differences between these
operations, not all of the code can be shared. The biggest
difference is in moving the shuttle after a barcode is
read. For scanning, the fastest possible shuttle movement
is desired. As soon as the barcode is acquired, the
shuttle begins to move to the next position. This permits
database activity to be performed while the shuttle is
moving. For pipetting, the shuttle must not move after
reading a tube barcode because the tube must be stationary
for fluid removal. Thus, get_next_barcode() uses flags to
control movement after a barcode is read. The type of
shuttle command used is also important. For scanning, MS3
W095/~9 PCT~S94/069~
Z~S3 ~S -30-
and MS1 can be used to move to the first or next tube as
required. When the last tube in a rack is read, and MS1
issues, the next tube one position will be moved into
place. If no rack is available, an MS3 can be issued to
move the next tube one position into place. This is
efficient for scanning because movement can begin as soon
as the barcode is acquired. For pipetting, it is not
efficient to stop at tube one unless a rack is present.
For pipetting, it is better to stop at the rack barcode and
determine if a rack is present, and then either use MS1
commands to move from tube to tube, or MS5 to move to the
next rack. Thus, scanning uses MS3/MS1 commands for
movement and pipetting uses MS5/MS1 commands.
get_next_barcode() keeps track of the "end" of the shuttle.
Since there is no physical "start" or "end" of the shuttle,
get_next_barcode() is passed a flag when a scan or pipette
operation starts. This causes the global count to be set
to zero and the flag cleared. Thereafter, every tube or
rack move will increment the count appropriately. When the
count adds up to the capacity of the shuttle (150=up to
fifteen racks times up to ten tubes per rack) the "end" of
shuttle is said to have been reached. This means that
every tube position has passed the barcode position once
and, unless something has been changed by the operator,
there is no new information to be acquired. Figs. 33-35
illustrate how scanning and pipetting modes are
interleaved, as well as how the tube count is managed to
determine the end-of-shuttle.
APLR SERVICE transmits operator commands directly
to the system, and views the results in the reply. See
Fig. 36. For each SERVICE message to ALPR there are four
system exchanges. The service facility automatically
requests the system to supply information, such as barcode
data, for display on the ZIM screen. The ACIN entity set
is initialized by ZIM and read by ALPR to do this. ALPR
W095/~829 2 PCT~S94/069~
- 1S3~
-31-
also uses ACOT to reply to the ZIM code. Transmissions to
- the system utilize AL_Serv_Disp(), not AL_Dispatch(). This
is so because AL_Dispatch() detects errors and sends ALER a
message to correct the error. This is not desired during
service operations. Fig. 36 illustrates how a loop is used
to read system commands from ACIN and send the commands
using AL_Serv_Disp().
ALPR SENSOR displays a continuous update of the
system sensors on a ZIM screen. Once in SENSOR mode, a
sequence of commands is repeated until a message is
received that changes the mode from SENSOR to something
else. Figs. 37-38 illustrate how SENSOR mode is
established and how the sensors are read and the readings
displayed.
ALPR AL_Dispatch() is in every system task that
communicates with ALCO. However, only ALPR AL_Dispatch()
detects system errors and passes control to ALER. At entry
to AL Dispatch() there is a test for ZIM index use. To
speed up ALPR as much as possible, the use of the ACMD
entity set has been replaced by an index to an array that
reflects the content of ACMD. However, for testing ALPR
and ALER during verification tests, it is necessary to use
the ZIM method because the index is not known as it would
be in the rest of ALPR. When using ALPR to issue a system
command, create an error, and pass the status to ALER, a
technician issues the command to ALPR in the DIRECT mode.
Under these conditions AL_Dispatch() must look up the
command control parameters in ACMD. If necessary,
AL_Dispatch() will re-initialize the Autoloader. This
would normally not be needed except in cases of power
failure. To transmit a command, AL_Dispatch() permits
retries beyond what is performed by ALCO. The overall
AL_Dispatch() entry, command transmission, and loop retry
method is illustrated in Figs. 39a-b. The details for
WO95/~9 PCT~S94/069~
2~53 4~S -32-
transmission are illustrated in Figs. 40, 41, 42a-b, and
43-45.
Fig. 40 illustrates the major command types, C
(Command), S (Status), R (Read), M (Macro), and E (ES300
Analyzer). Each type of command requires different
handling. The types are determined by the index passed to
AL_Dispatch(). Some commands must be detected prior to
transmission in case there is a subsequent error. This is
done using test_cmd_str() as illustrated in Fig. 40. The
system does not have a facility for maintaining the last
shuttle command sent. If there is an error due to a
shuttle command, such as MS1, ALER does not have a way to
obtain the shuttle command from the system. It must be
supplied by ALPR. In order for ALPR to do this, it must
trap the command before the message is sent to ALER,
test_cmd_str() is used. For ALER to issue the ASP and DS1
commands, the volume must be known by ALER. ALPR uses
test_cmd_str() to trap the volume for later use if needed,
see Fig. 46. Once the special command requirements are
met, AL_Dispatch() executes the section of code appropriate
for transmitting the command. In AL_Dispatch(), the error
handling is specified as O for purposes of marking the
trace. Normal processing is type O. If ALER is executing,
it uses a different error handling code and this causes the
trace to look different. This way ALER activity can be
discriminated easily.
ALPR AL_Dispatch() type C command does not return
a reply. Fig. 41 illustrates what is required to support a
type C command.
ALPR AL_Dispatch(), type S command causes the
system to return a reply reflecting the status of some part
of the system. All of the S type replies can include a
busy status. AL_Dispatch() resends the command until the
busy status is gone. Once the system is not busy, the
system reply is converted to a long for testing. A zero
WO9~/~82g 21 S3~1 S PCT~S94/06940
-33-
result indicates no errors. All other results cause the
- status message to be sent to ALER for error correction.
Along with the status goes a shuttle command, if
appropriate, and a volume (which is meaningless unless the
error was an ASQ or DSQ error). After ALER replies, the
return code is converted to an ASCII string to return to
the caller of AL_Dispatch(). The return code reflects the
success of ALER to correct the problem. One other
housekeeping task is accomplished after the ALER reply is
received. Because AL_Dispatch() keeps track of shuttle
commands for use with ALER, it also has to keep track of
the success of shuttle commands so that old information is
removed. When a system shuttle command reply is received,
and it is observed to be without error, the stored
knowledge of the command is cleared. If there is an error
and ALER is able to correct it so that the shuttle can
move, this must also be detected. The routine
test_smsg_str() is used with BEFORE and AFTER modes to
accommodate checking system replies "before" being sent to
ALER and "after." See Figs. 42a-b and 47.
ALPR AL_Dispatch(), type R commands are used to
obtain information from the system. An example of such
information is rack 300 and tube 304 barcodes. The replies
from the system are pointers to the system string returned.
Fig. 43 illustrates the type R flow chart.
ALPR AL_Dispatch, type M commands return system
status information to AL_Dispatch(). However, unlike S
commands, there is no busy status to contend with. When
- the system status is received, it is checked for errors.
If an error is present, the status message is sent to ALER
- for correction. Fig. 44 illustrates the type M flowchart.
ALPR AL Dispatch(), type E commands are for the
ES300 analyzer. The structure ES_Command is initialized
with the values needed by SENDPROC() for proper ES300
analyzer communication. No ES300 analyzer error correction
WOg5/~829 PCT~S94/069~
~53 4~S _34-
is possible from within the system task environment.
Errors are only reported. Fig. 45 illustrates the type E
flowchart.
ALPR test_scmd_str() and test smsg_str() are used
by AL_Dispatch() to detect certain commands so that
information can be supplied to ALER. Test_smsg_str() also
detects the results of ALER to clear knowledge about
previously trapped shuttle commands. See the discussion of
AL_Dispatch() and Figs. 46-47.
ALPR main(), Miscellaneous QNX messages include:
SHUTDOWN, which causes ALPR to terminate. See Fig. 48;
CONNECT, which causes an ENQ to be sent to the system. See
Fig. 49; DISCONNECT, which causes an EOT to be sent to the
system. See Fig. 50; INTERRUPT and CONTINUE, which are
used to start and stop an ALPR operation without canceling
it altogether. See Figs. 51-52; END_LOAD, which erases
any intermediate state as a result of a previous INTERRUPT,
and signals INAL to send the end_load sequence. See Fig.
53; DIRECT--when testing ALER, by sending messages to ALPR,
it is necessary to inform AL_Dispatch() that it has to look
up the command control data using ZIM PLI. DIRECT mode is
only used in the laboratory for software testing. See Fig.
S4; and, SCAN_NEXT_TUBE, which permits only one tube to be
scanned instead of the whole shuttle. See Fig. 55.
ALER is used to correct system errors during
scanning and pipetting operations. Only ALPR communicates
with ALER, so the only errors that can be corrected must
come from operations in ALPR. In addition, ALER is only
invoked by the routine AL_Dispatch() in ALPR. System
commands must go through AL_Dispatch() in ALPR in order to
trigger ALER if an error occurs. Fig. 56 illustrates the
QNX message relationship between ALPR and ALER. Messages
to ALER, triggered by system errors detected in ALPR,
contain a status string representing the errors detected.
wo gs/~g I S3 115 PCT~S94/069~
-35-
The message may also contain information about a shuttle
command or a fluid volume. However, unless the error was
caused by a shuttle command, the shuttle information is not
relevant. The same is true for fluid volume information.
Except for ASQ and DSQ errors, the volume is not required.
ALER may, or may not, be able to correct an
error. The flag value in the QNX reply from ALER reveals
how successful error correction was. Some errors are so
serious, such as SYSTEM errors, that ALER cannot correct
them. If ALER needs to install a pipette tip, it sends a
QNX message to TIPS for this purpose. Fig. 57 illustrates
the message relationship between ALER and TIPS. If a tip
is installed by ALER/TIPS, that event is reported to ALPR.
This is necessary to insure that the entity set ALSW is
always properly updated to reflect the next tip to use.
Each of the functions that makes up ALER is discussed
hereinafter.
Fig. 58 illustrates the major decision blocks in
ALER. To correct an error, ALER uses the status message
from ALPR as the starting point. The status message
contains information that can be used to select a
correction strategy from a database. Except for tip
installation, all error handling is list-based, using ZIM
databases. The basic sequence for correction is typically
error-bit detection, database key construction, database
search, list execution, and re-sending the original system
command to see if the error was corrected. There is an
added complexity to status messages due to the presence of
a "next-query." Some status messages report an error, but
another command must be used to get the details. To
accommodate more than one status message in ALER, there is
a status stack. The stack is first-in, last-out. When a
next-query is detected, the new status needed is requested
from the system and placed on the stack. Error correction
then proceeds using the new status until the error is fixed
WO95/~9 PCT~S94/069~
?.~53 4~S
-36-
or it is determined that correction is not possible.
Assuming that a next-query can be cleared from the stack,
the previous status is then used to continue error
correction. Presumably the error associated with the next-
query can then be resolved. However, there could be othererrors that still need to be corrected. These errors will
generate database searches for lists, which will cause more
commands to be sent to the system. Eventually, either an
error-free response will be received from the system, or it
will be clear that the error cannot be corrected. In
either case, al_error() will return, causing a reply to
ALPR reporting the success of ALER error correction
activity. A discussion of the operation of the functions
that make up ALER follows.
The function test_bits() is used to determine the
error bit number in the status message under investigation.
The al_error() inner loop operates when a bit number is
returned that is non-zero. The first step in processing an
error is to find the error in the AERR database. This is
done using find_aerr(). In the aerr structure is a member
called error_type. Error correction is guided by the
nature of error_type. For instance, if a particular error
is an `S' (System) type error, no attempt is made to try to
correct that error. On the other hand, a `F' or `N' error
is likely to be corrected. Figs. 59a-d illustrate the
steps and functions used to handle all of the error types.
When test_bits() reports that the last bit in the
status number has been processed, the outer loop section of
al_error() will operate. This section is illustrated in
Figs. 60a-b. The first decision point in the outer loop
determines if the preceding inner loop error correction
activity has had any effect. A check is made to determine
if the latest status information indicates that there is an
error. If there is still an error, it is possible that
some improvement has been made. In this case, a check is
WO95/~9 PCT~S94/069~
2ls3ql5
-37-
made to see if the new error status is different than the
original status when correction started. If the status is
different, it may be worthwhile to begin error correction
again from the beginning. A jump is made to the START
point in al_error() to accomplish this. The reason for
trying error correction again is related to bit position
dependent error correction. Suppose that there are two
errors that need to be corrected. test_bits() will
identify the first error, but conceivably this error cannot
be fixed because it is dependent on the second error.
Eventually, the second error is detected and corrected.
When the status is checked, it reveals that some error was
corrected, but there is still a problem. When error
recovery starts over at the beginning, the problem blocking
the first error correction has been fixed. Now the error
can be corrected, so the second pass produces complete
error correction. This form of error correction was
selected to eliminate the need to second-guess error
correction order when selecting error correction methods.
Once the decision point for no error/different
error has been passed, the next test involves the depth of
the status stack. When the status stack index reaches
zero, it is necessary to determine the return code for
ALPR. If the stack is not at zero, the current stack entry
can be deleted and error correction resumed at the next
higher stack level. When the stack reaches zero, the
function get return_status() determines the code to report
to ALPR. If the stack is not zero, solve_problem() is
called to position the system such that when the status
that caused the next-query error handling to take place is
reissued, no additional errors will be caused by the error
handler. At this point, the status query from the stack is
re-sent to the system, with the option to suppress an IPT
if a tip was already installed by ALER, to determine the
current status using send_current_query(). If the status
WO95/~9 PCT~S94/069~
~3~ -38-
shows that the error has been fixed, then the good status
is placed on the stack, and error correction continues.
When al_error() begins operation, the system-
stored memory of what desired positions have been requested
needs to be preserved. For instance, suppose that the
system was commanded to move the arm 20 to horizontal
position one, but failed because the arm 20 power was
turned off. The desired destination, horizontal position
one, is preserved by the system. Before al_error() can
send any commands that would overwrite the stored
destination positions, it must use get_current_pos() to
retrieve and save the information for later use. Fig. 61
illustrates the operation of get_cur pos(). The
information stored is used by restore position().
In order to accomplish error correction, it is
necessary to place the system in the same state that it was
in, or desired to be in, at the start of al_error(), the
information retrieved from the system and saved by
get_cur_pos(). Figs. 62-65 illustrate how the system
position is restored. The position of the shuttle is
special, and is actually the command used to produce an
error that is used by restore position(). This information
is provided by ALPR and is not available from the system.
The entity set AERR contains keys constructed by
adding a bit position to the end of a system command. The
lowest bit number possible is one, and the highest is
sixteen. Suppose ALER received the status QSSs4096. The
search key constructed by find aerr() would be QSS13. If
the status received has been ASQsl, the search key would be
ASQ1, with a space after the one. This is for
compatibility with ZIM. Fig. 66 illustrates how this is
done. After the search is completed, the AERR structure is
filled with a record from the ZIM AERR database on disk.
The status stack is a continuous char buffer.
Stack entries are determined by the index count and the
W095/~9 PCT~S94/069~
- Z1S3ql~
-39-
maximum length of a status message. To add a status to the
- stack, it is necessary to compute the starting location,
using the next index, and copy the message to the stack
buffer. This process is illustrated in Fig. 67. ALER
add_msg() will report an error if the stack is full.
However, the stack is defined big enough for ten status
messages. It is theoretically impossible for the stack to
grow beyond level 3, due to the limited number of
next_query bits that can be detected. Thus, if a stack-
full error is ever detected, something very wrong has
happened to the software.
When a next_query status is added to the stack,
the working state of the logic masks must also be saved.
Eventually, the next_query will be cleared from the stack
and error correction will resume on the previous status.
To be able to do this, the masks used by test_bits() must
be in the same state. ALER nxtquery_man() transfers the
working masks to the mask stack using the status stack
index. This is illustrated in ~ig. 68. So that
test_bits() is ready to process a new status, the working
masks are initialized. Then send_next_query() is used to
get the status specified by AERR that contains the
additional error information needed for error
correction,and add it to the stack.
The message sent from ALPR to ALER contains a
status string representing the system error condition.
After error correction has been performed, it is necessary
to request the same status to determine the results. If
the status was generated by a "high-level" command, it is
necessary to find the command that produced the error.
This is done with ALER status_to_query(). The status
characters are compared with an array of high-level status
strings. If a match is found, the corresponding command is
copied into the buffer padded at entry. Then the caller
can proceed transmitting the status with the command that
WO95/~9 PCT~S94/069~
~53 ~S
-40-
originally generated the error. Figs. 69a-b illustrate the
methods employed to translate one character string into
another. ALER status_to_guery() uses a 3 character query
to find a corresponding command. The input to
status_to_query() includes a pointer to a status string
such as IPQ, a pointer to a command string for return, and
an array stat_quer(), with the sets illustrated in the
following Table 1:
statu~ command
IPQ IPT
EPQ EPT
PLQ PLD
LVQ LEV
15 RFQ RFC
DSQ DS1
ZZZ end of table ZZZ end of table
Table _
ALER st diff() is a utility to compare a long,
supplied at entry, with an ASCII number in a status. The
status is in the status stack. In the outer loop of
al error(), st diff() is used to determine if a recent
status is different frGm one stored on the stack. Fig. 70
illustrates the steps involved in the comparison.
After error correction has been performed, the
query command that produced the system status must be re-
sent. The status returned by the system can be used to
determine if error correction has had any effect. For low-
level commands, the first three letters of the status canbe re-sent for the query. However, for high-level commands
SUBSllTUlE SHEEr (RULE 26)
W095/~829 PCT~S94/069~
-'~ 21S3~1S
-41-
it is necessary to re-send the command that preceded the
query, such as IPT before IPQ. Two high-level commands,
ASP and DS1, must also include the volume. Thus, it is
necessary to process the status characters and determine if
a high-level command is required. This is illustrated in
Fig. 71. If an ASP or DS1 command is needed, then no
additional search for a high-level command is performed.
Otherwise, status_to_query() is used to build the needed
command. Once the command is built, it is necessary to
check whether it is safe to transmit. If an IPT command
was previously used, and was successful, then it cannot be
sent again, as it would cause an error after one was just
corrected. To prevent IPT transmission, ALER
send_cur_query() is supplied an option flag maintained by
the caller. If suppressing IPT is needed, the caller
includes the flag and the sent_cur_query() logic checks to
see if the command is IPT, and, if the flag shows, to block
transmission. Irrespective of whether a special high-level
command is set or not, the f irst three characters of the
status message are always sent. A pointer to the system
reply is made available to the caller before returning.
To evaluate an error in a system status, it is
necessary to identify the position of an error bit. The
position of an error bit is used as part of a database
search. ALER test_bits() is used to f ind error bit
positions. Figs. 72a-b illustrate how test bits()
operates. test_bits() is designed to prevent retesting a
part of a status that has already been tested. This is
done by modifying a bit mask based on the results of a
previous test. By using the bit mask, it is possible to
generate a "new" status with the previously-checked bits
eliminated. Thus, only new bit positions will be reported
until the end of the status work is reached. Table 2
illustrates test_bits() operation for the value 4384, base
ten (1120 hex). The intermediate values generated on the
WO9~/00~9 PCT~S94/06940
~53 4~S -42-
way to producing the bit positions six, nine, thirteen, and
finally zero, are illustrated in Table 2.
entry inv stat- ~tatma~k statma~k exit poEition
mask ma~k mask & inv & s = new mask of error
(hex) (hex) (hex) ma~k = status (hex~ bit
ctatmask (hex) (ba~e
(hex) 10)
0 ffff ffff ffff 1120 20 6
ffdf ffff ffdf 1100 100 9
100 feff ffdf fedf 1000 1000 13
1000 efff fedf eedf 0 10000 0
Tabl~ 2
test bits() example for s=4384 (1120 hex)
Table 3 illustrates how the exit mask value
corresponds to bit positioning, so that bit positions are
not a mystery.
~llUlE SHEEl (FlULE 26)
WO9~/00~9 PCT~S94/06940
~S3ql~
-43-
mask (hex) position (base 10)
2 2
4 3
8 4
100 9
200 10
400 11
800 12
1000 13
2000 14
4000 15
8000 16
10000 ----
Tab_e 3
test bits() exit mask values with error bit positioning
After error correction is completed, the last
available status from the system is used to determine the
reply code to ALPR. If there are no errors, then the reply
will be OK. In case of errors, it is important to report
the worst error if there is more than one. Figs. 73a-b
SUBSmUTE SHEET (RULE 26)
WO95t00829 PCT~S94/069~
~S34~S
illustrate how get_return status() uses test_bits() to
analyze the last system status. The process is complicated
by next-query errors. ALER get_return_status() recovers
previous status information from the stack in order to
resolve comparisons between status values. The idea is to
find the worst error among the status values that reflect
system errors. This is done by transmitting the next-query
specified by AERR, obtaining the return value based on the
observed error, then recovering a previous status for
further analysis. Overall, the worst error will still be
reported.
Error correction is governed by defined
strategies stored in AERR. The names of the strategies
are: init_proc; flag_proc; run_proc; and, error_proc. The
function solve_problem() does not use the error_proc method
(see the discussion of clean_up() that follows). Two of
the methods in solve_problem(), init_proc and run_proc, are
nearly identical in operation. The flag_proc method is for
resolving problems that cannot be solved with a list-based
approach. Currently, only tip installation requires a
flag_proc. Figs. 74a-b, 75 and 76a-b illustrate how the
three methods are detected and used in solve problem() for
error correction. In init_proc and run_proc sections, the
base string for the ALMA search is copied from AERR to a
local buffer for key construction. Inside a loop, the base
key has a sequence number added to form the search key.
The search key is then used to find a command to send in
ALMA. Once no more commands can be found, the init_proc or
run_proc method is exhausted. Note that not all AERR
entries have all three methods defined. If init_proc or
run_proc have "ZZZ" in AERR, there is no defined strategy
available in ALMA. A flag_proc is defined by a number.
The number is used in a switch statement to select the
flag_proc function that does the error correction. For
flag_proc #1, the only flag_proc, the arm is moved over tip
W095/00~9 1 S3~1 ~ PCT~S94tO69~
number one prior to beginning TIPS. This is to assist TIPS
- by getting the arm in the neighborhood of the position TIPS
will need to request. This will prevent an arm error by
TIPS if the arm is not positioned over a tip rack when TIPS
is called. If the TIPS operations are successful,
solve_problem() sets the ipt_mode variable to SUPPRESS_IPT.
This is done to prevent future attempts at tip installation
after a tip was successfully installed.
The clean_up() function uses the error_proc
member of AERR. ALER clean_up() operates in the same
manner as init_proc and run_proc described immediately
above in solve_problem(). Figs. 77a-b illustrate the
operation of clean_up().
If a next-query bit is set in a status message,
the AERR structure will contain a command string after the
search is made. The AERR command is sent to the system and
the reply is placed on the status stack. This is
illustrated in Fig. 78.
The function ipq_test() is used to detect that a
tip was successfully installed. If the system status
message is IPQsO, then a tip is present. This information
is used by ALER to suppress future attempts to install a
tip, and cause an error because a tip is already installed.
Fig. 79 illustrates the method used to detect and report
IPQsO in ipq_test().
TIPS is a specialized task for installing pipette
tips during error handling. ALER is the only task that
communicates with TIPS. Figs. 80a-b illustrate the main()
function in TIPS. Only two operations are supported:
INSTALL_TIPS; and, SHUTDOWN. In the case of INSTALL_TIPS,
the reply back to ALER will contain the number of the tip
installed, and a success code.
To install a tip, tip_manager() begins with the
tip number in ALSW. In addition, this number is
incremented and saved back into ALSW. If the installation
WO95/~829 PCT~S94/069~
~S3 4~
-46-
is successful, then this will become the next tip to
install. The incrementing and saving of the tip number is
done by computer_tip(). Using the first number from ALSW
and install tip(), tip_manager() tries to install a tip.
If the installation fails, tip_manager() tries to find a
tip using what is called a "column search." The first tip
in each row of the first column of tip rack one and two is
tried. If a tip is found, ALSW is updated with the new tip
number plus one. The number of the tip actually installed
is saved for return to ALER. Figs. 81a-b illustrate how
the two methods are employed to find and install a tip.
Before a tip number can be saved in ALSW, it must
be incremented and checked for range. The maximum tip
number in rack two is 144. compute_tip() checks to see if
the maximum will be exceeded, and, if it will be, wraps the
next tip in ALSW around to one. See Fig. 82.
To record a tip number in ALSW, the caller passes
a tip number to save_tip(). change_alsw() is used to
record the change on disk. See Fig. 83.
Referring to Figs. 84, 85, 86a-b, 87 and 88, TIPS
AL Dispatch() is a subset of the version described in ALPR.
Because TIPS is controlled by ALER, there is no trapping of
errors as is done in ALPR. TIPS does not use indexes as a
substitute for ACMD. Also, because AL_Dispatch() commands
in TIPS are considered an extension of ALER, the error
handling for SENDCOMM() is specified as 100. This tags
TIPS' trace lines to show them as error handling like ALER.
INAL is used to initialize the system, and to
place it in a known state after a run is completed. Both
functions are performed in the same manner, the only
difference being the address of the array that is the
source of the search strings. Figs. 89a-b illustrate how
the two main jobs, INIT and END_LOAD, are selected.
INAL send_cmd() is called by initialize() and
end_load(). Those two functions initialize arrays as
W095/~29 3~1s PCT~S94/069
-47-
required for the operation and pass the array address to
- send_cmd(). send_cmd() searches ALMA for all numbered
sequences built around the contents of each array string
provided. If an ALMA search is successful, the string from
ALMA is sent to the system. Errors from the system will
cause an early exit from INAL and an error reply to ALPR
(only ALPR uses INAL). INAL does not send error messages
to ALER for correction. Table 4 and Figs. 90 and 91a-b
illustrate the content of the arrays used for the ALMA
searches and the method used to build ALMA keys and
transmit commands that are found. The input to send_cmd()
includes end_load() and initialize(). This stores the base
of each search key in an array and passes a pointer to the
array to send cmd(). The contents of each array are as
follows:
Initialize end loa~()
"RES" "VAX"
"ARM" "HME"
"IPE" "ZZZ" end of table
"HME"
"STL"
"PIN"
"ZZZ" end of table marker
T ble 4
The following INAL commands are sent to the
system for initialization and end-load cleanup. If any
errors occur during an INAL sequence, the sequence will be
aborted, an error message will be displayed on the screen,
and the error will be recorded in the error-log.
SU~STITUTE SHEET (RULE 26)
W095/~9 PCT~S94/069
2 153 415 -48-
Initialization sequence
Reset Firmware
RES - Checks Power Supply, EEPROM,
Microprocessors, and RAM. Returns same
status as QGS.
Test Arm
AP+ - Turn on power to arm motors.
LZ- - Move arm to Z-axis limit.
QAS - Poll busy-bit until arm move is complete.
LY+ - Move arm to Y-axis inner limit.
QAS - Poll busy-bit until arm move is complete.
LR- - Move arm to R-axis limit.
QAS - Poll busy-bit until arm move is complete.
LY- - Move arm to Y-axis minimum limit.
QAS - Poll busy-bit until arm move is complete.
LZ- - Move arm to Z-axis limit.
QAS - Poll busy-bit until arm move is complete.
MPVvl - Move arm down to full-up position.
QAS - Poll busy-bit until arm move is complete.
MPHhl91 - Move arm to "at rest" position.
QAS - Poll bus-bit until arm move is complete.
Eject Tip
MPVvl - Move arm to full-up position.
QAS - Poll busy-bit until arm move is complete.
MPHhl86 - Move arm to eject hole position.
QAS - Poll busy-bit until arm move is complete.
MPVv9 - Lower arm to tip eject elevation.
QAS - Poll busy-bit until arm move is complete.
EPT - Eject pipette tip.
W095/H~29 1S3~1S PCT~594l~6940
~,, t ,~ !,
~49- ~ f
EPQ - Check eject status.
MPHhl91 - Move arm to "at rest" position.
QAS - Poll busy-bit until arm move is complete.
Test Shuttle
SP+ - Turn on power to the shuttle.
MS5 - Move the rack barcode position of the next
tray to the aspirate location.
QSS - Poll busy-bit until shuttle move is
complete.
Test Pump
PP+ - Turn on power to pump.
ISP - Initialize pump.
QPS - Poll busy-bit until pump move is complete.
End-load sequence
AP+ - Turn on power to arm motors.
MPVvl - Move arm to full-up position.
QAS - Poll busy-bit until arm move is complete.
MPHhl91 - Move arm to "at rest" position.
QAS - Poll busy-bit until arm move is complete.
The calibration task, CAAL, is the only task not
controlled by ALPR. CAAL requires the services of ALCO.
Otherwise, it is self-sufficient. CAAL is not resident in
memory like the other system tasks. ZIM starts CAAL with a
- command line parameter for a specific operation. CAAL
executes the command and then terminates. For calibration
operations that require results from previous CAAL
operations, the results are saved and recovered using disk
files. There are no intermediate results preserved in
WO95/~9 PCT~S94/069~
~S34~5
memory between CAAL runs. Besides not consuming RAM when
not in use, execution by the command line technique allows
easier access to a display screen associated with PC 153.
This makes it easier for CAAL to overwrite ZIM screens.
There are basically two types of CAAL operations:
file and display operations; and, calibration operations.
CAAL requires a number of file copy options to permit new
calibrations to be performed while preserving old
information. Therefore, some command line parameters do
nothing more than read a file and copy it to a new name.
Some options are used only during development to make a
copy of a file with default values for the first time.
once the file is made as a placeholder, it can be read by
CAAL and eventually overwritten when a calibration is
performed. For display purposes, some options read a file
and use display coordinates to write to the screen.
The calibration options are much more complicated
than the file and display type options. For calibration,
the user is expected to toggle keys to align the system as
needed. After alignment, the new coordinates are written
to a file so they can be displayed. If the user decides
that the new parameters are correct, they can be
transferred from the file to the system EEPROM 140. Figs.
92 and 93a-c illustrate how main() uses command line
parameters to route control to calibration or file and
display operations.
The function that administers the calibration
program is calman(). It calls the functions needed to
perform the requested command line operations. Before any
calibration can be performed, the RAM tables that hold
constants and descriptions must be filled using disk files
and rd_ table(). In addition, new_table[] must be filled
with the most recent information from disk so that, if only
one calibration is performed, the table can be written back
with complete information. After the initial file
WO95/~9 PCT~S94/069~
21S3~ls
-51-
activity, calman() uses set_variables() to initialize the
flags that control which axis(es) is (are) calibrated, how
many positions on each axis, and how to find strings of
commands to position the system before calibration begins.
set_variables() does this based on the command line
parameter at entry. Once the calibration control variables
are set, calman() begins loop execution. Inside the loop,
a two letter code is used by send_cmd() to build keys for
finding commands to send to the system. These commands
will place the arm and shuttle where they need to be for
operator alignment. If the operation to be performed is
the calibration of the dispense positions, the ES300
analyzer is initialized. If a flag indicates that an axis
needs to be adjusted by an operator, calibrate() is used to
permit axis movement through keyboard control. The loop
control is incremented with every pass. When the
initialized loop value is exceeded, the loop exits.
calman() checks to see if the ES300 analyzer was needed,
and if so, disconnects communication. If there were no
system errors, calman() uses wrt_table() to save the new
calibration information in the al_new file and return.
Other command line parameters actually must be used to load
the calibrated coordinates into the system EEPROM 140.
Figs. 94a-c illustrate how calman() operates. Note that
store() is used to transfer system coordinates to
new_table[] in the loop.
Figs. 95a-b illustrate how CAAL set_variables()
converts a command line parameter into codes for
controlling calibration. For instance, if the command line
parameter were 3, then the loop count would be set to two,
the axis flags would be set to one for R, Y, and Z and the
search code would be set to T2. This means that there will
be two defined positions set during this calibration, all
three arm axes will be set, but the shuttle will not, and
the commands for setting up the arm can be found using T2
WO95/~829 PCT~S94/069~
~5
~3 4 ~ -52-
as the base code for searching ALMA. The input to
set_variables() includes a pointer to the structure for
holding sequence variables and CAAL entry command live
parameter, clp. This function assigns codes and axis loop
counts, for later use in sending sequences of commands to
the system and positioning the arm.
Figs. 96a-b illustrate how axis variables govern
allowed key strokes in CAAL calibrate(). Once in the
calibrate() loop, the user is permitted to move the arm and
the shuttle using key strokes. However, the R, Y, Z and S
variables, initialized by set_variables(), must be ones for
an axis to be controlled.
As part of the calman() calibration process,
send_cmd() is used to search for, and transmit, system
commands. set_variables() stores the base code for a
search of ALMA. set_variables() also sets the loop count
used by calman(). The base code, such as "Tl" or "BC,"
plus the loop count make up the first three characters of
the search key. In send_cmd() there is another loop. This
loop is set up to find every instance in ALMA where the
first three characters match the base code and the loop
count. To do this, an inner loop count is concatenated
onto the first three characters of the search string to
create the final key. Since there can be more than nine
commands for each sequence, this inner loop count can be up
to two digits long. Therefore, the full length of the key
can be four or five characters. For ZIM compatibility,
each key is padded with spaces to five characters if
needed. Figs. 97a-b illustrate how send_cmd() operates.
Once the operator has completed a calibration,
CAAL store() specifies how to save the information in
new_table[]. The specifications are passed to get_pos().
This function reads the system's current position and then
uses the index specifications from store() to save the
position. Figs. 98a-b and 99a-b illustrate how store() and
W095t~9 PCT~S94/069~
` ,; - .
-53-
get_pos() operate. The input to store() includes a pointer
to the structure for holding sequence variables. clp holds
the CAAL entry command line parameter. The loop is managed
by calman(). The input to get_pos() includes a pointer to
the structure holding sequence variables, specifically
ridx, yidx, zidx and sidx, initialized by store().
When the command line parameter number eleven is
received, the process of calculating the complete set of
calibration points from the set of points directly
calibrated by the user begins. The most involved part of
the process is the calibration of rackl and rack2 tip
coordinates. From only two tip rack positions, the R and Y
axis coordinates for every other tip in that rack can be
calculated. calc_rackl() begins the process, and the
function row_col() administers the calculations. Because
row_col() is general purpose, calc_rackl() and calc_rack2()
set up structures used by row_col(). Besides preparation
for row_col(), the calc_rackX() functions compute the Z-
axis tip installation and tip search elevations. These
calculations are simple additions of different offsets,
read from the file al_caal_parm, to the calibrated
elevation of the tip rack. Figs. 100 and 101 illustrate
how calc_rackl() and calc_rack2() operate.
CAP.L row_col() administers the calculations for
one tip rack at a time. At entry, it has access to the R
and Y-axis coordinates of tips one and twelve in the first
row of tips for the given rack. However, a Y-axis
coordinate is not the distance from the center of the arm
to the center of the tip, but is actually the distance from
the y-axis position furthest away from the center of the
arm to the center of the tip. To be able to use
trigonometry to find the polar coordinates of all tip
locations, it is necessary to compute the missing distance
from the center of the arm to the Y-axis initialization
position. This is performed using calc r4(). Once r4 is
W095/~9 PCT~S94/069~
2~S34~S
known, the coordinates to all of the tips in the first row
can be computed. This is done using init_rowl(). Once the
coordinates of all of the tips in rowl are known, they can
serve as the base coordinates for computing coordinates in
the other rows. Using the rowl coordinates for computing
all of the other tip locations comprises the main body of
calculations performed by row_col(). Figs. 102a-b
illustrate the overall operation of row_col(). Figs. 103a-
b illustrate how row_col() computes an unknown location
from a known rowl coordinate.
The following description describes each of the
functions used by row_col(), and ends with a discussion of
how row_col() computes the unknown locations from known
coordinates. The input to row_col() includes a pointer to
a working floating point array, and a pointer to a
structure holding limits for rows, columns and tips.
Fig. 104 illustrates the relevant locations and
distances for beginning the tip coordinate calculation
process. During calibration, a step performed prior to
beginning calculations, the positions of two tips in a rack
are obtained. For the purposes of this discussion rack one
is referenced, however, the same process could be explained
with reference to rack 2. Tip 1 and tip 12 in rack 1 have
known, measured, positions. These positions are available
in polar coordinates, and the units are in motor steps.
Fig. 104 illustrates the magnitudes of these coordinates,
and Fig. 105 illustrates the rotational coordinates. The
first calculation problem to overcome relates to the
unknown distance r4, which is measured from the center of
the arm post to the inner limit of the Y-axis. This
distance is not known due to possible differences in the
assembly of the arm, and the characteristics of the Y-axis
DC motor. In order to perform trigonometric calculations,
the length of the side of the triangle which includes
distance rl must be known. Because the triangle side is
W095/~829 PCT~S94/069~
21S311S
.~ ~
-55-
made up of r4 and rl, they must both be known. calc_r4()
is used to compute r4. There are some other complicating
factors to overcome before calc_r4() can be used. The
first has to do with the origin of the Y-axis. When the
"zero" point of the Y-axis is reached, the arm is not at
the arm post. It is at the outer limit of the arm. In
other words, the origin for the Y-axis polar coordinates is
not where the origin needs to be. To overcome this, the
origin is shifted by using a distance called ymax, so that
the y-axis measurement is now zero at a point near the
center of the arm, and greatest at a point farthest from
the center of the arm. The function unload() uses this
method to convert the given y-axis positions to the
reference origin. As an example, assume that ymax was
10000 step counts, and that the y-axis step count given was
5500 counts. The distance from the end of R4 to tip 1 is
10000 - 5500 = 4500 steps. This becomes the R~ value. To
compute R4, it will be necessary to know the value of 0~, as
illustrated in Fig. 105. The angle 02 is read directly from
the system. The corresponding rotation for tip 12 is also
given. By subtracting these two values, 0~ can be
determined.
The input to unload() includes a pointer to a
floating working array, arrt], a pointer to new_tablet], a
pointer to con_table[], and a rack number, either 1 or 2.
Besides converting the y-axis positions into R~
and R2, and computing ~" unload() is responsible for
building a working floating-point array specific to the
rack of interest. In the array are the values needed to
support future calculations. The values are gathered from
various locations and calculations and are stored in one
spot for ease of passing to other functions. Figs. 106a-c
illustrate the operations performed in unload().
To compute the R4 distance, equation 1 is used.
The R~, R2, and ~, values in equation 1 have already been
-
WO95/0~9 ~CT~S94/069~
2~s34~5
-56-
discussed. R3 is a constant which was measured from the
rack itself. See Fig. 104. Note that there is a + sign in
equation 1. By selecting R~ equal to the longer of the two
sides Rl and R2, the + sign becomes a - in all cases.
calc_r4() is responsible for performing this computation.
Fig. 107 illustrates this calculation. The remaining steps
to compute R4 are simple mathematical calculations. This
procedure is illustrated in Figs. 108a-b. calc_r4()
computes the distance r4 illustrated in Fig. 104. Equation
1 is used to compute r4. Note that ~, is illustrated in
Fig. 105.
r =_1 (r1+r2)~ (r2-rl) 2 (1 ICOS~1) 2+2r3 (1+COS~1)
4 2 sin~
Equation 1
By determining the longer side in software
between r2 and r" the + operator can be reduced to - for
Rack 1 and Rack 2 calculations. r2 must always be the long
side of the triangle, compared with r~. For RACK 1 and RACK
2, the distances R1 and R2 can be matched to equation
values r~ and r2 by using Fig. 107. The input to calc_r4()
includes a pointer to a working floating point array, with
variables stored for RACK 1 or RACK 2, and a pointer to a
structure holding rack limits for rows, columns, and tips.
Figs. lO9a-b illustrate the operation of
init_row(). This function calls calc_r4() and uses the
results to compute the angle ~6 illustrated in Fig. 110.
The angle ~6 is needed by calc_rowl(). Note that ~6 is
computed using equation 2 and illustrated in Fig. 110.
W095/~9 S3~15 PCT~S94/069
=180-arcsin(R2+r4)/R3~sin~
Equation 2
In the formula, R2 and R3 are known. r4 is computed using
calc_r4(). The angle ~ is computed before entry to
init_rowl(). The ~6 result is used by calc_rowl() as the
basis for computing coordinates for each tip location in
row 1. The input to init_rowl() includes a pointer to a
working floating point array.
The last preliminary step in tip coordinate
calculation is performed by calc_rowl(). To minimize the
propagation of errors though repeated calculations, the
coordinates of each tip in rowl are computed and used by
row_col() to compute locations in other rows. calc_rowl()
computes tip coordinates for tips 2-12 using equations 3-6.
Fig. 111 illustrates rackl with the angles defined for
computing tip2. calc_rowl() uses the known angles and
triangle sides from previous calculations to compute new
sides and angles for the triangles made from tips in rowl
and tipl. Fig. 111 illustrates the small triangle made
from the centers of tips 1 and 2, and the center of the
arm. Equations 3-7 are used to compute the coordinates of
tip2. All of the tips in row 1 are computed in the same
way. The main results is that the ~6 angle computed by
init_rowl() can be computed and stored for every tip.
These angles serve as the basis for computing other
coordinates at rows above rowl. Figs. 112a-b and 113a-b
illustrate the steps required to compute and store the ~6
angles. The input to calc_rowl() includes a pointer to a
working floating point array, and a pointer to a structure
holding row, column, and tip limits. Fig. 111 illustrates
an example to follow the steps to compute a tip position.
W095/~9 PCT~S94/069~
21S3415
-58-
To compute the r and y coordinates for every tip
in a rack, a base coordinate position is computed for the
12 columns using the tip location in rowl. These
coordinates are subsequently used by row_col() for every
location. calc_row() is responsible for computing an
angle, ~6, and a distance, r6, for each tip in row 12.
Refer to Fig. 111 for an illustration of the distance and
angle location for one tip. To compute an r6 distance (also
termed org_cc in the software), Equation 3 is used.
r6 ~(R1+r4) +I5 -2 (R1+I4) I5COS~6
Equation 3
R1 is known and r4 and ~6 have been computed before entry.
r5 is R3 divided by the total number of tip locations per
row, times the tip number less 1.
To compute ~6 for any rowl tip (called e6_cc in
the software) it is necessary to compute e, (also called
angle_b) so that the r coordinate of the system horizontal
position can be computed and angle_c can be computed.
angle_c can be computed based on the fact that the sum of
all 3 angles in a triangle is 180. Once angle_c is known,
~6 for the tip location can be computed by subtraction from
180.
=arcsin((r5/r6) sin~6)
Equation 4
~4 =~2 -~7
Equation 5
W095/~9 PCT~S94/069~
~l s ; -
-59-
angle c=180-THETA6 -~7
Equation 6
tip2=180-(angle c)
Equation 7
The final step in tip coordinate calculation is
to use the results from calc_rowl() to calculate all other
tip locations. row_col() does this in a loop, looking up
resources needed for calculations as it progresses from
row2, tipl to row8, tipl2. Fig. 114 illustrates an
example, computing the coordinates of tip23. Using the
stored ~6 value for tipll, it is possible to compute
angle_a. Because the distance from the origin to tip 11 is
known, and Rs is known, when used along with angle_a, the
distance from the origin to tip23 can be computed. When R4
is subtracted, the remaining distance is the normalized y-
axis coordinate. The angle_ccl for tipll is known for
init_rowl(). Because all of the sides of a triangle are
now known, and one angle, the angle designated angle_b can
be computed. This process is performed for every tip to
complete the calculations.
As part of row_col(), save_pos() is called to
store a computed Y and R tip coordinate in an image table.
A global count of the tips stored is used as an index into
the image tables. Before a tip can be stored, the position
must be checked against the tip positions permitted. Not
every tip in rack 2 is supported. The array pos_ok[] is
used for this purpose. For tips in rack 2, there must be a
- matching position in pos_ok[], or the tip is not stored.
Figs. 115a-b illustrate how save_pos() operates.
CAAL uses one basic technique for moving
information between memory and disk. There is a common
structure type that permits a description and the actual
WO 95/00829 PCT/US94/06940
,
341S ''''
--60--
data. The description permits the disk file contents to be
viewed and edited without reference to other documentation.
Both the data and description are stored in ASCII. By
specifying a RAM table address, a filename, and the number
5 of records to process, most of the CAAL data can be moved
using rd_table() and wrt_table(). See Figs. 116a-b and
117. The input to rd_table() includes a pointer to a
destination ram table, a pointer to the name of a source
disk file, and a number of records to read. Record length
10 must be less than 60 characters. The input to wrt_table()
includes a pointer to a ram table for source, a pointer to
a disk file name to write, and a number of records to
write.
CAAL ee_to_oldfile() is used to support command
15 line parameter 10. See Figs. 93 and 118a-b. The purpose
is to transfer the current system EEPROM 140 contents into
the file al_old. Only the parameters needed for
calibration are transferred. These are controlled by the
ctrl table[~ array which holds commands used to get the
20 data from the system.
CAAL images_to_ee and newfile_to_ee() are part of
the support for command line parameter 11. See Fig. 93.
After the calculations that compute all the system R, Y,
and Z coordinates are completed, images_to_ee() is used to
25 transmit the file data to the system. The calibration
points that are not calculated are in table al_new[]. The
function newfile_to_ee() is used to transmit the contents
of this file to the system. See Figs. ll9a-c, 120a-b,
121a-b and 122a-c.
CAAL dfile_to_new() is used to transfer the
nominal default parameters into the al_new file. The
default values are close to where the exact values will be
after calibration is completed. This provides a way to get
close to the final calibrated locations before any actual
W095/~9 PCT~S94/069~
-
-61-
calibration information is available for a particular
system/ES300 analyzer combination. See Figs. 93 and 123.
CAAL ofile_to_new() provides support for command
line parameter 13. When calibration begins, the "old" and
"new" information are made identical by use of this
function. As calibration proceeds, the new information
will change. However, if a section of data is not modified
by calibration it will need to be preserved. By starting
out with the old data, only part of the system may be
calibrated while still preserving the original, unchanged,
calibrations. See Figs. 93 and 124.
CAAL old_to_disp(), new_to_disp() are used to
support command line parameters 14 and 15. The calibration
data stored in each table can be displayed on the screen by
using the screen coordinates from ctrl_table[] and the
function video_out_line(). These functions are coordinated
with ZIM screens so that the old and new data actually fall
onto a ZIM template. See Figs. 93, 125 and 126.
The system uses some constants that need to be
loaded into the EEPROM 140. CAAL constants_to_eeprom()
performs this function. This is support for command line
parameter 16. See Figs. 93 and 127. The file al_constants
contains the data description, system command for
transmission, and the data all in one record. This
technique permits easier table updating to support new
parameters without having to change more than one file.
CAAL make_default(), make_constants(), and
make_images() provide support for command line parameters
50, 51, and 52. They are programmer's utilities and are
only used for convenience in making the first copy of the
files read by CAAL. Once the file is available, it can be
read and modified as needed. This first copy is produced
to avoid a missing file error. Should the CAAL data
structures change, the old versions of CAAL text files
should be discarded, and new ones built through the use of
W095/~9 PCT~S94/069~
2ls34l~
-62-
these functions. See Figs. 93, 128, 129 and 130. CAAL:
make_default() is a programmer's utility used for making a
copy of the first al_default file. CAAL: make-constants()
is a programmer's utility used for making a copy of the
first al_caal_parm file. CAAL: make_images() is a
programmer's utility used for making the first copies of
the r, y, and z image files.
CAAL save_old() supports command line parameter
10. CAAL save_old() will write the information contained
in old_tablet] into old_file. See Figs. 93, 118 and 131.
CAAL AL-Dispatch() transmits commands to the
system. Because the CAAL implementation of AL_Dispatch()
is identical in structure to the implementation in ALER,
the discussion of ALER can be consulted for an explanation
of the operation of AL-Dispatch(). For CAAL, the handling
type is set to 0 so that the trace will appear without the
asterisk as in normal operations. This is the only
difference between the CAAL and ALER implementations of
AL_Dispatch(). See Figs. 132, 133, 134a-b and 135-137.
CAAL: AL_Dispatch(), type E section is used for ES300
analyzer communications.
The task ALSC is a temporary task which is used
to pass messages from ZIM to ALPR. ALSC is started from
ZIM, and is passed one command line parameter. ALSC uses
this parameter to decide which message to pass to ALPR.
Table 5 lists all messages passed from ZIM to ALPR through
ALSC. ALSC terminates immediately after receiving a reply
from ALPR.
WO95/~g PCT~S94/069~
- 21S3~1S
.~ ,. ,, ~ ,.
-63-
Passed
Parameter Message to ALPR
1 Service Command Ready to be Sent
2 Begin Scan All Tubes Sequence
3 Begin Pipette Sequence
4 Interrupt Current Sequence
Continue Current Sequence
6 End Current Sequence
7 Connect to Autoloader
8 Disconnect from Autoloader
9 Start Sensor Test
Table 5
Racks 1 and 2 and their relationship to the rest
of the system can further be appreciated by referring to
Figs. 1 and 138. As best illustrated in Figs. 3, 5, 139
and 140, tube racks 300, each carrying from one to ten
tubes 304 are placed on the shuttle 302. The shuttle motor
195 is activated during the scan operation and the racks
300 with their tubes 304 are sequentially carried into
positions in front of the barcode reader 151 slot opening
310 in the shuttle 302 sidewall. The motion of racks 300
is achieved by the engagement of pins 312 on fifteen drag
links 314 uniformly spaced along a drive chain 316. The
racks 300 are provided with downwardly facing openings 318
for engagement by the pins 312. During initial set-up of
the system, the rack and tube position encoder 225 which is
driven from the shuttle 302 through a transmission is
adjusted so that its flag 320 breaks the light path through
optical switches 223-R and 223-1--223-10 as the barcodes
W095/~9 PCT~S94/069~
2153415
-64-
322-R and 322-1--322-10 of the racks 300 and any tubes 304-
1--304-10, respectively, that they carry reach positions
directly in front of opening 310. The barcode reader 151
is thus able to transmit through connector 152 and
connector 154 to PC 153 all of the rack 300 and patient
identities codified on the barcodes on rack 300 and tubes
304.
Once all of this information has been entered
into PC 153, pipetting can begin. Arm 20 and the pipette
chuck carriage 324 movably supported by bearings 325 on arm
20 are manipulated by the R, Z and Y motors 183, 185 and
197 over the location of a pipette tip 11 in one of rack 1
or rack 2. The Z motor 185 is actuated to lower arm 20
until the pipette chuck 326 engages the pipette tip 11. A
microswitch (not shown) with which pipette chuck 326 is
equipped senses, through amplifier 90, force applied by arm
20 to the pipette tip 11. An O-ring 328 with which chuck
326 is provided, helps seal the air circuit 14, while at
the same time facilitating fitting and ejection of pipette
tips 11. The Z motor 185 is actuated to raise arm 20 above
the level of tube racks 300 and the work surfaces of the
analyzer 155. The syringe pump 10 is filled with air. The
R and Y motors 183, 197 run to position the pipette chuck
326 with its tip 11 over a tube 304 from which a sample is
to be taken for testing. The Z motor 185 is then actuated
to lower the chuck 326 and tip 11. At the same time,
syringe pump 10 pumps air from circuit 14 through tip 11.
When transducer 12 detects a slight increase in the
pressure in circuit 14 by virtue of the proximity of the
surface 16 of the specimen 18 in tube 304, the Z motor 185
is stopped. The remaining air is pumped from syringe pump
10. The Z motor 185 is then actuated to immerse the
pipette 11 below the surface 16 of specimen 18 a distance
equal to 200~L divided by the cross-sectional area of tube
304 transverse to its cylindrical axis. Syringe pump 10
W095/~9 1$3~5 PCT~S94/069~
-65-
then aspirates into tip 11 200~L of the specimen 18. If a
test to be run on this specimen requires a larger volume,
the Z axis motor is then actuated to advance tip 11 a like
distance into tube 304 and the syringe pump lo aspirates
another 200~L of the specimen, and so on. The volume is
limited to lOOO~L, the capacity of tips 11 in the
illustrated embodiment. This procedure minimizes the
wetting of the pipette tip with the specimen 18. After an
appropriate sample volume has been aspirated into the
pipette 11, the Z axis motor 185 is actuated to raise the
pipette 11 clear of all work surfaces and tubes 304. Then
the R and Y axis motors 183, 197 are actuated to position
the sample-containing pipette over a test cup 338 on the
ES300 analyzer rotor 340.
The Z axis motor 185 is actuated. The Z axis
motor runs until the pipette 11 reaches the elevation where
it should find the bottom of the test cup 338 and open the
microswitch on the input terminals of amplifier 90. If the
microswitch does not open, the system interprets this as
the absence of a test cup and does not dispense the sample.
Contamination of the rotor 340 is avoided. If the
microswitch does open, the system interprets that opening
as the presence of a test cup 338. The sample contained in
tip 11 is dispensed into the test cup 338. The Z axis
motor 185 is then actuated to raise the pipette tip 11
clear of any work surfaces. The R and Y axis motors 183,
197 are actuated to move the pipette tip 11 over the tip
removal station 342. The R and Z axis motors 183, 185 are
then manipulated to pull the spent tip 11 from the chuck
326 in order that the spent tip 11 can be dispensed of, and
the system returns to get another tip 11.
If a test to be run in a test cup 338 requires
more than lOOO~L of sample, up to 2000~L, the R and Y axis
motors 183, 197 are actuated to move the pipette tip 11
back over the tube 304 from which the previous sample was
WO9~/~9 PCT~S94/069~
2ls34l5
-66-
withdrawn and the Z axis motor 185 is actuated to lower the
pipette tip into the sample. Again, as before, the syringe
pump 10 is actuated to expel air from the circuit 14 during
this process so that the level 16 of the specimen 18
remaining in tube 304 can be sought. Once level 16 is
found, the Z axis motor 185 is again actuated to lower the
pipette tip 11 in 200~L increments into specimen 18 and
aspirate the sample in 200~L increments until sufficient
sample to complete the volume requirement of the test cup
338 is aspirated. Then the Z axis motor 185 is actuated so
the pipette 11 will clear the work surfaces and tubes 304,
and the R and Y motors 183, 197 are actuated as before the
put the pipette tip 11 over the test cup 338. The Z axis
motor is actuated to return the tip 11 to the level of the
sample in the test cup, which level has been saved in
software. The sample is then dispensed into the test cup
338. The Z axis motor 185 is then actuated so that the
pipette 11 will clear the work surfaces, and the R and Y
axis motors 183, 197 are actuated to move the pipette tip
11 over the tip removal station 342. The R and Z axis
motors 183, 185 are then actuated to pull the spent tip 11
from the chuck 326, and the system returns to get another
tip 11.
The manner in which R, Z and Y axis motor 183,
185, 197 is transmitted to the chuck 326 can best be
understood by referring to highly diagrammatic Figs. 142
and 143. The R axis motor 183 is coupled 340 to the column
342 in such a manner as to rotate the column 342 about its
axis 344. A column rotation encoder wheel 346 is coupled
to the bottom end of the column, so that the signals
transmitted to inverters 184-11, -13 and -14 are
representative of column 342 rotation. Column 342 also is
slidably mounted to move axially. A lead screw 352 coupled
354 at its lower end to Z-axis motor 185 engages threads
provided within column 342, for example, by an acme nut
W095/0082g PCT~S94/06940
_,
2ls3~ls
-67-
(not shown) in column 342. Rotation of lead screw 352 is
detected by an encoder wheel 356 coupled to lead screw 352,
so that the signals transmitted to inverters 184-3, -15 and
-16 are representative of column 342 projection along the Z
axis.
The Y axis motor 197 illustratively is a
Portescap US, Inc., type MD162R16M18-210-D16-54-XX motor
which has a built-in encoder. Motor 197 drives carriage
324 through a toothed flexible belt 364 trained about a
toothed drive wheel 366 on the motor 197 output shaft and a
toothed idler wheel 368 rotatably mounted at the remote end
of arm 20. Belt 364 is cut and the resulting free ends
trained about toothed belt 364 tensioners 370 mounted on
carriage 324.