Note: Descriptions are shown in the official language in which they were submitted.
2161~U2
i
RESILIENT BAFETY BARRIER
FIELD OF THE INVENTION
The present invention relates generally to safety barriers,
railings, and supports incorporating mountings that will absorb
substantial impact without permanent deformation. More
specifically, the present invention relates to barriers,
railings, and supports that will, on a continuing and reliable
basis, without frequent repair or replacement, protect personnel
from injury and plant and facilities from damage.
BACKGROUND OF THE INVENTION
Almost every dangerous curve on a highway has some sort of a
crash barrier or guardrail intended to keep an out-of-control
vehicle on the highway right-of-way. After a crash, such a
barrier is often sufficiently damaged to require repair in order
to restore its strength to try to save the next unlucky driver.
Most factories that have indoor vehicular traffic have crash
barriers to confine the vehicles to designated paths and to keep
them out of areas where they are not wanted. Unless such a
barrier has been exceedingly overdesigned for the weight and
expected speed of the vehicles used in the factory, in time the
barriers will become bent, twisted, loose from the factory floor,
and otherwise deformed so as to impair their appearance and
probably even impair their effectiveness.
Hand railings and other edge supports are usually placed on
stairwells and ramps for the support and safety of pedestrians
using those facilities. If hand trucks and perhaps larger
vehicles also use those facilities, the railings, etc., must
either be seriously overdesigned for pedestrian purposes or will
in time become bent and deformed from impacts by the much
heavier, and less yielding wheeled vehicles.
DUR 1\F:\DOCS\WGD\INTELLEC\72118 5
Therefore, what is needed is a low-cost barrier, guardrail, or
hand railing system which can receive and shrug off, without
permanent deformation, the inevitable, occasional impacts from
vehicles, without the need for massive overdesign of the barrier
system, while maintaining a clean and neat appearance.
SUMMARY OF THE INVENTION
The present invention contemplates a resilient safety barrier
that is resiliently supported on a base of some sort comprising a
barrier member with the resilient support having a perimeter
calculated to resiliently support the perimeter of the barrier
member, and the barrier member being biased toward the resilient
support and the base, so as to allow limited, non-destructive,
shock-absorbent movement of the barrier member with respect to
the base.
The present invention further contemplates a resilient mounting
for a barrier rail on at least two support members, with a rail
member extending substantially between the two support members, a
resilient material located between the rail member and each
support member, so as to allow limited, non-destructive, shock-
absorbent movement of the rail member relative to the support
member, and with a clamp for squeezing the resilient gasket
between the rail member and the support member.
The present invention also contemplates a resilient mounting for
a post structure on the surface of a base which includes a
plurality of peripherally-arranged fastening facilities, with a
plurality of peripherally-arranged fastening means also
associated with the post, and a plurality of individual resilient
bushings supporting the post, each such bushing associated with
one of the plurality of peripherally-arranged fastening
facilities associated with the base and with one of the plurality
of peripherally-arranged fastening means associated with the
post, so as to allow limited, non-destructive, shock absorbent
movement of the post with respect to the base.
DUR 1\F:\DOCS\WGD\INTELLEC\72118 5 -
CA 02161202 2003-03-03
'the present invention further contemplates a resilient mounting
for a barrier rail on at least two upright support members, with
a rail member extending substantially between the two upright
support members, a resilient gasket located between the rail
member and each upright support member, so as to allow limited,
non-destructive, shock-absorbent movement of the rail member
relative to the upright support member, and with a clamp for
squeezing the resilient gasket between the rail member and the
upright support member.
The invention in one aspect provides a resilient mounting for a
guardrail comprising at least two support members, a rail member
extending substantially between the two support members, a
resilient member at each end of the rail member and separating
the rail member from each support member, and means for clamping
the resilient member to the rail member.
Another aspect of the invention provides a resilient mounting for
a guardrail comprising at least two support members, a rail
member extending substantially between the two support members
with a resilient member at each of the rail member and separating
the rail member from each support member. Means is provided for
squeezing the resilient member against the rail member and for
drawing the resilient member toward the support member, and
fractionally drawing the associated end of the rail member with
it.
Still further the invention comprehends a resilient safety
barrier with a barrier member having an end that is resiliently
supported on the surface of a base, comprising a block of
resilient material for flexibly supporting the end of the barrier
member on the base and having a shape approximately that of the
end of the member, a perimeter approximately the size of the
barrier member, with the end of the barrier member supported by
- 3 -
CA 02161202 2003-03-03
the block of resilient material at substantially the perimeter of
the block of resilient material, and a surface by which the block
rests on the base. A resilient fastener biases the barrier
member and the block of resilient material toward the base, so as
to allow limited, non-destructive, shock-absorbent movement of
the barrier member with respect to the base. At least one rail
extends from the member to another, similar member, and means
resiliently mount the rail to the barrier members.
BRIEF DESCRIPTION OF THE DRAWINGS
A more complete understanding of the present invention will be
had from the following detailed description when considered in
conjunction with the accompanying drawings, wherein the same
reference numbers refer to the same or corresponding parts shown
throughout the several figures, in which:
FIG. 1 is an elevation of an upright barrier member shown
partially cut away in cross section to illustrate the mounting of
rails to the barrier member and the resilient support on which
the barrier member is mounted to a base;
FIG. 2 is an alternative arrangement for mounting the barrier
member to the resilient support;
FIG. 3 is another alternative arrangement for mounting the
barrier member to the resilient support;
FIG. 4 is a partial view, in cross section, of the barrier member
of FIG. 1 but showing a top resiliently held onto the barrier
member;
FIG. 5 is a detail, in cross section, of an alternative top held
in an alternative manner to the barrier member;
- ;i A -
2161202
FIG. 6 is a partial cross sectional view showing one way to hold
a rail to the barrier member;
FIG. 7 is a partial cross sectional view showing another way to
hold a rail to the barrier member;
FIG. 8 is a cross sectional view taken along line 8-8 of FIG. 7;
FIG. 9 is an elevational view in cross section of a lightweight,
resilient post-mounting structure;
FIG. 10 is a detail view of a collar used for flexibly mounting a
post, with a fragment of the post shown in cross section;
FIG. 11 is a view, taken along line 11-11 of FIG. 10;
FIG. 12 is a partial cross sectional view showing yet another way
to hold a rail to a barrier member;
FIG. 13 is a view in cross section, taken along line 13-13 of
FIG. 12;
FIG. 14 is a cross sectional view showing still another way to
hold a rail to a barrier member;
FIG. 15 is a cross sectional view showing yet another way to hold
a rail to a barrier member;
FIG. 16 is a cross sectional view, taken along lines 16-16 of
FIG. 17, showing still yet another way to hold a rail to a
barrier member; and
FIG. 17 is a cross sectional view, taken along lines 17-17 of
FIG. 16, showing how the end of a rail and its attachment to a
barrier member would look from inside of the barrier member.
DETAILED DESCRIPTION OF THE PREFERRED EMBODIMENT
DUR 1\F:\DOCS\NGD\INTELLEC\72118 5 -
2161202
Referring now to the drawings and particularly to FIG. 1, an
upright, steel support member or barrier 20 of cylindrical shape
is shown partially broken away in cross section. Two circular
steel barrier rails or guardrails 22 are also shown, one shown in
cross section. The guardrails 22 extend between the barrier 20
and another, similar barrier, not shown.
The bottom end of the upright support member or barrier 20 is
preferably bent or otherwise formed inward to include a circular
lip 24. A circular block 26 of an elastomer such as resilient
urethane is preferably molded around the bottom end of the
barrier 20 and the lip 24 with approximately the same circular
shape as the barrier 20. The bottom of the urethane block is
shaped flat so as to rest on a suitable base 30, usually of
concrete or other paving or flooring material.
While urethane is preferred, any resilient material with
advantageous mechanical properties and a strong resistance to
taking a permanent set under stress can be used.
A domed steel plate 34 is preferably molded into the inside of
the urethane block 26. A central hole 35 in the plate 34
accommodates a mounting bolt or stud 36 that is rigidly anchored
into the base 30. The central hole 35 in the plate 34 is made
slightly oversize for the stud 36, in order to allow manual
adjustment of the barrier 20 and to accommodate manufacturing and
installation tolerances.
While the domed plate 34 is shown molded into the inside of the
urethane block 26, alternatively, a step could be formed in the
inner, upper perimeter of the block 26; and the domed plate 34
could be nested into that step.
One or more (preferably three) spring washers 38 are placed
around the stud 36 and on top of the plate 34. These spring
washers 38 are generally dome-shaped and are compressed when,
during installation of the barrier 20, a nut 40 is tightened onto
DUR 1\F:\DOCS\uGD\INTELLEC\72118 5 ' S
2161202
the stud 36, in order resiliently to apply a substantial downward
force on the plate 34 and thus hold the barrier in place. The
pile-up of spring washers 38 is made by putting each spring
washer in an alternating orientation as they are placed down
about the stud 36.
Thus, the first spring washer 38 is placed in an orientation so
that its periphery contacts the plate 34. This orientation of
the first spring washer 38 has the advantage of having the
periphery of the spring washer 38 extend beyond the oversize
perimeter of the hole 35. The second spring washer 38 is then
placed upside down with respect to the first spring washer and on
top of the first spring washer, with the edge of its central
aperture touching the edge of the central aperture of the first
spring washer. Then the third spring washer 38 is oriented just
like the first spring washer and is placed down on top of the
second spring washer with the outer peripheries of the second and
third spring washers in contact. In this way, the tightening of
the nut 40 partially compresses the three spring washers 38 and
forces or presses the plate 34 down and thus yieldably holds or
biases the barrier 20 and the block 26 down to the floor or base
30.
If the base 30 is slightly uneven, such that the barrier 20 would
stand tipped slightly to one side, the installer can move the
barrier toward the lower side of the base 30, using some of the
oversize diameter space allowed in the hole 35 through which the
stud 36 extends. Then, when the nut 40 is tightened, the
downward pressure is applied more strongly on the uppermost or
higher side of the urethane block 26. That tends to compress the
higher side of the urethane block 26 more than its lower side.
That differential compression of the urethane block 26 tends to
straighten the barrier 20, bringing it into a more vertical or
plumb condition.
The barrier 20 is preferably made from a length of common steel
pipe of sufficient diameter and thickness to do the job. It is
DUR 1\F:\DOCS\u~D\INTELLEC\72118 5 - 6
~1~1~~~
preferred that a standard, stock size of pipe be used and cut to
the desired length. Therefore, preferably, the upright barrier
20 is open at the top in order to provide access to the inside of
the barrier for on-site assembly and installation. However, the
barrier 20 should preferably be capped for safety and
cleanliness, as a final step in the on-site assembly process.
Preferably, a cap 44 of pressed steel, molded thermoplastic
rubber or any other crack-resistant, sturdy material can be
mounted on the top of the upright support member or barrier 20 in
order to protect anyone casually touching the barrier and to keep
out dirt and moisture. Any removable mounting can be used for
the cap 44. FIGS. 4 and 5 show two preferred mountings for a cap
44 and will be explained in greater detail hereinafter.
If the barrier 20 is struck by a vehicle, it will yield under the
impact. The steel barrier cylinder 20 will not noticeably BEND
under the impact so much as the barrier cylinder 20 will ROCK and
squeeze the far side of the resilient, elastomeric urethane block
26, which will act as a high-hysteresis spring and absorb the
energy of impact. The spring washers 38 will also yield slightly
as the plate 34 rocks, so as to accommodate the selective
squeezing of the block 26 that results from an impact. All of
this is calculated to let the barrier resist the impact but yet
yield under the impact without permanent deformation.
The barrier 20 can be either painted, galvanized, electroplated,
or covered by slipping a molded plastic cover over it, in order
to reduce rust and defacing of its surface that would inevitably
result from numerous impacts from vehicles.
The barrier 20 can stand alone to protect a corner or can be one
of many vertical barriers used to protect a wall or line.
Alternatively, the barrier 20 can be linked to another barrier,
not shown, by a pair of guardrails 22 which provide a continuous
barrier to traffic and thus protect a wall or line without
DUR 1\F:\DDCS\uGD\INTELLECV2118 5 - 7 -
2161202
necessitating an unreasonable number of individual vertical
barriers.
The guardrails 22 can also be resiliently mounted to the barrier
20, as shown in FIG. 1. Preferably, the guardrails 22 are made
of circular steel pipe of standard, off-the-shelf size and wall
thickness. A stepped urethane gasket or plug 50 is slipped into
each end (only one end shown) of the guardrail 22. Each plug 50
has a central hole which accommodates a rod or shaft 54, which
extends into the interior of the barrier 20. The shaft 54 has
threads at least at each end thereof for cooperating with a nut
56 which pulls on the two barriers 20 that support the ends of
the guardrail 22 and compresses the gasket or plug 50 at each end
of the guardrail 22.
The on-site installation of the barrier 20 and guardrails 22 (if
fitted to the barrier 20) can preferably be done with the cap 44
off of the cylindrical barrier 20 and then mounted on the barrier
20 as one of the final steps in the on-site installation.
Therefore, all of the internal assembly, such as tightening the
nuts 40 and 56, can be done through the open top of the barrier
20, before the cap 44 is installed.
Alternatively, but not preferred, the cap 44 can be either
integrally formed with the cylindrical barrier 20 or can be
welded to the cylindrical barrier 20 at the factory and
preferably not welded on site but possibly welded on site. If
the cap 44 is an integral part of the barrier 20, either by
integral forming or by welding, as it is delivered to the
installation site, access should be provided for tightening the
installation nuts 40 and 56 on site. Therefore, an access
opening (not shown) can be provided on the side of the barrier 20
opposite from the expected impacts, with machine screw or other
fasteners for closing the door of the access opening.
When a guardrail 22 is struck by a vehicle, not only does the
upright support member or barrier 20 yield under the impact, by
DUR 1\F:\DOCS\uGD\INTELLEC\72118 5 -
2161202
reason of the block 26; but the gasket or plug 50 also yields
slightly in order further to absorb the energy of impact.
ALTERNATIVES
Referring now to FIG. 2, if production volume is not adequate to
justify tooling to form the lip 24 at the lower end of the
barrier 20, the plate 34 can be welded, for example at a weld
bead 60, onto the inside of the bottom or lower end of the
barrier 20. The plate 34 can be a flat circle and need not be
domed. Also, the weld bead 60 can be either on the top or on the
bottom of the plate 34, although the bottom might be easier and
thus cheaper. Without the need to mold the lip 24 and the plate
34 (FIG. 1) into the urethane block 26, the urethane block 26 can
be cut and minimally shaped from flat, but thick, urethane stock.
The base 26 can be cut with a shelf 62 to support the plate 34
and the barrier 20 and to accommodate the weld bead 60, if
necessary. The bottom end of the barrier 20, together with the
perimeter of the plate 34 and perhaps also with the weld bead 60,
thus also constitutes a shelf which rests on the shelf 62 that is
formed on the resilient mounting support or block 26.
Referring now to FIG. 3, if production volume is adequate to
justify significant tooling, the lip 24 at the bottom of the
barrier 20 can be formed into a plurality of lips 24 bent in
alternate directions around the periphery of the bottom end of
the barrier 20, much like the teeth of a saw are "set" to
alternate sides of the blade.
Referring now to FIG. 4, the center and one side of the barrier
20 are shown in cross section with an example of a molded cap 44
of thermoplastic rubber. In order to removably hold the cap 44
in place on top of the barrier 20, a hole 70 is preferably formed
in a web or boss on the inside of the cap 44. A hook or a cut or
"jump" ring 72 (not shown in cross section, for clarity) is
passed through the hole 70 and preferably through a hole 74 in
the top end of a resilient rubber tarp strap or "bungee" strap
76. Another hook or jump ring 78 is passed through a hole 80 at
DUR 1\F:\DOCS\uGD\INTELLEC\72118 5
2161202
the bottom end of the resilient strap 76 and through a hole 82
formed near the top end of the stud 36. Alternatively, a loop or
an eye can be formed at the top end of the stud 36 or can be
welded, screwed on, or otherwise formed on the top of the nut 40.
If a hook or a cut or jump ring 72 and 78 is cut or open at one
point in its circumference, the entire load that it carries
resolves to a bending stress that is at a peak on the side of the
ring opposite from the cut. Therefore, the rings 72 and 78
should be designed accordingly. Such cut or jump rings are
commonly used, albeit on a much smaller size scale, in the
jewelry art. The hooks or jump rings 72 and 78 can be installed
on site or can be factory installed with the last connection to
the hole 82 being done on site. It will be evident to one
skilled in the art that there are any number of alternate ways
resiliently to hold the cap 44 to the barrier 20.
FIG. 5 shows, in fragmentary cross section, an alternate cap 44,
in the form of a steel dome, and means for holding it in place.
A plurality of angle irons 90 are riveted around the inside edge
of the cap 44 in the factory using rivets 92 having flat,
recessed heads in countersunk holes on the exposed surface of the
cap 44. The other arm of each angle iron 90 has a threaded hole.
Flat-head machine scxews 94 extend through countersunk holes
around the top end of the barrier 20 to fasten the angle irons 90
and thus the cap 44 to the top end of the barrier 20
FIG. 6 shows in cross section an alternate embodiment of the end
treatment of the guardrail 22. Instead of the rod or shaft 54
(FIG. 1) with threaded ends and a nut 56 to tension the shaft 54,
a larger central hole is formed in the gasket or plug 50 and a
pipe or tube 100 - the functional and structural equivalent of
the rod or shaft 54 - passes through the plug 50. With a tube
100 of larger diameter than the shaft 54, significantly higher
friction can be achieved between the plug 50 and the tube 100
than is possible with the shaft 54. Therefore, it is more
feasible to preassemble at the factory a plug 50 in each end of
DUR 1\F:\DOCS\NGD\INTELLEC\72118 5 - 1 O -
2161202
the guardrail 22 with the tube 100 firmly pressed into both plugs
to hold them tightly in place. That subassembly can then be
shipped to the assembly or job site with little fear that it will
fall apart. The tube 100 is preferably on the order of a steel
water pipe with either a galvanized or black oxided finish and
internal threads formed at each end.
Consequently, at the assembly or job site, the guardrail 22
subassembly is placed into position between two barriers 20 and a
bolt 102 is inserted through a hole in each barrier and threaded
into each internally threaded end of the tube 100. In this way,
the two barriers 20 don't have to be forced apart to allow the
insertion of the ends of the shaft 54, which must be a bit longer
than the distance between adjacent barriers.
FIGs. 7 and 8 show in cross section another alternative
embodiment for holding the guardrail 22 to a barrier 20. The
purpose of this embodiment is to obviate the long shaft 54 (FIG.
1) and the long tube 100 (FIG. 6). The whole idea is to grip the
inside of each end of the guardrail 22. In this embodiment, the
plug 50 is shaped with preferably six slots 106 (see FIG. 8)
extending axially part way from the end of the plug 50 that is
inside of the guardrail 22. At least one (but preferably three)
hard steel slugs 110 are placed into each slot 106. The slugs
110 are long enough so that they will always be at an acute angle
with respect to the axis of the guardrail 22. An inner edge of
each slug bears against the unthreaded portion of a bolt 112 that
extends out through the end of the guardrail 22 and the plug 50
and into the interior of the barrier 20. The slots 106 are just
a bit smaller than the width of the slugs 110 so as to
frictiona~ly capture and hold the slugs in place.
At the assembly or job site, the slugs 110 are pressed into the
slots in the plug 50, around the bolt 112, to form a subassembly.
That subassembly is then pushed into the end of the guardrail 22,
with the bolt 112 loosely in place or even pushed slightly into
the plug 50 so as not to cause the slugs 110 to bind as they are
DUR 1\F:\DOCS\WGD\INTELLEC\72118 5 - 1 1 -
2161202
eased into the end of the guardrail 22. When the plug 50 is as
far into the end of the guardrail 22 as it should go, the bolt
112 is pulled tight to set the slugs, as shown in FIG. 7, into
engagement with both the inside of the guardrail 22 and the
unthreaded portion of the bolt 112. The bolt 112 can still be
pushed in and out slightly to allow easy assembly of the
guardrail 22 to the barrier 20.
When in place between two barriers 20, the threaded end of the
bolt 112 is pulled into the interior of the barrier 20 and the
nut 56 is threaded onto the bolt 112. The bite of the slugs 110
against the bolt 112 keeps it from rotating while the nut 56 is
tightened, drawing a washer 114 on the head 116 of the bolt 112
against the slugs 110, wedging them into place, which causes the
slugs 110 to bite into the interior surface of the guardrail 22
which prevents their axial movement out of the guardrail 22. If
the bolt initially tends to rotate with the nut 56, a screwdriver
slot can be formed at the threaded end of the bolt 112 to enable
the assembler to keep the bolt 112 from rotating until the
wedging action of the slugs 110 comes into play to apply great
gripping force on the bolt 112.
The slugs 110 are preferably inexpensive, rectangular chunks of
steel. While not fully shown in FIG. 7, the edges of the slugs
110 are not curved but are squared off, as more nearly
illustrated in FIG. 8, where the slugs 110 meet the inside
surface of the guardrail 22. Therefore, each slug 110 actually
meets that inside surface of the guardrail 22 only at two points.
Similarly, each slug 110 actually meets the unthreaded portion of
the bolt 112 at only one point.
The inside diameter of the guardrail 22, the unthreaded portion
of the bolt 112 and the slugs 110 are all sized such that the
slugs 110 are all oriented much as shown in FIG. 7, whether
tighten into place or just barely touching each other. Each slug
110 touches the inside of the guardrail 22 at one of its edges.
DUR 1\F:\DOCS\WGD\INTELLEC\72118 5 - 1 2 -
21612p2
That slug 110 also touches the unthreaded portion of the bolt 112
at the diagonally opposite edge of the slug 110 (see FIG. 7).
Once installed in the guardrail 22, an imaginary diagonal line
along the side of the slug 110 that extends between those two
diagonally opposite edges should never be allowed to be
perpendicular to the axis of the guardrail 22. That imaginary
diagonal line should preferably be about ten degrees from the
perpendicular.
While a pipe is an inexpensive and convenient structure for the
guardrail 22, it will be evident that tubing of square or
rectangular or any other suitable cross section can be
equivalently used. Also, it will be evident that the ends of the
guardrail 22 can be either squared off or can be curved on top
and bottom to define a more uniform spacing between the ends of
the guardrail 22 and the outside of the upright barrier 20.
While not specifically illustrated in FIGS. 6, 7, and 8, it will
be evident to one skilled in the art that an equivalent of the
clamping means shown in those three figures could strongly expand
the portion of the urethane plug or gasket 50 within the inside
of the guardrail 22 so as firmly to grip by friction the inside
of the guardrail 22. For example, a frustoconical, 3-D wedge nut
at the end of the plug 50 inside of the guardrail 22 could be
internally threaded to cooperate with the threads of the bolt 102
so as to press inwardly at that inside end of the plug 50 as the
bolt 102 is tightened, thereby tending strongly to expand that
inside end of the plug 50 as well as biasing outwardly the entire
length of the plug 50 within the guardrail 22. In may even be
useful to either insert or mold into the plug 50 a second
frustoconical wedge, with a clearance hole to accommodate the
bolt 102. That second frustoconical wedge could be arranged in
the reverse direction from the first wedge and located at or near
the end of the plug 50 that is nearest to the upright barrier 20.
The result would be even stronger expansion and pressing by the
plug 50 on the inside surface of the guardrail 22.
DUR 1\F:\DOCS\WGD\INTELLEC\72118 5 - Z
_ 2161202
The inside of the guardrail 22 can be coated with epoxy or other
material to enhance the frictional grip of the elastomeric or
urethane plug 50 on the inside of the guardrail 22. As an
alternative, the resilient elastomeric plug 50 can even be bonded
to the inside of the guardrail 22.
In order to enhance the resilience of the mounting of the
guardrail 22 to the upright barrier 20, the clearance hole formed
in the upright barrier 20 in order to accommodate the bolt 102
can be made larger than the minimum size necessary to accommodate
the bolt 102. Then an elastomeric, eg., urethane, spacer can be
placed in the bolt clearance hole, around the bolt 102 and
between the head of the bolt 102 and the inside of the upright
barrier 20.
It will be evident to one skilled in the applicable art that all
of the embodiments disclosed for attaching the rail member or
guardrail 22 to the upright support member or barrier 20
constitute some form of clamp for squeezing the resilient gasket
or plug 50 between the guardrail 22 and the barrier 20.
While a resiliently-mounted upright barrier 20 has been disclosed
herein with respect to a plurality of guardrails 22 between
adjacent upright barriers, it will be recognized that one or more
guardrails 20 could be installed in a free-standing condition,
without any guardrails 22 between them. Also, any number of
guardrails 22 can be used, besides the two shown.
LIGHTWEIGHT EMBODIMENT
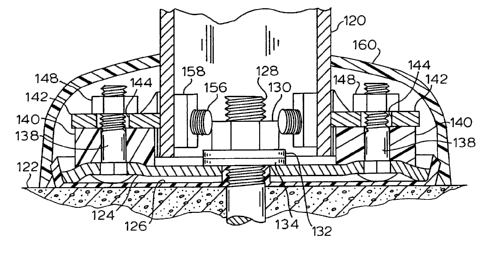
Referring now to FIG. 9, a lightweight resilient barrier support
is shown for such uses as resiliently supporting hand railings
along a pedestrian concourse or other passageway. A post 120
extends up from the area of the floor or base 122 which can be
concrete or other material as in the case of the base 30 of FIG.
1. A base plate 124 rests on a resilient isolator pad 126,
thereby locating the base plate 124 slightly above the base 122.
DUR 1\F:\DOCS\WGD\INTELLEC\72118 5 - 1 4 -
2161202
The base plate 124 and the isolator 126 have a central hole at
least large enough to accommodate a stud 128 that is firmly
anchored into the base 122. A nut 130 is threaded onto the stud
128 and is tightened to bear down on a steel washer 132 which in
turn bears down on a resilient washer 134 (not shown in section)
that presses the base plate 124 onto the isolator 126 and holds
the base plate 124 firmly but with a slight resilience over the
base 122.
The central hole in the base plate 124 is preferably somewhat
larger than necessary to accommodate the stud 128. A portion of
the resilient isolator 126 extends up through the central hole in
the base plate 124, between the material of the base plate 124
and the stud 128 for resiliently locating the base plate 124
laterally with respect to the stud 128. The use of the resilient
isolator pad 126 and the resilient washer 134 allow a little bit
of impact-absorbing movement of~the base plate 124 and with it
the post 120, but not enough movement for purposes of the present
invention.
Four square holes placed at 90-degree positions about the base
plate 124 accept and hold four carriage-type bolts 138 that
extend upward from the base plate 124. A thick, resilient
urethane block or bushing 140 (not shown in section), of
preferably about 90-95 durometer stiffness, is placed around each
of the four bolts 138 and on top of the base plate 124. A post
support plate 142 (see FIGS. 10 and 11) rests on top of the four
bushings 140, with the four bolts 138 extending through four
holes 144 in four ears 146 on the support plate 140. A nut 148
is threaded onto each of the four bolts 138 and tightened down to
squeeze the resilient bushings 140 between the support plate 142
and the base plate 124. It will be evident to one skilled in the
art that a single, large resilient urethane block having the
necessary four holes therein can be used in place of the four
bushings 140.
DUR 1\F:\DOCS\uGD\INTELLEC\72118 5 - 1 5 -
2161202
The ears 146 on the support plate 142 are all in the same plane
(see FIG. il). The support plate 142 has a large central hole
150 large enough to accommodate the outside diameter of the post
120. There are four webs 152 between the four ears 146 (see
FIGS. 10 and 11). The webs 152 are twisted so as to expose a
slightly curved, interior surface that preferably engages the
exterior of the post 120 (see FIG. 9). There is a hole 154 in
each web 152. As shown in FIGS. 9 and 10, four bolts 156 extend
through the holes 154 in the webs 152 and through matching holes
in the post 120 - a fragment of which is shown in cross section
in FIG. 10 - and are threaded into square nuts 158 on the inside
of the post 120. The post 120, with the bolts 156 and the nuts
158, are preferably assembled to the support plate 142 before
putting the support plate on the four bushings 140.
Preferably, the support plate 142 and the post 120 can be bolted
together at the factory. However, if they are to be shipped
separately to the installation site, preferably, there is a
slight interference or press fit between the large central hole
150 and the outside diameter of the post 120. The interference
fit should be loose enough to allow easy on-site assembly to
bring the bottom of the support plate 142 even with the bottom of
the post 120 by light tapping with a mallet or tapping of the
post and plate on the base 122. However, the interference fit
should be tight enough to hold the plate 142 tightly enough to
the post 120 so that four holes can be drilled in the post 120 in
direct alignment with the holes 154 in the webs 152, using the
holes 154 as guides for free-hand drilling.
If the material of the support plate 142 is too thick for easy
forming or for cost and scrap saving on low-volume production,
the support plate 142 can be fabricated from four pieces of
thinner strip that would then be spot welded together. For
example, each strip would be the width of the ear 146. Each
strip would be twisted (and holes punched) to form a single web
152 in the center with an ear 146 on each end. The two ears 146
would be 90 degrees apart, and the two ears would be offset by
DUR 1\F:\DOCS\41GD\1NTELLEC\72118 5 - 1 6 -
z~s~~o
the thickness of the material. After electroplating for
corrosion resistance, four such strips would be arranged in a
spot welding jig. The web 152 of each strip would be 90 degrees
away from its neighbor and the offset ears 146 from adjacent webs
152 would overlap. For example, the ear from the web to the
right would be above and would overlap the ear from the web on
the left, in each case. Then, the ears would be spot welded to
the extent necessary in order to achieve the desired cantilever
beam strength of each ear 146.
In order to get the post 120 to stand vertically or plumb, the
nuts 148 are selectively tightened to bias the support plate 142
in two directions.
A dust cover 160 of urethane or some other type of rubber can be
snapped over the entire structure shown in FIG. 9, extending from
the post 120 to the base 122, using a groove molded into the
lower, inner edge of the dust cover 160 to cooperate with a
corner or ridge molded onto the periphery of the resilient
isolator 126 to hold the dust cover 160 in place.
While this embodiment of the present invention is referred to as
the "lightweight" embodiment, its size can be scaled up or down
to almost any extent. Besides hand railings, the lightweight
embodiment can be used to mount such diverse things as partitions
and room dividers, turnstiles, wire fencing, time clocks and time
card racks, signs of all kinds, parking meters, etc., etc.
IMPROVED RESILIENT RAIL CLAMPING
Referring now to FIG. 12, there is shown a preferred embodiment
for resiliently mounting the rail 22 to the upright barrier 20.
A resilient member 50 which is generally similar to the
elastomeric or urethane plug 50 of FIG. 6. The resilient member
50 also fits inside of one end of the guardrail 22 but is
generally of thinner cross section than shown in FIG. 6, in order
to provide a larger inside dimension. The resilient member 50 of
FIG 12, also generally like the elastomeric or urethane plug 50
DUR 1\F:\DOCS\WGD\INTELLEC\72118 5 - 1 7
_._ 216120
of FIG. 6, has an enlarged end portion which fits between the end
of the rail 22 and the upright barrier 20.
Since the rail 22 is preferably of steel pipe with a circular
cross section, the outside of the resilient member 50 is also of
circular cross section, at least where it fits inside of the rail
22. However, other materials cross sections are also suitable
for the rail, depending upon cost and the nature of the service
environment. While the upright barrier is preferably resiliently
mounted as shown in FIG. 1, it is possible, but not usually
recommended, that the upright barrier might actually be a wall or
other member generally perpendicular to the length of the rail
22. However, if the upright member 20 is rigidly mounted, the
efficacy and robustness of the rail and its mounting might be
reduced.
A plurality of preferably-flat slugs 170 are spaced around the
inside of resilient member 50 and may actually be molded in place
on the inside of the resilient member. The inside end of each
slug 170 is beveled to constitute a form of wedge or cam
follower. A bolt 102 extends through a hole in the side of the
upright barrier 20 and through the inside of the resilient member
50.
Since there are preferably six slugs 170, a pair of hexagonal
wedges 174 (on the left as viewed in FIG. 12) and 176 (on the
right) are placed with their six angled, outer surfaces bearing
against the beveled surface at each end of the six slugs 170.
Therefore, as the hexagonal wedges 174 and 176 move together,
they cam the slugs apart and outwardly against the inside of the
resilient member 50 and the rail 22.
The wedge 174, as viewed in FIG. 12, has a central hole of
sufficient diameter to clear the bolt 102 without binding it in
any way. The lefthand end of the wedge 174 bears against the
outside surface of the upright barrier 20. The wedge 176 has a
central hole that is threaded to the same size and pitch as the
OUR 1\F:\DOCS\WGD\INTELLEC\72118 5 ' 1 8 '
2161202
bolt 102 so that rotation of the bolt moves the wedge 176 to the
left, as viewed in FIG. 12 and toward the wedge 174.
The bolt 102 has a hexagonal head that is accessible from the
inside of the upright barrier 20. Therefore, as the bolt 102 is
rotated so as to pull the wedges 174 and 176 together, the
outwardly-expanding slugs 170 squeeze the resilient member 50
against the inside of the rail 22, holding it in place, in a
radial direction with respect to the bolt 102.
Since the wedge 174 is stationary, against the side of the
upright barrier and the wedge 176 moves to the left in FIG. 12,
as it tightens against the resilient member 50, the slugs 170
move to the left, as viewed in FIG. 12, at about one-half the
rate of movement of the wedge 176. As the slugs 170 are thus
squeezed against the inside of the rail 22 and moved to the left,
they tension the rail 22 against the upright barrier 20 and
another upright barrier at the other end of the rail. This also
tends to squeeze and deform the resilient material, generally as
suggested in FIG. 12.
Two cupped spring washers 180, similar to the spring washers 38
of FIG. 1, are placed between the head of the bolt 102 and the
inside of the upright barrier 20 in order further to tension the
bolt 102 and add flexibility and resilience to the mounting of
the rail 22 to upright barrier 20.
Referring now to FIG. 13, the cross sectional view is taken
between the two wedges 174 and 176, looking toward the left and
wedge 174. The six sides of the wedge 174 are shown pushing the
beveled ends of the six slugs 170 to press them against the
inside surface of the resilient member 50. The outside surface
of the resilient member 50 then presses against the inside
surface of the rail 22.
Referring now to FIG. 14, the end of the guardrail 22 can be
threaded and screwed into a collar 184 which is preferably made
DUR 1\F:\DOCS\uGD\INTELLEC\72118 5 - 1 9 -
2161202
of steel. The collar 184 has a curved back (not shown in FIG.
14) and is placed against the barrier member 20. A resilient
member 50 (generally washer shaped) is positioned between the
collar 184 and the barrier member 20 in order to allow shock-
absorbing relative movement between the guardrail 22 and the
upright barrier member 20. The resilient member 50 is preferably
made of urethane.
A bolt 102 passes through an oversize hole in the barrier member
20 and is threaded into the collar 84. A resilient plug 186 is
placed around the shank of the bolt 102 and between the head of
the bolt 102 and the inside of the barrier member 20. The plug
186 also extends into and generally fills the annulus between the
bolt and the perimeter of the oversize hole in the barrier member
20. The plug 186 is also made preferably of urethane and
generally lets the bolt 102 move with the collar 184 so as to
absorb shock delivered to the guardrail 22, without bending metal
parts beyond their elastic limit.
A spring washer 180 between the bolt and the plug 86 controls the
amount of force pulling the collar 184 to the barrier member 20
and also protects the top of the plug 186 (the left side, as
viewed in FIG. 14) from the bottom (the right side, viewed in
FIG. 14) of the head of the bolt 102 during tightening and shock-
absorbing displacement. Otherwise, the bottom of the bolt 102
might damage the top of the plug 186 during tightening and shock
absorption, possibly causing premature failure. While only one
spring washer 180 is shown in FIG. 14, several such spring
washers might be used at that location.
Referring now to FIG. 15, there is shown a variation on the
guardrail holding embodiment of FIGs. 12 and 13. The hexagonal
wedges 174 and 176 are replaced with domed members 174 and 176,
respectively. However, rather than bear against slugs 170 (as in
FIGs. 12 and 13, the domed members 174 and 176 of FIG. 15 bear
directly against the portion of the resilient member 50 that
extends into the guardrail 22.
DUR 1\F:\DOCS\WGD\INTELLEC\72118 5 - 2 O -
CA 02161202 2003-03-03
n'he domed members 174 and 176 in FIG. 15 serve much the same
purpose as the hexagonal wedges 174 and 176 of FIGs. 12 and 13.
That is, when the bolt 102 is tightened, the internally-threaded
domed member 176 is moved to the left, as shown in FIG. 15.
Meanwhile, the domed member 174 stays pressed against the barrier
member 20 and can not move. Therefore, as the two domed members
174 and 176 come closer together, they displace the portion of
the resilient member 50 between them and cause the resilient
member 50 to press against the inside surface of the guardrail
22. This resiliently holds the guardrail 22 against the upright
barrier member 20.
A resilient plug 186 is also shown in FIG. 15 and serves the same
function here as it serves in the embodiment of FIG. 14. Here,
two spring washers 180 are shown; however, as with FIG. 14, any
number of spring washers can be used as may be deemed expedient.
Referring now to FIGS. 16 and 17, still yet another embodiment of
the present invention is shown .in which the guardrail 22 is
longer than the closest distance between two adjacent upright
barrier members 20, or some other upright support for the
guardrails. As shown in partial cross section in FIG. 16, the
guardrail 22 extends through and into the inside of the barrier
member 20. A resilient member 50 is placed between the guardrail
22 and the upright barrier member 20 to cushion an impact to the
guardrail 22 as that impact is transmitted to the supporting
barrier member 20. The resilient member 50 is preferably of
urethane.
A U-bolt clamp 192, generally of the type used to clamp the
components of an automotive exhaust system, but preferably
somewhat larger, is used to assure that the resilient member 50
is held tightly to the guardrail 22 and to assure that the end of
the guardrail 22 does not slip out of the hole in the side of the
barrier member 20. Referring now to FIG. 17, the end of the
guardrail 22 is shown, as it would appear when viewed from the
inside of the barrier member. An arcuate collar 194 completes
DUR 1\F:\DOCS\4IGD\INTELLEC\72118 5 " 2 1 -
216122
the clamping circle around the resilient member 50, and is drawn
tight by tightening two nuts 196.
Alternatively, a bolt or pin 188 passes through holes in the
guardrail 22 and perhaps the resilient member 50. The pin 188 is
long enough to prevent the guardrail 22 from slipping out of the
barrier member 20. However, the pin 188 is recessed far enough
inside of the inside surface of the barrier member 20 so that
slight longitudinal movement of the guardrail 22 is possible
within the opening in the barrier member 20, through which the
guardrail extends. A head 190 (see FIG. 17), of slightly larger
diameter than the diameter of the pin 188, keeps the pin, which
is inserted from the top, from falling through and out of the
guardrail. The slight clearance between the pin and the inside
surface of the barrier member 20 also allows the guardrail 22 to
bend, within its elastic limit, and slightly foreshorten in the
event of an impact, without tending to pull together the two
barrier members 20 which support the guardrail. If no impact is
anticipated that would tend to exceed the elastic limit of the
guardrail 22, the resilient member 50 may be omitted, just so
long as the guardrail 22 can still move inside the hole in the
barrier 22, so as to continue to be resiliently mounted; however,
this is not preferred.
Preferably, if a bolt or pin 188 is used to prevent the guardrail
22 from falling out of the barrier member 20, a shorter resilient
member 50 can be used, which does not extend quite so far into
the inside of the barrier member 20. Such a shorter resilient
member 50 would preferably have a ridge (not shown) extending
outwardly from its inner end, in order to prevent the resilient
member 50 from slipping out of the hole in the barrier member 20.
However, the resilient member could still be squeezed into the
hole in the barrier member so that the ridge would be on the
inside of the barrier member. Once the guardrail 22 has been
slid through the inside of the resilient member 50, the ridge
would not be able to pass through the hole in the barrier member
20, thereby locking the resilient member into place.
DUR 1\F:\OOCS\41GD\INTELLEC\72118 5 - 2 2 -
2161202
If a bolt or pin 188 is used to keep the end of the guardrail 22
within the upright barrier member 20, the resilient member 50 of
FIGS. 16 and 17 is preferably molded to an arcuate shape to match
the shape of the hole in the upright barrier member 20.
Therefore, as viewed in FIG. 16, the bolt or pin 188 would be
wholly inside of the molded inner end of the resilient member 50,
rather than passing through a hole in the resilient member 50, as
suggested by FIG. 16. Consequently, the head 190 of the pin 188
(or a bolt) would rest on the outside surface of the guardrail
22, not the outside surface of the resilient member 50, as is
shown in FIG. 17.
Since the guardrail 22 might rotate in the hole in the upright
barrier member 20, the pin can conventionally be retained in the
guardrail 22 by a spring ring (or equivalent) in a groove
(neither of which are shown in FIG. 17) at the end of the pin 188
opposite to the head 190. If a bolt is used instead of the pin
188, a nut (not shown) would hold the bolt 188 from falling out
of the hold in the guardrail 22. In either case, resilient
sleeves (not shown) are preferably placed around both ends of the
pin or bolt 188, where they contact their clearance holes in the
guardrail 22.
The bolt or pin 188 and the nuts 196 of the U-bolt clam 192 are
shown in FIG. 17 to be on the left side of the guardrail 22.
However, such an orientation is only to enable easy visual
correlation to the corresponding parts of FIG. 16, which is how
the parts would normally be viewed from the top of the upright
barrier member 20. The head 190 of the pin 188 and the nuts 196
would normally be positioned on top of the portion of the
guardrail 22 that extends into the inside of the barrier member
20.
While the form of apparatus herein described constitutes a
preferred embodiment of this invention, it is to be understood
that the invention is not limited to this precise form of
apparatus, and that changes may be made therein without departing
DUR 1\F:\DOCS\WGD\INTELLEC\72118 5 - 2 3 -
2161202
from the scope of the invention which is defined in the appended
claims.
DUR 1\F:\DDCS\41GD\INTELLEC\72118 5