Note: Descriptions are shown in the official language in which they were submitted.
-1- 2t94855
FIELD OF THE lNV~ ION
This invention relates to process gas distribution
systems and methods.
BACKGROUND OF T~ lNv~ ION
Systems and methods presently are used for the
automatic or semi-automatic control of process gas
distribution in semi-conductor manufacturing. One such system
and method which is highly advantageous is shown in U.S.
Patent No.4,949,160
assigned to the assignee of this patent application.
Despite its excellence, further improvements are needed to
solve several remaining problems.
Some prior systems provide for remote control at a
single computer console of a large number of remote gas flow
control units or "cabinets". Each control unit controls the
delivery of process gas to one or more locations where the gas
is used to make semiconductor devices. These locations are
called "tool" locations. Most control units are located
relatively far from the tool locations. It is desired to
provide communication links between the tool locations and the
flow control cabinets and to provide means for monitoring and
controlling the units at a central location. The problem is
how to do this without excessive cost.
Another problem with prior systems and methods has
been caused by the need to re-calibrate transducers in the gas
flow control cabinets at periodic intervals. For example, it
has been customary to zero-calibrate pressure transducers once
every three to six months or so. The process used in the past
often has required up to a full day of labor by one worker for
each cabinet. This creates relatively high labor costs and
shuts the control unit down for a substantial time during
which it cannot be used for production.
A further problem has been created by the expansion
of the capabilities of each of the gas flow control cabinets
so that it can deliver gas to any one or more of several
different tool locations upon demand. This has created
problems in purging the gas lines of toxic gas for worker
safety during local maintenance of the flow control units. If
the "flow-through" process is used, where a purge gas such as
-2- 21 94855
nitrogen simply is pumped in one direction through the
delivery conduit, it must flow through the long conduit from
the cabinet to the tool. This is wasteful of expensive gas,
and wastes time. Furthermore, sometimes it is not possible to
use the flow-through process, in which case maintenance work
on the long delivery conduit can be hazardous. The problems,
then, are how to achieve safe local purging without incurring
excessive costs, and how to purge the long delivery conduit
when flow-through purging is not available.
A similar problem in purging the conduits has been
created by the addition of means for delivering gas
selectively from two different supply tanks and switching back
and forth between the two tanks.
Each of the gas flow control cabinets has an exhaust
outlet which is connected to an exhaust duct and from which
air and gas from the inside of the cabinet is exhausted at a
relatively high flow rate in order to avoid the accumulation
of toxic gas in the cabinet due to leaks, etc. Flow
measurement means are provided to measure the flow rate of the
exhaust gas. If the flow rate falls below a pre-determined
safe level, an alarm is activated so that the low flow
condition can be remedied. Usually, each duct and fan is in
place in the plant before the cabinet is installed. If the
diameter of the duct is not the same as that of the exhaust
outlet, the flow rate measurement will be erroneous. A
tedious and expensive firmware program adjustment then is
required in order to avoid this source of error. The labor
cost and time to do this constitute another problem to be
solved.
A further problem in prior gas distribution systems
is that sometimes it is necessary to change the association
between a tool location and the gas distribution conduits.
For example, it may become necessary to supply a given tool
with a different gas or mix of gases, and it may be necessary
or expedient to change the connection of different gas
distribution conduits to the tool. In the past, this has
required re-wiring of the electrical connections so that the
tool is correctly connected to the proper control unit or
units corresponding to the new gas conduit connections. The
-3- 2 1 94855
inventors have recognized that the re-wiring requirement is
costly and time-consuming; it increases equipment down-time
and reduces productivity.
OBJECT OF TH~ lNv~l..ION
In accordance with the foregoing, it is an object of
the present invention to provide a process gas distribution
system and method which overcome or greatly alleviate the
foregoing problems.
In particular, it is an object of the invention to
provide such a system and method with simple centralized
monitoring and control of a number of widely-spaced gas flow
control cabinets and connection of the cabinets to the tools,
but without excessive installation, modification and equipment
costs. It is an object to provide such a system and method in
which each cabinet also is "smart" and can be used for
automatic control of gas delivery and other functions
independently of one another and independently of the central
control computer.
It is another object of the invention to provide
6uch a system and method in which various transducers which
convert process gas distribution parameters into electrical
signals can be re-calibrated very quickly and at a relatively
low cost.
Another object of the invention is to provide means
for automatically purging gas flow lines in a multiple-
distribution-leg gas distribution control cabinet quickly and
easily, without the cost of other purging means.
It is a further object to provide for purging of the
gas delivery conduits from the cabinets to the tools when
flow-through purging is not available.
A further object of the invention is to provide such
a system and method in which multiple gas sources are used
alternatingly to provide a continuous source of gas to the
too~ locations, and to provide rapid, efficient and flexible
purging of the gas flow lines used for that purpose.
A further object of the invention is to provide such
a system and method in which the error in the exhaust flow
measurement caused by the use of an exhaust duct of a
_4_ 21 94855
different diameter from that of the cabinet exhaust outlet can
be corrected quickly and easily.
Still further, it is an object to provide such a
system and method in which the electrical communications
between the tools and the flow control cabinets can be changed
to correspond to gas flow re-routing changes, without the time
and cost of re-wiring the communications connections.
SUMMARY OF TH~ lNv~.LION
In accordance with the present invention, the
foregoing objects are met by the provision of a process gas
distribution system and method in which the remote gas control
units are connected sequentially to one another and by a
single communication cable to a tool interface controller,
which also receives signals from various tool locations and
communicates them to the respective cabinets.
A supervisory control computer, preferably a simple
and relatively inexpensive personal computer, communicates
with the tool interface controller to provide monitoring of
the operations of the various cabinets and to control the flow
of gases to the tools. A separate data processor is provided
in each of the cabinets to control its functions independently
from the supervisory control computer. Preferably, direct
control by use of the data processor in the cabinet will
override control from the central supervisory control
computer.
The cost of this system is further minimized by the
use of the interface unit to enable communications between the
tools and the cabinets, instead of separate cables connected
from each tool to each of several cabinets, as in some prior
systems. The cable and installation costs thus are reduced
significantly.
Zero calibration is provided, advantageously, by
automatically subjecting each transducer to a reference
standard having a known parameter value. A computer routine
is used to compute the difference between the ideal output of
the transducer and its actual output. That difference, called
an "offset", is stored in computer memory. Later, the offset
is used to correct each reading of the transducer.
Advantageously, components of the system which are used for
_5_ 21 94855
other purposes also are used to provide a zero reference for
each of the transducers. By this means, re-calibration is
performed simply and quickly, at a relatively low labor cost
and with relatively little downtime.
In accordance with another feature of the invention,
the multiple distribution legs of each gas flow control unit,
and the delivery conduits to the tools, are purged by the
alternating connection of an evacuation source and a source of
purge gas to the distribution legs, with a number of such
cycles being selectable, and the duration of each of such
cycles being selectable. This provides variable and
adjustable cost-saving local purging for the multiple
distribution legs, and also provides purging of the delivery
conduits to the tools when flow-through purging is not
possible, thus providing improved safety.
Purging of toxic gas from conduits from plural
selectable gas sources also is provided by purge control means
similar to that described above for the distribution legs.
In accordance with another feature of the invention,
the exhaust duct diameter can be compensated for, if it is
different from that of the exhaust outlet from the cabinet, by
storing different constants for different outlet duct sizes,
and utilizing a computer routine and the stored constants to
compute the flow rate. Thus, the measurement corrections are
made by means of a few simple keystrokes of the gas cabinet
controls.
Another advantageous feature of the invention is the
provision of programmable interface means for enabling the
control of gas delivery through selected gas distribution
conduits. Preferably, communications lines from the tool
locations are terminated in a centrally located interface
unit. Each tool is identified by a number. The
responsiveness of each gas delivery leg to gas demand signals
from a given tool is stored in programmable memory, and the
association between tool signals and gas delivery legs is
stored in computer memory means. A change of the associations
can be made by relatively simple software procedures for
changing the data stored in memory, thus avoiding expensive
re-wiring.
-6- 21 94855
Other objects and advantages of the invention will
be set forth in or apparent from the following description and
drawings.
BRIFF DE8CRIPTION OF THE DRAWING8
Fig. 1 is a schematic diagram of a process gas
distribution system constructed in accordance with the present
invention;
Fig. 2 is a schematic circuit diagram of a
connection between the tool interface controller and one of
the tool locations shown in Fig. 1;
Fig. 3 is a schematic circuit diagram of an
alternative embodiment of the system shown in Fig. l;
Fig. 4 is a schematic circuit diagram of a portion
of the system shown in Fig. 1, showing in some detail the
electrical components of the tool interface controller and one
of the gas flow control cabinets of Fig. 1;
Fig. 5 is a side-elevation view partially broken
away of one of the gas cabinets shown in Fig. 1, with the side
panel removed to show the internal components;
Fig. 6 is a front-elevation view of the cabinets
shown in Fig. 5, with the front doors open and part of the
components broken away for the sake of clarity. Fig. 6 is
also partially schematic in showing the exhaust system in the
upper portion of the figure;
Fig. 7 is a front-elevation view of the control and
display portion of the gas cabinet shown in Figs. 5 and 6;
Fig. 8 is a schematic gas flow control diagram
showing the distribution of gas by means of the gas cabinet of
Figs. 5 and 6;
Figs. 9 and 10 are generalized flow diagrams for the
computer programs used for automatic zero calibration of
transducers used in the gas flow control units;
Fig. 11 is a flow diagram for a computer program
used for zero calibration of a weighing scale used to measure
the contents of one of the gas bottles in the cabinet of Figs.
5 and 6;
Fig. 12 is a flow diagram of a computer program used
to zero-calibrate the gas pressure transducers in the
21 94855
-7-
distribution gas flow legs of the cabinet shown in Figs. 5 and 6;
Fig. 13 is a flow diagram of a computer program used for zero
calibration of the transducers in the gas flow lines leading from the gas bottles in
the gas cabinet of Figs. 5 and 6;
Fig. 14 is a schematic diagram of a data packet used in
communications between the cabinets and the tool interface controller of Fig. 1;Fig. 15 is an enlarged view of the control panel and display shown in
Fig. 7; and
Figs 16-25 illusatrate displays which appear on the display screen of
the supervisory control computer of the system shown in Fig. 1.
GENERAL DESCRIPl'ION
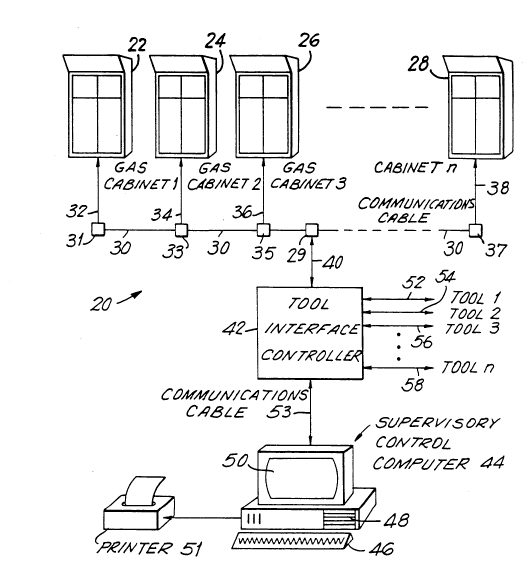
Fig. 1 shows a process gas distribution system 20 as it is used in a
semi-conductor manufacturing plant. The semi-conductors are manufactured
using equipment such as diffusion ovens, etc. at various different locations in the
plant, each of which is referred to as a "tool" location.
Located in one or more locations remote from the tool locations are a
plurality of gas flow control units 22, 24, 26, 28, etc. which are used to store process
gases, which often are highly toxic, and to control the distribution of those gases to
the various tool locations. Each of the cabinets is "smart"; that is, it contains its
own CPU, memory and other digital and analog interface circuitry, together with
its own control panel, to enable it to operate alone without a remote computer.
Each cabinet can be operated separately and independently of every other cabinet,
and independently of other equipment in the system. The circuitry of each cabinet
is described in some detail below, and in the aforementioned U.S. Patent No.
4,989,160. The disclosure of that patent hereby is incorporated herein so as to avoid
unnecessary duplication of the detailed description given therein.
The control circuitry of each cabinet 22, 24, etc. is connected to the
next cabinet by means of a plug-connectable shielded communications cable 30.
Each cable 30 is connected to its neighbor and to the circuitry of one cabinet
through a plug receptacle 31, 33, 35, 37, etc. All of the cabinets are connected in the
same manner so that the
-8- 2 1 94855
cabinets are connected together sequentially in "daisy-chain"
fashion. They are connected through a plug receptacle and a
communications cable link 40 to a tool interface controller
42.
Tool interface controller 42 is connected by a
communications cable 53 to a supervisory control computer 44
which includes a keyboard 46, a disk drive 48, and a video
display screen 50, and has a printer 51 connected to it.
Advantageously, the supervisory control computer i8
relatively inexpensive personal computer such as the IBM PS/2,
model 80.
Advantageously, the tool interface controller is
connected by the shielded cable 40 to the first cabinet 22
("cabinet 1"), which is then connected in sequence to cabinets
2, 3 and 4 and as many other cabinets as there are in the
system, up to 120 units, as the system presently is
configured. Of course, larger or smaller numbers of cabinets
can be incorporated in the system. For this reason, the
number of the last cabinet in the sequence is cabinet "n".
Additional cabinets can be added into the system
simply by plugging in a new cabinet to its nearest neighbor,
and re-configuring the system in software. Re-wiring is not
needed.
The tool interface controller is adapted to
sequentially poll each of the cabinets to send and receive
messages to and from each of the cabinets so as to enable
monitoring of the cabinet operation at the supervisory control
computer 44 and control of the functions of the cabinets from
that computer. By the use of this polling technique, the
necessity of using separate cables from each of the cabinets
to the interface controller 42 is avoided, and a significant
cost saving is achieved. Furthermore, since only a relatively
low baud rate is used in the communications signal
transmissions, the cable can be relatively inexpensive
shielded cable rather than the more expensive cable which
otherwise might be required.
In accordance with one of the advantageous features
of the invention, signals are conducted between the controller
42 and the tools on lines 52, 54, 56, 58 etc. The number of
21 94855
tools which can be connected is relatively large -- e.g., up
to 120 tools in a system which has been built and successfully
tested. Larger numbers are possible.
Turning now to Fig. 2, one of the lines 52 actually
is shown to have six separate conductors connected at the
controller end to a terminal block 55, and at the tool end to
a terminal block 57.
When an operator at a tool location desires to start
the flow of process gas to the tool, the operator closes ~
switch 60 and momentarily closes a gas reset switch 68 to
initiate the flow of gas from an appropriate one of the gas
cabinets. 24 volts DC is sent from terminal 61 at the tool
location to terminal 59 at the controller location over line
76 to enable switches 77 and 78 to operate. Switch 77 closes
and lights an indicator lamp 72 at the tool when gas is
flowing.
Switch 78 closes to energize an indicator lamp 74 at
the tool location to indicate when a purge is in process.
The "ready for gas" and "gas reset" signals sent
over terminals 62, 63, 64, 65, and 70 and 71, are delivered by
the tool interface controller 42 to the appropriate gas
cabinet to cause the opening of various valves to start the
gas flow. When the gas flow is to be shut off, the switch 60
is opened, and the controller 42 sends a signal to the gas
cabinet and causes it to shut off the gas flow.
ALTERNATIVE TOOL COMM~NIC~TION
Fig. 3 shows an alternative arrangement for
communication with each of the tool locations. Instead of a
separate six-conductor cable connected from each of the tool
locations to the controller 42, a single communications cable
80, like the cable 40, is connected to the controller, and a
separate tool termination unit 92, 94, 96, 98, etc. is located
at each of the tool locations. Each unit 92, 94, etc.
contains its own memory and CPU, such as that provided by a
microprocessor, together with programming sufficient to enable
it to communicate with the controller 42 in response to
polling.
Each of the tool termination units is connected to
its neighbor by means of a plug-in connector 39, 41, 43 and
2 1 94855
--10--
45, etc., through cables 84, 86, 88, 90, etc. and cable
section 82 in "daisy-chain" fashion, in the same way that the
cabinets 22, 24 etc. are connected together, and all are
connected to the interface controller. By this means, a great
deal of wiring, labor and materials cost is saved.
Each of the emhoAircnts shown in Figures 1-3 gives
considerable savings of installation and wiring costs, as well
as further savings of re-wiring costs when the tools are later
connected to receive gas from different cabinets. For
example, in one typical prior system, if four different gases
are delivered to a single tool, each from a separate cabinet,
four different cables are used to connect the tool
electrically directly to the four cabinets. With the
embodiment of Figures 1-2, only one cable from each tool to
the TIC is used, and in the Figure 3 embodiment, only one
cable is used for all tools.
Further saving are gained by both embodiments in
avoiding the cost of re-wiring the tools to the cabinets when
the association of a tool with the cabinets is changed.
CABINET CIRCUITRY AND CONTROLLER DETAIL8
Fig. 4 is a schematic circuit diagram of the control
circuit 300 for a single gas flow control unit or cabinet, and
shows some of the details of the controller 42. The
controller 42 communicates with the gas cabinets and the
supervisory computer 44 through a standard communications
board 320.
The controller 42 is the sole connection between the
tool locations and the gas flow control cabinets. Therefore,
it is important that it be as fail-safe as possible. To this
end, a certain amount of redundancy is provided. Instead of
one, there are two CPUs; a first CPU 322 and a second CPU 324,
each of which has a random-access memory ("RAM") 323 or 325.
An arbitrator circuit 326 is provided to determine
when one of the CPUs is not operating and automatically switch
in the other CPU. Alarms 328 are provided to indicate if
either or both of the CPUs is inoperative; to indicate if the
arbitrator circuit 326 is inoperative; to indicate whether
power is not being supplied to the controller; to determine
whether the communication link 40 is not operating, etc., all
-11- 2194855
in order to maximize chances that the terminal controller is
operating at substantially all times, or that an alarm will
call attention to any problems so they can be corrected
quickly. The construction and operation of the arbitrator
circuit and its control of the CPUs is conventional and will
not be described further herein.
The controller 42 also has several interface
terminal units ("ITUn) 327, 329, 331, etc, to which the tool
cables 52, 54, 56, 58, etc. are connected. The number of
ITU's used depends on the number of tools in the system. Each
tool and its cable is identified by the simple expedient of
connecting it to a single terminal in one of the ITUs, and
giving each terminal (and thus, each tool) an identifying
number. Each ITU comprises a circuit board with six
connection terminals, each terminal connected to a specific
tool.
The ITU arrangement is modular. The number of ITU
units can be changed easily to accommodate a greater or lesser
number of tools in a system.
As it will be described below in greater detail,
when the start or stop of gas flow is requested by signals
from the tool location, the interface controller broadcasts
the signals to the gas flow control cabinets, and each cabinet
which controls gas conduits connected to the tool recognizes
the tool number and starts or stops the flow of gas to the
tool.
In the embodiment of the invention shown in Figure
3, each tool is identified by a uniquely coded signal which is
transmitted to the tool interface controller 42 periodically,
by polling, along with gas flow start and stop signals, and is
broadcast to the cabinets.
The cabinet control circuit 300 shown in the upper
left-hand portion of figure 4 includes an analog input circuit
302, which receives analog inputs on lines 304 from various
transducers and other sources and amplifies those signals and
converts them from analog to digital signals. It delivers the
digital signals over a bus 318 to a CPU 306 which has a memory
308. The memory 308 contains both volatile RAM storage chips,
-12- 21 94855
as well as electrically erasable programmable read-only memory
("EEPROM").
The identity of the signal supplied on each analog
input line 304 is marked to the left of the line. Those
markings are shown in Figs. 6 and 8 to indicate their source.
Also provided in the circuit 300 is a digital
input/output unit 314 which receives digital signals and
transmits them over a bus 316 to the CPU 306. The operator
panel 138 which is shown in figures 7 and 15, and the display
panels 310 also receive signals over the bus 316 to display
the various warning lights and indicators to be described
below.
A set of DIP switches 307 is provided to set a code
number to uniquely identify the cabinet to the rest of the
system.
Further description of this circuitry and its
operation will be given below.
CABINET CONSTR~JCTION
Figs. 5 and 6, show the construction of one of the
cabinets 22. The cabinet 22 includes a rear wall 106, a
bottom wall 112, and front doors 108 and 110. Fig. 5 is a
left-side elevation view, with the front doors 108 and 110
open and the side-panel of the cabinet removed to show the
inside components, with some of the components broken away.
The cabinet 22 includes a control housing 92 with a
display panel 94 having a handle 96 for opening it. As it is
shown in figure 5, the panel 94 is angled downwardly so as to
be readily viewable by an operator standing in front of the
unit.
The cabinet 22 has an upwardly-sloping upper wall 98
(Fig. 6) which ends in a centrally-located exhaust outlet
conduit 100. Connected to the exhaust outlet is an exhaust
duct 102 whose diameter "d" is less than the diameter of the
exhaust conduit 100.
An exhaust fan 104, shown in Figure 6 normally is
located on the roof of the building in which the gas
distribution system is located. It connects with the conduit
102, as indicated at 136, to exhaust air and other gases from
the interior of the cabinet 122 to the atmosphere, where they
-13- 2 1 94855
can do no harm. Thus, the exhaust fan minimizes danger to
operating personnel by removing process gases which might
accumulate in the cabinet.
The cabinet 22 also includes a shelf 120 (Fig. 6)
supporting a scale 118 and a cylinder 116 of process gas. A
second cylinder 114 of process gas rests on a second scale 107
resting on the floor 112 of the cabinet. The scales 107 and
118 contain transducers which convert the weight of the gas
bottles into analog signals which are among the analog inputs
to the control cabinet circuitry shown in Fig. 4, labeled
"SCALE A" and "SCALE B". The weight of the gas cylinders
indicates the amount of gas left in them.
Gas is distributed from either bottle 114 or 116, as
needed, so as to ensure an uninterrupted supply of process
gas.
Various gas flow lines in the cabinet 22 include
sections 126 and 128 which form a "cylinder manifold" 136
(Fig. 8) which conducts gas from the bottle 114 or 116 to a
"cross-over" manifold 124 (Figs. 6 and 8) which changes the
bottle from which gas is supplied.
A gas distribution conduit system, called a
"distribution manifold" is shown at 134 (also see Fig. 8). It
includes four vertically aligned distribution "legs", which
will be described in greater detail below, to distribute gas
to 1, 2, 3 or 4 different tool locations simultaneously.
Also shown in Fig. 6 is an inlet 130 through which
nitrogen from a "house" supply of nitrogen is supplied to the
cabinet. An inlet 132 is provided for bottled nitrogen from
a local supply.
At the top of Figure 6, inside the duct 102, a pitot
tube transducer 105 is mounted. The transducer 105 is used to
measure the velocity of exhaust gas flow through the conduit
for purposes of determining whether the exhaust flow is above
predetermined safe level. The output of transducer 105 is
labeled "EXHAUST" in Figs. 4 and 6, and is one of the analog
inputs to the data processing system of the cabinet.
GA8 DI8TRIB~TION 8Y8TEM IN CABINET8
Fig. 7 is an enlarged view of the front panel 94 of
the cabinet 22. Displayed on the panel is an operator panel
-14- 21 94855
138, and schematic diagrams of the distribution manifold 134
and the cylinder manifold 136.
Fig. 8 is a schematic diagram showing the piping and
other flow control elements in a single one of the gas flow
control cabinets. Figure 8 is an enlarged reproduction of the
two diagrams 134 and 136 which appear on the panel 94 of
Figure 7, except that the two diagrams have been ~oined
together and modified, for the sake of clarity.
The distribution system shown in Figure 8 consists
of the three sections shown in Figures 5 and 6; the
distribution manifold 134, the cylinder manifold 136 and the
cross-over manifold 124.
In the diagram heavy lines indicate process gas
distribution lines, whereas lighter lines indicate purge gas
lines which are used only during purge and maintenance
operations.
The cylinder manifold 136 consists of two halves, an
"A" section 126 and a "B" section 128. The "A" section on the
left side includes equipment for delivering process gas from
a first source or cylinder A (cylinder 114 in Figs. 5 and 6),
and a right half, which is a mirror image of the left half,
for delivering process gas from a second source "B" (cylinder
116 in Fig. 6).
The distribution manifold 134 includes four
distribution "legs" 158 and 160, 162 and 164 ("A", "B", "C"
and "D") each of which delivers process gas to a remote tool
location 140, 142, 144 or 146, respectively.
The cross-over manifold 124 consists of a pair of
valves "XA" and "XB", which are connected to a common conduit
55 which distributes gas from either source A or source B to
any one or any combination of the four distribution legs.
In general, all of the valves shown in Figure 8 are
pneumatically operated with the exception of hand-operated
valves 157, 159, 161 and 163 shown at the top of Fig. 8.
Circles made with heavy lines are located in Fig. 8 next to
various valves and are designated by the letter "G". Green
LED's are located behind the transparent or translucent panel
material in the circles. When the valve is open, the LED is
2 t 94855
-15-
on. Thus, each of these circles glows green to indicate when
the valve next to it is open.
Other heavy circles marked with the letter "Y" glow
yellow when a predetermined condition exists. Those in the
distribution manifold marked "RFG A", "RFG B" etc. indicate
when either leg A, B, C or D (158, 160, 162 or 164) is Ready
For Gas; that is, ready for the delivery of process gas.
In the cylinder manifold 136, yellow indicator
circles labeled "Change A" and "Change B" indicate when either
gas cylinder A or gas cylinder B is empty and should be
changed.
The smaller circles formed with lighter lines in
Figure 8 are gas pressure transducers.
The delivery of gas from source A to Tool 1, for
example, is accomplished by the opening of valves A1, A2 and
A7 in the cylinder manifold 136, valve XA in the cross-over
manifold 124; and the opening of valves A1, A7 and 157 in the
distribution leg 158 in the distribution manifold 134. It
should be understood of course, that the delivery line between
the end of a distribution leg and the tool to which it is
connected can be relatively long; that is, the cabinet 22
often is up to several hundred feet from the tool location.
If process gas is to be delivered to Tool 2, the
foregoing procedure is altered by opening valves Bl, B7 and
159 in the distribution manifold. Similarly, process gas will
be delivered to Tool 3 by opening valves Cl, C7 and 161, and
to Tool 4 by opening valves D1, D7 and 163 are opened.
If it is desired to deliver process gas to more than
one tool at a time, this is accomplished simply by opening the
valves in the appropriate delivery legs. Up to four separate
tools can be supplied simultaneously by this means.
If it is desired to deliver gas from source B, such
as when the quantity remaining in source A is too low, the
valve XA in the cross-over manifold 124 is closed and the
valve XB in that manifold is opened, and gas is delivered from
source B to the line 155 and to all or any combination of the
four tools, in the same manner as described above. Then, the
A cylinder can be replaced, without interrupting gas flow to
the tool.
-16- 2 1 94855
In each of the process gas flow lines in the
cylinder manifold 136, there is a pressure regulator 154.
Similarly, there is a pressure regulator 154 and a filter 156
in each of the four delivery legs of the distribution manifold
134.
In the lower portion of the cylinder manifold 136 is
a purge isolation section 153 containing valves A3 and A4 with
a pressure transducer device 119 located between those valves.
Similarly, there is a purge isolation section consisting o~
two series-connected valves B3 and B4 with a pressure
transducer 117 in the right half of the cylinder manifold.
Those transducers supply "PURGE A" and "PURGE B" analog input
signals, as indicated in Figs. 4 and 8.
Purge throttling valves 4LA and 4LB are provided to
limit the flow of purge gas at certain times, as it will be
explained below.
Similarly, each distribution leg in the distribution
manifold 134 contains an isolation section consisting of
valves 3 and 4 in series (A3 and A4; B3 and B4; etc.), and a
transducer 125, 127, 129 or 131 to deliver a "PURGE LEG X"
signal to the controller ("X" being A or B or C or D) to
indicate a leak.
There is a flow switch 166 or 168 in each of the
cylinder manifold process gas flow lines, and a flow switch
141, 143, 145 or 147 in each of the four distribution legs.
These switches sense gas flow through them at an excessively
high rate and send signals to the controller circuitry on the
digital I/O unit 314 (Fig. 4) which cause the controller to
shut all valves in the conduit in question to stop flow
through it, and creates a high-priority alarm.
Other transducers and valve operations will be
explained below.
CABINET MENU AND PRO~PT DISPLAY8
Referring now to Figures 7 and 15, the operator
control panel 138 contains a number of pushbutton controls
354, an LCD display 352, and a row of alarm lamps 350. The
LCD display 352 will display two lines of character, with up
to 20 characters per line.
-17- 2 1 94 8 55
The cabinet 22 is designed to enable the operator to
quickly select and initiate functions with only a few push-
buttons, and a full keyboard is not needed. It is al~o
designed to be interactive; that is, to lead the operator
Sthrough the selection process by displaying appropriate
"prompts" or instructions. This is accomplished by means of
a layered menu.
By pressing the "menu" button (Figure 15), the functions listed in
the menu shown in Fig. 16 are displayed, one at a time on the LCD display 352
These are the highest menu layers. Within each
major category shown, there are several sub-menus and/or sub-
functions. To select a function, one merely need press the
scroll-up button 357 or the scroll-down button 355 (Fig. 15).
15The layered menu also allows protection of certain
modes or functions from activation by other than qualified
personnel. Each major function category, such as "Automatic"
or "Configuration" functions, is protected by a password.
Only those individuals given the password select functions
20within those modes. "Manual" mode requires two qualified
persons, each with his or her own password, to enable
operation.
Following are the automatic functions which can be
selected if the "Automatic Functions" submenu is selected.
25Purge to Change Cyl
Purge to Change Cyl A
Purqe to Change Cyl B
Maintenance Purge
Cylinder Manifolt A Maintenance Purge
Cylinder Manifold B Maintenance Purge
Manifold Leg Purge Function
2 1 94855
-18-
Purge Leg A (Off)
Purge Leg B (Off)
Purge Leg C (Off)
Purg- Leg D (Off)
Secure Manifold Leg
80cur- Leg A
8ecure Leg B
8ecure L-g C
8ecur- Leg D
Startup Manifold Leg
8tart up L~g A
8tart up Leg B
8tart up Leg C
8tart up Leg D
Pump/Purge Distribution Leg
Pump/Purge Leg A
Pump/Purge Leg B
Pump/Purge Leg C
Pump/Purge Leg D
21 94855
--19--
Distribution Maintenance Pump/Purge
Dist Maintenance P/P A
Dist Maintenance P/P B
Dist Mai~tenance P/P C
Dist Ma~ntenanco P/P D
Evacuate Delivery Leg
~vacuat- ~g A (Off'
gvacuat- L-g B (Off
Evacu~t- L-g C (Off
Bvacuat- ~-g D (Off~
Clear Purge Isolation Leak Alarm
Clear Cylinder A Isolation Lea~ Alarm
Clear Cylin~er B Isolation Lea~ Alarm
Clear Leg A Isolation Leak Alarm
Clear Leg B I~olation Lea~ Alarm
Clear Leg C Isolation Leak Alarm
Clear Leg D Isolation Lea~ Alarm
When the "Manual Functions" submenu is selected, it
is possible to manually operate each of the cylinder valves,
distribution manifold valves, and cross-over manifold valves
When the "Setpoint Functions" submenu is selected,
following are the functions which can be selected
Manifold Alarm Sets
Set Cylinder Empty Setpoint
8et High Cylinder Pressure
8et ~igh Regulated Pressure
8et Low Regulate~ Pressure
Set Purge Isolation Fail Pre~sure
Manifold Purge Definition
8et # of Pre Purge Cycles
8et # of Po~t Purge Cycles
8et Minimum Purge Pressure
8et Maximum Vent Pressure
8et Purge Time
Set Vent Time
Enable Refill
Disable Refill
Distribution Alarm Setpoints
8et High Delivery PrQssure
8et Low Delivery Pressur-
Distribution Purge Function Definition
~et # of Purges
-20- 2194855
8et Minimum Purge Pressure
8et Maximum Vent Pressure
8et Purge Time
8et Vent Time
General Setpoints
8et ~inimum ~haust Flo~ Rat-
The setpoints can be set by means of software
routines described more fully in the above-identified pending
patent application.
When the "Configuration Ftns" mode is selected, the
following functions can be performed:
Configure Cabinet
Cylinder Pressure Range
Cylinder M~nifold Regulated Pressure Range
Cylinder Manifold Purge Pressure Range
Cylinder Manifold Vent Pressure Range
Distribution Manifold Regulated Pressura Range
Distribution Manifold Vent Pre5sure Range
Cylinder Weight Range
Set Delivery Association
Select Line Leg A ~ssn.
Select Line Leg B Assn.
8elect Line Leg C Assn.
8elect Line Leg D Assn.
Select Exhaust Duct
~0 inch Duct
8 inch Duct
6 inch Duct
Do Zero Calibration
Calibrate Cylinder ~anifold A
Calibrate Cylinder Manifold B
Calibrate Distribution Manifold Leg A
Calibrate Distribution MAnifold Leg B
Calibr~te Distribution Manifold Leg C
Calibrate Distribution Manifold Leg D
Calibrate Scale A
Calibrate 8cale B
The steps taken by the operator to select the
various functions are set forth in the following table:
OPERATOR ACTION 8Y8TEM RESPON8E
Press MENU Displays the first item
in the "Main Menu", which
is "Automatic Function?"
-21- 2 ~ 94855
"Push ENTER to select"
(See Fig. 15)
Press the UP or DOWN buttons The display will scroll
355 or 357 until the through available
desired function displayed. menu items.
The item displayed will be
selected. This may be ~
function, which would
begin its operation, or
the next menu layer.
We'll assume we've
selected the next menu
layer.
The display will read
"ENTER PASSWORD"
Enter the appropriate The display will show an
password. '*' for each character
entered. If the password
is correct, the display
will show the first item
in the selected menu. If
incorrect, it will display
"INVALID PASSWORD"
Continue stepping through When the function is
the menu and selecting the selected, by pressing
desired function. "ENTER", it will start.
Many of the functions have associated interlock
conditions. If any of these interlock conditions are present,
the menu prompt for the function will not appear on the
display. Therefore, the existence of an interlock condition
inhibits activation of the function.
To better understand the function of the interlocks,
consider the case of "Purge To Change Cylinder A". If no
interlock condition exists, the operator can step through the
menu selection process and come to a point where the display
reads "Purge To Change Cylinder A?" At this point the
cylinder A purge cycle can be initiated. However, if a purge
isolation leak alarm was active on cylinder manifold A, the
display would not read "Purge To Change Cyl A?". It would
skip to the next valid function.
Details of some of the automatic functions now will
be discussed.
-22- 2194855
A~TOMATIC PURGE TO CHANGF CYLINDER (A OR B)
When it is necessary to change either the A or the
B gas cylinder to replace it with a fresh one, the toxic
process gas should first be removed or purged from the gas
5flow lines in order to protect the workers making the change
from being harmed by the toxic gas. The process gas is
required to be pure, and special precaution~ are necessary to
insure this purity. Therefore, the cylinder change must be
accomplished without significantly exposing the flow lines to
10air or other extraneous gas, in order to prevent
contamination.
Either the A section or the B section 128 of the
cylinder manifold is purged by alternatingly exhausting the
gas from each conduit, and then filling the conduit with a
15very pure inert purge gas such as nitrogen. This dilutes and
replaces almost all of the process gas with harmless nitrogen.
This process is used instead of a flow-through
purge, which might require purging the entire flow line from
the cylinder through to the tool. Such a process would be
20extremely wasteful of both process gas and purge gas.
Following are the steps used in purging the cylinder
manifold to change a gas cylinder.
First, the number of purge cycles to be used, and
the time of each cycle, are pre-selected by qualified
25personnel in the Setpoint Function mode of operation.
Assuming that it is desired to change cylinder A,
valve A8 in the cylinder manifold 136 is opened to supply
pressurized nitrogen from the house supply inlet 30 to a
venturi pump 148 which creates a vacuum in all parts of the
30conduit which are not isolated from the pump 148 by a closed
valve. The venturi pump vents its exhaust to the exhaust
system.
Valve A5 (and valve A2 for the first cycle) are
opened for a predetermined time, with the valve on the
35cylinder and valve A7 closed, to evacuate the gas conduit
extending from the cylinder to the valve A2.
The control system automatically measures the
pressure at point 101 by means of the transducer 109 at the
end of this period and checks to make sure that the vacuum is
-23- 2 1 94855
operating properly. This is done by checking to see if the
pressure signal "CYLA" is below a predetermined Maximum Vent
Pressure setpoint level (see above) set by the operator in the
Setpoint Function mode. Up to three seconds extra, in
addition to the pre-set vent time are allowed. If this
condition is met, the sequence continues to next step. If
not, the sequence is aborted and an alarm message is displayed
on the panel 138.
Next, valves A2 and A5 are closed, and valves A3 and
A4 are opened to supply purge nitrogen from a nitrogen
cylinder supply for a predetermined purge time. This dilutes
any process gas remaining in the manifold with nitrogen.
During this phase, the pressure in the manifold must rise
above the Minimum Purge Pressure (see above), which is preset
by the operator in the Setpoint Functions mode. Up to three
extra seconds in addition to the user-set purge time are
allowed. If this condition is met, the purge function
continues and the process is repeated for a number of cycles,
called "Pre-purge cycles", determined by the operator in the
Setpoint Functions mode.
When the prescribed number of Pre-purge Cycles has
been completed, the operator should change the process gas
cylinder A.
When the bottle change is complete, the operator
should push the ENTER button on the panel 138. This will
cause the cylinder manifold to perform a series of post-
cylinder-change purge cycles. These cycles are identical to
those described above for the pre-change purge. The number of
Post Purge Cycles can be set independently of the number of
pre-change purge cycles, as it is indicated above.
The manifold next will be filled with process gas by
opening valves A1 and A2, and then performing three short
cycles of opening and closing valve A6 to allow process gas to
flow into the conduit.
Now valve A8 now will close, turning off the venturi
pump.
Finally, a routine is performed to check for a
cylinder connection leak. The controller performs this check
by reading the cylinder pressure by means of the transducer
-24- 2 1 94855
123 which produces the output signal PT2A, then counting down
for two minutes. If, at any point during this two-minute
period, the cylinder pressure reading drops by over five
percent of the initial value, the controller considers this to
be a cylinder connection leak. If a leak is detected, an
alarm message will be displayed. Otherwise, at the end of the
two minute period, the function is complete.
If it is desired to change the B cylinder, the same
procedures are used as those described for the A cylinder,
except the separate valve system 128, as well as venturi pump
150 and venturi valve 88, are used instead of the venturi pump
and valves on the left side 126 of Figure 8.
CYLINDER MANIFOLD MAINTENANC~ PURGE ~A OR B)
The maintenance of the regulator 154 or other
functions requiring access to portions of the process gas flow
line downstream from the regulator 154, use a different purge
operation, as follows.
Again, as with the purge to change a gas cylinder,
the number of pre-maintenance purge cycles and the time of
each cycle can be defined by an operator.
First, assuming that maintenance is being performed
on the A side 126, valve A8 is opened to create a vacuum.
Valve A5 and A2 are opened for a predetermined time. Next,
valves A2 and A5 are closed and purge nitrogen is applied
through valves A3 and A4 for a predetermined time to dilute
any process gas remaining in the manifold. This cycle is
repeated a predetermined number of times to complete the pre-
maintenance purge. At this time, the operator can perform any
required maintenance. During this period, the purge nitrogen
valves A3 and 4LA and valve A2 are left open so that while the
maintenance is performed nitrogen flows through the conduit
and little or no air enters the conduit to contaminate it.
Valve 4LA throttles the flow of nitrogen to a relatively low
level, to minimize wasting of nitrogen during this phase of
operation.
When the maintenance is complete, the operator
pushes the ENTER button on the control panel 138. The control
system will perform a series of post-maintenance purge cycles
identical to those just described.
-25- 2 1 94855
Next, the cylinder manifold will be filled with
process gas. The cylinder valve will open, and, optionally
three short cycles of opening and closing the bypass vent
valve A6 will occur. When the refill is complete, the
controller will close all valves, and the system again is
ready to deliver process gas.
As with the cylinder change purge, the same process
steps are performed in purging side B of the system, except
the side B valves and venturi pump are used.
P~RG~ DI8TRIBUTION LINE (A, B, C OR D)
The Purge Distribution Line function automatically
turns purge nitrogen on and passes it through a distribution
leg, and through the line to the tool. The function is
performed according to the following sequence. Valve Al (or
Bl, or C1 or D1) in the distribution manifold 134 is closed.
A delay of approximately two seconds then occurs.
Next, valves A3, A4 and A7 are opened to allow
nitrogen to flow through the distribution leg to the tool,
where it is vented. Nitrogen will continue to flow through
the leg and line until the complementary function "Leg X Purge
Off" is initiated by the operator. "X" is A or B or C or D.
This procedure, often referred to as a "flow-
through" purge, is capable of producing the most thorough
purge, but uses substantial quantities of nitrogen and vents
the process gas in the whole line leading to the tool, thus
wasting the gas.
LINE PURGE OFF (A, B, C OR D)
In the Line Purge Off function, a vacuum is placed
on the purge isolation section by closing valves A3 and A4,
and nitrogen is turned off so it no longer flows. Valve A7
also is closed.
Of course, the same procedure can be used in each of
the separate distribution legs.
8ECIJRE Ml~NIFOLD LEG (A, B, C OR D)
The Secure Manifold leg function disables automatic
delivery of gas from the selected distribution manifold leg.
It does so by clearing the "Leg Enable" flag found in the
cabinet's EEPROM memory. This means that gas will not be
delivered until intentionally started by a qualified operator.
-26- 2194855
Being stored in EEPROM memory, this status is not susceptible
to being lost during power failure.
The Secure Manifold Leg function performs the following
sequence.
Leg valves 1,3,4,6, and 7 are closed
The Leg x enable flag is cleared in EEPROM. A two
second delay occurs. The display will read "Securing Leg
during this period.
8TART-~P MANIFO~D ~E~
The Start Up Manifold Leg function enables automatic
delivery from the selected manifold leg. It does so by
setting the "Leg Enable" flag found in the cabinet's EEPROM
memory. This means that automatic gas delivery will be
enabled until intentionally secured by a qualified operator.
Being stored in EEPROM memory, it is not susceptible to being
lost during power failure.
The function displays the message "Starting up Leg
x" while setting the appropriate flag.
PUMP/PURGE DISTRIBUTION LINE (A, B, C OR D)
Referring again to Fig. 8, the purpose of this
routine is to clear the toxic gas from one or more of the four
distribution legs 158, 160, 162 or 164 (A, B, C or D) of the
distribution manifold 134, and the line leading to the tool,
when the flow-through process ("Purge Distribution Line")
described above is not possible or is impractical.
The process to be described below has the advantage
that it purges toxic gas from each distribution leg up to the
first shut-off valve (not shown), which usually is located at
the tool, without opening the line to allow purge gas to
escape at the first shut-off valve. This provides purging
where it otherwise might not be feasible, thus improving
safety. It also confines all purging operations and venting
to the vicinity of the cabinet where the most qualified
personnel are on duty.
The operation now will be described with reference
to distribution leg 158 (leg A) of the distribution manifold
34. However, it should be understood that the same process
-27- 2194855
would be used in clearing each other distribution leg 160(B),
162(C) or 164(D), in a separate operation.
At the start of the operation, Valve A1 is closed to
prevent toxic process gas from entering the distribution leg.
Valves A3, A4 and A6 usually already will be closed. If open,
they will be closed. Valve A7 may be either open or closed at
the start of the procedure, but usually will be closed. The
hand-operated valve 157 is open. Valves Al, A3, A4, and A6
are closed at this time because it is des~red to close these
valves before V8 is opened, in order to avoid contamination of
the gas flow lines through the vent outlet of the venturi
pump.
The venturi valve A8 now opens to admit house
nitrogen, supplied through line 130, to the venturi pump 152,
which evacuates gas from the line 165 and vents the gas safely
to exhaust.
Next, the vacuum in the line 165 is applied to the
distribution leg at point 153 by opening the valve A6. Valve
A3 now is closed, and valves A6, A7 and A4 are opened.
The vacuum is thus applied to the delivery leg for
a pre-determined vent time, which can be set by a qualified
operator during the Setpoint Function mode.
At the end of this time period, the control system
checks to make sure that the vacuum is operating properly by
detecting the pressure at point 153 by means of the pressure
transducer 139 connected to that point (similarly, pressure
transducers 137, 135 and 133 are connected to points 151, 159
and 167, respectively, in the other distribution legs). The
analog output of the transducer, PT3A, is sent to the control
circuit (Fig. 4), where it is measured and compared with pre-
set signal levels stored in memory. If the pressure is below
a pre-set maximum vent pressure, which also can be set by a
qualified operator, then the operation continues to the next
step. If that pressure is not below the maximum vent
pressure, the operation is aborted and an error message is
displayed.
In the next step of the operation, valve A6 is
closed and valve A3 is opened. This allows purge nitrogen
from a cylinder to flow through valves A3 and A4 to the
-28- 2194855
junction between valve Al and the regulator 154, and into the
evacuated distribution leg and line leading to the tool from
valve Al to the first shut off valve, thus filling and
diluting any remaining process gas in that conduit. The time
that nitrogen is thus allowed to flow into the delivery
conduit is pre-determined by a qualified operator.
The transducer 139 also measures t~e purge pressur~
during this phase of the operation. The pressure measured at
that point must rise above the pre-determined d~stribution
minimum purge pressure. If this condition i8 met, the cycle
just completed will be repeated a pre-determined number of
times. The number being another parameter which can be set by
a qualified operator. If the pressure does not rise above the
minimum purge pressure, the operation is aborted and an error
message is displayed.
Upon the completion of the pump/purge operation
described above, the distribution leg and delivery conduit are
cleansed of most of the process gas so that the system can be
worked on safely by operating personnel.
PUMP/P~RGE DISTRIBUTION ~EG (A,B,C OR Dl
This operation is used to clear toxic gas from any
distribution leg from valve V1 to the hand-operated valve 157,
159, 161 or 163. This is done for the purpose of clearing
only that section, instead of the whole line leading to the
first shut-off valve, in order to facilitate changing the
filter 156 or performing other maintenance in the distribution
leg. This operation is exactly the same as that described
above for the Pump/Purge Distribution Line operation, except
that the hand-operated valve 157, 159, 161 or 163 is shut at
the start of the procedure, and remains closed so that gas is
not evacuated from the line extending to the tool. Thus,
wasting gas is avoided and time is saved in enabling the
changing of the filter or performing other maintenance.
After the filter has been changed or other
maintenance has been completed, the pump/purge operation is
repeated in order to clear the distribution leg of any
impurities which might have been introduced during the
maintenance.
21 94855
-29-
EVACUATE DELIVERY LINE (A,B,C OR D~
The Evacuate Delivery Line function applies vacuum
to the selected delivery leg and the line leading to the tool
by opening valves V8 and then V6, with V1 closed. If used in
conjunction with the application of purge source on the other
end (the tool end) of the delivery line, it will clear the
line of toxic gas through the cabinet's vent by a straight
flow-through process, but with the gas flowing in a direction
opposite to that used in the "Purge Distribution Line" proce~s
described above.
Once initiated, vacuum will continue to be applied
until terminated by the operator via the Line Evacuate Off
function.
LIN~ EVACUATE OFF (A,B,C, OR D)
The Line Evacuate Off function places a vacuum on
the purge isolation section (Yalves 3 and 4); and then turns
off vacuum from the distribution leg. Valves 4, 6 and 7 are
closed. If no other legs require vacuum, the venturi valve 8
also is closed.
The purge isolation section referred to above
consists of valves A3 and A4 in combination. The purge
isolation section is provided for the purpose of isolating the
purge source from the delivery leg, and accurately indicating
any leaks. A vacuum is maintained in the conduit between the
valves 3 and 4 in order to better detect such a leak.
CLEAR CYLINDER PURG~ ISOLATION ALARM (A OR B)
Referring again to the cylinder manifold section 136
of Fig. 8, if a leak should occur in the purge isolation
section, an alarm is set off. A mechanism is provided by the
controller for automatically evacuating the purge isolation
section 153 and clearing the alarm.
In clearing the alarm, valves 3, 5 and 8 are opened,
while valves 2,4 and 7 of the cylinder manifold are closed to
create a vacuum in the isolation section. After five seconds,
the vacuum is removed and valves 3, 5 and 8 are closed. The
vacuum existing between valves 3 and 4 has been restored, so
as to enable detection of a future leak.
_30_ 2 1 94855
CLEAR DI~TRIBUTION PURGE I80LATION A~ARM (LEG8 A,B,C, OR Dl
The procedure described above for clearing the purge
isolation leak alarm for the cylinder manifold also is used to
clear the leak alarm for the isolation sections A3-A4, B3-B4,
etc. of the distribution manifold 134. The isolation section
pressures are measured by transducers 125, 127, 129 and 131.
MANUA~ F~NCTION8
When the Manual Function mode of operation i8
selected from the main menu (see above), and when two
passwords are used by two qualified maintenance persons, any
valve can be operated manually. Opening or closing of a
particular valve simply requires selection of the proper valve
prompt from the screen and entering it with the ENTER button
from the control panel 138 (Fig. lS).
lS In the Manual mode, various setpoint functions can
be set by the ~ualified operators, as follows.
Alarm and warning indications
Cylinder Empty
High Cylinder Pressure
High Regulated Pressure (Cylinder Manifold)
Low Regulated Pressure (Cylinder Manifold)
Purge Isolation Fail
High Delivery Pressure
Low Delivery Pressure
Minimum Exhaust
Purge cycle definitions
Manifold Purge definitions
# of pre-purges
# of post purges
minimum purge pressure
maximum vent pressure
purge time
vent time
Refill On/Off
Distribution Purge definitions
# of purges
minimum purge pressure
maximum vent pressure
purge time
vent time
Note that all pressure readings and setpoints are
in terms of absolute pressure-psiA. Therefore, the reference
pressure for the system is absolute zero pressure, not
-31- 2 1 94855
atmospheric pressure. That is, the reference pressure is
approximately negative 14.7 psiG, at sea level.
Once the desired set points have been reached they
can be permanently stored in memory by pressing the ENTER
button. This stores the set points in the EEPROM where it
will be stored even if the cabinet loses power. Thus,
battery-backed memory is not required.
Of course, as it is well known, EEPROM's can be
electronically erased so that new data can be stored in them,
and they will operate in thi~ manner for a relatively large
number of cycles (e.g. 100 to 50,000 or more) depending upon
the needs determined by the frequency expected for changes of
setpoints etc.
8ETPOINT FUNCTIONs
Following is an explanation of the setpoints which
can be selected in the "Setpoint Functions" mode.
Cylinder Empty 8etpoint
The cabinet determines that the process gas cylinder
is empty based on either weight or pressure. If the cabinet
is defined as one having a weighing scale, the setting is
based on weight. Otherwise, the setting is based on cylinder
pressure. In either case, "Cylinder Empty" is defined as
occurring when the weight or pressure falls below this
setting.
Hiqh Cylinder Pressure 8etpoint
This setpoint is used to test a cylinder for over-
pressure or another problem such as temperature rise, pressure
applied from an inappropriate source, etc. If the cylinder
pressure should read above this setpoint value, the "High
Cylinder Pressure" Alarm will occur. The pressures are
measured by the transducers 109 and 118 (Fig. 8), which
transmit "CYL A" and "CYL B" analog signals to the control
circuit (Fig. 4).
High Requlated Pressure 8etpoint
This setpoint is used to test the pressure
downstream from the cylinder regulators 154, and is measured
by the transducers 121 and 123, which send signals "PT2A" and
"PT2B" to the control circuit shown in Fig. 4. This will
determine ~Regulator Creep" in that area. The setpoint should
-32- 2 1 94855
be set somewhat above the normal operating pre-regulated
pressure.
Low Regulated Pre~suro 8etDo~nt
This setpoint is used to test to determine when the
regulated pressure measured by transducer 121 or 123 falls
below an established minimum pressure. It is used to ensure
that sufficient gas pressure is available to the distribution
manifold 134 (Figure 8). A regulated pressure reading below
this setpoint will result in a "~ow Regulated Pressure" alarm.
Pur~e Isol~tion ~il 8etDoint
This setpoint is used as a basis for determining if
either valve V3 or V4 in the purge source line has failed. A
pressure reading above this setpoint, when not purging,
indicates that gas has leaked from one direction or the other.
As it has been noted above, at the end of each a
purge cycle, a vacuum is created in the section of pipe
between V3 and V4. The setpoint should be set at a pressure
above the vacuum pressure by an amount which would indicate
that there is a leak, if that pressure is reached after a
certain period of time.
Low DeliverY Pressure Setpoint
The Low Delivery Pressure setpoint is used to
determine when insufficient gas pressure for proper operation
is present downstream from the regulator 154 in any
distribution leg. This pressure is measured by the
transducers 133, 135, 137 and 139. A pressure below this
setpoint, when delivering gas, results in a "Low Delivery
Pressure" alarm.
~i~h Delivery Pressure ~etpoint
A "High Delivery Pressure" alarm occurs when the
pressure measured by any of transducers 133, 135, 137 and 139
is too high, usually due to regulator creep.
Minimum Exhaust Setpoint
The Minimum Exhaust setpoint is set as the minimum
acceptable exhaust gas flow rate through the exhaust duct 102
(Figure 6) for safe cabinet operation. It is interlocked with
the most significant cabinet valve and gas delivery
operations, to disable those operations under "Low Exhaust"
conditions.
_33_ 2194855
Pur~e 8etpoints
The computer program steps utilized in the above
purge operations and setting of purge parameters are given in
the above-identified pending patent application and will not
be repeated here.
CONFIG~RATION FUNCTION
When the "Configuration Functions~ mode is selected,
a qualified operator can modify or establish the following
parameters.
Cylinder pressure transducer range
Cylinder manifold regulated pressure transducer range
Cylinder manifold purge pressure transducer range
Cylinder manifold vent pressure transducer range
Distribution manifold regulated pressure transducer range
Distribution manifold vent pressure transmitter range
Cylinder weight range
Delivery association for each distribution leg
Exhaust duct size
Zero calibration for each manifold
Zero calibration for each scale
Pressure Ran~e 8elections
The range of the pressure transducers can be changed
to accommodate the use of the transducers with different
gases, or for any other reason.
As an example, the pressure range selection is
performed simply by using the arrow keys 355, 357 on the panel
138 (Fig. 15) to change the range until the desired range is
displayed (e.g. 0 to 100 psiA or O to 3000 psiA). Then ENTER
is pressed to select the range. The selection of the range of
the voltage of the analog output signal of each transducer
(e.g. 0 to 5 volts or 1 to 5 volts) also can be selected by a
similar procedure.
Cylinder Weiqht Range 8election
Cylinder weight range selection is similar to the
pressure range selection described above. One additional
option will allow the selection of "No Device Present" for
those cabinets not having a scale.
DeliverY Association (~e~ A, B, C or D)
Each distribution leg of each cabinet is associated
with a specific tool. The tools are wired to the Tool
Interface Controller (TIC) 42 shown in Figs. 1 and 4 and
discussed above. Each tool is assigned a number associated
2 1 94855
-34-
with the position in the TIC to which it is wired. This
number, (e.g., 0 through 120), is stored in the memory of the
cabinet for the leg which is connected to deliver gas to the
tool. In operation, when the tool (say Tool #32) requests gas
by closing its contacts connected to the TIC 42, all cabinet
legs having a matching stored delivery association (32) will
be opened to deliver gas.
The delivery association stored in the memory of
each cabinet can be changed simply by operating the up-down
keys 355 and 357 and the ENTER key 359 on the panel 138 (Fig.
15), in the manner described above for other configuration
selections. Re-wiring of the tools is not required.
8ELECT EX~A~ST DUCT RIZE
One of the advantageous features of the invention is
that it allows the user to adapt the gas cabinet to correctly
measure the cabinet exhaust gas flow rate through the outlet
duct 102 (Figs. 5 and 6) despite a difference between the
diameter of the outlet duct 100 on the cabinet and the
diameter "d" of the duct 102. This can be done by means of a
few keystrokes on the control panel 138 (Fig. 15), in the
manner described above. This allows each gas cabinet to be
moved to a plant location in which exhaust ducting already is
installed, without having to replace the ducting to match that
of the cabinet. Moreover, the adaptation is fast and simple.
Referring again to Fig. 6, as noted above, a pitot
tube device 134 is mounted in the duct 102 to measure the
velocity of the gas flowing through that conduit. The device
134 includes a transducer which converts the differential
pressure measured by the pitot tube device into an electrical
signal. This signal is delivered on the "EXHAUST" line
(Fig.4) to the analog input circuit 302 which converts the
analog input signal into a digital output signal which is
delivered to the CPU 306. The CPU then computes the flow rate
according to the following equation:
Flow = D x ~P
Where: Flow = Exhaust flow in cubic ft./minute
D=Duct size constant (examples: D=1425 for a 10 inch
duct and 1020 for an 8 inch duct)
_35_ 2194 855
P=Differential Pressure output of pitot tube device,
in inches of water
Stored in the memory 308 of the control system shown
in Fig. 4 are at least three different duct constants, as well
as the algorithm corresponding to the above equation.
When the operator selects one of the duct sizes by
manipulation of the pushbuttons on the control panel 138 (Fig.
15), the selection is stored in memory, and the program of the
controller causes each subsequent reading from device 134 to
be operated upon according to the algorithm to give correct
indication of the flow rate through the exhaust duct. The
operator also can select the minimum acceptable flow rate, in
the manner described above, in accordance with standards that
are set up to insure adequate ventilation of the cabinet to
protect operating personnel. If, for some reason, the flow
rate should fall below this minimum level at any time during
operation, an alarm is activated to indicate that correction
is needed.
Once the exhaust duct size has been selected, that
selection is retained in EEPROM and is not lost even if the
controller suffers a loss of power.
This feature of the invention facilitates and
reduces the cost of installation of the gas flow control
cabinets at various existing plant locations, regardless of
variations of the exhaust duct size. It increases the
versatility of the cabinet by increasing the feasibility of
moving it to new locations.
ZERO Cl~IBRATION
The transducers which are used to measure gas
pressure drift over a period of time. Therefore, the
transducers must be re-calibrated from time to time in order
to restore their accurate operation.
The transducers tend to drift both in the zero
readings and in the "span". The "span" is the difference
between the electrical output at zero and that at full scale.
Typically, the span drift is less significant that the drift
of the zero point. This is because the pressures which are
measured during purge tend to be very close to the zero point
of the transducer range. If the transducer zero reading has
-36- 2 1 94855
drifted by an amount which is significant compared to the
minimum and maximum pressures permitted during purge cycles,
the safety verification of the system is not valid. This can
result in either a serious safety problem, or the inability to
perform a purge cycle. For these reasons, the zero readings
usually require relatively frequent calibration, whereas the
span seldom requires calibration.
In the past, as it has been explained briefly abov~,
re-calibration of the transducers has been performed once
every three to six months. This ha5 been done manually, and
the procedure can take four to eight hours per gas cabinet.
A typical large semiconductor fabrication plant may have one
hundred to five or six hundred such gas cabinets. Thus, it is
evident that a relatively large amount of labor is required
for re-calibration. This creates a significant operating
cost. Furthermore, each of the gas cabinets, and its related
semiconductor manufacturing tools, is out of operation for a
significant period of time, thus reducing the productivity of
each gas distribution system, and of the entire plant.
In accordance with the present invention, the zero
point of each transducer is re-calibrated automatically in a
matter of a few minutes or seconds. This is done by the
manipulation of the control pushbuttons on the panel 138 shown
in Fig. 15.
The basic procedure for zero calibration is to first
subject the transducer to a known pressure or weight which is
at or very near its zero point, and read the electrical output
generated by the transducer. Next, the difference between the
measured value and the ideal value of the transducer is
calculated. That difference, called an "offset'l, is stored in
non-volatile memory (EEPROM) and then is used to compensate
all subsequent readings by adding it to or subtracting it from
the readings of the transducers during operation.
The computer program used to perform the zero
calibration and subsequent operation described above is shown
schematically in Figs. g and 10 of the drawings.
Fig. 9 shows the zero calibration routine described
above, and Fig. 10 describes the use of the offset value
stored in the zero calibration routine to adjust subsequent
_37- 2 194855
analog readings. The last step in the process illustrated in
Fig. 10 is to perform other scaling on the reading. That is,
the signal may be amplified or otherwise modified in
magnitude, as is needed by the control system.
8cale Zero Calibratio~
Fig. 11 is a flow chart describing the computer
program routine used to calibrate the zero setting of the
scale transducers. The same routine i4 used for both the A
scale and the 8 scale, if two scales are used in the cabinet.
The program uses a multi-tasking routine. Each of
the decision diamonds in the left hand portion of Fig. 11
determines whether the step is in progress or not. If the
answer is "yes", the step proceeds until it is completed by
the delivery of a return signal, at which point the program
proceeds to step 2. The same procedure is followed for each
subsequent step in the routine.
In step 1, the display on control panel 138 (Fig.
15) states "Insure scale empty, Press ENTER when ok". This
encourages the operator to make certain that the scale being
calibrated has no weight on it. The program then determines
whether the "ENTER" button has been pressed, within a certain
length of time. If the answer is yes, step 2 is set. If no,
the routine returns to start.
In step 2, the computer compares the reading of the
scale transducer with what it should be, and calculates and
stores a zero offset value in memory (EEPROM).
When step 2 is complete, step 3 is performed in
which the analog conversion factors for the scale are re-
initialized and stored in memory.
After step 3 is complete, step 4 is performed in
which a display "zero calibration complete" is formed on the
control panel display. After a delay of three seconds, step
5 is performed in which a "Function Over" display is produced
and the function is cleared. Step 1 is set, and the routine
is ready for the start of another operation.
2ero Calibration of Di~tribution Leg Pressure Transducer~
Fig. 12 shows the computer program routine used to
perform a zero calibration of the pressure transducers in one
of the four distribution legs in the distribution manifold 134
-38- 21 94855
(Fig.8). In Fig. 12, the valves that are open and closed are
referred to with a "V" preceding the number of the valve
rather than the letters "A" or "B" etc. used in Fig. 8. This
is done for the reason that the routine applies to any one of
the four legs and thus the valve identification is
generalized.
In the first step, V8, the venturi valve is opened
to apply a vacuum to line 165, and valves Vl, V4 and V7 arQ
closed. Vl is closed to shut off the flow of process gas. V4
is closed to shut off the flow of nitrogen, and V7 is closed
to minimize the length of conduit to be evacuated.
It is a notable feature of this aspect of the
invention that, by using absolute pressure values rather than
atmospheric pressure values, and by using the vacuum source as
lS a reference pressure source, a calibration reference source is
provided by the simple expedient of using the vacuum source
which already exists for purging the gas flow lines. This not
only avoids extra equipment costs, but it has the added
benefit of preventing the opening of the gas flow lines to
atmosphere, which might be required if atmospheric pressure
were used as the reference pressure, and thus avoids
contaminating the gas lines.
In step 2 shown in Fig. 12 the vent valve V6 is open
to evacuate the distribution leg between valves V1 and V7,
thereby subjecting the transducers in the leg to the vacuum as
a reference pressure. While the distribution leg is being
evacuated, a message "Releasing Pressure" is displayed for a
certain period of time. Then, after a delay of fifteen
seconds to insure that the measured pressure has dropped to
the relatively constant pressure of -11.7 psiG (+3 psiA) of
the venturi pump, the program continues to step 3.
In step 3, the zero offset values are calculated and
stored for each of the separate leg pressure transducers, in
sequence.
In step 4 the message displayed is "Storing New
Values". Vent valves V6 are closed and, after a wait of two
seconds, step 5 is initiated. Steps 5 and 6 correspond,
respectively to steps 3 and 4 of Fig. 11, and will not be
explained further here.
2194855
-39-
In step 7, the vacuum valve V8 is turned off, and in
step 8 the function is ended and the program returns to step
1 to wait for another operation.
Of course, the same process is repeated for each of
the other distribution legs in the cabinet.
Zero Calibration of the Cyli~der Manifold Transducer~
Fig. 13 is a flow chart for the program used to
perform a zero calibration for the pressure transducers in th~
cylinder manifold 136 (Fig.8). These include transducers 121,
123, 109 and 111, 113 and 115, 117 and 119 shown in Fig. 8.
As in the distribution leg transducer calibration
routine~, the vacuum pressure produced by the venturi pumps 148
and lSO by opening the venturi valves A8 and B8 are used to
provide a reference for the transducers.
In step 1 of Fig. 13, venturi A8 is opened. After
a delay of X seconds (a value which depends on the type of
cabinet) the program proceeds to step 2.
In step 2, the vent valves V5 and V2 are opened.
Valve Vl is closed. After a delay of Y seconds, which also
depends on the type of cabinet, the program moves to step 3.
In step 3, valves V3 and V6 are opened, thus
exposing the transducers to the low reference pressure
provided by the venturi pumps. After a delay of about ten
seconds, the program proceeds to step 4.
The various delays in the pressure transducer
calibration routines are provided in order to allow time for
stabi~ization of the transducer readings, and to insure that
atmosphere does not enter and contaminate the process gas
manifold.
In step 4, the offsets for the various transducers
are calculated and stored. Then, in step S, the message
"Storing New Values" is displayed, and all cylinder manifold
valves except venturi valves V8 are closed. After a delay of
two seconds, the program proceeds to step 6.
In step 6 the analog conversion factors are re-
initialized, and the venturis V8 are closed.
Finally, the program is completed in steps 7 and 8,
as in the programs described above.
21 94855
-40-
As it can be seen from the foregoin~, the automatic
calibration of the transducers can be performed in a few
minutes instead of several hours. This saves a great deal of
labor costs and down-time for the flow control units. Thus,
5labor costs are reduced, and productivity of the gas
distribution system is increased.
COMM~NICA~IONB BET~EN THE ~O~T-
INTERFACB CONTRO~T~R AND GA8 CA~IN~TS
10There are several types of message~ which are used
in communication between the tool interface controller (TIC)
and the gas flow control cabinets. The following is a list of
the message types which are sent by the TIC to the cabinets.
1. Polling Messages. The first message type polls
15the cabinets sequentially at the rate of about four messages
per second or less. Communications are at the rate of
approximately 9,600 baud. In response to each polling
message, one of the cabinets sends a data packet to the TIC.
The data packet will be described in detail below.
202. Broadcast Messages. Once per second, the tool
interface controller broadcasts signals to all of the gas flow
control cabinets informing them of which tools are requesting
that gas flow be started or stopped. The data processor in
each gas cabinet is programmed to receive these broadcasts on
25the digital input lines and compare the tool numbers with
those it has stored. When it detects a match, it executes the
instructions broadcast. Otherwise, it ignores the signals.
Thus, gas distribution legs for which a given tool number has
been stored will be enabled to start or stop gas flow.
303. Read Setpoint Signals. On command from the
supervisory control computer 44, the setpoints for each
selected cabinet are read and displayed on the screen of the
computer.
4. Read Setpoint Ranges. On command from the
35supervisory controller, the setpoint ranges for the various
flow control are read and displayed.
5. Read Configuration. On command from the
supervisory control computer, the configuration of each gas
flow control cabinet is displayed.
-41- 21 9q855
6. Direct Valve Control Messages. These messages
comprise commands directly from the supervisory control
computer to open or close specific valves in specific gas
cabinets.
7. Execute Pre-defined Function. On command from
the supervisory control computer, several automatic functions
such as purge operations can be ordered and will bQ executed
by a specific one of the flow control cabinets.
8. Get Cabinet D~splay Messages. Upon command
from the supervisory control computer, the display 352 on th~
cabinet control panel 138 (Fig. 15) is transmitted to the
screen of the supervisory control computer for display to the
operator there.
9. Message Display. Pursuant to the operation of
the supervisory control computer, the display 352 on any
selected cabinet can be made to display whatever the operator
of the supervisory control computer wishes. This feature is
used, for example, when there is direct control of valves from
the supervisory computer.
10. Alarm Acknowledge Messages. The operator at
the supervisory control computer can acknowledge any alarm by
operation of the computer. This is secondary to and
supplements acknowledgement of the same alarm condition at the
cabinet itself. Therefore, the control of the individual
units and the supervisory control computer both operate to
provide this function.
11. Abort Function Messages. These messages are
sent from the supervisory computer to abort a function which
is in process at one of the flow control cabinets.
12. Set-point Messages. On command from the
supervisory control computer, setpoints can downloaded from
any of the gas flow control cabinets to the supervisory
control computer for display there.
DATA PACRET 8TR~JCTURE
As noted above, the tool interface controller polls
the various gas flow control units periodically at the rate of
about four messages per second. In response to a polling
signal each cabinet sends back to the TIC a data packet.
21 94855
-42-
Fig. 14 shows the arrangement of data in each data
packet. Each packet is a maximum of 120 bytes in length. The
data packet structure is as follows:
1. First is the start of text message ("STX") to
identify the start of a packet.
2. Next is the acknowledge section (~AK").
3. Next is data indicating the type of cabin~t
which is responding. For example, there might be, in a singl~
system, four or more different types of cabinets, some having
only one distribution leg, some having four distribution legs,
etc.
5. Next is a byte defining the number of analog
values which are to follow.
6. Next are the analog values. Three bytes are
used for each analog value.
7. Next is a byte giving the number of alarm
status bytes to follow.
8. Next are the alarm status bytes (e.g. high
flow, low flow, etc.).
9. Next is the number of digital input bytes to
follow.
10. Next are the digital inputs.
11. Next is general status information, such as
which manifold legs currently are enabled; which of the two
gas sources A or B currently is being used, etc.
12. Next is the list of associated tool numbers for
each distribution leg of the flow control units.
13. Next is a checksum.
14. Finally, End of text (ETX).
If reconfiguration is desired, this can be done in
software in a simple manner. For example if the delivery
association is to be changed; that is, if the tool number
which is to be connected to a particular distribution leg is
changed, the following procedure is followed.
The tool number is entered at the cabinet by the
simple procedure described above. This is stored in an
EEPROM so that a battery-backed memory is not necessary.
The next data packet now has the new tool number in
it and the tool interface controller reads it and stores the
-42A- 2 1 94 8 55
number in its random access memory (RAM) 303. The cabinet now
responds to the new tool number request during the broadcast
of the calls for delivery of gas to the various tools.
Since the information from each gas cabinet stored
in RAM 303 is refreshed once every several seconds, the RAM
-42~ 21 94855
also need not be battery-backed, thus further reducing the
cost and maintenance requirements of the gas distribution
system.
8UPERVI80RY CON~ROL COMP~TER
As it was noted above, the supervisory control
computer is a personal computer, such as an IBM PS/2 Model 80.
It should be noted again that the control that the
supervisory control computer provides over each gas cabinet
can be overridden by someone operating the controls at the gas
cabinet itself. This is done in order to give preference to
local control at the site over central control, whenever the
controls compete with one another.
D~8P~AY8 AND PROMPT8
The supervisory control computer is programmed so as
lS to provide the following displays on its screen:
Home 8creen
The operator can bring up the Home Screen shown
F~ elb~bo~ld/
2194855
The screen shows, in graphic form, the status of the
entire system. There is a separate block (e.g. "970 G6 Room")
for each gas cabinets in the system. Only one room block is
shown on the home screen above, whereas usually there will be
several such rooms in a given system. The block is color-
coded to indicate the status of the room: Red means one or
more cabinets in the room has an active "high priority" alarm.
Yellow means that one or morQ cabinets in t~e room ha~ ~n
active warning (low priority) alarm condition. Green
indicates that all cabinets in the room are in a non-alarm
state.
On the home screen, immediately below the room bloc~
or blocks is an area "Alarm Messages" where all current system
alarms are shown. Two columns of four rows each are provided
in this area. This allows for up to eight alarm messages to
be displayed at one time. Additional messages can be
displayed by using the down and up arrows on the computer
keyboard to scroll down and up through the alarm messages.
The highest priority unacknowledged alarm appears in
the upper left-hand position. The next highest priority alarm
appears below it. This pattern continues by filling the first
row and then the second row for unacknowledged alarms. Next,
the acknowledged alarms follow in the list in the order of
descending priority. The alarm text is color-coded.
Unacknowledged alarms are printed in red text, whereas
acknowledged alarms are in white.
Acknowledgement of the alarms can be made by simply
pressing the llplus" key on the keyboard.
_44- 2194855
Room ~Yout 8c~e~n
By pressing the F2 key the operator can bring up the room layout
screen shown in Fig. 18, which shows in graphic form, the status of all
cabinets in a particular room.
Each cabinet is given a nu~ber, and the layout of
the cabinets on the screen the same as the cabinets have in
the room. The blocks representing the cabinets are color-
coded with either red, yellow or green color, following thecode above, to indicate respectively, whether the cabinet has
one or more active high-priority alarms; one or more active
lower-priority alarms; or no active alarms at ~11.
Below the room layout is an area for alarm messages.
Again, all active alarms are displayed in their descending
priority, with the highest-priority unacknowledged alarm in
the upper left hand position. The representation of a row of
keys displayed at the bottom of the screen identifies the
function keys that can be used to quickly move from one mode
or screen to another.
Automatic ~o~e 8creen
To select the automatic mode, while in the room
layout mode, the operator presses the F2 key and the computer
responds with a prompt asking for the desired cabinet number.
When the cabinet number is typed in and the ENTER key is
pressed, the system will bring up the screen ~hownin Fig 19
~45~ 2194855
The various sections on the Automatic Mode screen
are described below:
Quic~ ~-y- - Along the left-hand side of the display
is a block listing of the available quick ~eys. As discussed
previously, these keys can be used to quickly move from one
mode to another.
C~bln-t I~-ntifl-r - On the top left hand side of
the display is a label ident~ying the chosen cabinet number
and the type of gas it contain~.
~onu/Prompt Area - Below the Cabinet ldentifier is
a block used for menus, and other alphanumeric information, as
appropriate.
Exhaust Flo~ Bar C~art - Below the Menu/Prompt area
is a display giving the cabinet exhaust flow rate, in both a
bar graph and numerically, in C.F.M.
Alarm ~loc~ - On the bottom left hand side of the
display is an alarm block. Up to eight system alarms can be
displayed in prioritized order on the screen. These alarms
apply to all cabinets, not just the selected cabinet. If more
than eight alarms are active, the arrow keys on the computer
keyboard can be used to scroll through additional alarms.
Cabinet Manlfol~ Graphic - The right hand side of
the display provides a graphic representation of the cabinet
manifold status. The lines and valves are color-coded to
illustrate gas flow. An open valve and connected line are
shown in green, while closed valves and tubing segments are
shown in red.
Analog values of operating parameters are displayed
at the appropriate positions in the manifold. These readings
are primarily pressures measurements and cylinder weights.
The association of the delivery legs with the tools is given
above the piping diagram. As an example, in the screen shown,
leg ~1 is connected to tool t570, and leg ~2 is connected to
tool ~314. In the example shown, only two legs are in use,
either because that cabinet has only two legs, or because only
two of the four legs are in use.
801ecting An Automatic Function
Selectin~ an automatic function is a simple process
in which the operator follows the prompts in the Menu/Prompt
-46- 2i94855
area o~ the screen. In the Menu/Prompt area i8 a list of
available automatic functions, alorlg with the control functlon
key that wlll select each. Additional functions may be mad~
available on other pages by pressing tbe "Page Up" or "Page
Down" keys on the )ceyboard.
To select a function, the operator presses the
assoc~ated control key combination. For example, on thQ
screen shown, press ing tho Ctrl key and the ~1 koy
simultaneously will dlsplay a prompt to enter the password.
The password is typed and entered by pressing ENTER. If thc
correct password is entered, the Purge to Change Cyl inder A
function begins, unless an interlock conditlon exists which
prevents operation.
When a function is selected, the supervisory control
computer will communicate through the TIC to the cabinet. If
everything is satisfactory (no interlocks) the function will
start. If not, a message indicating that function operation
is inhibited will be displayed for a brief period in the
Menu/Prompt area.
During function operation, the Menu/Prompt area
displays the same messages that are being displayed at the
cabinet. During any automatic function, the operator can
abort the function by pressing the ESC key on the computer
keyboard .
Maintenance Mode
The screen shown in Fig 20 shows the maintenance mode of
operation
This mode can be used to print system readings or to change the
main system password Its display is identical in configuration to the
automatic mode display This mode can be selected simply by selecting the F4
- key to bring the screen up
2 1 94855
-47-
It may not be necessary to enter a particular cabinet identification
number, since the maintenance mode display will display the characteristics of the
last cabinet number which was previously selected in another mode.
The "Print Gas Readings" function, which is entered by pressing key
5 F1 while in the maintenance mode, allows the operator to select a gas room and to
get a printout of the current pressures and weights of cylinders used to supply gas
to each tool. The room number is listed, followed by the date and tiIne at the top
of the printout.
The printout lists one row of data for each tool that is connected to a
10 cabinet. Each row contains the tool name, tool number, cabinet number, gas type,
the active cylinder, and pressure or weight reading. If scales are present, a weight
reading is listed; otherwise, a pressure reading is listed.
From the Maintenance Mode Screen, to select the Print Gas Readings
function, the operator presses Ctrl and F1 simultaneously. A prompt is displayed15 to enter the room number. When this is done, a message is displayed "Please wait
until printing completes" while the document is being printed. After the printing
completes, the previous menu appears with selections to Print Gas Readings and
to Change Password.
The Change Password function allows the operator to change the
20 main system password. This password is utilized to enter Configuration Mode,
Parameter Set Mode, and the Exit to Dos mode. This password does not apply to
activating automatic functions; automatic functions have a built-in password that
cannot be changed.
- From the Maintenance Mode Screen, to select Change Password, the
25 operator presses Ctrl and F2 simultaneously. A prompt is displayed asking for the
current password. The current password is typed in and entered by pressing the
ENTER key. If an incorrect password is entered, a prompt appears "Try again" andthe operator can enter the password again to continue or the operator can press
Enter to return to the menu selections.
21 94855
-4~
If the correct password is entered, a prompt is displayed asking for the
new password. The new password is typed and entered. Next, a prompt is
displayed asking for the new password again. The same new password is typed
again and entered. If the second new password matches the first, a message is
5 displayed indicating that the password has been changed. If the second new
password does not match the first, a message is displayed indicating that the
password has not changed. In either case, the menu returns with the selections
displayed for Print Gas Readings and Change Password.
Parameter Set Mode
The supervisory control computer allows an operator at a single
supervisory station to review and/or modify setpoints in any cabinet in the
system. This is accomplished through the Parameter Set Mode.
Cabinet Parameter Set Mode can be selected from any screen. To do
so, the operator simply presses the F9 key, and, in response to a prompt, enters the
15 main system password. The system enters the Parameter Set Mode with the
graphics display for the most recently-selected cabinet.
Fig. 21 is a reproduction of the Parameter Set screen.
2 i 94855
-49-
Most of the information on the screen is of the same type as on
previous screens and need not be explained further. Only THE new features will
be explained.
All cabinet setpoints are stored in the gas cabinets themselves. In
5 order to view and/or change setpoints, the supervisory control computer must
first be used to retrieve these setpoints.
The first screen displayed upon entry into the Parameter Set mode is
one which reads "~F1 Remote Setpoints". The operator presses Ctrl and F1 to get a
list of available cabinets, and selects the one desired.
Next, the operator presses the appropriate control and function key
combination listed next to the cabinet number to command the supervisory
control computer to retrieve setpoints from the desired cabinet. The Menu-
Prompt area will display a list of cabinet setpoints along with their current values.
Changing A Setpoint
To change a setpoint, the operator presses the control key and
function key associated with the setpoint. The display will project the current
value of the setpoint along with the limits of adjustment. The operator types inthe desired setpoint value and presses ENTER. When the new value is entered, it
will be transmitted to the cabinet. If the cabinet accepts the setpoint, it sends back
an acceptance message, which will be displayed in the Menu/Prompt area,
indicating that the new setpoint has been stored. If not, a setpoint change failure
message will be displayed.
Configuration Mode
The Configuration Mode is provided to allow a qualified operator to
configure the supervisory control computer. It allows the following configuration
functions to be performed.
Set number of cabinets in the system
Enable/Disable alarm printing
Set the chemical gas name for each cabinet
Enable/Disable cabinets from being selected in any mode
Set the tool names that are displayed for each cabinet delivery leg
21 94855
-50
Set the tool numbers that are displayed for each
delivery leg
Configuration Mode can be selected from any
supervisory system screen by pressing the F8 key. After entry
o.~ tAe password, the system enters the Conflguration mode wlth
the graphics displayed for the most recently selected cablnet.
Fig 22shows ~etop-levelConfigura~on Modescr~n.
Following is an explanat$on o~ the functions which
can be performed in this mode.
8et Number o~ Cab~nets
In this function, the operator ~ets the number of
cabinets t~at can be accessed by the operator at the
supervisory control computer. This number i~ the total number
of cabinets that are available ~or selection ln any mode that
requires a cabinet number to be entered.
To select this function, the operator presses Ctrl
and F1. A prompt appears as~ing for the number of cabinets.
The number of cabinets is typed in and entered.
Selecting Ennble/~isable Alarm Printinq
In the Configuration Mode, whenever Ctrl and ~2 are
pressed, the alarm printing enable/disable selection toggles.
For example, if the current state is disabled, the menu
displays "Enable Alarm Printing. n Making the selection Ctrl
and ~2 enables alarm printing and the display changes to
"Disable Alarm Printing.~
Configure Cabinet
Selection of Configure Cabinet allows the entry or
modification of chemical gas names for a cabinet and tool
names and tool numbers that are displayed on the manifold
graphic associated with the delivery legs. Of course, this
should be done to match changes which are made in the gas used
or leg/tool connections at the cabinets. Also, a cabinet can
be disabled or enabled from operator selection.
21 94855
-51-
Selectir~g Configure Cabirlet
After entering Configuration Mode, to select the Configure
Cabinet function, the operator presses Ctrl and F3 simultaneously. A menu of
available cabinets appears in the Menu/Prompt area, as in the screen shown
in Fig. 23.
Next the cabinet desired is selected. A menu appears with
options to update the chemical name for a cabinet, disable cabinet from
operator selection, or update tool data.for a cabinet, as in ~e Configuration
Mode Cabinet Definition List screen (Fig. 24).
~p~te G~ me
This selection allows the operator to update the gas
name used on various displays for a partic~lar cabinet.
To update a gas name, after selecting Confi~ure
Cabinet, the operator pre~ses Ctrl and Fl. A prompt i~
displayed requesting entry of the gas name. The desired gas
name is typed in and entered. The Configure Cabinet ~enu
returns with the new gas name being displayed.
Di~ble Cab~net
This selection toggles between "Disable Cabinet" and
"Enable Cabinet." If a cabinet is disabled, it will not be
available for selection for any mode in the system except
Configuration Mode. The screen will display "Disable Cabinet"
if it is currently enabled.
21 ~4855
-52-
To select Disable Cabinet, after selecting Configure Cabinet, the
operator presses Ctrl and F2. Now the cabinet is disabled and the display now is"Enable Cabinet".
Update Tool Data
This selection allows the operator to update tool names and tool
numbers for each delivery leg of a particular cabinet.
To update tool data, after selecting Configure Cabinet, the operator
presses Ctrl and F3 and a new menu will appear displaying tool update selectionsfor each delivery leg. To update the tool data for a delivery leg, the operator
presses the associated control and function key combination. For example, he or
she presses Ctrl and F3 to update tool data for Leg 3. A menu will appear with
selections to Update Tool Name and Update Tool Hex Number.
To Update Tool Name, the operator presses Ctrl and F1 and a prompt
will appear asking for the new tool name. The new name is typed in and entered.
The menu will return with the options to Update Tool Name and to Update Tool
Hex Number.
To Update Tool Hex Number, the operator presses Ctrl and F2 and a
prompt will appear asking for the new tool hex number. The new hex number is
typed in and entered.
53_ 21 94855
~2~U~ O 8creen
TheTabularI/O ~n ~shown ~ Fi~.25
The above screen provides a presentAtion of all
cabinet inputs and outputs found for a particular cabinet. It
provides basically the same information that is found in the
cabinet graphic6. However, there are data that are not
displayed elsewhere.
This mode i~ used primarily for maintenance
purpose~. It provide~ maintenancQ personnQl with detailed
informa~ion of exactly what tbe gas cabinet i8 reading on its
inputs and what the controller is putting out on the output
- 2 1 94855
-5~
lines. The inputs and outputs are color-coded. For the valve outputs, green
indicates that the valve is open, while red indicates that the valve is closed. For
the other outputs to the alarm bus, the color green indicates an energized, normal
state, whereas red indicates an alarm state. For the inputs, the color green
5 indicates that the input is active while red indicates that the input is not active.
Printir~g
Pressing key F5 will cause the printer of the control computer to print
all the information on the current screen.
Exiting to Dos
Exiting to Dos terminates the supervisory program and allows the
operator to use the computer for other purposes. To exit to Dos from any screen,the operator presses the F10 key and a prompt appears asking for the password.
The main system password is entered, and the supervisor program will terminate,
and the computer can be used for other purposes.
CONCLUSION
It can be seen from the foregoing that the present invention amply
satisfies the objectives set forth above. It provides a gas flow control system which
is capable of both local operation of each gas flow control unit, and central
operation from a single personal computer by a single operator. This provides for
20 simultaneous monitoring of the operation of each flow control unit, and of the
system in its entirety.
Centralized control is provided with a minimum cost of cabling and
wiring.
A highly versatile gas control unit is provided which supplies process
25 gas to any one or all of four different tools at which the gas is utilized.
Furthermore, the gas can be supplied from either of two alternative source tanksso as to minimize down-time and insure a continuous flow of process gas.
The system provides a high degree of operator safety, without the cost
usually required in past systems. The cost of purging various flow lines in the
30 control units is simplified and made faster by the provision of local purging
21 94855
-55-
techniques in the short sections of the gas distribution legs in the flow control
units, rather than purging the entire length of the conduit from the flow control
cabinets to the tool locations. This saves gas and time.
Purging of the delivery lines to the tools is made possible, even
5 though flow-though purging is not available, thus improving safety in line
maintenance operations.
Automatic selection of exhaust conduit size parameters allows the
parameters, by means of a few simple keystrokes, to accommodate the gas flow
control unit to be used with a variety of different sizes of exhaust conduits which
10 may be installed in a given plant, thus increasing the versatility of the flow control
equipment, as well as decreasing installation costs.
Considerable labor savings are created by the provision of automatic
means to re-calibrate the zero readings of various pressure and weight transducers
in the system. By utilizing a pressure source already available in the system,
15 hardware costs are minimized. Moreover, the calibration is done without
exposing the gas flow conduits to the contaminating atmosphere. The calibrationsare performed quickly and easily by the operation of a few controls.
Changing the wiring connections between the tools and the gas
cabinets does not require mechanical re-wiring. Instead, the connections are
20 changed in software, by means of a few keystrokes.
The above description of the invention is intended to be illustrative
and not limiting. Various changes or modifications in the embodiments described
may occur to those skilled in the art and these can be made without departing
from the spirit or scope of the invention.