Note: Descriptions are shown in the official language in which they were submitted.
CA 0224~103 1998-08-14
CUTTING/BREAKING APPARATUS
This invention relates to apparatus for cutting/breaking tiles and similar
items (hereinafter referred to as a 'tile'), particularly apparatus which
includes measuring means and scoring means for correctly 'sizing' a tile
prior to cutting/breaking.
With apparatus of this kind, it is essential that the large forces involved in
the cuttinglbreaking process are satisfactorily and properly absorbed
without any deformation of the apparatus, since should such deformation
occur, there is a tendency for the tile to break laterally, i.e. at 90~ to its
score line and thus its intended breaking direction. Whilst with some
apparatus of this kind the necessary strength is provided by virtue of
either a whole frame of the device or a cutting/breaking base of the
device being of metal, such as by die-casting, this can result in the
apparatus being relatively expensive.
According to the invention there is provided apparatus for
cutting/breaking tiles, comprising a base having a surface for reception of
a tile to cut/broken, the base having first and second relatively spaced
apart ends, support means and strengthening/further support means
spaced from said base surface at respective opposite sides thereof and
extending from the first end to the second end of the base, operating
means for cutting/breaking said tile, the operating means being carried by
said support means and being actuatable to effect said cuttinglbreaking,
in use, and connecting means at one of said ends of the base
interconnecting the support means and the strengthening/further support
means, each of the connecting means, support means and
CA 0224~103 1998-08-14
strengtheninglfurther support means being of material which is more
rigid than the material of the base, such that forces arising, in use, during
the cutting/breaking operation are resisted/absorbed thereby.
The invention will now be described, by way of example, with reference
to the accompanying drawings, in which:-
Figure 1 is a perspective view of apparatus of the present invention,
Figure 2 is a reduced scale exploded view of the apparatus of Figure 1,
Figure 3 is an part-internal side view of the apparatus of Figure 1, in one
state of use,
Figure 4 is a side view of the apparatus of Figure 1, i;n another state of
use,
Figure 5 is a perspective view of parts of the apparatus of the presentinvention for resisting/absorbing breaking forces and breaking a tile,
respectively,
Figure 6 is a perspective view of a further part of the apparatus, and
Figure 7 is an enlarged schematic scrap sectional view through the
apparatus of Figure 1 showing relationship between a breaker bar and a
strengthening/support bar.
Apparatus of the present invention shown in Figure 1 is intended
primarily for the cutting/breaking of tiles, but can also be used for the
CA 0224~103 1998-08-14
cutting/breaking of similar items, namely those of the same type of plate-
like form, or items having a planar body. As used hereinafter, the term
'tile' is thus to be interpreted as including all such similar items.
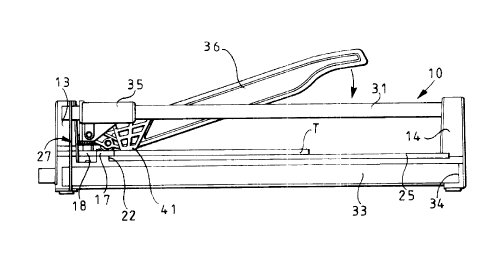
The tile cutter 10 shown in the drawings is formed by a main base
moulding 11 of plastics material. The moulding 11 is of generally
rectangular shape in plan and also in lateral cross-section. The moulding
has an upwardly facing surface 12 which extends between two upright
end columns 13, 14 respectively which are normal to the surface 12 and
extend vertically, in use. The moulding 11 is formed in one-part, so that
the end columns are integrally formed with the remainder of the
moulding, and are thus also of the same plastics material. As can be
seen from the drawings, the end column 13 which i!i at the
cutting/breaking end of the device is generally unbroken, whilst the
column 14 at the opposite end of the device is centrally divided into two
pillars 15, 16 respectively. As will be described, a recess is provided at
the junction between these two pillars.
The surface 12 extends from the column 14 towards the column 13, but
terminates short thereof at an upstanding projection 17 which extends
integrally laterally of the base moulding to define a location for a side
stop guide 18 which includes a laterally extending slotted member 19
which fits behind the projection 17 and against the end column 13.
Associated with this member 19 is a guide clamp knob 20, through
which extends a guide knob bolt which is received in a guide knob nut
at the underside of the slot. Thus by tightening or loosening the knob,
adjustment of the guide can be effected. The function of the stop guide
18 is conventional, in being essentially of the same form as with known
tile cutters where adjustment is possible to cut/break a tile to a specific
CA 0224~103 1998-08-14
size/shape, and will not be described further since it forms no part of the
present invention. As shown in Figures 2 and 7, at the longitudinal
centre of the surface 12 there is formed a groove 21 which can extend
slightly above the surface. This groove 21 extends into the column 14 at
its one end, and into a socket 22 in projection 17 at its other end.
Secured to the surface 12 at opposite sides of the groove are respective
foam sheets 23, 24 which have their respective outer surfaces
substantially flush with the outer surface of the groove 21 so as to
provide a base surface for reception of a tile to be cut/broken, in use, as
will be described hereinafter. Received in the groove 21, with its ends
extending into the column 14 and socket 22 respectively, is a metallic
circular-section breaker rod 25.
The end column 13 has a slot therein, this slot 26 extending inwardly
from the underside of the column 13 and, in the example shown,
extending completely through to the top of the colurnn, although it could
terminate short thereof. The slot 26 extends parallel to the, themselves
parallel, inner and outer faces of the column, so that, in use, the slot
e~tends vertically. Received in this slot is a generally rectangular steel
end plate 27 which forms connecting means, and also strengthening
means for the tile cutter, as will be described. As shown best in Figures
2 and 6, the plate 27 has a pair of laterally spaced circular holes 28 at its
upper end and, at its lower end, a central rectangular hole 29. The
upper end of the column 13 has pairs of corresponding circular holes or
slots 30 in its inner and outer faces at opposite sides of the slot 26 so
that with the plate received in the slot 26, a pair of circular through-
bores are formed at the upper end of this column 13. Moreover at the
lower end of the column 13, below the level of the base surface, the
rectangular hole 29 is exposed, for a purpose to be clescribed.
CA 0224~103 1998-08-14
As shown in Figure 1, the respective upper ends of the pillars 15, 16
respectively are provided with circular section bores 30a therein, these
being aligned with the circular bores referred to at the column 13. In
the assembled form of the tile cutter 10 shown in Figure 1, it can be
seen that a pair of circular section steel guide rods 31, 32 respectively
have their ends fitted in the bores in the column 13 and the holes in the
column 14 respectively, so that the rods are held between the two end
columns of the tile cutter and extend over the parts of the base surface
formed by the foam sheets at opposite sides of the groove 21.
At the underside of the main base moulding 11, there is a rectangular
section iron or steel bar 33 arranged with its longer sides vertiQI, one
end of the bar 33 being received through the rectangular hole 29 in the
end plate 27, its opposite end being received in an end pocket 34
(Figure 3) of the moulding. This bar engages the underside of the
moulding at a position directly below the breaker rod 25, Figure 7, and
thus forms both strengthening and also support means of the cutter 10 as
will be explained more clearly hereinafter, the bar 3:3, like the guide rods
31, 32, extending between the opposite end columns of the cutter.
It will be appreciated that the plate 27 acts as connecting means to
interlock the metallic guide rods and the nnetallic steel bars without the
use of welding, riveting etc. This constitutes a very convenient and
effective way of resisting/absorbing the large forces generated when a tile
is broken, bearing in mind that the main moulding 11 is of plastics
material. In this manner a relatively inexpensive base moulding can be
used, thus enabling the overall cost of the cutter to be reduced as
compared with known prior art devices where the base is metallic.
CA 0224~103 1998-08-14
Carried on the guide rods is a slider moulding 35 to which is centrallypivotally mounted an operating lever handle 36, the pivotal mounting
being by way of a lever pin 37 which extends through the moulding and
also through a circular bore 38 at the end of the handle 36. The
assembly of moulding 35 and handle 36 is shown in Figure 6, whilst
Figures 2 and 4 show how a carbide cutting wheel 39 is, by use of a
wheel axle pin 40, attached to the handle 36 at the underside thereof in
front of a pair of laterally spaced wings 41 extending integrally
downwards from the underside of the handle to effect breaking of a tile,
as will be described when the handle is pivotally fully downwardly as
shown in Figure 3.
Finally to complete the description of the cutter as shown in the Figures,
reference is made to a tube retainer moulding 42 which is shown in
Figure 2 and which can be screwed into place on top of the end column
13 to secure the guide rods against removal, this at the same time
thereby preventing removal/disengagement of the plate 27 and bar 33.
As can be seen, the moulding 42 is of right-angle form having a
downwardly depending part which is received in a recess at the top of
the outwardly facing surface of the column 13, and a forwardly
projecting part which fits across the top of the column 13 and through
which the fixing screw is received. Figure 2 also shows a lock plug 43
which is in the form of a snap-in retainer which is received in the recess
between the pillars 15, 16, and snap-fits or clips over the end of the
breaker rod 25. For clarity this plug 43 is not shown in Figure 3, but is,
for example, shown on the end of the rod in Figure 5.
Having described the structure of the tile cutter, assembly and use
thereof will now be described.
CA 0224~103 1998-08-14
Firstly it will be mentioned that assembly will only be explained in
relation to the parts of the tile cutter which form part of the present
invention and thus, for example, there will be no description of the
assembly or use of the side stop guide 18, nor of the assembly of the
moulding 35, operating lever handle 36 and associated cutting wheel 39.
The invention relates generally to the manner in which the large forcesproduced during breaking of a tile are taken by the interlocking metallic
parts described, without the use of welding, riveting etc. The main base
moulding is reinforced by the iron or steel bar 33. At the handle end,
this bar is supported by the plastics moulding because the forces here are
low. At the breaking end, however, the forces are taken by the plate 27
which links the bar 33 to the two top metallic guide rods. A downward
braking force exerted on a tile is received onto the central breaker rod 25
which sits in its groove in the moulding and is supported directly
underneath by the steel bar 33, as shown in Figure 7. In the
embodiment illustrated, the breaking can only be carried out at the
breaking end where the carbide cutting wheel 39 clears the tile surface,
allowing the breaking wings 41 to contact the tile surface. The breaking
action here tends to force the guide rods upwardly and the tile cutter bed
downwardly, and it is the method of interlocked metallic parts which
takes the forces.
Firstly on assembly, the bar 33 is inserted into the end pocket 34 formed
in the moulding at the bottom of the end column 14, the bar at this time
being orientated at an angle to the base surface. The other end of the
bar can then be inserted through its associated rectangular hole 29 in the
end pressing 27 and the two parts can then be swung upwardly so as to
move fully into the position shown in Figure 3, with the plate vertical
CA 0224~103 1998-08-14
and the bar horizontal, its end at the plate 27 being received at the
boKom of the upright 13. In this position, with the plate fully received
in the upright end column 13, the circular holes 28 in the plate 27 are
aligned with the other holes in the end column 13 to form two
respective through-bores, as previously described. Accordingly it is
possible for the guide rods 31, 32, now to be fed into position through
these bores through the end column 13, the rods also of course passing
through the holes in the end plate 27. The rods are inserted at this time
through the slider rnoulding, and then into the holes 30a respectively in
the pillars 15, 16 of the end column 14. The interconnection between
the guide rods 31, 32 and the bar 33 by way of the end plate 27 is now
complete and the tube retaining moulding 42 can now be screwed into
place at the top of the column 30 to retain the three metal, preferably
steel, components in place. As described, the closirlg of the outward
ends of the through bores in the end colurnn 13 prevents the guide rods
being moved outwardly in a direction opposite to their direction of
insertion, and as a result these three metallic components are now
securely interlocked to strengthen the moulding and to provide support,
by way of the bar 33, for the breaker rod 25.
The breaker rod itself is assembled into its groove 2 l by first inserting it
into the extension of the groove 21 into the end column 14 shown best
in Figure 2. This insertion is for approximately 25 mm (1 inch). The rod
can then be slid in the opposite direction towards the breaker end of the
cutter and fed a short way into the socket 22. The rod is then retained
in place by the lock plug 43 which, as shown in Figure 5, clips over the
rod end and, as shown best in Figure 1, fits flush in the recess between
the two pillars 15 and 16. The rod provides an accurate and desirable
hard edge to break the tiles over. It does not however provide strength
CA 0224~103 1998-08-14
and could, if required, be replaced, reduced or omitted. Accordingly in
use after a tile T has been correctly and accurately located on the
upwardly facing surface of the cutter defined by the foam sheets 23, 24
and the top of the groove 21, the handle 36 in its Figure 4 state can be
reciprocated with the cutting wheel in contact with the tile so as to score
the tile at the position at which it is to be cut, in the normal manner.
After scoring the tile, the handle and slider moulding are moved to theposition shown in Figure 3 where, as prev!ously mentioned, the cutting
wheel is now clear of the tile surface. Accordingly on pivoting the
handle downwardly, the braking wings 41 contact the tile surface, as
shown in Figure 3, whereupon continued downward pressure will lead
to the tile breaking clearly along its score line, with, as also mentioned,
the breaker rod providing the desired hard edge over which the tile
breaks. It will be noted that, as previously mentioned, without sufficient
strengthening/reinforcement to absorb the braking forces, the tile would
instead tend to break laterally.
In alternative embodiments, it would be possible to provide only a single
guide rod rather than the pair of guide rods shown. Moreover instead of
providing the interlocking plate 27 at one end of the cutter, such plate or
equivalent could be provided at the opposite end only or at both ends.
It will be appreciated that metal plates are likely to be required at both
ends should an alternative embodiment be such that breaking can take
place other than with the carbide cutting wheel at an end of the cutter.
For example some arrangement may be possible where the wings are
pivotable, and with such an arrangement breaking may take place by the
pivoting downwards of the wings onto the tile with the resultant lifting
off the tile of the cutting wheel. Since this could take place other than
CA 0224~103 1998-08-14
with the handle in a position shown in Figure 3, plates may be required
at both ends as described. Although preferably the plate 27, guide rods
31, 32 and bar 33 are all of iron or steel, any other suitable metal or
higher strength material could be used, such as carbon fibre. It is merely
necessary that with these components they are made of respective
materials which are more rigid/stronger than the material of the base. As
explained by utilising as much plastics material as possible the cost of
the cutter can be reduced. Clearly the plate 27, the guide rods 31, 32
and the steel bar 33 need not all be made of the same material.