Note: Descriptions are shown in the official language in which they were submitted.
1 i , it m m , il a L.. i I w. , I i
CA 02255997 2004-12-17
NETWORK SOFTWARE FOR A PLUMBING CONTROL SYSTEM
Background of the Invention
This invention relates to an apparatus and method for monitoring and con-
trolling usage of water. Various electrical controls for plumbing fixtures are
known in the
art. Some examples are shown in U.S. Patent 5,060,323 and U.S. Patent
5,031,258. These
controls typically employ water valves operated electrically by solenoids,
together with
various types of switches for activating the solenoids at desired times. The
switches include
pushbutton switches, infrared sensors in reflective mode or break-beam mode
for determining
when a user is present and when water should be supplied_
One of the problems with prior art controls is their inherent lack of
flexibility.
The controls can only perform one function with one type of fixture. Yet there
is a wide
variety of plumbing fixtures that need to be controlled, such as sinks (with
temperature
controlled either by pre-set hot and cold water mixing or-user-selectable
mixing), showers,
urinals and water closets. It is also sometimes desirable to control related
apparatus such as
IS soap dispensers and towel dispensers. Existing controls cannot be used with
all of these
different facilities, at least not without substantial alteration of their
basic functions to the
point of totally rebuilding the controls to suit a different device. Further
complications arise
due to the fact that some controlled devices (sinks, showers, soap dispensers)
need to
respond to the arrival or presence of a user, while other devices (urinals,
water closets) need
ZO to be aware of the presence of a user but not operate until the user leaves
a target zone.
CA 02255997 1998-12-14
Prior art controls are simply not set up to operate multiple types of fixtures
in the various
modes needed.
In many institutional settings it would also be desirable to allow the
operator
of the facility to select particular operating characteristics of an
apparatus. For example, in
dormitories and barracks it might be useful to limit the length of time a
shower will operate.
Correctional institutions may want to limit the number of times a water closet
may be flushed
within a given time window. Health care or food service operations may prefer
a hand
washing apparatus which will assure proper hand washing procedure by the
restaurant
employees ~or hospital personnel in order to reduce the chance of
contamination. Being able
to choose these limits would be highly useful in these settings and others but
the lack of
flexibility in existing controls prevents it.
Another desirable feature of water usage controls is the ability to monitor
remotely what is going on at a particular fixture or at all fixtures
throughout a building or
institution. A further desirable feature would be to alter remotely how a
particular fixture
operates. This requires communications capabilities that are not found in
existing conuols.
Summary of the Invention
The present invention is directed to a control board for plumbing fixtures
that
can be used with a wide variety of fixtures. The board has a microprocessor
which is
programmable from either a stored program or downloaded instructions or a
combination of
these. The microprocessor operates in any desired mode with settings that are
either pre-
determined or set individually as desired. The settings establish a timing
control for the
2
CA 02255997 1998-12-14
controlled device, be it a sink, shower, water closet or some combination of
these. The
timing control includes a delay before activation, a run time, a delay after
activation, the
counting of cycles within a selected time window, and an imposed lockout or
inhibit time if a
cycle count limit is exceeded.
The control board can operate either as a stand alone device or in a computer
network, in which case the board communicates via either twisted pair or a
power Line with a
central computer for monitoring and control purposes. The board can control
solenoid valves
or the like either directly or through auxiliary boards. Input jacks on the
control board can
accept signals ranging from 1.3 VAC to 120 VAC and 1.3 VDC to 100 VDC. An opto-
isolator can be used, if necessary, to convert input voltages other than the
one used by the
microprocessor. The output section of the board uses latching relays to
conserve power.
Three different outputs can be provided, depending on the needs of the
controlled device.
These outputs include two different on-board voltages or an off board voltage.
A switch
closure can also be provided to govern operation of a self powered controlled
device.
Brief Description of the Drawings
Figs. 1-7 together comprise a circuit diagram of the 4I0 board. More
specifically Fig. 1 is the power supply section of the board.
Fig. 2 shows representative samples . of the input and output sections, only
one
of each being shown for clarity.
Fig. 3 shows the microprocessor and some auxiliary functions and the output
addressing chip. The circuits in Figs. 2 and 3 are joined at junctions V, W,
X, Y and Z.
3
CA 02255997 1998-12-14
Fig. 4 shows the microprocessor, the EPROM and a portion of the flash
option.
Fig. S shows the off board voltage connector and one of the jumpers for
selecting outputs.
Fig. 6 shows the PLT-21 communications option.
Fig. 7 shows the FTT-l0A communications option.
Fig. 8 is a longitudinal section of a pushbutton switch used to actuate a
plumbing fixture.
- Fig. 9 is a circuit diagram of a latching relay.
Figs. 10 and 11 comprise a flowchart of the 4I0 software.
Fig. 12 is a block diagram of the Smart Sink.
Figs. 13 through 26 comprise a flowchart of the Programmed Water Technolo-
gies network software.
Fig. 27 is the main menu screen of the network software.
Fig. 28 is the detail form of the network software showing the devices in a
particular room.
Detailed Description of the Invention
The present invention encompasses a new control board that can be used with
plumbing fixtures such as sinks, showers, water closets, urinals and
combinations of these.
The board can provide the central control of a programmed scrub sink referred
to herein as a
Smart Sink. The board can also provide network communications with a central
computer
4
CA 02255997 1998-12-14
for monitoring and data logging plumbing fixtures throughout a facility in a
system referred
to as Programmed Water Technologies. The present description will deal with
these three
major areas: the 4I0 board, the Smart Sink and its software, and the
Programmed Water
Technologies network software.
I. The 4I0 Board
A schematic diagram of the control board 10 of the present invention is shown
in Figs. 1-7. This particular embodiment can accept input from four sensors or
switches and
direct output to four controlled devices. Due to this capability of handling
four inputs and
outputs, it is referred to herein as a 4I0 board. It will be understood that
different numbers
of inputs and outputs could be used within the scope of the present invention.
A description
of the major components of the 4I0 board follows.
A. Power Supply Section
The power supply section of the board is shown generally at I2 in Fig. 1. An
off board transformer (not shown) will provide 24 VAC to connector TB1. The
transformer
is somewhere upstream outside of the 4I0 board. Typically it is connected to
the 120 VAC
power main of the building. It could be a transformer that is supplying power
to one board
or it could be a transformer supplying power to many boards. Line 13 from TB1
is
connected to one side FH3 of a fuse holder. The other side FH1 of the fuse
holder is
connected to output power line 14, which is marked 24 VAC. This output power
line 14 is
connected to any other location on the circuit diagram similarly marked 24
VAC. The fuse
F2 in holder FH1, FH3 is a slow blow, two-amp fuse that limits the power
output on line
14.
5
CA 02255997 1998-12-14
Line 13 has filters indicated at inductor L5, capacitor C33 and resistor R40,
and inductor L1 and resistor R12. Then there is another fuse F1 in microfuse
holder FH2 to
protect the 5-volt logic circuit. Fuse F1 is a quick-blow fuse rated at two
amps. The 24
VAC goes through the second fuse F1 to a bridge rectifier D1 which turns the
24 VAC into
approximately 30 VDC on line 16. An LED D35 indicates the presence of the 30
VDC. A
capacitor C6 charges up to maintain a stable input. That is used as a reserve
so if there is a
small brownout, or if the line 16 goes down, there is a small reserve of
power. The board
can survive off this reserve for a short period of time.
Line 16 feeds the 30 VDC to a 9-volt switcher U6 which allows voltage up to
9 volts DC to go through to line 18. When voltage to line 18 starts to exceed
9 VDC the
switcher turns off. When the voltage falls back below 9 volts the switcher
turns back on.
So the switcher produces a pulsating 9 volts DC on line 18. A filter
comprising inductor L2
and resistors R18, R19 conditions the voltage. The purpose of the 9-volt
switcher U6 is to
reduce the voltage going through to a 5-volt regulator U7. If the circuit went
directly from
24 VAC through the bridge rectifier to the 5-volt regulator, the 5-volt
regulator would over-
heat. Since the 9-volt switcher is required anyway, than9 volt power is
supplied on output
line 20. Other locations on the circuit marked +9V are connected to line 20.
Among other
things the 9 VDC is used to activate the latching relays in the output
section, as will be
explained below. A latching relay only needs a 10 millisecond pulse to latch
or unlatch.
The switcher U6 is going to be on most of the time so usually when the 9 VDC
is needed it
will be there. There is also a capacitor C7 connected to line 18 to store up
some power. In
6
CA 02255997 1998-12-14
the event that the switcher U6 happens to be off when relay activation is
called for, capacitor
C7 will be able to supply the short pulse needed to latch the relay.
The 9 VDC is supplied to the 5-volt regulator U7. The S-volt regulator takes
the 9 VDC and drops it down to S VDC, which is the operating voltage for the
microproces-
sor and the rest of the logic circuit. The 5 VDC is supplied on output line
22. Locations on
the circuit marked VCC are connected to line 22. Capacitor C21 is a high pass
filter.
Taken together the power section is capable of supplying 24 VAC on line 14,
9 VDC on line 20 and 5 VDC on line 22.
B. Microprocessor
The functions of the 4I0 board are controlled by a microprocessor U12 (Figs.
3 and 4). The microprocessor is preferably a neuron type 3150, such as a TMP
N3150
B1AF from Echelon Corporation of Palo Alto, California, although others may
suffice. It is
designed to run at a specified operating voltage, in this case 5 VDC. The
microprocessor
has an internal electrically erasable, reprogrammable memory that will be
referred to herein
as the EE section of the microprocessor. The EE section is non-volatile
memory, meaning
that the information in the EE section will not be lost even if the power goes
out. . The
microprocessor has three internal processors. One of these runs the 4I0
software described
below. Another runs communications software that is provided with the chip.
The third
processor runs software that translates information between the first two
processors.
The first processor runs a 4I0 program stored in an EPROM U3 (Fig. 4).
The program is burned it into the chip and therefore is fixed. The EPROM
communicates
with the microprocessor through lines AO to A 15 and DO to D7.
7
CA 02255997 1998-12-14
The 4I0 board has heads or connectors built into it to provide a stuffing
option
that allows for an alternate embodiment called a flash option. The stuffing
option can
receive the logic chips shown generally at 24. When these chips are provided
the regular
EPROM U3 is replaced with a flash EPROM, also known as an EEPROM (for
electrically
erasable programmable read only memory). When a flash EPROM is used an
operator can
download new software and store it in the flash EPROM. Thus, the entire
program can be
rewritten. With the regular EPROM changing the software requires putting in a
new
EPROM chip. The details of the 4I0 software will be discussed below.
- It will be noted that several clean-up capacitors are used to clean up the 5
volts
that is being distributed throughout the chips. Capacitors C8 and C 17 (Fig.
4) form a high
pass and a low pass filter. Capacitors CIS, C22, C26, C25, C27 serve as high
pass filters.
In the event that the power drain upstream limits the voltage, capacitor C8
will also serve as
a small battery for the 5 VDC source.
C. Input Section
A description of the input section details will benefit from a preliminary
discussion of the various remote switches and sensors that might be found on a
controlled
device, i.e., on a sink, shower or water closet.
A commonly-used switch is an inductive pushbutton switch, as shown at 19 in
Fig. 8. The switch 19 has a cylindrical housing 21 which has external threads
for engaging
a mounting nut 23 and a wall flange 25. The housing is clamped to an
appropriate fixed
mounting surface 27 by the nut 23 and wall flange 25. Typically the mounting
surface 27
will be a wall near the sink, water closet or shower or it might be a part of
the fixture itself.
8
CA 02255997 1998-12-14
A washer 28 and spacer 29 assist the clamping action. The wall flange 25
retains a pushbu-
tton 30 which is slidable through a central opening in flange 25. The
pushbutton abuts one
end of a flanged filler tube 31. The other end of tube 31 adjoins a T-shaped
plunger 32,
which is made of ferrous metal. The plunger 32, filler tube 31 and pushbutton
30 are all
biased to the left of Fig. 8 by a spring 33. Spring 33 bears against a packing
34 which is re-
tamed by a bushing 37. The bushing is threaded to the housing 21. A proximity
sensor 35
is mounted in the packing 34. Three conductors 36A,B,C supplying 5 volts DC, a
return
signal and a ground, respectively, are attached to the proximity sensor 35 and
run back to the
4I0 board. -When a user of the controlled device pushes the pushbutton 30 it
carries the
plunger 32 close to the sensor 35 and changes the magnetic field adjacent the
sensor. The
altered magnetic field triggers a circuit inside the sensor 35 which closes a
circuit between
lines 36A and 36B, thereby creating a 5 VDC return signal. The sensor is a
readily
available item and itself forms no part of the present invention.
It will be understood that while the pushbutton switch is commonly used to
indicate to the 4I0 board a user's request for operation of a plumbing
fixture, other types of
devices can also be used. For example, infrared light sensors can be used to
detect the pres-
ence of a user. An infrared emitter and detector can be placed adjacent one
another and
infrared light reflected back from, say, a user's hands under a faucet, will
trigger the
detector. Or the emitter and detector can be separated with the emitter
focused on the
detector. When a user breaks the light beam between the emitter and detector a
signal is
triggered. When greater distances between the 4I0 board and a switch are
required, a reed
switch and a 24 VAC supply and signal may used, rather than the 5 VDC. Or a
relay switch
9
CA 02255997 1998-12-14
may be used with 5 volts going in with the return line coming back. In that
case, instead of
just a piece of ferrous metal in the housing, there is a magnet. When the
magnet comes
close to the relay switch, the relay switch makes a contact which then gives a
5 volt return
signal.
Other inputs to the microprocessor may involve monitoring the activities of
various components, rather than looking for remote switch closures. For
example, it may be
desired to monitor a 16 VDC motor or a 24 VAC solenoid to find out when they
activate so
some action can be taken in response thereto.
The foregoing illustrates that the 4I0 board must have the ability to accept a
wide variety of input signals. The input section that provides that ability
will now be
described. The 4I0 board communicates with the various switches or sensors of
a controlled
device through four RJ-11 style input jacks, one of which is shown at J4 in
Fig. 2. Jack J4
is connected by jumpers JP9 and 1P10 to an inverting Schmitt trigger U2A,
either directly or
through an opto-isolator UlA. The Schmitt trigger is connected to an I/O port
of the
microprocessor by line 26A as shown. The jumpers may have shunt clips that
simply
connect selected pairs of pins to one another.
Pin 1 of J4 is connected to the 24 VAC source as shown. If the particular
remote switch or sensor connected to J4 requires 24 VAC, pin 1 of J4 supplies
it. Naturally
if the switch does not use 24 VAC (or has its own power supply), the cable
plugged into jack
J4 would not have a connection to pin 1.
Similarly, pin 2 of J4 is connected to the 5 VDC source as shown. In the case
of the pushbutton switch, conductor 36A will connect to pin 2, providing the 5
VDC source
CA 02255997 1998-12-14
to the pushbutton switch. If the remote switch does not need 5 VDC, the cable
plugged into
jack J4 would not have a connection to pin 2.
Pin 3 of J4 is a first sensor return. In the case of the pushbutton switch,
pin 3
will connect to conductor 36B, providing the 5 VDC return signal. Line 39
connects pin 3
of J4 to pin 2 of jumper 1P10.
Pin 4 of J4 is connected to a clock signal from I09 of the microprocessor. In
a pushbutton scenario, a clock signal is not used. But there may be some type
of remote
sensor that either requires a clocking pulse to tell it when to operate or
while it is operating
it may need~clock pulses. Pin 4 would provide those pulses.
Pin 5 of J4 is a DC ground. In the case of the pushbutton switch, pin 5 will
connect to conductor 36C.
Pin 6 of J4 is a second sensor return signal. Again, in the case of a push-
button switch, the 5 volt return signal would come in pin 3 and pin 6 would
not be used.
Pin 6 would be used with an AC return signal. Line 41 connects pin 6 to jumper
JP9's pin
2. -
The shunt clips of jumpers JP9 and JP10 are set in accordance with the type of
remote switch or device connected to jack J4. If the remote switch connected
to J4 provides
a 5 VDC return on pin 3 of J4, the pins 1 and 2 of JP10 are shorted, as are
pins 1 and 2 of
JP9. In that case the return signal on pin 3 of J4 goes directly to the input
of Schmitt trigger
U2A, bypassing the opto-isolator UlA. Also, in the case of a 5 VDC return
signal the opto-
isolator input pin K,A is grounded through JP9 pins 2 and 1. The reason why
this is done is
if one side of the opto-isolator is left open it can pick up some noise
because it has the ability
11
CA 02255997 1998-12-14
to look at alternating current and it takes very little power to trigger it.
JP9 forcibly ties it
down so it will not operate. In the meantime input A,K of the opto-isolator
UlA is just
floating freely. So nothing is going into the opto-isolator. Therefore,
nothing is going to
come out and mess up the signal that is coming around it from JP10.
If the remote switch connected to J4 provides a return on pin 3 of J4 that is
anything other than 5 VDC, the pins 2 and 3 of jumper JP10 are shorted,
sending the return
signal to input A,K of the opto-isolator UlA. The settings of jumper JP9
depend on the
power source for the remote switch or device. If the remote device has its own
power
supply then the shunt clip is left entirely off of jumper JP9. If the remote
device uses the 5
VDC power from J4 pin 2, then jumper 1P9 is set to pins 1 and 2 to provide a
DC ground.
If the remote device uses the 24 VAC power from J4 pin l, then jumper JP9 is
set to pins 2
and 3 to provide an AC neutral through line 43.
When the opto-isolator receives an input on its ports A,K and K,A, it sends an
infrared signal inside the device. The infrared signal closes an electrical
connection between
ports C and E. Because an infrared light signal is used internally in the opto-
isolator to
trigger the output, there is no physical electrical connection between the
input side (ports
A,K & K,A) and the output side (ports C & E). Thus, whatever pin C is hooked
up to will
be sent as an output signal, regardless of what input triggered the output. In
the present
invention port C is hooked up to 5 VDC. So now, no matter what signal arrives
on the input
side of UlA, the rest of the circuit sees it as a 5 VDC signal on line 38.
The opto-isolator would be used when the 4I0 board is looking at a voltage
other than 5 VDC or if it looking at a voltage not supplied from the board.
For example,
12
CA 02255997 1998-12-14
take the case of monitoring a solenoid which operates at 24 VAC. Jumper JPIO
is set to
pins 2 and 3 and the other jumper JP9 is set at pins 2 and 3 so that same
signal can be
returned. Thus, the board is monitoring what is on J4 pin 3 but not giving it
any power.
With this arrangement there is no concern about having a common ground or
common power
supply; the board is just tapping in to see what is happening with that
particular solenoid.
When it activates or deactivates then the signal can be modified, whatever it
is, to a 5 VDC
signal and the processor runs off of this new signal. And then, of course, in
software this
signal can be controlled to be on or off, or when it should activate depending
on when that
signal comes in, or if it should activate when the signal comes in.
Now there is a 5 VDC signal on line 38 going into the Schmitt trigger U2A,
whether that signal comes from the opto-isolator or through jumper JP10.
Because the opto-
isolator is picking up AC, it has the ability to generate AC noise on the
line. To clean up
the 5 volt signal as much as possible there is a filter C4, Rll to help reduce
that high fre-
quency noise. The filtered 5 volt signal is sent to the Schmitt trigger U2A
which is part of
the common circuit.
As in most electronic logic circuits, the 4I0 board uses inverted logic. That
is, the normal output state is a logic high. In electronics when a line
breaks, there is nothing
there. Logically that is considered a high by solid. state electronics and a
microprocessor.
Because in the rest of the line, there is always a little bit of trickle back
from the compo-
nents, it will drive a line high. To have a good, definite signal you really
want the line to
drive low. With a low line it is known that a signal is defmiteIy there; there
is no question
about whether some voltage is a signal or noise. Accordingly, the Schmitt
trigger U2A is an
13
CA 02255997 1998-12-14
inverter. What the Schmitt trigger does is take a signal coming in that is
variable due to
noise and capacitance in the line and when the input signal reaches a certain
point, the
Schmitt trigger turns on and produces a clean signal out in the form of a
square wave. In
this case, U2A is an inverting Schmitt trigger so, when the input signal goes
high the output
is a nice, square wave with logic low. Whatever signal comes in the Schmitt
trigger cleans it
up and produces the opposite on line 26A for the microprocessor.
Amplifier USC is involved with driving LED D5. The LED cannot be driven
with the same signal sent to the microprocessor, because doing so can draw too
much power
away and produce a very weird signal. In this case, a low signal is used to
indicate that
something was occurring. It is desired that the LED DS turn on to indicate the
presence of a
signal. Thus, the LED is working in reverse of the logic used by the
microprocessor. An
amplifier USC is used to increase the power enough to drive the LED D5 so it
turns on when
a logic line goes low.
Power for LED DS is derived from VCC as shown. When line 38 goes high
(indicating the presence of a signal), line 40 goes low. Amplifier USC drives
line 42 low.
The amplifier USC just takes whatever signal is on line 40 and gives more
power~io it. So,
in this case, the amplifier is amplifying a logic low so it is forcing line 42
low. The power
VCC is coming through the LED DS and a current limiting resistor R17 to try to
bring this
line 42 up. But USC wants to make it low so now you have an electronic battle
which will
be won by USC which can sink more than what resistor Rl7 can supply because it
is a
current limiting resistor. So there is a current path that flows to the ground
of U5C and this
turns the LED DS on.
14
CA 02255997 1998-12-14
When line 38 is low (indicating the absence of a return signal), line 40 is
high.
Then amplifier U5C forces line 42 high. Now there is a high voltage on both
sides of LED
D5, there is no current path and LED D5 is off.
It will be understood that for clarity only one input jack J4 is shown and
described. In actuality the board has a plurality of input jacks identical to
J4. In the
preferred case there are four, although it could be a different number. Each
input jack has
the same associated circuit elements as shown for jack J1, i.e., a pair of
jumpers, an opto-
isolator, a Schmitt trigger, an LED driver and associated components. Thus,
input Iines
labeled J1, 72, J3 in Fig. 3 each connect to the same circuit as shown for
input line 26A.
D. Output Section
The output section of the 4I0 board faces the same general problem of the
input section, namely, a variety of different controlled devices need to be
accommodated. A
common controlled device will be a solenoid for actuating a water valve on a
sink or shower.
But the controlled device might also be a solenoid-activated flush valve, a
motor for a soap
or towel dispenser, or an auxiliary control board for one of these. Different
outputs are
required for these different devices so provision must be made for supplying
and controlling
these outputs.
As in the case of the input section, the 4I0 board has four RJ-11 style jacks
for connection to the controlled devices. One of these jacks is shown at J10,
the others
being similar. Briefly, pin 1 of each output jack connects to a switched 5
VDC. Pin 2 is
connectable to an selectable power source. Pin 3 provides a switched
selectable power
CA 02255997 1998-12-14
source. Pin 4 is not used. Pin 5 is the return for the selectable power. Pin 6
is a DC
ground. How these connections are made will now be described.
A latching relay is associated with each output jack. One of these relays
connected to jack J10 is shown at K4 The internal circuit of a latching relay
is shown in Fig.
9. The relay is a double-pole, double throw device having first and second
contacts 44-1 and
44-2. There are also two coils in the relay. Each coil is connected to a power
source, at the
terminals labeled SET and RESET, and to a ground, labeled GND 1 for the SET
coil and
GND2 for the RESET coil. The contacts 44-1 and 44-2 are pivotably and
electrically
connected to common pins labeled COMI and COM2. In what is designated the
"normal" or
latched condition, the RESET coil is considered the most recently activated
coil and the
contacts 44-1, 44-2 engage pins NC1 and NC2, respectively, thereby making
electrical paths
between NC 1-COM 1 and NC2-COM2. When the SET coil is activated it pulls the
contacts
44-1, 44-2 into engagement with pins NO1 and N02, respectively, thereby making
electrical
paths between NO1-COM1 and N02-COM2. There is no spring or other device
biasing the
contacts 44 one way or the other so the contacts remain in their most recently
activated state
until the opposite coil activates to move the contacts to the -other set of
poles.
Returning now to Fig. 2, the connections to one of the latching relays K4 will
be described, it being understood that the other relays have the same
components connected
thereto. The SET and RESET pins are connected to the 9 VDC source on lines 46
and 48,
respectively. Pins NC1 and NC2 are not used. COM1 is connected by line 50 to
pin 3 of
output jack J10. Line 50 is also connected to selectable power line AC4A. COM2
is
connected by line 52 to pin I of jack J10. Line 52 also branches off to an LED
DIO that
16
CA 02255997 1998-12-14
turns on when line 52 is active. NOl is connected by line 54 to pin 3 of jack
J10. N02 is
connected to the 5 volt power source VCC. GND1 connects to amplifier U9B
through line
56. Line 56 branches to the 9 VDC power supply through diode D26. GNDZ
similarly con-
nects to amplifier U9A through line 58 which branches to a 9 VDC power supply
through
diode D25.
The diodes D25 and D26 are there to help with inductive spikes. When there
is a relay coil and it is tu~~ed on, the 5 volt line will drain so fast
through U9A it now will
draw as much power as possible. This drops line 58 so low that it could
actually be lower
than ground: In which case, there would be a current path but since diode D25
is not
allowing power to go from +9 VDC to U9A, there will not be any current. But
again when
you turn the relay off you have an inductive spike going the other way. A low
does not hurt
the board but a high inductive spike might. In the case of a high inductive
spike, a high rush
of current is produced. So in this case, it is drained to ground to get rid of
it. This helps
with inductive spikes created by latching/unlatching of a relay.
The output of the microprocessor comes out of its ports I00 through I03 (Fig.
3). Four lines coming out of these ports connect to an addressing chip U10.
U10 only
allows one output to turn on depending on the combination of lines I00, IO1
and I02. I03
is an enabler. It tells the chip when to work and when not to work. I00, IO1
and I02 are
going to represent a binary number. That binary number specifies which output
to turn on
when the chip U10 is enabled by I03. Only one of the outputs from U10 is going
to be
activated at a time. Thus, one of the eight amplifiers U9A through U9H (only
three of
17
CA 02255997 1998-12-14
which are shown) is going to amplify the signal from U10 to allow for a
greater current
path.
Typically, from U10, a turned "on" output is going to be a logic zero. When
it is activated it is a logic zero. Otherwise it's a Logic high. The amplifier
U9 is going to
amplify that. So on all the amplifiers except one there is normally going to
be 5 volts
coming out of the amplifier. One amplifier is going to have a logic low or
logic zero. For
°xample, if amplifier U9A is low, line 58 is pulled low, completing a
current path through
the reset coil and pin GND2 of relay K4 and causing contacts 44 to close on
the NC1 and
NC2 pins. The contacts will stay that way even when U9A and GND2 go high and
shut off
the reset coil. The relay contacts will not move until amplifier U9B goes low,
taking line 56
and GND 1 low and providing a current path through the set coil. With the set
coil active the
relay contacts 44 will be thrown to pins NO1 and N02. With NO1 connected to
COM1, the
selectable voltage on AC4A and line 50 will be provided to line 54 and pin 3
of jack J10.
At the same time the connection of N02 to COM2 places the 5 VDC source on line
52 and
pin 1 of jack J10. Once again the relay contacts will remain in this.position
even when U9B
goes high and removes current from the set coil.
Since only one relay one coil is activated at a time and it is not necessary
to
maintain the power, the power consumption of the. 4I0 board is greatly
reduced. For
example, if the board is controlling a shower and the shower is to be on for
10 minutes, the
microprocessor sends a 10 millisecond pulse to unlatch the relay and turn the
shower on.
The relay is left there. The processor comes back in 10 minutes, looks at its
watch and says
18
CA 02255997 1998-12-14
when 10 minutes expires, go to the other address to unlatch (reset) this relay
and turn the
shower off.
The selectable voltage at AC4A is determined by two shunt clips on a jumpers
1P6 (Fig.S). Keep in mind that there is one such jumper for each of the four
output jacks
and each jumper and output jack has its own selectable voltage line ACxA,
where "x" can be
1,2,3 or 4. Each jumper, such as JP6 in Fig. 5, has on pin I a 24 VAC supply
from line I4
of the power supply section 12. Pin 2 connects to line AC4A at line 50. Pin 3
connects to
an external power source. Pin 4 is blank. Pin S is connected to ground for the
external
power source. Pin 6 is the return line from AC4B on pin S of jack J10 (Fig.
2). And pin 7
is an AC neutral.
The external power source, also referred to as an off board power source,
comes into the 4I0 board at jack J5 in Fig. 5. JS simply provides pins for
four external
power sources and related grounds therefor. These are connected to pins 3 and
5 of each of
the output jumpers 1P6. Thus, if a controlled device requires a voltage other
than the 24
VAC or 5 VDC available from the 4I0 board's power section, that off board
voltage could
be supplied to jack J5. One jumper shunt clip on JP6 would be set to pins 2
and 3 so
external power would be provided on AC4A and thus on pin 2 of output jack J10.
Further-
more, a switched external power would be available on pin 3 of J10. The other
jumper
shunt clip would be placed on pins S and 6 of 1P6 to connect AC4B from pin 5
of 110 to
external ground at JP6 pin 5.
If the controlled device needs 24 VAC, the jumper JP6 shunt clips are set on
pins 1 and 2, and pins 6 and 7. That places 24 VAC on AC4A and AC4B, which in
turn are
19
CA 02255997 1998-12-14
connected to pins 2 and 5 of output jack J10. Also, a switched version of the
24 VAC
source would be available through COM1-NO1, line 54 and pin 3 of J10. If the
controlled
device needs 5 VDC, that's going to always be available at pin 1 of J10 (when
K4 is
unlatched), regardless of the jumper JP6 settings.
It will also be noted that if the controlled device has its own power supply
but
it is desired to switch that power supply (control when the device turns on
and off), pins 2
and 3 of J10 could be tapped into the power circuit on the controlled device.
Contacts 44-1
at the NO1 and COMl pins would complete the power circuit when the set coil of
relay K4
is activated: Thus, the relay can simply provide a switch closure. In this
case the jumper
shunt clips would be removed from JP6 so nothing is supplied to AC4A or AC4B.
From the foregoing it can be seen that the microprocessor can control the
supply of different on-board voltages, or an-off board voltage or just provide
a switch closure
to a controlled device.
E. Communications and Utilities
The 4I0 board has the ability to communicate through twisted pair lines or a
power line. The twisted pair communications module is known as FTT-l0A as is
shown in
Fig. 7. The power line module is indicated as PLT-21 in Fig. 6. These are both
stuffing
options, whichever one desired can be used. The FTT-l0A can be bus or star
topology. It
is just a matter of the type of communication package desired. Other options
such as RS485
might also be used. Both the FTT-l0A module and PLT-21 transceiver can be
obtained from
Echelon Corporation of Palo Alto, California. The communication lines CP1, CPO
and
CLK2 of the FTT-l0A option and the PLT-21 option extend from the
microprocessor to the
CA 02255997 1998-12-14
communications module. The microprocessor sends out a series of 1's and 0's on
each of
these lines. The transceiver is really a big transformer, an isolation
transformer, and it sends
out those same clocking signals in serial fashion on either line Data A or
Data B (Fig. 7).
The transceiver on the other end looks at the two lines and when a difference
is detected then
there must be communication. Then the receiver starts looking at the
combination of 1's and
0's to determine if it is a valid message or not. This type of transmission is
known as
Manchester differential encoding. Since signals are sent on Data A or Data B
polarity is not
a concern. That is, the two wires can be hooked up in either fashion.
' The only difference with power line communication is there are more
communication lines hooked up and there is a little intelligence in the chip
that stores some
of the information and then sends it out at a slower rate: But essentially the
same type of
differential Manchester encoding applies with the power line transceiver. The
transmission is
slowed down a little bit and also it has the intelligence to look at the power
line to see if
there is traffic on the line or not.
The other components shown set up the voltage that is used for the comparison
by the transceiver. An inductor helps reduce noise spikes and things like that
and it is just
cleaning up the communication on a line.
Returning to Fig. 3, the 4I0 board has a reset switch SW 1. If something goes
drastically wrong or it is desired to start from a known beginning the reset
switch is pressed.
2.0 It tells the processor forget whatever you're doing, start from scratch.
Start from the very
beginning of your program. It does not affect the EE section of the
microprocessor. It only
21
CA 02255997 1998-12-14
tells the processor to stop what you're doing and start from the very first
step of your
program. That first step may be to turn all, the relays off as a safety
precaution.
U 11 is a chip that makes sure that the voltage is maintained. U 11 is a chip
that acts like a watchdog for the 5 VDC power. It makes sure that the 5 VDC
does not drop
below 4.3 volts. It is a security measure to make sure that the processor does
not produce
errors due to low voltage. When the 5 VDC line drops below 4.3 volts U 11 will
automati-
cally tell the processor to reset. UlI will keep sending that signal until the
5 VDC line is
back above 4.3 volts. This chip reset does the exact same thing as the push
button reset
SW1. It just tells the processor to start from the beginning. As long as that
reset is held
low, the processor is not going to work. It will be in continual reset. If a
processor is
allowed to free wheel or work on its own when the power drops below 3.8 or 3.7
volts, it
does not have enough power to latch information into its memory so there may
be some old
information, some new information, or a combination of old and new
information. The
processor is trying to operate but the data is completely unreliable. You just
do not know
what is in the processor's memory. U 11 protects against that happening.
The service switch SW2 is a special switch typically used in a communication
format. When the service switch is pressed it invokes a special routine in the
processor. It
tells the processor to send out its unique neuron ID number and to identify
itself with that
unique neuron ID number. So it will make a message that says this is my unique
neuron ID
number and it will throw it out on the communication line. That's what that
service switch
does. Also embedded in the software there is the ability through a combination
of reset and
the service switch to go into what is called an unconfigured state. Typically
that is used
22
CA 02255997 1998-12-14
when something is going very wrong or something needs to be changed
drastically or you
need this board not to work for some reason. You can force the board not to
work by going
into an unconfigured state. That is usually used as a diagnostic tool or if
new information is
going to be downloaded that will take a long time.
16 in Fig. 3 provides some extra input output points that can be configured
through programming to do pretty much whatever is needed. Since they are not
used in the
circuit they were brought out to a header with a 5 VDC power and 5 VDC ground
so this
can be used at a future date. In most cases it is not being used. It is for
future expansion.
In the case of the Smart Sink there is another board attached to 16 that has
three pushbuttons.
Those three pushbuttons interact with the software to talk to another display
to change
parameters just like would be done through a personal computer.
The 4I0 board has a ground shield to eliminate radio emissions from going in
and out of the board. Internally there is foil that goes around the entire
board except where
the traces go through. That acts as a shield to help prevent radio emissions
from affecting
the data lines externally because we have all these is and Os running back and
forth.
Naturally, that's going to cause noise. To prevent it from radiating out to
the world, an
earth ground shield is embedded in the board. That noise will tend to go to
that earth
ground shield. So, the noise that we generate from our board is going to be
drained to
ground and the noise from the outside world is going to be drained to ground
by the same
shield.
F. 4I0 Software
23
CA 02255997 1998-12-14
The software for use on the 4I0 board is stored on the EPROM U3 and runs
on the microprocessor U 12. Figs. 10 and 11 illustrate a flowchart for a
preferred general
program for use with a variety of plumbing fixtures. The flowchart only shows
the program
steps for a single input and output channel; it will be understood that the
steps for the other
channels are similar.
The program begins at SS by initializing a set of parameters for each
particular
input and output channel. The parameters include:
Valid target time - this is the length of time an input signal must be present
before the computer recognizes it as a valid input. While the term "target"
envisions an
infrared sensor as the activating device on the fixture, it also is meant to
encompass the
actuation of a pushbutton switch or the like.
Activation type - this tells the computer whether it should act on a valid
target
signal when the signal appears or after the signal disappears. This is to
accommodate
fixtures such as water closets that should not be activated until a target,
i.e., the user, leaves
the fixture.
Delay before on time - this is the length of time the computer should wait
before activating an output after a valid target is seen and the appropriate
activation type is
allowed for.
On time - the length of time the computer should allow activation of the
fixture. As explained above since the latching relays are used to control the
outputs, the on
time is not synonymous with the actual pulse length from the computer, which
is very short.
But if left unlatched the relay can be allowed to provide an output for a long
time.
24
CA 02255997 1998-12-14
Delay after on time - this is the length of time, after activation of the
fixture,
during which further inputs are ignored. This is to give the fixture time to
carry out its
operation. Most commonly this will be used with a water closet where it may
take ten
seconds or so to complete a flush. During that time you don't want a new flush
request to
interrupt an incomplete prior flush. So the delay after on time is used to
suppress new inputs
following too closely on a previous one.
Target count limit - in certain situations it is necessary to limit the number
of
fixture operations within a certain window of time. For example, if a request
for flushing a
water closet'in a prison cell is received more than twice in a five minute
span it is likely that
an inmate is up to some mischief by issuing repeated flush requests, i.e.,
hitting the flush
button over and over. The target count limit sets the maximum number of times
a request
will be accepted within the window.
Window time - this is the length of time associated with the count Limit just
described. When a first request is received a window timer is started and a
target count kept
and checked to see if it exceeds the specified Limit. In the embodiment shown
there is only
one window timer and it is not reset until it times out. Alternately there
could be~multipie
window timers with each target starting an additional window so that the
target Limit is never
exceeded in any time frame, not just the one kept by a first timer. Another
way of handling
the issue of multiple targets spanning the end of a first window is to
randomize the on delay
and off delay times. A longer off delay has somewhat the same effect as
multiple time
windows.
CA 02255997 1998-12-14
Lockout time - the length of time an output is shut down if the target count
limit is violated: During the lockout time the computer will acknowledge no
inputs and
provide no outputs. If the 4I0 board is part of a PWT network the violation is
reported to
the central computer.
User shut off permission - this parameter governs whether a second switch or
sensor activation by a user will turn off the fixture prior to its run time
limit. For example,
can the user turn off the shower before the ten minute time limit.
Randomize delays - this tells the computer whether it should use fixed on/off
delays or generate delays of random length.
Target count - this is the number of times that the pushbutton switch or
infrared sensor on a fixture has been actuated by a user. It is ignored if a
lockout is not
used. It is initialized at zero, incremented by each valid target and reset to
one when the
window timer times out and to zero when the lockout timer times out.
Returning now to Figs. 10 and 11, after initialization and junction point A,
the
1~ computer proceeds to monitor the input line for a target at 57. When a
target is seen (i.e., a
pushbutton is pressed or an infrared sensor is tripped), the Computer waits at
step 59 to see if
the target remains for the specified valid target time before recognizing the
target as valid.
Once a valid target is found the computer checks at 60 to see if target count
limits are
imposed on this channel. If not it proceeds to junction point B, with
subsequent actions ex-
plained momentarily. If count limits are in effect, the target count in
incremented at 62 and
checked at 64. If this is a first target (i.e., we are not presently in a
window period), the
window timer is started, 66, and the computer goes to junction B. If this is
not a first target,
26
CA 02255997 1998-12-14
the computer checks at 68 to see if the previously set window has expired. If
it has, a new
window is started and the target count is reset to one, as at 70. If the
window is still in
effect, the target count is compared to the limit at 72. If the limit has not
been exceeded we
go to junction B. But if the target count limit has been exceeded, the
computer shuts down
operation of both the input and output on this channel, starts a lockout
timer, resets the
window timer and resets the target count, 74. Operation will resume only after
the lockout
timer times out.
Following junction B, the computer checks if it is ok to actuate the fixture
upon presence of the user or if it is to wait until the user leaves the
fixture, 76. If this
parameter is set to "Leaving" the computer waits at 78 until the target is no
longer seen.
Next the computer checks if there is an on delay, 80. If there is an on delay,
the computer
checks to see if it a random delay, 82. If so the computer determines a random
delay at 84,
otherwise it uses the specified fixed delay to wait, 86, prior to activating
the output.
Activation at step 88 involves a pulse to the appropriate latching relay and
starting an on
timer. During the run or on time, the computer will check at 90 if the user
has shut off
permission. If so, the computer will look for a valid target or switch
activation, 92, and shut
off the output if it finds one. Otherwise the computer simply watches the on
timer at 94.
With either expiration of the on timer or a valid shut off request, the
computer turns off the
output and resets the on timer, 96.
The computer next determines if there is an off delay, 98. If so, any new
pushbutton or sensor activations by the user are ignored during the off delay
time, 99. The
27
CA 02255997 1998-12-14
off delay may be either fixed or random as previously determined. Finally, the
computer
then returns to junction point A and starts watching for the next target.
It can be seen that the basic control logic for an output is delay-activate-
delay
within imposed cycle limits. This basic logic suffices for a wide variety of
applications but
obviously it could be changed through new software in the EPROM. For
illustrative
purposes only, a specific example of the parameter settings in shown in the
following table.
This example assumes the 4I0 board is connected to combination fixture having
a sink with
hot and cold water on IO channels one and two, a water closet on IO channel
three and a
chnwPr nn rn channel four.
Hot Cold Water Shower
Water Water Closet
Parameter: 1 2 3 4
Valid target time (millisecs)100 100 100 1000
Activation on present P P L P
or leave
Delay before on (seconds)0 0 2 0
On time (seconds) 20 10 3 600
Delay after on (seconds)0 0 120 0
Cycle count limit NO NO 2 NO
Window time (seconds) 0 0 300 0
Lockout time (seconds) 0 0 1800 0
User shut off permission?YES YES NO YES
Randomize delays? NO NO YES NO
It can be seen with the above setting the hot, cold and shower water will be
supplied without delays or cycle limits and the user can shut them off. The
water closet,
28
CA 02255997 1998-12-14
however, can only be actuated twice in five minutes and randomized delays will
be supplied
both before and after activation, thus giving the flush valve time to operate.
II. Smart Sink
A traditional hand washing apparatus will not always assure that a proper hand
washing sequence has been conducted. To activate the traditional apparatus,
the user will be
required to physically touch the fixtures at each station of the apparatus,
such as the faucet
handle, soap dispenser lever or paper towel dispenser handle. These fixtures
might contain
contaminants which can be transferred to the user's hands. In addition, the
careless user
might skip a step in the hand washing process or conduct a step improperly to
obtain proper
hygiene, such as obtaining little or no soap, or allowing an insufficient
scrubbing time
period.
The use of a programmed washing device was taught by Griffin, U.S. Patent
No. 3,639,920. Griffin taught the use of a continuously sequenced washing
device in which
water is discharged for a predetermined interval, after which the water will
be turned off and
the soap will be dispensed for another predetermined interval. This is
followed by a
predetermined pause during which neither soap nor water is dispensed.
Thereafter, the flow
of water is reinstated and the flow continues until the user departs from the
plumbing fixture.
While a continuously sequenced washing device assures every step of the
washing cycle is conducted, the inflexibility of a continuously sequenced
washing device
creates some additional problems. The user is only allowed usage for a
predetermined time
interval at each station. A user desiring a more extensive hand washing
procedure is not
29
CA 02255997 1998-12-14
allowed the flexibility to remain at any one station for a longer period of
time than the
predetermined time. Hence, a user requiring more soap during the scrubbing
period to
conduct a proper hand washing will not be allowed to do so. This inflexibility
prevents
assurance that a proper scrubbing procedure was conducted. In addition, a
continuously
sequenced washing device does not allow the user to use only one particular
station or vary
the time interval to better suit the particular situation.
The present invention overcomes the problems described above by using a
separate sensor for each of the three units in the apparatus, namely, the
faucet, soap
dispenser anti paper towel dispenser. Each of these sensors are connected to
the 4I0 board.
The 4I0 board can operate in either in a smart mode or a random mode. The user
may be
provided with the option of selecting the mode of operation through the use of
a menu select
switch. The user may also have access to an override switch that bypasses the
4I0 board
and turns the faucet on.
The smart mode allows a flexible, sequenced hand washing cycle. In the
IS smart mode, a proper hand washing procedure comprises a hand wetting
interval, then a
dispensing of soap followed by a scrub time interval, then a rinse time
interval followed by a
dryer activation and, optionally, an output that verifies completion of a
proper hand washing
sequence. The time for the scrub time interval can be preprogrammed to suit
the particular
situation necessary for obtaining a proper wash. During this scrubbing period,
the user will
not be able to obtain water for rinsing off the soap, hence, assuring that the
user will not be
able to continue without conducting a proper scrub. Since separate sensors are
used for each
station, the user is able to control the length of the wetting and rinse
intervals, as well as the
CA 02255997 1998-12-14
number of dryer activations. Thus, the user can obtain additional water
(during wetting or
rinse only), soap or paper towel if additional water, soap or paper towel are
desired by the
user. What the user cannot do is shorten the scrub time and still obtain
verification of a
proper wash sequence.
In smart mode the paper towel dispenser sensor is always active so paper
towel is always available. Also, if available, the override switch could be
used to force the
faucet on for rinsing. Should the user have an urgent need to interrupt the
hand washing
procedure, the smart mode will allow the user to immediately dry his or her
hands.
Obtaining paper towel out of sequence or activating the override will preclude
issuance of a
verification of a proper wash sequence but it will permit a user to meet an
emergency
without soap covered hands.
To assist the user in the sequence of steps io be taken for obtaining a proper
hand wash, a display board is used to instruct the user in the proper
operation of the sink.
The display board is connected to the 4I0 board via a communication Iink.
When the user wishes to use one of the washing stations independently from
the other stations, the user can select a random mode. In the random mode,
each sensor is
active to allow each unit to be used separately, without interaction among the
stations.
The 4I0 board will also have the ability to monitor the number of times the
faucet, soap dispenser and paper towel dispenser was activated and, if
desired, by whom.
This data can then be retrieved and logged to a central computer. It will be
understood that
the software used by a 4I0 board connected to a Smart Sink is different from
that shown in
Figs. 10 and 11.
31
CA 02255997 1998-12-14
Turning now to the details of the Smart Sink hand washing apparatus, it
comprises a wash basin (not shown) with a faucet mounted thereon. Adjacent the
basin are a
soap dispenser and a towel dispenser, both motor-driven to provide soap and
towels at the
appropriate time. Each of the faucet and soap and towel dispensers has a
sensor associated
therewith. A VFD/LCD display is placed near the sink at a height where it will
be easy to
read.
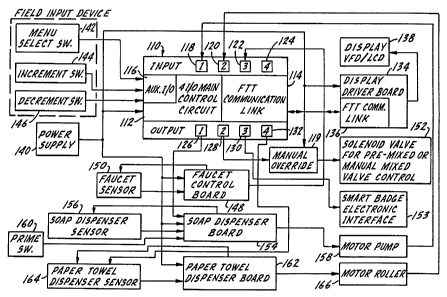
Referring to Fig. 12, one electromechanical solenoid valve 152 is mounted in
the water supply line, after a pre-mining device or back check valves, to
control the flow of
water to the.faucet. The valve 152 is off (closed) when no power is supplied
to it and on
(open) when power is supplied to it. A faucet sensor 150 is mounted in the
vicinity of the
faucet. A common arrangement is to have an infrared emitter mounted in the
neck or base
of the faucet and aimed at a point underneath the faucet outlet. An infrared
detector is
located adjacent the emitter. .
A faucet control board 148 contains a power supply, IR filter, signal condi-
tioner, and output driver. The board 148 also has a 24 VAC input from power
supply 140.
Power supply 140 is a transformer for converting the line power 120 VAC to 24
VAC:
Faucet control board 148 generates a continuous pulse signal and sends it to
the faucet sensor
150. The emitter receives the pulse signal from the faucet control board 148,
and sends an
infrared signal out to its target zone. When a user places his or her hands
underneath the
faucet, and therefore in the target zone of the emitter, infrared light will
be reflected off the
hands to the detector, thereby triggering a return signal to the faucet
control board, which
processes the signal to determine if it is a valid target. If so, the target
is reported to the
32