Note: Descriptions are shown in the official language in which they were submitted.
r
CA 02259767 1999-O1-20
DASHER BOARD SYSTEM
T . HNI A . ~ D
This invention relates to a dasher board system for providing a surrounding
barrier for the
playing surface of a rink, e.g., a hockey rink. More particularly, this
invention relates to a dasher
board system made up of frameless lower sections and an extended continuous
upper shielding
element.
BACKOROL1ND OF TH . INVENTT(1N
Dasher board systems are used for providing an outer wall surface for a hockey
rink and
they.typically include lower dasher board sections and an.upper shielding
arrangement attached
to certain dasher board sections. Numerous types of dasher board sections are
known in the prior
art. These prior art dasher board sections can basically be classified into
two groups: framed and
molded. Framed dasher board sections are typically comprised of steel,
aluminum, or wooden
supports that are welded, bolted, nailed, or attached otherwise to form a
frame. A facing panel,
typically made of a single sheet of plywood or polyethylene, or a mufti-
layered arrangement of
plywood and polyethylene sheets, is attached by screw fasteners to the side of
the frame that faces
the playing surface of the rink. A kick-plate is fastened to a lower portion
of the facing panel to
provide necessary support and reinforcement where pucks and skates are most
likely to contact
the dasher boards. Additionally, a back sheet is sometimes attached to the
frame. While some
CA 02259767 1999-O1-20
of these "framed" dasher boards have provided a suitable surrounding boundary
around rink
surfaces at some locations, they have had drawbacks. The framed dasher board
sections are labor
intensive to assemble, requiring the assembly of a frame and secondary
attachment of a plurality
of sheets to the frame. This significantly increases the cost of the dasher
board system.
Additionally, over time, maintenance and replacement costs can escalate, as
fasteners loosen,
wooden elements warp and rot, and facing panels chip and splinter. Further,
because the dasher
board sections are made from many different attached elements, tolerancing
problems between
adjacent dasher board sections are more likely to occur.
The second group of dasher boards, i. e. , the molded dasher board sections,
are made from
fiberglass with a binding resinous material, e.g., polyester. U.S. Pat. No.
3,844,539 to Abbott
and U. S. Pat. No. 3, 883,120 to Tippmann show two designs within this second
group. However,
as these dasher board sections are molded, they require a separate mold for
each distinct board
section. Thus, these designs may be costly as board sections have varying
lengths and varying
radii of curvature: Moreover; the general cost of manufacturing of these
designs is expensive.
Board systems similar to the design disclosed in U.S. Pat. No. 3,883,120 to
Tippmann can cost
approximately $100,000-$125,000 assembled, including upper shielding. Further,
in the molding
process, the fiberglass is packed into the mold manually. Most likely, this
method would achieve
only a 30 % ratio of glass-to-resin. This places an inherent limit on the
strength-to-weight ratio
of these dasher board sections and contributes to their high cost and high
weight per length. For
example, a 42 inch high, 8 foot dasher board section of this design typically
weighs approximately
260 lbs.
-2-
CA 02259767 1999-O1-20
Therefore, a dasher board system was thus needed which would overcome the
assembly,
maintenance, and replacement problems of the framed dasher board systems, and
which would
also overcome the manufacturing costs associated with the molded dasher board
systems. The
present invention was developed to accomplish this objective.
Additionally, prior art dasher board systems typically include some upper
shielding
structure above portions of the lower dasher board sections to (1) keep the
playing projectile in
the playing area, thus protecting any spectators and permitting play of the
game to continue, and
(2) protect the players and spectators when the players hit the dasher boards
during the normal
course of play. Currently, most upper shielding systems are made of chain link
fences or
individual thick transparent panels. Chain link shielding is frequently used
in outdoor
applications. Chain link shielding is formed by supporting metal fencing by
spaced metal posts
~-Iowever, .chain link shielding, has drawbacks in that there is poor
visibility, through the shielding
and that there are significant safety concerns with the fencing and its
supporting posts.
Transparent shielding has typically been comprised of 0.5 to 0.625 inch thick
glass,
acrylic, or polycarbonate transparent panels placed between metal frames.
These panels usually
come in 4 foot length sections. Metal-framed transparent panel systems have
their drawbacks as
well. For example, some of the panels have been known to shatter.
Additionally, the metal-
flamed transparent panels ale expensive and are labor intensive to assemble.
Moreover, individual
panels can fall out of their frames and injury people in the vicinity.
Another transparent shielding design has used transparent panels without
continuous
vertical frame members. According to this design, the panel sections are
coupled to each other
adjacent their upper ends by fastening devices. This design is commonly
referred to as
-3-
CA 02259767 1999-O1-20
"seamless", although seams are present between adjacent panels. In this
design, the panels have
been made thicker, e.g., 0.75 to 1.00 inches, to be more resistant to
shattering. However, these
thicker panels have little or no flexibility and can cause injury to a player
that has been checked
into the shielding.
Therefore, a dasher board system with an upper shielding arrangement was thus
needed
that would overcome the drawbacks of existing upper shielding arrangements.
The present
invention was developed to accomplish this additional objective.
The invention relates to a dasher board system having improved dasher board
sections,
improved upper shielding, and an improved mounting system for the dasher board
sections and
the upper shielding.
It is an object of the present invention to provide and make dasher boards
sections for a
dasher board system that have an exceptionally high fiberglass content and an
exceptionally high
strength-to-weight ratio.
It is an object of the present invention to provide and make dasher boards
sections for a
dasher board system that are formed by a pultrusion process that enables
straight and curved, and
long and short sections to be made from the same die.
Another object of the present invention to provide and make dasher boards
sections for a
dasher board system that includes significant cost savings over the prior art
molded designs.
It is another object of the present invention to provide a dasher board system
with
supporting arrangements that optimize mounting conditions based upon the
desired rink surface,
-4-
CA 02259767 1999-O1-20
e.g., ice, floor, or pavement, and the desired method of mounting, e.g.,
permanent of temporary.
It is yet another object of the present invention provide and upper shielding
for a dasher
board system that includes a frameless sheet of transparent material that can
be unrolled and curved
to match the contour of the dasher board sections.
It is another object of the present invention to facilitate the assembly of
the dasher board
sections and the upper shielding of a dasher board system.
It is an object of the present invention to provide a dasher board system, for
a boundary of
a hockey surface, having first and second dasher board sections positioned
adjacent each other in an
end-to-end relationship. At least the first dasher board section includes a
top, a bottom, a length, and
a horizontally extending strengthening rib located between and spaced from the
top and bottom of
the first dasher board section. The horizontally extending strengthening rib
extends substantially the
entire length of the first dasher board section, and/or includes portions
thereof that have been
removed at a plurality of spaced locations along its length: Additionally or
alternatively, the dasher
boards sections .are at least 10% fiberglass by volume and are in excess of
fifteen feet in length.
It is another object of the present invention to provide a method for making a
dasher board
system for a rink whereby a plurality of dasher board sections are formed by
the process of pultrusion.
The plurality of dasher board sections are placed in an end-to-end
relationship. The dasher board
sections are supported and stabilized in their end-to-end relationship.
It is yet another object of the present invention to provide a method for
making a dasher board
system for a rink whereby first and second dasher board sections are formed
having horizontal ribs.
The horizontal ribs of at least the second dasher board section are
transversely cut. The second
dasher board section is bent to achieve a predetern~ined curvature. The first
and second dasher board
sections are placed in an end-to-end relationship and fixed to restrain
movement thereof.
CA 02259767 1999-O1-20
It is an object of the present invention to provide a dasher board system, for
a boundary of
a hockey surface, having a plurality of dasher board sections that form a
lower peripheral wall around
the hockey surface. Transparent upper shielding extends along and above at
least three of the dasher
board sections to provide an upper peripheral wall around the hockey surface.
The transparent upper
shielding is a single frameless piece of material in at least the region above
the three dasher board
sections.
It is an additional object of the present invention to provide a dasher board
system, for a
boundary of a hockey surface; having a plurality of dasher board sections that
form a lower peripheral
wall around the hockey surface. The dasher board system also includes
supports, a wire, and
transparent upper shielding. The supports are spaced around the peripheral
wall on the outside of
the dasher board sections, and are attached to the dasher board sections to
restrain movement thereof. .
The wire extends between a plurality of the supports. The transparent upper
shielding extends along
and above the dasher board sections and is coupled to the wire.
It is an object of the present invention to provide a method for making a
dasher board system
for a rink whereby first and second dasher board sections are formed, and
rolled transparent shielding
material is provided. supports are attached to a base support structure. The
transparent shielding
material is unrolled and attached to the supports. The first and second dasher
board sections are
placed in an end-to-end relationship and attached to the supports.
Additionally, it is another object of the present invention to provide a
dasher board system,
for a boundary of a hockey surface, having first and second dasher board
sections positioned adjacent
each other in an end-to-end relationship. At least the first dasher board
section includes a top, a
bottom, a length, and a horizontally extending strengthening rib located
between and spaced from
the top and bottom of the first dasher board section. A support assembly is
pivotally coupled to
=6-
CA 02259767 1999-O1-20
the strengthening rib of the first dasher board section for movement between a
storage position
and an in-use position. The support assembly supports the first dasher board
section when in the
in-use position. The support assembly is pivotally movable with respect to the
first dasher board
section about a horizontal axis and about a vertical axis.
It is a further object of the present invention to provide a dasher board
system, mounted upon
an existing asphalt surface, having first and second dasher board sections
positioned adjacent each
other in an end-to-end relationship. Each of a plurality of structural
supports are attached to a dasher
board section. Each of a plurality of earth anchors extend through the asphalt
surface and into the
ground below the asphalt surface.
Further objects, features and other aspects of this invention will be
understood from the
following detailed~description of the preferred embodiments of this invention
with reference to the
attached drawing. figures.
FIG. 1 is a perspective assembly view of the dasher board system showing the
relationship
between the dasher board sections, the upper shielding, and the mounting
system;
FIG. 2 is a perspective assembly view of the dasher board system similar to
FIG. 1,
showing the upper shielding attached to the supports; .
FIG. 3 is a side cross sectional view of an installed dasher board system
taken through a
vertical support;
FIG. 4 is an isometric view of a dasher board section;
FIG. 5 and 6 are side elevational and rear elevational views of the support;
CA 02259767 1999-O1-20
FIG. 7-9 are front elevational, side elevational, and top plan views of the
mounting clip
for attaching the dasher board section to each other and/or to the support;
FIG. 10 is a perspective assembly view of the dasher board system similar to
FIG. 2,
showing the mounting of curved dasher board sections;
FIG. 11 is a rear elevational view of a curved dasher board section after ribs
have been cut
m it;
FIG. 12 is a schematic view illustrating a pultrusion process known for making
other
products, but used in the present invention to make the dasher board sections;
FIG. 13 is a perspective assembly view of the dasher board system showing the
portion
of the system having a team box;
FIG. 14 is an exploded assembly view of a dasher board section having a
pivotal rink
entry/exit gate;
FIG. 15' is ~a side elevatiorial .view of a support for mounting the dasher
board sections in
an alternative rink setting;
FIG. 16 is a cross sectional view of the dasher board system mounted to an
existing chain
link fence;
FIG. 17 is an enlarged detail of the lower portion of FIG. 16 showing. the
attachment of
an optional liner;
FIG. 18 is an exploded perspective view of the hardware for mounting the
dasher boards
to the chain link fence;
FIG. 19 is a side elevational view of a dasher board section mounting in an
alternative rink
setting using an alternative support in an in-use position;
s
CA 02259767 1999-O1-20
FIG. 20 is a top plan of FIG. 19 with the support shown in an in-use position
in solid line,
and in a storage position in broken line;
FIG. 21 is a side elevational view of a dasher board section and support of
FIG. 19, shown
in a storage or non-use position;
FIG. 22 is a perspective view of the lockdown mechanism used in the support of
FIG. 19;
FIG. 23 is a side cross sectional view of the dasher board system, similar to
FIG. 3,
installed at an asphalt surface with a concrete curb; and
FIG: 24 is a side cross sectional view of the dasher board system, similar to
FIG. 3,
installed at an asphalt surface without a concrete curb.
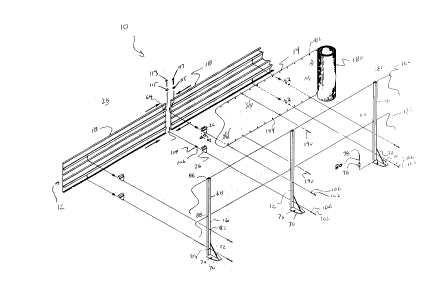
Referring to the drawings wherein like numerals indicate like elements, a
dasher board
system, designated generally by. reference numeral 10, is illustrated. Dasher
board system..10
.surrounds a rink. surface 28; e. g. , an ice, street, or floor hockey rink
21, and provides a structural
boundary for maintaining the playing projectile in the playing area. In
addition, dasher board
system 10 is sufficiently strong to withstand high forces when players are
checked into the
"boards", while being relatively.flexible to minimize injuries when this
occurs.
As illustrated in FIGS. 1-3, dasher board system 10 generally includes lower
dasher boards
12; upper shielding 14, and supports 16. The lower dasher boards 12 include a
number of dasher
board sections 18 arranged in an end-to-end configuration to define the outer
limits.or border of
the playing surface. The supports 16 are positioned outside the perimeter
region of the playing.
area and are spaced from one another by a suitable distance, e.g:, 5 feet
apart, to support the
-9-
CA 02259767 1999-O1-20
remainder of dasher board system 10. More specifically, supports 16 are used
to stabilize the
lower dasher board sections 12 and the upper shielding 14 with respect to the
playing surface. For
example, for a rink 21 having a raised perimeter curb 20, the supports 16 are
preferably mounted
to the top of the curb 20. The dasher board sections 18 are positioned with
their back surface
against the inside periphery 24 of the curb 20 and against the support 16.
Mounting clips or
brackets 26 are used to attach the dasher board sections 18 to each other and
to the supports 16.
The front of the dasher board sections 18 faces the rink surface 28 on which
the game is played.
The rink surface may be ice, paving, or a flooring surface. In a preferred
embodiment, one or
more sheets of transparent upper shielding 14 is positioned with its back
surface against the
supports 16 above the dasher board sections 18.
A cross section of a dasher board section 18 is shown in Figure 4. Each
.section 18
includes a wall portion 30 having a front side 32 that faces the playing
surface 28 and a rear side
34 facing 'away from the playing surface 28. Each dasher board section 18 also
includes a number
of strengthening ribs 36, 38, 40, 42, 44, and 46' that extend rearwardly,
i.e., away from the
playing surface, from the rear side 34 of wall portion 30, to strengthen and
reinforce the dasher
board section 18 and to provide the desired stiffness to the section 18.
The bottom strengthening rib 36 includes a horizontal flange 48 and a vertical
flange 50,
and assists in the alignment of the dasher board section 18 with respect to
the rink surface 28, and
raised perimeter curb 22, if available; in addition to providing strength and
stiffness to dasher
board section 18. A sealant or sealing member, may be positioned at the base
of horizontal flange
48 to seal the region between the bottom of the dasher board section 18 and
the rink surface 28.
- 10-
CA 02259767 1999-O1-20
The center strengthening ribs 40 and 42 and top strengthening rib 46 also
provide the
desired strength and rigidity to the board section 18. In addition to
providing strength and
stiffness, top strengthening rib 46 also has a horizontal top surface 52 that
forms a small ledge
within the playing area at the top of the dasher board section 18. Top
strengthening rib 46 further
includes a rear edge 54 that can be used to clamp the upper shielding 14 to
the support 16.
T-shaped strengthening ribs 38 and 44 are positioned above and below the
center
strengthening ribs 40 and 42. These ribs 44 and 38 help mount the board
section 18 to the support
16 and add additional strength and rigidity to its respective section 18. ~
Upper and lower T-shaped
strengthening ribs 38 and 44 include a horizontal flange 56 and 58 and a
vertical flange 60 and
62, respectively. Adjacent the ends of the dasher board sections 18, the
horizontal flanges 56 and
58 have respective vertical through holes 64 and .66 enabling the mounting
clip 26 to be fixedly
attached to the ends of the dasher board sections 18. This prevents any
undesirable separation
between adj acent dasher board sections 18. Details. of. the.. composition and
manufacturing of
dasher board sections 18 as well as additional details of. the mounting
arrangement .thereof are
described hereinafter.
As shown in FIGS. 1-3, 5 and 6, each support 16 includes a tubular vertical
post 68, a
horizontal baseplate 70, and a support gusset 72. The horizontal baseplate 70
is placed on a level
base supporting surface 29 adjacent the outer perimeter of the rink surface;
for example on a
raised perimeter curb 20. Holes 74 in horizontal baseplate 70 permit the
support 16 to be mounted
to the base supporting surface 29 by suitable mounting hardware. One preferred
mounting.
hardware arrangement includes high tensile concrete expansion anchors 76
positioned in holes in
the base supporting surface 29 that are in a pattern and spacing corresponding
to the pattern and
-11-
CA 02259767 1999-O1-20
spacing of the holes 74 in the baseplate 70. Bolts 78 and washers 80 may then
be used in a
conventional manner so that the bolts 78 extend through respective holes 74 in
baseplate 70 and
into respective anchors 76 for affixing the supports 16 to the base supporting
surface 29. A
vertically oriented support gusset 72 is suitably attached, for example by
welding, to a respective
vertical post 68 and baseplate 70 to provide a rigid and sturdy connection
therebetween.
Vertical post 68 also includes upper and lower pairs of holes 82 and 84
perpendicular to
the length of the attached dasher board section 18, and upper and lower holes
86 and 88 parallel
to the length of the attached dasher board section 18. The perpendicular hole
pairs 82 and 84
permit attachment of the mounting clips 26 thereto. The parallel holes 86 and
88 permit the
passage of respective wires for coupling upper shielding 14 thereto. To
facilitate access to the
holes 84, it is preferred that the gussets 72 be horizontally offset
The supports 16 vary in height depending upon the desired height and existence
of upper
shielding 14 at each point along the perimeter of the dasher board system 10.
For example; it may
be desirable to have (1) a first and maximum shielding height used in the
region immediately
surrounding the opposing ends of the rink, i.e., where the nets are typically
positioned; (2) a
second shielding height used on the sides of the rink between the opposing
ends, and (3) no upper
shielding used on side portions in the vicinity of the team benches. Thus,
according to this
example, the supports 16 in the vicinity of the team benches would terminate
at the approximate
position where the top strengthening rib 46 of the dasher board section 18
would abut those
supports 16. Additionally, these particular supports 16 would not include
holes 86 and 88 for
coupling upper shielding 14 thereto. Supports 16 in the regions of upper
shielding 14 extend
- 12-
CA 02259767 1999-O1-20
above the top of their respective dasher board section 18 by an amount
generally corresponding
to the approximate height of the upper shielding 14 in that area.
The mounting clips 26 are shown in FIGS. 1-3 and 7-9. Each mounting clip 26
primarily
includes a first lower vertical portion 90, a second upper vertical portion
92, and a horizontal
portion 94. An angular offset portion 96 provides a slight offset displacement
between the lower
and upper vertical portions 90 and 92 that generally corresponds to the
thickness of vertical
flanges 60 and 62 of the T-shaped strengthening ribs 38 and 44. Optionally, a
downwardly
extending lip 98 may be provided at the forward edge of horizontal portion 94.
As best shown
in FIG. 3, the shape of the mounting clip 26 corresponds to the contours of
the region on the
underside of the T-shaped strengthening ribs 38 and 44, respectively. For
example, the rear
surface of lower vertical portion 90 is positioned against the front face of
the. support 16. The rear
surface of upper vertical portion 92 is positioned against the forward facing
surface of the vertical
flanges 60 and 62 of the T-shaped strengthening ribs 38 and 44. ~ The
horizontal portion 94 is
positioned against the. bottom surface of the horizontal flanges 56 and 58 of
the T-shaped
strengthening ribs 38 and 44. Additionally, downwardly extending lip 98 is
positioned against
the rear side 34 of the wall portion 30 of the dasher board section 18.
Each mounting clip 26 is attached to the vertical post 68 of a respective
support 16 by
conventional hardware. For example, in a preferred embodiment, the lower
vertical portion 90
of the mounting clips 26 'include a vertically slotted hole 100. A bolt 102
may be 'inserted through
a hole 82 or 84 in post 68 and through slotted hole 100 in clip 26, and
fastened on the inner side
of the mounting clip 26 by a lock nut 104. Washers 106 may also be used in a
conventional
manner. This arrangement permits the clips 26 to first be coupled to the
support 16 and then
-13-
CA 02259767 1999-O1-20
raised up to the abut the inside region of the T-shaped strengthening ribs 38
and 44, prior to being
tightened.
The supports 16 are positioned along the length of the dasher board sections
18 in addition
to being placed at the junctions between adjacent dasher board sections 18
that have been placed
end-to-end. The mounting clips 26 and supports 16 positioned along the length
of the dasher
board sections 18 need not be physically fixed to the dasher board sections
18. The tolerancing
between the mounting clips 26 and the contours of the region on the underside
of the T-shaped
strengthening ribs 38 and 44 is sufficient to restrain any significant motion
therebetween.
Moreover, the small tolerancing in this region permits a small amount of
desired flexibility
between the dasher board section 18 and the support 16 to help minimize the
possibility of injury
to players who collides into a dasher board section 18 with a high impacting
force. In addition;
this tolerancing enhances the ability to align adjacent board.sections 18 at
their junctions.
The mounting clips 26 that are used on. supports 16 positioned at the dasher
board junctions
are affixed to the dasher. boards sections 18 to ensure' that the. ends of the
dasher board sections
18 abut each other and form and maintain a smooth continuous front facing wall
surface.
Accordingly, there is reduced flexibility and enhanced rigidity in this area.
To accomplish this,
the mounting clips 26 used in -this region preferably include two mounting
holes 110 in their
horizontal portion 94 that are laterally spaced to correspond to the spacing ~
between the holes 64
or 66 in the flanges 56 or 58 of adjacent dasher board sections 18 when placed
in an abutting
relationship. Conventional hardware, for example, lock nuts 112, bolts 113 and
washers 115,
may then be used to fixedly attach the mounting clips 26 to the dasher board
sections 18 through
the aligned holes 110 and 64 and 66. In one arrangement, the lock nuts 112 may
be press fit into
- 14-
CA 02259767 1999-O1-20
holes 110 as shown in FIG. 8. In another arrangement, not shown, upwardly
extending bolts may
be press fit into holes 110. In assembly, the bolts will extend through holes
64 and/or 66 in the
flanges 56 and/or 58 and attached and tightened using on the upper side of the
flanges 56 and/or
58 by a lock nut.
Normally, the playing surface will be curved in its corners and the desired
curvature in
these regions can vary greatly from design to design. Thus, to form the entire
wall boundary for
the playing area, the dasher boards system 10 also includes curved board
sections 118. Curved
board sections 118 are similar to the straight board with a few exceptions.
Primarily, curved
dasher board sections 118 differ from straight dasher board sections 18 by
slits, notches, or gaps,
generically referred to herein as cuts 120, that have been cut in
strengthening ribs 36, 38, 40, 42,
44, 46, by a saw or other cutting device, and by the addition of curve
defining and reinforcing,
members 122. As described below, the cuts 120 in the strengthening ribs
significantly reduce the
rigidity in those regions and permit the dasher board section I 18 . to bend .
and flex along those cut
Iines. ~It should be noted that the shape of the cut 120 is not critical and
it may be a .narrow linear
band, a wider band, or a V-shaped cutout. In a preferred embodiment, the cut
120 creates a
narrow linear void in the ribs as thin as possible, e. g. , less than 0.125
inches.
FIG. 11 shows one embodiment whereby an elongated dasher board section 1'18.
is
provided with a periodic transverse vertical cuts 120. For example, if dasher
board section 118
is 20 feet in length, cuts 120 might preferably be provided every 8 inches.
This frequency of cuts
120 permits the curvature of the dasher board section 118 to be gradual in
nature. The cuts 120
preferably extend substantially through the strengthening ribs .36, 38, 40,
42, 44, 46, but do not
extend into the wall portion 30. However, it may be possible to obtain the
necessary flexibility
- 15-
CA 02259767 1999-O1-20
by not cutting substantially through the strengthening ribs. Once the cuts 120
are formed, each
dasher board section 118 can be flexed to its desired radius to correspond to
its curve defining and
reinforcing members 122. It is preferred that all surfaces of the dasher board
sections 118 that
are exposed by the cuts 120 be sealed.
Curve defining and reinforcing members 122 are preferably steel L-shaped
brackets that
have been steel angle rolled or otherwise formed in a desired curved
configuration or radius.
Curve defining and reinforcing members 122 have a vertical flange 124 and a
horizontal flange
126 and are configured to fit into the top portion of the upper T-shaped
strengthening rib 44
and/or the lower T-shaped strengthening rib 38. For example, if curve defining
and reinforcing
members 122 are used in the upper T-shaped strengthening rib 44, portions of
the vertical flange
124 will rest against .the rear side 34 of wall portion 30 arid the horizontal
flange 126 will rest
against the horizontal flange 56 of the upper T-shaped strengthening 'rib 44.
Preferably, at least the ends of the curve ~ defining .and .reinforcing
members 122 are
attached to the dasher board sections 118 by conventional hardware. Vertical
holes 128 are
provided in at least the ends of horizontal flange 126 and holes, not shown,
are also provided at
corresponding locations on hol-izontal flange 56 and/or 58 of the upper and/or
lower T-shaped
strengthening ribs 44 and/or 38. Mounting hardware, for example, bolt 132,
.lock nut 134, and
washers 136, is used in a conventional manner by passing the bolt 132 through
the aligned holes
and threading the lock nut 134 onto bolt 132. This fixes the curve defining
and reinforcing
members 122 to the dasher board sections 118, and maintains the dasher board
sections.118.at
their desired curvature.
CA 02259767 1999-O1-20
Additionally, the curve defining and reinforcing members 122 are preferably
positioned
such that their ends do not correspond to the juncture between adjacent dasher
board sections 118.
The curve defining and reinforcing members 122 also serve to retain the
adjacent board sections
118 in the end-to-end relationship such that the mounting clips 26 positioned
at the junction
between the curved sections 118 may need not be affixed to the strengthening
ribs 38 and 44.
However, additional holes may be provided in the curve defining and
reinforcing members 122
in alignment with the mounting clip holes 110 if it is desired to use the two
attachment systems
together. Further, if desired, the curve defining and reinforcing members 122
may be shaped and
sized to frictionally fit within the T-shaped ribs 38 and 44 for attachment
therebetween.
The dasher board sections are preferably made by a process called pultrusion.
Pultrusion
is a well known method of manufacturing some reinforced plastic shapes that
includes
continuously pulling resin rich reinforcements through a heated steel die to
form profiles of
constant cross section of continuous length. While pultrusion has been used to
form' many
different products, it is believed that pultrusion has not been used for
dasher board sections. A
schematic representation of the pultrusion process is shown in FIG. 12.
Typically, unidirectional glass roving 150 begins the process. This is the
fiber that runs
along the length of the profile. Roving 150 is made up of fiberglass
unidirectional filaments,
which are manufactured in continuous rolls. Roving in pultruded products
typically comprises
SO% to 70% of the total glass content. In addition to supplying the necessary
strength to pull the
profile, roving provides the product with high tensile, flexural properties
and is a big contributor
to the overall section stiffness. Generally, fiberglass roving is used in
pultrusion to achieve the
required properties. As an alternative to fiberglass, graphite roving can be
used where more
-17_
CA 02259767 1999-O1-20
stiffness is desired, and polyester roving may be used where more flex is
desired. For the dasher
board sections 18 of the present invention, fiberglass roving is preferred.
One or more fiberglass mats 152 preferably provide the remainder of glass
reinforcement
used in the pultrusion process, and it typically includes 30 %-50 % of the
total glass content. The
mats 152 are multidirectional reinforcements and are used to obtain the
desired transverse
properties of the product. Whereas the roving 150 ties the composite together
in the longitudinal
direction, the mats 152 are responsible for typing the composite together in
all directions, but
mainly in the transverse direction.
Unlike hand-layed-up or press-molded processes which use short chopped fibers,
the
pultrusion process includes a multidirectional mat that has good pull strength
to facilitate getting
it to the die. after it has been wet-out with the resin. Continuous strand mat
is commercially
available for the pultrusion process and offers good wef-out characteristics,
conformability to a
variety of shapes, and good physical properties including the required pull
strength. However,
as an alternative to continuous strand mats, it may be desirable to use woven
roving, stitched
roving, and woven fabrics to increase the 'desired transverse properties. For
the dasher board
sections of the present invention, an arrangement of at least six mats;
extending from
strengthening rib to strengthening rib, is preferred:
The individual strands and mats are routed from their , respective supplies;
through a
guiding device 154, and into and through a liquid resin bath 156. This
thoroughly saturates or
"wets-out" every fiber with a thermoset resin. Generally, two types of resins
are most often used
in the pultrusion process. They are polyester resin and vinyl ester resin. A
polyester resin is a
preferred resin for the dasher board sections of the present invention. The
polyester resin
_ 18_
CA 02259767 1999-O1-20
preferably contains ultraviolet inhibitors, and is desirable because it
exhibits good corrosion
resistance and excellent mechanical properties.
Before the material is pulled into a heated die 162, a surface veil 158 may be
added to
enhance the surface appearance of the final product. The veil 158 is added to
the outside of the
profile prior to entrance of the die. As a result, the finished profile has a
resin-rich surface which
aids in resistance to ultraviolet degradation and makes the profile more hand-
friendly. The resin
soaked fibers and mats, are then passed through preformers or a series of
guides 160. The
preformers 160 slowly conform the product to its final shape for entry into
the heated die 162.
After the preformers 160, the next stage in the pultrusion process is the
curing of the
composite. The curing or hardening occurs while the wet-out reinforcements are
being pulled
through the heated die 162. As the resin is a thermoset resin; the heat from
the die causes the
resin to cure. By the time the part exits the die, a hard part in the exact
shape of .the die cavity
has 'been formed. The final result is a solid, rigid profile with all the
reinforcements, that.is the
strands and mats, laminated within.
Throughout this process, a pulley 164 is gripping and pulling the product. In
fact,
pultrusion gets its name from this pulling process. A drive system for the
pulley 164 keeps the
product .moving. The product exiting the pullet 164 passes by a. cut-off saw
166, which cuts the
product into the desired lengths. The cutting of the strengthening ribs to
make curved dasher
board sections 118 is preferably done at another station.
Some details of the dasher board sections 18 may be affected by the specific
pultrusion
arrangement used. For example, while it is preferred that all internal and
external corners are
- 19-
CA 02259767 1999-O1-20
rounded, the radii of each corner may depend upon the placement and grouping
of the fibers and
mats used in the pultrusion process.
One significant advantage of the present invention over molded dasher board
sections of
the prior art is the exceptional strength-to-weight ratio that can be obtained
by the pultrusion
technique. For example, the pultrusion process permits the dasher board
sections 18 and 118 to
include a fiberglass content of 50% or more by volume. In contrast, the prior
art molded dasher
board sections are limited by the amount of fiberglass they contain because of
their molding
process, and thus typically only include, at most, a fiberglass content of 30
% by volume.
The improvement of the strength-to-weight ratio of the current invention also
permits the
present invention to use longer dasher board sections without encountering
human limitations.
The prior art steel framed' dasher board. sections typically weigh about 260
pounds, without
hardware, and are 8 foot in length and 42 inches high. Human limitations,
e.g., how much a
person can lift, become significant assembly issues when dasher board sections
approach and/or
exceed this weight. The present invention includes dasher board sections that
are 20 feet long anal
42 inches high, but each weighs approximately 23T pounds, without hardware.
Thus, the present
invention permits dasher board sections to be used that are 150 % longer than
the molded prior art
dasher boards, but which actually weigh less.
Another significant advantage obtained by utilizing the pultrusion process is
the cflst
savings that can be obtained over the prior art molded designs. A single
pultrusion machine can.
be used to form straight and curved dasher board sections, and dasher board
sections of varying
length. In contrast, the prior art molded designs require a separate mold for
each board section
variation.
-20-
CA 02259767 1999-O1-20
Moreover, the length of the dasher board sections is only realistically
limited by shipping
and handling constraints. Thus, the dasher board sections of the present
invention can easily be
made in lengths of 20-25 feet long. Whereas, molded dasher board sections are
frequently only
8 feet in length, likely, at least partly, due to the constraints of the
molding machinery required
to make the sections.
Referring back to FIGS. 1-3 and 10, the transparent upper shielding 14 is
preferably made
of a clear polycarbonate sheet, e. g. , LEXAN, having a thickness equal to or
less than 0.125
inches. The shielding is preferably initially supplied in rolls 180 which
facilitates installation. The
shielding 14 preferably includes upper holes 182 and lower holes 184 along its
length adjacent its
top and bottom edges, respectively, for attachment purposes.
To attach the transparent upper shielding 14 around the playing surface, an
upper wire 186
is routed through the upper holes 86 in the posts 68. Similarly, a lower wire
188 is routed
through the lower holes 88 in the posts 68. In a preferred design, the wares
186 and 188 are clear
coated wires with a 0.125 inch diameter. A fastening element 190, which may be
a nylon quick
tie, a cable tie, a U-shaped crimp device, staples, or any other suitable
element, is inserted
through each hole 182 and 184 and wrapped around a respective wire 186 or 188
to couple the
transparent upper shielding 14 to the wires 186 and 188. The wires 186 and 188
are pulled and . . .
tied-off to tension the shielding 14: This design eliminates the need for
thick glass and acrylic
panels inserted between vertical frames. By using a single sheet from a roll,
upper shielding may
be provided at a fraction of the price of the currently used transparent
shielding designs.
As previously discussed, different shielding heights may be desired. However,
a single
uninterrupted portion of shielding material may be used for each segment of
upper shielding that
CA 02259767 1999-O1-20
has a constant height. For example, if a constant shielding height was desired
around most of the
rink, an uninterrupted sheet of shielding having a length of 144 feet could be
used.
To install the dasher board system 10, the supports 16 are mounted to a base
supporting
surface 29. The base supporting surface 29 need not be a raised perimeter curb
20 as shown in
FIG. 3, and may be any surface including asphalt, concrete, or even dirt. In
fact, a raised
perimeter curb 20 would likely be seen only in an ice rink installation where
it is helpful to retain
water. This dasher board system 10 can be used with street and roller hockey
surfaces as well.
Next the upper shielding 14 is installed by routing the wires 186 and 188
through the holes
86 and 88 in the posts 68. The upper shielding 14 is unrolled around a desired
area, and ties 190
are used to couple the shielding to the wires 186 and 188. The wires 186 and
188 are pulled and
tied-off to tension the shielding 14. If shielding is desired in other areas,
this process is repeated
for each constant-height segment of shielding 14.
The dasher board sections 18 and 118 are formed to their desired lengths
according. to the
above-described pultrusion process: Curved dasher board sections 118 ri~ay be
formed by cutting .
the strengthening ribs, bending the section 118 at the locations of the cuts
120, and inserting and
attaching curve defining and reinforcing members 122 into the upper portions
of the upper and/or
lower T-shaped supporting ribs 38 and 44.
The mounting clips 26 are loosely attached to the supports 16. The dasher
board sections
18 and 118 are placed in an end-to-end configuration around the playing
surface and against the
supports 16: The mounting clips 26 are raised to conformingly fit within the
lower portions of
the upper and/or lower T-shaped supporting ribs 38 and 44. The mounting clips
26 positioned
at the junction between adjacent dasher board sections 18 and 118 are affixed
to the dasher board
CA 02259767 1999-O1-20
sections 18 and 118. This effectively completes the installation of dasher
board system, exclusive
of installation of gate and/or team boxes as described below.
In a preferred embodiment, the shielding extends a small distance, for example
1 inch,
below the top of the dasher board sections 18 and 118. With this arrangement,
the rear edge 54
of the upper strengthening rib 46 serves to clamp this lower extension of the
upper shielding 14
between the dasher boards sections 18 and 118 and the supports 16. In effect,
the lower edge of
the shielding will conform to the perimeter of the dasher boards sections 18
and 118, and the top
edge of the shielding will substantially conform to the upper wire 186 which
will remain tensioned
in a straight line between adjacent supports 16. Thus, a very slight fishbowl
effect can be formed
by this arrangement. Optionally, flexible or inflexible straps, not shown, may
be placed with each
strap extending vertically along the front surface of the upper shielding 14
and having a first end
inside the top of,a respective post 68 and a secoild end clamped to the post
68 by the dasher boards
sections 18 and 118. In one design, the straps could. be made from molded or
extruded aluminum
strips. The straps would then hold the upper shielding 14 in place by pulling
the shielding profile
against the posts 68 to periodically clamp and/or compress the upper
shielding: If desired; this
arrangement may be used to eliminate the previously described fishbowl effect
and the need for
upper wire 186 and upper holes 182. A felt or foam cushion can be applied to
the aluminum
strips and/or posts 68 to isolate the transparent upper shielding 14 from the
metal components to
minimize scratching, wear, and cracking of the shielding 14.
FIG. 13 illustrates a team box design 200 for a hockey rink. In essence, team
box 200 is
formed by adding end walls 202 and a back wall 204, each that utilizes the
same pultruded
sections but cut to a desired length. Supports 216 are preferably placed at
the corners between
- 23 -
CA 02259767 1999-O1-20
the dasher board section 18 and the end walls 202, and the end walls 202 and
the back wall 204.
The supports 216 differ from supports 16 by including laterally flared
brackets 218 attached to the
posts 216. The mounting clips 26 are attached to holes 220 in brackets 218 in
lieu of the
mounting clip holes 82 and 84. Further, posts 216 inside the team boxes 200
need not include a
baseplate or gusset as these posts 216 are aimed at coupling the walls 202 and
204 and sections
18 together. Additionally, as shown in FIG. 13, posts 16 and 216 that
terminate at the top of
board sections 18 and do not upper shielding 14 are preferably capped by a
tube cap top 222 to
prevent possible injuries. Indeed, capping the top of the supports is
'preferred throughout 'the
dasher board system 10. Moreover, if the design of a team box 200 requires
mounting to both
sides of a wall section, for example back wall 204, holes, not shown, may be
drilled in the wall
portion 230 between the strengthening ribs. Alternatively, the back wall 204
may be reversed so
that the ribs will face the inside of the team boxes. This enables benches,
tables, and other
devices to be mounted directly to tk~e inwardly facing strengthening ribs:
FIG. 14 shows a dasher board section 318 provided with a gate or pivotable
door 320
therein. The door 320 may be formed by a tubular galvanized steel door frame
322 that is faced
with a fiberglass panel 324 and capped with another piece of fiberglass 326.
The pieces of
fiberglass 324 and 326 _are preferably attached to frame 322 by conventional
hardware, e. g. , rivet-
like retaining plugs 327. The dasher board section with gate 318 includes a
rectangular cutout 328
therein that corresponds to the size of the door 320. . The cutout extends
through the wall portion
330 in addition to the four uppermost strengthening ribs 340, 342, 344, 346.
The top portion of
vertical flange 362 of lower T-shaped strengthening rib 338 is also removed to
enable the
horizontal flange 358 of that rib 338 to act as a step 339.
-24-
CA 02259767 1999-O1-20
The ribs 338, 340, 342, 344, 346 are also cut away a distance from the door
320 on both
sides of the door 320. This enables a hinge tubular support 360 and a catch
tubular support 362
to be mounted to the dasher board section 318 through aligned holes 364 and
366 on both sides
of the door 330. A hinge 368 is connected between hinge tubular support 360
and frame 322 to
enable door 320 to pivot Catch tubular support 362 includes two catches on it
370 such that a
conventional door latching mechanism 372 can be used to lock and unlock, and
open and close
the door 320 with a handle 373.
In an alternative arrangement to FIG. 14, the door 320, including the frame
322 and the
panels 324 and 326, could be replaced by the dasher board section removed from
the rectangular
cutout 328. Suitable hardware would be used to pivotally mount the removed
door section to the
remaining dasher board section 318. A similar door latching arrangement could
also be used and
would preferably be mounted to the strengthening ribs on either side of the
cutout 328.
FIG. 14 also illustrates optional adhesive strips 374 that can be used to
simulate the effects
of a kickstrip and/or a sill strip to be attached to the bottom or top of all
dasher board sections 18,
118, 318. In the alternative, solvent-based paint; epoxy paint, dyed resin,
plastic elements, or
nothing may be used in Iieu of the adhesive strips 374.
A support 416 is shown in FIG. 15 for an application where it is undesirable.
to place
fasteners into the ground or base supporting surface. Such a situation may
arise in when it is
desirable to convert a tennis court into a street or roller hockey rink for
the winter, or when it is
desirable to may a hockey rink in a gymnasium for a short period of time. As
with support 16,
support 416 includes clip mounting holes 482 and 484. However, support 416
differs in that the
smaller horizontal baseplate 70 and gusset 72 arrangement of support 16 has
been replaced by a
- 25 -
CA 02259767 1999-O1-20
large tubular horizontal support 450 and a tubular diagonal support 452
attached at its ends to the
top of post 468 and the rear end of horizontal support 450. The horizontal
support 450 also has
front and rear baseplates 470 and 471 attached thereto. The bottom of the
baseplates 470 and 471
may include a rubber cushioning element if desired to minimize the defacement
of surfaces prone
to being scratched. This support 416 would be attached to a dasher board
section with mounting
clips in the same manner as support 16.
As shown in FIGS. 16-18, the dasher board sections 18 can be used to be
attached in an
area enclosed in a chain link fence 502. Such may be the case with some tennis
courts. The
dasher board sections 18 are attached to an existing fence post 504 in lieu of
a support 16. The
dasher board sections 18 are preferably connected to the existing fence posts
504 by using a U-bolt
506, a retainer plate 508, and nuts 510. The'U=bolt 506 is inserted through
the fence 504 and
around a post 504. The retainer plate 508 is placed on the end of the U-bolt
such that the bottom
end of the retainer plate 508 engages a vertical flange 60 or 62 on the dasher
board section 18,
Look nuts 510 are then tightened to clamp the dasher board panel 18 to the
fence 502.
Optionally; the playing surface area, for example the tennis court, can be
converted. to an
ice hockey rink by laying a polyurethane liner 512 on the ground between the
dasher board panels
18. A kickplate 514 is attached to. the bottom of the dasher board panels 18
by conventional
hardware, e.g., screw 520; nut 522, and washer 524. The liner 512 can be
clamped in between
the lackplate.514 and the bottom of dasher board panels 18 to form a sealed
area extending up to
approximately the height of the kickplate 514. Water can be deposited onto the
liner 512 to retain
water. If the temperature drops below freezing, the water will freeze and an
ice rink will be
formed.
-26-
CA 02259767 1999-O1-20
FIGS. 19-22 illustrate a mounting support assembly 616 for dasher board
sections 18 and
118 that is movable between an in-use position, as shown in FIG. 19, and a
storage position, as
shown in FIG. 21. Mounting support assembly 616 includes a first or upper
support 620 coupled
at a top end 634 to its respective dasher board section 18, and a second or
lower support 622
coupled to the other or bottom end 636 of the angled support 620. In an in-use
position, the lower
support 622 is horizontally oriented on top of the ground or supporting
surface to support the
dasher board section 18 in use so that dasher board section 18 provides a
boundary wall for the
rink surface 28. Further, upper support 620 is angled between the dasher board
section 18 and
the rear end 638 of the lower support 622 to transfer forces to the lower
support 622 and stabilize
the dasher board section 18. As shown in FIG. 21) in storage, the upper and
lower supports 620
and 622 fold up in between the strengthening ribs 42 and 44 of ttie dasher
board section 18 so that
the dasher board sections 18 can be effectively stored in a minimal, space by
permitting the dasher
board sections 18 to. be stacked.
To accomplish this folding arrangement, a swivel 624 is preferably mounted to.
the
horizontal flange 56 of the upper T-shaped strengthening rib 44. Swivel 624
includes a vertical
shaft 626 extending through a hole in the horizontal flange 56, a base 628
below the horizontal
flange 56, and a retaining member 630 above the horizontal flange 56 for
retaining the swivel 624
to the flange 56. A hinge 632 includes a first portion mounted to the base 628
and a. second
portion mounted to the top end 634 of the upper support' 620 to enable upper
support 620 to pivot
with respect to the base 628 about a horizontal axis in the direction of arrow
629. The top end
634 of upper support 620 is cut at an angle so that it is parallel to the base
628 when in an in-use
position. As best shown in FIG. 20, swivel 624 permits the upper support 620,
with lower
_2~_
CA 02259767 1999-O1-20
support 622 coupled thereto, to pivot about a vertical axis in the direction
of arrow 631 between
a storage position 620s where support 620 is against the rear side 34 of the
dasher board section
wall portion 30, and an in-use position 620i where support 620 extends
perpendicularly away from
the length of the dasher board section 18.
The bottom end 636 of upper support 620 is pivotally attached to the rear end
638 of lower
support 622 by a hinge 640. The permits relative pivotal movement in the
direction denoted by
arrow 641 between the supports 620 and 622 about a horizontal axis. The bottom
end 636 of
upper support 620 is cut at an angle to the length of the support 620 so that
it is parallel to the top
of the lower support 622 when in an in-use position. The bottom surface of the
lower support 622
is preferably provided with a rubber coating or strip 643. This permits safe
use of the dasher
board system on wooden or other floor surfaces that are sensitive to
scratching.
A lockdown device 642 includes a mounting flange 644, a locking member 646, at
least
one hinge 648 mounted between the mounting. flange 644 and the locking member.
646 to permit
relative pivotal movement about a horizontal axis between the mounting flange
644 and the
locking member 646 in the direction of arrow 649. Mounting flange 644 may be
attached to
horizontal flange 48 of lower strengthening rib 36 in any conventional manner,
e:g., mounting
hardware or an adhesive. In a storage position, as shown in FIG. 21, locking
member 646 is in
a vertical position to permit it to be effectively stored in a minimal space.
Locking member 646 includes a locking channel 650 having opposing vertical
wall sections
652 and an upper horizontal wall section 654. The opposing, vertical wall
sections 652 are spaced
apart by a distance slightly greater than the width of lower support 622. The
spacing between the
bottom of locking member 646 and the bottom of the upper horizontal wall
section 654 is greater
- 28 _
CA 02259767 1999-O1-20
than the height of lower support 622 and helps to keep the opposing vertical
wall sections 652
fixed with respect to one another. Accordingly, when the locking member 646 is
lowered onto
lower support 622, it restrains the lateral movement of lower support 622 to
guarantee that the
dasher board section 18 remains supported.
To move the support 616 from an in-use position to a storage position, the
locking member
646 is pivoted about hinge 648 to lift it to a vertical position. The lower
support 622 and the
upper support 620 are lifted to pivot about hinges 640 and 632 until they both
are in a horizontal
position. The supports 620 and 622 are rotated about the vertical axis
provided by swivel 624 to
be moves against the rear of the dasher board section 18. If desired, holding
straps or devices,
e.g., VELCRO, can be placed on engaging elements to help maintain the elements
in the storage
position in absence of a significant force. To move the support 616 back to
its in-use position,
the process is reversed.
The number and spacing of support assemblies 616 per dasher board section .18
.can be
selected based upon the expected use and desired strength: Additionally;
mounting clips 26. as
described earlier herein, would preferably be used as an attachment between
adjacent board
sections 18 to maintain alignment between the sections. The support assemblies
616 would be
mounted to curved dasher board sections 118 in the same manner. However, it
should .be noted
that the curve defining and reinforcing members 122 are first removed to store
the curved sections
I 18 in a flattened position with the assemblies 616 therein:
In a preferred embodiment, the supports 620 and 622 are made from square or
rectangular
aluminum tubes and the hinges 632, 640, and 648 are made from stainless steel.
However, it is
recognized that other materials can be used. Further, it is also recognized
that the vertical flange
-29=
CA 02259767 1999-O1-20
50 of lower strengthening rib 36 would preferably be notched in the region of
supports 620 and
622 to accommodate the locking member 646 and the lower support 622.
Alternatively, the
locking member 646 may be mounted on top of the vertical flange 50 and rest
thereon.
The dasher board system 10 of the present invention can be mounted to many
different
surfaces. For example, many times it is desirable to convert an existing
asphalt surface to a
hockey rink, usually for street hockey or in-line hockey. FIG. 23 shows the
dasher board system
installed on an asphalt surface 702. A concrete curb 704 can be formed in the
asphalt 702 and
the ground 703 that extends around the periphery rink surface immediately
below the dasher board
sections 18. Formation of such a concrete curb 704 is known and typically
consists of saw cutting
the existing asphalt and pouring a continuous concrete ring in the cut
section. It is recognized that
the concrete curb 704 can be initially formed in the asphalt surface 702 and
does not need to be
poured into a cut ring in the asphalt at a later time. Mounting of the
supports 16 to the concrete
curb 704 is the same as shown. in FIG. 3. That is, . high tensile concrete
expansion anchors 76 can
be positioned in holes in- the base supporting surface 29; e.g.-, concrete
curb 704, that are in a
pattern and spacing corresponding to the pattern and spacing of the holes 74
in the baseplate 70.
Bolts 78 and washers may then be used in a co>tventional manner so that the
bolts 78 extend
through respective holes. 74 in baseplate 70 and into respective anchors 76
for affixing the supports
16 to the concrete curb 704.
FIG. 23 also shows the dasher board system 10 of the present invention used
with an in-
line or desk surface 706. In line or deck surface 706 can be any flooring or
other surface,
preferably a smooth plastic surface, to enable or improve the playing of the
sports of in-line
and/or street hockey. In this arrangement, the dasher board sections 18 would
be mounted above
- 30 -
CA 02259767 1999-O1-20
the asphalt surface 702 by a distance slightly greater than the thickness of
the in line or deck
surface 706 to accommodate such a surface, and to permit the surface to freely
expand and
contract. However, it is recognized that the in line or deck surface 706 need
not be used and the
bottom of the dasher board sections 18 may be mounted flush to the concrete
ring 704 or the
asphalt 702, such as shown in FIG. 24.
FIG. 24 depicts the dasher board system installed at an asphalt surface 702
without a
concrete curb. This arrangement is used to convert an existing asphalt surface
to.a hockey rink
in lieu of the poured concrete curb of FIG. 23. This arrangement is preferred
over the
arrangement of FIG. 23 as pouring a concrete curb may cost up to $15,000,
whereas this
arrangement inexpensively and securely attaches the supports 16 to the asphalt
702 and earth 703
without the need to pour concrete.
The mounting arrangement of FIG. 24 uses earth anchors 708 that are in a
pattern and
spacing corresponding to the pattern and spacing of the holes 74 in the
baseplate 70. To form the
earth anchors 708, a hole is drilled through the asphalt 702 and into the
earth 703 corresponding
to each hole 74 in the baseplate 70. An epoxy resin capsule 710 that includes
an internal wall and
a tv~ro part composition is inserted into each drilled hole, The epoxy resin
capsules 710 are known
and used in the mining industry, and one such epoxy resin capsule design is
made by Dupont.
After the epoxy resin capsules 710 are in place, steel rods having a shaft 714
and a head 716 are
inserted through respective holes 74 in basepiate 70 so that the shafts 714
break a respective epoxy
capsule 710. The heads 716 of the steel rods remain above the baseplate 70 and
are shaped to be
engaged by a drill, e.g., .the head is square or hexagonal shaped. A drill is
used to rotate the steel
rods and their shafts.714 to actuate the epoxy capsule 710, and the mixing of
the two compositions
-31 -
CA 02259767 1999-O1-20
in the capsule 710 causes the epoxy to harden and form a rigid earth anchor
708. It is recognized
that some mechanical anchors may be used in lieu of the epoxy capsule and
steel rod anchor
arrangement. Additionally, FIG. 24 depicts the dasher board sections 18
mounted flush to the
asphalt surface 702. However, it is recognized that the dasher board sections
18 can be mounted
in a raised configuration to accommodate a floor surface as shown in FIG. 23.
The invention has been described in detail in connection with preferred
embodiments. The
preferred embodiments, however, are merely for example only and this invention
is not restricted
thereto. It would be easily understood by those skilled in the art that
variations and modifications
can be easily made within this scope of this invention as defined by the
appended claims.
-32-