Note: Descriptions are shown in the official language in which they were submitted.
CA 02438416 2003-08-27
LOCKSET ~RILLING GUIDE
[0001) This application claims priority to U.S. application serial number
601407,485, filed August 30, 200, pending, which is incorporated in its
entirety herein.
FIELD OF THE INVENTION
[0002] The present invention relates to carpentry tools. In particular, the
present invention relates to a drilling guide for facilitating the drilling of
holes in
a door for the installation of standard locksets.
BACKGROUND
[0003] Standard-sized door handle locksets are used to latct-s and secure
hinged doors to a doorjamb-mounted strikeplate. These locksefs typically
require the drilling of a large, throughgoing hole in the face of the door and
a
perpendicularly-extending, smaller hole in the edge of the door. Additional
holes must be drilled in the edge of the door to retain the latchplate. The
lockset and door handles are mounted to both sides of the larger hole, and
the latchpfate and cylinder latch are mounted to the smaller hole on the edge
of the door.
[0004] Typically, the center of the larger hole, which is located in the face
of the door, must be either 2-3/8 or 2-3/4 inches from the edge of the door,
depending on the type or brand of lockset to be installed. To facilitate the
drilling of the holes in the door, most of such locksets include a paper
template that the installer may affix to the door to mark the drilling holes
for
the lockset.
[0005) These paper templates have significant shortcomings, however.
First, the non-durable templates must be taped to the door, and this may
become a tedious task for carpenters who are charged with installing many
locksets at a jobsite. Furthermore, because of the stretching of the template
or the possibility of misaligning it on the door with the wrong marking line,
it is
very possible that one or more of the holes may be rrearked in the wrong
CA 02438416 2003-08-27
2
location. The fact that interior doors typically are configured in at least
two
popular thicknesses (1-3/8" and 1-314") adds to the difficulty in accurately
positioning the template. !n addition to these problems with the template, it
is
often difficult to drill holes in the door edge and face that are perfectly
aligned
with their central axes perpendicular to each other. Such misalignment or
misplacement may result in a poorly fitting lockset or a lockset that fails to
properly engage the strikeplate on the door jamb. At worst, an entire door can
be ruined and may need to be completely discarded if the holes are drilled
improperly.
[0006] A particularly inexperienced user may even use the wrong size
holesaw or paddle bit when using either of these template methods, thereby
resulting in a large hole of an incorrect size. If the hole is too smelt for
the
lockset yet too large for the pilot drill of a holesaw, it may be impossible
for the
proper-sized holesaw to enlarge the hole accurately on center of the previous
hole. A similar problem will arise when enlarging a preexisting fockset hole
in
a previously drilled door, in that it is extremely difficult to center the
larger
holesaw over the center of a preexisting hole. Because newer locksets
typically require a 2-1/8 inch hole in the face of the door instead of the
previously popular 1-7/8 inch hole, this has become an increasing problem.
[0007] In the past, some have attempted to solve some of the inaccuracy
problems in lockset installation through the use of a more durable plastic
template that allows the drilling of pilot holes in the door. Such a template
is
shown in U.S. Patent No. x,280,776. While the plastic template disclosed
therein may have some advantages over a paper template, the tool is still
prone to most of the inaccuracy problems discussed above. Furthermore, by
only allowing the marking or drilling of pilot holes, additional time-
consuming
steps must be taken in preparing and drilling each door.
BRIEF SUMMARY OF THE INVENTION
[0008] In order to address one or more of the shortcomings discussed
above, a Iockset drilPing guide is provided herein. In one embodiment and one
aspect of the invention, a frame is provided having a first opening and a
CA 02438416 2003-08-27
3
second opening. The first opening is positioned at approximately 90 degrees
to the second opening. The frame is configured for positioning on a door to
facilitate the forming of openings in the door for the installation of a
lockset.
[0009] In another embodiment of the invention, a drilling guide having an
angular frame for positioning along the edge of a door is provided. The frame
includes at least a first and a second opening defined in the frame wherein
the
openings are positioned relative to each other to guide the drilling of a
corresponding first and second set of holes in a door having perpendicularly
extending axes. The frame comprises at least one spacing tab mountable to
the drilling guide, each of the at least one tabs is flexibly attached to the
frame
via at feast one strap.
[0010] Another embodiment of the present invention includes a drilling
guide with an L-shaped frame for positioning along the edge of a door. A first
cylindrical opening is defined in the frame having a first axis and second
cylindrical opening is defined in the frame having a second axis. The first
and
second axes intersect at approximately 90 degrees to each other. The
openings are configured to guide correspondingly sized holesaws for forming
holes in the door_ The drilling guide includes at least one spacing tab for
spacing the frame a predefined distance from the door.
[0011] Another embodiment of the present invention includes a drilling
guide having an L-shaped frame having a first flange and a second flange
mounted perpendicularly thereto. The flanges define first and second rear
faces. A first circular opening is defined in the first flange, the first
opening
includes a first annular lip and a second circular opening is defined in the
second flange, the second opening including a second annular lip. A plurality
of spacing tabs are flexibly attached to the frame, the tabs being removably
mountable to the rear faces.
[0012] In another embodiment of the present invention, a method is
provided for forming holes in a door. The method comprises the steps of
providing a frame having at least a first opening and a second opening
defined in the frame, the first opening being positioned at approximately 90
degrees to the second opening; positioning the frame on an edge of the door;
CA 02438416 2003-08-27
inserting a first holesaw at least partially into the first opening and
drilling a
first hole in the door; inserting a second hoiesaw at least partially into the
second opening and drilling a second hole in the door; and removing the
frame from the door.
[0013 In another embodiment of the present invention, a method is
provided for forming holes in a first and a second door. The method includes
the steps of providing an angular frame having at feast a first opening and a
second opening defined in the frame, the frame including a plurality of
spacing
tabs mountable thereto; positioning the frame on an edge of the first door;
forming openings in the first door guided by the first and second openings;
and removing the frame from the first door. The method further includes the
steps of mounting the spacing tabs to the frame; p~~sitioning the frame on an
edge of the second door; and forming openings in the second door guided by
the first and second openings.
[0014 in an embodiment of the present invention, an apparatus is
provided for drilling holes in a door for the mounting of a lockset. The
apparatus comprises an angular frame for positioning along the edge of the
door; a first cylindrical opening defined in the frame having a first axis and
a
second cylindrical opening defined in the frame having a second axis. The
first and second axes intersect at approximately 90 degrees to each other.
The apparatus further comprises at least one hoiesaw blade sized to fit within
at feast one of the openings and at least one spacing tab mountable to the
frame for spacing the frame a predefined distance from the door.
~0015j In another embodiment of the present invention, a method is
provided for mounting a lockset on a door. The method includes the steps of
providing a frame member having an L-shaped cross section; attaching the
frame member to the door by driving at least one first fastener through the
frame member into the edge of the door; forming an opening for the mounting
of the lockset using the frame member as a guide; removing the at least one
first fastener and the frame from the door; and mounting the lockset in the
opening.
CA 02438416 2003-08-27
[0016] Other objects and advantages wil! be apparent from the following
description of the invention, and the various features of that invention will
be
particularly pointed out in conjunction with the preferred embodiments. As
realized, the invention is capable of other and different embodiments, and its
details are capable of modification in various respect. Accordingly, the
drawings and description are to be regarded as illustrative in nature and not
as restrictive.
BRIEF DESCRIPTION OF SEVERAL VIEWS OF THE DRAWINGS
[0017, The present embodiments of the invention are illustrated in the
accompanying drawings wherein:
[0018] F1G. 1 is a perspective view of a first embodiment of the lockset
drilling guide in accordance with the present invention;
[0019] FIG. 2 is a front elevational view of FIG. 1;
[0020] FiG. 3 is a top elevational view of FIG. 1;
[0021] FIG. 4 is a left-side elevational view of FIG. 1;
[0022] FIG. 5 is a perspective view of the fockset drilling guide of FIG. 1
showing the rear portion thereof;
[0023] FIG. 6 is a perspective view similar to that of FIG. 5, showing the
adjustment tabs positioned and installed on the frame of the preferred
embodiment; and
[0024.] FIG. 7 is a perspective view of the embodiment shown in FIG. 1
installed on the edge of a door and showing various aspects of the lockset
installation process;
[0025] FIG. 8 is a top elevational view similar to that of FIG. 3 showing the
installation of the drilling guide on a standard, non-beveled door;
[0026] FIG. 9 is an etevational view similar to that of FIGS. 3 and 8
showing the installation of the drilling guide on a beveled door; and
[0027) FIG. 10 is a top elevational view similar to FIGS. 3, 8 and 9 showing
the drifting guide installed on a door of reduced thickness.
CA 02438416 2003-08-27
G
DETAILED DESCRIPTION OF THE PREFERRED EMBODIMENTS
[0028j A preferred embodiment of the invention is shown as a drilling guide
having a frame 12 as shown in the various views of FIGS. 1-5. The frame
12 is generally L-shaped in that the frame 12 includes a first flange 14 and a
second flange 16 positioned relative to each to each other at a 90°
angle.
The first flange 14 preferably defines a generally flat, planar rear face 15
and
a second flange 16 preferably defines a generally fiat rear face 17. A pair of
upstanding, elongated spacing ridges 50 are provided along the rear face 17
of the second flange 16 to account for positioning along beveled door edges.
The first flange 14 preferably defines a first circular opening 18 surrounded
by
an annular tip 20 that is configured as an upstanding right-cylindrical
section.
The annular lip 20 defines a right cylindrical wall 22 on the interior of the
opening. It is preferred that the annular lip 20 upsta~nds in a direction
opposite
that of the rear face 15 so that the rear face 15 remains generally flat.
Preferably, the right cylindrical wall 22 defines a first central axis 24 that
is
generally perpendicular to the plane of the rear face 15 of the first flange
14,
as best seen in FIG. 3.
~0029j The second flange 16 preferably defines a second opening 26
surrounded by an annular lip 28. The annular lip 28 preferably upstands in an
opposite direction from the rear face 17 of the second flange 16, and, like
the
annular lip 20, extends in a right-cylindrical section from the flange 16. The
annular lip 28 preferably defrnes a right cylindrical wall 32 on the interior
of the
second opening 26. The right cylindrical welt 32 preferably defines a second
central axis 34 that extends perpendicularly to the rear face 17 of the second
flange 16 as shown best in FIG. 3. Thus, as shown in FIG. 3, the axes 24 and
34 of the first opening 18 and the second opening 26, respectively, intersect
at a 90° angle. The second flange 16 also preferabhy defines a pair of
through-going mounting openings 40 that are positioned to surround the
second opening 26. Preferably, the centers of the mounting openings 40 are
aligned with the center 44 of the second opening 26 as Shawn in FIG. 4.
Preferably, the mounting openings 40 are positioned relative to the second
CA 02438416 2003-08-27
7
opening 26 on the second flange 16 to correspond to similar latch plate
mounting openings on standard latch plates.
~0030J Preferably, the right cylindrical wall 22 defining the first opening 18
is 2-1/8 inches in diameter, and the right cylindrical wall 32 of the second
opening 26 is 1 inch in diameter. In one embodiment, these measurements
allow the right cylindrical wall 22 of the first opening 18 to closely
surround
and guide a standard holesaw having a 2-1l8 inch diameter within the opening
18 so that the saw remains generally perpendicular to the rear face 15 during
the drilling process. Similarly, the right cylindrical wall 32 of the opening
26
closely surrounds and is able to guide a smaller standard-sized holesaw for
drilling a hole of 1 inch in diameter, thus keeping the holesaw perpendicular
to
the rear face 17 during the drilling process.
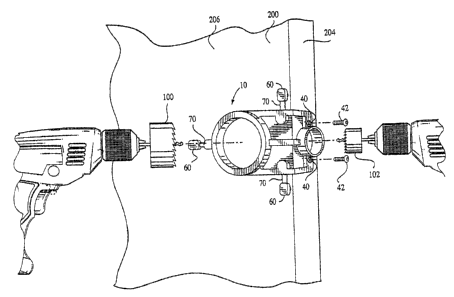
~0031J FIG. 7 shows the forward edge of a door 200 that is being prepared
for drilling. FIG. 7 also illustrates the holesaws 100 and 102 adjacent the
openings 18 and 26, respectively, on the drilling guide 10 positioned on an
undrilled door 200. The door 200 preferably includes a door face 202 and a
door edge 204. As shown in the drawing, the drilling guide 10 may be
mounted to the door 200 so that the rear face 15 of the first flange 14 is
positioned flush to the door face 202 and the spacing ridges 50 on the rear
face 17 of the second flange 16 are positioned against the door edge 204.
This is shown in FIG. 8. The drilling guide 10 may be mounted to the door
edge 204 using a pair of screws 42 inserted through the mounting openings
40 in the second flange 16. Preferably, in the preferred embodiment, the
screws 42 may be the same screws that are provided with a conventional
lockset. Conveniently, once the drilling process is completed and the drilling
guide 10 is removed from the door 200, the screws 42 may be reused to
attach the Latch plate to the door edge 204. The area surrounding the newly
drilled opening will of course require a section proper~fy mortised to fit the
latch
plate tnot shown).
[0032] When the drilling guide 10 is mounted with the frame 12 against a
conventional-edge door 200, the spacing ridges 50 are positioned against a
flat door edge 204. The proper positioning of the rear face 15 of the first
CA 02438416 2003-08-27
flange 14 against the door face 202 allows the plane of the rear face to be
property aligned perpendicularly to the door edge 204, and the center line 44
of the opening 26 aligned with the center line of door edge 204. This is shown
in FIGS. 7 and 8. When the drilling guide 10 is properly positioned on the
door 200, wherein the door is of a non-beveled edge configuration, the
spacing ridges 50 are positioned on the edge 204 of the door as shown in
FIG. 8. In the event that the door includes a beveled edge 304 as shown in
FIG. 9, the spacing ridges 50 properly provide stability to the second flange
16
and engage the beveled edge 304 of the door 300.
[0033 Because the most often-used interior door sizes have thicknesses
of 1-3/8 inches and 1-314 inches, the drilling guide of the present invention
may be adjusted for use on doors having at least these two thicknesses. In
the preferred embodiment, the rear face 15 of the first flange 14 is placed
flush against the face 202 of the door 200 for a 1-3l4 inch thick standard
door
as shown in F1G. 8. On thinner 1-3l8 inch doors, it is desirable to adjust the
guide so that the center line 44 of the second opening 26 on the flange 16 is
still properly positioned atong the center line of the edge of the thinner
door.
1n order to accommodate this adjustment, a plurality of removable spacing
tabs 60 are provided in the preferred embodiment. Preferably, the spacing
tabs 60 are defined with generally parallel opposed surfaces 62 and 64. The
surface 62 of each tab 60 preferably includes an upstanding peg 66 that is
sized to removably engage a corresponding opening 68 on the rear face 15 of
the first flange 14. Preferably, each of the spacing tabs 60 is flexibly
attached
by an integral, flexible strap 70 to the frame 12. In the preferred
embodiment,
the three spacing tabs 60 are provided around the periphery of the first
flange
14. The straps 70 may be integrally molded of the same plastic or may
include molded-in or co-molded elastomeric rubber to provide more flexibility.
[0034] f n use, when it desired to use the drilling guide 10 on a door of
reduced standard thickness, the tabs 60 may be inserted into each
corresponding opening 68 in the rear face 15 as shown in FlG. 6. The
thickness of the tab 60, in particular the distance between the opposed
surfaces 62 and 64, raises the first flange 14 slightly above the face of the
CA 02438416 2003-08-27
door on which it is installed. Thus, the drilling guide 10 contacts the face
of
the reduced-thickness door only via the surfaces fi4~ of the tabs 60 in this
configuration. This is shown in the top view of FIG. 10, which illustrates the
mounted guide 10 on a thinner door 400.
[0035, When it is desired to re-use the drilling guide 10 on a door of
increased standard thickness such as the door 200 shown in FIG. 8, the tabs
60 may be removed from the openings 68 and used as described above.
Note that in FIG. 8, the spacing tabs 60 are allowed to flex away from the
face
202 of the door 200 when the guide 10 is mounted thereto. Thus, the drilling
guide 10 may be quickly reconfigured for use on various standard-sized
doors.
[0036] It should be noted that further adjustment options may be
implemented in the preferred embodiment to allow use of the drilling guide 10
on doors of a variety of thicknesses. For example, a plurality of tabs of
differing thicknesses may be provided for use on doors having a variety of
thicknesses. Furthermore, the first opening 18 and the second opening 26
may be modified to receive properly sized holesaws, and the collars may also
include an upstanding annulet or flange that varies the spacing between the
rear 15 and the face of the door. Other alternative structures may of course
be provided within the scope of the invention.
[0037] In use, to enlarge existing lockset holes or otherwise drill lockset
holes in a blank door, the user need only take a few simple steps. First, the
user will set the drilling guide 10 for the proper door thickness. If used on
a
thicker door such as the door 200 first, the spacing tabs 60 will be removed
and remain unengaged from the face 15 of the first flange 14 as shown in
FIGS. 1-5 and 7-8. The drilling guide 10 is then positioned at the appropriate
height on the door 200 as shown in FIG. 7. Attachment screws 42 from the
lockset are then inserted through the openings 40 in the second flange 16 to
firmly attach the drilling guide 10 to the edge 204 of the door 200. if
desired,
small pilot holes may be drilled through the openings 40 before inserting the
screws 42. Once the drilling guide is mounted in place, the appropriately
sized holesaws 100 and 102 may be used to drill the properly sized lockset
CA 02438416 2003-08-27
holes in the door 200. The right cylindrical walls 22 and 32 of the first and
second openings 18 and 26, respectively, effectively guide the outer portions
of the holesaws 100, 102 during the drilling operation. Once the holes are
drilled in the door 200, the user need only remove the screws 42 from the
openings 40 to remove the drilling guide 10 from the door 200. The user may
then install the lockset and the latch plate using the screws 42 inserted into
the previously made openings on the door edge 204.
[0038] The drilling guide 10 may then be adjusted far use on a door having
Less thickness than the previous door 200, such as door 400 of FIG. 10. To
adjust the drilling guide 10, the user inserts the pegs 66 of the three
spacing
tabs 60 into the corresponding three openings 68 on the rear face 17 of the
second flange 16. The drilling guide 10 is then mounted on the door as
shown in FIG. 10, and the same procedures are followed for drilling the holes
in the door as described above in conjunction with FIG. 7.
[0039] The frame 12 is preferably an integral, one-piece design molded
from a rigid and durable plastic material. Exemplary plastic materials include
ABS plastic, Lexan~ or hard rubber materials. Also, the frame may be
constructed from machined or molded metal, such as aluminum. In addition,
the tabs 60 may be formed from rubber or similar flexible material and the
tabs 60 may be mated to the frame 12 when the frame 12 is constructed from
metal. It is intended that various framing artifacts, such as the bulkheads
13,
may vary in position to provide proper support to the frame 12 depending on
the particular material being used. tn the alternative, such artifacts and
bulkheads 13 may be eliminated completely as tong as support to the shape
of the frame 12 is adequately maintained and depending on the material from
which it is constructed.
[0040] Of course, it should be understood that a wide range of changes
and modifications could be made to the preferred embodiments described
above. In particular, some of the specific measurements noted herein may be
changed without departing from the invention. Thus, it is intended that the
foregoing detailed description be regarded as illustrative rather than
limiting.
The scope of the invention is defined by the appended claims, and all devise
CA 02438416 2003-08-27
11
that come within the meaning of the claims, either literally or by
equi~rafence,
are intended to be embraced therein.