Note: Descriptions are shown in the official language in which they were submitted.
'~ CA 02441460 2003-09-18
a
aliadom or door coastructioa
The invention relates to a window or door construction
having a frame and a casement/leaf attached moveably to
the frame.
The invention is based on the object of designing a
window or door construction of this type in such a'
manner that a motor-operated actuation can be realized
in a simple manner.
This object is achieved according to the invention by
the features of Claim 1. The provision of an encircling
control element which controls the sequence of movement
of the mounting modules provided between the frame and
casement/leaf makes it possible for a single motor to
drive this control element in such a manner that the
opening and closing movements of the casement/leaf are
executed, the motor drive also giving rise to the
possibility of remote control.
Embodiments by way of example will be explained in
greater detail below with reference to the drawings, in
which:
Fig. 1 shows, in schematic views, the types of
opening of the casement of a window,
Fig. 2 shows, schematically, the arrangement of
various mounting modules on the circumference
of the window construction,
Fig. 3 shows, in a perspective illustration, a
mounting module,
Figs 4-7 show, in a schematic illustration, different
positions of the mounting module according to
Fig. 3,
Figs 8+9 show a schematic view of two operating
positions of a different mounting module,
Fig. 10 shows, in a perspective view, part of a
tilting lever module,
CA 02441460 2003-09-18
.. t
- 2 -
Fig. 11 shows a view of the tilting lever module
according to Fig. 10 with the tilting lever,
Fig. 12 shows the tilting lever module in the tilting
position with the mounting module,
Fig. 13 shows a component of the tilting lever module
in various operating positions,
Fig. 14 shows a sectional view of the articulation
region of the tilting lever in Fig. 13,
Fig. 15 shows a view of the mounting module with a
pivoting function,
Fig. 16 shows a view of the mounting module from the
left in Fig. 15,
Fig. 17 shows a view of the mounting module from
below in Fig. 15,
Fig. 18 shows a pivoting position of the mounting
module,
Fig 19+20shows schematic views of two operating
positions of a mounting module,
Fig. 21 shows schematic views of a driving module in
two operating positions,
Fig. 22 shows a perspective view of a handle module,
Fig. 23 shows a schematic view of a pivoting lever,
Fig. 24 shows a schematic view of the keyboard on a
remote control unit,
Fig. 25 shows, schematically, the arrangement of the
mounting modules in a second embodiment of
the invention,
Fig. 26 shows, in an exploded view, the construction
of a mounting module,
Fig. 27 shows, in a schematic illustration, various
positions of the mounting module according
to
Fig. 26,
Fig. 28 shows the design of the control groove on the
four mounting modules in the second
embodiment,
Fig. 29 shows, schematically, a sectional view of a
mounting module,
Fig. 30 shows the construction of a mounting module
according to Fig. 26, schematically in a
r CA 02441460 2003-09-18
f
- 3 -
longitudinal section,
Fig. 31 shows two positions of a mounting module with
a hinge,
Fig. 32 shows, schematically, various positions
between the frame and casement/leaf according
to the second embodiment,
Fig. 33 shows, schematically, the construction of the
pivoting and tilting lever module according
to the second embodiment,
Fig. 34 shows the design of the pivoting and tilting
lever module according to Fig. 33,
Fig. 35 shows the coupling mechanism between the
control element and slide on the pivoting and
tilting lever module according to Figs 33 and
34,
Fig. 36 shows a third embodiment of a pivoting and
tilting lever module, and
Fig. 37 shows the arrangement of the hinge between
the frame and casement/leaf when the pivoting
and tilting lever module according to Fig. 36
is used.
Fig. 1 shows, schematically, the stationary frame 1 of
a window and a casement 2 attached moveably thereto, in
which
Fig. 1a reproduces a parallel lifting-off of the
casement 2 from the frame 1, for example for
ventilation purposes.
Fig. 1b shows the tilting of the window casement 2
following the parallel lifting-off according to
Fig. 1a, and
Fig. 1c shows the pivoting of the window casement 2
after the casement has been lifted off parallel by a
certain amount from the frame 1.
Fig. 2 shows, in a first embodiment according to Figs 2
to 21, various mounting modules in the circumference of
the window construction, the mounting modules being
preferably attached to the casement 2 together with a
CA 02441460 2003-09-18
- 4 -
control element 22. Two mounting modules 3.1, 3.2 and
3.3, 3.4 for the parallel lifting-off of the casement 2
from the frame 1, the function of which modules will be
explained below, are provided in each case on both
sides of the casement 2, in the vicinity of the corners
of the casement.
For tilting of the casement 2, a tilting lever module
4.1 and 4.2 is attached to the casement 2 in the upper
region on both sides, the said modules interacting with
the two lower mounting modules 3.2 and 3.4 for the
parallel lifting-off in order to tilt the casement 2.
To pivot the window casement 2, a pivoting lever module
5 is provided on the upper side of the said casement
and interacts with the two mounting modules 3.3 and 3.4
on the side of the casement 2 which is on the right in
Fig. 2.
In the profile of the casement 2, a driving module 6 is
furthermore accommodated in the region of a handle
module 7 which, in addition to the customary function
of a window handle, executes further control functions,
as will be described in greater detail below.
The arrangement of a supply module by means of which
the driving module 6 is supplied with current is
indicated at 8.
Furthermore, a sensor module 9 which establishes the
individual functions and positions of the casement
relative to the frame 1 and passes on corresponding
information, for example to a central monitoring and
control point, can be fixed on the casement 2.
Fig. 3 shows a perspective view of the basic
construction of a mounting module 3.1 to 3.4 which,
among other things, controls the parallel lifting-off
of the casement 2 from the window 1. At 20; a section
c ~ CA 02441460 2003-09-18
_ 5 _
of a window casement profile is reproduced, the said
section being provided with a circumferential groove 21
and being able to have a cross-sectional design which
is known per se and is not reproduced more
specifically. A control element in the form of a link
chain 22 is guided in the groove 21, which encircles
the circumference of the casement 2, and has, on the
individual chain links, control pins 23 which protrude
on the circumference parallel to the plane of the
window. A plate 24, on which a sector element 30 is
mounted pivotably via a rotary pin 26 on the side which
faces the frame 1 in Fig. 2, is attached to the
casement profile 20. The chain 22 provided with the
control pins 23 extends along one edge of the plate 24.
This sector element 30 has a semicircular toothed ring
31 on the circumference of a semicircular disc 32,
which toothed ring is in engagement with the control
pins 23 of the chain 22 in the illustration according
to Fig. 3. A retaining element 33, which is in the
shape of a sector of a circle, protrudes over the
control pins 23 and is not in engagement therewith, is
connected fixedly to the semicircular disc 32. Recesses
34 and 34', which are designed to receive a retaining
pin 11 (Figs 4 to 7), are formed on both sides of the
retaining element 33 at an angular distance from the
rotary pin 26. On the side which is remote from the
rotary pin 26 or on the radially outer side, the two
recesses 34 are covered by extensions 35 and 35' of the
retaining element 33 while, on the inner side, the
recesses 34 merge into a shoulder 36 and 36'. In the
exemplary embodiment according to Fig. 3, this section
of the retaining element 33 which is provided with the
recesses 34 is arranged at a distance above the toothed
ring 31 and the control pins 23 by a shoulder being
formed or a spacer disc being arranged between the
semicircular disc 32 and the retaining element 33.
The sector element 30 having the plate 24 is present in
V
CA 02441460 2003-09-18
_ ~ , _ 6 _
all of the mounting modules 3.1 to 3.4, this sector
element being reproduced schematically in the following
figures to clarify the control functions, and the
toothed ring 31 protruding over the retaining element
33 in the radial direction.
Clos~d position of the wiado~,r
Fig. 4 shows, for example, the mounting module 3.2 to
explain the retaining function of the casement 2 on the
frame 1, which is indicated by dashed lines in Fig. 4.
Two retaining pins 11 and 11' are attached to the frame
1 at a distance in the circumferential direction and
interact with the two recesses 34 and 34' of the
retaining element 33 on the casement 2, as follows.
In the closed position of the window according to
Fig. 4, the two retaining pins 11 and 11', which are
fastened to the frame 1, bear against the shoulders 36
and 36' on both sides of the retaining element 33,. so
that a wind force acting in the direction of the arrow
X in Fig. 4 cannot lift off the casement 2 from the
frame 1 because the retaining element 33 is connected
fixedly to the casement profile 20 and to the casement
2 via the rotary pin 26.
A horizontally extending guide groove 12 is formed on
the frame 1 in the region of each of the four mounting
modules 3.1 to 3.4 and in it is guided a roller 25
which, in the view according to Fig. 4, is arranged in
the region of the left, lower corner of the plate 24 of
the mounting module and is fastened to the casement 2
via a shank 27, the shank 27 protruding through a hole
in the plate 24 (cf. Fig. 16). The load of the casement
2 is supported on the frame 1 via these four rollers 25
on the mounting modules 3.1 to 3.4.
. ' CA 02441460 2003-09-18
_ _ , _ 7 _
Parallel lifting-off of the casement from the frame
In order for it to be possible for the window to be
opened from the closed position in Fig. 4, a
preliminary control movement of the chain 22 upwards or
downwards from the initial position, which is referred
to by 0 in Fig. 4, takes place, so that the retaining
element 33 is pivoted somewhat by the chain 22 and
comes free from one of the two retaining pins 11 or
11'.
Fig. 5 shows this preliminary control movement, in
which the chain 22 is moved downwards in Fig. 5 from
the position 0 into the position I in order to pivot
the retaining element 33 via the toothed ring 31 in the
clockwise direction about the rotary pin 26 until the
shoulder 36 on the upper recess 34 of the retaining
element 33 is released from the engagement with the
upper retaining pin 11. In Fig. 5, this is illustrated
in simplified form by a shortening of the shoulder 36
on the retaining element 33. In the exemplary
embodiment of the retaining element according to
Fig. 3, the transition between the groove section of
the recess 34 and the shoulder 36 is designed in such a
manner that, during the pivoting movement of the
retaining element 33 caused by the preliminary control
movement of the chain, the upper pin 11 slides along
this transition and comes free from the shoulder 36.
At the same time as this pivoting movement of the
retaining element 33, the lower retaining pin 11' comes
to bear against the extension 35' on the recess 34'.
After release of the engagement between the upper
retaining pin 11 and recess 34, a lift-off movement of
the casement from the frame can be executed to the
right in Fig. 5 because the retaining element 33 is no
longer supported on the two retaining pins 11 and 11'.
Fig. 6 shows the position of the mounting module 3.2
_ ' CA 02441460 2003-09-18
_ , _
after a further control movement of the chain 22
downwards over the section I and II, in which case the
retaining element 33 has executed a pivoting movement
in the clockwise direction over approximately 30°about
the rotary pin 26. The upper end of the retaining
element 33 has come away from the upper retaining pin
11 of the frame 1 while the lower retaining pin 11' is,
as before, in engagement with the recess 34' of the
retaining element.
The adjusting movement of the chain 22 from the
position I in Fig. 5 into the position II in Fig. 6,
the retaining element 33 is pivoted in the clockwise
direction, the lower extension 35' of the retaining
element being pressed against the lower retaining pin
11', so that the casement 2 is lifted off from the
frame 1 owing to the lever (chain-dotted line) between
the lower retaining pin 11' and the rotary pin 26. In
this case, the roller 25, which is fastened to~ the
casement 2, is supported in the horizontal guide 12 of
the frame .1. This control process takes place
synchronously at the four mounting modules 3.1 to 3.4
by means of the encircling chain 22, with the result
that the casement 2 is lifted off parallel from the
frame 1.
Fig. 6 shows the position of the casement 2 in which it
is lifted off to the maximum from the frame 1, in which
case the roller 25 is supported at the right end of the
horizontal guide 12 of the frame 1 and the frame
thereby absorbs the weight of the lifted-off casement
2.
During the parallel lifting-off of the casement 2 from
the frame 1 (Fig. 1a), any desired intermediate
position between the casement and frame can be taken
up; depending in each case on the controlling
displacement of the chain 22 from the position I in the
direction of position II, in order, for example, to
. ~ CA 02441460 2003-09-18
_ ' ' _ g _
enable a constricted ventilation of a room by means of
a casement which is only slightly lifted off from the
frame.
During the closing movement from the parallel position
in Fig. 6 or from an intermediate position back into
the position according to Fig. 4, the chain 22 is
initially moved back out of the position II or an .
intermediate position into the position I according to
Fig. 5, in which case the retaining element 33 is
pivoted in the anticlockwise direction via the toothed
ring 31. In this case, the lower shoulder 36' presses
against the lower retaining pin 11', as a result of
which the casement 2 is pushed in the direction of the
frame 1 via the lever between the rotary pin 26 and
retaining pin 11', and the roller 25 is displaced into
the left in the figures in the horizontal guide 12 of
the frame 1. L~hen the position according to Fig. 5 is
reached, the chain 22 is moved back by the preliminary
control amount from the position I into the position 0,
in which case the casement 2 is pressed against the
frame 1 via the lower shoulder 36' of the retaining
element 33 which is supported on the lower retaining
pin 11', while the upper retaining pin 11 comes to lie
in the recess 34 of the retaining element in such a
manner that the upper shoulder 36 is supported on the
retaining pin 11 in the same position as the lower
shoulder 36'. In this closing movement, in which the
casement 2 comes to bear tightly against the frame 1,
an elastic seal provided between the frame 1 and
casement 2 is compressed, the prestressing of the seal
ensuring that the two retaining pins 11 and 11' bear
against the shoulders 36 and 36' of the retaining
element 33, and therefore ensuring a tight closed
position of the window.
To initiate the lift-off movement of the casement 2
from the frame 1, the control chain 22 can be moved
upwards or downwards from the position 0 by the amount
- ' CA 02441460 2003-09-18
', - 10 -
of the preliminary control movement from 0 to I, so
that the retaining element 33 comes free from one of
the two retaining pins 11 or 11'. In the exemplary
embodiment according to Fig. 5, the chain 22 has been
moved into a preselection position for tilting of the
window from the position 0 downwards into the position
I.
Tilting of the window
From the position of maximum parallel lifting-off
according to Fig. 6, a tilting movement of the casement
can take place, as Figs 7 and 10 show, the roller 25 on
the two lower mounting modules 3.2 and 3.4 being fixed
in its supporting position in the horizontal guide 12
and the plate 24 of the mounting module being held
vertically while the casement 2 is pivoted relative to
the plate 24.
The plate 24.having the sector element 30 (Fig. 3) is
mounted pivotably on the profile of the casement 2 by
the roller 25 being fastened via the shank 27 to the
profile of the casement 2 (Fig. 14), the shank 27 being
guided through a hole in the plate 24 and carrying the
roller 25 rotatably at the free end. The plate 24
having the retaining element 33 can therefore be
pivoted about the shank 27 of the roller 25 relative to
the casement 2, as Fig. 7 shows.
A pin 13 which protrudes parallel to the roller 25 is
fastened to the frame 1 above the horizontal guide 12,
at the right end thereof, as indicated schematically in
Figs 4 and 5. This pin 13 is used for holding the plate
24 in the vertical position relative to the tilted
casement 2 (Fig. 7), as will be explained below.
In the position of Fig. 4, a link 37 is articulated on
the semicircular disc 32 and on the retaining element
33 approximately horizontally next to the rotary pin 26
°
CA 02441460 2003-09-18
_. - 11 -
and a supporting element 38 is articulated on its
opposite end, the supporting element being guided in a
vertical guide 28 on the plate 24 and having an
approximately semicircular recess 38' for fitting over
the shank 27 of the roller 25.
During the pivoting movement of the retaining element
33 in the clockwise direction from the position in
Fig. 4 into the position according to Fig. 6, this
supporting element 38 is displaced downwards on the
plate 24 via the link 37, so that it comes to rest on
the shank 27 towards the end of the lift-off movement
of the casement, as Fig. 6 shows. During the horizontal
displacement of the plate 24 relative to the frame 1
from the position in Fig. 4 into the position in
Fig. 6, the supporting element 38, shortly before
reaching the position in Fig. 6, comes into engagement
with the pin 13, which is fastened to the frame 1, the
supporting element 38 containing an oblique groove 39
in which the pin 13 engages while the supporting
element 38 is placed on the shank 27 of the roller 25.
This placing on the shank 27 of the roller 25 and the
latching of the pin 13 in the groove 39 take place in
the end region of the movement of the control chain 22
into the position II.
During the movement of the control chain 22 into the
position II in Fig. 6, the tilting lever modules 4.1
and 4.2 have already been activated and brought into
engagement with the control chain, as a result of
which, during the further control movement of the chain
22 from the position II into the position III (Fig. 7),
the upper part of the casement 2 is guided away from
the frame via the tilting lever 40 of the tilting
modules (Figs 9 and 10) , so that the lower part of the
casement 2 pivots about the shank 27 into the position
of Figs 7 and 10 while the plate 24 is held in the
vertical position via the pin 13, so that the chain 22
can be released from engagement with the toothed ring
CA 02441460 2003-09-18
. ' " - 12 -
31 of the retaining element 33.
In the tilting position according to Fig. 7, the
rollers 25 on the two lower mounting modules 3.1 and
3.4 lie in the horizontal guide 12 of the frame 1,
which is at a predetermined distance from the lower
corner of the casement 2, while the rollers 25 on the
upper mounting modules 3.1 and 3.3 are released from
the frame and the tilting lever modules 4.1 and 4.2
have taken over the securing and guiding of the upper
part of the casement 2. In the tilting position
according to Figs 7 and 10, the plate 24 of the two
upper mounting modules 3.1 and 3.3 is likewise held
vertically relative to the tilted casement 2, so that,
under the same conditions and in the same relative
positions of the components, the chain can also be
lifted off from the toothed ring 31 at the upper
mounting modules 3.1 and 3.3, after which the entire
upper mounting modules 3.1 and 3.3 are also lifted off
from the frame 1.
Figs 8 and 9 show the mounting modules 3.1, which is
attached to the casement 2 via the mounting module 3.2
of Figs 4 to 7, in which Fig. 8 corresponds to the
position in Fig. 6, and Fig. 9 shows the lifting-off of
the mounting module from the frame 1 as the tilting
movement of the casement 2 begins and before the
complete tilting position of Fig. 7 is reached.
Since it is not necessary for the roller 25 to be fixed
at the upper mounting modules 3.1 and 3.3 to the frame
1 during the tilting movement, the supporting element
38 of Figs 4 to 7, which is guided in the guide 28 on
the plate 24, is omitted in the mounting module 3.1. In
order for the plate 24 nevertheless to be held during
the tilting movement of the casement 2, a radial cam
320 is formed on the sector element 30 around the
rotary pin 26 and a pin 210, which is fastened to the
casement 2, engages in it. The radial cam 320 is formed
' CA 02441460 2003-09-18
- 13 -
on a radius around the rotary pin 26 and has radially
outwardly bent ends 321. Owing to the same mounting
module being used on both sides of the casement, the
radial cam 320 is formed symmetrically with respect to
the central line of the sector element 30, the pin 210,
in the initial position of the mounting module 3.1
corresponding to Fig. 4, lying on the central line of
the sector element 30, which corresponds to the centre
of the radial cam 320. In the position of Fig. 8, the
sector element 30 is pivoted by means of the control
movement of the chain 22 into the position II in the
clockwise direction until the pin 210, which is secured
to the casement 2, comes to lie in the vicinity of the
upper end 321 of the radial cam 320. The further
control movement of the chain 22 in the direction of
the position III causes the sector element 30 to be
pivoted further out of the position of Fig. 8, in which
case first of all the lower extension 35' disengages
from the lower retaining pin 11' of the frame 1 and the
lower shoulder 36' comes free from the retaining pin
11'. At the same time, the tilting lever modules 4.1
and 4.2 initiate the tilting movement of the casement
2 , in which the entire mounting module 3 .1 is released
from the frame 1, as Fig. 9 shows. During this control
movement of the chain 22 from the position II in the
direction of the position III, the pin 210, which is
fastened to the casement 2, comes to lie in the upper,
bent end 321 of the radial cam 320, as Fig. 9 shows.
Until this position of the pin 210 is reached, the
chain 22 is still in engagement with the toothed ring
31, so that the plate 24 is held in the vertical
position. In the position of Fig. 9, the chain 22 is
released from engagement with the toothed ring 31,
further pivoting of the plate 24 being prevented by the
pin 210 bearing against the end of the radial cam 320.
Until the maximum tilting position according to Fig. 7
and Fig. l2 is reached, the plate 24 maintains the
relative position to the casement 2, which is
reproduced in Fig. 9 and in which the plate 24 is not
CA 02441460 2003-09-18
- ' ' - 14 -
pivoted relative to the casement 2 to such an extent as
in Fig. 7, this reduced pivoting position of Fig. 9
being sufficient, however, in order, when the casement
2 is tilted back out of the maximum tilting position,
to produce the same engagement ratios between the
control chain 22 and toothed ring 31 on the upper
mounting module 3.1 as on the lower mounting module
3.2.
When the casement 2 is pivoted back out of the tilting
position, the control chain 22 moves upwards in Fig. 9
in the direction of the position II, the engagement
between the chain and toothed ring taking place in the
intermediate position of Fig. 9 and, as a result, the
sector element 30 being pivoted upwards in the
anticlockwise direction about the rotary pin 26, so
that the pin 210 moves in the direction of the centre
of the radial cam 320 while the plate 24 is held
vertically by the support between the sector element 30
and chain 22 until the lower retaining pin 11' of ' the
frame comes to bear against the extension 35' and the
roller 25 engages in the horizontal guide 12, as Fig. 8
shows.
During the tilting movement of the casement 2, the
retaining elements 33 on the lower mounting modules 3.2
and 3.4 are also no longer actively in engagement in
the lower retaining pin 11' of the frame 1. They are
retained in the position of Fig. 7 by means of the link
37, which is supported on the pin 13 of the frame. The
supporting of the casement 2 takes place solely via the
rollers 25 in the horizontal guide 12 with guidance by
the tilting modules 4.1 and 4.2. When the tilting
movement of the casement 2 relative to the plate 24
about the shank of the roller 25 begins, the toothed
ring 31 is released from the chain, so that the
retaining element 33, in the position of Figs 7 and 9,
no longer has any function on all four mounting modules
3.1 to 3.4.
CA 02441460 2003-09-18
- ' ' - 15 -
The tilting movement of the casement 2 according to
Fig. 1b is initiated by the two tilting lever modules
4.1 and 4.2 on both sides of the casement 2 (Fig. 2)
while the control chain 22 is still in engagement with
the toothed ring 31 on the mounting modules 3.1 to 3.4
in accordance with the position in Fig 6 and 8. The end
of the control movement of the chain 22 into the .
position II according to Fig. 6 overlaps with the
activation of the tilting lever modules 4.1 and 4.2, so
that the control chain 22 is still in engagement with
the toothed ring 31 of the mounting modules in
accordance with Figs 6 and 8 while the engagement of
the chain on the tilting lever module has already taken
place, so that, when the chain is released from the
toothed ring 31 when the tilting movement begins, the
retaining and guiding function of the tilting lever
modules 4.1 and 4.2 is already controlled by the chain
22 and a seamless transition of the sequence of
movement from the mounting modules 3.1 to 3.4 to the
tilting lever modules 4.1 and 4.2 takes place.
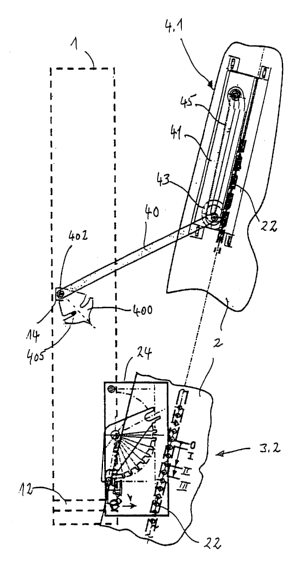
Fig. 10 shows, in a perspective illustration, a
component of the tilting lever module which is attached
to the casement 2 on both sides and is designed
essentially in the form of a rectangular plate 41. A
longitudinal groove in which the chain 22 is guided is
referred to by 42. A toothed wheel 43 comes into
engagement with the chain (not illustrated in Fig. 10),
the said toothed wheel being fixedly connected to a
smaller toothed wheel 44 which is arranged below it and
is in engagement with a toothed strip 45, which is
formed along one side of an elongate depression 46
along which the smaller toothed wheel 44 can be moved
while the toothed wheel 43, which is situated above it
and has a larger diameter, rests on the edges of this
depression 46. The two toothed wheels 43 and 44 are
connected fixedly to each other by a screw 47, the
downwardly protruding shank of which is guided in a
A
CA 02441460 2003-09-18
', - 16 -
guide groove 48 which extends along the bottom of the
depression 46. At the upper end 49 (in Fig. 10) of the
depression 46 and of the guide groove 48, the latter is
bent somewhat.
Eyelets 41' for the fastening to the profile of the
casement 2 are provided on the four corners of the
plate 41. Furthermore, an upwardly protruding edge 41 "
is formed around the larger toothed wheel 43 and
extends at least as far as the upper side of the
toothed wheel 43.
Figs 11 and 12 show that component of the tilting lever
module which is reproduced in Fig. 10 on the casement 2
in a schematic illustration, it being possible for the
casement 2 to be connected to the frame 1 via a tilting
lever 40, as follows.
Figs 13a to 13e show part of. the tilting lever module
with an intercepting element 400 which is articulated
at the end of the lever 40 which lies opposite the
toothed wheels 43, 44. In Fig. 13, the frame 1 is
indicated by chain-dotted lines and the casement is
indicated by solid lines.
Fig. 14 shows a sectional view in the region of the
articulation point between the lever 40 and
intercepting element 400, which is connected to the
lever 40 via an articulation pin 402, the articulation
pin 402 protruding on both sides and engaging in a U-
shaped groove 14 on the frame, which is indicated in
Fig. 13. On the opposite side, the articulation pin 402
is of somewhat longer design and protrudes into a guide
groove 29 on the casement 2, which groove is open
counter to the guide groove 14 on the frame 1. In
Fig. 13, the guide groove 14 is open on the frame 1 on
the right side. In a corresponding manner, the guide
groove 29, which is formed in the same manner, is open
to the left on the casement 2, so that the articulation
" CA 02441460 2003-09-18
- - 17 -
pin 402 can be released from the casement when it is
fixed on the frame 1.
The intercepting element 400 has two grooves 401 and
401' which extend on both sides of the sector-shaped
intercepting element over a radius around the
articulation pin 402 and end at a distance from the
central line 403 of the intercepting element, on which
a control extension 404 protrudes at the radially outer
end and is in engagement with the chain 22 in the
position 0 in Fig. 13a.
An intercepting pin 405 (Fig. 14) which comes into
engagement with the intercepting element is fastened to
the frame 1. At a distance parallel to the direction of
movement of the chain 22, an intercepting element 406,
which likewise comes into engagement with the
intercepting element 400, is fastened to the casement
2.
In the closed position of the window according to
Fig. 13a, the control chain 22 is in the position 0, in
which the central line 403 of the intercepting element
lies horizontally, as therefore does the control
extension 404. In this case, the two intercepting pins
405 an 406 are situated in the open end region of the
grooves 401 and 401'. The articulation pin 402 is
situated in the guide 14 on the frame 1 and in the
guide groove 29 (not illustrated in Fig. 13) on the
casement 2. During the preliminary control movement of
the chain 22 from the position 0 into the position I
for tilting purposes, as Fig. 13b shows, the
intercepting element 400 is pivoted in the clockwise
direction about the articulation pin 402, on account of
being in engagement with the chain, so that the lower
intercepting pin 405 of the frame 1 bears against the
inner end of the groove 401' whereas the intercepting
element 400 has been completely released from the upper
intercepting pin 406 of the casement. In this
' CA 02441460 2003-09-18
- 18 -
preselection position for tilting purposes according to
Fig. 13b, the tilting lever 40 is connected to the
frame 1 by the fact that the support of the frame-side,
lower intercepting pin 405 in the groove 401' of the
intercepting element means that the articulation pin
402 cannot be moved out of the guide 14 on the frame 1.
Fig. 13c shows the preselection position of the chain
22 from the position 0 into the position I' for the
pivoting of the casement, which will be explained in
greater detail below. In this case, the opposed
movement of the chain 22 pivots the intercepting
element 400 in the anticlockwise direction, so that the
upper, casement-side intercepting pin 406 comes to lie
in the upper groove 401 of the intercepting element, as
a result of which, during the pivoting movement
(described below) of the casement 2 relative to the
frame 1, the tilting lever 40 is retained in a manner
bearing against the casement 2 by the fact that the
articulation pin 402 is retained in the guide groove 29
on the casement 2 via the engagement of the
intercepting element 400 with the casement-side
intercepting pin 406 (corresponding to the retaining
function in Fig. 13b in the guide groove 14 of the
frame), so that, when the casement is pivoted, the
articulation pin 402 is moved with the casement out of
the guide groove 14 of the frame to the right in
Fig. 13.
As can be seen from Figs 13b and 13c, during the
preliminary control movement of the chain 22 from the
position 0 into the position I or I', the tilting lever
is already fixed to the frame 1 or secured to the
casement 2, depending on whether a preselection has
35 been made in the tilting direction or in the pivoting
direction. After the preselection in the tilting
direction, the casement 2 is lifted off to the right
from the position in Fig. 13b, in which the case the
articulation pin 402, which is fixed on the frame 1,
CA 02441460 2003-09-18
- 19 -
results in a pivoting movement of the tilting lever 40
in the clockwise direction about this articulation pin
(Fig. 11). That end 49 of the guide groove 48 which is
bent in the component 41 of the tilting lever module
lies on a radius around the articulation pin 402 in the
position of Fig. 13b, so that the onset of the pivoting
movement of the tilting lever 40 causes that end of the
tilting lever which is provided with the toothed wheels
43, 44 to be moved out of the bent end 49, owing to the
engagement of the smaller toothed wheel 44 with the
toothed strip 45, and causes the toothed wheel 43 to
come into engagement with the chain 22. This engagement
already takes place during the lift-off movement of the
casement 2 parallel to the frame 1 as the chain is
moving from the position I into the position II, so
that when the position of the casement is reached in
which it is lifted off to the maximum, in Fig. 6, the
tilting lever 40 is already able to execute the control
and retaining function during the tilting movement by
the chain 22,' which moves from the position II into the
position III, rotating the toothed wheel 43 in the
clockwise direction in Fig. 11, as a result of which
the tilting lever 40 in Fig. 11 is inevitably pivoted
in the clockwise direction about the articulation pin
402 via the toothed wheel 44 which is in engagement
with the toothed strip 45, and the casement is moved
into the tilting position by the two tilting lever
modules 4.1 and 4.2 while the upper mounting modules
3.1 and 3.3 are released from the frame 1 and the lower
mounting modules 3.2 and 3.4 are supported on the frame
via the rollers 25.
Fig. 11 shows the onset of the parallel lift-off
movement of the casement 2 from the frame 1, in which
the tilting lever 40 is pivoted in the clockwise
direction about the articulation pin 402, which is
fixed to the frame 1, with the result that the toothed
wheel 43 comes into engagement with the control pins 23
of the chain 22.
' CA 02441460 2003-09-18
' - 20 -
Fig. 12 shows the tilting position of the tilting lever
module, in which the shank of the connecting screw
between the toothed wheels 43 and 44 bears against the
lower end of the guide groove 48. Fig. 12 merely shows
the lower mounting modules 3.2 in relation to the
tilting lever module 4.1. The upper mounting module 3.1
lying in between is situated on the casement 2 in the
position of Fig. 9.
Fig. 12 shows the casement 2 from the left side in
Fig. 2 together with the lower mounting module 3.2 in
the tilting lever module 4.1. Since the chain moves
downwards during the control movement of the encircling
chain 22 on this side of the casement, a control
movement of the chain 22 upwards is produced on the
opposite, right side of the casement. In order, despite
this, to obtain the same control function of the
tilting lever module 4.2 on the right side
synchronously with the control function of the tilting
lever module 4.1 on the left side, there is a linkage
on the right tilting module 4.2 for reversing the
movement between the toothed wheel 43, which is in
engagement with the chain 22, and the smaller toothed
wheel 44, which is in engagement with the toothed strip
45, and so, when the chain toothed wheel 43 rotates in
the anticlockwise direction, the smaller toothed wheel
44 rotates in the clockwise direction and a synchronous
tilting movement of the two tilting levers 40 is
executed.
A linkage of this type between the two toothed wheels
43 and 44, which converts the rotational movement of
the one toothed wheel into an opposite movement on the
other toothed wheel, can be designed in various ways
and is not illustrated specifically in the drawings.
When the casement 2 is moved back from the tilting
position in Fig. 12 into the closed position, first of
CA 02441460 2003-09-18
- 21 -
all the chain 22 is moved back from the position III
into the position II (upwards in Fig. 12 ) , as a result
of which the toothed wheel 44 rolls upwards along the
toothed strip 45 and the tilting lever 40 is thereby
pivoted in the anticlockwise direction about the
articulation pin 402 until the maximum parallel
position in Figs 6 and 8 is reached, in which the chain
22 is already in engagement with the upper and lower
mounting modules 3.1 and 3.2 on the toothed ring 31. In
this case, the casement 2 is pivoted in the
anticlockwise direction about the shank 27 of the
roller 25 at all four~mounting modules and is aligned
again with the plate 24.
Before a pivoting movement of the casement 2 according
to Fig. 1c can be initiated, the casement has to be
transferred into the closed position according to
Fig. 4 by the chain 22 being moved back out of the
position II into the position 0. By this means, the
retaining element 33 is driven at the mounting modules
3.1 to 3.4 by the chain and is pivoted in the
anticlockwise direction, thus carrying out the
retrograde movement which is executed when the casement
2 is lifted off parallel from the frame 1.
During this closing movement from the position in
Fig. 6 into the position according to Fig. 5, the
supporting element 38 is lifted off upwards from the
shank 27 via the link 37 on account of the pivoting
movement of the retaining element 33, so that there is
no longer any engagement between the shank 27 and
supporting element 38, as Fig. 5 shows.
Vrhen the casement is pivoted back out of the tilting
position in Fig. 12, during the control movement of the
chain 22 from the position I into the position 0 the
intercepting element 400 comes again into engagement
with the chain 22, as a result that, in the position 0,
it takes up the initial position in Fig. 13a from which
CA 02441460 2003-09-18
', ' - 22 -
a preselection in the pivoting direction according to
Fig. 13c can be undertaken.
Pa.votiag of the casement
If the window is to be opened by pivoting from the
closed position in Fig. 4, a preselection takes place
by means of the control movement of the chain 22 from
the position 0 in Fig. 4 upwards into a position I', in
which, according to Fig. 5, the lower retaining pin 11'
comes free from the recess 34' or from the shoulder 36'
of the retaining element 33.
At the same time, the preliminary control movement of
the chain at the two tilting lever modules 4.2 and 4.2
causes the tilting lever 40 to be fixed to the casement
2 (Fig. 13c), so that the articulation pin 402 can be
moved out of the guide groove 14 of the frame 1 to the
right in Fig. 13c. This takes place synchronously at
both tilting lever modules 4.1 and 4.2.
Furthermore, the preliminary control movement of the
chain 22 simultaneously activates the pivoting lever
module 5, which is provided on the upper side of the
casement 2 (Fig. 2), in such a manner that a pivoting
lever 50 is fixed by one end to the frame 1 while its
other end is articulated on the casement 2.
The pivoting lever module 5 can be designed in the same
manner as the tilting lever module 4.1, the frame-side
end of the pivoting lever 50 being fixed in a groove on
the frame via an intercepting element by means of the
preselection position of the chain 22 in the pivoting
direction while the pivoting lever 50 is fixed to the
casement 2 during the preliminary control movement of
the chain in the tilting direction, as has been
explained with reference to Figs l3 and 14.
After the described preselection position of the
CA 02441460 2003-09-18
' - 23 -
components has been executed by the preliminary control
movement of the chain 22 at all four mounting modules
3.1 to 3.4, the two tilting lever modules 4.1 and 4.2
and at the pivoting lever module 5, in the next step
the chain is moved on from the preselection position I'
in the direction of the position II', so that the
casement 2 is lifted off parallel from the frame. In
this case, in order to reach the position in which the
pivoting movement of the casement begins, the casement
is not lifted off from the frame into the position in
Fig. 6 in which it is lifted off to the maximum, but
rather is lifted off only into a predetermined
intermediate position, as will be explained below with
reference to Figs 15 and 18.
Fig. 15 shows a view of the mounting module 3.4 from
the right in Fig . 2 , the frame 1 again being indicated
by dashed lines.
In contrast to the mounting module 3.2 of Figs 4 to 7,
the link 37 for the vertical displacement of the
supporting element 38 is not articulated in the initial
position on the retaining element 33 horizontally next
to the rotary pin 26, but rather, in Fig. 15, is
articulated on the left above the rotary pin 26 in such
a manner that, in the initial position of the retaining
element 33 according to Fig. 4, the upper articulation
point 37' lies in a line with the rotary pin 26, as
Fig. 19 shows. Fig. 15 shows the preselection position
I' of the retaining element 33, in which the upper
shoulder 36 of the retaining element has come free from
the retaining pin 11 fastened to the frame 1. In other
words, the position of the retaining element 33 in
Fig. 15 corresponds to that in Fig. 5, but with a
reversed preliminary control movement of the chain 22.
Fig. 16 shows a view of the mounting module from the
left in Fig. l5. A bearing block 300 is attached to the
plate 24 of the mounting module next to the retaining
CA 02441460 2003-09-18
- ~ ' - 24 -
element 33, is arranged on an elongation of the plate
24, which extends to the left in Fig. 15, and extends
with an elongated projection 300' over the width of the
plate 24. The bearing block 300 with the projection
300' fits over a shoulder 305 on the frame 1 (Fig. 16),
in which the horizontal guide 12 for the roller 25 is
formed.
On the casement 2, as Figs 17 and 18 show, a bearing
ball 302 is fastened via a projection 301 to the
profile of the casement, in which the chain 22 is
guided. In order to secure and fix the bearing ball 302
in the ball shell of the bearing block 300, a
positioning screw 303, which has a bearing surface
corresponding to the ball radius, is screwed into the
said bearing block from above. Fig. 15 shows, at 304, a
cutout on the bearing block 300, which permits a
pivoting movement of the projection 301 of the casement
relative to the bearing block. In the position of
Figs 16 and 17, the casement is still in the bearing
position on the frame 1. The control movement of the
chain 22 in the direction II' causes the retaining
element 33 to be pushed away from the lower retaining
pin 11' of the frame 1 by the lower extension 35', with
the result that the roller 25 in Fig. 15 is displaced
to the left in the horizontal guide 12 until the
bearing block 300 protrudes with the pivoting joint out
of the front plane of the frame 1, as Fig. 15 already
shows irrespective of whether the retaining element 33
is only in the preselection position in Fig. 15.
Fig. 18 shows the corresponding position of the bearing
block 300 relative to the frame 1 while Fig. 17
reproduces the initial position from which the pivoting
joint is displaced to the left in Fig. 17. Figs 17 and
18 show a view of the mounting module from below in
Fig. 15.
In order to reach the initial position for the pivoting
movement of the casement, the bearing block 300 is
' CA 02441460 2003-09-18
- 25 -
lifted off from the frame 1, from the position of
Fig . 17 into that of Fig . 18 , until the pivoting j oint
lies as close as possible to the frame and there is
sufficient support via the rollers 25. In this case,
additional support in the pivoting position according
to Fig. 18 can be provided by the shoulder 305, which
is reproduced in Fig. 16, via the horizontal guide 12.
The casement 2 with the mounting module 3.4, which is
fitted thereto via the pivoting joint, is displaced to
the left from the position of Fig. 17 into the position
of Fig. 18, in which case the casement 2 is only lifted
off from the frame 1 until the pivoting joint is
exposed. During this lift-off movement, the pivoting
lever module 5 is already in engagement with the chain
22, in which case the pivoting lever 50 is fastened to
the frame 1, with the result that the further control
movement of the chain 22 from the position II' into the
position III' causes the casement 2 to be pivoted by
the pivoting lever 50 into the pivoting position '
according to Fig. 18. In this case, the control pins 23
of the chain 22 are lifted off from the retaining
element 33 transversely with respect to the plane of
the toothed ring 31 on the said retaining element, as
revealed in Figs 17 and 18, with the result that the
chain 22 can be released from the toothed ring 31 from
an engagement position, as reproduced in Fig. 15.
The control movement of the chain 22 from the
preselection position I' into the position II' is
configured to be shorter than the control movement from
the position I into the position II when tilting. In a
corresponding manner, the chain movement, which is
required for pivoting the casement 2, from the position
II' into the position III', in which the casement 2 is
fully open, is designed to be longer so ws to bring
about the corresponding pivoting region at the pivoting
lever 50. The pivoting lever 50, which is indicated
schematically in Fig. 2, is expediently designed in the
CA 02441460 2003-09-18
26 -
form of a multijointed pivoting lever 50, which is
reproduced in Fig. 23 and in which the articulation
points on the frame 1, on the one hand, and on the
casement 2, on the other hand, lie opposite one
another, as reproduced at 51 and 52 in Fig. 23. Other
designs of the pivoting lever 50 may also be provided
in order to permit a large pivoting region over at
least 90° between the casement and frame. In the case
of the pivoting lever 50 which is reproduced in
Fig. 23, shorter links 503 and 504 are articulated in
the central region on two links 501 and 502, which are
connected in an articulated manner to each other, the
said shorter links in turn being connected in an
articulated manner to each other at the ends, so that a
rhomboidal arrangement between these links is produced
in the illustration of Fig. 23.
In order for the roller 25 to be fixed in the pivoting
position according to Fig. 18 in the horizontal guide
12 and the mounting module to therefore be fixed
relative to the frame 1, a further pin 15 (Fig. 15) is
provided on the frame 1 above the horizontal guide 12
in the region of the two mounting modules 3.3 and 3.4,
the said pin entering into engagement with the
supporting element 38 while it fits over the shank 27
of the roller 25, with the result that the plate 24 is
secured against tilting relative to the casement 2 in
the pivoting position of the mounting module. In
Fig. 15, the pin which is attached to the frame 1 and,
in the position of the casement in which it is lifted
off to the maximum according to Fig. 6, is used fox
holding the plate 24 relative to the casement 2 during
the tilting movement, as has been explained with
reference to Fig 6 and 7, is referred to at 13.
In Figs 19 and 20, only relative positions of the
retaining element 33 of the mounting module 3.4 are
reproduced, Fig. 19 reproducing the closing position
corresponding to Fig. 4, in which the link 37 extends
CA 02441460 2003-09-18
_ 27 _
between the lifted-off position of the supporting
element 38 over the rotary pin 26 to the upper
articulation point 37' on the sector element 30. The
guide 28 on the plate 24 has an interruption 208, so
that the guide 28, which is moved horizontally relative
to the frame 1 by the plate 24, can be moved via the
pin 15, which is used for fixing the pivoting position
if the mounting module 3.4 has to be moved to the left
in Fig. 19 into the tilting position in which an
engagement with the pin 13 on the frame takes place in
accordance with the illustration in Figs 6 and 7.
From the closed position of the casement in Fig. 19, a
preliminary control movement of the chain 22 in the
tilting direction into the position I is executed in
the described manner, with the sector element 30 being
pivoted in the clockwise direction in Fig. 19. In this
case, during the lift-off movement of the casement from
the frame from the position I into the position II
(Fig. 20), the pin 15 on the frame 1 is first of all
crossed by the guide 28 on the plate 24 with the
supporting element 38 still raised, so that the
engagement with the pin 13 during the further lowering
movement of the supporting element 38 takes place in
the position of the casement in which it is lifted off
to the maximum.
If, in contrast, the preselection position of the chain
22 in the pivoting direction is executed from the
position of Fig. 19, then the sector element 30 is
pivoted out of the position of Fig. 19 in the
anticlockwise direction, as a result of which, owing to
the shorter distance which the link 37 covers, the
supporting element 38 is lowered earlier than during
the pivoting movement of the sector element 30 in the
clockwise direction, and the oblique groove 39 on the
supporting element 38 is already in engagement with the
frame-side pin 15 when the pivoting position in Fig. 15
is reached.
" CA 02441460 2003-09-18
~ - 28 -
The mounting module 3.3 (not illustrated) has, on the
sector element 30, the radial cam 320, which is
reproduced in Figs 8 and 9, for fixing the plate 24 in
the tilting position and, at the same time, a link 37
which interacts with the frame-side pin 15 via the
supporting element 38 in accordance with Fig. 15, so
that the upper mounting module 3.3 is also fixed in the
pivoting position on the frame 1. The frame-side pin 13
for the tilting position is not present in the region
of the upper mounting module 3.3, and so the supporting
element 38 cannot be fixed on the frame in the tilting
position.
If the casement 2 is to be brought from the pivoting
position in Fig. 18 into the closed position, the
control chain 22 is moved back out of the position III'
(not reproduced in Fig. 15) into the position II', thus
enabling the pivoting lever 50 to be pivoted by the
chain drive (corresponding to the drive of the tilting
lever 40) and therefore enabling the casement 2 to be
brought into the position parallel to the frame 1. In
this position II' of the chain, in which the casement 2
in Fig. 18 lies parallel to the horizontal guide 12 of
the frame while the pivoting joint is still situated
together with the bearing block 300 outside the plane
of the frame 1, the control movement of the chain 22
from the position II' into the position 0 causes the
mounting module to be transferred from the position of
the casement in which it is lifted off parallel into
the closed position according to Fig. 17 and Fig. 19.
This corresponds to the already described sequence of
movement of the closing of the casement 2 from the
lifted-off position in Fig. 6 into the position of
Fig. 4.
A transfer from the pivoting position into a tilting
position of the casement is again only possible if the
casement 2 is transferred from the pivoting position
CA 02441460 2003-09-18
29
into the closed position according to Figs 4 and 19
with the chain position 0, from which a preselection
position in the tilting direction with the subsequent
sequences of movement can be carried out. This
operation of the window is therefore prevented since
the starting point both for tilting and for pivoting
has to be the position 0 of the chain, specifically in
the opposite direction in each case from the position
0.
Motor drive of the chain
Fig. 21 shows, schematically, the driving module 6
(Fig. 2) which has an electric motor 60 and a worm 61
which is driven by the latter. The worm drives two
spaced-apart worm wheels which are not reproduced in
Fig. 21 and which drive the two toothed wheels 62 which
are in engagement with the bearing pins 203 of the
chain 22 in Fig. 21a. The worm wheels (not illustrated)
are fixed on the two toothed wheels 62 and on a guide
element 63 which extends parallel to the worm 61. This
guide element 63 is supported on supporting elements
202 on the casement 2 via two spring plates 64 and 64',
a compression spring 66 being arranged between the two
spring plates which are held on the shank of the guide
element 63 via a spring ring or a transverse pin 65. As
indicated by the double arrow in Fig. 21, the guide
element 63 with the two toothed wheels 62 fixed on it
can be moved both to the left and to the right counter
to the force of the spring 66.
This construction of motor 60, worm 61 and guide
element 63 with toothed wheels 62 is guided on a
component 67 of the casement 2 in guides 68 in such a
manner that the entire driving unit can be lifted off
from the position in Fig. 21a transversely with respect
to the chain 22 into the position of Fig. 21b, in which
the toothed wheels 62 are no longer in engagement with
the control chain 22.
CA 02441460 2003-09-18
' ~ ~ - 30 -
An end view of the construction is reproduced
schematically on the left in Fig. 21a and Fig. 21b. The
toothed wheels 62 are designed in this case in such a
manner that they are in engagement with the bearing
pins 203 which protrude laterally on the chain links
and slide along a supporting surface 69 of the casement
2, so that the chain 22 is supported on an abutment
when the two toothed wheels 62 are engaged.
The guide element 63 which is supported via the spring
66 has a dual function. When the toothed wheels 62 are
brought from the disengaged position in Fig. 21b into
engagement with the chain 22, an impact may arise
during latching of the toothed wheels, in particular if
the chain moves somewhat. This impact movement is
intercepted by the spring 66 and by a corresponding
deflecting movement of the guide element 63.
The second function of the guide element 63 which is
supported by the spring 66 will be explained in greater
detail in conjunction with the handle module 7 which is
described below.
Manual actuation of the windov~
Instead of the chain 22 being driven by the motor 60,
the chain may also be controlled manually by the handle
module 7 which is reproduced in a schematic
illustration in Fig. 22. A handle 70 is attached
pivotably to the profile of the casement 2 and a
release button 71 is attached to the handle, it being
possible for the said button to be pressed by the
fingers of the hand grasping the handle 70 in order to
move, via a linkage of bars (not illustrated), the
driving unit comprising the motor 60, worm 61 and guide
element 63 with the toothed wheels 62 out of the
engagement position in Fig. 21a into the position of
Fig. 21b. The motor drive of the chain 22 is therefore
f
CA 02441460 2003-09-18
- 31 -
>.
disengaged by the release button 71 being pressed. A
spring (not illustrated) is expediently provided
between the component 67 and driving unit, the spring
acting upon the driving unit in the engagement
direction and having to be overcome by the release
button 71 being pressed.
In the position in Fig. 22, the handle 70 is orientated
downwards on the casement 2 corresponding to the
customary closed position of a window. If the window is
to be opened manually, the handle 70 is pivoted into
the horizontal position in which the window is
customarily opened by pivoting of the casement, or is
pivoted upwards through 180° into the pivoting
position, in which the window is customarily to be
opened by tilting of the casement. During execution of
these two pivoting movements at the handle 70, a
connecting linkage (not illustrated) between the handle
70 and guide element 63 is used to adjust the latter in
the one or other direction counter to the force of the
spring 66, so that a preselection position for tilting
or pivoting is implemented on the chain 22 via the
toothed wheel 62, corresponding to the previously
described positions I and I'.
The further control movement for opening the window in
the tilting direction or pivoting direction can then be
controlled via buttons 72, which are fixed on the
handle module 7, by the fact that, for example, the
OPEN button is pressed, causing the motor 60 to be
activated via electric connecting lines in order to
lift off the casement 2 from the frame 1 and to
transfer it into the tilting or pivoting position in
accordance with the position preselected by the handle
70. For this purpose, further buttons are provided on
the handle module 7, as Fig. 24 also shows.
If, from the preselection position of the handle 70,
the window is to be opened manually by the handle 70
t
CA 02441460 2003-09-18
- 32 -
being pulled, the release button 71 has to be pressed,
so that the driving unit is disengaged from the chain
22, as Fig. 21b. The casement 2 is then lifted off
parallel from the frame 1 by the handle 70 being
pulled, in which case, owing to the engagement of the
mounting modules 3.1 to 3.4 with the chain 22 because
of the manually executed movement of the casement 2,
the mounting modules are driven in such a manner that
the retaining elements 33, which are released from the
upper and lower retaining pins 11, 11' by the
preselection position of the handle 70, drive the chain
22, so that, in this case, the control movement of the
chain is executed via the mounting elements. The
sequence of movement of the mounting parts, on the one
hand, and of the chain, on the other hand, is identical
here with the previously described sequence of
movement, in which the starting point has been that the
chain 22 is moved into the one or other position by the
motor 60. In comparison to the motor drive, the driving
of the chain manually via the handle 70 with the button
71 pressed takes place via the mounting parts which are
attached to the casement 2 and move the chain into the
corresponding positions. In this case, the release
button 71 can be let go, for example in a partially
lifted-off position of the casement 2 parallel to the
frame 1, so that, in an intermediate position of the
chain, the casement is situated between the positions I
and II in Fig. 6. During this latching movement of the
driving unit on the chain 22 caused by the release
button 71 being let go of, an impact may occur which is
intercepted by the spring 66. Then, after the handle 70
is let go of, the window can be closed again or further
opened by motor drive by the motor 60 being
appropriately activated via the buttons 72 on the
handle module 7 or by remote control (Fig. 24).
Owing to the permanent engagement of the encircling
chain 22 with at least one of the mounting parts (for
example, pivoting lever module 5) including the
" CA 02441460 2003-09-18
' - 33 -
overlapping engagement with the tilting lever modules
and the pivoting lever module, the position of the
casement 2 relative to the frame 1 is defined at every
instance by the position of the chain 22, irrespective
of whether the chain 22 is driven and adjusted by the
motor 60 or manually via the handle 70.
Fig. 22 shows five buttons 72 which can be used, by
means of pressure on these buttons, to initiate the
various functions or movements of the window casement.
These buttons or sensor fields are connected via an
electronic control system (not illustrated) to the
driving motor 60, so that, by the particular buttons
being pressed, the corresponding driving movement can
be triggered at the motor 60. Fig. 24 shows, in the
form of symbols, the various functions of the buttons,
such as "parallel lifting off", "tilting" and
"pivoting" and also "window open" and "window shut", on
a remote control unit 100 (illustrated schematically).
The buttons provided on the handle module 7 may also be
provided on another part of the casement, for example
on the casement profile.
The preselection position of the handle 70 in the
tilting or pivoting position has priority over an
activation of the motor 60 in such a manner that, for
example in a tilting position of the handle 70,
activation of the motor 60 cannot lead directly to a
transfer into a pivoting position. Depending on the
preselection position of the handle 70, only a
movement, corresponding to the preselection position,
of the control chain 22 can be carried out by the motor
60 via the activation of the motor. There is a
connection (not illustrated) for this via electric
lines between the handle module 7 and driving module 6
so that, for example, a tilting position of the handle
70 blocks a drive of the motor 60 in the pivoting
direction, which drive could be triggered from a remote
' CA 02441460 2003-09-18
- 34 -
r
control 100.
Modifications
Various modifications of the described construction are
possible. Instead of a chain 22, a flexible strap may
be provided on which corresponding control pins are
fixed at least in some sections. Also, a toothed belt
may be provided instead of a chain.
It is not necessary to form the chain with control pins
23 or a toothed belt continuously over the
circumference of the casement/leaf 2. Control elements
in the form of chain links or a section of a toothed
belt may also be formed in some sections. Also, chain
sections may be connected to one another via a spring
element in order to compensate for an elongation of the
control element due to the effect of temperature. A
spring element of this type is configured in such a
manner that it is not affected by, and does not bring
about a change in length because of the forces of the
adjusting movements by the motor drive and by the
manual actuation, but only because of considerably
higher forces, such as occur, for example, in
temperature changes.
Instead of an individual driving module 6, a plurality
of driving modules may also be provided on the
circumference of a casement/leaf 2, in particular if it
involves a relatively large door leaf. In the case of a
relatively large door leaf, a plurality of the
described mounting modules 3.1 to 3.4 may also be
provided, for example three on each side of the leaf.
The predetermined sequence of the individual chain
positions from the position 0 in the one or other
direction also makes it possible to use just a single
driving module 6 or a single driving motor 60 to
control all of the functions of the window.
CA 02441460 2003-09-18
- 35 -
The control of the casement 2 can be carried out by
button control on the handle module 7, by remote
control, for example by means of an infrared control
device, or else by a central control system from which
all of the windows of a building can be activated in
this manner. Finally, it is also possible to actuate
each individual window manually by a pivoting, pulling
and pushing action on the handle 70, the motor drive in
this case being uncoupled from the chain, so that the
chain merely forms a coupling element for the mounting
modules during the manually executed movements of the
casement 2 relative to the frame 1.
If a remote control device 100 is to be used to
activate a plurality of windows from a room, a laser
pointer or the like is expediently provided on the
remote control device and can be used to activate a
corresponding sensor on the individual windows, with
the result that by targeting the remote control device
20. 100 at the relevant window which is to be opened, only
this window responds and not the adjacent windows.
In a simplified embodiment of the described window or
door construction, individual elements may also be
omitted. It is therefore possible to omit the keyboard
72 on the handle module 7, which means that a window
can only be actuated manually or by remote control. In
the simplest embodiment, it is also possible to omit
the driving module 6, so that the window can only be
opened and closed manually, in which case, owing to the
mounting modules which are permanently coupled together
by the chain, the casement 2 can be stopped in any
desired position, for example in a position in which it
is lifted off only approximately parallel, for
ventilation purposes or the like. In this case, instead .
of the driving module 6, a separate catch is provided
on the chain 22 and fixes the chain in a certain
position if it is not released by the button 71 on the
handle 70. If a driving module 6 is fitted
t
CA 02441460 2003-09-18
- 36 -
subsequently, a catch of this type for the chain 22 is
replaced by the driving module.
In Fig. 2, only cutouts on the frame 1 and on the
profile of the casement 2 are indicated for the supply
module 8. The supply module is. expediently arranged at
a location on the circumference of the casement at
which as few movements relative to the frame 1 as
possible take place. The supply module is therefore
positioned, for example, above the right, lower corner.
The supply module (not illustrated) comprises supply
cables and connecting plugs which are inserted into the
profile of the casement, the cables being connected to
the motor 60 of the driving module 6. The electronic
control unit can be formed on the supply module or else
on the driving module. The connection of the supply
module on the casement to the module on the frame 1
takes place via connecting cables having plugs at the
ends.
The shank 27 on the mounting modules 3.1 to 3.4 can
also be fixed by a spring-loaded catch in the position
of Fig. 6, in which the casement takes up the position
in which it is lifted off to the maximum parallel to
the frame 1.
The sensor module 9 is preferably provided on a corner
of the window construction at which the fewest
adjusting movements of the casement occur. The sensor
module is therefore fixed, for example, to the right,
lower corner.
In the exemplary embodiment described, the control
element in the form of the chain 22 with the various
mounting modules is attached to the casement 2. It is
also possible to attach the encircling control element
with the mounting modules controlled by it to the frame
1; however the attachment to the casement 2 is
advantageous in terms of installation and repair work
CA 02441460 2003-09-18
_ , _ 37 _
and the replacement of individual components.
In particular, the engagement element on the individual
mounting modules may also be designed in a different
manner than illustrated. Thus, instead of a toothed
ring which enters into engagement with the control pins
of the chain, a worm spindle or the like can be
provided for displacing a mounting part.
Instead of the roller 25, which supports the load of
the casement on the frame, a lever construction may
also be provided in order to support the casement on
the frame .
Instead of the supply module which is indicated in
Fig. 2 with current being fed via electric lines, the
feeding of power to the driving unit, which is
accommodated in the casement profile, may also take
place without lines, for example inductively.
Similarly, control signals may be transmitted to the
electronic control unit or the driving unit via radio,
so that the control element executes the corresponding
control movements, with the result that a supply module
having electric lines between the casement and frame is
not required.
In order to sense the positions of the casement
relative to the frame, a plurality of sensors may be
provided on the circumference of the casement in order
to directly sense the position of the casement. By
virtue of the fact that all of the sequences of
movement of the casement relative to the frame are
clearly defined by the sequential succession of control
movements of the chain 22 from the initial position 0
in the one or other circumferential direction, it is
also possible for just an individual sensor to be
provided, for example the sensor indicated in Figs 2 to
9, which is in engagement with the chain 22 and
indirectly determines the position of the casement by
CA 02441460 2003-09-18
_ 38 _
means of the sensed position of the chain 22 relative
to the initial position 0 and relative to the casement.
This clear definition of the chain movement also
prevents misoperation of the casement.
The preliminary control movement of the chain 22 by the
handle 70 can also be executed in such a manner that,
when the handle 70 is pivoted from the closed position
into the tilting or pivoting position, the release
button 71 is pressed and, via a coupling element
between the handle 70 and chain 22, the latter is moved
by the pivoting movement of the handle into the
preliminary control position I or I' while the driving
unit is disengaged from the chain by the release button
71. If the window is to be subsequently opened by means
of the handle, this coupling device is likewise
released from the chain 22, so that the latter can move
freely over the mounting elements because of the manual
movement on the casement. An. additional actuating
device may be provided for this coupling between the
handle 70 and chain 22 for the purpose of executing the
preliminary control movement when the driving unit is
disengaged.
Figs 25 to 35 show a preferred embodiment of mounting
modules on a window construction, the same reference
numbers as in the preceding figures are used for the
same components. In this embodiment too, the casement 2
of the window executes the movements, which are
reproduced in Figs 1a-1c, relative to the frame 1.
Fig. 25 shows, schematically, corresponding to Fig. 2,
the arrangement of the various mounting modules on the
circumference of the window construction, in which, in
comparison to the embodiment according to Fig. 2, the
tilting lever modules 4.1 and 4.2 are dispensed with
and the driving module 6 is arranged on the pivoting
lever module 5, which at the same time carries out the
tilting lever function. On the sides of the frame 1, in
CA 02441460 2003-09-18
_ 39 _
the region of the mounting modules 3.1; 3.2, 3.3 and
3.4, individual retaining pins 101 are fastened to the
frame 1 and enter into engagement with these mounting
modules.
Fig. 26 shows, in a perspective illustration and
schematically, the construction of a mounting module
3.1 on the casement 2 in conjunction with the retaining
pin 101 on the frame 1. The mounting module 3.1
comprises a control slide 102 which is connected to the
control element 22 and from which protrude, in the
exemplary embodiment illustrated, four guide pins 103
which engage in slots 104 in a plate-like mounting part
105 which is attached fixedly to the casement 2 of the
window, as Fig. 31 shows. The control slide 102 has a
control groove 106 which is reproduced in detail in
Fig. 27 and, in this exemplary embodiment, is of
approximately V-shaped design and in which the
retaining pin 101 of the frame 1 engages. This
retaining pin 101 engages. at the same time in a
horizontal groove 107 on the mounting part 105, on
which the control slide 102 is guided in a manner such
that it can be displaced in the direction of movement
of the control element 22. The control element 22 which
is guided in a circumferential groove of the casement 2
can be designed as a strap, chain or cable.
Fig. 27a shows, schematically, a side view of the
mounting module 3.1 in the locking position, in which
the retaining pin 101 of the frame 1 is situated at the
inner end of the horizontal groove 107 of the mounting
part 105, which is fixed on the casement, and at the
same time is situated at the vertex 106.1 of the radial
cam 106 of the control slide 102. At the vertex 106.1,
the control groove 106 is slightly flattened
transversely with respect to the horizontal groove 107,
so that the retaining pin 101 can take up a stable
position in the locking position of the window.
CA 02441460 2003-09-18
- 40 -
Fig. 27b shows a position of the mounting module 3.1
during pivoting of the casement 2 relative to the frame
1, the retaining pin 101 of the frame being situated in
a horizontal section 106.3 of the radial cam 106 that
is connected to the apex 106.1 via an oblique section
106.2. This relative position in Fig. 27b corresponds
to the position in which the casement 2 is released
from the frame 1, and it is brought about by a
displacement of the control slide 102 upwards from the
position in Fig. 27a, the control slide 102 having been
moved upwards in the pivoting direction of the casement
by means of the control. element 22 by the driving motor
or manually via the handle module 7. On further
movement of the casement, the retaining pin 101 of the
frame 1 slides out of the horizontal groove 107 and at
the same time out of the horizontal section 106.3 of
the control groove, so that the mounting module 3.1 can
be released from the frame 1, as Fig. 27d shows in
conjunction with a tilting position.
Fig. 27c shows a tilting position of the mounting
module 3.1 after the control slide 102 has been moved
downwards out of the locking position in Fig. 27a by
the driving module 6 or the handle module 7. This
causes the retaining pin 101 to move along an oblique
section 106.4 of the radial cam on the control slide
102 while the retaining pin 101 moves at the same time
in the horizontal direction along the horizontal groove
107 of the mounting part 105. As Figs 27a and 27b show,
the longer section 106.4 of the control groove is open
over a short section 106.5 on the left side, with the
result that, if the tilting movement of the casement
continues, the retaining pin 101 can be released from
the horizontal groove 107 and the control groove 106,
as Fig. 27d shows.
The two obliquely extending sections 106.2 and 106.4
have essentially the same inclination relative to the
horizontal and are also identical in length. However,
CA 02441460 2003-09-18
- 41 -
they may also differ in design.
That section 106.4 of the radial cam which corresponds
to the lower section 106.2 is used for the release of
the casement from the frame 1, in accordance with
Fig. 27b (position 1 in Fig. 34a). The extending
oblique section 106.4 is used for guiding the retaining
pin 101 on the casement 2 during the parallel lifting-
off and during the tilting movement while the retaining
pin 101 in the horizontal groove 107 still bears the
load of the casement 2, and then, towards the end of
the movement, the retaining pin 201 passes to the left
end of the horizontal groove 107 and into the short
horizontal section 106.5 of the radial cam, from which
the retaining pin 101 can be released from the mounting
module 3.1, as Figs 27c and d show.
The construction which is described for the mounting
module 3.1 is also provided in basic principle for the
mounting modules 3.2 to 3.4 where the control groove
106 on the control slide 102 is of different design
because of the different functions of these further
mounting modules. Fig. 28 shows the different designs
schematically, all of the positions reproducing the
locking position from which the retaining pin 101 is
moved into the upper or lower section of the control
groove 106 while it is moved at the same time in the
horizontal direction in the control groove 107.
Fig. 28a corresponds to the design of the mounting
module 3.1, in which the two legs of the approximately
V-shaped control groove 106 are open at the outer end
as is the horizontal groove 107 on the mounting part
105, so that the retaining pin 101 can be released from
the frame 1 both in the pivoting position of the
casement and also in the tilting position of the
casement. The horizontal double arrow indicates the
movement of the retaining pin 101 in the horizontal
groove 107, and the vertical double arrow indicates the
' CA 02441460 2003-09-18
- 42 -
movement of the retaining pin 101 in the two limbs of
the control groove 106. The position in Fig. 28a
corresponds to the locking position in Fig. 27a.
Fig. 28b shows the shape of the control groove 106 on
the mounting module 3.2, at which the casement 2 has to
be held on the frame 1 in the tilting position while,
in the pivoting position of the casement, the mounting
module 3.2 has to be released from the frame 1.
Therefore, on the mounting module 3.2, the upper end
106.6 of the obliquely extending section 106.4 of the
control groove is closed, so that, in the tilting
position of the casement, the retaining pin 101 of the
frame is held in the mounting module 3.2 by the
retaining pin 101 bearing against the closed end 106.6
of the control groove while, in the pivoting position,
the retaining pin 101 can be released from the mounting
module 3.2 by the lower, open section 106.3 of the
control groove.
At the closed end 106.6 of the upper oblique section
106.4 of the control groove, Fig. 27c shows the tilting
position of the casement 2 relative to the frame 1 on
the mounting module 3.2, the retaining pin 101 being
held in the mounting module by the closed end 106.6 of
the control groove while at the same time the load of
the casement 2 is supported on the retaining pin 101
via the horizontal groove 107.
Fig. 28c shows the shape of the control groove 106 on
the mounting module 3.3, at which the retaining pin 101
has to be released from the mounting module in the
tilting position of the casement 2 while, in the
pivoting position of the casement, the retaining pin
101 has to be held tightly against the mounting module.
It should be taken into account here that on the two
mounting modules 3.3 and 3.4 on the right side of the
window construction; the lower sections of the radial
cam 106 in Figs 28c and d correspond to the upper
CA 02441460 2003-09-18
- 43 -
sections of the radial cam on the mounting modules 3.1
and 3.2 according to Figs 28a and b because the control
slide 102 on the right side of the casement is moved
upwards when the control slide 102 on the left side of
the casement is displaced dovunwards, and vice versa.
Therefore, in Fig. 28c, the lower limb 106.4 and 106.5
of the control groove corresponds to the upper limb in
Fig. 28a because the mounting module 3.3 has to be
released from the frame 1 during tilting of the
casement. In contrast, the upper limb 106.2 in
Fig. 28c, which corresponds to the lower section 106.2
on the two left mounting modules 3.1 and 3.2, is
provided with a closed end 106.7, so that, in the
pivoting position of the casement, the connection
between the casement and frame is maintained by the
retaining pin 101 bearing, after being released,
against the end 106.7 of the control groove while it is
held at the same time in the horizontal groove 107. The
length of the upper section 106.2 in Fig. 28c
corresponds to the length of the lower section 106.2 in
Fig. 28a or to the distance necessary for releasing the
casement from the frame. After the casement has been
released, the retaining pin 101 comes to bear against
the closed end 106.7 of the control groove, so that it
is held on the mounting module 3.1, with the result
that then a pivoting movement of the casement 2
relative to the frame 1 can be initiated.
Fig. 28 shows, by means of the arrows "tilting" and
"pivoting" on the mounting modules 3.1 and 3.2, and in
the opposed direction on the mounting modules 3.3 and
3.4, the opposed design of the radial cam 106 which
arises on account of the opposed movement of the
control element 22.
Fig. 28d shows the shape of the control groove 106 on
the mounting module 3.4, at which the casement 2 is not
released from the frame 1 in any position. The
horizontal groove 107 at the left end is therefore also
CA 02441460 2003-09-18
_. - 44 -
closed so that the retaining pin 101 cannot be released
from the mounting module 3.4 and the weight of the
casement 2 is supported in every position on the
retaining pin 101 of the frame. Furthermore, the two
sections 106.2 and 106.4 of the control groove 106 are
of closed design at the ends. The section 106.4
corresponds to the upper section 106.4 in Fig. 27b, the
closed end 106.6 holding the retaining pin 101 in the
released position in the mounting module 3.4 (in
accordance with the illustration in Fig. 27c). The
upper, shortened limb 106.2 of the control groove in
Fig. 28d corresponds to the design in Fig. 28c.
Fig. 29 shows a sectional view through the construction
of the mounting modules, in which two roller bearings
101.1 and 101.2 of different diameter are fixed on the
retaining pin 101 of the frame 1. The roller bearing
101.1 of larger diameter is situated in the horizontal
groove 107 of the mounting part 105 while the roller
bearing 101.2 of smaller diameter. engages in the
control groove 106 of the control slide 102. By means
of this design, firstly, erroneous positioning during
installation is prevented and, secondly, the control
movement is helped to run smoothly.
Fig. 30 shows, schematically, a sectional view
corresponding to Fig. 29, in which the fastening is of
the plate-like mounting part 105 on the casement 2 is
indicated. The control slide 102 is guided by the pins
103 in the vertical guide slots 104 (Fig. 27) of the
mounting part 105, an engagement element 108 being
attached to the control slide 102 and being in
engagement with the control element 22 (reproduced
schematically by a double arrow) which is guided
displaceably in a groove on the circumference of the
casement 2. As Fig. 30 shows, one mounting module
combines a total of three guides, a vertical guide for
the control slide 102, a horizontal guide for the
retaining pin 101 in the mounting part 105 and the
' CA 02441460 2003-09-18
- 45 -
guide for the retaining pin 101 in the control groove
106. The mounting part 105 can be designed overall as a
flat housing in which the control slide 102 is guided.
Figs 31 and 32 show, schematically, a view from above
of one of the mounting modules 3.3 and 3.4 on the right
side of the casement where a hinge has to be provided
between the frame 1 and casement 2 in order to permit a
pivoting movement of the casement. In the embodiment
according to Fig. 31, one part of a hinge 109 is
fastened in each case to the mounting module 3.3 and
3.4 and to the mounting part 105 thereof and its other
part is connected to the casement 2. Fig. 31a and
Fig. 32a show the mounting module in the locking
position, in which the casement 2 bears against the
frame 1 or lies in the frame. Fig. 31b and Fig. 32c
show a pivoting position of the casement 2 of
approximately 45°. A curved strap 110 which is curved
concentrically about the hinge axis, is fastened in
each case to the control slide 102 of the mounting
module 3.3 and 3.4 and engages in a recess of the
strap-like control element 22. This curved strap 101
corresponds to the engagement element 108 (which is
reproduced in Fig. 30) between the control slide 102
and control element 22. By means of this curved strap
110, a connection between the control element 22 and
control slide 102 is maintained in every pivoting
position of the casement 2, with the result that, in
every position of the casement 2, the relative position
between the control slide 102 and control element 22 is
defined.
Fig. 32b shows the casement 2 in the position in which
it is lifted off parallel from the frame 1 and in which
the hinge 109, which is fixed on the outside of the
mounting module, is lifted off from the frame 1, in
which case the pivoting movement is then initiated, as
Fig. 32c shows. In Fig. 31, a plate of the hinge 109
that is fastened to the casement 2 is referred to by
~
CA 02441460 2003-09-18
- 46 -
2.1 while the mounting module 3.3 or 3.4 forms the
other plate of the hinge 109 that is held on the frame
in the parallel lifted-off position of the casement,
with the result that the weight of the casement is
supported on the frame via the retaining pin 101.
Fig. 33 shows, schematically, a combined pivoting and
tilting lever module 5, in a pivoting position of the
casement 2 in Fig. 33b, and in a tilting position in
Fig. 33a, the mounting part 105 with the horizontal
groove 107 being indicated schematically on the upper
mounting modules 3.1 and 3.3. The pivoting and tilting
lever module 5 has a pivoting lever 111 and a tilting
lever 112 which are both articulated on a slide 113
(Fig. 34). Intercepting elements 114 and 115 (indicated
schematically in Fig. 33) are formed on the frame 1,
the tilting lever 112 entering into engagement with the
intercepting element 114 before the tilting movement is
initiated and the pivoting lever 111 entering into
engagement with the intercepting element 115 before the
pivoting movement is initiated.
Fig. 34 shows, schematically, the construction of this
pivoting and tilting lever module 5, Fig. 34a
reproducing a plan view from above of a position of the
mounting module in which a tilting movement of the
casement 2 relative to the frame 1 is executed.
Fig. 34b shows a side view in the position of the
mounting module of Fig. 34a, while Fig. 34c reproduces
a view from the right in Fig. 34a.
As Figs 34a and b show, the axes of articulation 111.1
and 112.1 (Fig. 35b) of the pivoting lever 111 and
tilting lever 112 can be displaced on the slide in the
circumferential direction of the casement 2 in a slot
117 (Fig. 34a). The spindle 116, which is mounted
rotatably in the bearing points 118 on the profile of
the casement 2, is designed without self-locking and is
set into rotation by an electric driving motor 60 of
" CA 02441460 2003-09-18
_ 47 _
the driving module 6, which is likewise arranged in the
profile of the casement 2.
In the locking position of the casement 2 on the frame
1, the casement 2 is situated essentially within the
frame 1, in which case the slide 113 is situated in the
position 0 and the two levers 111 and 112 are aligned
in the circumferential direction on the casement 2 and
are not in engagement with the intercepting eleme nts
114 and 115, which are positioned on the frame in an
extension of the two levers 111 and 112. As a result of
the fact that the two intercepting elements 114 and 115
lie in a line with the two levers 111 and 112 in the
initial and locking positions, during a displacement of
the slide 113 in the one or other direction from the
position 0, the particular lever 111 or 112 can be
introduced into the associated intercepting element,
whereupon further displacement of the slide 113
initiates the tilting or pivoting movement of the
casement.
If, in the locking position, for example "tilting" of
the casement 2 is selected by remote control via the
control device 100 (Fig. 24), the slide 113 is
displaced by the motor 60 from the position 0 into the
position 1, which is on the left in Fig. 34a and in
which the casement is released from the frame, in which
case a ball 120, which is fixed on the free end of the
tilting lever 112, is introduced during the release
process into a guide channel 119 of the intercepting
element 114. The balls 120 at the free ends of the
levers 111 and 112 are of flattened design, so that
they can be introduced into the guide channel 119 of
the intercepting elements 114 and 115, whereupon, after
a pivoting movement of the relevant lever 111 or 112
relative to the connecting line of the intercepting
elements 114, 115, the flattened ball is reliably held
in the ball socket 121 by twisting.
CA 02441460 2003-09-18
, _ 48 _
In the position 0, the slide 113 is connected to the
control element 22, so that during the displacement
movement of the slide 113 from the position 0 into the
position 1, the control slides 102, which are connected
to the control element 22, on the mounting modules are
also displaced, as a result of which the casement 2 is
released from the frame 1.
UThen the slide 113 has reached the left position 1, the
casement 2 is released via the corresponding
displacement of the control slides 102 on the mounting
modules 3.1 to 3.4, in which case the ball 120 at the
free end of the tilting lever 112 is already situated
in the ball socket 121 of the intercepting element 114,
so that, on further displacement of the slide 113 in
the direction of position 2, the tilting lever 112 is
guided in an articulated manner in the intercepting
element 114. Fig. 34a shows an intermediate position of
the tilting movement, the slide 113 being situated
between the positions 1 and 2. The position 2
corresponds to the position of the casement in which it
is lifted off parallel.
The slide 113 is guided on the profile of the casement
2 by a longitudinal guide 122 (indicated schematically
in Fig. 34c) while the spindle 116 rotates in the one
or the other direction, as indicated by the double
arrow in Fig. 34c. At the same time, the slot 117 forms
a longitudinal guide for the axis of articulation of
the levers 111 and 112.
In the case of the exemplary embodiment which is
reproduced in Fig. 34a, the distance over which the
slide 113 is moved from the locking position 0 into the
released position 1 in the "tilting" direction is
configured to be greater than in the "pivoting"
direction, so that the hinge 109 (Fig. 31) arranged
between the casement 2 and frame 1 clearly comes free
from the frame during tilting of the casement.
' CA 02441460 2003-09-18
- 49 -
In contrast, the distance over which the slide 113 is
displaced into the released position in the pivoting
direction can be kept short because the hinge 109
remains in the corner between the casement 2 and frame
1 during pivoting of the casement.
In the case of the exemplary embodiment illustrated in
Fig. 34, the slide 113 is connected to the control
element 22 only in the locking position 0 and during
the displacement into the position 2 for parallel
lifting-off of the casement while, during the further
adjusting movement of the slide 113 in the "tilting" or
"pivoting" direction from the position 2, the slide 113
is decoupled from the control element 22 and the
pivoting or tilting movement of the casement is
controlled just via the levers 111 and 112,
respectively, while the control element 22 is latched
in its position on the casement 2.
Fig. 35 shows, schematically, the coupling mechanism
between the slide 113 and the strap-like control
element 22, in which Fig. 35a reproduces the coupling
position between the slide 113 and control element 22
and Fig. 35b reproduces the decoupled position, in
which the strap-like control element 22 is secured in
its position by a catch 128, which is supported on the
casement 2 by a spring 127, while the side can continue
to move without the position of the control element 22
being affected as a result.
The slide 113 is guided via a guide pin 123, which is
preferably provided with a roller bearing, in a radial
cam 124 which is formed on the casement 2 or on the
circumferential profile thereof. In the locking
position and during the adjusting movement for parallel
lifting-off, the control pin 123 is situated in the
offset section 124.1 of the radial cam, the slide 113
engaging via an engagement element 125 in a recess 126
CA 02441460 2003-09-18
w . _ 50 _
of the control element 22 , so that the control element
22 moves synchronously with the slide 113. In the
position 2 in Fig. 34a, i.e. at the end of the parallel
lifting-off of the casement, the radial cam 124 is
provided with an oblique section 124.2, the angle of
inclination of which corresponds to the angle of
inclination of the flank of the engagement element 125
into the recess 126, which is provided with oblique
flanks, on the control element 22, so that, on further
displacement of the control element 22 in the "tilting"
or "pivoting° direction, the engagement element 125
slides out of engagement with the control element 22
while the engagement pin 123 is displaced into an outer
section 124.3. When the control pin 123 is situated in
the section 124.3 of the radial cam 124, this
corresponds to a position of the slide 113 on that side
of the position 2 in Fig. 34a in which the slide 113 is
decoupled from the strap-like control element 122, as
Fig. 35b shows.
In the exemplary embodiment according to Fig. 35, the
coupling mechanism between the slide 113 and strap-like
control element 22, on the one hand, and between the
control element 22 and casement 2, on the other hand,
has a ram 129 which engages by means of a V-section in
the V-shaped recess 126 of the control element 22 and
lies with the opposite, widened end in a
correspondingly widened recess 130 of the control
element 22. As Fig. 35a shows, the ram 129 is held in a
manner bearing against a fixed part of the casement 2
by the engagement element 125 while the engagement
element 125 engages in the recess 126 for connection
between the control element 22 and slide 113. In this
position in Fig. 35a, the catches 128, which are loaded
by the springs 127, bear against the strap-shaped
control element 22 while the latter is being displaced
relative to the casement 2.
As soon as the slide 113 has reached the end position 2
CA 02441460 2003-09-18
- 51 -
(Fig. 34a) during the parallel lifting-off of the
casement and the control pin 123 is situated in the
lower section 124.3 of the radial cam 124 (Fig. 35b),
the control element 22 is also situated in a position
in which the widened recess 130 lies opposite a catch
128, thus enabling the spring-loaded catch 128 to push
the tappet 129 back into the position reproduced in
Fig. 35b and the catch 128 to engage in the recess 130 .
of the control element 22, so that the latter is fixed
in this position.
When the slide 113 is moved back again from the
position in Fig. 35b into the locking position 0
(Fig. 34a), then the engagement element 125, which is
pushed upwards in Fig. 35b by the control pin 123 in
the control groove 124, likewise pushes the ram 129
upwards, so that the catch 128 is pushed out of
engagement with the recess 130 of the control element
22 and the control element 22 can be displaced to the
right in Fig. 35b synchronously with the slide 113 on
account of the engagement with the engagement element
125. The catch 128 which is on the right in Fig. 35b
corresponds to the position 2 which is on the right in
Fig. 34a (end position during parallel lifting-off of
the casement), in which case the same latching
operation takes place as illustrated in Fig. 35b at the
left catch 128.
The engagement element 125 is guided between two guides
131 transversely with respect to the movement of the
slide. Guide pins on the casement 2 for the levers 111
and 112 are referred to by 113.1, and, in the position
in Fig. 34a, the lever 111 which is not active is
situated between the spaced-apart guide pins 113.1.
During the displacement movement of the slide 113 in
the pivoting direction, the lever 112 comes to lie
between these guide pins while the lever 111 is moved
out of the guide, so that, after engagement with the
intercepting element 115, it can control the pivoting
CA 02441460 2003-09-18
- 52 -
movement of the casement.
The decoupling of the slide 113 from the control
element 22 during the tilting and pivoting movements of
the casement 2 has the effect that the tilting and
pivoting movements are controlled solely by the levers
111 and 112 while the control slides 102 on the
individual mounting modules remain in their position
during the tilting and pivoting movements because of
the control element 22, which is latched to the
casement 2.
The mountings 3.1 to 3.4 in the embodiment according to
Figs 25 to 35 have essentially the same construction,,
unlike in the embodiment according to Figs 2 to 21.
Furthermore, a substantial simplification is produced
by the fact that the driving module 6 is combined with
the tilting and pivoting lever module 5 and the tilting
and pivoting levers 111 and 112 are alternatively
connected to the frame by 'articulation in the
intercepting elements 114, 115 on the frame 1.
In the embodiment according to Figs 25 to 35, the
handle 70 or the handle module 7 can have the same
design as in Fig. 22 with the keyboard 72 and button
71. In order for it to be possible for the window
construction to be actuated independently of the
driving motor 60 via the handle module 7, the handle 70
is connected via a control cable (not illustrated) to a
coupling 137 (Fig. 34b) which, by actuation of the
button 71, interrupts the connection between the motor
60 and spindle 116, whereupon the pivoting movement of
the handle 70 causes a control pin on the shank of the
handle 70 to engage in a slotted guide with control
grooves which is fixed on the strap-like control
element 22, so that the movement of the handle causes
the control element 22 to be displaced on the
circumference of the casement 2 in such a manner that
the casement can be lifted off parallel in order to
' CA 02441460 2003-09-18
A
- 53 -
initiate the desired tilting or pivoting movement, the
control element 22 in this case driving the slide 113
from the position 0 into the positions 1 and 2
(Fig. 34a) while the tilting or pivoting movement is
controlled exclusively via the tilting and pivoting
levers 111, 112, by appropriate pulling on the handle
70, since, even when the window construction is
actuated manually, the slide 113 is decoupled from the
control element 22 in the position 2.
As soon as the casement 2, by means of pressure on the
handle 70, is moved again from the pivoting or tilting
position into the position 2 in which it is lifted off
parallel, the slide 113 is coupled to the control
element 22 (Fig. 35). By further pressure on the handle
70, the casement is moved parallel to the frame from
the position 2 into the position 1. The coupled control
element 22 ensures that the sequence of movements is
synchronous. Rotation of the handle 70 into the closed
position causes the control element 22, and with the
latter the control slide 102 on the mounting modules,
to be displaced in such a manner that the casement 2 is
moved into the locking position 0 on the frame 1.
In the embodiment according to Figs 25 to 35, the
control element 22 may also be designed as a strap
section which does not extend over the entire
circumference of the casement 2, but rather extends
only from the mounting module 3.2 over the mounting
module 3.1 to the mounting module 3.4. In this case,
the control element 22 has to be of correspondingly
rigid design. The control element 22 is preferably
designed as a closed control cable which extends over
the entire circumference of the casement 2. In this
case, deflection rollers are preferably arranged at the
corners of the casement in order to enable the
adjusting movement of the cable on the circumference of
the casement to run smoothly.
CA 02441460 2003-09-18
- 54 -
Also in the embodiment according to Figs 25 to 35, the
casement 2 can be moved from any desired position into
the closed position if, for example, a rain sensor
indicates rain and causes a corresponding electronic
control unit to activate the motor 60 for the purpose
of closing the window. Owing to the fact that in the
positions 0 to 2 the casement 2 is connected via the
control slide 102 to the retaining pin 101 of the
frame, the window can be moved from the position in
which it is lifted off parallel into the closed
position by the driving motor 60 which drives the slide
113. If the casement 2 is in a tilting or pivoting
position, then the motor drive of the slide 113 first
of all moves the casement 2 into the position 2 in
which it is lifted off parallel and from which the
closing operation then takes place.
The closed position of the casement 2 is already
achieved in position 1 shortly before the retaining
pins 101 pass into the apex 106.7 (Fig. 27) of the
control groove 106. The rest of the movement of the
retaining pins 101 as far as the end position of the
apex of the radial cam corresponds to the compression
of the window seal.
Fig. 36 shows a modified embodiment of the tilting and
pivoting lever module 5, in which, in contrast to the
embodiment according to Fig. 33, there is only one
lever 140 between the frame 1 and casement 2 both for
the tilting movement and for the pivoting movement. In
this design, a parallel lifting-off of the casement 2
before the pivoting movement is initiated, i.e. the
displacement between the position 0 and the right
position 1 in Fig. 34a, can be dispensed with when the
slide 113 is displaced from the locking position 0 in
the pivoting direction of the casement. In this case,
the hinge 109 between the mounting modules 3.3 and 3.4
and casement 2 (Fig. 31) remains in the same position
as in the locking position, with the result that a
' CA 02441460 2003-09-18
- 55 -
pivoting movement of the casement 2 is initiated
directly from the locking position. The control element
22 is coupled to the mounting modules 3.3 and 3.4 via
the hinge pin of the hinge 109. The control slide of
the mounting modules 3.3 and 3.4 is always mechanically
in engagement with the control element 22.
Fig. 36a shows, schematically, the lever position
during tilting of the casement 2. The lever 140 is
articulated fixedly on the upper side of the frame 1 in
the vicinity of the right corner at 141 while its
opposite end 142 is guided in an articulated manner in
a slot 143 of the casement 2. A further lever 144 is
articulated approximately in the central region of the
lever 140 at 145 and its opposite end 146 is
articulated on the slide 113, which, as indicated by a
double arrow, can be displaced along the upper side of
the casement 2 by the driving module 6 in accordance
with the embodiment according to Fig. 34.
In the closed position of the window, the longer lever
140 lies in a line with the shorter lever 144 between
the articulation points 142 and 146. From this locking
position 0, a slide movement 113 in the tilting
direction causes the casement 2 to be lifted off
parallel from the frame 1, as is also the case in the
previously described embodiment. After the position 2
is reached, the slide 113 is decoupled from the control
element 22, so that the further tilting movement in
Fig. 34a is executed just by the lever 140 with control
by the shorter lever 144. In order to close the window
from the tilting position, the point of articulation
146 of the control lever 144 is displaced to the right
in Fig. 36a by the slide 113, as a result of which the
point of articulation 142 in the slot 143 is shifted to
the left in Fig. 36a until the casement 2 reaches the
position 2 in which it is lifted off parallel and from
which the mounting modules 3.1 to 3.4 execute the
closing movement of the casement 2 in parallel in
CA 02441460 2003-09-18
- 56 -
conjunction with the movement of the control element 22
that is guided by the slide 113.
Fig. 36b shows a pivoting position of the casement 2 by
means of the tilting and pivoting lever module 5, in
which the pivoting movement does not take place from
the position of the casement in which it is lifted off
parallel, but rather directly from the release position
1. In this case, the control element 22 is first of all
moved by the slide 113 somewhat in the pivoting
direction, so that the retaining pin 101 is moved out
of the locking position 0 at the apex 106.2 of the
radial cam 106 of the mounting modules 3.1 to 3.4 into
position 1. However, a further control movement of the
control element 22 is no longer required, with the
result that, right after this short adjusting movement
of the slide 113 , the latter can be decoupled from the
control element 22, so that the further pivoting
movement is executed solely by the levers 140, 144.
Since, during the pivoting, the mounting modules 3.3
and 3.4 on the right side of the casement 2 are not
released from the frame 1, during the further
displacement of the slide 113 to the right on the
casement 2, the lever 140 is pivoted about the point of
articulation 141 on the frame 1 by means of the control
lever 144, as Fig. 36b shows. By virtue of the fact
that the point of articulation 142 of the lever 140 is
guided in a slot 143 on the casement 2, the pivoting
movement of the casement about the axis of the hinge
209 can be executed.
Fig. 37 shows the arrangement of the hinge 109 on the
mounting modules 3.3 and 3.4 on the outer edge of the
casement 2. This arrangement of the hinges 109 on the
outer edge of the casement permits the casement to be
pivoted directly from the closed position which is
reproduced in Fig. 37.
In order to close the window from the pivoting position
CA 02441460 2003-09-18
r
- 57 -
in Fig. 36b, the slide 113 is displaced again in the
direction of the centre of the casement, so that the
lever 140 is pivoted in the clockwise direction about
the point of articulation 141 until it reaches the
position 1. From position 1, the slide 113 is coupled
again to the control element 22, thus permitting the
control element to be displaced by the slide 113 in the
tilting direction.
In contrast to the embodiment of the tilting and
pivoting lever module 5 according to Fig. 33, in the
case of the embodiment according to Fig. 36,
intercepting elements for the ends of the levers are no
longer required, but rather the two levers 140 and 144
always remain articulated on the casement 2 while, at
the same time, the longer lever 140 is permanently
articulated on the positionally fixed point of
articulation 141 on the frame 1. The two points of
articulation 146 and 142 of the levers on the casement
2 can be displaced along the circumference of the
casement, the point of articulation 142 along the slot
143 and the point of articulation 146 by means of the
movement of the slide.
Furthermore, instead of a hinge on the mounting module
3.4, a ball socket may also be provided between the
frame and casement because the casement is pivoted
directly out of the release position on the mounting
module 3.4, with the mounting module remaining in its
position. This ball socket is used at the same time as
a tilting axis during tilting of the casement.