Note: Descriptions are shown in the official language in which they were submitted.
CA 02456652 2004-02-06
WO 03/015395 PCT/AU02/00919
IMAGE SENSING APPARATUS INCLUDING A MICROCONTROLLER
FIELD OF THE INVENTION
The present invention relates to an image sensing apparatus. In particular,
the present invention relates to an
image sensing apparatus and to a microcontroller for an image sensing
apparatus.
BACKGROUND OF THE INVENTION
Recently, digital printing technology has been proposed as a suitable
replacement for traditional camera and
photographic film techniques. The traditional film and photographic techniques
rely upon a film roll having a number of
pre-formatted negatives which are drawn past a Tensing system and onto which
is imaged a negative of a image taken by
the Tensing system. Upon the completion of a film roll, the film is rewound
into its container and forwarded to a processing
shop for processing and development of the negatives so as to produce a
corresponding positive set of photos.
Unfortunately, such a system has a number of significant drawbacks. Firstly,
the chemicals utilized are obviously
very sensitive to light and any light impinging upon the film roll will lead
to exposure of the film. They are therefore
required to operate in a light sensitive environment where the light imaging
is totally controlled. This results in onerous
engineering requirements leading to increased expense. Further, film
processing techniques require the utilizing of a
"negative" and its subsequent processing onto a "positive" film paper through
the utilization of processing chemicals and
complex silver halide processing etc. This is generally unduly cumbersome,
complex and expensive. Further, such a
system through its popularity has lead to the standardization on certain size
film formats and generally minimal flexibility
is possible with the aforementioned techniques.
Recently, all digital cameras have been introduced. These camera devices
normally utilize a charge coupled
device (CCD) or other form of photosensor connected to a processing chip which
in tum is connected to and controls a
media storage device which can take the form of a detachable magnetic card. In
this type of device, the image is captured
by the CCD and stored on the magnetic storage device. At some later time, the
image or images that have been captured
are down loaded to a computer device and printed out for viewing. The digital
camera has the disadvantage that access to
images is non-immediate and the further post processing step of loading onto a
computer system is required, the further
post processing often being a hindrance to ready and expedient use.
At present, hardware for image processing demands processors that are capable
of mufti-media and high
resolution processing. In this field, VLIW microprocessor chips have found
favor rather than the Reduced Instruction
Set Computer (RISC) chip or the Complex Instruction Set Computer (CISC) chip.
By way of background, a CISC processor chip can have an instruction set of
well over 80 instructions, many of
them very powerful and very specialized for specific control tasks. It is
common for the instructions to all behave
differently. For example, some might only operate on certain address spaces or
registers, and others might only
recognize certain addressing modes. This does result in a chip that is
relatively slow, but that has powerfial instructions.
The advantages of the CISC architecture are that many of the instructions are
macro-like, allowing the programmer to
use one instruction in place of many simpler instructions. The problem of the
slow speed has rendered these chips
undesirable for image processing. Further, because of the macro-like
instructions, it often occurs that the processor is
not used to its full capacity.
CA 02456652 2004-02-06
WO 03/015395 PCT/AU02/00919
The industry trend for general-purpose microprocessor design is for RISC
designs. By implementing fewer
instructions, the chip designed is able to dedicate some of the precious
silicon real-estate for performance enhancing
features. The benefits of RISC design simplicity are a smaller chip, smaller
pin count, and relatively low power
consumption.
Modern microprocessors are complex chip structures that utilize task
scheduling and other devices to achieve
rapid processing of complex instructions. For example, microprocessors for pre-
Pentium type computers use ItISC
microprocessors together with pipelined superscalar architecture. On the other
hand, microprocessors for Pentium and
newer computers use CISC microprocessors together with pipelined superscalar
architecture. These are expensive and
complicated chips as a result of the many different tasks they are called upon
to perform.
In application-specific electronic devices such as cameras, it is simply
unnecessary and costly to incorporate such
chips into these devices. However, image manipulation demands substantial
processor performance. For this reason, Very
Long Instruction Word processors have been found to be most suitable for the
task. One of the reasons for this is that they
can be tuned to suit image processing functions. This can result in an
operational speed that is substantially higher than that
of a desktop computer.
As is known, RISC architecture takes advantage of temporal parallelism by
using pipelining and is limited to this
approach. VLIW architectures can take advantage of spatial parallelism as well
as temporal parallelism by using multiple
functional units to execute several operations concurrently.
VLIW processors have multiple functional units connected through a globally
shared register file. A central
controller is provided that issues a long instruction word every cycle. Each
instruction consists of multiple independent
parallel operations. Further, each operation requires a statically known
number of cycles to complete.
Instructions in VL1:W architecture are very long and may contain hundreds of
bits. Each instruction contains a
number of operations that are executed in parallel. A compiler schedules
operations in VLIW instructions. VLIW processes
rely on advanced compilation techniques such as percolation scheduling that
expose instruction level parallelism beyond
the limits of basic blocks. In other words, the compiler breaks code defining
the instructions into fragments and does
complex scheduling. The architecture of the VLIW processor is completely
exposed to the compiler so that the compiler
has full knowledge of operation latencies and resource constraints of the
processor implementation.
The advantages of the VLIW processor have led it to become a popular choice
for image processing devices.
In Fig 1A of the drawings, there is shown a prior art image processing device
la that incorporates a VLIW
microprocessor 2a. The microprocessor la includes a bus interface 3a.
The device la includes a CCD (charge coupled device) image sensor 4a. The
device la includes a CCD interface
Sa so that the CCD can be connected to the bus interface 2a, via a bus 6a. As
is known, such CCD's are analog devices. It
follows that the CCD interface Sa includes an analog/digital convener (ADC)
7a. A suitable memory 35a and other devices
36a are also connected to the bus 2a in a conventional fashion.
In Fig 1B of the drawings, there is shown another example of a prior art image
processing device. With reference
to Fig 1A, like reference numerals refer to like parts, unless otherwise
specified.
In this example, the image sensor is in the form of a CMOS image sensor 8a.
Typically, the CMOS image sensor
8a is in the form of an active pixel sensor. This form of sensor has become
popular lately, since it is a digital device and
can be manufactured using standard integrated circuit fabrication techniques.
CA 02456652 2004-02-06
WO 03/015395 PCT/AU02/00919
The CMOS image sensor 8a includes a bus interface 9a that permits the image
sensor 8a to be connected to the
bus interface 2a via the bus 6a.
VI,IW processors are generally, however, not yet the standard for digital
video cameras. A schematic diagram
indicating the main components of a digital video camera 10a is shown in Fig
1C.
The camera 10a includes an MPEG encoder l la that is connected to a
microcontroller 12a. The MPEG encoder
l la and the microcontroller 12a both communicate with an ASIC (application
specific integrated circuit) 13a that, in turn,
controls a digital tape drive 14a. A CCD 15a is connected to the MPEG encoder
l la, via an ADC 16a and an image
processor 17a. A suitable memory 18a is connected to the MPEG encoder l la.
In order for an image sensor device, be it a CCD or a CMOS Active Pixel Sensor
(APS), to communicate with a
VLIW processor, it is necessary for signals generated by an image sensor to be
converted into a form which is readable by
the VLIW processor. Further, control signals generated by the VLIW processor
must be converted into a form that is
suitable for reading by the image sensor.
In the case of a CCD device, this is done with a bus interface in combination
with a CCD interface that includes
an ADC. In the case of an APS, this is done with a bus interface that also
receives signals from other devices controlled by
the VLIW processor.
At present, an image sensing interface does not form part of a VLIW processor.
This results in the necessity for an
interface to be provided with the image sensor device or as an intermediate
component. As a result, a bus interface of the
VLIW processor is required to receive signals from this suitable interface and
from other components such as memory
devices. Image processing operations result in the transfer of large amounts
of data. Furthermore, it is necessary to carry
out a substantial amount of data processing as a result of the size of the
instruction words used by the VLIW processor.
This can result in an excessive demand being made of the bus interface.
Further, as can be seen in the description of the
prior art, it is necessary to provide at least two interfaces between the
image sensor and the VLIW processor.
Applicant has filed a large number of patent applications in the field of
integrated circuits and integrated circuit
manufacture. As a result, the Applicant has spent much time investigating
commercially viable integrated circuit devices
that would be suitable for mass manufacture. As a result of the time and
effort spent by the Applicant in developing this
technology the Applicant has investigated the possibility of using
microcontrollers to achieve low cost, yet complex image
processing devices.
A microcontroller is an integrated chip that includes, on one chip, all or
most of the components needed for a
controller. A microcontroller is what is known as a "system on a chip." A
microcontroller can typically include the
following components:
CPU (central processing unit);
RAM (Random Access Memory);
EPROM/PROM/ROM (Erasable Programmable Read Only Memory);
bus interfaces;
timers; and an
interrupt controller.
An advantage of microcontrollers is that by only including the features
specific to the task (control), cost is
relatively low. A typical microcontroller has bit manipulation instructions,
easy and direct access to I/O (input/output)
CA 02456652 2004-02-06
WO 03/015395 PCT/AU02/00919
data, and quick and efficient interrupt processing. Microcontrollers are a
"one-chip solution" which reduces parts count
and design costs. The fact that a microcontroller is in the form of a single
chip allows the manufacture of controlling
devices to take place in a single integrated circuit fabrication process.
In this invention, the Applicant has conceived a microcontroller that includes
a VLIW processor. In particular,
the Applicant believes that a microcontroller can be provided that is
specifically suited for image processing. It is
submitted that this approach is generally counter-intuitive, since VLIW
processors are generally used in the format
shown in the drawings indicating the prior art. The reason for this is that
the fabrication techniques are extremely
complex. However, Applicant believes that, in the event that a sufficiently
large number of microcontrollers are
manufactured, the cost per unit will drop exponentially. Applicant intends
utilizing the microcontroller of the present
invention in a device that it is envisaged will have a high turnover. At
present, it has been simply more convenient for
manufacturers of image processing devices to obtain a standard VLIW processor
and to program it to suit the particular
application.
SUMMARY OF THE INVENTION
According to a first aspect of the invention, there is provided an image
sensing and processing apparatus that
comprises
an image sensor that is capable of generating signals carrying data relating
to an image sensed by the image
sensor; and
a microcontroller that comprises
a wafer substrate;
VLIW processor circuitry that is positioned on the wafer substrate;
image sensor interface circuitry that is positioned on the wafer substrate and
is connected between the
VLIW processor circuitry and the image sensor, the image sensor interface
circuitry being configured to facilitate
communication between the VLIW processor circuitry and the image sensor; and
bus interface circuitry that is discrete from the image sensor interface
circuitry and is connected to the
VLIW processor circuitry so that the VLIW processor circuitry can communicate
with devices other than the image
sensor via a bus.
According to a second aspect of the invention, there is provided a
microcontroller for an image sensing and
processing apparatus, the microcontroller comprising
a wafer substrate;
VLIW processor circuitry that is positioned on the wafer substrate;
image sensor interface circuitry that is positioned on the wafer substrate and
is connected between the VLIW
processor circuitry and the image sensor, the image sensor interface circuitry
being configured to facilitate communication
between the VLIW processor circuitry and the image sensor; and
bus interface circuitry that is discrete from the image sensor interface
circuitry and is connected to the VLIW
processor circuitry so that the VLIW processor circuitry can communicate with
devices other than the image sensor via a
bus.
The invention is now described, by way of example, with reference to the
accompanying drawings. The specific
nature of the following description should not be construed as limiting in any
way the broad nature of this summary.
CA 02456652 2004-02-06
WO 03/015395 PCT/AU02/00919
BRIEF DESCRIPTION OF THE DRAWINGS
Notwithstanding any other forms that may fall within the scope of the present
invention, preferred forms of the
invention will now be described, by way of example only, with reference to the
accompanying drawings in which:
Fig. 1 illustrates an Artcam device constructed in accordance with the
preferred embodiment;
Fig. 1A illustrates a prior art image processing device that includes a CCD
image sensor;
Fig. 1B illustrates a prior art image processing device that includes an APS
(active pixel sensor);
Fig. 1C illustrates a prior art image processing device that includes an MPEG
decoder;
Fig. 1D illustrates a schematic block diagram of an image processing device of
the invention, including a CCD image
sensor;
Fig 1E illustrates a schematic block diagram of an image processing device of
the invention, including an APS;
Fig 1F includes a schematic block diagram of a digital video camera of the
invention;
Fig. 2 is a schematic block diagram of the main Artcam electronic components;
Fig. 3 is a schematic block diagram of the Artcam Central Processor;
Fig. 3(a) illustrates the VLIW Vector Processor in more detail;
Fig. 4 illustrates the Processing Unit in more detail;
Fig. 5 illustrates the ALU 188 in more detail;
Fig. 6 illustrates the In block in more detail;
Fig. 7 illustrates the Out block in more detail;
Fig. 8 illustrates the Registers block in more detail;
Fig. 9 illustrates the Crossbarl in more detail;
Fig. 10 illustrates the Crossbar2 in more detail;
Fig. 11 illustrates the read process block in more detail;
Fig. 12 illustrates the read process block in more detail;
Fig. 13 illustrates the barrel shifter block in more detail;
Fig. 14 illustrates the adder/logic block in more detail;
Fig. 15 illustrates the multiply block in more detail;
Fig. 16 illustrates the I/O address generator block in more detail;
Fig. 17 illustrates a pixel storage format;
Fig. 18 illustrates a sequential read iterator process;
Fig. 19 illustrates a box read iterator process;
Fig. 20 illustrates a box write iterator process;
Fig. 21 illustrates the vertical strip read/write iterator process;
Fig. 22 illustrates the vertical strip read/write iterator process;
Fig. 23 illustrates the generate sequential process;
Fig. 24 illustrates the generate sequential process;
Fig. 25 illustrates the generate vertical strip process;
Fig. 26 illustrates the generate vertical strip process;
CA 02456652 2004-02-06
WO 03/015395 PCT/AU02/00919
Fig. 27 illustrates a pixel data configuration;
Fig. 28 illustrates a pixel processing process;
Fig. 29 illustrates a schematic block diagram of the display controller;
Fig. 30 illustrates the CCD image organization;
Fig. 31 illustrates the storage format for a logical image;
Fig. 32 illustrates the internal image memory storage format;
Fig. 33 illustrates the image pyramid storage format;
Fig. 34 illustrates a time line of the process of sampling an Artcard;
Fig. 35 illustrates the super sampling process;
Fig. 36 illustrates the process of reading a rotated Artcard;
Fig. 37 illustrates a flow chart of the steps necessary to decode an Artcard;
Fig. 38 illustrates an enlargement of the left hand corner of a single
Artcard;
Fig. 39 illustrates a single target for detection;
Fig. 40 illustrates the method utilised to detect targets;
Fig. 41 illustrates the method of calculating the distance between two
targets;
Fig. 42 illustrates the process of centroid drift;
Fig. 43 shows one form of centroid lookup table;
Fig. 44 illustrates the centroid updating process;
Fig. 45 illustrates a delta processing lookup table utilised in the preferred
embodiment;
Fig. 46 illustrates the process of unscrambling Artcard data;
Fig. 47 illustrates a magnified view of a series of dots;
Fig. 48 illustrates the data surface of a dot card;
Fig. 49 illustrates schematically the layout of a single datablock;
Fig. 50 illustrates a single datablock;
Fig. 51 and Fig. 52 illustrate magnified views of portions of the datablock of
Fig. 50;
Fig. 53 illustrates a single target structure;
Fig. 54 illustrates the target structure of a datablock;
Fig. 55 illustrates the positional relationship of targets relative to border
clocking regions of a data region;
Fig. 56 illustrates the orientation columns of a datablock;
Fig. 57 illustrates the array of dots of a datablock;
Fig. 58 illustrates schematically the structure of data for Reed-Solomon
encoding;
Fig. 59 illustrates an example Reed-Solomon encoding;
Fig. 60 illustrates the Reed-Solomon encoding process;
Fig. 61 illustrates the layout of encoded data within a datablock;
Fig. 62 illustrates the sampling process in sampling an alternative Artcard;
Fig. 63 illustrates, in exaggerated form, an example of sampling a rotated
alternative Artcard;
Fig. 64 illustrates the scanning process;
Fig. 65 illustrates the likely scanning distribution of the scanning process;
CA 02456652 2004-02-06
WO 03/015395 PCT/AU02/00919
Fig. 66 illustrates the relationship between probability of symbol errors and
Reed-Solomon block errors;
Fig. 67 illustrates a flow chart of the decoding process;
Fig. 68 illustrates a process utilization diagram of the decoding process;
Fig. 69 illustrates the dataflow steps in decoding;
Fig. 70 illustrates the reading process in more detail;
Fig. 71 illustrates the process of detection of the start of an alternative
Artcard in more detail;
Fig. 72 illustrates the extraction of bit data process in more detail;
Fig. 73 illustrates the segmentation process utilized in the decoding process;
Fig. 74 illustrates the decoding process of finding targets in more detail;
Fig. 75 illustrates the data structures utilized in locating targets;
Fig. 76 illustrates the Lancos 3 function structure;
Fig. 77 illustrates an enlarged portion of a datablock illustrating the
clockmark and border region;
Fig. 78 illustrates the processing steps in decoding a bit image;
Fig. 79 illustrates the dataflow steps in decoding a bit image;
Fig. 80 illustrates the descrambling process of the preferred embodiment;
Fig. 81 illustrates one form of implementation of the convolver;
Fig. 82 illustrates a convolution process;
Fig. 83 illustrates the compositing process;
Fig. 84 illustrates the regular compositing process in more detail;
Fig. 85 illustrates the process of warping using a warp map;
Fig. 86 illustrates the warping bi-linear interpolation process;
Fig. 87 illustrates the process of span calculation;
Fig. 88 illustrates the basic span calculation process;
Fig. 89 illustrates one form of detail implementation of the span calculation
process;
Fig. 90 illustrates the process of reading image pyramid levels;
Fig. 91 illustrates using the pyramid table for bilinear interpolation;
Fig. 92 illustrates the histogram collection process;
Fig. 93 illustrates the color transform process;
Fig. 94 illustrates the color conversion process;
Fig. 95 illustrates the color space conversion process in more detail;
Fig. 96 illustrates the process of calculating an input coordinate;
Fig. 97 illustrates the process of compositing with feedback;
Fig. 98 illustrates the generalized scaling process;
Fig. 99 illustrates the scale in X scaling process;
Fig. 100 illustrates the scale in Y scaling process;
Fig. 101 illustrates the tessellation process;
Fig. 102 illustrates the sub-pixel translation process;
Fig. 103 illustrates the compositing process;
CA 02456652 2004-02-06
WO 03/015395 PCT/AU02/00919
Fig. 104 illustrates the process of compositing with feedback;
Fig. 105 illustrates the process of tiling with color from the input image;
Fig. 106 illustrates the process of tiling with feedback;
Fig. 107 illustrates the process of tiling with texture replacement;
Fig. 108 illustrates the process of tiling with color from the input image;
Fig. 109 illustrates the process of applying a texture without feedback;
Fig. I 10 illustrates the process of applying a texture with feedback;
Fig. 111 illustrates the process of rotation of CCD pixels;
Fig. 112 illustrates the process of interpolation of Green subpixels;
Fig. 113 illustrates the process of interpolation of Blue subpixels;
Fig. 114 illustrates the process of interpolation of Red subpixels;
Fig. 115 illustrates the process of CCD pixel interpolation with 0 degree
rotation for odd pixel lines;
Fig. 116 illustrates the process of CCD pixel interpolation with 0 degree
rotation for even pixel lines;
Fig. 117 illustrates the process of color conversion to Lab color space;
Fig. 118 illustrates the process of calculation of 1/'~X;
Fig. 119 illustrates the implementation of the calculation of 1/'~X in more
detail;
Fig. 120 illustrates the process of Normal calculation with a bump map;
Fig. 121 illustrates the process of illumination calculation with a bump map;
Fig. 122 illustrates the process of illumination calculation with a bump map
in more detail;
Fig. 123 illustrates the process of calculation of L using a directional
light;
Fig. 124 illustrates the process of calculation of L using a Omni lights and
spotlights;
Fig. 125 illustrates one form of implementation of calculation of L using a
Omni lights and spotlights;
Fig. 126 illustrates the process of calculating the N.L dot product;
Fig. 127 illustrates the process of calculating the N.L dot product in more
detail;
Fig. 128 illustrates the process of calculating the R.V dot product;
Fig. 129 illustrates the process of calculating the R.V dot product in more
detail;
Fig. 130 illustrates the attenuation calculation inputs and outputs;
Fig. 131 illustrates an actual implementation of attenuation calculation;
Fig. 132 illustrates an graph of the cone factor;
Fig. 133 illustrates the process of penumbra calculation;
Fig. 134 illustrates the angles utilised in penumbra calculation;
Fig. 135 illustrates the inputs and outputs to penumbra calculation;
Fig. 136 illustrates an actual implementation of penumbra calculation;
Fig. 137 illustrates the inputs and outputs to ambient calculation;
Fig. 138 illustrates an actual implementation of ambient calculation;
Fig. 139 illustrates an actual implementation of diffuse calculation;
Fig. 140 illustrates the inputs and outputs to a diffuse calculation;
CA 02456652 2004-02-06
WO 03/015395 PCT/AU02/00919
Fig. 141 illustrates an actual implementation of a diffuse calculation;
Fig. 142 illustrates the inputs and outputs to a specular calculation;
Fig. 143 illustrates an actual implementation of a specular calculation;
Fig. 144 illustrates the inputs and outputs to a specular calculation;
Fig. 145 illustrates an actual implementation of a specular calculation;
Fig. 146 illustrates an actual implementation of an ambient only calculation;
Fig. 147 illustrates the process overview of light calculation;
Fig. 148 illustrates an example illumination calculation for a single infinite
light source;
Fig. 149 illustrates an example illumination calculation for an Omni light
source without a bump map;
Fig. 150 illustrates an example illumination calculation for an Omni light
source with a bump map;
Fig. 151 illustrates an example illumination calculation for a Spotlight light
source without a bump map;
Fig. 152 illustrates the process of applying a single Spotlight onto an image
with an associated bump-map;
Fig. 153 illustrates the logical layout of a single printhead;
Fig. 154 illustrates the structure of the printhead interface;
Fig. 155 illustrates the process of rotation of a Lab image;
Fig. 156 illustrates the format of a pixel of the printed image;
Fig. 157 illustrates the dithering process;
Fig. 158 illustrates the process of generating an 8 bit dot output;
Fig. 159 illustrates a perspective view of the card reader;
Fig. 160 illustrates an exploded perspective of a card reader;
Fig. 161 illustrates a close up view of the Artcard reader;
Fig. 162 illustrates a perspective view of the print roll and print head;
Fig. 163 illustrates a first exploded perspective view of the print roll;
Fig. 164 illustrates a second exploded perspective view of the print roll;
Fig. 164A illustrates a three dimensional view of another embodiment of the
print roll and print head in the form of a
printing cartridge also in accordance with the invention;
Fig. 164B illustrates a three dimensional, sectional view of the print
cartridge of Fig. 164A;
Fig. 164C shows a three dimensional, exploded view of the print cartridge of
Fig. 164A;
Fig 164D shows a three dimensional, exploded view of an ink cartridge forming
part of the print cartridge of Fig 164A;
Fig. 164E shows a three dimensional view of an air filter of the print
cartridge of Fig. 164A;
Fig. 165 illustrates the print roll authentication chip;
Fig.166 illustrates an enlarged view of the print roll authentication chip;
Fig. 167 illustrates a single authentication chip data protocol;
Fig. 168 illustrates a dual authentication chip data protocol;
Fig. 169 illustrates a first presence only protocol;
Fig. 170 illustrates a second presence only protocol;
Fig. 171 illustrates a third data protocol;
Fig. 172 illustrates a fourth data protocol;
CA 02456652 2004-02-06
WO 03/015395 PCT/AU02/00919
Fig. 173 is a schematic block diagram of a maximal period LFSR;
Fig. 174 is a schematic block diagram of a clock limiting filter;
Fig. 175 is a schematic block diagram of the tamper detection lines;
Fig. 176 illustrates an oversized nMOS transistor;
Fig. 177 illustrates the taking of multiple XORs from the Tamper Detect Line
Fig. 178 illustrates how the Tamper Lines cover the noise generator circuitry;
Fig. 179 illustrates the normal form of FET implementation;
Fig. 180 illustrates the modified form of FET implementation of the preferred
embodiment;
Fig. 181 illustrates a schematic block diagram of the authentication chip;
Fig. 182 illustrates an example memory map;
Fig. 183 illustrates an example of the constants memory map;
Fig. 184 illustrates an example of the RAM memory map;
Fig. 185 illustrates an example of the Flash memory variables memory map;
Fig. 186 illustrates an example of the Flash memory program memory map;
Fig. 187 shows the data flow and relationship between components of the State
Machine;
Fig. 188 shows the data flow and relationship between components of the I/O
Unit.
Fig. 189 illustrates a schematic block diagram of the Arithmetic Logic Unit;
Fig. 190 illustrates a schematic block diagram of the RPL unit;
Fig. 191 illustrates a schematic block diagram of the ROR block of the ALU;
Fig. 192 is a block diagram of the Program Counter Unit;
Fig. 193 is a block diagram of the Memory Unit;
Fig. 194 shows a schematic block diagram for the Address Generator Unit;
Fig. 195 shows a schematic block diagram for the JSIGEN Unit;
Fig. 196 shows a schematic block diagram for the JSRGEN Unit.
Fig. 197 shows a schematic block diagram for the DBRGEN Unit;
Fig. 198 shows a schematic block diagram for the LDKGEN Unit;
Fig. 199 shows a schematic block diagram for the RPLGEN Unit;
Fig. 200 shows a schematic block diagram for the VARGEN Unit.
Fig. 201 shows a schematic block diagram for the CLRGEN Unit.
Fig. 202 shows a schematic block diagram for the BITGEN Unit.
Fig. 203 sets out the information stored on the print roll authentication
chip;
Fig. 204 illustrates the data stored within the Artcam authorization chip;
Fig. 205 illustrates the process of print head pulse characterization;
Fig. 206 is an exploded perspective, in section, of the print head ink supply
mechanism;
Fig. 207 is a bottom perspective of the ink head supply unit;
Fig. 208 is a bottom side sectional view of the ink head supply unit;
Fig. 209 is a top perspective of the ink head supply unit;
Fig. 210 is a top side sectional view of the ink head supply unit;
CA 02456652 2004-02-06
WO 03/015395 PCT/AU02/00919
11
Fig. 211 illustrates a perspective view of a small portion of the print head;
Fig. 212 illustrates is an exploded perspective of the print head unit;
Fig. 213 illustrates a top side perspective view of the internal portions of
an Artcam camera, showing the parts flattened out;
Fig. 214 illustrates a bottom side perspective view of the internal portions
of an Artcam camera, showing the parts flattened
out;
Fig. 215 illustrates a first top side perspective view of the internal
portions of an Artcam camera, showing the parts as
encased in an Artcam;
Fig. 216 illustrates a second top side perspective view of the internal
portions of an Artcam camera, showing the parts as
encased in an Artcam;
Fig. 217 illustrates a second top side perspective view of the internal
portions of an Artcam camera, showing the parts as
encased in an Artcam;
Fig. 218 illustrates the backing portion of a postcard print roll;
Fig. 219 illustrates the corresponding front image on the postcard print roll
after printing out images;
Fig. 220 illustrates a form of print roll ready for purchase by a consumer;
Fig. 221 illustrates a layout of the software/hardware modules of the overall
Artcam application;
Fig. 222 illustrates a layout of the software/hardware modules of the Camera
Manager;
Fig. 223 illustrates a layout of the software/hardware modules of the Image
Processing Manager;
Fig. 224 illustrates a layout of the softwarelhardware modules of the Printer
Manager;
Fig. 225 illustrates a layout of the software/hardware modules of the Image
Processing Manager;
Fig. 226 illustrates a layout of the software/hardware modules of the File
Manager;
Fig. 227 illustrates a perspective view, partly in section, of an alternative
form of printroll;
Fig. 228 is a left side exploded perspective view of the print roll of Fig.
227;
Fig. 229 is a right side exploded perspective view of a single printroll;
Fig. 230 is an exploded perspective view, partly in section, of the core
portion of the printroll; and
Fig. 231 is a second exploded perspective view of the core portion of the
printroll.
DESCRIPTION OF PREFERRED AND OTHER EMBODIMENTS
The digital image processing camera system constructed in accordance with the
preferred embodiment is as
illustrated in Fig. 1. The camera unit 1 includes means for the insertion of
an integral print roll (not shown). The camera
unit 1 can include an area image sensor 2 which sensors an image 3 for
captured by the camera. Optionally, the second area
image sensor can be provided to also image the scene 3 and to optionally
provide for the production of stereographic output
effects.
The camera 1 can include an optional color display 5 for the display of the
image being sensed by the sensor 2.
When a simple image is being displayed on the display 5, the button 6 can be
depressed resulting in the printed image 8
being output by the camera unit 1. A series of cards, herein after known as
"Artcards" 9 contain, on one surface encoded
information and on the other surface, contain an image distorted by the
particular effect produced by the Artcard 9. The
Artcard 9 is inserted in an Artcard reader 10 in the side of camera 1 and,
upon insertion, results in output image 8
being distorted in the same manner as the distortion appearing on the surface
of Artcard 9. Hence, by means of this simple
CA 02456652 2004-02-06
WO 03/015395 PCT/AU02/00919
12
user interface a user wishing to produce a particular effect can insert one of
many Artcards 9 into the Artcard reader 10 and
utilize button 19 to take a picture of the image 3 resulting in a
corresponding distorted output image 8.
The camera unit 1 can also include a number of other control button 13, 14 in
addition to a simple LCD output
display 15 for the display of informative information including the number of
printouts left on the internal print roll on the
camera unit. Additionally, different output formats can be controlled by CHP
switch 17.
Image Processing-Apparatus 20a
In Fig 1D, reference numeral 20a generally indicates an image processing
apparatus in accordance with the
invention.
The image processing apparatus 20a includes a microcontroller 22a. The
microcontroller 22a includes circuitry that
defines a VLIW processor that is indicated generally at 21a. The operational
details and structure of the VLIW processor is
described in further detail later on in the specification.
The microcontroller also includes circuitry that defines a bus interface 23a.
The bus interface permits the VLIW
processor 21a to communicate with other devices indicated at 24a and with a
memory, such as DRAM or EEPROM,
indicated at 25a.
The apparatus 20a includes an image sensor in the form of a CCD (charge-
coupled device) sensor 26a. These
sensors are widely used for image sensing. As is known, such sensors produce
an analog signal upon sensing an image. It
follows that it is necessary that such a signal be converted into a digital
signal in order that it can be processed by the VLIW
processor 21a. Further, as set out in the preamble and later on in the
specification, the VLIW processor 21a makes use of
long instruction words in order to process data.
Thus, the microcontroller 22a includes interface circuitry 28a that defines an
interface 27a that is capable of
converting a signal emanating from the image sensor 26a into a signal that can
be read by the VLIW processor 21a. Further,
the interface circuitry 28a defines an analog/digital convener (ADC) 29a for
converting signals passing between the VLIW
processor 21a and the CCD sensor 26a into an appropriate analog or digital
signal.
It is important to note that the interface circuitry 28a and the VLIW
processor 21a share a common wafer substrate.
This provides a compact and self contained microcontroller that is
specifically suited to image processing.
In Fig 1E, reference numeral 30a generally indicates a further image
processing apparatus in accordance with the
invention. With reference to Fig 1D, like reference numerals refer to like
parts, unless otherwise specified.
Instead of the CCD sensor 26a, the apparatus 30a includes a CMOS type sensor
in the form of an active pixel
sensor (APS) 31a.
Such sensors generate a digital signal upon sensing an image. It follows that,
in this case, the interface circuitry 28a
does not include the ADC 29a.
In Fig. 1F, reference numeral 32a generally indicates a schematic block
diagram of a digital video camera, in
accordance with the invention. With reference to Figs. 1D and 1E, like
reference numerals refer to like parts, unless
otherwise specified.
In this example, the bus interface 23a is connected to a memory 33a and to a
digital tape drive 34a.
The camera 32a includes a CCD sensor 35a. Thus, the interface circuitry 28
includes the ADC 29a to carry out the
necessary analog/digital conversion as described above. A particular advantage
of the VLIW processor 21a is that it
facilitates the provision of image processing, MPEG encoding, digital tape
formatting and control in a single integrated
CA 02456652 2004-02-06
WO 03/015395 PCT/AU02/00919
13
circuit device that is the microcontroller 22a.
Turning now to Fig. 2, there is illustrated a schematic view of the internal
hardware of the camera unit 1. The
internal hardware is based around an Artcam central processor unit (ACP) 31.
Artcam Central Processor 31
The Artcam central processor 31 provides many functions that form the 'heart'
of the system. The ACP 31 is
preferably implemented as a complex, high speed, CMOS system on-a-chip.
Utilising standard cell design with some full
custom regions is recommended. Fabrication on a 0.25 micron CMOS process will
provide the density and speed required,
along with a reasonably small die area.
The functions provided by the ACP 31 include:
1. Control and digitization of the area image sensor 2. A 3D stereoscopic
version of the ACP requires two
area image sensor interfaces with a second optional image sensor 4 being
provided for stereoscopic effects.
2. Area image sensor compensation, reformatting, and image enhancement.
3. Memory interface and management to a memory store 33.
4. Interface, control, and analog to digital conversion of an Artcard reader
linear image sensor 34 which is
provided for the reading of data from the Artcards 9.
5. Extraction of the raw Artcard data from the digitized and encoded Artcard
image.
6. Reed-Solomon error detection and correction of the Artcard encoded data.
The encoded surface of the
Artcard 9 includes information on how to process an image to produce the
effects displayed on the image distorted surface of
the Artcard 9. This information is in the form of a script, hereinafter known
as a "Vark script". The Vark script is utilised
by an interpreter running within the ACP 31 to produce the desired effect.
7. Interpretation of the Vark script on the Artcard 9.
8. Performing image processing operations as specified by the Vark script.
9. Controlling various motors for the paper transport 36, zoom lens 38,
autofocus 39 and Artcard driver 37.
10. Controlling a guillotine actuator 40 for the operation of a guillotine 41
for the cutting of photographs 8
from print roll 42.
11. Half-toning of the image data for printing.
12. Providing the print data to a print-head 44 at the appropriate times.
13. Controlling the print head 44.
14. Controlling the ink pressure feed to print-head 44.
15. Controlling optional flash unit 56.
16. Reading and acting on various sensors in the camera, including camera
orientation sensor 46, autofocus 47
and Artcard insertion sensor 49.
17. Reading and acting on the user interface buttons 6, 13, 14.
18. Controlling the status display 15.
19. Providing viewfinder and preview images to the color display 5.
20. Control of the system power consumption, including the ACP power
consumption via power management
circuit 51 .
21. Providing external communications 52 to general purpose computers (using
part USB).
CA 02456652 2004-02-06
WO 03/015395 PCT/AU02/00919
14
22. Reading and storing information in a printing roll authentication chip 53.
23. Reading and storing information in a camera authentication chip 54.
24. Communicating with an optional mini-keyboard 57 for text modification.
Ouartz crystal 58
A quartz crystal 58 is used as a frequency reference for the system clock. As
the system clock is very high, the
ACP 31 includes a phase locked loop clock circuit to increase the frequency
derived from the crystal 58.
Image Sensing
Area image sensor 2
The area image sensor 2 converts an image through its lens into an electrical
signal. It can either be a charge
coupled device (CCD) or an active pixel sensor (APS)CMOS image sector. At
present, available CCD's normally have a
higher image quality, however, there is currently much development occurring
in CMOS imagers. CMOS imagers are
eventually expected to be substantially cheaper than CCD's have smaller pixel
areas, and be able to incorporate drive
circuitry and signal processing. They can also be made in CMOS fabs, which are
transitioning to 12" wafers. CCD's are
usually built in 6" wafer fabs, and economics may not allow a conversion to
12" fabs. Therefore, the difference in
fabrication cost between CCD's and CMOS imagers is likely to increase,
progressively favoring CMOS imagers. However,
at present, a CCD is probably the best option.
The Artcam unit will produce suitable results with a 1,500 x 1,000 area image
sensor. However, smaller sensors,
such as 750 x 500, will be adequate for many markets. The Artcam is less
sensitive to image sensor resolution than are
conventional digital cameras. This is because many of the styles contained on
Artcards 9 process the image in such a way as
to obscure the lack of resolution. For example, if the image is distorted to
simulate the effect of being converted to an
impressionistic painting, low source image resolution can be used with minimal
effect. Further examples for which low
resolution input images will typically not be noticed include image warps
which produce high distorted images, multiple
miniature copies of the of the image (eg. passport photos), textural
processing such as bump mapping for a base relief metal
look, and photo-compositing into structured scenes.
This tolerance of low resolution image sensors may be a significant factor in
reducing the manufacturing cost of an
Artcam unit 1 camera. An Artcam with a low cost 750 x 500 image sensor will
often produce superior results to a
conventional digital camera with a much more expensive 1,500 x 1,000 image
sensor.
Optional stereoscopic 3D image sensor 4
The 3D versions of the Artcam unit 1 have an additional image sensor 4, for
stereoscopic operation. This image
sensor is identical to the main image sensor. The circuitry to drive the
optional image sensor may be included as a standard
part of the ACP chip 31 to reduce incremental design cost. Alternatively, a
separate 3D Artcam ACP can be designed. This
option will reduce the manufacturing cost of a mainstream single sensor
Artcam.
Print roll authentication chi~53
A small chip 53 is included in each print roll 42. This chip replaced the
functions of the bar code, optical sensor
and wheel, and ISO/ASA sensor on other forms of camera film units such as
Advanced Photo Systems film cartridges.
The authentication chip also provides other features:
The storage of data rather than that which is mechanically and optically
sensed from APS rolls
2. A remaining media length indication, accurate to high resolution.
CA 02456652 2004-02-06
WO 03/015395 PCT/AU02/00919
3. Authentication Information to prevent inferior clone print roll copies.
The authentication chip 53 contains 1024 bits of Flash memory, of which 128
bits is an authentication key, and 512
bits is the authentication information. Also included is an encryption circuit
to ensure that the authentication key cannot be
accessed directly.
Print-head 44
The Artcam unit 1 can utilize any color print technology which is small
enough, low enough power, fast enough,
high enough quality, and low enough cost, and is compatible with the print
roll. Relevant printheads will be specifically
discussed hereinafter.
The specifications of the ink jet head are:
Ima a t a Bi-level, dithered
Color CMY Process Color
Resolution 1600 d i
Print head length 'Page-width' (100mm)
Print speed I 2 seconds per photo
Optional ink pressure Controller (not shown)
The function of the ink pressure controller depends upon the type of ink jet
print head 44 incorporated in the
Artcam. For some types of ink jet, the use of an ink pressure controller can
be eliminated, as the ink pressure is simply
atmospheric pressure. Other types of print head require a regulated positive
ink pressure. In this case, the in pressure
controller consists of a pump and pressure transducer.
Other print heads may require an ultrasonic transducer to cause regular
oscillations in the ink pressure, typically at
frequencies around 100KHz. In the case, the ACP 31 controls the frequency
phase and amplitude of these oscillations.
Paper transport motor 36
The paper transport motor 36 moves the paper from within the print roll 42
past the print head at a relatively
constant rate. The motor 36 is a miniature motor geared down to an appropriate
speed to drive rollers which move the paper.
A high quality motor and mechanical gears are required to achieve high image
quality, as mechanical rumble or other
vibrations will affect the printed dot row spacing.
Paper transport motor driver 60
The motor driver 60 is a small circuit which amplifies the digital motor
control signals from the APC 31 to levels
suitable for driving the motor 36.
Paper dull sensor
A paper pull sensor 50 detects a user's attempt to pull a photo from the
camera unit during the printing process.
The APC 31 reads this sensor 50, and activates the guillotine 41 if the
condition occurs. The paper pull sensor 50 is
incorporated to make the camera more 'foolproof in operation. Were the user to
pull the paper out forcefully during
printing, the print mechanism 44 or print roll 42 may (in extreme cases) be
damaged. Since it is acceptable to pull out the
'pod' from a Polaroid type camera before it is fully ejected, the public has
been 'trained' to do this. Therefore, they are
unlikely to heed printed instructions not to pull the paper.
The Artcam preferably restarts the photo print process after the guillotine 41
has cut the paper after pull sensing.
The pull sensor can be implemented as a strain gauge sensor, or as an optical
sensor detecting a small plastic flag
CA 02456652 2004-02-06
WO 03/015395 PCT/AU02/00919
16
which is deflected by the torque that occurs on the paper drive rollers when
the paper is pulled. The latter implementation is
recommendation for low cost.
Paper guillotine actuator 40
The paper guillotine actuator 40 is a small actuator which causes the
guillotine 41 to cut the paper either at the end
of a photograph, or when the paper pull sensor 50 is activated.
The guillotine actuator 40 is a small circuit which amplifies a guillotine
control signal from the APC tot the level
required by the actuator 41.
Artcard 9
The Artcard 9 is a program storage medium for the Artcam unit. As noted
previously, the programs are in the form
of Vark scripts. Vark is a powerful image processing language especially
developed for the Artcam unit. Each Artcard 9
contains one Vark script, and thereby defines one image processing style.
Preferably, the VARK language is highly image processing specific. By being
highly image processing specific,
the amount of storage required to store the details on the card are
substantially reduced. Further, the ease with which new
programs can be created, including enhanced effects, is also substantially
increased. Preferably, the language includes
facilities for handling many image processing functions including image
warping via a warp map, convolution, color lookup
tables, posterizing an image, adding noise to an image, image enhancement
filters, painting algorithms, brush jittering and
manipulation edge detection filters, tiling, illumination via light sources,
bump maps, text, face detection and object
detection attributes, fonts, including three dimensional fonts, and arbitrary
complexity pre-rendered icons. Further details of
the operation of the Vark language interpreter are contained hereinafter.
Hence, by utilizing the language constructs as defined by the created
language, new affects on arbitrary images can
be created and constructed for inexpensive storage on Artcard and subsequent
distribution to camera owners. Further, on
one surface of the card can be provided an example illustrating the effect
that a particular VARK script, stored on the other
surface of the card, will have on an arbitrary captured image.
By utilizing such a system, camera technology can be distributed without a
great fear of obsolescence in that,
provided a VARK interpreter is incorporated in the camera device, a device
independent scenario is provided whereby the
underlying technology can be completely varied over time. Further, the VARK
scripts can be updated as new filters are
created and distributed in an inexpensive manner, such as via simple cards for
card reading.
The Artcard 9 is a piece of thin white plastic with the same format as a
credit card (86mm long by 54mm wide).
The Artcard is printed on both sides using a high resolution ink jet printer.
The inkjet printer technology is assumed to be
the same as that used in the Artcam, with 1600 dpi (63dpmm) resolution. A
major feature of the Artcard 9 is low
manufacturing cost. Artcards can be manufactured at high speeds as a wide web
of plastic film. The plastic web is coated
on both sides with a hydrophilic dye fixing layer. The web is printed
simultaneously on both sides using a 'pagewidth' color
ink jet printer. The web is then cut and punched into individual cards. On one
face of the card is printed a human readable
representation of the effect the Artcard 9 will have on the sensed image. This
can be simply a standard image which has
been processed using the Vark script stored on the back face of the card.
On the back face of the card is printed an array of dots which can be decoded
into the Vark script that defines the
image processing sequence. The print area is 80mm x SOmm, giving a total of
15,876,000 dots. This array of dots could
represent at least 1.89 Mbytes of data. To achieve high reliability, extensive
error detection and correction is incorporated in
CA 02456652 2004-02-06
WO 03/015395 PCT/AU02/00919
17
the array of dots. This allows a substantial portion of the card to be
defaced, worn, creased, or dirty with no effect on data
integrity. The data coding used is Reed-Solomon coding, with half of the data
devoted to error correction. This allows the
storage of 967 Kbytes of error corrected data on each Artcard 9.
Linear image sensor 34
The Artcard linear sensor 34 converts the aforementioned Artcard data image to
electrical signals. As with the area
image sensor 2, 4, the linear image sensor can be fabricated using either CCD
or APS CMOS technology. The active length
of the image sensor 34 is SOmm, equal to the width of the data array on the
Artcard 9. To satisfy Nyquist's sampling
theorem, the resolution of the linear image sensor 34 must be at least twice
the highest spatial frequency of the Artcard
optical image reaching the image sensor. In practice, data detection is easier
if the image sensor resolution is substantially
above this. A resolution of 4800 dpi (189 dpmm) is chosen, giving a total of
9,450 pixels. This resolution requires a pixel
sensor pitch of 5.3pm. This can readily be achieved by using four staggered
rows of 201tm pixel sensors.
The linear image sensor is mounted in a special package which includes a LED
65 to illuminate the Artcard 9 via a
light-pipe (not shown).
The Artcard reader light-pipe can be a molded light-pipe which has several
function:
It diffuses the light from the LED over the width of the card using total
internal reflection facets.
2. It focuses the light onto a l6N.m wide strip of the Artcard 9 using an
integrated cylindrical lens.
3. It focuses light reflected from the Artcard onto the linear image sensor
pixels using a molded array of
microlenses.
The operation of the Artcard reader is explained further hereinafter.
Artcard reader motor 37
The Artcard reader motor propels the Artcard past the linear image sensor 34
at a relatively constant rate. As it may
not be cost effective to include extreme precision mechanical components in
the Artcard reader, the motor 37 is a standard
miniature motor geared down to an appropriate speed to drive a pair of rollers
which move the Artcard 9. The speed
variations, rumble, and other vibrations will affect the raw image data as
circuitry within the APC 31 includes extensive
compensation for these effects to reliably read the Artcard data.
The motor 37 is driven in reverse when the Artcard is to be ejected.
Artcard motor driver 61
The Artcard motor driver 61 is a small circuit which amplifies the digital
motor control signals from the APC 31 to
levels suitable for driving the motor 37.
Card Insertion sensor 49
The card insertion sensor 49 is an optical sensor which detects the presence
of a card as it is being inserted in the
card reader 34. Upon a signal from this sensor 49, the APC 31 initiates the
card reading process, including the activation of
the Artcard reader motor 37.
Card elect button 16
A card eject button 16 (Fig. 1) is used by the user to eject the current
Artcard, so that another Artcard can be
inserted. The APC 31 detects the pressing of the button, and reverses the
Artcard reader motor 37 to eject the card.
Card status indicator 66
A card status indicator 66 is provided to signal the user as to the status of
the Artcard reading process. This can be a
CA 02456652 2004-02-06
WO 03/015395 PCT/AU02/00919
18
standard bi-color (red/green) LED. When the card is successfully read, and
data integrity has been verified, the LED lights
up green continually. If the card is faulty, then the LED lights up red.
If the camera is powered from a 1.5 V instead of 3V battery, then the power
supply voltage is less than the forward
voltage drop of the greed LED, and the LED will not light. In this case, red
LEDs can be used, or the LED can be powered
from a voltage pump which also powers other circuits in the Artcam which
require higher voltage.
64 Mbit DRAM 33
To perform the wide variety of image processing effects, the camera utilizes 8
Mbytes of memory 33. This can be
provided by a single 64 Mbit memory chip. Of course, with changing memory
technology increased Dram storage sizes
may be substituted.
High speed access to the memory chip is required. This can be achieved by
using a Rambus DRAM (burst access
rate of 500 Mbytes per second) or chips using the new open standards such as
double data rate (DDR) SDRAM or Synclink
DRAM.
Camera authentication chin
The camera authentication chip 54 is identical to the print roll
authentication chip 53, except that it has different
information stored in it. The camera authentication chip 54 has three main
purposes:
1. To provide a secure means of comparing authentication codes with the print
roll authentication chip;
2. To provide storage for manufacturing information, such as the serial number
of the camera;
3. To provide a small amount of non-volatile memory for storage of user
information.
Display
The Artcam includes an optional color display 5 and small status display 15.
Lowest cost consumer cameras may
include a color image display, such as a small TFT LCD 5 similar to those
found on some digital cameras and camcorders.
The color display 5 is a major cost element of these versions of Artcam, and
the display 5 plus back light are a major power
consumption drain.
Status display 15
The status display 15 is a small passive segment based LCD, similar to those
currently provided on silver halide and
digital cameras. Its main function is to show the number of prints remaining
in the print roll 42 and icons for various
standard camera features, such as flash and battery status.
Color display 5
The color display 5 is a full motion image display which operates as a
viewfinder, as a verification of the image to
be printed, and as a user interface display. The cost of the display 5 is
approximately proportional to its area, so large
displays (say 4" diagonal) unit will be restricted to expensive versions of
the Artcam unit. Smaller displays, such as color
camcorder viewfinder TFT's at around 1", may be effective for mid-range
Artcams.
Zoom lens (not shown)
The Artcam can include a zoom lens. This can be a standard electronically
controlled zoom lens, identical to one
which would be used on a standard electronic camera, and similar to pocket
camera zoom lenses. A referred version of the
Artcam unit may include standard interchangeable 35mm SLR lenses.
Autofocus motor 39
The autofocus motor 39 changes the focus of the zoom lens. The motor is a
miniature motor geared down to an
CA 02456652 2004-02-06
WO 03/015395 PCT/AU02/00919
19
appropriate speed to drive the autofocus mechanism.
Autofocus motor driver 63
The autofocus motor driver 63 is a small circuit which amplifies the digital
motor control signals from the APC 31
to levels suitable for driving the motor 39.
Zoom motor 38
The zoom motor 38 moves the zoom front lenses in and out. The motor is a
miniature motor geared down to an
appropriate speed to drive the zoom mechanism.
Zoom motor driver 62
The zoom motor driver 62 is a small circuit which amplifies the digital motor
control signals from the APC 31 to
levels suitable for driving the motor.
Communications
The ACP 31 contains a universal serial bus (USB) interface 52 for
communication with personal computers. Not
all Artcam models are intended to include the USB connector. However, the
silicon area required for a USB circuit 52 is
small, so the interface can be included in the standard ACP.
Optional Keyboard 57
The Artcam unit may include an optional miniature keyboard 57 for customizing
text specified by the Artcard. Any
text appearing in an Artcard image may be editable, even if it is in a complex
metallic 3D font. The miniature keyboard
includes a single line alphanumeric LCD to display the original text and
edited text. The keyboard may be a standard
accessory.
The ACP 31 contains a serial communications circuit for transferring data to
and from the miniature keyboard.
Power Supply
The Artcam unit uses a battery 48. Depending upon the Artcam options, this is
either a 3V Lithium cell, 1.5 V AA
alkaline cells, or other battery arrangement.
Power Management Unit 51
Power consumption is an important design constraint in the Artcam. It is
desirable that either standard camera
batteries (such as 3V lithium batters) or standard AA or AAA alkaline cells
can be used. While the electronic complexity of
the Artcam unit is dramatically higher than 35mm photographic cameras, the
power consumption need not be
commensurately higher. Power in the Artcam can be carefully managed with all
units being turned off when not in use.
The most significant current drains are the ACP 31, the area image sensors
2,4, the printer 44 various motors, the
flash unit 56, and the optional color display 5 dealing with each part
separately:
ACP: If fabricated using 0.25~tm CMOS, and running on 1.5V, the ACP power
consumption can be quite
low. Clocks to various parts of the ACP chip can be quite low. Clocks to
various parts of the ACP chip can be turned off
when not in use, virtually eliminating standby current consumption. The ACP
will only fully used for approximately 4
seconds for each photograph printed.
2. Area image sensor: power is only supplied to the area image sensor when the
user has their finger on the
button.
3. The printer power is only supplied to the printer when actually printing.
This is for around 2 seconds for
each photograph. Even so, suitably lower power consumption printing should be
used.
CA 02456652 2004-02-06
WO 03/015395 PCT/AU02/00919
4. The motors required in the Artcam are all low power miniature motors, and
are typically only activated for
a few seconds per photo.
5. The flash unit 45 is only used for some photographs. Its power consumption
can readily be provided by a
3V lithium battery for a reasonably battery life.
6. The optional color display 5 is a major current drain for two reasons: it
must be on for the whole time that
the camera is in use, and a backlight will be required if a liquid crystal
display is used. Cameras that incorporate a color
display will require a larger battery to achieve acceptable batter life.
Flash unit 56
The flash unit 56 can be a standard miniature electronic flash for consumer
cameras.
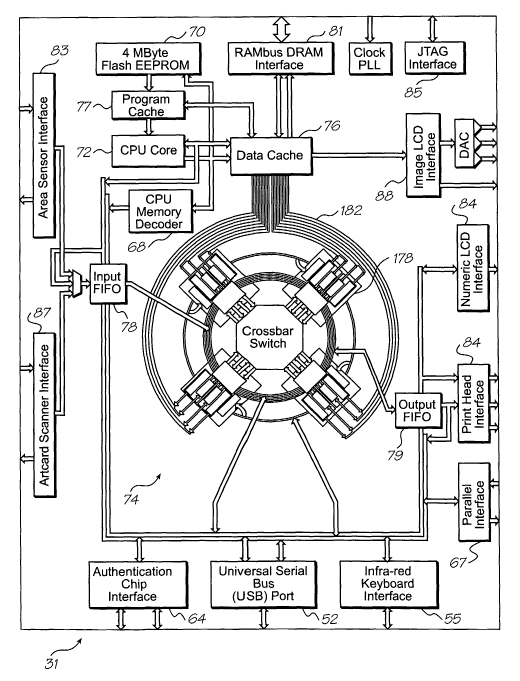
Overview of the ACP 31
Fig. 3 illustrates the Artcam Central Processor (ACP) 31 in more detail. The
Artcam Central Processor provides all of
the processing power for Artcam. It is designed for a 0.25 micron CMOS
process, with approximately 1.5 million
transistors and an area of around 50 mmz. The ACP 31 is a complex design, but
design effort can be reduced by the use
of datapath compilation techniques, macrocells, and IP cores. The ACP 31
contains:
A RISC CPU core 72
A 4 way parallel VLIW Vector Processor 74
A Direct RAMbus interface 81
A CMOS image sensor interface 83
A CMOS linear image sensor interface 88
A USB serial interface 52
An infrared keyboard interface 55
A numeric LCD interface 84, and
A color TFT LCD interface 88
A 4Mbyte Flash memory 70 for program storage 70
The RISC CPU, Direct RAMbus interface 81, CMOS sensor interface 83 and USB
serial interface 52 can be vendor
supplied cores. The ACP 31 is intended to run at a clock speed of 200 MHz on
3V externally and 1.5V internally to
minimize power consumption. The CPU core needs only to run at 100 MHz. The
following two block diagrams give
two views of the ACP 31:
A view of the ACP 31 in isolation
An example Artcam showing a high-level view of the ACP 31 connected to the
rest of the Artcam hardware.
Imase Access
As stated previously, the DRAM Interface 81 is responsible for interfacing
between other client portions of the
ACP chip and the RAMBUS DRAM. In effect, each module within the DRAM Interface
is an address generator.
There are three logical types of images manipulated by the ACP. They are:
-CCD Image, which is the Input Image captured from the CCD.
-Internal Image format - the Image format utilised internally by the Artcam
device.
Print Image - the Output Image format printed by the Artcam
CA 02456652 2004-02-06
WO 03/015395 PCT/AU02/00919
21
These images are typically different in color space, resolution, and the
output & input color spaces which can vary
from camera to camera. For example, a CCD image on a low-end camera may be a
different resolution, or have different
color characteristics from that used in a high-end camera. However all
internal image formats are the same format in terms
of color space across all cameras.
In addition, the three image types can vary with respect to which direction is
'up'. The physical orientation of the
camera causes the notion of a portrait or landscape image, and this must be
maintained throughout processing. For this
reason, the internal image is always oriented correctly, and rotation is
performed on images obtained from the CCD and
during the print operation.
CPU Core (CPU) 72
The ACP 31 incorporates a 32 bit RISC CPU 72 to run the Vark image processing
language interpreter and to perform
Artcam's general operating system duties. A wide variety of CPU cores are
suitable: it can be any processor core with
sufficient processing power to perform the required core calculations and
control functions fast enough to met consumer
expectations. Examples of suitable cores are: MIPS 84000 core from LSI Logic,
StrongARM core. There is no need to
maintain instruction set continuity between different Artcam models. Artcard
compatibility is maintained irrespective of
future processor advances and changes, because the Vark interpreter is simply
re-compiled for each new instruction set.
The ACP 31 architecture is therefore also free to evolve. Different ACP 31
chip designs may be fabricated by different
manufacturers, without requiring to license or port the CPU core. This device
independence avoids the chip vendor
lock-in such as has occurred in the PC market with Intel. The CPU operates at
100 MHz, with a single cycle time of
lOns. It must be fast enough to run the Vark interpreter, although the VLIW
Vector Processor 74 is responsible for most
of the time-critical operations.
PROGRAM CACHE 72
Although the program code is stored in on-chip Flash memory 70, it is unlikely
that well packed Flash memory 70 will
be able to operate at the lOns cycle time required by the CPU. Consequently a
small cache is required for good
performance. 16 cache lines of 32 bytes each are sufficient, for a total of
512 bytes. The program cache 72 is defined in
the chapter entitled Program cache 72.
DATA CACHE 76
A small data cache 76 is required for good performance. This requirement is
mostly due to the use of a RAMbus
DRAM, which can provide high-speed data in bursts, but is inefficient for
single byte accesses. The CPU has access to a
memory caching system that allows flexible manipulation of CPU data cache 76
sizes. A minimum of 16 cache lines
(512 bytes) is recommended for good performance.
CPU MEMORY MODEL
An Artcam's CPU memory model consists of a 32MB area. It consists of 8MB of
physical RDRAM off-chip in the base
model of Artcam, with provision for up to 16MB of off-chip memory. There is a
4MB Flash memory 70 on the ACP 31
for program storage, and finally a 4MB address space mapped to the various
registers and controls of the ACP 31. The
memory map then, for an Artcam is as follows:
Contents Size
CA 02456652 2004-02-06
WO 03/015395 PCT/AU02/00919
22
Base Artcam DRAM 8 MB
Extended DRAM 8 MB
Program memory (on ACP 31 in Flash 4 MB
memory 70)
Reserved for extension of ro ram memor4 MB
ACP 31 re isters and memo -ma ed I/O 4 MB
Reserved 4 MB
TOTAL ~32 MB
A straightforward way of decoding addresses is to use address bits 23-24:
If bit 24 is clear, the address is in the lower 16-MB range, and hence can be
satisfied from DRAM and the
Data cache 76. In most cases the DRAM will only be 8 MB, but 16 MB is
allocated to cater for a
higher memory model Artcams.
If bit 24 is set, and bit 23 is clear, then the address represents the Flash
memory 70 4Mbyte range and is
satisfied by the Program cache 72.
If bit 24 = 1 and bit 23 = 1, the address is translated into an access over
the low speed bus to the requested
component in the AC by the CPU Memory Decoder 68.
Flash memory 70
The ACP 31 contains a 4Mbyte Flash memory 70 for storing the Artcam program.
It is envisaged that Flash memory 70
will have denser packing coefficients than masked ROM, and allows for greater
flexibility for testing camera program
code. The downside of the Flash memory 70 is the access time, which is
unlikely to be fast enough for the 100 MHz
operating speed (lOns cycle time) of the CPU. A fast Program Instruction cache
77 therefore acts as the interface
between the CPU and the slower Flash memory 70.
Program cache 72
A small cache is required for good CPU performance. This requirement is due to
the slow speed Flash memory 70
which stores the Program code. 16 cache lines of 32 bytes each are sufficient,
for a total of 512 bytes. The Program
cache 72 is a read only cache. The data used by CPU programs comes through the
CPU Memory Decoder 68 and if the
address is in DRAM, through the general Data cache 76. The separation allows
the CPU to operate independently of the
VLIW Vector Processor 74. If the data requirements are low for a given
process, it can consequently operate completely
out of cache.
Finally, the Program cache 72 can be read as data by the CPU rather than
purely as program instructions. This allows
tables, microcode for the VLIW etc to be loaded from the Flash memory 70.
Addresses with bit 24 set and bit 23 clear
are satisfied from the Program cache 72.
CPU Memory Decoder 68
The CPU Memory Decoder 68 is a simple decoder for satisfying CPU data
accesses. The Decoder translates data
addresses into internal ACP register accesses over the internal low speed bus,
and therefore allows for memory mapped
I/O of ACP registers. The CPU Memory Decoder 68 only interprets addresses that
have bit 24 set and bit 23 clear.
There is no caching in the CPU Memory Decoder 68.
CA 02456652 2004-02-06
WO 03/015395 PCT/AU02/00919
23
DRAM interface 81
The DRAM used by the Artcam is a single channel 64Mbit (8MB) RAMbus RDRAM
operating at 1.6GB/sec. RDRAM
accesses are by a single channel (16-bit data path) controller. The RDRAM also
has several useful operating modes for
low power operation. Although the Rambus specification describes a system with
random 32 byte transfers as capable
of achieving a greater than 95% efficiency, this is not true if only part of
the 32 bytes are used. Two reads followed by
two writes to the same device yields over 86% efficiency. The primary latency
is required for bus turn-around going
from a Write to a Read, and since there is a Delayed Write mechanism,
efficiency can be further improved. With
regards to writes, Write Masks allow specific subsets of bytes to be written
to. These write masks would be set via
internal cache "dirty bits". The upshot of the Rambus Direct RDRAM is a
throughput of >1GB/sec is easily achievable,
and with multiple reads for every write (most processes) combined with
intelligent algorithms making good use of 32
byte transfer knowledge, transfer rates of >1.3 GB/sec are expected. Every
lOns, 16 bytes can be transferred to or from
the core.
DRAM ORGANIZATION
The DRAM organization for a base model (8MB RDRAM) Artcam is as follows:
Contents Size
Program scratch RAM 0.50 MB
Artcard data 1.00 MB
Photo Image, captured from CMOS 0.50 MB
Sensor
Print Image (compressed) 2.25 MB
1 Channel of ex anded Photo Image 1.50 MB
1 Image P amid of single channel 1.00 MB
Intermediate Ima a Processing 1.25 MB
TOTAL -. ~ 8 ~
Notes:
Uncompressed, the Print Image requires 4.5MB (1.5MB per channel). To
accommodate other objects in the 8MB
model, the Print Image needs to be compressed. If the chrominance channels are
compressed by 4:1 they require
only 0.375MB each).
The memory model described here assumes a single 8 MB RDRAM. Other models of
the Artcam may have more
memory, and thus not require compression of the Print Image. In addition, with
more memory a larger part of the
final image can be worked on at once, potentially giving a speed improvement.
Note that ejecting or inserting an Artcard invalidates the 5.5MB area holding
the Print Image, 1 channel of expanded
photo image, and the image pyramid. This space may be safely used by the
Artcard Interface for decoding the
Artcard data.
CA 02456652 2004-02-06
WO 03/015395 PCT/AU02/00919
24
Data cache 76
The ACP 31 contains a dedicated CPU instruction cache 77 and a general data
cache 76. The Data cache 76 handles all
DRAM requests (reads and writes of data) from the CPU, the VLIW Vector
Processor 74, and the Display Controller
88. These requests may have very different profiles in terms of memory usage
and algorithmic timing requirements. For
example, a VLIW process may be processing an image in linear memory, and
lookup a value in a table for each value in
the image. There is little need to cache much of the image, but it may be
desirable to cache the entire lookup table so
that no real memory access is required. Because of these differing
requirements, the Data cache 76 allows for an
intelligent definition of caching.
Although the Rambus DRAM interface 81 is capable of very high-speed memory
access (an average throughput of 32
bytes in 25ns), it is not efficient dealing with single byte requests. In
order to reduce effective memory latency, the ACP
31 contains 128 cache lines. Each cache line is 32 bytes wide. Thus the total
amount of data cache 76 is 4096 bytes
(4KB). The 128 cache lines are configured into 16 programmable-sized groups.
Each of the 16 groups must be a
contiguous set of cache lines. The CPU is responsible for determining how many
cache lines to allocate to each group.
Within each group cache lines are filled according to a simple Least Recently
Used algorithm. In terms of CPU data
requests, the Data cache 76 handles memory access requests that have address
bit 24 clear. If bit 24 is clear, the address
is in the lower 16 MB range, and hence can be satisfied from DRAM and the Data
cache 76. In most cases the DRAM
will only be 8 MB, but 16 MB is allocated to cater for a higher memory model
Artcam. If bit 24 is set, the address is
ignored by the Data cache 76.
All CPU data requests are satisfied from Cache Group 0. A minimum of 16 cache
lines is recommended for good CPU
performance, although the CPU can assign any number of cache lines (except
none) to Cache Group 0. The remaining
Cache Groups (1 to 15) are allocated according to the current requirements.
This could mean allocation to a VLIW
Vector Processor 74 program or the Display Controller 88. For example, a 256
byte lookup table required to be
permanently available would require 8 cache lines. Writing out a sequential
image would only require 2-4 cache lines
(depending on the size of record being generated and whether write requests
are being Write Delayed for a significant
number of cycles). Associated with each cache line byte is a dirty bit, used
for creating a Write Mask when writing
memory to DRAM. Associated with each cache line is another dirty bit, which
indicates whether any of the cache line
bytes has been written to (and therefore the cache line must be written back
to DRAM before it can be reused). Note
that it is possible for two different Cache Groups to be accessing the same
address in memory and to get out of sync.
The VLIW program writer is responsible to ensure that this is not an issue. It
could be perfectly reasonable, for
example, to have a Cache Group responsible for reading an image, and another
Cache Group responsible for writing the
changed image back to memory again. If the images are read or written
sequentially there may be advantages in
allocating cache lines in this manner. A total of 8 buses 182 connect the VLIW
Vector Processor 74 to the Data cache
76. Each bus is connected to an I/O Address Generator. (There are 2 I/O
Address Generators 189, 190 per Processing
Unit 178, and there are 4 Processing Units in the VLIW Vector Processor 74.
The total number of buses is therefore 8.)
In any given cycle, in addition to a single 32 bit (4 byte) access to the
CPU's cache group (Group 0), 4 simultaneous
accesses of 16 bits (2 bytes) to remaining cache groups are permitted on the 8
VLIW Vector Processor 74 buses. The
Data cache 76 is responsible for fairly processing the requests. On a given
cycle, no more than 1 request to a specific
Cache Group will be processed. Given that there are 8 Address Generators 189,
190 in the VLIW Vector Processor 74,
CA 02456652 2004-02-06
WO 03/015395 PCT/AU02/00919
each one of these has the potential to refer to an individual Cache Group.
However it is possible and occasionally
reasonable for 2 or more Address Generators 189, 190 to access the same Cache
Group. The CPU is responsible for
ensuring that the Cache Groups have been allocated the correct number of cache
lines, and that the various Address
Generators 189, 190 in the VLIW Vector Processor 74 reference the specific
Cache Groups correctly.
The Data cache 76 as described allows for the Display Controller 88 and VLIW
Vector Processor 74 to be active
simultaneously. If the operation of these two components were deemed to never
occur simultaneously, a total 9 Cache
Groups would suffice. The CPU would use Cache Group 0, and the VLIW Vector
Processor 74 and the Display
Controller 88 would share the remaining 8 Cache Groups, requiring only 3 bits
(rather than 4) to define which Cache
Group would satisfy a particular request.
JTAG Interface 85
A standard JTAG (Joint Test Action Group) Interface is included in the ACP 31
for testing purposes. Due to the
complexity of the chip, a variety of testing techniques are required,
including BIST (Built In Self Test) and functional
block isolation. An overhead of 10% in chip area is assumed for overall chip
testing circuitry. The test circuitry is
beyond the scope of this document.
Serial Interfaces
USB SERIAL PORT INTERFACE 52
This is a standard USB serial port, which is connected to the internal chip
low speed bus, thereby allowing the CPU to
control it.
KEYBOARD INTERFACE 6S
This is a standard low-speed serial port, which is connected to the internal
chip low speed bus, thereby allowing the
CPU to control it. It is designed to be optionally connected to a keyboard to
allow simple data input to customize prints.
AUTHENTICATION CHIP SERIAL INTERFACES 64
These are 2 standard low-speed serial ports, which are connected to the
internal chip low speed bus, thereby allowing
the CPU to control them. The reason for having 2 ports is to connect to both
the on-camera Authentication chip, and to
the print-roll Authentication chip using separate lines. Only using 1 line may
make it possible for a clone print-roll
manufacturer to design a chip which, instead of generating an authentication
code, tricks the camera into using the code
generated by the authentication chip in the camera.
Parallel Interface 67
The parallel interface connects the ACP 31 to individual static electrical
signals. The CPU is able to control each of
these connections as memory-mapped I/O via the low speed bus The following
table is a list of connections to the
parallel interface:
Connection Direction Pins
Pa er trans ort ste er motor Out 4
Artcard stepper motor Out 4
Zoom ste er motor Out 4
Guillotine motor Out 1
Flash trigger Out I 1
CA 02456652 2004-02-06
WO 03/015395 PCT/AU02/00919
26
Status LCD se ment drivers Out 7
Status LCD common drivers Out 4
Artcard illumination LED Out 1
Artcard status LED (red/ een) In 2
Artcard sensor In 1
Pa er ull sensor In 1
Orientation sensor In 2
Buttons In 4
TOTAL ~ 36
VLIW Input and Output FIFOs 78, 79
The VLIW Input and Output FIFOs are 8 bit wide FIFOs used for communicating
between processes and the VLIW
Vector Processor 74. Both FIFOs are under the control of the VLIW Vector
Processor 74, but can be cleared and
queried (e.g. for status) etc by the CPU.
VLIW INPUT FIFO 78
A client writes 8-bit data to the VLIW Input FIFO 78 in order to have the data
processed by the VLIW Vector Processor
74. Clients include the Image Sensor Interface, Artcard Interface, and CPU.
Each of these processes is able to offload
processing by simply writing the data to the FIFO, and letting the VLIW Vector
Processor 74 do all the hard work. An
example of the use of a client's use of the VLIW Input FIFO 78 is the Image
Sensor Interface (ISI 83). The ISI 83 takes
data from the Image Sensor and writes it to the FIFO. A VLIW process takes it
from the FIFO, transforming it into the
correct image data format, and writing it out to DRAM. The ISI 83 becomes much
simpler as a result.
VLIW OUTPUT FIFO 79
The VLIW Vector Processor 74 writes 8-bit data to the VLIW Output FIFO 79
where clients can read it. Clients include
the Print Head Interface and the CPU. Both of these clients is able to offload
processing by simply reading the already
processed data from the FIFO, and letting the VLIW Vector Processor 74 do all
the hard work. The CPU can also be
interrupted whenever data is placed into the VLIW Output FIFO 79, allowing it
to only process the data as it becomes
available rather than polling the FIFO continuously. An example of the use of
a client's use of the VLIW Output FIFO
79 is the Print Head Interface (PHI 62). A VLIW process takes an image,
rotates it to the correct orientation, color
converts it, and dithers the resulting image according to the print head
requirements. The PHI 62 reads the dithered
formatted 8-bit data from the VLIW Output FIFO 79 and simply passes it on to
the Print Head external to the ACP 31.
The PHI 62 becomes much simpler as a result.
VLIW Vector Processor 74
To achieve the high processing requirements of Artcam, the ACP 31 contains a
VLIW (Very Long Instruction Word)
Vector Processor. The VLIW processor is a set of 4 identical Processing Units
(PU e.g 178) working in parallel,
connected by a crossbar switch 183. Each PU e.g 178 can perform four 8-bit
multiplications, eight 8-bit additions, three
32-bit additions, I/O processing, and various logical operations in each
cycle. The PUs e.g 178 are microcoded, and
each has two Address Generators 189, 190 to allow full use of available cycles
for data processing. The four PUs e.g
178 are normally synchronized to provide a tightly interacting VLIW processor.
Clocking at 200 MHz, the VLIW
CA 02456652 2004-02-06
WO 03/015395 PCT/AU02/00919
27
Vector Processor 74 runs at 12 Gops (12 billion operations per second).
Instructions are tuned for image processing
functions such as warping, artistic brushing, complex synthetic illumination,
color transforms, image filtering, and
compositing. These are accelerated by two orders of magnitude over desktop
computers.
As shown in more detail in Fig. 3(a), the VL1W Vector Processor 74 is 4 PUs
e.g 178 connected by a crossbar switch
183 such that each PU e.g 178 provides two inputs to, and takes two outputs
from, the crossbar switch 183. Two
common registers form a control and synchronization mechanism for the PUs e.g
178. 8 Cache buses 182 allow
connectivity to DRAM via the Data cache 76, with 2 buses going to each PU e.g
178 (1 bus per I/O Address Generator).
Each PU e.g 178 consists of an ALU 188 (containing a number of registers &
some arithmetic logic for processing
data), some microcode RAM 196, and connections to the outside world (including
other ALUs). A local PU state
machine runs in microcode and is the means by which the PU e.g 178 is
controlled. Each PU e.g 178 contains two I/O
Address Generators 189, 190 controlling data flow between DRAM (via the Data
cache 76) and the ALU 188 (via Input
FIFO and Output FIFO). The address generator is able to read and write data
(specifically images in a variety of
formats) as well as tables and simulated FIFOs in DRAM. The formats are
customizable under software control, but are
not microcoded. Data taken from the Data cache 76 is transferred to the ALU
188 via the 16-bit wide Input FIFO.
Output data is written to the 16-bit wide Output FIFO and from there to the
Data cache 76. Finally, all PUs e.g 178
share a single 8-bit wide VLIW Input FIFO 78 and a single 8-bit wide VL1W
Output FIFO 79. The low speed data bus
connection allows the CPU to read and write registers in the PU e.g 178,
update microcode, as well as the common
registers shared by all PUs e.g 178 in the VLIW Vector Processor 74. Turning
now to Fig. 4, a closer detail of the
internals of a single PU e.g 178 can be seen, with components and control
signals detailed in subsequent hereinafter:
MICROCODE
Each PU e.g 178 contains a microcode RAM 196 to hold the program for that
particular PU e.g 178. Rather than have
the microcode in ROM, the microcode is in RAM, with the CPU responsible for
loading it up. For the same space on
chip, this tradeoff reduces the maximum size of any one function to the size
of the RAM, but allows an unlimited
number of functions to be written in microcode. Functions implemented using
microcode include Vark acceleration,
Artcard reading, and Printing. The VLIW Vector Processor 74 scheme has several
advantages for the case of the ACP
31:
Hardware design complexity is reduced
Hardware risk is reduced due to reduction in complexity
Hardware design time does not depend on all Vark functionality being
implemented in dedicated silicon
Space on chip is reduced overall (due to large number of processes able to be
implemented as microcode)
Functionality can be added to Vark (via microcode) with no impact on hardware
design time
Size and Content
The CPU loaded microcode RAM 196 for controlling each PU e.g 178 is 128 words,
with each word being 96 bits wide.
A summary of the microcode size for control of various units of the PU e.g 178
is listed in the following table:
Process Block Size (bits)
Status Ou ut 3
Branching (microcode 11
control)
CA 02456652 2004-02-06
WO 03/015395 PCT/AU02/00919
28
In 8
Out 6
Re isters 7
Read 10
Write 6
Barrel Shifter 12
Adder/I,o ical 14
Multi 1 /Inte olate 19
TOTAL ~ 96
With 128 instruction words, the total microcode RAM 196 per PU e.g 178 is
12,288 bits, or 1.SKB exactly. Since the
VLIW Vector Processor 74 consists of 4 identical PUs e.g 178 this equates to
6,144 bytes, exactly 6KB. Some of the
bits in a microcode word are directly used as control bits, while others are
decoded. See the various unit descriptions
that detail the interpretation of each of the bits of the microcode word.
Synchronization Between PUs e.g 178
Each PU e.g 178 contains a 4 bit Synchronization Register 197. It is a mask
used to determine which PUs e.g 178 work
together, and has one bit set for each of the corresponding PUs e.g 178 that
are functioning as a single process. For
example, if all of the PUs e.g 178 were functioning as a single process, each
of the 4 Synchronization Register 197s
would have all 4 bits set. If there were two asynchronous processes of 2 PUs
e.g 178 each, two of the PUs e.g 178
would have 2 bits set in their Synchronization Register 197s (corresponding to
themselves), and the other two would
have the other 2 bits set in their Synchronization Register 197s
(corresponding to themselves).
The Synchronization Register 197 is used in two basic ways:
Stopping and starting a given process in synchrony
Suspending execution within a process
Stopping and Starting Processes
The CPU is responsible for loading the microcode RAM 196 and loading the
execution address for the first instruction
(usually 0). When the CPU starts executing microcode, it begins at the
specified address.
Execution of microcode only occurs when all the bits of the Synchronization
Register 197 are also set in the Common
Synchronization Register 197. The CPU therefore sets up all the PUs e.g 178
and then starts or stops processes with a
single write to the Common Synchronization Register 197.
This synchronization scheme allows multiple processes to be running
asynchronously on the PUs e.g 178, being stopped
and started as processes rather than one PU e.g 178 at a time.
Suspending Execution within a Process
In a given cycle, a PU e.g 178 may need to read from or write to a FIFO (based
on the opcode of the current microcode
instruction). If the FIFO is empty on a read request, or full on a write
request, the FIFO request cannot be completed.
The PU e.g 178 will therefore assert its SuspendProcess control signal 198.
The SuspendProcess signals from all PUs
e.g 178 are fed back to all the PUs e.g 178. The Synchronization Register 197
is ANDed with the 4 SuspendProcess
CA 02456652 2004-02-06
WO 03/015395 PCT/AU02/00919
29
bits, and if the result is non-zero, none of the PU e.g 178's register
WriteEnables or FIFO strobes will be set.
Consequently none of the PUs e.g 178 that form the same process group as the
PU e.g 178 that was unable to complete
its task will have their registers or FIFOs updated during that cycle. This
simple technique keeps a given process group
in synchronization. Each subsequent cycle the PU e.g 178's state machine will
attempt to re-execute the microcode
instruction at the same address, and will continue to do so until successful.
Of course the Common Synchronization
Register 197 can be written to by the CPU to stop the entire process if
necessary. This synchronization scheme allows
any combinations of PUs e.g 178 to work together, each group only affecting
its co-workers with regards to suspension
due to data not being ready for reading or writing.
Control and Branchine
During each cycle, each of the four basic input and calculation units within a
PU e.g 178's ALU 188 (Read,
Adder/Logic, Multiply/Interpolate, and Barrel Shifter) produces two status
bits: a Zero flag and a Negative flag
indicating whether the result of the operation during that cycle was 0 or
negative. Each cycle one of those 4 status bits is
chosen by microcode instructions to be output from the PU e.g 178. The 4
status bits (1 per PU e.g 178's ALU 188) are
combined into a 4 bit Common Status Register 200. During the next cycle, each
PU e.g 178's microcode program can
select one of the bits from the Common Status Register 200, and branch to
another microcode address dependant on the
value of the status bit.
Status bit
Each PU e.g 178's ALU 188 contains a number of input and calculation units.
Each unit produces 2 status bits - a
negative flag and a zero flag. One of these status bits is output from the PU
e.g 178 when a particular unit asserts the
value on the 1-bit tri-state status bit bus. The single status bit is output
from the PU e.g 178, and then combined with the
other PU e.g 178 status bits to update the Common Status Register 200. The
microcode for determining the output
status bit takes the following form:
# BitsDescri lion
2 Select unit whose status bit is
to be output
00 = Adder unit
O1 = Multiply/Logic unit
10 = Barrel Shift unit
11 = Reader unit
1 0 = Zero flag
1 = Negative flag
-
I TOTAL
Within the ALU 188, the 2-bit Select Processor Block value is decoded into
four 1-bit enable bits, with a different
enable bit sent to each processor unit block. The status select bit (choosing
Zero or Negative) is passed into all units to
determine which bit is to be output onto the status bit bus.
Branching Within Microcode
Each PU e.g 178 contains a 7 bit Program Counter (PC) that holds the current
microcode address being executed.
Normal program execution is linear, moving from address N in one cycle to
address N+1 in the next cycle. Every cycle
CA 02456652 2004-02-06
WO 03/015395 PCT/AU02/00919
however, a microcode program has the ability to branch to a different
location, or to test a status bit from the Common
Status Register 200 and branch. The microcode for determining the next
execution address takes the following form:
# Bits Descri tion
2 00 = NOP (PC = PC+1)
O1 = Branch always
10 = Branch if status bit
clear
11 = Branch if status bit
set
2 Select status bit from status
word
7 Address to branch to (absolute
address, 00-7F)
11 TOTAL
ALU 188
Fig. 5 illustrates the ALU 188 in more detail. Inside the ALU 188 are a number
of specialized processing blocks,
controlled by a microcode program. The specialized processing blocks include:
Read Block 202, for accepting data from the input FIFOs
Write Block 203, for sending data out via the output FIFOs
Adder/Logical block 204, for addition & subtraction, comparisons and logical
operations
Multiply/Interpolate block 205, for multiple types of interpolations and
multiply/accumulates
Barrel Shift block 206, for shifting data as required
In block 207, for accepting data from the external crossbar switch 183
Out block 208, for sending data to the external crossbar switch 183
Registers block 215, for holding data in temporary storage
Four specialized 32 bit registers hold the results of the 4 main processing
blocks:
M register 209 holds the result of the Multiply/Interpolate block
L register 209 holds the result of the Adder/Logic block
S register 209 holds the result of the Barrel Shifter block
R register 209 holds the result of the Read Block 202
In addition there are two internal crossbar switches 213 and 214 for data
transport. The various process blocks are
further expanded in the following sections, together with the microcode
definitions that pertain to each block. Note that
the microcode is decoded within a block to provide the control signals to the
various units within.
Data Transfers Between PUs e.~ 178
Each PU e.g 178 is able to exchange data via the external crossbar. A PU e.g
178 takes two inputs and outputs two
values to the external crossbar. In this way two operands for processing can
be obtained in a single cycle, but cannot be
actually used in an operation until the following cycle.
In 207
This block is illustrated in Fig. 6 and contains two registers, In, and Inz
that accept data from the external crossbar. The
registers can be loaded each cycle, or can remain unchanged. The selection
bits for choosing from among the 8 inputs
are output to the external crossbar switch 183. The microcode takes the
following form:
CA 02456652 2004-02-06
WO 03/015395 PCT/AU02/00919
31
# Bits Descri lion
1 0 = NOP
1 = Load In, from crossbar
3 Select In ut 1 from external
crossbar
1 0=NOP
1 = Load Inz from crossbar
3 Select In ut 2 from external
crossbar
8 TOTAL
Out 208
Complementing In is Out 208. The Out block is illustrated in more detail in
Fig. 7. Out contains two registers, Out, and
Outz, both of which are output to the external crossbar each cycle for use by
other PUs e.g 178. The Write unit is also
able to write one of Out, or Outz to one of the output FIFOs attached to the
ALU 188. Finally, both registers are
available as inputs to Crossbarl 213, which therefore makes the register
values available as inputs to other units within
the ALU 188. Each cycle either of the two registers can be updated according
to microcode selection. The data loaded
into the specified register can be one of Do - D3 (selected from Crossbar)
213) one of M, L, S, and R (selected from
Crossbar2 214), one of 2 programmable constants, or the fixed values 0 or 1.
The microcode for Out takes the
following form:
# Bits Descri tion
1 0=NOP
1 = Load Register
1 Select Register to load [Out, or Out2]
4 Select input [In,,Inz,Out,,Out2,Do,D,,D2,D3,M,L,S,R,K,,Kz,O,I]
6 TOTAL
Local Registers and Data Transfers within ALU 188
As noted previously, the ALU 188 contains four specialized 32-bit registers to
hold the results of the 4 main processing
blocks:
M register 209 holds the result of the Multiply/Interpolate block
L register 209 holds the result of the Adder/Logic block
S register 209 holds the result of the Barrel Shifter block
R register 209 holds the result of the Read Block 202
The CPU has direct access to these registers, and other units can select them
as inputs via Crossbar2 214. Sometimes it
is necessary to delay an operation for one or more cycles. The Registers block
contains four 32-bit registers Do - D3 to
hold temporary variables during processing. Each cycle one of the registers
can be updated, while all the registers are
output for other units to use via Crossbar) 213 (which also includes In,, In2,
Out, and Out2). The CPU has direct access
to these registers. The data loaded into the specified register can be one of
Do -D3 (selected from Crossbar) 213) one
of M, L, S, and R (selected from Crossbar2 214), one of 2 programmable
constants, or the fixed values 0 or 1. The
Registers block 215 is illustrated in more detail in Fig. 8. The microcode for
Registers takes the following form:
# Bits Description
CA 02456652 2004-02-06
WO 03/015395 PCT/AU02/00919
32
1 0 = NOP
1 = Load Register
2 Select Re ister to load [Do - D3]
4 Select in ut [In,,Inz,Out,,Out2,Do,D,,D2,D3,M,L,S,R,K,,K2,0,1]
7 TOTAL
Crossbarl 213
Crossbarl 213 is illustrated in more detail in Fig. 9. Crossbarl 213 is used
to select from inputs In,, Inz, Out,, Outz, Do-
D3. 7 outputs are generated from Crossbarl 213: 3 to the Multiply/Interpolate
Unit, 2 to the Adder Unit, 1 to the
Registers unit and 1 to the Out unit. The control signals for Crossbarl 213
come from the various units that use the
Crossbar inputs. There is no specific microcode that is separate for Crossbarl
213.
Crossbar2 274
Crossbar2 214 is illustrated in more detail in Fig. lO.Crossbar2 214 is used
to select from the general ALU 188 registers
M, L, S and R. 6 outputs are generated from Crossbarl 213: 2 to the
Multiply/Interpolate Unit, 2 to the Adder Unit, 1 to
the Registers unit and 1 to the Out unit. The control signals for Crossbar2
214 come from the various units that use the
Crossbar inputs. There is no specific microcode that is separate for Crossbar2
214.
Data Transfers Between PUs e.g 178 and DRAM or External Processes
Returning to Fig. 4, PUs e.g 178 share data with each other directly via the
external crossbar. They also transfer data to
and from external processes as well as DRAM. Each PU e.g 178 has 2 I/O Address
Generators 189, 190 for transferring
data to and from DRAM. A PU e.g 178 can send data to DRAM via an I/O Address
Generator's Output FIFO e.g. 186,
or accept data from DRAM via an I/O Address Generator's Input FIFO 187. These
FIFOs are local to the PU e.g 178.
There is also a mechanism for transferring data to and from external processes
in the form of a common VLIW Input
FIFO 78 and a common VLIW Output FIFO 79, shared between all ALUs. The VLIW
Input and Output FIFOs are
only 8 bits wide, and are used for printing, Artcard reading, transferring
data to the CPU etc. The local Input and Output
FIFOs are 16 bits wide.
Read
The Read process block 202 of Fig. 5 is responsible for updating the ALU 188's
R register 209, which represents the
external input data to a VLIW microcoded process. Each cycle the Read Unit is
able to read from either the common
VLIW Input FIFO 78 (8 bits) or one of two local Input FIFOs (16 bits). A 32-
bit value is generated, and then all or part
of that data is transferred to the R register 209. The process can be seen in
Fig. 11. The microcode for Read is described
in the following table. Note that the interpretations of some bit patterns are
deliberately chosen to aid decoding.
# Bits Descri lion
2 00 = NOP
O1 = Read from VLIW Input FIFO 78
10 = Read from Local FIFO 1
11 = Read from Local FIFO 2
1 How many significant bits
0 = 8 bits (pad with 0 or sign extend)
1 = 16 bits (only valid for Local FIFO
reads)
1 0 = Treat data as unsigned (pad with
0)
1 = Treat data as signed (sign extend
when reading from FIFO)r
CA 02456652 2004-02-06
WO 03/015395 PCT/AU02/00919
33
2 How much to shift data left by:
00 = 0 bits (no change)
O1 = 8 bits
10 = 16 bits
11 = 24 bits
4 Which bytes of R to update (hi to to
order byte)
Each-of the 4 bits re resents 1 b a
WriteEnable on R
TOTAL
Write
The Write process block is able to write to either the common VLIW Output FIFO
79 or one of the two local Output
FIFOs each cycle. Note that since only 1 FIFO is written to in a given cycle,
only one 16-bit value is output to all
FIFOs, with the low 8 bits going to the VLIW Output FIFO 79. The microcode
controls which of the FIFOs gates in the
value. The process of data selection can be seen in more detail in Fig. 12.
The source values Out, and Outz come from
the Out block. They are simply two registers. The microcode for Write takes
the following form:
# BitsDescri tion
2 00 = NOP
O1 = Write VLIW Output FIFO 79
10 = Write local Output FIFO 1
11 = Write local Out ut FIFO 2
1 Select Out ut Value [Out, or OutZ]
3 Select part of Output Value to write (32
bits = 4 bytes ABCD)
000 = OD
001 = OD
010 = OB
011 = OA
100=CD
101 = BC
110 = AB
111 = 0
6 TOTAL
Computational Blocks
Each ALU 188 has two computational process blocks, namely an Adder/Logic
process block 204, and a
Multiply/Interpolate process block 205. In addition there is a Barrel Shifter
block to provide help to these computational
blocks. Registers from the Registers block 215 can be used for temporary
storage during pipelined operations.
Barrel Shifter
The Barrel Shifter process block 206 is shown in more detail in Fig. 13 and
takes its input from the output of
Adder/Logic or Multiply/Interpolate process blocks or the previous cycle's
results from those blocks (ALU registers L
and M). The 32 bits selected are barrel shifted an arbitrary number of bits in
either direction (with sign extension as
necessary), and output to the ALU 188's S register 209. The microcode for the
Barrel Shift process block is described
in the following table. Note that the interpretations of some bit patterns are
deliberately chosen to aid decoding.
# Bits I Description
CA 02456652 2004-02-06
WO 03/015395 PCT/AU02/00919
34
3 000 = NOP
001 = Shift Left (unsigned)
010 = Reserved
011 = Shift Left (signed)
100 = Shift right (unsigned, no rounding)
101 = Shift right (unsigned, with rounding)
110 = Shift right (signed, no rounding)
111 = Shift ri ht (si ned, with roundin
)
2 Select Input to barrel shift:
00 = Multiply/Interpolate result
O1=M
10 = Adder/Logic result
11=L
# bits to shift
1 Ceiling of 255
1 Floor of 0 (si ned data)
~OT~
AdderlLogic 204
The Adder/Logic process block is shown in more detail in Fig. 14 and is
designed for simple 32-bit addition/subtraction,
comparisons, and logical operations. In a single cycle a single addition,
comparison, or logical operation can be
performed, with the result stored in the ALU 188's L register 209. There are
two primary operands, A and B, which are
selected from either of the two crossbars or from the 4 constant registers.
One crossbar selection allows the results of the
previous cycle's arithmetic operation to be used while the second provides
access to operands previously calculated by
this or another ALU 188. The CPU is the only unit that has write access to the
four constants (K,-I~). In cases where
an operation such as (A+B) x 4 is desired, the direct output from the adder
can be used as input to the Ban-el Shifter, and
can thus be shifted left 2 places without needing to be latched into the L
register 209 first. The output from the adder
can also be made available to the multiply unit for a multiply-accumulate
operation. The microcode for the
Adder/Logic process block is described in the following table. The
interpretations of some bit patterns are deliberately
chosen to aid decoding. Microcode bit interpretation for Adder/Logic unit
# Bits Descri
tion
4 0000 = (carry in = 0)
A+B
0001 = (carry in = carry out of previous
A+B operation)
0010 =
A+B+1
(carry
in =
1)
0011 = (increments A)
A+1
0100 = (carry in = 0)
A-B-1
0101 = (carry in = carry out of previous
A-B operation)
0110 = (carry in = 1)
A-B
0111 = (decrements A)
A-1
1000 =
NOP
CA 02456652 2004-02-06
WO 03/015395 PCT/AU02/00919
1001 = ABS(A-B)
1010 = MINA, B)
1011 = MAX(A, B)
1100 = A AND B (both A & B can be inverted,
see below)
1101 = A OR B (both A & B can be inverted,
see below)
1110 = A XOR B (both A & B can be inverted,
see below)
1111 = A (A can be inverted, see below)
1 If logical operation:
0 = A=A
1 = A=NOT(A)
If Adder operation:
0 = A is unsigned
1 = A is signed
1 If logical operation:
0=B=B
1 = B=NOT(B)
If Adder operation
0 = B is unsigned
1 = B is signed
4 Select A [In,,In2,Out,,Outz,Do,D,,DZ,D3,M,L,S,R,K,,Kz,K3,K4]
4 Select B [In,,Inz,Out,,Outz,Do,D,,DZ,D3,M,L,S,R,K,,KZ,K3,K4]
14 I TOTAL
Multiplyllnterpolate 205
The Multiply/Interpolate process block is shown in more detail in Fig. 15 and
is a set of four 8 x 8 interpolator units that
are capable of performing four individual 8 x 8 interpolates per cycle, or can
be combined to perform a single 16 x 16
multiply. This gives the possibility to perform up to 4 linear interpolations,
a single bi-linear interpolation, or half of a
tri-linear interpolation in a single cycle. The result of the interpolations
or multiplication is stored in the ALU 188's M
register 209. There are two primary operands, A and B, which are selected from
any of the general registers in the ALU
188 or from four programmable constants internal to the Multiply/Interpolate
process block. Each interpolator block
functions as a simple 8 bit interpolator [result = A + (B-A)fj or as a simple
8 x 8 multiply [result = A * B]. When the
operation is interpolation, A and B are treated as four 8 bit numbers Ao thru
A3 (Ao is the low order byte), and Bo thru
B3. Agen, Bgen, and Fgen are responsible for ordering the inputs to the
Interpolate units so that they match the
operation being performed. For example, to perform bilinear interpolation,
each of the 4 values must be multiplied by a
different factor & the result summed, while a 16 x 16 bit multiplication
requires the factors to be 0. The microcode for
the Adder/Logic process block is described in the following table. Note that
the interpretations of some bit patterns are
deliberately chosen to aid decoding.
# Bits Descri lion
4 0000 = (A,o * B,o) + V
0001=(AO*BO)+(A1 *BI)+V
0010 = (A,o * B,o) - V
CA 02456652 2004-02-06
WO 03/015395 PCT/AU02/00919
36
0011=V-(A,o*B,o)
0100 = Interpolate Ao,Bo by fo
0101 = Interpolate Ao,Bo by fo, A,;B, by f,
0110 = Interpolate Ao,Bo by fo, A,,B, by f,,
Az,Bz by f2
0111 = Interpolate Ao,Bo by fo, A,,B, by f,,
Az,B2 by f2, A3,B3 by f3
1000 = Interpolate 16 bits stage 1 [M = A,o
* f,o]
1001 = Interpolate 16 bits stage 2 [M = M +
(Alo * f,o)]
1010 = Tri-linear interpolate A by f stage
1 [M=Aofo+A,f,+AZfz+A3f3]
1011 = Tri-linear interpolate A by f stage
2 [M=M+Aofo+Alf~+AZf2+A3f3]
1100 = Bi-linear interpolate A by f stage 1
[M=Aofo+A,f,]
1101 = Bi-linear interpolate A by f stage 2
[M=M+Aofo+Alf,]
1110 = Bi-linear interpolate A by f complete
[M=Aofo+A,fl+Azf2+A3f3]
1111 = NOP
4 Select A [In,,In2,Out,,Out2,Do,D,,DZ,D3,M,L,S,R,K,,KZ,K3,K4]
4 Select B [In,,In2,Out,,Out2,Do,D,,Dz,D3,M,L,S,R,K1,K2,K3,K4]
If
Mult:
4 Select V [In,,In2,Out,,Out2,Do,D,,DZ,D3,K,,K2,K3,K4,Adder
result,M,0,1]
1 Treat A as signed
1 Treat B as si ned
1 Treat V as signed
If
Inte
4 Select basis for f [In,,In2,Out,,Out2,Do,D,,DZ,D3,K,,Kz,K3,K4,X,X,X,X]
1 Select interpolation f generation from P, or
PZ
P" is interpreted as # fractional bits in f
If P"=0, f is range 0..255 re resenting 0..1
2 Reserved
19 TOTAL
The same 4 bits are used for the selection of V and f, although the last 4
options for V don't generally make sense as f
values. Interpolating with a factor of 1 or 0 is pointless, and the previous
multiplication or current result is unlikely to be
a meaningful value for f.
I/O ADDRESS GENERATORS 189, 19O
The I/O Address Generators are shown in more detail in Fig. 16. A VLTW process
does not access DRAM directly.
Access is via 2 I/O Address Generators 189, 190, each with its own Input and
Output FIFO. A PU e.g 178 reads data
from one of two local Input FIFOs, and writes data to one of two local Output
FIFOs. Each I/O Address Generator is
responsible for reading data from DRAM and placing it into its Input FIFO,
where it can be read by the PU e.g 178, and
is responsible for taking the data from its Output FIFO (placed there by the
PU e.g 178) and writing it to DRAM. The
I/O Address Generator is a state machine responsible for generating addresses
and control for data retrieval and storage
in DRAM via the Data cache 76. It is customizable under CPU software control,
but cannot be microcoded. The address
generator produces addresses in two broad categories:
CA 02456652 2004-02-06
WO 03/015395 PCT/AU02/00919
37
Image Iterators, used to iterate (reading, writing or both) through pixels of
an image in a variety of ways
Table I/O, used to randomly access pixels in images, data in tables, and to
simulate FIFOs in DRAM
Each of the I/O Address Generators 189, 190 has its own bus connection to the
Data cache 76, making 2 bus
connections per PU e.g 178, and a total of 8 buses over the entire VLIW Vector
Processor 74. The Data cache 76 is able
to service 4 of the maximum 8 requests from the 4 PUs e.g 178 each cycle. The
Input and Output FIFOs are 8 entry
deep 16-bit wide FIFOs. The various types of address generation (Image
Iterators and Table I/O) are described in the
subsequent sections.
Registers
The I/O Address Generator has a set of registers for that are used to control
address generation. The addressing mode
also determines how the data is formatted and sent into the local Input FIFO,
and how data is interpreted from the local
Output FIFO. The CPU is able to access the registers of the I/O Address
Generator via the low speed bus. The first set
of registers define the housekeeping parameters for the I/O Generator:
Re ister Name # bitsDescri tion
Reset 0 A write to this register halts any operations,
and writes Os to all the data
registers of the I/O Generator. The input
and output FIFOs are not
cleared.
Go 0 A write to this register restarts the
counters according to the current
setup. For example, if the I/O Generator
is a Read Iterator, and the
Iterator is currently halfway through
the image, a write to Go will cause
the reading to begin at the start of the
image again. While the I/O
Generator is performing, the Active bit
of the Status register will be set.
Halt 0 A write to this register stops any current
activity and clears the Active
bit of the Status register. If the Active
bit is already cleared, writing to
this register has no effect.
Continue 0 A write to this register continues the
I/O Generator from the current
setup. Counters are not reset, and FIFOs
are not cleared. A write to this
register while the I/O Generator is active
has no effect.
ClearFIFOsOnGo1 0 = Don't clear FIFOs on a write to the
Go bit.
1 = Do clear FIFOs on a write to the Go
bit.
Status -- ~ 8 I Status flags _
The Status register has the following values
Re ister Name# bitsDescri tion
Active 1 0 = Currently inactive
1 = Currentl active
_ -
~ 7 ~
deserved
Caching
Several registers are used to control the caching mechanism, specifying which
cache group to use for inputs, outputs etc.
See the section on the Data cache 76 for more information about cache groups.
Register Name # bits Description
CA 02456652 2004-02-06
WO 03/015395 PCT/AU02/00919
38
4 ~ Defines cache group to read data from
CacheGroup2 4 Defines which cache group to write data to, and in the case of
the ImagePyramidLookup I/O mode, defines the cache to use
for reading the Level Information Table.
Imaee Iterators = Sequential Automatic Access to pixels
The primary image pixel access method for software and hardware algorithms is
via Image Iterators. Image iterators
perform all of the addressing and access to the caches of the pixels within an
image channel and read, write or read &
write pixels for their client. Read Iterators read pixels in a specific order
for their clients, and Write Iterators write pixels
in a specific order for their clients. Clients of Iterators read pixels from
the local Input FIFO or write pixels via the local
Output FIFO.
Read Image Iterators read through an image in a specific order, placing the
pixel data into the local Input FIFO. Every
time a client reads a pixel from the Input FIFO, the Read Iterator places the
next pixel from the image (via the Data
cache 76) into the FIFO.
Write Image Iterators write pixels in a specific order to write out the entire
image. Clients write pixels to the Output
FIFO that is in turn read by the Write Image Iterator and written to DRAM via
the Data cache 76.
Typically a VLIW process will have its input tied to a Read Iterator, and
output tied to a corresponding Write Iterator.
From the PU e.g 178 microcode program's perspective, the FIFO is the effective
interface to DRAM. The actual method
of carrying out the storage (apart from the logical ordering of the data) is
not of concern. Although the FIFO is
perceived to be effectively unlimited in length, in practice the FIFO is of
limited length, and there can be delays storing
and retrieving data, especially if several memory accesses are competing. A
variety of Image Iterators exist to cope with
the most common addressing requirements of image processing algorithms. In
most cases there is a corresponding Write
Iterator for each Read Iterator. The different Iterators are listed in the
following table:
Read Iterators Write Iterators
Se uential ReadSe uential Write
Box Read
Vertical Strip Vertical Strip
Read ~ Write
The 4 bit Address Mode Register is used to determine the Iterator type:
Bit # Address Mode
3 0 = This addressing mode is
an Iterator
2 to Iterator Mode
0
001 = Sequential Iterator
010 = Box [read only]
100 = Vertical Strip
remaining bit patterns are
reserved
The Access Specific registers are used as follows:
I Resister Name I LocalName I Descriution I
1 AccessSpecific, I FlaQS I Flaes used for reading and writing I
CA 02456652 2004-02-06
WO 03/015395 PCT/AU02/00919
39
AccessSpecific2 XBoxSizeDetermines the size in X of Box
Read. Valid values are
3, 5, and 7.
AccessSpecific3 YBoxSizeDetermines the size in Y of Box
Read. Valid values are
3, 5, and 7.
AccessSpecific4 BoxOffsetOffset between one pixel center
and the next during a
Box Read only.
Usual value is 1, but other useful
values include 2, 4, 8...
See Box Read for more details.
The Flags register (AccessSpecific,) contains a number of flags used to
determine factors affecting the reading and
writing of data. The Flags register has the following composition:
Label #bits Descri tion
ReadEnable 1 Read data from DRAM
WriteEnable 1 Write data to DRAM [not valid for
Box mode]
PassX 1 Pass X ( ixel) ordinate back to
In ut FIFO
PassY 1 Pass Y (row) ordinate back to In
ut FIFO
Loop 1 0 = Do not loop through data
1 = Loo through data
Reserved 11 Must be 0
Notes on ReadEnable and WriteEnable:
When ReadEnable is set, the I/O Address Generator acts as a Read Iterator, and
therefore reads the image
in a particular order, placing the pixels into the Input FIFO.
When WriteEnable is set, the I/O Address Generator acts as a Write Iterator,
and therefore writes the
image in a particular order, taking the pixels from the Output FIFO.
When both ReadEnable and WriteEnable are set, the I/O Address Generator acts
as a Read Iterator and as
a Write Iterator, reading pixels into the Input FIFO, and writing pixels from
the Output FIFO. Pixels
are only written after they have been read - i.e. the Write Iterator will
never go faster than the Read
Iterator. Whenever this mode is used, care should be taken to ensure balance
between in and out
processing by the VLIW microcode. Note that separate cache groups can be
specified on reads and
writes by loading different values in CacheGroupl and CacheGroup2.
Notes on PassX and PassY:
If PassX and PassY are both set, the Y ordinate is placed into the Input FIFO
before the X ordinate.
PassX and PassY are only intended to be set when the ReadEnable bit is clear.
Instead of passing the
ordinates to the address generator, the ordinates are placed directly into the
Input FIFO. The ordinates
advance as they are removed from the FIFO.
If WriteEnable bit is set, the VLIW program must ensure that it balances reads
of ordinates from the Input
FIFO with writes to the Output FIFO, as writes will only occur up to the
ordinates (see note on
ReadEnable and WriteEnable above).
Notes on Loop:
CA 02456652 2004-02-06
WO 03/015395 PCT/AU02/00919
If the Loop bit is set, reads will recommence at [StartPixel, StartRow] once
it has reached [EndPixel,
EndRow]. This is ideal for processing a structure such a convolution kernel or
a dither cell matrix,
where the data must be read repeatedly.
Looping with ReadEnable and WriteEnable set can be useful in an environment
keeping a single line
history, but only where it is useful to have reading occur before writing. For
a FIFO effect (where
writing occurs before reading in a length constrained fashion), use an
appropriate Table I/O
addressing mode instead of an Image Iterator.
Looping with only WriteEnable set creates a written window of the last N
pixels. This can be used with
an asynchronous process that reads the data from the window. The Artcard
Reading algorithm makes
use of this mode.
Seguential Read and Write Iterators
Fig. 17 illustrates the pixel data format. The simplest Image Iterators are
the Sequential Read Iterator and corresponding
Sequential Write Iterator. The Sequential Read Iterator presents the pixels
from a channel one line at a time from top to
bottom, and within a line, pixels are presented left to right. The padding
bytes are not presented to the client. It is most
useful for algorithms that must perform some process on each pixel from an
image but don't care about the order of the
pixels being processed, or want the data specifically in this order.
Complementing the Sequential Read Iterator is the
Sequential Write Iterator. Clients write pixels to the Output FIFO. A
Sequential Write Iterator subsequently writes out a
valid image using appropriate caching and appropriate padding bytes. Each
Sequential Iterator requires access to 2
cache lines. When reading, while 32 pixels are presented from one cache line,
the other cache line can be loaded from
memory. When writing, while 32 pixels are being filled up in one cache line,
the other can be being written to memory.
A process that performs an operation on each pixel of an image independently
would typically use a Sequential Read
Iterator to obtain pixels, and a Sequential Write Iterator to write the new
pixel values to their corresponding locations
within the destination image. Such a process is shown in Fig. 18.
In most cases, the source and destination images are different, and are
represented by 2 I/O Address Generators 189,
190. However it can be valid to have the source image and destination image to
be the same, since a given input pixel is
not read more than once. In that case, then the same Iterator can be used for
both input and output, with both the
ReadEnable and WriteEnable registers set appropriately. For maximum
efficiency, 2 different cache groups should be
used - one for reading and the other for writing. If data is being created by
a VLIW process to be written via a
Sequential Write Iterator, the PassX and PassY flags can be used to generate
coordinates that are then passed down the
Input FIFO. The VLIW process can use these coordinates and create the output
data appropriately.
Box Read Iterator
The Box Read Iterator is used to present pixels in an order most useful for
performing operations such as general-
purpose filters and convolve. The Iterator presents pixel values in a square
box around the sequentially read pixels. The
box is limited to being 1, 3, 5, or 7 pixels wide in X and Y (set XBoxSize and
YBoxSize- they must be the same value
or 1 in one dimension and 3, 5, or 7 in the other). The process is shown in
Fig. 19:
BoxOffset: This special purpose register is used to determine a sub-sampling
in terms of which input pixels will be used
as the center of the box. The usual value is 1, which means that each pixel is
used as the center of the box. The value
CA 02456652 2004-02-06
WO 03/015395 PCT/AU02/00919
41
"2" would be useful in scaling an image down by 4:1 as in the case of building
an image pyramid. Using pixel addresses
from the previous diagram, the box would be centered on pixel 0, then 2, 8,
and 10. The Box Read Iterator requires
access to a maximum of 14 (2 x 7) cache lines. While pixels are presented from
one set of 7 lines, the other cache lines
can be loaded from memory.
Box Write Iterator
There is no corresponding Box Write Iterator, since the duplication of pixels
is only required on input. A process that
uses the Box Read Iterator for input would most likely use the Sequential
Write Iterator for output since they are in
sync. A good example is the convolver, where N input pixels are read to
calculate 1 output pixel. The process flow is as
illustrated in Fig. 20. The source and destination images should not occupy
the same memory when using a Box Read
Iterator, as subsequent lines of an image require the original (not newly
calculated) values.
Vertical-Strip Read and Write Iterators
In some instances it is necessary to write an image in output pixel order, but
there is no knowledge about the direction
of coherence in input pixels in relation to output pixels. An example of this
is rotation. If an image is rotated 90 degrees,
and we process the output pixels horizontally, there is a complete loss of
cache coherence. On the other hand, if we
process the output image one cache line's width of pixels at a time and then
advance to the next line (rather than
advance to the next cache-line's worth of pixels on the same line), we will
gain cache coherence for our input image
pixels. It can also be the case that there is known 'block' coherence in the
input pixels (such as color coherence), in
which case the read governs the processing order, and the write, to be
synchronized, must follow the same pixel order.
The order of pixels presented as input (Vertical-Strip Read), or expected for
output (Vertical-Strip Write) is the same.
The order is pixels 0 to 31 from line 0, then pixels 0 to 31 of line 1 etc for
all lines of the image, then pixels 32 to 63 of
line 0, pixels 32 to 63 of line 1 etc. In the final vertical strip there may
not be exactly 32 pixels wide. In this case only
the actual pixels in the image are presented or expected as input. This
process is illustrated in Fig. 21.
process that requires only a Vertical-Strip Write Iterator will typically have
a way of mapping input pixel coordinates
given an output pixel coordinate. It would access the input image pixels
according to this mapping, and coherence is
determined by having sufficient cache lines on the 'random-access' reader for
the input image. The coordinates will
typically be generated by setting the PassX and PassY flags on the
VerticalStripWrite Iterator, as shown in the process
overview illustrated in Fig. 22.
It is not meaningful to pair a Write Iterator with a Sequential Read Iterator
or a Box read Iterator, but a Vertical-Strip
Write Iterator does give significant improvements in performance when there is
a non trivial mapping between input
and output coordinates.
It can be meaningful to pair a Vertical Strip Read Iterator and Vertical Strip
Write Iterator. In this case it is possible to
assign both to a single ALU 188 if input and output images are the same. If
coordinates are required, a further Iterator
must be used with PassX and PassY flags set. The Vertical Strip Read/Write
Iterator presents pixels to the Input FIFO,
and accepts output pixels from the Output FIFO. Appropriate padding bytes will
be inserted on the write. Input and
output require a minimum of 2 cache lines each for good performance.
Table I/O Addressing Modes
It is often necessary to lookup values in a table (such as an image). Table
I/O addressing modes provide this
functionality, requiring the client to place the indexes into the Output FIFO.
The I/O Address Generator then processes
CA 02456652 2004-02-06
WO 03/015395 PCT/AU02/00919
42
the indexes, looks up the data appropriately, and returns the looked-up values
in the Input FIFO for subsequent
processing by the VLIW client.
1D, 2D and 3D tables are supported, with particular modes targeted at
interpolation. To reduce complexity on the VLIW
client side, the index values are treated as fixed-point numbers, with
AccessSpecific registers defining the fixed point
and therefore which bits should be treated as the integer portion of the
index. Data formats are restricted forms of the
general Image Characteristics in that the PixelOffset register is ignored, the
data is assumed to be contiguous within a
row, and can only be 8 or 16 bits (1 or 2 bytes) per data element. The 4 bit
Address Mode Register is used to determine
the I/O type:
Bit # Address Mode
3 1 = This addressing mode is
Table I/O
2 to 0 000 = 1D Direct Lookup
001 = 1D Interpolate (linear)
010 = DRAM FIFO
011 = Reserved
100 = 2D Interpolate (bi-linear)
101 = Reserved
110 = 3D Interpolate (tri-linear)
111 = Image Pyramid Looku
The access specific registers are:
Re ister Name LocalName#bits Descri tion
AccessSpecific, Flags 8 General flags for reading
and writing.
See below for more information.
AccessSpecific2 FractX 8 Number of fractional bits
in X index
AccessS ecific3 FractY 8 Number of fractional bits
in Y index
AccessSpecific4 FractZ 8 Number of fractional bits
in Z index
(low 8 bits / ZOffset 12 or See below
next 12 or 24
bits)) 24
FractX, FractY, and FractZ are used to generate addresses based on indexes,
and interpret the format of the index in
terms of significant bits and integer/fractional components. The various
parameters are only defined as required by the
number of dimensions in the table being indexed. A 1D table only needs FractX,
a 2D table requires FractX and FractY.
Each Fract_ value consists of the number of fractional bits in the
corresponding index. For example, an X index may be
in the format 5:3. This would indicate 5 bits of integer, and 3 bits of
fraction. FractX would therefore be set to 3. A
simple 1D lookup could have the format 8:0, i.e. no fractional component at
all. FractX would therefore be 0. ZOffset
is only required for 3D lookup and takes on two different interpretations. It
is described more fully in the 3D-table
lookup section. The Flags register (AccessSpecific,) contains a number of
flags used to determine factors affecting the
reading (and in one case, writing) of data. The Flags register has the
following composition:
Label #bits Descri tion
ReadEnable 1 Read data from DRAM
CA 02456652 2004-02-06
WO 03/015395 PCT/AU02/00919
43
WriteEnable 1 Write data to DRAM [onl valid for
1D direct looku ]
DataSize 1 0 = 8 bit data
1 = 16 bit data
Reserved 5 Must be 0
With the exception of the 1D Direct Lookup and DRAM FIFO, all Table I/O modes
only support reading, and not
writing. Therefore the ReadEnable bit will be set and the WriteEnable bit will
be clear for all I/O modes other than these
two modes. The 1D Direct Lookup supports 3 modes:
Read only, where the ReadEnable bit is set and the WriteEnable bit is clear
Write only, where the ReadEnable bit is clear and the WriteEnable bit is clear
Read-Modify-Write, where both ReadEnable and the WriteEnable bits are set
The different modes are described in the 1D Direct Lookup section below. The
DRAM FIFO mode supports only 1
mode:
Write-Read mode, where both ReadEnable and the WriteEnable bits are set
This mode is described in the DRAM FIFO section below. The DataSize flag
determines whether the size of each data
elements of the table is 8 or 16 bits. Only the two data sizes are supported.
32 bit elements can be created in either of 2
ways depending on the requirements of the process:
Reading from 2 16-bit tables simultaneously and combining the result. This is
convenient if timing is an
issue, but has the disadvantage of consuming 2 I/O Address Generators 189,
190, and each 32-bit
element is not readable by the CPU as a 32-bit entity.
Reading from a 16-bit table twice and combining the result. This is convenient
since only 1 lookup is
used, although different indexes must be generated and passed into the lookup.
I Dimensional Structures
Direct Lookup
A direct lookup is a simple indexing into a 1 dimensional lookup table.
Clients can choose between 3 access modes by
setting appropriate bits in the Flags register:
Read only
Write only
Read-Modify-Write
Read Only
A client passes the fixed-point index X into the Output FIFO, and the 8 or 16-
bit value at Table[Int(X)] is returned in
the Input FIFO. The fractional component of the index is completely ignored.
If the index is out of bounds, the
DuplicateEdge flag determines whether the edge pixel or ConstantPixel is
returned. The address generation is
straightforward:
If DataSize indicates 8 bits, X is barrel-shifted right FractX bits, and the
result is added to the table's base
address ImageStart.
If DataSize indicates 16 bits, X is barrel-shifted right FractX bits, and the
result shifted left 1 bit (bit0
becomes 0) is added to the table's base address ImageStart.
CA 02456652 2004-02-06
WO 03/015395 PCT/AU02/00919
44
The 8 or 16-bit data value at the resultant address is placed into the Input
FIFO. Address generation takes 1 cycle, and
transferring the requested data from the cache to the Output FIFO also takes 1
cycle (assuming a cache hit). For
example, assume we are looking up values in a 256-entry table, where each
entry is 16 bits, and the index is a 12 bit
fixed-point format of 8:4. FractX should be 4, and DataSize 1. When an index
is passed to the lookup, we shift right 4
bits, then add the result shifted left 1 bit to ImageStart.
Write Only
A client passes the fixed-point index X into the Output FIFO followed by the 8
or 16-bit value that is to be written to the
specified location in the table. A complete transfer takes a minimum of 2
cycles. 1 cycle for address generation, and 1
cycle to transfer the data from the FIFO to DRAM. There can be an arbitrary
number of cycles between a VLIW
process placing the index into the FIFO and placing the value to be written
into the FIFO. Address generation occurs in
the same way as Read Only mode, but instead of the data being read from the
address, the data from the Output FIFO is
written to the address. If the address is outside the table range, the data is
removed from the FIFO but not written to
DRAM.
Read-Modify-Write
A client passes the fixed-point index X into the Output FIFO, and the 8 or 16-
bit value at Table[Int(X)] is returned in
the Input FIFO. The next value placed into the Output FIFO is then written to
Table[Int(X)], replacing the value that
had been returned earlier. The general processing loop then, is that a process
reads from a location, modifies the value,
and writes it back. The overall time is 4 cycles:
Generate address from index
Return value from table
Modify value in some way
Write it back to the table
There is no specific read/write mode where a client passes in a flag saying
"read from X" or "write to X". Clients can
simulate a "read from X" by writing the original value, and a "write to X" by
simply ignoring the returned value.
However such use of the mode is not encouraged since each action consumes a
minimum of 3 cycles (the modify is not
required) and 2 data accesses instead of 1 access as provided by the specific
Read and Write modes.
Interpolate table
This is the same as a Direct Lookup in Read mode except that two values are
returned for a given fixed-point index X
instead of one. The values returned are Table[Int(X)], and Table[Int(X)+1]. If
either index is out of bounds the
DuplicateEdge flag determines whether the edge pixel or ConstantPixel is
returned. Address generation is the same as
Direct Lookup, with the exception that the second address is simply Address 1+
1 or 2 depending on 8 or 16 bit data.
Transferring the requested data to the Output FIFO takes 2 cycles (assuming a
cache hit), although two 8-bit values may
actually be returned from the cache to the Address Generator in a single 16-
bit fetch.
DRAM FIFO
A special case of a read/write 1D table is a DRAM FIFO. It is often necessary
to have a simulated FIFO of a given
length using DRAM and associated caches. With a DRAM FIFO, clients do not
index explicitly into the table, but write
to the Output FIFO as if it was one end of a FIFO and read from the Input FIFO
as if it was the other end of the same
CA 02456652 2004-02-06
WO 03/015395 PCT/AU02/00919
logical FIFO. 2 counters keep track of input and output positions in the
simulated FIFO, and cache to DRAM as
needed. Clients need to set both ReadEnable and WriteEnable bits in the Flags
register.
An example use of a DRAM FIFO is keeping a single line history of some value.
The initial history is written before
processing begins. As the general process goes through a line, the previous
line's value is retrieved from the FIFO, and
this line's value is placed into the FIFO (this line will be the previous line
when we process the next line). So long as
input and outputs match each other on average, the Output FIFO should always
be full. Consequently there is
effectively no access delay for this kind of FIFO (unless the total FIFO
length is very small - say 3 or 4 bytes, but that
would defeat the purpose of the FIFO).
2 Dimensional Tables
Direct Lookup
A 2 dimensional direct lookup is not supported. Since all cases of 2D lookups
are expected to be accessed for bi-linear
interpolation, .a special bi-linear lookup has been implemented.
Bi-Linear lookup
This kind of lookup is necessary for bi-linear interpolation of data from a 2D
table. Given fixed-point X and Y
coordinates (placed into the Output FIFO in the order Y, X), 4 values are
returned after lookup. The values (in order)
are:
Table[Int(X), Int(Y)]
Table[Int(X)+1, Int(Y)]
Table[Int(X), Int(Y)+1]
Table[Int(X)+1, Int(Y)+1]
The order of values returned gives the best cache coherence. If the data is 8-
bit, 2 values are returned each cycle over 2
cycles with the low order byte being the first data element. If the data is 16-
bit, the 4 values are returned in 4 cycles, 1
entry per cycle. Address generation takes 2 cycles. The first cycle has the
index (Y) barrel-shifted right FractY bits
being multiplied by RowOffset, with the result added to ImageStart. The second
cycle shifts the X index right by FractX
bits, and then either the result (in the case of 8 bit data) or the result
shifted left 1 bit (in the case of 16 bit data) is added
to the result from the first cycle. This gives us address Adr = address of
Table[Int(X), Int(Y)]:
Adr = ImageStart
+ ShiftRight(Y, FractY)* RowOffset)
+ ShiftRight(X, FractX)
We keep a copy of Adr in AdrOld for use fetching subsequent entries.
If the data is 8 bits, the timing is 2 cycles of address generation, followed
by 2 cycles of data being
returned (2 table entries per cycle).
If the data is 16 bits, the timing is 2 cycles of address generation, followed
by 4 cycles of data being
returned (1 entry per cycle)
The following 2 tables show the method of address calculation for 8 and 16 bit
data sizes:
C cle Calculation while fetchin 2 x 8-bit data entries from Adr
1 Adr = Adr + RowOffset
CA 02456652 2004-02-06
WO 03/015395 PCT/AU02/00919
46
2 <preparing next lookup>
C cle Calculation while fetchin 1 x 16-bit data
ent from Adr
1 Adr = Adr + 2
2 Adr = AdrOld + RowOffset
3 Adr = Adr + 2
4 <preparing next lookup>
In both cases, the first cycle of address generation can overlap the insertion
of the X index into the FIFO, so the
effective timing can be as low as 1 cycle for address generation, and 4 cycles
of return data. If the generation of indexes
is 2 steps ahead of the results, then there is no effective address generation
time, and the data is simply produced at the
appropriate rate (2 or 4 cycles per set).
3 Dimensional Lookup
Direct Lookup
Since all cases of 2D lookups are expected to be accessed for tri-linear
interpolation, .two special tri-linear lookups have
been implemented. The first is a straightforward lookup table, while the
second is for tri-linear interpolation from an
Image Pyramid.
Tri-linear lookup
This type of lookup is useful for 3D tables of data, such as color conversion
tables. The standard image parameters
define a single XY plane of the data - i.e. each plane consists of ImageHeight
rows, each row containing RowOffset
bytes. In most circumstances, assuming contiguous planes, one XY plane will be
ImageHeight x RowOffset bytes after
another. Rather than assume or calculate this offset, the software via the CPU
must provide it in the form of a 12-bit
ZOffset register. In this form of lookup, given 3 fixed-point indexes in the
order Z, Y, X, 8 values are returned in order
from the lookup table:
Table[Int(X), Int(Y), Int(Z)]
Table[Int(X)+1, Int(Y), Int(Z)]
Table[Int(X), Int(Y)+1, Int(Z)]
Table[Int(X)+1, Int(Y)+1, Int(Z)]
Table[Int(X), Int(Y), Int(Z)+1]
Table[Int(X)+1, Int(Y), Int(Z)+1]
Table[Int(X), Int(Y)+1, Int(Z)+1]
Table[Int(X)+1, Int(Y)+I, Int(Z)+I]
The order of values returned gives the best cache coherence. If the data is 8-
bit, 2 values are returned each cycle over 4
cycles with the low order byte being the first data element. If the data is 16-
bit, the 4 values are returned in 8 cycles, 1
entry per cycle. Address generation takes 3 cycles. The first cycle has the
index (Z) barrel-shifted right FractZ bits
being multiplied by the 12-bit ZOffset and added to ImageStart. The second
cycle has the index (Y) barrel-shifted right
FractY bits being multiplied by RowOffset, with the result added to the result
of the previous cycle. The second cycle
shifts the X index right by FractX bits, and then either the result (in the
case of 8 bit data) or the result shifted left I bit
CA 02456652 2004-02-06
WO 03/015395 PCT/AU02/00919
47
(in the case of 16 bit data) is added to the result from the second cycle.
This gives us address Adr= address of
Table[Int(X), Int(Y), Int(Z)):
Adr = ImageStart
+ (ShiftRight(Z, FractZ) * ZOffset)
+ (ShiftRight(Y, FractY)* RowOffset)
+ ShiftRight(X, FractX)
We keep a copy of Adr in AdrOld for use fetching subsequent entries.
If the data is 8 bits, the timing is 2 cycles of address generation, followed
by 2 cycles of data being
returned (2 table entries per cycle).
If the data is 16 bits, the timing is 2 cycles of address generation, followed
by 4 cycles of data being
returned ( 1 entry per cycle)
The following 2 tables show the method of address calculation for 8 and 16 bit
data sizes:
Cycle Calculation while fetchin 2 x 8-bit data entries
from Adr
1 Adr = Adr + RowOffset
2 Adr = AdrOld + ZOffset
3 Adr = Adr + RowOffset
4 <preparing nextlookup>
C cle Calculation while fetching 1 x 16-bit data
entries from Adr
1 Adr = Adr + 2
2 Adr = AdrOld + RowOffset
3 Adr = Adr + 2
4 Adr, AdrOld =AdrOld + Zoffset
S Adr = Adr + 2
6 Adr = AdrOld + RowOffset
7 Adr = Adr + 2
8 <preparing next lookup>
In both cases, the cycles of address generation can overlap the insertion of
the indexes into the FIFO, so the effective
timing for a single one-off lookup can be as low as 1 cycle for address
generation, and 4 cycles of return data. If the
generation of indexes is 2 steps ahead of the results, then there is no
effective address generation time, and the data is
simply produced at the appropriate rate (4 or 8 cycles per set).
Image Pyramid Lookup
During brushing, tiling, and warping it is necessary to compute the average
color of a particular area in an image. Rather
than calculate the value for each area given, these functions make use of an
image pyramid. The description and
construction of an image pyramid is detailed in the section on Internal Image
Formats in the DRAM interface 81 chapter
of this document. This section is concerned with a method of addressing given
pixels in the pyramid in terms of 3 fixed-
point indexes ordered: level (Z), Y, and X. Note that Image Pyramid lookup
assumes 8 bit data entries, so the DataSize
flag is completely ignored. After specification of Z, Y, and X, the following
8 pixels are returned via the Input FIFO:
CA 02456652 2004-02-06
WO 03/015395 PCT/AU02/00919
48
The pixel at [Int(X), Int(Y)], level Int(Z)
The pixel at [Int(X)+1, Int(Y)], level Int(Z)
The pixel at [Int(X), Int(Y)+1], level Int(Z)
The pixel at [Int(X)+1, Int(Y)+1], level Int(Z)
The pixel at [Int(X), Int(Y)], level Int(Z)+1
The pixel at [Int(X)+1, Int(Y)], level Int(Z)+1
The pixel at [Int(X), Int(Y)+1], level Int(Z)+1
The pixel at [Int(X)+1, Int(Y)+1], level Int(Z)+1
The 8 pixels are returned as 4 x 16 bit entries, with X and X+1 entries
combined hi/lo. For example, if the scaled (X, Y)
coordinate was (10.4, 12.7) the first 4 pixels returned would be: (10, 12),
(11, 12), (10, 13) and (11, 13). When a
coordinate is outside the valid range, clients have the choice of edge pixel
duplication or returning of a constant color
value via the DuplicateEdgePixels and ConstantPixel registers (only the low 8
bits are used). When the Image Pyramid
has been constructed, there is a simple mapping from level 0 coordinates to
level Z coordinates. The method is simply
to shift the X or Y coordinate right by Z bits. This must be done in addition
to the number of bits already shifted to
retrieve the integer portion of the coordinate (i.e. shifting right FractX and
FractY bits for X and Y ordinates
respectively). To find the ImageStart and RowOffset value for a given level of
the image pyramid, the 24-bit ZOffset
register is used as a pointer to a Level Information Table. The table is an
array of records, each representing a given
level of the pyramid, ordered by level number. Each record consists of a 16-
bit offset ZOffset from ImageStart to that
level of the pyramid (64-byte aligned address as lower 6 bits of the offset
are not present), and a 12 bit ZRowOffset for
that level. Element 0 of the table would contain a ZOffset of 0, and a
ZRowOffset equal to the general register
RowOffset, as it simply points to the full sized image. The ZOffset value at
element N of the table should be added to
ImageStart to yield the effective ImageStart of level N of the image pyramid.
The RowOffset value in element N of the
table contains the RowOffset value for level N. The software running on the
CPU must set up the table appropriately
before using this addressing mode. The actual address generation is outlined
here in a cycle by cycle description:
Cycle a Other Operations
Reg Address
ter
0 - - ZAdr = ShiftRight(Z, FractZ)
+ ZOffset
ZInt = ShiftRight(Z, FractZ)
1 ZOffset Zadr ZAdr += 2
YInt = ShiftRight(Y, FractY)
2 ZRowOffsetZAdr ZAdr += 2
YInt = ShiftRight(YInt, ZInt)
Adr = ZOffset + ImageStart
3 ZOffset ZAdr ZAdr += 2
Adr += ZrowOffset * YInt
XInt = ShiftRight(X, FractX)
4 ZAdr ZAdr Adr += ShiftRight(XInt, ZInt)
ZOffset += ShiftRight(XInt,
1)
FIFO Adr Adr += ZrowOffset
ZOffset += ImageStart
6 FIFO Adr Adr = (ZAdr * ShiftRight(Yint,l))
+ ZOffset
CA 02456652 2004-02-06
WO 03/015395 PCT/AU02/00919
49
7 FIFO Adr Adr += Zadr
8 FIFO Adr < Cycle 0 for next retrieval>
The address generation as described can be achieved using a single Barrel
Shifter, 2 adders, and a single 16x16
multiply/add unit yielding 24 bits. Although some cycles have 2 shifts, they
are either the same shift value (i.e. the
output of the Barrel Shifter is used two times) or the shift is 1 bit, and can
be hard wired. The following internal
registers are required: ZAdr, Adr, ZInt, YInt, XInt, ZRowOffset, and
ZImageStart. The Int registers only need to be 8
bits maximum, while the others can be up to 24 bits. Since this access method
only reads from, and does not write to
image pyramids, the CacheGroup2 is used to lookup the Image Pyramid Address
Table (via ZAdr). CacheGroupl is
used for lookups to the image pyramid itself (via Adr). The address table is
around 22 entries (depending on original
image size), each of 4 bytes. Therefore 3 or 4 cache lines should be allocated
to CacheGroup2, while as many cache
lines as possible should be allocated to CacheGroupl. The timing is 8 cycles
for returning a set of data, assuming that
Cycle 8 and Cycle 0 overlap in operation - i.e. the next request's Cycle 0
occurs during Cycle 8. This is acceptable
since Cycle 0 has no memory access, and Cycle 8 has no specific operations.
GENERATION OF COORDINATES USING VLIW VECTOR PROCESSOR 74
Some functions that are linked to Write Iterators require the X and/or Y
coordinates of the current pixel being processed
in part of the processing pipeline. Particular processing may also need to
take place at the end of each row, or column
being processed. In most cases, the PassX and PassY flags should be sufficient
to completely generate all coordinates.
However, if there are special requirements, the following functions can be
used. The calculation can be spread over a
number of ALUs, for a single cycle generation, or be in a single ALU 188 for a
multi-cycle generation.
Generate Sequential fX, Yl
When a process is processing pixels in sequential order according to the
Sequential Read Iterator (or generating pixels
and writing them out to a Sequential Write Iterator), the following process
can be used to generate X, Y coordinates
instead of PassX/PassY flags as shown in Fig. 23.
The coordinate generator counts up to ImageWidth in the X ordinate, and once
per ImageWidth pixels increments the Y
ordinate. The actual process is illustrated in Fig. 24, where the following
constants are set by software:
Constant Value
K, Ima eWidth
KZ I ImageHeight (optional)
The following registers are used to hold temporary variables:
Variable Value
Reg, X (starts at 0 each
line)
Reg2 Y (starts at 0)
The requirements are summarized as follows:
Re uirements *+ + R K LU Iterators
General 0 3/4 2 1/2 0 0
TOTAL 0 3/4 2 1/2 0 0
CA 02456652 2004-02-06
WO 03/015395 PCT/AU02/00919
Generate Vertical Strip fX, Yl
When a process is processing pixels in order to write them to a Vertical Strip
Write Iterator, and for some reason cannot
use the PassX/PassY flags, the process as illustrated in Fig. 25 can be used
to generate X, Y coordinates. The
coordinate generator simply counts up to ImageWidth in the X ordinate, and
once per ImageWidth pixels increments the
Y ordinate. The actual process is illustrated in Fig. 26, where the following
constants are set by software:
Constant Value
K, 32
KZ ImageWidth
K3 ImageHeight
The following registers are used to hold temporary variables:
Variable Value
Re , StartX (starts at 0, and is incremented b 32
once er vertical stri )
Re Z X
Reg3 EndX (starts at 32 and is incremented by 32
to a maximum of ImageWidth) once
er vertical stri )
Re 4 Y
The requirements are summarized as follows:
Re uirements *+ + R K LU Iterators
General 0 4 4 3 0 0
TOTAL 0 4 4 3 0 0
The calculations that occur once per vertical strip (2 additions, one of which
has an associated MIN) are not included in
the general timing statistics because they are not really part of the per
pixel timing. However they do need to be taken
into account for the programming of the microcode for the particular function.
Image Sensor Interface (ISI 83)
The Image Sensor Interface (ISI 83) takes data from the CMOS Image Sensor and
makes it available for storage in
DRAM. The image sensor has an aspect ratio of 3:2, with a typical resolution
of 750 x 500 samples, yielding 375K (8
bits per pixel). Each 2x2 pixel block has the configuration as shown in Fig.
27. The ISI 83 is a state machine that sends
control information to the Image Sensor, including frame sync pulses and pixel
clock pulses in order to read the image.
Pixels are read from the image sensor and placed into the VLIW Input FIFO 78.
The VLIW is then able to process
and/or store the pixels. This is illustrated further in Fig. 28. The ISI 83 is
used in conjunction with a VLIW program
that stores the sensed Photo Image in DRAM. Processing occurs in 2 steps:
A small VLIW program reads the pixels from the FIFO and writes them to DRAM
via a Sequential Write
Iterator.
The Photo Image in DRAM is rotated 90, 180 or 270 degrees according to the
orientation of the camera
when the photo was taken.
CA 02456652 2004-02-06
WO 03/015395 PCT/AU02/00919
51
If the rotation is 0 degrees, then step 1 merely writes the Photo Image out to
the final Photo Image location and step 2 is
not performed. If the rotation is other than 0 degrees, the image is written
out to a temporary area (for example into the
Print Image memory area), and then rotated during step 2 into the final Photo
Image location. Step 1 is very simple
microcode, taking data from the VLIW Input FIFO 78 and writing it to a
Sequential Write Iterator. Step 2's rotation is
accomplished by using the accelerated Vark Affine Transform function. The
processing is performed in 2 steps in order
to reduce design complexity and to re-use the Vark affine transform rotate
logic already required for images. This is
acceptable since both steps are completed in approximately 0.03 seconds, a
time imperceptible to the operator of the
Artcam. Even so, the read process is sensor speed bound, taking 0.02 seconds
to read the full frame, and approximately
0.01 seconds to rotate the image.
The orientation is important for converting between the sensed Photo Image and
the internal format image, since the
relative positioning of R, G, and B pixels changes with orientation.. The
processed image may also have to be rotated
during the Print process in order to be in the correct orientation for
printing. The 3D model of the Artcam has 2 image
sensors, with their inputs multiplexed to a single ISI 83 (different
microcode, but same ACP 31). Since each sensor is a
frame store, both images can be taken simultaneously, and then transferred to
memory one at a time.
Display Controller 88
When the "Take" button on an Artcam is half depressed, the TFT will display
the current image from the image sensor
(converted via a simple VLIW process). Once the Take button is fully
depressed, the Taken Image is displayed. When
the user presses the Print button and image processing begins, the TFT is
turned off. Once the image has been printed
the TFT is turned on again. The Display Controller 88 is used in those Artcam
models that incorporate a flat panel
display. An example display is a TFT LCD of resolution 240 x 160 pixels. The
structure of the Display Controller 88
isl illustrated in Fig. 29. The Display Controller 88 State Machine contains
registers that control the timing of the
Sync Generation, where the display image is to be taken from (in DRAM via the
Data cache 76 via a specific Cache
Group), and whether the TFT should be active or not (via TFT Enable) at the
moment. The CPU can write to these
registers via the low speed bus. Displaying a 240 x 160 pixel image on an RGB
TFT requires 3 components per pixel.
The image taken from DRAM is displayed via 3 DACs, one for each of the R, G,
and B output signals. At an image
refresh rate of 30 frames per second (60 fields per second) the Display
Controller 88 requires data transfer rates of:
240 x 160 x 3 x 30 = 3.5MB per second
This data rate is low compared to the rest of the system. However it is high
enough to cause VLIW programs to slow
down during the intensive image processing. The general principles of TFT
operation should reflect this.
Imase Data Formats
As stated previously, the DRAM Interface 81 is responsible for interfacing
between other client portions of the
ACP chip and the RAMBUS DRAM. In effect, each module within the DRAM Interface
is an address generator.
There are three logical types of images manipulated by the ACP. They are:
-CCD Image, which is the Input Image captured from the CCD.
-Internal Image format - the Image format utilised internally by the Artcam
device.
Print Image - the Output Image format printed by the Artcam
These images are typically different in color space, resolution, and the
output & input color spaces which can vary
CA 02456652 2004-02-06
WO 03/015395 PCT/AU02/00919
52
from camera to camera. For example, a CCD image on a low-end camera may be a
different resolution, or have different
color characteristics from that used in a high-end camera. However all
internal image formats are the same format in terms
of color space across all cameras.
In addition, the three image types can vary with respect to which direction is
'up'. The physical orientation of the
camera causes the notion of a portrait or landscape image, and this must be
maintained throughout processing. For this
reason, the internal image is always oriented correctly, and rotation is
performed on images obtained from the CCD and
during the print operation.
CCD Ima~~lnization
Although many different CCD image sensors could be utilised, it will be
assumed that the CCD itself is a 750 x 500
image sensor, yielding 375,000 bytes (8 bits per pixel). Each 2x2 pixel block
having the configuration as depicted in Fig.
30.
A CCD Image as stored in DRAM has consecutive pixels with a given line
contiguous in memory. Each line is
stored one after the other. The image sensor Interface 83 is responsible for
taking data from the CCD and storing it in the
DRAM correctly oriented. Thus a CCD image with rotation 0 degrees has its
first line G, R, G, R, G, R... and its second line
as B, G, B, G, B, G.... If the CCD image should be portrait, rotated 90
degrees, the first line will be R, G, R, G, R, G and
the second line G, B, G, B, G, B...etc.
Pixels are stored in an interleaved fashion since all color components are
required in order to convert to the internal
image format.
It should be noted that the ACP 31 makes no assumptions about the CCD pixel
format, since the actual CCDs for
imaging may vary from Artcam to Artcam, and over time. All processing that
takes place via the hardware is controlled by
major microcode in an attempt to extend the usefulness of the ACP 31.
Internal Image Organization
Internal images typically consist of a number of channels. Vark images can
include, but are not limited to:
Lab
Laba
LabO
a~
L
L, a and b correspond to components of the Lab color space, a is a matte
channel (used for compositing), and D is a
bump-map channel (used during brushing, tiling and illuminating).
The VLIW processor 74 requires images to be organized in a planar
configuration. Thus a Lab image would be
stored as 3 separate blocks of memory:
one block for the L channel,
one block for the a channel, and
one block for the b channel
Within each channel block, pixels are stored contiguously for a given row
(plus some optional padding bytes), and
rows are stored one after the other.
Turning to Fig. 31 there is illustrated an example form of storage of a
logical image 100. The logical image 100 is
CA 02456652 2004-02-06
WO 03/015395 PCT/AU02/00919
53
stored in a planar fashion having L 101, a 102 and b 103 color components
stored one after another. Alternatively, the
logical image 100 can be stored in a compressed format having an uncompressed
L component 101 and compressed A and
B components 105, 106.
Turning to Fig. 32, the pixels of for line n 110 are stored together before
the pixels of for line and n + 1 (111). With
the image being stored in contiguous memory within a single channel.
In the 8MB-memory model, the final Print Image after all processing is
finished, needs to be compressed in the
chrominance channels. Compression of chrominance channels can be 4:1, causing
an overall compression of 12:6, or 2:1.
Other than the final Print Image, images in the Artcam are typically not
compressed. Because of memory
constraints, software may choose to compress the final Print Image in the
chrominance channels by scaling each of these
channels by 2:1. If this has been done, the PRINT Vark function call utilised
to print an image must be told to treat the
specified chrominance channels as compressed. The PRINT function is the only
function that knows how to deal with
compressed chrominance, and even so, it only deals with a fixed 2:1
compression ratio.
Although it is possible to compress an image and then operate on the
compressed image to create the final print
image, it is not recommended due to a loss in resolution. In addition, an
image should only be compressed once - as the final
stage before printout. While one compression is virtually undetectable,
multiple compressions may cause substantial image
degradation.
Clip image Organization
Clip images stored on Artcards have no explicit support by the ACP 31.
Software is responsible for taking any
images from the current Artcard and organizing the data into a form known by
the ACP. If images are stored compressed on
an Artcard, software is responsible for decompressing them, as there is no
specific hardware support for decompression of
Artcard images.
Image Pyramid Organization
During brushing, tiling, and warping processes utilised to manipulate an image
it is often necessary to compute the
average color of a particular area in an image. Rather than calculate the
value for each area given, these functions make use
of an image pyramid. As illustrated in Fig. 33, an image pyramid is
effectively a multi-resolutionpixel- map. The original
image 115 is a 1:1 representation. Low-pass filtering and sub-sampling by 2:1
in each dimension produces an image'/a the
original size 116. This process continues until the entire image is
represented by a single pixel. An image pyramid is
constructed from an original internal format image, and consumes 1/3 of the
size taken up by the original image (1/4 + 1/16
+ 1/64 + ...). For an original image of 1500 x 1000 the corresponding image
pyramid is approximately'/zMB. An image
pyramid is constructed by a specific Vark function, and is used as a parameter
to other Vark functions.
Print Image Organization
The entire processed image is required at the same time in order to print it.
However the Print Image output can
comprise a CMY dithered image and is only a transient image format, used
within the Print Image functionality. However,
it should be noted that color conversion will need to take place from the
internal color space to the print color space. In
addition, color conversion can be tuned to be different for different print
rolls in the camera with different ink characteristics
e.g. Sepia output can be accomplished by using a specific sepia toning
Artcard, or by using a sepia tone print-roll (so all
Artcards will work in sepia tone).
Color Spaces
CA 02456652 2004-02-06
WO 03/015395 PCT/AU02/00919
54
As noted previously there are 3 color spaces used in the Artcam, corresponding
to the different image types.
The ACP has no direct knowledge of specific color spaces. Instead, it relies
on client color space conversion tables
to convert between CCD, internal, and printer color spaces:
CCD:RGB
Internal:Lab
Printer:CMY
Removing the color space conversion from the ACP 31 allows:
-Different CCDs to be used in different cameras
-Different inks (in different print rolls over time) to be used in the same
camera
-Separation of CCD selection from ACP design path
-A well defined internal color space for accurate color processing
Artcard Interface 87
The Artcard Interface (AI) takes data from the linear image Sensor while an
Artcard is passing under it, and makes that
data available for storage in DRAM. The image sensor produces 11,000 8-bit
samples per scanline, sampling the
Artcard at 4800 dpi. The AI is a state machine that sends control information
to the linear sensor, including LineSync
pulses and PixeIClock pulses in order to read the image. Pixels are read from
the linear sensor and placed into the
VLIW Input FIFO 78. The VLIW is then able to process and/or store the pixels.
The AI has only a few registers:
Register Name Descri tion
NumPixels The number of ixels in a sensor line (a
rox 11,000)
Status The Print Head Interface's Status Register
PixelsRemainin The number of b tes remainin in the current
line
Actions
Reset A write to this register resets the AI,
stops any scanning, and loads all
registers with 0.
Scan A write to this register with a non-zero
value sets the Scanning bit of the
Status register, and causes the Artcard
Interface Scan cycle to start.
A write to this register with 0 stops the
scanning process and clears the
Scanning bit in the Status register.
The Scan cycle causes the AI to transfer
NumPixels bytes from the sensor
to the VLIW Input FIFO 78, producing the
PixelClock signals
appropriately. Upon completion of NumPixels
bytes, a LineSync pulse is
given and the Scan cycle restarts.
The PixelsRemaining register holds the
number of pixels remaining to be
read on the current scanline.
Note that the CPU should clear the VLIW Input FIFO 78 before initiating a
Scan. The Status register has bit
interpretations as follows:
Bit Name Bits Descri tion
Scanning 1 If set, the AI is currently scanning, with the number of pixels
CA 02456652 2004-02-06
WO 03/015395 PCT/AU02/00919
remaining to be transferred from the current line recorded in
PixelsRemaining.
If clear, the AI is not currently scanning, so is not transferring pixels
to the VLIW Invut FIFO 78.
Artcard Interface (AI) 87
The Artcard Interface (An 87 is responsible for taking an Artcard image from
the Artcard Reader 34 , and decoding
it into the original data (usually a Vark script). Specifically, the AI 87
accepts signals from the Artcard scanner linear CCD
34, detects the bit pattern printed on the card, and converts the bit pattern
into the original data, correcting read errors.
With no Artcard 9 inserted, the image printed from an Artcam is simply the
sensed Photo Image cleaned up by any
standard image processing routines. The Artcard 9 is the means by which users
are able to modify a photo before printing it
out. By the simple task of inserting a specific Artcard 9 into an Artcam, a
user is able to define complex image processing to
be performed on the Photo Image.
With no Artcard inserted the Photo Image is processed in a standard way to
create the Print Image. When a single Artcard 9
is inserted into the Artcam, that Artcard's effect is applied to the Photo
Image to generate the Print Image.
When the Artcard 9 is removed (ejected), the printed image reverts to the
Photo Image processed in a standard way. When
the user presses the button to eject an Artcard, an event is placed in the
event queue maintained by the operating system
running on the Artcam Central Processor 31. When the event is processed (for
example after the current Print has occurred),
the following things occur:
If the current Artcard is valid, then the Print Image is marked as invalid and
a 'Process Standard' event is placed in
the event queue. When the event is eventually processed it will perform the
standard image processing operations on the
Photo Image to produce the Print Image.
The motor is started to eject the Artcard and a time-specific 'Stop-Motor'
Event is added to the event queue.
Inserting an Artcard
When a user inserts an Artcard 9, the Artcard Sensor 49 detects it notifying
the ACP72. This results in the software
inserting an 'Artcard Inserted' event into the event queue. When the event is
processed several things occur:
The current Artcard is marked as invalid (as opposed to 'none').
The Print Image is marked as invalid.
The Artcard motor 37 is started up to load the Artcard
The Artcard Interface 87 is instructed to read the Artcard
The Artcard Interface 87 accepts signals from the Artcard scanner linear CCD
34, detects the bit pattern printed on
the card, and corrects errors in the detected bit pattern, producing a valid
Artcard data block in DRAM.
Reading Data from the Artcard CCD - General Considerations
As illustrated in Fig. 34, the Data Card reading process has 4 phases operated
while the pixel data is read from the
card. The phases are as follows:
Phase 1. Detect data area on Artcard
Phase 2. Detect bit pattern from Artcard based on CCD pixels, and write as
bytes.
CA 02456652 2004-02-06
WO 03/015395 PCT/AU02/00919
56
Phase 3. Descramble and XOR the byte-pattern
Phase 4. Decode data (Reed-Solomon decode)
As illustrated in Fig. 35, the Artcard 9 must be sampled at least at double
the printed resolution to satisfy Nyquist's
Theorem. In practice it is better to sample at a higher rate than this.
Preferably, the pixels are sampled 230 at 3 times the
resolution of a printed dot in each dimension, requiring 9 pixels to define a
single dot. Thus if the resolution of the Artcard 9
is 1600 dpi, and the resolution of the sensor 34 is 4800 dpi, then using a
SOmm CCD image sensor results in 9450 pixels per
column. Therefore if we require 2MB of dot data (at 9 pixels per dot) then
this requires 2MB*8*9/9450 = 15,978 columns =
approximately 16,000 columns. Of course if a dot is not exactly aligned with
the sampling CCD the worst and most likely
case is that a dot will be sensed over a 16 pixel area (4x4) 231.
An Artcard 9 may be slightly warped due to heat damage, slightly rotated (up
to, say 1 degree) due to differences in
insertion into an Artcard reader, and can have slight differences in true data
rate due to fluctuations in the speed of the reader
motor 37. These changes will cause columns of data from the card not to be
read as corresponding columns of pixel data. As
illustrated in Fig. 36, a 1 degree rotation in the Artcard 9 can cause the
pixels from a column on the card to be read as pixels
across 166 columns:
Finally, the Artcard 9 should be read in a reasonable amount of time with
respect to the human operator. The data
on the Artcard covers most of the Artcard surface, so timing concerns can be
limited to the Artcard data itself. A reading
time of 1.5 seconds is adequate for Artcard reading.
The Artcard should be loaded in 1.5 seconds. Therefore all 16,000 columns of
pixel data must be read from the
CCD 34 in 1.5 second, i.e. 10,667 columns per second. Therefore the time
available to read one column is 1/10667 seconds,
or 93,747ns. Pixel data can be written to the DRAM one column at a time,
completely independently from any processes
that are reading the pixel data.
The time to write one column of data (9450/2 bytes since the reading can be 4
bits per pixel giving 2 x 4 bit pixels
per byte) to DRAM is reduced by using 8 cache lines. If 4 lines were written
out at one time, the 4 banks can be written to
independently, and thus overlap latency reduced. Thus the 4725 bytes can be
written in 11,840ns (4725/128 * 320ns). Thus
the time taken to write a given column's data to DRAM uses just under 13% of
the available bandwidth.
Decoding an Artcard
A simple look at the data sizes shows the impossibility of fitting the process
into the 8MB of memory 33 if the
entire Artcard pixel data (140 MB if each bit is read as a 3x3 array) as read
by the linear CCD 34 is kept. For this reason, the
reading of the linear CCD, decoding of the bitmap, and the un-bitmap process
should take place in real- time (while the
Artcard 9 is traveling past the linear CCD 34), and these processes must
effectively work without having entire data stores
available.
When an Artcard 9 is inserted, the old stored Print Image and any expanded
Photo Image becomes invalid. The new
Artcard 9 can contain directions for creating a new image based on the
currently captured Photo Image. The old Print Image
is invalid, and the area holding expanded Photo Image data and image pyramid
is invalid, leaving more than SMB that can
be used as scratch memory during the read process. Strictly speaking, the 1MB
area where the Artcard raw data is to be
written can also be used as scratch data during the Artcard read process as
long as by the time the final Reed-Solomon
decode is to occur, that 1MB area is free again. The reading process described
here does not make use of the extra 1MB area
(except as a final destination for the data).
CA 02456652 2004-02-06
WO 03/015395 PCT/AU02/00919
57
It should also be noted that the unscrambling process requires two sets of 2MB
areas of memory since
unscrambling cannot occur in place. Fortunately the SMB scratch area contains
enough space for this process.
Turning now to Fig. 37, there is shown a flowchart 220 of the steps necessary
to decode the Artcard data. These
steps include reading in the Artcard 221, decoding the read data to produce
corresponding encoded XORed scrambled
bitmap data 223. Next a checkerboard XOR is applied to the data to produces
encoded scrambled data 224. This data is then
unscrambled 227 to produce data 225 before this data is subjected to Reed-
Solomon decoding to produce the original raw
data 226. Alternatively, unscrambling and XOR process can take place together,
not requiring a separate pass of the data.
Each of the above steps is discussed in further detail hereinafter. As noted
previously with reference to Fig. 37, the Artcard
Interface, therefore, has 4 phases, the first 2 of which are time-critical,
and must take place while pixel data is being read
from the CCD:
Phase Detect data area on Artcard
1.
Phase Detect bit pattern from Artcard based on
2. CCD pixels, and write as bytes.
Phase Descramble and XOR the byte-pattern
3.
Phase Decode data (Reed-Solomon decode)
4.
The
four
phases
are
described
in
more
detail
as
follows:
Phase 1. As the Artcard 9 moves past the CCD 34 the AI must detect the start
of the data area by robustly detecting
special targets on the Artcard to the left of the data area. If these cannot
be detected, the card is marked as invalid. The
detection must occur in real-time, while the Artcard 9 is moving past the CCD
34.
If necessary, rotation invariance can be provided. In this case, the targets
are repeated on the right side of the
Artcard, but relative to the bottom right corner instead of the top corner. In
this way the targets end up in the correct
orientation if the card is inserted the "wrong" way. Phase 3 below can be
altered to detect the orientation of the data, and
account for the potential rotation.
Phase 2. Once the data area has been determined, the main read process begins,
placing pixel data from the CCD
into an 'Artcard data window', detecting bits from this window, assembling the
detected bits into bytes, and constructing a
byte-image in DRAM. This must all be done while the Artcard is moving past the
CCD.
Phase 3. Once all the pixels have been read from the Artcard data area, the
Artcard motor 37 can be stopped, and
the byte image descrambled and XORed. Although not requiring real-time
performance, the process should be fast enough
not to annoy the human operator. The process must take 2 MB of scrambled bit-
image and write the unscrambled/XORed
bit-image to a separate 2MB image.
Phase 4. The final phase in the Artcard read process is the Reed-Solomon
decoding process, where the 2MB bit-
image is decoded into a 1MB valid Artcard data area. Again, while not
requiring real-time performance it is still necessary to
decode quickly with regard to the human operator. If the decode process is
valid, the card is marked as valid. If the decode
failed, any duplicates of data in the bit-image are attempted to be decoded, a
process that is repeated until success or until
there are no more duplicate images of the data in the bit image.
The four phase process described requires 4.5 MB of DRAM. 2MB is reserved for
Phase 2 output, and O.SMB is
reserved for scratch data during phases 1 and 2. The remaining 2MB of space
can hold over 440 columns at 4725 byes per
column. In practice, the pixel data being read is a few columns ahead of the
phase 1 algorithm, and in the worst case, about
180 columns behind phase 2, comfortably inside the 440 column limit.
CA 02456652 2004-02-06
WO 03/015395 PCT/AU02/00919
58
A description of the actual operation of each phase will now be provided in
greater detail.
Phase 1 - Detect data area on Artcard
This phase is concerned with robustly detecting the left-hand side of the data
area on the Artcard 9. Accurate
detection of the data area is achieved by accurate detection of special
targets printed on the left side of the card. These targets
are especially designed to be easy to detect even if rotated up to 1 degree.
Turning to Fig. 38, there is shown an enlargement of the left hand side of an
Artcard 9. The side of the card is
divided into 16 bands, 239 with a target eg. 241 located at the center of each
band. The bands are logical in that there is no
line drawn to separate bands. Turning to Fig. 39, there is shown a single
target 241. The target 241, is a printed black square
containing a single white dot. The idea is to detect firstly as many targets
241 as possible, and then to join at least 8 of the
detected white-dot locations into a single logical straight line. If this can
be done, the start of the data area 243 is a fixed
distance from this logical line. If it cannot be done, then the card is
rejected as invalid.
As shown in Fig. 38, the height of the card 9 is 3150 dots. A target (Target0)
241 is placed a fixed distance of 24
dots away from the top left corner 244 of the data area so that it falls well
within the first of 16 equal sized regions 239 of
192 dots (576 pixels) with no target in the final pixel region of the card.
The target 241 must be big enough to be easy to
detect, yet be small enough not to go outside the height of the region if the
card is rotated 1 degree. A suitable size for the
target is a 31 x 31 dot (93 x 93 sensed pixels) black square 241 with the
white dot 242.
At the worst rotation of 1 degree, a 1 column shift occurs every 57 pixels.
Therefore in a 590 pixel sized band, we
cannot place any part of our symbol in the top or bottom 12 pixels or so of
the band or they could be detected in the wrong
band at CCD read time if the card is worst case rotated.
Therefore, if the black part of the rectangle is 57 pixels high (19 dots) we
can be sure that at least 9.5 black pixels
will be read in the same column by the CCD (worst case is half the pixels are
in one column and half in the next). To be sure
of reading at least 10 black dots in the same column, we must have a height of
20 dots. To give room for erroneous detection
on the edge of the start of the black dots, we increase the number of dots to
31, giving us 15 on either side of the white dot at
the target's local coordinate (15, 15). 31 dots is 91 pixels, which at most
suffers a 3 pixel shift in column, easily within the
576 pixel band.
Thus each target is a block of 31 x 31 dots (93 x 93 pixels) each with the
composition:
15 columns of 31 black dots each (45 pixel width columns of 93 pixels).
1 column of 15 black dots (45 pixels) followed by 1 white dot (3 pixels) and
then a further 15 black dots (45 pixels)
15 columns of 31 black dots each (45 pixel width columns of 93 pixels)
Detect targets
Targets are detected by reading columns of pixels, one column at a time rather
than by detecting dots. It is
necessary to look within a given band for a number of columns consisting of
large numbers of contiguous black pixels to
build up the left side of a target. Next, it is expected to see a white region
in the center of further black columns, and finally
the black columns to the left of the target center.
Eight cache lines are required for good cache performance on the reading of
the pixels. Each logical read fills 4
cache lines via 4 sub-reads while the other 4 cache-lines are being used. This
effectively uses up 13% of the available
DRAM bandwidth.
As illustrated in Fig. 40, the detection mechanism FIFO for detecting the
targets uses a filter 245, run-length
CA 02456652 2004-02-06
WO 03/015395 PCT/AU02/00919
59
encoder 246, and a FIFO 247 that requires special wiring of the top 3 elements
(S1, S2, and S3) for random access.
The columns of input pixels are processed one at a time until either all the
targets are found, or until a specified
number of columns have been processed. To process a column, the pixels are
read from DRAM, passed through a filter 245
to detect a 0 or 1, and then run length encoded 246. The bit value and the
number of contiguous bits of the same value are
placed in FIFO 247. Each entry of the FIFO 249 is in 8 bits, 7 bits 250 to
hold the run-length, and 1 bit 249 to hold the value
of the bit detected.
The run-length encoder 246 only encodes contiguous pixels within a 576 pixel (
192 dot) region.
The top 3 elements in the FIFO 247 can be accessed 252 in any random order.
The run lengths (in pixels) of these
entries are filtered into 3 values: short, medium, and long in accordance with
the following table:
Short Used to detect white dot. RunLength < 16
Medium Used to detect runs of black 16<= RunLength
above or below the < 48
white dot in the center of
the target.
Long Used to detect run lengths RunLength >=
of black to the left and 48
right of the center dot in
the target.
Looking at the top three entries in the FIFO 247 there are 3 specific cases of
interest:
Case 1 S 1 = white long We have detected a black column
of the target to
S2 = black long the left of or to the right
of the white center dot.
S3 = white medium/lon
Case 2 S 1 = white long If we've been processing a
series of columns of
S2 = black medium Case 1 s, then we have probably
detected the
S3 = white short white dot in this column.
We know that the next
Previous 8 columns entry will be black (or it
were Case 1 would have been
included in the white S3 entry),
but the number of
black pixels is in question.
Need to verify by
checking after the next FIFO
advance (see Case
3).
Case 3 Prev = Case 2 We have detected part of the
white dot. We
S3 = black med expect around 3 of these,
and then some more
columns of Case 1.
Preferably, the following information per region band is kept:
TargetDetected 1 bit
BIackDetectCount 4 bits
WhiteDetectCount 3 bits
PrevColumnStartPixel 15 bits
TargetColumn ordinate16 bits (15:1)
Tar etRow ordinate 16 bits (15:1)
TOTAL 7 b es (rounded to 8 b es for easy
addressing)
Given a total of 7 bytes. It makes address generation easier if the total is
assumed to be 8 bytes. Thus 16 entries
CA 02456652 2004-02-06
WO 03/015395 PCT/AU02/00919
requires 16 * 8 = 128 bytes, which fits in 4 cache lines. The address range
should be inside the scratch O.SMB DRAM area
since other phases make use of the remaining 4MB data area.
When beginning to process a given pixel column, the register value
S2StartPixel 254 is reset to 0. As entries in the
FIFO advance from S2 to S1, they are also added 255 to the existing
S2StartPixel value, giving the exact pixel position of
the run currently defined in S2. Looking at each of the 3 cases of interest in
the FIFO, S2StartPixel can be used to determine
the start of the black area of a target (Cases 1 and 2), and also the start of
the white dot in the center of the target (Case 3).
An algorithm for processing columns can be as follows:
1 TargetDetected[0-15]:= 0
BlackDetectCount[0-15] := 0
WhiteDetectCount[0-15] := 0
TargetRow[0-15] := 0
TargetColumn[0-15] := 0
PrevColStartPixel[0-15] := 0
CurrentColumn := 0
2 Do ProcessColumn
3 CurrentColumn++
4 If (CurrentColumn <= LastValidColumn)
Goto 2
The steps involved in the processing a column (Process Column) are as follows:
1 S2StartPixel := 0
FIFO := 0
BlackDetectCount := 0
WhiteDetectCount := 0
ThisColumnDetected := FALSE
PrevCaseWasCase2 := FALSE
2 If (! TargetDetected[Target]) & (! ColumnDetected[Target])
ProcessCases
EndIf
3 PrevCaseWasCase2 := Case=2
4 I Advance FIFO
The processing for each of the 3 (Process Cases) cases is as follows:
Case 1:
BlackDetectCount[target] < 8 ~ := ABS(S2StartPixel -PrevColStartPixel[Target])
OR If (0<=~< 2)
WhiteDetectCount[Target] = 0 BlackDetectCount[Target]++ (max value =8)
Else
BIackDetectCount[Target] := 1
WhiteDetectCount[Target] := 0
EndIf
PrevColStartPixel[Tar et] := S2StartPixel
CA 02456652 2004-02-06
WO 03/015395 PCT/AU02/00919
61
ColumnDetected[Target) := TRUE
BitDetected = 1
BlackDetectCount(target] PrevColStartPixel[Target] := S2StartPixel
>= 8
WhiteDetectCount[Target] ColumnDetected[Target] := TRUE
!= 0
BitDetected = 1
TargetDetected[Target] := TRUE
TargetColumn[Target] := CurrentColumn
- 8 -
(WhiteDetectCount[Tar et]/2)
Case 2:
No special processing is recorded except for setting the 'PrevCaseWasCase2'
flag for identifying Case 3 (see Step 3
of processing a column described above)
Case 3:
PrevCaseWasCase2 = TRUE If (WhiteDetectCount[Target] < 2)
BlackDetectCount[Target] >= 8 TargetRow[Target] = S2StartPixel +
(S2R"n,m,g~,,/2)
WhiteDetectCount=1 EndIf
0 := ABS(S2StartPixel -PrevColStartPixel[Target])
If (0<=0< 2)
WhiteDetectCount(Target]++
Else
WhiteDetectCount[Target] := 1
EndIf
PrevColStartPixel[Target) := S2StartPixel
ThisColumnDetected := TRUE
BitDetected = 0
At the end of processing a given column, a comparison is made of the current
column to the maximum number of
columns for target detection. If the number of columns allowed has been
exceeded, then it is necessary to check how many
targets have been found. If fewer than 8 have been found, the card is
considered invalid.
Process tarp
After the targets have been detected, they should be processed. All the
targets may be available or merely some of
them. Some targets may also have been erroneously detected.
This phase of processing is to determine a mathematical line that passes
through the center of as many targets as
possible. The more targets that the line passes through, the more confident
the target position has been found. The limit is set
to be 8 targets. If a line passes through at least 8 targets, then it is taken
to be the right one.
It is all right to take a brute-force but straightforward approach since there
is the time to do so (see below), and
lowering complexity makes testing easier. It is necessary to determine the
line between targets 0 and 1 (if both targets are
considered valid) and then determine how many targets fall on this line. Then
we determine the line between targets 0 and 2,
and repeat the process. Eventually we do the same for the line between targets
1 and 2, 1 and 3 etc. and finally for the line
between targets 14 and 15. Assuming all the targets have been found, we need
to perform 15+14+13+ ...= 90 sets of
calculations (with each set of calculations requiring 16 tests = 1440 actual
calculations), and choose the line which has the
CA 02456652 2004-02-06
WO 03/015395 PCT/AU02/00919
62
maximum number of targets found along the line. The algorithm for target
location can be as follows:
TargetA := 0
MaxFound := 0
BestLine := 0
While (TargetA < 15)
If (TargetA is Valid)
TargetB:= TargetA + 1
While (TargetB<= 15)
If (TargetB is valid)
CurrentLine := line between TargetA and TargetB
TargetC := 0;
While (TargetC <= 15)
If (TargetC valid AND TargetC on line AB)
TargetsHit++
EndIf
If (TargetsHit > MaxFound)
MaxFound := TargetsHit
BestLine := CurrentLine
EndIf
TargetC++
EndWhile
EndIf
TargetB ++
EndWhile
EndIf
TargetA++
EndWhile
If (MaxFound < 8)
Card is Invalid
Else
Store expected centroids for rows based on BestLine
EndIf
As illustrated in Fig. 34, in the algorithm above, to determine a CurrentLine
260 from Target A 261 and target B, it
is necessary to calculate Orow (264) & Ocolumn (263) between targets 261, 262,
and the location of Target A. It is then
possible to move from Target 0 to Target 1 etc. by adding Orow and Ocolumn.
The found (if actually found) location of
target N can be compared to the calculated expected position of Target N on
the line, and if it falls within the tolerance, then
Target N is determined to be on the line.
CA 02456652 2004-02-06
WO 03/015395 PCT/AU02/00919
63
To calculate Orow & Ocolumn:
Orow = (rOWT~,gew - rOw T~,gete)/(B-A)
Ocolumn =(columnT~ge,p,-columnT;~ge,B)/(B-A)
Then we calculate the position of Target0:
row = rowTargetA - (A * Orow)
column = columnTargetA - (A * Ocolumn )
And compare (row, column) against the actual rowT~e,o and COlumnT~e,o. To move
from one expected target to the
next (e.g. from Target0 to Targetl), we simply add Orow and column to row and
column respectively. To check if each
target is on the line, we must calculate the expected position of Target0, and
then perform one add and one comparison for
each target ordinate.
At the end of comparing all 16 targets against a maximum of 90 lines, the
result is the best line through the valid
targets. If that line passes through at least 8 targets (i.e. MaxFound >= 8),
it can be said that enough targets have been found
to form a line, and thus the card can be processed. If the best line passes
through fewer than 8, then the card is considered
invalid.
The resulting algorithm takes 180 divides to calculate Orow and Ocolumn, 180
multiply/adds to calculate target0
position, and then 2880 adds/comparisons. The time we have to perform this
processing is the time taken to read 36 columns
of pixel data = 3,374,892ns. Not even accounting for the fact that an add
takes less time than a divide, it is necessary to
perform 3240 mathematical operations in 3,374,892ns. That gives approximately
1040ns per operation, or 104 cycles. The
CPU can therefore safely perform the entire processing of targets, reducing
complexity of design.
Update centroids based on data edge border and clockmarks
Step 0: Locate the data area
From Target 0 (241 of Fig. 38) it is a predetermined fixed distance in rows
and columns to the top left
border 244 of the data area, and then a further 1 dot column to the vertical
clock marks 276. So we use TargetA, Orow and
Ocolumn found in the previous stage (Grow and Ocolumn refer to distances
between targets) to calculate the centroid or
expected location for Target0 as described previously.
Since the fixed pixel offset from Target0 to the data area is related to the
distance between targets (192 dots
between targets, and 24 dots between Target0 and the data area 243), simply
add Orow/8 to Target0's centroid column
coordinate (aspect ratio of dots is 1:1). Thus the top co-ordinate can be
defined as:
(column~~co,""~,ToP = columnT;"gem + (Arow/8)
(rOWDotColmrn~Top = rowT~e,O + (Ocolumn /8)
Next Orow and Ocolumn are updated to give the number of pixels between dots in
a single column (instead of
between targets) by dividing them by the number of dots between targets:
brow = ~row/192
Ocolumn = Ocolumn /192
We also set the currentColumn register (see Phase 2) to be -1 so that after
step 2, when phase 2 begins, the
currentColumn register will increment from -1 to 0.
Step l: Write out the initial centroid deltas (D) and bit history
CA 02456652 2004-02-06
WO 03/015395 PCT/AU02/00919
64
This simply involves writing setup information required for Phase 2.
This can be achieved by writing Os to all the Orow and Ocolumn entries for
each row, and a bit history. The bit
history is actually an expected bit history since it is known that to the left
of the clock mark column 276 is a border column
277, and before that, a white area. The bit history therefore is 011, 010,
011, 010 etc.
Step 2: Update the centroids based on actual pixels read.
The bit history is set up in Step 1 according to the expected clock marks and
data border. The actual centroids for
each dot row can now be more accurately set (they were initially 0) by
comparing the expected data against the actual pixel
values. The centroid updating mechanism is achieved by simply performing step
3 of Phase 2.
Phase 2 - Detect bit pattern from Artcard based on pixels read, and write as
bytes.
Since a dot from the Artcard 9 requires a minimum of 9 sensed pixels over 3
columns to be represented, there is
little point in performing dot detection calculations every sensed pixel
column. It is better to average the time required for
processing over the average dot occurrence, and thus make the most of the
available processing time. This allows processing
of a column of dots from an Artcard 9 in the time it takes to read 3 columns
of data from the Artcard. Although the most
likely case is that it takes 4 columns to represent a dot, the 4'" column will
be the last column of one dot and the first column
of a next dot. Processing should therefore be limited to only 3 columns.
As the pixels from the CCD are written to the DRAM in 13% of the time
available, 83% of the time is available for
processing of 1 column of dots i.e. 83% of (93,747*3) = 83% of 281,241ns =
233,430ns.
In the available time, it is necessary to detect 3150 dots, and write their
bit values into the raw data area of memory.
The processing therefore requires the following steps:
For each column of dots on the Artcard:
Step 0: Advance to the next dot column
Step 1: Detect the top and bottom of an Artcard dot column (check clock marks)
Step 2: Process the dot column, detecting bits and storing them appropriately
Step 3: Update the centroids
Since we are processing the Artcard's logical dot columns, and these may shift
over 165 pixels, the worst case is
that we cannot process the first column until at least 165 columns have been
read into DRAM. Phase 2 would therefore
finish the same amount of time after the read process had terminated. The
worst case time is: 165 * 93,747ns =15,468,255ns
or 0.015 seconds.
Sten 0: Advance to the next dot column
In order to advance to the next column of dots we add brow and Ocolumn to the
dotColumnTop to give us the
centroid of the dot at the top of the column. The first time we do this, we
are currently at the clock marks column 276 to the
left of the bit image data area, and so we advance to the first column of
data. Since Orow and Ocolumn refer to distance
between dots within a column, to move between dot columns it is necessary to
add Orow to columndo,coi""n,TaP and Ocolumn
to rowdo~coi""~,ToP.
To keep track of what column number is being processed, the column number is
recorded in a register called
CurrentColumn. Every time the sensor advances to the next dot column it is
necessary to increment the Cun'entColumn
register. The first time it is incremented, it is incremented from -1 to 0
(see Step 0 Phase 1). The CurrentColumn register
determines when to terminate the read process (when reaching maxColumns), and
also is used to advance the DataOut
CA 02456652 2004-02-06
WO 03/015395 PCT/AU02/00919
Pointer to the next column of byte information once all 8 bits have been
written to the byte (once every 8 dot columns). The
lower 3 bits determine what bit we're up to within the current byte. It will
be the same bit being written for the whole
column.
Step 1: Detect the top and bottom of an Artcard dot column.
In order to process a dot column from an Artcard, it is necessary to detect
the top and bottom of a column. The
column should form a straight line between the top and bottom of the column
(except for local warping etc.). Initially
dotColumnTop points to the clock mark column 276. We simply toggle the
expected value, write it out into the bit history,
and move on to step 2, whose first task will be to add the Orow and Ocolumn
values to dotColumnTop to arrive at the first
data dot of the column.
Std 2: Process an Artcard's dot column
Given the centroids of the top and bottom of a column in pixel coordinates the
column should form a straight line
between them, with possible minor variances due to warping etc.
Assuming the processing is to start at the top of a column (at the top
centroid coordinate) and move down to the
bottom of the column, subsequent expected dot centroids are given as:
row"eX, = row + Orow
COlumn"ext = column + Ocolumn
This gives us the address of the expected centroid for the next dot of the
column. However to account for local
warping and error we add another Orow and Ocolumn based on the last time we
found the dot in a given row. In this way we
can account for small drifts that accumulate into a maximum drift of some
percentage from the straight line joining the top of
the column to the bottom.
We therefore keep 2 values for each row, but store them in separate tables
since the row history is used in step 3 of
this phase.
* Orow and Ocolumn (2 @ 4 bits each = 1 byte)
* row history (3 bits per row, 2 rows are stored per byte)
For each row we need to read a Orow and column to determine the change to the
centroid. The read process takes
5% of the bandwidth and 2 cache lines:
76*(3150/32) + 2*3150 = 13,824ns = 5% of bandwidth
Once the centroid has been determined, the pixels around the centroid need to
be examined to detect the status of
the dot and hence the value of the bit. In the worst case a dot covers a 4x4
pixel area. However, thanks to the fact that we are
sampling at 3 times the resolution of the dot, the number of pixels required
to detect the status of the dot and hence the bit
value is much less than this. We only require access to 3 columns of pixel
columns at any one time.
In the worst case of pixel drift due to a 1% rotation, centroids will shift 1
column every 57 pixel rows, but since a
dot is 3 pixels in diameter, a given column will be valid for 171 pixel rows
(3*57). As a byte contains 2 pixels, the number
of bytes valid in each buffered read (4 cache lines) will be a worst case of
86 (out of 128 read).
Once the bit has been detected it must be written out to DRAM. We store the
bits from 8 columns as a set of
contiguous bytes to minimize DRAM delay. Since all the bits from a given dot
column will correspond to the next bit
position in a data byte, we can read the old value for the byte, shift and OR
in the new bit, and write the byte back.
The read / shift&OR / write process requires 2 cache lines.
CA 02456652 2004-02-06
WO 03/015395 PCT/AU02/00919
66
We need to read and write the bit history for the given row as we update it.
We only require 3 bits of history per
row, allowing the storage of 2 rows of history in a single byte. The read /
shift&OR / write process requires 2 cache lines.
The total bandwidth required for the bit detection and storage is summarised
in the following table:
Read centroid ~ 5%
Read 3 columns of ixel data 19%
Read/Write detected bits into 10%
b a buffer
Read/Write bit histor 5%
TOTAL 39%
Detectinga dot
The process of detecting the value of a dot (and hence the value of a bit)
given a centroid is accomplished by
examining 3 pixel values and getting the result from a lookup table. The
process is fairly simple and is illustrated in Fig. 42.
A dot 290 has a radius of about 1.5 pixels. Therefore the pixel 291 that holds
the centroid, regardless of the actual position of
the centroid within that pixel, should be 100% of the dot's value. If the
centroid is exactly in the center of the pixel 291, then
the pixels above 292 & below 293 the centroid's pixel, as well as the pixels
to the left 294 & right 295 of the centroid's pixel
will contain a majority of the dot's value. The further a centroid is away
from the exact center of the pixel 295, the more
likely that more than the center pixel will have 100% coverage by the dot.
Although Fig. 42 only shows centroids differing to the left and below the
center, the same relationship obviously
holds for centroids above and to the right of center. center. In Case 1, the
centroid is exactly in the center of the middle pixel
295. The center pixel 295 is completely covered by the dot, and the pixels
above, below, left, and right are also well covered
by the dot. In Case 2, the centroid is to the left of the center of the middle
pixel 291. The center pixel is still completely
covered by the dot, and the pixel 294 to the left of the center is now
completely covered by the dot. The pixels above 292
and below 293 are still well covered. In Case 3, the centroid is below the
center of the middle pixel 291. The center pixel
291 is still completely covered by the dot 291, and the pixel below center is
now completely covered by the dot. The pixels
left 294 and right 295 of center are still well covered. In Case 4, the
centroid is left and below the center of the middle pixel.
The center pixel 291 is still completely covered by the dot, and both the
pixel to the left of center 294 and the pixel below
center 293 are completely covered by the dot.
The algorithm for updating the centroid uses the distance of the centroid from
the center of the middle pixel 291 in
order to select 3 representative pixels and thus decide the value of the dot:
Pixel l: the pixel containing the centroid
Pixel 2: the pixel to the left of Pixel 1 if the centroid's X coordinate
(column value) is <'/z, otherwise the pixel to
the right of Pixel 1.
Pixel 3: the pixel above pixel 1 if the centroid's Y coordinate (row value) is
<'/z, otherwise the pixel below Pixel 1.
As shown in Fig. 43, the value of each pixel is output to a pre-calculated
lookup table 301. The 3 pixels are fed into
a 12-bit lookup table, which outputs a single bit indicating the value of the
dot - on or off. The lookup table 301 is
constructed at chip definition time, and can be compiled into about 500 gates.
The lookup table can be a simple threshold
table, with the exception that the center pixel (Pixel 1) is weighted more
heavily.
CA 02456652 2004-02-06
WO 03/015395 PCT/AU02/00919
67
Step 3: Update the centroid Ds for each row in the column
The idea of the Os processing is to use the previous bit history to generate a
'perfect' dot at the expected centroid
location for each row in a current column. The actual pixels (from the CCD)
are compared with the expected 'perfect' pixels.
If the two match, then the actual centroid location must be exactly in the
expected position, so the centroid Ds must be valid
and not need updating. Otherwise a process of changing the centroid Ds needs
to occur in order to best fit the expected
centroid location to the actual data. The new centroid 0s will be used for
processing the dot in the next column.
Updating the centroid Ds is done as a subsequent process from Step 2 for the
following reasons:
to reduce complexity in design, so that it can be performed as Step 2 of Phase
1 there is enough bandwidth
remaining to allow it to allow reuse of DRAM buffers, and
to ensure that all the data required for centroid updating is available at the
start of the process without special pipelining.
The centroid O are processed as Ocolumn brow respectively to reduce
complexity.
Although a given dot is 3 pixels in diameter, it is likely to occur in a 4x4
pixel area. However the edge of one dot
will as a result be in the same pixel as the edge of the next dot. For this
reason, centroid updating requires more than simply
the information about a given single dot.
Fig. 44 shows a single dot 310 from the previous column with a given centroid
311. In this example, the dot 310
extend O over 4 pixel columns 312-315 and in fact, part of the previous dot
column's dot (coordinate = (Prevcolumn,
Current Row)) has entered the current column for the dot on the current row.
If the dot in the current row and column was
white, we would expect the rightmost pixel column 314 from the previous dot
column to be a low value, since there is only
the dot information from the previous column's dot (the current column's dot
is white). From this we can see that the higher
the pixel value is in this pixel column 315, the more the centroid should be
to the right Of course, if the dot to the right was
also black, we cannot adjust the centroid as we cannot get information sub-
pixel. The same can be said for the dots to the
left, above and below the dot at dot coordinates (PrevColumn, CurrentRow).
From this we can say that a maximum of 5 pixel columns and rows are required.
It is possible to simplify the
situation by taking the cases of row and column centioid Os separately,
treating them as the same problem, only rotated 90
degrees.
Taking the horizontal case first, it is necessary to change the column
centroid Os if the expected pixels don't match
the detected pixels. From the bit history, the value of the bits found for the
Current Row in the current dot column, the
previous dot column, and the (previous-1)th dot column are known. The expected
centroid location is also known. Using
these two pieces of information, it is possible to generate a 20 bit expected
bit pattern should the read be 'perfect'. The 20 bit
bit-pattern represents the expected D values for each of the 5 pixels across
the horizontal dimension. The first nibble would
represent the rightmost pixel of the leftmost dot. The next 3 nibbles
represent the 3 pixels across the center of the dot 310
from the previous column, and the last nibble would be the leftmost pixel 317
of the rightmost dot (from the current
column).
If the expected centroid is in the center of the pixel, we would expect a 20
bit pattern based on the following table:
Bit histor Expected pixels
000 ~ 00000
001 OOOOD
CA 02456652 2004-02-06
WO 03/015395 PCT/AU02/00919
68
010 ODFDO
011 ODFDD
100 D0000
101 DOOOD
110 DDFDO
111 DDFDD
The pixels to the left and right of the center dot are either 0 or D depending
on whether the bit was a 0 or 1
respectively. The center three pixels are either 000 or DFD depending on
whether the bit was a 0 or 1 respectively. These
values are based on the physical area taken by a dot for a given pixel.
Depending on the distance of the centroid from the
exact center of the pixel, we would expect data shifted slightly, which really
only affects the pixels either side of the center
pixel. Since there are 16 possibilities, it is possible to divide the distance
from the center by 16 and use that amount to shift
the expected pixels.
Once the 20 bit 5 pixel expected value has been determined it can be compared
against the actual pixels read. This
can proceed by subtracting the expected pixels from the actual pixels read on
a pixel by pixel basis, and finally adding the
differences together to obtain a distance from the expected O values.
Fig. 45 illustrates one form of implementation of the above algorithm which
includes a look up table 320 which
receives the bit history 322 and central fractional component 323 and outputs
324 the corresponding 20 bit number which is
subtracted 321 from the central pixel input 326 to produce a pixel difference
327.
This process is carried out for the expected centroid and once for a shift of
the centroid left and right by 1 amount in
Ocolumn. The centroid with the smallest difference from the actual pixels is
considered to be the 'winner' and the Ocolumn
updated accordingly (which hopefully is 'no change'). As a result, a Ocolumn
cannot change by more than 1 each dot
column.
The process is repeated for the vertical pixels, and brow is consequentially
updated.
There is a large amount of scope here for parallelism. Depending on the rate
of the clock chosen for the ACP unit
31 these units can be placed in series (and thus the testing of 3 different D
could occur in consecutive clock cycles), or in
parallel where all 3 can be tested simultaneously. If the clock rate is fast
enough, there is less need for parallelism.
Bandwidth utilization
It is necessary to read the old O of the Ds, and to write them out again. This
takes 10% of the bandwidth:
2 * (76(3150/32) + 2*3150) = 27,648ns = 10% of bandwidth
It is necessary to read the bit history for the given row as we update its Os.
Each byte contains 2 row's bit histories,
thus taking 2.5% of the bandwidth:
76((3150/2)/32) + 2*(3150/2) = 4,085ns = 2.5% of bandwidth
In the worst case of pixel drift due to a 1% rotation, centroids will shift 1
column every 57 pixel rows, but since a
dot is 3 pixels in diameter, a given pixel column will be valid for 171 pixel
rows (3*57). As a byte contains 2 pixels, the
number of bytes valid in cached reads will be a worst case of 86 (out of 128
read). The worst case timing for 5 columns is
therefore 31% bandwidth.
*(((9450/( 128 * 2)) * 320) * 128/86) = 88, 1 l2ns = 31 % of bandwidth.
The total bandwidth required for the updating the centroid D is summarised in
the following table:
CA 02456652 2004-02-06
WO 03/015395 PCT/AU02/00919
69
Read/Write centroid O 10%
Read bit histor 2.5%
Read 5 columns of ixel 31%
data
TOTAL 43.5 %
Memory usage for Phase 2:
The 2MB bit-image DRAM area is read from and written to during Phase 2
processing. The 2MB pixel-data
DRAM area is read.
The 0.5MB scratch DRAM area is used for storing row data, namely:
Centroid array 24bits (16:8) * 2 * 3150 = 18,900 byes
Bit Historv array 3 bits * 3150 entries (2 per byte) = 1575 bytes
Phase 3 -Unscramble and XOR the raw data
Returning to Fig. 37, the next step in decoding is to unscramble and XOR the
raw data. The 2MB byte image, as
taken from the Artcard, is in a scrambled XORed form. It must be unscrambled
and re-XORed to retrieve the bit image
necessary for the Reed Solomon decoder in phase 4.
Turning to Fig. 46, the unscrambling process 330 takes a 2MB scrambled byte
image 331 and writes an
unscrambled 2MB image 332. The process cannot reasonably be performed in-
place, so 2 sets of 2MB areas are utilised. The
scrambled data 331 is in symbol block order arranged in a 16x16 array, with
symbol block 0 (334) having all the symbol 0's
from all the code words in random order. Symbol block 1 has all the symbol 1's
from all the code words in random order
etc. Since there are only 255 symbols, the 256'" symbol block is currently
unused.
A linear feedback shift register is used to determine the relationship between
the position within a symbol block eg.
334 and what code word eg. 355 it came from. This works as long as the same
seed is used when generating the original
Artcard images. The XOR of bytes from alternative source lines with OxAA and
0x55 respectively is effectively free (in
time) since the bottleneck of time is waiting for the DRAM to be ready to
read/write to non-sequential addresses.
The timing of the unscrambling XOR process is effectively 2MB of random byte-
reads, and 2MB of random byte-
writes i.e. 2 * (2MB * 76ns + 2MB * 2ns) = 327,155,712ns or approximately 0.33
seconds. This timing assumes no caching.
Phase 4 - Reed Solomon decode
This phase is a loop, iterating through copies of the data in the bit image,
passing them to the Reed-Solomon decode
module until either a successful decode is made or until there are no more
copies to attempt decode from.
The Reed-Solomon decoder used can be the VLIW processor, suitably programmed
or, alternatively, a separate
hardwired core such as LSI Logic's L64712. The L64712 has a throughput of
50Mbits per second (around 6.25MB per
second), so the time may be bound by the speed of the Reed-Solomon decoder
rather than the 2MB read and 1 MB write
memory access time (500MB/sec for sequential accesses). The time taken in the
worst case is thus 2/6.25s = approximately
0.32 seconds.
Phase 5 Running the Vark script
CA 02456652 2004-02-06
WO 03/015395 PCT/AU02/00919
The overall time taken to read the Artcard 9 and decode it is therefore
approximately 2.15 seconds. The apparent
delay to the user is actually only 0.65 seconds (the total of Phases 3 and 4),
since the Artcard stops moving after 1.5 seconds.
Once the Artcard is loaded, the Artvark script must be interpreted, Rather
than run the script immediately, the
script is only run upon the pressing of the 'Print' button 13 (Fig. 1). The
taken to run the script will vary depending on the
complexity of the script, and must be taken into account for the perceived
delay between pressing the print button and the
actual print button and the actual printing.
Alternative Artcard Fomat
Of course, other artcard formats are possible. There will now be described one
such alternative artcard format with a
number of preferable feature. Described hereinafter will be the alternative
Artcard data format, a mechanism for mapping
user data onto dots on an alternative Artcard, and a fast alternative Artcard
reading algorithm for use in embedded systems
where resources are scarce.
Alternative Artcard Overview
The Alternative Artcards can be used in both embedded and PC type
applications, providing a user-friendly
interface to large amounts of data or configuration information.
While the back side of an alternative Artcard has the same visual appearance
regardless of the application (since it
stores the data), the front of an alternative Artcard can be application
dependent. It must make sense to the user in the context
of the application.
Alternative Artcard technology can also be independent of the printing
resolution. The notion of storing data as dots
on a card simply means that if it is possible put more dots in the same space
(by increasing resolution), then those dots can
represent more data. The preferred embodiment assumes utilisation of 1600 dpi
printing on a 86 mm x 55 mm card as the
sample Artcard, but it is simple to determine alternative equivalent layouts
and data sizes for other card sizes and/or other
print resolutions. Regardless of the print resolution, the reading technique
remain the same. After all decoding and other
overhead has been taken into account, alternative Artcards are capable of
storing up to 1 Megabyte of data at print
resolutions up to 1600 dpi. Alternative Artcards can store megabytes of data
at print resolutions greater than 1600 dpi. The
following two tables summarize the effective alternative Artcard data storage
capacity for certain print resolutions:
Format of an alternative Artcard
The structure of data on the alternative Artcard is therefore specifically
designed to aid the recovery of data. This
section describes the format of the data (back) side of an alternative
Artcard.
Dots
The dots on the data side of an alternative Artcard can be monochrome. For
example, black dots printed on a white
background at a predetermined desired print resolution. Consequently a "black
dot" is physically different from a "white
dot". Fig. 47 illustrates various examples of magnified views of black and
white dots. The monochromatic scheme of black
dots on a white background is preferably chosen to maximize dynamic range in
blurry reading environments. Although
the black dots are printed at a particular pitch (eg. 1600 dpi), the dots
themselves are slightly larger in order to create
continuous lines when dots are printed contiguously. In the example images of
Fig. 47, the dots are not as merged as they
may be in reality as a result of bleeding. There would be more smoothing out
of the black indentations. Although the
alternative Artcard system described in the preferred embodiment allows for
flexibly different dot sizes, exact dot sizes and
CA 02456652 2004-02-06
WO 03/015395 PCT/AU02/00919
71
ink/printing behaviour for a particular printing technology should be studied
in more detail in order to obtain best results.
In describing this artcard embodiment, the term dot refers to a physical
printed dot (ink, thermal, electro-
photographic, silver-halide etc) on an alternative Artcard. When an
alternative Artcard reader scans an alternative Artcard,
the dots must be sampled at least double the printed resolution to satisfy
Nyquist's Theorem. The term pixel refers to a
sample value from an alternative Artcard reader device. For example, when 1600
dpi dots are scanned at 4800 dpi there are 3
pixels in each dimension of a dot, or 9 pixels per dot. The sampling process
will be further explained hereinafter.
Turning to Fig. 48, there is shown the data surface 1101 a sample of
alternative Artcard. Each alternative Artcard
consists of an "active" region 1102 surrounded by a white border region 1103.
The white border 1103 contains no data
information, but can be used by an alternative Artcard reader to calibrate
white levels. The active region is an array of data
blocks eg. 1104, with each data block separated from the next by a gap of 8
white dots eg. 1106. Depending on the print
resolution, the number of data blocks on an alternative Artcard will vary. On
a 1600 dpi alternative Artcard, the array can be
8 x 8. Each data block 1104 has dimensions of 627 x 394 dots. With an inter-
block gap 1106 of 8 white dots, the active area
of an alternative Artcard is therefore 5072 x 3208 dots (8.lmm x S.lmm at 1600
dpi).
Data blocks
Turning now to Fig. 49, there is shown a single data block 1107. The active
region of an alternative Artcard
consists of an array of identically structured data blocks 1107. Each of the
data blocks has the following structure: a data
region 1108 surrounded by clock-marks 1109, borders 1110, and targets 1111.
The data region holds the encoded data
proper, while the clock-marks, borders and targets are present specifically to
help locate the data region and ensure accurate
recovery of data from within the region.
Each data block 1107 has dimensions of 627 x 394 dots. Of this, the central
area of 595 x 384 dots is the data
region 1108. The surrounding dots are used to hold the clock-marks, borders,
and targets.
Borders and Clockmarks
Fig. 50 illustrates a data block with Fig. 51 and Fig. 52 illustrating
magnified edge portions thereof. As illustrated
in Fig. 51 and Fig. 52, there are two 5 dot high border and clockmark regions
1170, 1177 in each data block: one above and
one below the data region. For example, The top 5 dot high region consists of
an outer black dot border line 1112 (which
stretches the length of the data block), a white dot separator line 1113 (to
ensure the border line is independent), and a 3 dot
high set of clock marks 1114. The clock marks alternate between a white and
black row, starting with a black clock mark at
the 8th column from either end of the data block. There is no separation
between clockmark dots and dots in the data region.
The clock marks are symmetric in that if the alternative Artcard is inserted
rotated 180 degrees, the same relative
border/clockmark regions will be encountered. The border 1112, 1113 is
intended for use by an alternative Artcard reader to
keep vertical tracking as data is read from the data region. The clockmarks
1114 are intended to keep horizontal tracking as
data is read from the data region. The separation between the border and
clockmarks by a white line of dots is desirable as a
result of blurring occurring during reading. The border thus becomes a black
line with white on either side, making for a
good frequency response on reading. The clockmarks alternating between white
and black have a similar result, except in the
horizontal rather than the vertical dimension. Any alternative Artcard reader
must locate the clockmarks and border if it
intends to use them for tracking. The next section deals with targets, which
are designed to point the way to the clockmarks,
border and data.
Targets in the Target region
CA 02456652 2004-02-06
WO 03/015395 PCT/AU02/00919
72
As shown in Fig. 54, there are two 15-dot wide target regions 1116, 1117 in
each data block: one to the left and one
to the right of the data region. The target regions are separated from the
data region by a single column of dots used for
orientation. The purpose of the Target Regions 1116, 1117 is to point the way
to the clockmarks, border and data regions.
Each Target Region contains 6 targets eg. 1118 that are designed to be easy to
find by an alternative Artcard reader. Turning
now to Fig. 53 there is shown the structure of a single target 1120. Each
target 1120 is a 15 x 15 dot black square with a
center structure 1121 and a run-length encoded target number 1122. The center
structure 1121 is a simple white cross, and
the target number component 1122 is simply two columns of white dots, each
being 2 dots long for each part of the target
number. Thus target number 1's target id 1122 is 2 dots long, target number
2's target id 1122 is 4 dots wide etc.
As shown in Fig. 54, the targets are arranged so that they are rotation
invariant with regards to card insertion. This
means that the left targets and right targets are the same, except rotated 180
degrees. In the left Target Region 1116, the
targets are arranged such that targets 1 to 6 are located top to bottom
respectively. In the right Target Region, the targets are
arranged so that target numbers 1 to 6 are located bottom to top. The target
number id is always in the half closest to the data
region. The magnified view portions of Fig. 54 reveals clearly the how the
right targets are simply the same as the left
targets,exceptrotated 180 degrees.
As shown in Fig. 55, the targets 1124, 1125 are specifically placed within the
Target Region with centers 55 dots
apart. In addition, there is a distance of 55 dots from the center of target 1
(1124) to the first clockmark dot 1126 in the upper
clockmark region, and a distance of 55 dots from the center of the target to
the first clockmark dot in the lower clockmark
region (not shown). The first black clockmark in both regions begins directly
in line with the target center (the 8th dot
position is the center of the 15 dot-wide target).
The simplified schematic illustrations of Fig. 55 illustrates the distances
between target centers as well as the
distance from Target 1 (1124) to the first dot of the first black clockmark
(1126) in the upper border/clockmark region.
Since there is a distance of 55 dots to the clockmarks from both the upper and
lower targets, and both sides of the alternative
Artcard are symmetrical (rotated through 180 degrees), the card can be read
left-to-right or right-to-left. Regardless of
reading direction, the orientation does need to be determined in order to
extract the data from the data region.
Orientation columns
As illustrated in Fig. 56, there are two 1 dot wide Orientation Columns 1127,
1128 in each data block: one directly
to the left and one directly to the right of the data region. The Orientation
Columns are present to give orientation
information to an alternative Artcard reader: On the left side of the data
region (to the right of the Left Targets) is a single
column of white dots 1127. On the right side of the data region (to the left
of the Right Targets) is a single column of black
dots 1128. Since the targets are rotation invariant, these two columns of dots
allow an alternative Artcard reader to
determine the orientation of the alternative Artcard - has the card been
inserted the right way, or back to front.From the
alternative Artcard reader's point of view, assuming no degradation to the
dots, there are two possibilities:
If the column of dots to the left of the data region is white, and the column
to the right of the data region is
black, then the reader will know that the card has been inserted the same way
as it was written.
If the column of dots to the left of the data region is black, and the column
to the right of the data region is
white, then the reader will know that the card has been inserted backwards,
and the data region is appropriately rotated. The
reader must take appropriate action to correctly recover the information from
the alternative Artcard.
Data Region
CA 02456652 2004-02-06
WO 03/015395 PCT/AU02/00919
73
As shown in Fig. 57, the data region of a data block consists of 595 columns
of 384 dots each, for a total of 228,480
dots. These dots must be interpreted and decoded to yield the original data.
Each dot represents a single bit, so the 228,480
dots represent 228,480 bits, or 28,560 bytes. The interpretation of each dot
can be as follows:
Black 1
White 0
The actual interpretation of the bits derived from the dots, however, requires
understanding of the mapping from the
original data to the dots in the data regions of the alternative Artcard.
Mapping original data to data region dots
There will now be described the process of taking an original data file of
maximum size 910,082 bytes and
mapping it to the dots in the data regions of the 64 data blocks on a 1600 dpi
alternative Artcard. An alternative Artcard
reader would reverse the process in order to extract the original data from
the dots on an alternative Artcard. At first glance
it seems trivial to map data onto dots: binary data is comprised of is and Os,
so it would be possible to simply write black
and white dots onto the card. This scheme however, does not allow for the fact
that ink can fade, parts of a card may be
damaged with dirt, grime, or even scratches. Without error-detection encoding,
there is no way to detect if the data retrieved
from the card is correct. And without redundancy encoding, there is no way to
correct the detected errors. The aim of the
mapping process then, is to make the data recovery highly robust, and also
give the alternative Artcard reader the ability to
know it read the data correctly.
There are three basic steps involved in mapping an original data file to data
region dots:
Redundancy encode the original data
Shuffle the encoded data in a deterministic way to reduce the effect of
localized alternative Artcard
damage
Write out the shuffled, encoded data as dots to the data blocks on the
alternative Artcard
Each of these steps is examined in detail in the following sections.
Redundancy encode using Reed-Solomon encoding
The mapping of data to alternative Artcard dots relies heavily on the method
of redundancy encoding employed.
Reed-Solomon encoding is preferably chosen for its ability to deal with burst
errors and effectively detect and correct errors
using a minimum of redundancy. Reed Solomon encoding is adequately discussed
in the standard texts such as Wicker, S.,
and Bhargava, V., 1994, Reed-Solomon Codes and their Applications, IEEE Press.
Rorabaugh, C, 1996, Error Coding
Cookbook, McGraw-Hill. Lyppens, H., 1997, Reed-Solomon Error Correction, Dr.
Dobb's Journal, January 1997 (Volume
22, Issue 1).
A variety of different parameters for Reed-Solomon encoding can be used,
including different symbol sizes and
different levels of redundancy. Preferably, the following encoding parameters
are used:
m=8
t=64
Having m=8 means that the symbol size is 8 bits (1 byte). It also means that
each Reed-Solomon encoded block
size n is 255 bytes (28 - 1 symbols). In order to allow correction of up to t
symbols, 2t symbols in the final block size must
be taken up with redundancy symbols. Having t=64 means that 64 bytes (symbols)
can be corrected per block if they are in
error. Each 255 byte block therefore has 128 (2 x 64) redundancy bytes, and
the remaining 127 bytes (k=127) are used to
hold original data. Thus:
CA 02456652 2004-02-06
WO 03/015395 PCT/AU02/00919
74
n=255
k = 127
The practical result is that 127 bytes of original data are encoded to become
a 255-byte block of Reed-Solomon
encoded data. The encoded 255-byte blocks are stored on the alternative
Artcard and later decoded back to the original 127
bytes again by the alternative Artcard reader. The 384 dots in a single column
of a data block's data region can hold 48
bytes (384/8). 595 of these columns can hold 28,560 bytes. This amounts to 112
Reed-Solomon blocks (each block having
255 bytes). The 64 data blocks of a complete alternative Artcard can hold a
total of 7168 Reed-Solomon blocks (1,827,840
bytes, at 255 bytes per Reed-Solomon block). Two of the 7,168 Reed-Solomon
blocks are reserved for control information,
but the remaining 7166 are used to store data. Since each Reed-Solomon block
holds 127 bytes of actual data, the total
amount of data that can be stored on an alternative Artcard is 910,082 bytes
(7166 x 127). If the original data is less than this
amount, the data can be encoded to fit an exact number of Reed-Solomon blocks,
and then the encoded blocks can be
replicated until all 7,166 are used. Fig. 58 illustrates the overall form of
encoding utilised.
Each of the 2 Control blocks 1132, 1133 contain the same encoded information
required for decoding the remaining
7,166 Reed-Solomon blocks:
The number of Reed-Solomon blocks in a full message (16 bits stored lo/hi),
and
The number of data bytes in the last Reed-Solomon block of the message (8
bits)
These two numbers are repeated 32 times (consuming. 96 bytes) with the
remaining 31 bytes reserved and set to 0.
Each control block is then Reed-Solomon encoded, turning the 127 bytes of
control information into 255 bytes of Reed-
Solomon encoded data.
The Control Block is stored twice to give greater chance of it surviving. In
addition, the repetition of the data within
the Control Block has particular significance when using Reed-Solomon
encoding. In an uncorrupted Reed-Solomon
encoded block, the first 127 bytes of data are exactly the original data, and
can be looked at in an attempt to recover the
original message if the Control Block fails decoding (more than 64 symbols are
corrupted). Thus, if a Control Block fails
decoding, it is possible to examine sets of 3 bytes in an effort to determine
the most likely values for the 2 decoding
parameters. It is not guaranteed to be recoverable, but it has a better chance
through redundancy. Say the last 159 bytes of
the Control Block are destroyed, and the first 96 bytes are perfectly ok.
Looking at the first 96 bytes will show a repeating
set of numbers. These numbers can be sensibly used to decode the remainder of
the message in the remaining 7,166 Reed-
Solomon blocks.
By way of example, assume a data file containing exactly 9,967 bytes of data.
The number of Reed-Solomon
blocks required is 79. The first 78 Reed-Solomon blocks are completely
utilized, consuming 9,906 bytes (78 x 127). The
79th block has only 61 bytes of data (with the remaining 66 bytes all Os).
The alternative Artcard would consist of 7,168 Reed-Solomon blocks. The first
2 blocks would be Control Blocks,
the next 79 would be the encoded data, the next 79 would be a duplicate of the
encoded data, the next 79 would be another
duplicate of the encoded data, and so on. After storing the 79 Reed-Solomon
blocks 90 times, the remaining 56 Reed-
Solomon blocks would be another duplicate of the first 56 blocks from the 79
blocks of encoded data (the final 23 blocks of
encoded data would not be stored again as there is not enough room on the
alternative Artcard). A hex representation
of the 127 bytes in each Control Block data before being Reed-Solomon encoded
would be as illustrated in Fig. 59.
Scramble the Encoded Data
CA 02456652 2004-02-06
WO 03/015395 PCT/AU02/00919
Assuming all the encoded blocks have been stored contiguously in memory, a
maximum 1,827,840 bytes of data
can be stored on the alternative Artcard (2 Control Blocks and 7,166
information blocks, totalling 7,168 Reed-Solomon
encoded blocks). Preferably, the data is not directly stored onto the
alternative Artcard at this stage however, or all 255 bytes
of one Reed-Solomon block will be physically together on the card. Any dirt,
grime, or stain that causes physical damage to
the card has the potential of damaging more than 64 bytes in a single Reed-
Solomon block, which would make that block
unrecoverable. If there are no duplicates of that Reed-Solomon block, then the
entire alternative Artcard cannot be decoded.
The solution is to take advantage of the fact that there are a large number of
bytes on the alternative Artcard, and
that the alternative Artcard has a reasonable physical size. The data can
therefore be scrambled to ensure that symbols from a
single Reed-Solomon block are not in close proximity to one another. Of course
pathological cases of card degradation can
cause Reed-Solomon blocks to be unrecoverable, but on average, the scrambling
of data makes the card much more robust.
The scrambling scheme chosen is simple and is illustrated schematically in Fig
14. All the Byte Os from each Reed-
Solomon block are placed together 1136, then all the Byte is etc. There will
therefore be 7,168 byte 0's, then 7,168 Byte 1's
etc. Each data block on the alternative Artcard can store 28,560 bytes.
Consequently there are approximately 4 bytes from
each Reed-Solomon block in each of the 64 data blocks on the alternative
Artcard.
Under this scrambling scheme, complete damage to 16 entire data blocks on the
alternative Artcard will result in 64
symbol errors per Reed-Solomon block. This means that if there is no other
damage to the alternative Artcard, the entire data
is completely recoverable, even if there is no data duplication.
Write the scrambled encoded data to the alternative Artcard
Once the original data has been Reed-Solomon encoded, duplicated, and
scrambled, there are 1,827,840 bytes of
data to be stored on the alternative Artcard. Each of the 64 data blocks on
the alternative Artcard stores 28,560 bytes.
The data is simply written out to the alternative Artcard data blocks so that
the first data block contains the first
28,560 bytes of the scrambled data, the second data block contains the next
28,560 bytes etc.
As illustrated in Fig. 61, within a data block, the data is written out column-
wise left to right. Thus the left-most
column within a data block contains the first 48 bytes of the 28,560 bytes of
scrambled data, and the last column contains the
last 48 bytes of the 28,560 bytes of scrambled data. Within a column, bytes
are written out top to bottom, one bit at a time,
starting from bit 7 and finishing with bit 0. If the bit is set (1), a black
dot is placed on the alternative Artcard, if the bit is
clear (0), no dot is placed, leaving it the white background color of the
card.
For example, a set of 1,827,840 bytes of data can be created by scrambling
7,168 Reed-Solomon encoded blocks to
be stored onto an alternative Artcard. The first 28,560 bytes of data are
written to the first data block. The first 48 bytes of
the first 28,560 bytes are written to the first column of the data block, the
next 48 bytes to the next column and so on.
Suppose the first two bytes of the 28,560 bytes are hex D3 SF. Those first two
bytes will be stored in column 0 of the data
block. Bit 7 of byte 0 will be stored first, then bit 6 and so on. Then Bit 7
of byte 1 will be stored through to bit 0 of byte 1.
Since each "1" is stored as a black dot, and each "0" as a white dot, these
two bytes will be represented on the alternative
Artcard as the following set of dots:
D3 (1101 0011) becomes: black, black, white, black, white, white, black, black
SF (0101 1111) becomes: white, black, white, black, black, black, black, black
Decoding an alternative Artcard
This section deals with extracting the original data from an alternative
Artcard in an accurate and robust manner.
CA 02456652 2004-02-06
WO 03/015395 PCT/AU02/00919
76
Specifically, it assumes the alternative Artcard format as described in the
previous chapter, and describes a method of
extracting the original pre-encoded data from the alternative Artcard.
There are a number of general considerations that are part of the assumptions
for decoding an alternative Artcard.
User
The purpose of an alternative Artcard is to store data for use in different
applications. A user inserts an alternative
Artcard into an alternative Artcard reader, and expects the data to be loaded
in a "reasonable time". From the user's
perspective, a motor transport moves the alternative Artcard into an
alternative Artcard reader. This is not perceived as a
problematic delay, since the alternative Artcard is in motion. Any time after
the alternative Artcard has stopped is perceived
as a delay, and should be minimized in any alternative Artcard reading scheme.
Ideally, the entire alternative Artcard would
be read while in motion, and thus there would be no perceived delay after the
card had stopped moving.
For the purpose of the preferred embodiment, a reasonable time for an
alternative Artcard to be physically loaded is
defined to be 1.5 seconds. There should be a minimization of time for
additional decoding after the alternative Artcard has
stopped moving. Since the Active region of an alternative Artcard covers most
of the alternative Artcard surface we can limit
our timing concerns to that region.
Sampling Dots
The dots on an alternative Artcard must be sampled by a CCD reader or the like
at least at double the printed
resolution to satisfy Nyquist's Theorem. In practice it is better to sample at
a higher rate than this. In the alternative Artcard
reader environment, dots are preferably sampled at 3 times their printed
resolution in each dimension, requiring 9 pixels to
define a single dot. If the resolution of the alternative Artcard dots is 1600
dpi, the alternative Artcard reader's image sensor
must scan pixels at 4800 dpi. Of course if a dot is not exactly aligned with
the sampling sensor, the worst and most likely
case as illustrated in Fig. 62, is that a dot will be sensed over a 4x4 pixel
area.
Each sampled pixel is 1 byte (8 bits). The lowest 2 bits of each pixel can
contain significant noise. Decoding
algorithms must therefore be noise tolerant.
Alignment/Rotation
It is extremely unlikely that a user will insert an alternative Artcard into
an alternative Artcard reader perfectly
aligned with no rotation. Certain physical constraints at a reader entrance
and motor transport grips will help ensure that
once inserted, an alternative Artcard will stay at the original angle of
insertion relative to the CCD. Preferably this angle of
rotation, as illustrated in Fig. 63 is a maximum of 1 degree. There can be
some slight aberrations in angle due to fitter and
motor rumble during the reading process, but these are assumed to essentially
stay within the 1-degree limit.
The physical dimensions of an alternative Artcard are 86mm x SSmm. A 1 degree
rotation adds l.Smm to the
effective height of the card as 86mm passes under the CCD (86 sin 1°),
which will affect the required CCD length.
The effect of a 1 degree rotation on alternative Artcard reading is that a
single scanline from the CCD will include a
number of different columns of dots from the alternative Artcard. This is
illustrated in an exaggerated form in Fig. 63 which
shows the drift of dots across the columns of pixels. Although exaggerated in
this diagram, the actual drift will be a
maximum 1 pixel column shift every 57 pixels.
When an alternative Artcard is not rotated, a single column of dots can be
read over 3 pixel scanlines. The more an
alternative Artcard is rotated, the greater the local effect. The more dots
being read, the longer the rotation effect is applied.
As either of these factors increase, the larger the number of pixel scanlines
that are needed to be read to yield a given set of
CA 02456652 2004-02-06
WO 03/015395 PCT/AU02/00919
77
dots from a single column on an alternative Artcard. The following table shows
how many pixel scanlines are required for a
single column of dots in a particular alternative Artcard structure.
Region Height 0 rotation 1 rotation
Active region 3208 dots 3 ixel columns 168 ixel columns
Data block 394 dots 3 pixel columns~ pixel columns
To read an entire alternative Artcard, we need to read 87 mm (86mm + lmm due
to 1° rotation). At 4800 dpi this
implies 16,252 pixel columns.
CCD (or other Linear Image Sensor) Length
The length of the CCD itself must accommodate:
- the physical height of the alternative Artcard (55 mm),
- vertical slop on physical alternative Artcard insertion (lmm)
- insertion rotation of up to 1 degree (86 sin 1° = l.Smm)
These factors combine to form a total length of 57.Smm.
When the alternative Artcard Image sensor CCD in an alternative Artcard reader
scans at 4800 dpi, a single
scanline is 10,866 pixels. For simplicity, this figure has been rounded up to
11,000 pixels. The Active Region of an
alternative Artcard has a height of 3208 dots, which implies 9,624 pixels. A
Data Region has a height of 384 dots, which
implies 1,152 pixels.
DRAM Size
The amount of memory required for alternative Artcard reading and decoding is
ideally minimized. The typical
placement of an alternative Artcard reader is an embedded system where memory
resources are precious. This is made more
problematic by the effects of rotation. As described above, the more an
alternative Artcard is rotated, the more scanlines are
required to effectively recover original dots.
There is a trade-off between algorithmic complexity, user perceived delays,
robustness, and memory usage. One of
the simplest reader algorithms would be to simply scan the whole alternative
Artcard, and then to process the whole data
without real-time constraints. Not only would this require huge reserves of
memory, it would take longer than a reader
algorithm that occurred concurrently with the alternative Artcard reading
process.
The actual amount of memory required for reading and decoding an alternative
Artcard is twice the amount of
space required to hold the encoded data, together with a small amount of
scratch space (1-2 KB). For the 1600 dpi
alternative Artcard, this implies a 4 MB memory requirement. The actual usage
of the memory is detailed in the following
algorithm description.
Transfer rate
DRAM bandwidth assumptions need to be made for timing considerations and to a
certain extent affect algorithmic
design, especially since alternative Artcard readers are typically part of an
embedded system.
A standard Rambus Direct RDRAM architecture is assumed, as defined in Rambus
Inc, Oct 1997, Direct Xambus
Technology Disclosure, with a peak data transfer rate of 1.6GB/sec. Assuming
75% efficiency (easily achieved), we have an
average of 1.2GB/sec data transfer rate. The average time to access a block of
16 bytes is therefore l2ns.
CA 02456652 2004-02-06
WO 03/015395 PCT/AU02/00919
78
Dirty Data
Physically damaged alternative Artcards can be inserted into a reader.
Alternative Artcards may be scratched, or be
stained with grime or dirt. A alternative Artcard reader can't assume to read
everything perfectly. The effect of dirty data is
made worse by blurring, as the dirty data affects the surrounding clean dots.
Blurry Environment
There are two ways that blurring is introduced into the alternative Artcard
reading environment:
* Natural blurring due to nature of the CCD's distance from the alternative
Artcard.
* Warping of alternative Artcard
Natural blurring of an alternative Artcard image occurs when there is overlap
of sensed data from the CCD.
Blurring can be useful, as the overlap ensures there are no high frequencies
in the sensed data, and that there is no data
missed by the CCD. However if the area covered by a CCD pixel is too large,
there will be too much blurring and the
sampling required to recover the data will not be met. Fig. 64 is a schematic
illustration of the overlapping of sensed data.
Another form of blurring occurs when an alternative Artcard is slightly warped
due to heat damage. When the
warping is in the vertical dimension, the distance between the alternative
Artcard and the CCD will not be constant, and the
level of blurring will vary across those areas.
Black and white dots were chosen for alternative Artcards to give the best
dynamic range in blurry reading
environments. Blurring can cause problems in attempting to determine whether a
given dot is black or white.
As the blurring increases, the more a given dot is influenced by the
surrounding dots. Consequently the dynamic
range for a particular dot decreases. Consider a white dot and a black dot,
each surrounded by all possible sets of dots. The 9
dots are blurred, and the center dot sampled. Fig. 65 shows the distribution
of resultant center dot values for black and white
dots.
The diagram is intended to be a representative blurring. The curve 1140 from 0
to around 180 shows the range of
black dots. The curve 1141 from 75 to 250 shows the range of white dots.
However the greater the blurring, the more the
two curves shift towards the center of the range and therefore the greater the
intersection area, which means the more
difficult it is to determine whether a given dot is black or white. A pixel
value at the center point of intersection is ambiguous
- the dot is equally likely to be a black or a white.
As the blurring increases, the likelihood of a read bit error increases.
Fortunately, the Reed-Solomon decoding
algorithm can cope with these gracefully up to t symbol errors. Fig. 65 is a
graph of number predicted number of alternative
Artcard Reed-Solomon blocks that cannot be recovered given a particular symbol
error rate. Notice how the Reed-Solomon
decoding scheme performs well and then substantially degrades. If there is no
Reed-Solomon block duplication, then only 1
block needs to be in error for the data to be unrecoverable. Of course, with
block duplication the chance of an alternative
Artcard decoding increases.
Fig. 66 only illustrates the symbol (byte) errors corresponding to the number
of Reed-Solomon blocks in error.
There is a trade-off between the amount of blurring that can be coped with,
compared to the amount of damage that has been
done to a card. Since all error detection and correction is performed by a
Reed-Solomon decoder, there is a finite number of
errors per Reed-Solomon data block that can be coped with. The more errors
introduced through blurring, the fewer the
number of errors that can be coped with due to alternative Artcard damage.
Overview of alternative Artcard Decoding
CA 02456652 2004-02-06
WO 03/015395 PCT/AU02/00919
79
As noted previously, when the user inserts an alternative Artcard into an
alternative Artcard reading unit, a motor
transport ideally carries the alternative Artcard past a monochrome linear CCD
image sensor. The card is sampled in each
dimension at three times the printed resolution. Alternative Artcard reading
hardware and software compensate for rotation
up to 1 degree, fitter and vibration due to the motor transport, and blurring
due to variations in alternative Artcard to CCD
distance. A digital bit image of the data is extracted from the sampled image
by a complex method described here. Reed-
Solomon decoding corrects arbitrarily distributed data corruption of up to 25%
of the raw data on the alternative Artcard.
Approximately 1 MB of corrected data is extracted from a 1600 dpi card.
The steps involved in decoding are so as indicated in Fig. 67.
The decoding process requires the following steps:
Scan 1144 the alternative Artcard at three times printed resolution (eg scan
1600 dpi alternative Artcard at
4800 dpi)
* Extract 1145 the data bitmap from the scanned dots on the card.
* Reverse 1146 the bitmap if the alternative Artcard was inserted backwards.
* Unscramble 1147 the encoded data
* Reed-Solomon 1148 decode the data from the bitmap
Algorithmic Overview
Phase 1- Real time bit image extraction
A simple comparison between the available memory (4 MB) and the memory
required to hold all the scanned
pixels for a 1600 dpi alternative Artcard (172.5 MB) shows that unless the
card is read multiple times (not a realistic option),
the extraction of the bitmap from the pixel data must be done on the fly, in
real time, while the alternative Artcard is moving
past the CCD. Two tasks must be accomplished in this phase:
Scan the alternative Artcard at 4800 dpi
Extract the data bitmap from the scanned dots on the card
The rotation and unscrambling of the bit image cannot occur until the whole
bit image has been extracted. It is
therefore necessary to assign a memory region to hold the extracted bit image.
The bit image fits easily within 2MB, leaving
2MB for use in the extraction process.
Rather than extracting the bit image while looking only at the current
scanline of pixels from the CCD, it is possible
to allocate a buffer to act as a window onto the alternative Artcard, storing
the last N scanlines read. Memory requirements
do not allow the entire alternative Artcard to be stored this way (172.5MB
would be required), but allocating 2MB to store
190 pixel columns (each scanline takes less than 11,000 bytes) makes the bit
image extraction process simpler.
The 4MB memory is therefore used as follows:
2 MB for the extracted bit image
--2 MB for the scanned pixels
1.5 KB for Phase 1 scratch data (as required by algorithm)
The time taken for Phase 1 is 1.5 seconds, since this is the time taken for
the alternative Artcard to travel past the
CCD and physically load.
Phase 2 - Data extraction from bit image
Once the bit image has been extracted, it must be unscrambled and potentially
rotated 180°. It must then be
CA 02456652 2004-02-06
WO 03/015395 PCT/AU02/00919
decoded. Phase 2 has no real-time requirements, in that the alternative
Artcard has stopped moving, and we are only
concerned with the user's perception of elapsed time. Phase 2 therefore
involves the remaining tasks of decoding an
alternative Artcard:
* Re-organize the bit image, reversing it if the alternative Artcard was
inserted backwards
* Unscramble the encoded data
* Reed-Solomon decode the data from the bit image
The input to Phase 2 is the 2MB bit image buffer. Unscrambling and rotating
cannot be performed in situ, so a
second 2MB buffer is required. The 2MB buffer used to hold scanned pixels in
Phase 1 is no longer required and can be
used to store the rotated unscrambled data.
The Reed-Solomon decoding task takes the unscrambled bit image and decodes it
to 910,082 bytes. The decoding
can be performed in situ, or to a specified location elsewhere. The decoding
process does not require any additional memory
buffers.
The 4MB memory is therefore used as follows:
* 2 MB for the extracted bit image (from Phase 1)
* -2 MB for the unscrambled, potentially rotated bit image
* < lICB for Phase 2 scratch data (as required by algorithm)
The time taken for Phase 2 is hardware dependent and is bound by the time
taken for Reed-Solomon decoding.
Using a dedicated core such as LSI Logic's L64712, or an equivalent CPU/DSP
combination, it is estimated that Phase 2
would take 0.32 seconds.
Phase 1- Extract Bit Image
This is the real-time phase of the algorithm, and is concerned with extracting
the bit image from the alternative
Artcard as scanned by the CCD.
As shown in Fig. 68 Phase 1 can be divided into 2 asynchronous process
streams. The first of these streams is
simply the real-time reader of alternative Artcard pixels from the CCD,
writing the pixels to DRAM. The second stream
involves looking at the pixels, and extracting the bits. The second process
stream is itself divided into 2 processes. The first
process is a global process, concerned with locating the start of the
alternative Artcard. The second process is the bit image
extraction proper.
Fig. 69 illustrates the data flow from a data/process perspective.
Timing
For an entire 1600 dpi alternative Artcard, it is necessary to read a maximum
of 16,252 pixel-columns. Given a total
time of 1.5 seconds for the whole alternative Artcard, this implies a maximum
time of 92,296ns per pixel column during the
course of the various processes.
Process 1- Read pixels from CCD
The CCD scans the alternative Artcard at 4800 dpi, and generates 11,000 1-byte
pixel samples per column. This
process simply takes the data from the CCD and writes it to DRAM, completely
independently of any other process that is
reading the pixel data from DRAM. Fig. 70 illustrates the steps involved.
The pixels are written contiguously to a 2MB buffer that can hold 190 full
columns of pixels. The buffer always
holds the 190 columns most recently read. Consequently, any process that wants
to read the pixel data (such as Processes 2
CA 02456652 2004-02-06
WO 03/015395 PCT/AU02/00919
81
and 3) must firstly know where to look for a given column, and secondly, be
fast enough to ensure that the data required is
actually in the buffer.
Process 1 makes the current scanline number (CurrentScanLine) available to
other processes so they can ensure
they are not attempting to access pixels from scanlines that have not been
read yet.
The time taken to write out a single column of data (11,000 bytes) to DRAM is:
11,000/16 * 12 = 8,256ns
Process 1 therefore uses just under 9% of the available DRAM bandwidth
(8256/92296).
Process 2 - Detect start of alternative Artcard
This process is concerned with locating the Active Area on a scanned
alternative Artcard. The input to this stage is
the pixel data from DRAM (placed there by Process 1). The output is a set of
bounds for the first 8 data blocks on the
alternative Artcard, required as input to Process 3. A high level overview of
the process can be seen in Fig. 71.
An alternative Artcard can have vertical slop of lmm upon insertion. With a
rotation of 1 degree there is further
vertical slop of l.Smm (86 sin 1~. Consequently there is a total vertical slop
of 2.Smm. At 1600dpi, this equates to a slop of
approximately 160 dots. Since a single data block is only 394 dots high, the
slop is just under half a data block. To get a
better estimate of where the data blocks are located the alternative Artcard
itself needs to be detected.
Process 2 therefore consists of two parts:
Locate the start of the alternative Artcard, and if found,
Calculate the bounds of the first 8 data blocks based on the start of the
alternative Artcard.
Locate the Start of the alternative Artcard
The scanned pixels outside the alternative Artcard area are black (the surface
can be black plastic or some other
non-reflective surface). The border of the alternative Artcard area is white.
If we process the pixel columns one by one, and
filter the pixels to either black or white, the transition point from black to
white will mark the start of the alternative Artcard.
The highest level process is as follows:
for (Column=0; Column < MAX_COLLTNIN; Column++)
Pixel = ProcessColumn(Column)
if (Pixel)
return (Pixel, Column) // success!
return failure // no alternative Artcard found
The ProcessColumn function is simple. Pixels from two areas of the scanned
column are passed through a threshold
filter to determine if they are black or white. It is possible to then wait
for a certain number of white pixels and announce the
start of the alternative Artcard once the given number has been detected. The
logic of processing a pixel column is shown in
the following pseudocode. 0 is returned if the alternative Artcard has not
been detected during the column. Otherwise the
pixel number of the detected location is returned.
CA 02456652 2004-02-06
WO 03/015395 PCT/AU02/00919
82
// Try upper region first
count = 0
for (i=0; i<UPPER REGION BOI1ND; i++)
l
if (GetPixel(column, i) < THRESHOLD)
count = 0 // pixel is black
else
count++ // pixel is white
if (count > WHITE_ALTERNATIVE ARTCARD)
return t
// Try lower region next. Process pixels in reverse
count = 0
for (i=~ PIXEL. BOUND; i>LOWER_REGION_BOUND; i--)
1
if (GetPixel(column, i) < THRESHOLD)
count = 0 // pixel is black
else
(
count++ // pixel is white
if (count > WHITE_ALTERNATIVE ARTCARD)
return i
//Not in upper bound or in lower bound. Return failure
return 0
Calculate Data Block Bounds
At this stage, the alternative Artcard has been detected. Depending on the
rotation of the alternative Artcard, either
the top of the alternative Artcard has been detected or the lower part of the
alternative Artcard has been detected. The second
CA 02456652 2004-02-06
WO 03/015395 PCT/AU02/00919
83
step of Process 2 determines which was detected and sets the data block bounds
for Phase 3 appropriately.
A look at Phase 3 reveals that it works on data block segment bounds: each
data block has a StartPixel and an
EndPixel to determine where to look for targets in order to locate the data
block's data region.
If the pixel value is in the upper half of the card, it is possible to simply
use that as the first StartPixel bounds. If the
pixel value is in the lower half of the card, it is possible to move back so
that the pixel value is the last segment's EndPixel
bounds. We step forwards or backwards by the alternative Artcard data size,
and thus set up each segment with appropriate
bounds. We are now ready to begin extracting data from the alternative
Artcard.
// Adjust to become first pixel if is lower pixel
if (pixel > LOWER REGION BOUND)
pixel = 6 * 1152
if (pixel < 0)
pixel = 0
for (i=0; i<6; i++)
endPixel = pixel + 1152
segment[i].MaxPixel = MAX PIXEL_BOUND
segment[i].SetBounds(pixel, endPixel)
pixel = endPixel
The MaxPixel value is defined in Process 3, and the SetBounds function simply
sets StartPixel and EndPixel
clipping with respect to 0 and MaxPixel.
Process 3 - Extract bit data from pixels
This is the heart of the alternative Artcard Reader algorithm. This process is
concerned with extracting the bit data
from the CCD pixel data. The process essentially creates a bit-image from the
pixel data, based on scratch information
created by Process 2, and maintained by Process 3. A high level overview of
the process can be seen in Fig. 72.
Rather than simply read an alternative Artcard's pixel column and determine
what pixels belong to what data block,
Process 3 works the other way around. It knows where to look for the pixels of
a given data block. It does this by dividing a
logical alternative Artcard into 8 segments, each containing 8 data blocks as
shown in Fig. 73.
The segments as shown match the logical alternative Artcard. Physically, the
alternative Artcard is likely to be
rotated by some amount. The segments remain locked to the logical alternative
Artcard structure, and hence are rotation-
independent. A given segment can have one of two states:
LookingForTargets: where the exact data block position for this segment has
not yet been determined.
Targets are being located by scanning pixel column data in the bounds
indicated by the segment bounds. Once the data block
CA 02456652 2004-02-06
WO 03/015395 PCT/AU02/00919
84
has been located via the targets, and bounds set for black & white, the state
changes to ExtractingBitlmage.
* ExtractingBitlmage: where the data block has been accurately located, and
bit data is being extracted one
dot column at a time and written to the alternative Artcard bit image. The
following of data block clockmarks gives accurate
dot recovery regardless of rotation, and thus the segment bounds are ignored.
Once the entire data block has been extracted,
new segment bounds are calculated for the next data block based on the current
position. The state changes to
LookingForTargetS.
The process is complete when all 64 data blocks have been extracted, 8 from
each region.
Each data block consists of 595 columns of data, each with 48 bytes.
Preferably, the 2 orientation columns for the
data block are each extracted at 48 bytes each, giving a total of 28,656 bytes
extracted per data block. For simplicity, it is
possible to divide the 2MB of memory into 64 x 32k chunks. The nth data block
for a given segment is stored at the location:
StartBuffer + (256k * n)
Data Structure for Segments
Each of the 8 segments has an associated data structure. The data structure
defining each segment is stored in the
scratch data area. The structure can be as set out in the following table:
DataName Comment
CurrentState Defines the current state of the segment.
Can be one of:
LookingForTargets
ExtractingBitlmage
Initial value is LookingForTargets
Used during LookingForTargets:
StartPixel U er ixel bound of segment. Initiall set
b Process 2.
EndPixel Lower pixel bound of segment. Initially
set by Process 2
MaxPixel The maximum pixel number for any scanline.
It is set to the same value for each segment:
10,866.
CurrentColumn Pixel column we're up to while looking
for targets.
FinalColumn Defines the last ixel column to look in
for targets.
LocatedTargets Points to a list of located Targets.
PossibleTargets Points to a set of pointers to Target
structures that represent currently
investigated ixel sha es that may be targets
AvailableTargets Points to a set of ointers to Target structures
that are currently unused.
TargetsFound The number of Tar ets found so far in
this data block.
PossibleTar etCountThe number of elements in the PossibleTargets
list
AvailabletargetCountThe number of elements in the AvailableTargets
list
Used during ExtractingBitlmage:
BitImage The start of the Bit Image data area in
DRAM where to store the next
data block:
Segment 1 = X, Segment 2 = X+32k etc
Advances by 256k each time the state changes
from
ExtractingBitImageData to Looking ForTargets
CurrentByte Offset within BitIma a where to store
next extracted b a
CurrentDotColumn Holds current clockmark/dot column number.
Set to -8 when transitioning from state
LookingForTarget to
CA 02456652 2004-02-06
WO 03/015395 PCT/AU02/00919
Extractin BitIma e.
U erClock Coordinate (column/ ixel) of current a
er clockmark/border
LowerClock Coordinate (column/ ixel) of current lower
clockmark/border
CurrentDot The center of the current data dot for
the current dot column. Initially set
to the center of the first (to most) dot
of the data column.
DataDelta What to add (column/pixel) to CurrentDot
to advance to the center of the
next dot.
BlackMax Pixel value above which a dot is definitel
white
WhiteMin Pixel value below which a dot is definitel
black
MidRange The pixel value that has equal likelihood
of coming from black or white.
When all smarts have not determined the
dot, this value is used to
determine it. Pixels below this value
are black, and above it are white.
High Level of Process 3
Process 3 simply iterates through each of the segments, performing a single
line of processing depending on the
segment's current state. The pseudocode is straightforward:
blockCount = 0
while (blockCount < 64)
for (i=0; i<8; i++)
finishedBlock = segment[i].ProcessStateQ
if (finishedBlock)
blockCount++
Process 3 must be halted by an external controlling process if it has not
terminated after a specified amount of time.
This will only be the case if the data cannot be extracted. A simple mechanism
is to start a countdown after Process 1 has
finished reading the alternative Artcard. If Process 3 has not finished by
that time, the data from the alternative Artcard
cannotberecovered.
CurrentState = LookingForTargets
Targets are detected by reading columns of pixels, one pixel-column at a time
rather than by detecting dots within a
given band of pixels (between StartPixel and EndPixel) certain patterns of
pixels are detected. The pixel columns are
processed one at a time until either all the targets are found, or until a
specified number of columns have been processed. At
that time the targets can be processed and the data area located via
clockmarks. The state is changed to ExtractingBitImage
to signify that the data is now to be extracted. If enough valid targets are
not located, then the data block is ignored, skipping
to a column definitely within the missed data block, and then beginning again
the process of looking for the targets in the
next data block. This can be seen in the following pseudocode:
finishedBlock = FALSE
if(CurrentColumn < Processl.CurrentScanLine)
CA 02456652 2004-02-06
WO 03/015395 PCT/AU02/00919
86
ProcessPixelColumnQ
CurrentColumn++
if ((TargetsFound ---- 6) ~~ (CurrentColumn > LastColumn))
if (TargetsFound >= 2)
ProcessTargetsQ
if (TargetsFound >= 2)
BuiIdCIockmarkEstimates()
SetBlackAndWhiteBoundsQ
CurrentState = ExtractingBitImage
CurrentDotColumn = -8
else
// data block cannot be recovered. Look for
// next instead. Must adjust pixel bounds to
// take account of possible 1 degree rotation.
finishedBlock = TRUE
SetBounds(StartPixel-12, EndPixel+12)
BitImage += 256KB
CurrentByte = 0
LastColumn += 1024
TargetsFound = 0
return finishedBlock
ProcessPixelColumn
Each pixel column is processed within the specified bounds (between StartPixel
and EndPixel) to search for certain
patterns of pixels which will identify the targets. The structure of a single
target (target number 2) is as previously shown in
Fig. 54:
From a pixel point of view, a target can be identified by:
* Left black region, which is a number of pixel columns consisting of large
numbers of contiguous black
pixels to build up the first part of the target.
* Target center, which is a white region in the center of further black
columns
* Second black region, which is the 2 black dot columns after the target
center
CA 02456652 2004-02-06
WO 03/015395 PCT/AU02/00919
87
* Target number, which is a black-surrounded white region that defines the
target number by its length
* Third black region, which is the 2 black columns after the target number
An overview of the required process is as shown in Fig. 74.
Since identification only relies on black or white pixels, the pixels 1150
from each column are passed through a
filter 1151 to detect black or white, and then run length encoded 1152. The
run-lengths are then passed to a state machine
1153 that has access to the last 3 run lengths and the 4th last color. Based
on these values, possible targets pass through each
of the identification stages.
The GatherMin&Max process 1155 simply keeps the minimum & maximum pixel values
encountered dwing the
processing of the segment. These are used once the targets have been located
to set BlackMax, WhiteMin, and MidRange
values.
Each segment keeps a set of target structwes in its search for targets. While
the target structwes themselves don't
move around in memory, several segment variables point to lists of pointers to
these target structures. The three pointer lists
are repeated here:
LocatedTargetsPoints to a set of Tar et structures that
re resent located targets.
PossibleTargetsPoints to a set of pointers to Target structures
that represent currently
investigated ixel sha es that may be targets.
AvailableTargetsPoints to a set of pointers to Target structures
that are currently unused.
There are counters associated with each of these list pointers: TargetsFound,
PossibleTargetCount, and
AvailableTargetCount respectively.
Before the alternative Artcard is loaded, TargetsFound and PossibleTargetCount
are set to 0, and
AvailableTargetCount is set to 28 (the maximum number of target structwes
possible to have under investigation since the
minimum size of a target border is 40 pixels, and the data area is
approximately 1152 pixels). An example of the target
pointer layout is as illustrated in Fig. 75.
As potential new targets are found, they are taken from the AvailableTargets
list 1157, the target data structure is
updated, and the pointer to the structure is added to the PossibleTargets list
I 158. When a target is completely verified, it is
added to the LocatedTargets list 1159. If a possible target is found not to be
a target after all, it is placed back onto the
AvailableTargets list 1157. Consequently there are always 28 target pointers
in circulation at any time, moving between the
lists.
The Target data structure 1160 can have the following form:
DataName Comment
CurrentState The current state of the target search
DetectCount Counts how long a target has been in
a given state
StartPixel Where does the target start? All the
lines of pixels in this target should
start within a tolerance of this pixel
value.
TargetNumber Which target number is this (according
to what was read)
Column Best estimate of the target's center
column ordinate
Pixel Best estimate of the target's center
pixel ordinate
CA 02456652 2004-02-06
WO 03/015395 PCT/AU02/00919
88
The ProcessPixelColumn function within the find targets module 1162 (Fig. 74)
then, goes through all the run
lengths one by one, comparing the runs against existing possible targets (via
StartPixel), or creating new possible targets if a
potential target is found where none was previously known. In all cases, the
comparison is only made if SO.color is white
and Sl.color is black.
The pseudocode for the ProcessPixelColumn set out hereinafter. When the first
target is positively identified, the
last column to be checked for targets can be determined as being within a
maximum distance from it. For 1° rotation, the
maximum distance is 18 pixel columns.
pixel = StartPixel
t=0
target=PossibleTarget[t]
while ((pixel < EndPixel) && (TargetsFound < 6))
if ((SO.Color = white) && (Sl.Color ---- black))
do
keepTrying = FALSE
if
(target != NULL)
&&
(target->AddToTarget(Column, pixel, S1, S2, S3))
if (target->CurrentState == IsATarget)
Remove target from PossibleTargets List
Add target to LocatedTargets List
TargetsFound++
if (TargetsFound = 1)
FinalColumn = Column + MAX_TARGET DELTA]
else if (target->CurrentState == NotATarget)
1
Remove target from PossibleTargets List
Add target to AvailableTargets List
CA 02456652 2004-02-06
WO 03/015395 PCT/AU02/00919
89
keepTrying = TRUE
}
else
t++ // advance to next target
}
target = PossibleTarget[t]
}
else
tmp = AvailableTargets[O]
if (tmp->AddToTarget(Column,pixel,SI,S2,S3)
Remove tmp from AvailableTargets list
Add tmp to PossibleTargets list
t++ // target t has been shifted right
} while (keepTrying)
pixel += S I .RunLength
Advance SO/SI/S2/S3
AddToTarget is a function within the find targets module that determines
whether it is possible or not to add the
specific run to the given target:
* If the run is within the tolerance of target's starting position, the run is
directly related to the current target,
and can therefore be applied to it.
* If the run starts before the target, we assume that the existing target is
still ok, but not relevant to the run.
The target is therefore left unchanged, and a return value of FALSE tells the
caller that the run was not applied. The caller
can subsequently check the run to see if it starts a whole new target of its
own.
* If the run starts after the target, we assume the target is no longer a
possible target. The state is changed to
be NotATarget, and a return value of TRUE is returned.
If the run is to be applied to the target, a specific action is performed
based on the current state and set of runs in Sl,
S2, and S3. The AddToTarget pseudocode is as follows:
MAX TARGET DELTA = 1
if (CurrentState != NothingKnown)
3
CA 02456652 2004-02-06
WO 03/015395 PCT/AU02/00919
if (pixel > StarcPixel) // run starts after target
1
diff = pixel - StartPixel
if (diff > ~ TARGET_DELTA)
CurrentState = NotATarget
return TRUE
else
diff = StartPixel - pixel
if (diff > MAX TARGET DELTA)
return FALSE
runType=DetermineRunType(S1, S2, S3)
EvaluateState(runType)
StartPixel = currentPixel
return TRUE
Types of pixel runs are identified in DetermineRunType is as follows:
Types of Pixel
Runs
Type How identified (S1 is always black)
TargetBorder S 1 = 40 < RunLength < 50
S2 = white run
TargetCenter S1 = 15 < RunLength < 26
S2 = white run with [RunLength < 12]
S3 = black run with [ 15 < RunLength <
26]
TargetNumber S2 = white run with [RunLength <= 40]
The EvaluateState procedure takes action depending on the current state and
the run type.
The actions are shown as follows in tabular form:
CurrentState ~ Type of Pixel Run ~ Action
Nothin Known Tar etBorder DetectCount = 1
g ~ g ~ CurrentState = LeftOfCenter
CA 02456652 2004-02-06
WO 03/015395 PCT/AU02/00919
91
CurrentState Type of PixelAction
Run
LeftOfCenter TargetBorder DetectCount++
if (DetectCount > 24)
CurrentState = NotATarget
TargetCenter DetectCount = 1
CurrentState = InCenter
Column = currentColumn
Pixel = currentPixel + S 1.RunLen
th
CurrentState = NotATarget
InCenter TargetCenter DetectCount++
tmp = currentPixel + S l.RunLength
if (tmp < Pixel)
Pixel = tmp
if (DetectCount > 13)
CurrentState = NotATar et
TargetBorder DetectCount = 1
CurrentState = RightOfCenter
CurrentState = NotATarget
RightOfCenter TargetBorder DetectCount++
if (DetectCount >= 12)
CurrentState = NotATarget
TargetNumber DetectCount = 1
CurrentState = InTargetNumber
TargetNumber = (S2.RunLength+
2)/6
CurrentState = NotATar et
InTargetNumberTargetNumber tmp = (S2.RunLength+ 2)/6
if (tmp > TargetNumber)
TargetNumber = tmp
DetectCount++
if (DetectCount >= 12)
CurrentState = NotATarget
TargetBorder if (DetectCount >= 3)
CurrentState = IsATarget
else
CurrentState = NotATarget
CurrentState = NotATarget
IsATarget or
NotATarget
Processing Targets
he located targets (in the LocatedTargets list) are stored in the order they
were located. Depending on alternative
Artcard rotation these targets will be in ascending pixel order or descending
pixel order. In addition, the target numbers
recovered from the targets may be in error. We may have also have recovered a
false target. Before the clockmark estimates
can be obtained, the targets need to be processed to ensure that invalid
targets are discarded, and valid targets have target
numbers fixed if in error (e.g. a damaged target number due to dirt). Two main
steps are involved:
Sort targets into ascending pixel order
CA 02456652 2004-02-06
WO 03/015395 PCT/AU02/00919
92
* Locate and fix erroneous target numbers
The first step is simple. The nature of the target retrieval means that the
data should already be sorted in either
ascending pixel or descending pixel. A simple swap sort ensures that if the 6
targets are already sorted correctly a maximum
of 14 comparisons is made with no swaps. If the data is not sorted, 14
comparisons are made, with 3 swaps. The following
pseudocode shows the sorting process:
for (i = 0; i < TargetsFound-1; i++)
l
oldTarget = LocatedTargets[i]
bestPixel = oldTarget->Pixel
best = i
j = i+1
while (j<TargetsFound)
if (LocatedTargets[j]-> Pixel < bestPixel)
best = j
j++
if (best != i) // move only if necessary
LocatedTargets[i] =LocatedTargets[best]
LocatedTargets[best] = oldTarget
Locating and fixing erroneous target numbers is only slightly more complex.
One by one, each of the N targets
found is assumed to be correct. The other targets are compared to this
"correct" target and the number of targets that require
change should target N be correct is counted. If the number of changes is 0,
then all the targets must already be correct.
Otherwise the target that requires the fewest changes to the others is used as
the base for change. A change is registered if a
given target's target number and pixel position do not correlate when compared
to the "correct" target's pixel position and
target number. The change may mean updating a target's target number, or it
may mean elimination of the target. It is
possible to assume that ascending targets have pixels in ascending order
(since they have already been sorted).
kPixelFactor = 1/(55 * 3)
bestTarget = 0
bestChanges = TargetsFound + 1
for (ice; i< TotalTargetsFound; i++)
CA 02456652 2004-02-06
WO 03/015395 PCT/AU02/00919
93
numberOfChanges = 0;
fromPixel = (LocatedTargets[i])->Pixel
fromTargetNumber = LocatedTargets[i].TargetNumber
for (j=1; j< TotalTargetsFound; j++)
toPixel = LocatedTargets[j]->Pixel
deltaPixel = toPixel - fromPixel
if (deltaPixel >= 0)
deltaPixel += PIXELS BETWEEN TARGET CENTRES/2
else
deltaPixel -= PIXELS BETWEEN TARGET CENTRES/2
targetNumber =deltaPixel * kPixelFactor
targetNumber += fromTargetNumber
if
(targetNumber < 1)~~(targetNumber > 6)
(targetNumber != LocatedTargets[j]-> TargetNumber)
numberOfChanges++
if (numberOfChanges < bestChanges)
bestTarget = i
bestChanges = numberOfChanges
if (bestChanges < 2)
break;
In most cases this function will terminate with bestChanges = 0, which means
no changes are required. Otherwise
the changes need to be applied. The functionality of applying the changes is
identical to counting the changes (in the
pseudocode above) until the comparison with targetNumber. The change
application is:
if ((targetNumber < 1)~~(targetNumber > TARGETS_PER_BLOCK))
1
LocatedTargets(j] = NULL
CA 02456652 2004-02-06
WO 03/015395 PCT/AU02/00919
94
TargetsFound--
else
LocatedTargets[j]-> TargetNumber = targetNumber
At the end of the change loop, the LocatedTargets list needs to be compacted
and all NULL targets removed.
At the end of this procedure, there may be fewer targets. Whatever targets
remain may now be used (at least 2
targets are required) to locate the clockmarks and the data region.
Building Clockmark Estimates from Targets
As shown previously in Fig. 55, the upper region's first clockmark dot 1126 is
55 dots away from the center of the
first target 1124 (which is the same as the distance between target centers).
The center of the clockmark dots is a further 1
dot away, and the black border line 1123 is a further 4 dots away from the
first clockmark dot. The lower region's first
clockmark dot is exactly 7 targets-distance away (7 x 55 dots) from the upper
region's first clockmark dot 1126.
It cannot be assumed that Targets 1 and 6 have been located, so it is
necessary to use the upper-most and lower-
most targets, and use the target numbers to determine which targets are being
used. It is necessary at least 2 targets at this
point. In addition, the target centers are only estimates of the actual target
centers. It is to locate the target center more
accurately. The center of a target is white, surrounded by black. We therefore
want to find the local maximum in both pixel
& column dimensions. This involves reconstructing the continuous image since
the maximum is unlikely to be aligned
exactly on an integer boundary (our estimate).
Before the continuous image can be constructed around the target's center, it
is necessary to create a better estimate
of the 2 target centers. The existing target centers actually are the top left
coordinate of the bounding box of the target center.
It is a simple process to go through each of the pixels for the area defining
the center of the target, and find the pixel with the
highest value. There may be more than one pixel with the same maximum pixel
value, but the estimate of the center value
only requires one pixel.
The pseudocode is straightforward, and is performed for each of the 2 targets:
CENTER WIDTH = CENTER HEIGHT = 12
maxPixel = 0x00
for (i=0; i<CENTER WIDTH; i++)
for (j=0; j<CENTER_HEIGHT; j++)
p = GetPixel(column+i, pixel+j)
if (p > maxPixel)
maxPixel = p
centerColumn = column + i
CA 02456652 2004-02-06
WO 03/015395 PCT/AU02/00919
centerPixel = pixel + j
Target.Column = centerColumn
Target. Pixel = centerPixel
At the end of this process the target center coordinates point to the whitest
pixel of the target, which should be
within one pixel of the actual center. The process of building a more accurate
position for the target center involves
reconstructing the continuous signal for 7 scanline slices of the target, 3 to
either side of the estimated target center. The 7
maximum values found (one for each of these pixel dimension slices) are then
used to reconstruct a continuous signal in the
column dimension and thus to locate the maximum value in that dimension.
// Given estimates column and pixel, determine a
// betterColumn and betterPixel as the center of
// the target
for (y=0; y<7; y++)
for (x=0; x<7; x++)
samples[x] = GetPixel(column-3+y, pixel-3+x)
FindMax(samples, pos, maxVal)
reSamples[y] = maxVal
if (y == 3)
betterPixel = pos + pixel
FindMax(reSamples, pos, maxVal)
betterColumn = pos + column
FindMax is a function that reconstructs the original 1 dimensional signal
based sample points and returns the
position of the maximum as well as the maximum value found. The method of
signal reconstruction/resampling used is the
Lanczos3 windowed sinc function as shown in Fig. 76.
The Lanczos3 windowed sinc function takes 7 (pixel) samples from the dimension
being reconstructed, centered
around the estimated position X, i.e. at X-3, X-2, X-1, X, X+1, X+2, X+3. We
reconstruct points from X-1 to X+1, each at
an interval of 0.1, and determine which point is the maximum. The position
that is the maximum value becomes the new
center. Due to the nature of the kernel, only 6 entries are required in the
convolution kernel for points between X and X+1.
We use 6 points for X-1 to X, and 6 points for X to X+1, requiring 7 points
overall in order to get pixel values from X-1 to
X+1 since some of the pixels required are the same.
Given accurate estimates for the upper-most target from and lower-most target
to, it is possible to calculate the
position of the first clockmark dot for the upper and lower regions as
follows:
CA 02456652 2004-02-06
WO 03/015395 PCT/AU02/00919
96
TARGETS PER-BLOCK = 6
numTargetsDiff = to.TargetNum - from.TargetNum
deltaPixel = (to.Pixel - from.Pixel) / numTargetsDiff
deltaColumn = (to.Column - from.Column) / numTargetsDiff
UpperClock.pixel = from.Pixel - (from.TargetNum*deltaPixel)
UpperClock.column = from.Column-(from.TargetNum*deltaColumn)
// Given the first dot of the upper clockmark, the
// first dot of the lower clockmark is straightforward.
LowerClock.pixel - UpperClock.pixel +
((TARGETS_PER-BLOCK+1) * deltaPixel)
LowerClock.column - UpperClock.column +
((TARGETS PER_ BLOCK+1) * deltaColumn)
This gets us to the first clockmark dot. It is necessary move the column
position a further 1 dot away from the data
area to reach the center of the clockmark. It is necessary to also move the
pixel position a further 4 dots away to reach the
center of the border line. The pseudocode values for deltaColumn and
deltaPixel are based on a 55 dot distance (the distance
between targets), so these deltas must be scaled by 1/55 and 4/55 respectively
before being applied to the clockmark
coordinates. This is represented as:
kDeltaDotFactor = I/DOTS BETWEEN TARGET CENTRES
deltaColumn *= kDeltaDotFactor
deltaPixel *= 4 * kDeltaDotFactor
UpperClock.pixel -= deltaPixel
UpperClock.column -= deltaColumn
LowerClock.pixel += deltaPixel
LowerClock.column += deltaColumn
UpperClock and LowerClock are now valid clockmark estimates for the first
clockmarks directly in line with the
centers of the targets.
Setting Black and White Pixel/Dot Ranges
Before the data can be extracted from the data area, the pixel ranges for
black and white dots needs to be
ascertained. The minimum and maximum pixels encountered during the search for
targets were stored in WhiteMin and
BlackMax respectively, but these do not represent valid values for these
variables with respect to data extraction. They are
merely used for storage convenience. The following pseudocode shows the method
of obtaining good values for WhiteMin
and BlackMax based on the min & max pixels encountered:
CA 02456652 2004-02-06
WO 03/015395 PCT/AU02/00919
97
MinPixel = WhiteMin
MaxPixel = BlackMax
MidRange = (MinPixel + MaxPixel) / 2
WhiteMin = MaxPixel -105
BlackMax = MinPixel + 84
CurrentState = ExtractingBitImage
The ExtractingBitlmage state is one where the data block has already been
accurately located via the targets, and bit
data is currently being extracted one dot column at a time and written to the
alternative Artcard bit image. The following of
data block clockmarks/borders gives accurate dot recovery regardless of
rotation, and thus the segment bounds are ignored.
Once the entire data block has been extracted (597 columns of 48 bytes each;
595 columns of data + 2 orientation columns),
new segment bounds are calculated for the next data block based on the current
position. The state is changed to
LookingForTargets.
Processing a given dot column involves two tasks:
* The first task is to locate the specific dot column of data via the
clockmarks.
* The second task is to run down the dot column gathering the bit values, one
bit per dot.
These two tasks can only be undertaken if the data for the column has been
read off the alternative Artcard and
transferred to DRAM. This can be determined by checking what scanline Process
1 is up to, and comparing it to the
clockmark columns. If the dot data is in DRAM we can update the clockmarks and
then extract the data from the column
before advancing the clockmarks to the estimated value for the next dot
column. The process overview is given in the
following pseudocode, with specific functions explained hereinafter:
finishedBlock = FALSE
if((UpperClock.column < Processl.CurrentScanLine)
&&
(LowerClock.column < Processl.CurrentScanLine))
DetermineAccurateClockMarks()
DetermineDataInfoQ
if (CurrentDotColumn >= 0)
ExtractDataFromColumnQ
AdvanceClockMarksQ
if (CurrentDotColumn == FINAL-COLUMN)
1
finishedBlock = TRUE
currentState = LookingForTargets
SetBounds(UpperClock.pixel, LowerClock.pixel)
BitImage += 256KB
CurrentByte = 0
CA 02456652 2004-02-06
WO 03/015395 PCT/AU02/00919
98
TargetsFound = 0
return finishedBlock
Locating the dot column
A given dot column needs to be located before the dots can be read and the
data extracted. This is accomplished by
following the clockmarks/borderline along the upper and lower boundaries of
the data block. A software equivalent of a
phase-locked-loop is used to ensure that even if the clockmarks have been
damaged, good estimations of clockmark
positions will be made. Fig. 77 illustrates an example data block's top left
which corner reveals that there are clockmarks 3
dots high 1166 extending out to the target area, a white row, and then a black
border line.
Initially, an estimation of the center of the first black clockmark position
is provided (based on the target positions).
We use the black border 1168 to achieve an accurate vertical position (pixel),
and the clockmark eg. 1166 to get an accurate
horizontal position (column). These are reflected in the UpperClock and
LowerClock positions.
The clockmark estimate is taken and by looking at the pixel data in its
vicinity, the continuous signal is
reconstructed and the exact center is determined. Since we have broken out the
two dimensions into a clockmark and border,
this is a simple one-dimensional process that needs to be performed twice.
However, this is only done every second dot
column, when there is a black clockmark to register against. For the white
clockmarks we simply use the estimate and leave
it at that. Alternatively, we could update the pixel coordinate based on the
border each dot column (since it is always
present). In practice it is sufficient to update both ordinates every other
column (with the black clockmarks) since the
resolution being worked at is so fine. The process therefore becomes:
// Turn the estimates of the clockmarks into accurate
// positions only when there is a black clockmark
// (ie every 2nd dot column, starting from -8)
if (BitO(CurrentDotColumn) = 0) // even column
DetermineAccurateUpperDotCenterQ
DetermineAccurateLowerDotCenterQ
If there is a deviation by more than a given tolerance (MAX_CLOCKMARK
DEVIATION, the found signal is
ignored and only deviation from the estimate by the maximum tolerance is
allowed. In this respect the functionality is
similar to that of a phase-locked loop. Thus DetermineAccurateUpperDotCenter
is implemented via the following
pseudocode:
// Use the estimated pixel position of
// the border to determine where to look for
CA 02456652 2004-02-06
WO 03/015395 PCT/AU02/00919
99
// a more accurate clockmark center. The clockmark
// is 3 dots high so even if the estimated position
// of the border is wrong, it won't affect the
// fixing of the clockmark position.
MAX CLOCKMARK DEVIATION = 0.5
diff - GetAccurateColumn(UpperClock.column,
UpperClock.pixel+(3*PIXELS_PER_DOT))
diff -= UpperClock.column
if (diff > MAX_CLOCKMARK DEVIATION)
diff = MAX CLOCKMARK DEVIATION
else
if (diff < -MAX_CLOCKMARI~ DEVIATION)
diff = -MAX CLOCKMARK DEVIATION
UpperClock.column += diff
// Use the newly obtained clockmark center to
// determine a more accurate border position.
diff = GetAccuratePixel(UpperClock.column, UpperClock.pixel)
diff -= UpperClock.pixel
if (diff > MAX CLOCKMARK DEVIATION)
diff = MAX CLOCKMARK DEVIATION
else
if (diff < -MAX-CLOCKMARK DEVIATION)
diff = -MAX CLOCKMARK DEVIATION
UpperClock.pixel += diff
DetermineAccurateLowerDotCenter is the same, except that the direction from
the border to the clockmark is in the
negative direction (-3 dots rather than +3 dots).
GetAccuratePixel and GetAccurateColumn are functions that determine an
accurate dot center given a coordinate,
but only from the perspective of a single dimension. Determining accurate dot
centers is a process of signal reconstruction
and then finding the location where the minimum signal value is found (this is
different to locating a target center, which is
locating the maximum value of the signal since the target center is white, not
black). The method chosen for signal
reconstruction/resampling for this application is the Lanczos3 windowed sine
function as previously discussed with
reference to Fig. 76.
It may be that the clockmark or border has been damaged in some way - perhaps
it has been scratched. If the new
center value retrieved by the resampling differs from the estimate by more
than a tolerance amount, the center value is only
moved by the maximum tolerance. If it is an invalid position, it should be
close enough to use for data retrieval, and future
clockmarks will resynchronize the position.
CA 02456652 2004-02-06
WO 03/015395 PCT/AU02/00919
100
Determining the center of the first data dot and the deltas to subsequent dots
Once an accurate UpperClock and LowerClock position has been determined, it is
possible to calculate the center
of the first data dot (CurrentDot), and the delta amounts to be added to that
center position in order to advance to subsequent
dots in the column (DataDelta).
The first thing to do is calculate the deltas for the dot column. This is
achieved simply by subtracting the
UpperClock from the LowerClock, and then dividing by the number of dots
between the two points. It is possible to actually
multiply by the inverse of the number of dots since it is constant for an
alternative Artcard, and multiplying is faster. It is
possible to use different constants for obtaining the deltas in pixel and
column dimensions. The delta in pixels is the distance
between the two borders, while the delta in columns is between the centers of
the two clockmarks. Thus the function
DetermineDataInfo is two parts. The first is given by the pseudocode:
kDeltaColumnFactor = 1 / (DOTS PER DATA COLUMN + 2 + 2 - 1)
kDeltaPixelFactor = 1 / (DOTS_PER DATA COLUMN + 5 + 5 - 1)
delta = LowerClock.column - UpperClock.column
DataDelta.column = delta * kDeltaColumnFactor
delta = LowerClock.pixel - UpperClock.pixel
DataDelta.pixel = delta * kDeItaPixelFactor
It is now possible to determine the center of the first data dot of the
column. There is a distance of 2 dots from the
center of the clockmark to the center of the first data dot, and 5 dots from
the center of the border to the center of the first
data dot. Thus the second part of the function is given by the pseudocode:
CurrentDot.column = UpperClock.column + (2*DataDelta.column)
CurrentDot.pixel = UpperClock.pixel + (5*DataDelta.pixel)
Running down a dot column
Since the dot column has been located from the phase-locked loop tracking the
clockmarks, all that remains is to
sample the dot column at the center of each dot down that column. The variable
CurrentDot points is determined to the
center of the first dot of the current column. We can get to the next dot of
the column by simply adding DataDelta (2
additions: 1 for the column ordinate, the other for the pixel ordinate). A
sample of the dot at the given coordinate (bi-linear
interpolation) is taken, and a pixel value representing the center of the dot
is determined. The pixel value is then used to
determine the bit value for that dot. However it is possible to use the pixel
value in context with the center value for the two
surrounding dots on the same dot line to make a better bit judgement.
We can be assured that all the pixels for the dots in the dot column being
extracted are currently loaded in DRAM,
for if the two ends of the line (clockmarks) are in DRAM, then the dots
between those two clockmarks must also be in
DRAM. Additionally, the data block height is short enough (only 384 dots high)
to ensure that simple deltas are enough to
traverse the length of the line. One of the reasons the card is divided into 8
data blocks high is that we cannot make the same
CA 02456652 2004-02-06
WO 03/015395 PCT/AU02/00919
101
rigid guarantee across the entire height of the card that we can about a
single data block.
The high level process of extracting a single line of data (48 bytes) can be
seen in the following pseudocode. The
dataBuffer pointer increments as each byte is stored, ensuring that
consecutive bytes and columns of data are stored
consecutively.
bitCount = 8
curt = 0x00 // definitely black
next = GetPixel(CurrentDot)
for (i=0; i < DOTS PF.R-DATA COLUN>rt; i++)
CurrentDot += DataDelta
prev = curt
curt = next
next = GetPixel(CurrentDot)
bit = DetermineCenterDot(prev, curt, next)
byte = (byte « I ) ~ bit
bitCount--
if (bitCount == 0)
*(BitImage ~ CurrentByte) = byte
CurrentByte++
bitCount = 8
The GetPixel function takes a dot coordinate (fixed point) and samples 4 CCD
pixels to arrive at a center pixel
value via bilinear interpolation.
The DetermineCenterDot function takes the pixel values representing the dot
centers to either side of the dot whose
bit value is being determined, and attempts to intelligently guess the value
of that center dot's bit value. From the
generalized blurring curve of Fig. 64 there are three common cases to
consider:
* The dot's center pixel value is lower than WhiteMin, and is therefore
definitely a black dot. The bit value
is therefore definitely 1.
* The dot's center pixel value is higher than BlackMax, and is therefore
definitely a white dot. The bit value
is therefore definitely 0.
* The dot's center pixel value is somewhere between BlackMax and WhiteMin. The
dot may be black, and
it may be white. The value for the bit is therefore in question. A number of
schemes can be devised to make a reasonable
guess as to the value of the bit. These schemes must balance complexity
against accuracy, and also take into account the fact
that in some cases, there is no guaranteed solution. In those cases where we
make a wrong bit decision, the bit's Reed-
CA 02456652 2004-02-06
WO 03/015395 PCT/AU02/00919
102
Solomon symbol will be in error, and must be corrected by the Reed-Solomon
decoding stage in Phase 2.
The scheme used to determine a dot's value if the pixel value is between
BlackMax and WhiteMin is not too
complex, but gives good results. It uses the pixel values of the dot centers
to the left and right of the dot in question, using
their values to help determine a more likely value for the center dot:
* If the two dots to either side are on the white side of MidRange (an average
dot value), then we can guess
that if the center dot were white, it would likely be a "definite" white. The
fact that it is in the not-sure region would indicate
that the dot was black, and had been affected by the surrounding white dots to
make the value less sure. The dot value is
therefore assumed to be black, and hence the bit value is 1.
* If the two dots to either side are on the black side of MidRange, then we
can guess that if the center dot
were black, it would likely be a "definite" black. The fact that it is in the
not-sure region would indicate that the dot was
white, and had been affected by the surrounding black dots to make the value
less sure. The dot value is therefore assumed to
be white, and hence the bit value is 0.
* If one dot is on the black side of MidRange, and the other dot is on the
white side of MidRange, we simply
use the center dot value to decide. If the center dot is on the black side of
MidRange, we choose black (bit value 1).
Otherwise we choose white (bit value 0).
The logic is represented by the following:
if (pixel < WhiteMin) // definitely black
bit = 0x01
else
if (pixel > BlackMax) // definitely white
bit = 0x00
else
if ((prev > MidRange) && (nexU MidRange)) //prob black
bit = 0x01
else
if ((prev < MidRange) && (next < MidRange)) //prob white
bit = 0x00
else
if (pixel < MidRange)
bit = 0x01
else
bit = 0x00
From this one can see that using surrounding pixel values can give a good
indication of the value of the center dot's
state. The scheme described here only uses the dots from the same row, but
using a single dot line history (the previous dot
line) would also be straightforward as would be alternative arrangements.
Updating cloclimarks for the next column
CA 02456652 2004-02-06
WO 03/015395 PCT/AU02/00919
103
Once the center of the first data dot for the column has been determined, the
clockmark values are no longer
needed. They are conveniently updated in readiness for the next column after
the data has been retrieved for the column.
Since the clockmark direction is perpendicular to the traversal of dots down
the dot column, it is possible to use the pixel
delta to update the column, and subtract the column delta to update the pixel
for both clocks:
UpperClock.column += DataDelta.pixel
LowerClock.column += DataDelta.pixel
UpperClock.pixel -= DataDelta.column
LowerClock.pixel -= DataDelta.column
These are now the estimates for the next dot column.
Timing
The timing requirement will be met as long as DRAM utilization does not exceed
100%, and the addition of
parallel algorithm timing multiplied by the algorithm DRAM utilization does
not exceed 100%. DRAM utilization is
specified relative to Processl, which writes each pixel once in a consecutive
manner, consuming 9% of the DRAM
bandwidth.
The timing as described in this section, shows that the DRAM is easily able to
cope with the demands of the
alternative Artcard Reader algorithm. The timing bottleneck will therefore be
the implementation of the algorithm in terms
of logic speed, not DRAM access. The algorithms have been designed however,
with simple architectures in mind,
requiring a minimum number of logical operations for every memory cycle. From
this point of view, as long as the
implementation state machine or equivalent CPU/DSP architecture is able to
perform as described in the following sub-
sections, the target speed will be met.
Locating the targets
Targets are located by reading pixels within the bounds of a pixel column.
Each pixel is read once at most.
Assuming a run-length encoder that operates fast enough, the bounds on the
location of targets is memory access. The
accesses will therefore be no worse than the timing for Process 1, which means
a 9% utilization of the DRAM bandwidth.
The total utilization of DRAM during target location (including Processl) is
therefore 18%, meaning that the target
locator will always be catching up to the alternative Artcard image sensor
pixel reader.
Processing the targets
The timing for sorting and checking the target numbers is trivial. The finding
of better estimates for each of the two
target centers involves 12 sets of 12 pixel reads, taking a total of 144
reads. However the fixing of accurate target centers is
not trivial, requiring 2 sets of evaluations. Adjusting each target center
requires 8 sets of 20 different 6-entry convolution
kernels. Thus this totals 8 x 20 x 6 multiply-accumulates = 960. In addition,
there are 7 sets of 7 pixels to be retrieved,
requiring 49 memory accesses. The total number per target is therefore 144 +
960 + 49 = 1153, which is approximately the
same number of pixels in a column of pixels (1152). Thus each target
evaluation consumes the time taken by otherwise
processing a row of pixels. For two targets we effectively consume the time
for 2 columns of pixels.
A target is positively identified on the first pixel column after the target
number. Since there are 2 dot columns
before the orientation column, there are 6 pixel columns. The Target Location
process effectively uses up the first of the
CA 02456652 2004-02-06
WO 03/015395 PCT/AU02/00919
104
pixel columns, but the remaining 5 pixel columns are not processed at all.
Therefore the data area can be located in 2/5 of the
time available without impinging on any other process time.
The remaining 3/5 of the time available is ample for the trivial task of
assigning the ranges for black and white
pixels, a task that may take a couple of machine cycles at most.
Extracting data
There are two parts to consider in terms of timing:
Getting accurate clockmarks and border values
Extracting dot values
Clockmarks and border values are only gathered every second dot column.
However each time a clockmark
estimate is updated to become more accurate, 20 different 6-entry convolution
kernels must be evaluated. On average there
are 2 of these per dot column (there are 4 every 2 dot-columns). Updating the
pixel ordinate based on the border only
requires 7 pixels from the same pixel scanline. Updating the column ordinate
however, requires 7 pixels from different
columns, hence different scanlines. Assuming worst case scenario of a cache
miss for each scanline entry and 2 cache misses
for the pixels in the same scanline, this totals 8 cache misses.
Extracting the dot information involves only 4 pixel reads per dot (rather
than the average 9 that define the dot).
Considering the data area of 1152 pixels (384 dots), at best this will save 72
cache reads by only reading 4 pixel dots instead
of 9. The worst case is a rotation of 1° which is a single pixel
translation every 57 pixels, which gives only slightly worse
savings.
It can then be safely said that, at worst, we will be reading fewer cache
lines less than that consumed by the pixels
in the data area. The accesses will therefore be no worse than the timing for
Process 1, which implies a 9% utilization of the
DRAM bandwidth.
The total utilization of DRAM during data extraction (including Processl) is
therefore 18%, meaning that the data
extractor will always be catching up to the alternative Artcard image sensor
pixel reader. This has implications for the
Process Targets process in that the processing of targets can be performed by
a relatively inefficient method if necessary, yet
still catch up quickly during the extracting data process.
Phase 2 - Decode Bit Image
Phase 2 is the non-real-time phase of alternative Artcard data recovery
algorithm. At the start of Phase 2 a bit image
has been extracted from the alternative Artcard. It represents the bits read
from the data regions of the alternative Artcard.
Some of the bits will be in error, and perhaps the entire data is rotated
180° because the alternative Artcard was rotated when
inserted. Phase 2 is concerned with reliably extracting the original data from
this encoded bit image. There are basically 3
steps to be carried out as illustrated in Fig. 79:
Reorganize the bit image, reversing it if the alternative Artcard was inserted
backwards
Unscramble the encoded data
Reed-Solomon decode the data from the bit image
Each of the 3 steps is defined as a separate process, and performed
consecutively, since the output of one is required
as the input to the next. It is straightforward to combine the first two steps
into a single process, but for the purposes of
clarity, they are treated separately here.
From a data/process perspective, Phase 2 has the strncture as illustrated in
Fig. 80.
CA 02456652 2004-02-06
WO 03/015395 PCT/AU02/00919
105
The timing of Processes 1 and 2 are likely to be negligible, consuming less
than 1/1000'" of a second between them.
Process 3 (Reed Solomon decode) consumes approximately 0.32 seconds, making
this the total time required for Phase 2.
Reorganize the bit image, reversing it if necessary
The bit map in DRAM now represents the retrieved data from the alternative
Artcard. However the bit image is not
contiguous. It is broken into 64 32k chunks, one chunk for each data block.
Each 32k chunk contains only 28,656 useful
bytes:
48 bytes from the leftmost Orientation Column
28560 bytes from the data region proper
48 bytes from the rightmost Orientation Column
4112 unused bytes
The 2MB buffer used for pixel data (stored by Process 1 of Phase 1) can be
used to hold the reorganized bit image,
since pixel data is not required during Phase 2. At the end of the
reorganization, a correctly oriented contiguous bit image
will be in the 2MB pixel buffer, ready for Reed-Solomon decoding.
If the card is correctly oriented, the leftmost Orientation Column will be
white and the rightmost Orientation
Column will be black. If the card has been rotated 180°, then the
leftmost Orientation Column will be black and the
rightmost Orientation Column will be white.
A simple method of determining whether the card is correctly oriented or not,
is to go through each data block,
checking the first and last 48 bytes of data until a block is found with an
overwhelming ratio of black to white bits. The
following pseudocode demonstrates this, returning TRUE if the card is
correctly oriented, and FALSE if it is not:
totalCountL = 0
totalCountR = 0
for (i=0; i<64; i++)
blackCountL = 0
blackCountR = 0
currBuff = dataBuffer
for (j=0; j<48; j++)
blackCountL += CountBits(*currBuffj
currBuff++
currBuff += 28560
for (j=0; j<48; j++)
l
blackCountR += CountBits(*currBuff)
currBuff++
CA 02456652 2004-02-06
WO 03/015395 PCT/AU02/00919
106
dataBuffer += 32k
if (blackCountR > (blackCountL * 4))
return TRUE
if (blackCountL > (blackCountR * 4))
return FALSE
totalCountL += blackCountL
totalCountR += blackCountR
return (totalCountR > totalCountL)
The data must now be reorganized, based on whether the card was oriented
correctly or not. The simplest case is
that the card is correctly oriented. In this case the data only needs to be
moved around a little to remove the orientation
columns and to make the entire data contiguous. This is achieved very simply
in situ, as described by the following
pseudocode:
DATA BYTES PER DATA BLOCK = 28560
to = dataBuffer
from = dataBuffer + 48) // left orientation column
for (i=0; i<64; i++)
(
BIockMove(from, to, DATA_BYTES PER-DATA BLOCK)
from += 32k
to += DATA BYTES PER DATA BLOCK
The other case is that the data actually needs to be reversed. The algorithm
to reverse the data is quite simple, but
for simplicity, requires a 256-byte table Reverse where the value of
Reverse~NJ is a bit-reversed N.
DATA BYTES PER DATA BLOCK = 28560
to = outBuffer
for (i=0; i<64; i++)
1
from = dataBuffer + (i * 32k)
from += 48 // skip orientation column
from += DATA BYTES PER DATA BLOCK - 1 // end of block
for (j=0; j < DATA BYTES PER-DATA BLOCK; j++)
*to++ = Reverse[ *from
CA 02456652 2004-02-06
WO 03/015395 PCT/AU02/00919
107
from--
The timing for either process is negligible, consuming less than 1/1000'" of a
second:
* 2MB contiguous reads (2048/16 x l2ns = 1,536ns)
* 2MB effectively contiguous byte writes (2048/16 x l2ns = 1,536ns)
Unscramble the encoded image
The bit image is now 1,827,840 contiguous, correctly oriented, but scrambled
bytes. The bytes must be
unscrambled to create the 7,168 Reed-Solomon blocks, each 255 bytes long. The
unscrambling process is quite
straightforward, but requires a separate output buffer since the unscrambling
cannot be performed in situ. Fig. 80 illustrates
the unscrambling process conducted memory
The following pseudocode defines how to perform the unscrambling process:
groupSize = 255
numBytes = 1827840;
inBuffer = scrambledBuffer;
outBuffer = unscrambledBuffer;
for (i=0; i<groupSize; i++)
for (j=i; j<numBytes; j+=groupSize)
outBuffer[j] _ *inBuffer++
The timing for this process is negligible, consuming less than 1/1000'" of a
second:
* 2MB contiguous reads (2048/16 x l2ns = 1,536ns)
* 2MB non-contiguous byte writes (2048 x l2ns = 24,576ns)
At the end of this process the unscrambled data is ready for Reed-Solomon
decoding.
Reed Solomon decode
The final part of reading an alternative Artcard is the Reed-Solomon decode
process, where approximately 2MB of
unscrambled data is decoded into approximately 1MB of valid alternative
Artcard data.
The algorithm performs the decoding one Reed-Solomon block at a time, and can
(if desired) be performed in situ,
since the encoded block is larger than the decoded block, and the redundancy
bytes are stored after the data bytes.
The first 2 Reed-Solomon blocks are control blocks, containing information
about the size of the data to be
extracted from the bit image. This meta-information must be decoded first, and
the resultant information used to decode the
data proper. The decoding of the data proper is simply a case of decoding the
data blocks one at a time. Duplicate data
blocks can be used if a particular block fails to decode.
The highest level of the Reed-Solomon decode is set out in pseudocode:
CA 02456652 2004-02-06
WO 03/015395 PCT/AU02/00919
108
// Constants for Reed Solomon decode
sourceBlockLength = 255;
destBlockLength = 127;
numControlBlocks = 2;
// Decode the control information
if (! GetControlData(source, destBlocks, IastBlock))
return error
destBytes = ((destBlocks-1) * destBIockLength) + lastBlock
offsetToNextDuplicate = destBlocks * sourceBlockLength
// Skip the control blocks and position at data
source += numControlBlocks * sourceBlockLength
// Decode each of the data blocks, trying
// duplicates as necessary
blocksInEiror = 0;
for (i=0; i<destBlocks; i++)
found = DecodeBlock(source, dest);
if (! found)
duplicate = source + offsetToNextDuplicate
while ((! found) && (duplicate<sourceEnd))
1
found = DecodeBlock(duplicate, dest)
duplicate += offsetToNextDuplicate
if (! found)
blocksInError++
source += sourceBlockLength
dest += destBlockLength
return destBytes and blocksInError
DecodeBlock is a standard Reed Solomon block decoder using m=8 and t=64.
CA 02456652 2004-02-06
WO 03/015395 PCT/AU02/00919
109
The GetControlData function is straightforward as long as there are no
decoding errors. The function simply calls
- DecodeBlock to decode one control block at a time until successful. The
control parameters can then be extracted from the
first 3 bytes of the decoded data (destBlocks is stored in the bytes 0 and 1,
and lastBlock is stored in byte 2). If there are
decoding errors the function must traverse the 32 sets of 3 bytes and decide
which is the most likely set value to be correct.
One simple method is to find 2 consecutive equal copies of the 3 bytes, and to
declare those values the correct ones. An
alternative method is to count occurrences of the different sets of 3 bytes,
and announce the most common occurrence to be
the correct one.
The time taken to Reed-Solomon decode depends on the implementation. While it
is possible to use a dedicated
core to perform the Reed-Solomon decoding process (such as LSI Logic's
L64712), it is preferable to select a CPU/DSP
combination that can be more generally used throughout the embedded system
(usually to do something with the decoded
data) depending on the application. Of course decoding time must be fast
enough with the CPU/DSP combination.
The L64712 has a throughput of SOMbits per second (around 6.25MB per second),
so the time is bound by the
speed of the Reed-Solomon decoder rather than the maximum 2MB read and 1 MB
write memory access time. The time
taken in the worst case (all 2MB requires decoding) is thus 2/6.25s =
approximately 0.32 seconds. Of course, many further
refinements are possible including the following:
The blurrier the reading environment, the more a given dot is influenced by
the surrounding dots. The current
reading algorithm of the preferred embodiment has the ability to use the
surrounding dots in the same column in order to
make a better decision about a dot's value. Since the previous column's dots
have already been decoded, a previous column
dot history could be useful in determining the value of those dots whose pixel
values are in the not-sure range.
A different possibility with regard to the initial stage is to remove it
entirely, make the initial bounds of the data
blocks larger than necessary and place greater intelligence into the
ProcessingTargets functions. This may reduce overall
complexity. Care must be taken to maintain data block independence.
Further the control block mechanism can be made more robust:
The control block could be the first and last blocks rather than make them
contiguous (as is the case now).
This may give greater protection against certain pathological damage
scenarios.
The second refinement is to place an additional level of redundancy/error
detection into the control block
structure to be used if the Reed-Solomon decode step fails. Something as
simple as parity might improve the likelihood of
control information if the Reed-Solomon stage fails.
Phase 5 Running the Vark script
The overall time taken to read the Artcard 9 and decode it is therefore
approximately 2.15 seconds. The apparent
delay to the user is actually only 0.65 seconds (the total of Phases 3 and 4),
since the Artcard stops moving after 1.5 seconds.
Once the Artcard is loaded, the Artvark script must be interpreted, Rather
than run the script immediately, the
script is only run upon the pressing of the 'Print' button 13 (Fig. 1). The
taken to run the script will vary depending on the
complexity of the script, and must be taken into account for the perceived
delay between pressing the print button and the
actual print button and the actual printing.
As noted previously, the VLPJV processor 74 is a digital processing system
that accelerates computationally
expensive Vark functions. The balance of functions performed in software by
the CPU core 72, and in hardware by the
CA 02456652 2004-02-06
WO 03/015395 PCT/AU02/00919
110
VLIW processor 74 will be implementation dependent. The goal of the VLIW
processor 74 is to assist all Artcard styles to
execute in a time that does not seem too slow to the user. As CPUs become
faster and more powerful, the number of
functions requiring hardware acceleration becomes less and less. The VLIW
processor has a microcoded ALU sub-system
that allows general hardware speed up of the following time-critical
functions.
1) Image access mechanisms for general software processing
2) Image convolver.
3) Data driven image warper
4) Image scaling
5) Image tessellation
6) Affine transform
7) Image compositor
8) Color space transform
9) Histogram collector
10) Illumination of the Image
11) Brush stamper
12) Histogram collector
13) CCD image to internal image conversion
14) Construction of image pyramids (used by warper & for brushing)
The following table summarizes the time taken for each Vark operation if
implemented in the ALU model. The
method of implementing the function using the ALU model is described
hereinafter.
O eration S eed of O eration1500 * 1000
ima a
1 channel 3 channels
Image composite 1 cycle per 0.015 s 0.045 s
output pixel
Image convolve k/3 cycles per
output
pixel
(k = kernel
size)
3x3 convolve 0.045 s 0.135 s
5x5 convolve 0.125 s 0.375 s
7x7 convolve 0.245 s 0.735 s
Image w 8 c cles er 0.120 s 0.360 s
ixel
Histogram collect2 cycles per 0.030 s 0.090 s
pixel
Image Tessellate 1/3 c cle er 0.005 s 0.015 s
ixel
Image sub- ixel 1 cycle er out -
Translate ut ixel
Color looku re 'h cycle er 0.008 s 0.023
lace ixel
Color s ace transform8 c cles er 0.120 s 0.360 s
ixel
Convert CCD image4 cycles per 0.06 s 0.18 s
to output pixel
internal image
(including
color convert
& scale)
Construct image 1 cycle er input0.015 s 0.045 s
pyramid pixel
Scale Maximum of: 0.015 s 0.045 s (minimum)
2 cycles per (minimum)
input pixel
2 c cles er
out ut ixel
CA 02456652 2004-02-06
WO 03/015395 PCT/AU02/00919
111
2 cycles per
output pixel
(scaled in X
onl )
Affine transform 2 c cles er 0.03 s 0.09 s
out ut ixel
Brush rotate/translate?
and
com osite
Tile Image 4-8 cycles per 0.015 s to 0.060 s to
output 0.030 s 0.120 s to
for
pixel 4 channels
(Lab,
texture)
Illuminate image Cycles per pixel
Ambient only 1/z 0.008 s 0.023 s
Directional light1 0.015 s 0.045 s
Directional (bm) 6 0.09 s 0.27 s
Omni light 6 0.09 s 0.27 s
Omni (bm) 9 0.137 s 0.41 s
Spotlight 9 0.137 s 0.41 s
Spotlight (bm) 12 0.18 s 0.54 s
(bm) = bumpmap
For example, to convert a CCD image, collect histogram & perform lookup-color
replacement (for image
enhancement) takes: 9+2+0.5 cycles per pixel, or 11.5 cycles. For a 1500 x
1000 image that is 172,500,000, or
approximately 0.2 seconds per component, or 0.6 seconds for all 3 components.
Add a simple warp, and the total comes to
0.6 + 0.36, almost 1 second.
Image Convolver
A convolve is a weighted average around a center pixel. The average may be a
simple sum, a sum of absolute
values, the absolute value of a sum, or sums truncated at 0.
The image convolver is a general-purpose convolver, allowing a variety of
functions to be implemented by varying
the values within a variable-sized coefficient kernel. The kernel sizes
supported are 3x3, 5x5 and 7x7 only.
Turning now to Fig. 82, there is illustrated 340 an example of the convolution
process. The pixel component values
fed into the convolver process 341 come from a Box Read Iterator 342. The
Iterator 342 provides the image data row by
row, and within each row, pixel by pixel. The output from the convolver 341 is
sent to a Sequential Write Iterator 344, which
stores the resultant image in a valid image format.
A Coefficient Kernel 346 is a lookup table in DRAM. The kernel is arranged
with coefficients in the same order as
the Box Read Iterator 342. Each coefficient entry is 8 bits. A simple
Sequential Read Iterator can be used to index into the
kernel 346 and thus provide the coefficients. It simulates an image with
ImageWidth equal to the kernel size, and a Loop
option is set so that the kernel would continuously be provided.
One form of implementation of the convolve process on an ALU unit is as
illustrated in Fig. 8l.The following
constants are set by software:
Constant Value
K, Kernel size (9, 25, or 49)
The control logic is used to count down the number of multiply/adds per pixel.
When the count (accumulated in
Latch2) reaches 0, the control signal generated is used to write out the
current convolve value (from Latch) and to reset the
CA 02456652 2004-02-06
WO 03/015395 PCT/AU02/00919
112
count. In this way, one control logic block can be used for a number of
parallel convolve streams.
Each cycle the multiply ALU can perform one multiply/add to incorporate the
appropriate part of a pixel. The
number of cycles taken to sum up all the values is therefore the number of
entries in the kernel. Since this is compute bound,
it is appropriate to divide the image into multiple sections and process them
in parallel on different ALU units.
On a 7x7 kernel, the time taken for each pixel is 49 cycles, or 490ns. Since
each cache line holds 32 pixels, the time
available for memory access is 12,740ns. ((32-7+1) x 490ns). The time taken to
read 7 cache lines and write 1 is worse case
1,120ns (8*140ns, all accesses to same DRAM bank). Consequently it is possible
to process up to 10 pixels in parallel given
unlimited resources. Given a limited number of ALUs it is possible to do at
best 4 in parallel. The time taken to therefore
perform the convolution using a 7x7 kernel is 0.18375 seconds ( 1500* 1000 *
490ns / 4 = 183,750,OOOns).
On a 5x5 kernel, the time taken for each pixel is 25 cycles, or 250ns. Since
each cache line holds 32 pixels, the time
available for memory access is 7,OOOns. ((32-5+1) x 250ns). The time taken to
read 5 cache lines and write 1 is worse case
840ns (6 * 140ns, all accesses to same DRAM bank). Consequently it is possible
to process up to 7 pixels in parallel given
unlimited resources. Given a limited number of ALUs it is possible to do at
best 4. The time taken to therefore perform the
convolution using a Sx5 kernel is 0.09375 seconds ( 1500* 1000 * 250ns / 4 =
93,750,OOOns).
On a 3x3 kernel, the time taken for each pixel is 9 cycles, or 90ns. Since
each cache line holds 32 pixels, the time
available for memory access is 2,700ns. ((32-3+1) x 90ns). The time taken to
read 3 cache lines and write 1 is worse case
560ns (4 * 140ns, all accesses to same DRAM bank). Consequently it is possible
to process up to 4 pixels in parallel given
unlimited resources. Given a limited number of ALUs and Read/Write Iterators
it is possible to do at best 4. The time taken
to therefore perform the convolution using a 3x3 kernel is 0.03375 seconds
(1500*1000 * 90ns / 4 = 33,750,OOOns).
Consequently each output pixel takes kernelsize/3 cycles to compute. The
actual timings are summarised in the following
table:
Kernel size Time taken Time to process Time to Process
to 1 channel at 3 channels at
calculate output1500x1000 1500x1000
pixel
3x3 (9) 3 cycles 0.045 seconds 0.135 seconds
5x5 (25) 8 1/3 c cles 0.125 seconds 0.375 seconds
7x7 (49) 16 1/3 cycles 245 seconds r0.735 seconds
Image Compositor
Compositing is to add a foreground image to a background image using a matte
or a channel to govern the
appropriate proportions of background and foreground in the final image. Two
styles of compositing are preferably
supported, regular compositing and associated compositing. The rules for the
two styles are:
Regular composite: new Value = Foreground + (Background - Foreground) a
Associated composite: new value = Foreground + ( 1- a) Background
The difference then, is that with associated compositing, the foreground has
been pre-multiplied with the matte,
while in regular compositing it has not. An example of the compositing process
is as illustrated in Fig. 83.
The alpha channel has values from 0 to 255 corresponding to the range 0 to 1.
Regular Composite
CA 02456652 2004-02-06
WO 03/015395 PCT/AU02/00919
113
A regular composite is implemented as:
Foreground + (Background - Foreground) * a/ 255
The division by X/255 is approximated by 257X/65536. An implementation of the
compositing process is shown
in more detail in Fig. 84, where the following constant is set by software:
Constant Value
K, 257
Since 4 Iterators are required, the composite process takes 1 cycle per pixel,
with a utilization of only half of the
ALUs. The composite process is only run on a single channel. To composite a 3-
channel image with another, the compositor
must be run 3 times, once for each channel.
The time taken to composite a full size single channel is 0.015s ( 1500 * 1000
* 1 * lOns), or 0.045s to composite all
3 channels.
To approximate a divide by 255 it is possible to multiply by 257 and then
divide by 65536. It can also be achieved
by a single add (256 * x + x) and ignoring (except for rounding purposes) the
final 16 bits of the result.
As shown in Fig. 42, the compositor process requires 3 Sequential Read
Iterators 351-353 and 1 Sequential Write
Iterator 355, and is implemented as microcode using a Adder ALU in conjunction
with a multiplier ALU. Composite time is
1 cycle (lOns) per-pixel. Different microcode is required for associated and
regular compositing, although the average time
per pixel composite is the same.
The composite process is only run on a single channel. To composite one 3-
channel image with another, the
compositor must be run 3 times, once for each channel. As the a channel is the
same for each composite, it must be read each
time. However it should be noted that to transfer (read or write) 4 x 32 byte
cache-lines in the best case takes 320ns. The
pipeline gives an average of 1 cycle per pixel composite, taking 32 cycles or
320ns (at 100MHz) to composite the 32 pixels,
so the a channel is effectively read for free. An entire channel can therefore
be composited in:
1500/32 * 1000 * 320ns = 15,040,OOOns = 0.015seconds.
The time taken to composite a full size 3 channel image is therefore 0.045
seconds.
Construct Imaee Pyramid
Several functions, such as warping, tiling and brushing, require the average
value of a given area of pixels. Rather
than calculate the value for each area given, these functions preferably make
use of an image pyramid. As illustrated
previously in Fig. 33, an image pyramid 360 is effectively a multi-resolution
pixelmap. The original image is a 1:1
representation. Sub-sampling by 2:1 in each dimension produces an image'/a the
original size. This process continues until
the entire image is represented by a single pixel.
An image pyramid is constructed from an original image, and consumes 1/3 of
the size taken up by the original
image (1/4 + 1/16 + 1/64 + ...). For an original image of 1500 x 1000 the
corresponding image pyramid is approximately'/z
MB
The image pyramid can be constructed via a 3x3 convolve performed on 1 in 4
input image pixels advancing the
center of the convolve kernel by 2 pixels each dimension. A 3x3 convolve
results in higher accuracy than simply averaging 4
pixels, and has the added advantage that coordinates on different pyramid
levels differ only by shifting 1 bit per level.
The construction of an entire pyramid relies on a software loop that calls the
pyramid level construction function
once for each level of the pyramid. .
CA 02456652 2004-02-06
WO 03/015395 PCT/AU02/00919
114
The timing to produce 1 level of the pyramid is 9/4 * 1/4 of the resolution of
the input image since we are
generating an image 1/4 of the size of the original. Thus for a 1500 x 1000
image:
Timing to produce level 1 of pyramid = 9/4 * 750 * 500 = 843, 750 cycles
Timing to produce level 2 of pyramid = 9/4 * 375 * 250 = 210, 938 cycles
Timing to produce level 3 of pyramid = 9/4 * 188 * 125 = 52, 735 cycles
Etc.
The total time is 3/4 cycle per original image pixel (image pyramid is 1/3 of
original image size, and each pixel
takes 9/4 cycles to be calculated, i.e. 1/3 * 9/4 = 3/4). In the case of a
1500 x 1000 image is 1,125,000 cycles (at 100MHz),
or 0.011 seconds. This timing is for a single color channel, 3 color channels
require 0.034 seconds processing time.
General Data Driven Image Warper
The ACP 31 is able to carry out image warping manipulations of the input
image. The principles of image warping
are well-known in theory. One thorough text book reference on the process of
warping is "Digital Image Warping" by
George Wolberg published in 1990 by the IEEE Computer Society Press, Los
Alamitos, California. The warping process
utilizes a warp map which forms part of the data fed in via Artcard 9. The
warp map can be arbitrarily dimensioned in
accordance with requirements and provides information of a mapping of input
pixels to output pixels. Unfortunately, the
utilization of arbitrarily sized warp maps presents a number of problems which
must be solved by the image warper.
Turning to Fig. 85, a warp map 365, having dimensions AxB comprises array
values of a certain magnitude (for
example 8 bit values from 0 - 255) which set out the coordinate of a
theoretical input image which maps to the
corresponding "theoretical" output image having the same array coordinate
indices. Unfortunately, any output image eg.
366 will have its own dimensions CxD which may further be totally different
from an input image which may have its own
dimensions ExF. Hence, it is necessary to facilitate the remapping of the warp
map 365 so that it can be utilised for output
image 366 to determine, for each output pixel, the corresponding area or
region of the input image 367 from which the
output pixel color data is to be constructed. For each output pixel in output
image 366 it is necessary to first determine a
corresponding warp map value from warp map 365. This may include the need to
bilinearly interpolate the surrounding
warp map values when an output image pixel maps to a fractional position
within warp map table 365. The result of this
process will give the location of an input image pixel in a "theoretical"
image which will be dimensioned by the size of each
data value within the warp map 365. These values must be re-scaled so as to
map the theoretical image to the corresponding
actual input image 367.
In order to determine the actual value and output image pixel should take so
as to avoid aliasing effects, adjacent
output image pixels should be examined to determine a region of input image
pixels 367 which will contribute to the final
output image pixel value. In this respect, the image pyramid is utilised as
will become more apparent hereinafter.
The image warper performs several tasks in order to warp an image.
- Scale the warp map to match the output image size.
Determine the span of the region of input image pixels represented in each
output pixel.
Calculate the final output pixel value via tri-linear interpolation from the
input image pyramid
Scale warp map
As noted previously, in a data driven warp, there is the need for a warp map
that describes, for each output pixel,
the center of a corresponding input image map. Instead of having a single warp
map as previously described, containing
CA 02456652 2004-02-06
WO 03/015395 PCT/AU02/00919
115
interleaved x and y value information, it is possible to treat the X and Y
coordinates as separate channels.
Consequently, preferably there are two warp maps: an X warp map showing the
warping of X coordinates, and a Y
warp map, showing the warping of the Y coordinates. As noted previously, the
warp map 365 can have a different spatial
resolution than the image they being scaled (for example a 32 x 32 warp-map
365 may adequately describe a warp for a
1500 x 1000 image 366). In addition, the warp maps can be represented by 8 or
16 bit values that correspond to the size of
the image being warped.
There are several steps involved in producing points in the input image space
from a given warp map:
1. Determining the corresponding position in the warp map for the output pixel
2. Fetch the values from the warp map for the next step (this can require
scaling in the resolution
domain if the warp map is only 8 bit values)
3. Bi-linear interpolation of the warp map to determine the actual value
4. Scaling the value to correspond to the input image domain
The first step can be accomplished by multiplying the current X/Y coordinate
in the output image by a scale factor
(which can be different in X & Y). For example, if the output image was 1500 x
1000, and the warp map was 150 x 100, we
scale both X & Y by 1/10.
Fetching the values from the warp map requires access to 2 Lookup tables. One
Lookup table indexes into the X
warp-map, and the other indexes into the Y warp-map. The lookup table either
reads 8 or 16 bit entries from the lookup
table, but always returns 16 bit values (clearing the high 8 bits if the
original values are only 8 bits).
The next step in the pipeline is to bi-linearly interpolate the looked-up warp
map values.
Finally the result from the bi-linear interpolation is scaled to place it in
the same domain as the image to be warped.
Thus, if the warp map range was 0-255, we scale X by 1500/255, and Y by
1000/255.
The interpolation process is as illustrated in Fig. 86 with the following
constants set by software:
Constant Value
K, Xscale (scales 0-ImageWidth to 0-W ma Width)
KZ Yscale (scales 0-Ima eHei ht to 0-W ma Hei ht)
K3 XrangeScale (scales warpma range (eg 0-255) to
0-ImageWidth)
K4 YrangeScale (scales warpmap range (eg 0-255)
to 0-ImageHeight)
The following lookup table is used:
Looku Size Details
LUl and WarpmapWidth Warpmap lookup.
x
LUZ WarpmapHeight Given [X,YJ the 4 entries required
for bi-linear interpolation
are returned. Even if entries are
only 8 bit, they are returned
as 16 bit (high 8 bits 0).
Transfer time is 4 entries at 2
bytes per entry.
Total time is 8 cycles as 2 looku
s are used.
Span calculation
The points from the warp map 365 locate centers of pixel regions in the input
image 367. The distance between
input image pixels of adjacent output image pixels will indicate the size of
the regions, and this distance can be
approximated via a span calculation.
CA 02456652 2004-02-06
WO 03/015395 PCT/AU02/00919
116
Turning to Fig. 87, for a given current point in the warp map P1, the previous
point on the same line is called P0,
and the previous line's point at the same position is called P2. We determine
the absolute distance in X & Y between Pl and
P0, and between P1 and P2. The maximum distance in X or Y becomes the span
which will be a square approximation of
the actual shape.
Preferably, the points are processed in a vertical strip output order, PO is
the previous point on the same line within
a strip, and when P1 is the first point on line within a strip, then PO refers
to the last point in the previous strip's
corresponding line. P2 is the previous line's point in the same strip, so it
can be kept in a 32-entry history buffer. The basic
of the calculate span process are as illustrated in Fig. 88 with the details
of the process as illustrated in Fig. 89.
The following DRAM FIFO is used:
Looku Size Details
FIFO, 8 ImageWidth P2 history/lookup (both X & Y
bytes. in same FIFO)
[ImageWidth x P1 is put into the FIFO and taken
2 entries at out again at the same
32 bits per entry]pixel on the following row as
P2.
Transfer time is 4 cycles
(2 x 32 bits, with 1 cycle per
16 bits)
Since a 32 bit precision span history is kept, in the case of a 1500 pixel
wide image being warped 12,000 bytes
temporary storage is required.
Calculation of the span 364 uses 2 Adder ALUs (1 for span calculation, 1 for
looping and counting for PO and P2
histories) takes 7 cycles as follows:
C cle Action
1 A=ABS(PlX-P2X)
Store Plx in P2x histor
2 B = ABS(PlX -POX)
Store PlX in POx history
3 A = MAX(A, B)
4 B=ABS(PlY-P2Y)
Store P1 in P2 histo
A = MAX(A, B)
6 B = ABS(Ply -POY)
Store P1 in PO histo
7 A = MAX(A, B)
The history buffers 365, 366 are cached DRAM. The 'Previous Line' (for P2
history) buffer 366 is 32 entries of
span-precision. The 'Previous Point' (for PO history). Buffer 365 requires 1
register that is used most of the time (for
calculation of points 1 to 31 of a line in a strip), and a DRAM buffered set
of history values to be used in the calculation of
point 0 in a strip's line.
32 bit precision in span history requires 4 cache lines to hold P2 history,
and 2 for PO history. PO's history is only
written and read out once every 8 lines of 32 pixels to a temporary storage
space of (ImageHeight*4) bytes. Thus a 1500
pixel high image being warped requires 6000 bytes temporary storage, and a
total of 6 cache lines.
Tri-linear interpolation
CA 02456652 2004-02-06
WO 03/015395 PCT/AU02/00919
117
Having determined the center and span of the area from the input image to be
averaged, the final part of the warp
process is to determine the value of the output pixel. Since a single output
pixel could theoretically be represented by the
entire input image, it is potentially too time-consuming to actually read and
average the specific area of the input image
contributing to the output pixel. Instead, it is possible to approximate the
pixel value by using an image pyramid of the input
image.
If the span is 1 or less, it is necessary only to read the original image's
pixels around the given coordinate, and
perform bi-linear interpolation. If the span is greater than 1, we must read
two appropriate levels of the image pyramid and
perform tri-linear interpolation. Performing linear interpolation between two
levels of the image pyramid is not strictly
correct, but gives acceptable results (it errs on the side of blurring the
resultant image).
Turning to Fig. 90, generally speaking, for a given span 's', it is necessary
to read image pyramid levels given by
ln2s (370) and lnZS+1 (371). Ln2s is simply decoding the highest set bit of s.
We must bi-linear interpolate to determine the
value for the pixel value on each of the two levels 370,371 of the pyramid,
and then interpolate between levels.
As shown in Fig. 91, it is necessary to first interpolate in X and Y for each
pyramid level before interpolating
between the pyramid levels to obtain a final output value 373.
The image pyramid address mode issued to generate addresses for pixel
coordinates at (x, y) on pyramid level s &
s+1. Each level of the image pyramid contains pixels sequential in x. Hence,
reads in x are likely to be cache hits.
Reasonable cache coherence can be obtained as local regions in the output
image are typically locally coherent in
the input image (perhaps at a different scale however, but coherent within the
scale). Since it is not possible to know the
relationship between the input and output images, we ensure that output pixels
are written in a vertical strip (via a Vertical-
Strip Iterator) in order to best make use of cache coherence.
Tri-linear interpolation can be completed in as few as 2 cycles on average
using 4 multiply ALUs and all 4 adder
ALUs as a pipeline and assuming no memory access required. But since all the
interpolation values are derived from the
image pyramids, interpolation speed is completely dependent on cache coherence
(not to mention the other units are busy
doing warp-map scaling and span calculations). As many cache lines as possible
should therefore be available to the image-
pyramid reading. The best speed will be 8 cycles, using 2 Multiply ALUs.
The output pixels are written out to the DRAM via a Vertical-Strip Write
Iterator that uses 2 cache lines. The speed
is therefore limited to a minimum of 8 cycles per output pixel. If the scaling
of the warp map requires 8 or fewer cycles,
then the overall speed will be unchanged. Otherwise the throughput is the time
taken to scale the warp map. In most cases
the warp map will be scaled up to match the size of the photo.
Assuming a warp map that requires 8 or fewer cycles per pixel to scale, the
time taken to convert a single color
component of image is therefore 0.12s (1500 * 1000 * 8 cycles * lOns per
cycle).
Hist~am Collector
The histogram collector is a microcode program that takes an image channel as
input, and produces a histogram as
output. Each of a channel's pixels has a value in the range 0-255.
Consequently there are 256 entries in the histogram table,
each entry 32 bits - large enough to contain a count of an entire 1500x1000
image.
As shown in Fig. 92, since the histogram represents a summary of the entire
image, a Sequential Read Iterator 378
is sufficient for the input. The histogram itself can be completely cached,
requiring 32 cache lines (1K).
The microcode has two passes: an initialization pass which sets all the counts
to zero, and then a "count" stage that
CA 02456652 2004-02-06
WO 03/015395 PCT/AU02/00919
118
increments the appropriate counter for each pixel read from the image. The
first stage requires the Address Unit and a single
Adder ALU, with the address of the histogram table 377 for initialising.
Relative Microcode Address Unit Adder Unit 1
Address A = Base address of
histo ram
0 Write 0 to Outl = A
A + (Adderl .Outl A = A - 1
2)
BNZ 0
1 Rest of rocessing Rest of rocessing
The second stage processes the actual pixels from the image, and uses 4 Adder
ALUs:
Adder Adder 2 Adder Adder 4 Address Unit
1 3
1 A=0 A=-1
2 Outl A = Adderl A = A = A + Outl = Read 4
= A .Outl 1 bytes
BZ A = pixelZ = pixel Adr.0ut1 from: (A +
-
2 Adderl.0ut1 (Adderl.0ut1
2))
3 Outl = A Outl = Outl = Write Adder4.0ut1
A A to:
A = (A + (Adder 2.Out
2)
Adder3.0ut1
4 Write Adder4.0ut1
to:
(A + (Adder 2.Out
2)
Flush caches
The Zero flag from Adder2 cycle 2 is used to stay at microcode address 2 for
as long as the input pixel is the same.
When it changes, the new count is written out in microcode address 3, and
processing resumes at microcode address 2.
Microcode address 4 is used at the end, when there are no more pixels to be
read.
Stage 1 takes 256 cycles, or 2560ns. Stage 2 varies according to the values of
the pixels. The worst case time for
lookup table replacement is 2 cycles per image pixel if every pixel is not the
same as its neighbor. The time taken for a single
color lookup is 0.03s (1500 x 1000 x 2 cycle per pixel x lOns per cycle =
30,OOO,OOOns). The time taken for 3 color
components is 3 times this amount, or 0.09s.
Color Transform
Color transformation is achieved in two main ways:
Lookup table replacement
Color space conversion
Lookup Table Replacement
As illustrated in Fig. 86, one of the simplest ways to transform the color of
a pixel is to encode an arbitrarily
complex transform function into a lookup table 380. The component color value
of the pixel is used to lookup 381 the new
component value of the pixel. For each pixel read from a Sequential Read
Iterator, its new value is read from the New Color
Table 380, and written to a Sequential Write Iterator 383. The input image can
be processed simultaneously in two halves to
make effective use of memory bandwidth. The following lookup table is used:
~ Lookup ~ Size ~ Details
CA 02456652 2004-02-06
WO 03/015395 PCT/AU02/00919
119
LU, 256 entries Replacement[X]
8 bits per entry Table indexed by the 8 highest significant bits of X.
Resultant 8 bits treated as fixed point 0:8
The total process requires 2 Sequential Read Iterators and 2 Sequential Write
iterators. The 2 New Color Tables
require 8 cache lines each to hold the 256 bytes (256 entries of 1 byte).
The average time for lookup table replacement is therefore'/z cycle per image
pixel. The time taken for a single
color lookup is 0.0075s (1500 x 1000 x'/z cycle per pixel x lOns per cycle =
7,500,OOOns). The time taken for 3 color
components is 3 times this amount, or 0.0225s. Each color component has to be
processed one after the other under control
of software.
Color Space Conversion
Color Space conversion is only required when moving between color spaces. The
CCD images are captured in
RGB color space, and printing occurs in CMY color space, while clients of the
ACP 31 likely process images in the Lab
color space. All of the input color space channels are typically required as
input to determine each output channel's
component value. Thus the logical process is as illustrated 385 in Fig. 94.
Simply, conversion between Lab, RGB, and CMY is fairly straightforward.
However the individual color profile of
a particular device can vary considerably. Consequently, to allow future CCDs,
inks, and printers, the ACP 31 performs
color space conversion by means of tri-linear interpolation from color space
conversion lookup tables.
Color coherence tends to be area based rather than line based. To aid cache
coherence during tri-linear interpolation
lookups, it is best to process an image in vertical strips. Thus the read 386-
388 and write 389 iterators would be Vertical-
Strip Iterators.
Tri-linear color space conversion
For each output color component, a single 3D table mapping the input color
space to the output color component is
required. For example, to convert CCD images from RGB to Lab, 3 tables
calibrated to the physical characteristics of the
CCD are required:
RGB->L
RGB->a
RGB->b
To convert from Lab to CMY, 3 tables calibrated to the physical
characteristics of the ink/printer are required:
Lab->C
Lab->M
Lab->Y
The 8-bit input color components are treated as fixed-point numbers (3:5) in
order to index into the conversion
tables. The 3 bits of integer give the index, and the 5 bits of fraction are
used for interpolation. Since 3 bits gives 8 values, 3
dimensions gives 512 entries (8 x 8 x 8). The size of each entry is 1 byte,
requiring 512 bytes per table.
The Convert Color Space process can therefore be implemented as shown in Fig.
95 and the following lookup table
is used:
Lookup Size Details
LU, 8 x 8 x 8 entries Convert[X, Y, Z]
CA 02456652 2004-02-06
WO 03/015395 PCT/AU02/00919
120
512 entries Table indexed by the 3 highest bits of X, Y, and Z.
8 bits per entry 8 entries returned from Tri-linear index address unit
Resultant 8 bits treated as fixed point 8:0
Transfer time is 8 entries at 1 byte er entr
Tri-linear interpolation returns interpolation between 8 values. Each 8 bit
value takes 1 cycle to be returned from
the lookup, for a total of 8 cycles. The tri-linear interpolation also takes 8
cycles when 2 Multiply ALUs are used per cycle.
General tri-linear interpolation information is given in the ALU section of
this document. The 512 bytes for the lookup table
fits in 16 cache lines.
The time taken to convert a single color component of image is therefore
O.lOSs (1500 * 1000 * 7 cycles * lOns
per cycle). To convert 3 components takes 0.415s. Fortunately, the color space
conversion for printout takes place on the fly
during printout itself, so is not a perceived delay.
If color components are converted separately, they must not overwrite their
input color space components since all
color components from the input color space are required for converting each
component.
Since only 1 multiply unit is used to perform the interpolation, it is
alternatively possible to do the entire Lab-
>CMY conversion as a single pass. This would require 3 Vertical-Strip Read
Iterators, 3 Vertical-Strip Write Iterators, and
access to 3 conversion tables simultaneously. In that case, it is possible to
write back onto the input image and thus use no
extra memory. However, access to 3 conversion tables equals 1/3 of the caching
for each, that could lead to high latency for
the overall process.
Affine Transform
Prior to compositing an image with a photo, it may be necessary to rotate,
scale and translate it. If the image is only
being translated, it can be faster to use a direct sub-pixel translation
function. However, rotation, scale-up and translation can
all be incorporated into a single affine transform.
A general affine transform can be included as an accelerated function. Affine
transforms are limited to 2D, and if
scaling down, input images should be pre-scaled via the Scale function. Having
a general affme transform function allows an
output image to be constructed one block at a time, and can reduce the time
taken to perform a number of transformations on
an image since all can be applied at the same time.
A transformation matrix needs to be supplied by the client - the matrix should
be the inverse matrix of the
transformation desired i.e. applying the matrix to the output pixel coordinate
will give the input coordinate.
A 2D matrix is usually represented as a 3 x 3 array:
a b 0
c d 0
a f 1
Since the 3'~ column is always[0, 0, 1] clients do not need to specify it.
Clients instead specify a, b, c, d, e, and f.
Given a coordinate in the output image (x, y) whose top left pixel coordinate
is given as (0, 0), the input coordinate
is specified by: (ax + cy + e, bx + dy + f). Once the input coordinate is
determined, the input image is sampled to arrive at
the pixel value. Bi-linear interpolation of input image pixels is used to
determine the value of the pixel at the calculated
coordinate. Since affine transforms preserve parallel lines, images are
processed in output vertical strips of 32 pixels wide
for best average input image cache coherence.
CA 02456652 2004-02-06
WO 03/015395 PCT/AU02/00919
121
Three Multiply ALUs are required to perform the bi-linear interpolation in 2
cycles. Multiply ALUs 1 and 2 do
linear interpolation in X for lines Y and Y+1 respectively, and Multiply ALU 3
does linear interpolation in Y between the
values output by Multiply ALUs 1 and 2.
As we move to the right across an output line in X, 2 Adder ALUs calculate the
actual input image coordinates by
adding 'a' to the current X value, and 'b' to the current Y value
respectively. When we advance to the next line (either the
next line in a vertical strip after processing a maximum of 32 pixels, or to
the first line in a new vertical strip) we update X
and Y to pre-calculated start coordinate values constants for the given block
The process for calculating an input coordinate is given in Fig. 96 where the
following constants are set by
software:
Calculate Pixel
Once we have the input image coordinates, the input image must be sampled. A
lookup table is used to return the
values at the specified coordinates in readiness for bilinear interpolation.
The basic process is as indicated in Fig. 97 and the
following lookup table is used:
Looku Size Details
LU, Image Bilinear Image lookup [X, Y]
width Table indexed by the integer part of X
by and Y.
Image 4 entries returned from Bilinear index
address unit, 2 per cycle.
height Each 8 bit entry treated as fixed point
8:0
8 bits Transfer time is 2 cycles (2 16 bit entries
per in FIFO hold the 4 8 bit entries)
entry
The affine transform requires all 4 Multiply Units and all 4 Adder ALUs, and
with good cache coherence can
perform an affine transform with an average of 2 cycles per output pixel. This
timing assumes good cache coherence, which
is true for non-skewed images. Worst case timings are severely skewed images,
which meaningful Vark scripts are unlikely
to contain.
The time taken to transform a 128 x 128 image is therefore 0.00033 seconds
(32,768 cycles). If this is a clip image
with 4 channels (including a channel), the total time taken is 0.00131 seconds
(131,072 cycles).
A Vertical-Strip Write Iterator is required to output the pixels. No Read
Iterator is required. However, since the
affine transform accelerator is bound by time taken to access input image
pixels, as many cache lines as possible should be
allocated to the read of pixels from the input image. At least 32 should be
available, and preferably 64 or more.
Scaling
Scaling is essentially a re-sampling of an image. Scale up of an image can be
performed using the Affine Transform
function. Generalized scaling of an image, including scale down, is performed
by the hardware accelerated Scale function.
Scaling is performed independently in X and Y, so different scale factors can
be used in each dimension.
The generalized scale unit must match the Affine Transform scale function in
terms of registration. The generalized
scaling process is as illustrated in Fig. 98. The scale in X is accomplished
by Fant's re-sampling algorithm as illustrated in
Fig. 99.
Where the following constants are set by software:
Constant Value
K, Number of input pixels that contribute to an output pixel in X
CA 02456652 2004-02-06
WO 03/015395 PCT/AU02/00919
122
KZ 1 /K,
The following registers are used to hold temporary variables:
Variable Value
Latch, Amount of in ut ixel remainin unused (starts
at 1 and decrements)
Latch2 Amount of input pixels remaining to contribute
to current output pixel (starts at K,
and decrements)
Latch3 Next ixel (in X)
Latch4 Current ixel
LatchS Accumulator for out ut ixel (unscaled)
Latchb Pixel Scaled in X (output)
The Scale in Y process is illustrated in Fig. 100 and is also accomplished by
a slightly altered version of Fant's re-sampling
algorithm to account for processing in order of X pixels.
Where the following constants are set by software:
Constant Value
K, Number of in ut ixels that contribute to an
out ut ixel in Y
KZ 1/K,
The following registers are used to hold temporary variables:
Variable Value
Latch, Amount of in ut ixel remainin unused (starts
at 1 and decrements)
Latchz Amount of input pixels remaining to contribute
to current output pixel (starts at K,
and decrements)
Latch3 Next ixel (in Y)
Latch4 Current ixel
Latchs Pixel Scaled in Y (out ut)
The following DRAM FIFOs are used:
Looku Size Details
FIFO, ImageWidtho,r,, 1 row of image pixels already
entries scaled in X
8 bits per entry 1 cycle transfer time
FIFOZ ImageWidtho,r,~ 1 row of image pixels already
entries scaled in X
16 bits er entr 2 c cles transfer time (1
byte er cycle)
Tessellate Image
Tessellation of an image is a form of tiling. It involves copying a specially
designed "tile" multiple times
horizontally and vertically into a second (usually larger) image space. When
tessellated, the small tile forms a seamless
picture. One example of this is a small tile of a section of a brick wall. It
is designed so that when tessellated, it forms a full
brick wall. Note that there is no scaling or sub-pixel translation involved in
tessellation.
The most cache-coherent way to perform tessellation is to output the image
sequentially line by line, and to repeat
the same line of the input image for the duration of the line. When we finish
the line, the input image must also advance to
the next line (and repeat it multiple times across the output line).
CA 02456652 2004-02-06
WO 03/015395 PCT/AU02/00919
123
An overview of the tessellation function is illustrated 390 in Fig. 101. The
Sequential Read Iterator 392 is set up to
continuously read a single line of the input tile (StartLine would be 0 and
EndLine would be 1). Each input pixel is written to
all 3 of the Write Iterators 393-395. A counter 397 in an Adder ALU counts
down the number of pixels in an output line,
terminating the sequence at the end of the line.
At the end of processing a line, a small software routine updates the
Sequential Read Iterator's StartLine and
EndLine registers before restarting the microcode and the Sequential Read
Iterator (which clears the FIFO and repeats line 2
of the tile). The Write Iterators 393-395 are not updated, and simply keep on
writing out to their respective parts of the
output image. The net effect is that the tile has one line repeated across an
output line, and then the tile is repeated vertically
too.
This process does not fully use the memory bandwidth since we get good cache
coherence in the input image, but it
does allow the tessellation to function with tiles of any size. The process
uses 1 Adder ALU. If the 3 Write Iterators 393-395
each write to 1/3 of the image (breaking the image on tile sized boundaries),
then the entire tessellation process takes place at
an average speed of 1/3 cycle per output image pixel. For an image of 1500 x
1000, this equates to .005 seconds
(S,OOO,OOOns).
Sub-pixel Translator
Before compositing an image with a background, it may be necessary to
translate it by a sub-pixel amount in both
X and Y. Sub-pixel transforms can increase an image's size by 1 pixel in each
dimension. The value of the region outside the
image can be client determined, such as a constant value (e.g. black), or edge
pixel replication. Typically it will be better to
use black.
The sub-pixel translation process is as illustrated in Fig. 102. Sub-pixel
translation in a given dimension is defined
by:
Pixelo", = Pixel;" * (1-Translation) + Pixel;"_, * Translation
It can also be represented as a form of interpolation:
Pixelo", = Pixel;"_, + (Pixel;" - Pixel;"_~)* Translation
Implementation of a single (on average) cycle interpolation engine using a
single Multiply ALU and a single Adder
ALU in conjunction is straightforward. Sub-pixel translation in both X & Y
requires 2 interpolation engines.
In order to sub-pixel translate in Y, 2 Sequential Read Iterators 400, 401 are
required (one is reading a line ahead of
the other from the same image), and a single Sequential Write Iterator 403 is
required.
The first interpolation engine (interpolation in Y) accepts pairs of data from
2 streams, and linearly interpolates
between them. The second interpolation engine (interpolation in X) accepts its
data as a single 1 dimensional stream and
linearly interpolates between values. Both engines interpolate in 1 cycle on
average.
Each interpolation engine 405, 406 is capable of performing the sub-pixel
translation in 1 cycle per output pixel on
average. The overall time is therefore 1 cycle per output pixel, with
requirements of 2 Multiply ALUs and 2 Adder ALUs.
The time taken to output 32 pixels from the sub-pixel translate function is on
average 320ns (32 cycles). This is
enough time for 4 full cache-line accesses to DRAM, so the use of 3 Sequential
Iterators is well within timing limits.
The total time taken to sub-pixel translate an image is therefore 1 cycle per
pixel of the output image. A typical
image to be sub-pixel translated is a tile of size 128 * 128. The output image
size is 129 * 129. The process takes 129 * 129
* l Ons = 166,410ns.
CA 02456652 2004-02-06
WO 03/015395 PCT/AU02/00919
124
The Image Tiler function also makes use of the sub-pixel translation
algorithm, but does not require the writing out
of the sub-pixel-translated data, but rather processes it further.
Image Tiler
The high level algorithm for tiling an image is carried out in software. Once
the placement of the tile has been
determined, the appropriate colored tile must be composited. The actual
compositing of each tile onto an image is carried out
in hardware via the microcoded ALUs. Compositing a tile involves both a
texture application and a color application to a
background image. In some cases it is desirable to compare the actual amount
of texture added to the background in relation
to the intended amount of texture, and use this to scale the color being
applied. In these cases the texture must be applied
first.
Since color application functionality and texture application functionality
are somewhat independent, they are
separated into sub-functions.
The number of cycles per 4-channel tile composite for the different texture
styles and coloring styles is summarised
in the following table:
Constant Pixel
color color
Re lace texture 4 4.75
25% background + tile texture 4 4.75
Average height algorithm 5 5.75
Average height algorithm with feedback5.75 ~ 6.5
I
Tile Coloring and Compositing
A tile is set to have either a constant color (for the whole tile), or takes
each pixel value from an input image. Both
of these cases may also have feedback from a texturing stage to scale the
opacity (similar to thinning paint).
The steps for the 4 cases can be summarised as:
- Sub-pixel translate the tile's opacity values,
- Optionally scale the tile's opacity (if feedback from texture application is
enabled).
- Determine the color of the pixel (constant or from an image map).
- Composite the pixel onto the background image.
Each of the 4 cases is treated separately, in order to minimize the time taken
to perform the function. The summary
of time per color compositing style for a single color channel is described in
the following table:
Tiling color style No feedback Feedback from
from
texture (cyclestexture
per
ixel) (cycles er
ixel)
Tile has constant color per 1 2
ixel
Tile has er ixel color from 1.25 2
in ut image
Constant color
In this case, the tile has a constant color, determined by software. While the
ACP 31 is placing down one tile, the
CA 02456652 2004-02-06
WO 03/015395 PCT/AU02/00919
125
software can be determining the placement and coloring of the next tile.
The color of the tile can be determined by bi-linear interpolation into a
scaled version of the image being tiled. The
scaled version of the image can be created and stored in place of the image
pyramid, and needs only to be performed once
per entire tile operation. If the tile size is 128 x 128, then the image can
be scaled down by 128:1 in each dimension.
Without feedback
When there is no feedback from the texturing of a tile, the tile is simply
placed at the specified coordinates. The tile
color is used for each pixel's color, and the opacity for the composite comes
from the tile's sub-pixel translated opacity
channel. In this case color channels and the texture channel can be processed
completely independently between tiling
passes.
The overview of the process is illustrated in Fig. 103. Sub-pixel translation
410 of a tile can be accomplished using
2 Multiply ALUs and 2 Adder ALUs in an average time of 1 cycle per output
pixel. The output from the sub-pixel
translation is the mask to be used in compositing 411 the constant tile color
412 with the background image from
background sequential Read Iterator.
Compositing can be performed using 1 Multiply ALU and 1 Adder ALU in an
average time of 1 cycle per
composite. Requirements are therefore 3 Multiply ALUs and 3 Adder ALUs. 4
Sequential Iterators 413-416 are required,
taking 320ns to read or write their contents. With an average number of cycles
of 1 per pixel to sub-pixel translate and
composite, there is sufficient time to read and write the buffers.
With feedback
When there is feedback from the texturing of a tile, the tile is placed at the
specified coordinates. The tile color is
used for each pixel's color, and the opacity for the composite comes from the
tile's sub-pixel translated opacity channel
scaled by the feedback parameter. Thus the texture values must be calculated
before the color value is applied.
The overview of the process is illustrated in Fig. 97. Sub-pixel translation
of a tile can be accomplished using 2
Multiply ALUs and 2 Adder ALUs in an average time of 1 cycle per output pixel.
The output from the sub-pixel translation
is the mask to be scaled according to the feedback read from the Feedback
Sequential Read Iterator 420. The feedback is
passed it to a Scaler (1 Multiply ALU) 421.
Compositing 422 can be performed using 1 Multiply ALU and 1 Adder ALU in an
average time of 1 cycle per
composite. Requirements are therefore 4 Multiply ALUs and all 4 Adder ALUs.
Although the entire process can be
accomplished in 1 cycle on average, the bottleneck is the memory access, since
5 Sequential Iterators are required. With
sufficient buffering, the average time is 1.25 cycles per pixel.
Color from Input Imaee
One way of coloring pixels in a tile is to take the color from pixels in an
input image. Again, there are two
possibilities for compositing: with and without feedback from the texturing.
Without feedback
In this case, the tile color simply comes from the relative pixel in the input
image. The opacity for compositing
comes from the tile's opacity channel sub-pixel shifted.
The overview of the process is illustrated in Fig. 105. Sub-pixel translation
425 of a tile can be accomplished using
2 Multiply ALUs and 2 Adder ALUs in an average time of 1 cycle per output
pixel. The output from the sub-pixel
translation is the mask to be used in compositing 426 the tile's pixel color
(read from the input image 428 ) with the
CA 02456652 2004-02-06
WO 03/015395 PCT/AU02/00919
126
background image 429.
Compositing 426 can be performed using 1 Multiply ALU and 1 Adder ALU in an
average time of 1 cycle per
composite. Requirements are therefore 3 Multiply ALUs and 3 Adder ALUs.
Although the entire process can be
accomplished in 1 cycle on average, the bottleneck is the memory access, since
5 Sequential Iterators are required. With
sufficient buffering, the average time is 1.25 cycles per pixel.
With feedback
In this case, the tile color still comes from the relative pixel in the input
image, but the opacity for compositing is
affected by the relative amount of textwe height actually applied during the
textwing pass. This process is as illustrated in
Fig. 106.
Sub-pixel translation 431 of a tile can be accomplished using 2 Multiply ALUs
and 2 Adder ALUs in an average
time of 1 cycle per output pixel. The output from the sub-pixel translation is
the mask to be scaled 431 according to the
feedback read from the Feedback Sequential Read Iterator 432. The feedback is
passed to a Scaler (1 Multiply ALU) 431.
Compositing 434 can be performed using 1 Multiply ALU and 1 Adder ALU in an
average time of 1 cycle per
composite.
Requirements are therefore all 4 Multiply ALUs and 3 Adder ALUs. Although the
entire process can be
accomplished in 1 cycle on average, the bottleneck is the memory access, since
6 Sequential Iterators are required. With
sufficient buffering, the average time is 1.5 cycles per pixel.
Tile Texturing
Each tile has a surface texture defined by its texture channel. The texture
must be sub-pixel translated and then
applied to the output image. There are 3 styles of textwe compositing:
Replace texture
25% background + tile's textwe
Average height algorithm
In addition, the Average height algorithm can save feedback parameters for
color compositing.
The time taken per texture compositing style is summarised in the following
table:
Tiling color style Cycles per Cycles per
pixel pixel
(no feedback (feedback
from from
texture) texture)
Re lace texture 1 -
25% background + tile texture1
value
Average height algorithm 2 ~ 2
Replace texture
In this instance, the texture from the tile replaces the texture channel of
the image, as illustrated in Fig. 107. Sub-
pixel translation 436 of a tile's texture can be accomplished using 2 Multiply
ALUs and 2 Adder ALUs in an average time of
1 cycle per output pixel. The output from this sub-pixel translation is fed
directly to the Sequential Write Iterator 437.
The time taken for replace texture compositing is 1 cycle per pixel. There is
no feedback, since 100% of the textwe
value is always applied to the background. There is therefore no requirement
for processing the channels in any particular
CA 02456652 2004-02-06
WO 03/015395 PCT/AU02/00919
127
order.
25% Background + Tile's Texture
In this instance, the texture from the tile is added to 25% of the existing
texture value. The new value must be
greater than or equal to the original value. In addition, the new texture
value must be clipped at 255 since the texture channel
is only 8 bits. The process utilised is illustrated in Fig. 108.
Sub-pixel translation 440 of a tile's texture can be accomplished using 2
Multiply ALUs and 2 Adder ALUs in an
average time of 1 cycle per output pixel. The output from this sub-pixel
translation 440 is fed to an adder 441 where it is
added to'/a 442 of the background texture value. Min and Max functions 444 are
provided by the 2 adders not used for sub-
pixel translation and the output written to a Sequential Write Iterator 445.
The time taken for this style of texture compositing is 1 cycle per pixel.
There is no feedback, since 100% of the
texture value is considered to have been applied to the background (even if
clipping at 255 occurred). There is therefore no
requirement for processing the channels in any particular order.
Average hei he t al org ithm
In this texture application algorithm, the average height under the tile is
computed, and each pixel's height is
compared to the average height. If the pixel's height is less than the
average, the stroke height is added to the background
height. If the pixel's height is greater than or equal to the average, then
the stroke height is added to the average height. Thus
background peaks thin the stroke. The height is constrained to increase by a
minimum amount to prevent the background
from thinning the stroke application to 0 (the minimum amount can be 0
however). The height is also clipped at 255 due to
the 8-bit resolution of the texture channel.
There can be feedback of the difference in texture applied versus the expected
amount applied. The feedback
amount can be used as a scale factor in the application of the tile's color.
In both cases, the average texture is provided by software, calculated by
performing a bi-level interpolation on a
scaled version of the texture map. Software determines the next tile's average
texture height while the current tile is being
applied. Software must also provide the minimum thickness for addition, which
is typically constant for the entire tiling
process.
Without feedback
With no feedback, the texture is simply applied to the background texture, as
shown in Fig. 109.
4 Sequential Iterators are required, which means that if the process can be
pipelined for 1 cycle, the memory is fast
enough to keep up.
Sub-pixel translation 450 of a tile's texture can be accomplished using 2
Multiply ALUs and 2 Adder ALUs in an
average time of 1 cycle per output pixel. Each Min & Max function 451,452
requires a separate Adder ALU in order to
complete the entire operation in 1 cycle. Since 2 are already used by the sub-
pixel translation of the texture, there are not
enough remaining for a 1 cycle average time.
The average time for processing 1 pixel's texture is therefore 2 cycles. Note
that there is no feedback, and hence the
color channel order of compositing is irrelevant.
With feedback
This is conceptually the same as the case without feedback, except that in
addition to the standard processing of the
texture application algorithm, it is necessary to also record the proportion
of the texture actually applied. The proportion can
CA 02456652 2004-02-06
WO 03/015395 PCT/AU02/00919
128
be used as a scale factor for subsequent compositing of the tile's color onto
the background image. A flow diagram is
illustrated in Fig. 110 and the following lookup table is used:
Looku Size Details
LU, 256 entries 1/N
16 bits per Table indexed by N (range 0-255)
entry
Resultant 16 bits treated as fixed
oint 0:16
Each of the 256 entries in the software provided 1/N table 460 is 16 bits,
thus requiring 16 cache lines to hold
continuously.
Sub-pixel translation 461 of a tile's texture can be accomplished using 2
Multiply ALUs and 2 Adder ALUs in an
average time of 1 cycle per output pixel. Each Min 462 & Max 463 function
requires a separate Adder ALU in order to
complete the entire operation in 1 cycle. Since 2 are already used by the sub-
pixel translation of the texture, there are not
enough remaining for a 1 cycle average time.
The average time for processing 1 pixel's texture is therefore 2 cycles.
Sufficient space must be allocated for the
feedback data area (a tile sized image channel). The texture must be applied
before the tile's color is applied, since the
feedback is used in scaling the tile's opacity.
CCD Image Interpolator
Images obtained from the CCD via the ISI 83 (Fig. 3) are 750 x 500 pixels.
When the image is captured via the ISI,
the orientation of the camera is used to rotate the pixels by 0, 90, 180, or
270 degrees so that the top of the image
corresponds to 'up'. Since every pixel only has an R, G, or B color component
(rather than all 3), the fact that these have
been rotated must be taken into account when interpreting the pixel values.
Depending on the orientation of the camera, each
2x2 pixel block has one of the configurations illustrated in Fig. 111:
Several processes need to be performed on the CCD captured image in order to
transform it into a useful form for
processing:
Up-interpolation of low-sample rate color components in CCD image
(interpreting correct orientation of
pixels)
Color conversion from RGB to the internal color space
Scaling of the internal space image from 750 x 500 to 1500 x 1000.
Writing out the image in a planar format
The entire channel of an image is required to be available at the same time in
order to allow warping. In a low
memory model (8MB), there is only enough space to hold a single channel at
full resolution as a temporary object. Thus the
color conversion is to a single color channel. The limiting factor on the
process is the color conversion, as it involves tri-
linear interpolation from RGB to the internal color space, a process that
takes 0.026ns per channel (750 x 500 x 7 cycles per
pixel x lOns per cycle = 26,250,OOOns).
It is important to perform the color conversion before scaling of the internal
color space image as this reduces the
number of pixels scaled (and hence the overall process time) by a factor of 4.
The requirements for all of the transformations may not fit in the ALU scheme.
The transformations are therefore
broken into two phases:
Phase 1: Up-interpolation of low-sample rate color components in CCD image
(interpreting correct orientation of
pixels)
CA 02456652 2004-02-06
WO 03/015395 PCT/AU02/00919
129
Color conversion from RGB to the internal color space
Writing out the image in a planar format
Phase 2: Scaling of the internal space image from 750 x 500 to 1500 x 1000
Separating out the scale function implies that the small color convened image
must be in memory at the same time
as the large one. The output from Phase 1 (0.5 MB) can be safely written to
the memory area usually kept for the image
pyramid (1 MB). The output from Phase 2 can be the general expanded CCD image.
Separation of the scaling also allows
the scaling to be accomplished by the Affine Transform, and also allows for a
different CCD resolution that may not be a
simple 1:2 expansion.
Phase 1: Up-interpolation of low-sample rate color components.
Each of the 3 color components (R, G, and B) needs to be up interpolated in
order for color conversion to take place
for a given pixel. We have 7 cycles to perform the interpolation per pixel
since the color conversion takes 7 cycles.
Interpolation of G is straightforward and is illustrated in Fig. 112.
Depending on orientation, the actual pixel value
G alternates between odd pixels on odd lines & even pixels on even lines, and
odd pixels on even lines & even pixels on odd
lines. In Both cases, linear interpolation is all that is required.
Interpolation of R and B components as illustrated in Fig. 113
and Fig. 113, is more complicated, since in the horizontal and vertical
directions, as can be seen from the diagrams, access to
3 rows of pixels simultaneously is required, so 3 Sequential Read Iterators
are required, each one offset by a single row. In
addition, we have access to the previous pixel on the same row via a latch for
each row.
Each pixel therefore contains one component from the CCD, and the other 2 up-
interpolated. When one component
is being bi-linearly interpolated, the other is being linearly interpolated.
Since the interpolation factor is a constant 0.5,
interpolation can be calculated by an add and a shift 1 bit right (in 1
cycle), and bi-linear interpolation of factor 0.5 can be
calculated by 3 adds and a shift 2 bits right (3 cycles). The total number of
cycles required is therefore 4, using a single
multiply ALU.
Fig. 115 illustrates the case for rotation 0 even line even pixel (EL, EP),
and odd line odd pixel (0L, OP) and Fig.
116 illustrates the case for rotation 0 even line odd pixel (EL, OP), and odd
line even pixel (0L, EP). The other rotations are
simply different forms of these two expressions.
Color conversion
Color space conversion from RGB to Lab is achieved using the same method as
that described in the general Color
Space Convert function, a process that takes 8 cycles per pixel. Phase 1
processing can be described with reference to Fig.
117.
The up-interpolate of the RGB takes 4 cycles (1 Multiply ALU), but the
conversion of the color space takes 8
cycles per pixel (2 Multiply ALUs) due to the lookup transfer time.
Phase 2
Scaling the imaee
This phase is concerned with up-interpolating the image from the CCD
resolution (750 x 500) to the working photo
resolution (1500 x 1000). Scaling is accomplished by running the Affine
transform with a scale of 1:2. The timing of a
general affine transform is 2 cycles per output pixel, which in this case
means an elapsed scaling time of 0.03 seconds.
Illuminate Image
Once an image has been processed, it can be illuminated by one or more light
sources. Light sources can be:
CA 02456652 2004-02-06
WO 03/015395 PCT/AU02/00919
130
1. Directional - is infinitely distant so it casts parallel light in a single
direction
2. Omni - casts unfocused lights in all directions.
3. Spot - casts a focused beam of light at a specific target point. There is a
cone and penumbra associated with a
spotlight.
The scene may also have an associated bump-map to cause reflection angles to
vary. Ambient light is also
optionally present in an illuminated scene.'
In the process of accelerated illumination, we are concerned with illuminating
one image channel by a single light
source. Multiple light sources can be applied to a single image channel as
multiple passes one pass per light source. Multiple
channels can be processed one at a time with or without a bump-map.
The normal surface vector (N) at a pixel is computed from the bump-map if
present. The default normal vector, in
the absence of a bump-map, is perpendicular to the image plane i.e. N = [0, 0,
I].
The viewing vector V is always perpendicular to the image plane i.e. V = [0,
0, 1].
For a directional light source, the light source vector (L) from a pixel to
the light source is constant across the entire
image, so is computed once for the entire image. For an omni light source (at
a finite distance), the light source vector is
computed independently for each pixel.
A pixel's reflection of ambient light is computed according to: Iak~Od
A pixel's diffuse and specular reflection of a light source is computed
according to the Phong model:
fanlP[lcdOd(N~L) + ksOs~~V)°]
When the light source is at infinity, the light source intensity is constant
across the image.
Each light source has three contributions per pixel
Ambient Contribution
Diffuse contribution
Specular contribution
The light source can be defined using the following variables:
d~ Distance from 1i ht source
f~" Attenuation with distance [,~, = 1 / d~z]
R Normalised reflection vector [R = 2N(N.L ) - L]
h Ambient 1i ht intensit
I Diffuse light coefficient
k~ Ambient reflection coefficient
1d Diffuse reflection coefficient
ks S ecular reflection coefficient
ks~ S ecular color coefficient
L Normalised light source vector
N Normalised surface normal vector
n S ecular ex onent
Od Ob'ect's diffuse color (i.e. image ixel color)
Os Ob'ect's s ecular color (ks~Od + (1 - ks~)I )
V Normalised viewing vector [V = [0, 0, 1]]
CA 02456652 2004-02-06
WO 03/015395 PCT/AU02/00919
131
The same reflection coefficients (ka, 1c5, kd) are used for each color
component.
A given pixel's value will be equal to the ambient contribution plus the sum
of each light's diffuse and specular
contribution.
Sub-Processes of Illumination Calculation
In order to calculate diffuse and specular contributions, a variety of other
calculations are required. These are
calculations of:
1/~X
N
L
N~L
R~V
fart
f~a
Sub-processes are also defined for calculating the contributions of:
ambient
diffuse
specular
The sub-processes can then be used to calculate the overall illumination of a
light source. Since there are only 4
multiply ALUs, the microcode for a particular type of light source can have
sub-processes intermingled appropriately for
performance.
Calculation of 1/~X
The Vark lighting model uses vectors. In many cases it is important to
calculate the inverse of the length of the
vector for normalization purposes. Calculating the inverse of the length
requires the calculation of 1/SquareRoot[X].
Logically, the process can be represented as a process with inputs and outputs
as shown in Fig. 118. Referring to
Fig. 119, the calculation can be made via a lookup of the estimation, followed
by a single iteration of the following function:
V"+t ='~z V"(3 - XV"Z)
The number of iterations depends on the accuracy required. In this case only
16 bits of precision are required. The
table can therefore have 8 bits of precision, and only a single iteration is
necessary. The following constant is set by
software:
Constant Value
K, 3
The following lookup table is used:
Looku Size Details
LU, 256 entries1/SquareRoot[X]
8 bits per Table indexed by the 8 highest significant
entry bits of X.
Resultant 8 bits treated as fixed oint
0:8
Calculation of N
CA 02456652 2004-02-06
WO 03/015395 PCT/AU02/00919
132
N is the surface normal vector. When there is no bump-map, N is constant. When
a bump-map is present, N must
be calculated for each pixel.
No bump-map
When there is no bump-map, there is a fixed normal N that has the following
properties:
N = LXN, YN. ZNJ = Lo> o~ 1J
(~~~ = 1
1/~~N~~ = 1
normalized N = N
These properties can be used instead of specifically calculating the normal
vector and 1/~~NII and thus optimize other
calculations.
With bump-map
As illustrated in Fig. 120, when a bump-map is present, N is calculated by
comparing bump-map values in X and Y
dimensions. Fig. 120 shows the calculation of N for pixel Pl in terms of the
pixels in the same row and column, but not
including the value at Pl itself. The calculation of N is made resolution
independent by multiplying by a scale factor (same
scale factor in X & Y). This process can be represented as a process having
inputs and outputs (ZN is always 1) as illustrated
in Fig. 121.
As ZN is always 1. Consequently XN and YN are not normalized yet (since ZN =
1). Normalization of N is delayed
until after calculation of N.L so that there is only 1 multiply by 1/~~NII
instead of 3.
An actual process for calculating N is illustrated in Fig. 122.
The following constant is set by software:
Constant Value
K, ScaleFactor (to make N resolution independent)
Calculation of L
Directional lig
When a light source is infinitely distant, it has an effective constant light
vector L. L is normalized and calculated
by software such that:
L = LXL~ YL, ZLJ
~a-~~ =1
1/~~L~~ = 1
These properties can be used instead of specifically calculating the L and
1/~~L~~ and thus optimize other
calculations. This process is as illustrated in Fig. 123.
Omni lights and Spotli
When the light source is not infinitely distant, L is the vector from the
current point P to the light source PL. Since P = [XP,
YP, 0], L is given by:
L = LXL> YL, ZLJ
XL = XP - XPL
YL = YP - YPL
CA 02456652 2004-02-06
WO 03/015395 PCT/AU02/00919
133
ZL - -ZPL
We normalize XL, YL and ZL by multiplying each by 1/~~L~~. The calculation of
1/~~L,~~ (for later use in normalizing) is
accomplished by calculating
V = XLZ -~ YLZ -f ZL2
and then calculating V~~
In this case, the calculation of L can be represented as a process with the
inputs and outputs as indicated in Fig. 124.
Xp and Yp are the coordinates of the pixel whose illumination is being
calculated. Zp is always 0.
The actual process for calculating L can be as set out in Fig. 125.
Where the following constants are set by software:
Constant Value
K1 XPL
Kz YPL
I~3 ZpLZ (aS Zp 1S 0)
-
K4 -ZPL
Calculation of N.L
Calculating the dot product of vectors N and L is defined as:
XNXL + YNYL -~ ZNZL
No bump-map
When there is no bump-map N is a constant [0, 0, 1]. N.L therefore reduces to
ZL.
With bump-map
When there is a bump-map, we must calculate the dot product directly. Rather
than take in normalized N
components, we normalize after taking the dot product of a non-normalized N to
a normalized L. L is either normalized by
software (if it is constant), or by the Calculate L process. This process is
as illustrated in Fig. 126.
Note that ZN is not required as input since it is defined to be 1. However
1/~~N~~ is required instead, in order to
normalize the result. One actual process for calculating N.L is as illustrated
in Fig. 127.
Calculation of R~V
R~V is required as input to specular contribution calculations. Since V = [0,
0, 1], only the Z components are
required. R~V therefore reduces to:
R~V = 2ZN(N.L ) - ZL
In addition, since the un-normalized ZN = 1, normalized ZN = 1/~~N~~
No bum~map
The simplest implementation is when N is constant (i.e. no bump-map). Since N
and V are constant, N.L and R~V
can be simplified:
V = [0, 0, 1 ]
N = [0, 0, 1 ]
L = [XL, YL, ZL]
N.L = ZL
R~V = 2ZN(N.L ) - ZL
CA 02456652 2004-02-06
WO 03/015395 PCT/AU02/00919
134
-_ 2ZL - ZL
= ZL
When L is constant (Directional light source), a normalized ZL can be supplied
by software in the form of a
constant whenever R~V is required. When L varies (Omni lights and Spotlights),
normalized ZL must be calculated on the
fly. It is obtained as output from the Calculate L process.
With bump-map
When N is not constant, the process of calculating R~V is simply an
implementation of the generalized formula:
R~V = 2ZN(N.L ) - ZL
The inputs and outputs are as shown in Fig. 128 with the an actual
implementation as shown in Fig. 129.
Calculation of Attenuation Factor
Directional lishts
When a light source is infinitely distant, the intensity of the light does not
vary across the image. The attenuation
factor fa" is therefore 1. This constant can be used to optimize illumination
calculations for infinitely distant light sources.
Omni lights and Spotl~hts
When a light source is not infinitely distant, the intensity of the light can
vary according to the following formula:
fan = fo + f,/d + fz/dZ
Appropriate settings of coefficients fo, f,, and f2 allow light intensity to
be attenuated by a constant, linearly with
distance, or by the square of the distance.
Since d = ~~L~~, the calculation of fatt can be represented as a process with
the following inputs and outputs as
illustrated in Fig. 130.
The actual process for calculating fa« can be defined in Fig. 131.
Where the following constants are set by software:
Constant Value
K, FZ
KZ f,
K3 Fo
Calculation of Cone and Penumbra Factor
Directional lights and Omni lights
These two light sources are not focused, and therefore have no cone or
penumbra. The cone-penumbra scaling
factor fop is therefore 1. This constant can be used to optimize illumination
calculations for Directional and Omni light
sources.
Spotlights
A spotlight focuses on a particular target point (PTA. The intensity of the
Spotlight varies according to whether the
particular point of the image is in the cone, in the penumbra, or outside the
cone/penumbra region.
Turning now to Fig. 132, there is illustrated a graph of f~P with respect to
the penumbra position. Inside the cone
470, f~P is 1, outside 471 the penumbra fop is 0. From the edge of the cone
through to the end of the penumbra, the light
intensity varies according to a cubic function 472.
CA 02456652 2004-02-06
WO 03/015395 PCT/AU02/00919
135
The various vectors for penumbra 475 and cone 476 calculation are as
illustrated in Fig. 133 and Fig. 134.
Looking at the surface of the image in 1 dimension as shown in Fig. 134, 3
angles A, B, and C are defined. A is the
angle between the target point 479, the light source 478, and the end of the
cone 480. C is the angle between the target point
479, light source 478, and the end of the penumbra 481. Both are fixed for a
given light source. B is the angle between the
target point 479, the light source 478, and the position being calculated 482,
and therefore changes with every point being
calculated on the image.
We normalize the range A to C to be 0 to 1, and find the distance that B is
along that angle range by the formula:
(B-A)/(C-A)
The range is forced to be in the range 0 to 1 by truncation, and this value
used as a lookup for the cubic
approximation of f~p.
The calculation of f~tt can therefore be represented as a process with the
inputs and outputs as illustrated in Fig. 135
with an actual process for calculating f~P is as shown in Fig. 136 where the
following constants are set by software:
Constant Value
K, XLr
K2 yLT
K3 ZLT
K4 A
K5 1/(C-A). [MAXNUM if no penumbra]
The following lookup tables are used:
Looku Size Details
LU, 64 entries Arcos(X)
16 bits per Units are same as for constants
entry KS and K6
Table indexed by highest 6 bits
Result by linear interpolation of
2 entries
Timing is 2 * 8 bits * 2 entries
= 4 cycles
LUZ 64 entries Light Response function f~P
16 bits per F(1) = 0, F(0) = 1, others are according
entry to cubic
Table indexed by 6 bits (1:5)
Result by linear interpolation of
2 entries
Timing is 2 * 8 bits = 4 cycles
Calculation of Ambient Contribution
Regardless of the number of lights being applied to an image, the ambient
light contribution is performed once for
each pixel, and does not depend on the bump-map.
The ambient calculation process can be represented as a process with the
inputs and outputs as illustrated in Fig.
131. The implementation of the process requires multiplying each pixel from
the input image (0d) by a constant value (hk~,
as shown in Fig. 138 where the following constant is set by software:
Constant Value
K, I~k;,
CA 02456652 2004-02-06
WO 03/015395 PCT/AU02/00919
136
Calculation of Diffuse Contribution
Each light that is applied to a surface produces a diffuse illumination. The
diffuse illumination is given by the
formula:
diffuse = lcaOd(N.L )
There are 2 different implementations to consider:
Implementation 1 - constant N and L
When N and L are both constant (Directional light and no bump-map):
N.L =ZL
Therefore:
diffuse = lcdOdZL
Since Od is the only variable, the actual process for calculating the diffuse
contribution is as illustrated in Fig. 139
where the following constant is set by software:
Constant Value
K~ kd(N.L ) = kdZL
Implementation 2 - non-constant N & L
When either N or L are non-constant (either a bump-map or illumination from an
Omni light or a Spotlight), the
diffuse calculation is performed directly according to the formula:
diffuse = kaOd(N.L )
The diffuse calculation process can be represented as a process with the
inputs as illustrated in Fig. 140. N.L can
either be calculated using the Calculate N.L Process, or is provided as a
constant. An actual process for calculating the
diffuse contribution is as shown in Fig. 141 where the following constants are
set by software:
Constant Value
Kl kd
Calculation of Snecular Contribution
Each light that is applied to a surface produces a specular illumination. The
specular illumination is given by the
formula:
specular = ks05(R~V)n
where OS = k~Od + (1-ks~)Ip
There are two implementations of the Calculate Specular process.
Implementation 1- constant N and L
The first implementation is when both N and L are constant (Directional light
and no bump-map). Since N, L and V
are constant, N.L and R~V are also constant:
V=[0,0,1]
N = [0, 0, 1
L = [XL~ yL> ZL]
N.L = ZL
R~V = 2ZN(N.L ) - ZL
CA 02456652 2004-02-06
WO 03/015395 PCT/AU02/00919
137
= 2ZL - ZL
The specular calculation can thus be reduced to:
specular = kSOS ZL"
= ksZLn(~cOd + (1-ksc)Ip)
- kskscZL"~d + (I-ksc)IpksZL"
Since only Od is a variable in the specular calculation, the calculation of
the specular contribution can therefore be
represented as a process with the inputs and outputs as indicated in Fig. 142
and an actual process for calculating the
specular contribution is illustrated in Fig. 143 where the following constants
are set by software:
Constant Value
K, kSk~ZL'
Kz (1-ks~)IpksZ~'
Implementation 2 - non constant N and L
This implementation is when either N or L are not constant (either a bump-map
or illumination from an Omni light
or a Spotlight). This implies that R~V must be supplied, and hence R~V" must
also be calculated.
The specular calculation process can be represented as a process with the
inputs and outputs as shown in Fig. 144.
Fig. 145 shows an actual process for calculating the specular contribution
where the following constants are set by software:
Constant Value
K, k5
Kz k~
Ks ( 1-ks~)I
The following lookup table is used:
Looku Size Details
LU, 32 entriesX"
16 bits Table indexed by 5 highest bits of integer
per RV
entry Result by linear interpolation of 2 entries
using fraction of RV.
Interpolation by 2 Multiplies.
The time taken to retrieve the data from
the lookup is 2 * 8 bits * 2
entries = 4 cycles.
When ambient light is the only illumination
If the ambient contribution is the only light source, the process is very
straightforward since it is not necessary to
add the ambient light to anything with the overall process being as
illustrated in Fig. 146. We can divide the image
vertically into 2 sections, and process each half simultaneously by
duplicating the ambient light logic (thus using a total of 2
Multiply ALUs and 4 Sequential Iterators). The timing is therefore'/z cycle
per pixel for ambient light application.
The typical illumination case is a scene lit by one or more lights. In these
cases, because ambient light calculation is
so cheap, the ambient calculation is included with the processing of each
light source. The first light to be processed should
have the correct hk;, setting, and subsequent lights should have an Iaka value
of 0 (to prevent multiple ambient contributions).
CA 02456652 2004-02-06
WO 03/015395 PCT/AU02/00919
138
If the ambient light is processed as a separate pass (and not the first pass),
it is necessary to add the ambient light to
the current calculated value (requiring a read and write to the same address).
The process overview is shown in Fig. 147.
The process uses 3 Image Iterators, 1 Multiply ALU, and takes 1 cycle per
pixel on average.
Infinite Light Source
In the case of the infinite light source, we have a constant light source
intensity across the image. Thus both L and
fa" are constant.
No Bumn Ma
When there is no bump-map, there is a constant normal vector N [0, 0, 1 ]. The
complexity of the illumination is
greatly reduced by the constants of N, L, and f~~,. The process of applying a
single Directional light with no bump-map is as
illustrated in Fig. 147 where the following constant is set by software:
Constant Value
K, Ip
For a single infinite light source we want to perform the logical operations
as shown in Fig. 148 where K, through
K4 are constants with the following values:
Constant Value
K~ Kd(NsL) = Kd I~
K2 ksc
K3 Ks(NSH)" = Ks Hzz
K4 I
The process can be simplified since Kz, K3, and K4 are constants. Since the
complexity is essentially in the
calculation of the specular and diffuse contributions (using 3 of the Multiply
ALUs), it is possible to safely add an ambient
calculation as the 4'" Multiply ALU. The first infinite light source being
processed can have the true ambient light parameter
Iak~, and all subsequent infinite lights can set I"k" to be 0. The ambient
light calculation becomes effectively free.
If the infinite light source is the first light being applied, there is no
need to include the existing contributions made
by other light sources and the situation is as illustrated in Fig. 149 where
the constants have the following values:
Constant Value
K, 14,(LsN) = kdl2
K4 I
Ks (1- ks(NS~")I = (1 - ksHz")I
Kb kscks(NsH)n I = kscksHz"I
K~ Iaka
If the infinite light source is not the first light being applied, the
existing contribution made by previously processed
lights must be included (the same constants apply) and the situation is as
illustrated in Fig. 148.
In the first case 2 Sequential Iterators 490, 491 are required, and in the
second case, 3 Sequential Iterators 490, 491,
492 (the extra Iterator is required to read the previous light contributions).
In both cases, the application of an infinite light
source with no bump map takes 1 cycle per pixel, including optional
application of the ambient light.
With Bump Map
CA 02456652 2004-02-06
WO 03/015395 PCT/AU02/00919
139
When there is a bump-map, the normal vector N must be calculated per pixel and
applied to the constant light
source vector L. 1/~~N~~ is also used to calculate R~V, which is required as
input to the Calculate Specular 2 process. The
following constants are set by software:
Constant Value
K, XL
Kz YL
K3 ZL
K4 ID
Bump-map Sequential Read Iterator 490 is responsible for reading the current
line of the bump-map. It provides the
input for determining the slope in X. Bump-map Sequential Read Iterators 491,
492 and are responsible for reading the line
above and below the current line. They provide the input for determining the
slope in Y.
Omni Lights
In the case of the Omni light source, the lighting vector L and attenuation
factor fa" change for each pixel across an
image. Therefore both L and fat, must be calculated for each pixel.
No Bump Map
When there is no bump-map, there is a constant normal vector N [0, 0, 1].
Although L must be calculated for each
pixel, both N.L and R~V are simplified to ZL. When there is no bump-map, the
application of an Omni light can be
calculated as shown in Fig. 149 where the following constants are set by
software:
Constant Value
K, XP
Kz YP
Ks In
The algorithm optionally includes the contributions from previous light
sources, and also includes an ambient light
calculation. Ambient light needs only to be included once. For all other light
passes, the appropriate constant in the
Calculate Ambient process should be set to 0.
The algorithm as shown requires a total of 19 multiply/accumulates. The times
taken for the lookups are 1 cycle
during the calculation of L, and 4 cycles during the specular contribution.
The processing time of 5 cycles is therefore the
best that can be accomplished. The time taken is increased to 6 cycles in case
it is not possible to optimally microcode the
ALUs for the function. The speed for applying an Omni light onto an image with
no associated bump-map is 6 cycles per
pixel.
With Bump-map
When an Omni light is applied to an image with an associated a bump-map,
calculation of N, L, N.L and R~V are all
necessary. The process of applying an Omni light onto an image with an
associated bump-map is as indicated in Fig. 150
where the following constants are set by software:
Constant Value
K, XP
Kz YP
CA 02456652 2004-02-06
WO 03/015395 PCT/AU02/00919
140
K3 ~ Io
The algorithm optionally includes the contributions from previous light
sources, and also includes an ambient light
calculation. Ambient light needs only to be included once. For all other light
passes, the appropriate constant in the Calculate
Ambient process should be set to 0.
The algorithm as shown requires a total of 32 multiply/accumulates. The times
taken for the lookups are 1 cycle
each during the calculation of both L and N, and 4 cycles for the specular
contribution. However the lookup required for N
and L are both the same (thus 2 LUs implement the 3 LUs). The processing time
of 8 cycles is adequate. The time taken is
extended to 9 cycles in case it is not possible to optimally microcode the
ALUs for the function. The speed for applying an
Omni light onto an image with an associated bump-map is 9 cycles per pixel.
Spotlights
Spotlights are similar to Omni lights except that the attenuation factor fag,
is modified by a cone/penumbra factor f~
that effectively focuses the light around a target.
No bump-map
When there is no bump-map, there is a constant normal vector N [0, 0, 1].
Although L must be calculated for each
pixel, both N.L and R~V are simplified to Zi,. Fig. 151 illustrates the
application of a Spotlight to an image where the
following constants are set by software:
Constant Value
K, Xp
Kz YP
K3 Ip
The algorithm optionally includes the contributions from previous light
sources, and also includes an ambient light
calculation. Ambient light needs only to be included once. For all other light
passes, the appropriate constant in the Calculate
Ambient process should be set to 0.
The algorithm as shown requires a total of 30 multiply/accumulates. The times
taken for the lookups are 1 cycle
during the calculation of L, 4 cycles for the specular contribution, and 2
sets of 4 cycle lookups in the cone/penumbra
calculation.
With bump-map
When a Spotlight is applied to an image with an associated a bump-map,
calculation of N, L, N.L and R~V are all
necessary. The process of applying a single Spotlight onto an image with
associated bump-map is illustrated in Fig. 152
where the following constants are set by software:
The algorithm optionally includes the contributions from previous light
sources, and also includes an ambient light
calculation. Ambient light needs only to be included once. For all other light
passes, the appropriate constant in the Calculate
Ambient process should be set to 0. The algorithm as shown requires a total of
41 multiply/accumulates.
Print Head 44
Fig. 153 illustrates the logical layout of a single print Head which logically
consists of 8 segments, each printing bi-
CA 02456652 2004-02-06
WO 03/015395 PCT/AU02/00919
141
level cyan, magenta, and yellow onto a portion of the page.
Loading a segment for printing
Before anything can be printed, each of the 8 segments in the Print Head must
be loaded with 6 rows of data
corresponding to the following relative rows in the final output image:
Row 0 = Line N, Yellow, even dots 0, 2, 4, 6, 8,
Row 1 = Line N+8, Yellow, odd dots 1, 3, 5, 7,
Row 2 = Line N+10, Magenta, even dots 0, 2, 4, 6, 8, ...
Row 3 = Line N+18, Magenta, odd dots 1, 3, 5, 7, ...
Row 4 = Line N+20, Cyan, even dots 0, 2, 4, 6, 8, .. .
Row 5 = Line N+28, Cyan, odd dots 1, 3, 5, 7, ...
Each of the segments prints dots over different parts of the page. Each
segment prints 750 dots of one color, 375
even dots on one row, and 375 odd dots on another. The 8 segments have dots
corresponding to positions:
Se ment First dot Last dot
0 0 749
1 750 1499
2 1500 2249
3 2250 2999
4 3000 3749
3750 4499
6 4500 5249
7 5250 5999
Each dot is represented in the Print Head segment by a single bit. The data
must be loaded 1 bit at a time by placing
the data on the segment's BitValue pin, and clocked in to a shift register in
the segment according to a BitClock. Since the
data is loaded into a shift register, the order of loading bits must be
correct. Data can be clocked in to the Print Head at a
maximum rate of 10 MHz.
Once all the bits have been loaded, they must be transferred in parallel to
the Print Head output buffer, ready for
printing. The transfer is accomplished by a single pulse on the segment's
Para11e1XferClock pin.
Controlling the Print
In order to conserve power, not all the dots of the Print Head have to be
printed simultaneously. A set of control
lines enables the printing of specific dots. An external controller, such as
the ACP, can change the number of dots printed at
once, as well as the duration of the print pulse in accordance with speed
and/or power requirements.
Each segment has 5 NozzleSelect lines, which are decoded to select 32 sets of
nozzles per row. Since each row has
375 nozzles, each set contains 12 nozzles. There are also 2 BankEnable lines,
one for each of the odd and even rows of
color. Finally, each segment has 3 ColorEnable lines, one for each of C, M,
and Y colors. A pulse on one of the ColorEnable
lines causes the specified nozzles of the color's specified rows to be
printed. A pulse is typically about 2~s in duration.
If all the segments are controlled by the same set of NozzleSelect, BankEnable
and ColorEnable lines (wired
externally to the print head), the following is true:
If both odd and even banks print simultaneously (both BankEnable bits are
set), 24 nozzles fire simultaneously per
segment, 192 nozzles in all, consuming 5.7 Watts.
CA 02456652 2004-02-06
WO 03/015395 PCT/AU02/00919
142
If odd and even banks print independently, only 12 nozzles fire simultaneously
per segment, 96 in all, consuming
2.85 Watts.
Print Head Interface 62
The Print Head Interface 62 connects the ACP to the Print Head, providing both
data and appropriate signals to the
external Print Head. The Print Head Interface 62 works in conjunction with
both a VLIW processor 74 and a software
algorithm running on the CPU in order to print a photo in approximately 2
seconds.
An overview of the inputs and outputs to the Print Head Interface is shown in
Fig. 154. The Address and Data
Buses are used by the CPU to address the various registers in the Print Head
Interface. A single BitClock output line
connects to all 8 segments on the print head. The 8 DataBits lines lead one to
each segment, and are clocked in to the 8
segments on the print head simultaneously (on a BitClock pulse). For example,
dot 0 is transferred to segmento, dot 750 is
transferred to segment,, dot 1500 to segment2 etc. simultaneously.
The VLIW Output FIFO contains the dithered bi-level C, M, and Y 6000 x 9000
resolution print image in the
correct order for output to the 8 DataBits. The Para11e1XferClock is connected
to each of the 8 segments on the print head,
so that on a single pulse, all segments transfer their bits at the same time.
Finally, the NozzIeSelect, BankEnable and
ColorEnable lines are connected to each of the 8 segments, allowing the Print
Head Interface to control the duration of the C,
M, and Y drop pulses as well as how many drops are printed with each pulse.
Registers in the Print Head Interface allow the
specification of pulse durations between 0 and 6 lts, with a typical duration
of 2ps.
Printi ~ an Image
There are 2 phases that must occur before an image is in the hand of the
Artcam user:
Preparation of the image to be printed
Printing the prepared image
Preparation of an image only needs to be performed once. Printing the image
can be performed as many times as
desired.
Prepare the Image
Preparing an image for printing involves:
1. Convert the Photo Image into a Print Image
2. Rotation of the Print Image (internal color space) to align the output for
the orientation of the printer
3. Up-interpolation of compressed channels (if necessary)
4. Color conversion from the internal color space to the CMY color space
appropriate to the specific printer
and ink
At the end of image preparation, a 4.5MB correctly oriented 1000 x 1500 CMY
image is ready to be printed.
Convert Photo Imase to Print Image
The conversion of a Photo Image into a Print Image requires the execution of a
Vark script to perform image
processing. The script is either a default image enhancement script or a Vark
script taken from the currently inserted Artcard.
The Vark script is executed via the CPU, accelerated by functions performed by
the VLIW Vector Processor.
Rotate the Print Imaee
The image in memory is originally oriented to be top upwards. This allows for
straightforward Vark processing.
Before the image is printed, it must be aligned with the print roll's
orientation. The re-alignment only needs to be done once.
CA 02456652 2004-02-06
WO 03/015395 PCT/AU02/00919
143
Subsequent Prints of a Print Image will already have been rotated
appropriately.
The transformation to be applied is simply the inverse of that applied during
capture from the CCD when the user
pressed the "Image Capture" button on the Artcam. If the original rotation was
0, then no transformation needs to take place.
If the original rotation was +90 degrees, then the rotation before printing
needs to be -90 degrees (same as 270 degrees).
The method used to apply the rotation is the Vark accelerated Affine Transform
function. The Affine Transform engine can
be called to rotate each color channel independently. Note that the color
channels cannot be rotated in place. Instead, they
can make use of the space previously used for the expanded single channel
(1.SMB).
Fig. 155 shows an example of rotation of a Lab image where the a and b
channels are compressed 4:1. The L
channel is rotated into the space no longer required (the single channel
area), then the a channel can be rotated into the space
left vacant by L, and finally the b channel can be rotated. The total time to
rotate the 3 channels is 0.09 seconds. It is an
acceptable period of time to elapse before the first print image. Subsequent
prints do not incur this overhead.
Up Interpolate and color convert
The Lab image must be converted to CMY before printing. Different processing
occurs depending on whether the a
and b channels of the Lab image is compressed. If the Lab image is compressed,
the a and b channels must be
decompressed before the color conversion occurs. If the Lab image is not
compressed, the color conversion is the only
necessary step. The Lab image must be up interpolated (if the a and b channels
are compressed) and converted into a CMY
image. A single VLIW process combining scale and color transform can be used.
The method used to perform the color conversion is the Vark accelerated Color
Convert function. The Affine
Transform engine can be called to rotate each color channel independently. The
color channels cannot be rotated in place.
Instead, they can make use of the space previously used for the expanded
single channel (1.SMB).
Print the Image
Printing an image is concerned with taking a correctly oriented 1000 x 1500
CMY image, and generating data and
signals to be sent to the external Print Head. The process involves the CPU
working in conjunction with a VLIW process
and the Print Head Interface.
The resolution of the image in the Artcam is 1000 x 1500. The printed image
has a resolution of 6000 x 9000 dots,
which makes for a very straightforward relationship: 1 pixel = 6 x 6 = 36
dots. As shown in Fig. 156 since each dot is
16.6pm, the 6 x 6 dot square is 100 pm square. Since each of the dots is bi-
level, the output must be dithered.
The image should be printed in approximately 2 seconds. For 9000 rows of dots
this implies a time of 222 lts time
between printing each row. The Print Head Interface must generate the 6000
dots in this time, an average of 37ns per dot.
However, each dot comprises 3 colors, so the Print Head Interface must
generate each color component in approximately
l2ns, or 1 clock cycle of the ACP (lOns at 100 MHz). One VLIW process is
responsible for calculating the next line of
6000 dots to be printed. The odd and even C, M, and Y dots are generated by
dithering input from 6 different 1000 x 1500
CMY image lines. The second VLIW process is responsible for taking the
previously calculated line of 6000 dots, and
correctly generating the 8 bits of data for the 8 segments to be transferred
by the Print Head Interface to the Print Head in a
single transfer.
A CPU process updates registers in the fist VLIW process 3 times per print
line (once per color component = 27000
times in 2 seconds0, and in the 2nd VLIW process once every print line (9000
times in 2 seconds). The CPU works one line
ahead of the VLIW process in order to do this.
CA 02456652 2004-02-06
WO 03/015395 PCT/AU02/00919
144
Finally, the Print Head Interface takes the 8 bit data from the VLIW Output
FIFO, and outputs it unchanged to the
Print Head, producing the BitClock signals appropriately. Once all the data
has been transferred a ParallelXferClock signal
is generated to load the data for the next print line. In conjunction with
transferring the data to the Print Head, a separate
timer is generating the signals for the different print cycles of the Print
Head using the NozzleSelect, ColorEnable, and
BankEnable lines a specified by Print Head Interface internal registers.
The CPU also controls the various motors and guillotine via the parallel
interface during the print process.
Generate C. M, and Y Dots
The input to this process is a 1000 x 1500 CMY image correctly oriented for
printing. The image is not compressed
in any way. As illustrated in Fig. 157, a VLIW microcode program takes the CMY
image, and generates the C, M, and Y
pixels required by the Print Head Interface to be dithered.
The process is run 3 times, once for each of the 3 color components. The
process consists of 2 sub-processes run in
parallel - one for producing even dots, and the other for producing odd dots.
Each sub-process takes one pixel from the
input image, and produces 3 output dots (since one pixel = 6 output dots, and
each sub-process is concerned with either even
or odd dots). Thus one output dot is generated each cycle, but an input pixel
is only read once every 3 cycles.
The original dither cell is a 64 x 64 cell, with each entry 8 bits. This
original cell is divided into an odd cell and an
even cell, so that each is still 64 high, but only 32 entries wide. The even
dither cell contains original dither cell pixels 0, 2, 4
etc., while the odd contains original dither cell pixels 1, 3, 5 etc. Since a
dither cell repeats across a line, a single 32 byte line
of each of the 2 dither cells is required during an entire line, and can
therefore be completely cached. The odd and even lines
of a single process line are staggered 8 dot lines apart, so it is convenient
to rotate the odd dither cell's lines by 8 lines.
Therefore the same offset into both odd and even dither cells can be used.
Consequently the even dither cell's line
corresponds to the even entries of line L in the original dither cell, and the
even dither cell's line corresponds to the odd
entries of line L+8 in the original dither cell.
The process is run 3 times, once for each of the color components. The CPU
software routine must ensure that the
Sequential Read Iterators for odd and even lines are pointing to the correct
image lines corresponding to the print heads. For
example, to produce one set of 18,000 dots (3 sets of 6000 dots):
~ Yellow even dot line = 0, therefore input Yellow image line = 0/6 = 0
~ Yellow odd dot line = 8, therefore input Yellow image line = 8/6 = 1
~ Magenta even line = 10, therefore input Magenta image line = 10/6 = 1
~ Magenta odd line = 18, therefore input Magenta image line = 18/6 = 3
~ Cyan even line = 20, therefore input Cyan image line = 20/6 = 3
~ Cyan odd line = 28, therefore input Cyan image line = 28/6 = 4
Subsequent sets of input image lines are:
~ Y=[0, 1], M=[1, 3], C=[3, 4]
~ Y=[0, 1], M=[1, 3], C=[3, 4]
~ Y=[0, 1], M=[2, 3], C=[3, 5]
~ Y=[0, 1], M=[2, 3], C=[3, 5]
~ Y=[0, 2], M=[2, 3], C=[4, 5]
The dither cell data however, does not need to be updated for each color
component. The dither cell for the 3 colors
CA 02456652 2004-02-06
WO 03/015395 PCT/AU02/00919
145
becomes the same, but offset by 2 dot lines for each component.
The Dithered Output is written to a Sequential Write Iterator, with odd and
even dithered dots written to 2 separate
outputs. The same two Write Iterators are used for all 3 color components, so
that they are contiguous within the break-up of
odd and even dots.
While one set of dots is being generated for a print line, the previously
generated set of dots is being merged by a
second VLIW process as described in the next section.
Generate Merged 8 bit Dot Output
This process, as illustrated in Fig. 158, takes a single line of dithered dots
and generates the 8 bit data stream for
output to the Print Head Interface via the VLIW Output FIFO. The process
requires the entire line to have been prepared,
since it requires semi-random access to most of the dithered line at once. The
following constant is set by software:
Constant Value
K, I 375
The Sequential Read Iterators point to the line of previously generated dots,
with the Iterator registers set up to limit
access to a single color component. The distance between subsequent pixels is
375, and the distance between one line and
the next is given to be 1 byte. Consequently 8 entries are read for each
"line". A single "line" corresponds to the 8 bits to be
loaded on the print head. The total number of "lines" in the image is set to
be 375. With at least 8 cache lines assigned to the
Sequential Read Iterator, complete cache coherence is maintained. Instead of
counting the 8 bits, 8 Microcode steps count
implicitly.
The generation process first reads all the entries from the even dots,
combining 8 entries into a single byte which is
then output to the VLIW Output FIFO. Once all 3000 even dots have been read,
the 3000 odd dots are read and processed.
A software routine must update the address of the dots in the odd and even
Sequential Read Iterators once per color
component, which equates to 3 times per line. The two VLIW processes require
all 8 ALUs and the VLIW Output FIFO. As
long as the CPU is able to update the registers as described in the two
processes, the VLIW processor can generate the
dithered image dots fast enough to keep up with the printer.
Data Card Reader
Fig. 159, there is illustrated on form of card reader 500 which allows for the
insertion of Artcards 9 for reading. Fig.
158 shows an exploded perspective of the reader of Fig. 159. Cardreader is
interconnected to a computer system and
includes a CCD reading mechanism 35. The cardreader includes pinch rollers
506, 507 for pinching an inserted Artcard 9.
One of the roller e.g. 506 is driven by an Artcard motor 37 for the
advancement of the card 9 between the two rollers 506
and 507 at a uniformed speed. The Artcard 9 is passed over a series of LED
lights 512 which are encased within a clear
plastic mould 514 having a semi circular cross section. The cross section
focuses the light from the LEDs eg 512 onto the
surface of the card 9 as it passes by the LEDs 512. From the surface it is
reflected to a high resolution linear CCD 34 which
is constructed to a resolution of approximately 480 dpi. The surface of the
Artcard 9 is encoded to the level of
approximately 1600 dpi hence, the linear CCD 34 supersamples the Artcard
surface with an approximately three times
multiplier. The Artcard 9 is further driven at a speed such that the linear
CCD 34 is able to supersample in the direction of
Artcard movement at a rate of approximately 4800 readings per inch. The
scanned Artcard CCD data is forwarded from the
Artcard reader to ACP 31 for processing. A sensor 49, which can comprise a
light sensor acts to detect of the presence of
CA 02456652 2004-02-06
WO 03/015395 PCT/AU02/00919
146
the card 13.
The CCD reader includes a bottom substrate 516, a top substtate 514 which
comprises a transparent molded plastic.
In between the two substrates is inserted the linear CCD array 34 which
comprises a thin long linear CCD array constructed
by means of semi-conductor manufacturing processes.
Turning to Fig. 160, there is illustrated a side perspective view, partly in
section, of an example construction of the
CCD reader unit. The series of LEDs eg. 512 are operated to emit light when a
card 9 is passing across the surface of the
CCD reader 34. The emitted light is transmitted through a portion of the top
substrate 523. The substrate includes a portion
eg. 529 having a curved circumference so as to focus light emitted from LED
512 to a point eg. 532 on the surface of the
card 9. The focused light is reflected from the point 532 towards the CCD
array 34. A series of microlenses eg. 534, shown
in exaggerated form, are formed on the surface of the top substrate 523. The
microlenses 523 act to focus light received
across the surface to the focused down to a point 536 which corresponds to
point on the surface of the CCD reader 34 for
sensing of light falling on the light sensing portion of the CCD array 34.
A number of refinements of the above arrangement are possible. For example,
the sensing devices on the linear
CCD 34 may be staggered. The corresponding microlenses 34 can also be
correspondingly formed as to focus light into a
staggered series of spots so as to correspond to the staggered CCD sensors.
To assist reading, the data surface area of the Artcard 9 is modulated with a
checkerboard pattern as previously
discussed with reference to Fig. 38. Other forms of high frequency modulation
may be possible however.
It will be evident that an Artcard printer can be provided as for the printing
out of data on storage Artcard. Hence,
the Artcard system can be utilized as a general form of information
distribution outside of the Artcam device. An Artcard
printer can pr7nts out Artcards on high quality print surfaces and multiple
Artcards can be printed on same sheets and later
separated. On a second surface of the Artcard 9 can be printed information
relating to the files etc. stored on the Artcard 9 for
subsequent storage.
Hence, the Artcard system allows for a simplified form of storage which is
suitable for use in place of other forms
of storage such as CD ROMs, magnetic disks etc. The Artcards 9 can also be
mass produced and thereby produced in a
substantially inexpensive form for redistribution.
Print Rolls
Turning to Fig. 162, there is illustrated the print roll 42 and print-head
portions of the Artcam. The paper/film 611 is fed in a
continuous "web-like" process to a printing mechanism 15 which includes
further pinch rollers 616 - 619 and a print head 44
The pinch roller 613 is connected to a drive mechanism (not shown) and upon
rotation of the print roller 613,
"paper" in the form of film 611 is forced through the printing mechanism 615
and out of the picture output slot 6. A rotary
guillotine mechanism (not shown) is utilised to cut the roll of paper 611 at
required photo sizes.
It is therefore evident that the printer roll 42 is responsible for supplying
"paper" 611 to the print mechanism 615
for printing of photographically imaged pictures.
In Fig. 163, there is shown an exploded perspective of the print roll 42. The
printer roll 42 includes output printer
paper 611 which is output under the operation of pinching rollers 612, 613.
Referring now to Fig. 164, there is illustrated a more fully exploded
perspective view, of the print roll 42 of Fig.
163 without the "paper" film roll. The print roll 42 includes three main parts
comprising ink reservoir section 620, paper roll
sections 622, 623 and outer casing sections 626, 627.
CA 02456652 2004-02-06
WO 03/015395 PCT/AU02/00919
147
Turning first to the ink reservoir section 620, which includes the ink
reservoir or ink supply sections 633. The ink
for printing is contained within three bladder type containers 630 - 632. The
printer roll 42 is assumed to provide full color
output inks. Hence, a first ink reservoir or bladder container 630 contains
cyan colored ink. A second reservoir 631 contains
magenta colored ink and a third reservoir 632 contains yellow ink. Each of the
reservoirs 630 - 632, although having
different volumetric dimensions, are designed to have substantially the same
volumetric size.
The ink reservoir sections 621, 633, in addition to cover 624 can be made of
plastic sections and are designed to be
mated together by means of heat sealing, ultra violet radiation, etc. Each of
the equally sized ink reservoirs 630 - 632 is
connected to a corresponding ink channel 639 - 641 for allowing the flow of
ink from the reservoir 630 - 632 to a
corresponding ink output port 635 - 637. The ink reservoir 632 having ink
channel 641, and output port 637, the ink
reservoir 631 having ink channel 640 and output port 636, and the ink
reservoir 630 having ink channel 639 and output port
637.
In operation, the ink reservoirs 630 - 632 can be filled with corresponding
ink and the section 633 joined to the
section 621. The ink reservoir sections 630 - 632, being collapsible bladders,
allow for ink to traverse ink channels 639 -
641 and therefore be in fluid communication with the ink output ports 635 -
637. Further, if required, an air inlet port can
also be provided to allow the pressure associated with ink channel reservoirs
630 - 632 to be maintained as required.
The cap 624 can be joined to the ink reservoir section 620 so as to form a
pressurized cavity, accessible by the air
pressure inlet port.
The ink reservoir sections 621, 633 and 624 are designed to be connected
together as an integral unit and to be
inserted inside printer roll sections 622, 623. The printer roll sections 622,
623 are designed to mate together by means of a
snap fit by means of male portions 645 - 647 mating with corresponding female
portions (not shown). Similarly, female
portions 654 - 656 are designed to mate with corresponding male portions 660 -
662. The paper roll sections 622, 623 are
therefore designed to be snapped together. One end of the film within the role
is pinched between the two sections 622, 623
when they are joined together. The print film can then be rolled on the print
roll sections 622, 625 as required.
As noted previously, the ink reservoir sections 620, 621, 633, 624 are
designed to be inserted inside the paper roll
sections 622, 623. The printer roll sections 622, 623 are able to be rotatable
around stationery ink reservoir sections 621,
633 and 624 to dispense film on demand.
The outer casing sections 626 and 627 are further designed to be coupled
around the print roller sections 622, 623.
In addition to each end of pinch rollers eg 612, 613 is designed to clip in to
a corresponding cavity eg 670 in cover 626, 627
with roller 613 being driven externally (not shown) to feed the print film and
out of the print roll.
Finally, a cavity 677 can be provided in the ink reservoir sections 620, 621
for the insertion and gluing of an silicon
chip integrated circuit type device 53 for the storage of information
associated with the print roll 42.
As shown in Fig. 155 and Fig. 164, the print roll 42 is designed to be
inserted into the Artcam camera device so as
to couple with a coupling unit 680 which includes connector pads 681 for
providing a connection with the silicon chip 53.
Further, the connector 680 includes end connectors of four connecting with ink
supply ports 635 - 637. The ink supply ports
are in turn to connect to ink supply lines eg 682 which are in turn
interconnected to printheads supply ports eg. 687 for the
flow of ink to print-head 44 in accordance with requirements.
The "media" 611 utilised to form the roll can comprise many different
materials on which it is designed to print
suitable images. For example, opaque rollable plastic material may be
utilized, transparencies may be used by using
CA 02456652 2004-02-06
WO 03/015395 PCT/AU02/00919
148
transparent plastic sheets, metallic printing can take place via utilization
of a metallic sheet film. Further, fabrics could be
utilised within the printer roll 42 for printing images on fabric, although
care must be taken that only fabrics having a
suitable stiffness or suitable backing material are utilised.
When the print media is plastic, it can be coated with a layer, which sixes
and absorbs the ink. Further, several
types of print media may be used, for example, opaque white matte, opaque
white gloss, transparent film, frosted transparent
film, lenticular array film for stereoscopic 3D prints, metallized film, film
with the embossed optical variable devices such as
gratings or holograms, media which is pre-printed on the reverse side, and
media which includes a magnetic recording layer.
When utilizing a metallic foil, the metallic foil can have a polymer base,
coated with a thin (several micron) evaporated layer
of aluminum or other metal and then coated with a clear protective layer
adapted to receive the ink via the ink printer
mechanism.
In use the print roll 42 is obviously designed to be inserted inside a camera
device so as to provide ink and paper for
the printing of images on demand. The ink output ports 635 - 637 meet with
corresponding ports within the camera device
and the pinch rollers 672, 673 are operated to allow the supply of paper to
the camera device under the control of the camera
device.
As illustrated in Fig. 164, a mounted silicon chip 53 is inserted in one end
of the print roll 42. In Fig. 165 the
authentication chip 53 is shown in more detail and includes four
communications leads 680 - 683 for communicating details
from the chip 53 to the corresponding camera to which it is inserted.
Turning to Fig. 165, the chip can be separately created by means of encasing a
small integrated circuit 687 in epoxy
and running bonding leads eg. 688 to the external communications leads 680 -
683. The integrated chip 687 being
approximately 400 microns square with a 100 micron scribe boundary.
Subsequently, the chip can be glued to an
appropriate surface of the cavity of the print roll 42. In Fig. 166, there is
illustrated the integrated circuit 687 interconnected
to bonding pads 681, 682 in an exploded view of the arrangement of Fig. 165.
In Fig.'s 164A to 164E of the drawings, reference numeral 1100 generally
designates a print cartridge 1100. The
print cartridge 1100 includes an ink cartridge 1102, in accordance with the
invention.
The print cartridge 1100 includes a housing 1104. As illustrated more clearly
in Figure 2 of the drawings, the
housing 1104 is defined by an upper molding 1106 and a lower molding 1108. The
moldings 1106 and 1108 clip
together by means of clips 1110. The housing 1104 is covered by a label 1112
which provides an attractive appearance
to the cartridge 1100. The label 1112 also carries information to enable a
user to use the cartridge 1100.
The housing 1104 defines a chamber 1114 in which the ink cartridge 1102 is
received. The ink cartridge 1102
is fixedly supported in the chamber 1114 of the housing 1104.
A supply of print media 1116 comprising a roll 1126 of film/media 1118 wound
about a former 1120 is
received in the chamber 1114 of the housing 1104. The former 1120 is slidably
received over the ink cartridge 1102
and is rotatable relative thereto.
As illustrated in Figure 164B of the drawings, when the upper molding 1106 and
lower molding 1108 are
clipped together, an exit slot 1122 is defined through which a tongue of the
paper 1118 is ejected.
The cartridge 1100 includes a roller assembly 1124 which serves to de-curl the
paper 1118 as it is fed from the
roll 1126 and also to drive the paper 1118 through the slot 1122. The roller
assembly 1124 includes a drive roller 1128
CA 02456652 2004-02-06
WO 03/015395 PCT/AU02/00919
149
and two driven rollers 1130. The driven rollers 1130 are rotatably supported
in ribs 1132 which stand proud of a floor
1134 of the lower molding 1108 of the housing 1104. The rollers 1130, together
with the drive roller 1128, provide
positive traction to the paper 1118 to control its speed and position as it is
ejected from the housing 1104. The rollers
1130 are injection moldings of a suitable synthetic plastics material such as
polystyrene. In this regard also, the upper
molding 1106 and the lower molding 1108 are injection moldings of suitable
synthetic plastics material, such as
polystyrene.
The drive roller 1128 includes a drive shaft 1136 which is held rotatably
captive between mating recesses 1138
and 1140 defined in a side wall of each of the upper molding 1106 and the
lower molding 1108, respectively, of the
housing 1104. An opposed end 1142 of the drive roller 1128 is held rotatably
in suitable formations (not shown) in the
upper molding 1106 and the lower molding 1108 of the housing 1104.
The drive roller 1128 is a two shot injection molding comprising the shaft
1136 which is of a high impact
polystyrene and on which are molded a bearing means in the form of elastomeric
or rubber roller portions 1144. These
portions 1144 positively engage the paper 1118 and inhibit slippage of the
paper 1118 as the paper 1118 is fed from the
cartridge 1100.
The end of the roller 1128 projecting from the housing 1104 has an engaging
formation in the form of a
cruciform arrangement 1146 (Figure 164A) which mates with a geared drive
interface (not shown) of a printhead
assembly of a device, such as a camera, in which the print cartridge 1100 is
installed. This arrangement ensures that the
speed at which the paper 1118 is fed to the printhead is synchronised with
printing by the printhead to ensure accurate
registration of ink on the paper 1118.
The ink cartridge 1102 includes a container 1148 which is in the form of a
right circular cylindrical extrusion.
The container 1148 is extruded from a suitable synthetic plastics material
such as polystyrene.
In a preferred embodiment of the invention, the printhead with which the print
cartridge 1100 is used, is a
multi-colored printhead. Accordingly, the container 1148 is divided into a
plurality of, more particularly, four
compartments or reservoirs 1150. Each reservoir 1150 houses a different color
or type of ink. In one embodiment, the
inks contained in the reservoirs 1150 are cyan, magenta, yellow and black
inks. In another embodiment of the
invention, three different colored inks, being cyan, magenta and yellow inks,
are accommodated in three of the
reservoirs 1150 while a fourth reservoir 1150 houses an ink which is visible
in the infra-red light spectrum only.
As shown more clearly in Figures 164C and 164D of the drawings, one end of the
container 1148 is closed off
by an end cap 1152. The end cap 1152 has a plurality of openings 1154 defined
in it. An opening 1154 is associated
with each reservoir 1150 so that atmospheric pressure is maintained in the
reservoir 1150 at that end of the container
1148 having the end cap 1152.
A seal arrangement 1156 is received in the container 1148 at the end having
the end cap 1152. The seal
arrangement 1156 comprises a quadrant shaped pellet 1158 of gelatinous
material slidably received in each reservoir
1150. The gelatinous material of the pellet 1158 is a compound made of a
thermoplastic rubber and a hydrocarbon.
The hydrocarbon is a white mineral oil. The thermoplastic rubber is a
copolymer which imparts sufficient rigidity to the
CA 02456652 2004-02-06
WO 03/015395 PCT/AU02/00919
150
mineral oil so that the pellet 1158 retains its form at normal operating
temperatures while permitting sliding of the pellet
1158 within its associated reservoir 1150. A suitable thermoplastic rubber is
that sold under the registered trademark of
"Kraton" by the Shell Chemical Company. The copolymer is present in the
compound in an amount sufficient to impart
a gel-like consistency to each pellet 1158. Typically, the copolymer,
depending on the type used, would be present in
an amount of approximately three percent to twenty percent by mass.
In use, the compound is heated so that it becomes fluid. Once each reservoir
1150 has been charged with its
particular type of ink, the compound, in a molten state, is poured into each
reservoir 1150 where the compound is
allowed to set to form the pellet 1158. Atmospheric pressure behind the
pellets 1158, that is, at that end of the pellet
1158 facing the end cap 1152 ensures that, as ink is withdrawn from the
reservoir 1150, the pellets 1158, which are self-
lubricating, slide towards an opposed end of the container 1148. The pellets
1158 stop ink emptying out of the
container when inverted, inhibit contamination of the ink in the reservoir
1150 and also inhibit drying out of the ink in
the reservoir 1150. The pellets 1158 are hydrophobic further to inhibit
leakage of ink from the reservoirs 1150.
The opposed end of the container 1148 is closed off by an ink collar molding
1160. Baffles 1162 carried on
the molding 1160 receive an elastomeric seal molding 1164. The elastomeric
seal molding 1164, which is hydrophobic,
has sealing curtains 1166 defined therein. Each sealing curtain 1166 has a
slit 1168 so that a mating pin (not shown)
from the printhead assembly is insertable through the slits 1168 into fluid
communication with the reservoirs 1150 of
the container 1148. Hollow bosses 1170 project from an opposed side of the ink
collar molding 1160. Each boss 1170
is shaped to fit snugly in its associated reservoir 1150 for locating the ink
collar molding on the end of the container
1148.
Reverting again to Figure 164C of the drawings, the ink collar molding 1160 is
retained in place by means of a
carrier or fascia molding 1172. The fascia molding 1172 has a four leaf clover
shaped window 1174 defined therein
through which the elastomeric seal molding 1164 is accessible. The fascia
molding 1174 is held captive between the
upper molding 1106 and the lower molding 1108 of the housing 1104. The fascia
molding 1174 and webs 1176 and
1178 extending from an interior surface of the upper molding 1106 and the
lower molding 1108 respectively, of the
housing 1104 define a compartment 1180. An air filter 1182 is received in the
compartment 1180 and is retained in
place by the end molding 1174. The air filter 1182 cooperates with the
printhead assembly. Air is blown across a
nozzle guard of a printhead assembly to effect cleaning of the nozzle guard.
This air is filtered by being drawn through
the air filter 1182 by means of a pin (not shown) which is received in an
inlet opening 1184 in the fascia molding 1172.
The air filter 1182 is shown in greater detail in Figure 164E of the drawings.
The air filter 1182 comprises a
filter medium 1192. The filter medium 1192 is synthetic fiber based and is
arranged in a fluted form to increase the
surface area available for filtering purposes. Instead of a paper based filter
medium 1192 other fibrous bans could also
be used.
The filter medium 1192 is received in a canister 1194. The canister 1194
includes a base molding 1196 and a
lid 1198. To be accommodated in the compartment 1180 of the housing 1104, the
canister 1194 is part-annular or horse
shoe shaped. Thus, the canister 1194 has a pair of opposed ends 1200. An air
inlet opening 1202 is defined in each end
1200.
CA 02456652 2004-02-06
WO 03/015395 PCT/AU02/00919
151
An air outlet opening 1204 is defined in the lid 1198. The air outlet opening
1204, initially, is closed off by a
film or membrane 1206. When the filter 1182 is mounted in position in the
compartment 1180, the air outlet opening
1204 is in register with the opening 1184 in the fascia molding 1172. The pin
from the printhead assembly pierces the
film 1206 then draws air from the atmosphere through the air filter 1182 prior
to the air being blown over the nozzle
guard and the printhead of the printhead assembly.
The base molding 1194 includes locating formations 1208 and 1210 for locating
the filter medium 1192 in
position in the canister 1194. The locating formations 1208 are in the form of
a plurality of pins 1212 while the locating
formations 1210 are in the form of ribs which engage ends 1214 of the filter
medium 1192.
Once the filter medium 1192 has been placed in position in the base mold 1196,
the lid 1198 is secured to the
base molding 1196 by ultrasonic welding or similar means to seal the lid 1198
to the base molding 1196.
When the print cartridge 1100 has been assembled, a membrane or film 1186 is
applied to an outer end of the
fascia molding 1172 to close off the window 1174. This membrane or film 1186
is pierced or ruptured by the pins, for
use. The film 1186 inhibits the ingress of detritus into the ink reservoirs
1150.
An authentication means in the form of an authentication chip 1188 is received
in an opening 1190 in the fascia
molding 1172. The authentication chip 1188 is interrogated by the printhead
assembly 1188 to ensure that the print
cartridge 1100 is compatible and compliant with the printhead assembly of the
device.
Authentication Chin
Authentication Chins 53
The authentication chip 53 of the preferred embodiment is responsible for
ensuring that only correctly
manufactured print rolls are utilized in the camera system. The authentication
chip 53 utilizes technologies that are generally
valuable when utilized with any consumables and are not restricted to print
roll system. Manufacturers of other systems that
require consumables (such as a laser printer that requires toner cartridges)
have struggled with the problem of authenticating
consumables, to varying levels of success. Most have resorted to specialized
packaging. However this does not stop home
refill operations or clone manufacture. The prevention of copying is important
to prevent poorly manufactured substitute
consumables from damaging the base system. For example, poorly filtered ink
may clog print nozzles in an ink jet printer,
causing the consumer to blame the system manufacturer and not admit the use of
non-authorized consumables.
To solve the authentication problem, the Authentication chip 53 contains an
authentication code and circuit specially
designed to prevent copying. The chip is manufactured using the standard Flash
memory manufacturing process, and is
low cost enough to be included in consumables such as ink and toner
cartridges. Once programmed, the Authentication
chips as described here are compliant with the NSA export guidelines.
Authentication is an extremely large and
constantly growing field. Here we are concerned with authenticating
consumables only.
Symbolic Nomenclature
The following symbolic nomenclature is used throughout the discussion of this
embodiment:
CA 02456652 2004-02-06
WO 03/015395 PCT/AU02/00919
152
S mbolic NomenclatureDescri tion
F[X] Function F, takin a sin 1e arameter X
F[X, Y] Function F, takin two arameters, X and
Y
X Y X concatenated with Y
X n Y Bitwise X AND Y
X v Y Bitwise X OR Y (inclusive-OR)
XOY Bitwise X XOR Y (exclusive-OR)
-X Bitwise NOT X (com lement)
X E-- Y X is assigned the value Y
X f- (Y, Z} The domain of assignment inputs to X
is Y and Z.
X = Y X is equal to Y
X ~ Y X is not equal to Y
llX Decrement X by I (floor 0)
~X Increment X b 1 (with wra ing based on
register length)
Erase X Erase Flash memory register X
SetBits[X, Y] Set the bits of the Flash memor register
X based on Y
Z E- ShiftRight[X,Shift register X right one bit position,
Y) taking input bit from Y and
lacing the out ut bit in Z
BASIC TERMS
A message, denoted by M, is plaintext. The process of transforming M into
cyphertext C, where the substance of M is
hidden, is called encryption. The process of transforming C back into M is
called decryption. Referring to the
encryption function as E, and the decryption function as D, we have the
following identities:
E[M] = C
D[C] = M
Therefore the following identity is true:
D[E[M]] = M
SYMMETRIC CRYPTOGRAPHY
A symmetric encryption algorithm is one where:
the encryption function E relies on key K,,
the decryption function D relies on key K2,
Kz can be derived from K,, and
K, can be derived from Kz.
In most symmetric algorithms, K, usually equals Kz. However, even if K, does
not equal Kz, given that one key can be
derived from the other, a single key K can suffice for the mathematical
definition. Thus:
EK[M] = C
DK[C] = M
An enormous variety of symmetric algorithms exist, from the textbooks of
ancient history through to sophisticated
modern algorithms. Many of these are insecure, in that modern cryptanalysis
techniques can successfully attack the
algorithm to the extent that K can be derived. The security of the particular
symmetric algorithm is normally a function
CA 02456652 2004-02-06
WO 03/015395 PCT/AU02/00919
153
of two things: the strength of the algorithm and the length of the key. The
following algorithms include suitable aspects
for utilization in the authentication chip.
DES
Blowfish
RC5
IDEA
DES
DES (Data Encryption Standard) is a US and international standard, where the
same key is used to encrypt and decrypt.
The key length is 56 bits. It has been implemented in hardware and software,
although the original design was for
hardware only. The original algorithm used in DES is described in US patent
3,962,539. A variant of DES, called triple-
DES is more secure, but requires 3 keys: K,, Kz, and K3.The keys are used in
the following manner:
E,cs[Doz[EK, [M]]] = C
Dtc3[EKZ[DK~ [C]]] = M
The main advantage of triple-DES is that existing DES implementations can be
used to give more security than single
key DES. Specifically, triple-DES gives protection of equivalent key length of
112 bits. Triple-DES does not give the
equivalent protection of a 168-bit key (3 x 56) as one might naively expect.
Equipment that performs triple-DES
decoding and/or encoding cannot be exported from the United States.
Blowfish
Blowfish, is a symmetric block cipher first presented by Schneier in 1994. It
takes a variable length key, from 32 bits to
448 bits. In addition, it is much faster than DES. The Blowfish algorithm
consists of two parts: a key-expansion part
and a data-encryption part. Key expansion converts a key of at most 448 bits
into several subkey arrays totaling 4168
bytes. Data encryption occurs via a 16-round Feistel network. All operations
are XORs and additions on 32-bit words,
with four index array lookups per round. It should be noted that decryption is
the same as encryption except that the
subkey arrays are used in the reverse order. Complexity of implementation is
therefore reduced compared to other
algorithms that do not have such symmetry.
RCS
Designed by Ron Rivest in 1995, RCS has a variable block size, key size, and
number of rounds. Typically, however, it
uses a 64-bit block size and a 128-bit key. The RCS algorithm consists of two
parts: a key-expansion part and a data-
encryption part. Key expansion converts a key into 2r+2 subkeys (where r = the
number of rounds), each subkey being
w bits. For a 64-bit blocksize with 16 rounds (w=32, r=16), the subkey arrays
total 136 bytes. Data encryption uses
addition mod 2W , XOR and bitwise rotation.
IDEA
Developed in 1990 by Lai and Massey, the first incarnation of the IDEA cipher
was called PES. After differential
cryptanalysis was discovered by Biham and Shamir in 1991, the algorithm was
strengthened, with the result being
published in 1992 as IDEA. IDEA uses 128 bit-keys to operate on 64-bit
plaintext blocks. The same algorithm is used
for encryption and decryption. It is generally regarded to be the most secure
block algorithm available today. It is
described in US Patent No.5,214,703, issued in 1993.
CA 02456652 2004-02-06
WO 03/015395 PCT/AU02/00919
154
ASYMMETRIC CRYPTOGRAPHY
As alternative an asymmetric algorithm could be used. An asymmetric encryption
algorithm is one where:
the encryption function E relies on key K,,
the decryption function D relies on key Kz,
Kz cannot be derived from K, in a reasonable amount of time, and
Kl cannot be derived from Kz in a reasonable amount of time.
Thus:
Ex, [M] = C
D,~[C] = M
These algorithms are also called public-key because one key K, can be made
public. Thus anyone can encrypt a
message (using K,), but only the person with the corresponding decryption key
(Kz) can decrypt and thus read the
message. In most cases, the following identity also holds:
Exz[M] = C
Dx, [C] = M
This identity is very important because it implies that anyone with the public
key Kl can see M and know that it came
from the owner of Kz. No-one else could have generated C because to do so
would imply knowledge of Kz. The
property of not being able to derive K, from Kz and vice versa in a reasonable
time is of course clouded by the concept
of reasonable time. What has been demonstrated time after time, is that a
calculation that was thought to require a long
time has been made possible by the introduction of faster computers, new
algorithms etc. The security of asymmetric
algorithms is based on the difficulty of one of two problems: factoring large
numbers (more specifically large numbers
that are the product of two large primes), and the difficulty of calculating
discrete logarithms in a finite field. Factoring
large numbers is conjectured to be a hard problem given today's understanding
of mathematics. The problem however,
is that factoring is getting easier much faster than anticipated. Ron Rivest
in 1977 said that factoring a 125-digit number
would take 40 quadrillion years. In 1994 a 129-digit number was factored.
According to Schneier, you need a 1024-bit
number to get the level of security today that you got from a 512-bit number
in the 1980's. If the key is to last for some
years then 1024 bits may not even be enough. Rivest revised his key length
estimates in 1990: he suggests 1628 bits for
high security lasting until 2005, and 1884 bits for high security lasting
until 2015. By contrast, Schneier suggests 2048
bits are required in order to protect against corporations and governments
until 2015.
A number of public key cryptographic algorithms exist. Most are impractical to
implement, and many generate a very
large C for a given M or require enormous keys. Still others, while secure,
are far too slow to be practical for several
years. Because of this, many public-key systems are hybrid - a public key
mechanism is used to transmit a symmetric
session key, and then the session key is used for the actual messages. All of
the algorithms have a problem in terms of
key selection. A random number is simply not secure enough. The two large
primes p and q must be chosen carefully -
there are certain weak combinations that can be factored more easily (some of
the weak keys can be tested for). But
nonetheless, key selection is not a simple matter of randomly selecting 1024
bits for example. Consequently the key
selection process must also be secure.
Of the practical algorithms in use under public scrutiny, the following may be
suitable for utilization:
RSA
CA 02456652 2004-02-06
WO 03/015395 PCT/AU02/00919
155
DSA
ElGamal
RSA
The RSA cryptosystem, named after Rivest, Shamir, and Adleman, is the most
widely used public-key cryptosystem,
and is a de facto standard in much of the world. The security of RSA is
conjectured to depend on the difficulty of
factoring large numbers that are the product of two primes (p and q). There
are a number of restrictions on the
generation of p and q. They should both be large, with a similar number of
bits, yet not be close to one another
(otherwise pq = ~pq). In addition, many authors have suggested that p and q
should be strong primes. The RSA
algorithm patent was issued in 1983 (US patent number 4,405,829).
DSA
DSA (Digital Signature Standard) is an algorithm designed as part of the
Digital Signature Standard (DSS). As defined, it
cannot be used for generalized encryption. In addition, compared to RSA, DSA
is 10 to 40 times slower for signature
verification. DSA explicitly uses the SHA-1 hashing algorithm (see definition
in
One-way Functions below). DSA key generation relies on fording two primes p
and q such that q divides p-1. According to
Schneier, a 1024-bit p value is required for long term DSA security. However
the DSA standard does not permit values of p
larger than 1024 bits (p must also be a multiple of 64 bits). The US
Government owns the DSA algorithm and has at least
one relevant patent (US patent 5,231,688 granted in 1993).
ElGamal
The EIGamal scheme is used for both encryption and digital signatures. The
security is based on the difficulty of
calculating discrete logarithms in a finite field. Key selection involves the
selection of a prime p, and two random
numbers g and x such that both g and x are less than p. Then calculate y = gx
mod p. The public key is y, g, and p. The
private key is x.
CRYPTOGRAPHIC CHALLENGE-RESPONSE PROTOCOLS AND ZERO KNOWLEDGE PROOFS
The general principle of a challenge-response protocol is to provide identity
authentication adapted to a camera system.
The simplest form of challenge-response takes the form of a secret password. A
asks B for the secret password, and if B
responds with the correct password, A declares B authentic. There are three
main problems with this kind of simplistic
protocol. Firstly, once B has given out the password, any observer C will know
what the password is. Secondly, A must
know the password in order to verify it. Thirdly, if C impersonates A, then B
will give the password to C (thinking C
was A), thus compromising B. Using a copyright text (such as a haiku) is a
weaker alternative as we are assuming that
anyone is able to copy the password (for example in a country where
intellectual property is not respected). The idea of
cryptographic challenge-response protocols is that one entity (the claimant)
proves its identity to another (the verifier)
by demonstrating knowledge of a secret known to be associated with that
entity, without revealing the secret itself to the
verifier during the protocol. In the generalized case of cryptographic
challenge-response protocols, with some schemes
the verifier knows the secret, while in others the secret is not even known by
the verifier. Since the discussion of this
embodiment specifically concerns Authentication, the actual cryptographic
challenge-response protocols used for
authentication are detailed in the appropriate sections. However the concept
of Zero Knowledge Proofs will be
discussed here. The Zero Knowledge Proof protocol, first described by Feige,
Fiat and Shamir is extensively used in
CA 02456652 2004-02-06
WO 03/015395 PCT/AU02/00919
156
Smart Cards for the purpose of authentication. The protocol's effectiveness is
based on the assumption that it is
computationally infeasible to compute square roots modulo a large composite
integer with unknown factorization. This
is provably equivalent to the assumption that factoring large integers is
difficult. It should be noted that there is no need
for the claimant to have significant computing power. Smart cards implement
this kind of authentication using only a
few modular multiplications. The Zero Knowledge Proof protocol is described in
US Patent 4,748,668.
ONE-WAY FUNCTIONS
A one-way function F operates on an input X, and returns F[X] such that X
cannot be determined from F[X]. When
there is no restriction on the format of X, and F[X] contains fewer bits than
X, then collisions must exist. A collision is
defined as two different X input values producing the same F[X] value - i.e.
X, and XZ exist such that X, ~ XZ yet F[X,]
= F[XZ]. When X contains more bits than F[X], the input must be compressed in
some way to create the output. In
many cases, X is broken into blocks of a particular size, and compressed over
a number of rounds, with the output of
one round being the input to the next. The output of the hash function is the
last output once X has been consumed. A
pseudo-collision of the compression function CF is defined as two different
initial values V1 and Vz and two inputs X,
and XZ (possibly identical) are given such that CF(V,, X,) = CF(V2, XZ). Note
that the existence of a pseudo-collision
does not mean that it is easy to compute an XZ for a given X,.
We are only interested in one-way functions that are fast to compute. In
addition, we are only interested in deterministic
one-way functions that are repeatable in different implementations. Consider
an example F where F[X] is the time
between calls to F. For a given F[X] X cannot be determined because X is not
even used by F. However the output from
F will be different for different implementations. This kind of F is therefore
not of interest.
In the scope of the discussion of the implementation of the authentication
chip of this embodiment, we are interested in
the following forms of one-way functions:
Encryption using an unknown key
Random number sequences
Hash Functions
Message Authentication Codes
Encryption Using an Unknown Key
When a message is encrypted using an unknown key K, the encryption function E
is effectively one-way. Without the
key, it is computationally infeasible to obtain M from EK[M] without K. An
encryption function is only one-way for as
long as the key remains hidden. An encryption algorithm does not create
collisions, since E creates EK[M] such that it is
possible to reconstruct M using function D. Consequently F[X] contains at
least as many bits as X (no information is
lost) if the one-way function F is E. Symmetric encryption algorithms (see
above) have the advantage over Asymmetric
algorithms for producing one-way functions based on encryption for the
following reasons:
The key for a given strength encryption algorithm is shorter for a symmetric
algorithm than an
asymmetric algorithm
Symmetric algorithms are faster to compute and require less software/silicon
CA 02456652 2004-02-06
WO 03/015395 PCT/AU02/00919
157
The selection of a good key depends on the encryption algorithm chosen.
Certain keys are not strong for particular
encryption algorithms, so any key needs to be tested for strength. The more
tests that need to be performed for key
selection, the less likely the key will remain hidden.
Random Number Sectuences
Consider a random number sequence Ro, R,, . ., R,, R;+,. We define the one-way
function F such that F[X] returns the
X'" random number in the random sequence. However we must ensure that F[X] is
repeatable for a given X on different
implementations. The random number sequence therefore cannot be truly random.
Instead, it must be pseudo-random,
with the generator making use of a specific seed.
There are a large number of issues concerned with defining good random number
generators. Knuth, describes what
makes a generator "good" (including statistical tests), and the general
problems associated with constructing them. The
majority of random number generators produce the i'" random number from the i-
1'" state - the only way to determine
the i'" number is to iterate from the 0'" number to the i'". If i is large, it
may not be practical to wait for i iterations.
However there is a type of random number generator that does allow random
access. Blum, Blum and Shub define the
ideal generator as follows:"... we would like a pseudo-random sequence
generator to quickly produce, from short seeds,
long sequences (of bits) that appear in every way to be generated by
successive flips of a fair coin". They defined the x2
mod n generator, more commonly referred to as the BBS generator. They showed
that given certain assumptions upon
which modern cryptography relies, a BBS generator passes extremely stringent
statistical tests.
The BBS generator relies on selecting n which is a Blum integer (n = pq where
p and q are large prime numbers, p ~ q,
p mod 4 = 3, and q mod 4 = 3). The initial state of the generator is given by
xo where xo = x2 mod n, and x is a random
integer relatively prime to n. The i°' pseudo-random bit is the least
significant bit of x; where x; = x;_,2 mod n. As an
extra property, knowledge of p and q allows a direct calculation of the i'"
number in the sequence as follows: x; = xoY
mod n, where y = 2' mod ((p-1)(q-1))
Without knowledge of p and q, the generator must iterate (the security of
calculation relies on the difficulty of factoring
large numbers). When first defined, the primary problem with the BBS generator
was the amount of work required for
a single output bit. The algorithm was considered too slow for most
applications. However the advent of Montgomery
reduction arithmetic has given rise to more practical implementations. In
addition, Vazirani and Vazirani have shown
that depending on the size of n, more bits can safely be taken from x; without
compromising the security of the
generator. Assuming we only take 1 bit per x;, N bits (and hence N iterations
of the bit generator function) are needed
in order to generate an N-bit random number. To the outside observer, given a
particular set of bits, there is no way to
determine the next bit other than a 50/50 probability. If the x, p and q are
hidden, they act as a key, and it is
computationally unfeasible to take an output bit stream and compute x, p, and
q. It is also computationally unfeasible to
determine the value of i used to generate a given set of pseudo-random bits.
This last feature makes the generator one-
way. Different values of i can produce identical bit sequences of a given
length (e.g. 32 bits of random bits). Even if x, p
and q are known, for a given F[i], i can only be derived as a set of
possibilities, not as a certain value (of course if the
domain of i is known, then the set of possibilities is reduced further).
However, there are problems in selecting a good p
and q, and a good seed x. In particular, Ritter describes a problem in
selecting x. The nature of the problem is that a
BBS generator does not create a single cycle of known length. Instead, it
creates cycles of various lengths, including
CA 02456652 2004-02-06
WO 03/015395 PCT/AU02/00919
158
degenerate (zero-length) cycles. Thus a BBS generator cannot be initialized
with a random state - it might be on a short
cycle.
Hash Functions
Special one-way functions, known as Hash functions map arbitrary length
messages to fixed-length hash values. Hash
functions are referred to as H[M]. Since the input is arbitrary length, a hash
function has a compression component in
order to produce a fixed length output. Hash functions also have an
obfuscation component in order to make it difficult
to find collisions and to determine information about M from H[M]. Because
collisions do exist, most applications
require that the hash algorithm is preimage resistant, in that for a given X,
it is difficult to find XZ such that H[X,] _
H[XZ]. In addition, most applications also require the hash algorithm to be
collision resistant (i.e. it should be hard to
find two messages X, and XZ such that H[X,] = H[Xz]). It is an open problem
whether a collision-resistant hash
function, in the idealist sense, can exist at all. The primary application for
hash functions is in the reduction of an input
message into a digital "fingerprint" before the application of a digital
signature algorithm. One problem of collisions
with digital signatures can be seen in the following example.
A has a long message Ml that says "I owe B $10". A signs H[M,] using his
private key. B, being
greedy, then searches for a collision message MZ where H[Mz] = H[M,] but where
Mz is
favorable to B, for example "I owe B $lmillion". Clearly it is in A's interest
to ensure that it is
difficult to find such an MZ.
Examples of collision resistant one-way hash functions are SHA-1, MDS and
RIPEMD-160, all derived from MD4.
MD4
Ron Rivest introduced MD4 in 1990. It is mentioned here because all other one-
way hash functions are derived in some
way from MD4. MD4 is now considered completely broken in that collisions can
be calculated instead of searched for.
In the example above, B could trivially generate a substitute message MZ with
the same hash value as the original
message M,.
MDS
Ron Rivest introduced MDS in 1991 as a more secure MD4. Like MD4, MDS produces
a 128-bit hash value. Dobbertin
describes the status of MDS after recent attacks. He describes how pseudo-
collisions have been found in MDS,
indicating a weakness in the compression function, and more recently,
collisions have been found. This means that
MD5 should not be used for compression in digital signature schemes where the
existence of collisions may have dire
consequences. However MDS can still be used as a one-way function. In
addition, the HMAC-MDS construct is not
affected by these recent attacks.
SHA-I
SHA-1 is very similar to MDS, but has a 160-bit hash value (MDS only has 128
bits of hash value). SHA-1 was
designed and introduced by the NIST and NSA for use in the Digital Signature
Standard (DSS). The original published
description was called SHA, but very soon afterwards, was revised to become
SHA-1, supposedly to correct a security
flaw in SHA (although the NSA has not released the mathematical reasoning
behind the change). There are no known
cryptographic attacks against SHA-1. It is also more resistant to brute-force
attacks than MD4 or MDS simply because
of the longer hash result. The US Government owns the SHA-1 and DSA algorithms
(a digital signature authentication
algorithm defined as part of DSS) and has at least one relevant patent (US
patent 5,231,688 granted in 1993).
CA 02456652 2004-02-06
WO 03/015395 PCT/AU02/00919
159
RIPEMD-160
RIPEMD-160 is a hash function derived from its predecessor RIPEMD (developed
for the European Community's
RIPE project in 1992). As its name suggests, RIPEMD-160 produces a 160-bit
hash result. Tuned for software
implementations on 32-bit architectures, RIPEMD-160 is intended to provide a
high level of security for 10 years or
more. Although there have been no successful attacks on RIPEMD-160, it is
comparatively new and has not been
extensively cryptanalyzed. The original RIPEMD algorithm was specifically
designed to resist known cryptographic
attacks on MD4. The recent attacks on MDS showed similar weaknesses in the
RIPEMD 128-bit hash function.
Although the attacks showed only theoretical weaknesses, Dobbertin, Preneel
and Bosselaers further strengthened
RIPEMD into a new algorithm RIPEMD-160.
Message Authentication Codes
The problem of message authentication can be summed up as follows:
How can A be sure that a message supposedly from B is in fact from B?
Message authentication is different from entity authentication. With entity
authentication, one entity (the claimant)
proves its identity to another (the verifier). With message authentication, we
are concerned with making sure that a
given message is from who we think it is from i.e. it has not been tampered en
route from the source to its destination.
A one-way hash function is not sufficient protection for a message. Hash
functions such as MDS rely on generating a
hash value that is representative of the original input, and the original
input cannot be derived from the hash value. A
simple attack by E, who is in-between A and B, is to intercept the message
from B, and substitute his own. Even if A
also sends a hash of the original message, E can simply substitute the hash of
his new message. Using a one-way hash
function alone, A has no way of knowing that B's message has been changed. One
solution to the problem of message
authentication is the Message Authentication Code, or MAC. When B sends
message M, it also sends MAC[M] so that
the receiver will know that M is actually from B. For this to be possible,
only B must be able to produce a MAC of M,
and in addition, A should be able to verify M against MAC[M]. Notice that this
is different from encryption of M -
MACs are useful when M does not have to be secret. The simplest method of
constructing a MAC from a hash function
is to encrypt the hash value with a symmetric algorithm:
Hash the input message H[M]
Encrypt the hash Ex[H[M]]
This is more secure than first encrypting the message and then hashing the
encrypted message. Any symmetric or
asymmetric cryptographic function can be used. However, there are advantages
to using a key-dependant one-way hash
function instead of techniques that use encryption (such as that shown above):
Speed, because one-way hash functions in general work much faster than
encryption;
Message size, because EK[H[M]] is at least the same size as M, while H[M] is a
fixed size (usually considerably smaller
than M);
Hardware/software requirements - keyed one-way hash functions are typically
far less complexity than their
encryption-based counterparts; and
One-way hash function implementations are not considered to be encryption or
decryption devices and therefore are not
subject to US export controls.
CA 02456652 2004-02-06
WO 03/015395 PCT/AU02/00919
160
It should be noted that hash functions were never originally designed to
contain a key or to support message
authentication. As a result, some ad hoc methods of using hash functions to
perform message authentication, including
various functions that concatenate messages with secret prefixes, suffixes, or
both have been proposed. Most of these ad
hoc methods have been successfully attacked by sophisticated means. Additional
MACS have been suggested based on
XOR schemes and Toeplitz matricies (including the special case of LFSR-based
constructions).
HMAC
The HMAC construction in particular is gaining acceptance as a solution for
Internet message authentication security
protocols. The HMAC construction acts as a wrapper, using the underlying hash
function in a black-box way.
Replacement of the hash function is straightforward if desired due to security
or performance reasons. However, the
major advantage of the HMAC construct is that it can be proven secure provided
the underlying hash function has some
reasonable cryptographic strengths - that is, HMAC's strengths are directly
connected to the strength of the hash
function. Since the HMAC construct is a wrapper, any iterative hash function
can be used in an HMAC. Examples
include HMAC-MDS, HMAC-SHA1, HMAC-RIPEMD160 etc. Given the following
definitions:
H = the hash function (e.g. MDS or SHA-1)
= number of bits output from H (e.g. 160 for SHA-1, 128 bits for MDS)
M = the data to which the MAC function is to be applied
K = the secret key shared by the two parties
ipad = 0x36 repeated 64 times
opad = OxSC repeated 64 times
The HMAC algorithm is as follows:
Extend K to 64 bytes by appending 0x00 bytes to the end of K
XOR the 64 byte string created in (1) with ipad
Append data stream M to the 64 byte string created in (2)
Apply H to the stream generated in (3)
XOR the 64 byte string created in (1) with opad
Append the H result from (4) to the 64 byte string resulting from (5)
Apply H to the output of (6) and output the result
Thus:
HMAC[M] = H[(KOopad) ~ H((K~ipad)~M]J
The recommended key length is at least n bits, although it should not be
longer than 64 bytes (the length of the hashing
block). A key longer than n bits does not add to the security of the function.
HMAC optionally allows truncation of the
final output e.g. truncation to 128 bits from 160 bits. The HMAC designers'
Request for Comments was issued in 1997,
one year after the algorithm was first introduced. The designers claimed that
the strongest known attack against HMAC
is based on the frequency of collisions for the hash function H and is totally
impractical for minimally reasonable hash
functions. More recently, HMAC protocols with replay prevention components
have been defined in order to prevent
the capture and replay of any M, HMAC[M] combination within a given time
period.
CA 02456652 2004-02-06
WO 03/015395 PCT/AU02/00919
161
RANDOM NUMBERS AND TIME VARYING MESSAGES
The use of a random number generator as a one-way function has already been
examined. However, random number
generator theory is very much intertwined with cryptography, security, and
authentication. There are a large number of
issues concerned with defining good random number generators. Knuth, describes
what makes a generator good
(including statistical tests), and the general problems associated with
constructing them. One of the uses for random
numbers is to ensure that messages vary over time. Consider a system where A
encrypts commands and sends them to
B. If the encryption algorithm produces the same output for a given input, an
attacker could simply record the messages
and play them back to fool B. There is no need for the attacker to crack the
encryption mechanism other than to know
which message to play to B (while pretending to be A). Consequently messages
often include a random number and a
time stamp to ensure that the message (and hence its encrypted counterpart)
varies each time. Random number
generators are also often used to generate keys. It is therefore best to say
at the moment, that all generators are insecure
for this purpose. For example, the Berlekamp-Massey algorithm, is a classic
attack on an LFSR random number
generator. If the LFSR is of length n, then only 2n bits of the sequence
suffice to determine the LFSR, compromising
the key generator. If, however, the only role of the random number generator
is to make sure that messages vary over
time, the security of the generator and seed is not as important as it is for
session key generation. If however, the
random number seed generator is compromised, and an attacker is able to
calculate future "random" numbers, it can
leave some protocols open to attack. Any new protocol should be examined with
respect to this situation. The actual
type of random number generator required will depend upon the implementation
and the purposes for which the
generator is used. Generators include Blum, Blum, and Shub, stream ciphers
such as RC4 by Ron Rivest, hash functions
such as SHA-1 and RIPEMD-160, and traditional generators such LFSRs (Linear
Feedback Shift Registers) and their
more recent counterpart FCSRs (Feedback with Carry Shift Registers).
ATTACKS
This section describes the various types of attacks that can be undertaken to
break an authentication cryptosystem such
as the authentication chip. The attacks are grouped into physical and logical
attacks. Physical attacks describe methods
for breaking a physical implementation of a cryptosystem (for example,
breaking open a chip to retrieve the key), while
logical attacks involve attacks on the cryptosystem that are implementation
independent. Logical types of attack work
on the protocols or algorithms, and attempt to do one of three things:
Bypass the authentication process altogether
Obtain the secret key by force or deduction, so that any question can be
answered
Find enough about the nature of the authenticating questions and answers in
order to, without the key, give the right
answer to each question.
The attack styles and the forms they take are detailed below. Regardless of
the algorithms and protocol used by a
security chip, the circuitry of the authentication part of the chip can come
under physical attack. Physical attack comes
in four main ways, although the form of the attack can vary:
Bypassing the Authentication Chip altogether
Physical examination of chip while in operation (destructive and non-
destructive)
Physical decomposition of chip
Physical alteration of chip
CA 02456652 2004-02-06
WO 03/015395 PCT/AU02/00919
162
The attack styles and the forms they take are detailed below. This section
does not suggest solutions to these attacks. It
merely describes each attack type. The examination is restricted to the
context of an Authentication chip 53 (as opposed
to some other kind of system, such as Internet authentication) attached to
some System.
Logical Attacks
These attacks are those which do not depend on the physical implementation of
the cryptosystem. They work against the
protocols and the security of the algorithms and random number generators.
Ciphertext only attack
This is where an attacker has one or more encrypted messages, all encrypted
using the same algorithm. The aim of the
attacker is to obtain the plaintext messages from the encrypted messages.
Ideally, the key can be recovered so that all
messages in the future can also be recovered.
Known plaintext attack
This is where an attacker has both the plaintext and the encrypted form of the
plaintext. In the case of an Authentication
Chip, a known-plaintext attack is one where the attacker can see the data flow
between the System and the
Authentication Chip. The inputs and outputs are observed (not chosen by the
attacker), and can be analyzed for
weaknesses (such as birthday attacks or by a search for differentially
interesting input/output pairs). A known plaintext
attack is a weaker type of attack than the chosen plaintext attack, since the
attacker can only observe the data flow. A
known plaintext attack can be carried out by connecting a logic analyzer to
the connection between the System and the
Authentication Chip.
Chosen plaintext attacks
A chosen plaintext attack describes one where a cryptanalyst has the ability
to send any chosen message to the
cryptosystem, and observe the response. If the cryptanalyst knows the
algorithm, there may be a relationship between
inputs and outputs that can be exploited by feeding a specific output to the
input of another function. On a system using
an embedded Authentication Chip, it is generally very difficult to prevent
chosen plaintext attacks since the cryptanalyst
can logically pretend he/she is the System, and thus send any chosen bit-
pattern streams to the Authentication Chip.
Adaptive Chosen plaintext attacks
This type of attack is similar to the chosen plaintext attacks except that the
attacker has the added ability to modify
subsequent chosen plaintexts based upon the results of previous experiments.
This is certainly the case with any System
/ Authentication Chip scenario described when utilized for consumables such as
photocopiers and toner cartridges,
especially since both Systems and Consumables are made available to the
public.
Brute force attack
A guaranteed way to break any key-based cryptosystem algorithm is simply to
try every key. Eventually the right one
will be found. This is known as a Brute Force Attack. However, the more key
possibilities there are, the more keys must
be tried, and hence the longer it takes (on average) to find the right one. If
there are N keys, it will take a maximum of N
tries. If the key is N bits long, it will take a maximum of 2" tries, with a
50% chance of finding the key after only half
the attempts (2"-'). The longer N becomes, the longer it will take to find the
key, and hence the more secure the key is.
Of course, an attack may guess the key on the first try, but this is more
unlikely the longer the key is. Consider a key
length of 56 bits. In the worst case, all 256 tests (7.2 x 10⁶ tests) must be
made to find the key. In 1977, Diffie and
Hellman described a specialized machine for cracking DES, consisting of one
million processors, each capable of
CA 02456652 2004-02-06
WO 03/015395 PCT/AU02/00919
163
running one million tests per second. Such a machine would take 20 hours to
break any DES code. Consider a key
length of 128 bits. In the worst case, all 2'28 tests (3.4 x 10³$ tests) must
be made to find the key. This would take ten
billion years on an array of a trillion processors each running 1 billion
tests per second. With a long enough key length,
a Brute Force Attack takes too long to be worth the attacker's efforts.
Guessing attack
This type of attack is where an attacker attempts to simply "guess" the key.
As an attack it is identical to the Brute force
attack, where the odds of success depend on the length of the key.
Quantum Computer attack
To break an n-bit key, a quantum computer (NMR, Optical, or Caged Atom)
containing
n qubits embedded in an appropriate algorithm must be built. The quantum
computer effectively exists in 2"
simultaneous coherent states. The trick is to extract the right coherent state
without causing any decoherence. To date
this has been achieved with a 2 qubit system (which exists in 4 coherent
states). It is thought possible to extend this to 6
qubits (with 64 simultaneous coherent states) within a few years.
Unfortunately, every additional qubit halves the relative strength of the
signal representing the key. This rapidly
becomes a serious impediment to key retrieval, especially with the long keys
used in cryptographically secure systems.
As a result, attacks on a cryptographically secure key (e.g. 160 bits) using a
Quantum Computer are likely not to be
feasible and it is extremely unlikely that quantum computers will have
achieved more than 50 or so qubits within the
commercial lifetime of the Authentication Chips. Even using a 50 qubit quantum
computer, 2"° tests are required to
crack a 160 bit key.
Purposeful Error Attack
With certain algorithms, attackers can gather valuable information from the
results of a bad input. This can range from
the error message text to the time taken for the error to be generated. A
simple example is that of a userid/password
scheme. If the error message usually says "Bad userid", then when an attacker
gets a message saying "Bad password"
instead, then they know that the userid is correct. If the message always says
"Bad userid/password" then much less
information is given to the attacker. A more complex example is that of the
recent published method of cracking
encryption codes from secure web sites. The attack involves sending particular
messages to a server and observing the
error message responses. The responses give enough information to learn the
keys - even the lack of a response gives
some information. An example of algorithmic time can be seen with an algorithm
that returns an error as soon as an
erroneous bit is detected in the input message. Depending on hardware
implementation, it may be a simple method for
the attacker to time the response and alter each bit one by one depending on
the time taken for the error response, and
thus obtain the key. Certainly in a chip implementation the time taken can be
observed with far greater accuracy than
over the Internet.
Birthday attack
This attack is named after the famous "birthday paradox" (which is not
actually a paradox at all). The odds of one
person sharing a birthday with another, is 1 in 365 (not counting leap years).
Therefore there must be 183 people in a
room for the odds to be more than 50% that one of them shares your birthday.
However, there only needs to be 23
people in a room for there to be more than a 50% chance that any two share a
birthday. This is because 23 people yields
253 different pairs. Birthday attacks are common attacks against hashing
algorithms, especially those algorithms that
CA 02456652 2004-02-06
WO 03/015395 PCT/AU02/00919
164
combine hashing with digital signatures. If a message has been generated and
already signed, an attacker must search
for a collision message that hashes to the same value (analogous to finding
one person who shares your birthday).
However, if the attacker can generate the message, the Birthday Attack comes
into play. The attacker searches for two
messages that share the same hash value (analogous to any two people sharing a
birthday), only one message is
acceptable to the person signing it, and the other is beneficial for the
attacker. Once the person has signed the original
message the attacker simply claims now that the person signed the alternative
message - mathematically there is no way
to tell which message was the original, since they both hash to the same
value. Assuming a Brute Force Attack is the
only way to determine a match, the weakening of an n-bit key by the birthday
attack is 2"a. A key length of 128 bits that
is susceptible to the birthday attack has an effective length of only 64 bits.
Chaining attack
These are attacks made against the chaining nature of hash functions. They
focus on the compression function of a hash
function. The idea is based on the fact that a hash function generally takes
arbitrary length input and produces a constant
length output by processing the input n bits at a time. The output from one
block is used as the chaining variable set into
the next block. Rather than finding a collision against an entire input, the
idea is that given an input chaining variable
set, to find a substitute block that will result in the same output chaining
variables as the proper message. The number
of choices for a particular block is based on the length of the block. If the
chaining variable is c bits, the hashing
function behaves like a random mapping, and the block length is b bits, the
number of such b-bit blocks is
approximately 2b / 2c. The challenge for finding a substitution block is that
such blocks are a sparse subset of all
possible blocks. For SHA-1, the number of 512 bit blocks is approximately
25~z/2~bo, or 2352. The chance of finding a
block by brute force search is about 1 in 216°.
Substitution with a complete lookup table
If the number of potential messages sent to the chip is small, then there is
no need for a clone manufacturer to crack the
key. Instead, the clone manufacturer could incorporate a ROM in their chip
that had a record of all of the responses
from a genuine chip to the codes sent by the system. The larger the key, and
the larger the response, the more space is
required for such a lookup table.
Substitution with a sparse lookup table
If the messages sent to the chip are somehow predictable, rather than
effectively random, then the clone manufacturer
need not provide a complete lookup table. For example:
If the message is simply a serial number, the clone manufacturer need simply
provide a lookup table that contains
values for past and predicted future serial numbers. There are unlikely to be
more than 109 of these.
If the test code is simply the date, then the clone manufacturer can produce a
lookup table using the date as the address.
If the test code is a pseudo-random number using either the serial number or
the date as a seed, then the clone
manufacturer just needs to crack the pseudo-random number generator in the
System. This is probably not difficult,
as they have access to the object code of the System. The clone manufacturer
would then produce a content
addressable memory (or other sparse array lookup) using these codes to access
stored authentication codes.
Differential cryptanalysis
Differential cryptanalysis describes an attack where pairs of input streams
are generated with known differences, and
the differences in the encoded streams are analyzed. Existing differential
attacks are heavily dependent on the structure
CA 02456652 2004-02-06
WO 03/015395 PCT/AU02/00919
165
of S boxes, as used in DES and other similar algorithms. Although other
algorithms such as HMAC-SHAI have no S
boxes, an attacker can undertake a differential-like attack by undertaking
statistical analysis of:
Minimal-difference inputs, and their corresponding outputs
Minimal-difference outputs, and their corresponding inputs
Most algorithms were strengthened against differential cryptanalysis once the
process was described. This is covered in
the specific sections devoted to each cryptographic algorithm. However some
recent algorithms developed in secret
have been broken because the developers had not considered certain styles of
differential attacks and did not subject
their algorithms to public scrutiny.
Message substitution attacks
In certain protocols, a man-in-the-middle can substitute part or all of a
message. This is where a real Authentication
Chip is plugged into a reusable clone chip within the consumable. The clone
chip intercepts all messages between the
System and the Authentication Chip, and can perform a number of substitution
attacks. Consider a message containing
a header followed by content. An attacker may not be able to generate a valid
header, but may be able to substitute their
own content, especially if the valid response is something along the lines of
"Yes, I received your message". Even if
the return message is "Yes, I received the following message ...", the
attacker may be able to substitute the original
message before sending the acknowledgement back to the original sender.
Message Authentication Codes were
developed to combat most message substitution attacks.
Reverse engineering the key generator
If a pseudo-random number generator is used to generate keys, there is the
potential for a clone manufacture to obtain
the generator program or to deduce the random seed used. This was the way in
which the Netscape security program
was initially broken.
Bypassing authentication altogether
It may be that there are problems in the authentication protocols that can
allow a bypass of the authentication process
altogether. With these kinds of attacks the key is completely irrelevant, and
the attacker has no need to recover it or
deduce it. Consider an example of a system that Authenticates at power-up, but
does not authenticate at any other time.
A reusable consumable with a clone Authentication Chip may make use of a real
Authentication Chip. The clone
authentication chip 53 uses the real chip for the authentication call, and
then simulates the real Authentication Chip's
state data after that. Another example of bypassing authentication is if the
System authenticates only after the
consumable has been used. A clone Authentication Chip can accomplish a simple
authentication bypass by simulating a
loss of connection after the use of the consumable but before the
authentication protocol has completed (or even
started). One infamous attack known as the "Kentucky Fried Chip" hack involved
replacing a microcontroller chip for a
satellite TV system. When a subscriber stopped paying the subscription fee,
the system would send out a "disable"
message. However the new microcontroller would simply detect this message and
not pass it on to the consumer's
satellite TV system.
Garrotelbribe attack
If people know the key, there is the possibility that they could tell someone
else. The telling may be due to coercion
(bribe, garrote etc), revenge (e.g. a disgruntled employee), or simply for
principle. These attacks are usually cheaper and
easier than other efforts at deducing the key. As an example, a number of
people claiming to be involved with the
CA 02456652 2004-02-06
WO 03/015395 PCT/AU02/00919
166
development of the Divx standard have recently (May/June 1998) been making
noises on a variety of DVD newsgroups
to the effect they would like to help develop Divx specific cracking devices -
out of principle.
Physical Attacks
The following attacks assume implementation of an authentication mechanism in
a silicon chip that the attacker has
physical access to. The first attack, Reading ROM, describes an attack when
keys are stored in ROM, while the
remaining attacks assume that a secret key is stored in Flash memory.
Reading ROM
If a key is stored in ROM it can be read directly. A ROM can thus be safely
used to hold a public key (for use in
asymmetric cryptography), but not to hold a private key. In symmetric
cryptography, a ROM is completely insecure.
Using a copyright text (such as a haiku) as the key is not sufficient, because
we are assuming that the cloning of the chip
is occurring in a country where intellectual property is not respected.
Reverse engineering of chip
Reverse engineering of the chip is where an attacker opens the chip and
analyzes the circuitry. Once the circuitry has
been analyzed the inner workings of the chip's algorithm can be recovered.
Lucent Technologies have developed an
active method known as TOBIC (Two photon OBIC, where OBIC stands for Optical
Beam Induced Current), to image
circuits. Developed primarily for static RAM analysis, the process involves
removing any back materials, polishing the
back surface to a mirror finish, and then focusing light on the surface. The
excitation wavelength is specifically chosen
not to induce a current in the IC. A Kerckhoffs in the nineteenth century made
a fundamental assumption about
cryptanalysis: if the algorithm's inner workings are the sole secret of the
scheme, the scheme is as good as broken. He
stipulated that the secrecy must reside entirely in the key. As a result, the
best way to protect against reverse engineering
of the chip is to make the inner workings irrelevant.
Usurping the authentication process
It must be assumed that any clone manufacturer has access to both the System
and consumable designs. If the same
channel is used for communication between the System and a trusted System
Authentication Chip, and a non-trusted
consumable Authentication Chip, it may be possible for the non-trusted chip to
interrogate a trusted Authentication Chip
in order to obtain the "correct answer". If this is so, a clone manufacturer
would not have to determine the key. They
would only have to trick the System into using the responses from the System
Authentication Chip. The alternative
method of usurping the authentication process follows the same method as the
logical attack "Bypassing the
Authentication Process", involving simulated loss of contact with the System
whenever authentication processes take
place, simulating power-down etc.
Modification of System
This kind of attack is where the System itself is modified to accept clone
consumables. The attack may be a change of
System ROM, a rewiring of the consumable, or, taken to the extreme case, a
completely clone System. This kind of
attack requires each individual System to be modified, and would most likely
require the owner's consent. There would
usually have to be a clear advantage for the consumer to undertake such a
modification, since it would typically void
warranty and would most likely be costly. An example of such a modification
with a clear advantage to the consumer is
a software patch to change fixed-region DVD players into region-free DVD
players.
CA 02456652 2004-02-06
WO 03/015395 PCT/AU02/00919
167
Direct viewing of chip operation by conventional probing
If chip operation could be directly viewed using an STM or an electron beam,
the keys could be recorded as they are
read from the internal non-volatile memory and loaded into work registers.
These forms of conventional probing
require direct access to the top or front sides of the IC while it is powered.
Direct viewing of the non-volatile memory
If the chip were sliced so that the floating gates of the Flash memory were
exposed, without discharging them, then the
key could probably be viewed directly using an STM or SKM (Scanning Kelvin
Microscope). However, slicing the
chip to this level without discharging the gates is probably impossible. Using
wet etching, plasma etching, ion milling
(focused ion beam etching), or chemical mechanical polishing will almost
certainly discharge the small charges present
on the floating gates.
Viewing the light bursts caused by state changes
Whenever a gate changes state, a small amount of infrared energy is emitted.
Since silicon is transparent to infrared,
these changes can be observed by looking at the circuitry from the underside
of a chip. While the emission process is
weak, it is bright enough to be detected by highly sensitive equipment
developed for use in astronomy. The technique,
developed by IBM, is called PICA (Picosecond Imaging Circuit Analyzer). If the
state of a register is known at time t,
then watching that register change over time will reveal the exact value at
time t+n, and if the data is part of the key,
then that part is compromised.
Monitoring EMI
Whenever electronic circuitry operates, faint electromagnetic signals are
given off. Relatively inexpensive equipment (a
few thousand dollars) can monitor these signals. This could give enough
information to allow an attacker to deduce the
keys.
Viewing h~ fluctuations
Even if keys cannot be viewed, there is a fluctuation in current whenever
registers change state. If there is a high enough
signal to noise ratio, an attacker can monitor the difference in Idd that may
occur when programming over either a high
or a low bit. The change in Idd can reveal information about the key. Attacks
such as these have already been used to
break smart cards.
Differential Fault Analysis
This attack assumes introduction of a bit error by ionization, microwave
radiation, or environmental stress. In most
cases such an error is more likely to adversely affect the Chip (eg cause the
program code to crash) rather than cause
beneficial changes which would reveal the key. Targeted faults such as ROM
overwrite, gate destruction etc are far
more likely to produce useful results.
Clock glitch attacks
Chips are typically designed to properly operate within a certain clock speed
range. Some attackers attempt to introduce
faults in logic by running the chip at extremely high clock speeds or
introduce a clock glitch at a particular time for a
particular duration. The idea is to create race conditions where the circuitry
does not function properly. An example
could be an AND gate that (because of race conditions) gates through Input,
all the time instead of the AND of Input,
and Inputz. If an attacker knows the internal structure of the chip, they can
attempt to introduce race conditions at the
CA 02456652 2004-02-06
WO 03/015395 PCT/AU02/00919
168
correct moment in the algorithm execution, thereby revealing information about
the key (or in the worst case, the key
itself).
Power supply attacks
Instead of creating a glitch in the clock signal, attackers can also produce
glitches in the power supply where the power
is increased or decreased to be outside the working operating voltage range.
The net effect is the same as a clock glitch
- introduction of error in the execution of a particular instruction. The idea
is to stop the CPU from XORing the key, or
from shifting the data one bit-position etc. Specific instructions are
targeted so that information about the key is
revealed.
Overwriting ROM
Single bits in a ROM can be overwritten using a laser cutter microscope, to
either 1 or 0 depending on the sense of the
logic. With a given opcode/operand set, it may be a simple matter for an
attacker to change a conditional jump to a non-
conditional jump, or perhaps change the destination of a register transfer. If
the target instruction is chosen carefully, it
may result in the key being revealed.
Modifying EEPROMlFlash
EEPROM/Flash attacks are similar to ROM attacks except that the laser cutter
microscope technique can be used to
both set and reset individual bits. This gives much greater scope in terms of
modification of algorithms.
Gate Destruction
Anderson and Kuhn described the rump session of the 1997 workshop on Fast
Software Encryption, where Biham and
Shamir presented an attack on DES. The attack was to use a laser cutter to
destroy an individual gate in the hardware
implementation of a known block cipher (DES). The net effect of the attack was
to force a particular bit of a register to
be "stuck". Biham and Shamir described the effect of forcing a particular
register to be affected in this way - the least
significant bit of the output from the round function is set to 0. Comparing
the 6 least significant bits of the left half and
the right half can recover several bits of the key. Damaging a number of chips
in this way can reveal enough
information about the key to make complete key recovery easy. An encryption
chip modified in this way will have the
property that encryption and decryption will no longer be inverses.
Overwrite Attacks
Instead of trying to read the Flash memory, an attacker may simply set a
single bit by use of a laser cutter microscope.
Although the attacker doesn't know the previous value, they know the new
value. If the chip still works, the bit's
original state must be the same as the new state. If the chip doesn't work any
longer, the bit's original state must be the
logical NOT of the current state. An attacker can perform this attack on each
bit of the key and obtain the n-bit key
using at most n chips (if the new bit matched the old bit, a new chip is not
required for determining the next bit).
Test Circuitry Attack
Most chips contain test circuitry specifically designed to check for
manufacturing defects. This includes BIST (Built In
Self Test) and scan paths. Quite often the scan paths and test circuitry
includes access and readout mechanisms for all
the embedded latches. In some cases the test circuitry could potentially be
used to give information about the contents
of particular registers. Test circuitry is often disabled once the chip has
passed all manufacturing tests, in some cases by
blowing a specific connection within the chip. A determined attacker, however,
can reconnect the test circuitry and
hence enable it.
CA 02456652 2004-02-06
WO 03/015395 PCT/AU02/00919
169
Memory Remanence
Values remain in RAM long after the power has been removed, although they do
not remain long enough to be
considered non-volatile. An attacker can remove power once sensitive
information has been moved into RAM (for
example working registers), and then attempt to read the value from RAM. This
attack is most useful against security
systems that have regular RAM chips. A classic example is where a security
system was designed with an automatic
power-shut-off that is triggered when the computer case is opened. The
attacker was able to simply open the case,
remove the RAM chips, and retrieve the key because of memory remanence.
Chip Theft Attack .
If there are a number of stages in the lifetime of an Authentication Chip,
each of these stages must be examined in terms
of ramifications for security should chips be stolen. For example, if
information is programmed into the chip in stages,
theft of a chip between stages may allow an attacker to have access to key
information or reduced efforts for attack.
Similarly, if a chip is stolen directly after manufacture but before
programming, does it give an attacker any logical or
physical advantage?
Requirements
Existing solutions to the problem of authenticating consumables have typically
relied on physical patents on packaging.
However this does not stop home refill operations or clone manufacture in
countries with weak industrial property
protection. Consequently a much higher level of protection is required. The
authentication mechanism is therefore built
into an Authentication chip 53 that allows a system to authenticate a
consumable securely and easily. Limiting ourselves
to the system authenticating consumables (we don't consider the consumable
authenticating the system), two levels of
protection can be considered:
Presence Only Authentication
This is where only the presence of an Authentication Chip is tested. The
Authentication Chip can be reused in another
consumable without being reprogrammed.
Consumable Lifetime Authentication
This is where not only is the presence of the Authentication Chip tested for,
but also the Authentication chip 53 must
only last the lifetime of the consumable. For the chip to be reused it must be
completely erased and reprogrammed. The
two levels of protection address different requirements. We are primarily
concerned with Consumable Lifetime
Authentication in order to prevent cloned versions of high volume consumables.
In this case, each chip should hold
secure state information about the consumable being authenticated. It should
be noted that a Consumable Lifetime
Authentication Chip could be used in any situation requiring a Presence Only
Authentication Chip. The requirements
for authentication, data storage integrity and manufacture should be
considered separately. The following sections
summarize requirements of each.
AUTHENTICATION
The authentication requirements for both Presence Only Authentication and
Consumable Lifetime Authentication are
restricted to case of a system authenticating a consumable. For Presence Only
Authentication, we must be assured that
an Authentication Chip is physically present. For Consumable Lifetime
Authentication we also need to be assured that
state data actually came from the Authentication Chip, and that it has not
been altered en route. These issues cannot be
separated - data that has been altered has a new source, and if the source
cannot be determined, the question of
CA 02456652 2004-02-06
WO 03/015395 PCT/AU02/00919
170
alteration cannot be settled. It is not enough to provide an authentication
method that is secret, relying on a home-brew
security method that has not been scrutinized by security experts. The primary
requirement therefore is to provide
authentication by means that have withstood the scrutiny of experts. The
authentication scheme used by the
Authentication chip 53 should be resistant to defeat by logical means. Logical
types of attack are extensive, and attempt
to do one of three things:
Bypass the authentication process altogether
Obtain the secret key by force or deduction, so that any question can be
answered
Find enough about the nature of the authenticating questions and answers in
order to, without the key, give the right
answer to each question.
DATA STORAGE INTEGRITY
Although Authentication protocols take care of ensuring data integrity in
communicated messages, data storage integrity
is also required. Two kinds of data must be stored within the Authentication
Chip:
Authentication data, such as secret keys
Consumable state data, such as serial numbers, and media remaining etc.
The access requirements of these two data types differ greatly. The
Authentication chip 53 therefore requires a
storage/access control mechanism that allows for the integrity requirements of
each type.
Authentication Data
Authentication data must remain confidential. It needs to be stored in the
chip during a manufacturing/programming stage of
the chip's life, but from then on must not be permitted to leave the chip. It
must be resistant to being read from non-volatile
memory. The authentication scheme is responsible for ensuring the key cannot
be obtained by deduction, and the
manufacturing process is responsible for ensuring that the key cannot be
obtained by physical means. The size of the
authentication data memory area must be large enough to hold the necessary
keys and secret information as mandated by the
authentication protocols.
Consumable State Data
Each Authentication chip 53 needs to be able to also store 256 bits (32 bytes)
of consumable state data. Consumable
state data can be divided into the following types. Depending on the
application, there will be different numbers of each
of these types of data items. A maximum number of 32 bits for a single data
item is to be considered.
Read Only
ReadWrite
Decrement Only
Read Only data needs to be stored in the chip during a
manufacturing/programming stage of the chip's life, but from
then on should not be allowed to change. Examples of Read Only data items are
consumable batch numbers and serial
numbers.
ReadWrite data is changeable state information, for example, the last time the
particular consumable was used.
ReadWrite data items can be read and written an unlimited number of times
during the lifetime of the consumable. They
can be used to store any state information about the consumable. The only
requirement for this data is that it needs to be
kept in non-volatile memory. Since an attacker can obtain access to a system
(which can write to ReadWrite data), any
CA 02456652 2004-02-06
WO 03/015395 PCT/AU02/00919
171
attacker can potentially change data fields of this type. This data type
should not be used for secret information, and
must be considered insecure.
Decrement Only data is used to count down the availability of consumable
resources. A photocopier's toner cartridge,
for example, may store the amount of toner remaining as a Decrement Only data
item. An ink cartridge for a color
printer may store the amount of each ink color as a Decrement Only data item,
requiring 3 (one for each of Cyan,
Magenta, and Yellow), or even as many as 5 or 6 Decrement Only data items. The
requirement for this kind of data item
is that once programmed with an initial value at the manufacturing/programming
stage, it can only reduce in value.
Once it reaches the minimum value, it cannot decrement any further. The
Decrement Only data item is only required by
Consumable Lifetime Authentication.
MANUFACTURE
The Authentication chip 53 ideally must have a low manufacturing cost in order
to be included as the authentication
mechanism for low cost consumables. The Authentication chip 53 should use a
standard manufacturing process, such as
Flash. This is necessary to:
Allow a great range of manufacturing location options
Use well-defined and well-behaved technology
Reduce cost
Regardless of the authentication scheme used, the circuitry of the
authentication part of the chip must be resistant to
physical attack. Physical attack comes in four main ways, although the form of
the attack can vary:
Bypassing the Authentication Chip altogether
Physical examination of chip while in operation (destructive and non-
destructive)
Physical decomposition of chip
Physical alteration of chip
Ideally, the chip should be exportable from the U.S., so it should not be
possible to use an Authentication chip 53 as a
secure encryption device. This is low priority requirement since there are
many companies in other countries able to
manufacture the Authentication chips. In any case, the export restrictions
from the U.S. may change.
AUTHENTICATION
Existing solutions to the problem of authenticating consumables have typically
relied on physical patents on packaging.
However this does not stop home refill operations or clone manufacture in
countries with weak industrial property
protection. Consequently a much higher level of protection is required. It is
not enough to provide an authentication
method that is secret, relying on a home-brew security method that has not
been scrutinized by security experts.
Security systems such as Netscape's original proprietary system and the GSM
Fraud Prevention Network used by
cellular phones are examples where design secrecy caused the vulnerability of
the security. Both security systems were
broken by conventional means that would have been detected if the companies
had followed an open design process.
The solution is to provide authentication by means that have withstood the
scrutiny of experts. A number of protocols
that can be used for consumables authentication. We only use security methods
that are publicly described, using known
behaviors in this new way. For all protocols, the security of the scheme
relies on a secret key, not a secret algorithm.
All the protocols rely on a time-variant challenge (i.e. the challenge is
different each time), where the response depends
on the challenge and the secret. The challenge involves a random number so
that any observer will not be able to gather
CA 02456652 2004-02-06
WO 03/015395 PCT/AU02/00919
172
useful information about a subsequent identification. Two protocols are
presented for each of Presence Only
Authentication and Consumable Lifetime Authentication. Although the protocols
differ in the number of Authentication
Chips required for the authentication process, in all cases the System
authenticates the consumable. Certain protocols
will work with either one or two chips, while other protocols only work with
two chips. Whether one chip or two
Authentication Chips are used the System is still responsible for making the
authentication decision.
Sin 1g a Chip Authentication
When only one Authentication chip 53 is used for the authentication protocol,
a single chip (referred to as ChipA) is
responsible for proving to a system (referred to as System) that it is
authentic. At the start of the protocol, System is
unsure of ChipA's authenticity. System undertakes a challenge-response
protocol with ChipA, and thus determines
ChipA's authenticity. In all protocols the authenticity of the consumable is
directly based on the authenticity of the chip,
i.e. if ChipA is considered authentic, then the consumable is considered
authentic. The data flow can be seen in Fig.
167. In single chip authentication protocols, System can be software, hardware
or a combination of both. It is important
to note that System is considered insecure - it can be easily reverse
engineered by an attacker, either by examining the
ROM or by examining circuitry. System is not specially engineered to be secure
in itself.
Double Chip Authentication
In other protocols, two Authentication Chips are required as shown in Fig.
168. A single chip (referred to as ChipA) is
responsible for proving to a system (referred to as System) that it is
authentic. As part of the authentication process,
System makes use of a trusted Authentication Chip (referred to as ChipT). In
double chip authentication protocols,
System can be software, hardware or a combination of both. However ChipT must
be a physical Authentication Chip. In
some protocols ChipT and ChipA have the same internal structure, while in
others ChipT and ChipA have different
internal structures.
PRESENCE ONLY AUTHENTICATION (INSECURE STATE DATA)
For this level of consumable authentication we are only concerned about
validating the presence of the Authentication
chip 53. Although the Authentication Chip can contain state information, the
transmission of that state information
would not be considered secure. Two protocols are presented. Protocol 1
requires 2 Authentication Chips, while
Protocol 2 can be implemented using either 1 or 2 Authentication Chips.
Protocol 1
Protocol 1 is a double chip protocol (two Authentication Chips are required).
Each Authentication Chip contains the
following values:
K Key for FK[X]. Must be secret.
R Current random number. Does not have to be secret, but must be seeded with a
different initial value for each chip
instance. Changes with each invocation of the Random function.
Each Authentication Chip contains the following logical functions:
Random(] Returns R, and advances R to next in sequence.
F(X] Returns FK[X], the result of applying a one-way function F to X based
upon the secret key K.
The protocol is as follows:
System requests Random[] from ChipT;
ChipT returns R to System;
CA 02456652 2004-02-06
WO 03/015395 PCT/AU02/00919
173
System requests F[R] from both ChipT and ChipA;
ChipT returns F,~,~[R] to System;
ChipA returns F,t,e,[R] to System;
System compares FKT[R] with F~[R]. If they are equal, then ChipA is considered
valid. If not, then ChipA is
considered invalid.
The data flow can be seen in Fig. 169. The System does not have to comprehend
FK[R] messages. It must merely check
that the responses from ChipA and ChipT are the same. The System therefore
does not require the key. The security of
Protocol 1 lies in two places:
The security of F[X]. Only Authentication chips contain the secret key, so
anything that can produce an F[X] from an X
that matches the F[X] generated by a trusted Authentication chip 53 (ChipT)
must be authentic.
The domain of R generated by all Authentication chips must be large and non-
deterministic. If the domain of R
generated by all Authentication chips is small, then there is no need for a
clone manufacturer to crack the key.
Instead, the clone manufacturer could incorporate a ROM in their chip that had
a record of all of the responses from
a genuine chip to the codes sent by the system. The Random function does not
strictly have to be in the
Authentication Chip, since System can potentially generate the same random
number sequence. However it
simplifies the design of System and ensures the security of the random number
generator will be the same for all
implementations that use the Authentication Chip, reducing possible error in
system implementation.
Protocoll has several advantages:
K is not revealed during the authentication process
Given X, a clone chip cannot generate FK[X] without K or access to a real
Authentication Chip.
System is easy to design, especially in low cost systems such as ink jet
printers, as no encryption or decryption is
required by System itself.
A wide range of keyed one-way functions exists, including symmetric
cryptography, random number sequences, and
message authentication codes.
One-way functions require fewer gates and are easier to verify than asymmetric
algorithms).
Secure key size for a keyed one-way function does not have to be as large as
for an asymmetric (public key) algorithm.
A minimum of 128 bits can provide appropriate security if F[X] is a symmetric
cryptographic function.
However there are problems with this protocol:
It is susceptible to chosen text attack. An attacker can plug the chip into
their own system, generate chosen Rs, and
observe the output. In order to find the key, an attacker can also search for
an R that will generate a specific F[M]
since multiple Authentication chips can be tested in parallel.
Depending on the one-way function chosen, key generation can be complicated.
The method of selecting a good key
depends on the algorithm being used. Certain keys are weak for a given
algorithm.
The choice of the keyed one-way functions itself is non-trivial. Some require
licensing due to patent protection.
A man-in-the middle could take action on a plaintext message M before passing
it on to ChipA - it would be preferable
if the man-in-the-middle did not see M until after ChipA had seen it. It would
be even more preferable if a man-in-the-
middle didn't see M at all.
If F is symmetric encryption, because of the key size needed for adequate
security, the chips could not be exported from the
CA 02456652 2004-02-06
WO 03/015395 PCT/AU02/00919
174
USA since they could be used as strong encryption devices.
If Protocol 1 is implemented with F as an asymmetric encryption algorithm,
there is no advantage over the symmetric
case - the keys needs to be longer and the encryption algorithm is more
expensive in silicon. Protocol 1 must be
implemented with 2 Authentication Chips in order to keep the key secure. This
means that each System requires an
Authentication Chip and each consumable requires an Authentication Chip.
Protocol 2
In some cases, System may contain a large amount of processing power.
Alternatively, for instances of systems that are
manufactured in large quantities, integration of ChipT into System may be
desirable. Use of an asymmetrical encryption
algorithm allows the ChipT portion of System to be insecure. Protocol 2
therefore, uses asymmetric cryptography. For
this protocol, each chip contains the following values:
K Key for EK[X] and DK[X]. Must be secret in ChipA. Does not have to be secret
in ChipT.
R Current random number. Does not have to be secret, but must be seeded with a
different initial value for each chip
instance. Changes with each invocation of the Random function.
The following functions are defined:
E[X] ChipT only. Returns EK[X] where E is asymmetric encrypt function E.
D[X] ChipA only. Returns DK(X] where D is asymmetric decrypt function D.
Random[] ChipT only. Returns R ~ EK[R], where R is random number based on seed
S. Advances R to next in
random number sequence.
The public key KT is in ChipT, while the secret key KA is in ChipA. Having KT
in ChipT has the advantage that ChipT
can be implemented in software or hardware (with the proviso that the seed for
R is different for each chip or system).
Protocol 2 therefore can be implemented as a Single Chip Protocol or as a
Double Chip Protocol. The protocol for
authentication is as follows:
System calls ChipT's Random function;
ChipT returns R ~ EKT[R) to System;
System calls ChipA's D function, passing in E,t.,~[R];
ChipA returns R, obtained by D,~[EKT[R]];
System compares R from ChipA to the original R generated by ChipT. If they are
equal, then ChipA is considered valid.
If not, ChipA is invalid.
The data flow can be seen in Fig. 170. Protocol 2 has the following
advantages:
KA (the secret key) is not revealed during the authentication process
Given EKT[X], a clone chip cannot generate X without KA or access to a real
ChipA.
Since KT ~ KA, ChipT can be implemented completely in software or in insecure
hardware or as part of System. Only
ChipA (in the consumable) is required to be a secure Authentication Chip.
If ChipT is a physical chip, System is easy to design.
There are a number of well-documented and cryptanalyzed asymmetric algorithms
to chose from for implementation,
including patent-free and license-free solutions.
However, Protocol 2 has a number of its own problems:
For satisfactory security, each key needs to be 2048 bits (compared to minimum
128 bits for symmetric cryptography in
CA 02456652 2004-02-06
WO 03/015395 PCT/AU02/00919
175
Protocol 1). The associated intermediate memory used by the encryption and
decryption algorithms is
correspondingly larger.
Key generation is non-trivial. Random numbers are not good keys.
If ChipT is implemented as a core, there may be difficulties in linking it
into a given System ASIC.
If ChipT is implemented as software, not only is the implementation of System
open to programming error and non-
rigorous testing, but the integrity of the compiler and mathematics primitives
must be rigorously checked for each
implementation of System. This is more complicated and costly than simply
using a well-tested chip.
Although many symmetric algorithms are specifically strengthened to be
resistant to differential cryptanalysis (which is
based on chosen text attacks), the private key KA is susceptible to a chosen
text attack
If ChipA and ChipT are instances of the same Authentication Chip, each chip
must contain both asymmetric encrypt
and decrypt functionality. Consequently each chip is larger, more complex, and
more expensive than the chip
required for Protocol 1.
If the Authentication Chip is broken into 2 chips to save cost and reduce
complexity of design/test, two chips still need
to be manufactured, reducing the economies of scale. This is offset by the
relative numbers of systems to
consumables, but must still be taken into account.
Protocol 2 Authentication Chips could not be exported from the USA, since they
would be considered strong encryption
devices.
Even if the process of choosing a key for Protocol 2 was straightforward,
Protocol 2 is impractical at the present time
due to the high cost of silicon implementation (both key size and functional
implementation). Therefore Protocol 1 is
the protocol of choice for Presence Only Authentication.
Clone Consumable using Real Authentication Chip
Protocols 1 and 2 only check that ChipA is a real Authentication Chip. They do
not check to see if the consumable itself
is valid. The fundamental assumption for authentication is that if ChipA is
valid, the consumable is valid. It is therefore
possible for a clone manufacturer to insert a real Authentication Chip into a
clone consumable. There are two cases to
consider:
In cases where state data is not written to the Authentication Chip, the chip
is completely reusable. Clone manufacturers
could therefore recycle a valid consumable into a clone consumable. This may
be made more difficult by melding
the Authentication Chip into the consumable's physical packaging, but it would
not stop refill operators.
In cases where state data is written to the Authentication Chip, the chip may
be new, partially used up, or completely
used up. However this does not stop a clone manufacturer from using the
Piggyback attack, where the clone
manufacturer builds a chip that has a real Authentication Chip as a piggyback.
The Attacker's chip (ChipE) is
therefore a man-in-the-middle. At power up, ChipE reads all the memory state
values from the real Authentication
chip 53 into its own memory. ChipE then examines requests from System, and
takes different actions depending on
the request. Authentication requests can be passed directly to the real
Authentication chip 53, while read/write
requests can be simulated by a memory that resembles real Authentication Chip
behavior. In this way the
Authentication chip 53 will always appear fresh at power-up. ChipE can do this
because the data access is not
authenticated.
CA 02456652 2004-02-06
WO 03/015395 PCT/AU02/00919
176
In order to fool System into thinking its data accesses were successful, ChipE
still requires a real Authentication Chip,
and in the second case, a clone chip is required in addition to a real
Authentication Chip. Consequently Protocols 1 and
2 can be useful in situations where it is not cost effective for a clone
manufacturer to embed a real Authentication chip
53 into the consumable. If the consumable cannot be recycled or refilled
easily, it may be protection enough to use
Protocols 1 or 2. For a clone operation to be successful each clone consumable
must include a valid Authentication
Chip. The chips would have to be stolen en masse, or taken from old
consumables. The quantity of these reclaimed
chips (as well as the effort in reclaiming them) should not be enough to base
a business on, so the added protection of
secure data transfer (see Protocols 3 and 4) may not be useful.
Longevity of Key
A general problem of these two protocols is that once the authentication key
is chosen, it cannot easily be changed. In
some instances a key-compromise is not a problem, while for others a key
compromise is disastrous. For example, in a
car/car-key System/Consumable scenario, the customer has only one set of
car/car-keys. Each car has a different
authentication key. Consequently the loss of a car-key only compromises the
individual car. If the owner considers this
a problem, they must get a new lock on the car by replacing the System chip
inside the car's electronics. The owner's
keys must be reprogrammed/replaced to work with the new car System
Authentication Chip. By contrast, a
compromise of a key for a high volume consumable market (for example ink
cartridges in printers) would allow a clone
ink cartridge manufacturer to make their own Authentication Chips. The only
solution for existing systems is to update
the System Authentication Chips, which is a costly and logistically difficult
exercise. In any case, consumers' Systems
already work - they have no incentive to hobble their existing equipment.
CONSUMABLE LIFETIME AUTHENTICATION
In this level of consumable authentication we are concerned with validating
the existence of the Authentication Chip, as
well as ensuring that the Authentication Chip lasts only as long as the
consumable. In addition to validating that an
Authentication Chip is present, writes and reads of the Authentication Chip's
memory space must be authenticated as
well. In this section we assume that the Authentication Chip's data storage
integrity is secure - certain parts of memory
are Read Only, others are Read/Write, while others are Decrement Only (see the
chapter entitled Data Storage Integrity
for more information). Two protocols are presented. Protocol 3 requires 2
Authentication Chips, while Protocol 4 can
be implemented using either 1 or 2 Authentication Chips.
Protocol 3
This protocol is a double chip protocol (two Authentication Chips are
required). For this protocol, each Authentication
Chip contains the following values:
K, Key for calculating FK, [X]. Must be secret.
K2 Key for calculating F,~[X]. Must be secret.
R Current random number. Does not have to be secret, but must be seeded with a
different initial value for each chip
instance. Changes with each successful authentication as defined by the Test
function.
M Memory vector of Authentication chip 53. Part of this space should be
different for each chip (does not have to be a
random number).
Each Authentication Chip contains the following logical functions:
F[X] Internal function only. Returns FK[X], the result of applying a one-way
function F to X based upon either
CA 02456652 2004-02-06
WO 03/015395 PCT/AU02/00919
177
key K, or key KZ
Random[] Returns R ~ FK, [R].
Test[X, Y] Returns land advances R if F,~[R ~ X] = Y. Otherwise returns 0. The
time taken to return 0 must be
identical for all bad inputs.
Read[X, Y] Returns M ~ F,~[X ~ M] if FK, [X] = Y. Otherwise returns 0. The
time taken to return 0 must be identical for
all bad inputs.
Write[X] Writes X over those parts of M that can legitimately be written over.
To authenticate ChipA and read ChipA's memory M:
System calls ChipT's Random function;
ChipT produces R ~ FK[R] and returns these to System;
System calls ChipA's Read function, passing in R, FK[R];
ChipA returns M and FK[R ~ M];
System calls ChipT's Test function, passing in M and FK[R ~ M];
System checks response from ChipT. If the response is 1, then ChipA is
considered authentic. If 0, ChipA is considered
invalid.
To authenticate a write of M"eW to ChipA's memory M:
System calls ChipA's Write function, passing in M"eW;
The authentication procedure for a Read is carried out;
If ChipA is authentic and M"eW = M, the write succeeded. Otherwise it failed.
The data flow for read authentication is shown in Fig. 171. The first thing to
note about Protocol 3 is that FK[X] cannot
be called directly. Instead Fx(X] is called indirectly by Random, Test and
Read:
Random[] calls FK, [X]X is not chosen by the caller. It is chosen by the
Random function. An attacker must perform a
brute force search using multiple calls to Random, Read, and Test to obtain a
desired X, FK, [X] pair.
Test[X,Y] calls F,~[R ~ X] Does not return result directly, but compares the
result to Y and then returns 1 or 0.
Any attempt to deduce KZ by calling Test multiple times trying different
values of F,~[R ~ X] for a given X is
reduced to a brute force search where R cannot even be chosen by the attacker.
Read[X, Y] calls FK, [X] X and FKl [X] must be supplied by caller, so the
caller must already know the X, FKl [X]
pair. Since the call returns 0 if
Y ~ FK~ [X], a caller can use the Read function for a brute force attack on
K,.
Read[X, Y] calls F,~[X ~ M], X is supplied by caller, however X can only be
those values already given out by the
Random function (since X and Y are validated via K,). Thus a chosen text
attack must first collect pairs from
Random (effectively a brute force attack). In addition, only part of M can be
used in a chosen text attack since
some of M is constant (read-only) and the decrement-only part of M can only be
used once per consumable. In the
next consumable the read-only part of M will be different.
Having FK[X] being called indirectly prevents chosen text attacks on the
Authentication Chip. Since an attacker can
only obtain a chosen R, FK,[R] pair by calling Random, Read, and Test multiple
times until the desired R appears, a
brute force attack on K, is required in order to perform a limited chosen text
attack on K2. Any attempt at a chosen text
attack on KZ would be limited since the text cannot be completely chosen: pans
of M are read-only, yet different for
CA 02456652 2004-02-06
WO 03/015395 PCT/AU02/00919
178
each Authentication Chip. The second thing to note is that two keys are used.
Given the small size of M, two different
keys K, and KZ are used in order to ensure there is no correlation between
F[R] and F[RAM]. K, is therefore used to help
protect KZ against differential attacks. It is not enough to use a single
longer key since M is only 256 bits, and only part
of M changes during the lifetime of the consumable. Otherwise it is
potentially possible that an attacker via some as-yet
undiscovered technique, could determine the effect of the limited changes in M
to particular bit combinations in R and
thus calculate FKZ[X ~ M] based on FK, [X]. As an added precaution, the Random
and Test functions in ChipA should be
disabled so that in order to generate R, FK[R] pairs, an attacker must use
instances of ChipT, each of which is more
expensive than ChipA (since a system must be obtained for each ChipT).
Similarly, there should be a minimum delay
between calls to Random, Read and Test so that an attacker cannot call these
functions at high speed. Thus each chip
can only give a specific number of X, FK[X] pairs away in a certain time
period. The only specific timing requirement
of Protocol 3 is that the return value of 0 (indicating a bad input) must be
produced in the same amount of time
regardless of where the error is in the input. Attackers can therefore not
learn anything about what was bad about the
input value. This is true for both RD and TST functions.
Another thing to note about Protocol 3 is that Reading data from ChipA also
requires authentication of ChipA. The
System can be sure that the contents of memory (M) is what ChipA claims it to
be if FKZ[R ~ M] is returned correctly. A
clone chip may pretend that M is a certain value (for example it may pretend
that the consumable is full), but it cannot
return FKZ[R ~ M] for any R passed in by System. Thus the effective signature
F,~[R ~ M] assures System that not only
did an authentic ChipA send M, but also that M was not altered in between
ChipA and System. Finally, the Write
function as defined does not authenticate the Write. To authenticate a write,
the System must perform a Read after each
Write. There are some basic advantages with Protocol 3:
K, and K2 are not revealed during the authentication process
Given X, a clone chip cannot generate F,~[X ~ M] without the key or access to
a real Authentication Chip.
System is easy to design, especially in low cost systems such as ink jet
printers, as no encryption or decryption is
required by System itself.
A wide range of key based one-way functions exists, including symmetric
cryptography, random number sequences,
and message authentication codes.
Keyed one-way functions require fewer gates and are easier to verify than
asymmetric algorithms).
Secure key size for a keyed one-way function does not have to be as large as
for an asymmetric (public key) algorithm.
A minimum of 128 bits can provide appropriate security if F[X] is a symmetric
cryptographic function.
Consequently, with Protocol 3, the only way to authenticate ChipA is to read
the contents of ChipA's memory. The
security of this protocol depends on the underlying FK[X] scheme and the
domain of R over the set of all Systems.
Although FK[X] can be any keyed one-way function, there is no advantage to
implement it as asymmetric encryption.
The keys need to be longer and the encryption algorithm is more expensive in
silicon. This leads to a second protocol
for use with asymmetric algorithms - Protocol 4. Protocol 3 must be
implemented with 2 Authentication Chips in order
to keep the keys secure. This means that each System requires an
Authentication Chip and each consumable requires an
Authentication Chip
CA 02456652 2004-02-06
WO 03/015395 PCT/AU02/00919
179
Protocol 4
In some cases, System may contain a large amount of processing power.
Alternatively, for instances of systems that are
manufactured in large quantities, integration of ChipT into System may be
desirable. Use of an asymmetrical encryption
algorithm can allow the ChipT portion of System to be insecure. Protocol 4
therefore, uses asymmetric cryptography.
For this protocol, each chip contains the following values:
K Key for EK[X] and DK[X]. Must be secret in ChipA. Does not have to be secret
in ChipT.
R Current random number. Does not have to be secret, but must be seeded with a
different initial value for each chip
instance. Changes with each successful authentication as defined by the Test
function.
M Memory vector of Authentication chip 53. Part of this space should be
different for each chip, (does not have to be
a random number).
There is no point in verifying anything in the Read function, since anyone can
encrypt using a public key. Consequently
the following functions are defined:
E[X] Internal function only. Returns EK[X] where E is asymmetric encrypt
function E.
D[X] Internal function only. Returns DK[X] where D is asymmetric decrypt
function D.
Random[] ChipT only. Returns EK[R].
Test[X, Y] Returns 1 and advances R if DK[R ~ X] = Y. Otherwise returns 0. The
time taken to return 0 must be
identical for all bad inputs.
Read[X] Returns M ~ EK[R ~ M] where R = DK[X] (does not test input).
Write[X] Writes X over those parts of M that can legitimately be written over.
The public key KT is in ChipT, while the secret key K" is in ChipA. Having KT
in ChipT has the advantage that ChipT
can be implemented in software or hardware (with the proviso that R is seeded
with a different random number for each
system). To authenticate ChipA and read ChipA's memory M:
System calls ChipT's Random function;
ChipT produces ad returns EKT[R] to System;
System calls ChipA's Read function, passing in EKT[R];
ChipA returns M ~ E,U,[R ~ M], first obtaining R by D~[E,r,,[R]];
System calls ChipT's Test function, passing in M and E~[R ~ M];
ChipT calculates DKT[E~[R ~ M]] and compares it to R ~ M.
System checks response from ChipT. If the response is 1, then ChipA is
considered authentic. If 0, ChipA is considered
invalid.
To authenticate a write of M"eW to ChipA's memory M:
System calls ChipA's Write function, passing in M"eW;
The authentication procedure for a Read is carried out;
If ChipA is authentic and M"eW = M, the write succeeded. Otherwise it failed.
The data flow for read authentication is shown in Fig. 172. Only a valid ChipA
would know the value of R, since R is
not passed into the Authenticate function (it is passed in as an encrypted
value). R must be obtained by decrypting E(R],
which can only be done using the secret key KA. Once obtained, R must be
appended to M and then the result re-
CA 02456652 2004-02-06
WO 03/015395 PCT/AU02/00919
180
encoded. ChipT can then verify that the decoded form of E,~[R ~ M] = R ~ M and
hence ChipA is valid. Since KT ~ KA ,
EKT[R] ~ E,~a,[R]. Protocol 4 has the following advantages:
KA (the secret key) is not revealed during the authentication process
Given E,~[X], a clone chip cannot generate X without K,, or access to a real
ChipA.
Since KT ~ KA, ChipT can be implemented completely in software or in insecure
hardware or as part of System. Only
ChipA is required to be a secure Authentication Chip.
Since ChipT and ChipA contain different keys, intense testing of ChipT will
reveal nothing about K".
If ChipT is a physical chip, System is easy to design.
There are a number of well-documented and cryptanalyzed asymmetric algorithms
to chose from for implementation,
including patent-free and license-free solutions.
Even if System could be rewired so that ChipA requests were directed to ChipT,
ChipT could never answer for ChipA
since KT ~ KA. The attack would have to be directed at the System ROM itself
to bypass the Authentication
protocol.
However, Protocol 4 has a number of disadvantages:
All Authentication Chips need to contain both asymmetric encrypt and decrypt
functionality. Consequently each chip is
larger, more complex, and more expensive than the chip required for Protocol
3.
For satisfactory security, each key needs to be 2048 bits (compared to a
minimum of 128 bits for symmetric
cryptography in Protocol 1). The associated intermediate memory used by the
encryption and decryption
algorithms is correspondingly larger.
Key generation is non-trivial. Random numbers are not good keys.
If ChipT is implemented as a core, there may be difficulties in linking it
into a given System ASIC.
If ChipT is implemented as software, not only is the implementation of System
open to programming error and non-
rigorous testing, but the integrity of the compiler and mathematics primitives
must be rigorously checked for each
implementation of System. This is more complicated and costly than simply
using a well-tested chip.
Although many symmetric algorithms are specifically strengthened to be
resistant to differential cryptanalysis (which is
based on chosen text attacks), the private key KA is susceptible to a chosen
text attack
Protocol 4 Authentication Chips could not be exported from the USA, since they
would be considered strong encryption
devices.
As with Protocol 3, the only specific timing requirement of Protocol 4 is that
the return value of 0 (indicating a bad
input) must be produced in the same amount of time regardless of where the
error is in the input. Attackers can therefore
not learn anything about what was bad about the input value. This is true for
both RD and TST functions.
Variation on call to TST
If there are two Authentication Chips used, it is theoretically possible for a
clone manufacturer to replace the System
Authentication Chip with one that returns 1 (success) for each call to TST.
The System can test for this by calling TST a
number of times - N times with a wrong hash value, and expect the result to be
0. The final time that TST is called, the
true returned value from ChipA is passed, and the return value is trusted. The
question then arises of how many times to
call TST. The number of calls must be random, so that a clone chip
manufacturer cannot know the number ahead of
time. If System has a clock, bits from the clock can be used to determine how
many false calls to TST should be made.
CA 02456652 2004-02-06
WO 03/015395 PCT/AU02/00919
181
Otherwise the returned value from ChipA can be used. In the latter case, an
attacker could still rewire the System to
permit a clone ChipT to view the returned value from ChipA, and thus know
which hash value is the correct one. The
worst case of course, is that the System can be completely replaced by a clone
System that does not require
authenticated consumables - this is the limit case of rewiring and changing
the System. For this reason, the variation on
calls to TST is optional, depending on the System, the Consumable, and how
likely modifications are to be made.
Adding such logic to System (for example in the case of a small desktop
printer) may be considered not worthwhile, as
the System is made more complicated. By contrast, adding such logic to a
camera may be considered worthwhile.
Clone Consumable using Real Authentication Chip
It is important to decrement the amount of consumable remaining before use
that consumable portion. If the consumable
is used first, a clone consumable could fake a loss of contact during a write
to the special known address and then
appear as a fresh new consumable. It is important to note that this attack
still requires a real Authentication Chip in each
consumable.
Longevity of Key
A general problem of these two protocols is that once the authentication keys
are chosen, it cannot easily be changed. In
some instances a key-compromise is not a problem, while for others a key
compromise is disastrous.
CHOOSING A PROTOCOL
Even if the choice of keys for Protocols 2 and 4 was straightforward, both
protocols are impractical at the present time
due to the high cost of silicon implementation (both due to key size and
functional implementation). Therefore
Protocols I and 3 are the two protocols of choice. However, Protocols I and 3
contain much of the same components:
both require read and write access;
both require implementation of a keyed one-way function; and
both require random number generation functionality.
Protocol 3 requires an additional key (K2), as well as some minimal state
machine changes:
a state machine alteration to enable FK,[X] to be called during Random;
a Test function which calls F,~[X]
a state machine alteration to the Read function to call FK, [X] and F~[X]
Protocol 3 only requires minimal changes over Protocol 1. It is more secure
and can be used in all places where
Presence Only Authentication is required (Protocol I). It is therefore the
protocol of choice. Given that Protocols I and
3 both make use of keyed one-way functions, the choice of one-way function is
examined in more detail here. The
following table outlines the attributes of the applicable choices. The
attributes are worded so that the attribute is seen as
an advantage.
CA 02456652 2004-02-06
WO 03/015395 PCT/AU02/00919
182
0
~
_
U
C
N
Q
x
A ~ x
'-' ~ d ~ ~ d Q
3 '~
",
U A x
H as x x
Free of patents
Random key generation
Can be exported from
the USA
Fast
Preferred Key Size 168 128 128 128 512 128 160 160
(bits) for use in
this a lication
Block size (bits) 64 64 64 64 256 512 512 512
Cryptanalysis Attack-Free
(apart from weak keys)
Output size given input?N ~1 ?N ?N 128 128 160 160
size N
Low storage requirements
Low silicon complexity
NSA designed
An examination of the table shows that the choice is effectively between the 3
HMAC constructs and the Random
Sequence. The problem of key size and key generation eliminates the Random
Sequence. Given that a number of
attacks have already been carried out on MDS and since the hash result is only
128 bits, HMAC-MDS is also
eliminated. The choice is therefore between HMAC-SHAT and HMAC-RIPEMD160.
RIPEMD-160 is relatively new,
and has not been as extensively cryptanalyzed as SHA1. However, SHA-1 was
designed by the NSA, so this may be
seen by some as a negative attribute.
Given that there is not much between the two, SHA-1 will be used for the HMAC
construct.
CHOOSING A RANDOM NUMBER GENERATOR
Each of the protocols described (1-4) requires a random number generator. The
generator must be "good" in the sense that
the random numbers generated over the life of all Systems cannot be predicted.
If the random numbers were the same for
each System, an attacker could easily record the correct responses from a real
Authentication Chip, and place the responses
into a ROM lookup for a clone chip. With such an attack there is no need to
obtain K, or KZ. Therefore the random numbers
from each System must be different enough to be unpredictable, or non-
deterministic. As such, the initial value for R (the
random seed) should be programmed with a physically generated random number
gathered from a physically random
phenomenon, one where there is no information about whether a particular bit
will be 1 or 0. The seed for R must NOT be
generated with a computer-run random number generator. Otherwise the generator
algorithm and seed may be compromised
enabling an attacker to generate and therefore know the set of all R values in
all Systems.
CA 02456652 2004-02-06
WO 03/015395 PCT/AU02/00919
183
Having a different R seed in each Authentication Chip means that the first R
will be both random and unpredictable
across all chips. The question therefore arises of how to generate subsequent
R values in each chip.
The base case is not to change R at all. Consequently R and FK, [R] will be
the same for each call to Random[]. If they are
the same, then FK, [R] can be a constant rather than calculated. An attacker
could then use a single valid Authentication Chip
to generate a valid lookup table, and then use that lookup table in a clone
chip programmed especially for that System. A
constant R is not secure.
The simplest conceptual method of changing R is to increment it by 1. Since R
is random to begin with, the values across
differing systems are still likely to be random. However given an initial R,
all subsequent R values can be determined
directly (there is no need to iterate 10,000 times - R will take on values
from R° to R°+ 10000). An incrementing R is
immune to the earlier attack on a constant R. Since R is always different,
there is no way to construct a lookup table for the
particular System without wasting as many real Authentication Chips as the
clone chip will replace.
Rather than increment using an adder, another way of changing R is to
implement it as an LFSR (Linear Feedback Shift
Register). This has the advantage of less silicon than an adder, but the
advantage of an attacker not being able to directly
determine the range of R for a particular System, since an LFSR value-domain
is determined by sequential access. To
determine which values an given initial R will generate, an attacker must
iterate through the possibilities and enumerate
them. The advantages of a changing R are also evident in the LFSR solution.
Since R is always different, there is no way to
construct a lookup table for the particular System without using-up as many
real Authentication Chips as the clone chip will
replace (and only for that System). There is therefore no advantage in having
a more complex function to change R.
Regardless of the function, it will always be possible for an attacker to
iterate through the lifetime set of values in a
simulation. The primary security lies in the initial randomness of R. Using an
LFSR to change R (apart from using less
silicon than an adder) simply has the advantage of not being restricted to a
consecutive numeric range (i.e. knowing R, RN
cannot be directly calculated; an attacker must iterate through the LFSR N
times).
The Random number generator within the Authentication Chip is therefore an
LFSR with 160 bits. Tap selection of the
160 bits for a maximal-period LFSR (i.e. the LFSR will cycle through all
2'6°-1 states, 0 is not a valid state) yields bits
159, 4, 2, and 1, as shown in Fig. 173. The LFSR is sparse, in that not many
bits are used for feedback (only 4 out of
160 bits are used). This is a problem for cryptographic applications, but not
for this application of non-sequential
number generation. The 160-bit seed value for R can be any random number
except 0, since an LFSR filled with Os will
produce a never-ending stream of Os. Since the LFSR described is a maximal
period LFSR, all 160 bits can be used
directly as R. There is no need to construct a number sequentially from output
bits of b°. After each successful call to
TST, the random number (R) must be advanced by XORing bits 1, 2, 4, and 159,
and shifting the result into the high
order bit. The new R and corresponding Fx, [R] can be retrieved on the next
call to Random.
HOLDING OUT AGAINST LOGICAL ATTACKS
Protocol 3 is the authentication scheme used by the Authentication Chip. As
such, it should be resistant to defeat by
logical means. While the effect of various types of attacks on Protocol 3 have
been mentioned in discussion, this section
details each type of attack in turn with reference to Protocol 3.
Brute Force attack
A Brute Force attack is guaranteed to break Protocol 3. However the length of
the key means that the time for an
attacker to perform a brute force attack is too long to be worth the effort.
An attacker only needs to break K~ to build a
CA 02456652 2004-02-06
WO 03/015395 PCT/AU02/00919
184
clone Authentication Chip. K, is merely present to strengthen KZ against other
forms of attack. A Brute Force Attack on
Kz must therefore break a 160-bit key. An attack against Kz requires a maximum
of 2'6° attempts, with a 50% chance of
finding the key after only 2's9 attempts. Assuming an array of a trillion
processors, each running one million tests per
second, 2'59 (7.3 x 10⁴') tests takes 2.3 x 10²³ years, which is longer than
the lifetime of the universe. There are only 100
million personal computers in the world. Even if these were all connected in
an attack (e.g. via the Internet), this
number is still 10,000 times smaller than the trillion-processor attack
described. Further, if the manufacture of one
trillion processors becomes a possibility in the age of nanocomputers, the
time taken to obtain the key is longer than the
lifetime of the universe.
Guessing the ke ate
It is theoretically possible that an attacker can simply "guess the key". In
fact, given enough time, and trying every
possible number, an attacker will obtain the key. This is identical to the
Brute Force attack described above, where 259
attempts must be made before a 50% chance of success is obtained. The chances
of someone simply guessing the key on
the first try is 2'6°. For comparison, the chance of someone winning
the top prize in a U.S. state lottery and being killed
by lightning in the same day is only 1 in 26'. The chance of someone guessing
the Authentication Chip key on the first
go is 1 in 2'6°, which is comparative to two people choosing exactly
the same atoms from a choice of all the atoms in
the Earth i.e. extremely unlikely.
Quantum Computer attack
To break K2, a quantum computer containing 160 qubits embedded in an
appropriate algorithm must be built. An attack
against a 160-bit key is not feasible. An outside estimate of the possibility
of quantum computers is that 50 qubits may
be achievable within 50 years. Even using a 50 qubit quantum computer,
2"° tests are required to crack a 160 bit key.
Assuming an array of 1 billion 50 qubit quantum computers, each able to try
25° keys in 1 microsecond (beyond the
current wildest estimates) finding the key would take an average of 18 billion
years.
Cwhertext Only attack
An attacker can launch a Cyphertext Only attack on K, by calling monitoring
calls to RND and RD, and on KZ by
monitoring calls to RD and TST. However, given that all these calls also
reveal the plaintext as well as the hashed form
of the plaintext, the attack would be transformed into a stronger form of
attack - a Known Plaintext attack.
Known Plaintext attack
It is easy to connect a logic analyzer to the connection between the System
and the Authentication Chip, and thereby
monitor the flow of data. This flow of data results in known plaintext and the
hashed form of the plaintext, which can
therefore be used to launch a Known Plaintext attack against both K, and KZ.
To launch an attack against K,, multiple
calls to RND and TST must be made (with the call to TST being successful, and
therefore requiring a call to RD on a
valid chip). This is straightforward, requiring the attacker to have both a
System Authentication Chip and a Consumable
Authentication Chip. For each K, X, HK,(X] pair revealed, a KZ Y, Hx2[Y] pair
is also revealed. The attacker must
collect these pairs for further analysis. The question arises of how many
pairs must be collected for a meaningful attack
to be launched with this data. An example of an attack that requires
collection of data for statistical analysis is
Differential Cryptanalysis. However, there are no known attacks against SHA-1
or HMAC-SHA1, so there is no use for
the collected data at this time.
CA 02456652 2004-02-06
WO 03/015395 PCT/AU02/00919
185
Chosen Plaintext attacks
Given that the cryptanalyst has the ability to modify subsequent chosen
plaintexts based upon the results of previous
experiments, Kz is open to a partial form of the Adaptive Chosen Plaintext
attack, which is certainly a stronger form of
attack than a simple Chosen Plaintext attack. A chosen plaintext attack is not
possible against K,, since there is no way
for a caller to modify R, which used as input to the RND function (the only
function to provide the result of hashing
with K,). Clearing R also has the effect of clearing the keys, so is not
useful, and the SSI command calls CLR before
storing the new R-value.
Adaptive Chosen plaintext attacks
This kind of attack is not possible against K,, since K, is not susceptible to
chosen plaintext attacks. However, a partial
form of this attack is possible against Kz, especially since both System and
consumables are typically available to the
attacker (the System may not be available to the attacker in some instances,
such as a specific car). The HMAC
construct provides security against all forms of chosen plaintext attacks.
This is primarily because the HMAC construct
has 2 secret input variables (the result of the original hash, and the secret
key). Thus finding collisions in the hash
function itself when the input variable is secret is even harder than finding
collisions in the plain hash function. This is
because the former requires direct access to SHA-1 (not permitted in Protocol
3) in order to generate pairs of
input/output from SHA-1. The only values that can be collected by an attacker
are HMAC[R] and HMAC[R ~ M].
These are not attacks against the SHA-1 hash function itself, and reduce the
attack to a Differential Cryptanalysis attack,
examining statistical differences between collected data. Given that there is
no Differential Cryptanalysis attack known
against SHA-1 or HMAC, Protocol 3 is resistant to the Adaptive Chosen
Plaintext attacks.
Purposeful Error Attack
An attacker can only launch a Purposeful Error Attack on the TST and RD
functions, since these are the only functions
that validate input against the keys. With both the TST and RD functions, a 0
value is produced if an error is found in
the input - no further information is given. In addition, the time taken to
produce the 0 result is independent of the input,
giving the attacker no information about which bits) were wrong. A Purposeful
Error Attack is therefore fruitless.
Chainin atg tack
Any form of chaining attack assumes that the message to be hashed is over
several blocks, or the input variables can
somehow be set. The HMAC-SHA1 algorithm used by Protocol 3 only ever hashes a
single 512-bit block at a time.
Consequently chaining attacks are not possible against Protocol 3.
Birthda, at~ck
The strongest attack known against HMAC is the birthday attack, based on the
frequency of collisions for the hash
function. However this is totally impractical for minimally reasonable hash
functions such as SHA-1. And the birthday
attack is only possible when the attacker has control over the message that is
signed. Protocol 3 uses hashing as a form
of digital signature. The System sends a number that must be incorporated into
the response from a valid Authentication
Chip. Since the Authentication Chip must respond with H[R ~ M], but has no
control over the input value R, the birthday
attack is not possible. This is because the message has effectively already
been generated and signed. An attacker must
instead search for a collision message that hashes to the same value
(analogous to finding one person who shares your
birthday). The clone chip must therefore attempt to find a new value Rz such
that the hash of Rz and a chosen MZ yields
the same hash value as H[R ~ M]. However the System Authentication Chip does
not reveal the correct hash value (the
CA 02456652 2004-02-06
WO 03/015395 PCT/AU02/00919
186
TST function only returns 1 or 0 depending on whether the hash value is
correct). Therefore the only way of finding out
the correct hash value (in order to find a collision) is to interrogate a real
Authentication Chip. But to find the correct
value means to update M, and since the decrement-only parts of M are one-way,
and the read-only parts of M cannot be
changed, a clone consumable would have to update a real consumable before
attempting to find a collision. The
alternative is a Brute Force attack search on the TST function to find a
success (requiring each clone consumable to
have access to a System consumable). A Brute Force Search, as described above,
takes longer than the lifetime of the
universe, in this case, per authentication. Due to the fact that a timely
gathering of a hash value implies a real
consumable must be decremented, there is no point for a clone consumable to
launch this kind of attack.
Substitution with a complete lookup table
The random number seed in each System is 160 bits. The worst case situation
for an Authentication Chip is that no state
data is changed. Consequently there is a constant value returned as M. However
a clone chip must still return FKZ[R ~
M], which is a 160 bit value. Assuming a 160-bit lookup of a 160-bit result,
this requires 7.3 x 10'$ bytes, or 6.6 x 1036
terabytes, certainly more space than is feasible for the near future. This of
course does not even take into account the
method of collecting the values for the ROM. A complete lookup table is
therefore completely impossible.
Substitution with a sparse lookup table
A sparse lookup table is only feasible if the messages sent to the
Authentication Chip are somehow predictable, rather
than effectively random. The random number R is seeded with an unknown random
number, gathered from a naturally
random event. There is no possibility for a clone manufacturer to know what
the possible range of R is for all Systems,
since each bit has a 50% chance of being a 1 or a 0. Since the range of R in
all systems is unknown, it is not possible to
build a sparse lookup table that can be used in all systems. The general
sparse lookup table is therefore not a possible
attack. However, it is possible for a clone manufacturer to know what the
range of R is for a given System. This can be
accomplished by loading a LFSR with the current result from a call to a
specific System Authentication Chip's RND
function, and iterating some number of times into the future. If this is done,
a special ROM can be built which will only
contain the responses for that particular range of R, i.e. a ROM specifically
for the consumables of that particular
System. But the attacker still needs to place correct information in the ROM.
The attacker will therefore need to find a
valid Authentication Chip and call it for each of the values in R.
Suppose the clone Authentication Chip reports a full consumable, and then
allows a single use before simulating loss of
connection and insertion of a new full consumable. The clone consumable would
therefore need to contain responses for
authentication of a full consumable and authentication of a partially used
consumable. The worst case ROM contains
entries for full and partially used consumables for R over the lifetime of
System. However, a valid Authentication Chip
must be used to generate the information, and be partially used in the
process. If a given System only produces about n
R-values, the sparse lookup-ROM required is lOn bytes multiplied by the number
of different values for M. The time
taken to build the ROM depends on the amount of time enforced between calls to
RD.
After all this, the clone manufacturer must rely on the consumer returning for
a refill, since the cost of building the
ROM in the first place consumes a single consumable. The clone manufacturer's
business in such a situation is
consequently in the refills. The time and cost then, depends on the size of R
and the number of different values for M
that must be incorporated in the lookup. In addition, a custom clone
consumable ROM must be built to match each and
every System, and a different valid Authentication Chip must be used for each
System (in order to provide the full and
CA 02456652 2004-02-06
WO 03/015395 PCT/AU02/00919
187
partially used data). The use of an Authentication Chip in a System must
therefore be examined to determine whether or
not this kind of attack is worthwhile for a clone manufacturer. As an example,
of a camera system that has about 10,000
prints in its lifetime. Assume it has a single Decrement Only value (number of
prints remaining), and a delay of 1
second between calls to RD. In such a system, the sparse table will take about
3 hours to build, and consumes 100K.
Remember that the construction of the ROM requires the consumption of a valid
Authentication Chip, so any money
charged must be worth more than a single consumable and the clone consumable
combined. Thus it is not cost effective
to perform this function for a single consumable (unless the clone consumable
somehow contained the equivalent of
multiple authentic consumables). If a clone manufacturer is going to go to the
trouble of building a custom ROM for
each owner of a System, an easier approach would be to update System to
completely ignore the Authentication Chip.
Consequently, this attack is possible as a per-System attack, and a decision
must be made about the chance of this
occurring for a given System/Consumable combination. The chance will depend on
the cost of the consumable and
Authentication Chips, the longevity of the consumable, the profit margin on
the consumable, the time taken to generate
the ROM, the size of the resultant ROM, and whether customers will come back
to the clone manufacturer for refills
that use the same clone chip etc.
Differential cryptanals
Existing differential attacks are heavily dependent on the structure of S
boxes, as used in DES and other similar
algorithms. Although other algorithms such as HMAC-SHA1 used in Protocol 3
have no S boxes, an attacker can
undertake a differential-like attack by undertaking statistical analysis of:
Minimal-difference inputs, and their corresponding outputs
Minimal-difference outputs, and their corresponding inputs
To launch an attack of this nature, sets of input/output pairs must be
collected. The collection from Protocol 3 can be via
Known Plaintext, or from a Partially Adaptive Chosen Plaintext attack.
Obviously the latter, being chosen, will be more
useful. Hashing algorithms in general are designed to be resistant to
differential analysis. SHA-1 in particular has been
specifically strengthened, especially by the 80 word expansion so that minimal
differences in input produce will still
produce outputs that vary in a larger number of bit positions (compared to 128
bit hash functions). In addition, the
information collected is not a direct SHA-1 input/output set, due to the
nature of the HMAC algorithm. The HMAC
algorithm hashes a known value with an unknown value (the key), and the result
of this hash is then rehashed with a
separate unknown value. Since the attacker does not know the secret value, nor
the result of the first hash, the inputs and
outputs from SHA-1 are not known, making any differential attack extremely
difficult. The following is a more detailed
discussion of minimally different inputs and outputs from the Authentication
Chip.
Minimal Difference Inputs
This is where an attacker takes a set of X, FK[X] values where the X values
are minimally different, and examines the
statistical differences between the outputs FK[X]. The attack relies on X
values that only differ by a minimal number of
bits. The question then arises as to how to obtain minimally different X
values in order to compare the FK[X] values.
K,:With K,, the attacker needs to statistically examine minimally different X,
FK,[X] pairs. However the attacker cannot
choose any X value and obtain a related FK,[X] value. Since X, FK,[X] pairs
can only be generated by calling the RND
function on a System Authentication Chip, the attacker must call RND multiple
times, recording each observed pair in a
CA 02456652 2004-02-06
WO 03/015395 PCT/AU02/00919
188
table. A search must then be made through the observed values for enough
minimally different X values to undertake a
statistical analysis of the FK, [X] values.
KZ:With KZ, the attacker needs to statistically examine minimally different X,
F,~[X] pairs. The only way of generating
X, F,~[X] pairs is via the RD function, which produces FKZ[X] for a given Y,
Fx,[Y] pair, where X = Y ~ M. This means
that Y and the changeable part of M can be chosen to a limited extent by an
attacker. The amount of choice must
therefore be limited as much as possible.
The first way of limiting an attacker's choice is to limit Y, since RD
requires an input of the format Y, FK, [Y]. Although
a valid pair can be readily obtained from the RND function, it is a pair of
RND's choosing. An attacker can only
provide their own Y if they have obtained the appropriate pair from RND, or if
they know K,. Obtaining the appropriate
pair from RND requires a Brute Force search. Knowing K, is only logically
possible by performing cryptanalysis on
pairs obtained from the RND function - effectively a known text attack.
Although RND can only be called so many
times per second, K, is common across System chips. Therefore known pairs can
be generated in parallel.
The second way to limit an attacker's choice is to limit M, or at least the
attacker's ability to choose M. The limiting of
M is done by making some parts of M Read Only, yet different for each
Authentication Chip, and other parts of M
Decrement Only. The Read Only parts of M should ideally be different for each
Authentication Chip, so could be
information such as serial numbers, batch numbers, or random numbers. The
Decrement Only parts of M mean that for
an attacker to try a different M, they can only decrement those parts of M so
many times - after the Decrement Only
parts of M have been reduced to 0 those parts cannot be changed again.
Obtaining a new Authentication chip 53
provides a new M, but the Read Only portions will be different from the
previous Authentication Chip's Read Only
portions, thus reducing an attacker's ability to choose M even further.
Consequently an attacker can only gain a limited
number of chances at choosing values for Y and M.
Minimal Difference Outputs
This is where an attacker takes a set of X, FK(X] values where the FK[X]
values are minimally different, and examines
the statistical differences between the X values. The attack relies on FK[X]
values that only differ by a minimal number
of bits. For both K, and K2, there is no way for an attacker to generate an X
value for a given FK[X]. To do so would
violate the fact that F is a one-way function. Consequently the only way for
an attacker to mount an attack of this nature
is to record all observed X, FK[X] pairs in a table. A search must then be
made through the observed values for enough
minimally different FK[X] values to undertake a statistical analysis of the X
values. Given that this requires more work
than a minimally different input attack (which is extremely limited due to the
restriction on M and the choice of R), this
attack is not fruitful.
Message substitution attacks
In order for this kind of attack to be carried out, a clone consumable must
contain a real Authentication chip 53, but one
that is effectively reusable since it never gets decremented. The clone
Authentication Chip would intercept messages,
and substitute its own. However this attack does not give success to the
attacker. A clone Authentication Chip may
choose not to pass on a WR command to the real Authentication Chip. However
the subsequent RD command must
return the correct response (as if the WR had succeeded). To return the
correct response, the hash value must be known
for the specific R and M. As described in the Birthday Attack section, an
attacker can only determine the hash value by
actually updating M in a real Chip, which the attacker does not want to do.
Even changing the R sent by System does
CA 02456652 2004-02-06
WO 03/015395 PCT/AU02/00919
189
not help since the System Authentication Chip must match the R during a
subsequent TST. A Message substitution
attack would therefore be unsuccessful. This is only true if System updates
the amount of consumable remaining before
it is used.
Reverse en ing eerin, tg he key ~yenerator
If a pseudo-random number generator is used to generate keys, there is the
potential for a clone manufacture to obtain
the generator program or to deduce the random seed used. This was the way in
which the Netscape security program
was initially broken.
Byaassing authentication altogether
Protocol 3 requires the System to update the consumable state data before the
consumable is used, and follow every
write by a read (to authenticate the write). Thus each use of the consumable
requires an authentication. If the System
adheres to these two simple rules, a clone manufacturer will have to simulate
authentication via a method above (such
as sparse ROM lookup).
Reuse of Authentication Chins
As described above, Protocol 3 requires the System to update the consumable
state data before the consumable is used,
and follow every write by a read (to authenticate the write). Thus each use of
the consumable requires an authentication.
If a consumable has been used up, then its Authentication Chip will have had
the appropriate state-data values
decremented to 0. The chip can therefore not be used in another consumable.
Note that this only holds true for
Authentication Chips that hold Decrement-Only data items. If there is no state
data decremented with each usage, there
is nothing stopping the reuse of the chip. This is the basic difference
between Presence-Only Authentication and
Consumable Lifetime Authentication. Protocol 3 allows both. The bottom line is
that if a consumable has Decrement
Only data items that are used by the System, the Authentication Chip cannot be
reused without being completely
reprogrammed by a valid Programming Station that has knowledge of the secret
key.
Management decision to omit authentication to save costs
Although not strictly an external attack, a decision to omit authentication in
future Systems in order to save costs will
have widely varying effects on different markets. In the case of high volume
consumables, it is essential to remember
that it is very difficult to introduce authentication after the market has
started, as systems requiring authenticated
consumables will not work with older consumables still in circulation.
Likewise, it is impractical to discontinue
authentication at any stage, as older Systems will not work with the new,
unauthenticated, consumables. In he second
case, older Systems can be individually altered by replacing the System
Authentication Chip by a simple chip that has
the same programming interface, but whose TST function always succeeds. Of
course the System may be programmed
to test for an always-succeeding TST function, and shut down. In the case of a
specialized pairing, such as a car/car-
keys, or door/door-key, or some other similar situation, the omission of
authentication in future systems is trivial and
non-repercussive. This is because the consumer is sold the entire set of
System and Consumable Authentication Chips at
the one time.
Garrote/bribe attack
This form of attack is only successful in one of two circumstances:
K,, K2, and R are already recorded by the chip-programmer, or
the attacker can coerce future values of K,, K2, and R to be recorded.
CA 02456652 2004-02-06
WO 03/015395 PCT/AU02/00919
190
If humans or computer systems external to the Programming Station do not know
the keys, there is no amount of force
or bribery that can reveal them. The level of security against this kind of
attack is ultimately a decision for the
System/Consumable owner, to be made according to the desired level of service.
For example, a car company may
wish to keep a record of all keys manufactured, so that a person can request a
new key to be made for their car.
However this allows the potential compromise of the entire key database,
allowing an attacker to make keys for any of
the manufacturer's existing cars. It does not allow an attacker to make keys
for any new cars. Of course, the key
database itself may also be encrypted with a further key that requires a
certain number of people to combine their key
portions together for access. If no record is kept of which key is used in a
particular car, there is no way to make
additional keys should one become lost. Thus an owner will have to replace his
car's Authentication Chip and all his
car-keys. This is not necessarily a bad situation. By contrast, in a
consumable such as a printer ink cartridge, the one
key combination is used for all Systems and all consumables. Certainly if no
backup of the keys is kept, there is no
human with knowledge of the key, and therefore no attack is possible. However,
a no-backup situation is not desirable
for a consumable such as ink cartridges, since if the key is lost no more
consumables can be made. The manufacturer
should therefore keep a backup of the key information in several parts, where
a certain number of people must together
combine their portions to reveal the full key information. This may be
required if case the chip programming station
needs to be reloaded. In any case, none of these attacks are against Protocol
3 itself, since no humans are involved in
the authentication process. Instead, it is an attack against the programming
stage of the chips.
HMAC-SHA 1
The mechanism for authentication is the HMAC-SHA1 algorithm, acting on one of:
HMAC-SHAT (R, K,), or
HMAC-SHAT (R ~ M, KZ)
We will now examine the HMAC-SHA1 algorithm in greater detail than covered so
far, and describes an optimization
of the algorithm that requires fewer memory resources than the original
definition.
HMAC
The HMAC algorithm proceeds, given the following definitions:
H = the hash function (e.g. MDS or SHA-1)
n = number of bits output from H (e.g. 160 for SHA-1, 128 bits for MDS)
M = the data to which the MAC function is to be applied
K = the secret key shared by the two parties
ipad= 0x36 repeated 64 times
opad = OxSC repeated 64 times
The HMAC algorithm is as follows:
Extend K to 64 bytes by appending 0x00 bytes to the end of K
XOR the 64 byte string created in (1) with ipad
Append data stream M to the 64 byte string created in (2)
Apply H to the stream generated in (3)
XOR the 64 byte string created in (1) with opad
CA 02456652 2004-02-06
WO 03/015395 PCT/AU02/00919
191
Append the H result from (4) to the 64 byte string resulting from (S)
Apply H to the output of (6) and output the result
Thus:
HMAC[M] = H((KOopad) ~ H[(K~ipad)~1VI]]
HMAC-SHA1 algorithm is simply HMAC with H = SHA-1.
SHA-1
The SHAT hashing algorithm is defined in the algorithm as summarized here.
Nine 32-bit constants are defined. There are 5 constants used to initialize
the chaining variables, and there are 4 additive
constants.
Initial Chaining Values Additive Constants
h, 0x67452301 y, Ox5A827999
hz OxEFCDAB89 z Ox6ED9EBA1
h3 Ox98BADCFE 3 Ox8FIBBCDC
h4 0x10325476 y4 OxCA62C1D6
h5 ~-OxC3D2E1F0 -
--
Non-optimized SHA-1 requires a total of 2912 bits of data storage:
Five 32-bit chaining variables are defined: H,, Hz, H3, H4 and H5.
Five 32-bit working variables are defined: A, B, C, D, and E.
One 32-bit temporary variable is defined: t.
Eighty 32-bit temporary registers are defined: X0.9.
The following functions are defined for SHA-1:
S bolic Nomenclature Descri tion
+ Addition modulo 23z
Xc.SY Result of rotating X left through
Y bit ositions
f(X, Y, Z) (X n Y) v (-X n Z)
g(X,Y,Z) (XnY)v(XnZ)v(YnZ)
-
h(X, Y, Z) I X m Y m Z
The hashing algorithm consists of firstly padding the input message to be a
multiple of 512 bits and initializing the
chaining variables H,_5 with h,_5. The padded message is then processed in 512-
bit chunks, with the output hash value
being the final 160-bit value given by the concatenation of the chaining
variables: H, ~ Hz ~ H3 ~ H4 ~ Hs. The steps of the
SHA-1 algorithm are now examined in greater detail.
CA 02456652 2004-02-06
WO 03/015395 PCT/AU02/00919
192
Step 1. Preprocessing
The first step of SHA-1 is to pad the input message to be a multiple of 512
bits as follows and to initialize the chaining
variables.
Ste s to follow to
re rocess the in ut
messa a
Pad the input message A end a 1 bit to the messa a
Append 0 bits such that the length
of the padded message is
64-bits short of a multi 1e of 512
bits.
Append a 64-bit value containing
the length in bits of the
original input message. Store the
length as most significant bit
through to least significant bit.
Initialize the chainingH, ~ h,, Hz ~ h2, H3 ~ h3, H4 ~ h4,
variables I HS ~- h5
Step 2.ProcessinQ
The padded input message can now be processed. We process the message in 512-
bit blocks. Each 512-bit block is in
the form of 16 x 32-bit words, referred to as InputWordo_,5.
Ste s to follow for each
512 bit block (In utWordo_,s)
Copy the 512 input bits For j=0 to 15
into Xa_,5
X = In utWord~
Expand Xo_,5 into X,~~9 For j=16 to 79
X' ~ ((X _3 a X _g ~ X'_14 ~ X'_16)
c.5 1)
Initialize working variablesA ~ H,, B E- H2, C E- H3, D ~ H4,
E ~ HS
Round 1 For j=0 to 19
t ~ ((At55) + f(B, C, D) + E +
X~ + y,)
EE-D,D~C,Cf-(Bc530),B~A,A~t
Round 2 For j = 20 to 39
t ~- ((AC55) + h(B, C, D) + E +
X~ + yz)
E~D,D~-C,C~(BC530),B~A,A~t
Round 3 For j = 40 to 59
t e-- ((Ac.55) + g(B, C, D) + E
+ X~ + y3)
E~D,D~C,C~-(B~530),B~A,A~-t
Round 4 For j = 60 to 79
t F- ((AC55) + h(B, C, D) + E +
X~ + y4)
EE-D,D~C,CE-(BC530),B~A,A~t
Update chaining variablesH, ~ H, + A, HZ ~ HZ + B,
H3~H3+C,H4~H4+D,
H5~H5+E
Step 3. Completion
After all the 512-bit blocks of the padded input message have been processed,
the output hash value is the final 160-bit
value given by: H, ~ Hz ~ H3 ~ H4 ~ Hs.
CA 02456652 2004-02-06
WO 03/015395 PCT/AU02/00919
193
~timization for Hardware Implementation
The SHA-1 Step 2 procedure is not optimized for hardware. In particular, the
80 temporary 32-bit registers use up
valuable silicon on a hardware implementation. This section describes an
optimization to the SHA-1 algorithm that only
uses 16 temporary registers. The reduction in silicon is from 2560 bits down
to 512 bits, a saving of over 2000 bits. It
may not be important in some applications, but in the Authentication Chip
storage space must be reduced where
possible. The optimization is based on the fact that although the original 16-
word message block is expanded into an
80-word message block, the 80 words are not updated during the algorithm. In
addition, the words rely on the previous
16 words only, and hence the expanded words can be calculated on-the-fly
during processing, as long as we keep 16
words for the backward references. We require rotating counters to keep track
of which register we are up to using, but
the effect is to save a large amount of storage. Rather than index X by a
single value j, we use a 5 bit counter to count
through the iterations. This can be achieved by initializing a 5-bit register
with either 16 or 20, and decrementing it until
it reaches 0. In order to update the 16 temporary variables as if they were
80, we require 4 indexes, each a 4-bit register.
All 4 indexes increment (with wraparound) during the course of the algorithm.
Ste s to follow
for each 512 bit
block (In utWordo_IS)
Initialize working A ~ HI, B e- Hz, C E- H3, D ~ H4, E
variables ~ HS
NI~l3,Nz~8,N3~2,N4f-0
Round 0 Do 16 times:
Copy the 512 input XN4 = InputWordNa
bits into Xa_
t5 ~~NI, ~NZ, ~N3~o tional ~No
Round 1A Do 16 times:
t ~- ((A~55) + f(B, C, D) + E + XNQ
+ y1)
~~NI, IIN2> ~N3~optional IIN4
E~D,DE--C,C~(BC530),B~A,A~t
Round 1B Do 4 times:
XN4 ~ ((XNI ~ XN2 ~ XN3 ~ XN4) ~ 1)
t ~ ((Ac75) + f(B, C, D) + E + XN4 +
y)
~1N1, ~NZ,1TN3, ~1N4
E~D,D~C,C<-(Bc.530),B~A,A~t
Round 2 Do 20 times:
XN4 ~ ((XNI ~ XN2 ~ XN3 ~ XN4) ~ 1)
t E- ((Ac.55) + h(B, C, D) + E + XN4
+ yz)
IINI, '~Nz, ~?N3, ~1N4
E~D,DE-C,C~-(Bc.530),B~A,A~t
Round 3 Do 20 times:
XN4 ~ ((XN1 ~ XN2 ~ XN3 ~ XN4) ~ 1)
t ~ ((AC55) + g(B, C, D) + E + XN4 +
ys)
nNl, ~Nz> ~N3, ~N4
E~-D,D~C,C~(BC530),BE-A,A~t
Round 4 Do 20 times:
XN4 ~ ((XN1 ~ XN2 ~ XN3 ~ XN4) ~ 1)
t E- ((AC.55) + h(B, C, D) + E + XN4
+ y4)
nNl, ~Nz, ~1N3, ~1N4
Ef-D,D~C,C<--(BC530),BE-A,AE-t
CA 02456652 2004-02-06
WO 03/015395 PCT/AU02/00919
194
Update chaining variables ~ H, ~ H, + A, HZ ~ HZ + B,
H3 E- H3 + C, H4 E- H4 + D,
E-HS+E
The incrementing of N,, Nz, and N3 during Rounds 0 and 1A is optional. A
software implementation would not
increment them, since it takes time, and at the end of the 16 times through
the loop, all 4 counters will be their original
values. Designers of hardware may wish to increment all 4 counters together to
save on control logic. Round 0 can be
completely omitted if the caller loads the 512 bits of Xo.,S.
HMAC-SHA 1
In the Authentication Chip implementation, the HMAC-SHA1 unit only ever
performs hashing on two types of inputs:
on R using K, and on R ( M using K2. Since the inputs are two constant
lengths, rather than have HMAC and SHA-1 as
separate entities on chip, they can be combined and the hardware optimized.
The padding of messages in SHA-1 Step 1
(a 1 bit, a string of 0 bits, and the length of the message) is necessary to
ensure that different messages will not look the
same after padding. Since we only deal with 2 types of messages, our padding
can be constant Os. In addition, the
optimized version of the SHA-1 algorithm is used, where only 16 32-bit words
are used for temporary storage. These 16
registers are loaded directly by the optimized HMAC-SHA1 hardware. The Nine 32-
bit constants h,_5 and y,.~ are still
required, although the fact that they are constants is an advantage for
hardware implementation. Hardware optimized
HMAC-SHA-1 requires a total of 1024 bits of data storage:
Five 32-bit chaining variables are defined: H,, HZ, H3, H4 and H5.
Five 32-bit working variables are defined: A, B, C, D, and E.
Five 32-bit variables for temporary storage and final result: Buff160,_s
One 32 bit temporary variable is defined: t.
Sixteen 32-bit temporary registers are defined: Xo_,5.
The following two sections describe the steps for the two types of calls to
HMAC-SHA1.
HWl
In the case of producing the keyed hash of R using K,, the original input
message R is a constant length of 160 bits. We
can therefore take advantage of this fact during processing. Rather than load
Xo_,5 during the first part of the SHA-1
algorithm, we load Xo_,5 directly, and thereby omit Round 0 of the optimized
Process Block (Step 2) of SHA-1. The
pseudocode takes on the following steps:
Ste Descri lion Action
1 Process K m i ad Xo~ ~ K, O 0x363636...
2 X5_,5 ~ 0x363636...
3 H,_5 ~ h,_5
4 Process Block
Process R Xo_4 E- R
6 XS_,5 F- 0
7 Process Block
8 Buff 160, _5 E- H, _5
CA 02456652 2004-02-06
WO 03/015395 PCT/AU02/00919
195
9 Process K ~ o ad Xo-~ E- K, D Ox5C5C5C...
X5.,5 E- Ox5C5C5C...
11 H,_5 ~ h1_5
12 Process Block
13 Process previous Xa_4 ~ Result
H[x]
14 XS_,s E- 0
Process Block
16 Get results Buff1601_5 ~ H,_s
HfR I M, K~l
In the case of producing the keyed hash of R ~ M using K2, the original input
message is a constant length of 416
(256+160) bits. We can therefore take advantage of this fact during
processing. Rather than load Xo_ls during the first
part of the SHA-1 algorithm, we load
Xo_IS directly, and thereby omit Round 0 of the optimized Process Block (Step
2) of SHA-1. The pseudocode takes on
the following steps:
Ste Descri tion Action
1 Process K O i ad Xo_4 E-- KZ ~ 0x363636...
2 Xs-IS ~ 0x363636...
3 HI_5 <- h,_5
4 Process Block
5 Process R ~ M Xo_4 E- R
6 . X5_,2 E- M
7 X13-t5 ~0
8 Process Block
9 Tem E- H,_5
10 Process K O o ad Xo~~ Kz O Ox5C5CSC...
11 X5_15 ~ Ox5C5C5C...
12 HI_5 E- hl-s
13 Process Block
14 Process previous Xo_4 E-Tem
H[x]
15 Xs-IS ~- 0
16 Process Block
17 Get results Result ~ HI_5
CA 02456652 2004-02-06
WO 03/015395 PCT/AU02/00919
196
DATA STORAGE INTEGRITY
Each Authentication Chip contains some non-volatile memory in order to hold
the variables required by Authentication
Protocol 3. The following non-volatile variables are defined:
Variable Name Size (in Description
bits)
M[0..15] 256 16 words (each 16 bits) containing
state data such as
serial numbers, media remainin
etc.
K, 160 Key used to transform R Burin
authentication.
K2 160 Key used to transform M during
authentication.
R 160 Current random number
AccessMode[0..15]32 The 16 sets of 2-bit AccessMode
values for M[n].
MinTicks 32 The minimum number of clock ticks
between calls to
ke -based functions
SIWritten 1 If set, the secret key information
(K,, K2, and R) has
been written to the chip. If
clear, the secret information
has not been written et.
IsTrusted 1 If set, the RND and TST functions
can be called, but
RD and WR functions cannot be
called.
If clear, the RND and TST functions
cannot be called,
but RD and WR functions can be
called.
Total bits 802
Note that if these variables are in Flash memory, it is not a simple matter to
write a new value to replace the old. The
memory must be erased first, and then the appropriate bits set. This has an
effect on the algorithms used to change Flash
memory based variables. For example, Flash memory cannot easily be used as
shift registers. To update a Flash memory
variable by a general operation, it is necessary to follow these steps:
Read the entire N bit value into a general purpose register;
Perform the operation on the general purpose register;
Erase the Flash memory corresponding to the variable; and
Set the bits of the Flash memory location based on the bits set in the general-
purpose register.
A RESET of the Authentication Chip has no effect on these non-volatile
variables.
M AND ACCESSMODE
Variables M[0] through M[15] are used to hold consumable state data, such as
serial numbers, batch numbers, and
amount of consumable remaining. Each M[n] register is 16 bits, making the
entire M vector 256 bits (32 bytes). Clients
cannot read from or written to individual M[n] variables. Instead, the entire
vector, referred to as M, is read or written in
a single logical access. M can be read using the RD (read) command, and
written to via the WR (write) command. The
commands only succeed if K, and Kz are both defined (SIWritten = 1) and the
Authentication Chip is a consumable
non-trusted chip (IsTrusted = 0). Although M may contain a number of different
data types, they differ only in their
write permissions. Each data type can always be read. Once in client memory,
the 256 bits can be interpreted in any way
CA 02456652 2004-02-06
WO 03/015395 PCT/AU02/00919
197
chosen by the client. The entire 256 bits of M are read at one time instead of
in smaller amounts for reasons of security,
as described in the chapter entitled Authentication. The different write
permissions are outlined in the following table:
Data T a Access Note
Read Onl Can never be written to
ReadWrite Can always be written to
Decrement Can only be written to if the new value
Only is less than the old value. Decrement
Only values are typically 16-bit or 32-bit
values, but can be any multiple of
16 bits.
To accomplish the protection required for writing, a 2-bit access mode value
is defined for each M(n]. The following
table defines the interpretation of the 2-bit access mode bit-pattern:
Bits O Inte retationAction taken durin Write command
00 RW ReadWrite The new 16-bit value is always
written to M[n].
O1 MSR Decrement The new 16-bit value is only
Only written to M[n] if it is
(Most Significantless than the value currently
in M[n]. This is used for
Region) access to the Most Significant
16 bits of a Decrement
Onl number.
NMSR Decrement The new 16-bit value is only
Only written to M[n] if
(Not the MostM[n+1] can also be written.
The NMSR access mode
Significant allows multiple precision values
Region) of 32 bits and more
(multi les of 16 bits) to decrement.
11 RO Read Only The new 16-bit value is ignored.
M[n] is left unchanged.
The 16 sets of access mode bits for the 16 M[n] registers are gathered
together in a single 32-bit AccessMode register.
The 32 bits of the AccessMode register correspond to M[n] with n as follows:
MSB LSB
14 13 12 11 10 9 8 7 6 5 4 3 2 1 0
Each 2-bit value is stored in hi/lo format. Consequently, if M[0-5] were
access mode MSR, with M[6-15] access mode
RO, the 32-bit AccessMode register would be:
11-11-11-11-11-11-11-11-11-11-Ol-O1-O1-O1-O1-Ol
During execution of a WR (write) command, AccessMode[n] is examined for each
M[n], and a decision made as to
whether the new M[n] value will replace the old. The AccessMode register is
set using the Authentication Chip's SAM
(Set Access Mode) command. Note that the Decrement Only comparison is
unsigned, so any Decrement Only values
that require negative ranges must be shifted into a positive range. For
example, a consumable with a Decrement Only
data item range of -50 to 50 must have the range shifted to be 0 to 100. The
System must then interpret the range 0 to
100 as being -50 to 50. Note that most instances of Decrement Only ranges are
N to 0, so there is no range shift
CA 02456652 2004-02-06
WO 03/015395 PCT/AU02/00919
198
required. For Decrement Only data items, arrange the data in order from most
significant to least significant 16-bit
quantities from M[n] onward. The access mode for the most significant 16 bits
(stored in M[n]) should be set to MSR.
The remaining registers (M[n+1], M[n+2] etc) should have their access modes
set to NMSR. If erroneously set to
NMSR, with no associated MSR region, each NMSR region will be considered
independently instead of being a multi-
precision comparison.
K,
K~ is the 160-bit secret key used to transform R during the authentication
protocol. K, is programmed along with Kz and
R with the SSI (Set Secret Information) command. Since K~ must be kept secret,
clients cannot directly read K,. The
commands that make use of K, are RND and RD. RND returns a pair R, FK, [R]
where R is a random number, while RD
requires an X, FK,[X] pair as input. K, is used in the keyed one-way hash
function HMAC-SHA1. As such it should be
programmed with a physically generated random number, gathered from a
physically random phenomenon. K, must
NOT be generated with a computer-run random number generator. The security of
the Authentication chips depends on
K,, Kz and R being generated in a way that is not deterministic. For example,
to set K,, a person can toss a fair coin 160
times, recording heads as 1, and tails as 0. K, is automatically cleared to 0
upon execution of a CLR command. It can
only be programmed to a non-zero value by the SSI command.
Kz
Kz is the 160-bit secret key used to transform M ~ R during the authentication
protocol. Kz is programmed along with K,
and R with the SSI (Set Secret Information) command. Since Kz must be kept
secret, clients cannot directly read Kz.
The commands that make use of Kz are RD and TST. RD returns a pair M, FKZ[M ~
X] where X was passed in as one of
the parameters to the RD function. TST requires an M, Fxz[M ~ R] pair as
input, where R was obtained from the
Authentication Chip's RND function. Kz is used in the keyed one-way hash
function HMAC-SHA1. As such it should
be programmed with a physically generated random number, gathered from a
physically random phenomenon. Kz must
NOT be generated with a computer-run random number generator. The security of
the Authentication chips depends on
K,, Kz and R being generated in a way that is not deterministic. For example,
to set Kz, a person can toss a fair coin 160
times, recording heads as 1, and tails as 0. Kz is automatically cleared to 0
upon execution of a CLR command. It can
only be programmed to a non-zero value by the SSI command.
R AND ISTRUSTED
R is a 160-bit random number seed that is programmed along with K, and Kz with
the SSI (Set Secret Information)
command. R does not have to be kept secret, since it is given freely to
callers via the RND command. However R must
be changed only by the Authentication Chip, and not set to any chosen value by
a caller. R is used during the TST
command to ensure that the R from the previous call to RND was used to
generate the FKZ[M ~ R] value in the non-
trusted Authentication Chip (ChipA). Both RND and TST are only used in trusted
Authentication Chips (ChipT).
IsTrusted is a 1-bit flag register that determines whether or not the
Authentication Chip is a trusted chip (ChipT):
If the IsTrusted bit is set, the chip is considered to be a trusted chip, and
hence clients can call RND and TST functions
(but not RD or WR).
If the IsTrusted bit is clear, the chip is not considered to be trusted.
Therefore RND and TST functions cannot be called
(but RD and WR functions can be called instead). System never needs to call
RND or TST on the consumable
(since a clone chip would simply return 1 to a function such as TST, and a
constant value for RND).
CA 02456652 2004-02-06
WO 03/015395 PCT/AU02/00919
199
The IsTrusted bit has the added advantage of reducing the number of available
R, FK, [R] pairs obtainable by an
attacker, yet still maintain the integrity of the Authentication protocol. To
obtain valid R, FK,[R] pairs, an attacker
requires a System Authentication Chip, which is more expensive and less
readily available than the consumables. Both
R and the IsTrusted bit are cleared to 0 by the CLR command. They are both
written to by the issuing of the SSI
command. The IsTrusted bit can only set by storing a non-zero seed value in R
via the SSI command (R must be non-
zero to be a valid LFSR state, so this is quite reasonable). R is changed via
a 160-bit maximal period LFSR with taps on
bits 1, 2, 4, and 159, and is changed only by a successful call to TST (where
1 is returned).
Authentication Chips destined to be trusted Chips used in Systems (ChipT)
should have their IsTrusted bit set during
programming, and Authentication Chips used in Consumables (ChipA) should have
their IsTrusted bit kept clear (by
storing 0 in R via the SSI command during programming). There is no command to
read or write the IsTrusted bit
directly. The security of the Authentication Chip does not only rely upon the
randomness of K, and KZ and the strength
of the HMAC-SHAT algorithm. To prevent an attacker from building a sparse
lookup table, the security of the
Authentication Chip also depends on the range of R over the lifetime of all
Systems. What this means is that an attacker
must not be able to deduce what values of R there are in produced and future
Systems. As such R should be
programmed with a physically generated random number, gathered from a
physically random phenomenon. R must
NOT be generated with a computer-run random number generator. The generation
of R must not be deterministic. For
example, to generate an R for use in a trusted System chip, a person can toss
a fair coin 160 times, recording heads as 1,
and tails as 0. 0 is the only non-valid initial value for a trusted R is 0 (or
the IsTrusted bit will not be set).
SIW BITTEN
The SIWritten (Secret Information Written) 1-bit register holds the status of
the secret information stored within the
Authentication Chip. The secret information is K,, Kz and R. A client cannot
directly access the SIWritten bit. Instead,
it is cleared via the CLR command (which also clears K,, KZ and R). When the
Authentication Chip is programmed
with secret keys and random number seed using the SSI command (regardless of
the value written), the SIWritten bit is
set automatically. Although R is strictly not secret, it must be written
together with KI and KZ to ensure that an attacker
cannot generate their own random number seed in order to obtain chosen R, FK,
[R] pairs. The SIWritten status bit is
used by all functions that access K~, K2, or R. If the SIWritten bit is clear,
then calls to RD, WR, RND, and TST are
interpreted as calls to CLR.
MINTICKS
There are two mechanisms for preventing an attacker from generating multiple
calls to TST and RD functions in a short
period of time. The first is a clock limiting hardware component that prevents
the internal clock from operating at a
speed more than a particular maximum (e.g. 10 MHz). The second mechanism is
the 32-bit MinTicks register, which is
used to specify the minimum number of clock ticks that must elapse between
calls to key-based functions. The
MinTicks variable is cleared to 0 via the CLR command. Bits can then be set
via the SMT (Set MinTicks) command.
The input parameter to SMT contains the bit pattern that represents which bits
of MinTicks are to be set. The practical
effect is that an attacker can only increase the value in MinTicks (since the
SMT function only sets bits). In addition,
there is no function provided to allow a caller to read the current value of
this register. The value of MinTicks depends
on the operating clock speed and the notion of what constitutes a reasonable
time between key-based function calls
CA 02456652 2004-02-06
WO 03/015395 PCT/AU02/00919
200
(application specific). The duration of a single tick depends on the operating
clock speed. This is the maximum of the
input clock speed and the Authentication Chip's clock-limiting hardware. For
example, the Authentication Chip's
clock-limiting hardware may be set at 10 MHz (it is not changeable), but the
input clock is 1 MHz. In this case, the
value of 1 tick is based on 1 MHz, not 10 MHz. If the input clock was 20 MHz
instead of 1 MHz, the value of 1 tick is
based on 10 MHz (since the clock speed is limited to 10 MHz).
Once the duration of a tick is known, the MinTicks value can to be set. The
value for MinTicks is the minimum number
of ticks required to pass between calls to the key-based RD and TST functions.
The value is a real-time number, and
divided by the length of an operating tick. Suppose the input clock speed
matches the maximum clock speed of 10
MHz. If we want a minimum of 1 second between calls to key based functions,
the value for MinTicks is set to
10,000,000. Consider an attacker attempting to collect X, FK,[X] pairs by
calling RND, RD and TST multiple times. If
the MinTicks value is set such that the amount of time between calls to TST is
1 second, then each pair requires 1
second to generate. To generate 225 pairs (only requiring 1.25 GB of storage),
an attacker requires more than 1 year. An
attack requiring 2~ pairs would require 5.84 x 10' ~ years using a single
chip, or 584 years if 1 billion chips were used,
making such an attack completely impractical in terms of time (not to mention
the storage requirements!).
With regards to K,, it should be noted that the MinTicks variable only slows
down an attacker and causes the attack to
cost more since it does not stop an attacker using multiple System chips in
parallel. However MinTicks does make an
attack on KZ more difficult, since each consumable has a different M (part of
M is random read-only data). In order to
launch a differential attack, minimally different inputs are required, and
this can only be achieved with a single
consumable (containing an effectively constant part of M). Minimally different
inputs require the attacker to use a
single chip, and MinTicks causes the use of a single chip to be slowed down.
If it takes a year just to get the data to start
searching for values to begin a differential attack this increases the cost of
attack and reduces the effective market time
of a clone consumable.
AUTHENTICATION CHIP COMMANDS
The System communicates with the Authentication Chips via a simple operation
command set. This section details the
actual commands and parameters necessary for implementation of Protocol 3. The
Authentication Chip is defined here
as communicating to System via a serial interface as a minimum implementation.
It is a trivial matter to define an
equivalent chip that operates over a wider interface (such as 8, 16 or 32
bits). Each command is defined by 3-bit
opcode. The interpretation of the opcode can depend on the current value of
the IsTrusted bit and the current value of
the IsWritten bit. The following operations are defined:
O T W Mn In ut Out ut Descri lion
000 - - CLR Clear
001 0 0 SSI [160, 160, Set Secret Information
160]
010 0 1 RD (160, 160] [256, 160] Read M securely
010 1 1 RND - [ 160, 160]Random
011 0 1 WR [256] - Write M
011 1 1 TST [256, 160] [1] Test
100 0 1 SAM [32] [32] Set Access Mode
101 1 GIT - [1] Get Is Trusted
CA 02456652 2004-02-06
WO 03/015395 PCT/AU02/00919
201
110 - 1 SMT [32] Set MinTicks
Op = Opcode, T = IsTrusted value, W = IsWritten value,
Mn = Mnemonic, [n] = number of bits required for parameter
Any command not defined in this table is interpreted as NOP (No Operation).
Examples include opcodes 110 and 111
(regardless of IsTrusted or IsWritten values), and any opcode other than SSI
when IsWritten = 0. Note that the opcodes
for RD and RND are the same, as are the opcodes for WR and TST. The actual
command run upon receipt of the
opcode will depend on the current value of the IsTrusted bit (as long as
IsWritten is 1). Where the IsTrusted bit is clear,
RD and WR functions will be called. Where the IsTrusted bit is set, RND and
TST functions will be called. The two
sets of commands are mutually exclusive between trusted and non-trusted
Authentication Chips, and the same opcodes
enforces this relationship. Each of the commands is examined in detail in the
subsequent sections. Note that some
algorithms are specifically designed because Flash memory is assumed for the
implementation of non-volatile variables.
CLR Clear
In ut None
Out ut None
Changes All
The CLR (Clear) Command is designed to completely erase the contents of all
Authentication Chip memory. This
includes all keys and secret information, access mode bits, and state data.
After the execution of the CLR command, an
Authentication Chip will be in a programmable state, just as if it had been
freshly manufactured. It can be
reprogrammed with a new key and reused. A CLR command consists of simply the
CLR command opcode. Since the
Authentication Chip is serial, this must be transferred one bit at a time. The
bit order is LSB to MSB for each command
component. A CLR command is therefore sent as bits 0-2 of the CLR opcode. A
total of 3 bits are transferred. The
CLR command can be called directly at any time. The order of erasure is
important. SIWritten must be cleared first, to
disable further calls to key access functions (such as RND, TST, RD and WR).
If the AccessMode bits are cleared
before SIWritten, an attacker could remove power at some point after they have
been cleared, and manipulate M,
thereby have a better chance of retrieving the secret information with a
partial chosen text attack. The CLR command is
implemented with the following steps:
Ste Action
1 Erase SIWritten
Erase IsTrusted
Erase K,
Erase Kz
Erase R
Erase M
2 Erase AccessMode
Erase MinTicks
CA 02456652 2004-02-06
WO 03/015395 PCT/AU02/00919
202
Once the chip has been cleared it is ready for reprogramming and reuse. A
blank chip is of no use to an attacker, since
although they can create any value for M (M can be read from and written to),
key-based functions will not provide any
information as K, and KZ will be incorrect. It is not necessary to consume any
input parameter bits if CLR is called for
any opcode other than CLR. An attacker will simply have to RESET the chip. The
reason for calling CLR is to ensure
that all secret information has been destroyed, making the chip useless to an
attacker.
SSI - SET SECRET INFORMATION
Input: K,, Kz, R= [160 bits, 160 bits, 160 bits]
Output: None
Changes: K~, K2, R, SIWritten, IsTrusted
The SSI (Set Secret Information) command is used to load the K,, Kz and R
variables, and to set SIWritten and
IsTrusted flags for later calls to RND, TST, RD and WR commands. An SSI
command consists of the SSI command
opcode followed by the secret information to be stored in the K,, Kz and R
registers. Since the Authentication Chip is
serial, this must be transferred one bit at a time. The bit order is LSB to
MSB for each command component. An SSI
command is therefore sent as: bits 0-2 of the SSI opcode, followed by bits 0-
159 of the new value for K,, bits 0-159 of
the new value for K2, and finally bits 0-159 of the seed value for R. A total
of 483 bits are transferred. The K,, KZ, R,
SIWritten, and IsTrusted registers are all cleared to 0 with a CLR command.
They can only be set using the SSI
command.
The SSI conunand uses the flag SIWritten to store the fact that data has been
loaded into K,, K2, and R. If the SIWritten
and IsTrusted flags are clear (this is the case after a CLR instruction), then
K,, KZ and R are loaded with the new values.
If either flag is set, an attempted call to SSI results in a CLR command being
executed, since only an attacker or an
erroneous client would attempt to change keys or the random seed without
calling CLR first. The SSI command also
sets the IsTrusted flag depending on the value for R. If R = 0, then the chip
is considered untrustworthy, and therefore
IsTrusted remains at 0. If R ~ 0, then the chip is considered trustworthy, and
therefore IsTrusted is set to 1. Note that the
setting of the IsTrusted bit only occurs during the SSI command. If an
Authentication Chip is to be reused, the CLR
command must be called first. The keys can then be safely reprogrammed with an
SSI command, and fresh state
information loaded into M using the SAM and WR commands. The SSI command is
implemented with the following
steps:
Ste Action
1 CLR
2 K, ~ Read 160 bits from client
3 KZ ~ Read 160 bits from client
4 R ~ Read 160 bits from client
IF(R~0)
IsTrusted E- 1
6 I SIWritten ~ 1
CA 02456652 2004-02-06
WO 03/015395 PCT/AU02/00919
203
RD - READ
Input: X, FK,[X] _ [160 bits, 160 bits]
Output: M, F,~[X ~ M] _ [256 bits, 160 bits]
Changes: R
The RD (Read) command is used to securely read the entire 256 bits of state
data (M) from a non-trusted Authentication
Chip. Only a valid Authentication Chip will respond correctly to the RD
request. The output bits from the RD command
can be fed as the input bits to the TST command on a trusted Authentication
Chip for verification, with the first 256 bits
(M) stored for later use if (as we hope) TST returns 1. Since the
Authentication Chip is serial, the command and input
parameters must be transferred one bit at a time. The bit order is LSB to MSB
for each command component. A RD
command is therefore: bits 0-2 of the RD opcode, followed by bits 0-159 of X,
and bits 0-159 of FKl[X]. 323 bits are
transferred in total. X and FK,[X] are obtained by calling the trusted
Authentication Chip's RND command. The 320
bits output by the trusted chip's RND command can therefore be fed directly
into the non-trusted chip's RD command,
with no need for these bits to be stored by System. The RD command can only be
used when the following conditions
have been met:
SIWritten = 1 indicating that K,, KZ and R have been set up via the SSI
command; and
IsTrusted = 0 indicating the chip is not trusted since it is not permitted to
generate random
number sequences;
In addition, calls to RD must wait for the MinTicksRemaining register to reach
0. Once it has done so, the register is
reloaded with MinTicks to ensure that a minimum time will elapse between calls
to RD. Once MinTicksRemaining has
been reloaded with MinTicks, the RD command verifies that the input parameters
are valid. This is accomplished by
internally generating FK, [X] for the input X, and then comparing the result
against the input FK, [X]. This generation and
comparison must take the same amount of time regardless of whether the input
parameters are correct or not. If the
times are not the same, an attacker can gain information about which bits of
FK,[X] are incorrect. The only way for the
input parameters to be invalid is an erroneous System (passing the wrong
bits), a case of the wrong consumable in the
wrong System, a bad trusted chip (generating bad pairs), or an attack on the
Authentication Chip. A constant value of 0
is returned when the input parameters are wrong. The time taken for 0 to be
returned must be the same for all bad inputs
so that attackers can learn nothing about what was invalid. Once the input
parameters have been verified the output
values are calculated. The 256 bit content of M are transferred in the
following order: bits 0-15 of M[0], bits 0-15 of
M[1], through to bits 0-15 of M[15]. FKZ[X ~ M] is calculated and output as
bits 0-159. The R register is used to store
the X value during the validation of the X, FK,[X] pair. This is because RND
and RD are mutually exclusive. The RD
command is implemented with the following steps:
Ste Action
1 IF (MinTicksRemaining ~ 0
GOTO 1
2 MinTicksRemainin ~ MinTicks
3 R ~ Read 160 bits from client
4 Hash ~ Calculate FK, [R]
OK E- (Hash = next 160 bits from client)
CA 02456652 2004-02-06
WO 03/015395 PCT/AU02/00919
204
Note that this operation must take constant
time so an attacker cannot determine
how much of their uess is correct.
6 IF (OK)
Output 256 bits of M to client
ELSE
Out ut 256 bits of 0 to client
7 Hash ~ Calculate F~[R M]
8 IF (OK)
Output 160 bits of Hash to client
ELSE
Out ut 160 bits of 0 to client
RND - RANDOM
Input: None
Output: R, FK,[R] _ [160 bits, 160 bits]
Changes: None
The RND (Random) command is used by a client to obtain a valid R, FK,[R] pair
for use in a subsequent authentication
via the RD and TST commands. Since there are no input parameters, an RND
command is therefore simply bits 0-2 of
the RND opcode. The RND command can only be used when the following conditions
have been met:
SIWritten = 1 indicating K, and R have been set up via the SSI command;
IsTrusted = 1 indicating the chip is permitted to generate random number
sequences;
RND returns both R and FK~[R] to the caller. The 288-bit output of the RND
command can be fed straight into the non-
trusted chip's RD command as the input parameters. There is no need for the
client to store them at all, since they are
not required again. However the TST command will only succeed if the random
number passed into the RD command
was obtained first from the RND command. If a caller only calls RND multiple
times, the same R, FK~[R] pair will be
returned each time. R will only advance to the next random number in the
sequence after a successful call to TST. See
TST for more information. The RND command is implemented with the following
steps:
Ste Action
1 Out ut 160 bits of R to client
2 Hash ~ Calculate FK, [R]
3 Output 160 bits of Hash to client
TST - TEST
Input: X, FKZ[R ~ X] _ [256 bits, 160 bits]
Output: 1 or 0 = [ 1 bit]
Changes: M, R and MinTicksRemaining (or all registers if attack detected)
The TST (Test) command is used to authenticate a read of M from a non-trusted
Authentication Chip. The TST (Test)
command consists of the TST command opcode followed by input parameters: X and
FKZ[R ~ X]. Since the
Authentication Chip is serial, this must be transferred one bit at a time. The
bit order is LSB to MSB for each command
CA 02456652 2004-02-06
WO 03/015395 PCT/AU02/00919
205
component. A TST command is therefore: bits 0-2 of the TST opcode, followed by
bits 0-255 of M, bits 0-159 of FKZ[R
~ M]. 419 bits are transferred in total. Since the last 416 input bits are
obtained as the output bits from a RD command to
a non-trusted Authentication Chip, the entire data does not even have to be
stored by the client. Instead, the bits can be
passed directly to the trusted Authentication Chip's TST command. Only the 256
bits of M should be kept from a RD
command. The TST command can only be used when the following conditions have
been met:
SIWritten = 1 indicating Kz and R have been set up via the SSI command;
IsTrusted = 1 indicating the chip is permitted to generate random number
sequences;
In addition, calls to TST must wait for the MinTicksRemaining register to
reach 0. Once it has done so, the register is
reloaded with MinTicks to ensure that a minimum time will elapse between calls
to TST. TST causes the internal M
value to be replaced by the input M value. F~[M ~ R] is then calculated, and
compared against the 160 bit input hash
value. A single output bit is produced: 1 if they are the same, and 0 if they
are different. The use of the internal M value
is to save space on chip, and is the reason why RD and TST are mutually
exclusive commands. If the output bit is 1, R
is updated to be the next random number in the sequence. This forces the
caller to use a new random number each time
RD and TST are called. The resultant output bit is not output until the entire
input string has been compared, so that the
time to evaluate the comparison in the TST function is always the same. Thus
no attacker can compare execution times
or number of bits processed before an output is given.
The next random number is generated from R using a 160-bit maximal period LFSR
(tap selections on bits 159, 4, 2,
and 1). The initial 160-bit value for R is set up via the SSI command, and can
be any random number except 0 (an
LFSR filled with Os will produce a never-ending stream of Os). R is
transformed by XORing bits 1, 2, 4, and 159
together, and shifting all 160 bits right 1 bit using the XOR result as the
input bit to b,59. The new R will be returned on
the next call to RND. Note that the time taken for 0 to be returned from TST
must be the same for all bad inputs so that
attackers can learn nothing about what was invalid about the input.
The TST command is implemented with the following steps:
Ste Action
1 IF (MinTicksRemaining ~ 0
GOTO 1
2 MinTicksRemaining ~- MinTicks
3 M f- Read 256 bits from client
4 IF (R = 0)
GOTO CLR
Hash ~- Calculate FKZ[R M]
6 OK ~ (Hash = next 160 bits from client)
Note that this operation must take constant time
so an attacker cannot determine how
much of their guess is correct.
7 IF (OK)
Temp ~ R
Erase R
Advance TEMP via LFSR
R E- TEMP
CA 02456652 2004-02-06
WO 03/015395 PCT/AU02/00919
206
8 Output 1 bit of OK to client
Note that we can't simply advance R directly in Step 7 since R is Flash
memory, and must be erased in order for any set
bit to become 0. If power is removed from the Authentication Chip during Step
7 after erasing the old value of R, but
before the new value for R has been written, then R will be erased but not
reprogrammed. We therefore have the
situation of IsTrusted=1, yet R=0, a situation only possible due to an
attacker. Step 4 detects this event, and takes action
if the attack is detected. This problem can be avoided by having a second 160-
bit Flash register for R and a Validity
Bit, toggled after the new value has been loaded. It has not been included in
this implementation for reasons of space,
but if chip space allows it, an extra 160-bit Flash register would be useful
for this purpose.
WR - WRITE
Input: M"eW = [256 bits]
Output: None
Changes: M
A WR (Write) command is used to update the writeable parts of M containing
Authentication Chip state data. The WR
command by itself is not secure. It must be followed by an authenticated read
of M (via a RD command) to ensure that
the change was made as specified. The WR command is called by passing the WR
command opcode followed by the
new 256 bits of data to be written to M. Since the Authentication Chip is
serial, the new value for M must be
transferred one bit at a time. The bit order is LSB to MSB for each command
component. A WR command is therefore:
bits 0-2 of the WR opcode, followed by bits 0-15 of M[0], bits 0-15 of M[1],
through to bits 0-15 of M[15]. 259 bits are
transferred in total. The WR command can only be used when SIWritten = 1,
indicating that K,, KZ and R have been set
up via the SSI command (if SIWritten is 0, then K,, KZ and R have not been
setup yet, and the CLR command is called
instead). The ability to write to a specific M[n] is governed by the
corresponding Access Mode bits as stored in the
AccessMode register. The AccessMode bits can be set using the SAM command.
When writing the new value to M[n]
the fact that M[n] is Flash memory must be taken into account. All the bits of
M[n] must be erased, and then the
appropriate bits set. Since these two steps occur on different cycles, it
leaves the possibility of attack open. An attacker
can remove power after erasure, but before programming with the new value.
However, there is no advantage to an
attacker in doing this:
A Read/Write M[n] changed to 0 by this means is of no advantage since the
attacker could have written any value using
the WR command anyway.
A Read Only M[n] changed to 0 by this means allows an additional known text
pair (where the M[n] is 0 instead of the
original value). For future use M[n] values, they are already 0, so no
information is given.
A Decrement Only M[n] changed to 0 simply speeds up the time in which the
consumable is used up. It does not give
any new information to an attacker that using the consumable would give.
The WR command is implemented with the following steps:
Ste Action
1 DecEncountered ~ 0
CA 02456652 2004-02-06
WO 03/015395 PCT/AU02/00919
207
LT <-- (Temp < M[-n]) [comparison
is unsigned]
EQ ~ (Tem = M[~n])
6 WE E- (AM = RW) v
((AM = MSR) n LT) v
((AM = NMSR) n (DecEncountered v
LT))
7 DecEncountered ~ ((AM = MSR) n LT)
v
((AM = NMSR) n DecEncountered) v
((AM = NMSR) n EqEncountered n LT)
EqEncountered ~ ((AM = MSR) n EQ)
v
((AM = NMSR) n E Encountered n EQ)
Advance to the next Access Mode set
and write the new M[-n] if
8 ~ IF (WE)
Erase M[-n]
~n
11 ~ IF (n ~ 0)
GOTO 2
SAM - SET ACCESSMODE
Input: AccessMode"eW = [32 bits]
Output: AccessMode = [32 bits]
Changes: AccessMode
The SAM (Set Access Mode) command is used to set the 32 bits of the AccessMode
register, and is only available for
use in consumable Authentication Chips (where the IsTrusted flag = 0). The SAM
command is called by passing the
SAM command opcode followed by a 32-bit value that is used to set bits in the
AccessMode register. Since the
Authentication Chip is serial, the data must be transferred one bit at a time.
The bit order is LSB to MSB for each
command component. A SAM command is therefore: bits 0-2 of the SAM opcode,
followed by bits 0-31 of bits to be
set in AccessMode. 35 bits are transferred in total. The AccessMode register
is only cleared to 0 upon execution of a
CLR command. Since an access mode of 00 indicates an access mode of RW
(read/write), not setting any AccessMode
bits after a CLR means that all of M can be read from and written to. The SAM
command only sets bits in the
AccessMode register. Consequently a client can change the access mode bits for
M[n] from RW to RO (read only) by
setting the appropriate bits in a 32-bit word, and calling SAM with that 32-
bit value as the input parameter. This allows
the programming of the access mode bits at different times, perhaps at
different stages of the manufacturing process.
CA 02456652 2004-02-06
WO 03/015395 PCT/AU02/00919
208
For example, the read only random data can be written to during the initial
key programming stage, while allowing a
second programming stage for items such as consumable serial numbers.
Since the SAM command only sets bits, the effect is to allow the access mode
bits corresponding to M(n] to progress
from RW to either MSR, NMSR, or RO. It should be noted that an access mode of
MSR can be changed to RO, but this
would not help an attacker, since the authentication of M after a write to a
doctored Authentication Chip would detect
that the write was not successful and hence abort the operation. The setting
of bits corresponds to the way that Flash
memory works best. The only way to clear bits in the AccessMode register, for
example to change a Decrement Only
M[n] to be Read/Write, is to use the CLR command. The CLR command not only
erases (clears) the AccessMode
register, but also clears the keys and all of M. Thus the AccessMode[n] bits
corresponding to M[n] can only usefully be
changed once between CLR commands. The SAM command returns the new value of
the AccessMode register (after
the appropriate bits have been set due to the input parameter). By calling SAM
with an input parameter of 0,
AccessMode will not be changed, and therefore the current value of AccessMode
will be returned to the caller.
The SAM command is implemented with the following steps:
Ste Action
I Tem ~ Read 32 bits from client
2 SetBits(AccessMode, Tem )
3 Output 32 bits of AccessMode to client
GIT - GET IS TRUSTED
Input: None
Output: IsTrusted = [1 bit]
Changes: None
The GIT (Get Is Trusted) command is used to read the current value of the
IsTrusted bit on the Authentication Chip. If
the bit returned is I, the Authentication Chip is a trusted System
Authentication Chip. If the bit returned is 0, the
Authentication Chip is a consumable Authentication Chip. A GIT command
consists of simply the GIT command
opcode. Since the Authentication Chip is serial, this must be transferred one
bit at a time. The bit order is LSB to MSB
for each command component. A GIT command is therefore sent as bits 0-2 of the
GIT opcode. A total of 3 bits are
transferred. The GIT command is implemented with the following steps:
Action
I 1 I Output IsTrusted bit to client I
SMT - SET MINTICKS
Input: MinTicks"eW = [32 bits]
Output: None
CA 02456652 2004-02-06
WO 03/015395 PCT/AU02/00919
209
Changes: MinTicks
The SMT (Set MinTicks) command is used to set bits in the MinTicks register
and hence define the minimum number
of ticks that must pass in between calls to TST and RD. The SMT command is
called by passing the SMT command
opcode followed by a 32-bit value that is used to set bits in the MinTicks
register. Since the Authentication Chip is
serial, the data must be transferred one bit at a time. The bit order is LSB
to MSB for each command component. An
SMT command is therefore: bits 0-2 of the SMT opcode, followed by bits 0-31 of
bits to be set in MinTicks. 35 bits are
transferred in total. The MinTicks register is only cleared to 0 upon
execution of a CLR command. A value of 0
indicates that no ticks need to pass between calls to key-based functions. The
functions may therefore be called as
frequently as the clock speed limiting hardware allows the chip to run.
Since the SMT command only sets bits, the effect is to allow a client to set a
value, and only increase the time delay if
further calls are made. Setting a bit that is already set has no effect, and
setting a bit that is clear only serves to slow the
chip down further. The setting of bits corresponds to the way that Flash
memory works best. The only way to clear bits
in the MinTicks register, for example to change a value of 10 ticks to a value
of 4 ticks, is to use the CLR command.
However the CLR command clears the MinTicks register to 0 as well as clearing
all keys and M. It is therefore useless
for an attacker. Thus the MinTicks register can only usefully be changed once
between CLR commands.
The SMT command is implemented with the following steps:
Ste Action
1 Tem ~ Read 32 bits from client
2 SetBits(MinTicks, Temp)
PROGRAMMING AUTHENTICATION CHIPS
Authentication Chips must be programmed with logically secure information in a
physically secure environment.
Consequently the programming procedures cover both logical and physical
security. Logical security is the process of
ensuring that K,, K2, R, and the random M[n] values are generated by a
physically random process, and not by a
computer. It is also the process of ensuring that the order in which parts of
the chip are programmed is the most
logically secure. Physical security is the process of ensuring that the
programming station is physically secure, so that
K, and KZ remain secret, both during the key generation stage and during the
lifetime of the storage of the keys. In
addition, the programming station must be resistant to physical attempts to
obtain or destroy the keys. The
Authentication Chip has its own security mechanisms for ensuring that K, and
Kz are kept secret, but the Programming
Station must also keep K, and KZ safe.
OVERVIEW
After manufacture, an Authentication Chip must be programmed before it can be
used. In all chips values for K~ and KZ
must be established. If the chip is destined to be a System Authentication
Chip, the initial value for R must be
determined. If the chip is destined to be a consumable Authentication Chip, R
must be set to 0, and initial values for M
and AccessMode must be set up. The following stages are therefore identified:
Determine Interaction between Systems and Consumables
Determine Keys for Systems and Consumables
Determine MinTicks for Systems and Consumables
CA 02456652 2004-02-06
WO 03/015395 PCT/AU02/00919
210
Program Keys, Random Seed, MinTicks and Unused M
Program State Data and Access Modes
Once the consumable or system is no longer required, the attached
Authentication Chip can be reused. This is easily
accomplished by reprogrammed the chip starting at Stage 4 again. Each of the
stages is examined in the subsequent
sections.
STAGE O: MANUFACTURE
The manufacture of Authentication Chips does not require any special security.
There is no secret information
programmed into the chips at manufacturing stage. The algorithms and chip
process is not special. Standard Flash
processes are used. A theft of Authentication Chips between the chip
manufacturer and programming station would
only provide the clone manufacturer with blank chips. This merely compromises
the sale of Authentication chips, not
anything authenticated by Authentication Chips. Since the programming station
is the only mechanism with consumable
and system product keys, a clone manufacturer would not be able to program the
chips with the correct key. Clone
manufacturers would be able to program the blank chips for their own systems
and consumables, but it would be
difficult to place these items on the market without detection. In addition, a
single theft would be difficult to base a
business around.
STAGE I: DETERMINE INTERACTION BETWEEN SYSTEMS AND CONSUMABLES
The decision of what is a System and what is a Consumable needs to be
determined before any Authentication Chips
can be programmed. A decision needs to be made about which Consumables can be
used in which Systems, since all
connected Systems and Consumables must share the same key information. They
also need to share state-data usage
mechanisms even if some of the interpretations of that data have not yet been
determined. A simple example is that of a
car and car-keys. The car itself is the System, and the car-keys are the
consumables. There are several car-keys for each
car, each containing the same key information as the specific car. However
each car (System) would contain a different
key (shared by its car-keys), since we don't want car-keys from one car
working in another. Another example is that of
a photocopier that requires a particular toner cartridge. In simple terms the
photocopier is the System, and the toner
cartridge is the consumable. However the decision must be made as to what
compatibility there is to be between
cartridges and photocopiers. The decision has historically been made in terms
of the physical packaging of the toner
cartridge: certain cartridges will or won't fit in a new model photocopier
based on the design decisions for that copier.
When Authentication Chips are used, the components that must work together
must share the same key information.
In addition, each type of consumable requires a different way of dividing M
(the state data). Although the way in which
M is used will vary from application to application, the method of allocating
M[n] and AccessMode[n] will be the same:
Define the consumable state data for specific use
Set some M[n] registers aside for future use (if required). Set these to be 0
and Read Only. The value can be tested for in
Systems to maintain compatibility.
Set the remaining M[n] registers (at least one, but it does not have to be
M[15]) to be Read Only, with the contents of
each M[n] completely random. This is to make it more difficult for a clone
manufacturer to attack the
authentication keys.
CA 02456652 2004-02-06
WO 03/015395 PCT/AU02/00919
211
The following examples show ways in which the state data may be organized.
Example 1
Suppose we have a car with associated car-keys. A 16-bit key number is more
than enough to uniquely identify each
car-key for a given car. The 256 bits of M could be divided up as follows:
M[n] Access Descri tion
0 RO Ke number (16 bits)
1-4 RO Car en ine number (64 bits)
5-8 RO For future ex ansion = 0 (64 bits)
~15 RO Random bit data (128 bits)
If the car manufacturer keeps all logical keys for all cars, it is a trivial
matter to manufacture a new physical car-key for
a given car should one be lost. The new car-key would contain a new Key Number
in M[0], but have the same K, and
KZ as the car's Authentication Chip. Car Systems could allow specific key
numbers to be invalidated (for example if a
key is lost). Such a system might require Key 0 (the master key) to be
inserted first, then all valid keys, then Key 0
again. Only those valid keys would now work with the car. In the worst case,
for example if all car-keys are lost, then a
new set of logical keys could be generated for the car and its associated
physical car-keys if desired. The Car engine
number would be used to tie the key to the particular car. Future use data may
include such things as rental information,
such as driver/renter details.
Example 2
Suppose we have a photocopier image unit which should be replaced every
100,000 copies. 32 bits are required to store
the number of pages remaining. The 256 bits of M could be divided up as
follows:
M[n] Access Description
0 RO Serial number (16 bits)
1 RO Batch number (16 bits)
2 MSR Page Count Remaining (32 bits, hi/lo)
3 NMSR
4-7 RO For future expansion = 0 (64 bits)
8-15 RO Random bit data (128 bits)
If a lower quality image unit is made that must be replaced after only 10,000
copies, the 32-bit page count can still be
used for compatibility with existing photocopiers. This allows several
consumable types to be used with the same
system.
Example 3
Consider a Polaroid camera consumable containing 25 photos. A 16-bit countdown
is all that is required to store the
number of photos remaining. The 256 bits of M could be divided up as follows:
Access
I 0 I RO I Serial number (16 bits) 1
CA 02456652 2004-02-06
WO 03/015395 PCT/AU02/00919
212
1 RO Batch number (16 bits)
2 MSR Photos Remainin (16 bits)
3-6 RO For future ex ansion = 0 (64 bits)
7-15 RO Random bit data (144 bits)
The Photos Remaining value at M[2] allows a number of consumable types to be
built for use with the same camera
System. For example, a new consumable with 36 photos is trivial to program.
Suppose 2 years after the introduction of
the camera, a new type of camera was introduced. It is able to use the old
consumable, but also can process a new film
type. M[3] can be used to define Film Type. Old film types would be 0, and the
new film types would be some new
value. New Systems can take advantage of this. Original systems would detect a
non-zero value at M[3] and realize
incompatibility with new film types. New Systems would understand the value of
M[3] and so react appropriately. To
maintain compatibility with the old consumable, the new consumable and System
needs to have the same key
information as the old one. To make a clean break with a new System and its
own special consumables, a new key set
would be required.
Example 4
Consider a printer consumable containing 3 inks: cyan, magenta, and yellow.
Each ink amount can be decremented
separately. The 256 bits of M could be divided up as follows:
M[n] Access Descri tion
0 RO Serial number (16 bits)
1 RO Batch number (16 bits)
2 MSR Cyan Remaining (32 bits, hi/lo)
3 NMSR
4 MSR Magenta Remaining (32 bits, hi/lo)
NMSR
6 MSR Yellow Remaining (32 bits, hi/lo)
7 NMSR
8-11 RO For future ex ansion = 0 (64 bits)
12-15 RO Random bit data (64 bits)
STAGE 2: DETERMINE KEYS FOR SYSTEMS AND CONSUMABLES
Once the decision has been made as to which Systems and consumables are to
share the same keys, those keys must be
defined. The values for K, and KZ must therefore be determined. In most cases,
K, and KZ will be generated once for all
time. All Systems and consumables that have to work together (both now and in
the future) need to have the same K,
and KZ values. K, and Kz must therefore be kept secret since the entire
security mechanism for the System/Consumable
combination is made void if the keys are compromised. If the keys are
compromised, the damage depends on the
number of systems and consumables, and the ease to which they can be
reprogrammed with new non-compromised
keys: In the case of a photocopier with toner cartridges, the worst case is
that a clone manufacturer could then
manufacture their own Authentication Chips (or worse, buy them), program the
chips with the known keys, and then
insert them into their own consumables. In the case of a car with car-keys,
each car has a different set of keys. This
leads to two possible general scenarios. The first is that after the car and
car-keys are programmed with the keys, K, and
CA 02456652 2004-02-06
WO 03/015395 PCT/AU02/00919
213
Kz are deleted so no record of their values are kept, meaning that there is no
way to compromise K, and Kz. However no
more car-keys can be made for that car without reprogramming the car's
Authentication Chip. The second scenario is
that the car manufacturer keeps K, and K2, and new keys can be made for the
car. A compromise of K, and KZ means
that someone could make a car-key specifically for a particular car.
The keys and random data used in the Authentication Chips must therefore be
generated by a means that is non-
deterministic (a completely computer generated pseudo-random number cannot be
used because it is deterministic -
knowledge of the generator's seed gives all future numbers). K, and KZ should
be generated by a physically random
process, and not by a computer. However, random bit generators based on
natural sources of randomness are subject to
influence by external factors and also to malfunction. It is imperative that
such devices be tested periodically for
statistical randomness.
A simple yet useful source of random numbers is the Lavarand ~ system from
SGI. This generator uses a digital camera
to photograph six lava lamps every few minutes. Lava lamps contain chaotic
turbulent systems. The resultant digital
images are fed into an SHA-1 implementation that produces a 7-way hash,
resulting in a 160-bit value from every 7th
bye from the digitized image. These 7 sets of 160 bits total 140 bytes. The
140 byte value is fed into a BBS generator to
position the start of the output bitstream. The output 160 bits from the BBS
would be the key or the Authentication chip
53.
An extreme example of a non-deterministic random process is someone flipping a
coin 160 times for Kl and 160 times
for K2 in a clean room. With each head or tail, a 1 or 0 is entered on a panel
of a Key Programmer Device. The process
must be undertaken with several observers (for verification) in silence
(someone may have a hidden microphone). The
point to be made is that secure data entry and storage is not as simple as it
sounds. The physical security of the Key
Programmer Device and accompanying Programming Station requires an entire
document of its own. Once keys K, and
Kz have been determined, they must be kept for as long as Authentication Chips
need to be made that use the key. In the
first car/car-key scenario K, and Kz are destroyed after a single System chip
and a few consumable chips have been
programmed. In the case of the photocopier / toner cartridge, K, and KZ must
be retained for as long as the toner-
cartridges are being made for the photocopiers. The keys must be kept
securely.
STAGE 3: DETERMINE MINTICKS FOR SYSTEMS AND CONSUMABLES
The value of MinTicks depends on the operating clock speed of the
Authentication Chip (System specific) and the
notion of what constitutes a reasonable time between RD or TST function calls
(application specific). The duration of a
single tick depends on the operating clock speed. This is the maximum of the
input clock speed and the Authentication
Chip's clock-limiting hardware. For example, the Authentication Chip's clock-
limiting hardware may be set at 10 MHz
(it is not changeable), but the input clock is 1 MHz. In this case, the value
of 1 tick is based on 1 MHz, not 10 MHz. If
the input clock was 20 MHz instead of 1 MHz, the value of 1 tick is based on
10 MHz (since the clock speed is limited
to 10 MHz). Once the duration of a tick is known, the MinTicks value can be
set. The value for Min'Picks is the
minimum number of ticks required to pass between calls to RD or RND key-based
functions. Suppose the input clock
speed matches the maximum clock speed of 10 MHz. If we want a minimum of 1
second between calls to TST, the
value for MinTicks is set to 10,000,000. Even a value such as 2 seconds might
be a completely reasonable value for a
System such as a printer (one authentication per page, and one page produced
every 2 or 3 seconds).
CA 02456652 2004-02-06
WO 03/015395 PCT/AU02/00919
214
STAGE 4: PROGRAM KEYS, RANDOM SEED, MINTICKS AND UNUSED M
Authentication Chips are in an unknown state after manufacture. Alternatively,
they have already been used in one
consumable, and must be reprogrammed for use in another. Each Authentication
Chip must be cleared and programmed
with new keys and new state data. Clearing and subsequent programming of
Authentication Chips must take place in a
secure Programming Station environment.
Pro ramming a Trusted System Authentication Chip
If the chip is to be a trusted System chip, a seed value for R must be
generated. It must be a random number derived
from a physically random process, and must not be 0. The following tasks must
be undertaken, in the following order,
and in a secure programming environment:
RESET the chip
CLR[]
Load R (160 bit register) with physically random data
SSI[K,, Kz, R]
SMT[MinTickssyste"~
The Authentication Chip is now ready for insertion into a System. It has been
completely programmed. If the System
Authentication Chips are stolen at this point, a clone manufacturer could use
them to generate R, FK, [R] pairs in order to
launch a known text attack on K,, or to use for launching a partially chosen-
text attack on K2. This is no different to the
purchase of a number of Systems, each containing a trusted Authentication
Chip. The security relies on the strength of
the Authentication protocols and the randomness of K, and K2.
Programming a Non-Trusted Consumable Authentication Chip
If the chip is to be a non-trusted Consumable Authentication Chip, the
programming is slightly different to that of the
trusted System Authentication Chip. Firstly, the seed value for R must be 0.
It must have additional programming for M
and the AccessMode values. The future use M[n] must be programmed with 0, and
the random M[n] must be
programmed with random data. The following tasks must be undertaken, in the
following order, and in a secure
programming environment:
RESET the chip
CLR[]
Load R (160 bit register) with 0
SSI[K,, Kz, R]
Load X (256 bit register) with 0
Set bits in X corresponding to appropriate M[n] with physically random data
WR[X]
Load Y (32 bit register) with 0
Set bits in Y corresponding to appropriate M[n] with Read Only Access Modes
SAM[Y]
SMT[MlnTICICSCoasurtcible]
CA 02456652 2004-02-06
WO 03/015395 PCT/AU02/00919
215
The non-trusted consumable chip is now ready to be programmed with the general
state data. If the Authentication
Chips are stolen at this point, an attacker could perform a limited chosen
text attack. In the best situation, parts of M are
Read Only (0 and random data), with the remainder of M completely chosen by an
attacker (via the WR command). A
number of RD calls by an attacker obtains F,~[MAR] for a limited M. In the
worst situation, M can be completely chosen
by an attacker (since all 256 bits are used for state data). In both cases
however, the attacker cannot choose any value
for R since it is supplied by calls to RIVD from a System Authentication Chip.
The only way to obtain a chosen R is by a
Brute Force attack. It should be noted that if Stages 4 and 5 are carried out
on the same Programming Station (the
preferred and ideal situation), Authentication Chips cannot be removed in
between the stages. Hence there is no
possibility of the Authentication Chips being stolen at this point. The
decision to program the Authentication Chips at
one or two times depends on the requirements of the System/Consumable
manufacturer.
STAGE S: PROGRAM STATE DATA AND ACCESS MODES
This stage is only required for consumable Authentication Chips, since M and
AccessMode registers cannot be altered
on System Authentication Chips. The future use and random values of M[n] have
already been programmed in Stage 4.
The remaining state data values need to be programmed and the associated
Access Mode values need to be set. Bear in
mind that the speed of this stage will be limited by the value stored in the
MinTicks register. This stage is separated
from Stage 4 on account of the differences either in physical location or in
time between where/when Stage 4 is
performed, and where/when Stage S is performed. Ideally, Stages 4 and 5 are
performed at the same time in the same
Programming Station. Stage 4 produces valid Authentication Chips, but does not
load them with initial state values
(other than 0). This is to allow the programming of the chips to coincide with
production line runs of consumables.
Although Stage 5 can be run multiple times, each time setting a different
state data value and Access Mode value, it is
more likely to be run a single time, setting all the remaining state data
values and setting all the remaining Access Mode
values. For example, a production line can be set up where the batch number
and serial number of the Authentication
Chip is produced according to the physical consumable being produced. This is
much harder to match if the state data is
loaded at a physically different factory.
The Stage 5 process involves first checking to ensure the chip is a valid
consumable chip, which includes a RD to gather
the data from the Authentication Chip, followed by a WR of the initial data
values, and then a SAM to permanently set
the new data values. The steps are outlined here:
IsTrusted = GIT[]
If (IsTrusted), exit with error (wrong kind of chip!)
Call RND on a valid System chip to get a valid input pair
Call RD on chip to be programmed, passing in valid input pair
Load X (256 bit register) with results from a RD of Authentication Chip
Call TST on valid System chip to ensure X and consumable chip are valid
If (TST returns 0), exit with error (wrong consumable chip for system)
Set bits of X to initial state values
WR(X]
Load Y (32 bit register) with 0
Set bits of Y corresponding to Access Modes for new state values
CA 02456652 2004-02-06
WO 03/015395 PCT/AU02/00919
216
SAM[Y]
Of course the validation (Steps 1 to 7) does not have to occur if Stage 4 and
5 follow on from one another on the same
Programming Station. But it should occur in all other situations where Stage 5
is run as a separate programming process
from Stage 4. If these Authentication Chips are now stolen, they are already
programmed for use in a particular
consumable. An attacker could place the stolen chips into a clone consumable.
Such a theft would limit the number of
cloned products to the number of chips stolen. A single theft should not
create a supply constant enough to provide
clone manufacturers with a cost-effective business. The alternative use for
the chips is to save the attacker from
purchasing the same number of consumables, each with an Authentication Chip,
in order to launch a partially chosen
text attack or brute force attack. There is no special security breach of the
keys if such an attack were to occur.
MANUFACTURE
The circuitry of the Authentication Chip must be resistant to physical attack.
A summary of manufacturing
implementation guidelines is presented, followed by specification of the
chip's physical defenses (ordered by attack).
GUmELINES FOR MANUFACTURING
The following are general guidelines for implementation of an Authentication
Chip in terms of manufacture:
Standard process
Minimum size (if possible)
Clock Filter
Noise Generator
Tamper Prevention and Detection circuitry
Protected memory with tamper detection
Boot circuitry for loading program code
Special implementation of FETs for key data paths
Data connections in polysilicon layers where possible
OverUnderPower Detection Unit
No test circuitry
Standard Process
The Authentication Chip should be implemented with a standard manufacturing
process (such as Flash). This is
necessary to:
Allow a great range of manufacturing location options
Take advantage of well-defined and well-known technology
Reduce cost
Note that the standard process still allows physical protection mechanisms.
Minimum size
The Authentication chip 53 must have a low manufacturing cost in order to be
included as the authentication
mechanism for low cost consumables. It is therefore desirable to keep the chip
size as low as reasonably possible. Each
Authentication Chip requires 802 bits of non-volatile memory. In addition, the
storage required for optimized HMAC-
SHA1 is 1024 bits. The remainder of the chip (state machine, processor, CPU or
whatever is chosen to implement
Protocol 3) must be kept to a minimum in order that the number of transistors
is minimized and thus the cost per chip is
CA 02456652 2004-02-06
WO 03/015395 PCT/AU02/00919
217
minimized. The circuit areas that process the secret key information or could
reveal information about the key should
also be minimized (see Non-Flashing CMOS below for special data paths).
Clock Filter
The Authentication Chip circuitry is designed to operate within a specific
clock speed range. Since the user directly
supplies the clock signal, it is possible for an attacker to attempt to
introduce race-conditions in the circuitry at specific
times during processing. An example of this is where a high clock speed
(higher than the circuitry is designed for) may
prevent an XOR from working properly, and of the two inputs, the first may
always be returned. These styles of
transient fault attacks can be very efficient at recovering secret key
information. The lesson to be learned from this is
that the input clock signal cannot be trusted. Since the input clock signal
cannot be trusted, it must be limited to operate
up to a maximum frequency. This can be achieved a number of ways. One way to
filter the clock signal is to use an
edge detect unit passing the edge on to a delay, which in turn enables the
input clock signal to pass through. Fig. 174
shows clock signal flow within the Clock Filter. The delay should be set so
that the maximum clock speed is a
particular frequency (e.g. about 4 MHz). Note that this delay is not
programmable - it is fixed. The filtered clock signal
would be further divided internally as required.
Noise Generator
Each Authentication Chip should contain a noise generator that generates
continuous circuit noise. The noise will
interfere with other electromagnetic emissions from the chip's regular
activities and add noise to the Idd signal.
Placement of the noise generator is not an issue on an Authentication Chip due
to the length of the emission
wavelengths. The noise generator is used to generate electronic noise,
multiple state changes each clock cycle, and as a
source of pseudo-random bits for the Tamper Prevention and Detection
circuitry. A simple implementation of a noise
generator is a 64-bit LFSR seeded with a non-zero number. The clock used for
the noise generator should be running at
the maximum clock rate for the chip in order to generate as much noise as
possible.
Tamper Prevention and Detection circuitry
A set of circuits is required to test for and prevent physical attacks on the
Authentication Chip. However what is
actually detected as an attack may not be an intentional physical attack. It
is therefore important to distinguish between
these two types of attacks in an Authentication Chip:
where you can be certain that a physical attack has occurred.
where you cannot be certain that a physical attack has occurred.
The two types of detection differ in what is performed as a result of the
detection. In the first case, where the circuitry
can be certain that a true physical attack has occurred, erasure of Flash
memory key information is a sensible action. In
the second case, where the circuitry cannot be sure if an attack has occurred,
there is still certainly something wrong.
Action must be taken, but the action should not be the erasure of secret key
information. A suitable action to take in the
second case is a chip RESET. If what was detected was an attack that has
permanently damaged the chip, the same
conditions will occur next time and the chip will RESET again. If, on the
other hand, what was detected was part of the
normal operating environment of the chip, a RESET will not harm the key.
A good example of an event that circuitry cannot have knowledge about, is a
power glitch. The glitch may be an
intentional attack, attempting to reveal information about the key. It may,
however, be the result of a faulty connection,
or simply the start of a power-down sequence. It is therefore best to only
RESET the chip, and not erase the key. If the
CA 02456652 2004-02-06
WO 03/015395 PCT/AU02/00919
218
chip was powering down, nothing is lost. If the System is faulty, repeated
RESETS will cause the consumer to get the
System repaired. In both cases the consumable is still intact.A good example
of an event that circuitry can have
knowledge about, is the cutting of a data line within the chip. If this attack
is somehow detected, it could only be a result
of a faulty chip (manufacturing defect) or an attack. In either case, the
erasure of the secret information is a sensible step
to take.
Consequently each Authentication Chip should have 2 Tamper Detection Lines as
illustrated in Fig. - one for definite
attacks, and one for possible attacks. Connected to these Tamper Detection
Lines would be a number of Tamper
Detection test units, each testing for different forms of tampering. In
addition, we want to ensure that the Tamper
Detection Lines and Circuits themselves cannot also be tampered with.
At one end of the Tamper Detection Line is a source of pseudo-random bits
(clocking at high speed compared to the
general operating circuitry). The Noise Generator circuit described above is
an adequate source. The generated bits pass
through two different paths - one carries the original data, and the other
carries the inverse of the data. The wires
carrying these bits are in the layer above the general chip circuitry (for
example, the memory, the key manipulation
circuitry etc). The wires must also cover the random bit generator. The bits
are recombined at a number of places via an
XOR gate. If the bits are different (they should be), a 1 is output, and used
by the particular unit (for example, each
output bit from a memory read should be ANDed with this bit value). The lines
finally come together at the Flash
memory Erase circuit, where a complete erasure is triggered by a 0 from the
XOR. Attached to the line is a number of
triggers, each detecting a physical attack on the chip. Each trigger has an
oversize nMOS transistor attached to GND.
The Tamper Detection Line physically goes through this nMOS transistor. If the
test fails, the trigger causes the Tamper
Detect Line to become 0. The XOR test will therefore fail on either this clock
cycle or the next one (on average), thus
RESETing or erasing the chip. Fig. 175 illustrates the basic principle of a
Tamper Detection Line in terms of tests and
the XOR connected to either the Erase or RESET circuitry.
The Tamper Detection Line must go through the drain of an output transistor
for each test, as illustrated by the oversize
nMOS transistor layout of Fig. 176. :It is not possible to break the Tamper
Detect Line since this would stop the flow of
is and Os from the random source. The XOR tests would therefore fail. As the
Tamper Detect Line physically passes
through each test, it is not possible to eliminate any particular test without
breaking the Tamper Detect Line. It is
important that the XORs take values from a variety of places along the Tamper
Detect Lines in order to reduce the
chances of an attack. Fig. 177 illustrates the taking of multiple XORs from
the Tamper Detect Line to be used in the
different parts of the chip. Each of these XORs can be considered to be
generating a ChipOK bit that can be used within
each unit or sub-unit.
A sample usage would be to have an OK bit in each unit that is ANDed with a
given ChipOK bit each cycle. The OK bit
is loaded with 1 on a RESET. If OK is 0, that unit will fail until the next
RESET. If the Tamper Detect Line is
functioning correctly, the chip will either RESET or erase all key
information. If the RESET or erase circuitry has been
destroyed, then this unit will not function, thus thwarting an attacker. The
destination of the RESET and Erase line and
associated circuitry is very context sensitive. It needs to be protected in
much the same way as the individual tamper
tests. There is no point generating a RESET pulse if the attacker can simply
cut the wire leading to the RESET circuitry.
The actual implementation will depend very much on what is to be cleared at
RESET, and how those items are cleared.
CA 02456652 2004-02-06
WO 03/015395 PCT/AU02/00919
219
Finally, Fig. 178 shows how the Tamper Lines cover the noise generator
circuitry of the chip. The generator and NOT
gate are on one level, while the Tamper Detect Lines run on a level above the
generator.
Protected memory with tamper detection
It is not enough to simply store secret information or program code in Flash
memory. The Flash memory and RAM
must be protected from an attacker who would attempt to modify (or set) a
particular bit of program code or key
information. The mechanism used must conform to being used in the Tamper
Detection Circuitry (described above).
The first part of the solution is to ensure that the Tamper Detection Line
passes directly above each Flash or RAM bit.
This ensures that an attacker cannot probe the contents of Flash or RAM. A
breach of the covering wire is a break in the
Tamper Detection Line. The breach causes the Erase signal to be set, thus
deleting any contents of the memory. The
high frequency noise on the Tamper Detection Line also obscures passive
observation.
The second part of the solution for Flash is to use multi-level data storage,
but only to use a subset of those multiple
levels for valid bit representations. Normally, when multi-level Flash storage
is used, a single floating gate holds more
than one bit. For example, a 4-voltage-state transistor can represent two
bits. Assuming a minimum and maximum
voltage representing 00 and 11 respectively, the two middle voltages represent
O1 and 10. In the Authentication Chip,
we can use the two middle voltages to represent a single bit, and consider the
two extremes to be invalid states. If an
attacker attempts to force the state of a bit one way or the other by closing
or cutting the gate's circuit, an invalid
voltage (and hence invalid state) results.
The second part of the solution for RAM is to use a parity bit. The data part
of the register can be checked against the
parity bit (which will not match after an attack). The bits coming from Flash
and RAM can therefore be validated by a
number of test units (one per bit) connected to the common Tamper Detection
Line. The Tamper Detection circuitry
would be the first circuitry the data passes through (thus stopping an
attacker from cutting the data lines).
Boot circuitry for loadine program code
Program code should be kept in multi-level Flash instead of ROM, since ROM is
subject to being altered in a non-
testable way. A boot mechanism is therefore required to load the program code
into Flash memory (Flash memory is in
an indeterminate state after manufacture). The boot circuitry must not be in
ROM - a small state-machine would
suffice. Otherwise the boot code could be modified in an undetectable way. The
boot circuitry must erase all Flash
memory, check to ensure the erasure worked, and then load the program code.
Flash memory must be erased before
loading the program code. Otherwise an attacker could put the chip into the
boot state, and then load program code that
simply extracted the existing keys. The state machine must also check to
ensure that all Flash memory has been cleared
(to ensure that an attacker has not cut the Erase line) before loading the new
program code. The loading of program
code must be undertaken by the secure Programming Station before secret
information (such as keys) can be loaded.
Special implementation of FETs for key data paths
The normal situation for FET implementation for the case of a CMOS Inverter
(which involves a pMOS transistor
combined with an nMOS transistor) is shown in Fig. 179. During the transition,
there is a small period of time where
both the nMOS transistor and the pMOS transistor have an intermediate
resistance. The resultant power-ground short
circuit causes a temporary increase in the current, and in fact accounts for
the majority of current consumed by a CMOS
device. A small amount of infrared light is emitted during the short circuit,
and can be viewed through the silicon
CA 02456652 2004-02-06
WO 03/015395 PCT/AU02/00919
220
substrate (silicon is transparent to infrared light). A small amount of light
is also emitted during the charging and
discharging of the transistor gate capacitance and transmission line
capacitance.
For circuitry that manipulates secret key information, such information must
be kept hidden. An alternative non-flashing
CMOS implementation should therefore be used for all data paths that
manipulate the key or a partially calculated value
that is based on the key. The use of two non-overlapping clocks ~1 and ~2 can
provide a non-flashing mechanism. ~1 is
connected to a second gate of all nMOS transistors, and ~2 is connected to a
second gate of all pMOS transistors. The
transition can only take place in combination with the clock. Since ~1 and ~2
are non-overlapping, the pMOS and
nMOS transistors will not have a simultaneous intermediate resistance. The
setup is shown in Fig. 180.
Finally, regular CMOS inverters can be positioned near critical non-Flashing
CMOS components. These inverters
should take their input signal from the Tamper Detection Line above. Since the
Tamper Detection Line operates
multiple times faster than the regular operating circuitry, the net effect
will be a high rate of light-bursts next to each
non-Flashing CMOS component. Since a bright light overwhelms observation of a
nearby faint light, an observer will
not be able to detect what switching operations are occurring in the chip
proper. These regular CMOS inverters will also
effectively increase the amount of circuit noise, reducing the SNR and
obscuring useful EMI.
There are a number of side effects due to the use of non-Flashing CMOS:
The effective speed of the chip is reduced by twice the rise time of the clock
per clock cycle. This is not a problem for
an Authentication Chip.
The amount of current drawn by the non-Flashing CMOS is reduced (since the
short circuits do not occur). However,
this is offset by the use of regular CMOS inverters.
Routing of the clocks increases chip area, especially since multiple versions
of ~1 and ø2 are required to cater for
different levels of propagation. The estimation of chip area is double that of
a regular implementation.
Design of the non-Flashing areas of the Authentication Chip are slightly more
complex than to do the same with a with
a regular CMOS design. In particular, standard cell components cannot be used,
making these areas full custom.
This is not a problem for something as small as an Authentication Chip,
particularly when the entire chip does not
have to be protected in this manner.
Connections in nolysilicon layers where possible
Wherever possible, the connections along which the key or secret data flows,
should be made in the polysilicon layers.
Where necessary, they can be in metal 1, but must never be in the top metal
layer (containing the Tamper Detection
Lines).
OverUnderPower Detection Unit
Each Authentication Chip requires an OverUnderPower Detection Unit to prevent
Power Supply Attacks. An
OverUnderPower Detection Unit detects power glitches and tests the power level
against a Voltage Reference to ensure
it is within a certain tolerance. The Unit contains a single Voltage Reference
and two comparators. The
OverUnderPower Detection Unit would be connected into the RESET Tamper
Detection Line, thus causing a RESET
when triggered. A side effect of the OverUnderPower Detection Unit is that as
the voltage drops during a power-down,
a RESET is triggered, thus erasing any work registers.
CA 02456652 2004-02-06
WO 03/015395 PCT/AU02/00919
221
No Test Circuitry
Test hardware on an Authentication Chip could very easily introduce
wlnerabilities. As a result, the Authentication
Chip should not contain any BIST or scan paths. The Authentication Chip must
therefore be testable with external test
vectors. This should be possible since the Authentication Chip is not complex.
Reading ROM
This attack depends on the key being stored in an addressable ROM. Since each
Authentication Chip stores its
authentication keys in internal Flash memory and not in an addressable ROM,
this attack is irrelevant.
Reverse En ineerin~ the Chip
Reverse engineering a chip is only useful when the security of authentication
lies in the algorithm alone. However our
Authentication Chips rely on a secret key, and not in the secrecy of the
algorithm. Our authentication algorithm is, by
contrast, public, and in any case, an attacker of a high volume consumable is
assumed to have been able to obtain
detailed plans of the internals of the chip. In light of these factors,
reverse engineering the chip itself, as opposed to the
stored data, poses no threat.
Usurning the Authentication Process
There are several forms this attack can take, each with varying degrees of
success. In all cases, it is assumed that a clone
manufacturer will have access to both the System and the consumable designs.
An attacker may attempt to build a chip
that tricks the System into returning a valid code instead of generating an
authentication code. This attack is not possible
for two reasons. The first reason is that System Authentication chips and
Consumable Authentication Chips, although
physically identical, are programmed differently. In particular, the RD opcode
and the RND opcode are the same, as are
the WR and TST opcodes. A System authentication Chip cannot perform a RD
command since every call is interpreted
as a call to RND instead. The second reason this attack would fail is that
separate serial data lines are provided from the
System to the System and Consumable Authentication Chips. Consequently neither
chip can see what is being
transmitted to or received from the other. If the attacker builds a clone chip
that ignores WR commands (which
decrement the consumable remaining), Protocol 3 ensures that the subsequent RD
will detect that the WR did not occur.
The System will therefore not go ahead with the use of the consumable, thus
thwarting the attacker. The same is true if
an attacker simulates loss of contact before authentication - since the
authentication does not take place, the use of the
consumable doesn't occur. An attacker is therefore limited to modifying each
System in order for clone consumables to
be accepted ,
Modification of System
The simplest method of modification is to replace the System's Authentication
Chip with one that simply reports
success for each call to TST. This can be thwarted by System calling TST
several times for each authentication, with the
first few times providing false values, and expecting a fail from TST. The
final call to TST would be expected to
succeed. The number of false calls to TST could be determined by some part of
the returned result from RD or from the
system clock. Unfortunately an attacker could simply rewire System so that the
new System clone authentication chip
53 can monitor the returned result from the consumable chip or clock. The
clone System Authentication Chip would
only return success when that monitored value is presented to its TST
function. Clone consumables could then return
any value as the hash result for RD, as the clone System chip would declare
that value valid. There is therefore no point
for the System to call the System Authentication Chip multiple times, since a
rewiring attack will only work for the
CA 02456652 2004-02-06
WO 03/015395 PCT/AU02/00919
222
System that has been rewired, and not for all Systems. A similar form of
attack on a System is a replacement of the
System ROM. The ROM program code can be altered so that the Authentication
never occurs. There is nothing that can
be done about this, since the System remains in the hands of a consumer. Of
course this would void any warranty, but
the consumer may consider the alteration worthwhile if the clone consumable
were extremely cheap and more readily
available than the original item.
The System/consumable manufacturer must therefore determine how likely an
attack of this nature is. Such a study
must include given the pricing structure of Systems and Consumables, frequency
of System service, advantage to the
consumer of having a physical modification performed, and where consumers
would go to get the modification
performed. The limit case of modifying a system is for a clone manufacturer to
provide a completely clone System
which takes clone consumables. This may be simple competition or violation of
patents. Either way, it is beyond the
scope of the Authentication Chip and depends on the technology or service
being cloned.
Direct viewin o~ f chip operation by conventional probing
In order to view the chip operation, the chip must be operating. However, the
Tamper Prevention and Detection
circuitry covers those sections of the chip that process or hold the key. It
is not possible to view those sections through
the Tamper Prevention lines. An attacker cannot simply slice the chip past the
Tamper Prevention layer, for this will
break the Tamper Detection Lines and cause an erasure of all keys at power-up.
Simply destroying the erasure circuitry
is not sufficient, since the multiple ChipOK bits (now all 0) feeding into
multiple units within the Authentication Chip
will cause the chip's regular operating circuitry to stop functioning. To set
up the chip for an attack, then, requires the
attacker to delete the Tamper Detection lines, stop the Erasure of Flash
memory, and somehow rewire the components
that relied on the ChipOK lines. Even if all this could be done, the act of
slicing the chip to this level will most likely
destroy the charge patterns in the non-volatile memory that holds the keys,
making the process fruitless.
Direct viewing of the non-volatile memory
If the Authentication Chip were sliced so that the floating gates of the Flash
memory were exposed, without discharging
them, then the keys could probably be viewed directly using an STM or SKM.
However, slicing the chip to this level
without discharging the gates is probably impossible. Using wet etching,
plasma etching, ion milling, or chemical
mechanical polishing will almost certainly discharge the small charges present
on the floating gates. This is true of
regular Flash memory, but even more so of mufti-level Flash memory.
Viewing the light bursts caused by state changes
All sections of circuitry that manipulate secret key information are
implemented in the non-Flashing CMOS described
above. This prevents the emission of the majority of light bursts. Regular
CMOS inverters placed in close proximity to
the non-Flashing CMOS will hide any faint emissions caused by capacitor charge
and discharge. The inverters are
connected to the Tamper Detection circuitry, so they change state many times
(at the high clock rate) for each non-
Flashing CMOS state change.
Monitories
The Noise Generator described above will cause circuit noise. The noise will
interfere with other electromagnetic
emissions from the chip's regular activities and thus obscure any meaningful
reading of internal data transfers.
CA 02456652 2004-02-06
WO 03/015395 PCT/AU02/00919
223
Viewine I,,,, fluctuations
The solution against this kind of attack is to decrease the SNR in the Iaa
signal. This is accomplished by increasing the
amount of circuit noise and decreasing the amount of signal. The Noise
Generator circuit (which also acts as a defense
against EMI attacks) will also cause enough state changes each cycle to
obscure any meaningful information in the Iaa
signal. In addition, the special Non-Flashing CMOS implementation of the key-
carrying data paths of the chip prevents
current from flowing when state changes occur. This has the benefit of
reducing the amount of signal.
Differential Fault Analysis
Differential fault bit errors are introduced in a non-targeted fashion by
ionization, microwave radiation, and
environmental stress. The most likely effect of an attack of this nature is a
change in Flash memory (causing an invalid
state) or RAM (bad parity). Invalid states and bad parity are detected by the
Tamper Detection Circuitry, and cause an
erasure of the key. Since the Tamper Detection Lines cover the key
manipulation circuitry, any error introduced in the
key manipulation circuitry will be mirrored by an error in a Tamper Detection
Line. If the Tamper Detection Line is
affected, the chip will either continually RESET or simply erase the key upon
a power-up, rendering the attack fruitless.
Rather than relying on a non-targeted attack and hoping that ' just the right
part of the chip is affected in just the right
way", an attacker is better off trying to introduce a targeted fault (such as
overwrite attacks, gate destruction etc). For
information on these targeted fault attacks, see the relevant sections below.
Clock Glitch Attacks
The Clock Filter (described above) eliminates the possibility of clock glitch
attacks.
Power Supelv Attacks
The OverUnderPower Detection Unit (described above) eliminates the possibility
of power supply attacks.
Overwriting ROM
Authentication Chips store Program code, keys and secret information in Flash
memory, and not in ROM. This attack is
therefore not possible.
Modifying EEPROM/Flash
Authentication Chips store Program code, keys and secret information in Flash
memory. However, Flash memory is
covered by two Tamper Prevention and Detection Lines. If either of these lines
is broken (in the process of destroying a
gate) the attack will be detected on power-up, and the chip will either RESET
(continually) or erase the keys from Flash
memory. However, even if the attacker is able to somehow access the bits of
Flash and destroy or short out the gate
holding a particular bit, this will force the bit to have no charge or a full
charge. These are both invalid states for the
Authentication Chip's usage of the multi-level Flash memory (only the two
middle states are valid). When that data
value is transferred from Flash, detection circuitry will cause the Erasure
Tamper Detection Line to be triggered -
thereby erasing the remainder of Flash memory and RESETing the chip. A Modify
EEPROM/Flash Attack is therefore
fruitless.
Gate Destruction Attacks
Gate Destruction Attacks rely on the ability of an attacker to modify a single
gate to cause the chip to reveal information
during operation. However any circuitry that manipulates secret information is
covered by one of the two Tamper
Prevention and Detection lines. If either of these lines is broken (in the
process of destroying a gate) the attack will be
detected on power-up, and the chip will either RESET (continually) or erase
the keys from Flash memory. To launch
CA 02456652 2004-02-06
WO 03/015395 PCT/AU02/00919
224
this kind of attack, an attacker must first reverse-engineer the chip to
determine which gates) should be targeted. Once
the location of the target gates has been determined, the attacker must break
the covering Tamper Detection line, stop
the Erasure of Flash memory, and somehow rewire the components that rely on
the ChipOK lines. Rewiring the
circuitry cannot be done without slicing the chip, and even if it could be
done, the act of slicing the chip to this level
will most likely destroy the charge patterns in the non-volatile memory that
holds the keys, making the process fruitless.
Overwrite Attacks
An Overwrite Attack relies on being able to set individual bits of the key
without knowing the previous value. It relies
on probing the chip, as in the Conventional Probing Attack and destroying
gates as in the Gate Destruction Attack. Both
of these attacks (as explained in their respective sections), will not succeed
due to the use of the Tamper Prevention and
Detection Circuitry and ChipOK lines. However, even if the attacker is able to
somehow access the bits of Flash and
destroy or short out the gate holding a particular bit, this will force the
bit to have no charge or a full charge. These are
both invalid states for the Authentication Chip's usage of the multi-level
Flash memory (only the two middle states are
valid). When that data value is transferred from Flash detection circuitry
will cause the Erasure Tamper Detection Line
to be triggered - thereby erasing the remainder of Flash memory and RESETing
the chip. In the same way, a parity
check on tampered values read from RAM will cause the Erasure Tamper Detection
Line to be triggered. An Overwrite
Attack is therefore fruitless.
Memory Remanence Attack
Any working registers or RAM within the Authentication Chip may be holding
part of the authentication keys when
power is removed. The working registers and RAM would continue to hold the
information for some time after the
removal of power. If the chip were sliced so that the gates of the
registers/RAM were exposed, without discharging
them, then the data could probably be viewed directly using an STM. The first
defense can be found above, in the
description of defense against Power Glitch Attacks. When power is removed,
all registers and RAM are cleared, just as
the RESET condition causes a clearing of memory. The chances then, are less
for this attack to succeed than for a
reading of the Flash memory. RAM charges (by nature) are more easily lost than
Flash memory. The slicing of the chip
to reveal the RAM will certainly cause the charges to be lost (if they haven't
been lost simply due to the memory not
being refreshed and the time taken to perform the slicing). This attack is
therefore fruitless.
Chp Theft Attack
There are distinct phases in the lifetime of an Authentication Chip. Chips can
be stolen when at any of these stages:
After manufacture, but before programming of key
After programming of key, but before programming of state data
After programming of state data, but before insertion into the consumable or
system
After insertion into the system or consumable
A theft in between the chip manufacturer and programming station would only
provide the clone manufacturer with
blank chips. This merely compromises the sale of Authentication chips, not
anything authenticated by the
Authentication chips. Since the programming station is the only mechanism with
consumable and system product keys,
a clone manufacturer would not be able to program the chips with the correct
key. Clone manufacturers would be able
to program the blank chips for their own Systems and Consumables, but it would
be difficult to place these items on the
CA 02456652 2004-02-06
WO 03/015395 PCT/AU02/00919
225
market without detection. The second form of theft can only happen in a
situation where an Authentication Chip passes
through two or more distinct programming phases. This is possible, but
unlikely. In any case, the worst situation is
where no state data has been programmed, so all of M is read/write. If this
were the case, an attacker could attempt to
launch an Adaptive Chosen Text Attack on the chip. The HMAC-SHA1 algorithm is
resistant to such attacks. The third
form of theft would have to take place in between the programming station and
the installation factory. The
Authentication chips would already be programmed for use in a particular
system or for use in a particular consumable.
The only use these chips have to a thief is to place them into a clone System
or clone Consumable. Clone systems are
irrelevant - a cloned System would not even require an authentication chip 53.
For clone Consumables, such a theft
would limit the number of cloned products to the number of chips stolen. A
single theft should not create a supply
constant enough to provide clone manufacturers with a cost-effective
business.The final form of theft is where the
System or Consumable itself is stolen. When the theft occurs at the
manufacturer, physical security protocols must be
enhanced. If the theft occurs anywhere else, it is a matter of concern only
for the owner of the item and the police or
insurance company. The security mechanisms that the Authentication Chip uses
assume that the consumables and
systems are in the hands of the public. Consequently, having them stolen makes
no difference to the security of the
keys.
Authentication Chip Design
The Authentication Chip has a physical and a logical external interface. The
physical interface defines how the
Authentication Chip can be connected to a physical System, and the logical
interface determines how that System can
communicate with the Authentication Chip.
PHYSICALINTERFACE
The Authentication Chip is a small 4-pin CMOS package (actual internal size is
approximately 0.30 mm2 using 0.25 lun
Flash process). The 4 pins are GND, CLK, Power, and Data. Power is a nominal
voltage. If the voltage deviates from
this by more than a fixed amount, the chip will RESET. The recommended clock
speed is 4-10 MHz. Internal circuitry
filters the clock signal to ensure that a safe maximum clock speed is not
exceeded. Data is transmitted and received one
bit at a time along the serial data line. The chip performs a RESET upon power-
up, power-down. In addition, tamper
detection and prevention circuitry in the chip will cause the chip to either
RESET or erase Flash memory (depending on
the attack detected) if an attack is detected. A special Programming Mode is
enabled by holding the CLK voltage at a
particular level. This is defined further in the next section.
LOGICALINTERFACE
The Authentication Chip has two operating modes - a Normal Mode and a
Programming Mode. The two modes are
required because the operating program code is stored in Flash memory instead
of ROM (for security reasons). The
Programming mode is used for testing purposes after manufacture and to load up
the operating program code, while the
normal mode is used for all subsequent usage of the chip.
PROGRAMMING MODE
The Programming Mode is enabled by holding a specific voltage on the CLK line
for a given amount of time. When the
chip enters Programming Mode, all Flash memory is erased (including all secret
key information and any program
CA 02456652 2004-02-06
WO 03/015395 PCT/AU02/00919
226
code). The Authentication Chip then validates the erasure. If the erasure was
successful, the Authentication Chip
receives 384 bytes of data corresponding to the new program code. The bytes
are transferred in order byteo to byte383.
The bits are transferred from bito to bits. Once all 384 bytes of program code
have been loaded, the Authentication Chip
hangs. If the erasure was not successful, the Authentication Chip will hang
without loading any data into the Flash
memory. After the chip has been programmed, it can be restarted. When the chip
is RESET with a normal voltage on
the CLK line, Normal Mode is entered.
NORMAL MODE
Whenever the Authentication Chip is not in Programming Mode, it is in Normal
Mode. When the Authentication Chip
starts up in Normal Mode (for example a power-up RESET), it executes the
program currently stored in the program
code region of Flash memory. The program code implements a communication
mechanism between the System and
Authentication Chip, accepting commands and data from the System and producing
output values. Since the
Authentication Chip communicates serially, bits are transferred one at a
time.The System communicates with the
Authentication Chips via a simple operation command set. Each command is
defined by 3-bit opcode. The
interpretation of the opcode depends on the current value of the IsTrusted bit
and the IsWritten bit.
The following operations are defined:
O T W Mn In ut Ou ut Descri tion
000 - CLR - Clear
001 0 0 SSI [160, 160, Set Secret Information
160]
010 0 1 RD [160, 160] (256, Read M securely
160]
010 1 1 RND [ 160, Random
160]
011 0 1 WR [256] - Write M
011 1 1 TST [256, 160] [1] Test
100 0 1 SAM [32] (32] Set Access Mode
101 - 1 GIT ( 1 ] Get Is Trusted
110 - 1 SMT [32] - Set MinTicks
Op = Opcode, T = IsTrusted value, W = IsWritten value,
Mn = Mnemonic, [n] = number of bits required for parameter
Any command not defined in this table is interpreted as NOP (No operation).
Examples include opcodes 110 and 111
(regardless of IsTrusted or IsWritten values), and any opcode other than SSI
when IsWritten = 0. Note that the opcodes
for RD and RND are the same, as are the opcodes for WR and TST. The actual
command run upon receipt of the
opcode will depend on the current value of the IsTrusted bit (as long as
IsWritten is 1). Where the IsTrusted bit is clear,
RD and WR functions will be called. Where the IsTrusted bit is set, RND and
TST functions will be called. The two
sets of commands are mutually exclusive between trusted and non-trusted
Authentication Chips. In order to execute a
command on an Authentication Chip, a client (such as System) sends the command
opcode followed by the required
input parameters for that opcode. The opcode is sent least significant bit
through to most significant bit. For example, to
send the SSI command, the bits 1, 0, and 0 would be sent in that order. Each
input parameter is sent in the same way,
least significant bit first through to most significant bit last. Return
values are read in the same way - least significant
bit first and most significant bit last. The client must know how many bits to
retrieve.
CA 02456652 2004-02-06
WO 03/015395 PCT/AU02/00919
227
COMPOSITTON AND BLOCK DIAGRAM
The Authentication Chip contains the following components:
Unit Name CMOS T a Descri lion
Clock FrequencyNormal Ensures the operating frequency
of the Authentication
Limiter Chi does not exceed a s ecific
maximum fre uenc .
OverUnderPowerNormal Ensures that the power supply
remains in a valid
Detection Unit o eratin ran e.
Programming Normal Allows users to enter Programming
Mode Mode.
Detection Unit
Noise GeneratorNormal For generating Idd noise and
for use in the Tamper
Prevention and Detection circuit
for controlling the two operating
modes of the chip
(Programming Mode and Normal
Mode). This
State Machine Normal includes generating the two operating
cycles of the
CPU, stalling during long command
operations, and
storing the op-code and operand
during operating
c cles.
I/O Unit Normal Responsible for communicating
serially with the
outside world.
ALU Non-flashingContains the 32-bit accumulator
as well as the general
mathematical and logical operators.
MinTicks Unit Normal (99%),Responsible for a programmable
minimum delay (via a
Non-flashingcountdown) between certain key-based
(1%) o erations.
Address GeneratorNormal (99%),Generates direct, indirect, and
indexed addresses as
Unit Non-flashingre wired b s ecific o Brands.
( 1 %)
Program CounterNormal Includes the 9 bit PC (program
Unit counter), as well as
logic for branching and subroutine
control
Addressed by 9 bits of address.
It contains an 8-bit
wide program Flash memory, and
32-bit wide Flash
Memory Unit Non-flashingmemory, RAM, and look-up tables.
Also contains
Programming Mode circuitry to
enable loading of
program code.
Fig. 181 illustrates a schematic block diagram of the Authentication Chip. The
tamper prevention and Detection
Circuitry is not shown: The Noise Generator, OverUnderPower Detection Unit,
and ProgrammingMode Detection Unit
are connected to the Tamper Prevention and Detection Circuitry and not to the
remaining units.
MEMORY MAP
Fig. 182 illustrates an example memory map. Although the Authentication Chip
does not have external memory, it does
have internal memory. The internal memory is addressed by 9 bits, and is
either 32-bits wide or 8-bits wide (depending
on address). The 32-bit wide memory is used to hold the non-volatile data, the
variables used for HMAC-SHA1, and
constants. The 8-bit wide memory is used to hold the program and the various
jump tables used by the program. The
address breakup (including reserved memory ranges) is designed to optimize
address generation and decoding.
Constants
Fig. 183 illustrates an example of the constants memory map. The Constants
region consists of 32-bit constants. These
are the simple constants (such as 32-bits of all 0 and 32-bits of all 1), the
constants used by the HMAC algorithm, and
CA 02456652 2004-02-06
WO 03/015395 PCT/AU02/00919
228
the constants yo_3 and ho_4 required for use in the SHA-1 algorithm. None of
these values are affected by a RESET. The
only opcode that makes use of constants is LDK. In this case, the operands and
the memory placement are closely
linked, in order to minimize the address generation and decoding.
RAM
Fig. 184 illustrates an example of the RAM memory map. The RAM region consists
of the 32 parity-checked 32-bit
registers required for the general functioning of the Authentication Chip, but
only during the operation of the chip.
RAM is volatile memory, which means that once power is removed, the values are
lost. Note that in actual fact, memory
retains its value for some period of time after power-down (due to memory
remnance), but cannot be considered to be
available upon power-up. This has issues for security that are addressed in
other sections of this document. RAM
contains the variables used for the HMAC-SHA1 algorithm, namely: A-E, the
temporary variable T, space for the 160-
bit working hash value H, space for temporary storage of a hash result
(required by HMAC) B 160, and the space for the
512 bits of expanded hashing memory X. All RAM values are cleared to 0 upon a
RESET, although any program code
should not take this for granted. Opcodes that make use of RAM addresses are
LD, ST, ADD, LOG, XOR, and RPL. In
all cases, the operands and the memory placement are closely linked, in order
to minimize the address generation and
decoding (multiword variables are stored most significant word first).
CA 02456652 2004-02-06
WO 03/015395 PCT/AU02/00919
229
In some cases, the output bits from one chip's command can be fed directly as
the input bits to another chip's command.
An example of this is the RND and RD commands. The output bits from a call to
RND on a trusted Authentication Chip
do not have to be kept by System. Instead, System can transfer the output bits
directly to the input of the non-trusted
Authentication Chip's RD command. The description of each command points out
where this is so. Each of the
commands is examined in detail in the subsequent sections. Note that some
algorithms are specifically designed because
the permanent registers are kept in Flash memory.
Regi sters
The memory within the Authentication Chip contains some non-volatile memory to
store the variables required by the
Authentication Protocol. The following non-volatile (Flash) variables are
defined:
Variable Name Size Description
(in bits)
M[0..15] 256 16 words (each 16 bits) containing
state data such as
serial numbers, media remaining
etc.
K, 160 Key used to transform R during
authentication.
K2 160 Key used to transform M during
authentication.
R 160 Current random number
AccessMode[0..15]32 The 16 sets of 2-bit AccessMode
values for M[n].
MinTicks 32 The minimum number of clock ticks
between calls to key-
based functions
SIWritten 1 If set, the secret key information
(K1, K2, and R) has been
written to the chip. If clear,
the secret information has not
been written et.
IsTrusted 1 If set, the RND and TST functions
can be called, but RD
and WR functions cannot be called.
If clear, the RND and TST functions
cannot be called, but
RD and WR functions can be called.
Total bits 802
ARCHITECTURE OV ERV IEW
This section chapter provides the high-level definition of a purpose-built CPU
capable of implementing the functionality
required of an Authentication Chip. Note that this CPU is not a general
purpose CPU. It is tailor-made for
implementing the Authentication logic. The authentication commands that a user
of an Authentication Chip sees, such
as WRITE, TST, RND etc are all implemented as small programs written in the
CPU instruction set. The CPU contains
a 32-bit Accumulator (which is used in most operations), and a number of
registers. The CPU operates on 8-bit
instructions specifically tailored to implementing authentication logic. Each
8-bit instruction typically consists of a 4-bit
opcode, and a 4-bit operand.
OPERATING SPEED
An internal Clock Frequency Limiter Unit prevents the chip from operating at
speeds any faster than a predetermined
frequency. The frequency is built into the chip during manufacture, and cannot
be changed. The frequency is
recommended to be about 4-10 MHz.
CA 02456652 2004-02-06
WO 03/015395 PCT/AU02/00919
230
COMPOSITION AND BLOCK DIAGRAM
The Authentication Chip contains the following components:
Unit Name CMOS T a Descri tion
Clock Frequency Ensures the operating frequency
Normal of the Authentication
Limner Chi does not exceed a s ecific
maximum fre uenc .
OverUnderPower Ensures that the power supply
Normal remains in a valid
Detection Unit o eratin ran e.
Programming Normal Allows users to enter Programming
Mode Mode.
Detection Unit
Noise GeneratorNormal For generating Idd noise and
for use in the Tamper
Prevention and Detection circuitry.
for controlling the two operating
modes of the chip
(Programming Mode and Normal
Mode). This
State Machine Normal includes generating the two operating
cycles of the
CPU, stalling during long command
operations, and
storing the op-code and operand
during operating
c cles.
I/O Unit Normal Responsible for communicating
serially with the
outside world.
ALU Non-flashingContains the 32-bit accumulator
as well as the general
mathematical and logical o erators.
MinTicks Unit Normal (99%),Responsible for a programmable
minimum delay (via a
Non-flashingcountdown) between certain key-based
(1%) o erations.
Address GeneratorNormal (99%),Generates direct, indirect, and
indexed addresses as
Unit Non-flashin re uired b s ecific o Brands.
(1%)
Program CounterNormal Includes the 9 bit PC (program
Unit counter), as well as
to is for branching and subroutine
control
Addressed by 9 bits of address.
It contains an 8-bit
wide program Flash memory, and
32-bit wide Flash
Memory Unit Non-flashingmemory, RAM, and look-up tables.
Also contains
Programming Mode circuitry to
enable loading of
program code.
Fig. 181 illustrates a schematic block diagram of the Authentication Chip. The
tamper prevention and Detection
Circuitry is not shown: The Noise Generator, OverUnderPower Detection Unit,
and ProgrammingMode Detection Unit
are connected to the Tamper Prevention and Detection Circuitry and not to the
remaining units.
MEMORY MAP
Fig. 182 illustrates an example memory map. Although the Authentication Chip
does not have external memory, it does
have internal memory. The internal memory is addressed by 9 bits, and is
either 32-bits wide or 8-bits wide (depending
on address). The 32-bit wide memory is used to hold the non-volatile data, the
variables used for HMAC-SHA1, and
constants. The 8-bit wide memory is used to hold the program and the various
jump tables used by the program. The
address breakup (including reserved memory ranges) is designed to optimize
address generation and decoding.
Constants
Fig. 183 illustrates an example of the constants memory map. The Constants
region consists of 32-bit constants. These
are the simple constants (such as 32-bits of all 0 and 32-bits of all 1), the
constants used by the HMAC algorithm, and
CA 02456652 2004-02-06
WO 03/015395 PCT/AU02/00919
231
the constants yo_3 and ho_4 required for use in the SHA-1 algorithm. None of
these values are affected by a RESET. The
only opcode that makes use of constants is LDK. In this case, the operands and
the memory placement are closely
linked, in order to minimize the address generation and decoding.
RAM
Fig. 184 illustrates an example of the RAM memory map. The RAM region consists
of the 32 parity-checked 32-bit
registers required for the general functioning of the Authentication Chip, but
only during the operation of the chip.
RAM is volatile memory, which means that once power is removed, the values are
lost. Note that in actual fact, memory
retains its value for some period of time after power-down (due to memory
remnance), but cannot be considered to be
available upon power-up. This has issues for security that are addressed in
other sections of this document. RAM
contains the variables used for the HMAC-SHAT algorithm, namely: A-E, the
temporary variable T, space for the 160-
bit working hash value H, space for temporary storage of a hash result
(required by HMAC) B 160, and the space for the
512 bits of expanded hashing memory X. All RAM values are cleared to 0 upon a
RESET, although any program code
should not take this for granted. Opcodes that make use of RAM addresses are
LD, ST, ADD, LOG, XOR, and RPL. In
all cases, the operands and the memory placement are closely linked, in order
to minimize the address generation and
decoding (multiword variables are stored most significant word first).
CA 02456652 2004-02-06
WO 03/015395 PCT/AU02/00919
232
Flash Memory- Variables
Fig. 185 illustrates an example of the Flash memory variables memory map. The
Flash memory region contains the
non-volatile information in the Authentication Chip. Flash memory retains its
value after power is removed, and can be
expected to be unchanged when the power is next turned on. The non-volatile
information kept in multi-state Flash
memory includes the two 160-bit keys (K, and KZ), the current random number
value (R), the state data (M), the
MinTicks value (M'I~, the AccessMode value (AM), and the IsWritten (ISW) and
IsTrusted (IST) flags.Flash values are
unchanged by a RESET, but are cleared (to 0) upon entering Programming Mode.
Operations that make use of Flash
addresses are LD, ST, ADD, RPL, ROR, CLR, and SET. In all cases, the operands
and the memory placement are
closely linked, in order to minimize the address generation and decoding.
Multiword variables K,, Kz, and M are stored
most significant word first due to addressing requirements. The addressing
scheme used is a base address offset by an
index that starts at N and ends at 0. Thus MN is the first word accessed, and
lVio is the last 32-bit word accessed in loop
processing. Multiword variable R is stored least significant word first for
ease of LFSR generation using the same
indexing scheme.
Flash Memory-Program
Fig. 186 illustrates an example of the Flash memory program memory map. The
second multi-state Flash memory
region is 384 x 8-bits. The region contains the address tables for the JSR,
JSI and TBR instructions, the offsets for the
DBR commands, constants and the program itself. The Flash memory is unaffected
by a RESET, but is cleared (to 0)
upon entering Programming Mode. Once Programming Mode has been entered, the 8-
bit Flash memory can be loaded
with a new set of 384 bytes. Once this has been done, the chip can be RESET
and the normal chip operations can occur.
REGISTERS
A number of registers are defined in the Authentication Chip. They are used
for temporary storage during function
execution. Some are used for arithmetic functions, others are used for
counting and indexing, and others are used for
serial I/O. These registers do not need to be kept in non-volatile (Flash)
memory. They can be read or written without
the need for an erase cycle (unlike Flash memory). Temporary storage registers
that contain secret information still need
to be protected from physical attack by Tamper Prevention and Detection
circuitry and parity checks.
All registers are cleared to 0 on a RESET. However, program code should not
assume any particular state, and set up
register values appropriately. Note that these registers do not include the
various OK bits defined for the Tamper
Prevention and Detection circuitry. The OK bits are scattered throughout the
various units and are set to 1 upon a
RESET.
The 1-bit Cycle value determines whether the CPU is in a Fetch cycle (0) or an
Execute cycle (1). Cycle is actually
derived from a 1-bit register that holds the previous Cycle value. Cycle is
not directly accessible from the instruction
set. It is an internal register only.
Program Counter
A 6-level deep 9-bit Program Counter Array (PCA) is defined. It is indexed by
a 3-bit Stack Pointer (SP). The current
Program Counter (PC), containing the address of the currently executing
instruction, is effectively PCA[SP]. In
addition, a 9-bit Adr register is defined, containing the resolved address of
the current memory reference (for indexed or
CA 02456652 2004-02-06
WO 03/015395 PCT/AU02/00919
233
indirect memory accesses). The PCA, SP, and Adr registers are not directly
accessible from the instruction set. They are
internal registers only
CMD
The 8-bit CMD register is used to hold the currently executing command. While
the CMD register is not directly
accessible from the instruction set, and is an internal register only.
Accumulator and Z flae
The Accumulator is a 32-bit general-purpose register. It is used as one of the
inputs to all arithmetic operations, and is
the register used for transferring information between memory registers. The Z
register is a I-bit flag, and is updated
each time the Accumulator is written to. The Z register contains the zero-ness
of the Accumulator. Z = 1 if the last value
written to the Accumulator was 0, and 0 if the last value written was non-0.
Both the Accumulator and Z registers are
directly accessible from the instruction set.
Counters
A number of special purpose counters/index registers are defined:
Name Register Bits Description
Size
C1 1 x 3 3 Counter used to index arrays:
AE, B 160, M, H, , and h.
C2 I x 5 5 General a ose counter
Nl_4 4 x 4 16 Used to index array X
All these counter registers are directly accessible from the instruction set.
Special instructions exist to load them with
specific values, and other instructions exist to decrement or increment them,
or to branch depending on the whether or
not the specific counter is zero. There are also 2 special flags (not
registers) associated with CI and C2, and these flags
hold the zero-ness of C1 or C2. The flags are used for loop control, and are
listed here, for although they are not
registers, they can be tested like registers.
Name Description
C1Z 1 = C1 is current zero, 0 =C1 is currentl
non-zero.
C2Z 1 = C2 is current zero, 0 =C2 is currently
non-zero.
Flags
A number of I-bit flags, corresponding to CPU operating modes, are defined:
Name Bits Description
WE 1 WriteEnable for X register array:
0 = Writes to X registers become no-ops
1 = Writes to X registers are carried out
K2MX 1 0 = K1 is accessed during K references. Reads
from M are interpreted as reads
of 0
CA 02456652 2004-02-06
WO 03/015395 PCT/AU02/00919
234
1 = K2 is accessed during K references. Reads from M succeed.
All these 1-bit flags are directly accessible from the instruction set.
Special instructions exist to set and clear these flags.
Registers used for Write Integrity
Name Bits Description
EE I Corresponds to the EqEncountered variable
in the WR command pseudocode.
Used during the writing of multi-precision
data values to determine whether all
more si nificant com onents have been a ual
to their revious values.
DE 1 Corresponds to the DecEncountered variable
in the WR command pseudocode.
Used during the writing of multi-precision
data values to determine whether a
more significant com onents has been decremented
already.
Registers used for I/O
Four 1-bit registers are defined for communication between the client (System)
and the Authentication Chip. These
registers are InBit, InBitValid, OutBit, and OutBitValid. InBit and InBitValid
provide the means for clients to pass
commands and data to the Authentication Chip. OutBit and OutBitValid provide
the means for clients to get
information from the Authentication Chip. A client sends commands and
parameter bits to the Authentication Chip one
bit at a time. Since the Authentication Chip is a slave device, from the
Authentication Chip's point of view:
Reads from InBit will hang while InBitValid is clear. InBitValid will remain
clear until the client has written the next
input bit to InBit. Reading InBit clears the InBitValid bit to allow the next
InBit to be read from the client. A client
cannot write a bit to the Authentication Chip unless the InBitValid bit is
clear.
Writes to OutBit will hang while OutBitValid is set. OutBitValid will remain
set until the client has read the bit from
OutBit. Writing OutBit sets the OutBitValid bit to allow the next OutBit to be
read by the client. A client cannot
read a bit from the Authentication Chip unless the OutBitValid bit is set.
Registers Used for Timing Access
A single 32-bit register is defined for use as a timer. The MTR
(MinTicksRemaining) register decrements every time an
instruction is executed. Once the MTR register gets to 0, it stays at zero.
Associated with MTR is a I-bit flag MTRZ,
which contains the zero-ness of the MTR register. If MTRZ is l, then the MTR
register is zero. If MTRZ is 0, then the
MTR register is not zero yet. MTR always starts off at the MinTicks value
(after a RESET or a specific key-accessing
function), and eventually decrements to 0. While MTR can be set and MTRZ
tested by specific instructions, the value of
MTR cannot be directly read by any instruction.
Register Summary
The following table summarizes all temporary registers (ordered by register
name). It lists register names, size (in bits),
as well as where the specified register can be found.
Register Bits Parity Where Found
Name
Acc 32 1 Arithmetic Lo is Unit
Adr 9 1 Address Generator Unit
AMT 32 Arithmetic Logic Unit
CA 02456652 2004-02-06
WO 03/015395 PCT/AU02/00919
235
C1 3 1 Address Generator Unit
C2 5 1 Address Generator Unit
CMD 8 1 State Machine
Cycle (Old = 1 State Machine
prev
C cle)
DE 1 Arithmetic Lo is Unit
EE 1 Arithmetic Lo is Unit
InBit 1 In ut Out ut Unit
InBitValid 1 In ut Out ut Unit
K2MX 1 Address Generator Unit
MTR 32 1 MinTicks Unit
MTRZ 1 MinTicks Unit
N[1-4] 16 4 Address Generator Unit
OutBit 1 In ut Out ut Unit
OutBitValid 1 In ut Out ut Unit
PCA 54 6 Program Counter Unit
RTMP 1 Arithmetic Logic Unit
SP 3 1 Program Counter Unit
WE 1 Memo Unit
Z 1 Arithmetic Logic Unit
Total bits 206 17
INSTRUCTION SET
The CPU operates on 8-bit instructions specifically tailored to implementing
authentication logic. The majority of 8-bit
instruction consists of a 4-bit opcode, and a 4-bit operand. The high-order 4
bits contains the opcode, and the low-order
4 bits contains the operand.
O~codes and Operands (Summary)
The opcodes are summarized in the following table:
O code Mnemonic Sim 1e Descri lion
0000 TBR Test and branch.
0001 DBR Decrement and branch
001 JSR Jum subroutine via table
01000 RTS Return from subroutine
01001 JSI Jum subroutine indirect
0101 SC Set counter
0110 CLR Clear s ecific flash registers
0111 SET Set bits in s ecific flash re ister
1000 ADD Add a 32 bit value to the Accumulator
1001 LOG Logical operation (AND, and OR )
1010 XOR Exclusive-OR Accumulator with some
value
1011 LD Load Accumulator from s ecified location
1100 ROR Rotate Accumulator ri ht
1101 RPL ~ Replace bits
CA 02456652 2004-02-06
WO 03/015395 PCT/AU02/00919
236
1110 LDK Load Accumulator with a constant
1111 ST Store Accumulator in specified location
The following table is a summary of which operands can be used with which
opcodes. The table is ordered
alphabetically by opcode mnemonic. The binary value for each operand can be
found in the subsequent tables.
0 code Valid O Brand
ADD { A, B, C, D, E, T, MT, AM,
AE[C1], B160[C1], H[C1], M[C1], K[C1], R[C1],
X[N4]}
CLR {WE, K2MX, M[C1], Grou 1, Grou 2}
DBR {C1, C2}, Offset into DBR Table
JSI { }
JSR Offset into Table 1
LD { A, B, C, D, E, T, MT, AM,
AE[C1], B160[C1], H[C1], M[C1], K[C1], R[C1],
X[N4] }
LDK {0x0000..., 0x3636..., Ox5C5C..., OxFFFF,
h[C1], [C1]}
LOG { AND, OR }, { A, B, C, D, E, T, MT, AM }
ROR {InBit, OutBit, LFSR, RLFSR, IST, ISW, MTRZ,
1, 2, 27, 31 }
RPL { Init, MHI, MLO }
RTS {}
SC {C1, C2}, Offset into counter list
SET { WE, K2MX, Nx, MTR, IST, ISW }
ST { A, B, C, D, E, T, MT, AM,
AE[C1], B160[C1], H[C1), M[C1], K[C1], R[C1],
X[N4] }
TBR {0, 1 }, Offset into Table 1
XOR { A, B, C, D, E, T, MT, AM, X[Nl], X[N2],
X[N3], X[N4] }
The following operand table shows the interpretation of the 4-bit operands
where all 4 bits are used for direct
interpretation.
Operand D DT XOR ROR LDK RPL SET CLR
0000 E E InBit 0x00...Init WE WE
0001 D D OutBit 0x36... K2MX K2MX
0010 C C RB OxSC... Nx
0011 B B XRB OxFF... - -
0100 A A IST y[C1] IST -
0101 T T ISW - - ISW -
0110 MT MT MTRZ - - MTR
0111 AM AM 1 - -
1000 AE[C1] - - h[C1] - -
1001 B160[C1]- 2 - -
1010 H[C1] - 27 - - - -
- .
1011 - ~
CA 02456652 2004-02-06
WO 03/015395 PCT/AU02/00919
237
1100 R[C1] X[N1] 31 - - R
1101 K[C1] X[N2] - - Grou
1
1110 M[C1] X[N3] - MLO M[C1]
1111 X(N4] X[N4] - I MHI ~ Group2~
~
The following instructions make a selection based upon the highest bit of the
operand:
Operandi Which Counter?Which operation?Which Value?
(DBR, SC) (LOG) (TBR)
0 C 1 AND Zero
1 C2 OR Non-zero
The lowest 3 bits of the operand are either offsets (DBR, TBR), values from a
special table (SC) or as in the case of
LOG, they select the second input for the logical operation. The
interpretation matches the interpretation for the ADD,
LD, and ST opcodes:
Operand2-0 LOG Input2 SC Value
000 E 2
001 D 3
010 C 4
011 B 7
100 A 10
101 T 15
110 MT 19
111 AM 31
ADD - Add To Accumulator
Mnemonic: ADD
Opcode: 1000
Usage: ADD Value
The ADD instruction adds the specified operand to the Accumulator via modulo
23z addition. The operand is one of A,
B, C, D, E, T, AM, MT, AE[C1], H[C1], B160[C1], R[C1], K[C1], M[C1], or X[N4].
The Z flag is also set during this
operation, depending on whether the value loaded is zero or not.
CLR - Clear Bits
Mnemonic: CLR
Opcode: 0110
Usage: CLR Flag/Register
CA 02456652 2004-02-06
WO 03/015395 PCT/AU02/00919
238
The CLR instruction causes the specified internal flag or Flash memory
registers to be cleared. In the case of Flash
memory, although the CLR instruction takes some time the next instruction is
stalled until the erasure of Flash memory
has finished. The registers that can be cleared are WE and K2MX. The Flash
memory that can be cleared are: R,
M[C1], Groupl, and Group2. Groupl is the IST and ISW flags. If these are
cleared, then the only valid high level
command is the SSI instruction. Group2 is the MT, AM, K1 and K2 registers. R
is erased separately since it must be
updated after each call to TST. M is also erased via an index mechanism to
allow individual parts of M to be updated.
There is also a corresponding SET instruction.
DBR - Decrement and Branch
Mnemonic: DBR
Opcode: 0001
Usage: DBR Counter, Offset
This instruction provides the mechanism for building simple loops. The high
hit of the operand selects between testing
C1 or C2 (the two counters). If the specified counter is non-zero, then the
counter is decremented and the value at the
given offset (sign extended) is added to the PC. If the specified counter is
zero, it is decremented and processing
continues at PC+1. The 8-entry offset table is stored at address 0 1100 0000
(the 64'" entry of the program memory).
The 8 bits of offset are treated as a signed number. Thus OxFF is treated as -
1, and 0x01 is treated as +1. Typically the
value will be negative for use in loops.
JSI - Jumn Subroutine Indirect
Mnemonic: JSI
Opcode: 01001
Usage: JSI (Acc)
The JSI instruction allows the jumping to a subroutine dependant on the value
currently in the Accumulator. The
instruction pushes the current PC onto the stack, and loads the PC with a new
value. The upper 8 bits of the new PC are
loaded from Jump Table 2 (offset given by the lower 5 bits of the
Accumulator), and the lowest bit of the PC is cleared
to 0. Thus all subroutines must start at even addresses. The stack provides
for 6 levels of execution (5 subroutines
deep). It is the responsibility of the programmer to ensure that this depth is
not exceeded or the return value will be
overwritten (since the stack wraps).
JSR - Jump Subroutine
Mnemonic: JSR
Opcode: 001
Usage: JSR Offset
The JSR instruction provides for the most common usage of the subroutine
construct. The instruction pushes the current
PC onto the stack, and loads the PC with a new value. The upper 8 bits of the
new PC value comes from Address Table
1, with the offset into the table provided by the 5-bit operand (32 possible
addresses). The lowest bit of the new PC is
cleared to 0. Thus all subroutines must start at even addresses. The stack
provides for 6 levels of execution (5
CA 02456652 2004-02-06
WO 03/015395 PCT/AU02/00919
239
subroutines deep). It is the responsibility of the programmer to ensure that
this depth is not exceeded or the return value
will be overwritten (since the stack wraps).
LD - Load Accumulator
Mnemonic: LD
Opcode: 1011
Usage: LD Value
The LD instruction loads the Accumulator from the specified operand. The
operand is one of A, B, C, D, E, T, AM,
MT, AE[C1], H[C1], B160[C1], R[C1], K[C1], M[C1], or X[N4]. The Z flag is also
set during this operation,
depending on whether the value loaded is zero or not.
LDK - Load Constant
Mnemonic: LDK
Opcode: 1110
Usage: LDK Constant
The LDK instruction loads the Accumulator with the specified constant. The
constants are those 32-bit values required
for HMAC-SHAT and all Os and all is as most useful for general purpose
processing. Consequently they are a choice
of:
0x00000000
0x36363636
Ox5C5C5C5C
OxF'FFF'FFFF
or from the h and y constant tables, indexed by C1. The h and y constant
tables hold the 32-bit tabular constants
required for HMAC-SHA1. The Z flag is also set during this operation,
depending on whether the constant loaded is
zero or not.
LOG - Loeical Operation
Mnemonic: LOG
Opcode: 1001
Usage: LOG Operation Value
The LOG instruction performs 32-bit bitwise logical operations on the
Accumulator and a specified value. The two
operations supported by the LOG instruction are AND and OR. Bitwise NOT and
XOR operations are supported by the
XOR instruction. The 32-bit value to be ANDed or ORed with the accumulator is
one of the following: A, B, C, D, E,
T, MT and AM. The Z flag is also set during this operation, depending on
whether resultant 32-bit value (loaded into
the Accumulator) is zero or not.
ROR - Rotate Right
Mnemonic: ROR
CA 02456652 2004-02-06
WO 03/015395 PCT/AU02/00919
240
Opcode: 1100
Usage: ROR Value
The ROR instruction provides a way of rotating the Accumulator right a set
number of bits. The bit coming in at the top
of the Accumulator (to become bit 31) can either come from the previous bit 0
of the Accumulator, or from an external
1-bit flag (such as a flag, or the serial input connection). The bit rotated
out can also be output from the serial
connection, or combined with an external flag. The allowed operands are:
InBit, OutBit, LFSR, RLFSR, IST, ISW,
MTRZ, 1, 2, 27, and 31. The Z flag is also set during this operation,
depending on whether resultant 32-bit value
(loaded into the Accumulator) is zero or not. In its simplest form, the
operand for the ROR instruction is one of 1, 2, 27,
31, indicating how many bit positions the Accumulator should be rotated. For
these operands, there is no external input
or output - the bits of the Accumulator are merely rotated right. With
operands IST, ISW, and MTRZ, the appropriate
flag is transferred to the highest bit of the Accumulator. The remainder of
the Accumulator is shifted right one bit
position (bit31 becomes bit 30 etc), with lowest bit of the Accumulator
shifted out. With operand InBit, the next serial
input bit is transferred to the highest bit of the Accumulator. The InBitValid
bit is then cleared. If there is no input bit
available from the client yet, execution is suspended until there is one. The
remainder of the Accumulator is shifted
right one bit position (bit31 becomes bit 30 etc), with lowest bit of the
Accumulator shifted out.
With operand OutBit, the Accumulator is shifted right one bit position. The
bit shifted out from bit 0 is stored in the
OutBit flag and the OutBitValid flag is set. It is therefore ready for a
client to read. If the OutBitValid flag is already
set, execution of the instruction stalls until the OutBit bit has been read by
the client (and the OutBitValid flag cleared).
The new bit shifted in to bit 31 should be considered garbage (actually the
value currently in the InBit register). Finally,
the RB and XRB operands allow the implementation of LFSRs and multiple
precision shift registers. With RB, the bit
shifted out (formally bit 0) is written to the RTMP register. The register
currently in the RTMP register becomes the
new bit 31 of the Accumulator. Performing multiple ROR RB commands over
several 32-bit values implements a
multiple precision rotate/shift right. The XRB operates in the same way as RB,
in that the current value in the RTMP
register becomes the new bit 31 of the Accumulator. However with the XRB
instruction, the bit formally known as bit 0
does not simply replace RTMP (as in the RB instruction). Instead, it is XORed
with RTMP, and the result stored in
RTMP. This allows the implementation of long LFSRs, as required by the
Authentication protocol.
RPL - Replace Bits
Mnemonic: RPL
Opcode: 1101
Usage: ROR Value
The RPL instruction is designed for implementing the high level WRITE command
in the Authentication Chip. The
instruction is designed to replace the upper 16 bits of the Accumulator by the
value that will eventually be written to the
M array (dependant on the Access Mode value). The instruction takes 3
operands: Init, MHI, and MLO. The Init
operand sets all internal flags and prepares the RPL unit within the ALU for
subsequent processing. The Accumulator is
transferred to an internal AccessMode register. The Accumulator should have
been loaded from the AM Flash memory
location before the call to RPL Init in the case of implementing the WRITE
command, or with 0 in the case of
implementing the TST command. The Accumulator is left unchanged. The MHI and
MLO operands refer to whether
CA 02456652 2004-02-06
WO 03/015395 PCT/AU02/00919
241
the upper or lower 16 bits of M[C1] will be used in the comparison against the
(always) upper 16 bits of the
Accumulator. Each MHI and MLO instruction executed uses the subsequent 2 bits
from the initialized AccessMode
value. The Erst execution of MHI or MLO uses the lowest 2 bits, the next uses
the second two bits etc.
RTS -Return From Subroutine
Mnemonic: RTS
Opcode: 01000
Usage: RTS
The RTS instruction causes execution to resume at the instruction after the
most recently executed JSR or JSI
instruction. Hence the term: returning from the subroutine. In actuality, the
instruction pulls the saved PC from the
stack, adds 1, and resumes execution at the resultant address. Although 6
levels of execution are provided for (5
subroutines), it is the responsibility of the programmer to balance each JSR
and JSI instruction with an RTS. An RTS
executed with no previous JSR will cause execution to begin at whatever
address happens to be pulled from the stack.
SC - Set Counter
Mnemonic: SC
Opcode: 0101
Usage: SC Counter Value
The SC instruction is used to load a counter with a particular value. The
operand determines which of counters C1 and
C2 is to be loaded. The Value to be loaded is one of 2, 3, 4, 7, 10, 15, 19,
and 31. The counter values are used for
looping and indexing. Both C1 and C2 can be used for looping constructs (when
combined with the DBR instruction),
while only C1 can be used for indexing 32-bit parts of multi-precision
variables.
SET - Set Bits
Mnemonic: SET
Opcode: 0111
Usage: SET Flag/Register
The SET instruction allows the setting of particular flags or flash memory.
There is also a corresponding CLR
instruction. The WE and K2MX operands each set the specified flag for later
processing. The IST and ISW operands
each set the appropriate bit in Flash memory, while the MTR operand transfers
the current value in the Accumulator
into the MTR register. The SET Nx command loads N1 - N4 with the following
constants:
Index Constant Initial X[N] referred to
Loaded
N1 2 X[13]
N2 7 X[8]
N3 13 X[2]
N4 15 X[0]
CA 02456652 2004-02-06
WO 03/015395 PCT/AU02/00919
242
Note that each initial X[N"] referred to matches the optimized SHA-1 algorithm
initial states for indexes N1 - N4.
When each index value N" decrements, the effective X[N] increments. This is
because the X words are stored in
memory with most significant word first.
ST - Store Accumulator
Mnemonic: ST
Opcode: 1111
Usage: ST Location
The ST instruction is stores the current value of the Accumulator in the
specified location. The location is one of A, B,
C, D, E, T, AM, MT, AE[C1], H[C1], B160[C1], R[C1], K[C1], M[C1], or X[N4].
The X[N4] operand has the side
effect of advancing the N4 index. After the store has taken place, N4 will be
pointing to the next element in the X array.
N4 decrements by 1, but since the X array is ordered from high to low, to
decrement the index advances to the next
element in the array. If the destination is in Flash memory, the effect of the
ST instruction is to set the bits in the Flash
memory corresponding to the bits in the Accumulator. To ensure a store of the
exact value from the Accumulator, be
sure to use the CLR instruction to erase the appropriate memory location
first.
TBR - Test and Branch
Mnemonic: TBR
Opcode: 0000
Usage: TBR Value Index
The Test and Branch instruction tests whether the Accumulator is zero or non-
zero, and then branches to the given
address if the Accumulator's current state matches that being tested for. If
the Z flag matches the TRB test, replace the
PC by 9 bit value where bit0 = 0 and upper 8 bits come from MU. Otherwise
increment current PC by 1. The Value
operand is either 0 or 1. A 0 indicates the test is for the Accumulator to be
zero. A 1 indicates the test is for the
Accumulator to be non-zero. The Index operand indicates where execution is to
jump to should the test succeed. The
remaining 3 bits of operand index into the lowest 8 entries of Jump Table 1.
The upper 8 bits are taken from the table,
and the lowest bit (bit 0) is cleared to 0. CMD is cleared to 0 upon a RESET.
0 is translated as TBR 0, which means
branch to the address stored in address offset 0 if the Accumulator = 0. Since
the Accumulator and Z flag are also
cleared to 0 on a RESET, the test will be true, so the net effect is a jump to
the address stored in the 0th entry in the
jump table.
XOR - Exclusive OR
Mnemonic: XOR
Opcode: 1010
Usage: XOR Value
The XOR instruction performs a 32-bit bitwise XOR with the Accumulator, and
stores the result in the Accumulator.
The operand is one of A, B, C, D, E, T, AM, MT, X[Nl], X[N2], X[N3], or X[N4].
The Z flag is also set during this
operation, depending on the result (i.e. what value is loaded into the
Accumulator). A bitwise NOT operation can be
CA 02456652 2004-02-06
WO 03/015395 PCT/AU02/00919
243
performed by XORing the Accumulator with OxFFFFFFFF (via the LDK instruction).
The X[N] operands have a side
effect of advancing the appropriate index to the next value (after the
operation). After the XOR has taken place, the
index will be pointing to the next element in the X array. N4 is also advanced
by the ST X[N4] instruction. The index
decrements by l, but since the X array is ordered from high to low, to
decrement the index advances to the next element
in the array.
PROGRAMMINGMODE DETECTION UNIT
The ProgrammingMode Detection Unit monitors the input clock voltage. If the
clock voltage is a particular value the
Erase Tamper Detection Line is triggered to erase all keys, program code,
secret information etc and enter Program
Mode. The ProgrammingMode Detection Unit can be implemented with regular CMOS,
since the key does not pass
through this unit. It does not have to be implemented with non-flashing CMOS.
There is no particular need to cover the
ProgrammingMode Detection Unit by the Tamper Detection Lines, since an
attacker can always place the chip in
ProgrammingMode via the CLK input. The use of the Erase Tamper Detection Line
as the signal for entering
Programming Mode means that if an attacker wants to use Programming Mode as
part of an attack, the Erase Tamper
Detection Lines must be active and functional. This makes an attack on the
Authentication Chip far more difficult.
NOISE GENERATOR
The Noise Generator can be implemented with regular CMOS, since the key does
not pass through this unit. It does not
have to be implemented with non-flashing CMOS. However, the Noise Generator
must be protected by both Tamper
Detection and Prevention lines so that if an attacker attempts to tamper with
the unit, the chip will either RESET or
erase all secret information. In addition, the bits in the LFSR must be
validated to ensure they have not been tampered
with (i.e. a parity check). If the parity check fails, the Erase Tamper
Detection Line is triggered. Finally, all 64 bits of
the Noise Generator are ORed into a single bit. If this bit is 0, the Erase
Tamper Detection Line is triggered. This is
because 0 is an invalid state for an LFSR. There is no point in using an OK
bit setup since the Noise Generator bits are
only used by the Tamper Detection and Prevention circuitry.
STATE MACHINE
The State Machine is responsible for generating the two operating cycles of
the CPU, stalling during long command
operations, and storing the op-code and operand during operating cycles. The
State Machine can be implemented with
regular CMOS, since the key does not pass through this unit. It does not have
to be implemented with non-flashing
CMOS. However, the opcode/operand latch needs to be parity-checked. The logic
and registers contained in the State
Machine must be covered by both Tamper Detection Lines. This is to ensure that
the instructions to be executed are not
changed by an attacker.
The Authentication Chip does not require the high speeds and throughput of a
general purpose CPU. It must operate fast
enough to perform the authentication protocols, but not faster. Rather than
have specialized circuitry for optimizing
branch control or executing opcodes while fetching the next one (and all the
complexity associated with that), the state
machine adopts a simplistic view of the world. This helps to minimize design
time as well as reducing the possibility of
error in implementation.
CA 02456652 2004-02-06
WO 03/015395 PCT/AU02/00919
244
The general operation of the state machine is to generate sets of cycles:
Cycle 0: Fetch cycle. This is where the opcode is fetched from the program
memory, and the effective address from the
fetched opcode is generated.
Cycle I: Execute cycle. This is where the operand is (potentially) looked up
via the generated effective address (from
Cycle 0) and the operation itself is executed.
Under normal conditions, the state machine generates cycles: 0, 1, 0, 1, 0, l,
0, 1... However, in some cases, the state
machine stalls, generating Cycle 0 each clock tick until the stall condition
finishes. Stall conditions include waiting for
erase cycles of Flash memory, waiting for clients to read or write serial
information, or an invalid opcode (due to
tampering). If the Flash memory is currently being erased, the next
instruction cannot execute until the Flash memory
has finished being erased. This is determined by the Wait signal coming from
the Memory Unit. If Wait = 1, the State
Machine must only generate Cycle Os. There are also two cases for stalling due
to serial I/O operations:
The opcode is ROR OutBit, and OutBitValid already= 1. This means that the
current operation requires outputting a bit
to the client, but the client hasn't read the last bit yet.
The operation is ROR InBit, and InBitValid = 0. This means that the current
operation requires reading a bit from the
client, but the client hasn't supplied the bit yet.
In both these cases, the state machine must stall until the stalling condition
has finished. The next "cycle" therefore
depends on the old or previous cycle, and the current values of CMD, Wait,
OutBitValid, and InBitValid. Wait comes
from the MU, and OutBitValid and InBitValid come from the I/O Unit. When Cycle
is 0, the 8-bit op-code is fetched
from the memory unit and placed in the 8-bit CMD register. The write enable
for the CMD register is therefore -Cycle.
There are two outputs from this unit: Cycle and CMD. Both of these values are
passed into all the other processing units
within the Authentication Chip. The 1-bit Cycle value lets each unit know
whether a fetch or execute cycle is taking
place, while the 8-bit CMD value allows each unit to take appropriate action
for commands related to the specific unit.
Fig. 187 shows the data flow and relationship between components of the State
Machine where:
Logic,: ~ Wait OR
(Old OR ((CMD=ROR) & ((CMD=InBit AND ~InBitValid) OR
(CMD=OutBit AND OutBitValid))))
Old and CMD are both cleared to 0 upon a RESET. This results in the first
cycle being 1, which causes the 0 CMD to be
executed. 0 is translated as TBR 0, which means branch to the address stored
in address offset 0 if the Accumulator = 0.
Since the Accumulator is also cleared to 0 on a RESET, the test will be true,
so the net effect is a jump to the address
stored in the 0th entry in the jump table. The two VAL units are designed to
validate the data that passes through them.
Each contains an OK bit connected to both Tamper Prevention and Detection
Lines. The OK bit is set to 1 on RESET,
and ORed with the ChipOK values from both Tamper Detection Lines each cycle.
The OK bit is ANDed with each data
bit that passes through the unit. In the case of VAL,, the effective Cycle
will always be 0 if the chip has been tampered
with. Thus no program code will execute since there will never be a Cycle 1.
There is no need to check if Old has been
tampered with, for if an attacker freezes the Old state, the chip will not
execute any further instructions. In the case of
VALz, the effective 8-bit CMD value will always be 0 if the chip has been
tampered with, which is the TBR 0
CA 02456652 2004-02-06
WO 03/015395 PCT/AU02/00919
245
instruction. This will stop execution of any program code. VALZ also performs
a parity check on the bits from CMD to
ensure that CMD has not been tampered with. If the parity check fails, the
Erase Tamper Detection Line is triggered.
I/O UrrtT
The I/O Unit is responsible for communicating serially with the outside world.
The Authentication Chip acts as a slave
serial device, accepting serial data from a client, processing the command,
and sending the resultant data to the client
serially. The I/O Unit can be implemented with regular CMOS, since the key
does not pass through this unit. It does not
have to be implemented with non-flashing CMOS. In addition, none of the
latches need to be parity checked since there
is no advantage for an attacker to destroy or modify them. The I/O Unit
outputs Os and inputs Os if either of the Tamper
Detection Lines is broken. This will only come into effect if an attacker has
disabled the RESET and/or erase circuitry,
since breaking either Tamper Detection Lines should result in a RESET or the
erasure of all Flash memory
The InBit, InBitValid, OutBit, and OutBitValid 1 bit registers are used for
communication between the client (System)
and the Authentication Chip. InBit and InBitValid provide the means for
clients to pass commands and data to the
Authentication Chip. OutBit and OutBitValid provide the means for clients to
get information from the Authentication
Chip.When the chip is RESET, InBitValid and OutBitValid are both cleared. A
client sends commands and parameter
bits to the Authentication Chip one bit at a time. From the Authentication
Chip's point of view:
Reads from InBit will hang while InBitValid is clear. InBitValid will remain
clear until the client has written the next
input bit to InBit. Reading InBit clears the InBitValid bit to allow the next
InBit to be read from the client. A client
cannot write a bit to the Authentication Chip unless the InBitValid bit is
clear.
Writes to OutBit will hang while OutBitValid is set. OutBitValid will remain
set until the client has read the bit from
OutBit. Writing OutBit sets the OutBitValid bit to allow the next OutBit to be
read by the client. A client cannot
read a bit from the Authentication Chip unless the OutBitValid bit is set.
The actual stalling of commands is taken care of by the State Machine, but the
various communication registers and the
communication circuitry is found in the I/O Unit.
Fig. 188 shows the data flow and relationship between components of the I/O
Unit where:
Logic,: Cycle AND (CMD = ROR OutBit)
The Serial I/O unit contains the circuitry for communicating externally with
the external world via the Data pin. The
InBitUsed control signal must be set by whichever unit consumes the InBit
during a given clock cycle (which can be
any state of Cycle). The two VAL units are validation units connected to the
Tamper Prevention and Detection
circuitry, each with an OK bit. The OK bit is set to 1 on RESET, and ORed with
the ChipOK values from both Tamper
Detection Lines each cycle. The OK bit is ANDed with each data bit that passes
through the unit.
In the case of VAL,, the effective bit output from the chip will always be 0
if the chip has been tampered with. Thus no
useful output can be generated by an attacker. In the case of VALz, the
effective bit input to the chip will always be 0 if
the chip has been tampered with. Thus no useful input can be chosen by an
attacker. There is no need to verify the
registers in the I/O Unit since an attacker does not gain anything by
destroying or modifying them.
CA 02456652 2004-02-06
WO 03/015395 PCT/AU02/00919
246
ALU
Fig. 189 illustrates a schematic block diagram of the Arithmetic Logic Unit.
The Arithmetic Logic Unit (ALU) contains
a 32-bit Acc (Accumulator) register as well as the circuitry for simple
arithmetic and logical operations. The ALU and
all sub-units must be implemented with non-flashing CMOS since the key passes
through it. In addition, the
Accumulator must be parity-checked. The logic and registers contained in the
ALU must be covered by both Tamper
Detection Lines. This is to ensure that keys and intermediate calculation
values cannot be changed by an attacker. A 1-
bit Z register contains the state of zero-ness of the Accumulator. Both the Z
and Accumulator registers are cleared to 0
upon a RESET. The Z register is updated whenever the Accumulator is updated,
and the Accumulator is updated for any
of the commands: LD, LDK, LOG, XOR, ROR, RPL, and ADD. Each arithmetic and
logical block operates on two 32-
bit inputs: the current value of the Accumulator, and the current 32-bit
output of the MU. Where:
Logic,: Cycle AND CMD~ AND (CMD6_g ~ ST)
Since the WriteEnables of Acc and Z takes CMD~ and Cycle into account (due to
Logic,), these two bits are not
required by the multiplexor MX, in order to select the output. The output
selection for MX, only requires bits 6-3 of
CMD and is therefore simpler as a result.
Output CMD6_3
ADD ADD
AND LOG AND
OR LOG OR
MX, XOR XOR
RPL RPL
ROR ROR
From LD or LDK
MU
The two VAL units are validation units connected to the Tamper Prevention and
Detection circuitry, each with an OK
bit. The OK bit is set to 1 on RESET, and ORed with the ChipOK values from
both Tamper Detection Lines each cycle.
The OK bit is ANDed with each data bit that passes through the unit. In the
case of VAL,, the effective bit output from
the Accumulator will always be 0 if the chip has been tampered with. This
prevents an attacker from processing
anything involving the Accumulator. VAL, also performs a parity check on the
Accumulator, setting the Erase Tamper
Detection Line if the check fails. In the case of VAL2, the effective Z status
of the Accumulator will always be true if
the chip has been tampered with. Thus no looping constructs can be created by
an attacker. The remaining function
blocks in the ALU are described as follows. All must be implemented in non-
flashing CMOS.
Block Descri tion
OR Takes the 32-bit out ut from the multi lexor MXI,
ORs all 32 bits to ether to et 1 bit.
ADD Out uts the result of the addition of its two in
uts, modulo 232.
AND Outputs the 32-bit result of a arallel bitwise AND
of its two 32-bit inputs.
OR Outputs the 32-bit result of a parallel bitwise OR
of its two 32-bit inputs.
CA 02456652 2004-02-06
WO 03/015395 PCT/AU02/00919
247
XOR Out uts the 32-bit result of a arallel bitwise XOR
of its two 32-bit in uts.
RPL Examined in further detail below.
ROR Examined in further detail below.
RPL
Fig. 190 illustrates a schematic block diagram of the RPL unit. The RPL unit
is a component within the ALU. It is
designed to implement the RPLCMP functionality of the Authentication Chip. The
RPLCMP command is specifically
designed for use in secure writing to Flash memory M, based upon the values in
AccessMode. The RPL unit contains a
32-bit shift register called AMT (AccessModeTemp), which shifts right two bits
each shift pulse, and two 1-bit registers
called EE and DE, directly based upon the WR pseudocode's EqEncountered and
DecEncountered flags. All registers
are cleared to 0 upon a RESET. AMT is loaded with the 32 bit AM value (via the
Accumulator) with a RPL INIT
command, and EE and DE are set according to the general write algorithm via
calls to RPL MHI and RPL MLO. The
EQ and LT blocks have functionality exactly as documented in the WR command
pseudocode. The EQ block outputs 1
if the 2 16-bit inputs are bit-identical and 0 if they are not. The LT block
outputs 1 if the upper 16-bit input from the
Accumulator is less than the 16-bit value selected from the MU via MX2. The
comparison is unsigned. The bit patterns
for the operands are specifically chosen to make the combinatorial logic
simpler. The bit patterns for the operands are
listed again here since we will make use of the patterns:
O Brand CMD3-o
Init 0000
MLO 1110
The MHI and MLO have the hi bit set to easily differentiate them from the Init
bit pattern, and the lowest bit can be
used to differentiate between MHI and MLO. The EE and DE flags must be updated
each time the RPL command is
issued. For the Init stage, we need to setup the two values with 0, and for
MHI and MLO, we need to update the values
of EE and DE appropriately. The WriteEnable for EE and DE is therefore:
Logic,: Cycle AND (CMD~_4 = RPL) -
With the 32 bit AMT register, we want to load the register with the contents
of AM (read from the MU) upon an RPL
Init command, and to shift the AMT register right two bit positions for the
RPL MLO and RPL MHI commands. This
can be simply tested for with the highest bit of the RPL operand (CMD3). The
WriteEnable and ShiftEnable for the
AMT registeris therefore:
CA 02456652 2004-02-06
WO 03/015395 PCT/AU02/00919
248
The output from Logic3 is also useful as input to multiplexor MX,, since it
can be used to gate through either the current
2 access mode bits or 00 (which results in a reset of the DE and EE registers
since it represents the access mode RW).
Consequently MX, is:
Out ut ~ Lo ic3
AMT ou ut 0
00 1
The RPL logic only replaces the upper 16 bits of the Accumulator. The lower 16
bits pass through untouched. However,
of the 32 bits from the MU (corresponding to one of M[0-15]), only the upper
or lower 16 bits are used. Thus MXZ tests
CMDo to distinguish between MHI and MLO.
Out ut CMDo
Lower 16 bits 0
U er 16 bits 1
The logic for updating the DE and EE registers matches the pseudocode of the
WR command. Note that an input of an
AccessMode value of 00 (=RW which occurs during an RPL INIT) causes both DE
and EE to be loaded with 0 (the
correct initialization value). EE is loaded with the result from Logic4, and
DE is loaded with the result fromLogicS.
Logic4 (((AccessMode=MSR) AND EQ) OR
((AccessMode=NMSR) AND EE AND EQ))
LogicS (((AccessMode=MSR) AND LT) OR
((AccessMode=NMSR) AND DE) OR
((AccessMode=NMSR) AND EQ AND LT))
The upper 16 bits of the Accumulator must be replaced with the value that is
to be written to M. Consequently Logicb
matches the WE flag from the WR command pseudocode.
Logicb ((AccessMode=RW) OR
((AccessMode=MSR) AND LT) OR
AND (DE OR L'
The output from Logicb is used directly to drive the selection between the
original 16 bits from the Accumulator and the
value from M[0-15] via multiplexor MX3. If the 16 bits from the Accumulator
are selected (leaving the Accumulator
unchanged), this signifies that the Accumulator value can be written to M[n].
If the 16-bit value from M is selected
(changing the upper 16 bits of the Accumulator), this signifies that the 16-
bit value in M will be unchanged. MX3
therefore takes the following form:
I Output I Logicb
CA 02456652 2004-02-06
WO 03/015395 PCT/AU02/00919
249
16 bits from MU 0
MX3 16 bits from Acc 1
There is no point parity checking AMT as an attacker is better off forcing the
input to MX3 to be 0 (thereby enabling an
attacker to write any value to M). However, if an attacker is going to go to
the trouble of laser-cutting the chip
(including all Tamper Detection tests and circuitry), there are better targets
than allowing the possibility of a limited
chosen-text attack by fixing the input of MX3.
ROR
Fig. 191 illustrates a schematic block diagram of the ROR block of the ALU.
The ROR unit is a component within the
ALU. It is designed to implement the ROR functionality of the Authentication
Chip. A 1-bit register named RTMP is
contained within the ROR unit. RTMP is cleared to 0 on a RESET, and set during
the ROR RB and ROR XRB
commands. The RTMP register allows implementation of Linear Feedback Shift
Registers with any tap configuration.
The XOR block is a 2 single-bit input, 1-bit out XOR. The RORn, blocks are
shown for clarity, but in fact would be
hardwired into multiplexor MX3, since each block is simply a rewiring of the
32-bits, rotated right N bits.All 3
multiplexors (MX~, MX2, and MX3) depend upon the 8-bit CMD value. However, the
bit patterns for the ROR op-code
are arranged for logic optimization purposes. The bit patterns for the
operands are listed again here since we will make
use of the patterns:
O Brand CMD3_o
InB it 0000
OutBit 0001
RB 0010
XRB 0011
IST 0100
ISW 0101
MTRZ 0110
1 0111
2 1001
27 1010
~31 -~ 1100
Logic, is used to provide the WriteEnable signal to RTMP. The RTMP register
should only be written to during ROR
RB and ROR XRB commands. Logicz is used to provide the control signal whenever
the InBit is consumed. The two
combinatorial logic blocks are:
Logic,: C cle AND (CMD~_4 = ROR) AND (CMD3_,= 001)
Loeic~: Cycle AND (CMD,.r, = ROR InBitl
CA 02456652 2004-02-06
WO 03/015395 PCT/AU02/00919
250
With multiplexor MX,, we are selecting the bit to be stored in RTMP. Logic,
already narrows down the CMD inputs to
one of RB and XRB. We can therefore simply test CMDo to differentiate between
the two. The following table
expresses the relationship between CMDo and the value output from MX,.
Out ut CMDo
Acco 0
XOR out ut 1
With multiplexor MX2, we are selecting which input bit is going to replace bit
0 of the Accumulator input. We can only
perform a small amount of optimization here, since each different input bit
typically relates to a specific operand. The
following table expresses the relationship between CMD3_o and the value output
from MX2.
Out CMD3_o Comment
ut
Acco lxxx OR 1, 2, 27,
111 31
RTMP OOlx RB, XRB
MXz InBit OOOx InBit, OutBit
MUo OlOx IST, ISW
I M~ llo - I .
I I
The final multiplexor, MX3, does the final rotating of the 32-bit value.
Again, the bit patterns of the CMD operand are
taken advantage of:
Out CMD3-0 Comment
ut
ROR Oxxx All exce t 2, 27,
1 and 31
ROR lxxl 2
2
ROR lxlx 27
27
ROR l lxx 31
31
MINTICKS UNIT
Fig. 192 shows the data flow and relationship between components of the
MinTicks Unit. The MinTicks Unit is
responsible for a programmable minimum delay (via a countdown) between key-
based operations within the
Authentication Chip. The logic and registers contained in the MinTicksUnit
must be covered by both Tamper Detection
Lines. This is to ensure that an attacker cannot change the time between calls
to key-based functions. Nearly all of the
MinTicks Unit can be implemented with regular CMOS, since the key does not
pass through most of this unit. However
the Accumulator is used in the SET MTR instruction. Consequently this tiny
section of circuitry must be implemented
in non-flashing CMOS. The remainder of the MinTicks Unit does not have to be
implemented with non-flashing
CMOS. However, the MTRZ latch (see below) needs to be parity checked.
The MinTicks Unit contains a 32-bit register named MTR (MinTicksRemaining).
The MTR register contains the
number of clock ticks remaining before the next key-based function can be
called. Each cycle, the value in MTR is
CA 02456652 2004-02-06
WO 03/015395 PCT/AU02/00919
251
decremented by 1 until the value is 0. Once MTR hits 0, it does not decrement
any further. An additional one-bit
register named MTRZ (MinTicksRegisterZero) reflects the current zero-ness of
the MTR register. MTRZ is 1 if the
MTRZ register is 0, and MTRZ is 0 if the MTRZ register is not 0. The MTR
register is cleared by a RESET, and set to
a new count via the SET MTR command, which transfers the current value in the
Accumulator into the MTR register.
W here:
Logic, CMD SET MTR
And
Out Logic, MTRZ
ut
Acc 1
MX, MTR-1 0 0
0 0 1
Since Cycle is connected to the WriteEnables of MTR and MTRZ, these registers
only update during the Execute cycle,
i.e. when Cycle = 1. The two VAL units are validation units connected to the
Tamper Prevention and Detection
circuitry, each with an OK bit. The OK bit is set to 1 on RESET, and ORed with
the ChipOK values from both Tamper
Detection Lines each cycle. The OK bit is ANDed with each data bit that passes
through the unit. In the case of VAL,,
the effective output from MTR is 0, which means that the output from the
decrementor unit is all 1s, thereby causing
MTRZ to remain 0, thereby preventing an attacker from using the key-based
functions. VAL, also validates the parity
of the MTR register. If the parity check fails, the Erase Tamper Detection
Line is triggered. In the case of VAL2, if the
chip has been tampered with, the effective output from MTRZ will be 0,
indicating that the MinTicksRemaining register
has not yet reached 0, thereby preventing an attacker from using the key-based
functions.
Program Counter Unit
Fig. 192 is a block diagram of the Program Counter Unit. The Program Counter
Unit (PCU) includes the 9 bit PC
(Program Counter), as well as logic for branching and subroutine control. The
Program Counter Unit can be
implemented with regular CMOS, since the key does not pass through this unit.
It does not have to be implemented with
non-flashing CMOS. However, the latches need to be parity-checked. In
addition, the logic and registers contained in
the Memory Unit must be covered by both Tamper Detection Lines to ensure that
the PC cannot be changed by an
attacker. The PC is actually implemented as a 6-level by 9-bit PCA (PC Array),
indexed by the 3-bit SP (Stack Pointer)
register. The PC and SP registers are all cleared to 0 on a RESET, and updated
during the flow of program control
according to the opcodes. The current value for the PC is output to the MU
during Cycle 0 (the Fetch cycle). The PC is
updated during Cycle 1 (the Execute cycle) according on the command being
executed. In most cases, the PC simply
increments by 1. However, when branching occurs (due to subroutine or some
other form of jump), the PC is replaced
by a new value. The mechanism for calculating the new PC value depends upon
the opcode being processed.
The ADD block is a simple adder modulo 29. The inputs are the PC value and
either 1 (for incrementing the PC by 1) or
a 9 bit offset (with hi bit set and lower 8 bits from the MU). The "+1" block
takes a 3-bit input and increments it by 1
CA 02456652 2004-02-06
WO 03/015395 PCT/AU02/00919
252
(with wrap). The "-1" block takes a 3-bit input and decrements it by 1 (with
wrap). The different forms of PC control
are as follows:
Command Action
JSR, Save old value of PC onto stack for later.
JSI (ACC) New PC is 9 bit value where bit0 = 0 (subroutines
must therefore start at an
even address), and upper 8 bits of address
come from MU
(MU 8-bit value is Jum Table 1 for JSR, and
Jum Table 2 for JSI)
JSI RTS Po old value of PC from stack and increment
b 1 to et new PC.
TBR If the Z flag matches the TRB test, replace
PC by 9 bit value where bit0 = 0 and
a er 8 bits come from MU. Otherwise increment
current PC by 1.
DBR C1, Add 9 bit offset (8 bit value from MU and
hi bit = 1) to current PC only if the
DBR C2 C1Z or C2Z is set (C1Z for DBR C1, C2Z for
DBR C2). Otherwise increment
current PC by 1.
All others Increment current PC by 1.
Since the same action takes place for JSR, and JSI (ACC), we specifically
detect that case in Logic,. By the same
concept, we can specifically test for the JSI RTS case in Logic2.
Logic, (CMD~_5 = 001) OR (CMD~_3 = 01001)
Lo~ic~ CMD,_~ = 01000
When updating the PC, we must decide if the PC is to be replaced by a
completely new item, or by the result of the
adder. This is the case for JSR and JSI (ACC), as well as TBR as long as the
test bit matches the state of the
Accumulator. All but TBR is tested for by Logic,, so Logic3 also includes the
output of Logic, as its input. The output
from Logic3 is then used by multiplexors MXZ to obtain the new PC value.
Logic3 ~ Logic, OR
l(CMD, ~ = TBRI AND (CMDz XOR Z))
Out ut Lo ic3
Out ut from Adder0
MXz
Re lacement value1
The input to the 9-bit adder depends on whether we are incrementing by 1 (the
usual case), or adding the offset as read
from the MU (the DBR command). Logic4 generates the test. The output from
Logic4 is then directly used by
multiplexor MX3 accordingly.
Logic4 ~ ((CMD~_3 = DBR C1) AND C1Z) OR
(CMD,_z = DBR C2) AND C2Z))
Output Logic4
CA 02456652 2004-02-06
WO 03/015395 PCT/AU02/00919
253
Out ut from Adder 0
Re lacement value 1
Finally, the selection of which PC entry to use depends on the current value
for SP. As we enter a subroutine, the SP
index value must increment, and as we return from a subroutine, the SP index
value must decrement. In all other cases,
and when we want to fetch a command (Cycle 0), the current value for the SP
must be used. Logic, tells us when a
subroutine is being entered, and Logicz tells us when the subroutine is being
returned from. The multiplexor selection is
therefore defined as follows:
Out C cle/Lo ic,/Logic2
ut
SP-1 1x1
MX, SP+1 llx
SP Oxx OR 00
The two VAL units are validation units connected to the Tamper Prevention and
Detection circuitry), each with an OK
bit. The OK bit is set to 1 on RESET, and ORed with the ChipOK values from
both Tamper Detection Lines each cycle.
The OK bit is ANDed with each data bit that passes through the unit. Both VAL
units also parity-check the data bits to
ensure that they are valid. If the parity-check fails, the Erase Tamper
Detection Line is triggered. In the case of VAL,,
the effective output from the SP register will always be 0. If the chip has
been tampered with. This prevents an attacker
from executing any subroutines.In the case of VALZ, the effective PC output
will always be 0 if the chip has been
tampered with. This prevents an attacker from executing any program code.
Memory Unit
The Memory Unit (MU) contains the internal memory of the Authentication Chip.
The internal memory is addressed by
9 bits of address, which is passed in from the Address Generator Unit. The
Memory Unit outputs the appropriate 32-bit
and 8-bit values according to the address. The Memory Unit is also responsible
for the special Programming Mode,
which allows input of the program Flash memory. The contents of the entire
Memory Unit must be protected from
tampering. Therefore the logic and registers contained in the Memory Unit must
be covered by both Tamper Detection
Lines. This is to ensure that program code, keys, and intermediate data values
cannot be changed by an attacker. All
Flash memory needs to be multi-state, and must be checked upon being read for
invalid voltages. The 32-bit RAM also
needs to be parity-checked. The 32-bit data paths through the Memory Unit must
be implemented with non-flashing
CMOS since the key passes along them. The 8-bit data paths can be implemented
in regular CMOS since the key does
not pass along them.
Constants
The Constants memory region has address range: 000000000 - 000001111. It is
therefore the range OOOOOxxxx.
However, given that the next 48 addresses are reserved, this can be taken
advantage of during decoding. The Constants
memory region can therefore be selected by the upper 3 bits of the address
(AdrB~ = 000), with the lower 4 bits fed into
combinatorial logic, with the 4 bits mapping to 32-bit output values as
follows:
CA 02456652 2004-02-06
WO 03/015395 PCT/AU02/00919
254
Adr3-0Out ut Value
0000 0x00000000
0001 0x36363636
0010 Ox5C5C5C5C
0011 OxFFF'FFFFF
0100 Ox5A827999
0101 Ox6ED9EBA1
0110 Ox8FIBBCDC
0111 OxCA62C 1D6
1000 0x67452301
1001 OxEFCDAB 89
1010 Ox98BADCFE
1011 0x10325476
llxx OxC3D2E1F0
RAM
The address space for the 32 entry 32-bit RAM is 001000000 - 001011111. It is
therefore the range OOlOxxxxx. The
RAM memory region can therefore be selected by the upper 4 bits of the address
(AdrB_5 = 0010), with the lower 5 bits
selecting which of the 32 values to address. Given the contiguous 32-entry
address space, the RAM can easily be
implemented as a simple 32x32-bit RAM. Although the CPU treats each address
from the range 00000 - 11111 in
special ways, the RAM address decoder itself treats no address specially. All
RAM values are cleared to 0 upon a
RESET, although any program code should not take this for granted.
Flash Memory Variables
The address space for the 32-bit wide Flash memory is 001100000 - 001111111.
It is therefore the range 0011 xxxxx.
The Flash memory region can therefore be selected by the upper 4 bits of the
address (AdrB_5 = 0111), with the lower 5
bits selecting which value to address. The Flash memory has special
requirements for erasure. It takes quite some time
for the erasure of Flash memory to complete. The Wait signal is therefore set
inside the Flash controller upon receipt of
a CLR command, and is only cleared once the requested memory has been erased.
Internally, the erase lines of
particular memory ranges are tied together, so that only 2 bits are required
as indicated by the following table:
Adr4_3Erases range
00 Rp_4
O l MT, AM, K 10~, K2o_a
Individual M address (Adr)
11 IST, ISW
Flash values are unchanged by a RESET, although program code should not take
the initial values for Flash (after
manufacture) other than garbage. Operations that make use of Flash addresses
are LD, ST, ADD, RPL, ROR, CLR, and
SET. In all cases, the operands and the memory placement are closely linked,
in order to minimize the address
CA 02456652 2004-02-06
WO 03/015395 PCT/AU02/00919
255
generation and decoding.The entire variable section of Flash memory is also
erased upon entering Programming Mode,
and upon detection of a definite physical Attack.
Flash Memory - Pro am
The address range for the 384 entry 8-bit wide program Flash memory is
010000000 -111111111. It is therefore the
range Olxxxxxxx - l lxxxxxxx. Decoding is straightforward given the ROM start
address and address range. Although
the CPU treats parts of the address range in special ways, the address decoder
itself treats no address specially. Flash
values are unchanged by a RESET, and are cleared only by entering Programming
Mode. After manufacture, the Flash
contents must be considered to be garbage. The 384 bytes can only be loaded by
the State machine when in
Programming Mode.
BLOCK DIAGRAM of MU
Fig. 193 is a block diagram of the Memory Unit. The logic shown takes
advantage of the fact that 32-bit data and 8-bit
data are required by separate commands, and therefore fewer bits are required
for decoding. As shown, 32-bit output
and 8-bit output are always generated. The appropriate components within the
remainder of the Authentication Chip
simply use the 32-bit or 8-bit value depending on the command being executed.
Multiplexor MX,, selects the 32-bit
output from a choice of Truth Table constants, RAM, and Flash memory. Only 2
bits are required to select between
these 3 outputs, namely Adrb and AdrS. Thus MXZtakes the following form:
Output Adr6_s
Out ut from 32-bit 00
Truth Table
MXZ Out ut from 32-bit 10
Flash memo
Output from 32-bit I 11
RAM
The logic for erasing a particular part of the 32-bit Flash memory is
satisfied by Logic,. The Erase Part control signal
should only be set during a CLR command to the correct part of memory while
Cycle=1. Note that a single CLR
command may clear a range of Flash memory. Adrb is sufficient as an address
range for CLR since the range will
always be within Flash for valid operands, and 0 for non-valid operands. The
entire range of 32-bit wide Flash memory
is erased when the Erase Detection Lines is triggered (either by an attacker,
or by deliberately entering Programming
Mode).
Logic, Cycle AND (CMD~~ = CLR) AND Adrb
The logic for writing to a particular part of Flash memory is satisfied by
Logic2. The WriteEnable control signal should
only be set during an appropriate ST command to a Flash memory range while
Cycle=1. Testing only Adrb.s is
acceptable since the ST command only validly writes to Flash or RAM (if Adrb_5
is 00, K2MX must be 0).
Logic2 Cycle AND (CMD~~ = ST) AND (Adr~S = 10)
CA 02456652 2004-02-06
WO 03/015395 PCT/AU02/00919
256
The WE (WriteEnable) flag is set during execution of the SET WE and CLR WE
commands. Logic3 tests for these two
cases. The actual bit written to WE is CMD4.
~ic3 Cycle AND (CMD~_5 = 011) AND (CMD3.o =0000)
The logic for writing to the RAM region of memory is satisfied by Logic4. The
WriteEnable control signal should only
be set during an appropriate ST command to a RAM memory range while Cycle=1.
However this is tempered by the
WE flag, which governs whether writes to X[N] are permitted. The X[N] range is
the upper half of the RAM, so this can
be tested for using Adr4. Testing only Adrb_5 as the full address range of RAM
is acceptable since the ST command only
writes to Flash or RAM.
Logic4 ~ Cycle AND (CMD~~ = ST) AND (Adrb_5 = 11) AND
AND WE) OR
The three VAL units are validation units connected to the Tamper Prevention
and Detection circuitry, each with an OK
bit. The OK bit is set to 1 on RESET, and ORed with the ChipOK values from
both Tamper Detection Lines each cycle.
The OK bit is ANDed with each data bit that passes through the unit. The VAL
units also check the data bits to ensure
that they are valid. VAL, and VALZ validate by checking the state of each data
bit, and VAL3 performs a parity check.
If any validity test fails, the Erase Tamper Detection Line is triggered. In
the case of VAL,, the effective output from
the program Flash will always be 0 (interpreted as TBR 0) if the chip has been
tampered with. This prevents an attacker
from executing any useful instructions. In the case of VAL2, the effective 32-
bit output will always be 0 if the chip has
been tampered with. Thus no key or intermediate storage value is available to
an attacker. The 8-bit Flash memory is
used to hold the program code, jump tables and other program information. The
384 bytes of Program Flash memory
are selected by the full 9 bits of address (using address range Olxxxxxxx - l
lxxxxxxx). The Program Flash memory is
erased only when the Erase Detection Lines is triggered (either by an
attacker, or by entering Programming Mode due to
the Programming Mode Detection Unit). When the Erase Detection Line is
triggered, a small state machine in the
Program Flash Memory Unit erases the 8-bit Flash memory, validates the
erasure, and loads in the new contents (384
bytes) from the serial input. The following pseudocode illustrates the state
machine logic that is executed when the
Erase Detection line is triggered:
Set WAIT output bit to prevent the remainder of the chip from functioning
Fix 8-bit output to be 0
Erase all 8-bit Flash memory
Temp ~- 0
For Adr = 0 to 383
Temp ~ Temp OR FlashAd~
IF (Temp ~ 0)
Hang
For Adr = 0 to 383
CA 02456652 2004-02-06
WO 03/015395 PCT/AU02/00919
257
Do 8 times
Wait for InBitValid to be set
ShiftRight[Temp, InBit]
Set InBitUsed control signal
FlashAd~ E-- Temp
Hang
During the Programming Mode state machine execution, 0 must be placed onto the
8-bit output. A 0 command causes
the remainder of the Authentication chip to interpret the command as a TBR 0.
When the chip has read all 384 bytes
into the Program Flash Memory, it hangs (loops indefinitely). The
Authentication Chip can then be reset and the
program used normally. Note that the erasure is validated by the same 8-bit
register that is used to load the new
contents of the 8-bit program Flash memory. This helps to reduce the chances
of a successful attack, since program code
can't be loaded properly if the register used to validate the erasure is
destroyed by an attacker. In addition, the entire
state machine is protected by both Tamper Detection lines.
Address Generator Unit
The Address Generator Unit generates effective addresses for accessing the
Memory Unit (MU). In Cycle 0, the PC is
passed through to the MU in order to fetch the next opcode. The Address
Generator interprets the returned opcode in
order to generate the effective address for Cycle 1. In Cycle 1, the generated
address is passed to the MU. The logic and
registers contained in the Address Generator Unit must be covered by both
Tamper Detection Lines. This is to ensure
that an attacker cannot alter any generated address. Nearly all of the Address
Generator Unit can be implemented with
regular CMOS, since the key does not pass through most of this unit. However 5
bits of the Accumulator are used in the
JSI Address generation. Consequently this tiny section of circuitry must be
implemented in non-flashing CMOS. The
remainder of the Address Generator Unit does not have to be implemented with
non-flashing CMOS. However, the
latches for the counters and calculated address should be parity-checked. If
either of the Tamper Detection Lines is
broken, the Address Generator Unit will generate address 0 each cycle and all
counters will be fixed at 0. This will only
come into effect if an attacker has disabled the RESET and/or erase circuitry,
since under normal circumstances,
breaking a Tamper Detection Line will result in a RESET or the erasure of all
Flash memory.
BACKGROUND TO ADDRESS GENERATION
The logic for address generation requires an examination of the various
opcodes and operand combinations. The
relationship between opcode/operand and address is examined in this section,
and is used as the basis for the Address
Generator Unit.
Constants
The lower 4 entries are the simple constants for general-purpose use as well
as the HMAC algorithm. The lower 4 bits
of the LDK operand directly correspond to the lower 3 bits of the address in
memory for these 4 values, i.e. 0000, 0001,
0010, and 0011 respectively. The y constants and the h constants are also
addressed by the LDK command. However
CA 02456652 2004-02-06
WO 03/015395 PCT/AU02/00919
258
the address is generated by ORing the lower 3 bits of the operand with the
inverse of the C1 counter value, and keeping
the 4th bit of the operand intact. Thus for LDK y, the y operand is 0100, and
with LDK h, the h operand is 1000. Since
the inverted C1 value takes on the range 000 - 011 for y, and 000 - 100 for h,
the ORed result gives the exact address.
For all constants, the upper 5 bits of the final address are always 00000.
Variables A-T have addresses directly related to the lower 3 bits of their
operand values. That is, for operand values
0000 - 0101 of the LD, ST, ADD, LOG, and XOR commands, as well as operand
vales 1000-1101 of the LOG
command, the lower 3 operand address bits can be used together with a constant
high 6-bit address of 001000 to
generate the final address. The remaining register values can only be accessed
via an indexed mechanism. Variables A-
E, B160, and H are only accessible as indexed by the C1 counter value, while X
is indexed by N,, N2, N3, and N4. With
the LD, ST and ADD commands, the address for AE as indexed by C1 can be
generated by taking the lower 3 bits of
the operand (000) and ORing them with the C1 counter value. However, H and
B160 addresses cannot be generated in
this way, (otherwise the RAM address space would be non-contiguous). Therefore
simple combinatorial logic must
convert AE into 0000, H into 0110, and B160 into 1011. The final address can
be obtained by adding C1 to the 4-bit
value (yielding a 4-bit result), and prepending the constant high 5-bit
address of 00100. Finally, the X range of registers
is only accessed as indexed by N,, Nz, N3, and N4. With the XOR command, any
of N,.~ can be used to index, while
with LD, ST, and ADD, only N4 can be used. Since the operand of X in LD, ST,
and ADD is the same as the XNQ
operand, the lower 2 bits of the operand selects which N to use. The address
can thus be generated as a constant high 5-
bit value of 00101, with the lower 4 bits coming from by the selected N
counter.
Flash Memory - Variables
The addresses for variables MT and AM can be generated from the operands of
associated commands. The 4 bits of
operand can be used directly (0110 and 0111), and prepending the constant high
5-bit address of 00110. Variables R,.S,
K1,_5, K2,_5, and Mo_~ are only accessible as indexed by the inverse of the C1
counter value (and additionally in the case
of R, by the actual C 1 value). Simple combinatorial logic must convert R and
RF into 00000, K into 01000 or 11000
depending on whether K1 or K2 is being addressed, and M (including MHI and
MLO) into 10000. The final address can
be obtained by ORing (or adding) C1 (or in the case of RF, using C1 directly)
with the 5-bit value, and prepending the
constant high 4-bit address of 0011. Variables IST and ISW are each only 1 bit
of value, but can be implemented by
any number of bits. Data is read and written as either 0x00000000 or
OxFFF'FFFFF. They are addressed only by ROR,
CLR and SET commands. In the case of ROR, the low bit of the operand is
combined with a constant upper 8-bits value
of 00111111, yielding 001111110 and 001111111 for IST and ISW respectively.
This is because none of the other ROR
operands make use of memory, so in cases other than IST and ISW, the value
returned can be ignored. With SET and
CLR, IST and ISW are addressed by combining a constant upper 4-bits of 0011
with a mapping from IST (0100) to
11110 and from ISW (0101) to 11111. Since IST and ISW share the same operand
values with E and T from RAM, the
same decoding logic can be used for the lower 5 bits. The final address
requires bits 4, 3, and 1 to be set (this can be
done by ORing in the result of testing for operand values 010x).
CA 02456652 2004-02-06
WO 03/015395 PCT/AU02/00919
259
Flash Memos rg am
The address to lookup in program Flash memory comes directly from the 9-bit PC
(in Cycle 0) or the 9-bit Adr register
(in Cycle 1). Commands such as TBR, DBR, JSR and JSI modify the PC according
to data stored in tables at specific
addresses in the program memory. As a result, address generation makes use of
some constant address components,
with the command operand (or the Accumulator) forming the lower bits of the
effective address:
Command Address RangeConstant (upper) Variable (lower)
part of part of
address address
TBR O10000xxx 010000 CMD2-o
JSR Ol00xxxxx 0100 CMDa-o
JSI ACC OlOlxxxxx 0101 Acc4_o
DBR 011000xxx 011000 CMDZ-o I
BLOCK DIAGRAM OF ADDRESS GENERATOR UMT
Fig. 194 shows a schematic block diagram for the Address Generator Unit. The
primary output from the Address
Generator Unit is selected by multiplexor MXI, as shown in the following
table:
Out ut C cle
PC 0
MX,
Adr 1
It is important to distinguish between the CMD data and the 8-bit data from
the MU:
In Cycle 0, the 8-bit data line holds the next instruction to be executed in
the following Cycle 1. This 8-bit command
value is used to decode the effective address. By contrast, the CMD 8-bit data
holds the previous instruction, so
should beignored.
In Cycle 1, the CMD line holds the currently executing instruction (which was
in the 8-bit data line during Cycle 0),
while the 8-bit data line holds the data at the effective address from the
instruction. The CMD data must be
executed during Cycle 1.
Consequently, the choice of 9-bit data from the MU or the CMD value is made by
multiplexor MX3, as shown in the
following table:
Out ut C cle
8-bit data from 0
MU
CMD 1
Since the 9-bit Adr register is updated every Cycle 0, the WriteEnable of Adr
is connected to -Cycle. The Counter Unit
generates counters C1, C2 (used internally) and the selected N index. In
addition, the Counter Unit outputs flags C1Z
and C2Z for use by the Program Counter Unit. The various *GEN units generate
addresses for particular command
CA 02456652 2004-02-06
WO 03/015395 PCT/AU02/00919
260
types during Cycle 0, and multiplexor MXZ selects between them based on the
command as read from program memory
via the PC (i.e. the 8-bit data line). The generated values are as follows:
Block Commands for which address is enerated
JSIGEN JSI ACC
JSRGEN JSR, TBR
DBRGEN DBR
LDKGEN LDK
RPLGEN RPL
VARGEN LD, ST, ADD, LOG, XOR
BITGEN ROR, SET
CLRGEN CLR
Multiplexor MXZ has the following selection criteria:
Ou ut 8-bit data value from MU
9-bit value from JSIGEN O1001xxx
9-bit value from JSRGEN OOlxxxxx OR OOOOxxxx
9-bit value from DBRGEN OOOlxxxx
9-bit value from LDKGEN 1110xxxx
MXZ 9 bit value from RPLGEN 1101xxxx
9-bit value from VARGEN lOxxxxxx OR 1x1lxxxx
9-bit value from BITGEN O1l lxxxx OR 1100xxxx
9 bit value from CLRGEN O110xxxx
The VALE unit is a validation unit connected to the Tamper Prevention and
Detection circuitry. It contains an OK bit
that is set to 1 on RESET, and ORed with the ChipOK values from both Tamper
Detection Lines each cycle. The OK
bit is ANDed with the 9 bits of Effective Address before they can be used. If
the chip has been tampered with, the
address output will be always 0, thereby preventing an attacker from accessing
other parts of memory. The VAL, unit
also performs a parity check on the Effective Address bits to ensure it has
not been tampered with. If the parity-check
fails, the Erase Tamper Detection Line is triggered.
JSIGEN
Fig. 195 shows a schematic block diagram for the JSIGEN Unit. The JSIGEN Unit
generates addresses for the JSI ACC
instruction. The effective address is simply the concatenation of:
the 4-bit high part of the address for the JSI Table (0101) and
the lower 5 bits of the Accumulator value.
Since the Accumulator may hold the key at other times (when a jump address is
not being generated), the value must be
hidden from sight. Consequently this unit must be implemented with non-
flashing CMOS. The multiplexor MX,
simply chooses between the lower 5 bits from Accumulator or 0, based upon
whether the command is JSIGEN.
Multiplexor MX, has the following selection criteria:
CA 02456652 2004-02-06
WO 03/015395 PCT/AU02/00919
261
Output CMD7-o
Accumulator4.o JSI ACC
MX,
00000 ~(JSI ACC)
JSRGEN
Fig. 196 shows a schematic block diagram for the JSRGEN Unit. The JSRGEN Unit
generates addresses for the JSR
and TBR instructions. The effective address comes from the concatenation of:
the 4-bit high part of the address for the JSR table (0100),
the offset within the table from the operand (5 bits for JSR commands, and 3
bits plus a constant 0 bit for
TBR).
where Logicl produces bit 3 of the effective address. This bit should be bit 3
in the case of JSR, and 0 in the case of
TBR:
Logic, bits AND bit3
Since the JSR instruction has a 1 in bit 5, (while TBR is 0 for this bit)
ANDing this with bit 3 will produce bit 3 in the
case of JSR, and 0 in the case of TBR.
DBRGEN
Fig. 197 shows a schematic block diagram for the DBRGEN Unit. The DBRGEN Unit
generates addresses for the DBR
instructions. The effective address comes from the concatenation of:
the 6-bit high part of the address for the DBR table (011000), and
the lower 3 bits of the operand
LDKGEN
Fig. 198 shows a schematic block diagram for the LDKGEN Unit. The LDKGEN Unit
generates addresses for the LDK
instructions. The effective address comes from the concatenation of:
the 5-bit high part of the address for the LDK table (00000),
the high bit of the operand, and
the lower 3 bits of the operand (in the case of the lower constants), or the
lower 3 bits of the operand
ORed with C1 (in the case of indexed constants).
The ORZ block simply ORs the 3 bits of C1 with the 3 lowest bits from the 8-
bit data output from the MU. The
multiplexor MX, simply chooses between the actual data bits and the data bits
ORed with C1, based upon whether the
upper bits of the operand are set or not. The selector input to the
multiplexor is a simple OR gate, ORing bite with bit3.
Multiplexor MX, has the following selection criteria:
Output bit3 OR bite
bit2.o 0
MX~
Out ut from OR block 1
CA 02456652 2004-02-06
WO 03/015395 PCT/AU02/00919
262
RPLGEN
Fig. 199 shows a schematic block diagram for the RPLGEN Unit. The RPLGEN Unit
generates addresses for the RPL
instructions. When K2MX is 0, the effective address is a constant 000000000.
When K2MX is 1 (indicating reads from
M return valid values), the effective address comes from the concatenation of:
the 6-bit high part of the address for M (001110), and
the 3 bits of the current value for C1
The multiplexor MX, chooses between the two addresses, depending on the
current value of K2MX. Multiplexor MX,
therefore has the following selection criteria:
Out ut K2MX
000000000 0
001110 C1 1
VARGEN
Fig. 200 shows a schematic block diagram for the VARGEN Unit. The VARGEN Unit
generates addresses for the LD,
ST, ADD, LOG, and XOR instructions. The K2MX 1-bit flag is used to determine
whether reads from M are mapped to
the constant 0 address (which returns 0 and cannot be written to), and which
of K1 and K2 is accessed when the operand
specifies K. The 4-bit Adder block takes 2 sets of 4-bit inputs, and produces
a 4-bit output via addition modulo 24. The
single bit register K2MX is only ever written to during execution of a CLR
K2MX or a SET K2MX instruction. Logic,
sets the K2MX WriteEnable based on these conditions:
logic, ~cle AND bit»=011x0001
The bit written to the K2MX variable is 1 during a SET instruction, and 0
during a CLR instruction. It is convenient to
use the low order bit of the opcode (bit4) as the source for the input bit.
During address generation, a Truth Table
implemented as combinatorial logic determines part of the base address as
follows:
bite bit3_o Descri tion Out ut Value
LOG x A, B, C, D, E, T, 00000
MT, AM
~ LOG Oxxx OR 1x00 A, B, C, D, E, T, 00000
MT, AM,
AE[C1], R[C1]
$ LOG 1001 B 160 01011
~ LOG 1010 H 00110
~ LOG 111 x X, M 10000
~ LOG 1101 I K ~ K2MX ~ 1000
Although the Truth Table produces 5 bits of output, the lower 4 bits are
passed to the 4-bit Adder, where they are added
to the index value (C1, N or the lower 3 bits of the operand itself). The
highest bit passes the adder, and is prepended to
the 4-bit result from the adder result in order to produce a 5-bit result. The
second input to the adder comes from
CA 02456652 2004-02-06
WO 03/015395 PCT/AU02/00919
263
multiplexor MX,, which chooses the index value from C1, N, and the lower 3
bits of the operand itself). Although Cl is
only 3 bits, the fourth bit is a constant 0. Multiplexor MX, has the following
selection criteria:
Out ut bit~-0
Data2-0 (bit3=0) OR (bit7.~=LOG)
C1 (bit3=1) AND (bite-0111) AND
MX, ((bit~_4=1x11) OR (bit~_4=ADD))
N ((bit3=1) AND (bite=XOR)) OR
(((bit~_4=1x11) OR (bit=ADD)) AND (bit3_o=1111))
The 6th bit (bits) of the effective address is 0 for RAM addresses, and 1 for
Flash memory addresses. The Flash memory
addresses are MT, AM, R, K, and M. The computation for bits is provided by
Logic2:
Logicz ~ ((bit3_o=110) OR (bit3_o=011x) OR (bit3-0=110x)) AND
((bit,_a=1x11) OR (bit,.a=ADD))
A constant 1 bit is prepended, making a total of 7 bits of effective address.
These bits will form the effective address
unless K2MX is 0 and the instruction is LD, ADD or ST M[C1]. In the latter
case, the effective address is the constant
address of 0000000. In both cases, two 0 bits are prepended to form the final
9-bit address. The computation is shown
here, provided by Logic3 and multiplexor MXz.
Logic3 -K2MX AND (bit3-0=1110) AND
((bit,~=1x11) OR (bit,~=ADD))
Out ut Lo ic3
Calculated bits 0
0000000 1
CLRGEN
Fig. 201 shows a schematic block diagram for the CLRGEN Unit. The CLRGEN Unit
generates addresses for the CLR
instruction. The effective address is always in Flash memory for valid memory
accessing operands, and is 0 for invalid
operands. The CLR M[C1] instruction always erases M[C1], regardless of the
status of the K2MX flag (kept in the
VARGEN Unit). The Truth Table is simple combinatorial logic that implements
the following relationship:
In ut Value Out ut Value
(bit3-0)
1100 00 1100 000
1101 00 1101 000
1110 00 1110 C1
1111 00 1111 110
-.(llxx) 000000000
CA 02456652 2004-02-06
WO 03/015395 PCT/AU02/00919
264
It is a simple matter to reduce the logic required for the Truth Table since
in all 4 main cases, the first 6 bits of the
effective address are 00 followed by the operand (bits3-0).
BITGEN
Fig. 202 shows a schematic block diagram for the BITGEN Unit. The BITGEN Unit
generates addresses for the ROR
and SET instructions. The effective address is always in Flash memory for
valid memory accessing operands, and is 0
for invalid operands. Since ROR and SET instructions only access the IST and
ISW Flash memory addresses (the
remainder of the operands access registers), a simple combinatorial logic
Truth Table suffices for address generation:
In ut Value Out ut Value
(bit3-0)
OlOx 00111111 bito
~(010x) 000000000
Counter Unit
Fig. Y37 shows a schematic block diagram for the Counter Unit. The Counter
Unit generates counters C1, C2 (used
internally) and the selected N index. In addition, the Counter Unit outputs
flags C1Z and C2Z for use externally.
Registers C1 and C2 are updated when they are the targets of a DBR or SC
instruction. The high bit of the operand (bit3
of the effective command) gives the selection between C1 and C2. Logic, and
Logic2 determine the WriteEnables for
C1 and C2 respectively.
AND
AND
The single bit flags C1Z and C2Z are produced by the NOR of their multibit C1
and C2 counterparts. Thus C1Z is 1 if
C1 = 0, and C2Z is 1 if C2 = 0. During a DBR instruction, the value of either
C1 or C2 is decremented by 1 (with wrap).
The input to the Decrementor unit is selected by multiplexor MXz as follows:
Out ut bit3
MXZ C 1 0
C2 1
The actual value written to C1 or C2 depends on whether the DBR or SC
instruction is being executed. Multiplexor
MX, selects between the output from the Decrementor (for a DBR instruction),
and the output from the Truth Table (for
a SC instruction). Note that only the lowest 3 bits of the 5-bit output are
written to C1. Multiplexor MX, therefore has
the following selection criteria:
Out ut bitb
MX, Output from Truth Table 0
CA 02456652 2004-02-06
WO 03/015395 PCT/AU02/00919
265
Output from Decrementor 1
The Truth Table holds the values to be loaded by C1 and C2 via the SC
instruction. The Truth Table is simple
combinatorial logic that implements the following relationship:
Input ValueOutput
(bitz_ Value
o)
000 00010
001 00011
010 00100
011 00111
100 01010
101 01111
110 10011
111 11111
Registers N1, N2, N3, and N4 are updated by their next value - 1 (with wrap)
when they are referred to by the XOR
instruction. Register N4 is also updated when a ST X[N4] instruction is
executed. LD and ADD instructions do not
update N4. In addition, all 4 registers are updated during a SET Nx command.
Logic4_~ generate the WriteEnables for
registers Nl-N4. All use Logic3, which produces a 1 if the command is SET Nx,
or 0 otherwise.
Logic3bits-0=01110010
Logic4C cle AND ((bit~_o=10101000) OR Logic3)
Lo Cycle AND ((bit~_o=10101001) OR Logic3)
ics
Logic6Cycle AND ((bit~_o=10101010) OR Logic3)
Logic Cycle AND ((bit~_o=11111011) OR (bits-0=10101011)
OR Logic3)
The actual N index value passed out, or used as the input to the Decrementor,
is simply selected by multiplexor MX4
using the lower 2 bits of the operand:
Out bit,_o
ut
N 1 00
N2 O1
MX4
N3 10
I l
l
The Incrementor takes 4 bits of input value (selected by multiplexor MX4) and
adds 1, producing a 4-bit result (due to
addition modulo 24). Finally, four instances of multiplexor MX3 select between
a constant value (different for each N,
and to be loaded during the SET Nx command), and the result of the Decrementor
(during XOR or ST instructions). The
value will only be written if the appropriate WriteEnable flag is set (see
Logic4 - Logic), so Logic3 can safely be used
for the multiplexor.
CA 02456652 2004-02-06
WO 03/015395 PCT/AU02/00919
266
Out ut Lo
ic3
Out ut from Decrementor0
Constant value 1
The SET Nx command loads N1 - N4 with the following constants:
Index Constant Initial X[N]
Loaded referred
to
N1 2 X[13]
N2 7 X[8]
N3 13 X[2]
N4 15 ~ X~~] -
Note that each initial X[N"] referred to matches the optimized SHA-1 algorithm
initial states for indexes N1 - N4.
When each index value N" decrements, the effective X[N] increments. This is
because the X words are stored in
memory with most significant word first. The three VAL units are validation
units connected to the Tamper Prevention
and Detection circuitry, each with an OK bit. The OK bit is set to 1 on RESET,
and ORed with the ChipOK values from
both Tamper Detection Lines each cycle. The OK bit is ANDed with each data bit
that passes through the unit. All VAL
units also parity check the data to ensure the counters have not been tampered
with. If a parity check fails, the Erase
Tamper Detection Line is triggered. In the case of VALE, the effective output
from the counter C1 will always be 0 if
the chip has been tampered with: This prevents an attacker from executing any
looping constructs that index through the
keys. In the case of VAL2, the effective output from the counter C2 will
always be 0 if the chip has been tampered with.
This prevents an attacker from executing any looping constructs. In the case
of VAL3, the effective output from any N
counter (N1-N4) will always be 0 if the chip has been tampered with. This
prevents an attacker from executing any
looping constructs 'that index through X.
Turning now to Fig. 203, there is illustrated 705 the information stored
within the flash memory store 701. This
data can include the following:
Factory Code
The factory code is a 16 bit code indicating the factory at which the print
roll was manufactured. This identifies
factories belonging to the owner of the print roll technology, or factories
making print rolls under license. The purpose of
this number is to allow the tracking of factory that a print roll came from,
in case there are quality problems.
Batch Number
The batch number is a 32 bit number indicating the manufacturing batch of the
print roll. The purpose of this
number is to track the batch that a print roll came from, in case there are
quality problems.
Serial Number
A 48 bit serial number is provided to allow unique identification of each
print roll up to a maximum of 280 trillion
print rolls.
Manufacturing date
CA 02456652 2004-02-06
WO 03/015395 PCT/AU02/00919
267
A 16 bit manufacturing date is included for tracking the age of print rolls,
in case the shelf life is limited.
Media length
The length of print media remaining on the roll is represented by this number.
This length is represented in small
units such as millimeters or the smallest dot pitch of printer devices using
the print roll and to allow the calculation of the
number of remaining photos in each of the well known C, H, and P formats, as
well as other formats which may be printed.
The use of small units also ensures a high resolution can be used to maintain
synchronization with pre-printed media.
Media Tvne
The media type datum enumerates the media contained in the print roll.
(1) Transparent
(2) Opaque white
(3) Opaque tinted
(4) 3D lenticular
(5) Pre-printed: length specific
(6) Pre-printed: not length specific
(7) Metallic foil
(8) Holographic/optically variable device foil
Preprinted Media Length
The length of the repeat pattern of any pre-printed media contained, for
example on the back surface of the print roll
is stored here.
Ink Viscosity
The viscosity of each ink color is included as an 8 bit number. the ink
viscosity numbers can be used to adjust the
print head actuator characteristics to compensate for viscosity (typically, a
higher viscosity will require a longer actuator
pulse to achieve the same drop volume).
Recommended Drop Volume for 1200 dQi
The recommended drop volume of each ink color is included as an 8 bit number.
The most appropriate drop
volume will be dependent upon the ink and print media characteristics. For
example, the required drop volume will decrease
with increasing dye concentration or absorptivity. Also, transparent media
require around twice the drop volume as opaque
white media, as light only passes through the dye layer once for transparent
media.
As the print roll contains both ink and media, a custom match can be obtained.
The drop volume is only the
recommended drop volume, as the printer may be other than 1200 dpi, or the
printer may be adjusted for lighter or darker
printing.
Ink Color
The color of each of the dye colors is included and can be used to "fine tune"
the digital half toning that is applied
to any image before printing.
Remaining Media Length Indicator
The length of print media remaining on the roll is represented by this number
and is updatable by the camera
device. The length is represented in small units (eg. 1200 dpi pixels) to
allow calculation of the number of remaining photos
in each of C, H, and P formats, as well as other formats which may be printed.
The high resolution can also be used to
CA 02456652 2004-02-06
WO 03/015395 PCT/AU02/00919
268
maintain synchronization with pre-printed media.
Cop right or Bit Pattern
This 512 bit pattern represents an ASCII character sequence sufficient to
allow the contents of the flash memory
store to be copyrightable.
Turning now to Fig. 204, there is illustrated the storage table 730 of the
Artcam authorization chip. The table
includes manufacturing code, batch number and serial number and date which
have an identical format to that previously
described. The table 730 also includes information 731 on the print engine
within the Artcam device. The information
stored can include a print engine type, the DPI resolution of the printer and
a printer count of the number of prints produced
by the printer device.
Further, an authentication test key 710 is provided which can randomly vary
from chip to chip and is utilised as the
Artcam random identification code in the previously described algorithm. The
128 bit print roll authentication key 713 is
also provided and is equivalent to the key stored within the print rolls.
Next, the 512 bit pattern is stored followed by a 120
bit spare area suitable for Artcam use.
As noted previously, the Artcam preferably includes a liquid crystal display 1
S which indicates the number of prints
left on the print roll stored within the Artcam. Further, the Artcam also
includes a three state switch 17 which allows a user
to switch between three standard formats C H and P (classic, HDTV and
panoramic). Upon switching between the three
states, the liquid crystal display 15 is updated to reflect the number of
images left on the print roll if the particular format
selected is used.
In order to correctly operate the liquid crystal display, the Artcam
processor, upon the insertion of a print roll and
the passing of the authentication test reads the from the flash memory store
of the print roll chip 53 and determines the
amount of paper left. Next, the value of the output format selection switch 17
is determined by the Artcam processor.
Dividing the print length by the corresponding length of the selected output
format the Artcam processor determines the
number of possible prints and updates the liquid crystal display 15 with the
number of prints left. Upon a user changing the
output format selection switch 17 the Artcam processor 31 re-calculates the
number of output pictures in accordance with
that format and again updates the LCD display 15.
The storage of process information in the printer roll table 705 (Fig. 165)
also allows the Artcam device to take
advantage of changes in process and print characteristics of the print roll.
In particular, the pulse characteristics applied to each nozzle within the
print head can be altered to take into
account of changes in the process characteristics. Turning now to Fig. 205,
the Artcam Processor can be adapted to run a
software program stored in an ancillary memory ROM chip. The software program,
a pulse profile characteriser 771 is able
to read a number of variables from the printer roll. These variables include
the remaining roll media on printer roll 772, the
printer media type 773, the ink color viscosity 774, the ink color drop volume
775 and the ink color 776. Each of these
variables are read by the pulse profile characteriser and a corresponding,
most suitable pulse profile is determined in
accordance with prior trial and experiment. The parameters alters the printer
pulse received by each printer nozzle so as to
improve the stability of ink output.
It will be evident that the authorization chip includes significant advances
in that important and valuable
information is stored on the printer chip with the print roll. This
information can include process characteristics of the print
roll in question in addition to information on the type of print roll and the
amount of paper left in the print roll.
CA 02456652 2004-02-06
WO 03/015395 PCT/AU02/00919
269
Additionally, the print roll interface chip can provide valuable
authentication information and can be constructed in a
tamper proof manner. Further, a tamper resistant method of utilising the chip
has been provided. The utilization of the
print roll chip also allows a convenient and effective user interface to be
provided for an immediate output form of Artcam
device able to output multiple photographic formats whilst simultaneously able
to provide an indicator of the number of
photographs left in the printing device.
Print Head Unit
Turning now to Fig. 206 , there is illustrated an exploded perspective view,
partly in section, of the print head unit
615 of Fig. 162.
The print head unit 615 is based around the print-head 44 which ejects ink
drops on demand on to print media 611
so as to form an image. The print media 611 is pinched between two set of
rollers comprising a first set 618, 616 and second
set 617, 619.
The print-head 44 operates under the control of power, ground and signal lines
810 which provides power and
control for the print-head 44 and are bonded by means of Tape Automated
Bonding (TAB) to the surface of the print-head
44.
Importantly, the print-head 44 which can be constructed from a silicon wafer
device suitably separated, relies upon
a series of anisotropic etches 812 through the wafer having near vertical side
walls. The through wafer etches 812 allow for
the direct supply of ink to the print-head surface from the back of the wafer
for subsequent ejection.
The ink is supplied to the back of the inkjet print-head 44 by means of ink-
head supply unit 814. The inkjet print-
head 44 has three separate rows along its surface for the supply of separate
colors of ink. The ink-head supply unit 814 also
includes a lid 815 for the sealing of ink channels.
In Fig. 207 to Fig. 210, there is illustrated various perspective views of the
ink-head supply unit 814. Each of Fig.
207 to Fig. 210 illustrate only a portion of the ink head supply unit which
can be constructed of indefinite length, the
portions shown so as to provide exemplary details. In Fig. 207 there is
illustrated a bottom perspective view, Fig. 148
illustrates a top perspective view, Fig. 209 illustrates a close up bottom
perspective view, partly in section, Fig. 210
illustrates a top side perspective view showing details of the ink channels,
and Fig. 211 illustrates a top side perspective view
as does Fig. 212.
There is considerable cost advantage in forming ink-head supply unit 814 from
injection molded plastic instead of,
say, micromachined silicon. The manufacturing cost of a plastic ink channel
will be considerably less in volume and
manufacturing is substantially easier. The design illustrated in the
accompanying Figures assumes a 1600 dpi three color
monolithic print head, of a predetermined length. The provided flow rate
calculations are for a 100mm photo printer.
The ink-head supply unit 814 contains all of the required fine details. The
lid 815 (Fig. 206) is permanently glued
or ultrasonically welded to the ink-head supply unit 814 and provides a seal
for the ink channels.
Turning to Fig. 209, the cyan, magenta and yellow ink flows in through ink
inlets 820-822, the magenta ink flows
through the throughholes 824,825 and along the magenta main channels 826,827
(Fig. 141). The cyan ink flows along cyan
main channel 830 and the yellow ink flows along the yellow main channel 831.
As best seen from Fig. 209, the cyan ink in
the cyan main channels then flows into a cyan sub-channel 833. The yellow
subchannel 834 similarly receiving yellow ink
from the yellow main channel 831.
As best seen in Fig. 210, the magenta ink also flows from magenta main
channels 826,827 through magenta
CA 02456652 2004-02-06
WO 03/015395 PCT/AU02/00919
270
throughholes 836, 837. Returning again to Fig. 209, the magenta ink flows out
of the throughholes 836, 837. The magenta
ink flows along first magenta subchannel e.g. 838 and then along second
magenta subchannel e.g. 839 before flowing into a
magenta trough 840. The magenta ink then flows through magenta vial e.g. 842
which are aligned with corresponding
inkjet head throughholes (e.g. 812 of Fig. 166) wherein they subsequently
supply ink to inkjet nozzles for printing out.
Similarly, the cyan ink within the cyan subchannel 833 flows into a cyan pit
area 849 which supplies ink two cyan
vias 843, 844. Similarly, the yellow subchannel.834 supplies yellow pit area
46 which in turn supplies yellow vial 847, 848.
As seen in Fig. 210, the print-head is designed to be received within print-
head slot 850 with the various vial e.g.
851 aligned with corresponding through holes eg. 851 in the print-head wafer.
Returning to Fig. 206, care must be taken to provide adequate ink flow to the
entire print-head chip 44, while
satisfying the constraints of an injection moulding process. The size of the
ink through wafer holes 812 at the back of the
print head chip is approximately 100pm x SOpm, and the spacing between through
holes carrying different colors of ink is
approximately 170~cn. While features of this size can readily be molded in
plastic (compact discs have micron sized
features), ideally the wall height must not exceed a few times the wall
thickness so as to maintain adequate stiffness. The
preferred embodiment overcomes these problems by using hierarchy of
progressively smaller ink channels.
In Fig. 211, there is illustrated a small portion 870 of the surface of the
print-head 44. The surface is divided into 3
series of nozzles comprising the cyan series 871, the magenta series 872 and
the yellow series 873. Each series of nozzles is
further divided into two rows eg. 875, 876 with the print-head 44 having a
series of bond pads 878 for bonding of power and
control signals.
The print head is preferably constructed in accordance with a large number of
different forms of ink jet invented for
uses including Artcam devices. These ink jet devices are discussed in further
detail hereinafter.
The print-head nozzles include the ink supply channels 880, equivalent to
anisotropic etch hole 812 of Fig. 206.
The ink flows from the back of the wafer through supply channel 881 and in
turn through the filter grill 882 to ink nozzle
chambers eg. 883. The operation of the nozzle chamber 883 and print-head 44
(Fig. 1) is, as mentioned previously,
described in the abovementioned patent specification.
Ink Channel Fluid Flow Anaysis
Turning now to an analysis of the ink flow, the main ink channels 826, 827,
830, 831 (Fig. 207, Fig. 141) are
around lmm x lmm, and supply all of the nozzles of one color. The sub-channels
833, 834, 838, 839 (Fig. 209) are around
200pm x 100pm and supply about 25 inkjet nozzles each. The print head through
holes 843, 844, 847, 848 and wafer
through holes eg. 881 (Fig. 211) are 100pm x SOpm and, supply 3 nozzles at
each side of the print head through holes. Each
nozzle filter 882 has 8 slits, each with an area of 20Nm x 2pm and supplies a
single nozzle.
An analysis has been conducted of the pressure requirements of an ink jet
printer constructed as described. The
analysis is for a 1,600 dpi three color process print head for photograph
printing. The print width was 100 mm which gives
6,250 nozzles for each color, giving a total of 18,750 nozzles.
The maximum ink flow rate required in various channels for full black printing
is important. It determines the
pressure drop along the ink channels, and therefore whether the print head
will stay filled by the surface tension forces alone,
or, if not, the ink pressure that is required to keep the print head full.
To calculate the pressure drop, a drop volume of 2.5 p1 for 1,600 dpi
operation was utilized. While the nozzles may
be capable of operating at a higher rate, the chosen drop repetition rate is 5
kHz which is suitable to print a 150 mm long
CA 02456652 2004-02-06
WO 03/015395 PCT/AU02/00919
271
photograph in an little under 2 seconds. Thus, the print head, in the extreme
case, has a 18,750 nozzles, all printing a
maximum of 5,000 drops per second. This ink flow is distributed over the
hierarchy of ink channels. Each ink channel
effectively supplies a fixed number of nozzles when all nozzles are printing.
The pressure drop Op was calculated according to the Darcy-Weisbach formula:
0A°e~~.
2D
Where p is the density of the ink, U is the average flow velocity, L is the
length, D is the hydraulic diameter, and f is
a dimensionless friction factor calculated as follows:
f= k
Re
Where Re is the Reynolds number and k is a dimensionless friction coefficient
dependent upon the cross section of
the channel calculated as follows:
Re = UD
v
Where v is the kinematic viscosity of the ink.
For a rectangular cross section, k can be approximated by:
k = 64
2+116 llb(2-b/a)
3 24a 24a
Where a is the longest side of the rectangular cross section, and b is the
shortest side. The hydraulic diameter D for
a rectangular cross section is given by:
D = tab
a+b
Ink is drawn off the main ink channels at 250 points along the length of the
channels. The ink velocity falls linearly
from the start of the channel to zero at the end of the channel, so the
average flow velocity U is half of the maximum flow
velocity. Therefore, the pressure drop along the main ink channels is half of
that calculated using the maximum flow
velocity
Utilizing these formulas, the pressure drops can be calculated in accordance
with the following tables:
CA 02456652 2004-02-06
WO 03/015395 PCT/AU02/00919
272
Table of Ink Channel Dimensions and Pressure Drons
# Length Width Depth NozzlesMax.ink Pressure
of
Items suppliedIIoW drop
at Op
SKHz(In
Central Mouldin1 106mm 6.4mm l.4mm 18,750 0,23m1/sNA
Cyan main 1 100mm lmm lmm 6,250 0.16ft1/ps111 Pa
channel
(830)
Magenta main 2 100mm 700wm 700pm 3,125 0.16~t1/p,s231 Pa
channel (826)
Yellow main 1 100mm lmm lmm 6,250 0.16pUlts111 Pa
channel(831)
Cyan sub-channel250 l.5mm 200pm 100pm 25 0.16p,1/ws41.7
Pa
(833)
Magenta sub- 500 200p.m 50pm 100pm 12.5 0,031p1/~ts44.5
Pa
channel (834)(a)
Magenta sub- 500 400~tm 100pm 200p.m12.5 0.031p1/Its5.6 Pa
channel (838)(b)
Yellow sub- 250 l.5mm 200pm 100pm 25 0.016p1/Its41.7
Pa
channel (834)
Cyan pit (842)250 200~tm 100pm 3001tm25 O.OlOpl/p,s3.2 Pa
Magenta through500 200~tm 50p.m 2001tm12.5 0.016p1/lts18.0
Pa
(840)
Yellow pit 250 200p,m 100~tm 300pm 25 O.OlOp,l/ps3.2 Pa
(846)
Cyan via (843)500 100~tm 50 m 100pm 12.5 0.031p1/ps22.3
Pa
Magenta via 500 100pm 50~tm 1001tm12.5 0.031p1/~ts22.3
(842) Pa
Yellow via 500 100p,m 50pm 100pm 12.5 0.031p1/~ts22.3
Pa
Magenta through500 200pm 500pm 100~tm12.5 0.003~t1/ps0.87
Pa
hole (837)
Chip slot 1 100mm 7301tm 625 18,750 NA NA
Print head 1500 600p 100~tm 50~tm 12.5 0.0521t1/~ts133 Pa
through holes
(881)(in the
chip
substrate)
Print head 1,000/50pm 60pm 20pm 3.125 0.049~t1/ps62.8
Pa
channel segmentscolor
(on chi front)
Filter Slits 8 2pm 2pm 20pm 0.125 0.039p1/Its251 Pa
(on per
entrance to nozzle
nozzle chamber
(882)
Nozzle chamber1 70pm 30pm 201tm 1 0.021p1/ps75.4
(on per Pa
chip front)(883)nozzle
The total pressure drop from the ink inlet to the nozzle is therefore
approximately 701Pa for cyan and yellow, and
845 Pa for magenta. This is less than 1% of atmospheric pressure. Of course,
when the image printed is less than full black,
the ink flow (and therefore the pressure drop) is reduced from these values.
Making the Mould for the Ink-head Supply Unit
CA 02456652 2004-02-06
WO 03/015395 PCT/AU02/00919
273
The ink head supply unit 14 (Fig. 1) has features as small as 50~t and a
length of 106mm. It is impractical to
machine the injection moulding tools in the conventional manner. However, even
though the overall shape may be complex,
there are no complex curves required. The injection moulding tools can be made
using conventional milling for the main ink
channels and other millimeter scale features, with a lithographically
fabricated inset for the fine features. A LIGA process
can be used for the inset.
A single injection moulding tool could readily have 50 or more cavities. Most
of the tool complexity is in the inset.
Turning to Fig. 206, the printing system is constructed via moulding ink
supply unit 814 and lid 815 together and
sealing them together as previously described. Subsequently print-head 44 is
placed in its corresponding slot 850. Adhesive
sealing strips 852, 853 are placed over the magenta main channels so to ensure
they are properly sealed. The Tape
Automated Bonding (TAB) strip 810 is then connected to the inkjet print-head
44 with the tab bonding wires running in the
cavity 855. As can best be seen from Fig. 206, Fig. 207 and Fig. 212, aperture
slots 855 - 862 are provided for the snap in
insertion of rollers. The slots provided for the "clipping in" of the rollers
with a small degree of play subsequently being
provided for simple rotation of the rollers.
In Fig. 213 to Fig. 217, there are illustrated various perspective views of
the internal portions of a finally assembled
Artcam device with devices appropriately numbered.
~ Fig. 213 illustrates a top side perspective view of the internal portions of
an Artcam camera, showing the parts flattened
out;
~ Fig. 214 illustrates a bottom side perspective view of the internal portions
of an Artcam camera, showing the parts
flattened out;Fig. 215 illustrates a first
~ top side perspective view of the internal portions of an Artcam camera,
showing the parts as encased in an Artcam;
Fig. 216 illustrates a second top side perspective view of the internal
portions of an Artcam camera, showing the parts as
encased in an Artcam;
~ Fig. 217 illustrates a second top side perspective view of the internal
portions of an Artcam camera, showing the parts
as encased in an Artcam;
Postcard Print Rolls
Turning now to Fig. 218, in one form of the preferred embodiment, the output
printer paper 11 can, on the side that
is not to receive the printed image, contain a number of pre-printed
"postcard" formatted backing portions 885. The postcard
formatted sections 885 can include prepaid postage "stamps" 886 which can
comprise a printed authorization from the
relevant postage authority within whose jurisdiction the print roll is to be
sold or utilised. By agreement with the relevant
jurisdictional postal authority, the print rolls can be made available having
different postages. This is especially convenient
where overseas travelers are in a local jurisdiction and wishing to send a
number of postcards to their home country.
Further, an address format portion 887 is provided for the writing of address
dispatch details in the usual form of a postcard.
Finally, a message area 887 is provided for the writing of a personalized
information.
Turning now to Fig. 218 and Fig. 219, the operation of the camera device is
such that when a series of images 890-
892 is printed on a first surface of the print roll, the corresponding backing
surface is that illustrated in Fig. 218. Hence, as
each image eg. 891 is printed by the camera, the back of the image has a ready
made postcard 885 which can be immediately
dispatched at the nearest post office box within the jurisdiction. In this
way, personalized postcards can be created.
It would be evident that when utilising the postcard system as illustrated in
Fig. 219 and Fig. 220 only
CA 02456652 2004-02-06
WO 03/015395 PCT/AU02/00919
274
predetermined image sizes are possible as the synchronization between the
backing postcard portion 885 and the front image
891 must be maintained. This can be achieved by utilising the memory portions
of the authentication chip stored within the
print roll to store details of the length of each postcard backing format
sheet 885. This can be achieved by either having each
postcard the same size or by storing each size within the print rolls on-board
print chip memory.
The Artcam camera control system can ensure that, when utilising a print roll
having pre-formatted postcards, that
the printer roll is utilised only to print images such that each image will be
on a postcard boundary. Of course, a degree of
"play" can be provided by providing border regions at the edges of each
photograph which can account for slight
misalignment.
Turning now to Fig. 220, it will be evident that postcard rolls can be pre-
purchased by a camera user when traveling
within a particular jurisdiction where they are available. The postcard roll
can, on its external surface, have printed
information including country of purchase, the amount of postage on each
postcard, the format of each postcard (for
example being C,H or P or a combination of these image modes), the countries
that it is suitable for use with and the postage
expiry date after which the postage is no longer guaranteed to be sufficient
can also be provided.
Hence, a user of the camera device can produce a postcard for dispatch in the
mail by utilising their hand held
camera to point at a relevant scene and taking a picture having the image on
one surface and the pre-paid postcard details on
the other. Subsequently, the postcard can be addressed and a short message
written on the postcard before its immediate
dispatch in the mail.
In respect of the software operation of the Artcam device, although many
different software designs are possible, in
one design, each Artcam device can consist of a set of loosely coupled
functional modules utilised in a coordinated way by a
single embedded application to serve the core purpose of the device. While the
functional modules are reused in different
combinations in various classes of Artcam device, the application is specific
to the class of Artcam device.
Most functional modules contain both software and hardware components. The
software is shielded from details of
the hardware by a hardware abstraction layer, while users of a module are
shielded from its software implementation by an
abstract software interface. Because the system as a whole is driven by user-
initiated andhardware- initiated events, most
modules can run one or more asynchronous event-driven processes.
The most important modules which comprise the generic Artcam device are shown
in Fig. 221. In this and
subsequent diagrams, software components are shown on the left separated by a
vertical dashed line 901 from hardware
components on the right. The software aspects of these modules are described
below:
Software Modules - Artcam Ap~ication 902
The Artcam Application implements the high-level functionality of the Artcam
device. This normally involves
capturing an image, applying an artistic effect to the image, and then
printing the image. In a camera-oriented Artcam
device, the image is captured via the Camera Manager 903. In a printer-
oriented Artcam device, the image is captured via
the Network Manager 904, perhaps as the result of the image being "squirted"
by another device.
Artistic effects are found within the unified file system managed by the File
Manager 905. An artistic effect consist
of a script file and a set of resources. The script is interpreted and applied
to the image via the Image Processing Manager
906. Scripts are normally shipped on ArtCards known as Artcards. By default
the application uses the script contained on the
currently mounted Artcard.
The image is printed via the Printer Manager 908.
CA 02456652 2004-02-06
WO 03/015395 PCT/AU02/00919
275
When the Artcam device starts up, the bootstrap process starts the various
manager processes before starting the application.
This allows the application to immediately request services from the various
managers when it starts.
On initialization the application 902 registers itself as the handler for the
events listed below. When it receives an event, it
performs the action described in the table.
User interface Action
event
Lock Focus Perform any automatic pre-capture setup
via the Camera Manager. This
includes auto-focussing, auto-adjusting
exposure, and charging the
flash. This is normally initiated by
the user pressing the Take button
halfway.
Take Ca ture an image via the Camera Manager.
Self-Timer Ca ture an ima a in self-timed mode via
the Camera Mana er.
Flash Mode Update the Camera Manager to use the
next flash mode. Update the
Status Dis lay to show the new flash
mode.
Print Print the current image via the Printer
Manager. Apply an artistic effect
to the image via the Image Processing
Manager if there is a current
script. Update the remaining prints count
on the Status Display (see
Print Roll In.rerted below).
Hold Apply an artistic effect to the current
image via the Image Processing
Mana er if there is a current scri t,
but don't rint the image.
E'ect ArtCards Eject the currently inserted ArtCards
via the File Mana er.
Print Roll InsertedCalculate the number of prints remaining
based on the Print Manager's
remaining media length and the Camera
Manager's aspect ratio. Update
the remaining rims count on the Status
dis la .
Print Roll RemovedUpdate the Status Dis lay to indicate
there is no print roll present.
Where the camera includes a display, the application also constructs a
graphical user interface via the User Interface
Manager 910 which allows the user to edit the current date and time, and other
editable camera parameters. The application
saves all persistent parameters in flash memory.
Real-Time Microkernel 911
The Real-Time Microkernel schedules processes preemptively on the basis of
interrupts and process priority. It
provides integrated inter-process communication and timer services, as these
are closely tied to process scheduling. All other
operating system functions are implemented outside the microkernel.
Camera Mana ear 903
The Camera Manager provides image capture services. It controls the camera
hardware embedded in the Artcam. It
provides an abstract camera control interface which allows camera parameters
to be queried and set, and images captured.
This abstract interface decouples the application from details of camera
implementation. The Camera Manager utilizes the
following input / output parameters and commands:
out ut arameters domains
focus range real, real
zoom range real, real
a erture range real, real
shutter s eed real, real
range
in ut ammeters domains
focus real
CA 02456652 2004-02-06
WO 03/015395 PCT/AU02/00919
276
zoom real
a erture real
shutter s eed real
as ect ratio classic, HDTV, anoramic
focus control mode multi- oint auto, sin 1e- oint auto,
manual
ex osure control mode auto, a erture riori , shutter riori
, manual
flash mode auto, auto with red-a a removal,
ll, o
view scene mode on, off
commands return value domains
Lock Focus none
Self-Timed Ca Raw Image
tore
Capture Image Raw Image
The Camera Manager runs as an asynchronous event-driven process. It contains a
set of linked state machines, one
for each asynchronous operation. These include auto focussing, charging the
flash, counting down the self timer, and
capturing the image. On initialization the Camera Manager sets the camera
hardware to a known state. This includes setting
a normal focal distance and retracting the zoom. The software structure of the
Camera Manager is illustrated in Fig. 222.
The software components are described in the following subsections:
Lock Focus 913
Lock Focus automatically adjusts focus and exposure for the current scene, and
enables the flash if necessary,
depending on the focus control mode, exposure control mode and flash mode.
Lock Focus is normally initiated in response
to the user pressing the Take button halfway. It is part of the normal image
capture sequence, but may be separated in time
from the actual capture of the image, if the user holds the take button
halfway depressed. This allows the user to do spot
focusing and spot metering.
Capture Imaee 914
Capture Image captures an image of the current scene. It lights a red-eye lamp
if the flash mode includes red-eye
removal, controls the shutter, triggers the flash if enabled, and senses the
image through the image sensor. It determines the
orientation of the camera, and hence the captured image, so that the image can
be properly oriented during later image
processing. It also determines the presence of camera motion during image
capture, to trigger deblurring during later image
processing.
Self Timed C~ture 915
Self-Timed Capture captures an image of the current scene after counting down
a 20s timer. It gives the user
feedback during the countdown via the self-timer LED. During the first 15s it
can light the LED. During the last Ss it flashes
the LED.
View Scene 917
View Scene periodically senses the current scene through the image sensor and
displays it on the color LCD, giving
the user an LCD-based viewfinder.
Auto Focus 918
Auto Focus changes the focal length until selected regions of the image are
sufficiently sharp to signify that they are
in focus. It assumes the regions are in focus if an image sharpness metric
derived from specified regions of the image sensor
CA 02456652 2004-02-06
WO 03/015395 PCT/AU02/00919
277
is above a fixed threshold. It finds the optimal focal length by performing a
gradient descent on the derivative of sharpness
by focal length, changing direction and stepsize as required. If the focus
control mode is multi-point auto, then three regions
are used, arranged horizontally across the field of view. If the focus control
mode is single-point auto, then one region is
used, in the center of the field of view. Auto Focus works within the
available focal length range as indicated by the focus
controller. In fixed-focus devices it is therefore effectively disabled.
Auto Flash 919
Auto Flash determines if scene lighting is dim enough to require the flash. It
assumes the lighting is dim enough if
the scene lighting is below a fixed threshold. The scene lighting is obtained
from the lighting sensor, which derives a lighting
metric from a central region of the image sensor. If the flash is required,
then it charges the flash.
Auto Exposure 920
The combination of scene lighting, aperture, and shutter speed determine the
exposure of the captured image. The
desired exposure is a fixed value. If the exposure control mode is auto, Auto
Exposure determines a combined aperture and
shutter speed which yields the desired exposure for the given scene lighting.
If the exposure control mode is aperture
priority, Auto Exposure determines a shutter.speed which yields the desired
exposure for the given scene lighting and
current aperture. If the exposure control mode is shutter priority, Auto
Exposure determines an aperture which yields the
desired exposure for the given scene lighting and current shutter speed. The
scene lighting is obtained from the lighting
sensor, which derives a lighting metric from a central region of the image
sensor.
Auto Exposure works within the available aperture range and shutter speed
range as indicated by the aperture
controller and shutter speed controller. The shutter speed controller and
shutter controller hide the absence of a mechanical
shutter in most Artcam devices.
If the flash is enabled, either manually or by Auto Flash, then the effective
shutter speed is the duration of the flash,
which is typically in the range 1/1000 s to 1/10000 s.
Image Processing M, anager 906 (Fig. 221
The Image Processing Manager provides image processing and artistic effects
services. It utilises the VLIW Vector
Processor embedded in the Artcam to perform high-speed image processing. The
Image Processing Manager contains an
interpreter for scripts written in the Vark image processing language. An
artistic effect therefore consists of a Vark script file
and related resources such as fonts, clip images etc. The software structure
of the Image Processing Manager is illustrated in
more detail in Fig. 223 and include the following modules:
Convert and Enhance Image 921
The Image Processing Manager performs image processing in the device-
independent CIE LAB color space, at a
resolution which suits the reproduction capabilities of the Artcam printer
hardware. The captured image is first enhanced by
filtering out noise. It is optionally processed to remove motion-induced blur.
The image is then converted from its device-
dependent RGB color space to the CIE LAB color space. It is also rotated to
undo the effect of any camera rotation at the
time of image capture, and scaled to the working image resolution. The image
is further enhanced by scaling its dynamic
range to the available dynamic range.
Detect Faces 923
Faces are detected in the captured image based on hue and local feature
analysis. The list of detected face regions is
used by the Vark script for applying face-specific effects such as warping and
positioning speech balloons.
CA 02456652 2004-02-06
WO 03/015395 PCT/AU02/00919
278
Vark Imaee Processing~Langua eg Interpreter 924
Vark consists of a general-purpose programming language with a rich set of
image processing extensions. It
provides a range of primitive data types (integer, real, boolean, character),
a range of aggregate data types for constructing
more complex types (array, string, record), a rich set of arithmetic and
relational operators, conditional and iterative control
flow (if then-else, while-do), and recursive functions and procedures. It also
provides a range of image-processing data types
(image, clip image, matte, color, color lookup table, palette, dither matrix,
convolution kernel, etc.), graphics data types
(font, text, path), a set of image-processing functions (color
transformations, compositing, filtering, spatial transformations
and warping, illumination, text setting and rendering), and a set of higher-
level artistic functions (tiling, painting and
stroking).
A Vark program is portable in two senses. Because it is interpreted, it is
independent of the CPU and image
processing engines of its host. Because it uses a device-independent model
space and a device-independent color space, it is
independent of the input color characteristics and resolution of the host
input device, and the output color characteristics and
resolution of the host output device.
The Vark Interpreter 924 parses the source statements which make up the Vark
script and produces a parse tree
which represents the semantics of the script. Nodes in the parse tree
correspond to statements, expressions, sub-expressions,
variables and constants in the program. The root node corresponds to the main
procedure statement list.
The interpreter executes the program by executing the root statement in the
parse tree. Each node of the parse tree asks its
children to evaluate or execute themselves appropriately. An if statement
node, for example, has three children - a condition
expression node, a then statement node, and an else statement node. The if
statement asks the condition expression node to
evaluate itself, and depending on the Boolean value returned asks the then
statement or the else statement to execute itself. It
knows nothing about the actual condition expression or the actual statements.
While operations on most data types are executed during execution of the parse
tree, operations on image data types
are deferred until after execution of the parse tree. This allows imaging
operations to be optimized so that only those
intermediate pixels which contribute to the final image are computed. It also
allows the final image to be computed in
multiple passes by spatial subdivision, to reduce the amount of memory
required.
During execution of the parse tree, each imaging function simply returns an
imaging graph - a graph whose nodes
are imaging operators and whose leaves are images - constructed with its
corresponding imaging operator as the root and its
image parameters as the root's children. The image parameters are of course
themselves image graphs. Thus each successive
imaging function returns a deeper imaging graph.
After execution of the parse tree, an imaging graph is obtained which
corresponds to the final image. This imaging
graph is then executed in a depth-first manner (like any expression tree),
with the following two optimizations: (1) only
those pixels which contribute to the final image are computed at a given node,
and (2) the children of a node are executed in
the order which minimizes the amount of memory required. The imaging operators
in the imaging graph are executed in
the optimized order to produce the final image. Compute-intensive imaging
operators are accelerated using the VLIW
Processor embedded in the Artcam device. If the amount of memory required to
execute the imaging graph exceeds
available memory, then the final image region is subdivided until the required
memory no longer exceeds available memory.
For a well-constructed Vark program the first optimization is unlikely to
provide much benefit per se. However, if
the final image region is subdivided, then the optimization is likely to
provide considerable benefit. It is precisely this
CA 02456652 2004-02-06
WO 03/015395 PCT/AU02/00919
279
optimization, then, that allows subdivision to be used as an effective
technique for reducing memory requirements. One of
the consequences of deferred execution of imaging operations is that program
control flow cannot depend on image content,
since image content is not known during parse tree execution. In practice this
is not a severe restriction, but nonetheless must
be borne in mind during language design.
The notion of deferred execution (or lazy evaluation) of imaging operations is
described by Guibas and Stolfi
(Guibas, L.J., and J. Stolfi, "A Language for Bitmap Manipulation", ACM
Transactions on Graphics, Vol. 1, No. 3, July
1982, pp. 191-214). They likewise construct an imaging graph during the
execution of a program, and during subsequent
graph evaluation propagate the result region backwards to avoid computing
pixels which do not contribute to the final
image. Shantzis additionally propagates regions of available pixels forwards
during imaging graph evaluation (Shantzis,
M.A., "A Model for Efficient and Flexible Image Computing", Computer Graphics
Proceedings, Annual Conference Series,
1994, pp. 147-154). The Vark Interpreter uses the more sophisticated multi-
pass bi-directional region propagation scheme
described by Cameron (Cameron, S., "Efficient Bounds in Constructive Solid
Geometry", IEEE Computer Graphics &
Applications, Vol. 11, No. 3, May 1991, pp. 68-74). The optimization of
execution order to minimise memory usage is due
to Shantzis, but is based on standard compiler theory (Aho, A.V., R. Sethi,
and J.D. Unman, "Generating Code from
DAGs", in Compilers: Principles, Techni9ues, and Tools, Addison-Wesley,1986,
pp. 557-567,). The Vark Interpreter uses a
more sophisticated scheme than Shantzis, however, to support variable-sized
image buffers. The subdivision of the result
region in conjunction with region propagation to reduce memory usage is also
due to Shantzis.
Printer Manager 908 (Fig. 221
The Printer Manager provides image printing services. It controls the Ink Jet
printer hardware embedded in the Artcam. It
provides an abstract printer control interface which allows printer parameters
to be queried and set, and images printed. This
abstract interface decouples the application from details of printer
implementation and includes the following variables:
out ut arameters domains
media is resent bool
media has fixed bool
a a size
media width real
remaining media real
length
fixed page size real, real
domains
I naQe size I real, real I
commands return value domains
Print Image none
out ut events
invalid media
media exhausted
media inserted
media removed
The Printer Manager runs as an asynchronous event-driven process. It contains
a set of linked state machines, one
CA 02456652 2004-02-06
WO 03/015395 PCT/AU02/00919
280
for each asynchronous operation. These include printing the image and auto
mounting the print roll. The software structure
of the Printer Manager is illustrated in Fig. 224. The software components are
described in the following description:
Print Image 930
Print Image prints the supplied image. It uses the VLIW Processor to prepare
the image for printing. This includes
converting the image color space to device-specific CMY and producing half
toned bi-level data in the format expected by
the print head.
Between prints, the paper is retracted to the lip of the print roll to allow
print roll removal, and the nozzles can be
capped to prevent ink leakage and drying. Before actual printing starts,
therefore, the nozzles are uncapped and cleared, and
the paper is advanced to the print head. Printing itself consists of
transferring line data from the VLIW processor, printing
the line data, and advancing the paper, until the image is completely printed.
After printing is complete, the paper is cut with
the guillotine and retracted to the print roll, and the nozzles are capped.
The remaining media length is then updated in the
print roll.
Auto Mount Print Roll 131
Auto Mount Print Roll responds to the insertion and removal of the print roll.
It generates print roll insertion and
removal events which are handled by the application and used to update the
status display. The print roll is authenticated
according to a protocol between the authentication chip embedded in the print
roll and the authentication chip embedded in
Artcam. If the print roll fails authentication then it is rejected. Various
information is extracted from the print roll. Paper and
ink characteristics are used during the printing process. The remaining media
length and the fixed page size of the media, if
any, are published by the Print Manager and are used by the application.
User Interface Manager 910 (Fig. 221
The User Interface Manager is illustrated in more detail if Fig. 225 and
provides user interface management
services. It consists of a Physical User Interface Manager 911, which controls
status display and input hardware, and a
Graphical User Interface Manager 912, which manages a virtual graphical user
interface on the color display. The User
Interface Manager translates virtual and physical inputs into events. Each
event is placed in the event queue of the process
registered for that event.
File Mana, erg 905 (Fig. 222
The File Manager provides file management services. It provides a unified
hierarchical file system within which the
file systems of all mounted volumes appear. The primary removable storage
medium used in the Artcam is the ArtCards. A
ArtCards is printed at high resolution with blocks of bi-level dots which
directly representserror- tolerant Reed-Solomon-
encoded binary data. The block structure supports append and append-rewrite in
suitable read-write ArtCards devices (not
initially used in Artcam). At a higher level a ArtCards can contain an
extended append-rewriteable IS09660 CD-ROM file
system. The software structure of the File Manager, and the ArtCards Device
Controller in particular, can be as illustrated in
Fig. 226.
Network Manager 904 (Fig. 222
The Network Manager provides "appliance" networking services across various
interfaces including infra-red
(IrDA) and universal serial bus (USB). This allows the Artcam to share
captured images, and receive images for printing.
Clock Mana erg 907 (Fig. 2222
The Clock Manager provides date and time-of day clock services. It utilises
the battery-backed real-time clock
CA 02456652 2004-02-06
WO 03/015395 PCT/AU02/00919
281
embedded in the Artcam, and controls it to the extent that it automatically
adjusts for clock drift, based on auto-calibration
carried out when the user sets the time.
Power Mana ee ment
When the system is idle it enters a quiescent power state during which only
periodic scanning for input events
occurs. Input events include the press of a button or the insertion of a
ArtCards. As soon as an input event is detected the
Artcam device re-enters an active power state. The system then handles the
input event in the usual way.
Even when the system is in an active power state, the hardware associated with
individual modules is typically in a
quiescent power state. This reduces overall power consumption, and allows
particularly draining hardware components such
as the printer's paper cutting guillotine to monopolise the power source when
they are operating. A camera-oriented Artcam
device is, by default, in image capture mode. This means that the camera is
active, and other modules, such as the printer, are
quiescent. This means that when non-camera functions are initiated, the
application must explicitly suspend the camera
module. Other modules naturally suspend themselves when they become idle.
Watchdo Timer
The system generates a periodic high-priority watchdog timer interrupt. The
interrupt handler resets the system if it
concludes that the system has not progressed since the last interrupt, i.e.
that it has crashed.
Alternative Print Roll
In an alternative embodiment, there is provided a modified form of print roll
which can be constructed mostly from
injection moulded plastic pieces suitably snapped fitted together. The
modified form of print roll has a high ink storage
capacity in addition to a somewhat simplified construction. The print media
onto which the image is to be printed is
wrapped around a plastic sleeve former for simplified construction. The ink
media reservoir has a series of air vents which
are constructed so as to minimise the opportunities for the ink flow out of
the air vents. Further, a rubber seal is provided for
the ink outlet holes with the rubber seal being pierced on insertion of the
print roll into a camera system. Further, the print
roll includes a print media ejection slot and the ejection slot includes a
surrounding moulded surface which provides and
assists in the accurate positioning of the print media ejection slot relative
to the printhead within the printing or camera
system.
Turning to Fig. 227 to Fig. 231, in Fig. 227 there is illustrated a single
point roll unit 1001 in an assembled form
with a partial cutaway showing internal portions of the printroll. Fig. 228
and Fig. 229 illustrate left and right side exploded
perspective views respectively. Fig. 230 and Fig. 231 are exploded
perspective's of the internal core portion 1007 of Fig.
227 to Fig. 229.
The print roll 1001 is constructed around the internal core portion 1007 which
contains an internal ink supply.
Outside of the core portion 1007 is provided a former 1008 around which is
wrapped a paper or film supply 1009. Around
the paper supply it is constructed two cover pieces 1010, 1011 that snap
together around the print roll so as to form a
covering unit as illustrated in Fig. 227. The bottom cover piece 1011 includes
a slot 1012 through which the output of the
print media 1004 for interconnection with the camera system.
Two pinch rollers 1038, 1039 are provided to pinch the paper against a drive
pinch roller 1040 so they together
provide for a decurling of the paper around the roller 1040. The decurling
acts to negate the strong curl that may be
imparted to the paper from being stored in the form of print roll for an
extended period of time. The rollers 1038, 1039 are
provided to form a snap fit with end portions of the cover base portion 1077
and the roller 1040 which includes a cogged end
CA 02456652 2004-02-06
WO 03/015395 PCT/AU02/00919
282
1043 for driving, snap fits into the upper cover piece 1010 so as to pinch the
paper 1004 firmly between.
The cover pieces 1011 includes an end protuberance or lip 1042. The end lip
1042 is provided for accurately
alignment of the exit hole of the paper with a corresponding printing heat
platen structure within the camera system. In this
way, accurate alignment or positioning of the exiting paper relative to an
adjacent printhead is provided for full guidance of
the paper to the printhead.
Turning now to Fig. 230 and Fig. 231, there is illustrated exploded
perspectives of the internal core portion which
can be formed from an injection moulded part and is based around 3 core ink
cylinders having internal sponge portions
1034-1036.
At one end of the core portion there is provided a series of air breathing
channels eg. 1014 - 1016. Each air
breathing channel 1014 - 1016 interconnects a first hole eg. 1018 with an
external contact point 1019 which is
interconnected to the ambient atmosphere. The path followed by the air
breathing channel eg. 1014 is preferably of a
winding nature, winding back and forth. The air breathing channel is sealed by
a portion of sealing tape 1020 which is
placed over the end of the core portion. The surface of the sealing tape 1020
is preferably hydrophobically treated to make it
highly hydrophobic and to therefore resist the entry of any fluid portions
into the air breathing channels.
At a second end of the core portion 1007 there is provided a rubber sealing
cap 1023 which includes three
thickened portions 1024, 1025 and 1026 with each thickened portion having a
series of thinned holes. For example, the
portion 1024 has thinned holes 1029, 1030 and 1031. The thinned holes are
arranged such that one hole from each of the
separate thickened portions is arranged in a single line. For example, the
thinned holes 1031, 1032 and 1033 (Fig. 230) are
all arranged in a single line with each hole coming from a different thinned
portion. Each of the thickened portions
corresponds to a corresponding ink supply reservoir such that when the three
holes are pierced, fluid communication is made
with a corresponding reservoir.
An end cap unit 1044 is provided for attachment to the core portion 1007. The
end cap 1044 includes an aperture
1046 for the insertion of an authentication chip 1033 in addition to a pronged
adaptor (not shown) which includes three
prongs which are inserted through corresponding holes (e.g., 1048), piercing a
thinned portion (e.g., 1033) of seal 1023 and
interconnecting to a corresponding ink chamber (e.g., 1035).
Also inserted in the end portion 1044 is an authentication chip 1033, the
authentication chip being provided to
authenticate access of the print roll to the camera system. This core portion
is therefore divided into three separate chambers
with each containing a separate color of ink and internal sponge. Each chamber
includes an ink outlet in a first end and an
air breathing hole in the second end. A cover of the sealing tape 1020 is
provided for covering the air breathing channels
and the rubber seal 1023 is provided for sealing the second end of the ink
chamber.
The internal ink chamber sponges and the hydrophobic channel allow the print
roll to be utilized in a mobile
environment and with many different orientations. Further, the sponge can
itself be hydrophobically treated so as to force
the ink out of the core portion in an orderly manner.
A series of ribs (e.g., 1027) can be provided on the surface of the core
portion so as to allow for minimal frictional
contact between the core portion 1007 and the printroll former 1008.
Most of the portions of the print roll can be constructed from ejection
moulded plastic and the print roll includes a
high internal ink storage capacity. The simplified construction also includes
a paper decurling mechanism in addition to ink
chamber air vents which provide for minimal leaking. The rubber seal provides
for effective communication with an ink
CA 02456652 2004-02-06
WO 03/015395 PCT/AU02/00919
283
supply chambers so as to provide for high operational capabilities.
Artcards can, of course, be used in many other environments. For example
ArtCards can be used in both embedded
and personal computer (PC) applications, providing a user-friendly interface
to large amounts of data or configuration
information.
This leads to a large number of possible applications. For example, a ArtCards
reader can be attached to a PC. The
applications for PCs are many and varied. The simplest application is as a low
cost read-only distribution medium. Since
ArtCards are printed, they provide an audit trail if used for data
distribution within a company.
Further, many times a PC is used as the basis for a closed system, yet a
number of configuration options may exist. Rather
than rely on a complex operating system interface for users, the simple
insertion of a ArtCards into the ArtCards reader can
provide all the configuration requirements.
While the back side of a ArtCards has the same visual appearance regardless of
the application (since it stores the data), the
front of a ArtCards is application dependent. It must make sense to the user
in the context of the application.
It can therefore be seen that the arrangement of Fig. Z35 provides for an
efficient distribution of information in the
forms of books, newspapers, magazines, technical manuals, etc.
In a further application, as illustrated in Fig. Z36, the front side of a
ArtCards 80 can show an image that includes an artistic
effect to be applied to a sampled image. A camera system 81 can be provided
which includes a cardreader 82 for reading the
programmed data on the back of the card 80 and applying the algorithmic data
to a sampled image 83 so as to produce an
output image 84. The camera unit 81 including an on board inkjet printer and
sufficient processing means for processing the
sampled image data. A further application of the ArtCards concept, hereinafter
called "BizCard" is to store company
information on business cards. BizCard is a new concept in company
information. The front side of a bizCard as illustrated
in Fig. Z37 and looks and functions exactly as today's normal business card.
It includes a photograph and contact
information, with as many varied card styles as there are business cards.
However, the back of each bizCard contains a
printed array of black and white dots that holds 1 - 2 megabytes of data about
the company. The result is similar to having
the storage of a 3.5" disk attached to each business card.
The information could be company information, specific product sheets, web-
site pointers, e-mail addresses, a resume ..... in
short, whatever the bizCard holder wants it to. BizCards can be read by any
ArtCards reader such as an attached PC card
reader, which can be connected to a standard PC by a USB port. BizCards can
also be displayed as documents on specific
embedded devices. In the case of a PC, a user simply inserts the bizCard into
their reader. The bizCard is then preferably
navigated just like a web-site using a regular web browser.
Simply by containing the owner's photograph and digital signature as well as a
pointer to the company's public key, each
bizCard can be used to electronically verify that the person is in fact who
they claim to be and does actually work for the
specified company. In addition by pointing to the company's public key, a
bizCard permits simple initiation of secure
communications.
A further application, hereinafter known as "TourCard" is an application of
the ArtCards which contains information for
tourists and visitors to a city. When a tourCard is inserted into the ArtCards
book reader, information can be in the form of:
Maps
Public Transport Timetables
Places of Interest
CA 02456652 2004-02-06
WO 03/015395 PCT/AU02/00919
284
* Local history
* Events and Exhibitions
* Restaurant locations
* Shopping Centres
TourCard is a low cost alternative to tourist brochures, guidebooks and street
directories. With a manufacturing cost of just
one cent per card, tourCards could be distributed at tourist information
centres, hotels and tourist attractions, at a minimum
cost, or free if sponsored by advertising. The portability of the bookreader
makes it the perfect solution for tourists.
TourCards can also be used at information kiosk's, where a computer equipped
with the ArtCards reader can decode the
information encoded into the tourCard on any web browser.
It is interactivity of the bookreader that makes the tourCard so versatile.
For example, Hypertext links contained on the map
can be selected to show historical narratives of the feature buildings. In
this way the tourist can embark on a guided tour of
the city, with relevant transportation routes and timetables available at any
time. The tourCard eliminates the need for
separate maps, guidebooks, timetables and restaurant guides and creates a
simple solution for the independent traveller.
Of course, many other utilizations of the data cards are possible. For
example, newspapers, study guides, pop group cards,
baseball cards, timetables, music data files, product parts, advertising, TV
guides, movie guides, trade show information, tear
off cards in magazines, recipes, classified ads, medical information,
programmes and software, horse racing form guides,
electronic forms, annual reports, restaurant, hotel and vacation guides,
translation programmes, golf course information,
news broadcast, comics, weather details etc.
For example, the ArtCards could include a book's contents or a newspaper's
contents. An example of such a
system is as illustrated in Fig. Z35 wherein the ArtCards 70 includes a book
title on one surface with the second surface
having the encoded contents of the book printed thereon. The card 70 is
inserted in the reader 72 which can include a
flexible display 73 that allows for the folding up of card reader 72. The card
reader 72 can include display controls 74 which
allow for paging forward and back and other controls of the card reader 72.