Note: Descriptions are shown in the official language in which they were submitted.
CA 02467274 2004-05-13
WO 03/044283 PCT/US02/36403
SEGMENTED FOUNDATION INSTALLATION APPARATUS AND METHOD
OF INSTALLATION THEREFOR
BACKGROUND OF THE INVENTION
1. Technical Field
This invention relates to a segmented anchoring and
support apparatus utilized as a tool for the installation of
finned and non-finned tubular foundations. Tn one aspect,
this invention relates to a method of installation of founda-
tions in the ground utilizing the apparatus of the invention.
In one aspect, this invention relates to the utilization of
the apparatus and methods of this invention for the installa-
tion of SAFE Foundations Secure Anchoring and Foundation
Equipment.
2. Background
Tubular foundations are utilized for supporting struc-
tures, e.g., lighting poles, across-the-highway traffic
signs, communication towers, and others. Tubular foundations
are installed in the ground by pressing them into the soil
utilizing hydraulic power means and a pre-stressed, conven-
tional anchoring device, which is been anchored, i.e., pre-
stressed inside a pre-augered earthen hole.
Conventional tubular foundations are fabricated in a
multitude of lengths, requiring the availability of a conven-
tional anchoring device of the proper length for each tubular
foundation to be installed, requiring a multitude of conven-
tional, anchoring device lengths. Conventional anchoring
devices are pre-stressed inside a pre-augered earthen hole.
The conventional anchoring device, the conventional SAFE
Foundation Secure Anchoring and Foundation Equipment, as well
as the methods of installation for the conventional anchoring
device and for the SAFE Foundation are fully described in
U.S. Patent Nos. 4,843,785 of July 4, 1989, 4,882,891 of
November 28, 1989, and 4,974,997 of December 4, 1990.
CA 02467274 2004-05-13
WO 03/044283 PCT/US02/36403
-2-
INTRODUCTION TO THE INVENTION
The installation of a SAFE Foundation requires utilizing
an anchoring device of the required length, which depends on
the length of the SAFE Foundation. In many instances and
occasions, the installation of the SAFE Foundation requires
utilizing one, two, or more pairs of additional conventional
anchoring devices, which means the installation of a SAFE
Foundation sometimes requires three, five, or more conven-
tional anchoring devices instead of a single one.
Conventional anchoring devices are made in one piece,
consisting of a one-piece, standard threaded rod with an
anchorhead attached at the end of the rod and of a one-piece
pipe column, with fins. These conventional anchoring devices
have to be transported to the foundation installation site.
One drawback of the conventional anchoring device is
they are made only in one-piece full lengths, making them
expensive to transport and to handle.
Another drawback is the conventional anchoring device is
manufactured only in a limited number of standard lengths,
while the SAFE Foundations installed with these devices are
manufactured in a multitude of lengths, in increments of six
inches. When the installer cannot find a standard anchoring
device length, he/she is forced either to install a longer
standard length than the actual length required, or the
installer is forced to have one special anchoring device made
to order, i.e., specially custom ordered of the required
size, which means more expensive and time consuming installa-
tions.
Yet another drawback is when the installer is forced to
utilize a longer-than-required anchoring device. He or she
also is forced to drill a deeper earthen hole to accommodate
the extra length of the non-standard anchoring device. This
translates into additional costs.
Still another drawback exists despite the fact that the
characteristics of the soil are known in advance where the
CA 02467274 2004-05-13
WO 03/044283 PCT/US02/36403
-3-
SAFE Foundation is to be installed and the length of anchor-
ing device is determined. After augering the earthen hole,
unexpected soil conditions are encountered, e.g., an unex-
pected location of the water table, or reaching an unexpected
layer of softer, i.e., weaker soils. In such situations,
deeper holes have to be augered, requiring longer anchoring
devices, standard or not, to be utilized and therefore not
instantly available at the installation site. These unex-
pected developments create installation delays as well as
l0 cost overruns.
A further drawback involves the forces required for
stressing the conventional anchoring assembly. At some point
during the installation of the anchoring device, force is
exerted on the components of the device, instead of being
Z5 exerted upon the soil, because of its "mechanical stop" that
serves as "limiting means." This can provide false readings
of the strength of the installation.
Another drawback is the need for large equipment to lift
the anchor because of the weight of the long anchor assembly.
20 Yet a further drawback is that the conventional anchor
ing device is very difficult to retrieve from inside its
earthen hole, if after the installation is complete its top
portion falls below grade, i.e., below the top surface of the
earthen hole it was installed in.
25 According, there is a need for apparatus and method for
installing a SAFE Foundation which is less expensive and much
easier to handle while providing any length required.
It is therefore an object of the present invention to
provide apparatus and method for installing a SAFE Foundation
30 which is less expensive and much easier to handle while
providing any length required.
It is another object of the present invention to provide
apparatus and method for installing a SAFE Foundation that
can be readily available in the field and easy to assemble in
CA 02467274 2004-05-13
WO 03/044283 PCT/US02/36403
-4-
the field to match any required length, eliminating the need
to install special lengths.
It is yet another object of the present invention to
provide apparatus and methods for installing a SAFE Founda-
tion that eliminate the need to drill a deeper earthen hole,
when the installer is forced to use a longer anchoring de-
vice, by providing the installer with apparatus and methods
to match any length required by the foundation to be in-
stalled with it.
It is still another object of the present invention to
provide apparatus and methods for installing a SAFE Founda-
tion that can meet any unforeseen length requirement because
of unexpected soil conditions.
It is a further object of the present invention to
provide apparatus and methods for installing a SAFE Founda-
tion which always exerts the installation forces upon the
soil instead of exerting the forces upon its components.
It is yet a further object of the present invention to
provide apparatus and methods for installing a SAFE Founda
tion which is easily retrievable, even when its top portion
falls down below the surface, at the top of the earthen hole
it was installed in.
These and other objects of the present invention will
become apparent to those skilled in the art from a careful
review of the detailed description which follows.
SUMMARY OF THE INVENTION
The apparatus and method of the present invention pro-
vide for installation of a novel segmented foundation and
anchoring device of any required length. The installation of
the novel segmented foundation uses an anchoring device
manufactured in a multitude of lengths, e.g, in one aspect in
increments of six inches. The apparatus and method of the
present invention provide for installing a segmented founda-
tion which is less expensive and much easier to handle while
CA 02467274 2004-05-13
WO 03/044283 PCT/US02/36403
-5-
providing any length required. The apparatus and method of
the present invention provide for installing a segmented
foundation that can be readily available in the field and
easy to assemble in the field to match any required length,
eliminating the need to install special lengths. The novel
segmented foundation and anchoring device eliminate the need
to drill a deeper earthen hole, when the installer is forced
to use a longer anchoring device, by providing the installer
with apparatus and methods to match any length required by
the foundation to be installed with. it, and meet any unfore-
seen length requirement because of unexpected soil Condi-
tions. The apparatus and method of the presentqinvention
provide for installing a novel segmented foundation and
anchoring device which always exert the installation forces
upon the soil instead of exerting the forces upon its compo-
nents, and which are easily retrievable, even when the top.
portion falls down below the surface, at the top of the
earthen hole it was installed in.
The apparatus and method of the present invention pro-
vide for a segmented anchoring or foundation apparatus to be
installed in an earthen hole, including a vertical segmented
support means and a plurality of spaced media consolidation
plates swingably mounted about respective pivot points on the
vertical support means, the plates having media-facing sur-
faces swingable outwardly from the vertical support means
into the surrounding media. Varying segmented lengths form
the segmented vertical support means. In one aspect, the
apparatus and method of the present invention provide for a
centering collar 113, an anchor positioning means at level
force pivoting plates 194, and pivoting plates 194 are posi-
tioned 40-50 degrees from vertical. In one aspect, the
pivoting plates 194 positioned 45 degrees from vertical. In
one aspect, the apparatus and method of the present invention
provide for a frusto-cone 197 having a dx equal to a prede-
termined distance of one-half inch to form gap 204, The
CA 02467274 2004-05-13
WO 03/044283 PCT/US02/36403
-6-
method for installing an anchor for a foundation device in
the earth includes preparing a hole in the earth, lowering
into the hole a segmented anchor or foundation device having
swingable media facing plates, and applying force to swing
the plates outwardly into the surrounding media.
The apparatus and method of the present invention
include providing a central segmented rod means; plate assem-
bly means mounted around the rod means; pipe column means
around the Central segmented rod means positioned above the
plate assembly means; a plurality of circumferentially spaced
media Consolidation plates the plate assembly means; swing
means on the media facing surfaces pivotally mounted and
swingable outwardly about respective pivot points in a sub-
stantially vertical arc; spreader means adapted to swing the
plates outwardly into the surrounding media upon relative
vertical movement.between the pipe Column means and the rod
means to spread the plates to an arc of no more than about 55
degrees; restrainer means to restrain the plate assembly
means from vertical movement; and force applying means
adapted to provide relative vertical movement between the
pipe column means and the rod means.
BRIEF DESCRIPTION OF THE DRAWINGS
Figure 1 is an elevation view, partially cut-away, of
anchoring and foundation support apparatus.
Figure 2 is an elevation view of one embodiment of the
segmented foundation anchoring and support assembly of the
present invention.
Figure 3 is an elevation view of the top segment Compo-
nent part of the preferred embodiment of the segmented
foundation-anchoring and support assembly of the present
invention. Figure 3 also shows a centering collar, a hydrau-
lic cylinder assembly, and component parts of the present
invention.
CA 02467274 2004-05-13
WO 03/044283 PCT/US02/36403
Figure 4 is an elevation view of the middle segment
component part of the preferred embodiment of the present
invention.
Figure 4a is an elevation view of a Dywidag coupling,
component part of the present invention.
Figure 5 is an elevation view of the bottom segment
component part of a preferred embodiment of the present
invention.
Figure 6 is an elevation view of the anchoring head
l0 assembly component part of a preferred embodiment of the
present invention.
Figure 6a is a detail view showing in elevation and
partially in section the frusto-cone of Figure 6, restrained
inbetween two nuts.
Figure 7 is a top plan view of the top plate of Figure
3.
Figure 8 is an elevation view of the segmented, founda-
tion anchoring and support assembly of a preferred embodiment
of the present invention, fully assembled and installed in an
earthen hole. Figure 8 also shows a centering collar and a
hydraulic cylinder assembly.
Figure 9 is an elevation view of the hydraulic cylinder
assembly of the present invention, showing a reversed move-
ment of its pistons, by the methods of the invention.
Figure 10 is an elevation view partially showing the
segmented anchoring and support assembly of the present
invention being lifted, by the method of the invention.
Figure 11 is an elevation view of the segmented founda-
tion anchoring and support assembly of the present invention,
in the process of installing a SAFE Foundation.
Figure 12 is an elevation view showing one segmented
foundation anchoring and support assembly and two satellite
segmented foundation anchoring and support assemblies.
Figure 12 also shows a pushing collar, a hydraulic cylinder
assembly, and a beam assembly, in combination to form all
CA 02467274 2004-05-13
WO 03/044283 PCT/US02/36403
_g_
component parts of the present invention, shown in the pro-
cess of installing a SAFE Foundation.
DETAILED DESCRIPTION
Figure 1 shows a foundation anchoring and support assem-
bly 2 utilized for the installation of a SAFE Foundation in
the ground. Figure 1 shows a one-piece foundation-guiding
column 2, shown cut-away in order to show one-piece, standard
threaded rod 7 going through the inside of a one-piece pipe
column 3. Anchoring assembly 2 is shown already installed,
inside earthen hole 17, in soil 18.
Foundation-guiding column 2 includes a one-piece length
of steel pipe 3, with three or four fins 4 welded along
vertical surface 3 and at ninety degrees from each other. A
top plate 5 is welded to the top end of pipe 3.
Figure 1 also shows an anchoring head assembly 6, in-
cluding one-piece threaded rod 7, four pivoting compaction
and consolidation plates 8 (only two are fully shown and one
is partially shown) which pivot around bolts 9, also support
frame 10 with plate 16 welded to it, frusto-cone 11 held in
position by nut 12, which is threaded-on to the bottom end of
threaded rod 7.
By pulling threaded rod 7 upwardly, nut 12 pulls frusto
cone 11 also upwardly. This in turn forces the four pivoting
compaction and Consolidation plates (only two fully shown)
and swing upwardly around bolts 9 and away from their origi-
nal vertical position. Nut 13 and nut 14 are utilized at
various stages of the installation process. Bottom end 15 of
foundation-guiding column 2 rests on plate 16 of support
frame 10 of anchoring head assembly 6.
Referring now to Figure 2, one embodiment of the seg-
mented foundation anchoring and support assembly of the
present invention is shown partially assembled, in order to
enable a better understanding of its component parts.
CA 02467274 2004-05-13
WO 03/044283 PCT/US02/36403
-9-
Novel segmented foundation-anchoring and support assem-
bly of Figure 2 includes top segment 30, middle segment 50,
bottom segment 70, and anchoring head assembly 90.
Top segment 30 has four fins 34 (only three are shown)
vertically welded to pipe 35. Sleeve 36 is welded to the
bottom end of pipe 35 of top segment 30, and it is utilized
for helping align the top end 51 of pipe 52 of middle segment
50 to top segment 30. Top plate 39 is welded to pipe 35 and
fins 34. Flat bar 31 is utilized for firmly bolting top
segment 30 to middle segment 50, by means of four bolts (not
shown) with their respective nuts (not shown) on each bar,
through bolt holes 32 on flat bars 31 and bolt holes 33 on
fins 34 and through bolt holes 53 on fins 54 of middle seC-
tion 50. Flat bars 31 could be welded instead to fins 34 and
bolted on to fins 54.
There are two flat bars 31 including one on the front
and one on the back (not shown) of each fin 34 of top segment
30 and fins 54 of middle segment 50.
Middle segment 50 also has four fins 54 (only three are
shown) vertically welded to pipe 52. Sleeve 55 is welded to
the bottom end of pipe 52 of middle segment 50 and is uti-
lized in attaching top end 71 of pipe 74 of bottom segment 70
to middle segment 50. Flat bars 57 are utilized for firmly
bolting middle segment 50 to bottom segment 70 by means of
four screws (not shown) with their respective nuts (not
shown), through bolt holes 56 on flat bars 57 and bolt holes
(not shown) on fins 54 of middle segment 50 and through bolt
holes 72 on fins 73 of bottom segment 70. There are two flat
bars 57, one on the front and one on the back (not shown) of
each fin 54 of middle segment 50 and fins 73 of bottom seC-
tion 70. Flat bars 57, instead, could be welded to fins 54
while bolted to fins 73.
Bottom segment 70 also has four fins 73 (only three are
shown), vertically welded to pipe 74. Bottom segment 70
attaches to anchoring head assembly 90 by means of Collar 91
CA 02467274 2004-05-13
WO 03/044283 PCT/US02/36403
-10-
on anchoring head assembly 90 and four screws 75 (only two
are shown).
Anchoring head assembly 90 has collar 91 welded to steel
plate 92, which in turn is welded to the top side of struc-
tural support frame 93. Frame 93 includes four ninety-degree
angled bars 93 (only two shown) which provide support to four
pivoting compaction and consolidation plates 94 (only three
are shown). ~Frusto-cone 95 is held in position by nut 94,
which is threaded-on to the bottom of threaded rod 96.
Threaded rod 96 goes through the inside of segments 30, 50,
and 70. Rod 96 can be segmented, i.e., made of several
length of rod joined together by means of a threaded cou-
pling, not shown.
The completely assembled-segmented foundation-anchoring
and support of Figure 2 is inserted, i.e., lowered vertically
down in a pre-augered earthen hole (not shown).
Figures 3 through 12 represent the preferred embodiment
of the segmented foundation-anchoring and support assembly of
the present invention.
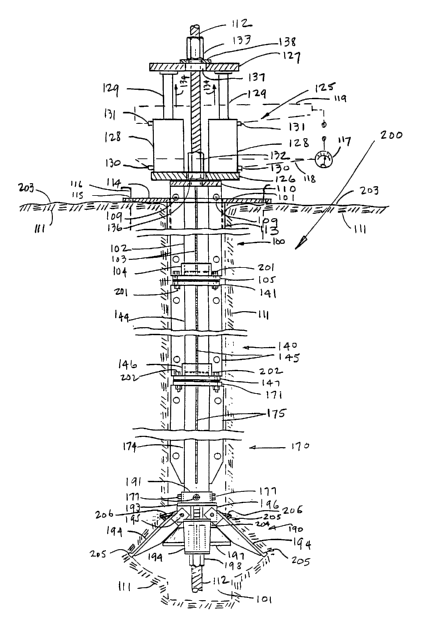
Referring now to Figure 3, top segment 100 and hydraulic
cylinder assembly 125 are shown in the installation mode,
i.e., pushing mode.
Top segment 100 is shown inside pre-augered earthen hole
101, in soil 111, and passing through centering collar 113,
which is at the top of earthen hole 101 and inside it, with
its top plate 113 firmly resting on the top of surface 203.
Top plate 114 of centering collar 113 has four through holes
115, utilized for driving pins 116 through them into soil
111, in order to keep centering collar 113 centered at the
top of earthen hole 101.
Top segment 100 includes steel pipe column 102, to which
four vertical fins 103 (only three are shown) are welded at
ninety degrees to each other and parallel to the vertical
axis of pipe column 102. Steel collar 104, welded to flange
105, also is welded to the bottom of fins 103, with end 106
CA 02467274 2004-05-13
WO 03/044283 PCT/US02/36403
-11-
of pipe column 102 protruding approximately half-way inside
of collar 104. Flange 105 is utilized for bolting on to top
flange 141, Figure 4 of middle segment 140, by means of bolts
201 as shown in Figure 8, through bolt holes 107, Figure 3
and bolt holes 142 of Figure 4, on flanges 105 and 141,
respectively.
Top end 143 of pipe column 144, of middle segment 140 of
Figure 4, protrudes inside collar 104 of top segment 100 of
Figure 3 and firmly abutts against bottom end 106 of pipe
column 102 of top segment 100. Flanges 105, 141 are bolted
together, therefore closing up space 108 of Figure 3, as
shown in Figure 8.
Steel fin 103, Figure 3, each has two holes 109 at the
top end and another two at the bottom end. Holes 109 are
utilized for helping in hoisting 100, when necessary.
Top plate 110 is welded at the top-end of top segment
100, both to the pipe Column 102, as well as, to fins 103.
Top plate 110 is utilized for setting hydraulic cylinder
assembly 125, a Component part of the present invention, on
top of the segmented foundation-anchoring and support assem-
bly, shown fully assembled on Figure 8. Hydraulic cylinders
assembly 125 is utilized, first to anchor the segmented
foundation-anchoring and support assembly to the bottom of
earthen hole 101, as shown in Figures 6 and 8, and second for
pushing a SAFE Foundation in soil 111 as shown in Figure 11,
utilizing the segmented foundation-anchoring and support
assembly as a vertically guiding column, inside pre-augered,
vertical earthen hole 101, as well as an anchor point to push
against in order to push a SAFE Foundation downwardly into
soil 111 in a vertical direction as shown in Figure 11.
Top segments 100 of Figure 3 Can be fabricated in a
variety of lengths, preferably in four feet lengths.
Continuing to refer to Figure 3, threaded rod 112,
preferably a "Dywidag" rod manufactured by Dywidag Systems
International of Fairfiel.d, N.J., is shown passing through
CA 02467274 2004-05-13
WO 03/044283 PCT/US02/36403
-12-
the inside of top segment 100, through its bottom flange 105,
through its top plate 110, through bottom plate 126 of hy-
draulic assembly 125, through top plate 127 of hydraulic
assembly 125, and through washer plate 138.
"Dywidag" nut 132 is utilized to hold anchor head 190 of
Figure 6, anchored against soil 111 at the bottom of earthen
hole 101, preventing it from falling down. "Dywidag" nut 133
is utilized for providing a point of resistance for pistons
129 of hydraulic cylinder assembly 125 to push against both
nuts 132, 133 are treaded on Dywidag rod 112.
Hydraulic cylinder assembly 125 is a component part of
the present invention. Hydraulic assembly 125 includes two
hydraulic Cylinders 128 with their respective pistons 129, a
pump (not shown), hydraulic hoses 118, 119, pressure gauge
117, and controls (not shown). The bottoms of cylinders 128
are welded to bottom plate 126, while the top ends of pistons
129 are welded to top plate 127.
Hydraulic cylinders assembly 125 is operated by means of
a hydraulic pump (not shown) of the required capacity.
Hydraulic fluid inlets 130 and outlets 131 allow pumped
hydraulic fluid into and out of cylinders 128 via hoses 118,
119~in the process of forcing pistons 129 out of and back
into their respective cylinders 128. The relative movements
of pistons 129 and cylinders 128 are represented, respec-
tively, by arrows 134, 135.
Hydraulic cylinder assembly 125 provides the powerful
force required to anchor the segmented foundation anchoring
and support assembly 200 in soil 111 as shown in Figure 8.
They also provide the powerful force required for installing,
i.e., for pushing, a tubular foundation, e.g., finned tube
SAFE Foundation 210, into soil 111 as shown in Figures 11 and
12.
Referring now to Figure 4, middle segment 140, a compo-
nent part of the present invention, includes steel pipe
column 144, to which four vertical fins 145 (only three are
CA 02467274 2004-05-13
WO 03/044283 PCT/US02/36403
-13-
shown) are welded at ninety degrees to each other and paral-
lel to the vertical axis of pipe column 144. Steel collar
146, welded to flange 147, also is welded to the bottom of
fins 145, with bottom end 148 of pipe column 144 protruding
approximately half-way inside of collar 146. Flange 147 is
utilized for bolting onto top flange 171, Figure 5, of bottom
segment 170 by means of bolts 202 as shown in Figure 8,
through bolt holes 149 on flange 147 of Figure 4 and bolt
holes 172 of flange 171 of Figure 5.
Top end 173 of pipe column 174 of bottom segment 170 of
Figure 5, protrudes inside collar 146 of middle segment 140
of Figure 4 and firmly abutts against bottom end 148 of pipe
column 144, when flanges 147, 171 are bolted together, there-
fore closing up space 150, as shown in Figure 8.
Fins 145, each having two holes 151 at the top and
another two at the bottom, includes holes 151 for aiding in
hoisting middle segment 140 when required.
"Dywidag" rod 112 is shown passing through the inside of
middle segment 140, through its bottom flange 147, and
through its top flange 141.
Middle segments 140 can be fabricated in a variety of
lengths, preferably in one, two, and three feet lengths.
Referring now to Figure 4a, the present invention pro-
vides the capability of utilizing a segmented "Dywidag" rod,
by joining together two lengths of "Dywidag" rod by means of
an inside threaded "Dywidag" coupling 152, creating a very
strong joint. The strength of the joint substantially is
increased by eight Allen set-screws 153 (only six are shown).
The segmenting of rod 112 eliminates the need to trans-
port very long pieces of "Dywidag" rod. These rod segments
are assembled easily as shown in Figure 4a, by threading
"Dywidag" rod 112 pieces into inside-threaded coupling 152
and then threading-in and tightening eight Allen-set-screws
CA 02467274 2004-05-13
WO 03/044283 PCT/US02/36403
-14-
(only six are shown). These joints fit inside pipe column
144 or any other of the pipe columns.
Referring now to Figure 5, bottom segment 170, a compo-
nent part of the present invention includes steel pipe column
174 to which four vertical fins 175 (only three are shown)
are welded at ninety degrees to each other and parallel to
the vertical axis of pipe column 174. Four bolts 177 (only
two are shown) are utilized for bolting end 176 of pipe
column 174 onto collar 191 of anchor head assembly 190 of
Figure 6, through four threaded holes 178 (only three are
shown) on end 176 of pipe column 174 and through four holes
192 (only three are shown) on collar 191 of anchor head
assembly 190 of Figure &.
End 176 of pipe column 174 is to be inserted into collar
191 until its bottom end 179 firmly rests on top of plate 193
of Figure 6. Then bolts 177 are threaded-in and tightened.
Bottom end 176 of pipe column 174 are made to fit either
inside or outside of collar 191 of Figure 6.
Fins l75 of bottom segment 170 are cut at an angle
toward end 176 of pipe column 174, in order to facilitate the
insertion of end 176 inside collar 191 and also to facilitate
the bolting of the two components, i.e., pipe column 174 and
anchoring head 190.
"Dywidag" rod 112 is shown passing through the inside of
bottom segment 170, inside pipe column 174, and. through
flange 171.
Bottom segments 170 are fabricated in a variety of
lengths, preferably in four feet lengths.
Referring now to Figure 6, anchoring head assembly 190
includes threaded rod 112, preferably a "Dywidag" threaded
rod, which are made of several pieces, joined by "Dywidag"
couplings, Figure 6a, also including four pivoting, compac-
tion and consolidation plates 194 (only three are shown),
which pivot, i.e., swing upwardly, around bolts 195 and in-
between two steel plates 196, which are component parts 'of
CA 02467274 2004-05-13
WO 03/044283 PCT/US02/36403
-1S-
plate support frame 196. Each plate has rib means 205 and
incline ramps 206. Anchoring head assembly 190 also has
frusto-cone 197 at the bottom end of "Dywidag" rod 112, held
in place by "Dywidag" nut 198, which is threaded on the
bottom end of "Dywidag" rod 112 and by a shorter Dywidag nut
199, detail Figure 6a.
By pulling "Dywidag" rod 112 upwardly, Dywidag nut 198
pulls frusto-cone 197 also upwardly. This, in turn, forces
the four pivoting, compaction and consolidation plates 294
(only three are shown) to pivot, i.e., to swing upwardly,
around bolts 195 and away from their original vertical posi-
tion at the bottom of earthen hole .101, as shown in Figure 6.
By pushing "Dywidag" rod 112 downwardly, frusto-cone 197 also
is pushed downwardly because of shorter "Dywidag" nut 199 of
Figure 6a.
When the anohoring and support assembly of the present
invention is fully assembled, a sufficiently powerful force
is exerted on "Dywidag" rod 112 while it is being pulled
upwardly, pivoting compaction and consolidation plates 194 to
press, i.e., push and compact, soil 1l1 at the bottom of
earthen hole 101, as shown in Figures 6 and 8, firmly anchor-
ing pivoting plates 194, as also shown in Figures 6 and 8.
Pivoting Compaction and consolidating plates 194 are swung
out and upwardly, into soil 121 up to a desired point, to a
point where pivoting plates 194 are at an angle of approxi-
mately forty-five degrees from their original vertical posi-
tion. Pivoting plates 194 then are kept from falling back
down, by means of nut 132 of Figure 3, 8, which is threaded
downwardly on "Dywidag" rod 112, and hand tightened against
top plate 110, Figure 3, before releasing the force that
swung plates 194 upwardly.
Figure 6a is a detail of a portion of the anchoring head
assembly 190 of Figure 6 with pivoting plates 194 removed, in
order to show how frusto-cone 197 is restrained in between a
full-size "Dywidag" nut 198 on its bottom and a shorter
CA 02467274 2004-05-13
WO 03/044283 PCT/US02/36403
-16-
"Dywidag" nut 199 on its top. Both "Dywidag" nuts 198, 199
are threaded on "Dywidag" rod 112, which is shown in Figure
6a passing through frusto-cone 197 and support frame 196 and
plate 193 with a gap 204 of about one half of one inch be-
tween the top of "Dywidag" nut 199 and the bottom of support
frame 196.
Figure 7 shows a plain view detail of top plate 110 of
top segment 100 of Figure 3. Fins 103 are welded to the
underside of top plate 110 and to pipe column 102. Top plate
110 has a center hole 113 in order to allow "Dywidag" rod 112
pass through it. Wire rope choker-openings 114 are utilized
for engaging a wire rope choker, as shown in Figure 6a, in
the process of lowering down or pulling out of earthen hole
101 the foundation-anchoring and support assembly 200, shown
l5 fully assembled in Figure 8. The foundation-anchoring and
support assembly of the present invention is reusable. Tn
other words, after it has been utilized for installing a SAFE
Foundation, it is retrieved, i.e., pulled' up and out of
earthen hole 101 to be reused again, many times more,
Figure 8 shows the foundation-anchoring and support
assembly 200 of the present invention fully assembled and
anchored inside pre-augered earthen hole 101 by means of its
anchoring head assembly 190. "Dywidag" nut 132 is shown
threaded on "Dywidag" rod 112 and tightened against top plate
110.
Top segment 100 is bolted onto middle segment 140 by
means of bolts 201 and collar 104, flange 105 of top segment
100, and flange 141 of middle segment 140.
Middle segment 140 is bolted onto bottom segment 170 by
means of bolts 202 and collar 146, flange 147 of middle
segment 140, and flange 171 of bottom segment 170.
Bottom segment 170 is bolted onto anchoring head assem-
bly 190 by means of bolts 177 bolted onto collar 191 of
anchoring head assembly 190°by means of bolts 177. Collar
191 is welded to plate 193 which, in turn, is welded to the
CA 02467274 2004-05-13
WO 03/044283 PCT/US02/36403
-17-
top end of plate support frame 196. Four pivoting plates 194
(only three shown) pivot around bolts 195 in frame 196, when
pushed up by frusto-cone 197.
Centering collar 113 is shown inside and at the top of
earthen hole 101 with plate 114 welded to collar 113 and.
resting on surface 203 of soil 111. Four pins 116 (only two
are shown) are inserted through holes 115 of plate 114 of
centering collar 113 with the purpose of firmly keeping
centering collar 113 vertically aligned inside hole 101.
Centering collar 113 is utilized for keeping the anchor-
ing assembly of the present invention in a vertical position
inside hole 101 and for preventing the anchoring assembly 200
from moving sideways during the anchoring process.
A problem constantly encountered during installations
utilizing the prior art anchoring assembly empirically has
been found to be resolved after many trials and errors, by
installing the proper centering collar 113 component of the
present invention.
Figure 8 also shows a hydraulic cylinder assembly 125,
with hydraulic fluid-carrying hoses 118, 119 and pressure
gauge 117, all component parts of the present invention.
Hydraulic cylinder assembly 125 is shown with its bottom
plate 126 set on top of plate 110 and with its pistons 129
extended out of their respective cylinders 128. Arrows 134
show the upward movement of pistons 129 as they extend out of
their respective cylinders 128.
"Dywiclag" threaded rod 112 passes through the inside of
the entire assembly, and it has "Dywidag" nut 132, threaded
onto it and hand tightened against plate 110, in order to
prevent pivoting plates 194 from falling back down from their
anchored position after hydraulic assembly 125 is removed.
Steel plate washer 138 is shown on top of top plate 127
of hydraulic cylinder assembly 125. "Dywidag" nut 133 is
shown threaded down on "Dywidag" rod 112 and tightened
against steel plate washer 138. After the foundation-anchor-
CA 02467274 2004-05-13
WO 03/044283 PCT/US02/36403
-18-
ing and support assembly has been anchored inside earthen
hole 101, nut 133 and plate washer 138 are removed, in order
to allow the removal of hydraulic cylinder assembly 125,
while "Dywidag" nut 132 remains tightened against plate 110,
maintaining anchoring assembly 200 anchored in place. Figure
8 also shows frusto-cone 197 held in place at the bottom end
of "Dywidag" rod 112 by means of "Dywidag" nut 198 which is
threaded-up at the bottom of "Dywidag'° rod 112.
Figure 9 shows the top end of the segmented anchoring
and support assembly, with hydraulic cylinder assembly 125 on
top of plate 110 of the anchoring assembly 200. Hydraulic
fluid-carrying hoses 118, 119 and pressure gauge 117, as
shown in Figure 8, are not shown in this detail view, for
simplification purposes only. Tn this view of hydraulic
assembly 125, "Dywidag" nut 132 has been threaded up from its
original position, (as shown in Figure 8), where it was hand-
tightened against plate 110 through hole 136 of plate 126 of
hydraulic assembly 125. Plate washer is shown now also
removed from its original position, as also shown in Figure
8, where it was placed on top of plate 127 and now is under-
neath plate 127 of hydraulic assembly 125, with "Dywidag" nut
138 now hand-tightened against plate washer 138. Arrow 117
shows the downwardly push of pistons 129, against threaded
nut 132, which is threaded on rod 112.
Figure 10 shows the segmented anchoring and support
assembly 200, partially depicted, in the process of being
lifted by hook 120 of a crane (not shown) attached to a wire-
rope choker Z19 with two heavy duty devises 118 bolted throu-
gh holes 109 on fins 103. Segmented anchoring and support
assembly 200 is shown being lifted through the inside of pipe
column 218 of SAFE Foundation 215.
Figure 11 shows the anchoring assembly of the present
invention in the process of installing SAFE Foundation 210,in
soil 111.
CA 02467274 2004-05-13
WO 03/044283 PCT/US02/36403
-19-
The anchoring and support assembly 200 is shown inside
pipe column 218 of foundation 210. Bottom 222 of pipe column
218 of foundation 210 is shown at about one and one half feet
from the top of collar 191.
For the purpose of this description, foundation 210 will
be considered completely installed when the bottom of its top
plate 214 is sitting on surface 203 of soil 111. Accordingly,
foundation 210 of Figure Z1 is shown partially installed.
Nevertheless, top plate 214 of foundation 210 can be in-
stalled at any elevation required. By way of an example, top
plate 214 of foundation 210 can be installed at six inches
above surface 203 of soil 111 if the structure to be mounted
upon foundation 210 so requires.
Foundation 210 has four fins 215 (only two shown) verti-
tally welded to its pipe column 218 and to the bottom of its
top plate 214. Fins 215 are at.ninety degrees from each
other. If foundation 210 is a three-fin foundation, then
fins 215 would be at one hundred and twenty degrees from each
other, instead. Foundation 210 also could be without fins
215, if so specified.
Pushing collar 211 has its bottom flange 213 on top of
flange 214 of foundation 210. Bottom plate 126 of hydraulic
assembly 125 sits on top of top plate 212 of pushing collar
211. The top end of anchoring assembly 200 is shown par-
tially inside 219 of pushing collar 211. Pushing collar 211
is utilized to provide a safety space between bottom end 222
of foundation 210 and pivoting plates 194 and also between
the top end of the anchoring assembly 200 and the bottom
plate 126 of hydraulic assembly 125. Such a safety space is
necessary because occasionally the anchoring assembly of the
present invention could be pulled up, when soil 111 at the
bottom of earthen hole 101 does not provide enough resis-
tance. In such cases, it is required to install additional
segmented foundation-anchoring and support assemblies as
shown in Figure 12. It has been found that these additional
CA 02467274 2004-05-13
WO 03/044283 PCT/US02/36403
-20-
anchoring assembly "satellite anchors" are to be installed in
pairs of satellite anchors 230, as shown in Figure 12.
Continuing to refer to Figure 11, "Dywidag" coupling 216
has been utilized for extending the length of "Dywidag" rod
112 with an additional length of "Dywidag" 217. A "Dywidag"
coupling 152, with its Allen set-screws 153, as shown in
Figure 4a, is utilized instead when installing large size
foundations requiring large forces.
Hydraulic cylinder assembly 125 is shown on top of plate
212 of pushing collar 211 and with steel plate washer 138 and
"Dywidag" nut 133 firmly tightened against it, by threading
nut 133 down on "Dywidag" extended rod 217.
Arrows 134 represent the upward push of pistons 129 of
hydraulic assembly 125 against "Dywidag" nut 133. Since the
pushing force of pistons 129 can not move nut 133 and
"Dywidag" rod 112, because the anchoring head assembly 190
previously has been anchored firmly at the bottom of earthen
hole 101, cylinders 128 are the ones that move downwardly
instead, as represented by arrows 135, effectively transfer-
ring the downward push onto foundation 210, pressing it into
the ground, i.e., into soil 111, as represented by arrow 221.
Referring now to Figure 12, the foundation-anchoring and
support assembly of the present invention is shown in the
process of installing SAFE Foundation 210, by pushing it into
soil 111. The installation of SAFE Foundation 210 is shown
taking place with the help of a pair of additional, i.e.,
satellite, segmented anchoring and supports assemblies 230.
Satellite anchoring and support assemblies 230 substantially
are identical to center anchoring and support assembly 200 of
Figure 8.
Segmented satellite anchoring and support assemblies 230
are required when soil 111 does not provide enough resistance
at the bottom of earthen hole 101 to the force required to
push SAFE Foundation 210 into soil 111. In such cases, the
CA 02467274 2004-05-13
WO 03/044283 PCT/US02/36403
-21_
force exerted by hydraulic Cylinder assembly 125 is spread
among one, two, or more pairs of satellite anchors 230.
Segmented satellite anchoring assemblies 230 also are
required when the force needed to push foundation 210 exceeds
the allowable force for one single foundation anchoring and
support assembly 200. The allowable force for one anchoring
assembly is approximately eighty tons. By utilizing one or
more pairs of segmented satellite anchoring assemblies 230,
in addition to the center anchor, i.e., anchoring assembly
200, the total force is spread among all the anchoring assem-
blies.
The requirement for satellite anchors 230 depends on the
size of foundation 210 to be installed. Soil characteristics
are determined in advance, and the foundation is fabricated
before it is installed.
Figure 12 shows center anchoring assembly 200 and two
satellite anchoring assemblies 230 already installed, i.e.,
anchored, inside earthen holes 101, 245, 246, respectively.
Foundation 210 is shown partially installed, i.e.,
partially pressed into soil 111. A small portion of founda-
tion 210 is shown still above surface 203 of sail 111.
The top end of center anchoring assembly 200 is shown
partially inside space 219 of pushing collar 211. Hydraulic
cylinders assembly 125 is shown on top of top plate 212 of
pushing collar 211.
I-Beam assembly 234 is shown on top of top plate l27 of
hydraulic assembly 125. "Dywidag" rods 112 of each anchoring
assembly have been extended in length by means of "Dywidag"
couplings 216, 232 and a length 217, 233 of "Dywidag" rod,
respectively.
I-Beam assembly 234 includes two parallel I-Beams 235
(only one shown) providing a space (not shown) in between the
two, parallel, I-Beams 235 (only one is shown).
I-Beams 235 have angle channels 243 welded across the
ends of beam flanges 244 and to webs 242 on both I-Beams at
CA 02467274 2004-05-13
WO 03/044283 PCT/US02/36403
-22-
each end 242 of beams 235. Plates 237 are welded across the
ends of beam flanges 248 and to webs 242 of I-Beams 235 at
each end. I-Beams 235 have one sliding plate 241 on each
end, across the top of beam flanges 248 (only one is shown).
Each sliding plate sits across the top of the two I-Beams
235. Sliding plates 241 are moved inside respective box 240
on the top ends of I-Beams 235. Boxes 240 are formed by
plates 237, 239,' angle bars 238, and the top of beam flanges
248. Plates 237, 239 and angle bars 238 all are welded to
and across the top of beam flanges 248 (only one shown).
Extended rods 233 pass through and in-between I-Beams 235 and
through a center hole 250 on plates 241. "Dywidag" nuts 242
are threaded down extended rods 233 and tightened firmly
against plates 241.
Plate 247 is welded at 236 to and across the topside of
flanges 248 (only one shown) of I-Beams 235 (only one
shown). Extended rod 217 passes in-between I-Beams 235 and
through a center hole 249 on plate 247. "Dywidag" nut 133 is
threaded down on extended rod 217 and firmly tightened again-
st plate 247.
Hole 220 on top plate 127 of hydraulic cylinders assem-
bly 125 is sufficiently large to allow "Dywidag" coupling 216
easily pass through it.
Arrows 134 represent the upward push of pistons 129,
pushing against beam.assembly 234. Beam assembly 234 can not
move because of anchoring and support assemblies 200, 230,
which are all anchored at the bottom of holes 101, 245, 246,
respectively. Cylinders 128 move, i.e., push, downwardly as
represented by arrows 135. The downward push, presses, i.e.,
injects foundation 210 into soil 111.
Installation Methods
Method of Installation of the Anchoring and. Support
Assembly of this Invention
Referring to Figure 8, by the method of installation of
the segmented foundation-anchoring and support assembly of
CA 02467274 2004-05-13
WO 03/044283 PCT/US02/36403
-23-
the present invention, segments 100, 140, 170, and anchoring
head assembly 190 are brought disassembled to the site where
the installation of the anchoring assembly 200 is to take
place. Substantial shipping costs are saved by utilizing the
segmented foundation anchoring and support assembly of the
present invention.
By bringing to the installation site a number of each,
top, middle, bottom segments, anchoring head assemblies,
lengths of rod 112, and couplings 152, a large number of
segmented anchoring assembly lengths can be assembled easily.
By the Conventional method, an individual one-piece anchor is
brought to the foundation installation site for each founda-
tion size, i.e., for each foundation length, to be installed.
This conventional method requires substantially greater
shipping and overall costs in comparison to the present
invention. '
In addition, if an unexpectedly longer anchoring and
support assembly is required, e.g., because of unexpected
soil conditions, such length can be assembled easily on site
in the field by combining a number of four-foot top segments
with a number of one to three-foot middle segments and a
four-foot bottom segment. "Dywidag" rod 112 can be extended
easily, to the desired length, by means of "Dywidag" Cou-
plings 152, 216. The unexpected required length problem is
eliminated easily by the method of the present invention.
Continuing to describe the method of installation of the
segmented anchoring and support assembly of this invention,
reference now is made to Figure 8. An earthen hole 101 is
augered by the operator or by a drilling contractor. Earthen
hole 101 is drilled to the required depth, which depends on
the length of the SAFE Foundation 210, (Figures 11 and 12),
the mechanical characteristics of soil 111, and the depth of
the watertable in soil 111, by way of examples.
In the great majority of cases, the characteristics of
the soil is determined in advance, whether it be for the
CA 02467274 2004-05-13
WO 03/044283 PCT/US02/36403
-24-
installation of a SAFE Foundation, a concrete foundation, or
any other type of foundation. In fact, a foundation is
engineered based upon two main groups of elements. The
mechanical characteristics of the structure to be supported
by the foundation determine the various loads the foundation
will support, i.e., uplift and compression loads, lateral and
moment loads, and torsional loads. Also the mechanical
characteristics of the soil depend on where the foundation
will be installed. Climatic characteristics play an impor-
tant role on certain structures as well, e.g., highway signs
which are exposed to high winds.
When the soil characteristics are not known in advance,
they are determined prior to engineering the foundation. If
they are not determined at all, the structural engineer
should select the foundation based upon "worst characteris-
tics." In such cases, a foundation larger than actually
required is the result and therefore a longer, i.e., deeper
earthen hole 101 and a longer anchoring and support assembly
200 are required.
The overall length of pivoting plates 194 also depends
on the soil characteristics. By way of an example, weak
soils require longer plates 194. Rocky soil requires shorter
plates 194.
The installation process continues by assembling on-site
in the field the required length of anchoring and support
assembly 200.
Segments 100, 140, and 170, in the required number
needed to meet the required depth of earthen hole 101 are
placed first over "Dywidag" rod 112, i.e., "Dywidag" rod 112
passing through the inside of segments 100, 140, and 170.
Anchoring head assembly 190 is assembled at the shop, by
installing its "Dywidag" rod 112 on its head assembly 190
portion, prior to shipping to the foundation installation
site. "Dywidag" rod 112 is extended easily by means of a
CA 02467274 2004-05-13
WO 03/044283 PCT/US02/36403
-25-
"Dywidag" coupling 152, 216, as shown in Figures 4a and 11,
respectively.
Now segments 100, 140, and 170 are bolted easily to-
gether by the installation workers, by means of bolts 201 of
flanges 105 and 141, and by bolts 202 of flanges 147 and 171
as shown in Figure 8.
Next, pivoting plates 194 of anchoring head assembly 190
are brought manually to a position parallel alongside rod
112. Then, by pulling on rod~Il2, which also pulls up
"Dywidag" nut 198, which in turn pulls up frusto-cone 197,
the operator adjusts the position of frusto-cone 197 to a
point where the top of frusto-cone 197 touches the bottom of
pivoting plates 194. When the operator pulls rod 112, nut
198 pulls frusto-cone 197 as well, because nut 198 is
threaded at the bottom end of rod 112.
The operator now ties pivoting plates 194 by wrapping
all four plates 194 (only three shown) with breakable tie
wire (not shown). After plates 194 are tied, the larger
diameter of frusto-cone 197 is greater than the overall
diagonal measurement of the four tightened pivoting plates.
Then the operator hand tightens nut 132 against plate 110 of
the anchoring and support assembly to keep frusto-cone 112
immobilised in that position. This procedure is labeled
"pivoting plates adjustment," because it establishes the
precise distance, i.e., length, required to extend pistons
229 of hydraulic assembly 125, out of their respective'cylin-
ders 128, in order to produce a forty-five degree pivoting
movement of pivoting plates 194 away from their tightened,
parallel position (with respect to rod 112) and still main-
taro a gap 204 of one quarter of one inch to one half of one
inch in between the top "Dywidag" nut 199 and the bottom of
support frame 196, after frusto-cone 197 is pulled up by
hydraulic assembly 125 during the installation process. This
gap 204 is required later during the process of installation
of SAFE Foundation 210 of Figures 11 and 12.
CA 02467274 2004-05-13
WO 03/044283 PCT/US02/36403
-2&-
The operator carefully measures and records the distance
between the top of nut 199 and the bottom of support frame
196 after completing the pivoting plates adjustment. That
distance depends on the length of pivoting plates 194, which
in turn depends on the soil characteristics.
Anchoring and support assembly 200 of Figure 8 is low-
ered inside pre-angered, vertical earthen hole 101 by means
of hook 120, Figure 10, of truck mounted hydraulic boom (not
shown) and utilizing a wire-rope choker 119, Figure 10,
hooked onto choker openings 114 on plate 110 of Figure 7 or
by means of Clevises 118, through holes 109 on fins 103 of
Figure 10.
The length of foundation anchoring and support assembly
200 is six to twelve inches longer than the depth of earthen
hole 101 or six to twelve inches longer than the final grade
top plate 214 of foundation 210, of Figures 11 and 12, after
the installation of completed foundation 210. The combined
length of pipe column 100, 140, 170, after they axe assembled
should be at Least one foot greater than the overall length
of the foundation to be installed.
After the anchoring and support assembly 200 is inside
earthen hole 101, centering collar 113 is placed over the
protruding six to twelve inches of top segment 100. Collar
113 is utilized for ensuring the anchoring and support assem-
bly stays vertically plumb inside earthen hole 101. Collar
113 is about one to one and one half feet long. Collar 113
has plate 114 welded to it. Plate 114 rests on top of sur-
face 203 of soil 111, while collar 113 is placed inside and
at the top of earthen hole 101. Through-holes 115 on plate
114 allow inserting pins 116 through them and into soil 111,
by hammering. Pins 115 immobilize collar 113 in place.
Anchoring head assembly 190 rests at the bottom of
earthen hole 101, with pivoting plates 194 tied down, by
breakable tie-wire (not shown) and in a vertical position,
parallel to rod 112 of anchoring assembly 190.
CA 02467274 2004-05-13
WO 03/044283 PCT/US02/36403
-27-
Now the operator places hydraulic assembly 125, over rod
112 utilizing a crane (not shown), and sets it on top of
plate 110. Plate 126 of the hydraulic assembly 125 sits on
top of plate 110 of the segmented anchoring and support ass-
embly, while rod 112 passes through opening 136 of plate 126
and through opening 137 of plate 127, as shown in Figure 8.
Steel plate washer 138 is placed on top of top plate 127
of hydraulic assembly 125, with rod 112 passing through a
center hole in plate 138. "Dywidag" nut 133 then is threaded
down on "Dywidag" threaded rod 112 and hand tightened against
plate washer 138 and plate 127. Plate washer 138 is required
for covering opening 137, on plate 127, because opening 137
is larger in diameter than nut 133 in order to allow
"Dywidag" coupling 216 of Figure 11 pass through it when and
if rod 112 requires to be extended and when installing foun-
dation 210, of Figure 11.
Continuing to refer to Figure 8, now the operator acti-
vates hydraulic cylinder assembly 125 by means of a hydraulic
fluid pumping system, which includes, by way of an example,
at least, a hydraulic pump (not shown), hydraulic fluid-
carrying hoses 118, 119, a pressure gauge 117, and controls
(not shown).
The hydraulic pump (not shown) pumps hydraulic fluid
into cylinders 128, through hoses 118, via their inlets 130.
This pumping forces pistons 129 out of cylinders 128. Both
pistons 129 are attached to top plate 127. Top plate 127,
therefore, is pushed upwardly, encountering the resistance of
"Dywidag" threaded nut 133, which is threaded on "Dywidag"
threaded rod 112. As a result, the upward moving force of
pistons 129 pull rod 112 upwardly as represented by arrows
134, with a force of approximately eighty tons, which is the
allowable force for the anchoring and support assembly.
Since frusto-cone 197 is at the bottom end of rod 112
and prevented from falling down by means of "Dywidag"
threaded nut 198, which is threaded onto rod 112, the slow
CA 02467274 2004-05-13
WO 03/044283 PCT/US02/36403
-28-
yet powerful upward pull on rod 112 by pistons 129 also pulls
frusto-cone 197 upwardly. The powerful, slow, upward pull of
frusto-cone 197 then is transferred to, i.e., exerted on,
pivoting plates 194, forcing them to break easily the tie-
s wire (not shown) that kept them vertically down and parallel
to "Dywidag" rod 112. As rod 112 is pulled up by pistons
129, threaded nut 132 is carried up with it. The operator
threads nut 132 down, in order to keep it hand tightened
against plate 110.
Frusto-cone 197, because of its geometry, pushes pivot-
ing plates 194 away from their original vertical position.
Pivoting plates 194 are forced by the powerful upward advance
of frusto-cone 197, and swing, i.e., move upwardly, rotating
about their respective bolts 195 on structural support frame
196.
The upward swing of the four pivoting plates 194 (only
three are shown) strongly forces pivoting plates 294 to
compact and consolidate soil 111 at the bottom of earthen
hole 101, effectively transferring the powerful upward force
of hydraulic cylinder assembly 125 onto the soil at the
bottom of earthen hole 101, thus anchoring the foundation
anchoring and support assembly 200 at the bottom of vertical
earthen hole 101. Dywidag nut 132 tightened against plate
110 prevents the anchoring head assembly 190 from falling
back down.
The assembled segments 100, 140, 170, and collar'191
with plate 193 are welded to structure support frame 19&, and
become one combined piece that supports the hydraulic assem-
bly 125 upon it, i.e., upon the assembly, so that the upward
force of pistons 129 is exerted upon rod 112 and thus upon
plates 194 and ultimately upon the soil at the bottom of
earthen hole 101.
The operator measures and records the distance between
the top end of frusto-cone 197 and the bottom of support
frame 196, after adjusting the top of frusto-cone 197 firmly
CA 02467274 2004-05-13
WO 03/044283 PCT/US02/36403
_29_
to touch the ends of pivoting plates 194 which were tied-down
by wrapping breakable tie-wire around them and before expand-
ing pivoting plates 194.
It has been found empirically, after performing a multi-
tude of tests, that the.,preferred anchoring position is
achieved when at the desired level of forced pivoting plates
194 have swung to a forty-five degree position with respect
to their original vertical position, i.e., the position prior
to any force being applied to them by cylinder assembly 125.
As a result of many trials and errors, it has been found
empirically that the forty-five degree position of pivoting
plates 194 is achieved, when frusto-cone 197 'has been pulled-
up, by rod 112 and nut 198, for a distance equal to the
measured distance less approximate one half of one inch.
This additional one half of one inch, gap 204, is required
later-on, after installing foundation 210 of Figure 11, in
order to allow the unthreading of nut 132. Therefore, the
operator watches very carefully the slow, upward movement of
pistons 129, and he/she stops the upward movement of pistons
129, by stopping the hydraulic pumping system, when pistons
129 have extended out of cylinders 128 for a distance equal
to the recorded measurement less than one half of one inch
gap 204. It should be noted that, if the operator did not
stop the upward pull of frusto-cone 197, nut 199, Figure 6a,
eventually would hit the bottom of support frame 196. If
that happens, the hydraulic force then would be exerted
against the finned pipe column 100, 140, 170, and frame 196,
instead of plates 194.
It has been found that one of the many drawbacks encoun-
tered with the anchoring assembly, the old art assembly used
the fact that frusto-cone can hit the bottom of structural
support frame as the signal to the installer indicating that
pivoting plates 194 had swung outwardly forty-five to fifty-
five degrees from their original vertical position'. In fact,
in U.S. Patent No. 4,843,785, dated July 4, 1989, this
CA 02467274 2004-05-13
WO 03/044283 PCT/US02/36403
-30-
trouble-creating feature is diclosed, as follows, (referring
to Figure 1): "Section 16 can constitute a mechanical stop
and serve as limiting means to limit the angular spread
accomplished by Section 18." and Claim 7: "The apparatus of
Claim 1 including swing limiting means to limit the swing of
said plates to an arc of substantially 55 degrees."
The major problem with the frusto-cone hitting the
bottom of structural support frame l96 is that hydraulic
assembly 125 pushes against segments 100, 140, and 170, with
collar 177, plate 193, and support frame 196 sandwiched in
between segment 170 and frusto-cone 197, hitting the bottom
end of support frame 196. Under these circumstances, any
force provided by the hydraulic assembly 125 is not exerted
upon pivoting plates 194, i.e., not exerted upon the soil,
but upon support frame 196. Any gage reading is a false
indication of the anchor setting force and, therefore, a
false reading of the installation capabilities.
Continuing now to describe the installation method of
the present invention, the operator all this time has been
readjusting, i.e., threading down, nut 132. After he/she
stops the hydraulic pump (not shown), the operator ensures
that nut 132 is hand tightened against plate 110 of top
segment 100 in order to prevent pivoting plates 194 from
falling back down when the operator releases the upward pull
of pistons 129.
Before turning off the hydraulic pumping system, i.e.,
before deactivating hydraulic assembly 125, the operator
reads and records the hydraulic pressure at the final setting
of anchoring assembly 200. The actual reading is taken from
hydraulic pressure gauge 117, and it represents the capabil-
ity of the installed anchor to resist the design structural
loadings. Such reading is generally in pounds per square
inch of hydraulic pressure. Based on the diameter of pistons
129, the pound per square inch, or P.S.T., can be mathemati-
tally converted to tons-force. The operator does not make
CA 02467274 2004-05-13
WO 03/044283 PCT/US02/36403
-31-
calculations by the method of the present invention. The
operator is provided with a tabulation, i.e., a printed
table, showing the equivalent tons-force for various P.S.I.
readings for the hydraulic assembly being used. The operator
records the final tons-force used for setting, i.e., for
anchoring the segmented foundation anchoring and support
assembly of the present invention inside earthen hole 101.
The maximum reading shall never be allowed to be greater than
the allowable force for the anchoring assembly.
This maximum reading represents the maximum resisting
capacity of the installed-segmented anchoring and support
assembly of this invention. This knowledge is important,
because if the SAFE Foundation to be installed requires a
greater amount of force for its installation, the operator
immediately knows he or she will need to use additional
segmented anchoring assemblies 230, as shown in Figure 12.
After segmented anchoring assembly 200 of Figure 8 has
been installed, by anchoring it in earthen hole 101, hydrau-
lic assembly 125 is removed first by retracting pistons 129
back inside their respective cylinders 128, and by releasing
any hydraulic pressure from the system. Then nut 133 is
unthreaded, plate washer 138 is removed, and finally hydrau-
lic assembly 125 and centering collar 113 also~are removed.
Method of Installation of a Safe Foundation Utilizing
the Segmented Anchoring and Support Assembly of the Present
Invention
Referring now to Figure 11, while segmented anchoring
assembly 20'0 is assembled, the installation crew makes one
inch and one foot marks (not shown) on the fin 215, of foun-
dation 210, that will face the operator. Starting from
bottom end 222, the fin is marked in one-inch intervals with
a magic marker, by the way of an example, and with larger
marks at one-foot intervals, starting from the bottom. These
markings allow the operator to see how many feet and inches
CA 02467274 2004-05-13
WO 03/044283 PCT/US02/36403
-32-
foundation 210 penetrates soil 111 as it is being pushed into
it.
Continuing now to refer to Figure 11, rod 112 now is
extended, if it has not been extended before, by means of
"Dywidag" coupling 216 and a length of rod 217. Foundation
210 is lifted then by means of a crane (not shown) and placed
over rod 217/112, i.e., with the "Dywidag'° rod passing inside
pipe column 218 of foundation 210 and the top portion of
anchoring and support assembly 200 inside bottom end 222 of
foundation 210. Bottom end 222 at this point is set on top
of hole 101, with the bottom end of fins 215 slightly pressed
into surface 203 of soil 111 around the top of earthen hole
101.
Preferably, fins 215 of foundation 210 should be at
forty-five degrees to pivoting plates 194 of anchoring and
support assembly 200. Figure 11 does not show fins 215, of
foundation 210 at a forty-five degree angle to pivoting
plates 194 for simplification purposes. The installer deter-
mines the position of pivoting plates 194, because the in-
staller sets pivoting plates 194 an orientation in reference
to fins 103, 145, 175 of anchoring and support assembly 200,
before lowering assembly 200 in earthen hole 101. Therefore,
by looking at fins 103 of protruding top segment 100, the
operator sets the orientation of pivoting plates 194, such
that each pivoting plate 192 becomes established to be set in
line with a corresponding fin of the anchoring and support
assembly, by the method of this invention.
The type of structure to be installed upon a SAFE Foun-
dation is the determining factor that sets the orientation at
which fins 215 are placed into soil 111 and the orientation
of pivoting plates 194 set inside hold 101, prior to swinging
open plates 194, i.e., while in a vertical position, prefera-
bly so as to, have fins 215 at a forty-five degree angle to
pivoting plates 194 when in a vertical position, i.e., with
CA 02467274 2004-05-13
WO 03/044283 PCT/US02/36403
-33-
each fin 215 lined in between two adjacent pivoting plates
194.
After foundation 21.5 has been placed over rod 217 by
means of a crane (not shown) and with its end 222 on ground
surface 203, and pipe oolumn 218 centered around the protrud-
ing top of segmented anchoring and support assembly 200,
pushing collar 211 is placed by means of a crane (not shown),
over rod 217, i.e., with rod 217 passing through the inside
219 of pushing collar 211 and with plate 213 of pushing
collar 211 sitting on top of foundation plate 214.
Pushing collar 211 is required because, by the method of
installation of this invention, segmented anchoring and
support assembly 200 is installed with six. to twelve inches
of its top end protruding above surface 203 of soil 111 in
earthen hole 101, as shown in Figure 8. Pushing collar 211
provides a safety space to prevent plate 126 of hydraulic
assembly 125 from hitting top plate 110 of top segment 100 of
the segmented anchoring and support assembly.
Now hydraulic cylinder assembly 125 is placed also by
means of a crane (not shown) over rod 217. Extended rod 217
passes through opening 136 of bottom plate 126 and through
opening 220 of top plate 127. Then steel plate washer 138
also is placed over rod 217, which passes through a center
hole in plate washer 138. Washer 238 is provided for allow-
ing tightening "Dywidag" nut 133 against hydraulic assembly
125, while preventing it from passing through opening 220 of
plate 127 on hydraulic assembly 125.
"Dywidag" nut 133 is threaded down on "Dywidag" rod 217
and hand-tightened.against plate washer 138, which is on top
of plate 127 of hydraulic assembly 125.
The operator activates the hydraulic pump (not shown),
which pumps in hydraulic fluid through hoses 118, through
inlet 130 and out of 131 through hose 119, making pistons 129
slowly, yet powerfully push upwardly against nut 133, as
represented by arrow 134. Nut 133, being threaded onto rod
CA 02467274 2004-05-13
WO 03/044283 PCT/US02/36403
-34-
217, does not allow pistons 129 to move upwardly. Pistons
129 push upwardly against "Dywidag" nut 133, actually to lift
threaded rod 217, 112 up, which in turn makes "Dywidag" nut
198 push on frusto-cone 297, and frusto-cone 197 pushes on
pivoting plates 194. The powerful upward push 134 of pistons
129 actually is exerted upon pivoting plates 194. But be-
cause pivoting plates 194 have been pressed previously,
powerfully against soil 111 at the bottom of earthen hole
101, as shown in Figure 11, "Dywidag" rod 112 can not be
lifted. Soil 111 resists the push provided by pistons 129.
Cylinders 128 move downwardly slowly, yet powerfully, as
represented by arrows 135, pressing on pushing collar 211 and
therefore on foundation 210, by means of its top plate 214.
The powerful push of pistons 129 against "Dywidag" nut 133,
resisted by the soil at the bottom of earthen hole 101,
forces cylinders 128 to push foundation 210 into the soil.
If the force required to push foundation 210 into the
soil is greater than the allowable force the segmented an
choring and support assembly can take without deformation,
then it is required to install additional pairs of segmented
anchoring and support assemblies, also called segmented
satellite anchors 230, as shown in Figure 12.
If soil 111 can not provide the resistance to the force
required to push foundation 210 into soil 111, then addi-
tional pairs of segmented satellite anchors 230 are required
as shown in Figure 12.
As hydraulic assembly 125 pushes foundation 210 into
soil 111, the operator monitors the stroke, i.e., length of
pistons 129 that has extended out of cylinders 128, The
operator compares that length, i.e., stroke, to the length
foundation 210 has penetrated into soil 111 by reading the
markings the operator had previously made on the fin 215
facing he or she. Both lengths are to be substantially
equal. Tf the pistons have extended more than what the
foundation has penetrated into the soil, it means segmented
CA 02467274 2004-05-13
WO 03/044283 PCT/US02/36403
-35-
anchoring and support assembly 200 has been pulled up from
hole 101 for a length which is equal to the difference be-
tween the two compared lengths, i.e., the length pistons 129
have extended less the length foundation 210 has penetrated
into the soil below surface 203.
In such a case, where the segmented anchoring and sup-
port assembly 200 is pulled out of earthen hole 101 while
installing a SAFE Foundation, the operator immediately stops
the hydraulic pump (not shown) and proceeds to install addi-
tional pairs of segmented satellite anchoring and support
assemblies, as shown in Figure 12. If the stroke of cylin-
ders 129 and the length foundation 210 substantially are
equal, then the operator proceeds with another pushing cycle.
Pistons 129 of Figure 11 can extend out of cylinders 128
only a maximum allowable length, e.g., two feet, by way of an
example. SAFE Foundations can be of any length, up to
twenty-five feet, by way of an example. If a twenty-four
foot long foundation is being installed with a two-foot-
stroke set of pistons 129, then the pushing process has to be
repeated at least twelve times, because each time pistons 129
extend out of cylinders 128 for their maximum two feet stroke
(used as an example), foundation 210 will be pushed into soil
111 for substantially close to two feet.
Before starting a new pushing cycle, the operator re-
verses the flow of hydraulic fluid from the hydraulic pump
(not shown), by pumping the hydraulic fluid out of 130 and
pumping it into inlet 131. That pumping forces pistons 129
to retract into their respective cylinders 128, bringing down
top plate 127 and plate washer 138. When pistons 129 are
inside their respective cylinders, the operator stops the
hydraulic pump. Next, the operator threads down "Dywidag"
nut 133 on "Dywidag" extended rod 217 and hand-tightens nut
133 against plate washer 138, which is against plate 127 of
hydraulic assembly 125.
CA 02467274 2004-05-13
WO 03/044283 PCT/US02/36403
-36-
Now the operator starts a new pushing cycle by reversing
again the flow of hydraulic fluid, by starting to pump the
fluid out of 131 and back into inlet 130, forcing pistons 129
to push powerfully against "Dywidag" nut 133, as represented
by arrows 134. Again, this powerful push is resisted by the
soil at the bottom of earthen hole 101, forcing cylinders 128
slowly, yet powerfully, further to push foundation 210 down-
wardly as represented by arrows 135.
The pushing cycles are repeated until top plate 214 of
foundation 210 is at the elevation required for the installa-
tion of the structure to be mounted on it, i.e., supported by
it. Top plate 214 is utilized for installing upon it what-
ever structure is to be supported by the foundation, e.g.,
lighting poles, communication towers, cross-highway signs, by
way of examples. The operator monitors the pressure and
records the final setting pressure in the foundation instal-
lation records.
After foundation 210 has been installed, i.e., pushed
into the ground, with its top plate 214 at the specified
elevation, by the methods of this invention, pistons 129 are
brought back into their respective cylinders 128. The hy-
draulic system is deactivated, any pressure in the system is
released, and "Dywidag" nut 133 and plate washer 138 are
removed. "Dywidag""extension rod 217 and coupling 216 also
are removed. Then hydraulic cylinder assembly 125 and push-
ing collar or Collars 2l1 all are removed utilizing a crane
(not shown).
Now, if no segmented satellite anchor is required,
segmented anchoring and support assembly 200 can be removed.
In order to remove anchoring and support assembly 200 through
the inside of pipe column 218 of foundation 210, it is neces-
sary to release the pressure exerted by pivoting plates 194
upon soil 111 at the bottom of earthen hole 101. In order to
do that, first hydraulic cylinder assembly 125 is lifted up
by means of a crane and placed on top of plate 214 of founda-
CA 02467274 2004-05-13
WO 03/044283 PCT/US02/36403
-37-
Lion 210, washer plate 138 is replaced on top of plate 127 of
the hydraulic assembly, and "Dywidag" nut 133 is threaded
unto rod 112 and hand tightened against plate washer 138,
which is against plate 127. The operator activates the
hydraulic pump, pumping hydraulic fluid into cylinders 128,
via hoses 118 and inlets 130, extending pistons 129 which
upwardly push "Dywidag" nut 133 against top plate 214 of
foundation 210 by means of the bottoms of cylinders 128 on
top of plate 214 lifting rod 112 just enough to release the
large pressure exerted on nut 132, allowing the operator to
unthread nut 132. The upward movement of rod 112 of about
one quarter of one inch is possible because during the in-
stallation of segmented anchoring assembly 200, a gap 204,
Figures 8, 11, of approximately one quarter to one half of an
inch was left between the top of nut 199, on top of frusto-
cone 197 and the bottom of structural support frame 196,
precisely for this purpose; in other words, allowing pulling
"Dywidag" rod 112 up for about less than one half of one inch
with the purpose of unthreading nut 132 starts collapsing
pivoting plates 194 back down to their original vertical
position, so that the whole anchoring assembly of this inven-
tion is extracted through the inside of pipe column 218 of
foundation 210 as shown in Figure 10. The segmented anchor-
ing and support assembly of this invention is re-utilized
again and again.
Now the hydraulic systems is deactivated again, releas-
ing the pressure on pistons 129. Nut 133 and plate washer
138 are removed again, and hydraulic assembly 125 is lifted
up, so that its plate 127 is above the top end of rod 112
coupling 216 and extension rod 217 were removed previously.
The operator then re-installs plate washer 138, this time on
top of nut 132, Figure 9, and lowers down hydraulic assembly
125 allowing rod 112 pass through opening 220 of plate 127.
Next the operator re-activates the hydraulic pump,
extending pistons.129 upwardly, for a distance equal to the
CA 02467274 2004-05-13
WO 03/044283 PCT/US02/36403
-38-
distance the operator used for swinging pivoting~plates 194,
when he/she installed the segmented anchoring and support
assembly. The operator has that measurement written in his
installation records.
Then, nut 132 is threaded upwardly on rod 112, hand
tightening plate washer 138 now against the bottom of plate
127 of hydraulic assembly 125, as shown in Figure 9. The
operator then reverses the flow of hydraulic fluid, pumping
the fluid through hoses 119, into inlets 131 and out of 130,
via hoses 118, which makes pistons 129 push forcefully
downwardly as represented by arrow 117 of Figure 9, exerting
their push on plate washer 138 as they retract into their
respective cylinders 128 and therefore on nut 132 threaded
onto rod 112. Rod l12 moves downwardly under the forceful
push of pistons 129, carrying down with it nut 199 of Figure
6a, which is threaded onto rod 112, on top of frusto-cone
197, therefore pushing down on frusto-cone 197. The downward
push on frusto-cone 197 further releases pivoting plates 194,
which are. now free to swing back down to their original
vertical position.
Referring to Figure 10, now the operator lifts up seg-
mented anchoring and support assembly 200, utilizing a stan-
dard wire-rope choker 119, with one-heavy-duty clevis 118 on
each end, bolted through holes 109 of fins 103, by means of
lifting hook 120 of a crane, not shown, or other similar type
of equipment. Sometimes a great amount of upward pulling
force is required to collapse pivoting plates 194 of Figure
11 back to their original vertical position, which is neces-
sary in order for anchoring head assembly 190 to pass through
the inside of pipe column 218 of foundation 215 of Figure 11.
Incline ramps 206, Figure 11, help in centering the anchoring
head assembly inside pipe column 218.
After removing the segmented anchoring and support
assembly, it can be reused immediately for installing a
similar SAFE Foundation, or it can be modified easily in
CA 02467274 2004-05-13
WO 03/044283 PCT/US02/36403
-39-
length by adding or removing segments and "Dywidag" rods
lengths in order to meet new SAFE Foundation requirements.
The spoils (not shown) created when earthen hole 101 was
augered are now placed, some around the top end of foundation
210 and the majority of it placed inside pipe column 218 of
foundation 210. The SAFE Foundation then is ready to receive
whichever structure it was intended to be installed upon it,
by bolting onto the foundation top plate 214.
Method of Installation of a Safe Foundation Utilizing
the Segmented Satellite Anchoring and Support Assemblies of
the Present Invention
The method of installation of a SAFE Foundation or any
tubular type foundation, utilizing satellite anchors is
described referring to Figure 12, which teaches such instal-
lation method utilizing three segmented anchoring and support
assemblies 200, 230. Figure 12 shows two segmented satellite
anchoring and support assemblies 230 and a central, segmented
anchoring and support assembly 200. Anchoring assembly 200
is called the center anchor or center anchor 200 for the
purpose of this detailed description.
Satellite anchoring assemblies 230 are substantially
identical in configuration to center anchor 200. Most of the
times, satellite anchors 230 are shorter in length than
center anchor 200.
The method of installation and.subsequent removal of
satellite anchors 230 is not different from the method of
installation and of removal of center anchor 200. The in-
stallation of the SAFE Foundation utilizing satellite anchors
will assume all anchors already have been installed by the
method of the invention.
By the methods of the present invention, center anchor
200 of Figure 12 and each satellite anchor 230 first are
installed in their respective preaugered earthen holes 101,
245, 246. Prior to installing foundation 220, satellite
anchors 230 are installed at a distance from center anchor
CA 02467274 2004-05-13
WO 03/044283 PCT/US02/36403
-40-
200 and one on each opposite side. Satellite anchors 230 are
installed on a centerline that passes through the center of
earthen hole 101. A second pair of satellite anchors, if
required, would be installed on a centerline that passes over
the center of earthen hole 101 and that is perpendicular to
the first pair. In other words, a satellite anchor of the
second pair would be at ninety degrees to a satellite anchor
of the first pair. Further additional pairs would be in-
stalled on a centerline that passes over the center of earth-
ern hole 101, with those satellite anchors being at forty-
five degrees to the two adjacent satellite anchors.
Referring now to Figure 11, the operator begins the
installation process utilizing at first only one single
segmented anchoring and support assembly, i.e., center anchor
200. He or she pushes foundation 210 into soil 111, by means
of hydraulic assembly 125 as far as it is possible, until
either center anchor 200 starts pulling out of earthen hole
101, which he or she determines by comparing the length
foundation 210 has been pushed below surface 203, with the
length pistons 129 are out of cylinders 128, or until the
pushing force of pistons 129 approaches the allowable force
the single anchoring assembly 200 can resist, i.e., approxi-
mately 80 tons. The operator reads the pressure in P.S.I.,
i.e., pounds per square inch, on the pressure gauge 117
component of the hydraulic pumping system and reads the
equivalent tons-force from a conversion table.
When the operator determines satellite anchors 230 are
required for further pushing foundation 210 into soil 111, he
or she deactivates the hydraulic system and releases the
hydraulic pressure on pistons 129. The operator then removes
nut 133 by unthreading it off from extension rod 217 and then
removes plate washer 138, Figure 11.
Referring now to Figure 12, the operator places sliding
plates 241 inside boxes 240, one on each end of I-Beam assem-
bly 234, then he/she picks up beam assembly 234 by means of a
CA 02467274 2004-05-13
WO 03/044283 PCT/US02/36403
-41-
crane or a boom-truck (none shown) and places I-Beam assembly
234 over extension rod 217, slowly and carefully lowering
beam assembly 234 until it sits on top of plate 127 of hy-
draulic assembly 125 and with extended rod 217 passing
through hole 249 of plate 247. Flanges 244 (only one is
shown) sit on top of plate 127.
The operator now proceeds to extend rods 112 of each
satellite anchor 230 by means of couplings 232 and by
threading a length of extension rod 233 into couplings 232.
The operator at his/her choice either inserts extension rods
233 from underneath beam assembly 234 to pass through hole
250 of each sliding plate 241 (one on each end of beam assem-
bly 234), or he/she inserts extension rods 233 from above
beam assembly 234 to pass through holes 250 of each sliding
plate 241. Either way, extension rods 233 are threaded into
their respective couplings 232. Then nuts 133, 242 are
threaded down onto their respective extension rods 217, 233
and tightened against their respective plates 241, 247.
During the entire installation procedure, by the method of
this invention, the operator makes sure foundation 210 is
vertically plumb and that each component tool, i.e., pushing
collar 211, hydraulic cylinder assembly 125, and I-Beam
assembly 234 are also vertically plumb, i.e., leveled.
Next the operator continues the pushing cycles required
to complete the insertion of foundation 210 into soil 111.
The operator activates the hydraulic pumping system and pumps
hydraulic fluid via hoses 118 into inlets 130 of hydraulic
assembly 125, which forces pistons 129 to push upwardly
against bottom flanges 244 (only one shown) of I-Beam assem-
bly 234 as represented by arrows 134. I-Beam assembly 234 is
immobilized by "Dywidag" nuts 133, 242 of center anchor 200
and satellite anchors 230 respectively. Pistons 129 can not
move upwardly. Cylinders 128 are the ones that move down-
wardly instead, as represented by arrow 135, pushing down on
pushing collar 211 by means of plate 126 of hydraulic assem-
CA 02467274 2004-05-13
WO 03/044283 PCT/US02/36403
-42-
bly 125, pushing down on plate 212. This powerful downward
push is transferred onto foundation 210, by means of plate
213 of pushing collar 211, which is sitting on top of plate
214 of foundation 210, slowly, yet forcefully pushing founda-
tion 210 into soil 111.
The operator watches the advance of foundation 210 into
soil 111, past its surface 203, by watching the inch/feet
marks previously made on the fin 215 facing the operator, as
described in this text. The operator compares the length
foundation 210 has been pushed below surface 203 with the
length pistons 129 have extended out of cylinders 128. Both
lengths are to be substantially equal. In some occasions, a
second pair of satellite anchors 230 and an additional I-Beam
assembly are required. The required number of components are
brought to the installation site prior to starting the in-
stallation process, all by the methods of the present inven-
tion.
The pushing cycles, utilizing I-Beam assembly 234 are
repeated until foundation 210 is pushed into soil 111, to the
required elevation specified for its top plate 214 to be at.
The operator records in its installation record the final
setting pressure at which the installation was completed.
The final setting pressure proves the capability of the
foundation of carrying its design load with the design mar-
grog of safety .
The operator then retracts pistons 129 back into their
respective cylinders 128 and deactivates the pumping system
after that. Then he/she removes "Dywidag" nuts 133, 242 and
the I-Beam assembly 234. Extension rods 217, 233 and cou-
plings 216, 232 are removed, while hydraulic assembly l25 and
pushing collar 211 also are removed.
Next, the operator extracts center anchor 200 through
the inside of pipe column 218 of foundation 210 by the method
of this invention. Then some of the spoils from previously
angering earthen hole 101 are packed around the top of pipe
CA 02467274 2004-05-13
WO 03/044283 PCT/US02/36403
-43-
column 218 of the foundation, and the balance is placed
inside pipe column 218.
Next, satellite anchors 230 also are removed, following
the method of this invention. Satellite anchor assemblies
230 are extracted from their respective earthen holes 245,
246, and the spoils from previously angering earthen holes
245, 246 are placed back into their respective earthen holes,
and compacted afterwards.
Now the structure, for which foundation 210 was engi-
veered, can be installed upon installed the foundation by
bolting onto the foundation's top plate.
As it can be seen by those skilled in the art, this
invention accomplishes all of its stated.objectives.
V~lhat is claimed is
20
30