Note: Descriptions are shown in the official language in which they were submitted.
CA 02534640 2006-O1-20
WO 2005/009485 PCT/US2004/022608
INSTRUMENTS AND METHOD FOR
INSERTING AN INTERVERTEBRAL
IMPLANT
FIELD OF THE INVENTION
(0001] This invention relates to intervertebral implants, and more
specifically, it relates to new and improved instruments and methods for
inserting an intervertebral implant.
BACKGROUND OF THE INVENTION
(0002] Currently, when it is necessary to completely remove a disc
from between adjacent vertebrae, the conventional remedy is to fuse the
adjacent vertebrae together. More recently, there have been important
developments in the field of disc replacement, namely disc arthroplasty,
which involve the insertion of an artificial intervertebral implant into the
intervertebral space between adjacent vertebrae, and which allows limited
universal movement of the adjacent vertebrae with respect to each other.
(0003] In conjunction with the development of such artificial
intervertebral implants, instruments for inserting same were also
developed. Such instruments are shown in Published Application
No. WO 01/19295, published March 22, 2001. An artificial intervertebral
implant which was developed for use with said instruments is shown in
Published Application No. WO 01/01893, published January 11, 2001.
CA 02534640 2006-O1-20
WO 2005/009485 PCT/US2004/022608
2
[0004] While the new instruments, methods and the artificial
intervertebral implant shown in these publications represent a substantial
improvement in the art, there exists a continuing need for improvements
in the field of instruments and methods for inserting artificial
intervertebral
implants, especially in conjunction with newly developed artificial
intervertebral implants.
(0005] One such area in need of further improvements includes
instruments and methods for inserting artificial intervertebral implants into
the cervical spine. This is because the cervical spine and the dimensions
of the intervertebral spaces between the vertebrae are quite small. For
example, the area of facing adjacent cervical vertebral surfaces may be
only about 20% of the facing surfaces of the vertebrae in the lumbar
region, thereby making this an extremely delicate area in which to insert
an intervertebral implant.
BRIEF SUMMARY OF THE INVENTION
[0006] The purpose of the present invention is provide new and
improved instruments and accompanying methods for inserting an
intervertebral implant into the intervertebral space, especially in the
cervical spine.
(0007] The intervertebral implant is normally inserted from the
patient's anterior moving towards the patient's posterior. However, it is to
be understood that the implant, the instruments and the method can also
CA 02534640 2006-O1-20
WO 2005/009485 PCT/US2004/022608
3
be designed and arranged to insert the implant laterally, i.e., from the
side, in which case the implant will be constructed for such lateral
movement and any cutouts in the adjacent vertebrae will be opened
toward a lateral side. Although the terms "anterior" and "posterior" will
sometimes be used in the conventional sense with respect to the patient's
anatomy, for purposes of convenience, the invention will be described
herein primarily with respect to more simple terminology which relates to
the instruments and methods themselves. For example, in describing the
invention, the terms "front" or "forward" mean the part of the instrument
which faces toward the vertebrae or is moving in the direction of
movement toward the vertebrae, while the words "back", "rear" or
"rearward" refer to the end of the instrument farthest from the vertebrae or
moving away from the vertebrae. Also, ;in this application, the words
"upper" or "lower" or "uppermost" or "lowermost" or any other words
describing the orientation of the intervertebral implant or the instruments
or methods associated therewith are used only for convenience and are
not intended to convey any limitation. More specifically, the parts of the
implant, the instruments and/or the methods described in this application
with reference to the upper part can in fact be positioned as the superior
or inferior part within the patient's vertebrae, with the other of the two
parts being the opposite part.
[0008] Although the instruments and method of the present
invention have been developed and are particularly advantageous for the
CA 02534640 2006-O1-20
WO 2005/009485 PCT/US2004/022608
4
cervical spine, they are equally applicable for any location in the spine,
including the lumbar spine. Thus, the instruments and method of the
present invention will be described more generally without specifically
identifying any particular portion of the spine.
[0009] The instruments and the methods of the present invention
are particularly adapted for use with an intervertebral implant having
upper and lower parts which undergo limited universal movement with
respect to each other, with the upper and lower surfaces of the upper and
lower parts engaging the adjacent vertebral surfaces, and wherein the
implant has a keel extending from the vertebrae engaging surfaces of the
upper and lower parts into cutouts formed in the adjacent vertebrae, and
wherein these keels have recesses for receiving insertion instruments
which are utilized for inserting the intervertebral implant into the ,
intervertebral space with the keels located in the cutouts.
[0010] In accordance with a first aspect of the present invention,
there is provided instruments and methods for inserting an intervertebral
implant.
(0011] In accordance with a first embodiment and the
accompanying method, an insertion instrument is provided which
comprises a pair of arms connected to a body, and including a crossed
linkage for separating the arms and then bringing them together so that
the ends of the arms firmly engage the intervertebral implant, with the
small outer extremities of the arms engaged within the recesses of the
CA 02534640 2006-O1-20
WO 2005/009485 PCT/US2004/022608
keels of the implant. A knob may be provided at the end remote from the
implant engaging end, the knob being turnable to operate a crossed
linkage to separate or close the arms of the instrument.
[0012] In accordance with another instrument and its
accompanying method, there is provided a very simple, preferably plastic
insertion instrument wherein the arms adjacent the implant engaging end
are resiliently urged against the implant to secure it. In one embodiment,
a thumb slide or other mechanism is provided for moving the arms apart
from each other to the open position. In another embodiment, the plastic
insertion instrument has a pair of arms of a resilient material which, in
their relaxed state, are movable onto the implant after which, as they are
moved farther onto the implant and into indentations 221 and 223, they
are moved farther apart, creating a resilient force which secures the arms
onto the implant. In either embodiment, to remove the arms from the
implant the instrument is simply grasped and forcibly removed from the
implant. Owing to its resilient nature, it comes out of the keel of the
implant without harming the implant. ,
[0013] In accordance with another embodiment of an insertion
instrument and its accompanying method, there is provided a scissors like
insertion instrument, wherein two pivotally mounted scissors like arms
have at the implant engaging ends thereof a structure, which like the
above described insertion instrument embodiment, engages within the
recesses of the keels of the implant. In addition, this embodiment
CA 02534640 2006-O1-20
WO 2005/009485 PCT/US2004/022608
6
includes a spacer which is movable to a position between the upper and
lower parts of the implant to stabilize the implant as it is being held by the
upper and lower arms and/or to create anatomical angulation. The spacer
is removably secured to the scissors like insertion instrument so that
spacers of different sizes may be provided for different size implants.
[0014] Thus, it is an object of the present invention to provide new
and improved instruments for inserting an intervertebral implant.
[0015] It is another object of the present invention to provide new
and improved methods for inserting an intervertebral implant.
[0016] These and other objects of the present invention will be
apparent from the detailed description to follow, together with the
accompanying drawings.
BRIEF DESCRIPTION OF THE DRAWINGS
[0017] Preferred embodiments of the invention will now be
described by way of example with reference to the accompanying
drawings, wherein:
[0018] Figure 1 is a perspective view of an intervertebral implant of
the type which can be inserted by the instruments and method of the
present invention;
[0019] Figure 2 is a central cross sectional view of Figure 1;
[0020] Figure 3 is a top perspective view of the lower part of
implant of Figure 1;
CA 02534640 2006-O1-20
WO 2005/009485 PCT/US2004/022608
7
[0021] Figure 4 is a top perspective view of the plastic inlay of the
implant of Figure 1;
[0022] Figure 5 is a schematic view of a pair of adjacent vertebrae
prepared to receive an implant using the instruments and in accordance
with the method of the present invention;
[0023] Figure 6 illustrates the vertebrae of Figure 5, viewed in the
direction of line 6-6 of Figure 5 and showing the assembled implant
positioned to be inserted and showing a portion of an insertion instrument;
[0024] Figure 7 illustrates in greater detail the portion of the
insertion instrument shown in Figure 6;
[0025] Figure 8 illustrates the vertebrae of Figure 5, with the
implant in place therein and the portion of the insertion instrument still
engaged with the implant;
[0026] Figure 9 illustrates the vertebrae with the implant in place
and the insertion instrument removed;
[0027] Figure 10 is a perspective view of a first embodiment of an
insertion instrument, shown in the closed position;
[0028] Figure 11 is a longitudinal cross sectional view of Figure 10;
[0029] Figure 12 is an enlarged view of a portion of Figure 11;
[0030] Figure 13 is a partial cross sectional view taken along line
13-13 of Figure 12;
[0031] Figure 14 is a perspective view of the insertion instrument of
Figures 10 and 11, but shown in an opened position;
CA 02534640 2006-O1-20
WO 2005/009485 PCT/US2004/022608
8
[0032] Figure 15 is a longitudinal cross sectional view similar to
Figure 11, but showing the insertion instrument in an opened position;
[0033] Figure 16 is a top plan view of Figure 10;
[0034] Figure 17 is a longitudinal sectional view of another
embodiment of an insertion instrument, shown in the closed position;
[0035] Figure 18 is an enlarged view of a portion of Figure 17,
shown in cross section;
[0036] Figure 19 is a perspective view of another embodiment of an
insertion instrument, shown in the closed position;
[0037] Figure 20 is an enlarged view of the implant engaging end of
Figure 19;
[0038] Figure 21 is a view similar to Figure 20, but with portions
removed to illustrate interior features;
[0039] Figure 22 is an enlarged view of the end of Figure 21,
showing the parts in a moved position;
[0040] Figure 23 is a view similar to Figure 20, but showing another
embodiment of an insertion instrument;
[0041] Figure 23A illustrates a method of attaching an implant to
the insertion instrument of Figure 23;
[0042] Figure 24 is a perspective view of another embodiment of an
insertion instrument;
[0043] Figure 25 is an enlarged perspective view of the implant
engaging end of Figure 24;
CA 02534640 2006-O1-20
WO 2005/009485 PCT/US2004/022608
9
[0044] Figures 26A and 26B show respectively the two arms of the
insertion instrument of Figure 24;
[0045] Figure 27 is a side elevational view of the insertion
instrument of Figure 24;
[0046] Figure 28 is a top plan view of Figure 27;
[0047] Figure 29 is a partial cross sectional view taken along line
29-29 of Figure 27;
[0048] Figure 30 is a top plan view of the spacer of Figure 24;
[0049] Figure 31 is a side elevational view of the spacer of
Figure 30;
[0050] Figure 32 is a plan view of the bottom part of an implant with
the spacer positioned thereon;
[0051] Figure 33 is a side view of an implant with the spacer
positioned therein;
[0052] Figures 33A and 33B are side views similar to Figure 33, but
showing modifications; and
[0053] Figures 34-37 show different steps in the operation of the
insertion instrument of Figures 24-33, wherein Figure 37 is greatly
enlarged relative to Figures 34-36.
DETAILED DESCRIPTION OF THE PREFERRED EMBODIMENTS
[0054] Referring now to the drawings, like elements are
represented by like numerals throughout the several views.
CA 02534640 2006-O1-20
WO 2005/009485 PCT/US2004/022608
[0055] Figures 1-4 illustrate the implant constructed to be inserted
using the instruments and in accordance with ttie method of the present
invention. Figures 1 and 2 illustrate an assembled intervertebral
implant 210 including an upper part 211 and a lower part 230 and a
plastic inlay 250 located therebetween but essentially connected to the
lower part 230. Figure 3 illustrates in detail the lower part 230 and
Figure 4 illustrates in detail the plastic inlay 250 which is adapted to be
connected to the lower part 230 in a manner to be described below.
[0056] The upper part 211 includes an upper surface 212 which
engages and supports the adjacent vertebral surface. Upper surface 212
is bounded by edges which are slightly beveled all the way around as
shown at 213 with the largest portion of the bevel being shown along the
front surface. Below the beveled edge 213, the upper part is bounded by
a surrounding side wall 214 which has a front support cutout 215. Thus,
in this figure, the keels as discussed below are shown oriented front to
back, with the solid portion of the keels facing front and the insertion
engaging recess facing rearwardly.
[0057] Rising above the upper surface 212 of the upper part 211 is
a keel 216 which includes a recess 217 formed therein. This recess is
opened upwardly and rearwardly. Referring to Figure 2, this recess
includes an indentation 221 in the base thereof. The front end of keel 216
comprises a V-shaped upper bevel 219. Referring to Figure 1, the lower
portion of the front end of the keel is in the form of a V-shaped bevel 220.
CA 02534640 2006-O1-20
WO 2005/009485 PCT/US2004/022608
11
The two V-shaped bevels 219 and 220 provide a front end which is
"arrow" shaped in order to facilitate insertion of the keel into a cutout
formed in the adjacent vertebrae. The rear opening of the recess is flared
at 218 to anchor the rear end of the keel 216 in its cutout in the adjacent
vertebrae.
[0058] The upper part 211 includes a lower plane inner surface 224
which includes a raised rim 226 which defines a concave spherical
portion 225. This spherical portion 225 mates with an upper convex
surface 252 of the plastic inlay 250.
[0059] The lower part 230 includes a lower vertebrae supporting
and engaging surface 231 and an inner upper surface 232. This lower
part includes grooves 233 and 234 formed in the interior side wall thereof
beneath surface 232 and above a base surface 238. A substantially flat
wall 235 extends upwardly from the base surface 238 to the upper
surface 232.
[0060] The lower part 230 includes a back support cutout 237. A
keel 240 rises upwardly (or in the usual orientation, extends downwardly)
from lower surface 231. This keel includes a recess 241 which opens
downwardly and rearwardly and has a flared entrance at 242 which
serves the same function as flared entrance 218, i.e., to facilitate
engagement of the rear end of the keel within its cutout in the vertebrae.
Recess 241 opens downwardly and rearwardly and includes an
indentation 243. At its front end, the keel 240 includes a V-shaped lower
CA 02534640 2006-O1-20
WO 2005/009485 PCT/US2004/022608
12
bevel 245 and a V-shaped vertical portion (not shown) which together
provide an "arrow" shaped front end to facilitate insertion of the keel into
its cutout formed in the adjacent vertebrae. Referring to Figures 3 and 4,
the plastic inlay 250 includes a pair of side flanges 253 and 254 which
slide into the grooves 233 and 234 in the lower part. The bottom of the
plastic inlay 250 may include a projection (visible in Figure 2) which snaps
into place in the recess 244 formed in the base surface 238 when the
plastic inlay 250 is inserted into the lower part 230.
[0061] The intervertebral implant shown in Figures 1-4 and to be
inserted by the instruments and method of the present invention has been
designed primarily for insertion in the cervical spine. When viewed in plan
view, this implant would be approximately 12-16 mm in width and
approximately 15-19 mm in length. It has been found practical to provide
three different sizes, 15 mm x 19 mm, 14 mm x 17 mm and
16 mm x 19 mm. The height of the implant, meaning the height from the
upper surface 212 of the upper part to the lower surface 231 of the lower
part, would normally be between 5 mm and 9 mm. While this implant has
been designed especially for application to the more delicate smaller
cervical spine, the principles described herein are also applicable to
intervertebral implants of a different size and design, such as for use in
the lumbar spine.
[0062] The upper and lower parts are made of a suitable material
such as titanium, cobalt chromium molybdenum, stainless steel or
CA 02534640 2006-O1-20
WO 2005/009485 PCT/US2004/022608
13
ceramics. The upper surface of the upper part and the lower surface of
the lower part as well as the side surfaces of the keels are coated with a
porous coating of titanium. The porosity of the coating ideally permits
vascularization and osteoplast formation with subsequent bony on-growth.
[0063] Before the instruments of the present invention can be used
and the methods of the present invention commenced to insert an
implant, it is of course necessary to prepare the patient by providing
access to and cleaning out the relevant intervertebral space. Once such
preparation has been completed, trial implants are inserted into the
intervertebral space to determine which trial implant is the correct one,
thereby determining the size of the implant which is to be inserted therein.
Trial implants for the cervical spine may be provided in three different
surface areas, i.e., when viewed in plan view, to match the three basic
sizes of the implants, i.e., 12 mm x 15 mm, 14 mm x 17 mm and
16 mm x 19 mm. Each of these three surface areas could then be
provided in five different heights from 5 mm to 9 mm, inclusive, thus
providing a set of 15 trial implants. Cutouts would then be formed in the
adjacent vertebrae to receive the keels.
[0064] Insertion instruments and methods of the present invention
are then used for inserting the implant into the intervertebral space.
[0065] The insertion process is shown and described generally in
Figures 5-9. Figure 5 is an anterior view of a pair of adjacent vertebrae V
on opposite sides of a cleaned out intervertebral space I. In preparation
CA 02534640 2006-O1-20
WO 2005/009485 PCT/US2004/022608
14
for insertion of the intervertebral implant, cutouts C will have been formed.
As shown in Figure 6, these cutouts start from the anterior of the
vertebrae and extend for most but not all of the distance towards the
posterior of the vertebrae, each intersecting along its entire length with the
surface of the vertebrae facing into the intervertebral space. If formed by
a chisel, the posterior end may either be neutral or angled back as shown
at line D. The depth of the cutouts C into the vertebrae V is established
by the precisely controlled depth of a cutting tool.
[0066] Figure 6 illustrates just to the right of the prepared adjacent
vertebrae the intervertebral implant assembled and ready to be inserted,
and to the right thereof is a schematic representation of a portion of an
insertion instrument 90. The insertion instrument includes upper and
lower arms 91A and 91 B which are arranged to move towards and away
from each other as indicated by arrows B in Figure 6. One mechanism for
moving the arms toward and away from each other is a crossed
linkage 98 which is partially shown in Figure 7. The upper and lower
arms 91A and 91 B include narrow keel engaging portions 92A and 92B
which engage the recesses 217 and 241, respectively. These arms
include towards their outer ends projections 93A and 93B which are
constructed to be received in indentations 221 and 243, respectively. It
will be noted that these keel engaging portions 92A and 92B are relatively
narrow. In fact, it is contemplated that the entire width of each keel will be
approximately 2 mm, thus allowing less than 2 mm for the actual
CA 02534640 2006-O1-20
WO 2005/009485 PCT/US2004/022608
recesses. The arms 91A and 91 B also include lateral support
surfaces 94A and 94B which, upon engagement of the instrument with the
implant, will engage the front support cutouts 215 and 237. The arms 91A
and 91 B will be spaced apart just enough for the projections 93A and 93B
to clear the bottoms of the recesses 217 and 241 until these projections
reach the indentations 221 and 243, at which time the arms 91A and 91 B
will be moved towards each other such that the projections engage within
the indentations and the lateral support surfaces 94A and 94B are
engaged within the cutouts 215 and 237. At this position, abutment
surfaces 95A and 95B on the upper and lower arms 91A and 91 B,
respectively, will abut each other, thus limiting further movement of the
arms 91A and 91 B towards each other.
[0067] To attach the implant to the insertion instrument, the implant
is held in a suitable manner and the arms 92A and 92B are spread apart,
moved into the recesses 217,241, and closed together such that the
projections 93A and 93B engage indentations 221 and 243. Alternatively,
the implant can be placed on the lower arm, with arm 92B within
recess 241 and projection 93B in indentation 223, after which the upper
arm 92A can be brought down into recess 217 with projection 93A
entering indentation 221. With the implant thus attached to the insertion
instrument, the insertion instrument moves the entire implant into the
intervertebral space I with the keels 216 and 240 entering the cutouts C
CA 02534640 2006-O1-20
WO 2005/009485 PCT/US2004/022608
16
while the surfaces 212 and 231 posterior to and adjacent to the keels
engage the adjacent vertebral surfaces.
[0068] It will be noted that in Figure 8 there is a space above and
below the arms 91A and 91B within the keel recesses 217 and 241, the
vertical dimension of which spaces is greater than the height of the
projections 93A and 93B, which would normally be about 1.2 mm. This is
necessary so that the arms 91A and 91 B can be moved upwardly and
downwardly, respectively, away from the base of their respective
recesses to free the projections from their respective indentations before
the upper and lower arms 91A and 91 B can move horizontally out of the
cutouts, without engaging the vertebrae at the vertical extremities of the
cutouts C. The arms 91A and 91 B can then be moved out anteriorly from
the implant, leaving the implant in place as shown in Figure 9.
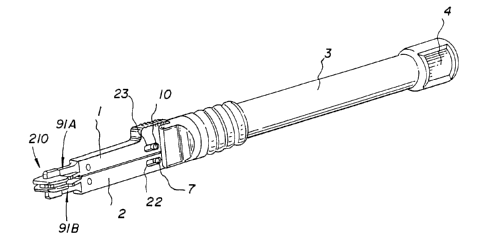
(0069] Figures 10-16 show a first embodiment of an insertion
instrument.
[0070] This crossed linkage instrument insertion instrument
includes a body 3 having a control knob 4 at the rear end thereof and
arms 1 and 2 at the forward end thereof. There is shown forward of these
arms 1 and 2, the arms 91A and 91 B of the insertion instrument which is
shown in Figures 6, 7 and 8, with, an assembled implant 210 being held
thereby.
[0071] Figure 11, like Figure 10, shows the insertion instrument
with the arms 1 and 2 in the closed position holding the implant 210.
CA 02534640 2006-O1-20
WO 2005/009485 PCT/US2004/022608
17
Referring to Figure 11 which shows the insertion instrument in the closed
position, as well as Figures 14 and 15 which show the insertion
instrument in the opened position, it is seen that the arms 1 and 2 are
operated to move towards and away from each other, or more specifically,
to raise the arm 1 while the arm 2 is fixed with respect to the body 3. The
mechanism for raising the arm 1 includes crossed linkage comprising a
first link 5 having a pivot pin 6 at one end thereof and a pivot pin 7 at the
other end thereof. A second link 8 has a pivot pin 9 at one end thereof
and a second pin 10 at the opposite end thereof. As is seen in Figure 10,
the two rear pivot pins 7 and 10 can undergo limited horizontal movement
within slots 22 and 23. A third link 11 is connected at one end to second
link 8 by means of a pivot pin 10 and at its other end to a sleeve 13 by
means of a pivot pin 12. Sleeve 13 is in turn attached to a threaded
rod 15 which is attached at pin 16 to a square cross section rod 17 which
is slidably received in square opening 18 in the knob 4. A spring 19 rests
against a shoulder in the body 3 and urges the rods 15 and 16 to the left,
i.e., to the opened position of the arms.
[0072] The insertion instrument of Figures 10-16 operates as
follows. Referring to Figures 12 and 13, the threaded rod 15 engages a
bevel washer 14 which is held in a space between the right hand end of
lower arm 2 (which at its far right hand end extends upwardly to cover
virtually the entire circumference of the tool) and the left hand end of body
portion 3. To open the instrument, i.e., to move from the position of
CA 02534640 2006-O1-20
WO 2005/009485 PCT/US2004/022608
18
Figures 10 and 11 to the position of Figures 14 and 15, the knob 4 is
turned. The square recess 18 engages the square shaft 17, turning it and
thus via pin 16, turning the threaded rod 15. This causes the rod 15 to
move to the left via its threaded engagement with the bevel washer 14.
This causes the end 21 of rod 15, which is rotatably received in sleeve 13
to move the sleeve 13 to the left, thereby also moving link 11 to the left.
As is apparent by observing the positions of the various links in
Figures 11 and 15, this leftward movement of link 11 moves all of the
other links so as to move the upper arm 1 upwardly relative to the lower
arm 2. To close this insertion instrument from the position of Figure 15 to
the position of Figures 10 and 11, thumb engaging portion of upper arm 1
is simply pressed down. This will move the link 11 downwardly and thus
the sleeve 13 to the right. This in turn will move the threaded rod 15 to
the right, allowing its threads to simply slip past the lobes 22 of the
washer 14 (see Figure 13).
[0073] Figures 17 and 18 illustrate another embodiment 25 of a
crossed linkage insertion instrument. This insertion instrument is similar
to the insertion instrument of Figures 10-16 with the exception of a circular
knob 26 at the right hand end thereof and the thread engaging
mechanism which is shown in greater detail in Figure 18. Thus, in
Figures 17 and 18, elements which are identical to those shown in
Figures 10-16 are represented by the same numerals.
CA 02534640 2006-O1-20
WO 2005/009485 PCT/US2004/022608
19
[0074] Referring to Figure 18, in this case the bevel washer 14 is
replaced by a tapered washer or nut 27. To the left of nut 27, the taper
frictionally engages a conical wall 28 formed on the right hand end of
lower arm 2. Thus, when the threaded rod 15 is caused to move to the
left by the turning of knob 26, the conical portion of nut 27 frictionally
engages the conical surface 28 which prevents the nut 27 from rotating,
whereby the threaded rod 15 is threaded through the nut 27 to move the
sleeve 13 and hence the link 11 to the left to move the upper arm 1
upwardly in the same manner as described above with respect to the
embodiment of Figures 35-39. To close the linkage, i.e., to move the
arm 1 downwardly, once again the finger engaging top of arm 1 is
grasped and pushed downwardly. As in the case of the previous
embodiment, this will move the links in such a way as to move link 11 to
the right. This moves the sleeve 13 and hence also the threaded rod 15
to the right. The washer 27 becomes disengaged from conical wall 28.
The facing wall 29 of the body 3 cooperates in a low friction manner with
the right hand side of nut 27 so it can spin, permitting simplified
movement of the threaded rod 15 to the right, causing closing motion of
the arm 1 on the arm 2 to the position as shown in Figure 17. Attaching
the implant to the instruments of Figures 10-18 and inserting the implant
into the intervertebral space is essentially as described above with
respect to Figures 5-9.
CA 02534640 2006-O1-20
WO 2005/009485 PCT/US2004/022608
[0075] Figures 19-22 show another embodiment 30 of an insertion
instrument. This embodiment is extremely simple and hence economical.
Basically, this insertion instrument 30 comprises a plastic body 31 having
a front part 32 formed integrally with body 31 and comprising upper and
lower arms 33 and 34. In Figure 19, insertion instrument 30 is shown in
its closed position holding an implant 210.
[0076] Figures 20 and 21 illustrate the front portion 32 of the
insertion instrument 30. Figure 20 shows a thumb slide 35 and a pin 36
while in Figure 21 part of the side wall and the thumb slide 35 are
removed, thus revealing the pin 38 which would be attached to the thumb
slide 35 and the rod 37 which engages a pin 36. The two arms 33 and 34
are normally urged resiliently towards each other to a closed implant
holdin '
g position. However, referring to Figure 22, by moving the rod 37 to
the left, the pin 36 rides out of its recess 39 and urges the arms 33 and 34
apart, thus opening the insertion instrument.
[0077] Attaching the implant to the instrument of Figures 19-22 and
inserting the implant into the intervertebral space is essentially the same
as described above with respect to Figures 5-9.
[0078] Figure 23 illustrates another embodiment of an insertion
instrument. This embodiment 40 is similar to the embodiment 30 of
Figures 19-22 except that it is even more highly simplified. Forward of a
body 41 is a front part 40 which comprises at the outer end thereof upper
and lower arms 42 and 43 which are of a resilient material and in their rest
CA 02534640 2006-O1-20
WO 2005/009485 PCT/US2004/022608
21
state are spread apart as shown in Figure 23. This embodiment includes
no separate mechanism for separating the arms 42 and 43 from each
other. To attach the implant to the instrument of Figure 23, one would
move the upper part of the implant about the spherical surface of plastic
inlay 250 as shown in Figure 23A, so that the front bottoms of the keels
are slightly closer to each other than the distance between projections 42
and 43 in their relaxed state, as shown, arms 42 and 43 are then moved
into the recesses until the projections 93A and 93B move into the
indentations 221 and 243 and the top part rotates back to its correct
position. As the top part rotates back to its correct position, the arms 42
and 43 are moved farther apart, thus creating the resilient force in the
arms to secure them onto the implant. The insertion instrument 40 is
made with a degree of resilience such that the insertion instrument 40 can
simply be pulled out of the inserted implant, whereupon the
projections 93A and 93B will simply ride up out of their respective
indentations 221 and 243 without harm to the inserted implant. This is
because after the implant has been inserted and the adjacent vertebrae
relaxed (distention removed) so as to permit the adjacent vertebrae to
move against the implant, the implant will then be held with a very strong
force by the adjacent vertebrae such that the force of removing the
instrument 40 will be relatively small by comparison such that the
projections 93A and 93B can easily ride up out of their respective
indentations, as described above.
CA 02534640 2006-O1-20
WO 2005/009485 PCT/US2004/022608
22
[0079] Referring to Figures 24 and 25, there is shown in
perspective view an entire insertion instrument 45 and an enlarged view
of the forward end thereof, respectively. This insertion instrument
includes a first arm 46 and a second arm 47, which arms are mounted on
a common pivot in the manner of a scissors, which pivot is in the area of
securing nut 65, as described in greater detail below. A spacer tube 55
runs the length of the instrument from a knob 57 at its rear end to an open
end 56 at its opposite, forward end.
[0080] The two arms 46 and 47 are essentially coplanar rearward
of the pivot connection and to one side of the spacer tube. These two
arms then bend laterally in the vicinity of the pivot connection such that
they become coplanar with the spacer tube 55 forward of their pivot
connections.
[0081] At the forward end of this insertion instrument, as best seen
in Figure 25, each of the arms 46 and 47 have a narrow keel engaging
end 50 and 48, respectively, each of which has at its end a projection 51
and 49, respectively, which engages the recesses 243 and 221 in the
implants, respectively. Arm 47 has a generally flat spacer engaging
member 47B and arm 46 has a similar generally flat spacer engaging
member 46B.
[0082] Referring to Figure 25 as well as Figures 30 and 31, this
insertion instrument includes a spacer 60 with an enlarged spacer
head 70 and a shaft 71 which is removably secured in the spacer tube 55.
CA 02534640 2006-O1-20
WO 2005/009485 PCT/US2004/022608
23
The purpose of making the spacer removable is so that different size
spacers can be utilized for different size implants.
[0083] Figures 26A and 26B show the two arms 47 and 46,
respectively, separated from each other. The arm 47 includes a
thumb/finger grip portion 47A, a central flat circular portion 46C and the
previously described flat spacer engaging member 47B. This end,
including narrow forward end 48 and member 47B engage the implant
and the spacer from above. Figure 26B shows the other arm 46 which
includes portions similar to those of arm 47 including a thumb/finger grip
portion 46A, a flat circular central portion 46C and a forward end including
a narrow forward end 50 and a lower flat spacer engaging member 46B,
wherein the members 46B and 50 engage the implant and spacer from
below. The ridged locking flange 48D includes ridges on the opposite
side thereof which, when lowered onto ridges 47D will lock the two arms
together.
[0084] Referring to Figures 27-29, it will be seen that the insertion
instrument 45 is made by placing the two circular flat portions 46C and
47C against each other with the portion 47C closest to the securing nut 65
and the portion 46C closest to the tube 55, as best shown in Figure 29.
The two flat central portions 46C and 47C are secured together by a
securing nut 65 and a shaft 66 which passes threrethrough, through the
openings in the flat central portions 46C and 47C and includes at the
other end thereof a sleeve 67 which fixedly secures the forward and rear
CA 02534640 2006-O1-20
WO 2005/009485 PCT/US2004/022608
24
sections of the fixed spacer tube 55. It will be seen that the two arms 46
and 47 are generally coplanar, as viewed from above, toward the rear of
their pivot connection, they both bend toward the spacer tube 55 so that
the forward ends of both arms, as viewed from above, are generally
coplanar with the spacer tube 55.
[0085] Figures 30 and 31 illustrate a spacer 60. The spacer
includes an enlarged head 70 and a shaft 71. The shaft is made of a bent
resilient material having sufficient resiliency that when the shaft 71 is
inserted into the end 56 of spacer tube 55, the resiliency of shaft 71 will
cause it to be secured within the spacer tube 55. The spacer head 70
includes projections 72 and 73 on the top and bottom thereof,
respectively. These engage dimpled recesses 74 and 75 in
members 47B and 46B, respectively, in order to positively position the
spacer head 70 and hence the spacer itself in position between the
members 47B and 46B, when they are closed against the spacer.
[0086] Figures 32 and 33 illustrate the position of the spacer 60 in
its fully operative position wherein the arms 46 and 47 would be in their
closed position securing the implant 210. In that position, the spacer 60
would rest on the very small ledge of the lower part just rearward of the
plastic inlay 250 while the upper edge of spacer 60 would engage the
bottom rearwardmost surface of the upper part, rearward of the raised
rim 226, to thereby prevent the rear of the upper and lower parts from
rotating about the plastic inlay 50 any closer to each other than permitted
CA 02534640 2006-O1-20
WO 2005/009485 PCT/US2004/022608
by the spacer 60. Figures 33A and 33B show how the spacer can be
used to create anatomical angulation. In Figure 33A, a thinner spacer 60
is used to create a kyphosis angle while in Figure 33B a thicker spacer 60
is used to crease a lordosis angle.
[0087] Although the method of inserting an implant will be apparent
from the preceding discussion of the instruments, there follows a brief
summary of the method of the present invention.
[0088] Once the intervertebral space has been prepared and the
cutouts C formed, the various insertion instruments may be used to insert
the implant.
[0089] According to one insertion method, using the crossed
linkage insertion instrument, the knob 4 is turned to move the arms 1 and
2 away from each other (actually moving the arm 1 upwardly away from
the arm 2 which is fixed with respect to the body 3). The assembled
implant is then placed between the arms 1 and 2, and more specifically,
between the keel engaging portions 91A and 91 B thereof, as described
above, and the crossed linkage mechanism is closed. To close this
mechanism, one simply pushes down on the thumb engaging portion of
upper arm 1. This causes the arms of the crossed linkage to move freely
to the right because the structure which engages the thread of the
crossed linkage is such that it freely permits movement to the right, i.e., to
the closing position, of the threaded rod. In one arrangement, this free
movement to the right, to the closing position, is permitted because a
CA 02534640 2006-O1-20
WO 2005/009485 PCT/US2004/022608
26
beveled washer engages the threaded rod and prevents its free
movement to the left, i.e., to the open position of the scissors linkage. In
another arrangement, instead of a beveled washer, there is provided a
conical nut which meets frictional resistance and thus causes threaded
movement of the threaded rod to the left, to the open position, but moves
to a friction-free position to permit free movement of the threaded rod to
the right upon downward pressure applied to the upper arm 1 to move the
crossed linkage to the closed, implant engaging position. With the implant
thus grasped by the insertion instrument, the implant is moved into the
intervertebral space. The two arms 1 and 2 would then be moved apart in
the manner described above, just enough to free the projections 93A and
93B from the indentations 221 and 243, after which the insertion
instrument would be moved rearwardly out of the implant, leaving the
implant in place.
[0090] Using the insertion instrument of Figures 19-22, one would
move the thumb slide 35 to separate the arms 33 and 34 from each other.
The implant would then be assembled onto the arms, as described above.
Then, by moving the thumb slide in the other direction, i.e., to the left, as
best shown in Figure 22, a pin 36 which had been moved to the left to
separate the arms 33 and 34, would then move to the right into a
recess 39, thus permitting the arms 33 and 34 to move resiliently towards
each other towards a closed position whereat the ends of these arms
would hold an implant.
CA 02534640 2006-O1-20
WO 2005/009485 PCT/US2004/022608
27
[0091] The method of operating the insertion instrument of
Figure 23 would differ slightly from the method of operating the insertion
instrument of Figures 19-22. In the case of the insertion instrument of
Figure 23, there is no thumb slide, no recess 39 and no pin 36. To mount
an implant on this insertion instrument, the operator would insert a slightly
inclined implant, as shown in Figure 23A, between the arms 33 and 34 to
permit the ends of these arms to move into the keel recesses until the
projections 93A and 93B reached and engaged the respective
indentations 221 and 243. After the implant has been inserted, the
insertion instrument of Figure 23 would be removed by physically pulling
the arms 33 and 34 out of the implant.
[0092] The method of operation of the insertion instrument shown
in Figures 24-37 will be described below, especially with reference to
Figures 34-37.
[0093] At the time that this insertion instrument is used, the correct
size implant will have been determined by the use of trial implants.
Referring to Figure 34, the resilient shaft 71 of the correct size spacer 60
is inserted into the open end 56 of the tube 55 and moved all the way in
until the collar 76 fits snuggly within the end of the tube 55, wherein the
resilient bending of shaft 71 secures this spacer in place in the tube.
Next, as shown in Figure 35, the bottom part 230 of the implant is
positioned on the arm 46, and specifically, on fihe forward narrow end 50
such that its projection 51 engages the recess 243 in the keel 240. At this
CA 02534640 2006-O1-20
WO 2005/009485 PCT/US2004/022608
28
time the forward end of spacer 60 is placed against the rear of the lower
part as shown in Figure 35, which position is also shown in Figure 32.
Next, the upper part 211 of the implant is placed onto the upper arm 47,
and specifically the narrow front end 48 thereof such that the projection 49
engages the recess 221 in the keel 216. This might be done by a slight
friction fit between these parts or, in the absence of a friction fit, one
would simply hold the upper part 211 into position on this upper arm,
which position is shown in Figure 36, until the next step of closing the two
arms together. Finally, as shown in Figure 37, the forward ends of the
arms 46 and 47, with the upper and lower implant parts mounted thereon,
are brought together wherein the implant is held securely by these
arms 46 and 47 and the spacer prevents the rear ends of the upper and
lower parts from coming any closer together than permitted by the
spacer 60 as shown in Figures 33 and 37. As noted above, a narrower or
thicker spacer 60 may be used to create a kyphosis angle or a lordosis
angle, respectively.
[0094] The insertion instrument is now moved to bring the
implant 210 into the intervertebral space, with the keels 216 and 240
entering the cutouts C, as discussed with respect to earlier embodiments
and as described with respect to Figures 5, 6, 8 and 9. During this final
insertion position of this insertion instrument, the spacer 60 and its facing
surfaces of members 46B and 47B are secured relative to each other by
CA 02534640 2006-O1-20
WO 2005/009485 PCT/US2004/022608
29
engagement of the projections 72 and 73 into recesses 74 and 75,
respectively.
[0095] Once the implant is in place, removal of the insertion
instrument is essentially the same as described above with respect to the
other embodiments in that the arms 46 and 47 are separated slightly so
that the projections 49 and 50 can move out of the recesses 221 and 243
while the top and bottom of the narrow ends 48 and 50, respectively, have
not yet engaged the adjacent vertebral surface, whereupon the narrow
ends 43 and 50 can be withdrawn out of the keels and the insertion
instrument removed.
[0096] Although the invention has been described in considerable
detail with respect to preferred embodiments thereof, it will be apparent
that the invention is capable of numerous modifications and variations,
apparent to those skilled in the art.