Note: Descriptions are shown in the official language in which they were submitted.
CA 02568544 2013-02-04
1
MULTIFUNCTION CLIPS AND GROUND/MOUNTING
STRAP FOR WIRING DEVICE
BACKGROUND OF THE INVENTION
Field of the Invention
The present invention relates generally to the field of electrical wiring
devices such
as, by way of example, electrical switches and/or receptacles and accessories
for said
switches and/or receptacles of the type installed in building walls.
Description of the Related Art
When modifying the wiring in an existing building, whether public, commercial
or
residential by adding a wiring device such as a switch, a receptacle or a
combination of
switches and receptacles, it is necessary to cut a hole in a wall of the
building, install a box
within the hole, attach the box to a vertical stud and install the wiring
device(s) into the box.
In new construction, the box is attached to a stud of an open wall and,
thereafter, the wall,
which may be sheet rock having an opening for access to the box, is placed
over the studs.
The conventional wall box has pairs of mounting ears for mounting the wiring
devices to the
box. After the wiring devices are connected to the various conductors which
they will service,
each is fastened with threaded fasteners such as screws to a pair of ears on
the box. The
process of connecting a wiring device to various conductors and then attaching
the wiring
device with the attached wires to the box is done for each wiring device
located within the
box. Thereafter, a wall plate is typically positioned around each wiring
device in the box.
Typical installations can include one or multiple wiring devices positioned
side by
side in a common box. In installations where there are multiple wiring devices
in a common
box, the installation of the wall plate can be time consuming. The wiring
devices must be
aligned with each other, must be positioned parallel to each other and must be
spaced from
each other by a distance dictated by the spacing between the openings or
windows in the wall
plate.
CA 02568544 2007-03-09
2
Misalignment and positioning problems are often caused by wall boxes that are
skewed relative
to the wall or by walls which may not be flat. It is only after all of the
wiring devices are
accurately positioned relative to each other that a wall plate can be
installed around the wiring
devices.
A common type of electrical wiring device in use today is the rocker type
Decora-branded
electrical switch whose activating member pivots about a centrally located
horizontal axis and is
flat in its horizontal plane. The trademark "Decora" is owned by the assignee
of the present
invention. To operate the switch, the rocker paddle (the actuating member) is
pushed in at the
top to supply electricity to a load such as a light, and is pushed in at the
bottom to disconnect the
source of electricity from the load. Thus, with two or more rocker type
switches positioned side
by side in a box, the actuating members or paddles of the switches can be in
opposite positions at
any one time. For example, with two or more rocker type Switches positioned
side-by-side in a
box, the top edges of the paddles of the switches will not always be in
alignment when they are
not all in their "on" or "off" positions. The in-out positioning of adjacent
switches can also occur
=when all the switches are in their on or off state if one of the switches is
a 3-way or 4-way switch.
The irregular in-out positioning of adjacent switches, particularly with 3-way
and 4-way
switches, can cause visual inconsistency in the mind of the user as to which
switch is on and
which switch is off when subsequent activation or deactivation of less than
all of the rocker
switches is desired by a user. Another type of wiring device in use today is a
receptacle having a
flat face. In normal use, it is not uncommon to gang a receptacle with a
switch. A receptacle
with a flat face, when ganged with a switch which is not flat in one plane,
typically presents a
visual discontinuous array of wiring devices which homeowners seem to find
visually
objectionable.
SUMMARY OF THE INVENTION
The present invention discloses a structure which overcomes the deficiencies
with respect
to the prior art devices by providing a wiring device such as a switch having
an actuating paddle
which pivots about its upper end and is biased with a spring to assume the
same at-rest position
when either in its on position or its off position. Repeated pressing and
releasing of the lower
portion of the face of the rocker paddle alternately closes and opens a set of
contacts within the
switch to alternately connect and disconnect a load such as a light from a
source of electricity
CA 02568544 2007-03-09
3
each time the paddle is so pressed. Thus, regardless of whether adjacent
switches of a gang of
switches are on-off switches or 3-way switches, they will always be in
alignment. An on-off
indicator such as a small light may be provided in the paddle to indicate to a
user when the
contacts of the switch are opened and closed.
The paddle of the switch has a length-width ratio dimension that is
proportioned to
provide a finger contact surface of increased area to allow a user to more
easily and quickly
identify and operate a particular switch. The vertical axis of the switch has
a surface of positive
first differential, comprised of splines drawn between points of varying
distance from a datum
plane, and has along the horizontal axis a surface of a positive first
differential and negative
second differential, comprised of a combination of splines drawn between
points of varying
distance from the datum plane.
A wall plate according to the present invention is located around the switch
and has a
single opening for accommodating one or more switches, with no dividing or
separating
members dividing the single opening, for receiving one or a gang of two or
more wiring devices.
The shape of the wall plate around the switch along a section which runs along
its vertical axis
defines a surface of positive first differential and zero second differential,
comprised of a
combination of splines drawn between points of varying distance from a datum
plane. The
surface has zero second differential when the rate of height increase of
individual splines is
constant. The wall plate, when composed of non-conducting material, can have a
conductive
coating on one of its surfaces to help provide a conductive path to a ground.
When the wiring device is a receptacle, the face of the receptacle across its
width is flat in
one plane and has a substantially constant radius along its length to allow
for the proper seating
of an inserted plug.
The present invention teaches an alignment plate which is capable of
accommodating one
or more electrical wiring devices. The conventional difficulties encountered
with respect to
mounting and visually positioning a plurality of wiring devices such as one or
more receptacles
and/or switches in a wall box and then attaching a wall plate are overcome
with the use of the
alignment plate of the present invention. Such difficulties have included
attempting to position
the wiring devices to be in alignment with each other, attempting to position
the wiring devices
to be parallel to each other, attempting to adjust the spacing between the
different devices to be
relatively equal and uniform, and attempting to fix all of the devices to be
flat against the wall.
CA 02568544 2007-03-09
4
The alignment plate of the present invention has a single centrally located
opening sized to
receive one or more wiring devices and a set of alignment pins for each wiring
device. Each set
of alignment pins on the alignment plate is located along a vertical axis
which defines the
longitudinal centerline for a wiring device, and each wiring device is
equipped at or proximate
the ends of its associated ground/mounting strap with a multi-function clip
for frictionally
receiving and holding captive an alignment pin on the alignment plate. The
alignment pins
accurately position, align and locate all of the wiring devices relative to
each other and, together
with the multi-function clips, establishes a conductive path to ground.
Thereafter the alignment
plate and wiring devices attached to the alignment pins on the alignment plate
can be attached to
a box with mounting screws. The alignment pins accurately position, align and
locate the wiring
devices and the alignment plate positions all of the wiring devices to a flat
plane.
In one embodiment of the switch according to the present invention, an
articulated cam
driver coupled to the rocker paddle of the switch causes a cam to rotate first
in a clockwise
direction and then in a counter clockwise direction each time the rocker
paddle is depressed.
Alternate rotation of the cam drives a slider member back and forth along a
linear axis to open
and close a set of contacts. A leaf spring of predetermined shape cooperates
with a cam follower
on the slider member to assist in the movement of the slider and to determine
its rest positions. A
spring, acting through the rigid member, urges the rocker paddle to always be
in its out position
when the switch is in its on position and its off at-rest position. An
indicator such as an LED
located in the paddle indicates the state of conduction of the switch.
In another embodiment of the switch according to the present invention, the
cam driver
coupled to the rocker paddle of the switch comprises an initially flat ribbon
of flexible material
such as spring steel formed with a blunt end having a generous radius which
drives the cam. A
spring urges the rocker paddle to always be in its out position when the
switch is in its on and off
at-rest position.
In still another embodiment of the switch according to the present invention,
the cam
driver coupled to the rocker paddle of the switch is a closely wound spring
of, for example, piano
wire coupled to a conical shaped tip which can be of plastic, metal or the
like which drives the
cam. A spring urges the rocker paddle to always be in its out position when
the switch is in its on
and off at-rest position.
CA 02568544 2007-03-09
The foregoing has outlined, rather broadly, a preferred blending feature, for
example, of
the present invention so that those skilled in the art may better understand
the detailed description
of the invention that follows. Additional features of the invention will be
described hereinafter
that form the subject of the claims of the invention. Those skilled in the art
should appreciate
5 that they can readily use the disclosed conception and specific
embodiment as a basis for
designing or modifying other structures for carrying out the same purposes of
the present
invention and that such other structures do not depart from the spirit and
scope of the invention in
its broadest form.
BRIEF DESCRIPTION OF THE DRAWINGS
Other aspects, features, and advantages of the present invention will become
more fully
apparent from the following detailed description, the appended claim, and the
accompanying
drawings in which similar elements are given similar reference numerals.
Fig. 1 is a front perspective view of a prior art switch and wall plate;
Fig. 2 is a perspective exploded view of a prior art switch, attachment plate
and wall
plate, and a box for receiving said prior art device;
Fig. 3 is a front perspective view of a switch and wall plate in accordance
with the
principles of the invention;
Fig. 4 is a front perspective view of the switch shown in Fig. 3 showing the
ground/mounting strap and multi-function clips;
Fig. 5 is an exploded view of alignment plate, a switch fitted with multi-
function clips on
its ground/mounting strap, and a wall plate, all according to the present
invention;
Fig. 6 is a front view of a receptacle and wall plate;
Fig. 7 is a front perspective view of the receptacle of Fig. 6 showing an
exploded view of
the ground/mounting strap and multi-function clips;
Fig. 8 is an exploded view of alignment plate, receptacle and wall plate;
Fig. 9 is a front perspective view of alignment plate for a single wiring
device;
CA 02568544 2007-03-09
6
Fig. 10 is a perspective view of ground/mounting strap for a wiring device;
Figs. 11 is a bottom perspective view showing ground/mounting strap attached
to a
switch;
Fig. 12 is a plan view of a multi-function clip according to the present
invention, which is
normally attached to the bottom end of the ground/mounting strap;
Fig. 12A is a side view of the multi-function clip of Fig. 12;
Fig. 13 is a plan view of multi-function clip normally attached to the top end
of the
ground/mounting strap;
Fig. 13A is a sectional view of the multi-function clip of Fig. 13 taken along
line 13A-
13A;
Fig. 14 is an exploded perspective view of structure of the switch of Fig. 4;
Fig. 15 is a perspective view of the base assembly of the switch of Fig. 14;
Fig. 16 is an exploded perspective view of the structure of the base assembly
of Fig. 15;
Fig. 17 is another exploded perspective view of the switch according to the
present
invention;
Fig. 18 is still another exploded perspective view of the switch according to
the present
invention;
Fig. 19 is a partial sectional exploded view of the cam driver of the switch
of Fig. 18;
Fig. 20 is a perspective exploded view of the switch of Fig. 18 including a
printed circuit
board;
Fig. 21A is a plan view of the printed circuit board of Fig. 20;
Fig. 21B is a bottom perspective view of the printed circuit board of Fig.
21A;
Fig. 22 is a perspective exploded view showing a light pipe in the paddle of
the switch;
Fig. 23 is a perspective view of the light pipe;
Fig. 24 is a sectional view taken along the line 24-24 of the switch of Fig.
3;
Figs. 25A-25C are sectional views along the lines 25A-25A, 25B-258, 25C-25C of
the
paddle of Fig. 14;
CA 02568544 2007-03-09
=
7
Fig. 26 is a perspective exploded view of the switch having another cam
driver;
Fig. 27 is a sectional view along the line 24-24 of Fig. 3 where the cam
driver is that
shown in Fig. 26;
Fig. 28 is a perspective exploded view of the switch having still another cam
driver;
Fig. 29 is a sectional view along the line 24-24 of Fig. 3 where the cam
driver is that
shown in Fig. 28;
Fig. 30 is a front perspective view of a wall plate according to the present
invention for
accommodating a single wiring device;
Figs. 31A-31C are sectional views taken along the lines 31A-31A, 31B-31B and
31C-31C
of the wall plate of Fig. 30;
Fig. 32 is a sectional view of the bottom edge of the wall plate of Fig. 30
along the line
32A-32A;
Fig. 33 is a sectional view of the top edge of the wall plate of Fig. 30 along
the line 33A-
33A;
Figs. 34, 34A are views of the top edge of the wall plate of Fig. 30;
Fig. 35 is a fragmentary, enlarged perspective of the pawl of the multi-
function clip
engaging the tooth shaped rack of the wall plate;
Fig. 36 is a fragmentary, enlarged sectional side view of the wall plate and
tab of the
alignment plate to indicate how the two components can be separated following
latching;
Fig. 37 is an exploded perspective view of a box, alignment plate and wall
plate capable
of accommodating two wiring devices, according to the present invention;
Fig. 38 is an exploded view of alignment plate and wall plate capable of
accommodating
three wiring devices;
Fig. 39 is an exploded view of alignment plate and wall plate capable of
accommodating
four wiring devices;
Fig. 40 is an exploded view of alignment plate and wall plate capable of
accommodating
five wiring devices; and
CA 02568544 2007-03-09
=
8
Fig. 41 is an exploded view of alignment plate and wall plate capable of
accommodating
six wiring devices,
DESCRIPTION OF A PREFERRED EMBODIMENT
Referring to Fig. 1, there is illustrated a front perspective view of a prior
art "Decora"
type electrical wall-type switch 18 and wall plate 16 forming assembly 10.
Referring to Fig. 2,
there is shown a perspective exploded view of a box 13 and the prior art
switch 18, wall plate 16
and attachment plate 30. A suitable aperture is cut into a wall (where there
is an existing wail
and this installation is not a new construction) to provide access to the box
13 mounted to a stud
CA 02568544 2007-03-09
9
switch 18 or a receptacle. The head of the screw which passes through
elongated mounting slot
25 of switch 18 and engages threaded aperture 23 of mounting ears 21 is larger
than the inner
dimension of slot 25 and, therefore, holds switch 18 or a receptacle captive
to the box 13 and to a
wall surface (not shown). In a similar manner, the head of the screw which
passes through
ground/mounting strap of the switch is larger than the diameter of clearance
opening 32 and,
therefore, holds attachment plate 30 captive to switch 18.
At each of the ends 36, 38 respectively, of attachment plate 30 are two
latching pawls 40,
42 which are formed as extensions of attachment plate 30 but which are
relatively thinner in
Wall plate 16 is proportioned to fit over attachment plate 30 and box 13 into
which the
single wiring device, such as switch 18, or a receptacle, is placed and to
which it is fastened.
15 To attach wall plate 16 to attachment plate 30, latching pawls 40, 42
which are a part of
attachment plate 30 are made to engage saw-tooth shaped racks 81 on the inner
surfaces of end
walls 70 and 72 of wall plate 16 as the wall plate is pushed on.
Fig. 3 is a front perspective view of a wiring device such as switch 110 and
wall plate 138
in accordance with the principles of the present invention; Fig. 4 is a front
perspective view of
are ganged together. An on-off indicator such as a light 112 may be provided
in the rocker
CA 02568544 2007-03-09
IO
paddle 111 to indicate to a user when the switch 110 is in its on position or
off position. For
example, when the light 112 is on, the switch will be in its off position, and
when the light is off,
the switch will be in its on position. Light 112 also serves the purpose of
permitting the user to
locate the switch 110 in the dark. The rocker paddle 111 of the switch 110 is
not located within a
frame and aesthetically complements the wall plate 138, The rocker paddle 111
of the switch
110 has a length-width ratio dimension and surface configuration which
provides a robust finger
contact surface of increased size which is easier to identify and use.
The switch 110 is attached to a ground/mounting strap 123 having ends 122
which
provide increased surface area for contact with the surface of a wall and
provides support for
multi-function clips 130, 151 attached to the ends 122 by fastener means such
as screws, rivets,
spot welds, pressure bonding, TOX process or the like.
Referring to Fig, 10, there is shown a perspective view of the ground/mounting
strap 123
for a wiring device such as switch 110. Ground/mounting strap 123 has a base
support member
150 located between two intermediate support members 152 bent at right angles
with respect to
the base support member 150 and each of which terminates in an outward
projecting end 122 of
the ground/mounting strap. The two intermediate support members 152 and the
base support
member 150 cradle and are securely attached to the wiring device, such as
switch 110, with
rivets, screws or the like 155 (see Fig. 11 which is a bottom perspective view
showing
ground/mounting strap attached to a switch) which pass through openings 154 in
the base support
member 150. A ground terminal 163 which projects out from the ground/mounting
strap 123 and
having a threaded opening for receiving a screw 127 (see Fig. 5) is provided
for connection to a
ground wire. Each end 122 of the strap 123 is substantially rectangular in
shape and has two
openings 126 and 128. Opening 126 can be circular, oval, square or rectangular
and is a
clearance opening for mounting screws 108 (Fig. 8) which are normally provided
by the
manufacturer of the wiring device for attaching the wiring device to a box.
The distance between
centers of openings 126 in ends 122 of the ground/mounting strap is equal to
the distance
between the centers of threaded apertures 23 in mounting ears 21 of box 13
(see Fig. 2) to allow
mounting screws 108 to engage and be held captive by threaded apertures 23.
Opening 128 in
each end 122 of the ground/mounting strap is a clearance opening for an
alignment pin which is a
part of and is located on an alignment plate. Additional openings can be
provided in the ends
122 for attaching and/or aligning a multi-function clips 130, 151 to the ends
of the
ground/mounting strap. The ends 122 are substantially flat rectangular members
which provide
CA 02568544 2007-03-09
11
an increased area for increased contact with a wall surface. See Fig. 2 which
shows the relatively
small ends of the prior art ground/mounting strap where, if the scored washers
31 are removed
from the strap, the only surface left for contact with a wall surface is the
material around the
threaded opening 24 in the ground/mounting strap.
Returning to Fig. 10, the ends 122 of ground /mounting strap 123 has a width
"X" of
about 1.563 inches and a depth "Y" of about 0.318 inches. These dimensions are
not critical.
However, the distance between the edges 129 of the ends 122 of the
ground/mounting strap 123
are preferably not greater than about 4.6 inches to allow a wall plate to fit
over and cover the
grouncUmounting strap. The ground/mounting strap 123 can be of conducting
material such as
steel, etc., and is secured to the switch with screws, rivets or any
convenient fastening means.
Screw terminals 137 located on either side of the body of the switch (see Fig.
11) are provided to
receive phase and neutral wire conductors.
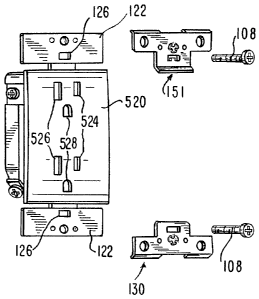
Multi-function clips 130, 151 according to the present invention are attached
to the ends
122 of the ground/mounting strap. The multi-function clips can be composed of
phosphor
bronze, spring brass, spring steel or the like. Referring to Fig. 12, there is
shown a plan view of
multi-function clip 130 normally attached to the bottom end of the
ground/mounting strap, and
Fig. 12A is a side view of the multi-function clip 130 of Fig. 12. Multi-
function clip 130 is
attached to the bottom end 122 of ground/mounting strap 123 and has openings
132 and 134.
When multi-function clip 130 is attached to the end 122 of ground/mounting
strap, opening 132
is aligned with opening 126 of the ground/mounting strap, and opening 134 is
aligned with
opening 128 in the strap end 122. Opening 132 is a clearance opening for a
threaded fastener
such as screw 108 (see Figs. 5 and 8) used to couple the wiring device to a
box. Opening 132
can be round, square, oval or rectangular to allow the threaded fastener to be
moved in all
directions to allow the threaded fastener 108 to be aligned with the threaded
aperture in the box
when attaching the wiring device to the box.
Looking at Fig. 12, opening 134 in multi-function clips 130 and 151 is
generally circular
but for three inwardly projecting members 133 which are formed upwardly at an
angle of
between 10 degrees and 30 degrees. An angle of 20 degrees was found to be
preferred. The
inner ends of the three inwardly projecting members 133 form an opening
slightly smaller than
the outer diameter of an alignment pin 118 on an alignment plate 121 (see Fig.
9) and flex or
bend upwardly as the alignment pin enters the opening 134 from the rear. The
ends of the
CA 02568544 2007-03-09
12
projecting members 133 frictionally engage and hold captive the alignment pin
118 to prevent
undesired disengagement of the wiring device from the alignment plate. It is
to be noted that the
projecting members 133, by physically contacting and holding captive the
alignment pins 118 on
the alignment plate 121 (see Fig. 9), provide the desired alignment. Located
at the end 147 of
multi-function clip 130 are two latching pawls 140 each slightly more than one-
half of an inch in
length. The end 147 of each latching pawl 140 is bent downward at an angle of
between 20
degrees and 60 degrees and is used to engage tooth shaped racks 80 on the
inside surface of the
ends of a wall plate to hold the wall plate captive (see Fig. 35). The ends
147 of the latching
pawls 140 capture and securely hold the wall plate when the downward bend of
the latching pawl
140 relative to the ground/mounting strap is between 20 degrees and 60
degrees, and where a
bend of about 40 degrees was found to be preferable (see Fig. 35). The multi-
function clips 130
and 151 are just that, clips which perform a combination of a plurality of
functions not found in
the prior art, including accurately aligning one or more wiring devices when
the multi-function
clip of the wiring device engages the alignment pins on the alignment plate;
and, holding a wall
plate to the wiring device and against a wall, even when a wall is not
perfectly flat,
The openings 143 in the multi-function clip can be provided for attaching the
clip to the
end of the ground/mounting strap with, for example, rivets, screws, the TOX
process etc.
Openings 145 can be provided for alignment purposes when attaching the clip to
the end 122 of
the ground/mounting strap 123. The distance between the side edges 154 of the
multi-function
clip should preferably not exceed 1.533 inches to allow the clip to be
attached to the end of the
ground/mounting strap without extending over the side edges of the strap 123.
The clip shown in
Figs. 12 and 12A is the clip that is attached to the bottom end of the
ground/mounting strap and is
slightly different from the multi-function clip that is attached to the top
end of the
ground/mounting strap.
Referring to Fig, 13, there is shown a plan view of the multi-function clip
151 normally
attached to the top end of the ground/mounting strap and Fig. 13A is a
sectional side view of the
multi-function clip along line 13A-13A of Fig. 13. The clip 151 shown in Figs.
13 and 13A is
similar to the clip 130 shown in Figs. 12 and 12A except that end 157 of clip
151 is bent upward
and opening 153 for the threaded fastener 108 (see Fig. 5) has a fastener
engaging tab 155 which
extends into opening 153, and is bent at a slight downward angle toward the
back of the switch.
Engaging tab 155 is provided to engage and hold captive the threaded body of
threaded fastener
108 and, in addition, helps to provide a good electrical connection between
the multi-function
CA 02568544 2007-03-09
13
clip, the ground/mounting strap, the alignment plate and the box as the
threaded fastener is
tightened. As with multi-function clip 130, openings 153 in multi-function
clip 151 and opening
126 in the ground/mounting strap are aligned with each other during assembly
to permit the
threaded fastener 108 to be aligned with the threaded aperture in the box as
the switch is being
attached to the box. The distance between the side edges 148 of the multi-
function clip should
preferably not exceed 1.533 inches to allow the multi-function clip to be
attached to the end 122
of the ground/mounting strap and not extend over the side edges of the ends
122 of the
ground/mounting strap 123.
Referring to Fig. 6, there is shown a front view of a receptacle 520 with its
face located
within wall plate 138; Fig. 7 is a front perspective partial exploded view of
the receptacle 520 of
Fig. 6 showing the ends 122 of ground/mounting strap 123 and multi-function
clips 130, 151; and
Fig. 8 is a perspective exploded view of Fig. 6 showing alignment plate 114,
receptacle 520 and
wall plate 138. Referring to Figs. 7 and 8, the receptacle 520 is intended for
15 Amp. 125 V to
Amp. 125 V where, according to NEMA specification 5-15R, each individual
receptacle has
15 two slot openings 524 and 526 for receiving the flat blades of a
suitable plug and a semi-circular
ground blade opening 528. Opening 526 is larger than the opening 524 to allow
a two blade plug
to be inserted in only one way to maintain correct electrical polarization.
The contact in the
larger slot is connected to the neutral conductor and, by maintaining the
correct polarization, the
external metal parts of appliances such as toasters, TV's etc. can be grounded
through the neutral
20 conductor. The semi-circular ground blade is normally connected to a
ground and prevents a
plug from making a reverse polarity connection with the receptacle and
connects it to the ground
conductor which provides a ground path for the plug-connected equipment.
Receptacle 520 is attached during assembly to a ground/mounting strap 123 as
shown in
Fig. 10 having ends 122 which provide increased surface area for contact with
the surface of a
wall and provides support for multi-function clips 130, 151 (more fully shown
in Figs. 12, I2A,
13 and 13A) attached to the ends 122 of ground/mounting strap 123 by fastening
mean such as
screws, rivets, spot welds, pressure bonding, TOX process or the like.
Referring to Fig. 10, as stated above, there is shown a perspective view of
the
ground/mounting strap 123 for a wiring device such as a receptacle (not
shown), and (see Figs.
12, 12A, 13 and 13A) multi-function clips attached to the ends of the
ground/mounting strap.
Ground/mounting strap 123 and the multi-function clips 130, 151 for a
receptacle are similar to
CA 02568544 2007-03-09
=
14
the ground/mounting strap and multi-function clips shown and described above
for a switch and,
therefore, in the interest of brevity, the detailed description of the
ground/mounting strap shown
in Fig. 10 and of the multi-function clips shown in Figs. 12, 12A, 13 and 13A
for use with a
receptacle will not again be here repeated. The multi-function clips can be
composed of
phosphor bronze, spring brass, spring steel or the like.
Referring to Fig. 9, there is shown a front perspective view of alignment
plate 114 for a
single wiring device such as a switch or a receptacle. Alignment plate 114,
which can be
composed of any suitable material such as brass, aluminum, cold rolled steel,
plastic, a plastic
coated with a conducting material, etc., has a centrally located opening 116
sized to accept the
body of a wiring device. Centrally located at opposite top and bottom ends of
opening 116 and
either opening into or separated from opening 116 are two clearance openings
117 for threaded
fasteners 108 used to secure the wiring device (a switch or a receptacle) and
the alignment plate
114 to box 13 and wall surface. When the wiring device is attached to the box,
the alignment
plate 114 is sandwiched between the ground/mounting strap of the wiring device
and the box.
Located between the outer edge of each clearance opening 117 and the edge 121
of alignment
plate 114 is an alignment pin 118. Clearance openings 117 in alignment plate
114 can have an
open end as shown in Fig. 9 or an opening fully encircled by material. When
the alignment plate
is attached to the ground/mounting strap, openings 128 at the ends 122 of the
ground/mounting
strap are clearance openings for alignment pins 118 and are aligned with
openings 134 in multi-
function clips 130,151. Thus, the alignment pins 118 are positioned to enter
openings 134 in
multi-function clips 130, 151 attached to the lower and upper ends 122 of the
ground/mounting
strap 123 of the wiring device as the wiring device, either a switch or a
receptacle, is being
attached to an alignment plate. Alignment plate 114 can have two ribs 119 and
a downwardly
extending tab 120. Tab 120 extends from the bottom edge of the alignment plate
and is used to
facilitate removal of a wall plate from around the face of a wiring device.
The two ribs 119 are =
present to provide an alignment plate that resists flexing and is an optional
feature which is not
required as shown for the alignment plate 114 of Fig. 8. The alignment plate
114, when attached
to a wiring device, substantially covers the box in which the wiring device is
installed. The
alignment plate 114 shown in Figs. 8 and 9 is for a single wiring device.
The alignment plate 114 helps to overcome difficulties encountered with
respect to
mounting and positioning wiring devices such as one or more switches, a switch
and/or a
receptacle, or one or more receptacles to a box prior to placing a wall plate
around the wiring
CA 02568544 2007-03-09
devices. Prior to mounting a wall plate, various difficulties can be
encountered such as aligning
the wiring devices with each other, positioning the wiring devices to be
parallel to each other,
adjusting the spacing between the wiring devices to be equal and uniform and
fixing all of the
wiring devices to be flat against the wall. These difficulties are overcome
with alignment plate
5 114 which has a single opening 116 and a pair of alignment pins 118 in
combination with the
multi-function clips on the wiring devices of each wiring device that is to be
mounted to the
alignment plate in side by side relationship. The opening 116 in the alignment
plate is sized to
receive one or a gang of wiring devices positioned side by side in a box and
the alignment plate
has a pair of alignment pins 118 for each wiring device which engage the multi-
function clips on
10 each wiring device to hold and accurately position each wiring device
relative to each other and
along a flat plane. Each set of alignment pins on the alignment plate is
located on a vertical axis
which defines the center for a wiring device and each wiring device has a
multi-function clip at
each end of the ground/mounting strap for frictionally receiving and holding
captive the
alignment pins on the alignment plate. When being assembled, the wiring
devices, normally
15 after being connected to the electrical wires, may first be attached to
the alignment plate and the
alignment plate, which now holds captive the wiring devices, is attached to a
wall box and wall
surface by means of threaded fasteners. Thereafter, a wall plate is positioned
around the wiring
devices without requiring any further adjustments on the part of a user by
simply pressing the
wall plate in toward the wall to allow the latching pawls 140 at the end 147
of the multi-function
clips to engage tooth shaped racks 80 on the inside ends of the wall plate.
The multi-function clips, in addition to clamping the wall plate to the
ground/mounting
strap, helps to overcome various difficulties encountered with respect to
mounting and
positioning one or more electrical wiring devices to a box to allow a wall
plate to be quickly and
easily positioned around one or more wiring devices and to also be flat
against the wall. Each
wiring device according to the present invention has at each end of the
ground/mounting strap a
multi-function clip that has locating openings 134 for receiving and engaging
alignment pins 118
on the alignment plate 114. The pins on the alignment plate, when engaged by
the openings 134
in the multi-function clips, accurately positions each wiring device
vertically and horizontally on
the alignment plate, and the alignment plate itself positions the wiring
device along a flat plane to
allow a wall plate to be positioned around a single wiring device or a gang of
two or more wiring
devices without any further adjustments being required. Each pair of alignment
pins on the
alignment plate is located on a substantially vertical axis which accurately
defines the center of a
CA 02568544 2007-03-09
16
wiring device, although it is within the scope of the present invention to
provide other
alignments, as well. The opening 134 in combination with the projecting
members 133 in each
multi-function clip receives and holds captive an alignment pin 118. The multi-
function clips, in
cooperation with the alignment pins, accurately positions and aligns all
wiring devices, either
15 adjustment.
When assembling wiring devices to a wall mounted box, the electrical cables
that have
been fed through openings to the confines of the box are stripped of
insulation and attached to
terminals on the side or back of the wiring device, such as a switch and/or
receptacle that is to be
mounted in the box. After the wires are attached to the wiring device, the
alignment plate may be
20 positioned behind the wiring device by threading the wiring device
through the opening in the
alignment plate. The alignment plate may have adhesive strips or the like to
facilitate temporary
positioning to the wall surface. The back face of the ends of the
ground/mounting strap is now
moved toward the front face of the alignment plate. As the wiring device moves
toward the
alignment plate, the alignment pins 118 on the alignment plate enter openings
128 in the
25 ground/mounting strap and openings 134 in the multi-function clips 130,
151. As the alignment
pins enter the openings 134, they force the upwardly bent projections 133 to
resiliently move
upward and spread slightly apart to allow the alignment pins to fully enter
openings 134. The
ends of the upwardly bent projections 133 engage and hold captive alignment
pins 118 and resist
backward movement and withdrawal of the pins from the openings 134. The body
of the switch
30 or receptacle which is now attached to the alignment plate and connected
to the electrical wires,
is pushed into the box. As the wiring device is pushed into the box, threaded
fasteners 108
located in openings 132 and 153 in the multi-function clip 130 and opening 153
of multi-function
CA 02568544 2007-03-09
17
clip 151 and clearance openings 117 in alignment plate 114 are aligned with
and are threaded
into threaded apertures 23 in mounting ears of box 13 to hold both the
alignment plate and wiring
device(s) to the box and wall surface. The head of the threaded fasteners
which pass through
opening 126 in the ends of the ground/mounting strap of the wiring device and
openings 132, 153
The wall plate is now placed over the installed wiring devices. It is to be
noted (see Figs.
3, 4 and 5) when the wiring device is a switch, as here disclosed, the rocker
paddle 111 of switch
110 is frameless, it is not located within a frame. Thus, the switch must be
accurately positioned
Each multi-function clip 130, 151 contains two side-by-side latching pawls
140. See
Figs. 12 and 13. Each latching pawl 140 is bent downward toward the back of
the wiring device
at an angle of about 40 degrees more or less. After the wiring device is
attached to the alignment
Wall plate 138 is proportioned to fit over alignment plate 114, the ends 122
of the
ground/mounting strap 123 and the box within which the wiring device is
located. The wall plate
138 is located around the wiring device and locked in position by pushing the
wall plate toward
the wiring device until the ends of the latching pawls on the multi-function
clips 130, 151 engage
Referring to Figs. 14-24, there is shown views of the switch shown generally
in Figs. 3-5
where Fig. 14 (which illustrates one of several construction embodiments of
the present
invention, shows a flexible actuator, as opposed to an alternative embodiment
where a
plunger/joystick mechanism may be used) is an exploded perspective view of the
switch; Fig. 15
CA 02568544 2007-03-09
18
the switch; Fig. 18 is still another exploded perspective view of the switch;
Fig. 19 is a partial
sectional exploded view of the cam driver of the switch; Fig. 20 is a
perspective exploded view
of the switch including a printed circuit board; Fig. 21A is a plan view of
the printed circuit
board; Fig. 21B is a bottom perspective view of the printed circuit board;
Fig. 22 is a perspective
exploded view showing a light pipe in the paddle of the switch; Fig. 23 is a
perspective view of
=
the light pipe; and, Fig. 24 is a sectional view along the line 24-24 of the
switch of Fig. 1
Referring to Figs. 14 and 17, there is shown exploded views of base assembly
300 and
frame assembly 400 which, when joined together and coupled to the rocker
paddle 111 forms the
single pole switch 110. Fig. 15 shows a perspective top view of the various
parts in base
assembly 300 of switch 110. Base assembly 300 includes shell member 302
composed of
electrically insulating material and having a longitudinal channel 304 which
extends along the
length of shell member 302 and is centrally located between the side walls
306, 308 of member
302. Channel 304 is sized to receive a slider 320 (more fully shown in Fig.
16) which can slide
back and forth in channel 304. Located in shell member 302 and beyond each end
of channel
304 are clearance openings 310 for receiving fastening means 124 (see Fig. 18)
such as rivets,
screws or the like which secures the ground/mounting strap 123, the base
assembly 300 and the
frame assembly 400 to each other. Side wall 308 of the shell member 302 has an
opening 309
(see Fig. 16) adapted to receive a stationary terminal assembly 312, and side
wall 306 has an
opening 384 for receiving brush terminal assembly 346, each more fully shown
in Fig. 16.
Referring to Fig. 16, stationary terminal assembly 312 which is of conducting
material
such as brass, etc. consists of a rectangular plate 313 and a substantially
non-yielding contact
bearing arm 314 bent at a right angle to the plate and having a contact 316. A
slot 318 located in
rectangular plate 313 is a clearance opening for terminal screw 305 which
threads into pressure
plate 323 located behind rectangular plate 313. In operation, as terminal
screw 305 is tightened,
the bottom surface of the head of terminal screw 305 and pressure plate 323
move toward each
other to clamp the rectangular plate 313. Stationary terminal assembly 312 is
provided for
connection to an electrical conductor by either placing a turn of electrical
conductor such as a
wire under the head of the terminal screw 305 or by inserting a straight end
of the conductor
between the pressure plate 323 and the rectangular plate 313, and then
tightening terminal screw
305 to lock the conductor between plates 313 and 323, or the plate 313 and the
head of the screw
305. Looking at side wall 308 of shell member 302, each of the two side edges
311 of opening
309 has a vertical slot or rail 315 for receiving and holding the side edges
of rectangular plate
CA 02568544 2007-03-09
19
313 of the stationary terminal assembly. Sliding the rectangular plate 313
down into the slots or
rails 315 in the edges of the opening 309 positions and holds the stationary
terminal assembly
312 in position within opening 309 of side wall 308 of shell member 302.
Brush terminal assembly 346 includes a rectangular plate 380 composed of
electrical
conducting material such as brass etc., which supports a yieldable contact
bearing arm 344
having a contact 307. A slot 381 located in rectangular plate 380 is a
clearance opening for
terminal screw 386 which freely passes through the slot 381 and threads into
pressure plate 388.
Tightening terminal screw 386 clamps the rectangular plate 380 between the
bottom surface of
the head of the terminal screw 386 and the pressure plate 388. Brush terminal
assembly 346 is
provided for connection to an electrical conductor by either placing a turn of
the conductor under
the head of the screw or inserting a straight end of the conductor between the
pressure plate 388
and the rectangular plate 380. Tightening the screw 386 locks the conductor
between the screw
head and rectangular plate 380, or between plate 380 and pressure plate 388.
Looking at side
wall 306 of shell member 302, the two edges 303 of opening 384 each has a
narrow vertical slot
or rail 317 for receiving and holding the side edges of rectangular plate 380.
Sliding rectangular
plate 380 of brush terminal assembly 346 down into slots or rails 317 in the
edges 303 of opening
384 positions and holds the brush terminal assembly in opening 384 of the side
wall 306 of the
shell member 302.
The stationary terminal assembly 312 and the brush terminal assembly 346 are
made of
conductive material so that a circuit can be completed between the conductive
wires connected to
screw terminals 305 and 386. Preferably, the conductive components of the
switch are all of
substantial grade, good quality electrical materials so that substantial
currents, for example 10 to
20 amperes, can repeatedly be carried for extended periods of time without
significant heat
generation, electrical losses or excessive arcing. Such materials can include
silver alloys for the
contacts, beryllium copper alloy for the brush arm and brass for the remaining
conductive
components.
Referring to Figs. 15 and 16, slider 320, when positioned within longitudinal
channel 304
can freely slide back and forth between the side walls 319, 321 from one end
of the channel to
the other end of the channel. Slider 320 has, at one end, a rectangular funnel
shaped slot opening
322 which extends completely through the slider and is provided to receive cam
follower 370 of
cam 366. It is understood that the rectangular funnel shaped slot opening 322
is not restricted to
CA 02568544 2007-03-09
'
an end of the slider, but can be located anywhere along the slider. Projecting
downward from the
bottom surface of slider 320 and about mid-way between the ends of the slider
is a triangular
shaped cam follower 324. Projecting upward from the top surface of the slider
320 and about
mid-way between the slider ends is a hold down projection 326. Also projecting
upward from
Yieldable contact arm 344 of brush terminal assembly 346 is spring biased to
move
contact 317 toward stationary contact 316. Therefore, more force is needed by
the slider 320 to
CA 02568544 2007-03-09
21
urges it to move toward leg 337. At this time, helper spring 338 is compressed
and biases slider
320 to move in direction A. When the contacts 316, 317 are being opened,
helper spring 338
urges slider 320 to move against the force of the yieldable contact arm 344.
Thus, helper spring
338 helps to overcome the force exerted by the yieldable contact arm 344 of
the brush terminal
assembly 346 as the yieldable contact arm 344 is being moved in direction A by
the slider 320 to
open contacts 316, 317.
Wall 348 at an end of chamber 340 contains a slot opening 350 which allows the
end 342
of slider 320 to enter chamber 340 and engage and move leg 339 toward leg 337
of helper spring
338. Wall 348 helps to keep helper spring 338 within the chamber 340.
As seen in Fig. 24, located directly beneath longitudinal channel 304 and
opening into
channel 304 is spring chamber 354. Spring chamber 354 is elongated, has a
rectangular cross-
section and contains a flat cam shaped leaf spring 352. The spring chamber 354
can be centrally
and symmetrically disposed in the base assembly 302 and has support bars 356
spaced from each
end for supporting flat cam shaped leaf spring 352. Located beyond each
support bar 356 is an
end pocket 365. The overall length of spring chamber 354 is determined by the
length of the flat
cam shaped leaf spring 352.
Flat cam shaped leaf spring 352 can be formed from a flat strip of spring
steel to form a
flat cam shaped leaf spring having a profile substantially similar to that
shown in Figs. 16 and 24.
The flat cam shaped leaf spring 352 has a profile that is symmetrical about a
center apex 358.
Moving along the spring 352 from the apex 358 to an end, the spring has a
short down sloping
cam portion 359 on each side of the apex 358 which, together with support
sections 357 forms a
valley 360, 362 at each side of the apex. The support sections 357 rest on
support bars 356 and
terminate in U shaped outer end portions 364 which resides in end pockets 365.
The apex 358,
the centrally located rise of the spring and the short down sloping cam
portions 359 on each side
of the apex and joined by support sections 357 provide a surface discontinuity
rather than a
smooth transition for the cam follower 324 as it travels over the apex 358.
Continuing with Figs. 16 and 24, cam 366 is used to urge the slider 320 to
move back and
forth in longitudinal channel 304 to open and close the contacts 316,317 of
the switch. Cam 366
has two cylindrical shaped projections 368 aligned with each other and which
extend out from
the sides to form a support shaft rotatably received by support bearing
openings 378 located in
side walls 319,321 of the longitudinal channel 304. In operation, cam 366
rocks back and forth
CA 02568544 2007-03-09
=
22
in a clockwise and counterclockwise direction about the axel defined by the
projections 368.
Extending downward and below the cylindrical shaped projections 368 is cam
follower 370
which fits in the rectangular funnel shaped slot opening 322 in slider 320
with minimum
clearance. Extending upward from projections 368 is cam control surface 430
(see Fig. 16)
having a first pocket 374 located at the left of the cam, and a second pocket
372 located at the
right of the cam, see Fig. 24. Looking at the profile of the cam 366 as shown
in Fig. 24, pocket
372 is at the right side of the axes of rotation of the cam, and pocket 374 is
at the left side of the
axes of rotation of the cam. Thus, when the slider is at its right hand
position, application of a
downward force on pocket 372 will cause the cam follower 370 to rotate in a
clockwise direction
to cause slider 320 to move to the left. In a similar way, application of a
downward force on
pocket 374, when the slider is at its left hand position, will cause the cam
follower 370 to rotate
in a counterclockwise direction to cause the slider to move to the right.
Thus, pressing down on
pocket 372 causes the cam to rotate clockwise which causes the cam follower
370 to move the
slider to the left. Thereafter, pressing down on pocket 374 will now cause the
cam to rotate
counterclockwise to cause the cam follower to move the slider to the right.
Alternately pressing
on pockets 372 and 374 will cause the slider to move back and forth, first in
one direction and
then in the other direction.
Referring to Figs. 14, 17 and 18, projecting upward from the bottom floor
member 401 of
frame assembly 400, and of the same material as the floor member, are two hook
shaped
members 396 which are provided to engage and pivotly hold cooperating hook
members 418 (see
Fig. 17) which project down from subplate 412 attached to rocker paddle 111.
Frame assembly
400 includes a clearance opening 402 located in floor member 401 which is
aligned with the top
of cam 366 and through which an actuator 405 (See Figs. 18 and 19) of cam
driver 431 projects
to engage and operate cam 366. The opening 402 is at the bottom of an upwardly
projecting
cylinder and is adapted to receive a cover plate 404 (see Fig. 19) having an
opening 402 through
which actuator 405 (see Figs. 18 and 19) of cam driver 431 projects through to
engage and
operate cam 366.
Looking at Fig. 19, cam 366 is operated by cam driver 431 which consists of a
cylindrical
shaped member 409, a plunger 403, an actuator 405, and a conical shaped coil
spring 407. The
cam driver 431 engages and drives cam 366, first in a clockwise direction,
then in a counter-
clockwise direction each time plunger 403 is moved down. The open ended
cylindrical shaped
member 409 is an integral part of the frame 400, but is shown as a separate
part for clarity. In the
CA 02568544 2007-03-09
23
actual device, member 409 projects upward from the top surface of floor member
401 of frame
assembly 400. Member 409 contains a first opening 413 at its lower end and a
second opening
415 at its upper end. The first opening 413 at the lower end of the
cylindrical shaped member
409 is sufficiently large to avoid obstructing or interfering with clearance
opening 399 located in
cover plate 404 when cover plate 404 is coupled to the bottom surface of floor
member 401. The
cylindrical shaped member 409 supports an internal ridge 417 located between
openings 413,
415.
To assemble the cam driver (Fig. 19) plunger 403 is inserted through opening
399 in the
floor member 401 and into member 409. Plunger 403 slidably fits within member
409. The
outside diameter of plunger 403 is slightly smaller than the diameter of
opening 415 in the upper
end of cylindrical shaped member 409 to allow plunger 403 to move up and down
in opening 415
without binding. Plunger 403 has a skirt 433 which forms an external,
outwardly projecting
ridge 429. Shoulder 417 in cylindrical shaped member 409 and ridge 429 on
plunger 403 engage
each other to keep plunger 403 captive within member 409.
Actuator 405 is then inserted through opening 399 and into plunger 403.
Actuator 405,
which can be composed of a metal such as brass or steel, or of a plastic
having suitable
characteristics, is a shaft 421 having a generous radius at one end 422 and
first 423 and second
425 collars at the other end. Collar 423 is smaller in diameter than collar
425 and collar 423 has
a diameter slightly larger than the inside diameter of the apex of conical
spring 407 and fits into
and frictionally engages the apex end of spring 407. The end of collar 425 is
located within
opening 428 of plunger 403 and contacts internal projection 427.
Thereafter, spring 407 is inserted through opening 399 in the floor member 401
and onto
shaft 421 of the actuator 405. Spring 407 has a conical shape, the apex of
which is wrapped
around and frictionally engages collar 423 and the base of spring 407 has a
diameter that is large
enough to extend beyond clearance opening 399 in cover plate 404 when said
plate 404 is
secured to the bottom surface of the floor member 401 to avoid interfering
with shaft 421 as it
moves up and down and pivots back and forth in rectangular clearance opening
399. Thereafter,
cover plate 404 is positioned to cover opening 402 in the floor member 401 and
is securely
coupled to the bottom surface of the floor member 401 with adhesive or the
like. Clearance
opening 402 in the cover plate 404 can have a long dimension along the length
of the switch and
a small dimension along the width of the switch. The small dimension of
opening 399 is slightly
CA 02568544 2007-03-09
24
larger than the diameter of shaft 421 to permit the shaft 421 to move in
opening 399 without
binding and the long dimension of opening 399 allows shaft 421 to engage and
freely rock back
and forth while operating cam 366 without binding.
Referring to Fig. 18, cylindrical shaped member 409 which is an integral part
of the floor
member 401 and projects upward from said floor member is shown as being
separated from said
floor member for clarity only. If desired, a small projection 406 which
extends upward from the
floor member 401 of frame assembly 400 and of the same material as the floor
member 401 can
be provided to engage the lower end of a helical helper spring 408 (see Fig.
24) which can be
used, if desired, to help urge the rocker paddle 111 to its out position. In
normal use, spring 407,
acting on plunger 403 through actuator 405 provides sufficient force to urge
paddle 111 away
from frame assembly 400. However, in those instances where additional force
may be desired,
helper spring 408 can be provided. The outside diameter of the projection 406
(see Figs. 14 and
24) is slightly larger than the inside diameter of helical helper spring 408
and is inserted into the
lower end of the helical helper spring. The upper end of helical helper spring
408 can be located
within and held captive in a pocket 410 (see Figs. 17 and 24) located on
subplate 412. Subplate
412 is secured to the underside of the rocker paddle 111 by adhesive and/or by
plastic locking
projections which extend from the underside of the rocker paddle 111, pass
through openings 429
in the subplate and are then staked over, or the like.
Referring to Fig. 17, there is shown an exploded perspective view of the
bottom of base
assembly 300, frame assembly 400 and rocker paddle Ill of a single pole
switch. Referring to
the frame assembly 400 which can be a unitary member formed of a suitable
plastic, two
projections 414 which are a part of the cover plate 404 extend out from the
bottom surface of the
floor 401 are positioned to contact the top surface of the axel support shaft
formed by the aligned
cylindrical projections 368 of the cam 366. Projections 414 help prevent the
cylindrical
projections 368 from moving out of their bearing surfaces in the side walls of
the longitudinal
slider receiving channel. Also projecting downward from the bottom surface of
the frame
assembly 400 is slider hold down projection 416 which slidably contacts hold
down projection
326 on slider 320. Projection 416, by contacting projection 326 on slider 330,
prevents slider
320 from being pushed up and out of channel 304 by the upward force of flat
cam shaped leaf
spring 352 pushing up on cam follower 324.
CA 02568544 2007-03-09
Subplate 412, which is attached to the underside of rocker paddle 111, is a
unitary
member of a plastic material having two hook shaped members 418 formed thereon
which
project down from the bottom surface. The hook shaped members 418 are
positioned to engage
hooks 396 (see Fig. 14) on frame assembly 400. Hooks 418, when engaged by
hooks 396, allow
Two arms 422 which project beyond the rear end of the subplate 412 each
supports a
circular stud 420, one on the outside surface of each arm, which are axially
aligned with each
other to form a common axel. The circular studs 420 snap into openings 424 in
the frame
The switch here disclosed has an on-off indicator 112 such as a light to
indicate to a user
CA 02568544 2007-03-09
26
Referring now to Fig. 23, there is shown a light pipe 440 which is connected
to the
underside of the rocker paddle 111 (see Fig. 22) to optically connect the LED
on the PCB to an
opening in the lower edge of the rocker paddle 111. One end 442 of the light
pipe, which is
positioned to receive light from the LED, has a spherical face 443 for
receiving light from the
LED, and the other end 446 of the light pipe has a diffuser texture exit
surface 448 which is the
indicator 112 in the edge of the rocker paddle 111 for indicating to a user
the conductive state of
the switch. The light pipe can have any desired serpentine shape to provide
flexibility when
positioning the PCB having the LED within the switch. In another embodiment,
the indicator
112 can be located to be at any place on the rocker paddle 111.
Referring to Fig. 24, as the switch is assembled, the helper spring 338 is
inserted into
chamber 340, flat cam shaped leaf spring 352 is placed into spring chamber 354
and slider 320 is
placed into longitudinal channel 304 and above leaf spring 352. The end 342 of
the slider 320
faces the helper spring 338 and the triangular shaped cam follower 324, which
projects from the
bottom of the slider, slidably engages the top surface of flat cam shaped leaf
spring 352.
Cylindrical projections 368 of cam 366 are placed within bearing surface
openings 378 in side
walls 319, 321 of longitudinal channel 304 with cam follower 370 being
positioned within
rectangular funnel shaped slot opening 322 of slider 320. Stationary terminal
assembly 312 is
positioned in the opening 309, and brush terminal assembly 346 is positioned
within opening
384. As the brush terminal assembly 346 is being placed in position, the
yieldable contact arm
344 is moved backward against the force of the spring arm and is positioned
within slot 329
located between the hold down projection 326 and the brush terminal control
projection 327 of
slider 320. At this time all the various components are within the switch base
300.
Referring now to the frame assembly 400 (see Fig. 18) and the cam driver 431
(see Fig.
19) which is coupled to and is an integral part of the frame assembly. Cam
driver 431 has a
plunger 403 which is positioned within cylindrical shaped member 409 by
inserting the plunger
403 through the bottom opening 413 of the cylindrical shaped member 409 which
projects
upward from the top surface of the floor member 401 until the outwardly
extending ridge 429
formed by the projecting skirt 433 engages inwardly projecting shoulder 417 in
cylindrical
shaped member 409. Thereafter, actuator 405 is inserted through the bottom
opening of the
cylindrical shaped member 409 and into the plunger 403 until the top convex
surface of collar
425 contacts internal projection 427 which extends downward from the inside
surface of the top
of the plunger 403. The convex top surface of collar 425 is provided to allow
the actuator 405 to
CA 02568544 2007-03-09
27
more easily rock back and forth as it moves down and contacts cam 366. Conical
shaped coil
spring 407 is now placed around the actuator 405 with the apex of the coil
spring being
positioned around the collar 423. At this time the cover plate 404 is attached
to the bottom
surface of the floor member 401 and positioned to allow the shaft 421 to
extend through the
opening 399. The PCB board is now positioned.on to the floor member 401 with
the spring
contacts 436, 438 extending thru the openings in the floor member 401 to make
electrical contact
with stationary terminal assembly 312 and brush terminal assembly 346.
The frame assemblage 400, which includes the PCB having the LED, resistor,
diode and
spring terminals 436, 438, is now placed over the switch base assembly 300 and
the
ground/mounting strap 123 is attached to base assembly 300 with screws, drive
pins, rivets or the
like to connect the ground/mounting strap 123, switch base assemblage and
frame assemblage
together. In the embodiment shown, when the rocker paddle 111 is attached to
the frame 400, the
conical shaped coil spring 407, acting through the plunger 403, exerts an
upward force on the
rocker paddle 111 and, in addition, spring 407 urges the plunger to its
extended out position. The
subplate 412 has a cutout 441 through which the plunger 403 passes to contact
the underside of
the rocker paddle 111. Thus, the top surface of the plunger 403 contacts the
bottom surface of
the rocker paddle 111 and it is the upward force of the spring 407 which
biases the paddle to its
outward position and which a user must overcome when pressing on the paddle.
In some
instances, it may be desirable to have a switch which requires a greater force
to operate. If a
greater force is desired, it can be obtained with helical spring 408 where the
lower end is placed
over projection 406 on the frame and the top is placed within the pocket 410
of the subplate. The
light pipe 440 is attached to the underside of the subplate and the end 443 is
located to receive
light from the LED and the end 446 is positioned in the opening in the bottom
edge of the paddle
and is the indicator which shows the conductive state of the switch. The
projections 420 on the
arms 422 of the subplate 412 are snapped into the openings 424 in the frame
assembly 400 to
form the hinge about which the rocker paddle 111 and the frame assembly 400
pivot relative to
each other. Thereafter the rocker paddle 111 which includes the subplate 412,
is pressed down
toward the frame assembly until hooks 418 engage hooks 396. At this time the
bottom or
underside of the paddle contacts the top surface of the plunger 403 and the
application of finger
pressure on the rocker paddle will move it toward the frame assembly against
the force of spring
407 to drive the shaft 421 of the actuator 405 down through opening 402 to
engage the cam
eccentric surfaces 372, 374 and operate cam 366.
CA 02568544 2007-03-09
28
Fig. 24 is a sectional view of a single pole switch where the contacts of the
switch are
closed and the switch is in its conducting state. The next time the rocker
paddle is pressed,
actuator 405, acting against the force of spring 407, is urged to move down to
contact the ramp of
cam 366 and slide toward the right and enter pocket 372. Continued pressing on
the paddle
causes the actuator 405 to continue to move down and rotate cam 366 clockwise
about
cylindrical projections 368. This causes cam follower 370 to rotate in a
clockwise direction and
move slider 320 to the left. As slider 320 moves to the left, the triangular
shaped cam follower
324 moves out of depression 360 of the flat cam shaped leaf spring and across
the right Support
section 359 toward the centrally located apex 358. As the slider continues to
move to the left,
triangular shaped cam 324 deflects leaf spring 352 downward because projection
326 on slider
320, in cooperation with slider hold down projection 416, prevents the slider
320 from moving
upward. As the triangular shaped cam 324 moves over the top of apex 358 of the
cam shaped
leaf spring and toward the left support section 359 of the apex, the leaf
spring starts to spring
back to its original unstressed up position. This upward movement of the leaf
spring, acting on
the shaped cam follower 324, helps drive the cam follower 324 and the slider
320 to the left until
the cam follower 324 comes to rest in depression 362. At this time the
contacts of the switch are
separated from each other and the switch is in its off state. Thus, the cam
shaped leaf spring 352,
in combination with the cam follower 324 helps to move the slider to either
the left or right
depressions 362, 360 to help open and close the contacts. The next time that
the rocker paddle is
depressed, actuator 405 will enter pocket 374 of the cam to cause it to rotate
in a
counterclockwise direction which will cause cam follower 324 on the slider to
depress the leaf
spring as it moves to the right. As the cam follower 324 continues to move to
the right and as it
passes apex 358, the depressed leaf spring starts to spring up to return to
its original position.
This upward movement of the leaf spring, in combination with the
counterclockwise rotation of
the cam 366 causes the cam follower 324 to move toward the right until it
reaches depression 360
at which time the switch contacts are closed and the switch is in its on
state. Continued pressing
and releasing the rocker paddle of the switch alternately opens and closes the
contacts of the
switch. The state of conduction of the switch is displayed to a user by the
absence or presence of
light at the indicator 112 in the edge of rocker paddle 111. The light can be
from an LED, a neon
lamp or a pilot light on the PCB which is connected to the stationary and
brush terminal
assemblies. When the contacts of the switch are closed, there is no potential
difference across the
CA 02568544 2007-03-09
29
lamp and the lamp will remain dark. When the contacts of the switch are open,
there will be a
potential difference across the lamp and the lamp will be lit.
Referring to Figs. 25A, 25B and 25C, there is shown sectional views of the
rocker paddle
of the switch of Fig. 14. Fig. 25A is a section along the line 25A-25A of Fig,
14; Fig. 25B is a
section along the line 25B-25B of Fig. 14; and, Fig. 25C is a section along
the line 25C-25C of
Fig. 14. The width of the paddle is substantially 1.80 inches and the length
of the paddle is
substantially 2.77 inches. The face of the paddle has a vertical axis along
its length and a=
horizontal axis along its width where the face of the paddle along its
vertical axis has a surface of
positive first differential comprised of a combination of splines drawn
between points of varying
distances from a datum plane and zero second differential where the rate of
height increase of the
individual splines is constant. The horizontal axis has a surface of a
positive first differential and
negative second differential comprised of a combination of splines drawn
between points of
varying distance from a datum plane. Referring to Fig. 25A, the surface along
line 25A-25A lies
between two profile boundaries substantially 0.139 inches apart, perpendicular
to a datum plane
equally disposed about the true profile and positioned with respect to a datum
plane. The basic
dimensions and the profile tolerance establish a tolerance zone to control the
shape and size of
the surface. The surface is substantially 2.77 inches in length. Within that
length, a surface is
defined by the dimensions of about twenty equidistant points which are about
0.139 inches apart.
Each dimension indicates that point's distance to a datum plane, the back,
fiat surface of the
rocker paddle 111. Moving from left to right in Fig. 25A, the dimensions
increase from about
0.277 to about 0.328 inches at the center, and then decreases to about 0.278
inches at the right
end. This progression defines a surface of increasing and then decreasing
height where the points
are connected by individual splines. The points are not connected by a single
arc and the rate at
which the surface height increases in not constant. The rate of height
increase of the individual
splines decreases from left to right to the center, and then increases from
the center to the right
end. Thus, the second differential of the surface is negative from each end
toward the center.
That is that the difference between some of the points distance dimension from
an end toward the
center decreases. Thus, from an end to the center, the surface has a contour
of positive first
differential and negative second differential, comprised of a combination of
splices drawn
between points of varying distance from a datum plane. This description
substantially describes
the paddle's face along the lines 25A-25A, 25B-25B and 25C-25C of Fig. 14.
CA 02568544 2007-03-09
The section along line 25B-25B of Fig. 14 which runs along the horizontal
center line of
the paddle is shown in Fig. 25B and defines a surface having positive first
differential and
substantially negative second differential from an end to the center line. The
second differential
is substantially negative because not all successive points have a constant
increase.
5 The section along line 25C-25C of Fig. 14 which runs along the diagonal
of the paddle is
shown in Fig. 25C and defines a surface having a positive first differential
and substantially
negative second differential from an end to the center line. The second
differential is
substantially negative because not all successive points have a constant
increase.
Figs. 25A-25C disclose, in detail, the dimensions of the paddle and,
therefore, in the
10 interest of brevity, the dimensions shown in the Figs. 25A, 25B and 25C
are not here repeated.
Referring to Fig. 26, there is shown an exploded view of the switch with
another cam
driver embodiment; and Fig. 27 is a sectional view along line 24-24 of Fig. 3
where the cam
driver is that shown in Fig. 26. In this embodiment, the cam driver 431 shown
in Fig. 19 is
replaced with cam driver 600. Cam driver 600 is composed of a fiat ribbon of
semi-flexible
15 material such as spring steel bent back upon itself at its center to
form a blunt end 602 and having
a generous radius which forms the blunt end 602 having a diameter which fits
within the pockets
372, 374 of cam 366. The ends 606 of the cam driver are bent outward at 90
degrees to form two
legs 604 which lie in the same plane and each of which has an opening 608 for
receiving a
holding member for attaching cam driver 600 to the subplate 412. In this
embodiment, subplate
20 412 does not have cutout 433 (see Fig. 18), but is continuous to allow
the cam driver 600 to be
attached to the subplate. Cam driver 600 can be attached to the subplate with
rivets, plastic
projections which protrude from the subplate and pass through the openings 608
in the legs 604
which are deformed with heat to secure the cam driver to the subplate, or by
any other method.
In this embodiment, spring 408 is used to urge the paddle to its "up" at rest
position. If desired, a
25 channel 610 can be formed on the subplate 412 for positioning at least
one of the legs 604.
Except for the substitution of the cam driver 600 for the cam driver 431
disclosed in Fig. 19, and
the absence of the cutout 433 in subplate 412, the construction and operation
of the switch of the
embodiment disclosed in Figs. 26 and 27 is similar to that of the switch
disclosed in Figs. 14-24.
Referring to Fig. 28, there is shown an exploded view of the switch with still
another cam
30 driver embodiment, and Fig 29, is a sectional view along line 24-24 of
Fig. 3 where the cam
driver is that of Fig. 28. In this embodiment, the cam driver 431 shown in
Fig, 19 is replaced
CA 02568544 2007-03-09
31
with a semi-flexible cam driver having a sharp end 700. Semi-flexible cam
driver with sharp end
700 is composed of a closely wound helical spring 701 of, for example, piano
wire coupled at
one end to a tip 702 which has a front end having a conical shape and a back
end having a
cylindrical shape. The tip 702 can be of plastic, metal or the like. The
outside diameter of the
Fig. 30 is a front perspective view of a wall plate for a single wiring device
such as a
second differential comprised of a combination of splines drawn between points
of varying
CA 02568544 2007-03-09
=
32
distance from a datum plane. The wall plate has a surface configuration which
allows it to be
placed around a switch or a receptacle, or both a switch and a receptacle
placed side by side, and
which blends with the wiring device, or wiring devices, even thou the surface
configuration of
the switch is different than that of the receptacle. Referring to Fig. 30, the
wall plate is
substantially 4.92 inches in length by 3.28 inches in width and has a single
opening 100. When
the wall plate of Fig. 30 is for more than a single wiring device, the opening
100 has no dividing
members for receiving multiple wiring devices, either a switch which has no
frame or a
receptacle, or any combination of switches and receptacles. When the wall
plate is for one
wiring device, the dimensions of the wiring device is slightly less than 2.81
inches in length by
1.83 inches in width to fit within the opening 100. The width of the wall
plate varies depending
upon the number of wiring devices ganged together in side-by-side
relationship. The front
surface of the wall plate here disclosed has a complex/compound shape such
that the surface at
the opening for the wiring device is further from the wall than it is at the
outer edge of the wall
plate.
Referring to Fig. 31B which is a sectional view along the line 31B-31B of the
wall plate
of Fig. 30 along the horizontal centerline, from point K, the outer left edge,
to point L, the inner
edge of the opening for the wiring device. As shown in Fig. 31B, the surface
lies between two
profile boundaries substantially 0.002 inches apart, perpendicular to a datum
plane, equally
disposed about the true profile and positioned with respect to the datum
plane. The basic
dimensions of the profile establishes a tolerance zone which controls the
shape and size of the
surface. The surface is substantially 0.73 inches in width. Within this width,
a shape is defined
by the dimensions often equidistant points, more or less, which are
approximately 0.073 inches
apart. Each dimension indicates that point's distance to the datum plane, the
back (flat) surface
of the wall plate, which begins at point K. Moving from left to right, the
dimensions increase
from about 0.243 inches to about 0.302 inches. This progression defines a
surface of increasing
height, positive first differential, when the points are connected by
individual splines. The points
are not connected by a single arc and the rate at which the surface height
increases is not
constant. The rate of height increase of the individual splines decreases from
left to right, and the
second differential of the shape is negative. That is, the difference between
the first and second
point's distance dimension is larger than the difference between the second
and the third, etc.
Thus, the surface has a contour of positive first differential and negative
second differential,
comprised of a combination of splines drawn between points of varying distance
from the datum
CA 02568544 2007-03-09
33
plane. Fig. 31A is a sectional view along the line 31A-31A of Fig. 30; and
Fig. 31C is a sectional
view along the line 31C-31C of Fig. 30. Figs. 31A; 31B and 31C show the wall
plate for sections
along lines 31A-31A, 31B-31B and 31C-31C of Fig. 30.
The section along line 31C-31C of Fig. 30 (see Fig. 31C), which runs along the
vertical
centerline of the wall plate defines a surface contour having a positive first
differential and zero
second differential, comprised of a combination of splines drawn between
points of varying
distance from a datum plane. The difference between any two sequential point
dimensions is
substantially 0.0037 inches and this surface has a zero second differential
because the rate of
height increase of the individual splines is constant.
The wall plate 138 for a single wiring device shown in Fig. 30 includes, along
the inside
top edge, and the inside bottom edge, tooth shaped racks 80 for engagement
with latching pawls
140 on the end 147 of the multi-function clips 130, 151. Fig. 32 is a
sectional view of the bottom
edge of the wall plate 138 along the line 32A-32A of Fig. 30; and Fig. 33
which is a sectional
view of the top edge of the wall plate 138 along the line 33A-33A of Fig. 30.
The top outside
edge of the wall plate (see Fig. 33), has a recessed area 750 such as a
channel having centrally
located raised identifying nomenclature structure 752 such as letters of the
alphabet, numbers
and/or a symbol which can, for example, identify the manufacturer of the
device. Figs. 34, 34A
show views of a portion of the top edge of the wall plate of Fig. 30 showing
the channel and
identifying nomenclature structure.
As shown in Figs. 34 and 34A a channel 750 is in the top outside edge of the
wall plate
138. The channel can be approximately three-quarters of an inch in length and
have a width
which is less than the width of the edge of the wall plate. As shown in Figs.
33, 34 and 34A,
channel 750 is a rectangular depression defined by four walls 754, 756, 758
and 760. Located
within the channel is raised identifying structure 752 such as the name of the
manufacturer, i.e.,
"LEVITON". The height of the raised identifying structure can be 0.010 of an
inch where the
top surface of the raised identifying structure is substantially flush with
the surface of the top
edge of the wall plate.
When the wiring device is a switch as is here shown, the surface of the rocker
paddle of
the switch is a continuation of contours of the wall plate, so that the
surface of the wall plate
complements the surface of the switch. When the wiring device is a receptacle,
the contour along
the width of the receptacle face is substantially flat in one plane and is
complex along the length
CA 02568544 2007-03-09
34
of the face of the receptacle with a substantially constant radius. The shape
of the receptacle face
is different from that of the switch to allow for the proper seating of an
inserted plug. But, again,
when the wiring device is a receptacle as is here shown, the surface of the
wall plate
complements the surface of the receptacle. The wall plate has no exposed
mounting screws or
other visible metal hardware. When the wall plate is placed around a wiring
device, the only
visible parts are the wall plate 138 and the wiring device, the switch or
receptacle. No fastening
means such as screws, etc. for holding the wall plate in place are visible.
To attach the wall plate 138 to a wiring device, the edges 147 of pawls 140 of
the bottom
and top multi-function clips 130, 151 engage tooth shaped racks 80 located on
the inside surfaces
of the top and bottom end walls 170 of wall plate 138. There are two tooth
shaped racks 80 on
the inside edge of each end wall 170 of the wall plate 138. Each tooth shaped
rack 80 contains a
number of teeth each having an inclined front face 84 and an inclined back
face 86. Referring to
Fig. 35, there is shown a fragmentary, enlarged perspective of the end 147 of
the latching pawl
144 of the multi-function clip engaging the tooth shaped rack 80 of the wall
plate 138. When
attaching a wall plate to a wiring device, the wall plate is placed over the
wiring device and
pushed in toward the wall. As the wall plate moves toward the wall, the end
147 of latching pawl
140 of the multi-function clip engages the inclined front face 84 of a tooth,
and the pawl 140
deflects as it moves past the tip of the first tooth. Once the end of the
latching pawl 140 is past
the tip of the first tooth, it returns to its initial position and takes a
position between the inclined
back face 86 of the tooth and the inclined front face of the next tooth. This
operation is repeated
as many times as is needed to position the top and bottom of wall plate 138 as
close to the wall as
possible. As tooth shaped racks 80 and pawls 140 at the top and bottom are
independently
operated, it is possible to position the wall plate 138 to closely follow the
contour of the wall,
even when the wall is not flat. This ability to follow the wall contour is
appreciated when the
wall plate 138 is large, such as a wall plate positioned around multiple
wiring devices.
Referring to Fig. 36, there is shown a fragmentary, enlarged sectional side
view of the
wall plate 138 and tab 120 of the alignment plate 14 to indicate how the two
components can be
separated following latching. Once the ends of latching pawl 140 are
positioned in a valley
between two teeth, it becomes difficult to dislodge the wall plate 138 from
the wiring device(s)
and the wall. To help in the removal of the wall plate, a slot 74 is formed in
the bottom end 170
of wall plate 138 to provide access to tab 120. A small, flat tool blade such
as a screw driver
blade 76, or the like, can be moved through slot 74 in end 170 to contact both
the outer surface of
CA 02568544 2007-03-09
tab 120 and the back wall of slot 74. By moving the blade 76 using the back
wall of slot 74 as a
fulcrum, the force applied to tab 120 will separate wall plate 138 from the
wiring device and the
wall. As tool 76 can apply a great deal of force to tab 120, it is possible to
separate the pawl 140
from engagement with the tooth shaped racks 80 and thus the wall plate from
the wiring device
5 and the wall.
Referring to Fig. 37, there is shown an exploded view of a box, an alignment
plate and a
wall plate for two wiring devices. There is no partition or dividing member
located in either the
wall plate opening 100 or the alignment plate opening 116 to separate the two
wiring devices
from each other. The two wiring devices can be placed in a double ganged box
160 made up, for
10 example, of two single boxes joined by fasteners 162 extending through
the threaded apertures
164 of two joining ears 166. Alignment plate 114 has a single opening 116,
four openings 117
and four alignment pins 118 for receiving the two wiring devices such as two
switches, a
receptacle and a switch, or two receptacles.
Wall plate 138 can have four tooth shaped racks 80 on the inside surface of
the top and
15 bottom end walls for receiving four latching pawls where the two center
tooth shaped racks
receive one pawl from each wiring device. Also, the alignment plate has two
tabs 120, which are
accessible via slots 74 in the bottom end wall of wall plate 138. The
independent operation of
the pawls 140 with their respective racks 80 allows the wall plate 138 to
compensate somewhat
for lack of flatness of a wall in which the wiring devices are installed.
20 Referring to Fig. 38, there is shown an exploded view of alignment plate
114 having a
single opening 116 and a wall plate 138 for three wiring devices ganged
together and mounted in
three boxes (not illustrated). Wall plate 138 has a single opening 100 with no
dividing or
separating members for receiving three wiring devices positioned side by side
and has three sets
of tooth shaped racks 80 (one set for each wiring device) on the inside
surface of the top and
25 bottom end walls. The two end racks each receive a single latching pawl
and the center racks
receive two latching pawls. Alignment plate 114 has a single opening 116 with
no dividing or
separating members, three sets of openings 117 and three sets of alignment
pins 118 for receiving
three wiring devices.
Referring to Fig. 39, there is shown an exploded view of attachment plate 114
having a
30 single opening 116 with no dividing or separating members for receiving
four wiring devices and
wall plate 138 for four wiring devices which are to be ganged together. Wall
plate 138 has a
CA 02568544 2007-03-09
36
single opening 100 with no dividing or separating members for receiving four
wiring devices
positioned side by side and the attachment plate 114 has a single opening 116
with no dividing or
separating members for receiving four wiring devices positioned side by side,
and four sets of
openings 117 and four sets of alignment pins 118. The wall plate has four sets
of tooth shaped
racks 80 (one set for each wiring device) on the inside surface of the top and
bottom end walls.
Referring to Fig. 40, there is an exploded view of alignment plate 114 having
a single
opening 116 with no dividing or separating members for receiving five wiring
devices and wall
plate 138 for five wiring devices which are to be ganged together. Wall plate
138 has a single
opening 100 with no dividing or separating members for receiving five wiring
devices positioned
side by side and the alignment plate 114 has a single opening 116 with no
dividing or separating
members for receiving five wiring devices positioned side by side, and five
sets of openings 117
and five sets of alignment pins 118. The wall plate 138 has five sets of tooth
shaped racks 80
(one set for each wiring device) on the inside surface of the top and bottom
end walls.
Referring to Fig. 41, there is shown an exploded view of alignment plate 114
having a
single opening 116 with no dividing or separating members for receiving six
wiring devices and
wall plate 138 for six wiring devices which are to be ganged together. Wall
plate 138 has a
single opening 100 with no dividing or separating members for receiving six
wiring devices
positioned side by side and the alignment plate 114 has a single opening 116
with no dividing or
separating members for receiving six wiring devices positioned side by side,
and six sets of
openings 117 and six sets of alignment pins 118. The wall plate has six sets
of tooth shaped
racks 80 (one set for each wiring device) on the inside surface of the top and
bottom end walls.
Each wall plate shown in the Figs. can be made of conductive material or of
non-
conductive material. Where the wall plate is made of non-conductive material
such as plastic, a
conductive coating can be sprayed, plated, etc. to the front, back or both the
front and back
surfaces of the wall plate to provide a conductive path from the wall plate to
ground on the
ground/mounting strap and/or the box through a conductive path. The conductive
path can be
from the wall plate, through the latching pawls 140 of the multi-function
clips 130, 151, the
alignment pins 118 on the alignment plate contacting the multi-function clips,
and the threaded
fasteners contacting the multi-function clips and the box; or it can be
through the latching pawls
140 of the multi-function clips and the threaded fasteners contacting the
multi-function clips to
the ground terminal on the ground/mounting strap and/or the ground connected
to the box.
CA 02568544 2007-03-09
37
The present invention contemplates a system wherein multiple electrical wiring
devices in
numbers not expressly set forth hereinabove may be utilized; without departing
from the spirit or
lawful scope of the invention.
While there have been shown and described and pointed out the fundamental
novel
features of the invention as applied to the preferred embodiments, it will be
understood that
various omissions and substitutions and changes of the form and details of the
devices illustrated
and in their operation may be made by those skilled in the art without
departing from the spirit of
the invention.