Note: Descriptions are shown in the official language in which they were submitted.
CA 02579564 2007-02-26
USABILITY METHODS OF CALIBRATING AN ANALYTE MEASUREMENT
METER USING RFID
BACKGROUND OF THE INVENTION
1. Field of the Invention
[0001] The present invention relates, in general, to a device used for
monitoring an analyte,
such as a blood glucose measurement meter, and to means and methods of
conveying
information to such a device.
2. Problem to be Solved
[0002] Systems for measuring the concentration of a specific analyte,
indicator, or marker
(hereinafter "analyte") from a sample of body fluid such as, for example,
whole blood,
plasma or interstitial fluid are commonly known and documented. For many
individuals who suffer from a particular disease, such as diabetes,
measurement of their
analytes such as blood glucose is a necessary part of daily life. Such
patients are
advised by their health care professional to monitor their blood sugar levels
regularly
each day, typically ranging between two and six tests per day. To do this,
patients rely
on measurement systems are commercially available. These systems typically
include
a meter, disposable test sensors and lancets, such as those sold under the
OneTouch
Ultra brand from Lifescan, Inc., Milpitas, California, USA.
[0003] In order to more fully describe the problem to be solved, reference
will be made to the
specific disease, diabetes, and to diabetics. Reference to this disease is
intended only to
help clarify understanding. It is not intended to limit understanding or use
of any
information in this document to that specific disease.
[0004] As stated above, diabetics typically use a system that employs a
disposable test sensor
(also known as test strips) in a blood glucose meter that can be given them by
their
1
CA 02579564 2007-02-26
healthcare professional (HCP) or purchased. A diabetic will insert a test
strip into a
meter and apply a drop of his blood to the test area. In an electrochemical
device, the
test area will typically include a chemical system to change the glucose
molecules in
the drop of blood into ionic derivatives. When a voltage or current is applied
across the
test area, a resultant voltage or current can measured that is directly
proportional to the
amount of glucose in the drop of blood. This resultant voltage or current can
then be,
through an algorithm in the meter, used to calculate the amount of glucose in
that
sample and, hence, in the diabetic patient.
[0005] When using this type of test strip and meter, it is often necessary to
make
compensations for such things as temperature at the time of measurement as
these
factors will affect the accuracy and precision of the meter. Similarly, the
process of
manufacturing test strips may often result in a degree of variability between
lots or
batches. This variability is due to many factors among which are lot-to-lot
variations in
the test strip components during manufacture. Thus, during manufacture, each
batch of
test sensors is assigned a calibration code which, when input into the meter,
will
compensate for this variability so that all test strips will measure the same
amount of
blood glucose in a given sample with the same degree of accuracy and
precision,
regardless of the lot. This calibration code is used in the algorithm of the
meter to
compensate for such lot-to-lot manufacturing variability.
[0006] Each time a user purchases a new vial (taken herein to include
alternative terms such as
cartridge, dispenser or other container) of test sensors it will have assigned
to it one of a
number of different calibration codes. It is possible for the new vial to have
the same
calibration code as the previous vial used; however, it is likely that it will
be different.
Most meters currently available require the user to read the calibration code
assigned to
the new vial and manually enter this code into the meter prior to use.
[0007] Calibrating the meter each time a new vial of sensors is started, or
indeed each time the
user wishes to perform a test, can be inconvenient, and potentially life-
threatening, due
to the number of steps involved and the time consuming process of having to
check the
calibration code printed on the label of the vial. It is potentially
inconvenient for the
2
CA 02579564 2007-02-26
user to perform this step, particularly if the code required is printed on
packaging that
potentially could have been discarded or if the user is in a hurry, for
example,
experiencing a period of hypoglycemia, in which case their thought processes
could be
blurred.
[0008] Looking for small print on a label can be problematic for many
diabetics, too, as
diminished eyesight is often a resultant complication of the disease. Many
users may
forget to enter the calibration code or they may decide not to enter it if
they do not
understand its significance. Obtaining a result, such as a blood glucose
concentration
from a meter and strip system that is not properly calibrated, may be
incorrect and
potentially harmful to the user. An incorrect result may cause them to take
inappropriate action. For reasons including those described herein it is
desirable for the
measurement system to include automatic calibration, and for the number of
steps
required by the user in order to perform a measurement to be kept to a
minimum.
SUMMARY OF THE INVENTION
[0009] The present invention overcomes many of the issues described above. A
method of
calibrating test sensors is disclosed herein, that requires minimum user
intervention and
removes many of the extra steps currently performed by users of conventional
meters.
[0010] Provided is an analyte measuring system including a meter and a vial of
test sensors,
whereby calibration information specific to a particular vial of test sensors
is
transmitted wirelessly from a radio frequency identification (RF or RFID) tag
incorporated within the vial, at a predefined time or within a predefined
period, to a
reader housed within the meter. The process of calibration may or may not be
completely automated. For example, the user may be prompted to press a
dedicated
button, or bring the vial into contact with the meter, or somehow confirm that
the
calibration code transmitted from the vial to a receiver within the meter is
correct.
Alternatively the process of calibration may be completely automated requiring
no
action or input by the user, thereby simplifying the process of performing a
test and
ultimately reducing the time taken.
3
CA 02579564 2007-02-26
BRIEF DESCRIPTION OF THE DRAWINGS
[0011] The novel features of the invention are set forth with particularity in
the appended
claims. A better understanding of the features and advantages of the present
invention
will be obtained by reference to the following detailed description that sets
forth
illustrative embodiments, in which the principles of the invention are
utilized, and the
accompanying drawings of which:
[0012] Figure 1 shows a flow diagram of the process steps involved in
calibrating a
conventional meter.
[0013] Figure 2 shows a simplified drawing of an example system for use with
the present
invention.
[0014] Figure 3 shows an example plot of an analyte measurement reaction
versus time.
[0015] Figure 4 shows a process flow diagram outlining several different
polling opportunities
within a measurement cycle according to the present invention.
[0016] Figure 4a shows a simplified process flow of the main steps involved in
polling option
1 of Figure 4.
[0017] Figure 4b shows a simplified process flow of the main steps involved in
polling option
2 of Figure 4.
[0018] Figure 4c shows a simplified process flow of the main steps involved in
polling option
3 of Figure 4.
100191 Figure 4d shows a simplified process flow of the main steps involved in
polling option
4 of Figure 4.
4
CA 02579564 2007-02-26
[0020] Figure 4e shows a simplified process flow of the main steps involved in
polling option
of Figure 4.
[0021] Figure 4f shows a simplified process flow of the main steps involved in
polling option
6 of Figure 4.
[0022] Figure 4g shows a simplified process flow of the main steps involved in
polling option
7 of Figure 4.
[0023] Figure 4h shows a simplified process flow of the main steps involved in
polling option
8 of Figure 4.
[0024] Figure 4i shows a simplified process flow of the main steps involved in
polling option 9
of Figure 4.
[0025] Figure 5 shows a table of information that may be loaded from a RFID
tag to a meter,
or from a meter to the RFID tag in accordance with the present invention.
[0026] Figure 6 shows a first example embodiment of a system according to the
present
invention including a clip.
[0027] Figure 7 shows a flow diagram of the steps involved in calibrating the
meter of
Figure 6.
[0028] Figure 8 shows an example system according to a second embodiment of
the present
invention, including a dedicated calibration button.
[0029] Figure 9 shows a perspective view of the system of Figure 8, showing a
vial contacting
the meter and also an LED indicator.
[0030] Figure 10 shows a flow diagram of the steps involved in calibrating the
system of
Figures 8 and 9.
5
CA 02579564 2007-02-26
[0031] Figure 11 shows an example system according to a third embodiment of
the present
invention, including a micro-switch.
[0032] Figure 12 shows a perspective view of the system of Figure 11, showing
a recess in the
base of the meter and the location of a micro-switch.
[0033] Figure 13 shows a flow diagram of the steps involved in calibrating the
system of
Figures 11 and 12.
[0034] Figure 14 shows a further example embodiment of a system according to
the present
invention incorporating a cradle.
DETAILED DESCRIPTION OF ILLUSTRATIVE EMBODIMENTS OF THE
INVENTION
[0035] Looking at Figures 1 and 2, a system kit used to test a patient's blood
glucose level
typically consists of a meter 101, a lancet (not shown) and a plurality of
disposable test
sensors or strips 102, optionally contained within a re-closeable, moisture
impermeable
container such as a desiccated vial 104. Figure 1 shows a flow diagram of
process
steps involved in calibrating a conventional analyte measuring meter, such as
the type
of meters used by diabetic patients for self-measurement of their blood
glucose
concentration. Calibrating the system, to account for any lot-to-lot
variability in
response of the test sensors to the analyte being measured caused by the
manufacturing
process, is important to achieve accurate and reliable results.
[0036] To perform a test, the user first removes a new test sensor from a vial
and inserts it into
the receiving strip port of the meter, step 2. For some meters, for example
the
OneTouch Ultra from Lifescan Inc., Milpitas, California, USA, the action of
inserting
a strip into the receiving connector initiates automatic power-on of the
meter. First,
optionally a splash screen may be displayed followed by a screen check, step
4. Next, a
calibration code is typically displayed for a predefined period of time, and
optionally
may flash, step 6. If the code displayed matches the calibration code printed
on the vial,
6
CA 02579564 2007-02-26
step 8, then the user can accept the code shown by the meter by either
pressing a
confirmation button or letting the display time out. The display will then
show a prompt
indicating that the system is ready to accept a sample, step 10. The user may
then
proceed to perform the test, step 12.
[0037] If however the code currently set within the meter does not match the
code printed on
the vial of test sensors, then the user presses a specific button on the meter
to scroll
through all the calibration code options until the correct number is reached,
step 14.
Once selected, the new code is displayed to the user for a predetermined
period of time,
e.g. 3 seconds, step 16, and optionally the number may flash. During this
time, the user
may confirm the new code by pressing a button or by letting the display time
out.
[0038] Figure 2 is a simplified schematic drawing of an example embodiment of
an analyte
monitoring system for use with the present invention. Monitoring system kit
100
includes a measurement meter 101, including a strip port 108, an internal RFID
reader
152, display 103 and a set of buttons 105, a vial 102 or otherwise suitable
container for
holding blood glucose test sensors 104 including an RFID tag 150. It would be
apparent
to a person skilled in the art that containers or cartridges designed to house
test sensors
may take a form different from the vial shown herein. Optionally the container
may be
a vial, cartridge, cassette, dispenser, for example, and may be of any
suitable shape,
e.g., cylindrical, rectangular or disk-shaped. For the purpose of this
application the term
'vial' will be used to encompass all types of container used for holding test
sensors.
[0039] A measurement system, such as the simplified system of Figure 2, may be
used for the
routine determination of blood glucose by patients suffering from, for
example,
diabetes. For the purpose of this disclosure, the analyte of interest will be
limited to
blood glucose concentration, however it would be apparent to a person skilled
in the art
that monitoring meters or systems for the measurement of characteristics of
other
analytes or indicators may also incorporate the invention disclosed herein.
[0040] To perform a blood glucose measurement, a user first inserts a new test
strip 104 into
the strip port connector region 108 of the meter 101. Insertion of a test
strip 104, or
7
CA 02579564 2007-02-26
pressing of a button 105 will initiate the meter to switch on. Software within
meter 101
may run a startup routine to check various system components prior to
displaying to the
user that their meter is ready to begin a test. Vial 102 incorporates an RFID
tag 150 that
may include information such as the calibration code for the specific batch of
test
sensors being used. A corresponding RFID reader 152 with appropriate antenna
for
interrogating RFID tag 150 is located at a suitable position within the
housing of meter
101. Polling by RFID reader 152 to determine the presence of RFID tag 150 (and
so
upload any information) can occur wirelessly at any point prior to the
beginning of the
measurement calculation in which it is to be used, as will be discussed in
more detail in
relation to Figures 3 and 4. For example, information stored on RFID tag 150
(such as
calibration information) located on vial 102 is required in the calculation
performed by
the meter software to convert the measured current into an accurate blood
glucose
concentration and displayed to the user. Wireless transfer of information
using RFID
may be totally, partially, or not automated. In other words, the transfer can
be
accomplished without any user interaction other than bringing the vial 102 in
close
enough proximity to the RFID reader 152 to allow the polling and transfer to
take
place. Alternatively, the system can be designed to require the user to begin
or
subsequently acknowledge the polling step to begin and/or complete the
information
transfer.
[0041] RFID provides wireless communication through use of low cost portable
data carriers,
the technology of which is commonly known and will not be described further
herein.
An example RFID tag that may be used with the present invention is Tag-it HF-I
Transponder inlay (part number RI-103-112A) available from Texas Instruments,
[city], Texas, USA. An example RFID reader for use with such an RFID tag is
component number TRF 7961 also available from Texas Instruments. Transmission
ranges may be in the order or 1 to 30cm depending on power supply and
component
configuration within the meter, but preferably in the range 1 to 4cm.
[0042] Whilst this application refers to RFID tags and RFID readers
throughout, other wireless
information transfer mechanisms incorporating wireless emitters and receivers
could be
used such as Bluetooth or WiFi. One advantage of using RFID tags and readers
is that
8
CA 02579564 2007-02-26
the tag can be powered and queried by the reader and does not therefore need
its own
power source.
[0043] Optionally, the exterior housing of meter 101 of system 100 may be
designed in such a
way to internally integrate a vial or container 102 of test sensors that
itself incorporates
an RFID tag 150. One such meter is described in patent US5989917 titled
"Improved
Glucose Monitor And Test Strip Containers For Use In Same" filed February 13,
1996
by Selfcare, Inc. (Attorney Docket number DDI0001), the entire contents of
which are
hereby incorporated. Such a housing design would hold the RFID reader 152 and
tag
150 within the required range for efficient wireless communication. The user
may or
may not have to physically remove vial 102 from the meter housing to obtain a
test
sensor to enable them to perform a test. Optionally the user may be able to
access and
open the vial to retrieve a test sensor whilst the vial is held within the
meter housing.
An advantage of such a system would be the reduced number of separate
components
comprising system 100.
[0044] Optionally, system 100 may be held within a system kit case, designed
specifically to
ensure that vial 102 is located in the required position when the reader 152
polls the
RFID tag 150 for information such as the calibration code. Such a design may
include a
holder (for example in-built elastic material or a recess or indent) designed
specifically
to hold the meter, and also a separate holder for the vial. Such a case design
would
facilitate the relative positions of the meter and vial, maintaining them in
close
proximity to each other, and enabling wireless communication there-between.
[0045] Figure 3 shows a plot of a typical analyte measurement timing cycle
200, such as that
obtained for the OneTouch Ultra test strip (available from Lifescan Inc.,
Milpitas,
California, USA).
[0046] To perform a blood glucose measurement, the user first inserts a new
test strip 104 into
the strip port region of their meter 108. The meter software will scroll
through a startup
sequence, and upon successful completion will display a'apply blood' icon or
message. The user will then lance their skin to obtain a sample of blood to be
analysed.
9
CA 02579564 2007-02-26
The sample is then applied to the test strip, and upon sufficient uptake of
sample, the
countdown will begin. During the countdown period (5 seconds for the OneTouch
Ultra test strip) an assay procedure is performed by applying +400mV to each
of two
working electrodes on the test sensor and measuring the current developed
after 5
seconds. Almost immediately thereafter, the measured current is transformed,
using the
calibration information, into a corrected blood glucose concentration.
[0047] Turning now to Figure 3 in detail, timing cycle 200 includes a
threshold point G (e.g. a
current of lOOnA), a trigger point A (e.g. with a trigger current of 150 nA)
for a
working electrode 1(Wl) which triggers the start of a countdown period B (5
seconds
in this example), a trigger point C (e.g. with a trigger current of 150 nA)
for a working
electrode 2 (W2) which triggers the start of a countdown period D (also 5
seconds) for
W2, the relative ends of the countdown periods for W l and W2 are denoted E
and F
respectively. The current developed at times E (for W 1) and F (for W2) are
representative of the glucose concentration in the sample under test and are
used in a
subsequent calculation to determine the glucose concentration in the sample.
100481 Calibration information (for example a calibration code) has to be
available to the
meter software prior to the beginning of the calculation, to enable the blood
glucose
concentration to be calculated. If this calibration information is stored on
the RFID tag
on the vial, then there exist a number of different points throughout the
measurement
cycle at which transfer of this information could occur so as not to delay the
calculation. These points are discussed in relation to Figure 4.
[0049] Figure 4 is a simplified process flow diagram, showing the sequence of
main events
that occur during the process of making an analyte measurement. Several
different
timing options are indicated for the transfer of information, such as
calibration
information e.g. a calibration code in particular, from the RFID tag
integrated within
the vial to the reader in the meter, enabling the software to use this
information during
the calculation of the final blood glucose result.
CA 02579564 2007-02-26
[0050] Meters such as the OneTouch Ultra from Lifescan Inc., Milpitas,
California, USA,
power-on, step 302, automatically when a test sensor 102 is inserted in
preparation to
perform a measurement. Following strip insertion, step 300, the meter software
undergoes a series of start-up checks, step 302, to ensure the meter is ready
for use. On
completion of the start-up routine, the meter may display a message or icon to
indicate
to the user that it is ready to accept a sample to be measured, step 304. When
a sample
is successfully applied, step 306, the assay sequence is triggered, step 308,
and the
biochemical reaction is measured over a predefined period e.g. 5 seconds. The
final
measurement is then used in conjunction with the calibration information to
calculate
the analyte concentration, which is then displayed to the patient, step 310.
[0051] Retrieval of the calibration information from an RFID tag, integrated
within a vial or
container of test sensors as described herein, by RFID technology may occur at
several
stages during the procedure, outlined by polling options 1 to 9 shown in
Figure 4. This
application covers all the options outlined although some options are more
user friendly
and/or power efficient than others. If the RFID tag is not found, and hence
the
calibration information is not available for whatever reason, then the meter
may
optionally indicate to the user that the calculation will be performed using
the
information previously stored, or optionally the user may be provided with the
ability
to manually calibrate the meter.
[0052] Figure 4a shows a brief outline of the steps involved in timing of
polling option 1.
Calibration information may be obtained during the start-up routine. Power-on
of the
meter in order to conduct a test can occur by means of inserting a test strip
into the strip
port region or by pressing a button on the user interface, step 311. Before
the meter is
ready for the user to begin a test, it may automatically perform a start-up
sequence of
system checks, step 312. Such checks may include memory, pixel illumination,
battery
charge and ambient temperature for example. The RFID reader within the meter
may
optionally be programmed to poll for the RFID tag as part of this start-up
sequence,
thereby ensuring the calibration information and any other relevant
information is
stored within the memory of the meter and available for calculation of the
final result,
step 314. This option results in refreshing of the calibration information
every time the
11
CA 02579564 2007-02-26
meter is switched on. This may result in unnecessary power drain on the
battery
because of the need to power up the reader, as it is not necessary to update
the
calibration information each time the user performs a test.
[0053] Figure 4b shows a brief outline of the steps involved in timing of
polling option 2.
Calibration information may be obtained, step 317, on successful completion of
the
start-up routine 316 and before the 'apply blood' icon 318 is displayed. The
meter
software may optionally be programmed to have the RFID reader poll for the
RFID tag
information automatically after completion of all start-up checks, step 316.
If the RFID
reader finds the RFID tag, then transfer of the information held in the RFID
tag would
take only a fraction of a second, thus calibration of the system may be
completely
invisible to the user. Optionally a confirmation screen, showing the
previously retrieved
information, may be displayed requiring the user to press a button to confirm
that the
new information is to be sought. This option could provide some advantage over
polling option 1 since polling would not occur if the meter start up checks
were
unsuccessful.
[0054] Whilst it is conceivable for polling options 1 and 2 to include a
prompt asking the user
to confirm whether they wish to have the meter poll for calibration
information each
time the meter is switched on, this represents an additional user step, and
may result in
the user being asked this question needlessly whilst the test sensors in each
vial are
used up.
[0055] Figure 4c shows a brief outline of the steps involved in timing of
polling option 3.
Calibration information may be obtained whilst the 'apply blood' indicator is
being
displayed, step 320. Optionally the RFID reader may be programmed to poll for
the
RFID tag information once, or intermittently during the period in which the
system is
primed and waiting for sample application to the test sensor, step 322.
Polling for the
information at this point in the measurement sequence would not increase the
overall
test time, as essentially the software would be conducting two processes at
the same
time. Indeed, prior to the 'apply blood' screen appearing 320, a check of the
test sensor
is made to ensure it is usable (i.e. within certain parameters). If the strip
is not usable,
12
CA 02579564 2007-02-26
then no polling would occur until a usable strip is provided. This would
reduce power
loss during polling and aid predictability of the lifetime of the battery, as
the number of
polls would equate to the number of test sensors inserted and found ready to
be used.
Transfer of calibration from the RFID tag to the meter memory may again be
completely invisible to the user, or optionally a confirmation screen may be
displayed
requiring the user to confirm that new information is to be sought.
[0056] Figure 4d shows a brief outline of the steps involved in timing of
polling option 4.
Calibration information may be obtained at a point during sample application,
step 324.
Optionally, the RFID reader may be programmed to poll for the RFID tag
information
whilst the user is in the process of applying sample to the reaction zone of
the test
sensor. Polling may optionally be triggered when a threshold current e.g.
lOOnA is
achieved, step 325, at the start of the electrochemical reaction (indicated by
'G' on
Figure 3). Again, this method of calibration would not increase the overall
test time,
and it may be completely invisible to the user, or optionally a confirmation
screen
could be displayed.
[0057] Figure 4e shows a brief outline of the steps involved in timing of
polling option 5.
Calibration information may be obtained when a trigger current is detected at
working
electrode 1, step 326. The measurement and countdown period, step 328 (for
example a
second countdown) is initiated when a particular current e.g. 150nA, is
detected at
working electrode 1, indicated by 'A' in Figure 3. This trigger current may
also
optionally be used to trigger the RFID reader to poll for the RFID tag and
hence the
calibration information contained therein. This has the advantage that the pre-
measurement test sensor checks would be complete, and at least the first
working
electrode (W 1) had received sample and was undertaking the assay reaction
before
polling occurred, therefore polling only occurs when a test sensor is in the
meter and is
operating correctly. Also, similar to the options already described, obtaining
the
calibration information at this stage in the measurement cycle would not
increase the
overall measurement time, and could provide invisible calibration of the
system,
although optionally a confirmation screen could be displayed.
13
CA 02579564 2007-02-26
[0058] Figure 4f shows a brief outline of the steps involved in timing of
polling option 6.
Calibration information may be obtained when a trigger current is detected at
working
electrode 2, step 330. Similar to timing of polling option 5, a trigger
current measured
at working electrode 2 e.g. 150nA (indicated by 'C' in Figure 3) could be used
to
trigger the RFID reader located within the meter to poll for the RFID tag. As
working
electrode 2 is located further down the test sensor than working electrode 1
i.e. further
away from the inlet for sample application, then the trigger current for W2
(indicated
by 'D' in Figure 3) is reached approximately 300ms after the trigger current
for W 1
(indicated by 'B' in Figure 3), and the countdown period, step 332 for W2 is
initiated.
This is also an indicator that the test sensor has been constructed correctly
and it is
likely that an appropriate amount of blood has been used so that a successful
fill of the
test sensor is likely to occur because sample has reached the second working
electrode.
Therefore in this option, no polling (and hence no battery usage) would occur
if the
sample does not reach the second working electrode.
[0059] Figure 4g shows a brief outline of the steps involved in timing of
polling option 7.
Calibration information may be obtained at any time during the countdown. Here
the
option is to program the RFID reader to poll for the RFID tag information at
any point
within the countdown period. The countdown period for the OneTouch Ultra
meter
(available from Lifescan Inc., Milpitas, USA) is 5 seconds, allowing
sufficient time for
the RFID reader to poll for the RFID tag and obtain the calibration
information.
[0060] Figure 4h shows a brief outline of the steps involved in timing of
polling option 8.
Calibration information may be obtained once the process carried out to check
for
sufficient fill of the test sensor is complete, step 338. As described in
polling option 6,
the sample e.g. blood takes some time to move up the reaction zone of the test
sensor
by capillary action. At the end of the countdown period, step 336, the
measurement
software may determine that the strip is operating correctly, has no
manufacturing
errors and has received sufficient sample to perform the analysis, by
comparing the
currents detected at W 1 and W2 (times E and F respectively in Figure 3) and
checking
that the two measurements are within acceptable agreement with one another
e.g. +/-
20%. If the test strip is not performing correctly e.g. if there is a
manufacturing error or
14
CA 02579564 2007-02-26
insufficient sample was applied, then this calculation may prompt an error
message to
warn the user and may ask them to retest. Once it has been determined that the
test
sensor is performing correctly, only then is the RFID reader activated to poll
for the
RFID tag. The RFID reader may optionally be programmed to poll for the RFID
tag
information during, or just after this sensor performance calculation. Again,
the process
of calibration would not increase the overall measurement time, and may be
completely
invisible to the user. If polling occurs after the sensor performance
calculation, there is
reduced risk of polling unnecessarily. Alternatively, by having already
obtained the
necessary information by polling for the RFID tag in advance of inviting the
user to
apply sample to the test sensor (as described in polling options 1 and 2),
there is
reduced risk of wasting a test sensor should the RF polling for the
calibration
information, and the optional manual entry of the calibration information both
be
unsuccessful for any reason.
[0061] Figure 4i shows a brief outline of the steps involved in timing of
polling option 9.
Calibration information may be obtained, step 342, after the end of the
current
measurement, step 340, but before the beginning of the calculation that
transforms the
measured current into an accurate blood glucose result, step 344. The RFID
reader may
optionally be programmed to poll for the RFID tag to obtain the calibration
information
after the check for sufficient sample has occurred and the current has been
measured.
The calibration information is required in the calculation of the final result
subsequently displayed to the user therefore it is retrieved from the RFID tag
prior to
the start of this calculation. This option can take longer since there is no
advantage
from conducting activities e.g. countdown and polling in parallel.
[0062] Provided the RFID reader is instructed to poll the RFID tag for the
calibration
information during one of the above-listed options, then the calibration
information will
be readily available to be used in the calculation of the analyte
concentration.
[0063] Figure 5 shows a table of information that may be loaded from a RFID
tag to the meter
and/or from the meter to the RFID tag, in accordance with any of the example
embodiments of the present invention.
CA 02579564 2007-02-26
[0064] Four different example embodiments incorporating the present invention
will now be
discussed.
[0065] Figure 6 shows a first example embodiment of a system 400 according to
the present
invention, including a meter 401 incorporating an RFID reader 452, a vial 402
incorporating an RFID tag 450, a test sensor 404, a reaction zone 406, a strip
insertion
port 408, an indicator 410 and a clip 412 comprising an elongate portion 412c
and
gripping features 412a, 412b and 412d. Clip 412 is semi-rigid and designed to
releasably receive meter 401 (between gripping features 412a and 412b) and
vial 402
(via gripping feature 412d). Thus both the meter 401 and vial 402 can be held
in fixed
relation together by clip 412. Whilst in clip 412, both the front face and
strip insertion
point 408 of meter 401 can be accessed by a user. Also, whilst in clip 412,
via1402 can
be accessed by a user. Typically gripping features 412a, 412b and 412d provide
an
interference snap-fit with meter 401 and via1402 and are releasable.
[0066] Figure 6 is an example embodiment of an analyte-monitoring device, such
as a glucose-
monitoring device for example, used by diabetic patients to measure their
blood
glucose concentration. System 400 comprises a meter 401 and a vial of test
sensors
402. According to the present invention, meter 401 includes an RFID reader 452
typically comprising an antenna, transceiver and decoder, located within the
meter
housing. Vial 402 includes a transponder, commonly known as an RFID tag 450,
electronically programmed with information such as calibration data, and
optionally
expiry and other country-specific information such as the examples provided in
Figure
5. Methods of integrating the RFID tag 450 as part of a vial of test sensors
is described
in detail in co-pending application 'Container with RFID device for storing
test
sensors' (DDI5116GBPSP, filed at the UK Patent Office on 22 December 2005 in
the
name of LifeScan Scotland Ltd).
[0067] System 400 includes a locator, here in the form of a clip 412 to hold
vial 402 fixed in
relation to meter 401 thereby providing the close proximity required for
efficient RFID
communication. In one embodiment, clip 412 is molded in one piece using a semi-
16
CA 02579564 2007-02-26
rigid, yet slightly deformable material. Clip 412 is essentially 'T'-shaped,
and is
intended to grip meter 401 from behind by means of two optionally rounded
gripping
elements 412a and 412b, that press against the top surface of meter 401 at
each side,
securely holding meter 401 against elongate portion 412c of clip 412. In this
embodiment, gripping elements 412a and 412b may optionally engage with
cooperating
features located on the meter housing 401 (not shown). Elongate portion 412c
terminates into a further gripping element 412d, that extends beyond the
bottom edge
of meter 401. Gripping element 412d is intended to hold vial 402 securely
adjacent the
bottom edge of meter 401, enabling successful RF communication between the
RFID
tag 450 integrated within vial 402 and the reader 452 housed within meter 401.
It will
be apparent to a person skilled in the art that other embodiments (i.e.
materials, shape
and components) may be used to provide a locator to hold a vial and meter in
close
proximity to one-another, and these are intended to be included.
Alternatively, a meter
housing may be adapted e.g. by provision of a recess, to receive a vial of
test sensors,
see US5989917 titled 'Improved glucose monitor and test strip containers for
use in
same' filed February 13, 1996 in the name of Selfcare Inc., (Attorney Docket
number
DDI 0001), the entire contents of which are hereby incorporated
[0068] The following description utilizes the embodiment shown in Figure 6 in
combination
with timing of polling option 2 described in relation to Figure 4 and 4b, and
will be
described in more detail with respect to Figure 7. To perform a test, a user
would
remove a test sensor 404 from within via1402, optionally whilst vial 402 is
held within
clip 412, or alternatively prior to attaching vial 402 to clip 412, then
insert strip 404
into insertion port 408. The act of inserting strip 404 into port 408 may
power-on meter
401, automatically initiating the test procedure. Optionally a splash screen
may first be
displayed, followed by a display check. Following the power up procedure, the
RFID
reader 452 housed within meter 401 emits a radio frequency signal to activate
RFID tag
450 located on vial 402. The reader controls data acquisition and
communication, and
decodes the information stored within the integrated circuit of RFID tag 450
incorporated within vial 402.
17
CA 02579564 2007-02-26
[0069] Clip 412 of the present invention therefore ensures that vial 402, with
RFID tag 450
housed therein, is positioned correctly to receive the RF signal sent by
antenna 452,
enabling transfer of information such as the calibration code to the meter
software prior
to the user applying blood to the reaction zone 406 of test sensor 404. System
400 of
the present invention provides a unique, low power consumption hence power
efficient
and cost-effective means of invisible calibration to the user.
[0070] Optionally, clip 412 may be used alone or in conjunction with a
specifically designed
system kit case. The process steps of performing a test such as a blood
glucose
measurement will be described in more detail in relation to Figure 7.
[0071] Figure 7 shows a flow diagram of the process steps involved in
calibrating system 400
of Figure 6. To perform a measurement, the user first inserts a test sensor
into insertion
port, step 414, which may optionally power-on meter 401 automatically, step
416. At a
defined point during the power-up sequence, the RFID reader 452 located within
the
housing of the meter is programmed to start emitting wirelessly, at a
predetermined
frequency to poll for RFID tag 450, step 418. At this stage in the sequence,
the meter
software has to determine whether a RFID tag 450 has been located or not, step
420. If
a vial containing an RFID tag is within range and located within the short
polling
period, then the calibration code and optionally any other relevant pieces of
information
is transferred from the tag to the meter software, step 422, a process
invisible to the
user. As soon as a valid tag is detected and the information obtained, the
RFID circuitry
is switched off to conserve battery power. Following successful calibration,
meter 401
will move to the 'apply blood' instruction screen, step 424, and the user will
then be
able to proceed with the measurement procedure, step 436, assured that their
meter is
correctly calibrated for the vial 402 of test sensors they are using.
Optionally a
confirmation screen displaying the calibration may be displayed briefly to the
user, and
optionally the user may be asked to confirm the calibration code.
[0072] If however an RFID tag 450 is not located at step 420 by the reader
during the short
polling period 418, then meter 401 may enter a visible calibration mode, step
426. A
message or indicator may be displayed to the user, step 428, for a short
period of time
18
CA 02579564 2007-02-26
(e.g. 2 to 10 seconds) informing them that the tag was not found. During this
period,
RFID reader 452 may optionally continue to poll for RFID tag 450, step 430,
and if vial
402 is placed into clip 412 then RFID tag 450 will be located and the
calibration
information transferred, step 422. If however the RFID tag 450 is still not
found, then a
message may be displayed on the screen that no vial was found, step 434. The
RFID
circuitry only polls for the RFID tag information briefly. Thereafter the RFID
circuitry
times out and switches off to conserve battery power, and meter 401 retains
the last
calibration code that was used. The 'apply blood' message or indicator is then
displayed to the user, step 424, allowing the patient to carry on with the
test, step 436,
however this is with the knowledge that the calibration code may not be
correct.
Optionally, the user may be provided with the facility to manually enter the
correct
calibration code, step 435, if for some reason the RFID information transfer
is
unsuccessful. This will allow the user to continue testing, and ensure that
the result
obtained is accurate.
[0073] Figure 8 shows an example analyte measuring system 500 according to a
further
embodiment of the present invention, including a meter 501 incorporating an
RFID
reader (not shown), a strip insertion port 508, a first optional indicator 510
and a
dedicated calibration button 512.
[0074] Figure 9 shows a perspective view of the system 500 of Figure 8,
showing a meter 501
incorporating an RFID reader 552, a vial 502 incorporating an RFID tag 550, a
test
sensor 504, a reaction zone 506, a strip insertion port 508, a dedicated
calibration
button 512 and a second optional indicator 514.
[0075] Referring now to Figures 8 and 9, provided is a further example
embodiment of an
analyte measurement system 500 according to the present invention. As
described
previously in relation to Figure 6, meter 501 contains an RFID reader 552
housed
therein, and vial 502 contains an RFID tag 550 either co-molded within the
make-up of
vial 502 or optionally as part of the label provided on vial 502, as described
in detail in
co-pending application DDI 5116GBPSP 'Container with RFID device for storing
test
sensors', filed December 2005.
19
CA 02579564 2007-02-26
[0076] System 500 enables a user to ensure their meter is correctly calibrated
at any time i.e.
the procedure of calibration does not require the user to insert a new strip
into the
receiving port to power up the meter. The same calibration procedure will
apply
whether the meter 501 is powered on by depressing a button or by inserting a
strip 504.
In this example embodiment, calibration of a new vial 502 of test sensors is
enabled by
means of the user bringing vial 502 close to meter 501 and pressing a
dedicated button
512. Button 512 may have the exclusive purpose of activating the RFID reader
and thus
polling for RFID tag 550. Button 512 may be pressed either when meter 501 is
in an off
mode, or after a sensor 504 has been inserted into port 508 or meter 501 is
otherwise
switched on. However, typically button 512 must be pressed prior to
application of
sample to sensor 504 to allow polling for an RFID tag and subsequent uploading
of
information such as calibration information. It is possible for button 512
(and hence
polling) to be activated during the 5 second countdown, but this would require
a prompt
for a user action within a defined time window and therefore this could delay
the test
result if it were not done in a timely manner.
[0077] An additional indicator 514, such as an LED may also be used to
indicate the location
of the area of meter 501 containing the RFID reader so providing guidance to
the user
as to where to place via1502 to be in close proximity to RFID reader 552.
Indicator 514
may also provide information on the communication status by either
illuminating,
ceasing to illuminate or flashing at a certain time for example.
[0078] From the sleep or off mode, meter 501 is activated either by pressing
button 512 or
inserting a test strip 504 into receiving port 508 prior to pressing button
512. Following
an optional splash screen and display check, the calibration code previously
stored in
meter 501 may be displayed, followed by a display indicator showing that
reader 552 is
polling for RFID tag 550. The display indicator may optionally be combined
with a
second indicator such as illumination of an LED 510 for example, to indicate
that the
antenna of RFID reader 552 within meter 501 is emitting a radio signal to scan
for the
presence of RFID tag 550.
CA 02579564 2007-02-26
[0079] Dedicated button 512 may include an icon, such as a picture of a vial
in this instance, to
clearly and unambiguously depict its use. A user would intuitively know that
dedicated
button 512 is involved in the procedure for calibrating system 500,
particularly when
coupled with similar icons displayed on the user interface of meter 501.
[0080] Figure 10 shows a flow diagram of possible steps involved in
calibrating system 500 of
Figures 8 and 9. A user is able to calibrate their system 500 with or without
actually
performing a measurement, step 516. With a strip inserted into the insertion
port or not,
the user presses the dedicated key or button at any time as long as it is
prior to blood
application, step 518, similar to polling timing options 1 and 2 described in
relation to
Figure 4. The previously stored calibration code may then optionally be
displayed to
the user, step 520. The display will then indicate that reader 552 housed
within meter
501 is scanning for the RFID tag 550 located within vial 502, step 522. Such a
display
may be by means of a pictorial representation, an intuitive icon, words or
even LED
state. If the vial is detected, step 524, an icon may be displayed to the user
to indicate
successful location of RFID tag 550 and/or successful transfer of information
e.g.
calibration information, step 526, and the meter is then ready to be used to
perform a
test or power off, step 528. Following successful transmission and receipt of
the
information stored, the RFID circuitry may switch off automatically to
conserve battery
power.
[0081] If RFID reader 552 does not communicate with an RFID tag 550, then an
icon may be
displayed to the user to indicate that no vial was found, step 530, and
optionally the
previous calibration code stored within the meter memory may again be
displayed. The
meter is then ready to begin a test using the previously stored code, or if
not required it
will power off, step 528. As described previously, if for some reason the RF
auto-
calibration is unsuccessful, the user may be provided with the option to
manually
calibrate their system, step 532, to ensure accuracy of readings taken.
[0082] RFID reader 552 will only activate for short periods of time in order
to conserve battery
power. A specific time-out will be programmed to ensure the RF circuitry
powers off
after the predetermined period of time. Optionally, button 512 may be operated
by
21
CA 02579564 2007-02-26
means of a depress and hold action, thereby the possibility of accidentally
powering on
meter 501 and activating the RF circuitry unnecessarily is virtually
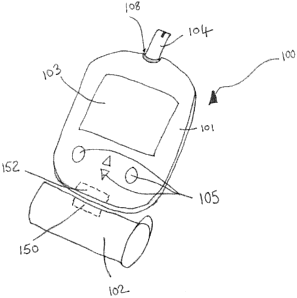
eliminated, in-
keeping with the desire to conserve battery power.
[0083] Provision of a dedicated button 512 for calibrating system 500
according to the present
invention, enables a user to more easily maintain the correct calibration
status of their
meter. A dedicated button 512 may also be used in conjunction with clip 412
seen in
Figure 6.
[0084] Figure 11 shows an example system 600 according to a further embodiment
of the
present invention, including a meter 601, a via1602 and a micro-switch 612.
[0085] Figure 12 shows a perspective view of the system 600 of Figure 11,
including a meter
601 incorporating an RFID reader 652, a via1602 incorporating an RFID tag 650,
a test
sensor 604 with a reaction zone 606, a strip insertion port 608, a concave
recess 610, a
micro-switch 612 and an indicator 614. An example micro-switch is an ultra
miniature
button micro-switch, component number DH3C-B1AA available from Cherry
Electrical Products Ltd., Luton, England. In one embodiment of micro-switch
612, a
magnet (not shown) and RFID tag 650 are incorporated within vial 602, and a
cooperating reed switch (not shown) is incorporated within meter 601. When
vial 602
is placed in close proximity to meter 601, the magnet triggers the reed switch
thereby
activating RFID reader 652 to poll for RFID tag 650 and transfer the
information.
[0086] In more detail, an RFID tag 650 and a magnetic element (not shown) is
associated with
a vial 602 of test sensors, either via application as a label or integrated
within the
molding of vial 602. The magnetic element should be in close proximity to RFID
tag
650. A reed switch is incorporated within meter 601 in a suitable location
e.g. on the
top surface, side or base of meter 601. To power up and calibrate system 600,
the user
would positively place and hold vial 602 against a conveniently marked target
area on
meter 601 where the reed switch is located. The proximity would be such that
the
magnet within vial 602 triggers the reed switch to turn on meter 601 and
activate the
RFID circuitry. RFID reader 652 would poll for a short period of time e.g. 2
seconds,
22
CA 02579564 2007-02-26
interrogate RFID tag 650 and subsequently transfer the calibration code and
any other
information to meter 601. Once the information is retrieved the RFID circuitry
is
immediately switched off, and some form of feedback may be given to the user
indicating that they may stop holding vial 602 against meter 601. The
calibration
information retrieved may be displayed to the user for verification, before
the user is
given the option of whether or not they wish to proceed with a test.
[0087] Meter 601 may optionally be switched on to the data management mode by
pressing
the on/off button, and doing so will not power up the RFID circuitry.
Optionally,
insertion of a test sensor into meter 601 may power on meter 601 without
activating the
RFID circuitry, whereby the calibration information may still be entered
manually. If
meter 601 was switched on via micro-switch 612 and no response from an RFID
tag
650 was detected after polling for a short, set period of time e.g. 2 seconds,
the RFID
circuitry would power off and manual input of the calibration information may
be
requested or meter 601 may switch off entirely. This may occur if there was an
error
with RFID tag 650, an inconsistent placement of vial 602 to meter 601 or a
rogue
magnetic source potentially triggering micro-switch 612 without a via1602
present.
[0088] Referring now to Figures 11 and 12, provided is a further example
embodiment of an
analyte measurement system 600 according to the present invention. As
described
previously in relation to Figures 6, 8 and 9 meter 601 contains an RFID reader
652
housed therein, and vial 602 contains an RFID tag 650 either co-molded within
the
make-up of vial 602 or optionally as part of the label provided on the vial,
as described
in detail in co-pending patent application 'Container with RFID device for
storing test
sensors' (DDI5116GBPSP, filed at the UK Patent Office on 22 December 2005 in
the
name of LifeScan Scotland Ltd). Similar to analyte measurement system 500
described
in relation to Figures 8 and 9, system 600 also enables a user to ensure their
meter 601
is correctly calibrated at any time i.e. with or without a test strip 604
inserted into
insertion port 608.
[0089] In this example embodiment, the user touches vial 602 against a
specific location on the
external housing of meter 601, e.g. a specially designed locator arrangement
such as
23
CA 02579564 2007-02-26
concave recess 610, to enable calibration of a new vial 602 of test sensors.
Concave
recess 610 may be shaped in the negative form of vial 602, making it intuitive
to the
user to hold vial 602 against this area of meter 601. Optionally, an
additional indicator
may be provided to the user, for example by means of colouring and/or
illuminating
active area 610 of meter 601 in a distinctive way, or the addition of a label
including
text or a picture to encouraging the user to bring the vial into contact with
meter 601 at
this specific location. Optionally, active area 610 may include a second LED
612 to
provide further information regarding the status of the communication.
[0090] Contacting the meter at concave recess 610 activates a micro-switch 612
that in turn
initiates the RFID reader 652 to poll in search of RFID tag 650. Micro-switch
612 may
have the exclusive purpose of activating the RFID circuitry and thus
calibrating the
meter.
[0091] An indicator 614, such as an LED indicator for example, provided on the
external
housing of meter 601 may be used to give additional information regarding the
status of
the RF communication. Such an indicator may illuminate or flash to confirm
that the
antenna within meter 601 is emitting a radio signal to scan for the presence
of an RFID
tag. Similarly, extinction of such an indicator, or an obvious change in some
other way,
may supplement the screen display indicating to the user that calibration has
been
successful. It would be apparent to a person skilled in the art that different
indicators
may be used to reflect the status of the wireless communication, and is not
intended to
be restricted to those described herein.
[0092] From the sleep or off mode, meter 601 is activated either by contacting
vial 602 against
micro-switch 612 located within concave recess 610 on the external housing of
meter
601, or by inserting a test strip 604 into receiving port 608. Following an
optional
splash screen and display check, the calibration code previously stored in
meter 601
may optionally be displayed, followed by a display indicator showing that the
meter is
scanning for the RFID tag 650 to obtain the calibration information. RFID
readers 452,
552 and 652 and RFID tags 450, 550 and 650 depicted herein are shown by means
of
24
CA 02579564 2007-02-26
. ~ , example only, and are not intended to restrict the size or location of
either component
covered within the realms of this disclosure.
[0093] Optionally, system 600 according to the present invention may be used
as described or
in conjunction with a specifically designed case.
[0094] Figure 13 shows a flow diagram of the process steps involved in
calibrating the system
600 of Figures 11 and 12. When meter 601 is in off or sleep mode 615, the user
may
insert a test sensor, step 617, if they intend to make a measurement.
Inserting the strip
may automatically power-on the meter, step 618, and the meter would display a
prompt
requesting the user to contact micro-switch 612 with vial 602, step 619.
Alternatively
system 600 can be calibrated without a test sensor being inserted, by
contacting micro-
switch 612 within recess 610 with vial 602, step 616. Activation of micro-
switch 612
causes meter 601 to power-on, step 618, and the previous calibration code
stored within
the meter memory may optionally be displayed, step 620, prior to RFID reader
652
polling for RFID tag 650 to retrieve information such as the calibration
information,
step 622.
[0095] Whether meter 601 is powered-on by strip insertion or activation of
micro-switch 612,
the meter first displays the last calibration code saved in the meter memory,
step 620.
After a predefined period of time, an indicator is displayed showing that
reader 652
housed within meter 601 is polling for the information stored in the RFID tag
650
located within vial 602, step 622. If a vial is found, step 624, a
confirmation is
displayed to indicate successful calibration, step 626, and the meter is ready
to begin a
test or alternatively power-off if not required, step 628. In this embodiment,
system 600
incorporates polling timing options 1 or 2 described in relation to Figure 4,
retrieving
the calibration information from RFID tag 650 prior to sample application. If
a vial is
not found, or it is removed without successful communication, step 624, then
meter 601
may still be used for a test using the calibration code previously stored in
the memory.
If the user does not intend to test at this time, then meter 601 may return to
the off or
sleep mode, step 628. The user may be provided with the option to manually
calibrate
CA 02579564 2007-02-26
system 600, step 630, enabling them to continue with the test and ensures
accurate
results.
[0096] By utilizing a reed switch and magnet in this embodiment, the user
action of presenting
tagged vial 602 to meter 601 combines power up of system 600 with calibration.
This
embodiment therefore has the advantage of being efficient with regard to
polling time
and hence power consumption.
[0097] As described in relation to earlier embodiments, the RF circuitry will
only poll for the
RFID tag information for a short, defined period of time in order to conserve
battery
power. The predefined period would be programmed into the meter software,
causing
the RF circuitry to power-off independent of whether a tag was found or not.
Controlling the activation of the RF circuitry for such short periods of time
is beneficial
in the potential occurrence of micro-switch 612 being triggered accidentally,
for
example whilst being carried in a bag or pocket. An automatic RF circuitry
activation
time-out mechanism will maximize battery power conservation.
100981 Figure 14 shows an example system 700 according to a further embodiment
according
to the present invention, including a meter 701, a stereo jack connector 708,
a vial 702
incorporating an RFID tag 750 therein, a cradle 704 including an RFID reader
752, a
battery 705 and a cooperating engagement feature 706.
[0099] This last example embodiment provides a means for enabling meters
currently
commercially available to be implemented with RFID auto-calibration technology
as
described herein. Figure 14 shows a conventionally available meter 701, such
as the
OneTouch Ultra meter (available from Lifescan Inc., Milpitas, USA.), held in
close
proximity to a vial of test sensors 702 that incorporates an RFID tag 750 by
means of a
cradle 704. Cradle 704 includes an RFID reader 752 located in a position close
to the
engagement point for vial 702, hence in close proximity to RFID tag 750 to
facilitate
wireless communication there-between. Meter 701 is attached to cooperating
engagement feature 706 of cradle 704 via the stereo jack opening 708 in this
example
embodiment. Optionally, meter 701 may engage to cradle 704 via the strip port
26
CA 02579564 2007-02-26
connector, or optionally via any type of connector e.g. USB. Figure 14
provides one
example embodiment of a cradle according to the present invention; it would be
apparent to a person skilled in the art that different shapes, forms and
materials of
cradle are conceivable.
[0100] It is intended that cradle 704 be used each time a user purchases a new
vial 702 of test
sensors, enabling easy, quick and reliable calibration of their system 700
prior to use
for measuring their blood glucose concentration. Placement of vial 702 into
cradle 704
may trigger the RFID reader 752 within cradle 704 to poll for RFID tag 750 and
retrieve the information stored therein. Placement of meter 701 into cradle
704 engages
electronic communication between cradle 704 at engagement feature 706, with
stereo
jack connector 708, enabling transfer of information such as calibration
information to
meter 701. Transfer of the information from vial 702 would occur once for each
new
vial, when vial 702 and meter 701 were placed in cradle 704. Thus the
information
would be available before any subsequent measurements and calculations of
results
using said measurements.
101011 Cradle 704 would contain all necessary electronics required to read the
information
stored on RFID tag 750, retrieve this information, then interrogates the
appropriate
parameters within the memory of the meter and modifies them to include the
correct
information corresponding to the vial of test sensors being used. It is
anticipated that
cradle 701 may also include a power source 705, and may optionally include an
external indicator (not shown) such as an LED for example, that can be used to
inform
the user of battery charge status, thereby informing them when they need to
change the
battery. Optionally power source 705 may be rechargeable, therefore an
external
indicator may display the charging status to the user.
[0102] Such a cradle enables use of RFID technology for auto-calibration with
existing meters
and/or future meters without inbuilt RFID technology e.g. lower cost meters
whereby
the cradle may be provided as an accessory. Auto-calibration by means of RFID
technology provides the user with an easier and more reliable process than the
conventional manual process.
27
CA 02579564 2007-02-26
[0103] Calibration information corresponding to the specific batch of test
sensors would be
contained within RFID tag 750 and transmitted wirelessly to the memory of
meter 701
upon request from the RFID reader 752 housed within meter 701. Other
information
may also, optionally, be transferred between vial 702 and the memory of meter
701,
examples of such information are listed in Figure 5.
[0104] The limitations associated with using RFID technology to facilitate the
transfer of
calibration information, namely the limited read range and the limited
available battery
power, are in whole or in part overcome by the embodiments provided herein.
Each
embodiment ensures that the meter and vial, or container housing new test
sensors, are
within the limited read range of the RFID reader. Each embodiment may also
ensure
that the RFID circuitry is only powered-on for short periods when required,
and
automatically powers-off following successful transfer of stored data to
conserve
battery power. RFID auto-calibration may also provide the user with fewer
steps in the
process of performing a blood glucose measurement, and may reduce the overall
test
time if information transfer is completely invisible to the user.
[0105] It should be understood that various alternatives to the embodiments of
the invention
described herein might be employed in practicing the invention. It is intended
that the
following claims define the scope of the invention and that methods and
structures
within the scope of these claims and their equivalents be covered thereby.
28