Note: Descriptions are shown in the official language in which they were submitted.
CA 02588099 2007-04-03
WO 2006/042188 PCT/US2005/036339
A SPINAL IMPLANT STABILIZATION SYSTEM
CROSS-REFERENCE TO RELATED APPLICATIONS
[0001] This application claims priority to: U.S. Provisional Application No.
60/617,461 filed on October 8, 2004, entitled "MEDICAL DEVICES AND METHODS
FOR USE IN A MINIMALLY INVASIVE SPINAL FIXATION SYSTEM;" U.S.
Utility Application No. 10/990,221 filed on November 16, 2004, entitled
"INTERNAL
STRUCTURE STABILIZATION SYSTEM FOR SPANNING THREE OR MORE
STRUCTURES;" and U.S. Utility Application No. 10/990,272 filed on November 16,
2004, entitled "AN IMPLANT ASSEMBLY AND METHOD OF USE IN AN
INTERNAL STRUCTURE STABILIZATION SYSTEM;" and U.S. Utility Application
No. 10/989,715 filed on November 16, 2004, entitled "AN EXTENSION FOR USE
WITH STABILIZATION SYSTEMS FOR INTERNAL STRUCTURES;" the
disclosures of which are hereby incorporated herein by reference.
-1-
CA 02588099 2007-04-03
WO 2006/042188 PCT/US2005/036339
A SPINAL IMPLANT STABILIZATION SYSTEM
TECHNICAL FIELD
[0002] This invention relates to bone stabilization systems, and more
particularly to implant assemblies and their components for stabilizing bony
structures
such as vertebrae.
-2-
CA 02588099 2007-04-03
WO 2006/042188 PCT/US2005/036339
BACKGROUND
[0003] The human spine provides a vast array of functions, many of which
are mechanical in nature. The spine is constructed to allow nerves from the
brain to pass
to various portions of the middle and lower body. These nerves, typically
called the
spinal cord, are located in a region within the spine called the spinal canal.
Various nerve
bundles emerge from the spine at different locations along the lateral length
of the spine.
In a healthy spine, these nerves are protected from damage and/or undue
pressure thereon
by the structure of the spine itself.
[0004] The spine has a complex curvature made up of a plurality (24 in all)
of individual vertebrae separated by intervertebral discs. These discs hold
the vertebrae
together in a flexible inamler so as to allow a relative movement between the
vertebrae
from front to back and from side to side. This movement then allows the body
to bend
forward and backward, to twist from side to side, and to rotate about a
vertical axis.
Throughout this movement, when the spine is operating properly the nerves are
maintained clear of the hard structure of the spine.
[0005] Over time, or because of accidents, the intervertebral discs loose
height, become cracked, dehydrated, or herniated. The result is that the disc
height is
reduced leading to compression of the nerve bundles, causing pain and in some
cases
damage to the nerves.
[0006] Currently, there are many systems and methods at the disposal of a
physician for reducing, or eliminating, the pain by minimizing the stress on
the nerve
bundles. In some instances, the existing disk is removed and an artificial
disk is
substituted therefore. In other instances, two or more vertebrae are fused
together to
prevent relative movement between the fused discs.
[007] Often there is required a system and method for maintaining, or
recreating, proper space for the nerve bundles that emerge from the spine at a
certain
location. In some cases a cage or bone graft is placed in the disc space to
preserve, or
restore, height and to cause fusion of the vertebral level. As an aid in
stabilizing the
vertebrae, one or more rods or braces are placed between the fused vertebrae
with the
purpose of the rods being to support the vertebrae, usually along the
posterior of the
-3-
CA 02588099 2007-04-03
WO 2006/042188 PCT/US2005/036339
spine while fusion takes place. These rods are often held in place by anchors
which are
fitted into the pedicle of the vertebrae. One type of anchor is a pedicle
screw, and such
screws come in a variety of lengths, diameters, and thread types.
[008] One problem when connecting the braces to the anchors is to position
the braces in place as quickly as possible and without doing more damage to
the
surrounding tissue and muscle of the patient as is absolutely necessary. For
that reason,
procedures have been developed that allow the physician to secure the anchors
in the
bony portion of the spine and to then connect the brace between the anchors.
Techniques
have been developed to allow the surgeon to perfornl this procedure in a
minimally
invasive manner, utilizing a percutaneous method.
[009] In one such procedure, a first pedicle screw is inserted in a first
vertebra to be stabilized. This screw is inserted using a tube, or cannula,
extending
through the patient's skin to the pedicle portion of the vertebrae. A second
pedicle screw
is inserted through a second cannula into the second vertebrae to be
stabilized. Under
current practice, the physician then must work the brace, or other supporting
device, so
that each brace end is positioned properly with respect to the preplaced
pedicle screws.
In order to properly position the brace ends fluoroscope pictures are taken as
the brace is
worked into position. It is difficult for the physician to know the exact
orientation of the
brace and even to know for certain when the brace ends have been properly
positioned.
U. S. Patent No. 6,530,929 shows one instrument for positioning a
stabilization brace
between two preplaced anchors.
[0010] Another problem with both of the approach discussed above, is that
the braces must be made significantly longer than the distance between the
pedicle
screws to allow for proper attachment of the brace ends to the screws.
Placement of the
brace is sensitive to anchor alignment since the adjustment establishes the
trajectory of
the brace. If this trajectory is not established properly, the brace would
have to pass
through tissue or would be blocked by bone. Also, the design of the brace
necessitates a
separate incision in the back of the patient, and the learning curve for
manipulation the
insertion device of the '929 patent is difficult.
[0011] A more recent approach has been to insert cannulae over the
respective pedicle areas of the vertebrae to be stabilized, and then measure
the distance
-4-
CA 02588099 2007-04-03
WO 2006/042188 PCT/US2005/036339
between the cannulae. This measurement is then used to select, or cut a rod,
adding a bit
to the dimension to ensure that the rod can be rigidly affixed to each anchor.
In addition,
each rod must be bent a certain amount (or a pre-bent rod utilized) to reflect
the
curvature of the spine. Once the proper rod dimension and shape is obtained
each end of
the rod is positioned in its respective cannulae and the rod is worked
downward toward
the anchors passing through a separation of muscle and tissue from the skin
line to the
pedicle site. This placement of the rod is facilitated by a long handheld
gripper which
must then be manipulated to position the rod ends over the respective anchors
so as to
capture the rod end with set screws in the tops of the respective anchors.
Proper
positioning of the rod ends is difficult, and requires repeated use of
fluoroscopy to insure
that the rod is fully seated and in a correct position. If the rod is not
fully seated, the
construct will not assemble correctly and will most likely fail. Further, the
failure of the
construct will most likely not be immediately apparent.
(0012] What is needed is an improved stabilization assembly which uses
improved screw heads, connectors or rods, where the rod being preassembled
with a
bone anchor and movable to span from one bone anchor to another bone anchor
using
extensions and tools designed to work with the assembly.
-5-
CA 02588099 2007-04-03
WO 2006/042188 PCT/US2005/036339
SUMMARY
[0013] The present invention describes various embodiments of assemblies
for use in spinal stabilization procedures. The assembly includes a first and
second bone
anchor assemblies inserted into a first and second bony structure, such as the
pedicle of a
vertebra.
[0014] A first screw head for use with a bone anchor, the screw head
characterized by: a proximal end having a center aperture for coupling to a
locking
means; a distal end for coupling to a proximal end of the bone anchor wherein
the distal
end has a receptacle for receiving a proximal end of the bone anchor; a
central cavity
defined within the body of the screw head; a rotatable attachment means
disposed within
the cavity for allowing a connector means to slidingly couple to the head and
to rotate
with respect to the head; and a mating means for allowing the screw head to
temporarily
mate with a tubular extension means.
[0015] The first screw head may be further characterized by a pair of
elongated vertical openings for capturing tabs protruding from the rotatable
coupling
means, the vertical openings defined within opposing sides of the body of the
screw
head.
[0016] The first screw head may be further characterized by a pair of
unbounded openings for allowing the connector to rotate from a longitudinal
position to
a horizontal position, the openings formed within opposing sides of the body
of the
screw head.
[0017] Furthermore, the rotatable attachment means includes a means to
torsionally lock the connector to the rotatable attachment means.
[0018] The may be a second screw head for use with a bone anchor, the
screw head characterized by: a proximal end having an aperture for coupling to
a locking
means; a distal end for coupling to a proximal end of the bone anchor wherein
the distal
end has a receptacle for receiving a proximal end of the bone anchor; a
central cavity
defined within the screw head; and a groove for coupling with a snap ring,
wherein the
groove is formed at least around a portion of the interior walls of the
cavity.
-6-
CA 02588099 2007-04-03
WO 2006/042188 PCT/US2005/036339
[0019] The second screw head may be further characterized by a snap ring
for vertically restraining an end of a connector, the snap ring sized to mate
with the
groove.
[0020] The second screw head may be further characterized by an
unbounded opening sized to allow a connector shank to rotatably pass through
the
opening such that an enlarged end of the connector passes through the aperture
and is
laterally restrained by the unbounded opening.
[0021] Both screw heads may be further characterized in that the receptacle
includes internal threads for allowing the receptacle to threadingly couple to
the bone
anchor.
[0022] Both screw heads may be fiu-t11er characterized in that the center
aperture has an interlocking structure adapted to engage a locking means.
[0023] Both screw heads may be further characterized by a locking means
having a thread shape, wherein the thread shape includes: a root portion which
is
proximal to the shank having a root thickness parallel to a longitudinal axis
of the shank,
crest portion which is distal from the shank having a crest thickness parallel
to the
longitudinal axis of the shank, wherein the crest thickness is thicker than
the root
thickness, and wherein the root portion is joined to the crest portion by a
transition
portion which comprises two substantially straight edges, wherein at least one
of the
straight edges flares outwardly from the root portion to the crest portion.
[0024] Furthermore, there may be a medical implant component
characterized by: the first screw head, and a connector means slidingly
coupled to the
rotatable cradle means.
[0025] Furthermore, there may be a medical implant system characterized
by: the first screw head; a first bone anchor coupled to the first screw head,
the second
screw head; a second bone anchor coupled to the second screw head, and a
connector
having a proximal end and a distal end, wherein the distal end is slidingly
coupled to the
rotatable cradle means of the first screw head and the proximal end is
positioned within
the central cavity of the second screw head.
-7-
CA 02588099 2007-04-03
WO 2006/042188 PCT/US2005/036339
[0026] There may also be a multilevel medical implant system
characterized by the first screw head used as an end screw; a first end bone
anchor
coupled to the first screw head, at least one intermediate screw head having
at least two
openings for allowing a connecting member to pass laterally through the screw
head, at
least one intermediate bone anchor coupled to the second screw head, the
second screw
head used as an end screw; a second end bone anchor coupled to the second
screw head,
and a connector having a proximal end and a distal end, wherein the distal end
is
slidingly coupled to the rotatable cradle means of the first end screw head
and the
proximal end is positioned within the central cavity of the second end screw
head.
[0027] Furthermore, both screw heads may be characterized in that the
mating means includes at least one partial rim extending about the aperture
and a notch
fonned within the partial rim.
[00281 In some embodiments, there may be an extension for use with a
bone anchor assembly characterized by: a tubular body which includes an
engagement
means at a distal end for connecting to a screw head; and a locking means for
locking the
tubular body to the screw head, the locking means including: a sliding lock
means for
preventing relative movement between the tubular body and the screw head,
wherein the
sliding means is disposed longitudinally along the tubular body; a rotatable
actuating
means for moving the sliding lock means from a retracted position to an
extended
position for engaging the screw head, a biasing means for keeping the
rotatable actuating
means rotated in a locked position.
[0029] The extension may be characterized in that the sliding lock means is
adapted to couple to a notch formed in a partial rim extending about an
aperture in the
screw head.
[0030] The extension may be characterized by at least one unbounded
longitudinal slot for allowing a connector to pass through the slot, wherein
the slot is
positioned at the distal end of the tubular body.
[0031] The extension may be characterized in that the longitudinal slot
includes a wide portion and a narrow portion, wherein the narrow portion is
located at
the distal end of the tubular body.
-8-
CA 02588099 2007-04-03
WO 2006/042188 PCT/US2005/036339
[0032] The extension may be characterized the engagement means at
includes at least one twist means for controllably engaging a corresponding
mating
means on the screw head.
[0033] The extension may be characterized by at least one longitudinal
opening for allowing a proximal end of a connector to be rotated out of the
extension
through the opening.
[0034] The extension may be characterized by at least one longitudinal
opening for allowing entry of an end of a connector.
[0035] There may be a medical implant system having at least two
extensions as described above, characterized by at least one longitudinal
opening in one
of the extensions for aiming one extension opening relative to another
extension opening
so that a connector may be transferred from one extension to the other.
-9-
CA 02588099 2007-04-03
WO 2006/042188 PCT/US2005/036339
BRIEF DESCRIPTION OF THE DRAWINGS
[0036] For a more complete understanding of the present invention,
reference is now made to the following descriptions taken in conjunction with
the
accompanying drawing, in which:
[00371 FIGURE 1 is a perspective view of an embodiment of an internal
stabilization system in accordance with the present invention;
100381 FIGURE 2 is a perspective view showing a cut-away of the head
holding the rod from FIGURE 1;
[0039] FIGURE 3 is a perspective view of the head shown in FIGURE 2.
[0040] FIGURE 4 shows a sectional view of FIGURE 3 taken along line 3-
3;
[0041] FIGURE 5 is a perspective view of an embodiment of the anchor
from FIGURE 1;
[0042] FIGURE 6 is a cross-section of the anchor from FIGURE 5 showing
partially cannulated channe1504;
[0043] FIGURE 7 is a perspective view of the rod from FIGURE 1
showing the distal end with a drive mechanism;
[0044] FIGURE 8 is a perspective view of an embodiment of the slide ring
from FIGURE 1.
[0045] FIGURE 9 is a perspective view of the rod of FIGURE 7 mated
with the slide ring of FIGURE 8.
[0046] FIGURE 10A is a cut-away view showing the drive mechanism of
the rod of FIGURE 7 mated with the anchor of FIGURE 5.
[0047] FIGURE l OB is an alternate cut-away view of the rod of FIGIJRE 7
capturing the anchor of FIGURE 5 in a pocket beyond the receiving threads of
the rod;
-10-
CA 02588099 2007-04-03
WO 2006/042188 PCT/US2005/036339
[0048] FIGURE 11 is a perspective view of the rod and anchor assembly of
FIGURE 1 OA mounted with the head of FIGURE 3;
[0049] FIGURE 12 is a cross-sectional view of FIGURE 11;
[0050] FIGURE 13 is a perspective view of the rod, anchor and head
assembly of FIGURE 11 where the drive mechanism of the rod has been disengaged
from the anchor and rotated within the head;
[0051] FIGURE 14 is a perspective view of an embodiment of a capturing
head mounted to an anchor in accordance with certain embodiments of the
present
invention;
[0052] FIGURE 15 is a detailed perspective view of the capturing head of
FIGURE 14;
[0053] FIGURE 16 is a perspective view of an embodiment of a clip ring
used with the capturing head of FIGURE 15;
[0054] FIGURE 17 is a cross-section view of a capturing head mounted on
an anchor with a locking cap inserted in the capturing head;
[0055] FIGURE 18 is a perspective view of a locking cap according to
certain embodiments of the present invention;
[0056] FIGITRE 19 is a cross-sectional view of the locking cap of FIGURE
18;
[0057] FIGURE 20 is a cross-sectional view of the locking cap of FIGURE
18 threaded into the capturing head of FIGURE 15;
[0058] FIGURE 21 is a cross-sectional view of an embodiment of the
locking cap and capturing head employing helical dovetail interlocking threads
according
to certain embodiments of the present invention;
[0059] FIGURE 22a is a cross-sectional view of an anchor, head, rod, and
locking cap assembly;
-11-
CA 02588099 2007-04-03
WO 2006/042188 PCT/US2005/036339
[0060] FIGURE 22b is a cross-sectional view of an anchor, capturing head,
rod, and locking cap assembly;
[0061] FIGURE 23 is a cross sectional assembly showing an alternate
embodiment of a locking cap in relation to a poly-axial head, anchor, rod, and
slide ring
assembly in accordance with certain embodiments of the present invention.
[0062] FIGURE 24 is a cross-section view of the stabilization system of
FIGLTRE 1;
[0063] FIGURE 25 is an exploded perspective view of an extension,
cannula assembly in accordance with certain embodiments of the present
invention;
[0064] FIGURE 26 is a perspective view of the assembly of FIGURE 25;
[0065] FIGURE 27 is a perspective view of the assembly of FIGURE 26
rotated 90 degrees;
[0066] FIGURE 28 is a perspective view of the tube end of the assembly
shown in FIGURE 25;
[0067] FIGURE 29 is a perspective view of the tube end of FIGURE 28
rotated clockwise approximately 90 degrees;
[0068] FIGURE 30 is a bottom view of the tube end of FIGURE 28
illustrating a dovetail channel;
[0069] FIGURE 31 is a prospective view of the drive head from FIGURE
25;
[0070] FIGURE 32 is a perspective view of the slide from FIGURE 25;
[0071] FIGURE 33 is a perspective view of twist ring 3005;
[0072] FIGURE 34 is a perspective view of the head of FIGURE 3 in
relation to the tube of FIGURE 25;
-12-
CA 02588099 2007-04-03
WO 2006/042188 PCT/US2005/036339
[0073] FIGURE 35 is a perspective view of the assembly of FIGURE 34
with the tube rotated 180 degrees.
[0074] FIGURE 36 is a cross-sectional bottom view of the assembly of
FIGURE 34;
[0075] FIGURE 37 is a perspective view of the assembly of FIGURE 34
with the tube fully engaged with the head.
[0076] FIGURE 38 is a cross-sectional bottom view of the assembly of
FIGURE 37;
[0077] FIGURE 39 is a perspective view of the assembly of FIGURE 37
rotated clockwise 90 degrees;
[0078] FIGURE 40 is a cross-sectional bottom view of the assembly of
FIGURE 39;
[0079] FIGURE 41 is an exploded perspective view of the assembly of
FIGURE 11 in relation to the assembly of FIGURE 25 in relation a driver, and a
handle
assembly in accordance with certain embodiments of the present invention;
[0080] FIGURE 42 is a perspective view of the assemblies of FIGURE 41
mated together in accordance with certain embodiments of the present
invention.
[0081] FIGURE 43 is an exploded perspective view of the assembly of
FIGURE 14 in relation with the assembly of FIGURE 25, a drive tool, and a
handle
assembly in accordance with certain embodiments of the present invention;
[0082] FIGURE 44 is a perspective view of the assemblies of FIGURE 43
mated together in accordance with certain embodiments of the present
invention;
[0083] FIGURE 45 is a side view of one embodiment of a rod transfer tool
operating to transfer a rod from the assembly of FIGURE 11 into the capturing
head of
the assembly of FIGURE 14 using the assemblies of FIGURE 25;
-13-
CA 02588099 2007-04-03
WO 2006/042188 PCT/US2005/036339
[0084] FIGURE 46a shows a cross-section through section 65a-65a of
FIGURE 45;
[0085] FIGURE 46b shows a cross-section through 65b-65b of FIGURE
46a;
[0086] FIGURE 47 is a perspective view of a drive tool and a counter
torque handle in accordance with certain embodiments of the present invention,
where
the drive tool is used to install the locking caps of FIGUR.E 18;
[0087] FIGURE 48 is a perspective view of a drive mechanism in
accordance with certain embodiments of the present invention;
[0088] FIGLTRE 49a is a perspective view of an embodiment of a rod
intended to span three pedicles according to certain embodiments of the
present
invention;
[0089] FIGURE 49b is a perspective view of the rod of FIGURE 49a
rotated 180 degrees;
[0090] FIGURE 50 is a partial section view of the rod of FIGURE 47
mounted to a head and anchor assembly which is mounted to a guide assembly;
[0091] FIGURE 51 is a partial section view of the assembly of FIGURE 41
with a tool shown rotating the rod into position;
[0092] FIGU].tE 52 is a side view of a three pedicle assembly according to
certain embodiments of the present invention;
[0093] FIGURE 53 is a perspective view of an embodiment of a cannula
for the three pedicle rod according to certain embodiments of the present
invention;
[0094] FIGURE 54 is a partial section view of the assembly of FIGURE 52
with the rod spanning three anchor assemblies;
[0095] FIGURE 55 is a perspective view of the three pedicle assembly with
locking caps installed;
-14-
CA 02588099 2007-04-03
WO 2006/042188 PCT/US2005/036339
DETAILED DESCRIPTION
[0096] To better understand the devices, assemblies, tools, and methods
described below, and understanding of the procedure through which the back
stabilization of certain embodiments of the present invention is placed into
the vertebrae
of a patient is required. Reference is made to the figure numbers where
specific
embodiments of the devices, assemblies, tools and methods are described in
greater
detail to aid in the understanding of those particular items.
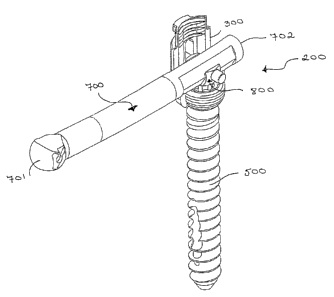
[0097] FIGURE 1 shows stabilization assembly 10 which includes poly-
axial head assemblies 100 and 200 shown interconnected by rod 700. Rod 700 is
shown
fastened securely to assemblies 100 and 200 by locking caps 1800. As described
above,
poly-axial rod capturing assembly 100 is anchored in the patient's pedicle by
anchor 500
along a guide wire which passes through off axis screw guide 504 in anchor
500. When
assembly 100 is positioned, a measurement is taken to the pedicle where the
second
assembly is to be positioned. This measurement determines the length of rod
700. The
poly-axial rod-assembly 200 with proper size rod 700 is chosen and assembly
200, with
anchor 500 attached to head 300, is positioned in the selected other pedicle
with torque
being applied to anchor 500 through drive mechanism in distal end 702 of rod
700
which, at that point, is in-line with the longitudinal axis of assembly 200.
From the in-
line position, rod 700 is rotated such that it has and end captured by poly-
axial rod-
capturing head 1500.
[00981 While stabilization assembly 10 is shown connected by rod 700, any
type of connector for comiecting anchor assemblies 100 and 200 could be used
and is
within the scope of the present invention. Such connectors could include any
rod,
implant, fastener, or brace used for the purpose of connecting anchors mounted
in bony
structures. Further such connectors may be rigid, as rod 700, may be elastic,
as bands,
cables or artificial Iigaments, or may be dynamic such as the dynamic brace
described in
United States Patent Application, Serial Number 10/914,751 filed August 9,
2004 and
entitled SYSTEM AND METHOD FOR DYNAMIC SKELETAL STABILIZATION,
which is herein incorporated by reference.
[0099] FIGURE 2 shows assembly 200 and it has poly-axial head 300,
anchor 500, rod 700 and slide ring 800. Slide ring 800 allows rod 700 to
translate in
-15-
CA 02588099 2007-04-03
WO 2006/042188 PCT/US2005/036339
position so that proximal end 701 can be carefully adjusted to fit into poly-
axial rod
capturing head 1500 of assembly 100 as shown in FIGURE 1. Rod 700 includes a
distal
end 702 with a drive mechanism, and a proximal end 701 shaped such that is can
be
captured by poly-axial rod-capturing head 1500 shown in FIGURE 1.
[0100] FIGURE 3 shows poly-axial rod-assembly head 300 having main
body 316 and arms 318a and 318b. Arms 318a, b are created by channel 320 on
the
center line of poly-axial head 300. A bore extends through the longitudinal
center line of
poly-axial head 300 and the bore has a spherical portion having threads 324
cut therein.
As will be seen with reference to FIGURES 10a and 10b, the spherical portion
allows the
head to rotate about the top of a bone anchor while threads 324 allow head 300
to gain
access to, and interconnect to the head of the bone screw.
[0101] Head 300 also has channels 326a and 326b in opposing arms 318a,
b, which arms receive slide ring pins of bracket 800 as will be described.
Head 300 also
has machined surfaces 328a and 328b. These surfaces allow for locking onto a
guide tip
or extensions to be described hereinafter. Surfaces 328a, b have torquing
surfaces 330a
and 330b for locking purposes, also to be described hereinafter. Arm 318b also
has cuts
332 and 334, which accept locking member 3700, shown in FIGURE 32 to enable
locking of extensions to head 300 as will be described in greater detail with
reference to
FIGURES 30-32. Machined surface 328a also includes a recessed area 336 which
is
positioned as a keyway to allow an extension to be locked onto head 300 in
only one
direction. Therefore surface 336 is constructed only on surface 328a and not
on surface
328b. Head 300 also includes screw threads 338 for receiving locking cap 1800
of
FIGURE 18.
[0102] FIGURE 4 shows a sectional view of FIGURE 3 taken along line 3-
3, and illustrates spherical portion 350 with threads 324, and cylindrical
portion 352
formed by interior wall 401. Spherical portion 350 with threads 324 allow the
threaded
portion of anchor 500 from FIGURES 1 and 5, to be threaded onto head 300. When
anchor 500 is threaded beyond threads 324, the threaded portion of anchor 500
becomes
captured in cylindrical portion 352, thereby allowing anchor 500 to move in
relation to
head 300 up to a 30 angle from the center line, which translates into 60
degrees of
conical freedom. While 60 degrees of conical freedom is described with
reference to the
-16-
CA 02588099 2007-04-03
WO 2006/042188 PCT/US2005/036339
preferred embodiment, any amount of poly axial movement is well within the
scope of
the present invention.
[0103] FIGURE 5 illustrates anchor 500, which in this einbodiment is a
screw having tlireads 506 which are inserted into the pedicle or other bony
structure.
While anchor 500 is shown as a screw, any other type of anchor that could be
inserted
into a pedicle of a vertebra is within the scope of the present invention.
Anchor 500 also
includes screw threads 501 which thread in the opposite direction from
tlireads 506 for
attaching anchor 500 to head 300 shown in FIGURE 4. Anchor 500 also includes a
torque transfer drive mechanism 505, which mates with torque transfer drive
706 shown
in FIGURE 7, used in driving anchor 500 into the pedicle of the spine. Anchor
500 also
includes stop limiting collar 502, which is slightly larger in diameter then
spherical
portion 350 of head 300 shown in FIGURE 4, allowing head 510 with threads 501
of
anchor 500 to be movably held by cylindrical portion 352 of head 300, thereby
allowing
rotation of head 300 in relation to anchor 500.
[0104) As discussed, anchor 500 also includes threads 506 which are bone
threads used to purchase anchor 500 into a pedicle. Included near the distal
end of
anchor 500 is off-axis screw guide 504, which is a cylindrical bore passing
through the
treads 506 of anchor 500 and out tip 512. This bore is used to pass anchor 500
down a
guide wire to direct the anchor into a pre-tapped hole in the pedicle as
discussed.
[0105] FIGURE 6 is a cross-section of anchor 500 showing off-axis screw
guide 504. This channel, at its distal end 601, receives a guide wire, the end
of which is
positioned within the tapped hole in the bone. The screw is passed down the
guide wire
until distal end 601 enters the tapped hole in the pedicle. Off-axis screw
guide 504 is at
angle alpha from the center line of anchor 500. Alpha can be any small angle,
but is
preferably in the range of 100 - 15 . As a bore, or cannulation, through the
entire screw,
as is commonly practiced in the industry, weakens the screw and limits the
size of guide
wire that can be employed, the off-axis screw guide 504, allows for the
benefit of placing
the screw in the tapped hole using a guide wire, while preserving the strength
of a non-
cannulated screw. After the screw has been delivered, the guide wire is
removed and the
screw can then be screwed into the pre-tapped hole in the pedicle.
-17-
CA 02588099 2007-04-03
WO 2006/042188 PCT/US2005/036339
[0106] FIGURE 6 also illustrates drive mechanism 505 for engagement by
drive surfaces of tightening tools, such as the drive tool shown in FIGURE 52
or the
drive mechanism of rod 700 shown in FIGURE 7, for driving anchor 500 into the
bone.
Stop limiting collar 502 allows a mated head, such as poly-axial rod-assembly
head 300
from FIGURE 3 or poly-axial rod-capturing head 1500 from FIGURE 15, to have a
poly-
axial motion with respect to anchor 500.
[0107] As discussed above, to create a tapped hole in a pedicle, the surgeon
inserts a bone biopsy needle into the bone. Then the top portion of the bone
biopsy
needle is removed and pulled out leaving a cannula (an open tube) extending
from
outside the patient down to the newly created hole in the bone. A guide wire,
which can
have a diameter on the order of two millimeters, is passed down inside the
cannula and
over the guide wire and dilators are sent down to create a passageway between
the
muscle tissue.
[0108] Next, the anchor, or bone screw, must be inserted into the hole.
Typically, a cannulated screw is used with a hole all the way through the
longitudinal
axis. Because some of the screws an be as small as 5.5 millimeters on the
major
diameter, the minor diameter is extremely small. Consequently, only a very
small hole
will work because otherwise the screw loses strength. Thus, the holes tend to
be small,
on the order of 1 millimeter. However, even with a cannulation of 1 millimeter
the
screws may break, either as a result of misplacement, or when they are used on
heavy or
active patients. Also, a small cannulation diameter requires a small guide
wire, which in
turn creates several problems for the surgeon. Small wires can kink, or become
bent, or
get caught when the screw is being advanced.
[0109] When a guide wire is caught inside a screw it begins to advance
with the screw and can move beyond the plane of the vertebral body thereby
puncturing
through the anterior portion of the vertebral body causing trauma to the soft
tissue and
vessels anterior to the vertebral body. The anchor of certain embodiments of
the present
invention, which is formed with the off-axis screw guide, together with a
cannula with a
groove down its entire length allows the guide wire to remain outside the
cannula while
the screw is within the cannula. This allows for much thicker guide wires to
be used, for
example 2 millimeters in diameter, without sacrificing the strength of the
screw or
-18-
CA 02588099 2007-04-03
WO 2006/042188 PCT/US2005/036339
having guide wire issues of kinking or wire advancement while the screw is
being
positioned.
[0110] FIGURE 7 illustrates rod 700 which has distal end 702 in which
drive mechanism 706 is positioned. Drive mechanism 706 mates with drive
mechanism
505 as shown in FIGURE 12. Rod 700 also includes rod curved body portion 703
in
which the rod is partially curved to conform to a patient. Sliding surfaces
705 are
constructed to engage with slide ring 800 (FIGURE 8).
[0111] Proximal end 701 of rod 700 must accomplish at least two
functions, first driving the rod/poly-axial head assembly as an extension of a
driver, such
as the one shown in FIGURE 48, and second being captured by poly-axial rod-
capturing
assembly 1500 shown in FIGURE 15, which allows for the repositioning of rod
700 from
the in-line position shown in FIGURE 11 to the "horizontal" position for
mating with
assembly 100 as shown in FIGURE 1. Specifically, rod 700 has driving surface
710 to
engage a special head of the driving tool shown as head 4901 in FIGURE 49.
Driving
surface 710 engages with the head of the driving tool and allows torque to be
transferred
from the driving tool through rod 700 and into anchor 500 which is then
screwed into a
pedicle or other bony structure. Opposing drive surface 710 is locking surface
714
which is designed to engage with the bottom surface of locking cap 1800 from
Figure 18.
The locking of rod 700 using locking caps 1800 will be discussed in greater
detail with
reference to FIGURES 22 and 23
[0112] Proximal end 701 of rod 700 also includes spherical portion 711
having a diameter larger than the diameter of rod 700 for the purposes of
allowing the
cavity of poly-axial rod-capturing head 1500 (FIGURE 15) to capture rod 700
and to
keep the spherical portion 711 engaged with head 1500 as will be discussed
with greater
detail with respect to FIGURE 15.
[0113] Proximal end of rod 700 must also be capable of being captured by
rod transfer too15700 shown in FIGURE 57, such that the rod transfer tool is
engaged
with rod 700 until it is nearing the horizontal position at which point rod
700 must
disengage from the rod transfer tool so that it may be engaged with the poly-
axial rod-
capturing head. Rod transfer tool engagement mechanism 720, which is
duplicated on
the opposing side of spherical portion 711 includes ramp 715 which allows
tines 5905a
-19-
CA 02588099 2007-04-03
WO 2006/042188 PCT/US2005/036339
and b from FIGURE 59 of the rod transfer tool to slide up, over lip 722, and
into recess
713, thereby engaging end 701 with the rod transfer tool until tines 5905a and
b of rod
transfer tool 5700 are turned to the point that they can slide out of exit
ramp 716, which
controls the release of the tine from end 701. While engaged in recess 713,
tines 5905a
and b are free to rotate about an axis normal to flats 712a and 712b.
[0114] As the tool pushes on proximal end 701, that end rotates toward
assembly 100 (FIGURE 1) until end 701 of rod 700 is in position to be captured
by head
1500. At that point, the angle of rod 700 with the pushing instrument is such
that the
tines of the instrument are pushed out of cylindrical recess 713 and out
through exit ramp
716 thereby releasing proximal end 701 to be engaged into head 1500. The
operation of
rod transfer engagement mechanism, along with the distal end of the rod
transfer tool of
FIGURE 57 will be discussed with greater detail with reference to FIGURES 63
and 65a.
[0115] Once engaged with both heads 300 and 1500, locking caps can be
inserted into each of heads 300 and 1500, such that the ends of the locking
caps are
engaged with locking surfaces 714 and 704. Locking surfaces 714 and 704 are
preferably curved to have locking cap 1800, shown in FIGURE 18, not force rod
700
into a position that is normal to the bottom of the locking cap, but rather a
position that
allows rod 700 to assume its natural rotation. Thereby allowing for
installation of the
rod in positions that accounts for variations in anatomical positioning of the
vertebral
bodies.
[0116] FIGURE 8 illustrates slide ring 800 which includes main body
cylindrical portion 805, and extension dog-ear tines 802a and 802b. Dog-ear
tines 802a,
and b allow rod 700 to register with racetrack openings 326a, b of head 300 as
shown in
FIGURE 3. This facilitates up-down movement of rod 700 with respect to
assembly 200
(FIGURE 1). This then allows for a variation in height of the rod to occur
when the rod
is in process of being translated from an in-line position to an approximately
90 degree
position for engaging rod-capturing assembly 100.
[0117] Also, as shown in FIGURE 8, slide ring 800 includes a portion
having flats 803a, 803b and 803c and partial flats 806a and 806b forming a
hexagonal
saddle in which sliding surfaces 705 rest. While a hexagonal saddle is shown,
any shape
of saddle may be used that captures rod 700 in a manner that prevents rotation
of rod 700
-20-
CA 02588099 2007-04-03
WO 2006/042188 PCT/US2005/036339
within the slide ring and allows rod 700 to slide freely therein. As stated,
these surfaces
are constructed to allow slide ring 800 to mate with flats 705 of rod 700 and
to allow rod
700 to slide in head 300 while being held by slide ring 800 which in turn is
held by ears
802a and 802b inside openings 326a and 326b, respectively, of head 300.
Surface 804 is
used to contact anchor 500 from FIGURE 5 during the locking of the poly-axial
head
assembly, which will be discussed in greater detail with reference to FIGURE
22a
[0118] FIGURE 9 shows rod 700 mated with slide ring 800 which allows
rod 700 to move laterally with respect to slide ring 800. The preferred
distance of such
movement, approximately 1 centimeter of translation, is allowed along track
705. For
multilevel procedures, discussed with reference FIGURES 67-77, approximately
15
millimeters of translation is required.
[0119] FIGURES l0a and b show the mating of head 300 with anchor 500,
with the following description applying also to the mating of head 1500 from
FIGURE
15 with anchor 500. Anchor 500 has stop limiting collar 502 and threads 501.
As
threads 324 in spherical portion 350 of head 300 advance beyond threads 501,
spherical
portion 510 of anchor 500 becomes captured by cylindrical portion 352 of head
300.
This allows angulation, shown in FIGURE l Ob, between head 300 and anchor 500
with
the preferred angulation to be about 30 degrees from centerline, yielding 60
degrees
conical motion. An interesting feature to note is that screw threads 501 of
anchor 500
and screw threads 324 of spherical portion 350 essentially bind creating a
cold weld type
of mate when pressure is applied from the top in an axial direction through
the rod and
slide ring to drive 505, such as when locking cap 1800 from FIGURE 18 is
tightened into
head 300.
[0120] FIGURE 11 shows a complete poly-axial rod assembly 1101
formed by anchor 500 mated with poly-axial rod assembly head 300 which is in
turn
holding rod 700, where rod 700 is shown in its in-line orientation with anchor
500.
[0121] FIGURE 12 is a cross-sectional view of FIGURE 11 showing that
in the in-line orientation, drive mechanism 706 of the rod 700 is mated with
drive
mechanism 505 of anchor 500, such that assembly 1101 is ready to be delivered
into the
pedicle as discussed above.
-21-
CA 02588099 2007-04-03
WO 2006/042188 PCT/US2005/036339
[0122] FIGURE 13 shows rod 700 in the process of being translated from
the in-line orientation such as would occur when rod 700 is being rotated for
mating with
a rod-capturing head assembly (not shown). The procedure and tool used for
this
translation will be described hereinafter. Note that during this translation,
ears 802a and
802b (not shown) move upward in opening 326a while rod 700 is free to move
laterally
with respect to head 300 via flats 705 riding in the slide ring.
[0123] FIGURE 14 shows a poly-axial rod-capturing assembly 100 having
rod-capturing head 1500 positioned on anchor 500. Clip ring 1600 is shown
positioned
in groove 1510 constructed on the inside face of body 1401. Ring 1600 opens by
moving backwards as force is applied to it by mating end 701 of rod 700 (not
shown).
Once end 701 passes into housing 1401, ring 1600 resumes its normal dimensions
thereby preventing rod end 701 from coming out of body 1401 resulting in rod
end 701
being captured by head 1500. The force required to deform ring 1600 and the
returning
of ring 1600 back to its original position yields a tactile as well as audible
sensation
which can be felt and heard by the surgeon performing the procedure, allowing
the
surgeon to know that the rod has be placed in the proper position in head
1500. Note that
the back wall of clip ring groove 1510 is of a greater diaineter than outer
diameter 1604,
shown in FIGURE 16, of clip ring 1600. Therefore, clip ring groove 1510 has
room to
allow for the expansion of clip ring 1600 into the groove to allow spherical
portion 711
of rod 700 from FIGURE 7 to pass by clip ring 1600.
[0124] FIGURE 15 shows head 1500 having threaded spherical portion
1520 for mating with anchor 500 as discussed above with respect to head 300.
Reduced
area 1521 a and 1521b form a groove with ledge 1501 acting as a stop. This
grove
accepts an extension, such as the extension shown in Figure 25-27. Body 1401
includes
a horseshoe opening 1522 and interior surfaces 1506a and 1506b. Horseshoe
opening
1522 is sized to accept body 703 of rod 700 from FIGURE 7, while being smaller
than
spherical portion 711 of rod 700, preventing rod 700 from pulling out of head
1500.
[0125] Above surface 1501 there are two arms, 1521a and 1521b. Arms
1521a and 1521b include torquing surfaces 1523a and 1523b which allow delivery
of a
counter-torque when held by a tool as will be described with reference to
FIGURE 47.
When final tightening is given to locking cap 1800, surfaces 1523a and 1523b
mate with
-22-
CA 02588099 2007-04-03
WO 2006/042188 PCT/US2005/036339
the tool as will be described. Key way 1507 allows for uni-directional
assembly of head
1500 on the extension insuring proper orientation of the extension in relation
to head
1500. Threads 1508 are designed to receive locking cap 1800. On the far side
of
housing 1401 channel 1509 allows for assembly of the extension. Slots 1511 and
1512
are positioned on arm 1521b to accept a locking slider, described with
reference to
Figures 30 and 37 from the extension.
[0126] FIGURE 16 illustrates clip ring 1600 that mates inside clip ring
groove 1510 of head 1500 as discussed. Clip ring 1600 has an outer diameter
1604 and
an inner diameter 1603 and keeping arms 1601a and 1601b. These keeping arms
have
flat surfaces 1605 a, b for preventing rotation of the clip ring in the
groove. Clip ring
1600 splays apart as the spherical end portion of rod 700 exerts a force on
clip ring 1600
as it enters head 1500. When the spherical portion 711 of rod 700 enters head
1500 the
spherical portion contacts inner diameter 1603 of clip ring 1600 and requires
the
expansion of 1601a and 1601b away from one another to allow the spherical
portion to
pass. Once that portion has passed, there is a tactile snap that is felt when
1601a and
1601b return to their proper position. Holes 1602a and 1602b allow for
installation of
clip ring 1600 into snap ring groove 1510 of head 1500.
[0127] Clip ring 1600 also acts to prevent the spherical portion 711 of rod
700 from passing upward out of head 1500. As mentioned, rod 703 cannot pull
out of
channel 1522 because channel 1522 has a smaller diameter than does spherical
portion
711 of rod 700. The capturing of rod 700 in rod-capturing head 1500 allows the
surgeon
to then perform other activities that could take many minutes, all while
knowing that rod
700 is captured properly, even though locking cup 1800 has not yet been either
installed
or tightened with the final tightening force. Rod end 701 cannot pull out of
head 1500
laterally, nor can it lift vertically. In addition to allowing the surgeon to
perform other
procedures before locking the assembly, this system allows the rod to be
traversed to
adjust for a compression or distraction without worry that the rod will become
dislodged
from head 1500.
[0123] FIGURE 17 is a cross-section of screw assembly 100 showing
threads 1508 for receiving locking cap 1800 and also showing threads 1520 of
head 1500
corresponding to threads 501 of anchor 500. Also the relationship between clip
ring
- 23 -
CA 02588099 2007-04-03
WO 2006/042188 PCT/US2005/036339
1800, spherical portion 711 of rod 700, and drive mechanism 505 of anchor 500
are
shown when rod 700 is in the captured position before locking cap 1800 is
installed.
[0129] FIGURE 18 shows details of locking cap 1800 with threads 1803
for mating with threads 1508 of head 1500 or head 300. Cap 1800 has boss 1801
for
applying force to a captured rod. Driving mechanism 1802 for tightening the
cap is also
shown.
[0130] FIGURE 19 is a cross-sectional view of cap 1800 illustrating
threads 1803 which can be, for example, the type shown in United States
Application
Serial Number 10/805,967, filed March 22, 2004 and entitled CLOSURE MEMBER
FOR A MEDICAL IMPLANT DEVICE, hereby incorporated by reference herein. Also
shown are extruded appendages 1902 and 1903 for the purpose of reducing
surface area,
therefore increasing pressure when locking cap 1800 comes to bear on a rod.
[0131] FIGURE 20 shows locking cap 1800 screwed into head 1500 such
that threads 1803 are mated with threads 1508 of head 1500.
[0132] FIGURE 21 illustrates the thread interaction of a helical dovetail
interlocking thread 2101 as described in the above-mentioned Application
Serial Number
10/805,967. Thread 2101 is on cap 1800 while mating threads 2102 is on head
1500
(300). As described in the referenced application, the dovetail threads act to
pull the
thread of the head inward, instead of acting to place an outward force,
causing the walls
of the head to splay outwardly as would occur using normally shaped threads.
[0133] FIGURE 22a shows the relationship between rod 700, which is
positioned in slide ring 800, both positioned in head 300, locking cap 1800
and anchor
500. Appendage 1903 on locking cap 1800 exerts a force on locking surface 704
of rod
700 when locking cap 1800 is tightened into head 300. Surface 804 of slide
ring 800 in
turn exerts a force on drive mechanism 505 of anchor 500. The force of
tightening
locking cap 1800 therefore, exerts the necessary forces on the elements of
assembly 200
to hold the elements rigidly in place relative to one another.
[0134] FIGURE 22b similarly shows the relationship between spherical
end 711 of rod 700, locking cap 1800 and anchor 500. Appendage 1903 on locking
cap
-24-
CA 02588099 2007-04-03
WO 2006/042188 PCT/US2005/036339
1800 exerts a force on locking surface 714 of rod 700 when locking cap 1800 is
tightened into head 1500. Surface 710 of rod 700 in turn exerts a force on
drive
mechanism 505 of anchor 500. The force of tightening locking cap 1800
therefore,
exerts the necessary forces on the elements of assembly 100 to hold the
elements rigidly
in place relative to one another.
[0135] FIGURE 23 is a cross sectional view showing an alternate
embodiment of a locking cap 1850 in relation to rod 700, slide 800, and poly-
axial head
300. Where locking cap 1800 of FIGURE 18 is a single body which is threaded
into a
poly-axial head, such as head 300 or head 1500, and engaged surface 704 or 714
on rod
700 from FIGURE 7 as appropriate, locking cap 1850 is formed by two distinct
elements, namely locking ring 1852 and compression cap 1856. Locking ring 1852
threads into poly-axial head 300, which could also be poly-axial head 1500, by
means of
threads 1858. Threads 1858 are described in greater detail with reference to
FIGURE 21.
Locking ring 1852 also includes drive mechanism 1854 which accepts a male
drive
mechanism head such as the one shown in FIGURE 48 attached to drive shaft
6505.
Locking ring 1852 is inserted first, after rod 700 is properly positioned, and
acts to
compress guide ring 800, through surface 1868 of the locking ring mating with
surface
1866 of the slide ring, which in turn causes guide ring 800 to compress anchor
500. This
results in immobilizing head 300 relative to anchor 500, eliminating the poly-
axial
movement of head 300 and anchor 500. Locking ring 1852 locks the head/anchor
assembly together but does not compress rod 700 when it is installed allowing
the rod to
slide in guide ring 800 allowing assemblies 100 and 200 from FIGURE 1 to move
relative to one another so that the positioning of the entire assembly can be
finalized.
[0136] Once the positioning of the assemblies is finalized, and any other
tasks needed before the rod is compressed and made rigid, are finished,
compression cap
1856 can be installed in locking ring 1852. Compression cap 1856 is threaded
into
locking ring 1852 by means of threads 1862 and drive mechanism 1860. When
compression cap is tightened into place, surface 1864 contacts surface 704, or
714 for
assembly 100 from FIGURE 1, and compresses rod 700, causing rod 700 to lock
into
place with respect to guide ring 800 and become rigid, or immobile in the same
manner
described with reference to locking cap 1800 in FIGURES 22a and b.
-25-
CA 02588099 2007-04-03
WO 2006/042188 PCT/US2005/036339
[0137] Locking cap 1850 has advantages over locking cap 1800 in that it
allows assembly 100 or 200 to be locked together in two phases instead of the
single
phase of locking cap 1800. The first phase, the insertion of locking ring
1852, allows the
poly-axial motion of the assembly to removed, holding head 300 rigid with
respect to
anchor 500, but not compressing rod 700 so that rod 700 retains the ability to
slide within
slide ring 800. The second phase, the installation of the compression cap,
compresses
rod 700 with slide ring 800, thereby causing them to be held rigidly in place
and
preventing any further motion with respect to rod 700 and guide ring 800. This
two
phase approach allows for adjustments to be made while the assemblies are held
rigidly
in place but rod 700 is still free to slide laterally within guide ring 800,
allowing for
greater flexibility in the delivery of the stabilization system.
[0138] FIGURE 24 is a cross-section view of system 10 (FIGURE 1).
[0139] FIGURE 25 shows an embodiment of an extension used to facilitate
the insertion and assembly of the stabilization system and method described in
accordance with certain embodiments of the present invention. Extension
assembly
3001 includes tube 3002 which attaches at one end to a poly-axial head, such
as poly-
axial head 300 or 1500. Over the opposing end of tube 3002 a locking ring is
installed
with spring 3004. Drive head 3006, which is used to tighten the extension to a
poly-axial
head, and to provide attachment for an anti torque handle, attaches to locking
ring 3005
and tube 3002 using torque key 3007 for proper positioning. Extension assembly
3001
also includes slide 3700 which fits into a slot on tube 3002 and engages
locking ring
3005 by means of pin 3704.
[0140] FIGURES 26 and 27 shows extension assembly 3001 assembled.
Starting at the proximal end, thread 3603 in drive head 3006 acts as a
mechanism for
mating the driver guides which are part of the drive assemblies shown in
FIGURES 41
through 44, to be described hereafter. Torque flats 3602 are used with anti-
torque handle
shown is FIGURE 47, as will be described. Drive head 3006 mates with locking
ring
3005. Locking ring 3005 provides the mechanism for locking the extension to
the poly-
axial head assembly, such as the ones shown in FIGURES 11 or 14. Locking ring
3005
includes slot 3806 which is formed in locking ring at an angle by having the
slot begin at
one end below the midline of the locking ring and end at the other end above
the midline.
-26-
CA 02588099 2007-04-03
WO 2006/042188 PCT/US2005/036339
Slide 3700 is coupled to slot 3806 of locking ring 3005 by means of pin 3704
and
extends down tube 3002 where it can engage with a poly-axial head connected to
the
extension.
[0141] While slide 3700 will be shown in greater detail with reference to
FIGURE 32, its purpose is to lock a poly-axial head with the extension. It
accomplishes
this by sliding up and down the tube in response to the twisting of the
locking ring 3005.
Twisting locking ring 3005 causes slot 3806 to move from its low end to its
high end or
vise versa. Pin 3704 coupled to slot 3806 translates the twisting motion of
the locking
ring 3005 into a linear up and down motion by slide 3700 as pin 3704 traverses
slot 3806
from low to high or high to low. A locking extension at the end of slide 3700
proximal
to the poly-axial head, shown in FIGURE 32 as element 3701, locks the poly-
axial head
in place by engaging with slots 332 and 334 of head 300 from FIGURE 3 or slots
1511
and 1512 of head 1500 from FIGURE 15. The poly-axial head is unlocked by
moving
the locking extension of slide 3700 out of the referenced slots by twisting
locking ring
3005 such that pin 3704 moves to the high position in slot 3806.
[0142] Tube 3002 includes numbers and lines 3101 positioned in 10
millimeter increments, which are used, if desired, to determine the depth the
anchor has
been threaded into the bone. Tube 3002 remains constant and the screw turning
tool is
inside the tube. If a surgeon desires to go down 40 millimeters then he/she
would take a
tool with a mark on it and move the mark, for example, from 1 to 5. Tube 3002
has
several openings. The first opening is 3103. It is the largest opening with a
distance d2.
The second opening is opening 3104 having a reduced distance dl. This change
of
distance is important during rod transfer (rotation from in-line to
horizontal) because the
rod proximal end enters tube 3001 at 3103 and is guided into the poly-axial
head held by
tube 3002 by the reduced opening formed by distance d2.
[0143] Protuberance 3601a, shown in FIGURE 27, interacts with
indentions 3801a and 3801b from FIGURE 33 on twist ring 3005. These indentions
prevent the twist ring from inadvertently twisting thereby raising slider 3700
causing the
assembly to unlock. In operation, to unlock the assembly twist ring 3005 is
pushed down
freeing latch 3801a from latch 3601a. Spring 3004 holds the twist ring upward
into a
latched position. Window 3202 allows the rod to back out of the attached head
during its
- 27 -
CA 02588099 2007-04-03
WO 2006/042188 PCT/US2005/036339
transfer. Window 3102 is used for inserting multi-pedicle systems as will be
discussed
in greater detail with reference to FIGURES 49a-55.
[0144] FIGURE 28 describes details of the distal end of tube 3002 of
FIGURE 25. Starting at the top here is dovetail slide groove 3503. Opening
3202 is
below the slide groove next to opening 3301 adapted for receiving head 300 or
1500.
Also shown is channel groove 3306 having top surface 3303. Grove 3306 creates
radial
surface 3305, which is also a surface for keying onto head 300 (1500). Bottom
surface
3304 is adapted for contacting the head as well. Torquing surface 3302
connects to the
head to allow for torque transfer from the extension to the head when the
pedicle screw is
being tightened, as will be discussed.
[0145] FIGURE 29 shows openings 3103 and 3202 with key 3401 adapted
to engage the head as will be discussed hereinafter. Opposite side torquing
surface 3402
is shown as is surface 3405 which is a groove similar to groove 3306 (FIGURE
28).
Triangular cut 3503 and surfaces 3403 and 3404 are adapted for mating with the
head.
Reduced diameter portion 3404 mates to the head as well. These parts are
designed to
prevent a radial motion between the parts when slider 3700 is down and mating
the
groove of the head. Groove 3405 which mates to a portion on the head functions
to
prevents separation that could be caused by an upward force on extension 3001.
[0146] FIGURE 30 is a top down view looking down at tube 3002
illustrating dovetail channel 3503, as will later be described, for receiving
sliding
member 3700 from FIGURE 25. Triangular portion 3502 receives key 3701 of
slider
3700 shown in FIGURE 32. Also shown in FIGURE 30 is key way cut 3501 for
receiving torque key 3007 shown in FIGURE 25. Torque key 3501 mates with slot
3605
from FIGURE 31, to be described hereinafter, for the purposes of transferring
torque so
that when counter-torque is applied against flat 3602 shown in FIGURE 25 such
that
transmission of torque is allowed from top proximal member 3006 from FIGURE 26
through torque key 3007 to the lower portion of extension 3002.
[0147] FIGURE 31 shows that the proximal end of head 3006 has surfaces
3602 for the transmission of the torque as described. Line 3604 shown in
FIGLTRE 31 is
an alignment line used to align the extensions relative to one another. Thread
3603 is
used to accept a tool as will be described. Torque key groove 3605 is where
key 3007 of
-28-
CA 02588099 2007-04-03
WO 2006/042188 PCT/US2005/036339
FIGURE 31 mates. The torque goes between groove 3605 and slot 3501, shown in
FIGURE 30, such that the one side surface is against the back wall of slot
3501, and the
other surface is against the back wall of slot 3605. Protuberances 3601a and
3601b, as
described hereinafter, serve to lock the position of twist ring 3005 (FIGURE
25) in the
desired position.
[0148] FIGURE 32 shows slide 3700 having at its proximal end pin 3704.
Body 3702 has three surfaces, 3703a, 3703b and 3703c. These surfaces go into
the three
mating sides of dovetail 3503 of body 3002 as shown in FIGURE 30. Triangular
element 3701 is positioned at the distal end of slider 3700 and acts to lock
head 300 onto
the extension as has been described.
[0149] FIGLTRE 33 shows twist ring 3005 having slots 3801a and 3801 b
for receiving protuberances 3601a, 3601b of top portion 3006 from FIGURE 31.
Ring
3005 has central bore 3802 wherein it is positioned over the top portion of
tube 3002
wliich is shown in FIGURES 30 and 35. Ring 3005 also has middle body 3805 and
distal surface 3804. Witliin middle body 3805 there is slot 3806 which is a
helical
pattern with ends 3807 and 3808 which are positioned approximately 180 degrees
from
one another. Slot 3806 receives pin 3704 of slider 3700. Since slider 3700 is
fixed in
rotational position, when the twist ring is rotated it forces slider 3700 to
move up or
down as pin 3704 travels inside slot 3806. The down position would be when pin
3704
is against stop 3807 and the up position would be when pin 3704 is against
stop 3808.
[0150] FIGURES 34 and 35 show head 300 with channel 320. Key 128a is
adapted to mate with tube 3002. When the parts are mated part 3901 is locked
into
extension 3002. On the opposite side male surface 3401 of extension 3002 is
mated with
female portion 336 of head 300 as well as 328b and the torquing surface 330a.
Torquing
surface 330b is also shown in FIGURE 34. FIGURE 35 shows channe1320 as well as
slider mating surface 332 of head 300. This forces the head into the extension
in only
one direction.
[0151] FIGURE 36 shows a cross-section when top section 328a of the
poly-axial head is inserted until it is in contact with surfaces 3306 and 3405
of the
extension. Opening 3103 is shown illustrating torquing surface 330b there and
330a on
the opposite side. Opening 3202 of the extension is shown at the bottom. One
important
-29-
CA 02588099 2007-04-03
WO 2006/042188 PCT/US2005/036339
part of this figure is that portion 3401 is shown interacting with portion
336, and portion
3901 of head 300 is mated with portions 330b and 330a of extension 3002. This
makes
this a one-way device that can not go in the other direction, and a clockwise
rotation of
the head or a counter-clockwise rotation of the extension would bring surfaces
330b and
3302 and surfaces 330a and surface 3402 into contact, thereby trapping the
head in a
vertical position.
[0152] FIGURE 37 shows head 300 being twisted into locking position
with respect to extension 3002.
[0153] FIGURE 38 is a cross-section through the midline of the 3303
groove from FIGURE 28. With rotation, 330a and 330b are in contact with
portions
3402 and 3302 respectively. Opening 3202 is shown as well as opening 3103.
Channel
332 of head 300 is positioned at the same position as channel 3503 so as to be
in position
to receive slider 3700, tab 3701. Portion 328a is positioned in its locked
position as
shown with portion 330b stopped against stop 3302 and with 330a stopped
against stop
3402. FIGURE 37 shows that there is an actual axial trapping by using the
male/female
key way.
[0154] FIGURE 39 shows slider 3700 pushed down into locking position
by twisting the twist ring (not shown) to reposition the twist ring into its
lower position
forcing slider 3700 down so that element 3701 from FIGURE 32 engages in groove
332.
[0155] FIGiJRE 40 shows this operation in cross-section with locking
element 3701 of slider 3700 engaged with groove 332 in head 300. At this point
the
head is locked axially and cannot rotate out of its axial position.
[0156] FIGURE 41 shows screw assembly 200 from FIGURE 1 inside
extension 3001 with too14800 about to go inside extension 3100. Handle 2902
will mate
with too14800. Portion 3001 has been latched onto head 1500 as described
above. Tool
4800 is then passed down inside the extension and mated with the proximal end
of rod
700. Lower portion 4804 has drive head 4901 which includes distal surface 4902
and
pocket 4904 for receiving spherical portion 741 of rod 700 shown in FIGURE 9.
Drive
head 4901 has opposite flats 4903 and 4902 for engaging flats 712a and 712b of
rod 700
shown in FIGURE 7. Then threads 4907 are threaded into threads 3603 of
extension
-30-
CA 02588099 2007-04-03
WO 2006/042188 PCT/US2005/036339
3001 forcing distal end 4902 against rod end 711. The threads are used to
compress the
assembly completely, such that a rigid assembly occurs, allowing the surgeon,
using
ratchet handle 2902 on proximal surfaces 4913 and 4911 of too1480, to rotate
anchor
500.
[0157] FIGURE 42 shows spherical surface 711 captured by distal end
4902 of too14800 inside extension 3001. As portion 4802 turns, threaded sleeve
4803
does not turn since portion 4802 turns inside bore 4906 of thread sleeve 4803.
When
tool portion 4802 turns, the rod 700 turns and turns anchor 500. During this
time, rod
700 is effectively part of the anchor driving mechanism. By forming the poly-
axial rod-
assembly head 300 in this manner, rod 700 is part of the anchor assembly and
does not
need to be inserted after the anchor assembly has been put in place. This
means that the
rod does not have to be delivered from outside the extension into the patient
after the
anchor asseinbly has been set.
[0158] FIGURE 43 shows screw assembly 100 from FIGURE 1, extension
3001, screwdriver 5200 which is passed down through extension 3001 to engage
the top
of the drive mechanism (not shown) of anchor 500 inside head 1500. Screwdriver
5200,
used to drive in the screw associated with assembly 100. Screwdriver 5200 may
have a
drive head 4902 is designed to mate with drive mechanism 505 of anchor 500 in
assembly 100. Too15200, therefore, is designed to go all the way down and
interact with
the drive means on the anchor itself. At the distal end there is distal
driving member
5203 and drive head 5205 ending in driver 5204 which connects with the drive
means of
the screw.
[0159] FIGURE 44 shows the assembly of anchor 500, head 1500,
extension 3001, too15200 and handle 2902. This assembly is then sent down into
the
bone after the tap (over the guide wire on the off axis screw guide, if
desired) so that
anchor 500 can be embedded in the pedicle. The guide wire is pulled out and
retracted
and then the screw is able to overtake the axis that the guide wire had and is
then turned
down into the waiting tapped hole.
[0160] FIGURE 45 illustrates one example of a rod transfer tool 5700. The
handle is a "pistol grip" having elongated portion 5702 and an elongated
portion 5703
which rotates about pin 5704 to form a trigger. The trigger pushes sliding
member 5705
-31-
CA 02588099 2007-04-03
WO 2006/042188 PCT/US2005/036339
which moves along elongated portion 5706. Movement of portion 5706 operates to
rotate distal end portion 5707 about pin 5708. As slider 5705 moves forward,
distal arm
5707 rotates about pin 5708 as shown in FIGURE 58. Pin 5709 allows for partial
pushing motion between slider 5705 and end portion 5707. Distal end 5710
transcribes
on arc as it rotates upward as is shown in FIGURE 58.
[0161] As illustrated, too15700 in operation with arm 5707 rotating rod
700 from extension 3001a into extension 3001b. Note the angle that arm 5707 of
tool
5700 is making with respect to the proximal end of rod 700. The design is such
that once
the rod end enters wide opening 3103 of extension 3001b, the tine flats will
line up with
the exit ramps and with the help of cam 5908 will release therefrom.
[0162] FIGURE 46a shows a cross-section through section 65a-65a of
FIGURE 40 and illustrates tines 5905a and 5905b in pocket 5906 but radial
surfaces
6001a and 6001b can now pass through exit slots 716. FIGURE 46b is a cross
section
through section 65b-65b of FIGURE 46a and again shows the small diameter of
tines
5905a and be aligned to pass through the transition between recesses 713 and
exit slots
716. Cam 5708 is also shown which, as it rotates, operates to push the rod end
out of
pocket 5906.
[0163] FIGURE 47, shows one assembly for inserting and tightening the
locking caps 1800 from FIGURE 18 into the poly axial head assemblies 100 and
200,
after rod 700 is rotated into place. Once rod transfer tool 5700 from Figure
57 is
removed from extension 3 001 a, rod 700 needs to be locked into the rigid
position shown
by FIGURES 22 and 23 by the installation of locking caps 1800. Locking caps
1800 are
installed by the drive shaft attached to handle 6506 and using drive mechanism
head
6508. A locking cap is positioned on drive mechanism head 6508 where drive
mechanism head 6508 is sized to hold locking cap in place until it is
tightened into a
head assembly. Drive mechanism shaft 6505 with a locking cap is inserted down
the
extensions 3001 a and b in turn and handle 6506 is twisted to seat locking cap
1800 into
the poly-axial head assembly.
[0164] Used alone, drive mechanism shaft 6505 would not only screw
locking cap 1800 in place but would also tend to place a torque on the poly-
axial head
assembly due to the friction between the threads of the locking cap 1800 and
the treads
-32-
CA 02588099 2007-04-03
WO 2006/042188 PCT/US2005/036339
of the poly-axial head assembly. This force would load the poly-axial head
assembly,
with such a load remaining after the end of the procedure potentially leading
to problems
with the assembly. To prevent this torque from being placed on the poly-axial
head
assembly, the system of certain embodiments of the present invention uses anti-
torque
handle 6501 to place an opposing force on the poly-axial head assembly to the
force
applied by drive mechanism shaft 6505. Anti-torque handle 6501 includes handle
6502
and ring 6503 which has flats 6504 dimensioned to mate with the flats of the
drive head
of extension 3001. As the locking cap is tightened in one direction, for
example
clockwise, by drive mechanism shaft 6505, an equal force to the force applied
to the
poly-axial head assembly is applied in the opposite direction, for example
counter
clockwise, preventing any load from being introduced into the poly-axial head
assembly.
[0165] FIGURE 48 shows an embodiment of a drive mechanism shaft 6505
having a driving end 6508 and flats 6509 at the proximal end with quick
connect ring
6510. As described, a locking cap, such as cap 1800 (FIGURE 18) is placed on
drive
mechanism head 6508 of drive mechanism shaft 6505. End 6508 is a reverse
tapered
surface so it taper locks with the locking cap so that the cap will not fall
off. The length
of too16505 is sucli that end 6508 reaches assembly 200 as shown in FIGURE 47
which
end 6509 comes out of the patient's skin. Handle 6506 is connected to the
proximal end
of too16505 which is rotated using handle 6506 to tighten locking cap 1800
thereby
locking the assembly together.
[0166] Anti-torque handle 6501 can also be used to disconnect extension
3001a from assembly 200 by rotating assembly 3001a. Once released, assembly
3001a
is removed from the patient's body and the incision can be closed leaving the
assembly
of FIGURE 1.
[0167] FIGURES 49a and 49b show a rod for use in a multi-level
procedure where more than two pedicle screws are used. Rod 6600 has an arched
or bent
portion, 6602, so that rod 6600 has an arc that best fits the spine curvature.
Slide ring
surface 6603 and distal end driving surface 6604 are the same as discussed for
rod 700
(FIGURE 7) except that driving surface 6604 is at an angle because portion
6605 is
angled with respect to slider 6603.
-33-
CA 02588099 2007-04-03
WO 2006/042188 PCT/US2005/036339
[0168] At the proximal end of rod 6600 there is top surface 6606 where the
locking cap will engage. Entrance ramp 6607 and spherical portion 6611
performs
exactly as it does for rod 700 (FIGURE 7). Exit ramp surface 66091eads away
from
cylindrical surface (hole) 6608 that is the same as on rod 700. The entire
proximal end
works exactly as does the proximal end of rod 700, except for the use of
surface 6701.
[0169] Distal angled portion 6605 is shown in FIGURE 49b and illustrates
bent or arched portion 6602 of rod 6600. Surface 6701 gives more purchase for
turning
the pedicle screw and works in addition to flats 6612. Flat surface 6610 is on
spherical
end 6611. Flat surface 6610 will connect with the drive features of the driver
just like in
the single level.
[0170] In addition to stabilization systems connection two bony structures,
such as vertebrae, stabilization systems my be employed that rigidly connect
three or
more vertebrae. In a three pedicle stabilization system, the outer poly-axial
head
assemblies are inserted into the first and second vertebrae, which surround
the third
vertebra, as described above. To position the third poly-axial head assembly,
an arc
defining tool may be used since the rod has a predefined curvature and the
third, or
middle, poly-axial head assembly must be precisely located to capture the
middle of the
rod when it is transferred. Additionally, because of the additional length and
curvature
of the three pedicle rod over the two pedicle rod, the end of the rod with the
drive
mechanism may be formed with an angle to the drive mechanism to minimize the
diameter of the extension required. The additional length of the rod also
requires a
different rod transfer tool to move the rod into position in the poly-axial
head assemblies
(FIGURE 52), and an extension for the middle poly-axial head assembly (FIGURE
53).
[0171] One such embodiment is illustrated in FIGURE 50. FIGURE 50
illustrates the relationship of rod 6600 with extension 3001 when rod is mated
with
anchor 500 and poly-axial head assembly 300. Because rod 6600 is longer than
rod 700
to allow it to span three vertebrae, and has additional curvature to match the
natural
curvature of the spine, an angle of end 6605 is required to allow rod 6600 to
fit inside
extension 3001 as shown in FIGURE 50. This required angle in end 6605 allows
the
drive mechanism in the distal end to match up with the drive mechanism of
anchor 500.
Opening 3102 allows the rod transfer tool used in multi-pedicle systems, shown
in
-34-
CA 02588099 2007-04-03
WO 2006/042188 PCT/US2005/036339
FIGURE 51, to enter extension 3001. The distal end of the rod transfer tool
operates in
the same manner as the rod transfer tool of FIGURE 45, and mates with end 6701
in the
same manner as described with reference to the two pedicle system.
[0172] Rod transfer tool 6900 is shown in FIGURE 45. Tool 6900 has
shaft 6902 and handle 6903. It has distal arm 5707 connected to shaft 6902 by
pivots
6904, which is the same as discussed above with respect to tool 5700 from
FIGURE 57.
Tool 6900 and shaft 6902 are designed to span three or more pedicles through
three
extensions as shown in FIGURE 52.
[0173] In operation, distal arm 5707, which is part of the multi-level rod
transfer device 6900, is placed through window 3102 and then tines of arm 5707
are
snapped onto the proximal end of rod 6600 as discussed above. Then the
instrument is
lifted to disengage the rod/screw drive mechanism. Next, using handle 6903,
the rod is
pushed out of extension 3001 via opening 3103.
[0174] FIGURE 52 shows, in cut-away, a multi-level setup where assembly
7000 has been added to a center pedicle between assemblies 100 and 200.
Assembly
7000 is the same as assembly 100 except that slider 800 is omitted as it is
not required.
[0175] FIGURE 53 shows extension 7100 in greater detail. Extension
7100 is used instead of extension 3001 for the center assembly of the multi-
pedicle
system. Extension 7100 includes longitudinal cuts 7102 and 7103 on both sides
of the
body. These cuts allow the rod to pass through extension 7100 so that end 5908
can be
positioned in assembly 100. Referring back to FIGURE 52, when end 5905 is
within
extension 3001 of assembly 100, the tines come out of the rod, as discussed
above, and
tool 6901 can be removed leaving rod 6600 positioned from assembly 200,
through
assembly 7000 to assembly 100.
[0176] FIGURE 54 shows the entire assembly with extensions. Rod 600 is
in its down position ready to accept locking caps, such as caps 1800, FIGURE
18, in the
manner as discussed above.
[0177] FIGURE 55 shows multi-level system 7300 locked down. Heads
300 and 1500 are not necessarily in line with its respective anchor 500
because of the
- 35 -
CA 02588099 2007-04-03
WO 2006/042188 PCT/US2005/036339
axial nature of the connection between the head and the screw. However, once
cap 1800
is tightened, the rod, the poly-axial head, and the anchors are held in a
rigid, immovable
relationship to one another.
[0178] The bend in rod 6600 is predefined and can be different for rods of
different lengths. By way of example, one could have a 65 millimeter rod, a 75
millimeter rod and an 85 millimeter rod, all having different bends. What is
presently
done in multi-pedicle systems is not to have a rod with a predefined bend, but
rather to
set all three pedicle screws and then bend a rod, lay it in and take a
fluoroscope shot to
see how the rod lines up with the three screws. If it is not correct, it is
pulled out, re-bent
and again put in position and imaged again. If the rod is over-bent, it is
often scrapped.
If it is under-bent it is re-bent until it is right. However, in order to
allow for use of a
pre-bent rod, the screws must be installed in the proper arc. Thus, instead of
bending the
rod to fit the arc defined by the screws, the screws are installed to fit a
pre-defined arc.
In operation, assembly 100 is put in first just as with the single level. Then
a length is
established to the other end pedicles, assembly 200 in FIGURE 1, and rod 6600
is moved
from the in-line position to the horizontal position. In so doing, a center
portion of rod
6600 passes through one or more center extensions (FIGURE 52) until end 5908
becomes engaged within extension 3001 of assembly 100.
[0179] An operation to insert a pedicle screw assembly into a patient's
back to immobilize certain vertebrae in order to allow bone grafts to
ultimately fuse
those vertebrae begins with the surgeon inserting a standard bone biopsy
needle into the
pedicle of a first vertebra and using the bone biopsy needle to place a guide
wire where
the first pedicle screw should be inserted. Using the guide wire,
progressively larger
tissue expanders are inserted into the patient to expand, or dilate, the
incision to the size
necessary to accommodate the instruments to be used, with the final cannula
being left in
the incision after the smaller ones are removed. Next, an awl may be used to
enlarge the
hole in the pedicle made by the bone biopsy needle with the awl being inserted
over the
guide wire to ensure proper placement in the pedicle. In certain embodiments,
a tap,
having a diameter slightly smaller than the pedicle screw to be used, is
inserted down the
guide wire and used to tap the hole started by the bone biopsy needle and the
awl,
making it ready to accept the first pedicle screw.
-36-
CA 02588099 2007-04-03
WO 2006/042188 PCT/US2005/036339
[0180] A first pedicle screw (Figure 5) with a poly-axial rod-capturing
head (Figure 15) attached to form a rod-capturing pedicle screw assembly
(Figure 14)
may be inserted down the guide wire using the off-axis screw guide of the
pedicle screw
and into the hole left by the tap. An extension (Figures 25-27) and drive
mechanism
with a torque head may be attached to this pedicle screw assembly. The
extension
allows access to the pedicle screw assembly once it is in place. The drive
mechanism is
used to screw the pedicle screw assembly in place and is removed from the
extension
once the pedicle screw assembly is set to the desired depth.
[0181] A tissue separator may then be used to make a path from the first
and second, and potentially additional, vertebra where the second pedicle
screw
assembly will be inserted. A bone biopsy needle may then used to insert a
guide wire
into the second vertebra where the second pedicle screw assembly is to be
placed. Once
the guide wire is in place, the surgeon may measure the distance between the
first pedicle
screw assembly and the guide wire which determines the length of the rod to be
used.
The second pedicle screw assembly (Figure 11) is then chosen according to the
proper
length of the rod. The second pedicle screw assembly is formed by a pedicle
screw
identical to the pedicle screw of the first assembly, a poly-axial rod-
assembly head
(Figure 3), a slide ring (Figure 8), and a rod (Figures 7 and 9) all connected
to another
extension.
[0182] A drive mechanism with a head to accept the end of the rod may be
used to drive the second pedicle screw assembly into the pedicle of the second
vertebra,
using the rod to transfer torque from the drive mechanism to the pedicle
screw. The
pedicle screw may be sent along the guide wire using the off-axis screw guide
in the
pedicle screw. The screw is then inserted to the desired depth using the drive
mechanism, which is then removed leaving the extension attached to the pedicle
screw
assembly.
[0183] A rod transfer tool (FIGURE 44) is then inserted into the extension
which is attached to the pedicle screw assembly with the poly-axial rod-
assembly head
until the distal end of the rod transfer tool locks with the end of the rod.
The rod transfer
tool is then used to disengage the rod from the drive mechanism of the pedicle
screw,
and guide the rod down into the extension holding the pedicle screw assembly
with the
-37-
CA 02588099 2007-04-03
WO 2006/042188 PCT/US2005/036339
poly-axial rod-capturing head, the end of rod ultimately being pressed down
into the
poly-axial rod-capturing head, where it is held in place by a clip ring
(Figure 16) in the
rod-capturing head.
[0184] After the rod is pressed into the poly-axial rod-capturing head, the
rod transfer tool is removed and locking caps (Figure 18) are screwed into
each of the
poly-axial heads using a drive tool and counter torque handle assembly (Figure
47). The
counter torque handle is used to provide a counter torque force to the torque
applied by
the drive tool, thereby preventing the loading of the rod assembly with torque
when the
locking caps are tightened into place.
[0185] After the locking caps are tightened appropriately, the extensions
are removed leaving the stabilization system (Figure 1) in place. Bone grafts
can then be
placed between the two stabilized vertebrae which will then grow to fuse the
vertebrae
together while the stabilization system holds the vertebral segment.
[0186] Although the present invention and its advantages have been
described in detail, it should be understood that various changes,
substitutions and
alterations can be made herein without departing from the spirit and scope of
the
invention as defined by the appended claims. Moreover, the scope of the
present
application is not intended to be limited to the particular embodiments of the
process,
machine, manufacture, composition of matter, means, methods and steps
described in the
specification. As one of ordinary skill in the art will readily appreciate
from the
disclosure of the present invention, processes, machines, manufacture,
compositions of
matter, means, methods, or steps, presently existing or later to be developed
that perform
substantially the same function or achieve substantially the same result as
the
corresponding embodiments described herein may be utilized according to the
present
invention. Accordingly, the appended claims are intended to include within
their scope
such processes, machines, manufacture, compositions of matter, means, methods,
or
steps.
-38-