Note: Descriptions are shown in the official language in which they were submitted.
CA 02603400 2013-08-28
METHOD AND APPARATUS FOR PERFORMING AN
OPEN WEDGE, HIGH TIBIAL OSTEOTOMY
Reference To Pending Prior Patent Applications
This patent application:
[BLANK]
[BLANK]
[BLANK]
CA 02603400 2013-08-28
- 2 -
[BLANK]
[BLANK]
[BLANK]
[BLANK]
CA 02603400 2013-08-28
- 3 -
[BLANK]
Field Of The Invention
This invention relates to surgical methods and
apparatus in general, and more particularly,to surgical
methods and apparatus for performing open wedge
osteotomies of the knee.
Background Of The Invention
Osteotomies of the knee are an important technique
for treating knee osteoarthritis. In essence, knee
osteotomies adjust the geometry of the knee joint so as
to transfer weight bearing load from arthritic portions
of the joint to the relatively unaffected portions of
the joint.
CA 02603400 2007-10-01
WO 2006/107800
PCT/US2006/012172
- 4 -
Knee osteotomies are also an important technique
for addressing abnormal knee geometries, e.g., due to
birth defect, injury, etc.
Most knee osteotomies are designed to modify the
geometry of the tibia, so as to adjust the manner in
which the load is transferred across the knee joint.
There are essentially two ways in which to adjust
the orientation of the tibia: (i) the closed wedge
technique; and (ii) the open wedge technique.
With the closed wedge technique, a wedge of bone
is removed from the upper portion of the tibia, and
then the tibia manipulated so as to close the resulting
gap, whereby to reorient the lower portion of the tibia
relative to the tibial plateau and hence adjust the
manner in which load is transferred from the femur to
the tibia.
With the open wedge technique, a cut is made into
the upper portion of the tibia, the tibia is
manipulated so as to open a wedge-like opening in the
bone, and then the bone is secured in this position
(e.g., by screwing metal plates to the bone or by
inserting a wedge-shaped implant into the opening in
CA 02603400 2007-10-01
WO 2006/107800
PCT/US2006/012172
- 5 -
the bone), whereby to reorient the lower portion of the
tibia relative to the tibial plateau and hence adjust
the manner in which load is transferred from the femur
to the tibia.
While both closed wedge osteotomies and open wedge
osteotomies provide substantial benefits to the
patient, they are procedurally challenging for the
surgeon. Among other things, with respect to open
wedge osteotomies, it can be difficult to create the
wedge-like opening in the bone with the necessary
precision and with a minimum of trauma to the
surrounding tissue.
The present invention is directed to open wedge
osteotomies of the knee.
Summary Of The Invention
The present invention comprises a novel method and
apparatus for performing an open wedge, high tibial
osteotomy. More particularly, the present invention
comprises the provision and use of a novel method and
apparatus for forming an appropriate osteotomy cut into
the upper portion of the tibia, manipulating the tibia
CA 02603400 2007-10-01
WO 2006/107800
PCT/US2006/012172
- 6 -
so as to open an appropriate wedge-like opening in the
tibia, and then inserting an appropriate wedge-shaped
implant into the wedge-like opening in the tibia, so as
to stabilize the tibia with the desired orientation,
whereby to reorient the lower portion of the tibia
relative to the tibial plateau and hence adjust the
manner in which load is transferred from the femur to
the tibia.
In one form of the present invention, there is
provided apparatus for performing an open wedge, high
tibial osteotomy, the apparatus comprising:
cutting apparatus for forming an osteotomy cut in
the tibia, the. cutting apparatus comprising:
targeting apparatus for identifying a cutting
plane through the tibia and a boundary line for
terminating a cut made along the cutting plane, wherein
the boundary line is located within the tibia, parallel
to the anterior-posterior slope of the tibia and
parallel to the sagittal plane of the patient.
In another form of the invention, there is
provided a method for performing an open wedge, high
tibial osteotomy, the method comprising:
CA 02603400 2007-10-01
WO 2006/107800
PCT/US2006/012172
- 7 -
positioning targeting apparatus for identifying a
cutting plane through the tibia and a boundary line for
terminating a cut made along the cutting plane, wherein
the boundary line is located within the tibia, parallel
to the anterior-posterior slope of the tibia and
parallel to the sagittal plane of the patient;
cutting the bone along the cutting plane, with the
cut terminating at the boundary line;
moving the bone on either side of the cut apart so
as to form the wedge-like opening in the bone; and
stabilizing the bone.
In another form of the invention, there is
provided apparatus for performing an open wedge, high
tibial osteotomy, the apparatus comprising:
a wedge-shaped implant for disposition in a
wedge-shaped opening created in the tibia, wherein the
wedge-shaped implant comprises at least one key for
disposition in a keyhole formed in the tibia adjacent
to the wedge-shaped opening created in the tibia.
In. another form of the invention, there is
provided a method for performing an open wedge, high
tibial osteotomy, the method comprising:
CA 02603400 2007-10-01
WO 2006/107800
PCT/US2006/012172
- 8 -
cutting the bone along a cutting plane, with the
cut terminating at a boundary line, and forming at
least one keyhole in the tibia adjacent to the cut;
moving the bone on either side of the cut apart so
as to form a wedge-like opening in the bone; and
positioning a wedge-shaped implant in the
wedge-shaped opening created in the tibia, wherein the
wedge-shaped implant comprises at least one key, and
further wherein the at least one key is disposed in the
at least one keyhole formed in the tibia.
In another form of the invention, there is
provided apparatus for performing an open wedge, high
tibial osteotomy, the apparatus comprising:
cutting apparatus for forming an osteotomy cut in
the tibia, the cutting apparatus comprising:
targeting apparatus for identifying a cutting
plane through the tibia and a boundary line for
terminating a cut made along the cutting plane, wherein
the boundary line is located within the tibia, parallel
to the anterior-posterior slope of the tibia and at a
selected angle to the sagittal plane of the patient.
CA 02603400 2007-10-01
WO 2006/107800
PCT/US2006/012172
- 9 -
In another form of the invention, there is
provided a method for performing an open wedge, high
tibial osteotomy, the method comprising:
positioning targeting apparatus for identifying a
cutting plane through the tibia and a boundary line for
terminating a cut made along the cutting plane, wherein
the boundary line is located within the tibia, parallel
to the anterior-posterior slope of the tibia and at a
selected angle to the sagittal plane of the patient;
cutting the bone along the cutting plane, with the
cut terminating at the boundary line;
moving the bone on either side of the cut apart so
as to form the wedge-like opening in the bone; and
stabilizing the bone.
Brief Description Of The Drawings
These and other objects and features of the
present invention will be more fully disclosed or
rendered obvious by the following detailed description
of the preferred embodiments of the invention, which is
to be considered together with the accompanying
CA 02603400 2007-10-01
WO 2006/107800
PCT/US2006/012172
- 10 -
drawings wherein like numbers refer to like parts, and
further wherein:
Figs. 1-3 are schematic views showing the
formation of a wedge-like opening in the tibia for an
open wedge, high tibial osteotomy, and positioning of a
wedge-shaped implant into the wedge-like opening in the
tibia;
Fig. 3A is a schematic view showing selected
anatomical planes;
Figs. 4-9 show the relevant planar surfaces in an
open wedge, high tibial osteotomy;
Figs. 10-30 are schematic views showing a
preferred method and apparatus for forming an
appropriate osteotomy cut into the upper portion of the
tibia, manipulating the tibia so as to open an
appropriate wedge-like opening in the tibia, and then
inserting an appropriate wedge-shaped implant into the
wedge-like opening in the tibia;
Figs. 31-37 are schematic views showing various
apex pin dispositions which may be used in connection
with the open wedge, high tibial osteotomy; and
CA 02603400 2007-10-01
WO 2006/107800
PCT/US2006/012172
- 11 -
Fig. 38 is a schematic illustration showing how
the disposition of the apex pin may be adjusted in
accordance with the present invention.
Detailed Description Of The Preferred Embodiments
Overview Of An Open Wedge, High Tibial Osteotomy
Looking first at Figs. 1-3, there is shown a knee
joint 5 upon which an open wedge osteotomy is to be
performed. Knee joint 5 generally comprises a tibia 10
and a femur 15. In accordance with the present
invention, the open wedge osteotomy is effected by
first making a cut 20 (Fig. 1) into the upper tibia,
and then manipulating the lower portion of the tibia so
as to open a wedge-like opening 25 (Fig. 2) in the
bone, with the wedge-like opening 25 being configured
so as to adjust the manner in which load is transferred
from the femur to the tibia. Cut 20 and wedge-like
opening 25 may be formed in a variety of ways well
known in the art.
Among other things, the present invention provides
a new and improved method and apparatus for forming cut
CA 02603400 2007-10-01
WO 2006/107800
PCT/US2006/012172
- 12 -
20 and wedge-like opening 25, as will be discussed in
detail below.
Once the desired wedge-like opening 25 has been
formed in tibia 10 so as to reconfigure tibia 10 to the
desired geometry, the bone may be secured in position
in a variety of ways well known in the art (e.g., by
screwing metal plates to the bone or by inserting a
wedge-shaped implant into the opening in the bone),
whereby to adjust the manner in which load is
transferred from the femur to the tibia. By way of
example, Fig. 3 shows a wedge-shaped implant 27
inserted into the wedge-like opening 25 formed in the
tibia, whereby to stabilize the tibia in its
reconfigured geometry.
Among other things, the present invention also
provides a new and improved wedge-shaped implant, and
an associated method and apparatus for deploying the
same into the wedge-shaped opening in the tibia.
Discussion Of The Relevant Planar Surfaces In The
High Tibial Osteotomy Of The Present Invention
CA 02603400 2007-10-01
WO 2006/107800
PCT/US2006/012172
- 13 -
In order to appreciate certain aspects of the
present invention, it is helpful to have a thorough
understanding of the planar surfaces of the tibia that
are relevant in performing the high tibial osteotomy of
the present invention. Thus, the following discussion
presents a geometric description of the planar surfaces
that are relevant to the open wedge, high tibial
osteotomy of the present invention. For the purposes
of the present discussion, it can sometimes be helpful
to make reference to selected anatomical planes, e.g.,
the coronal plane, the sagittal plane and the
transverse plane (Fig. 3A).
Looking now at Figs. 1-4, for the purposes of the
present invention, the tibial plateau 30 may be
described as a horizontal (or transverse) plane that
extends along the superior surface of tibia 10. For
reference, the sagittal plane 32 is also shown in Fig.
4. As seen in Fig. 5, tibial plateau 30 is also
perpendicular to the frontal (or coronal) plane 40.
The anterior-posterior (A-P) slope is defined by an
anterior-posterior (A-P) slope plane 45 that extends
along the sloping top surface of the tibia from
CA 02603400 2007-10-01
WO 2006/107800
PCT/US2006/012172
- 14 -
anterior-to-posterior. Published research has
demonstrated that the anterior-posterior (A-P) slope
typically extends at an angle of approximately 7 to
11 to the tibial plateau 30; however, the specific
angle may vary from individual to individual.
Looking next at Fig. 6, for the high tibial
osteotomy of the present invention, it is generally
desirable to stay about 2 cm inferior to the A-P slope
plane 45. This offset can be referred to as the A-P
offset plane 50.
As seen in Fig. 7, the lateral aspect and cut
depth.may be defined by a lateral aspect plane 55 and a
cut depth plane 60, with the cut depth being about 1 cm
medial to the lateral aspect of the tibia.
Looking next at Fig. 8, the osteotomy cut plane 65
(when seen from the direct frontal view of Fig. 8) is
formed by a plane that is rotated away from the A-P
offset plane 50 through an axis formed by the
intersection of the cut depth plane 60 and the A-P
offset plane 50. The degree of rotation is selected so
as to be sufficient to place the entry of the osteotomy
cut plane 65 at the medial neck 66 (Fig. 8) of the
CA 02603400 2007-10-01
WO 2006/107800
PCT/US2006/012172
- 15 -
tibia. It should be noted that the A-P offset plane 50
and the osteotomy cut plane 65 are "tilted" slightly
from anterior to posterior (but not seen in the direct
frontal view of Fig. 8), since the A-P offset plane 50
and the osteotomy cut plane 65 follow the tilt of the
A-P slope plane 45 (Fig. 6). The intersection of the
A-P offset plane 50 and the cut depth plane 60 forms an
axis 70 which, in accordance with the present
invention, defines the lateral limit of the osteotomy
cut. In other words, axis 70 defines a line through
the tibia which is (i) parallel to A-P slope plane 45,
and (ii) contained within osteotomy cut plane 65.
Furthermore, in accordance with the present invention,
axis 70 is used to define the lateral limit of the
osteotomy cut which is to be made into the tibia.
As seen in Fig. 9, the direct view of the
osteotomy plane is a direct view in line with the
osteotomy. This view is tilted downward (e.g., at
approximately 70) from the direct frontal view. Again,
the angle of tilt downward is equal to the A-P slope.
In other words, with the present invention, the
osteotomy cut plane 65 extends parallel to the A-P
CA 02603400 2007-10-01
WO 2006/107800
PCT/US2006/012172
- 16 -
slope plane 45 (in the anterior-to-posterior direction,
although not in the medial-to-lateral direction), and
typically slopes downward (e.g., at an angle of 7-11 )
when viewed in the anterior-to-posterior direction.
Furthermore, with the present invention, the axis 70
(which defines the lateral limit to the osteotomy cut)
is contained within the osteotomy cut plane 65.
Novel Method And Apparatus For Performing The Open
Wedge, High Tibial Osteotomy Of The Present Invention
In one preferred embodiment of the present
invention, there is provided a novel osteotomy system
which comprises instrumentation for use in making
precise and repeatable osteotomy cuts for use in open
wedge, high tibial osteotomies, preferably using an
antero-medial approach. The novel osteotomy system
generally comprises a positioning guide 100 (Fig. 16),
a slope guide 200 (Fig. 11), an apex pin 300 (Fig. 16),
a keyhole drill guide 400 (Fig. 18), a posterior
protector 500 (Fig. 20), and a cutting guide 600 (Fig.
20), as will hereinafter be discussed in further
detail.
CA 02603400 2007-10-01
WO 2006/107800
PCT/US2006/012172
- 17 -
The novel osteotomy system preferably also
comprises a novel opening jack 700 (Fig. 22) for
opening the cut in the tibia so as to form the
wedge-like opening in the tibia, as will also
hereinafter be discussed in further detail.
And the novel osteotomy system preferably also
includes a novel implant 800 (Fig. 24) for positioning
in the wedge-like opening in the tibia so as to
stabilize the tibia in its corrected configuration, as
will also hereinafter be discussed in further detail.
In a preferred form of the invention, the novel
osteotomy system is configured so that:
(i) the axis 70 formed at the lateral limit of
the osteotomy cut (which forms the lateral bony hinge
when the osteotomy cut is opened) is parallel to the
A-P tibial slope;
(ii) the axis of the lateral bony hinge created
by the osteotomy lies in a plane that is perpendicular
to the frontal (i.e., coronal) plane; and
(iii) when the osteotomy is completed and the
wedge is opened, the distal (i.e., lower) tibia is
rotated about the bony hinge so as to substantially
CA 02603400 2007-10-01
WO 2006/107800
PCT/US2006/012172
- 18 -
maintain, in anatomical alignment, the A-P slope and
the frontal plane.
In a preferred form of the invention, the novel
osteotomy system is also configured so that:
(iv) the osteotomy can be performed less
invasively; and
(v) the osteotomy can be performed with minimum
incising of soft tissue such as the medial collateral
ligament, the lateral collateral ligament, and the
hamstrings.
In one preferred form of the invention, the novel
osteotomy system is constructed and used as follows.
1. A vertical incision is first made on the
antero-medial portion of the knee, approximately 1 cm
from the medial edge of the patellar tendon, with the
incision beginning approximately 2.5-3 cm inferior to
the joint line, and extending approximately 6-10 cm in
length.
2. The soft tissue between the patellar tendon
and the proximal tibia surface is then dissected in
order to make a small tunnel-like opening beneath the
CA 02603400 2007-10-01
WO 2006/107800
PCT/US2006/012172
- 19 -
patellar tendon, just above the patellar tendon's
insertion to the proximal tibia.
3. Looking now at Fig. 10, an assembly
comprising position guide 100 (Figs. 10 and 16), slope
guide 200 (Figs. 10 and 11) and an introducer 105
(Figs. 10 and 11) is advanced to the surgical site.
Preferably the assembly of position guide 100, slope
guide 200 and introducer 105 is pre-assembled prior to
opening the skin. The assembly is assembled by
mounting slope guide 200 to position guide 100 and then
mounting introducer 105 to slope guide 200 and position
guide 100 using a screw 115 (Fig. 10) passing through
slope guide 200 and received in a threaded bore 120
formed in position guide 100.
In one preferred form of the invention, slope
guide 200 may comprise two separate elements secured
together, a base 210 and a guide element 215 connected
by pins 205, with base 210 being formed out of a radio-
translucent material (e.g., plastic) and with guide
element 215 being formed out of a radio-opaque material
(e.g., stainless steel), whereby guide element 215 will
be visible under fluoroscopy and base 210 will be
CA 02603400 2007-10-01
WO 2006/107800
PCT/US2006/012172
- 20 -
effectively invisible under fluoroscopy, as will
hereinafter be discussed. In one preferred form of the
invention, introducer 105 may comprise an arm 125 and a
handle 130. Arm 125 and handle 130 may be formed as
two separate elements secured together, or arm 125 and
handle 130 may be formed as a singular construction.
4. Next, the foregoing assembly is maneuvered so
that a tibial tubercle locating tab 135 (Figs. 10 and
16) of position guide 100 is inserted between the
patellar tendon (not shown) and the tibia, and so that
tibial tubercle locating tab 135 is set against the
tibial tubercle. In this way, the tibial tubercle
provides a rough alignment guide for aligning position
guide 100 with the tibia.
5. Using a lateral fluoroscope view, taken from
the medial side at the level of the tibial plateau, the
assembly is aligned so that the underside surface 220
of guide element 215 of slope guide 200 (Fig. 11) is
aligned with the top of the medial condyle 75 of the
tibia. See Figure 11. Alternatively, if the surgeon
prefers to shift the osteotomy slightly distally on the
tibia, the top edge 225 of guide element 215 of slope
CA 02603400 2007-10-01
WO 2006/107800
PCT/US2006/012172
- 21 -
guide 200 can be aligned with medial condyle 75,
offsetting the osteotomy a fixed distance distally
(e.g., 3 mm).
By forming the guide element 215 of slope guide
200 out of a radio-opaque material and by forming the
base 210 of slope guide 200 out of a radio-translucent
material, base 210 will be effectively invisible Under
fluoroscopy and guide element 215 will stand out in
clear relief against the bone.
It should be noted that guide element 215 of slope
guide 200 is preferably formed with a "Z shape" (Figs.
10 and 11A) so as to provide additional functionality.
More particularly, by forming guide element 215 with a
"Z shape", several significant advantages are obtained.
First, this construction permits guide element 215 to
wrap around the perimeter of the tibia. Second, the "Z
shape" of guide element 215 also operates to indicate
if the slope guide is not vertically aligned with the
level of the fluoroscope. More particularly, if slope
guide 2'00 is not vertically aligned with the level of
the fluoroscope, the "Z shape" of guide element 215
will appear as a jagged or zig-zag shape on the
CA 02603400 2007-10-01
WO 2006/107800
PCT/US2006/012172
- 22 -
fluoroscope (Fig. 11B). However, if guide element 215
is vertically aligned with the level of the
fluoroscope, then the guide element will appear as a
straight line on the fluoroscope (Figs. 11 and 110).
This vertical alignment is important, since it enables
alignment of slope guide 200 (and hence position guide
100) with the medial condyle, i.e., the A-P slope
plane.
7. The assembly is then maneuvered so that the
medial locating pin 140 (Figs. 10, 11 and 16),
preferably formed as a pin although it could also be
formed as a tab, fin, etc., is located against the
medial aspect 80 of the tibia (Fig. 16). As further
adjustments in position are made, medial locating pin
140 is held in contact with the medial aspect of the
tibia, thus ensuring proper alignment of the
instrumentation. Medial locating pin 140 references
the medial aspect of the tibia, thus setting the
distance from the medial aspect of the tibia to the
apex pin 300 (Fig. 10), as will hereinafter be
discussed. This reference distance is used in
conjunction with the sizing of the osteotomy implant 27
CA 02603400 2007-10-01
WO 2006/107800
PCT/US2006/012172
- 23 -
(Fig. 3) to ensure a proper tibial reconstruction,
i.e., the distance from the medial aspect of the tibia
to the center of apex pin 300 is designed to correspond
to the distance from the medial aspect of the implant
to the vertex of the wedge angle of the implant.
In another form of the invention, the reference
distance may be the distance from the medial aspect of
the tibia to a neutral axis of rotation in the bony
hinge, which could be estimated by calculation. In
this case, the distance from the medial aspect of the
tibia to the neutral axis of the bony hinge would
correspond to the distance from the medial aspect of
the implant to the vertex of the wedge angle of the
implant.
8. = The assembly is then rotated around the
primary tibial anatomical axis, by sliding introducer
handle 130 in side-to-side motion, such that the
instrumentation is aligned perpendicular to the frontal
(coronal) plane, i.e., so that introducer 105 and apex
pin 300 (see below) will extend parallel to the
sagittal plane of the patient. To this end, slope
guide 200 is provided with a ball 230 and a groove 235.
CA 02603400 2007-10-01
WO 2006/107800
PCT/US2006/012172
- 24 -
With the fluoroscope arranged so that it is set in the
lateral mode, with the image being taken from the
medial side at the level of the tibial plateau (see
Fig. 11), the assembly is maneuvered until ball 230 is
centered in groove 235 (Fig. 11). When this occurs,
the system is aligned with the sagittal plane (i.e.,
position guide 100 is disposed so that apex pin 300
will extend perpendicular to the frontal plane, as will
hereinafter be discussed).
9. Thus, when slope guide 200 is aligned with
the medial condyle 75, and when ball 230 is aligned
with groove 235, the system is aligned with (i) the A-P
slope, and (ii) the sagittal plane. In other words,
when slope guide 200 is aligned with medial condyle 75,
and when ball 230 is aligned with groove 235, the
instrumentation is positioned so that apex pin 300 (see
below) will be aligned with both the A-P slope and the
sagittal plane, as will hereinafter be discussed.
10. With all of the previous adjustments in
place, the positions of (i) tibial tubercle locating
tab 135, (ii) slope guide 200, (iii) medial locating
pin 140, and (iv) the ball and groove sights 230, 235
CA 02603400 2007-10-01
WO 2006/107800
PCT/US2006/012172
- 25 -
are verified. With all positions confirmed, the
frontal pin 145 (Fig. 16) and the antero-medial (AM)
pin 150 (Fig. 16) are inserted through position guide
100 and into the tibia. This secures position guide
100 to the tibia with the desired alignment.
11. Next, apex pin 300 is inserted through
position guide 100 and into the tibia. An apex aime'r
155 (Figs. 14 and 16) serves to guide apex pin 300 into
the tibia with the proper orientation, i.e., so that
apex pin 300 is positioned along the axis 70 formed at
the lateral limit to the osteotomy cut, with apex pin
300 extending parallel to the A-P slope, perpendicular
to the coronal plane, and within cutting plane 65. As
a result, apex pin 300 can serve as the lateral stop
for the osteotomy saw, whereby to clearly define the
perimeter of the bony hinge, as will hereinafter be
discussed. Apex pin 300 may be tapped or drilled into
virgin bone, or it may be received in a pre-drilled
hole (e.g., formed using apex aimer 155). A thumbscrew
160 (Fig. 16) may be used to secure apex pin 300 to
position guide 100.
Apex pin 300 may be cylindrical in shape.
CA 02603400 2007-10-01
WO 2006/107800
PCT/US2006/012172
- 26 -
Alternatively, apex pin 300 may have a flat 305
(Figs. 12 and 13) formed thereon to promote a complete
cut-through of the osteotomy. Where apex pin 300 is
provided with a distinct flat 305, it is preferably
provided with a counterpart flat 310 (Figs. 12 and 13),
so that when apex pin 300 is in place and thumbscrew
160 is tightened against flat 310, the aforementioned
flat 305 will be aligned with the osteotomy cut,
whereby to ensure that the osteotomy blade cuts
completely through the bone to reach the apex pin. See
Figure 13.
In another version of this construction (not
shown), the flats 305, 310 may be diametrically opposed
to one another, with thumbscrew 160 also being aligned
with the osteotomy cut to make insertion of apex pin
300 less prone to error.
And in another embodiment of the present
invention, apex pin 300 may be necked down to a smaller
diameter in the area of the osteotomy. As a result of
this construction, a slight relief area exists to
accommodate the saw blade so as to help promote a
complete cut-through, but does not require any specific
CA 02603400 2007-10-01
WO 2006/107800
PCT/US2006/012172
- 27 -
orientation of the apex pin with respect to the
osteotomy plane, as is the case where the apex pin is
formed with distinct flats.
And in another version of the present invention,
apex aimer 155 may be used with a guide sleeve 160 and
a small-diameter guide pin 165 in order to first check
the position-of the small-diameter guide pin 165
relative to the desired axis for the apex pin, before
thereafter deploying the larger-diameter apex pin 300.
See Figure 14. In this respect, it will be appreciated
that repositioning a misdirected small-diameter guide
pin 165 is easier and less traumatic to the host bone
than repositioning a misdirected larger-diameter apex
pin 300.
As seen in Fig. 15, tibial tubercle locating tab
135 is preferably sized so that it also functions as an
anterior protector, by providing a protective shield
between the oscillating saw blade (to be used later in
the procedure to form the osteotomy cut 20) and the
anterior soft tissue structures, e.g., the patellar
tendon. ,
CA 02603400 2007-10-01
WO 2006/107800
PCT/US2006/012172
- 28 -
12. By virtue of the foregoing, it will be seen
that apex pin 300 is deployed in the patient's tibia so
that the apex pin extends (i) parallel to the A-P slope
of the tibia, and (ii) parallel to the sagittal plane
of the patient. As a result, when the osteotomy cut is
subsequently formed in the bone (see below) by cutting
along the oteotomy cut plane until the apex pin is
engaged, so that the perimeter of the bony hinge is
defined by the location of the apex pin, the bony hinge
will extend (i) parallel to the A-P slope of the tibia,
and (ii) parallel to the sagittal plane of the patient.
By ensuring that apex pin 300 is set in this fashion,
and hence ensuring that the bony hinge is so created,
the final configuration of the tibia can be properly
regulated when the bone cut is thereafter opened so as
to form the open wedge osteotomy.
13. Once apex pin 300 has been properly
positioned in the bone, slope guide 200 and introducer
105 are removed, leaving position guide 100 properly
aligned on, and secured to, the tibia, and apex pin 300
properly.deployed into the tibia (i.e., with apex pin
300 extending parallel to the A-P slope and parallel to
CA 02603400 2007-10-01
WO 2006/107800
PCT/US2006/012172
- 29 -
the sagittal plane of the patient). See Figure 16.
The size of position guide 100 and the associated
instrumentation is used to prepare the osteotomy to fit
the particular implant sizing of small, medium or
large. More particularly, the medial locating pin 140,
the size of position guide 100, and apex pin 300 all
combine to implement the implant sizing scheme. As
seen in Fig. 17, medial locating pin 140, position
guide 100 and apex pin 300 combine to provide a known,
fixed distance from the medial aspect of the tibia to
the apex pin. The size of the planned osteotomy is
then set, allowing a specifically-sized implant (e.g.,
small, medium or large) to nominally fit between the
medial aspect and the apex pin.
In the embodiment shown in Fig. 17, there is a
known lateral offset between medial locating pin 140
and the entry point of the osteotomy. The implant size
is reduced slightly to factor in this offset distance
_
so as to yield a proper fit.
In an alternative construction, medial locating
pin 140 may be perfectly aligned with the entry point
of the planned osteotomy (not shown).
CA 02603400 2007-10-01
WO 2006/107800
PCT/US2006/012172
- 30 -
14. Looking next at Fig. 18, keyhole drill guide
400 is then attached to position guide 100 by passing
keyhole drill guide 400 over frontal pin 145 and apex
aimer 155. Keyhole drill guide 400 is then secured in
this position with thumbscrew 405. At this point, a
distai pin 410 is inserted through keyhole drill guide
400 and into the tibia. Distal pin 410 further secures
the instrumentation to the tibia. Next, a surface
locator pin 415 is inserted through keyhole drill guide
400. Surface locator pin 415 slides through keyhole
drill guide 400 until the distal tip of surface locator
pin 415 contacts the surface of the tibia. For the
purposes of the present invention, this surface may be
referred to as the "antero-medial surface" or the "A-M
surface", which is the anatomical surface of the tibia
corresponding to the antero-medial approach of the
osteotomy. When surface locator pin 415 contacts the
A-M surface, the surface locator pin can act as an
indicator as to the location of the A-M surface. This
information can then be used to set the depth of the
keyholes to be formed in the tibia (see below) for an
improved implant fit.
CA 02603400 2007-10-01
WO 2006/107800
PCT/US2006/012172
- 31 -
Next, an end mill 420 is inserted into the distal
hole 425 (i.e., the bottom hole 425) of keyhole drill
guide 400 and drilled until a stop flange 430 on end
mill 420 contacts the proximal end of surface locator
pin 415, whereby to form the distal keyhole 85 (Fig.
21) in the tibia. The drilling procedure is then
repeated for the proximal hole 435 (i.e., the top hole
435), whereby to form the proximal keyhole 90 (Fig. 21)
in the tibia. While it is possible to drill the
proximal keyhole before the distal keyhole, it is
generally preferable to drill the distal keyhole first.
This is because drilling the distal keyhole before the
proximal keyhole reduces the possibility that the
sloping nature of the bone will cause a later-drilled
keyhole to slip into an earlier-drilled keyhole. It
should be appreciated that keyhole drill guide 400 is
configured so that distal hole 425 and proximal hole
435 will overlap the osteotomy cutting plane 65 to some
extent (Fig. 21), so that when osteotomy cut 20 is
thereafter formed and the tibia subsequently opened so
as to create the wedge-like opening 25, distal keyhole
CA 02603400 2007-10-01
WO 2006/107800
PCT/US2006/012172
- 32 -
85 and proximal keyhole 90 will overlap, and
communicate with, the wedge-like opening 25 (Fig. 29).
15. Once the two implant keyholes have been
drilled into the tibia, end mill 420 is removed,
thumbscrew 405 is loosened, and then keyhole drill
guide 400 is removed.
16. Next, and looking now at Fig. 19, posterior
protector 500 is attached to an introducer 505 with a
thumbscrew 510. The far tip 515 (Figs. 19 and 21) of
posterior protector 500 is inserted into the incision.
Posterior protector 500 is preferably formed out of a
somewhat flexible material so as to allow the posterior
protector to flex slightly to allow easier insertion
into the incision and to conform to the shape of the
posterior cortex. See Fig. 19. Posterior protector
500 is inserted by gradually sliding it around the
posterior cortex of the tibia until far tip 515 of
posterior protector 500 substantially crosses the axis
of, and in some cases actually engages, apex pin 300
(Fig.. 21)... Posterior protector 500 preferably
comprises a stiff curved portion 520 proximal to
flexible tip 515. Once posterior protector 500 has
CA 02603400 2007-10-01
WO 2006/107800
PCT/US2006/012172
- 33 -
been properly deployed, the thumbscrew 510 is
unscrewed, and introducer handle 505 is removed.
17. Looking next at Fig. 20, cutting guide 600 is
then attached to position guide 100 and secured in
place using cutting guide thumbscrew 605. Cutting
guide 600 comprises alignment rods 610 that extend from
the cutting guide into the pre-drilled keyholes 85, 90
(Fig. 21) to assist with cutting alignment. More
particularly, alignment rods 610 ensure proper
alignment between cutting guide 600, its cutting slot
615 (Figs. 20 and 21) and the pre-drilled keyholes 85,
90 previously formed in the tibia with end mill 420
and, ultimately, ensure the desired fit between the
implant.. and the tibia.
Then, posterior protector 500 is attached to
cutting guide 600 using thumbscrew 620 (Fig. 20).
- At this point, the instrumentation is ready to
form the osteotomy cut, with cutting slot 615 of
cutting guide 600 properly aligned with the osteotomy
cut plane, apex pin 300 properly positioned at the far
(lateral) limit of the osteotomy cut, tibial tubercle
locating tab 135 forming a protective shield for the
CA 02603400 2007-10-01
WO 2006/107800
PCT/US2006/012172
- 34 -
patellar tendon, and with posterior protector 500
forming a protective shield for the vascular and
neurological structures at the back of the knee. In
this respect it should be appreciated that cutting
guide 600 is sized and shaped, and cutting slot 615 is
positioned, so that, in addition to being aligned with
the apex pin 300, the entry point of the cutting plane
into the tibia is located at an appropriate location on
the tibia's medial neck 66.
18. Next, a saw blade 625 (attached to an
oscillating saw, not shown) is inserted into cutting
slot 615 of cutting guide 600. The osteotomy cut is
then made by plunging the oscillating saw blade through
cutting slot 615 and into the bone (Fig. 20). The saw
blade will cut completely through the medial and
posterior cortices. The saw is operated until saw
blade 625 contacts posterior protector 500 and apex pin
300. As the saw blade cuts through the tibia, it is
constrained by cutting slot 615, apex pin 300 and
posterior protector 500, so that the saw blade may only
cut bone along the osteotomy plane, up to but not
beyond the desired location of the bony hinge, and does
CA 02603400 2007-10-01
WO 2006/107800
PCT/US2006/012172
- 35 -
not cut soft tissue. During cutting, tibial tubercle
locating tab 135 also ensures that the saw blade will
not inadvertently cut the patellar tendon.
After saw blade 625 forms the desired osteotomy
cut 20 along the cutting plane, the saw blade is
removed, and a hand osteotome (not shown) of the sort
well know in the art is inserted through cutting slot
615 and into the osteotomy cut 20, and then the cut is
completed through the posterior cortical bone near apex
pin 300 and posterior protector 500. Then the hand
osteotome is removed.
At this point the osteotomy cut 20 has been
completed, with the osteotomy cut terminating on the
lateral side at apex pin 300, so that the bony hinge is
properly positioned at the desired location, i.e.,
parallel to the A-P slope and perpendicular to the
coronal plane.
Next, thumbscrew 620 is loosened and posterior
protector 500 removed. Then thumbscrew 605 is loosened
and cutting guide 600 is removed.
At this point, the desired osteotomy cut 20 has
been formed in the tibia, with keyholes 85 and 90
CA 02603400 2007-10-01
WO 2006/107800
PCT/US2006/012172
- 36 -
formed below and above, respectively, the osteotomy
cut.
In order to complete the procedure, the bone must
now be opened so as to reconfigure the tibia to the
desired geometry, and then the tibia stabilized with
the desired configuration, e.g., by inserting a
wedge-shaped implant 27 into wedge-like opening 25.
19. Looking next at Fig. 22, opening jack 700 is
assembled onto the instrumentation by receiving frontal
pin 145 in a hole 705 formed in jack arm 710, by
receiving apex aimer 155 in another hole 715 formed in
jack arm 710 and jack arm 725, and by receiving distal
pin 410 in a slot 720 formed in jack arm 725. Opening
jack 700 is secured to position guide 100 with a
thumbscrew 730.
Once opening jack 700 is in place, the jack is
opened by rotating jack screw 735. This causes jack
arm 725 to pivot about apex aimer 155 so as to open the
jack and thereby open the desired wedge-like opening 25
in the tibia. See Fig. 23. Preferably the patient's
lower leg is manipulated as jack screw 735 is turned so
as to assist opening of the bone. As the wedge-like
CA 02603400 2007-10-01
WO 2006/107800
PCT/US2006/012172
- 37 -
opening 25 is created in the bone, the tibia will be
reoriented in a highly controlled manner, due to the
fact that the bony hinge will be precisely positioned
at axis 70 through the use of apex pin 300, i.e., the
bony hinge will extend parallel to the A-P slope and
parallel to the sagittal plane. Furthermore, as the
wedge-like opening 25 is created in the bone, the risk
of bone cracking will be minimized, due to the fact
that apex pin 300 forms an oversized hole 95 (Figs. 23A
and 27) at the lateral end of the bone cut, i.e.,
"oversized" relative to the thickness of the osteotomy
cut, whereby to reduce the occurrence of stress risers
and the like.
20. Then, with opening jack 700 still in place,
an implant is positioned in the wedge-like opening 25.
If desired, the implant may be a "generic" implant such
as the implant 27 shown in Fig. 3. More preferably,
however, and looking now at Fig. 24, there is shown a
wedge-shaped implant 800 formed in accordance with the
preseryt invention. . Wedge-shaped implant 800 is
characterized by a wedge-like side profile configured
to match the geometry of the wedge-like opening 25.
CA 02603400 2007-10-01
WO 2006/107800
PCT/US2006/012172
- 38 -
Preferably, wedge-shaped implant 800 is also formed so
as to have a U-shaped top profile, such that it can
form a barrier about the perimeter of the wedge-like
opening 25, whereby to constrain graft material (e.g.,
bone paste, bone cement, etc.) which may be positioned
within the interior of the wedge-like opening 25. In
one preferred form= of the present invention,
wedge-shaped implant 800 is formed so as to have an
asymmetric configuration when viewed in a top view, so
as to mate with the geometry of the tibia when the
implant is positioned using an antero-medial approach.
Wedge-shaped implant 800 may be formed out of
absorbable material or non-absorbable material, as
desired.
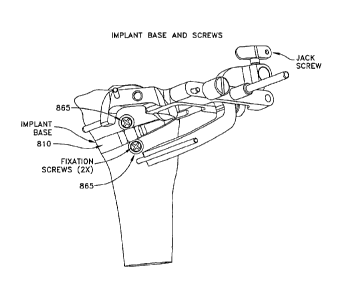
In one preferred form of the invention, and
looking now at Figs. 25 and 26, implant 800 preferably
comprises a three-part assembly, comprising posterior
graft containment arm (GCA) 805, a base 810 and an
anterior graft containment arm (GCA) 815. The
individual components of implant 800 may each be formed
out of absorbable material and/or non-absorbable
material, as desired. Furthermore, where one or more
CA 02603400 2007-10-01
WO 2006/107800
PCT/US2006/012172
- 39 -
of the implant components is formed out of an
absorbable material, the absorption characteristics of
the material may vary as desired. By way of example
but not limitation, base 810 may be formed out of a
relatively slowly-absorbing material, while posterior
graft containment arm (GCA) 805 and anterior graft
containment arm (GCA) 815 may be formed out of a
relatively faster-absorbing material. Base 810
preferably comprises a pair of keys 820, 825.
In one preferred form of the invention, implant
800 is formed so that posterior graft containment arm
(GCA) 805 has a generally wedge-shaped profile
including an engagement seat 826 comprising an
alignment post 827, and an introducer hole 828 opening
on the antero-medial side of the component for
engagement with introducer 845 (see below). A
strengthening rib 829 is preferably provided as shown.
Additionally, raised points or dimples 831 may be
provided to help fix GCA 805 to the bone. An alignment
tab 832 is provided for extension into upper keyhole 90
(Fig. 29) when GCA 805 is positioned in the
wedge-shaped opening 25.
CA 02603400 2007-10-01
WO 2006/107800
PCT/US2006/012172
- 40 -
And in one preferred form of the invention, base
805 is formed so that its keys 820, 825 each includes a
tapered axial bore 833, 834, respectively, with the
keys being slotted longitudinally so as to permit
expansion of the keys when screws 865 are thereafter
deployed in the tapered axial bores. External ribs 836
may be provided on the outer surfaces of keys 820, 825
so as to help fix keys 820, 825 in keyholes 85, 90,
respectively, as will hereafter be discussed in further
detail. An alignment mechanism (not shown) is provided
for mating with alignment post 827 of GCA 805.
Anterior graft containment arm (GCA) 815 also
comprises a generally wedge-shaped profile, and an
alignment tab 834 is provided for extension into lower
keyhole 85 when GCA 815 is positioned in the
wedge-shaped opening 25.
Horseshoe implant 800 is preferably assembled in
situ.
More particularly, a pre-assembled assembly
comprising posterior graft containment arm (GCA) 805,
an implant trial base 830 and two guide sleeves 835,
CA 02603400 2007-10-01
WO 2006/107800
PCT/US2006/012172
- 41 -
840 are first inserted into wedge-like opening 25 in
the bone using an introducer 845. See Figs. 27 and 28.
Next, a drill sleeve 850 and a drill 855 are
inserted into guide sleeve 840 (Fig. 27). An upper
hole is drilled into the tibia with the drill. The
drilling procedure is then repeated for guide sleeve
835 so as to create a lower hole. Then drill sleeve
-8-5-0--and-d/4-14-8-55-aT-c ______ reme-v-ed¨f-rem¨th-e
Next, a tap 860 is inserted into guide sleeve 840 and
the upper hole is tapped. See Fig. 28. Then the tap
is inserted into guide sleeve 835 and the lower hole is
tapped. Then tap 860 is removed from the surgical
site.
21. Next, posterior graft containment arm (GCA)
805 is released from introducer 845, and then
introducer 845 and implant trial base 830 are removed.
22. Then, if desired, graft material is packed
into the osteotomy opening.
23. Next, anterior graft containment arm (GCA)
815 is placed into the osteotomy opening and aligned
with the prepared implant holes. See Fig. 29. If
CA 02603400 2007-10-01
WO 2006/107800
PCT/US2006/012172
- 42 -
necessary, jack screw 735 is rotated as needed so as to
facilitate insertion of anterior GCA 815.
24. Then implant base 810 is inserted into the
prepared osteotomy, with keys 820 and 825 seated in
tibial holes 85 and 90, respectively. See Fig. 29.
Keys 820 and 825, seating in tibial holes 85 and 90,
help enure a precise fit of the implant to the bone.
As this is done, jack screw 735 is adjusted as
necessary to facilitate insertion of the base into the
osteotomy. Then jack screw 735 is tightened slightly
to ensure that the implant components are fully seated
into the osteotomy wedge. Next, fixation screws 865
are in Kted throuWkeys 820 and 825 in base 810 and
into the tapped holes in the tibia, and tightened into
place. See Fig. 30. Finally, opening jack 700,
position guide 100, apex pin 300, distal pin 410,
frontal pin 145 and A-M pin 150 are removed from the
surgical site, and the incision closed.
Anterio-Lateral Osteotomies
In the foregoing description, the present
invention is discussed in the context of performing an
CA 02603400 2007-10-01
WO 2006/107800
PCT/US2006/012172
- 43 -
open wedge osteotomy using an antero-medial approach.
Of course, it should be appreciated that the present
invention may also be used in antero-lateral
approaches, or other approaches which will be well
known to those skilled in the art.
Method For Obtaining An Anterior-Posterior (A-P) Slope
Correction In Conjunction With A Lateral-Medial (L-M)
Correction In A High Tibial Osteotomy
In the foregoing description, there was disclosed
an approach for effecting a high tibial osteotomy in
which the surgeon determines the anterior-posterior
(A-P) slope of the tibia and determines the proper
orientation of the osteotomy in relation to the frontal
(i.e., coronal) plane of the tibia. After this is
done, the surgeon places an apex pin into the tibia so
as to precisely define the lateral limit of the
osteotomy cut and hence the bony hinge of the
osteotomy. The foregoing discussion identifies the
importance of setting the apex pin parallel to the A-P
tibial slope and perpendicular to the frontal (i.e.,
coronal) plane. See Fig. 31 which shows the apex pin
CA 02603400 2007-10-01
WO 2006/107800
PCT/US2006/012172
- 44 -
perpendicular to the coronal plane, and Fig. 32 which
shows the axis of the apex pin parallel to the A-P
slope. Such an approach is important to prevent
inadvertent or unintended changes to the A-P tibial
slope as the alignment correction (and the opening of
the osteotomy) is executed.
However, there may be situations in which the
surgeon may deliberately wish to introduce an A-P slope
change into the tibia, e.g., such as when resolving
knee instability or knee ligament laxity.
The following disclosure describes an approach
which allows the surgeon to make a quantifiable change
to the A-P tibial slope. This approach essentially
involves rotating the axis of the apex pin about the
longitudinal axis of the tibia to a prescribed angle
relative to the sagittal plane. This is in contrast to
the preferred approach disclosed above, in which the
axis of the apex pin is parallel to the sagittal plane.
More_particularly, Fig. 33 shows the axis of the
apex pin disposed parallel to the sagittal plane. As
noted previously, this orientation produces a
CA 02603400 2007-10-01
WO 2006/107800
PCT/US2006/012172
- 45 -
lateral-medial (L-M) correction without affecting th
A-P slope, since the inserted apex pin is parallel to
the A-P slope.
Looking now at Fig. 34, the axis of the apex pin
is shown rotated in the posterior direction (i.e.,
counter-clockwise when seen from the top view of Fig.
34). This alternative orientation of the apex pin
produces an increased A-P slope with a corresponding
adjustment of the L-M slope. The resulting L-M and A-P
slope corrections are a function of the total
correction angle, i.e., the total amount that the axis
of the apex pin is rotated relative to the sagittal
plane.
Looking now at Fig. 35, the axis of the apex pin
is shown rotated in the anterior direction (i.e.,
clockwise when seen from the top view of Fig. 35).
This alternative orientation of the apex pin produces a
decreased A-P slope with a corresponding adjustment of
the L-M slope. Again, the resulting L-M and A-P slope
corrections are a function of the total correction
angle, i.e., the total amount that the axis of the apex
pin is rotated relative to the sagittal plane.
CA 02603400 2007-10-01
WO 2006/107800
PCT/US2006/012172
- 46 -
For discussion purposes, it can be assumed that
there are no surgical limitations on the orientation of
the apex pin. This allows the inspection of extreme
orientations for the purposes of illustrating the
operative concepts. From a surgical perspective,
however, there are practical limitations to how far the
apex pin can be rotated relative to the "standard"
position (i.e., parallel to the sagittal plane).
However, the following examples are valid for
illustration purposes.
Looking now at Fig. 36, it becomes clear that if
the apex pin is oriented posteriorly and parallel to
the frontal (coronal) plane, the opening wedge
osteotomy produces only A-P slope increases with no
effect on the L-M slope.
Similarly, and looking now at Fig. 37, an apex pin
that is oriented anteriorly and parallel to the frontal
(corona') plane, produces only A-P slope decreases with
no effect on the L-M slope.
It is clear from Figs. 36 and 37 that, using this
method, and interpolating between the extreme
orientations, it is possible to obtain any combination
CA 02603400 2007-10-01
WO 2006/107800
PCT/US2006/012172
- 47 -
of L-M slope, and either A-P slope increase and/or A-P
slope decrease, by reorienting the apex pin relative to
the sagittal plane.
An apex pin that is oriented 45 from the sagittal
plane will necessarily produce equal L-M and A-P
corrections for a given total correction angle. A 450
posterior orientation produces equal angle L-M increase
and A-P increase. A 45 anterior orientation produces
equal angle L-M increase and A-P decrease.
Furthermore, it can be shown that an apex pin
located near the medial cortex instead of the lateral
cortex will produce L-M slope changes in the opposite
direction. This may be used for correcting a valgus
malalignment.
Various constructions may be used to orient apex
pin 300 with the desired angle relative to the sagittal
plane. By way of example but not limitation, Fig. 38
shows how apex aimer 155 may be slidably mounted to a
curved boom B so that the angle of apex pin may be
adjusted relative to the sagittal plane. Other
constructions will be apparent to those skilled in the
art in view of the present disclosure.
CA 02603400 2007-10-01
WO 2006/107800
PCT/US2006/012172
- 48 -
Modifications
It will be understood that many changes in the
details, materials, steps and arrangements of parts,
which have been herein described and illustrated in
order to explain the nature of the invention, may be
made by those skilled in the art without departing from
the principles and scope of the present invention.