Note: Descriptions are shown in the official language in which they were submitted.
CA 02624761 2008-04-03
WO 00/79141 PCT1US99/13929
1
LOCKING NUT, BOLT AND CLIP SYSTEMS AND ASSEMBLIES
Technical'Field
T7se present invention relates to locking nut, bolt, clip and fastener
systems. With these systems, one-
way rotation is permitted (to fasten or tighten the system onto an underlying
substrate) but counter-rotational
movement is not permitted (thereby limiting or eliminating loosening of the
fastener system).
Background Art
6 U.S. Patent No. 307,722 to Klemroth discloses a bolt A with longitudinal
chaanel D running through
the crest of the threads. The nut has a tine extending above a flat end
surface of the nut. The tine pops into
and out of channel D. U.S. Patent No. 591,062 to Smith discloses a bolt with a
longitudinal channel which
enables a chisel to be placed in a slot in a nut block and further to stop
rotation of the bolt with respect to the
bloek. U.S. Patent No. 1,088,892 to Foreman discloses a screw with a
longitudinal channel extending through
F
11 the threads of the bolt. The tine is located outside of the nut threads.
U.S. Patent No. 1,136,310 to Burnett discloses small notches cut in the top of
the crest of the bolt
threads. I'he notches define radially aligned surfaces. A flexible tine in the
interior of the nut moves in and
out of the small notches. The tine is inserted in a tangential cavity in the
nut. U.S. Patent No. 1,211,194 to
Lang discloses what appears to be a bolt with longitudinal channels on its
threads. A sheet steel spring is
16 wrapped around an exterior portion of the nut and a portion of the spring
is generally radially inserted through
the nut to lock into the bolt channels. U.S. Patent No. 1,226,143 to
Stubblefield et al. discloses a bolt with
longitudinal channels having a somewhat radial surface and an angularly
disposed surface. The nut has an
annular groove or recess on one end face thereof. A semi-circular member fits
within the groove. One end
of the semi-circular member defines a tangentially oriented tine that pops
into and out of the bolt channels.
C 21 U.S. PatentNo.1,245,362 to Lynch discloses a bolt with a single, offset
bolt thread crest which catches
on a cut-out in the nut. U.S. Patent No. 1,278,028 to Savory et al. discloses
a bolt with a longitudinal channel
and tines in a nut which are mounted in an internally located groove. The
internal groove has a single radial
dimension. U.S. Patent No. 1,465,148 to Rosenberg discloses a bolt with a
longitudinal channel through the
thread crest. No nut is shown. U.S. Patent No. 1,703,947 to Nation discloses a
bolt with several longitudinal
26 channels. A single tine is located at an interior position in the nut. The
tine in the nut has a terminal end that
is radially moved in*ard based upon the position of a locking cam. The locking
cam biases the terminal end
of the tine toward the notches in the bolt. The locking cam extends radially
through the nut. U.S. Patent No.
2,232,336 to Meersteiner discloses a bolt with a longitudinal channel. No nut
is shown.
U.S. PatentNo. 2,301,181 to Ilsemann discloses non-load bearing or carrying
faces of most of the bolt
31 threads which are deforrned and which carry locking projections. Locking
projections on a pltuality of bolt
threads are adapted to engage nut threads and compensate for the clearances in
the assembly to align and
frictionally lock the nut and bolt together. The non-load carrying faces
ofeach boltthread include two annular
series of spaced, rounded projections. The surfaces of the projections are
substantially rounded. Bolt
CA 02624761 2008-04-03
WO 00/79141 PCT/US99/13929
2
1 projections force the load bearing surface of the bolt against the load
bearing surfaces ofthe nut U.S. Patent
No. 2,484,645 to Baumle discloses a bolt with longitudinal channels. No nut is
shown. U.S. Patent No.
2,$21,257 to Sample discloses a bolt with longitudinal channels. Springy tines
are mounted at one end of the
nut and the tines flip in and out of channels. The tines are sheared from the
threads on the nut. Accordingly,
there is no space radially behind the tines when the tine is fully compressed
by the crest on the bolt thread.
6 U.S. Patent No. 2,834,390 to Stevens discloses bolts which appear to have
longitudinal channels
through the threads. A plurality of radially inward pointed teeth on the nut
provide locking for the
combination. U.S. Patent No. 3,176,746 to Walton discloses that each crest of
each thread on the bolt has a
gouged out portion. These portions, when aligned, are similar to a
longitudinal channel. No nut is disclosed.
U.S. Patent No. 3,517,717 to Oriomoski discloses threads on a bolt which
include two outwardly directed
11 prongs. The prongs flex inward when the bolt is screwed onto a nut. The
sliced away wedge or prongs do not
have a narrow mouth and a deep throat. No nut is disclosed. ~
U.S. Patent No. 3,792,757 to Wright discloses a nut with a bore having a
triangular cross-sectional
dimension. U.S. Patent No. 3,982,575 to Ollis et al. discloses a thread on
each bolt with a plurality of ridges
forming wedge surfaces. U.S. Patent No. 4,024,899 to Stewart discloses a top
of each crest ofthe bolt thread
16 having a slice and a prong protruding therefrom. The prong fits within a
cut-out depression in the root of the
nut thread. The cut-outs at the root of the threads do not appear to be
radiaily aligned. U.S. Patent No.
4,168,731 to Taber discloses a root of the nut with a cut-out and the bolt
having a plurality of wedges which
fit within the nut cut-out.
U.S. Patent No. 4,790,703 to Wing discloses a nut with a bore with an
imperfect, non-symmetrical
21 cross-sectional aspect. U.S. Patent No. 4,790,208 to Kaiser et al.
discloses a bolt with a longitudinal channel
through the threads.
U.S. Patent No. 5,238,342 to Stencel discloses a bolt with a longitudinal
channel into which snaps
inwardly biased wings from a nut insert. The nut insert has a radially
extending top flange (similar to a hat
ring) and is formed as an elongated cylinder which fits within a cylindrical
end bore in the nut. The wings
26 from the insert protrude inwardly atan angle, tangentially inward toward
the bolt's axial centerline. The wings
are pressed inward from the elongated cylinder of the nut insert. The terminal
end ofthe wings lock into axial
or longitudinal grooves running through the bolt thread. The nut insert is
keyed to a certain position on the
nut by a key-tab and a complementary lockway.
U.S. Patent No. 5,460,468 to DiStasio discloses a bolt having one or more
longitudinal channels.,
31 through the bolt threads. The nut has one or more tines which cooperate
with the channels to prevent counter-
rotation of the bolt with respect to the nut. The tine or tines define a
narrow mouth leading to-a wider throat
behind the tine such that the mouth and throat enable the tine to flex therein
while the bolt threads radially
move the tine back and forth during one-way rotation of the bolt with respect
to the nut.
CA 02624761 2008-04-03
WO O0r7914I PCT/US99/13929
3
1 U.S. Patent No. 1,208,210 to Purcell discloses a locking nut with tangential
slot within which is
disposed a spring pawl. The terminal end of the pawl interacts with a spiral
groove through the bolt thread.
U.S. Patent No. 827,289 to Bowers discloses a generally circular insert having
a key end, fitted into
a radial keyway in the nut, and a tine terminal end which cooperates with a
longitudinal or axial groove on the
bolt thread.
6 U.S. Patent No. 589,599 to Hardy discloses a semi-circular nut insert with a
generally radially aligned
tine. The tine locks into a longitudinal groove in the bolt thread. A space is
provided radially behind the tine
to permit the tine to flex inboard and outboard as the tine moves into and out
of the longitudinal groove on the
bolt thread.
U.S. Patent No. 5,538,378 to Van Der Drift discloses a nut insert which is
flat punched to deftne a
11 series of circumferential tines. The insert has a cut-out region radially
behind each tine. The tenainal end of
~. each tine falls into a recess at the bottom of the root of the bolt thread.
The nut insert is captured in a recess
at an end face of the nut.
U.K. Patent Publication No. 142,748 to Thibert discloses a semi-circular nut
insert having a
tangentially oriented locking tine. The tine moves tangentially, not radially,
when the tine drops into and
16 moves out of the longitudinal groove in the bolt thread.
U.K. Patent Publication No. 662,298 to Simmonds a swagged nut insert.
Disclosure of the Invention
It is an object of the present invention to provide locking nut and bolt
systems with one or more
compressible tines carried by nut inserts or fonned on U, S and J-shaped
clips.
21 ItJs another object of the present invention to provide a locking nut and
bolt system with a latch
~ mechanism which places the compressible tine into a locking position or a
closed position.
It is an additional object of the present invention to provide a locking nut
and bolt system wherein the
bolt head carries notches thereon and the compressible tine or tines block
counter-rotational movement by
interacting with the notches on the bolt head.
26 It is another object ofthe present invention to provide locking nut and
bolt systems which utilize bolts
having a longitudinal aligned locking channel in the same plane as the bolt's
axial centerline and bolts having
a locking channel forming a spiral about the axial centerline.
It is an additional object to provide for removal tools for the locking nut
and bolt combination.
The locking nut, bolt, clip or fastener system utilizes in one embod'unent a
boltwith an axial centerline
31 and a bolt thread having a plurality of notches generally longitudinally
spaced thereon in a predetermined
patrorn. The nut for the fastener system has complementary threads. A locking
unit or structnre is associated
with the nut. The locking unit has an elongated tine with a generally planar
tine body. Sometimes the distal
tine end is offset from the planar tine body. The tine extends from the
locking unit body in a substantially
tangential and radial manner toward the axial centerline of the bolt. The tine
has -a distal tine end adapted to
CA 02624761 2008-04-03
WO 00/79141 pCT/[JS99113929
4
1 latch onto the lock faee of the notch on the bolt and, when the disW tine
end is not disposed in one or more
notches, the tine end moves on the bolt thread crest. When the distal tine end
is in the notch or notches, the
lock face of the notch prevents counter-rotational movement of the bolt with
respectto the nut when the distal
tine end abuts the lock face. The tine carrying locking unit may be in a nut
insert which includes a plutglity
of tines circumferentially disposed about the planar peripheral ring of the
nut. In a further embodiment,
6 toeking is provided by an elongated locking unit formed as a cylinder eit4w
mounted on the nut or on a leg
ofan S, U or J-shaped clip. When created from a sheet metal plate, the nut
thread barrel is formed on one plate
section and the tine carrying locking unit is carries on another plate
section. The two plate sections are bent
over each other such that the axial center points of the threaded barrel (or
single thread nut) is coaxial with the
same point in the tine carrying locking unit. In an additional fastening
system, the locking unit includes a latch
11 closure. When the latch is in a closed position, the distal tine end is
captured between the latch and the locking
unit peripheral wall. In an open position, the tine or tines permit only one-
way rotation. In a further ~, .
enhancement, the locking nut and bolt assembly with a latch can be used in
conjunction with a ratchet tool
when the latch is formed as a complementary cylinder to a cylindrical locking
unit. In another embodiment,
the locking nut and bolt system is utilized in conjunction with a bolt having
a plurality of notches defined on
16 the bolt head. The boit stem is not grooved or notched. A female threaded
unit in an underlying fastenable
substrate has a nut thread complementary to the bolt thread (or is simply a
passage way for a self-threading
bolt or screw). A locking unit is mounted on the underlying substrate and has
at least one tine, and preferably
a plurality of tines, protruding tangentially and radially inward toward the
central axis formed by the female
threads or bore on the underlying substrate. The distal tine ends of the
locking unit prohibit counter-rotational
21 movement when the tine ends fall within the notches on the bolt head and
abut the locking faces. Otherwise,
thetines are axially disposed beyond the notches on the bolt head and permit
rotational movement. In a further
embodiment, the locking nut and bolt is operable with a removal tool. The
removal tool includes axially
outboard and biased legs which are interposed between the proximal tine body
and the bolt thread. When
rotated, the interposed depending leg withdraws the distal tine end from the
notches on the bolt or bolt head
26 thereby permitting removal of the locking nut, bolt, clip or fastener from
the underiying substrate.
Brief Description of Drawings
FIG. ia illustrates a bolt having a longitudinal locking channel formed
thereon, and FIG. I b illustrates
the notch or recess on the bolt thread.
FIG. 2a illustrates a spiral locking channel on the bolt, and FIGS. 2b and 2c
diagrammatically illustrate
31 a partial, axial side view of a notched or grooved bolt thread and a
diagrammatic cross-sectional view of the
bolt over a thread line 2b'-2b", respectively.
FIGS. 3a and 3b illustrate a tine having an offset proximal end loop.
FIG. 4 diagrammatically illustrates the tine placed in a reeess in a nut and
the tine acting.on the bolt
threaded onto the nut.
CA 02624761 2008-04-03
WO 00/79141 P(TIUS99113929
1 FIGS. Sa and b illustrate a tine having a proximal end loop disposed in
parallel planes with respect to
the tine body.
FIG. 6a diagzammatically illustrates the tine disposed in the recess in a nut
and the bolt threaded onto
the nut, and FIGS. 6b-6e illustrate bolts carrying notches or bolt heads
carrying lock face notches (for blind
hole apptications) and FIGS. 6f and 6g illustrate locking protrusions, and
FIG. 6h graphicaily illustrates the
6 geometry ofthe angle of engagement, and FIGS. 6i-6q diagrammatically
illustrate engagement or locking face
wall designs.
FIGS. 7a, b, c and d diagrammatically illustrate a tine with a proximal end
loop formed as a solid
planar element and the tine body twisted and the depending normally from the
solid body proximal end loop
plane.
_ 11 FIG. 8 diagrammatically illustrates the tine disposed in the nut recess
and the nut threaded on the bolt.
FIG. 9 diagrammatically illustrates a cross-sectional plan view of the tine
with the solid planar element
from the perspective of section line a'-a" in FIG. 8.
FIG. 1U diagrammatically illustrates another shape for the proximal end loop
as a solid planar element
in a recess in a nut wherein the bolt is threaded onto the nut.
16 FIG. 11 is a perspective view of the nut having an arcuate recess on an end
face.
FIG. 12 illustrates a nut having a nut insert disposed in a circumferential
recess and a bolt threaded
into the nut.
FIGS. 13 and 14 illustrate the nut insert at various production stages before
and after the tines have
been twisted from the plane defined by the peripheral ring body of the nut
inscrt.
21 FIG.15 illustrates a partial, cut-away view ofthe nut insert and
particularly shows the shoulder in the
recess and the displacement of the distal tine end and a portion of the tine
body in a radial space defined
beneath -the nut insert.
FIG. 16 shows a nut insert keyed to a nut and a bolt threaded on the nut.
FIGS. 17a and 17b show the nut insert in various stages of manufacture with
the tines in the plane of
26 the peripheral ring and the tines depending below the plane.
FIG.18 illustrates a nut insert having planar support plates for the tines
with a bolt threaded onto the
nut, and FIGS. 19 and 20 illustrate partial, cross-sectional views of the nut
insert and nat from the perspective
of section lines a'-a" and b'-b in FIG. 18.
FIGS. 21 and 22 illustrate various stages of manufacture of a nut insert
before and after the tines have
31 been rotated or twisted from the nut insert plane.
FIG. 23 illustrates aperspectiveview of acylindrical locking unitaffixed to
the nut via'a rearward ring
member disposed in a recess on the nut.end faee.
FIG. 24 diagrammatically illustrates the notches on the bolt.
CA 02624761 2008-04-03
WO 0on9141 PCT/US99/13929
6
1 FIGS. 25a and 25b provide perspective views of bolts respectively having (a)
a longitudinal locking
chanael wherein the notches fall in the same plane as the axial centerline of
the bolt and (b) a spiral locking
channel wherein the lock notches are longitudinally adjacent but fall in a
spiral, predeterinined pattern about
the axial centerline of the bolt.
FIG.26 diagrammatically illustrates the locking action provided by the tines
falling into one or more
6 notches on the bolt.
FIGS. 27a and 27b illustrate the cyllndrieal locking units respectively having
circumferentially
disposed tines and circumferentially and axially disposed tines sometimes
called the "railroad design".
FIG. 28 diagrammatically illustrates a bolt having a longitudinal locking
channel and a nut carrying
the cylindrical locking unit.
11 FIG. 29 illustrates a partial, cross-sectional view of the cylindrical
locking unit mounted in the recess
on the end face of the nut. '
FIG. 30a diagrammatically illustrates the bolt locked onto two panels with a
nut and the cylindrical
locking unit, and FIGS. 30b-30e diagrammatically illustrate the top hat design
which includes a single, radial
end plate above a cylindrical looking unit, and FIG. 30f diagrammatically
illustrates the top hap design or
16 insert mounted in a nut, and FIGS. 30g-30i diagrammatically illustrate
axially stacked locking units or inserts.
FIG. 31 provides a perspective view af a nut carrying a locking element having
a plurality of axially
protruding legs and a con=ponding plurality of tines.
FIG. 32 illustrates the locking aation provided by the tines on the locking
element, on the nut and on
the specially configured bolt.
21 FIGS. 33a and 33b illustrate various stages of manufacture of the looking
element with the axially
protruding iegs and tines. ~..
FIG. 34 illustrates a specially configured bolt and a nut carrying the locking
element with the axiaUy
protruding legs.
FIG. 35a shows the nut carrying the locking unit threaded onto the special
bolt, and FIGS. 35b-35e
26 diagramrnatically illustraLe radial rim loeking features on and about nut
faces to affLx the loeking inserts or
locking units into the nut, and FIGS. 35f-35oo diagrammatically illustrate
stamped (and partially extruded)
lockingnutsorfastenerclips, andFIGS. 35pp-35ss diagrammatically illustrate a
lockingdrawn barrel fastener,
and FIGS. 35tt-35xx diagrammatically iilustrate pipe or bolt end locking
systems.
FIGS. 36 and 37 diagrammatically illustrate an S-shaped locking nut and bolt
clip assembly wherein
31 one of the clip legs carries a cylindrical locking unit.
FIGS. 38a and 38b diagrammatically iliustrate an S-shaped locking nut and bolt
clip assembly wherein
one of the clip legs carries a locking element having a plurality of axial ly
protruding legs and diagrammatically
shows a manufacturing stage for the locking element.
CA 02624761 2008-04-03
7
FIG. 39 diagrammatically illustrates the S-shaped clip utilized in conjunction
with a bolt having a
longitudinal locking cbannel and a bolt having a spiral locking channel and a
panel having a bore.
FIG. 40 diagrammaticaliy illustrates an S-shaped clip having a locking element
with a plurality of
axially protruding legs formed on one clip leg.
FIGS. 41 a and 41b diagrammatically illustrate stages of manufacture for the
locking eletnent.
6 FIGS. 42 and 43 diagnunmatically illustrate an S-shaped clip and locking nut
and bolt assembly
wherein one clip leg carries a cylindrical locking unit.
FIGS. 44, 45a, 45b and 46a diagrammatically illustrate an S-shaped clip
wherein one clip leg carries
a locking element having a plurality of axially protruding legs,
diagrammatieally shows various stages of
manufacture of the locking element and diagrammatically shows a side view of
the S-shaped clip with the
11 bored panel, and FIGS. 46b-46g diagrammatically illustrate various clip
locks, clip fasteners or nuts which may
be configured as separate locking nuts or fasteners (see FIGS. 46f and 46h) or
may be disposed on a leg of a
U, J or S-shaped clip, and FIGS. 46h-46j diagrammatically illustrate a locking
mechanism with the threaded
nut barrel disposed on a axiai end of a cylindrical, tine carrying locking
unit or structiue.
FIG. 47 diagrammatically illustrates a U-shaped clip or locking nut assembly
whorein one of the clip
16 legs carries a single thread nut and the other clip leg carries a locking
element with a plurality of axially
protruding legs.
FIG. 48 diagrammatically illustrates a partial view of the single thread nut.
FIG. 49 diagrammatically illustrates a U-shaped clip with a single thread nut
on one clip leg and a
cylindrical locking unit on the other clip leg.
21 FIG. 50 diagrammatically illustrates a U-shaped ciip with a single thread
nut used in connection with
either the special bolt with a longitudinal locking channel or the special
bolt with a spiral locking channel.
i' - FIG. 51 diagrammatically illustrates a U-shaped locking nut clip assembly
having a single thread nut
and a locking element formed beyond the arc of the nut thread.
FIGS. 52a and 52b diagrammatically illustrate a U-shaped and a J-shaped clip.
26 FIGS. 53a and 53b illustrate boits having longitudinal locking chaneels and
spiral locking chanriels.
FIGS. 54a and 54b diagrammatically illustrate various stages of manufacture of
the clip leg carrying
the single thread nut and locking element.
FIG. 55 diagrammatically illustrates a J-shaped clip having a single thread
nut and a locking element
formed beyond the arc of the nut thread.
31 FIG. 56a diagrammatically illus'trates a clip having a segmented single
thread nut with a plurality of
locking element legs between each segment, and FIGS. 56b-56h diagrammatically
illustraia clipfasteners with
a single nut thread on a clip leg (the clips may be U, J or S-shaped).
FIGS. 57 and 58 diagrammatically illustrate clips having a nut on one clip leg
and a cylindrical locking
unit formed on the outboard axial end of the nut.
CA 02624761 2008-04-03
WO 00179141 PC.'r/US99/13929
B
I FIG. 59 illustrates a detailed view of the nut and cylindrical locking unit.
FIG. 60 diagrammatically illusirates a partial, cross-sectional, broken away
side view ofthe nut with
the cylindrical locking unit formed on an axial outboard end, and FIGS. 61a
and 61b diagrammatically
illustrate the tines from the perspective of section lines a'-a" and b'-b" in
FIG. 60.
FIG. 62 diagrammaticaily illustrates a side view of a U-sbaped locking nut
clip assembly with a thin
6 walled nut and a locking unit formed an interior region of the nut.
FIGS. 63a-h diagrammatically illustrate plan side views and end views of the
nut and locking unit at
various stages ofmanufacture (with the axial view from the perspective
ofcorresponding section lines in FIGS.
63a, c, e and g). .
FIG. 64a diagrarnmatically illustrates a perspective view of the thin walled
nut and intermediate
11 locking unit, and FIG. 64b graphically illustrates the spacial flex zone
and locking zone for the locking
fasteners illustrated in FIGS. 64a and 67. ~
FIG. 65 illustrates a side view of a locking nut clip assembly (a truncated U-
shaped clip or a J-shaped
ciip) wherein the locking unit is on an interior of the nut adjacent one axial
end of the nut.
FIGS. 66a, b, c and d diagrammatieally iilustrate various stages of
manufacture of the locking unit
16 formed on the interior of the nut at one axially end.
FIG. 67 diagcammatically illustrates a perspective view of the thin walled
cylindrical nut and the
locking unit on an interior portion of the nut adjacent one axial end.
FIGS. 68a and 68b illustrate a bolt having a longitudinal locking channel and
a spiral locking channel,
respectively.
21 FIG. 69 diagrammatically illustrates a perspective view of a locking unit
having a peripheral wall with
a plurality of tines protruding tangentially and radially inward. C
FIG. 70 diagrammaticaliy illustrates a perspective view ofthe locking unit
carrying two latches which
are moveably disposed on the peripheral wall carrying the locking tines, and
FIGS. 71a and 71b
diagrammatically illustrate side views from the perspective of section line a'-
a" in FIG. 70 and from the
26 perspective of section line b'-b" in FIG. 70.
FIG. 72 illusaates a side view of a nut carrying the locking unit.
FIGS. 73a, b and c and 74a, b and c diagrammatically illustrate top views of
the locking unit in a
locking position; an intermediate position and a closed position (FIG. 73c)
and the locking unit disposed in
a nut with a bolt threaded on the nut in a locking position, an intermediate
position and a closed position (FIG.
31 74c).
FIGS, 75a and 75b diagrammatically illustrate a perspective view of the
locking unit formed as a
cylindrical locking unit before and after the formation of channel members.
FIG. 76 diagrammatically illustrates a perspective view ofa latch formed as a
complementary cylinder.
CA 02624761 2008-04-03
WO 00/79141 PGT/US99/13929
9
1 FIG. 77 diagrammatically illustrates a perspective view of the cylindrical
locking unit with the
cylindrical latch inserted therein.
FIG. 78 illustrates a top view of the cylindrical locking unit, the
cylindrical latch mounted on and in
a reoess on the end fax of a nut.
FIG. 79 diagrammatically illustrates a perspective view of a cylindrical latch
(without an end cap).
6 FIG. 80 diagrammatically illustrates a perspective view of a cylindrical
latch mounted into a
cylindrical looking unit.
FIGS. 81 and 82 illustrate a side view of a cylindrical locking unit and a
cylindrical latch and a side
view of that same system mounted into a recess in an end face of a nut.
FIG. 83 illustrates a side view of the nut carrying a cylindrical locking unit
and a cylindrical latch
I 1 about to be threaded onto a bolt thread having a longitudinal locking
channel.
FIG. 84 illustrates a side view of the locking nut and bolt assembly locking
two panels together.
FIGS. 85 and 86 illustrate a bolt carrying a longitudinal locking channel and
a spiral locking channel,
respectively.
FIGS. 87a and 87b diagrammatically illustrate a perspective view of a
cylindrical locking unit before
16 and after a channel member has been defined on the peripheral wall carrying
the lockirig tines.
FIG. 88 diagrammatically illustrates a cylindrical latch having a user
aetuatable control surface
extending radially from one axial end thereo~
FIG. 89 diagrammatieally illustrates a perspective view of a cylindrical
locking unit and a
complementary cylindrical latch mounted therein.
21 FIG. 90 illustrates an end view of the cylindrical locking unit and
cylindrical latch mounted into the
recess on an end face of a nut.
L..= .
FIG. 91 diagrammatically illusttates a socket with a cylindrical latch having
a user actuatable control
surface extending from the socket which is about to be mounted on a receptacle
on a rachet tool.
FIG. 92 diagrammatically illustrates a plan view of the socket and the
cylindrical latch with a user
26 actuatable radial control surface.
FIG. 93 diagrammatically illustrates across-sectional plan view ofthe socket
and the cylindrical latch.
FIGS. 94aand94bdiagrammaticaliy illustrate afemale threaded unit in various
stages ofmanufacture.
FIGS. 95a and 95b diagrammatically illustrates a perspective view and a side
view, respectively, of
a locking unit with a peripheral wall carrying a plurality oftines.
31 FIG. 96 diagrammatically illustrates the locking unitmounted in the recess
ofthefemale threadedunit.
FIGS. 97a, b and c itlustrate a side view, an end view (from the section line
b'-b") and a perspective
view of the bolt having a notched bolt head.
FIGS. 98a and 98b diagrammatically illustrate a perspective view and an end
view ofthe notched bolt
head threaded into the female unit wherein the tines lock onto the notches on
the bolt head.
CA 02624761 2008-04-03
FIG. 99 diagranunatically illustrates a removal tool about to be placed atop
the locking
nut and associated bolt.
FIGS. 100, 101 and 102 respectively diagram the user actuable control surface;
the
depending leg interposed between the locking body carried by the nut; the
depending leg moved
5 proximal tine body radially outward; and the depending leg lifting the
distal tine end away from
the notch on the bolt after rotation.
FIG. 103a diagrammatically illustrates a partial detail end view of a nut
carrying the
locking body witli an interspace identified for insertion of a depending leg,
FIGs. 103b and 103c
diagrammatically illustrate tine configuration, and FIGs. 104-115
diagrammatically illustrate blind
10 hole one-way locking fasteners or nut and bolt combination.
FIG. 104 shows bolt head and FIG. 105 diagrammatically illustrates a specially
configured blind hole bolt.
FIGs. 106, 107, 108 diagrammatically show a rectilinear, flat sided and
partial flat sided
tine supports, respectively.
FIGs. 109, 110a, I 10b and 110c show a top view, side view, operational top
view and a
perspective view of the tine supports.
FIGs. 111 a-112c diagrammatically illustrate other types of blind hole
fastening
mechanisms wherein a wall carries a plurality of tines which interact with
locking zones on the
bolt head.
FIGs 113-115 show a blind hole bolt with a common nut head atop an axially
grooved
blind hole bolt head section and a blind hole tine support.
Industrial Applicability
The present invention relates to the nut, bolt and fastener art and also
relates to fasteners
which are carried by clip systems. These fastening devices are utilized
throughout a wide range of
f 25 industrial and consuiner applications which require locking nuts, bolts
and fasteners which do not
\ loosen during utilization of the industrial or consumer equipment.
Best Mode for Canying Out the Invention
The present invention relates to a locking nut and bolt and fastener system
and clips-
forming a locking nut assembly, a locking nut and bolt systein having a latch,
and a reinoval tool
for such locking systems.
FIG. I a illustrates bolt 20 having a longitudinal locking channel 28 through
bolt threads
26. Bolt threads 26 are formed on bolt stem 24. Bolt 20 includes bolt head 22.
Bolt 20 includes
an axial centerline C-C' numerically identified as centerline 60 in the
figure. A nut 40 has been
threaded onto bolt thread 26. It should be noted that the longitudinal locking
clianne128 may
extend the entire length of bolt thread 26 or may occupy a segment or a
portion of thread 26. As
described later, nut 40 has some type of locking mechanism disposed thereon to
therein which
generally includes a compressible tine which moves into the notch formed on
each bolt thread and
CA 02624761 2008-04-03
IOA
out the notch and rides atop the crest of the bolt thread. As used herein, the
term "compressible"
refers to a tine that moves generally radially into a locking notch or groove.
FIG. lb
diagrammatically illustrates a partial view of the bolt. Bolt thread 26
includes bolt thread crest 30
and a trough 32. Notch 34 may be deeper than through 32 or may be a shallow
notch on crest 30.
The longitudinal channe128 of FIG. 1 a is formed by a plurality of notches
shown in FIG. lb as
notch 34. Notch 34 includes a locking face 36 and an opposing slope 38. Other
notch designs are
illustrated in FIG. 2c and 6b. When the distal tine end falls into notch 34,
locking action occurs
prohibiting counter-rotational movement when the tine end abuts lock face 36.
When the distal
tine end is circumferentially beyond notch 34, the tine end rides atop bolt
thread crest 30.
Dependent upon the axial dimension of the distal tine end and the axial
distance between
circumferentially aligned segments of bolt thread crest 30, the distal tine
end may interact with a
single notch or may interact with a plurality of notches.
FIG. 1a illustrates a bolt having a longitudinal locking charuxel formed as a
predetermined
pattern with proximal notches being longitudinally adjacent each other. FIG.
2a illustrates bolt 41
C 15 having a spiral locking
CA 02624761 2008-04-03
ii
1 channe143. Spiral locking channel 43 is formed of a plurality of notches,
similar to notch 34 in FIG. Ib,
however these notches when placed adjacent longitudinalIy each other form a
spiral 43 about the axial
centerline D'-D" in FIG. 2a. The spiral looking channe143 also consists of=a
plurality of notches generally =
longitudinally forn-ed on the bolt thread_45 in a predetermined spiral pattern
with proximal notches being
longitudinally adjacent each other on the bolt thread. 'In other words, each
notch on adjacent circumferential
6 segments of the bolt thread 45 are generally longitudinally adjacent.
However, a group of notches forni a spiral
-pattern about the bolt. This notch pattern accommodates the axial dimension
of the compressible distal tine
end. However, when a plurafity of notches is defined on bolt thread 45, the
plurality of notches forms a
predatermined spiral pattern about axial centerline D'-D". Bolt heads 22, 41
may be hexagonal and may
include a recess for an allen wrench or slots for screwdrivers. Further
details of the specially configured bolts
, ll and other features of the operation of the locking nut and bolt assembly
can be found in U.S. Patent No.
5,460,468 to DiStasio which is incorporated herein by reference thereto. Also,
additional details of the locking
nut and bolt assembly, the compressible tine and features of the specially
configured bolts and the locking nut
and bolt assembly consisting of clips can be found in U.S. Patent No.
5,951,224 issued September 14, 1999
to Robert DiStasio.
16
FIG. 2b diagrammatically illustrates a partial, axial side view of bolt 1003
having bolt thread 1005,
root 1006 and a plurality of notches or cut-outs 1008, 1009, 1010, 1012
forming an axial channel or groove.
FTG. 2c illustrates a diagrammatic cross-section of bolt 1003 along the crest
of bolt thread 1005. Bolt 1003
is designed to operate as a locking ratchet. The teeth 1013 (beyond cut-out or
notch 1012) are equally spaced
21 apart. The following table provides exemplary dimensions.
C. Bolt Thread Groove Table
Outside diameter y 0385"
Thread gap x 0.059"
Ratchet tooth arc w 40 degrees
26 Descending slope 1015 angle v 55 degrees
maximum lock face 10 17 angle u 10 degrees
base 1019 t 0.050
lock face 1017 height s 0.020
Bolt 1003 may be used with the fastening nuts, clips and fasteners rather that
bolts 20, 41.
31 FIGS. 3a, 3b and 4 illustrate an elongated tine and a nut and bolt system.
These figures will be
discussed concurrently herein; FIGS. 3a and 3 b show elongated tine 50 having
a generaily planar tine body
51, a distal tine end 53 angularly disposed at an offset position with respect
to planar body 51 and a proximal
tine end loop 55 opposite distal tine end 53. Proximal end loop 55 is
angularly offset with respect to planar
body 51. Proximal end loop 55 is generally U-shaped and has legs 57, 59.
CA 02624761 2008-04-03
WO 00/79141 PC17US99I13929
12
1 Elongated tine 50 is placed in recess 62 foraied on end face 64 of nut 66 as
shown in FIG. 4.
FIG. 11 shows a generic example of nut 66 having a recess 67 on end fac:e 64.
A=euate recess 67
generally shows the shape of recess 62 in nut 66 in FIG. 4. However, nut 66 in
FIG. 11 provides a perspective,
broken away, partial view of nut 66, nut thre.ad 68 and the central axis E'-E"
for nut 66.
Returning to FIG. 4, recess 62 includes a central arcuate region 70 and a
recessional mouh 72 open
6 to the internal passageway about the central axis of nut 66. Recess 62 also
includes a tangential cavity 74
which is tangentially disposed with respeot to the nut thread 68. In FIG. 4,
the tangential aspect of tangential
cavity 74 is ideMified by section line F'-F". Proximal tine end loop 55 is
disposed in tangential cavity 76 such
that the U-shaped legs 57, 59 exert radially directed, opposing spring force
against the nut walls forming the
tangential cavity. These radially directed forces, one of which is radially
direoted toward the axial centeriine
11 of the nut and the bolt and the other of which is radially directed away
from that coaxial centerline, lock tine
50 into recess 62. Distal end 53 of tine 50 moves radially inward and outward
dependent upon whether tine(
end 53 falis in one of the notches or rides atop the bolt thread crest. Recess
62 is large enough and central
region 70 is large enough such that distal tine 53 moves radially into central
region 70 when the tine end rides
on the bolt thread crest. This is the spacial flex zone of this locking
system. As an example of the distal tine
16 end moving in the radial space of central region 70, see FIGS. 8 and 10.
When distal tine end 53 abuts the lock face of the notch, counter-rotational
movement is prohibited.
This occurs when the tine is in the locking zone. Rotational movement shown by
arrow 77 is permitted since
distal tine end 53 rides the opposing slope 38 of tite notch 34 (see FIG.1 b)
and moves onto the bolt thread c,rest
30 based upon the relative position of the bolt and nut 66. Bolt 78 is shown
as including four circumferentially
21 disposed locking channels. However, the bolt may include only a single
loeking channel as shown in
eonnection with bolt 20 in FIG. Ia.
~
The radially directed tine locking forces affecting the nut walls adjacent U-
shaped legs 57, 59
effectively lock tine 50 into recess 62. Tangential cavity 74 is tangentially
disposed with respect to central
region 70 in that it is slightly radially beyond the nut thread crest and nut
trough. See FIG. i 1.
26 FIGS. 5a, Sb and 6 are discussed concurrently herein. FIG. Sa shows an
elongated tine 80 having a
planar body 81, a distal tine end 82 offset at an angle with respect to planar
tine body 8 i and a proximal tine
end loop 83. End loop 83 consists of a U-shaped body having legs 84, 85. Legs
84, 85 lie either in the same
plane as planar body 81 or in a plane parallel to planar body 81.
Tine 80 is placed in recess 90 formed in nut 91. Recess 90 has a central
region 92, a recessional mouth
31 93, and a tangential cavity 94. The recessional mouth is open to the axial
centerline of the nut. Tangential
cavity 94 is generally in the same plane as central region 92. Legs 84, 85
exert opposing spring=forces against
the nut walls formed by tangential cavity 94.. These forces are generally
tangentially disposed with respect to
nut tbread 95 and the axial centerline of bolt 96.
CA 02624761 2008-04-03
WO 00179141 PGT/US99/13929
13
1 Recess 90 establishes a radial free space radially behind tine 80 (the
spacial flex zone) and particularly
planar body 81. This enables tine 80 to move intD and out of the radial free
space dependent upon the position
of distal tine end 82. When distal tine end 82 is disposed in one or more
notches on bolt 96 (shown in FIG.
6a), the radial free space is large. When the distai tine end 82 rides atop
the bolt crest (see generally FIGS.
8, 10), the radial free space behind tine body 81 and tine 80 is reduced. 'The
paraItel plane configuration of
6 legs 84, 85 is illustrated in FIG. 6a. The forces exerted against the nut
wall by legs 84, 85 are generally
tangentially oriented in plane G'-G".
Sometimes, reference will be made to certain ternis explained below. A
"locking zone" is the area
where a locking mechanism, such as a tine, engages a loeking face, on a bolt
or pipe thread, to prevent counter-
ratation. In a general sense, the space making up the zone extends from one or
more locking faces on the bolt
11 thread (or the bolt head in the so-called "blind hole" locking design shown
in FIGS. 97a, and 103b et al.), and
~ projects out to a perimeter of the bolt or locked item. For example, in a
threaded bolt manufactuned with a
groove or a slot, the locking zone is the volumetric space missing from a
comparable threaded bolt without
a groove or slot. See FIG. 6b. Of course, multiple grooves or slots may be
fonmed in the bolt thread. In
another embodiment, such as a protrusion on a polygonal shaped object, the
locking zone extends from the
16 outer most point of the protrusion and surrounds and mimics the perimeter
of the polygm in a space
determined by the height of the protrusion. In a strictly mechanical sense,
the locking zone is defined as the
difle+ence between the greatestradial distaneeatthe outer edge ofthe
protrusionandthe radially inner distance
at the base of the protrusion. See FIG. 6g. Since the protrusion describes a
circle when rotated about an axial
centerline, any locking mechanism or tine in the peripheral band or locking
zone will engage the protrusion
21 and hence lock the rotating bolt or pipe against the stationary nut or
fastener. Also, the lockable bolt or pipe
C or bolt head may cany+ a cut-out, groove or slot. The locking zone in this
embodiment is the radial difference
between the radially outermost portion of the slot and the root or n;dially
innermost portion of the slot, groove
or cut-out. If a tine or locking element falls into the locking zone and'
engages the locking face, counter-
rotational movement is prohibited. Any body can contain one or more locking
zones. A "spacial flex zone"
26 is a spacial area around the locking mechanism, (for example, a tine), once
the Iocking device or mechanism
is fully outside of the locking zone. The spacial flex zone al lows the
locking mechanism (i.e., tine) to operate,
flex naturally and retract from the locking zone without permanent
deformation. The "spacial flex zone"
whether in clips, nuts or blind hole clips: (a)allows tines to flex naturally
with a sufFtcient long straight tine
or variations with bent tines; (b)prevents the tine from taking a set; (c)
allows variations of engagement angle;
31 (d) allows grooves to be above, or below, the minor of the bolt; and (e)
reduces resistance during installation
by an end-nser who may not need a wrench to spin the nut on the bolt. The
spacial flex zone allows a variety
of dlfferent shaped tines to accomplish (a) secure engagement during locking,
and (b) flexing during inbound
installation. The tine design and the spacial flex zone prevents the tine from
bouncing out of the locking zone
CA 02624761 2008-04-03
WO 00/79141 PCT/US99/13929
14
1 and malfunctioning following installation. For example, in one embodiment
the spacial flex zone is a radial
space or cavity between the bolt and the tine housing.
Sometimes, the term "angle of engagement" is utilized herein. In preferred
embodiments, tines
intersect the engagement face in a locking zone at an angle less than 90
degrees to prevent the tine from
popping out under stress. See FIG. 6h. Keeping the tine from popping out is
important. The deeper the tine
6 drops into the slot or locking zone and abuts the locking engagement face,
the easier it is to achieve a high
quality angle ofengagement. Although a short tine can achieve an adequate
angle of engagement, it generally
will not flex correctly. A steep angle of engagement also exerts excessive
forces on the tine, even deforming
the tine should it exceed the yield point, as it flexes in and out of the
grooves. There are certain benefits of
a longer tine. A longer tine will generally result in less wear and tear on
the bolt and tine when applying the
I 1 nut to a bolt See FIG. 64b. A tine of sufficient length that has attained
an acceptable angle of engagement
will keep the tine under its "yield strength" and avoid pennanent deformation
when turning the nut onto a bolt ~..
A short explanation of yield strength is set forth below. The longer the tine,
the smallerthe radial angle of flex
of the tine. This lowers the chance of the tine being permanently deformed
which could result in either losing
the angle of engagement or losing its designed form as it is installed. If the
tine loses its "spring" it ceases to
16 function correctly. The tine can overcome this tendency to permanently
deform and/or incorrectly function
ifthere is a sufficient spacial flex zone in the locking system. For example,
there should be an adequate spacial
flex zone between the outer radial diameter of the bolt and the point where
the tine is attached to its base
mechanism. This attachment is sometimes referred to herein as the proximal end
portion or region of the tine.
The portion of the tine that engages the locking face in the locking zone is
the distal end or terminal end of the
21 tine. In other embodiments, the distal end of the tine is juxtaposed or
near the circumference of the outer
diameter of the male thread. To function without distorting the tine, the
spring tine must be bent away from
the bolt thread when outside the locking zone and radially moved into the
spacial flex zone. A second bend
at the distal end of the tine moves the tine back from the bolt at an angle of
engagement. See FIG. 14. This
permits the tine to be lengthened and, depending on the composition and
thickness of the tine, will increase
26 the tine's flexibility and effectiveness. The issue of yield strength ofthe
tine is important. Without the proper
spacial flex zone, deformation of the tine can occur during retraction. For
example, if the tine is forced into
a concave shape or any other position that results in jamming or distortion of
the tine body, it will not function
correctly.
- General comments regarding certain aspects of the present invention follow.
31 The stamped fasteners (e.g. FIGS. 35f-35oo) may be considered a unique sub-
group within the locking
nut and bolt system. When referring to a "locking position or closed
position", the term "engaged" may better
explain the system. The invention described herein is not limited to
"fasteners" but is also relevant to threaded
pipe or rod and all other objects that require locking attachments where
counter-rotation is undesirable.
CA 02624761 2008-04-03
WO 00l79141 PCTIUS99/13929
1 General comments regarding bolt and nut combinatory systems follow. A
variety of desigas for tines
and engagement walls attain a predetermined "angle of engagement". The system
allows an end-user to
visually view or inspect the locking mechanism, confirming the locking
engagement. The nut in the system
is nearly "free spinning" during assembly. This can only be accomplished by
designing the tines to reduce
resistance (friction) during one-way rotation. The tines should be as long as
possible and the spacial flex zone
6 around the bolt should be large enough for the longer tine to correctly
flex. An important object of the
invention is to establish the correct geometry to attain consistent
engagements of tines in grooves at minimal
and consistent degrees between engagements based on a mathematical formula.
Odd number of tines off-set
against an even number of grooves or an even number of tines off-set against
and odd number of grooves.
The formula follows: 360 divided by (the number of equally spaced tines) times
(the number of
11 equally spaced grooves) = degrees between engagements. Example: 360/8x9=5
degrees represems 8 tines and
C 9 grooves or slots.
This mathematical relationship represents a vast improvement over haphazard
spacing of tines, i.e.,
over 100, 120, 160 degrees. The invention allows the locking system to be re-
tightened or re-torqued when
necessary. Once the system is engaged it can be easily disengaged. This is
provided by the removal tool and
16 the latch. See PIGS. 99 and 89 and 95a. In many embodiments of the
invention, redundant locking features
can be provided with simultaneous engagement of tines in locking zones to
reduce the locking dependence on
single tines and to disperse the locking stresses over multiple tines when
necessary within extreme vibrational
environments. In many embodiments, the .stamped tine can be installed on the
nut without a keyway or
orientation with respect to the nut other than the stamped tine and locking
nut insert being upside down. In
21 many embodiments, in order to prevent rotation of the locking mechanism,
ridges or striations are formed on
the nut end face. The end nut face is the planar, radially aligned,
circumferential wall on which the "brim" sits.
A cutout on the brim of the top hat nut insert (FIGS. 30b-30e) allows the
swaged wall of the nut to fill the
cutout during swaging. In several embodiments, the V-shaped cutouts in the
"brims" of the top hat design or
the railroad design are not designed to key the clip or insert to a certain
orientation on the nut since
26 circumferential orientation of the locking insert is not necessary. This
reduces assembly costs. In several
embodiments of the invention, incorrect installation ofthe nut by the end user
is prevented because the nut can
not be inadvertently put on backwards. Because there are no threads easily
accessible from the locking tine
side, the nut can only be threaded inbound from one side.
The invention has a minimum number of parts for ease of assembly. This makes
the system easily
31 manufacturable with a minimum number of secondary processes. In order to
help the end user save time
during installation ofttfie nut and bolt systeni, the present invention does
not use cotterpins that require either
expensive tools or manual instructions and bending. The present system is
simply threaded together. In many
embodiments, the user is able to install the locking system with ordinary
tools, such as a wrench or nutrunner.
In several embodiments, the invention applies more accurate clamp loads to the
locking system since the nut
CA 02624761 2008-04-03
WO 40179141 PCT/US99/13929
16
1 and bolt are more "free spinning" than prevailing torque nuts. Prevailing
torque nuts require more torque to
instalI the nut on the bolt which results in additional wear and tear on
instaUation tools and guns and adds to
worker fatigue during installation of the fastener systems..
General comments regarding fasteners, clips, formed nuts and nuts follow. The
clip and the tine are
manufactured with varying thickness and are adapted to form a positive lock if
the distal tine is altered to mate
6 properly with grooves in a screw and the tines are long enough to allow
proper flexing. The distal tines can
be beveled to permit an angle of engagement and/or a mating of tine "shape"
with screw grooves to assure
mechanical loclang. The radial spring arms of the tines in certain clip
designs are protected from being
accidentally crnshed in shipment or during installation using protective
stsuctsaes. See, e.g., FIGS. 46c, 56h.
In certain clip and tine designs, a locking clip or tine is integrated into an
extension of a threaded extruded
11' barrel which has been extruded to a wider diameter to accommodate a
spacial flex zone that is not threaded.
FIGS. 46h-46j. This double extrusion design serves to save material costs add
space. A locking clip is ~
integrated into a lanced threaded extruded barrel that permits increased clamp
load due to an increase number
of threads which surround the looking mechanism.
Locking bolt and screw sys0ems have the following general features. The
bolthas an engagement faoe,
16 within a groove perpendicular or helical to the threads, that engages a
locking tine mechanism at an angle,
which prevents counter-rotation of the bolt or serew. The "angle of
engagement" between the tine or locking
device and the engagement wall should be less than 90 degrees to prevent the
tine from diseng.aging from the
bolt notch. The rising face of the notch, opposite the engagement face, in the
tluee face groove design, is an
innovation to increase the load carrying thread surface, allowing for
increased torque tension strength within
21 the locking zone of the fastener. FIGS. 2c, 6k, 6n, 6q. A three-faced
pattern for grooves is utilized to permit
better "angle of engagement" for the tines. FIGS. 6k, 6n and 6q. The three-
faced pattern for grooves allows
either a thicker tine to engage on the engaging wall or a variety of distal
tine designs, in a variety of materials
to seat properly on the engagement wall. The bolt having a concave engagement
wall (FIG. 60) defleats the
tine into the core of the groove and thereby decreases the angle of engagement
at the upper portion of the
26 engagement wall. The bolt having an "overhung" engagement (FIG. 61) wall
deflects the tine into the core of
the groove and thereby decreases the angle of engagement along the engagement
wall. Screw and bolt designs
permit the screws or bolts to be rolled with roll dies requiring no secondary
processes to make engagement
grooves. The screw or bolt designs have grooves in the bolt or screw limited
to a zone on the bolt or screw
such that the clampload of the fastener is contained on the full threads of
the bolt and the locking device can
31 fully engage in the grooves. All clips that have a tine on the locking
mechanism engage -in a locking zone in
a groove above minor. The "V" cuts in the blind hole clip allow proper seating
in a beveled blind hole or a
funnel shaped blind hole. FIG. 106. Four (4) tines or four (4) engagement
locking devices can be
manufactured with an economy of material by cutting metal prior to folding in
a pattern that offsets the tines.
CA 02624761 2008-04-03
WO 00/79141 PCT/US99/13929
17
1 FIGS. 6b-6g graphically illustrate the locking zone and spacial flex zone
for certain locking bolts and
locking bolt heads. Locking bolt heads are used in connecdon with the blind
hole design (see FIG. 96). With
respect to FIG. 6b, a plurality of locking zones 1101,1103 are created
intermediate protrnsions I 105, 1107 and
1109. Of course, locking zones 1101 and 1103 are sometimes referred to as
grooves or slots herein. The
spacial flex zone 1120 is the area around locking zones 1101,1103 and
graphically identifies the peripherai
6 area in which the distal end of the locking tine travels when that portion
of the locking tine has not fallen into
locking zones 1101,1103. As described later, solid body 1122 may be the core
or stem of the bolt or may be
a bolt head.
With respect to FIG. 6c, locking zones I 101, 1103 have a different shape ( a
triangular shape) as
c~omparod with locking zones 1101, 1003 in FIG. 6b. In FIG. 6b, the locking
zones are generally four-sided.
1 I One side is open to the outermost peripheral dimension of the body.
~ FIG. 6d graphically illustrates locking zone 1124 formed within a polygonal
shape body 1126. Spacial
flex zone I 128 represents the area in which the distal end of the tine moves
when that end has not fallen into
locking zone 1124. In a strict mechanical sense, assuming body 1126 rotaties
about central axis 1131, the
locking zone describes a circular band defined by the outer radial dimension
of locking zone 1124 and the
16 radially inward dimension of that zone.
In a like manner, FIG. 6e includes locking zone 1124 and a square body 1125.
Square body 1125
rotates about axially center line 1132 and the polygonal cut-out shape
describes a similar ciraumferential
locking zone band and a spaeial flex zone 1128. The tine, when outside the
polygonal cut-out, moves in the
spacial flex zone.
21 FIGS. 6f and 6g show bodies 1133 having protruding elements 1135, 1137
which establish the outer
c boundary of locking zone 1138. With respect to FIG. 6g, the mechanically
accurate locking zone is a
peripheral ring or band established by the radially outermost dimension of
protrusions 1135, 1137 and
dimension 1140 which represents the largest radial dimension of the body other
than protrusion 1135, 1137.
Body 1133 rotates about axially center line 1141. Spacial flex zone 1142 is
graphically iliustrated in FIG. 6f
26 and 6g. It should be noted that the locking zone and spacial flex zones
shown in FIGS. 6b-6g are only
ilhLstrative of these zones and the actual dimensions of the zones are
normally smaller dependent upon the
mechanical operation of the tine and the depth of the groove or the heigltt of
the protrusion from the respective
rotating body.
FIGS. 6h graphically illustrates the preferred angle of engagement Rotating
body 1144 rotates about
31 axial centerline 1146. The root or inside perimeter of the threads 1147 and
the outside perimeter of the threads
1148 establish locking zone 1150. Engagement wail 1151 includes a locking faoa
1152 that has a slope 1 154
offset approximately 3 degcees from diametric centerline 1155. The angle of
engagement 1156 is
approximately 98 degrees and the descending slope 1157 of cutout or groove
1158 has an angle of
CA 02624761 2008-04-03
WO 00/79141 PGT/US99l13929
18
I approximately 91 degrees offset from imaginary line 1160'-1160". That
imaginary line is coextensive with
locking face 1152 of the cutout or groove 1158.
FIGS. 6i, 61 and 6o graphically illustrate a straight wall groove or cutout
1162, and overbang cutout
or groove 1164 and a concave cutout or groove 1166. A radial line 1163 passes
through the axial centerline
of rotating body or bolt 1165. Preferably, that the angle of engagement
between groove or cutout 1162,1164,
6 1166 and the distal tine end (not illustrated) be less than 90 degrees in
order to prevent the tine from
disengaging from the groove. FYGS. 6j, 6m and 6p diagrammatically ilIustrate a
flat descending wall 1167.
In contrast, FIGS. 6k, 6n and 6q graphically illustrate a base wall 1168 and
an'angularly offset descending wall
1169. Tlte overhang on the walls shown in FIGS. 6m, 6n, 6p and 6q tend to
decrease the angle of engagement
along locking or engaging wall 1161. It is believed that the "three wall"
groove design shown in FIGS. 6k, 6n
11 and 6q (and FIG. 2c), increases the load carrying thread surface and
permits incrcased torque tension strength
within locking zone 1162, 1164, 1166. This, as a result, results in a better
angle'of engagement for the distal
end of the tine. Further, the three wall pattern for locking zone or groove
1162, 1164, 1166 enables the use
of athicker tine and permits the designer to select different materials
(difPerent types of steel, metal or plastic).
FIGS. 7a, b, c and d and FIG. 8 are discussed concurrently herein. FIGS. 7a-d
show various
16 manufacturing stages for tine 101. In FIG. 7a, tine 101 is formed by
stamping or cutting the tine from a sheet
of inetal. Although the tines described herein are preferably made of metal,
and particularly spring steel metal,
plastic tines and plastic nuts and bolts may also be utilized. T'me 101 in
FIG. 7a includes a proximal end loop
103 which is formed as a solid planar element. In FIG. 7a, tine segment 105
includes both the planar tine body
and the distal tine end. Tine segment 105 is rotated out of the plane
established by solid planar element 103
21 by rotating segment 105 in the direction shown by arrow 107. In FIG. 7b,
#ine 101 has a sold planar el.ement
103 and a planar tine body 109 which is perpendicular with respect to solid
planar element 103. FIG. 7c is a
side view of tine 101. FIG. 7d illustrates tine 101 as having a solid planar
element 103 which establishes the
proximal 'tine end loop of tine 101, a planar tine body 109 and a d istal tine
end 111 which is angularly offset
with respect to planar tine body 109. Distal tine end 111 is formed by bending
a tine segment to an angle offset
26 with respect to planar tine body 109.
In FIG. 8, tine 101 has been mounted into arcuate recession 112 in nut 114.
Recess 112 is generaily
similar to recess 90 in FIG. 6a and recess 62 in FIG. 4. As such, recess 112
includes a recessional mouth open
to the internal passageway of nut 114, a centraI region fonming a radial free
space behind tine body 109 and
a tangential cavity tangentially disposed with respect to nut thread 116. The
tangential cavity is generally
31 similar to tangential cavity 94 in FIG. 6a. As such, the tangential cavity
is generally coplanar with respect to
central region 117 of recess 112. Distal tine end 111 moves into and out of
the notches formed in bolt 1 I8.
The solid plwiar element 103 is sized to conform with the tangential cavity of
recess 112. As shown in FIG.
8, distal tine end 111 is riding atop the bolt thread crest of bolt 118.
Accordingly, the planar tine body and the
CA 02624761 2008-04-03
WO 00/79141 PCT/CTS99/13929
19
1 distal tine end 111 are disposed in the radial free space of the recess 112
which has been diminished by the
radially outward movement of the distal tine end 111.
FIG. 9 diagrammatically illustrates a partial, cross-sectional view of tine
101 from the perspective of
section line a'-a" in FIG. 8. Distal tine end 1 I I and tine body 109 move
within centrai region 117 of recess
112. This recess is formed or cut into end face 113 of nut 114. The solid
planar element 103 is trapped in a
6 shallow recess in nut 114.
FIG. 10 shows nut 114 having a recess 119 having a slightly different shape.
Also, tine 120 has a solid
planar proximal tine end loop 121 which is shaped complementary to tangential
cavity 122. Tine 120 also has
a tine body that is tangential with respect to the axial centerline of bolt
123 and is perpendicular to solid planar
element 121 which defines the proximal end loop of tine 120.
11 FIG. 12 illustrates nut 150 carrying nut insert 152. The nut insert is
disposed in a circumferential
G recess on the end face of the nut. Bo1t 154 is threaded onto nut 150. Nut
insert 152 includes a peripheral ring
156 and a plurality oftines one of which is tine 158. Tine 158 includes a
distal tine end 160. In FIG. 12, distal
tine end 160 is riding atop bolt thread crest 162. Tine 164, and in particular
distal tine end 166, has fallen into
notch 168. Distal tine end 166 prevents counter-rotational movement in the
direction shown by arrow 169 with
16 respect to a fixed nut position for nut 150.
FIGS. 13 and 14 show various manufactnring stages for nut insert 152. In FIG.
13, nut insert 152 has
been stamped or cut from a planar sheet of metal, such as spring metal.
Alternatively, plastic may be used.
Each tine, one of which is tine 158, includes a proximal tine portion 170, a
tine body 172 and a distal tine end
segment 160. In FIG.14, tine body 172 has been rotated in direction shown by
arrow 171 in FIG. 13 such that
21 tine body~172 is ina plane perpendicular to peripheral ring 156 of nut
insert 152. Further, the distal tine end
160 has been bent and angularly offset with respect to the generally planar
tine body 172.
FIG. 15 shows a partial, cross-sectional, broken away axial end view of nut
150 and nut insert 152.
Nut insert 152 is placed in a recess 174 and is specifically disposed atop a
shoulder 176 i n recess 174. Recess
174 is established below the nut end face 175. In the illustrated embodiment,
nut insert 152 is formed with
26 a complementary shape as compared with recess 174. Since nut insert 152 is
placed atop shoulder 176, the
nut insert 152 forms a radial free space there below within which tine 158
moves. Distal end 160 rides atop
bolt thread crest 180. The peripheral ring 156 of nut insert 152 is
established about the crest of nut thread 182.
Although three tines are shown in FIGS. 12 and 15, the nut insert may operate
with a single tine. When distal
tine end 166 falls in notch 168 and abuts locking face 183, counter-rotational
movement of the bolt with
31 respect to a fixed nut in the direction shown by arrow 185 is prohibited.
Rotational movement opposite to
direction 185 permits distat tine end 166 to move along opposing slope 185 of
notch 168 and also to move atop
bolt thread crest 180. When the distal tine end rides atop the bolt thread
crest, the tine body and a portion of
the distal tine end flex within the radial free space defined beneath the
peripheral ring 156 of nut insert 152.
CA 02624761 2008-04-03
WO 00179141 pCT/US99i13929
i As shown with respect to tine 158, tine body 172 generally fails within a
substantially tangential plane with
respect to the axial centerline C of bolt 154.
FIG. 16 shows nut 190 having a plurality of keys 192 which are aligned with
keyways 194 on nut
inserts 196. In this manner, the nut insert can be aligned in a certain
circumferential position with respect to
the nut 190. Of course, nut insert 196 could define the keys and the keyways
could be defined in the recess
6 established in nut 190.
Alternatively, keyways 194 are simply cut-outs that permit the locking nut
insert to be swaged and "locked" into the nut end face. No keys on the nut
face are necessary. It is not necessary to orient the locking
nut insert on the nut. The nut end face material, during the swaging process
fills the keyway i: 4 thereby
locking the insert on the nut.
11 FIGS. 17a and 17b show various stages of manufacture of the nut insert. In
FIG. 17a, nut insert 196
is flat cut or punched from a sheet of steel (preferably spring steel). Keyway
or cut-out 194 is clearly shown(
in FIG. 17a. A plurality oftines, one of which is tine 197, are formed on a
radiaily inward peripheral edge 198
of peripherai ring 199 of the nut insert 196. In FIG. 17, these tine bodies
197 have been rotated such that they
depend beneath the plane established by peripheral ring '199. Accordingly, the
distal tines ends, one ofwhieh
16 is distal tine end 193, extend generally tangentially and radially inward
toward the axial centerline of the
specially configured bolt. The tines are circumferentially disposed around
edge 198 of the planar peripheral
ring 199 of nut insert 196. Each tine 193 has a planar body which is generally
tangentially disposed with
respect to the axial centerline of bolt 191.
FIG. 18 shows nut 201 having a nut insert 203 disposed in a recess below nut
face 204. Nut insert 203
21 includes a peripheral ring 205 and a plurality of planar support plates,
one of which is support plate 207
associated with tine 209. Tine 209 rides atop bolt thread crest 211 for bolt
210. Bolt 210 may be similar tk
the bolt shown in FIG. I a, that is, having a longitudinal locking channel, or
may be similar to the bolt shown
in FIG. 2a, that is, having a spiral locking channel.
FIGS. 19 and 20 are partial, cross-sectional views taken from the perspective
of section line a'-a" and
26 b'-b" in FIG. 18. FIG. 19 shows nut 201 having a nut face 204 and a reeess
202 there below. Peripheral plate
205 of the nut insert is disposed on the first level of recess 202 or on a
shoulder 206. The recess 202 has a
lower region 210. FIG. 20 shows that tine 209 is spaced away from the
periphera) walls defining lower recess
area 210. In order to provide this radial frce space, insert 205 utilizes
planar support plates 207 for each tine.
The free space is the spacial flex zone.
31 FIG. 19 also shows that the outer peripheral planar section of nut insert
205 has substantially the same
radial dimension as the shoulder 202 in recess 206. This permits the insert to
be firmly seated in the reoess.
FIGS. 21 and 22 show various manufacturing stages for nut insert 203. In FIG.
21, nut insert 203 is
pressed, stamped or cut from a single sheet of metal or plastic. Tine segments
214 extend from planar support
plate 207. Tine 209 (FIG. 22) is formed when tine segment 214 is rotated in
the direction shown by arrow 215
CA 02624761 2008-04-03
WO 00/79141 PCT/U599/13929
21
1 such that tine body 216 is tangentially disposed with respect to the nut
thread and bolt thread. Distal tine 209
is then rotated in the direction shown by arrow 218 such that distal tine end
209 extends tangentially and
radially inward toward the axial eenterline of the locking unit.
In this configuration, the distal tine ends flex radially inward when the
distal tine end is disposed in
one or more notches (see FIG. 18, and the tine at 8 o'clock) and the distal
tine ends move radially outward into
6 the radial free space (FIG. 20, space 210) when the distal tine end rides on
the bolt thread crest as shown with
respect to distal tine end 209 in FIG. 18.
FIG. 23 shows nut 220 carrying an elongated locking unit 221 formed as a
cylinder on nut end face
222. Elongated locking unit 221 has a rearward ring member 223 which is
disposed in a nut recess (see FIG.
29). The elongated locking unit 221 has a cylindrical body 225 with a
plurality of tines 226, 228 fonued
11 thereon. Each tine has a distal tine end 227 and a proximal tine portion
229. Proximal tine portion 229 is
~ adjaeent cylindrical body 225 of elongated locking unit 221. Proferably,
distal tine end 227 is formed by
cutting out region 230 from cylindrical body 225. A plurality of tines, in a
preferred embodiment, are
circumfarentially disposed about cylinder 225. Additionally, the tines may be
axially disposed such that tine
228 is axially inboard with respect to tine 232.
16 FIG. 24 shows bolt 231 having a bolt thread trough 233, a bolt thread crest
234 and a plurality of
notches, one of whhich is notch 235. Each notch includes a loeicing face 236
and an opposing slope 237.
FIGS. 25 a and 25b show bolt segments i l and 13 carrying a plurality of
notches thereon. With
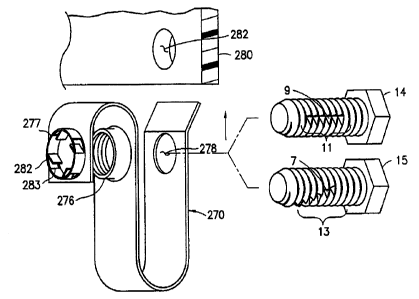
respect to bolt segment 1 I in FIG. 25a, the plurality of notches are
longitudinally aligned to forrn longitudinal
locking channel 9. With respect to bolt segment 13 in FIG. 25b, the notches
are aligned in a predetermined
21 spiial pattern to fornn spiral locking channel 7.
~. FIG. 26 shows nut 220 threaded onta bolt 231. Locking unit 221 is looked
onto bolt 220. Tine 228
is in a locked or engaged position with its distal tine end abutting a locking
face in the locking channel. Tiiis
is the locking zone. In contrast, distal tine end 232 is riding atop the
opposing slope in the flex zone. Tine 240
is riding atop bolt thread crest 234.
26 FIG. 27a shows an elongated locking unit 241 having a cylindrical body 225
with circumferentially
disposed distal tine ends 226, 232. FIG. 27b shows locking unit 221 with disml
tine ends 226,229 and 232
both circumferentially disposed about cylinder 225 and axially disposed about
cylinder 225. The locking
mechanisms in FIGS. 27a and 27b are sometimes referred to herein as "railroad"
designs.
FIG. 28 illustrates bolt 1 having a plurality of longitudinal locking channels
3 aboutto bethreadedonto
31 nut 220 carrying elongated locking unit 221.
FIG. 29 shows elongated locking unit 221 having an axially rearward ring 223
disposed in a recess
242 beneath end face 222. One methodof attaching rearward ring 223 in recess
242 is by swaging the nut face
222. Otherwise, the ring may be snap fit into recess 242. The ring may also be
inserted via a key and rotated
to block or trap the key in a keyway. The key and keyway locking is not the
preferred embodiment.
CA 02624761 2008-04-03
WO 00179141 PCT/US99/13929
22
I FIG. 30a shows bolt 1 locking panels 4, 5 via nut 220 and locking unit 221.
The user can easily
determine whether the tines 228, 232 have fallen into one of the locking
channels 3 by viewing the position
of the tine in the cut-out. For example, with reference to tine 228, cut-out
230 enables the user to visually
identify whether the tine has been placed in the locking channel.
Refenting to FIG. 26, tines 228,232 and 240 protrude both tangentially and
radially toward the axial
6 centerline of bolt 231. The placement of tines 232,228 and 226 (FIG. 23) in
respeetive cut-outs (for exampie
tine 228 in cut-out 230) enhances the visibility of the locking action of each
tine. As shown in FIG. 26, the
rearward ring 223 of locking unit 221 has a complementary key and keyway fit
in region 246. As shown, the
rearward ring defines the keyway and the nut recess or nut end surface 222
defines a complementary key. This
key and keyway fit permits the circumferential aligament of locking unit 221
with respectto a certain position
11 on nut 220. In the railroad design, liquid will not accumulate in the
locking mechanism.
FIG. 30b diagrammatically illustrates a top hat design or nut insert.
Elongated locking unit 1170 is ~
substantially similar to elongated locking unit 1171 shown in FIG. 30c exoept
that unit 1170 includes a seam
1172 whereas locking unit 1171 does not have a seam. Unit 1171 is manufactured
by poking a"bubble" in a
thin metai sheet, breaking through the bubble, forming a tube, lancing the
tube and then creating axially
16 forward ring plate member 1173. In contrast, locking unit 1170 is created
from a flat strip of inetal (or plastic)
which is cut, folded, and wrapped on a mandrill to forni barrel or the
cylinder. Seam 1172 is spot welded or
is left open such that the cylinder acts a spring. Both locking units 1170,
1771 include a cylinder 1174. The
cylinder has a central region 1175 shown in FIG. 30d and carries at least one,
and preferably, a plurality of
tines. The top hat design illustrated in FIGS. 30b-30e include four tines
1176; 1177, 1178 and 1179 carried
21 by the cylindrical lock body shown in FIG. 30e. These tines protrude
tangentially and radially towards axial
centerline 1 I80 of rotating bolt or body 1181. Axially centerline 1180 is
shown in FIG. 30f. '
The top hat design is unique in that tines 1176-1179 are disposed in a central
region 1.175 in cylinder
1174. This central disposition ofthe tines provides stability and extra
strength since cylinder 1174;nas a lower
peripheral axial ring section 1182 shown in FIG. 30d and an upper ring norntal
to radial top hat lip 1173.
26 When locking unit 1170 is placed in a recess defined on the end face of a
nut (see the recess in FIGS. 11, 19
and 20 for example), the locking unit is swagged onto end face 1182 of nut
1183 (FIG. 30f) and the swagged
portion of end face 1182 "flows up" to lock into the V formed on axially
forward radial ring 1173. Other cut
outs are useful. See FIGS. 17a,18. V 1185 is shown on forward axial radial
ring 1173 of locking unit 1170
in FIG. 30b. V 1185 is swagged into nut end face 1182.
31 Since there is no reason to circumferentially orient the top hat or locking
unit 1170, 1171, the top hat
design is easier to assemble. It is only neoessary to orient the top hat
design such that lower axial edge 1182
(FIG. 30d) is disposed near the nut end face such that the locking nut insert
drops into the recess on the nut
face. Further, the present top hat or locking unit design 1170, 1171 is easily
handled by automatic feeding
units. The lower circumferential ring 1182 prevents the nut inserts from
locking together and also ensures that
CA 02624761 2008-04-03
WO 00/79141 23 PGT/US99/13929
1 tines 1176-1179 are not altered, deformed or otherwise harmed during the
automatic feeding and insertion into
the nut recess. If the tines become dented, the locking ability of the system
is adversely effected. It is
important to note that the automatic sorting and handling of these fasteners
is an important feature of the
present invention.
FIGS. 30g-30i diagrammatically illustrate axial stacking oftwo top hat locking
units 1190 and 1191.
6 Locking units 1190 and 1191 are aligned sueh that V cutouts 1185 on each
locking unit are axially aligned.
Thereafter, the two top hat locking units are attached by adhesion, spot
welding or otherwise to form a
composite unit 1193. Composite unit 1193 is then inserted into nut 1194. Lower
or axially inboard locking
unit 1191 is placed in the recess on tbe end face 1182 of nut 1194. The upper
locking unit or axially outboard
locking unit 1190 extends axially outboard from nut face 1182. Of course, the
dual locking units 1190,1991
11 are coaxial with axially eenterline 1195 of nut 1194. The dual top hat
locking unit 1190, 1191 provides
multiple, circumferentially disposed tines thereby enhancing the locking
capability of the system. This
peripheral and axial distribution of tines both axially and circumferentiially
is described above in connection
with the railroad design shown in FIG. 27b.
'I'lie top hat locking unit design (FIGS. 30b, 30c) are different from prior
art designs in that the present
16 invention is a single part and not a multiple part piece. The prior art
does not have a lower circumferential ring
1182 (FIG. 30d) and bence, is difficult to sort, automatically feed and
assemble in a nut recess. These features
are important in the present invention.
General comments regarding the axial end locking mecitanisin follow. The
invention relates to a
cylinder extend'mg axially from an eAd of a nut wherein the eylinder earries
ioeking elements thereon. The
21 invention also relates to a locking clip or insert with tines supported in
an axial manner (with respect to the
~ axial centerl'use of the nut), and tines emanating from the axially disposed
cylindrical body that pass through
a spacial flex zone and engage grooves in a screw. Since the locking mechanism
is axially outboard from the
nut, water or other liquid cannot pool in the locking mechanism. This reduces
the possibility of corrosion of
the mechanism in adverse environments or outdoors.
26 General comments regarding the "top hat" design follow. A protective rim or
peripherai wall axially
above and below, alongside the tine (a) protects the integrity of the Ioaking
mechanism at all stages of
manufacture including shipping, storage, handling and installation; (b) allows
shipping oftine components in
bulk, preventing entanglement prior to instaDation in the nut and allowing for
high speed installation in any
swaging process; and (o) will shield any sharp edges of the tines when
protruding from the loaking mechanism.
31 This makes the locking mechanism safer to handle and reduces the risk of
something catching on the locking
mechanism including loose clothing.
General comments on the axial stacked embodiment follow. In an axial stacked
mode (two top hat
designs stacked together), one locking insert is keyed to the second insert
This provides a maximunn amount
of tine engagements equally separated for either maximum engagements with the
lowest possible degrees
CA 02624761 2008-04-03
WO 00/79141 PCT/[3S99113929
24
1 between engagements (see, for example, the earlier example of 8 tines
operating on 9 grooves or slots), or the
maximum engagements with a specification for multiple or duplicate
simultaneous tine engagements (e.g., 8
tines in 8 grooves).
FIG. 31 illustrates a perspective view of nut 250 having a locking element 252
disposed in a recess
on nut face 251. The recess is similar to recess 242 in FIG. 29. Locking
element 252 includes a rearward ring
6 member 254 and a plurality of axially protruding legs 255 extcnding normally
therefrom. Each axiatly
protruding leg includes a tine 256 that protrudes tangentially and radially
inward toward the axial centerline
of the bolt. FIG. 32 shows an end view of nut 250 with locking element 252
attached to the end face 251 of
the nut. Tine 257 is in a locked position in a notch in bolt 258. In contrast,
tine 259 is riding on top of bolt
thread crest 261. Locking element 252 is keyed to a certain position with
respect to nut 250 based upon key
31 and keyway combination 262. As explained earlier, it is not critical
whether locking element carries the key
or keyway as long as the complementary key or keyway element is formed on the
appropriate portion of nut ~
ond face 251.
FIG. 33a and FIG. 33b show various stages of manufaeture of locking element
252. In FIG. 33a,
locking element 252 is cut, stamped or pressed from a single sheet of steel or
metal, preferably spring steel.
16 Alternatively, plastic may be utilized. A tine segment 263 is formed by
cutting, pressing or otherwise. In FIG.
33b, tine segment 263 has been rotated such that it is in a plane
perpendicular to the plane of rearward ring
member 254. Tine segment 263 includes a proximal tine portion 265 and a distal
tine end 267. A proxfmal
tine portion 265 is generaliy perpendicular to radially inward edge 266 of
ring member 254. The distal tine
portion 267 protrudes tangentially and radially inward toward the axial
centerline of the bolt This centerline
21 is coaxial to the centerline of the nut
FIG. 34 shows bolt I having a plurality of longitudinal locking channels 3 and
nut 250 canying locking
(...
element 252. The axially protruding legs of the proximal tine portion 265 are
clearly shown. These legs
protrude normally from the ring member of the nut insert. The distal tine
portion 267 is angled inward to catch
one or more notches in the longitudinal locking channel 3. Ofcourse, a spiral
locking chanael 7 shown on bolt
26 segment 13 in FIG. 25b may be utilized. A plurality of tines are
circumfcrentially spacod about locking
element 252.
FIG. 35a shows nut 250 carrying locking element 252 and locking onto bolt 1.
The user can visibly
confirm whether one or more of the distal tine ends 267 have locked into
locking ohannel3_ Also, when the
distal tine ends 267 ride atop bolt thread crest 2, this can be visibly
confirmcd by the user. Locking element
31 252 can be swaged onto nut face 251 as shown in FIG. 29 or snapped into the
recess
FIGS. 35b-35e diagrammatically illustrate various mechanisms to swag or attaeh
or affix the axially
disposed radially extending rim or lip of various locking units or nut
inserts. For example, rim 1173 in FIG.
30b; plate 156 in FIG. 13; plate 205 in FIGS. 18, 19; plate 223 in FFG. 29;
among others. FIG. 35b
diagrammaticaIly shows nut 1202 having primary nut recess 1204 and radial wall
or ledge 1206. In addition,
CA 02624761 2008-04-03
WO 00/79141 PCT/US99/13929
1 nut end face 1208 includes an axial protrusion 1210. In FIG. 35c, locking
unit or nut insert 1213 has been
disposed in nut recess 1204. Lockingunit 1213 includes atan axial end, aradial
plate 1215. In orderto secure
locking unit 1213 in nut recess 1204, axial protrusion 1210 has been flattened
or deforrned as shown as
deformation 1211 to cover a reasonable portion of radial end plate 1215. This
mechanism effectively locks
the locking unit 1213 or nut insert into nut recess 1204.
6 In FIGS. 35d 35e, radial ledge 1206 of nut 1202 includes a striation or
slight radially aligned, axial
protrasion or ridge 1216. When nut insert 1213 is placed in nut recess 1204
and radial ring or plate 1215 is
placed thereon, upon deformation of axial ridge 1210 to form deformation 1211,
the bump or striation 1216
provides a sturdy anti-rotation lock between deformation 1211 and ridge 1216.
This anti-rotation lock results
in a similar deformation of radial ring 1215 on nut insert 1213.
11 FIGS.35h-35oorelatetofasteners,clipsornutsformedfromessentiallysheetmetal.
Similarnumerals
~ designate similar items in this group of figures. In the industry, these
structures may alternatively be called
locking fasteners, locking nuts or locking clips. Further, it should be noted
that these locking fastoaer
structures may be mounted on a clip leg establisbed by a U, ] or S-shaped
clip. The fastener on a U-shaped
clip is shown in FIG. 46c. The fastener on a clip leg on a J-shaped clip is
shown in FIG. 46k. S-shaped clips
16 are shown in FIGS. 37 and 38a. Generally, U, J or S-shaped fastener designs
are interchangeable, i.e., it does
not matter whether the fastener is mounted on a U, 3 or S-shaped clip body.
FIGS. 35f-35i ultimately form nut, clip or fastener 1220. FIG. 35h
diagrammatically illustratesaside
view of, fastener 1220 and F1G. 35i diagrammatically illustrates a prospective
view of the fastener. In FIG.
35>y thefastener is shown at an early manufacturing stage wherein sheet metal
plate 1222 has been partially
21 extruded to forcn thread barre11224 and cylindrical body 1225. The
extrusion has been threaded. Tines 1226
have been punched or tooled into a medial portion 1227 of cylinder 1225. The
dashed lines 1228 in FIG. 35f
identify hinge or bend regions for partially manufactured sheet plate 1222.
Dashed lines 1228 in this group of
figures 35f-35oo indicate bend lines.
To partially manufacture sheet metal plate 1222, a bubble is created to form
thread barral 1224. The
26 bubble is then lanced or cutoff to form axial edge 1223. In a similar
manner, a bubble is formed on plate 1222
in order to form looking cylindrical body 1225. That bubble is cut or lanced
to form edge 1229. Thereafter,
cylinder 1225 is put=on a mandrel or other properly shaped tool or dye and a
radial stamp tool is radially
inserted at medial region 1227 to form tine 1226.
As shown in FIG. 35g, thread barrel 1224 and cylindrical body 1225 extend
above sheet plate 1222.
31 Tines 1226 extend tangentially and radially inward towards the axial
centerline.
In order to form fastener 1220 shown in FIGS. 35h and 35i, plate section 1330
is bent.at bend plastes
1228 shown in dashed lines in FIG. 35g. Intermediate section 133.1 becomes a
side wall for fastener 1220.
Cylindrical locking body 1225 carried by plate section 1332 is axially
disposed, in a coaxial manner along
axial centerline 1335. The axial centerliae of threaded barrel I224 and the
axial centerline of cylindrical
CA 02624761 2008-04-03
WO OW79143 PCT/EJS99113929
26
I locking unit 1225 is coaxial. Plate section 1333 is bent to form another
side of fastener 1220. The completed
product is shown in perspective in FIG. 35i wherein tines 1226 extend radially
and tangentially towards the
axial centerline 1335 and threads 1221 are visible on thre.ad barrei portion
1224.
Although sheet metal is currently used to make these fasteners, other
composite materials or plastic
may be used.
6 FIGS. 35j and 35k show an initial manufactured phase and a final
manufactured phase for fastener
1340. Partially manufactured sheet plate 1342 in FIG. 35j has an extruded
threaded barrel 1344 and an
extruded locking cylinder 1346. A plurality of tines 1348 extends radially and
tangentially in the axial
oenterline 1350 of locking cylinder 1346. Partially manufactured sheet plate
1342 is bent as shown in FIG.
35j. Additionally; nut or fastener end plate 1352 has extending therefrom face
plates 1354, 1355, 1356 and
11 1357. Prior to or subsequent to axially alignment of axial centerline 1350
and axial centerline 1354 (related
to threaded barre11344), side faces 1354-1357 are bent to enclose fastener
1340. =Plate sections 1331 and 1333 ~
enclose the other sides of fastener 1340. The completed fastener is shown in
FIG. 35k. Plate sections 1331,
1333 protect the tines from damage during shipping etc., and provide axial
stability and support for the clip
fastener.
16 With respect to FIGS. 351-35q, siniilar numerals designate similar items.
Only significant differences
in ttie structures will be discussed herein. FIGS. 351-35o diagrammatically
illustrate the partially manufactured
and finished version of fastener 13 70. In FIG. 351, extruded threaded bore
1372 has been partially cut to form
cutout 1374. Before or after establishing cutout 1374, cylinder 1372 is
threaded. Partially manufaCtured plate
1373 is bent at lines 1228 such that axial centerline 1345 of threaded bore
1372 is coaxial with axial centerline
21 1350 of locking cylinder 1346. Further, tines 1348 are disposed in cutouts
1374. This is shown in perspective
in FIG. 35o. As a result, fastener 1370 has a compact shape and threaded bore
1372 carries a greater number(
of threads thereby enhancing the fastening capability of fastener 1370. -
In FIGS. 35p and 35q, the same concept is earried forward. Partially
manufactured sheet plato 1380
has a threaded bore 1372 with cutouts 1374. The cutouts accommodate tines
1348. In a final manufactured
26 stage, fastener 1385 includes one ormore tines 1348 which are disposed in
cutouts 1374 in threaded bore 1372.
The side plates protect the tines and add axial stability to the locking
system.
FIGS. 35r-35u diagrammatically illustrate partial and final manufactured
versions of fastener 1390.
In FIG. 35r threaded bore 1372 includes a cutout 1374. However, rather than a
cylindrical locking body as
shown in FIG. 35o, a ractangular locking body 1391 carries at least one, and a
preferably a plurality of tines
31 1348. In FIG. 35s, tine 1348 includes tine body 1392 and distal tine end
1393. Tine body 1392 is rotated with
respect to the sheet plate along the dashed bend line and distal tine end
section 1393 is bent along the dashed
bend line. Distal tine end 1393 is positioned in cutout 1374 when the axial
centerline 1345 of threaded barrel
1372 is coaxial with axial centerline 1350 of rectangular loclcing body 1391.
CA 02624761 2008-04-03
WO 00/79141 PGTJUS99113929
27
1 With respectto FIGS. 35v and 35w, those figmes diagrammaticalIy iilustrate
fastener 1395. Sirnilar
numerals designate similaritems in FIGS. 35r-35w. Fastener 1395 includestine
1393 mountedonrectm-gular
locking body or structure 1391. In its fully mannfactured state shown in FIG.
35w, tine 1393 is disposed in
cutout 1374 of threaded barre11372.
FIGS. 35x-35aadiagrammatically illustrate fastener 1401 having a singlethread
1403 on plate section
6 1404. Single thread 1403 in FIG. 35y has a center point 1405. When the axial
centerline 1350 of locking
cylinder 1346 is place coaxial with respect to center point 1405 of single
thread 1403, the finished fastener
1401 is created as shown in FIG. 35aa. FIG. 35z shows that single thread 1403
rises above the planar plate
surface 1406. This enables the single thread to travel on the inclined plane
of the threaded bolt operating on
fastener 1401.
11 FIGS. 35bb and 35cc show a partial manufactured view and a final
manufactured view of fastener
c 1410. When center point 1405 is made coaxial with respect to axial
eenterline 1350 of cylindrical locking
cylinder 1346, tines 1378 protrude radially and tangentially into the axial
centerline of fastener 1410. The
operation of single thread 1403 is discussed in greater detail later in
connection with FIGS. 47-50, among
others.
16 FIGS. 35dd-35gg diagrammatically
illustratepartialmanufacturedviewsandfinalmanufacturedviews
offastener 1420. Fastener 1420 includes a single thread 1403 and a rectangular
locking body or structure 1391
carrying at least one and preferably a plurality of tines 1393. Tines 1393 are
distal end sections protruding
from tine body 1348 and particular main tine body 1392. When center point 1405
of single thread 1403 is
made coaxial with respect to axial centerline 1350, tines 1393 protrude
radially and tangentially into the axiai
21 centerline of the entire fastener 1420.
~ FIGS. 35hh and 35ii also utilize a single thtvad 1430 and a rectangular tine
carrying strucdu+e 1391
which supports a plurality of tine 1348. Particularly, distal tine end section
1393 projects tangentially and
radially inwards towards the axial centerline of the entire fastener 1425. As
discussed earlier, the channeled
bolt moves longitudinaIly along the axial centerline.
26 FIGS. 35jj-35mm diagrammatically illustrate various stages of manufacture
and the futal version of
fastener 1430. Fastener 1430 includes a single thread 1403 which cooperates
with the bolt thread Plate
sections 1331 and 1333 are stamped out and tines 1431, 1432 are formed in
those plate sections. Plate section
1332 includes a through bore or hole 1436. Bore 1436 includes a center point
1437. When center point 1405
of single thread 1403 is coaxial with center point 1437 of bore 1436, the
fastener 1430 has an axial centerline
31 of 1435. Tines 1431 and 1432 extend tangentially and radially towards axial
centerline 1435 of fasoener 1430.
The channeled bolt travels along the axial centerline of the fastener.
Fastener 1440 is diagrammatically illustratcd in FIGS. 35nn and 3Soo. In FIG.
35an, plate section
1442 includes a through bore 1436. Bore 1436 includes a center point 1437.
Further, side panels 1354 and
1356 have been punched out, stamped or tooled to creatie tines 1442,1444. When
fastener 1440 is bent along
CA 02624761 2008-04-03
WO 00/79141 PCT/tFS99/13429
28
1 bend plane lines 1228 (perforated lines) and side faces 1354, 1355, 1356 and
1357 are placed perpendicular
to end plate 1352, tines 1442,1444 protrude radially and tangentially through
and towards the axial centerline
of fastener 1440. The axial centerline of fastener 1440 passes through center
point 1405 of single #hread 1403
and center point 1437 of through bore 1436. -
FIGS.35pp-35ssdiagrammatically illustratealockingdrawri barre11500.
Lockingdrawn barrel 1500
6 in FIG. 35qq includes an axially inboard radial lip 1502. In contrast, the
thread carrying oylinder 1504 for
looking barre11500 in FIG. 3Spp does not include an axially inboard, radial
lip. Both drawn barrels include
a eyl'mdrieal locking structure 1506 from which tangentially and radially
extends tine 1510. A plurality of
tines may be utilized to increase the clamping factor of the fastener system.
FIG. 35rr shows locking barrel 1500 mounted in a recess in nut 1511. Tines
1510 are shownextending
11 tangentially and radially toward the axial centerline of the composite
locking barrel 1500 and nut 1511. The
term "composite" refers to the insert and nut combination. Threads 1512
are'disposed axially inboard on
thread barrel 1504.
FIG. 35ss shows thread barrel cylinder 1504, locking cylindrical structure
1506 and tine 1510,
Lip 1502 in FIG. 35qq helps lock the extrusion into a plastio or oomposite nut
body. This kicking
16 feature is an important feature of the present design because the locking
drawn barrel 1500 can be mass
assembled. Further, this feature may enable a composite nut/locking stivcture
to be cheaply manufactured
while maintaining the strength ofthe locking sarncture in the nut insert and
the lightness of the system by using
a piastic nut body. Hence, the term "composite" is appropriate for a plastic
nut and a metal nut insert as
described in FIGS. 35pp-35ss.
21 FIGS. 35tt-35xx diagrammatically illustrate a double reverse extrusion
(FIG. 35tt) which can be further
utilized as a pipe lock (FIGS. 35tt 35xx). The locking nut or fastener may be
utilized in conjunction with aC
threaded pipe or rod in order to provide a locking mechanism for the pipe or
rod. If the outside of a flanged
female pipe (or possibly a staadard female pipe) is threaded, the lock of tlie
pcesent invention can be threaded
onto the pipe and the locking engagements may drop into axial grooves on the
outside of the male end of the
26 pipe. Threads may not be neeessary under the grooves on the male side of
the pipe.
FIG. 35tt shows a cylindrical body 1520 carrying, in an internal region, a
threaded bore 1522.
Threaded bore 1522 includes a cutout 1524 through which protrudes a tine 1526.
The tine may be supported
by a further interaal body in body 1520.
FIG. 35uu shows a diagrammatic, cross-sectional view of cylindrical structure
1520. Strneture 1520
31 has an open end 1530 into which pipe 1531 is inserted. Pipe 1531 includes
threads 1533 and axial grooves
1535. Threads 1533 are complementary to female threads
1532disposedontheinteriorofcylindricalstructure
1520. Threaded bore 1532 has a cutout 1524 and a tine 1526 extends there
through. If cylindrical structure
1520 were truncated at face 1540, the structure would define a smaller
cylindrical structure and operate to lock
CA 02624761 2008-04-03
WO 00179141 PC.TlUS99/13929
29
I on to and cap pipe 1531. Of course, rather than utilizing a pipe 1531 any
type of cylindrical item or rod
canying threads 1533 and axial grooves 1531 could be locked onto cylindrical
structure 1520.
In the absence of a truncation at face 1540, the locking joint shown in FIG. 3
Suu includes a second set
of female threads 1542 which is complimentary to male threads 1544 on pipe
1546. Further, pipe end 1548
includes internal female threads 1550. Internal female threads 1550 enable
male threads 1533 on pipe 1531
6 to be fully inserted and ride not only on female threads 1532 of cylindrical
unit 1520 but also on pipe 1546.
The structure illustrated in FIG. 35uu enables the user to lock on the
cylindrical unit 1520 while being
able to disassemble or withdraw pipe 1546 from lock unit 1520.
Similar numerals designate similar items and are carried forward into FIGS.
35ww, 35vv and 35xx.
FIG. 35ww diagrammatically illustrates pipe lock or coupler 1560. FIG. 35vv
diagrammatieally
11 illustrates the outside appearance of pipe lock 1560. Pipe lock 1560
includes, on its left hand side, a similar
~ pipe lock as described above in connection with FIG. 35uu. On the right hand-
side, pipe ioek 1560 includes
female threads 1542 which are complimentary to male threads 1544 on pipe 1562.
Pipe 1562 includes axial
grooves or cutouts 1564. Pipe 1562 also may include internal female thraads
1550 in a manner similar to the
pipe lock shown in FIG. 35uu. Further, pipe lock 1560 includes a larger
diameter section 1566. The internal
16 wall 1568 of larger diameter section 1566 includes a cutout 1570. A tine
1572 extends through the cutoutand
coacts with axial grooves 1564 of pipe 1562. Accordingly, the user may lock
pipe 1531 on the left hand side
of coupler 1560. The user may subsequently lock pipe 1562 on the right haad
side of pipe lock 1560.
FIG. 35xx shows a modified pipe lock 1580 disposed at a terminal end of pipe
1582. Female threads
1532 have been moved axially inboard away from tine 1526. Accordingly, male
threads 1533 of pipe 1531
21 can be mounted on fenude threaded coupling 1532. Accordingly, tine 1526
pops into and out of the grooves
~.. 1535 on pipe 1531 thereby locking the pipe onto the terminal end of pipe
1582.
FIG. 36 diagrammatical ly illustrates an S-shaped locking nut and bolt
assembly 270. All illustrations
of the clips are expanded to better show the critical features of the
invention. The S-shaped member includes
legs 271, 272 and 273. It is iinportant to remember that leg 271 may be
truncated at any location above line
26 274 thereby eliminating the leg portion toward terminal end 275. As used
herein, "S-shaped" refers to the S-
shape shown in FIG. 36 or a truncat$d S-shape which eliminates all or a
portion of the segment from line 274
to terminal end 275 of leg 271.
Leg 272 includes a nut formed as cylindrical unit 276. On leg 273, an
elongated locking unit 277 is
formed. In view of the length of leg 271, that leg also has a bore 278. The
ax,ial centerline through bore 278
31 and nut 276 and cylindrical locking unit 277 is coaxial. As shown in FIG.
37, panel 280 includes a panel bore
282. The panel bore is coaxial with clip leg bore 278, nut 276 and cylindriaal
locking unit 277.- A bolt similar
to that described above in connection with FIGS. 25a and 25b is inserted
through bore 279,282 and threaded
througis nut 276 and ultimately loeking onto cylindrical locking unit 277.
CA 02624761 2008-04-03
WO 00/79141 PCT/US99l13929
1 Cylindrical locking unit 277 includes at least one, and in the illustrated
embodiment, a plurality of
tines, one of which is tine 282. In a preferred embod'unent, tine 282 is
established by cutting out a region 283
from the cylindrical locking unit 277. As discussed earlier, tine 282 has a
distal tine end which tangentially
and radially protrudes inward toward the eylindrical axis of the speaiaily
configured bolt. When the tine end
abuts a locldng face (for example, locking face 236 in FIG. 24 for bolt 231j,
the tine and the locking face
6 prevent counter-rotational movement of the bolt with respect to the locking
nut and bolt clip assembly 270.
Otherwise, when the bolt is moved in a rotational manner, the distal tine end
rides on opposing slope 237 and
bolt thread crest 234 and fnrther rotational movement is permitted.
Cylindrical locking unit 277 has a cylindrical axis perpendicular to the plane
of leg 273. As shown
with respect to FIG. 42, cylindrical locking unit 277 may be disposed on
intermediate leg 272 and nut 276 may
I I be disposed on latarally distant leg 273.
FIG. 37 shows that bored panel 280 is placed between clip leg 271 and clip leg
272 of S-shaped clip
270 such that bore 278 is coaxial with panel bore 282 and the nut thread 285
of nut 276. Cylindrical locking
unit 277 is also coaxial with this bolt passageway. The locking action of tine
282 is visibly confirmed since
tine 282 is disposed in cut-out 283.
16 FIG. 38a shows an S-shaped locking nut and bolt clip assembly having an S-
shaped clip 290 and clip
legs 291, 292 and 293. Clip leg 291 includes bore 294 since the terminal end
295 of that leg extends above
nut thread 296 of nut 297. S-shaped clip 290 is adapted to be slid or placed,
as shown by arrow 298, onto panel
299. Panel 299 includes bore 301. Bore 301 is placed coaxially with respect to
bore 294 and nut thread 296
of nut 297.
21 A locking element is configured or formed on leg 293. This locking element
includes a plurality of
perpendicular panels 303, 304, 305 and 306. These panels are perpendicular to
the generally planar surfaee
of clip leg 293. More importantly, these panels 303, 304, 305 and 306 define
axially protruding tegs which
are perpendicular to clip leg 293 and, more importantly, are tangentially
disposed with respect to an axial
centerline passing through bore 294 and nut 297. As such, the locking element
forms a locking element bore
26 307 through which protrudes the specially configured bolt. See FIGS. 25a,
25b. Each axially protruding leg
303, 304,305 and 306 also includes a re.spective tine 310, 311, 312 and 314.
These tines protrude tangentially
and radially toward the axial centerline defined by bore 294, nut thread 296
and locking element bore 307.
As discussed in detail earlier, each tine has a distal tine end adapted to
latch onbo a lock face of one or more
notches in a specially configured bolt. See bolt segment L 1,13 ;-! c'IGS.
25a, 25b, and particnlarly longitudinal
31 locking channel 9 and spiral locking channel 7. Each tine also includes a
proximal tine portion attached to the
corresponding axially protruding leg 303, 304, 305 and 306. When the specially
configured bolt is inserted
through bore 294, bore 282 in panel 280 (FIG. 37), and threaded onto nut
thread 296 of nut 297, and further
when the locking channels pass tines 310, 311, 312 and 314, the position of
each distal tine end is visible to
the user. This visibility is provided not only bythe cut-outs defined adjacent
each tine 310, 311, 312 and 314
CA 02624761 2008-04-03
WO 00/79141 PCT/US99/13929
31
1 but also because of the tangential orientation of the small axially
protruding leg segments 303, 304,305 and
306.
FIG. 38b shows a manufacturing stage for the locking element formed by the
plurality of axially
protruding legs 303, 304, 305 and 306 in FIG. 38a. In FIG. 38b, clip leg
segment 293 is generally planar and
locking leg segments 303', 304', 305' and 306 have been formed by stamping,
cutting or otherwise fonning
6 leg segments on clip leg segment 293. Each axially protruding leg segment
clearly defuees the distal tine end
and proximal tine portion. For example, with respect to locking leg segment
303', distal tine end 310' is
identified. Proximal tine portion 316 is immediately adjacent protruding
leg'segment 303'. Accordingly, in
orderto form axially protruding legs 303, 304, 305 and 306 as shown in FIG.
38a, leg segments 303', 304', 305'
and 306' are rotated out of the plane formed by clip leg segment 293.
ThereaRer, the distal tine portions 310,
11 311, 312 and 314 are pressed radially inward toward the axial centerline
ranning through bore 294 and nut
~ thread 296.
FIG. 39 diagrammatically illustrates that S-shaped clip 270 can be utilized in
conjunction with bolt
14 carrying longitudinal loeicing channet 9 on bolt thread segment 11 or bolt
15, carrying spiral locking
channel 7 on bolt thread segment 13. Either one of these specially configured
bohs can be threaded through
16 bore 278 after S-shaped clip 270 is placed onto pane1280 such that bore 278
is coaxial with panel bore 282.
Bolts 14,15 threaded through bores 278,282 and threaded onto nut 276
ultimately engage cylindrical locking
unit 277. Distal tine ends 282 visibly engage locking channels 7, 9 due to the
tine's position in cut-out 283.
Also, the axially extending nature of the locking unit enhances visibility.
FIG. 40 diagrammatically shows S-shaped clip 320 having clip legs 321, 322 and
323. Clip leg 321
21 defines bore 324. Clip leg 322 carries nut 325 having nut tlmad 326
thereon. Clip leg 323 carries a locking
element formed of a plurality of axialiy protruding legs 327, 328, 329 and
330. Each axially protruding leg
includes a distal tine end 331, 332, 333 and 334. Additionally, the locking
element establishes a locking
element bore 335. These tines ere not cut-out from the locking element legs
but are simply angularly offset
with respect to the legs. It should be noted that clip legs 321, 322, 323 may
be bent inward towards nut thread
26 326 rather than outboard away from the thread. This will protect the
integrity of the tines, i.e., limit damage
during shipping and installation. Also, the terminal end of clip leg 323 may
include a depending spacer leg
as shown in FIG. 43, leg 362.
FIGS. 41 a and 41b show various manufacturing stages for the locking element.
Clip leg segment 323
in FIG. 41a shows that protruding leg segments 327, 328', 329' and 330' are
stamped or cut from a generally
31 planar sheet of metal or plastic. Each protruding leg segment clearly
defines a distal tine end, for example
distal tine end 331 for leg 32T is identified in FIG. 41a. Further, leg
segment 327 also establishes proximal
tine pordon 340. In order to form the locking element shown in FIG: 40,
protruding leg segments 327, 328',
329' and 330' are rotated out ofthe plane formed by clip leg segment 323. FIG.
41b shows a front view of clip
leg segment 323. Axially protruding legs 327, 328, 329 and 330 are normal to
the plane established by clip
CA 02624761 2008-04-03
WO 00179141 32 PC,'T/tdS99/13929
1 leg segment 323. Distal tine ends 331, 332,333 and 334 protrude tangentially
and radially inward toward the
axially centerline'C in locking element bore 335.
FIG. 42 diagrammatically illustrates S-shaped clip 350 having clip legs 351,
352 and 353. As shown
in FIG. 43, S-shaped clip 350 is placed on bored panel 354 as shown by arrow
355. Clip leg 351 includes a
bore 356. Clip leg 352 includes a cylindrical locking unit 357. Cylindrical
locking unit 357 has a plurality
6 of circumferentially spaced apart tines, one of which is distal tine end
358. Alternatively, cylindrical locking
unit 357 may include only a single tine. Distal tine end 358 has a proximal
tine portion 359 adjacent
cylindrical body 360 of cylindrical locking unit 357. Clip leg 353 includes
nut 360 having nut threads 361
thereat. Nut 360 is coaxial with cylindrical locking unit 357 and bore 356.
As shown in FIG. 43, clip leg 353 includes depending spacer leg 362. FIG. 43
also shows that distal
1 I tine end 358 is visible during locking and unlocking due to cut-out 364.
Basically, the distal tine end 358
moves into and out of one or more notches forming longitudinal locking channel
9(FIG. 25a) or spiral locking ~
channel7 (FIG. 25b). The depending spacer leg 362 ensures that when the bolt
segment 11, 13 (FIGS. 25a,
25b) are threaded onto thread 361, nut 360 maintains its coaxial position with
respect to the axial centerline
of the bolt. In other words, when the bolt pulls clip legs 351, 352 and 353
together, the coaxial nature of nut
16 360 with respect to the axial centerline of the bolt is maintained due to
depending spacing leg 362.
FIG. 44 diagratnmatically illustrates S-shaped clip 370 having clip legs 371,
372,373 and a fourth clip
leg 374. Clip leg 371 includes bore 375. Clip leg 372 includes a nut 376
having a nut thread 377. Clip leg
373 includes a locking element formed of a plurality of axially protruding
legs, two of which are axially
protruding legs 378, 379. Each axially protruding leg includes a distal tine
end 380 and 381 which extends
21 tangentially and radially inward toward the axial centerline formed by bore
375, nut thzead 377 and nut 376
and the locking element bore 382. In the illustrated embodiment, another pair
of opposing axially protruding
~_.
legs is formed on clip leg 373. Clip leg 374 includes a supplemental bore 384.
Supplemental leg 374 includes
a depending spacer leg 385.
FIGS. 45a and 45b illustrate various manufacturing stages for the axially
protruding legs. Clip leg
26 segment 373 is stamped or pressed or cut to form a number of locking leg
segments, one of which is segment
379'. Leg segment 379' includes a distal tine end 381 and a proximal tine
portion 386. Proximal tine portion
386 is adjacent.clip leg segment 373. In FIG. 45b, protruding leg segment379'
(FIG. 45a) is rotated out ofthe
plane formed by clip leg segment 373 to form axially protruding leg 379. In
order to form the distal tine end
381, the tine end is pressed radially inward toward centerline C of locking
element bore 392.
31 FIG. 46a diagrammatically illustrates a side view of S-shaped clip 370
being placed on bored panel
390 in the direction shown by arrow 391. FIG. 46a also shows that bore 375 in
clip leg 371 is coaxial with nut
376 on clip leg 372 and the.locking element formed by axially protruding legs
379 and distal tine end 381.
Bore 384 on leg 374 is also coaxial with bore 375 on leg 371. Depending leg
385 spaces supplemental leg 374
away from locking element formed by axially protruding legs 379. In this
configuration, supplemental clip
CA 02624761 2008-04-03
WO 00/79141 PCT/US99/13929
33
I leg 374 and depending spacing leg 385 protect the axially protruding nature
of legs 379 and 378. Supplemental
clip leg 374 also protects the rad'zally protruding nature of distal tine ends
381.
FIGS.46b-46j diagrammatically illustrate another embodiment offastenerclips or
fastener nuts. FIG.
46b shows partially manufactured plate 1600 having plate segments l
60I,1602,1603 and 1604. These various
plate segments are bent along bend lines 1605 as shown by arrow 1606. Plate
section 1602 includes axially
6 eittending structures 1610 and 1612. These stractures carry tines 1611.
Plate section 1604 carries a threaded
barrel 1615. Threaded barrel 1615 has a cutout 1616. The barrel is extruded or
is otherwise formed on the
plate. Thereafter the cylindrical shaped body is threaded.
FIG. 46c shows a U-clip 1620. It should be noted that when the axial
centerline 1613 of tine carrying
struc[vres 1610,1612 is made coaxial with the axially centerline 1614
ofthreaded barrel 1615 (by bending and
1 l foming the structure), a single nut or fastener is created. Further, the
fastener made in accordance with FIG.
46b may include a U-clip, J-clip or an S-shaped clip attached to end 1619.
Henco, the fastoner may be a stand
alone unit or may be part of a U, J or S-shaped clip system.
FIG. 46c shows the rolled up fastener or nut. Similar numerals designate
similar items in FIGS. 46b-
46j. Of course, clip leg 1621 includes a through bore at region 1623 in order
to pennit the specially configured
16 boli or pipe or other rod-like structure to pass through and to activate
the locking mechanism created by tines
1611.
FIGS. 46f-46g diagrammatically illustrate another type of nut or fastener
1650. In FIG. 464 fastener
1650 stands alone. In FIG. 46g, fastener 1650 is attached to a U-shaped clip
1651. Of course, U-clip 1651
may be a d-shaped clip or may be a S-shaped clip.
21 In FIG. 46d, clip 1650 is c=reated by utilizing a sheet metal plate having
sections 1652, 1653, 1654,
C 1655 and 1656. Bend planes 1605 are shown in FIGS. 46d and 46e. Axial
stability is enhanced by the axial
"stacking" of these stractures.
A threaded bore 1660 is extruded from section 1653. A cylindrical locking
structure 1662 is extruded
from sections 1655 and 1656. Tines 1664 are stamped or cut from cylindrical
locking cylinders 1662, 1663.
26 The plate is bent such that axial centerline 1665 ofthreaded bore 1660 is
coaxial with the axial centerline 1666
of cylindrical locking structure 1662. Further, the axial centerline 1667 of
cylindrical locking struetsum 1663
is also made coaxial with the other axial center lines 1665 and 1666. The
resulting sGructure for fastener or
nut 1650 is illustrated in FIG. 46f.
FIG. 46g shows that fastener 1650 can be mounted on U, J or S-shaped clips. In
FIG. 46g, U-shaped
31 clip 1651 is utilized.
Fastener 1650 in FIG. 46f is partially protected by depending end wall 1652
and the opposing joining
wall 1654. Wall 1652 provides additional axial support. Further, multiple
cylindrical (or rectangular)
structures may be added to additional plate sections. R,eetangular tine
supporting structures are discussed
above in connection with FIGS. 35dd-35ii, among others.
CA 02624761 2008-04-03
WO 00/79141 PCT/US99113929
34
1 FIGS. 46h-46j diagrammatically illustrate additional locking fasteners. In
FIG. 46h, the metal plate
is divided into section 1701, 1702 and 1703. Bend planes 1605 are shown in
dashed lines. The fastener is
created by rotating plate 1701 in the direction shown by arrow 1705 such that
axial centerline 1706 is coaxial
with axial centerline 1707.
The fastener includes a cylindrical tine carrying support 1710 and a threaded
barrel 1712 at an axial
6 end of the cylindrical support 1710. Support 1710 has one or more tines 1711
stamped, tooled or created in
its cylindrical wall. Plate section 1703 includes an extruded guide cylinder
1714.
As shown in FIG. 46i, guide cylinder 1714 captures threaded barrel 1712 in its
interior. Cylindrical
locking structure1710 provides support for locking tine 1711. Of course, a
single fastener may be created by
truncating J-shaped clip 1720 at point shown by arrow 1721. The axial capture
of the thread barrei greatly
11 enhances stability and clamping forces.
FIG. 46j diagrammatically illustrates aU-shaped clip 1730 canying afastener
1732 atoneendthereof.(
Clip leg 1733 will include a through bore at region 1734. Clip leg 1735 will
include a similar through bore
coaxial with through bore 1734. Fastener 1732 includes a cylindrical or a
rectangular tine carrying structure
1740 and an threaded bore 1742 adjacent thereto. Tines 1744 provide locking
for fastener structure 1732.
16 FIG. 47 diagrammatically illustrates a U-shaped clip 400 which.is adapted
to be placed onto a bored
pane1401 as shown by arrow 402. Panel 401 includes a bore 403 there through. U-
sitaped clip 400 includes
clip leg 404 and clip leg 405. Clip leg 404 has a single thread nut 406
thereon. The single thread nut 406 has
an ara less than 3601. In the illustrated embodiment, the arc of single thread
nut is approximately 3501. The
single thread nut, shown in a partial, broken away view in FIG. 48, is formed
by cutting or stamping a strip
21 407 from clip leg 404. Strip 407 remains attached to clip leg 404 via
region 410.
A locking element is formed on clip leg 405. See FIG. 47. The locking element
includes a pluralit~(
of axially protruding legs 412, 413, 414 and 415. Each axially protruding leg
includes a corresponding tine
416, 417, 418 and 419. The distal tine ends 416, 417, 418 and 419 protrude
tangentially and radiaily inward
toward the axial centerline C of locking element bore 420. Axial centerline C
is coaxial with the axial
26 centeriine through single thread nut 106. This axial centerline is also
normal or perpendicular to planar clip
legs 404 and 405. As explained earlier in connection with FIGS. 40 and 44, the
distal tine ends 416, 417, 418
and 4191atch onto the lock face 36 FIG. lb) ofeither a longitudinal locking
channel 9 in bolt segment I 1(FIG.
25a) or a spiral locking channel 7 for bolt segment 13 (FIG. 25b). When the
distal tine ends abut lock face 36
(FIG. lb) counter-rotational movement is prohibited. Otherwise, during
rotational movement, the distal tine
31 ends 416, 417, 418 and 419 ride on opposing slope 38 and bolt thread crest
30.
FIG. 50 shows bolts 14, 15 carrying longitudinal locking channel 9 and spiral
loeking channel 7,
respectively, adapted to be fed into single thread nut 406 on clip leg 404.
Clip leg 405 is truncated since that
clip leg may carry a cylindrical locking unit (FTG. 49) or a locking element
with axially protruding legs.
CA 02624761 2008-04-03
WO 00179141 PGT/US99/13929
1 FIG. 49 diagrammatically illustrates a U-shaped clip 420 having clip leg 404
and a second clip leg 421.
A single thread nut 406 having an arc less than 360 is formed on clip leg
404. On clip leg 421, a oylindrical
locking unit 422 is formed. Cylindrical locking unit 422 includes a plurality
of tines extending tangentially
and radially inward toward the cylindrical axis of cylindrical locking unit
422 which is coaxial to the axis of
single thread nut 406. Cylindrical looking unit 422 may utilize a single tine
423 having a proximal tine portion
6 424 extending from cylinder 425. Distal tine end 423 is cut-out from cut-out
426 of cylinder 425.
Accordingly, the user can easily identify whether distal tine end 423 has
fallen into spiral locking channel 7
(FIG. 50) or longitudinal locking channel 9(FIG. 50). In a like manner, distal
tine ends 416, 417, 41.8 and 419
(FIG. 47) can be viewed by an observer in order to determine whether the
distal tine ends have fallen into spiral
locking channel 7 (FIG. 50) or longitudinal locking channel 9 (FIG. 50).
_ 1 I FIG. 51 diagrammatically illustrates U-shaped clip 430 having a clip
leg431 and clip leg 432. A bore
C 433 is defined at an upper region 434 of clip leg 431. If upper region 434
is eliminated or truncated, a J-shaped
clip is provided. See FIG. 55.
Clip leg 432 also defines a single thread nut 436. Single thread nut has an
arc less than 360 and the
axial centerline of single thread nut 436 is coaxial with bore 433. A locking
element 438 is defined on nut bore
16 437. Locking element 438 includes an axially protruding leg 439 and a tine
440 protruding tangentially and
radially inward toward the axial centerline of nut bore 437 which is coaxial
with bore 433. In the illustrated
embodiment, the single thread nut 436 defines an arc of about 225 . Leg 439 is
disposed beyond the arc ofthe
nut thread.
FIGS. 52a and 52b diagrammatically illustrate U-shaped clip 430 and J-shaped
clip 450. FIG. 52a
21 shows U-shaped clip 430 with the axial extending leg 439 of locking element
438 directed radially inward.
Axially extending leg 439 is perpendicular to the plane of clip leg 432. Tine
440 protrudes tangentially and
radially inward toward the axial centerline generally located at imaginary
line 441. A panel 442 having a bore
443 is used in connection with U-shaped clip 430. Clip 430 is placed on panel
442 as shown by arrow 444.
In operation, U-shaped clip 430 is placed on bored panel 442 sueh that the
axial centerline 441 forthe apertures
26 in clip 430 is coaxial with bore 443: Thereafter, one of the specially
configured bolts shown in FIGS. 53a and
53b can be inserted along axial centerline 441. Bolt 14 has a longitudinal
locking channel 9 along bolt thread
segment 11. Bolt 15 includes spiral locking ehannel 7 along bolt thread
segment 13. When tine 440 falls in
one or more of the notches in bolt segments 11, 13, the distal end of the
tine, when it abuts the Iooking face
of the notch (see lock face 36 in FIG.1b), prevents counter-rotational
movement. Otherwise during rotational
31 movement, the distal tine end moves on opposing slope 38 (FIG. ib) and
rides atop bolt tluead crest 30.
FIG. 52b diagrammatically illustrates a J-shaped clip 450 which is placed on
pane1451 as shown by
arrow 452. Panel 451 includes bore 453. Bore 453, when clip 450 is place
thereon is coaxial with the axial
centerline 454 of the locking element nut bore.
CA 02624761 2008-04-03
WO 00/79141 - PCT/LTS99/13929
36
1 FIG. 55 diagrammat'scally illustrates J-shaped clip 450 having a first leg
455 and a second clip leg 456.
A single thread nut 457 is defined on clip leg456. The single thread nut 457
includes an arc less than 360 and,
in the illustrated embodiment, an are spanning approximately 225 . The single
thread nut also is utilized in
cooperation with a locking element 458. Looking element 458 includes an axial
protruding leg 459 and a distal
tine end 460. Axially protruding leg 459 is best illustrated in FIG. 52b. Leg
459 is perpendicular to clip leg
6 456. Distal tine end 460 extends tangentially and radially inward toward
axial centerline 454 ofthe nut bore.
Locking element bore 461 is shown in FIG. 55. The locking element is formed at
a radially inward edge of
the locking element bore. The locking element bore in this embodiment is
identical to the nut bore.
It should be noted that although panels 442, 451 in the figures are shown as
being made of insulated
material, those panels may be wood, plastic, metal or any other type of
composite panel. Also, when used
11 herein, the term U-shaped clip also includes the J-shaped clip
construction. A J-shaped clip is simply a U-
shaped clip with a certain portion of a terntinal end of a clip leg truncated.
For example, U-shaped clip 430 ~
FIG. 51 can be converted into a J-shaped clip simply by truncating segment
434.
As in FIG. 55, locking element 458 is formed on nut bore 461 at a point beyond
the arc of the single
thread nut 457.
16 FIGS. 54a and 54b illustrate various stages of manufacture for the locking
element. Clip leg segment
456 includes a locking element segment 458'. Locking element segment 458'
shows a distal clip end segment
460', a leg segment 459' and a proximal tine segment 463. In order to f irther
relieve stress, clip leg 456 may
include a stress cut or slice at a 45 degree angle on the right side of
proximal tine segment 463. Also, rather
than the "squared" cut defining the right side of segrnent 458', the cut or
slice may be at a 45 degree angle.
21 In FIG. 54b, clip leg segment 456 has been further cut, stamped or
otherwise configured to establish
single thread nut 457 with the locking element 458 on the nut bore. Axially
protruding leg 459 has beenC
formed by bending leg 459 out= of the plane established by clip leg 456.
Distal tine end 460 has been formed
by bending the tine leg radially inward toward nut bore 461 away from the
plane of axial leg 459. Yi
56a shows a J-clip 470 having a truncated clip leg 471 and a second clip leg
472. Clip leg 472 has a nut bore
26 473 and a single thread nut 474. Single thread nut 474 includes nut
segments 475, 476 and 477. These nut
thread segments define arcuate regions around the nut thread bore 473.
In addition, clip leg 472 includes a locking element consisting of axially
protruding legs 480 and 481.
Each axially protruding leg includes a distal tine end 482, 484. Distal tine
ends 482, 484 flex into and out of
the notches in longitudinal channel 9 (FIG. 53a) or spiral locking channel 7
(FIG. 53b) of a specially
31 configured bolt. Counter-rotational movement is prohibited when the
distaldne ends 482,484 abut the locking
face of one or more notches. Rotational movement is permitted because the
distal tine ends 484, 482 ride on
the opposing slope of the notcb or notches and the bolt thread crest. The
operation of the distal tine ends is
shown earlier herein. As shown in FIG. 56a, the axially protruding legs are
disposed circumferentially at
certain regions beyond nut thread segments 475, 476 and 477.
CA 02624761 2008-04-03
WO 00/79141 PCTIUS99l13929
37
1 FIGS. 56b-56h diagrammatically illustrate anothertype of locking fastener
orolip. In FIGS. 56b-56d,
tine support plate 1800 is bent normal to clip leg 1802. CIip leg 1802
includes a single thread bore 1804.
Support plate 1800 is punched or tooled to defcna tine 1806. Side sections
1810,1812 are bent normal to plate
1800 to provide additional support for the plate. See FIG. 56d. Axial
compression of the fastener is limited
by wall sections 1826, 1843. FIG. 56c is a head on view of the fastener clip.
As shown, tine 1806 protrudes
6 radially and tangentially towards center point 1805 of single thread 1804.
With respeat to FIG. 56e, plate 1800 carries tine 1806. Thattine cooperates
with a groove or channel
onthe boltsecuredto singie thread 1804. Support plate 1800 does not include
support end sections 1810, 1812
shown in FIGS. 56b-56d. The structure in FIGS. 56b-d is slightiy snore stable
and less li'kely to twist upon
application of excessive fastening torque,
I 1 FIGS. 56f-56h diagrammatically illustrate another type of construction for
the single thread system.
(7. In FIG. $64 single tbread bore 1804 is carried by plate section 1820.
Plate section 1822 is divided into end
panel 1824, central panel 1826 and opposing side panel 1828. A tine 1830 is
defined in central panel section
1826. Tbe fastener includes a further plate section 1832 having a through bore
1834 therethrough. Through
bore 1834 has a center point 1836. Single thread bore 1804 also has a center
point 1803. The fastener fardter
16 includes a trisected panel section 1840. Panel section 1840 includes side
panels 1841, 1942 and central panel
section 1843. A tine 1845 is de,fined in central panel section 1843. To
constructthe fastener, center point 1836
of through bore 1934 is placed coaxial with respect to center point 1803 of
single thread bore 1804. The plate
is bent accordingly. FIG. 56g illustrates the completed fastener 1850. Similar
numerals designate similar
items in FIGS. 56f-56h. Side panels 1824,1842 provide additional support for
central pane11826,1843 which
21 carry tines 1830, 1845. The side panels enhance axial compression and limit
twisting of the fastener.
FIG. 56h is similar to the fastener discussed above in connection with FIGS.
56f and 56g. However,
the fastener ofFIG. 56h does not include supporting side panels. Instead,
central panels 1926, 1943 carry tines
1830, 1845. This fastener utilizes less manufacturing steps than FIG. 56f.
FIG. 57 diagrammatically illustrates U-shaped clip 490 having clip leg 491 and
clip leg 492. A bore
26 493 is defined on clip leg 491. A nut 494 is formed on clip leg 492. Nut
494 inaludes nut threads 495 and a
nut bore 496. An elongated locking unit 497 is formed on an outboard axial end
498 of nut 494. The
cylindrical loeking unit 497 includes at least one, and in the
illnstratedembodiment, several compressible tines.
For example, distai tine end 500 is defined in cut-out 501 of cylindrical wall
503 of cylindrical locking unit
497. Nut bore 496 is coaxial with respect to bore 493 on clip leg 491. U-
shaped clip 490 is adapted to be
31 insorted onto a panel having a bore in the direction shown by arrow 454.
Examples ofthese bored panels are
shown in panel 401 in FIG. 47 and panel 354 in FIG. 43, among others.
The clip fastener systems illustrated in FIGS. 57, 58, 59 and 60 include a
threaded, extruded barrel 495
{FIG. 57} and a wider diameter extruded portion or cylinder 497 to accommodate
a spacial flex zone that is
not tlueaded, This double extrusion design saves material costs and space.
CA 02624761 2008-04-03
WO 00/79141 PCT/[3S99113929
38
I FIG. 58 shows a truncated U-shaped or J-shaped clip 560. Clip 560 includes
truncated clip leg 561
and clip leg 562. A nut 563 is formed on clip leg 562. Nut 563 includes nut
threads 564 and an elongated,
cylindrical locking unit 565. J-shaped clip 560 is placed on a bored panel by
moving clip 560 in the direction
shown by arrow 566. Examples of bored panels are found in FIG. 47, panel 401;
FIG. 39, pane1280 and FIG.
38, panel 299.
6 FIG. 59 diagrammatically shows a perspective view of cylindrical locking
unit 497 mounted at an
axial end of nut 494. Tine 500 is formed by cutting a cut-out 501 from
cylindrical wal1503 of cylindrical
locking unit 497. Additionally, tine 500 is pushed or forced radially inward
toward nut bore 496.
FIG. 60 shows a partial, broken away, plan view of cylindrical locking unit
497 mounted at an axial
end of nut 494. Nut 494 has an axial end 498. Cylindrical Iocking unit 497
includes a frusto-conical member
11 505 which leads to a larger diameter cylindrical member of cylindrical wall
503. Cylindrical wall 503 has a
larger diameter as compared with frusto-conical member 504 and nut 494. The
user can clearly see whetheC
tine 507 is locked into one or more of the notches in longitudinal locking
channel 9 (FIG. 53a) or spiral locking
channel 7 (FIG. 53b) of the bolt. This is due to the fact that distal tine 507
is positioned in cut-out 508. Tine
507 has a proximal tine portion 509 that is adjacent cylindrical wall 503.
16 FIGS. 61 a and 61b diagrammatically illustrates plan views from the
perspective of section line a'-a"
in FIG. 60 and section line b'-b" in FIG. 60. In Fig. 61 a, the axially
outboard edge 510 of cylindrical locking
unit 497 is shown as is the axial outboard end 511 of the frusto-conical
section 505 (FIG. 60). A plurality of
tines 500, 512, 509 and 513 protrude tangentially and radially inward toward
nut bore 496 which establishes
the axial centerline ofthe nut. In FIG. 61b, the axially inward edge 514 of
nut 494 is illustrated. The radially
21 large outer edge 515 of frusto-conical member 505 (FIG. 60) is also shown
in FIG. 61b. The distal tine ends
500, 512, 509 and 513 are also illustrated. ~
As discussed earlier, U-shaped clips 490,560 are placed on a bored panel such
that the axial centerline
496 of nuts 494, 563, are coaxial with the bore through the panel. Thereafter,
a specially configured nut such
as the nut shown in FIGS. 53a and 53b and bolts 14, 15 are threaded through
the bores and onto nut threads
26 495, 564. Distal tine endi 500, 509, 512 and 513 pop into and out of one or
more notches fonned in
longitudinal channel 9 of boltthread segment I 1(FIG. 53a) or spiral locking
channel 7 of bolt thread segment
13 on bolt 15 (FIG. 53 b). Counter-rotational movement is prohibited when the
distal tine end abuts the looking
face 36 of the notch. Rotational movement is permitted when the bolt moves
respect to the nut thread and the
distal tine end rides on opposing slope 38 (FIG.1b) and bolt thread crest 30.
The user can determine :vhether
31 the distal tine end is locked by viewing the tines in the cut-outs. The
user can determine whett: r the
cylindrical locking unit is locking on the specially configured bolt because
the position of the distal tine end
is visible due to the cut-outs. See cut-out 501 in FIG. 57 for tine 500 and
cut-out 508 for tine 507 in FIG. 60.
FIG. 62 shows U-shaped clip 520 having clip leg 521 with a bore 522 there
through. Clip 520 also
includes clip leg 523. Clip 520 is placed on a panel 524 having a bore 525
there through. Clip 520 is placed
CA 02624761 2008-04-03
WO 00119141 PGTIUS99113929
39
1 on panel 524 by moving the clip in the direction shown by arrow 526. Clip
leg 523 carries a nut and locking
unit 527 thereon.
FIGS. 63a, b, c, d, e, f, g and h show various manufacturing stages and axial
end views of the nut and
locking unit 527. A perspective plan view of nut and locking unit 527 is shown
in FIG. 64a. In FIG. 64a, the
nut and locking unit is a cylindrical system having cylinder walls 528. The
interior of cylinder wall 528
6 includes a nut thread 529. A locking unit 530 is formed on an interior of
said nut. Locking unit 530 includes
a distal tine end 540 protruding tangentially and radially inward toward the
axially centerline of the nut and
locking unit. The axial centerline 541 ofthe nut is shown in FIG. 63h. In the
illustrated environment, nut and
locking unit 527 includes a second distal tine end 542. The distal tine ends
540, 542 extend from tine bodies
543, 544. These tine bodies and distal tine ends are cutaway from cylinder nut
wall 528.
11 In FIGS. 63 a and 63b, cylinder body 528 of nut and locking unit 527 is
mounted or formed on clip leg
C segment 523. As shown in FIG. 63b, whicb provides a view of cylinder 528
from the perspective of section
lines b'-b" in FIG. 63a, cylinder 528 is an elongated, thin walled cylinder.
In FIGS. 63c and 63d, a tine body or locking unit body 530 has been cut or
stamped out of cylindrical
wall 528.
16 In FIGS. 63e and 63f, locking unit segment 530 has been forced radially
outward. FIG. 63f shows
locking unit segment 530 and locking unit segment 550.
In FIGS. 63g and 63h, locking unit segment 530 has been modified by bending
distal tine end 540
radially inward to form the generally tangential and radially inward distal
tine end. Tine body 543 provides
added flexibility to the tine and proximal tine portion 551 adjoins tine body
543 with cylindrical wal1528.
21 As shown in FIG. 63h, distal tine ends 540,542 protrude tangentially and
radially inward toward axial
~. centerline 541. Tine bodies 543, 544 protrude slightly radially outward
beyond the radial dimension of
cylinder wall 528.
Of course, cylinderwall 528 would have to be thick enough to accommodate and
carry the nut threads
529 on its interior wall surface. Threads are formed after formation of the
compressible tines.
26 Since the locking units 530, 550, are formed in cut-outs on the cylindrical
wall 528, the user can
visually determine whether distal tine ends 540, 542 have fallen into
longitudinal locking channel9 or spiral
locking channel 7 in bolt 14, 15 shown in FIGS. 68a, 68b.
The "punctured barreI" clip or fastener locks shown in FIG. 64a (and the
associated U & J-shaped
clips, FIGS. 62 and 65) utilize a spacial flex zone that radially extends
outside the barrel 528. This extended
31 flex zone increases tine length and, when combined with a distai tine bend
540, 542, results in a predetermined
angle of engagement
FIG. 64b graphically illustrates the tocking zone 1900 for the punctured
barrel clip locks shown in
FIGS. 64a and 67 (discassed later). The spacial flex zone 1902 for tine 1904
is outside the threaded barrel
1906. Of course, threaded barrel 1906 also provides the cyIindrical support
for tine 1904. The use of spacial
CA 02624761 2008-04-03
WO 00l79141 PCT1US99l13929
1 flex zone 1902 outside of threaded barre11906 enables an increase in tine
length 1904. When this increase
length is combined with secondary bend 1905 at the distal end of tine 1904, a
larger angle of engagement is
achieved on the specially configured bolt (FIGS. 68a, 68b and 2b). This
increases the fastening or clamping
ability.
FIG. 65 diagrammatically shows a J-shaped clip 570. Of course, as explained
earlier, clip 570 is a
6 U-clip with a truncated clip leg 571. Clip 570 includes clip leg 572 on
which is mounted, attached or formed
a nut and locking unit 573. This nut locking unit 573 is described in detail
in conjunction with FIGS. 66a-d
and 67. When clip 570 is placed on bored panel 574 by moving the clip in the
direction shown by arrow 575
and bore 576 of nut and locking unit 573 is coaxial with bore 577 on pane1574,
one ofthe specially configured
bolts 14, 15 (FIGS. 68a, 68b) may be utilized to lock the bolt on the locking
nut clip assembly and particularly
11 clip 570.
Nut and locking unit 573 is generally similar to the nut and locking unit 527
discussed earlier.
However, the locking unit element is moved from an intermediate position on
the nut threads to an axially
outbaard position near axial end 578 of nut 573.
FIGS.66a-d
diagrammaticallyillustratevariousstagesofmanufactureofthenutandlockingunit573.
16 In FIG. 66a, a thin wall cylinder 580 is formed, mounted or attached to
clip leg segment 572. In FIG. 66b, a
locking unit segment 581 is cut or formed from thin walled cylinder 580. In
FIG. 66c, tine segment 581 is
moved radially outward as shown by arrow 583 away from nut bore 576. In such a
configuration, tine segment
581 operates substantially the same as tine segment 530 in FIG. 63f. In FIG.
66, the tine segment has been
further divided into tine body 585 and distal tine end 586.
21 In FIG. 67, the nut and locking unit 573 is shown as having tine body 585,
tangential and radially
inwardly disposed distal tine end 586 and tine body 587 with a distal tine end
588. Thin walled cylinder 580 ~
has a nut thread 590 formed thereon. In this manner, when one of the specially
configured bolts 14,15 (FIGS.
68a, 68b) are coaxially disposed through panel bore 577 (FIG. 65) and the
botts are threaded on nut thread 590,
locking is achieved when distal tine ends 586, 588 fall within and abut one or
more of the locking faces in
26 longitudinal locking channel 9 or spiral locking channel 7 of bolts 14, 15.
Otherwise, the bolt moves rotatably
with respect to the nut and locking unit assembly 573 because the distal tine
end rides on opposing slope 38
(FIG.1 b) or atop bolt thread crest 30. The user can visually confirm whether
the distal tine ends have locked
onto the locking channels because the distal tine ends move in and out
appropriate cut-outs in the thin walled
cylinder 580. Visibility is enhanced due to these cut-outs.
31 Bolts 14, 15 illustrated in FIGS. 68a, 68b are described in detail earlier
herein.
FIG. 69 illustrates a perspective view of locking unit 600 which, when
utilized in connection with a
latch, enables the user to close the tines thereby enabling full rotational
and counter-rotational movement and,
alternatively, unlatch and fully exposing the tines and providing a locking
nut and bolt system in a locking
position. Elongated iocking unit 600 illustrated in FIG. 69 includes a
peripheral wall 601 which includes
CA 02624761 2008-04-03
WO 00/79141 PGTlUS99l13929
4].
1 planar wall segments 603, 604, 605 and 606 as well as adjoining wall
segments 607, 608, 609 and 610. As
described later in connection with the elongated locking unit shown in FIG.
75a, peripheral watl 601 may be
cylindrically formed. Peripheral wal1601 is elongated in that it has a
reasonable axial dimension. The axial
dimension of peripheral wall 601 is shown as dimension 612 in FIG. 71a
Planar wall segments 603,605 include cut-outs 613,615 which enable the
formation of dista! tine ends
6 616, 617. Peripheral wall segments 603, 605 also include radially extending
lips 618, 619. In order to provide
stops for the slidable latch (described later in conjunction with FIG. 70), a
stop button or control surface 620,
621 is provided on lips 618, 619. The other planar walls 604, 606 also include
radially extending lips. Wall
segments 607, 608, 609 and 610 also include radially extending lips along
respective axially outboard edges.
In FIG. 70, latohes 630,631 are moveably disposed on peripheral wall segments
603, 605. As shown
11 in FIG. 70, the latches 630, 631 fully expose tines 616, 617. The latches
are shaped complementary to the
~ peripheral wall. By fully exposing tines 616, 617, the tines and the latches
are in a locking position. The
locking position is shown in FIG. 74a. In order to provide a moveable latch
630, 631, the axially outboard
edges of peripheral wall segments 603,605 form either channels or channel
members. Latches 630,631 form
complementary channel members or complementary channels. In the iilustrated
embodiment, the radially
16 outwardly extending lips 618, 619 of peripherai wall segments 603, 605
establish channel members. The
channel is formed on the latch by an axially outboard and radialiy extending
surface 635 and a tangentially
extending surface 636. See FIG. 71a. In other words, each Iatch 630, 631
includes an axially extending latcli
wall 640, 641 (see FIG. 71a) and, that latch wall, in conjunction with radial
surface 635, and tangential
depeading surface 63 6, forms an inverted Irshaped channel at an axially
outboard position of the latch. The
21 radial lip 6ls of peripheral wall segment 603 forms the channel member
which is trapped within the channel
fonmed by latch wa[1640, radial latch wa11625 and tangential latch wall 636.
FIG. 71 a diagranmmatically illustrates the channel formed by the latcl-. In
addition, a lower radially
inward extending channel d.efining latch member 645 is provided.
FIG. 71 b shows latch 630 in a locking position fully exposing tine 616. Tlu
latch is moved far away
26 from the stop. As discussed in detail carlier, tine 616 is formed in a cut-
out 613 in peripheral wall segment
603. The tine prevents counter-rotational movement when co-acting with one or
more notches on the bolt
FIG. 72 shows elongated locking unit 600 disposed in a recess below nut end
face 650 of nut 651.
This recess is similar to other recesses discussed herein. See, for example,
FIG. 15.
FIGS. 73a, b and c diagrammatically illustrate the closing action of latch 630
with respect to distal
31 tine end 616. In FIG. 73a, latch 630 fnlly exposes distal tine end 616
thereby enabling the tine to lock onto
one or more notches in longitudinal locking channel9 shown on bolt 14 in FIG.
68a or spiral locking channel
7 shown on bolt 15 in FIG: 68b.
In FIG. 73b latch 630 has been moved in the direction shown by arrow 655 which
is near the capture
or closed position for distal tine end 616. In FIG. 73c, latch 630 is
completely capturing tine 616 theroby
CA 02624761 2008-04-03
WO 00/79141 PCT/US99/13929
42
1 placing the tine in a closed position.. When the tine is in a closed
position, the bolt may move in a rotational
and a counter-rotational with respect to the nut thread. Of course, in order
to fully place the elongat.ed locking
unit 600 in a fully closed position, latch 631 must be moved in the direction
shown by arrow 656 to capture
distal tine end 617.
FIGS. 74a, b and e diagrammatically show bolt 657 threaded onto nut 651. In
FIG. 74a, latch 630 fully
6 exposes distal tine end 616 and that tine has dropped into a notch in bolt
thread 658. Distal tine end 617 is also
fully exposed in a locking position due to the position of latch 631.
In FIG. 74b, latch 630 is in an intermediate position between locking position
(FIG. 74a) and the
closed position (FIG. 74c). Distal tine end 616 is only partially removed from
notch 660 on bolt thread 658.
In FIG. 67c, latch 630 has completely captured the associated distal tine end
thereby permitting bolt 657 to
11 rofate in either rotational or counter-rotational movement. Of course, when
distal tine end 617 falls - =ithin one
or more notches, counter-rotational movement is prohibited. FIG. 74c also
shows that latch 630 has beenC
moved in the direction shown by arrow 660 such that the latch abuts stop 620.
Various types of stops such as
buttons, walls, etc. can be utilized.
As a further enhancement of the latch, the axially inboard portion of the
latch may require the
16 formation of a channel within which the axially inboard edge 659 (FIG. 71
a) acts as a channel member. The
channel is formed by an axially inboard lip region of the peripheral wall.
FIGS. 75a and 75b show a perspective view of a cylindrical locking unit 662.
Cylindrical locking unit
662 includes a cylindrical peripheral wall 663 which has cut-outs 664, 665
within which are disposed distal
tine ends 666, 667. Elongated locking unit 662 also includes a radial lip 668.
21 FIG. 75b shows that radial lip 668 has been segmented and rolled radially
inward to form radially
inward lip segments 669 and 670. As discussed later, these radially inward lip
segments 669, 670 operate
channel members in order to guide the latch. These channel members 669, 670
inter-fit with certain defined
channels in the latch.
FIG. 76 shows a cylindrical latch 671 having a cylindrical wall 672 which is
complementary to
26 cylindrical peripheral wa11663. In other words, cylindrical latch 672 is
adapted to be inserted and inter-fit into
cylindrical wa11663. Cylindrical latch 671 includes a corresponding.cut-out
673, 674 for each distal tine end
666, 667. Latch wall 672 also includes channels defined as cut-outs 675, 676.
Radially inward lip channel
members 669, 670 (FIG. 75b) of the cylindrical locking unit are piaced within
channels 675, 676.ofthe latch.
Cylindrical latch 671 includes an axial end cap 678. Axial end cap 678
includes a slot 679 thereon. This slot
31 enables the user to turn the cylindrical latch with a screwdriver or other
thin tool.
FIG. 77 shows elongated locking unit 662 carrying cylindrical latch 671.
Distal tine end 666 is fully
exposed in ciit-out 664. This reveals that cylindrical latch 671 is in a
locking position.
FIG. 78 shows cylindrical locking unit 662 mounted in a recess in nut 680.
Cylindrical latch 671 is
inounted within cylindrical locking unit 662. The nut witb a recess is
described earlier.
CA 02624761 2008-04-03
WO 00119141 PCT/US99/13929
43
l FIG. 79 shows a perspective view of cylindrieal latch 671 without axial end
cap 678. Similar numerals
designate similar items.in FIGS. 76, 77 and 79.
In FIG. 80, cylindrical latch 671 has been placed in cylindrical locking unit
662. As shown in FIG.
80, radially inward lips 669, 670 form channel members on the locking unit
which cooperate with the
respective channels 675, 676 on the latch. As shown in FIG. 80, the
cylindrical latch 671 fally exposes distal
6 tine ends 666, 667 thereby providing a locking position of the latch and
locking unit 662. When the latch is
rotated in the direction shown by arrow 683, distal tine ends 666,667 are
trapped by latch cylindrieal wa11672
and are in a closed position.
FIG. 81 shows cylindrical latch 671 mounted within cylindrical locking unit
662. FIG. 82 shows
cylindrical locking unit 662 mounted in a recess in nut 680. Cylindrical latch
671 extends axially outboard
11 of end face 681 of nut 680. Of course, the distal tine ends 666, 667 extend
tangentially and radially inward
toward axial centerline 685.
FIG. 83 shows a specially configured bolt I with longitudinal locking channels
3 thereon. Nut 680
will be threaded onto the bolt throads of bolt 1. Nut 680 carries cyllndrical
locking unit 662 and cylindrical
latch 671.
16 In FIG. 84, bolt I has been threaded onto nut 680 and captures panels 687,
688,
FIGS. 85 and 86 show bolts 14,15 having a longitudinal locking ehannel9 and a
spiral locking channel
7, respectively. Longitudinal locking ebannel9 is disposed on boltthread
segment 11. Spiral locking channel
7 is disposed on bolt thread segment 13. Rather than using bolt 1 with
longitudinal locking channels 3, this
system described as the cylindrical locking unit 662 and the cylindrical latch
671 can be used with bolt 15
21 having the spiral locking channel 7.
~. FIGS. 87a and 87b show a cylindrical locking unit 662 similar to the
cylindrical locking unit shown
in connection with FIGS. 75a and 75b above. Distal tine ends 666,667 extend
tangentially and radially inward
toward the axial centerline 701 of cylindrical locking unit 662. Radially
inward channel members 669, 670
are formed from a portion of radially outward extending lip 668.
26 F1G. 88 diagraanmatically illustrates a cylindrical latch 702 having a
peripheral, cylindrical wall 703.
Peripheral wall 703 includes cut-outs 704, 705. In additional, peripheral wall
703 includes radially extending,
user actuatable control surfaces 707, 708. Control surfaces 707,708 extend
radially beyond the axial centerline
7 10 of cylindrical latch unit 702. In additional, peripheral wa11703 includes
a channel cut-out 711. Channel
cut-out 711 cooperates with channel member 669 in FIG. 87b in order to provide
guidance for the rotation of
31 cylindrical latch 702 with respect to cylindrical locking unit 662.
Basically, the latch stops at either end of
channel 711 based upon the size of ehanne1711 and the size of radially inward
channei members 669. Another
channel would be formed on the opposing portion of peripheral wall 703 to
accommodate radially inward
channel member 670. Alternatively, these channels and channel members may be
deleted in favor of radial
stops provided by the user actuatable control surfaces.
CA 02624761 2008-04-03
WO 00179141 44 PCr/US99/13929
I FIG. 89 shows a perspective view of cylindrical latch 702 inserted into
cylindrical locking unit 662.
Radially extending control surfaces 707, 708 enable the user to rotate
cylindrical latch 702 within cylindrical
looking unit 662. As an altemative embod'unent, radially inward lips 669,670
can be wrapped around the axial
edge 712 of cylindrical latch 702. In this manner additional guide channels
are provided for the latch. As
shown in FIG. 89, cylindrical latch 702 fully exposes distal tme ends 666,
667, thereby providing a locking
6 position for the cylindrical loaking unit 662 and the cylindrical latch 702.
When the cylindrical latch 702 is
moved in the direction shown by arrow 713, the peripheral wall 703 of latch
702 captures distal tines 666,667
and prohibits the distal tine ends from locking onto the locking surfaces of a
longitudinal locking channel 9
(FIG. 85) or a spiral locking channel 7 (FIG. 86).
FIG. 90 illustrates an end view of bolt 720 which carries in a recess on bolt
end face 721 the cylindrical
11 locking unit 662. Cylindrical latch 702 is disposed within the interior of
eylindrical locking unit 662. The user
actuatable control surfaces 707,708 are available for use. A bolt 722 is
threaded into nut 720. Distal tine ends ~
667 have fallen into the appropriate notch and the distal tine end 667 abuts
the locking face thereby preventing
counter-rotational movement of bolt 772 in direction 723 with respect to nut
720.
FIG. 91 diagrammatically illustrates a socket 730 having a female socket
fitting 731. Female socket
16 fitting 731 is sized to mate with male rachet fitting 732. Male fitting 732
is attached to a rachet 733. Ra.chet
733 is a eorr--?tional tool. FIG. 91 also shows a user actuatable control
surface 735 which is functionally
equivalent to control surfaces 707, 708 for cylindrical latch 702. By moving
control surface 735 in the
direction shown by arrow 736, the user can place the elongated locking unit
and the cylindrical latch in a closed
position, thereby enabling the user to move the bolt in a clockwise rotational
movement and a
21 eounterclockwise rotational movement via rachet tool 733.
~
FIG. 92 illustrates a plan view of the socket. Socket 703 and female fming 731
are diagrammatically
illusdated in FIG: 92. The oylindrical latch 777 having a user achmtable
control surface 735, 737 is also
shown. Tbe cylindrical latch has axially extending legs 738,739 that operate
in the same manner as peripheral
lafth wa11703 in cylindrical latch 702. In other words, when axial latch
panels 738, 739 trap d;stal tine ends
26 666, 667, the tool is in a closed position and the user can operate rachet
tool 733 in either a clockwise or
countercloekwise a-acuier. Tlte distal tine ends do not abut the locking face
of &e specially configured bolt
thereby permitting counter rotational movement. When the axial legs 738, 739
of cylindrical latch 777 are
circumferentially disposed away from distal tine ends 666, 667, the system is
in a locking position and the user
may only rotate the bolt with respect to the nut in a clockwise or single
rotational direction.
31 FIG. 93 diagrammatically shows the lateh system. Socket 730 is shown in
cross section and user
actuatable control surfaces 735,737 are visible. Cylindrical latch 777 has
axially depending legs 738,739 and
940.
CA 02624761 2008-04-03
WO 00l79141 PCT/US99/13929
1 FIGS. 94a and 94b diagrammatically illustrate a female threaded unit 750.
Female threaded unit 750
includes a bore 752 carrying a female thread 753. Female thread 753 is
complementary to a bolt. In FIG. 94b,
surfaoe 754 of female threaded unit 750 has a recess 755 formed therein.
FIGS. 95a and 95b illustrate a perspective and a side view of locking unit
760. In the illustrated
embodiment, locking unit 760 is shaped as a rectangle. However, the locking
unit could be cylindrical as
6 shown with respect to locking unit 662 in FIG. 75b. The shape of locking
unit 760 is complementary to the
shape of recess 755. Locking unit 760 includes a plurality of distal tine ends
761, 762, 763 and 764. These
distal tine ends protrude tangentially and radially toward the axial
centerline 765 formed within loeking unit
760. Locking unit 760 also includes a central bore 766. As explained later, a
specially configured bolt passes
through bore 766. If a cylindrical locking unit is utilimd, bore 766 would be
defined bythe eylindrieal locking
11 unit body. See FIG. 75b. The distal tine ends 761, 762, 763 and 764 are
formed by cut-outs in the locking unit
~. wall. One cut-out 768 is associated with tine 762.
FIG. 95b shows a side view of locking unit 760 and particularly distal tine
end 764. Distal tine end
764 is formed and operates in cut-out 770. The view in FIG. 95b is from the
perspeotive of section line b'-b
in FIG. 95a.
16 FIG. 96 diagrammatically illustrates female threaded unit 750 having
looking unit 760 installed in
recess 755. As shown, distal tine ends 761, 762, 763 and 764 protrude axially
toward the actual ceaterline of
nnt thmad 753 in the female unit 750.
FIGS. 97a, 97b and 97c show a specially configured bolt 772. Bolt 772 has a
bolt stem 773 with a
bolt thread 774. Bolt 772 includes a bolt head 775 defming a plurality of
notches thereon, one of which is
21 notch 776.
FIG. 97b is a top view from the perspective of section line b'-b" in FIG. 97a.
In FIG. 97b, bolt head
775 has a plurality of notches, one of which is notch 776. Notch 776 includes
a locking face 777 and an
opposing slope 778.
FFG, 97c shows bolt 772 and notches spaced circumferentially spaced around
bolt head 775. In other
26 words, notch 776 is spaced from notch 780 by an arc 781. The larger the are
781, the less digital locking action
is provided by the bolt head and the distal tine ends of the locking unit.
FIGS. 98a and 98b show a perspective view and an end view of the locking nut
and bolt system as a
"blind hole" design. In FIG. 98a female threaded unit 750 has bolt 772
threaded therein. 'Distai tine end 761
is locking into notch 776. Counter rotational movement in the direction shown
by arrow 790 is prohibited.
31 In other words, if bolt 772 were moved in direction 790 with respect to
female threaded unit 750, such counter
rotational movement would be prohibited. Alternatively, if bolt 772 were moved
in a direction opposite to
direction 790, the tine would move over the notch in the bolt head.
CA 02624761 2008-04-03
WO 00/79141 PGTNS99/13929
46
1 FIG. 98b clearly shows distal tine ends 761, 762, 763 and 764 acting in
respective notches for example
notch 776 in conjunction with distal tine end 761. Since all of the distal
tine ends have locked onto and abut
a respective lock face 36 (FIG. I b) of the respective notch, counter
rotational movement is prohibited.
As stated earlier, rather than a rectangular locking unit 760 a cylindrical
locking unit 662 shown in
FIG. 75b may be utilized. The operation of a cylindrical locking unit 662 is
substantially identical to the action
6 of rectangular locking unit 760.
General comments regarding the blind hole screw design follow. The blind hole
screw head grooves
must have one or more engagement walls. The angle of engagement should be less
than 90 degrees to prevent
the tine from disengaging from the screw head. The blind screw system permits
a screw to mechanically lock
into a blind hole or tapped hole. The blind hole screw system includes, in
some embodiments, tines
l I incorporated within recesses of any shape, polygonal or otherwise, to
prevent the rotation of the entire locking
mechanism. Compare FIGS. 95a, 107, 108, 110a,1 I Oc and 111a. The blind hole
screw system may include
tines mounted on non-recessed shapes that abut faces, shapes or other bolts to
prevent the rotation ofthe entire
locking mechanism. See FIG. l l la. FIG. 95a shows a recessed blind hole. Some
embodiments of the blind
screw include a tine mechanism with a seat with a hole through which a screw
passes prior to insertion into
16 the blind hole -- to which is attached a m5 ad of optional configurations
that include a locking meehanism or
series of locking mechanisms to engage in the grooves of the screw head, and
those locking mechanisms be
housed or secured in an assortment of recess designs or in the absence of a
recess, an assortment of fonns,
posts or objects, thereby preventing the seat from rotation around with the
screw. A anti-rotation protrusion
on the underside of a blind hole clip may key into a recess adjacent to the
blind screw hole. Other scraws may
21 be used to mutually prevent locking mechanism rotation. The blind screw may
include a screw that uses a
tapered or curvilinear surface on the underside of the screw head to deflect a
locking device into the screw~
head or locking mechanism so as to not damage or crush the tines. A self-
threading screw may be utilized.
In some embodiments of the blind screw, the system incorporates self tapping
screw technology or any other
thread form, including standard thread patterns, into the shank of the screw
to permit fastening into any
26 material. The head of the screw or bolt must carry grooves. See FIG. 104,
for example.
General comments regarding blind hole screws and clips aad removal tools
follow. In some
embodiments of the blind screw, the system is enabled to remove the locking
mechanism with atool or destroy
the locking mechanism of the blind or tapped screw during servicing without
damaging the threaded features
ofthe tapped hole, the threaded features ofthe screw itself, orthe looking
grooves incorporated within the bead
31 of the screw. Adhesives will actually "weld" a tapped screw in place under
of high temperature conditions
requiring drill taps to remove the screw. The locking mechanism may be
manufactured in any shape to
increase the number of tines or reduce the circumference of the space taken up
around the blind hole or to fit
the tines into an unusual recess dictated by the tapped hole and its
surrounding structures. Visual inspection
of the blind screw enables the user to visually inspect the locking feature of
the blind hole conflrming locking
CA 02624761 2008-04-03
WO 00/79141 PCT/US99/13929
47
1 engagement. In all embodiments of the blind screw, normal tools may be used
for installation. Drive heads
in the blind hole screw can be Phillips, hexlobe, Allen, standard screw drive
heads, Torx , etc., or any other
licensed proprietary drive. The "V" cuts in the blind hole clip allow proper
seating in a beveled blind hole or
a funnel shaped blind hole. See FIG. 106. Other embodiments ofthe blind hole
design are discussed below
in connection with FIGS. 103b-112c.
6 . FIG. 99 diagrammatically illustrates a removal tool 802 aboutto be placed
atop a locking nut and bolt
assembly 804. Top end 806 of removal tool 802 includes a female socket fitting
808 into which male socket
810 is inserted as shown by arrow 812. Male socket fitting 810 is part of the
conventional ratchet 814.
In the illustrated embodiment, removal tool 802 includes an outer cylinder 816
and an inner cylinder
or cylindrical body 818. Tle outer shape of cylinder 816 may be altered. It is
the inner cylindrical shape that
11 is important since body 818 rotates within cylinder 816. Also, the removal
tool may be configured exclusively
~ as cylindrical body 818 with the depressible legs as described herein.
Cylindrical body 818 has an open end
which is established by lower edge 820. Since cylindrical body 818 is shown in
a partial, broken away view,
only the rearward arcuate edge 820 is illustrated in FIG. 99. As discussed
later, if the forward portion of
cylindrical body 818 is rotated in the direction shown by arrow 824, the
rearward arcuate edge 820 moves in
16 the direction shown by arTow 826.
A plurality of depending legs axially extend beyond lower edge 820 of
cylindrical body 818. For
example, see legs 830 and 832. The depending legs 830, 832 are axially
moveable within guide channels
formed near lower edge 820. In the illustrated embodiment, these guide
channels are formed by lateral stops
834, 836 specifieally illustrated in connection with depending leg 832. In
order to limit radial movement of
21 the depending legs, a circumferential bar 838 traps the moveable depending
legs between the lateral stops.
~. Circumferential bar 838 is shown in connection with depending leg 830.
Other guides such as tongue and
groove structures may be utilized.
Each depending leg axially moves relatively independent of the other legs.
Also, each depending leg
is axially biased outward, beyond edge 820. In the illustrated embodiment,
this axially outward bias is
26 provided by a spring 840. To provide relatively independent movement for
each depending leg, spring 840
rests against one or more upper stops 842. Of course, each depending leg could
be axially biased outward on
its separate spring. Also, there are many mechanisms to capture single,
circumferential spring 840 while
providing for independent, axially outboard biasing of depending legs 830,
832. The claims appended hereto
are meant to cover these and other modifications.
31 Also, the removal tool may be much smaller than illustrated herein and the
proportional size of
depending legs relative to the locking body (discussed later) may be different
than illustrated herein. The
removal tool drawings are illustrative of the concepts discussed herein.
In operation, lower edge 820 of cylindrical body 818 is sized to mate closely
with locking body 850
and bolt thread 872. Nut 852 carries locking body 850 in a recess 854 below
the nut face. Locking body 850
CA 02624761 2008-04-03
WO 00/79141 PCT/[3S99/13929
48
1 includes a locking tine having a distal tine end 860 and a proximal tine
body 862. As described earlier, distal
tine 860 falls into one or more of a plurality of notches 870 on bolt thread
872. The locking body may be
configured as shown in many earlier figures.
Locking body 850 has a radially inward edge 851 that closely follows bolt
thread 872. Other than
interspace 853 between locking body edge 851 and bolt thread 872, locking body
850 closely matches the
6 circumferential size of bolt thread 872.
Since lower edge 820 of cylindrical body 818 is complementary to bolt thread
872, depending legs
830, 832 are also complementary and circumferentially disposed about ttie
radially outer periphery of bolt
thread 872. In operation, lower edge 820 is place atop bolt thread 872 and one
or more depending legs 830,
832 fall within the interspace 853 between locking body edge 851 and
boltthread 872. When cylindrical body
11 818 is rotated as shown in the direction 826 and depending leg 831 is
axially disposed in interspace 853, the
leg is forced against and radially outwardly moves proximal tine body 862. By
moving proximal tine body ~
862 radially outward, distal tine end 860 is moved out ofnotch 870. This
enables counterrotationai movement
of the bolt relative to the nut. This counter rotational movement can be
provided, in the illustrated
embodiment, by the appropriate directional movement of ratchet 814. In
summary, the removal tool unlocks
16 the nut from the bolt.
In the illustrated embodiment, cylindrical body 818 is coaxial with respect to
outer cylinder 816.
Rotational movement of cylindrical body 818 with respect to outer cylinder 816
is provided by moving user
actuatable control surface 880. User actuatable control surface 880 protrudes
radially outward through a hole
882 in outer cylinder 816. In the illustrated embodiment, hole 882 is a
pactial spiral such that when control
21 surface 880 is moved in the direction shown by arrow 824, cylindrical body,
818 moves rotatably and axially
with respect to the relatively stationary outer cylinder 816. Also,
cylindrical body 81$ is moved axially(
outward or downward as shown by arrow 825 based upon control surface 880
moving in partial spiral 882.
Of eouwse, hole 882 could be a circumferential are such that removal tool
moves rotatably and not axially with
respect to other cylinder 816. In this configuration, the user would place
body 818 on the locked bolt an rotate
26 the unit until one or more depending legs are forced into the interspace.
FIG. 100 diagrammatically illustrates
outer cylinder 816, inner cylindrical body 818, user actuatable control
surface 880 and bole 882.
FIGS. 101 and 102 diagrammatically illustrate certain operational aspects of
the depending legs. In
FIG. 101, depending leg 902 has been axially disposed in interspace 853.
Interspace 853 is formed between
radially inward edge 851 of locking body 850 and bolt thread 872. The terminal
end 903 of depending leg 904
31 rests on the exposed face of body 8S0 in a singular radial plane formed by
the axial end face of locking body
850. Terminal end 905 is also resting on the end face of locking body 850. As
illustrated, biasing spring 840
(or other biasing structure) is a exerting axially outward bias against
depending legs 907 and 904. The spring stopa, one of which is stop 842, limits
axially movement of spring 840. In contrast, the axially outward bias
of spring 840 maintains the axially outboard position of depending leg 902
into interspace 853.
CA 02624761 2008-04-03
WO 00/79141 PCT/[IS99/13929
49
I In FIG. 102, the removal tool has been rotated as shown in arrow 912.
Depending leg 902 has moved
proximal tine body 862 radially outward and hence has moved distal tine end
860 out of notch 870 on bolt
thread 872. Terminal ends 904 and 903 are riding atop locking body 850. In
this manner, the nut can be
removed with respect to the bolt.
FIG. 103a diagrammatically illustrates interspace 920 formed between locking
body 922 and bolt
6 thread 924. If a depending leg is placed in interspace 920 and moved in the
direction shown by arrow 926,
proximal tine body 930 moves radially outward which, in turn, moves distal
tine end 932 out of notch 934.
The locking nut and bolt combination shown in FIG. 103a is similar to the nut
configuration shown in FIGS.
12, 15 and many other figures herein.
With respect to nuts, bolts, clips, screws and removal tools, general comments
follow. In several
11 embodiments, the system facilitates servicing and removal of the nut or
clip by a removal tool, whereby the
C nut, bolt and locking meehanism can be reused. The system is enabled to
remove and replace a "clip lock"
during repairs or servicing while reusing the bolt or screw. With respect to
nuts with built-in removal tool,
general comments follow. A removal system is incorporated within the stamped
locking mechanism that will
not damage the stamped locking tines and allow reuse ofthe nut and locking
mechanism. The spacial flex zone
16 aIlows access for the removal tool in all embodiments discussed herein.
Further, the spacial flex zone allows
a removal tflol to be incorporated within the locking mechanism and, as such,
will not damage the locking tines
and will allow the re-use of the system.
FIGS. 103b-112c diagrarnmatically ipustrate various embodiments of the blind
hole locldng design.
FIGS. 103b and 103c diagrammatically illustrate tine configurations. Leg 2001
represents the proximal end
21 of the tine which is part of the tine supporting structure. With respect to
FIG. 103b, tine 2003 is straight. In
eontrast, tine 2005 has a distal end portion 2006 which is bent with respect
to a proximal tine portion 2008.
In some instances, this increases the angle of engagement and enhances the
fastening ability of the blind hole.
FIG. 104 shows bolt head 2010 having a recess 2011 which is adapted to receive
allen wrenches and
various other types of tools. Additionally, bolt head 2010 has the specially
configured locking zone 2012
26 similar to that shown in FIG. 2c.
FIG. 105 diagrammatically illustrates specially configured blind hole bolt
2014 having a plurality of
notches or channels 2016 on bolt head 2018. At the axially inboard end of each
channel 2016 is a tapered or
curvilinear surface 2020. This carved out surface on the underside of bolt or
screw head 2018 deflects the tine
into groove 2016. This limits or eliminates damage or crushing of the end of
the tine.
31 FIG. 106 diagrammatically shows a rectilinear tine support 2025. The base
2026 of tine carrying box
2025 includes V shaped cutouts 2028 spaced about through bore 2030. The V
shaped cutouts 2028 enable the
bIind hole clip 2025 to properly seat in a beveled blind hole (hole 755 in
FIG. 94b) or a funnel shaped blind
hole. The hole may be a truncated, frustoconical shape.
CA 02624761 2008-04-03
WO 00/79141 PCT/US99/13929
1 FIGS. 107-109 diagrammatically illustrate various shapes for the blind hole,
tine carrying sttucture.
In FIG. 108, tine carrying structure 2040 is a polygon or a hexagon. A
plurality oftines 2041 extend radially
and tangentially into the interior space in which the bolt head passes. Each
tine is mounted on a wall segment
2042.
With respect to FIG. 108, tine carrying structure 2040 is a truncated
geometric shape. In a similar
6 manner to the blind hole locking system in FIG. 107, tine 2041 is supported
and carried by wall 2042. The tine
has a spacial flex zone adequate to pass over the non-grooved portions of the
bolt or screw head.
In FIG. 109, tine carrying support structure 2040 has a lower, radially
disposed plate 2045 which lends
additional support to the structure. The term "radial" relates to axial
centerline of the bolt or screw.
FIGS. 1 I Oa-110c diagrammatically ilhlstrate a blind hole locking system
which is mounted atop a
11 structure 2050. The tine support structure 2040 supports and carries a
plurality of tines 2041. The bolt head,
2051 includes a plurality of locking zones 2052. The bolt passes through
throagh bore 2054 defined in base(.
2056. Further, tine support 2040 is further supported by base 2056. Base 2056
includes a depending leg 2057.
The tine support 2040 and base 2056 is mounted by any reasonable fastening
means (nails, screws, rivets,
bolts, etc.) to underlying structure 2050. Structure 2050 includes a bore
there through 2060 in order to permit
16 the stem of the bolt to pass through structure 2050.
FIGS.111 a-112c diagrammatically illustrate other types of blind hole
fastening mechanisms. In FIG.
11 la, tine carrying wall 2040 is curved. However, wall 2040 carries a
plurality of tines 2041 which interaat
with locking zones 2052 on bolt head 2051.
FIG. I Ilb shows that tine carrying wa112040 is connected to base 2056. Base
2056 includes a
21 depending leg 2071.
FIG. 111 c shows that tine carrying wall 2040 has a plurality of tines 2041
thereon. Tines 2041 each(,,
include a distal tine end 2006 which is offset at an angle with respect to
tine body 2008. A better illustration
of the offset of distal tine end 2006 is shown in connection with FIG. 103c.
FIG. 11 Id shows tine carrying wall structare 2040.
26 FIG. 11 le shows tine carrying wall 2040 coacting with bolt head 2051. Bolt
head 2051 includes a
pluraiity of grooves which defcne locking zones 2052.
FIG. l l lf shows that blind hole locking system and tine canrying structure
2040 is mounted on
structure 2050. Structure 2050 includes a truncated partial bore 2080 into
whicb is depending disposed leg
2071. See FIG. 111 b. Structure 2050 also includes bore 2060 to accommodate
the stem of the bolt.
31 FIG. 1 12a diagrammatically i llustrates tine carrying wal12040 with a
plurality of tines 2041 coacting
with locking zones 2052 on bolt head 2051. However, in order to provide a
stationary positioning of the tine
canying wall 2040, the structure includes or co-acts with posts 2090. FIG. I
12b diagrammaticaIly shows tine
carrying wal12040 and base 2056.
CA 02624761 2008-04-03
51
FIG. 112c shows tine carrying wall 2040 locked in place via post 2090 and
opposing post
2091. Post 2090 and 2091 arise from base 2050. Alternatively, post 2090 and
2091 may be
separate items that are affixed to base 2050. These items may be screws, bolts
or poles.
FIGS. 113 and 114 diagrammatically illustrate other embodiments of the blind
hole one-
way locking nut and bolt system.
In FIG. 113, blind hole bolt 2200 includes a common nut head 2202 atop an
axially
grooved blind hole bolt head section 2204. Threaded bolt stem 2210 depends
from blind hole bolt
head section 2204. In operation, the locking tines fall into and out of axial
grooves 2203 on blind
hole bolt section 2204. See also FIG. 115, tines 2301 operative with axial
bolt head grooves 2003.
Counter-rotational movement is prohibited when the locking face of the grooves
engages with the
tine. See FIGS. 98a and I I l a. The presence of common nut, bolt of screw
head 2202 atop blind
hole bolt head 2204 enables the user to tighten the fastener system onto the
underlying structure.
Of course, eommon nut, bolt or screw head section may be hexagonal or allen
wrench or straight
~ or phillips screwdriver driven. These systems are covered by the appended
claims.
FIG. 114 diagrammatically illustrates the combinatory common nut head and
blind hole
bolt head 2220 with the common unit 2223 beneath blind hole bolt head 2222.
Further, the blind
hole both head section 2222 includes an upper beve12224. The bevel facilitates
the locking tine
action.
FIG. 115 diagrammatically illustrates combinatory unit 2221 being threaded
onto bolt
stem 2306. Internal female threads 2308 of unit 2221 are complementary to stem
tlueads 2306.
Grooves 2203 enable the blind hole section 2222 to lock onto locking unit 2305
which carries
tines 2301. Tines 2301 extend tangentially and radially towards the axial
centerline of the unit.
Stop ring 2211 limits axially inboard movement of the combinatory unit 2221
inboard toward the
left of FIG. 115. Stop ring 2211 acts on axially outboard edge 2309.
Alternatively, stem 2306
ir 25 may extend axially beyond edge 2309 (and possibly well beyond the
locking unit wall). Further,
stop 2211 may limit axially inboard movement of a socket acting on nut surface
2221.
Segmenting rim 2211 acts as a stop to the common driver for the bolt stein.
Also the
blind hole bolt head section 2204, 2222 has a smaller radii than the common
nut, bolt or screw
head. This enables the common driver to easily grasp the common drive head.
The smaller size is
also useful in mechanically sensing the blind hold bolt head grooves.
What is claimed is