Note: Descriptions are shown in the official language in which they were submitted.
CA 02654179 2008-12-02
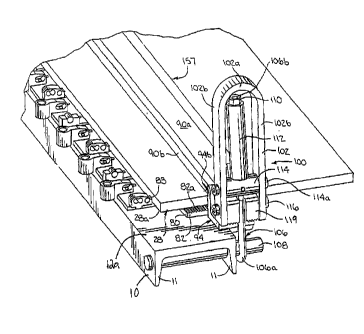
WO 2007/143120 PCT/US2007/012986
BELT FASTENING SYSTEM
Field of the Invention
[0001] This invention relates to a system for securing belt fasteners to
a belt
by fasteners such as rivets or the like for a belt splice used to join
opposite ends of a
conveyor belt to one another.
Background of the Invention
[0002] The belt fastener apparatus disclosed herein will be described in
conjunction with a hinged belt fastener such as shown in U.S. Patent
Nos. 3,742,557; 3,176,358 and 6,053,308. Features of the present invention may
also be used with the typical plate kind of belt fasteners as shown in U.S.
Patent
No. 3,141,346. The present invention is not limited to these particular belt
fasteners identified herein as other belt fasteners may be used which have
upper and
lower.plate portions secured to the top and bottom surfaces of a belt by
fasteners.
[0003] In the hinged belt fastener, an upper and lower plate are joined
by
central U-shaped hinge or loop portions. These adjacent hinge portions are
pivotally connected by a hinge pin to complete the belt splice between rows of
individual hinge belt fasteners along each of the opposite belt ends.
[00041 Preferably, these upper and lower plates are secured tightly to
and
generally flush against the respective top and bottom sides of the conveyor
belt by
rivet fasteners. Typically, the rivets have an upper, preformed head which
seats in a
recess or depression in the top of a plate or fastener and the opposite end of
the
rivet is upset or flared to form a lower rivet head which then is seated in a
recess or
depression in the lower plate of the belt fastener.
[00051 In a widely use conventional belt fastener system now in the prior
art,
the U-shaped hinge portions of a row or strip of hinged belt fasteners are
held in
alignment along the belt end by a gauge pin on the belt fastening apparatus.
More
- 1 -
CA 02654179 2008-12-02
WO 2007/143120
PCT/US2007/012986
specifically, the gauge pin is located through openings in a series of
upstanding
guide members fixed to the anvil base and through the loop portions of the
belt
fasteners aligned and located on the tool. In this conventional tool, there
are lower
anvil plates with rivet head forming bushings raised above the surface of the
lower
anvil plate to upset the lower hollow ends of the rivets into the shape of
rivet heads.
Usually, the rivets are attached to the lower end thereof to a pointed pilot
nail
which is driven through the belt carcass, and then the pilot goes into the
hollow
rivet forming bushings for cooperation with the rivet head forming bushings to
upset the thin, hollow cylindrical wall on the lower end of the rivet into the
lower
rivet head.
[0006] In some applications, the operator will individually align and
drive
the rivets one by one into the belt fasteners. Usually, a faster operation is
obtained
by using a guide block having a plurality of rivet receiving, through bores
each of
which is loaded with a rivet; and a common driver having a drive pin for each
of
the loaded rivets is driven to drive simultaneously the drive pins through the
bores
in the quick block and to drive the rivets through the upper and lower plate
apertures and to form the lower rivet heads.
[00071 Prior to driving the strip of belt fasteners in the tool, the belt
end was
is inserted into the gap between the upper and lower plates until the belt end
hit belt
stops integrally formed on the belt fasteners. Then, the belt is clamped in
this
inserted position by turning a pair of L-shaped handles which have screw
threads in
the clamping bar and in the lower plate of the tool so that the clamping bar
is
pushed down toward the anvil plates located at the lower side of the belt end.
[0008] After belt insertion and clamping and loading of the rivets in the
guide block, the common driver having the plurality of drive rods is hit with
a large
hammer or mallet to simultaneously drive the loaded pilot nails and rivets
through
the belt carcass and to bend down the upper plate of the belt fastener from an
upwardly, inclined position to a horizontal position flat against the top side
of the
- 2 -
CA 02654179 2008-12-02
WO 2007/143120
PCT/US2007/012986
belt. The rivets are driven through the belt carcass to cause the hollow ends
of the
rivets to be upset by the raised bushings to form the lower heads on the
rivets.
[0009] In some instances the belt clamp may not be effective in holding
the
belt securely fixed in the clamped position within the belt fasteners between
the
upper and lower plates thereof. Instead of using a belt clamp bar or the like,
as
described in U.S. Patent No. 6,053,308, the belt fastener's upper or lower
plates
may be provided with integral projecting teeth which can be driven into the
belt to
secure the belt end and to hold it in position as the rivets are being driven
through
the belt and upset to form the lower rivet heads. Although the above described
conventional tool operates quite successfully and has been employed in large
numbers for a number of years, it has been found that the clamping bar is not
as
effective as desirable. In some instances, some operators dispense with the
use of
the clamping bar and merely tack or nail the belt to an underlying board to
prevent
outward movement of the belt end from its original location inserted fully
between
the upper and lower fastener plates during the hammering and the pounding of a
succession of the belt fasteners in the strip. If the belt end withdraws or
otherwise
shifts from its fully inserted position, the rivet may be driven through the
belt
carcass at a location very close to the belt edge leaving insufficient belt
material to
resist tearing of this thin belt end portion.
[0010] Also, in this conventional belt fastening tool, the belt clamping
bar is
tightened against the belt by rotating a pair of screw handles that are
screwed into
the lower plate of the belt fastening tool; and sometimes the screw holes for
the
handles in the tool become filled with coal dust in a dirty coal mining
operation and
as such, is a source of maintenance problems and a hindrance to tool
operation.
Moreover, the clamping force obtained using the manual screw handles could be
greater in order to achieve a better clamping of the belt to the tool. In
addition to
low clamping force from the screw handles, the above-described clamping bar
may
deflect or bend vertically or horizontally, thereby lessening the force being
applied
to clamp the belt. Therefore, a need exists for an improved clamp bar
construction.
- 3 -
CA 02654179 2008-12-02
WO 2007/143120 PCT/US2007/012986
Finally, very long belt ends, e.g., several feet to five feet may be difficult
to insert
in the gap between the upper and lower plates prior to being clamped.
Summary of the Invention
[00111 In the illustrated embodiment, the belt end being inserted is
raised on
the tool by a belt guide surface positioned above the front edge of the lower
fastener plate; and hence it is easier to slide the belt end past this front
edge and
into the gap space between the upper and lower plates than in the conventional
tool.
In the preferred embodiment, this belt raised surface may also be formed with
an
improved gripping surface having an uneven surface such as formed by
serrations
or grooves forming lowered points or areas into which the bottom surface of
the
belt is pushed by the overhead clamp and projecting ribs or points which are
pushed
into the bottom surface of the belt. This improved gripping surface preferably
comprises parallel serrations running the length of the belt gripping surface
and
parallel to the belt clamping bar. The gripping surface may be constructed or
formed in various manners such as a roughened surface, non-parallel grooves or
an
additional textured material surface applied to this support clamp portion of
the
frame.
[0012] In one form, the raised surface has the gripping surface features
thereof on only the portion of the surface that is aligned under the clamp
with the
remainder of the surface being smooth so that hang-ups during sliding of the
belt
thereon into position between the fastener plates is kept to a minimum.
[0013] The raised surface may be formed on a riser plate that is separate
from the current anvil plates and base of the existing belt fastener
installation tool.
In this manner, the riser plate can be offered as an add-on for being fastened
to the
anvil plates of existing tools.
[0014] Another alternative is to form the anvil plate and riser plate as
a
unitary, one-piece, plate member. In this alternative, the riser plate portion
can
- 4 -
CA 02654179 2008-12-02
have a smooth upper surface with the base having a raised surface
substantially
level therewith and adjacent thereto with the base raised surface being
provided
with gripping features or structure such as ridges or serrations. In this
instance, the
base is preferably an extrusion for forming the integral gripping surface
features
thereof.
[0015) Alternatively, the extruded base can include the entire raised
surface
integrally formed therewith. In this form, the base raised surface includes
gripping
structure under the clamp and the remainder of the surface extending toward
the
fasteners is smooth to minimize belt hang-ups as the belt is inserted between
the
fastener plates. The anvil plates are separate components from the raised
surface
that is integrally formed with the base in this form.
[0016] Additionally, the gripping or clamping of the belt to resist
movement
of the belt during a fastener application operation may be enhanced or
provided by
a more strong or rigid construction for the clamp bar. The preferred overhead
clamp bar is a solid bar of metal in contrast to the hollow, thin wall metal
tube used
heretofore. The solid bar illustrated herein has an inverted T-shape with an
upstanding central portion and a lower horizontally extending lower portion to
provide increased cross-sectional thickness to resist bending or deflecting in
both
the vertical and horizontal directions.
[0017] In accardance with another aspect, the illustrated belt fastener
applying apparatus is provided with improved belting handles or devices for
applying greater locking or clamping force to each of the opposite ends of the
overhead clamp bar than heretofore provided by threaded locking handles
heretofore used in the prior art and as disclosed in U.S. Patent No.
4,344,213.
Preferably, this is achieved by use of over-center toggle locking handles
cooperating with opposite ends of the clamping bar and the stationary frame of
the
belt fastener tool. The over-center toggle locking mechanism-may be operated
- 5 -
CA 02654179 2008-12-02
WO 2007/143120
PCT/US2007/012986
quickly with a simple arcuate swinging motion in contrast to the slow
rotations of
screw handles heretofore used to screw the clamping bar tightly against the
belt.
Brief Description of the Drawings
[0018] Figure 1 is an elevational, sectional view of a conventional,
prior art
belt fastener applying system;
[0019] Figure IA is a perspective view of a prior art, hinged belt
fastener
with a-contoured, outboard end on the lower plate;
[0020] Figure 2 is an end perspective view of the illustrated
embodiment of
the belt fastener applying system of the present invention;
= [0021] Figure 3 is a front perspective view of the belt fastener
applying
system of Figure 2 having a guide block mounted thereon;
[0022] Figure 4 is a side elevational view of the illustrated
embodiment
showing a contoured or scalloped surface on the raised guide bar to fit into
scalloped, outboard edges on the belt fasteners;
[0023] Figure 5 is a side elevational view of the illustrated
embodiment of
Figure 2;
[00241 Figure 6 is a photographic view of an alternative belt
fastener
applicator system showing a separate riser plate fastened to an underlying
anvil
plate which is, in turn, secured to a base;
[0025] Figure 7 is a view similar to Figure 6 showing an existing
belt
applicator tool including the separate riser plates fastened thereto;
[0026] Figure 8 is a photographic view of the riser plate fastened to
the
existing anvil plate;
[0027] Figure 9 is a photographic view of the riser plate fastened to
the anvil
plate via rivets in apertures of edge projections of the riser plate;
- 6 -
CA 02654179 2008-12-02
WO 2007/143120 PCT/US2007/012986
[00281 Figure 10 is a photographic view of the separate riser plate;
[00291 Figure 11 is a photographic view of the existing anvil plate;
[00301 = Figure 12 is a photographic view of a single piece anvil and riser
plate member;
[00311 Figure 13 is a photographic view of the anvil and riser plate
member
of Figure 12 showing the offset of the riser plate portion to the anvil plate
portion
and the locator edge projections extending from the riser plate portion over
the
anvil plate portion;
[00321 Figure 14 is a perspective view of the unitary or single piece
anvil and
riser plate member secured to an extruded base and showing gripping ridges
formed
on the extruded base under the clamp bar;
[0033] Figure 15 is an enlarged perspective view similar to Figure 14
showing a step on the extruded base for supporting the riser plate portion of
the
single piece anvil and riser plate member adjacent to the gripping ridges of
the
extruded base;
[00341 Figure 16 is a perspective view of the belt applicator system of
Figures 14 and 15 showing a plurality of single piece anvil and riser plate
members
secured to the extruded base;
10035] Figure 17 is a alternative belt applicator system showing an
extruded
base having the raised surface formed integrally thereon with the raised
surface
including the gripping ridges under the clamp bar and a smooth surface portion
adjacent the separate anvil plates secufed to a recessed surface of the
extruded base;
100361 Figure 18 is a enlarged perspective view similar to Figure 17 with
the
conveyor belt removed to show the edge scalloped projections integrally formed
on
the extruded base to extend from the raised surface over the recessed surface
thereof; and
=
- 7 -
CA 02654179 2008-12-02
WO 2007/143120 PCT/US2007/012986
[0037] Figure 19 is an elevational view showing the separate anvil plate
secured to the recessed surface adjacent to the smooth surface portion of the
raised
surface of the extruded base.
Detailed Description of the Preferred Embodiment
[0038] Prior to describing the preferred embodiment illustrated in
Figures 2-
5, a general understanding of the conventional, prior art tool illustrated in
Figure 1
and as shown and described in the Appendix (attached hereto) will be first
provided. The tool of Figure 1 generally includes a base 10 made from a length
of
steel channel and having a generally horizontal web portion 12 which supports
a
plurality of anvil plates 14. The width of the belt 28 determines the minimum
length
of the base 10. Belts typically have widths of, for example, 24, 42, or 60
inches.
100391 Apertures 16 and 18 are formed in the anvil plate 14 at locations
which correspond to countersunk holes or perforations 20 and 21 in the belt
fasteners 22, and also are formed in the underlying horizontal portion 12 of
the base
respectively. Each of the apertures 16 in the anvil plates is substantially
centered in
a button or rivet head forming bushing 24 which comprises a generally
circular,
upwardly extending rim. As described in greater detail below, each of the
apertures
and bushings 24 cooperates with one of the rivet assemblies 26 as the rivet
assemblies are driven downward to form the lower rivet heads.
[0040] Each of the hinge-type fasteners 22 includes an upper plate 32 and
a
lower plate 34 which are joined by a generally U-shaped center hinge loop
portion 36 adapted to interfit with an opposite U-shaped portion of belt
fasteners on
an adjacent belt end (not shown) to form a hinge structure to receive a hinge
pin
(not shown). The countersunk holes or apertures 20, 21 for receiving rivets
are
formed in a predetermined pattern through each fastener plate 32, 34, the
upper
fastener plates 32 being countersunk on their top surfaces and the lower
fastener
plates being countersunk on their bottom surfaces. The preferred fastener
plates
- 8 -
CA 02654179 2008-12-02
WO 2007/143120 PCT/US2007/012986
each have five recessed apertures arranged in a W-shaped pattern. The
fastener-receiving apertures or perforations are located about one-half inch
from an
adjacent perforation. The preferred fastener plates have an inboard, contoured
edge
34a (Figure 1A) preferably in the form of a scalloped edge for the reasons
described
in U.S. Patent No. 6,053,308.
[0041] Prior to installation, the upper plates 32 are upwardly inclined
relative
to the lower plates 34 via the U-shaped portions 36 to facilitate insertion of
the belt
end 44 between the upper and lower plates. Installation of the rivets 46 (FIG.
1)
pushes the upper plates 32 downward, flexing the U-shaped portions 36 so that
the
belt end 44 is squeezed between the upper and lower plates.
[0042] The fasteners 22 are maintained in a predetermined position by
engagement of the countersunk portions of the apertures 21 of the lower
fastener
plates 34 with the upwardly projecting bushings 24 on the anvil plates 14,
which
assist in forming the lower rivet head. The strip of fasteners are locked into
place
at their inboard side by a gauge pin 50 which extends through the U-shaped
portions 36 of the belt fasteners 22.
[0043] Pressure is applied to clamp the belt 28 in position by a clamp 56
which herein comprises a generally horizontal clamping member 57 with screw
handles 59 at each end for applying downward pressure to the clamping member.
The illustrated clamping member 57 is a bar in the form of a length of square
tubing, e.g., having a thin wall of about 0.125 inch thick. Particularly, for
large belts
of the five foot width, this tube clamping member becomes deflected or bent at
the
middle portion of the belt in either or both of the vertical and horizontal
directions
thereby reducing its effective clamping force. Each screw handle 59 comprises
a
generally L-shaped rod having a threaded portion 118 at its lower end and a
nut 120
fixed to it above the threaded portion and inside the hollow tube. The
threaded
portions 118 of the screw handles are received in threaded bores 122 in the
anvil
plates 14 at the corners of the base. Clockwise rotation of the screw handles
59
-9-
CA 02654179 2008-12-02
WO 2007/143120
PCT/US2007/012986
through the nuts 120 and further into the threaded bores forces the clamping
member downward to clamp the belt in place against the web portion 12 of the
channel base 10. In some applications, such as in a coal mine, the threaded
bores
become filled or partially filled with coal dust or other debris and
necessitate a
cleaning to remove the coal dust accumulated therein.
100441 To rivet a row of fasteners 22 to the belt 28, the belt end 44
is inserted
between the upper and lower fastener plates 32 and 34, and rivet assemblies 26
are
driven downwardly through the perforations 20 in the upper fastener plate,
through
the thickness of the belt end 44, and through the perforations 21 in the lower
fastener plate.
100451 Referring to FIG. 1, each of the illustrated rivet assemblies
26
includes a rivet 46 having a head at its upper end and a hollow lower end for
receiving the upper end of an interfitting detachable pilot nail 60. The pilot
nail has
a sharpened point at its lower end for piercing the belt material and guiding
the
rivet assembly through the perforations 20, 21 in the fasteners and apertures
in the
anvil plates 14. The pilot nail has an integral upwardly extending pin portion
at its
upper end which fits within the hollow lower end of the rivet 46, and an
integral
annular shoulder 66 formed just below the pin.
100461 As a rivet assembly 26 is driven downward, the shoulder 66
seats in
the bushings 24, arresting the downward progress of the nail 60. As the lower
end
of the rivet 46 passes through the perforation 21 in the lower fastener plate
34, the
upper surface of the button 24 flares the hollow lower end of the rivet 46
outwardly
as described in U.S. Pat. No. 4,258,461. As described in greater detail below,
the
rivet assemblies 26 are aligned and guided as they are driven by a plurality
of
substantially vertical bores 70 in a guide block assembly 78.
[00471 An impact distributing driver, which is either manual or power
driven, is employed to transmit impact force such as from a single hammer 75
simultaneously to a plurality of rivet assemblies disposed within the bores 70
of the
- 10 -
SUBSTITUTE SHEET (RULE 26)
CA 02654179 2008-12-02
WO 2007/143120
PCT/US2007/012986
guide means 78. The guide block 72, preferably made of an elastomer, is part
of
the guide means or block assembly 78 supported in a rigid frame 91 and
preferably
includes alignment surfaces 79 for maintaining the guide block in one of a
plurality
of predetermined positions with respect to the base 10. The preferred driver
74
includes an impact upper end or cap 76 for receiving hammer blows and a
plurality
of downwardly extending drive pins or rods 77 which are fixed at their upper
ends
to the cap and adapted to be received within the bores 70 of the guide block
72. The
drive rods are preferably arranged in a group corresponding to a group of
perforations 20, 21 in a single fastener plate 32, 34 so that all of the rivet
assemblies 26 for a particular fastener 22 may be driven simultaneously.
[0048] Referring now to the illustrated embodiment which is shown in
Figures 2-5, the belt end is inserted into the gap between the upper and lower
plates 32 and 34 and is positioned on a raised belt surface 80 (Figure 5)
which
raises the belt up to at least the level of the top side of the lower fastener
plate 34,
preferably to a height above the upper front edge 34a (Figure 1) of the lower
plate
34 so that when the belt is pushed into the gap, the lower corner 28a of the
belt end
will not abut against this edge 34a on the lower plate and interfere or even
stop the
sliding insertion, as may occur in the prior art system illustrated in Figure
1. Herein
this raised belt guiding surface 80 (Figure 5) is formed on a plate 82 which
is a
horizontally oriented plate fastened to the top side of the web portion 12a of
the
channel base so as to provide an extra thickness from that shown in Figure 1
of the
prior art. Thus, the raised surface 80 causes the belt end to slide more
easily across
the lower fastener plate 34 and rivet head forming bushings 24 and into
abutment
with a belt stop 83 (Figure 2) thereby limiting any further insertion of the
belt into
the space between the upper and lower fastener plates.
[0049] In the illustrated embodiment in Figures 2-5, this belt raised
surface 80 is also provided with an improved gripping or mechanical bite
surface 82a in the form of an uneven surface having grooves, serrations 84
(Figure 5) and/or raised points and ribs 85. Herein, grooves 84 between ribs
- 11 -
SUBSTITUTE SHEET (RULE 26)
CA 02654179 2008-12-02
provide some lowered areas into which the lower belt surface may be pushed and
the ribs 85 provide some upward projections which are pressed into the lower
surface of the belt In the illustrated embodiment shown in Figures 2-5, the
gripping surface 82a is part of the raised surface 80 and comprises this
series of
parallel serrations or grooves and ribs running the length of the belt clamp
surface
and being parallel to the belt clamping member 157. Preferably, the belt
bottom
surface is pressed with sufficient pressure to conform to the contour ribbed,
gripping surface 82a. A number of different mechanical gripping surfaces 82a
may
be used, such as a roughened surface, non-parallel grooves, cross grooves,
such as a
knurled surface, or an attached, separate roughened substrate to provide an
improved grip with the clamping bar to hold the belt end against shifting
movement, particularly during the hammering of the succession of the belt
fasteners and rivets into position along a tong length of belt. For example,
the belt
may be up to five feet in width.
[0050) In accordance with
another aspect, the belt clamping effectiveness is
improved over the prior art such as illustrated in Figure 1, by providing a
stronger
and more rigid construction for the clamping member 157 from that of the
hollow,
metal tube 57 (Figure 1) having about a 1/8 inch thick metal wall thickness.
As
previously explained, when the screw handles 59 are tightened or during the
rivet
attaching of the fasteners.to the belt, the Center portion of this hollow,
thin wall
metal tube may bend or be deflected by the belt particularly at the center
thereof in
either or both of the vertical and horizontal directions_ In the illustrated
embodiment of Figures 2-5, the clamping member 157 is provided with a
considerably thicker or larger cross-sectional portion preferably in the form
of a
contoured, solid bar 90. This illustrated solid bar has a Contoured shape in
the form
of an inverted T with an upstanding central solid portion 90a (Figure 2) and a
lower
horizontally extending flange portion 90b. The T-shape bar provides an
increased,
metal cross-sectional thickness over that of the hollow tubes shown in Figure
1 to
resist bending and flex deflection in both the vertical and the horizontal
directions.
- 12
CA 02654179 2008-12-02
WO 2007/143120
PCT/US2007/012986
Herein, both upstanding portion 90a and lower, horizontal flange portion 90b
have
rectangular cross-sections which could be other shapes than rectangular. The
bottom side of the larger width horizontal bar portion 90b engages the top of
the
belt and pushes the belt down with sufficient clamping pressure to have the
mechanical grip with the underlying ribbed surface 82a at the underside of the
belt.
[00511 The clamping member 157 is guided for vertical movement between
an upper position and a lower gripping position by a pair of upstanding end
guides
in the form of angled shaped bodies 94 (Figures 2 and 4), which have a
vertical
slot 94a in a vertical flange 94b of the body. Vertical side walls 94c at the
slot
define a pair of spaced, vertical guide walls against which the vertical sides
90c of
the lower horizontal, flange portion 90b of the clamping bar may abut and
slide.
The guide body 94, in this instance, is secured by fasteners to the channel
base 10.
[0052] In accordance with another important aspect of the embodiment
illustrated in Figures 2-5, the screw handles 59 had been replaced by improved
locking handles or devices which provide a greater locking or clamping force
for at
the opposite ends of the clamping bar 90 than heretofore provided. As will be
described in detail below, an over-center toggle locking device having a U-
shaped
handle 102 which operates an over-center toggle clamp 100 to push the clamping
bar 90 downwardly to cause a mechanical bite of the serrated surface 82a on
the
raised portion 82 which is located immediately beneath the clamping bar. Also,
the
over-center toggle clamp is faster in terms of its clamping operation in that
the
handle 102 is swung only through a small arc to effect the belt clamping, as
will be
explained in greater detail below, rather than the slow rotations of the screw
handles to screw down the prior art clamping device.
100531 Herein, not only is a greater clamping force being applied to
opposite
ends of the clamping bar 90 than has been provided by the screw handles 59,
used
in the Figure 1 system, but also the clamping operation is much faster than a
number of slow rotations of each of the screw handles 59 needed to tighten the
- 13 -
CA 02654179 2008-12-02
WO 2007/143120
PCT/US2007/012986
clamp tubular bar which is used in the Figure 1 embodiment. This faster
operation
is achieved by pivoting of over-center clamps 100 having pivot handles 102
through an arc of 180 or less to operate a toggle mechanism that provides a
large
mechanical advantage and hence results in a larger force being applied to
clamping
bar 90 when it is engaging and pushing on the upper side of the belt.
[0054] As seen in Figures 2-5, the over-center toggle clamp 100
illustrated
herein comprise a long, vertically extending, toggle rod 106 which has a lower
hooked end 106a (Figures 2 and 5 in the shape of a J) for hooking engagement
under a horizontally extending anchor pin 108 which is secured to the channel
base 10. Herein, the anchor pin is a round shaft extending through holes in
the
depending flanges 11 of the channel base. The toggle rod 106 extends
vertically
from its lower and hooked end to an upper end 106b (Figures 2 and 5) located
adjacent, a curved upper end 102a of the U-shaped handle 102. The upper
end 106b of the toggle rod is formed with a screw thread and has one or more
nuts 110 threaded thereon. The nuts 110 bear down against the top of a coiled
compression spring 112 which encircles the upper portion end of the toggle
rod 106. The compression spring is a heavy coiled spring which when compressed
will provide a biasing, clamping force to the clamping bar 90 when the toggle
handle is positioned in its over-center locking position.
[0055] The spring 112 is located between the upper nut 110 and a
central
located roller shaft 114 which is journaled at its opposite ends by pins 114a
to the
opposite legs 102b of the U-shaped, over-center toggle handle 102. In its
unlocked
position, the pivoted handle may extend to the left and counterclockwise
direction
as viewed in Figure 2. The lower end of the U-shaped handle 102 is pivotally
mounted on the ends of the clamping bar 90 for pivoting about a pivot axis
through
the center of a horizontal pivot pin 116 which spans a pair of spaced blocks
or
lugs 119, 121 which are fixedly connected to or integral with the opposite
ends of
the clamping bar 90. The lugs are located on opposite sides of the lower
portion of
the toggle rod 106 which extends vertically within the slot formed between the
lugs.
- 14 -
SUBSTITUTE SHEET (RULE 26)
CA 02654179 2008-12-02
WO 2007/143120
PCT/US2007/012986
This allows the toggle rod 106 to pivot and to move back and forth across at
the
axis of rotation of the pivot pin 116 about which the entire U-shaped handle
pivots.
[0056] In the open and non-clamping position to allow insertion or
removal
of the belt end, handle 102 and the upper end 106b of the toggle rod 106 will
be
pivoted outwardly away from the belt and the lower hooked end 106a of the
toggle
rod will be slightly lowered from engagement with the anchor pin 108. When the
handle is pivoted upwardly to turn about the central axis through its pivot
pin 116,
the lower hooked end 106a will rise slightly and be tightly hooked onto the
horizontally extending anchor pin 108 on the channel base 10 and with further
upward pivoting of the handle, the nut 110 at the top of toggle rod 106 will
compress the compression spring 112 between the nut 110 and roller 114 until
the
handle 102 reaches the vertical, center position where the handle is straight
vertically. In this position, the toggle rod 106 is also positioned in a
vertical plane
with the spring being compressed the maximum. As the handle 102 is continued
to
be pivoted through this center position, the spring then slightly expands
causing the
over-center action where there will be a slight lengthening of the compressed
spring. The spring force from the compressed, over-center spring is providing
a
downward force to the handle to pivot it further downward toward the belt. The
compressed spring pushes down on the roller 114, roller shaft 114a, handle
legs 102b, pivot pin 116, and lugs 119 and 121 and attached bar 90 and thereby
pushes down the clamping bar 90 to clamp the belt end. Stop surfaces may be
formed at various locations to stop the rotation of the handle in this over-
center
locking position, as shown in Figure 2. To release the clamping pressure, the
handle is pivoted outwardly from the belt and across the vertical center
position to
where the lower J-shaped end of the toggle rod is spaced slightly from the
anchor
pin 108. The clamping bar 90 and its attached over-center toggle clamps 100
may
be detached from the channel base 10 by swinging the handles 102 downwardly
until hooked ends 106a of the toggle rod 106 may be pulled and swung clear of
their respective anchor pins 108 on the channel base. Then the clamping bar
and its
- 15 -
SUBSTITUTE SHEET (RULE 26)
CA 02654179 2008-12-02
WO 2007/143120
PCT/US2007/012986
loosening toggle clamps may be lifted and separated from the channel base for
separate transfer from the location of the finished belt splice.
[00571 Although the hinge belt fasteners may have various shapes and
configurations, particularly along the inboard edges thereof, a contoured
surface in
the shape of scalloped configuration (Figure IA) may be used. U.S. Patent
No. 6,053,308, discloses a number of advantages for the hinge fastener shown
in
Figure IA, having the contoured edge on the lower plate. For instance, removal
of
some of the web of metal at the outboard edge between the adjacent countersunk
apertures for receiving the rivets allows the belt fastener to provide a lower
profile
for the fastener and this profiled contoured end sinks deeper into the belt
carcass
under the force from the rivets so that scrapping devices do not catch the
scalloped
edges of the fasteners.
[0058] Referring now more specifically to the scalloped, outboard edge
34a
of the lower plate 34 in Figure IA, it comprises a pair of rounded, projecting
portions 34b that are merged by curving into a central, reversely curved
depression
portion 34c located between the curved projecting portions 34b. The projecting
portions have the rivet receiving apertures therein.
[0059] To provide additional locating surfaces for these lower plates
34 having the
scalloped, inboard edge 34a, scalloped locating surfaces may be provided on
the anvil base
to mate with the fastener scalloped edges when the lower plates are nested on
the
bushings 24 on the anvil plates 14a. To this end, a vertical end wall 82d on
the raised
plate 82 on the anvil base 10 is provided with a mating scallop surface for
each of the
scalloped, inboard edges of the strip of belt fasteners being riveted to the
belt. More
specifically, the scalloped fasteners may have their scalloped edges mated to
the scalloped
wall 82d of the fixed plate 82 to minimize or prevent the lateral shifting of
the inboard
edges 34a relative to the hinged portions 36 being held by the gauge pin 50 at
the opposite
end of the fasteners. As best seen in Figure 3, the scalloped surface on the
plate end wall
82d comprises spaced, curved projections 130 to fit into the depression
portions of the
lower plates and spaced curved depressions 131 to receive the curved
projecting portions
- 16 -
SUBSTITUTE SHEET (RULE 26)
CA 02654179 2008-12-02
WO 2007/143120 PCT/US2007/012986
the lower plates 34 of each of the string of belt fasteners. Thus, the
scalloped edge on the
tool provides an extra point of support and guidance for the fasteners to
avoid a shifting of
a lower plate 34 on the tool during the rivet fastening operation and a miss
driving of a
rivet.
[00601 Figures 6-11 are directed to a variation of the embodiment shown
in
Figures 2-5. In this instance, a separate riser plate 200 similar to plate 82
is provided.
However, as can be seen in Figures 6-10, the riser plate 200 is not provided
with the
serrations or ridges 84, and instead has a smooth, top surface 202 thereof. In
this form, the
riser plate 200 is adapted to be used with the current, existing belt fastener
installation tool
commercially provided by applicant's assignee herein. As such, the riser plate
200 is an
add-on component that can aid in the installation process in a manner similar
to that
described for plate 82.
(00611 Namely, the riser plate 200 is fastened to the underlining anvil
plate 204
which is secured to and supported on the steel channel base 206. As shown, the
end wall
208 of the riser plate 200 is disposed adjacent to the rivet forming bushings
210 of the
anvil plate 204. The riser plate 200 is provided with a thickness such that
the height of its
end wall 208 is sufficient such that with the fasteners 22 secured in position
on the anvil
plate 204 as previously described with respect to the installation tool of
Figures 2-5, the
insertion of the conveyor belt 28 between the fastener plates 32 and 34 can
occur without
having the end of the conveyor belt abut or catch against the lower plate 34
of the belt
fasteners 22. In other words, the thickness of the riser plate 200 is
generally greater than
that of the lower plates 34 of the belt fasteners 22 such that the upper
surface 202 of the
riser plate 200 is raised to such an extent that the leading end of the
conveyor belt 28 will
not need to be lifted over the lower plates 34 of the belt fasteners 22 to be
fit between the
fastener plates 32 and 34.
[0062] In addition, it can be seen that the end wall 208 has generally
annular edge
projections 212 extending therefrom generally toward the bushings 210 of the
anvil plate
204. These scalloped projections 212 serve substantially the same purpose as
the
scalloped wall 82d of the plate 82. In this regard, the projections 212 fit
into the recesses
34c in the inboard edges 34a of the fastener lower plates 34. Accordingly, the
fastener
plates are now located securely not only at their outboard side at their loops
36 via the
- 17 -
CA 02654179 2008-12-02
gauge pin 50 extends, but also at their inboard side by the projections 212
configured to be
snugly received in the lower plate recesses 34c.
[00631 The top surface 202 is also smooth across its entire extent In this
manner,
the riser plate 200 differs from the plate 82 in lacking any serrations or
ridges 84, as
previously mentioned. While not having the improved gripping action provided
by these
gripping features, the plate 200 also avoids having structure that could cause
hang up
during sliding of the belt along the belt surface 202 during belt insertion
between the
fastener plates 32 and 34.
(0064) Figure 7 shows the riser plate's 200 secured to the anvil plate in a
conventional belt fastener installation tool including a .1-screw clamp
actuator 214 with a
hollow, clamp bar 216 having a square shape in cross-section, as previously
described.
[00651 Figure 10 shows thc separate riser plate 200 that is configured as
an add-on
for the existing tool, and particularly, to be fastened to the anvil plate 204
of Figure 11 that
is used with the existing tool. Figure 8 shows one means of fastening the
riser plate 200 to
the existing anvil plate 204. Similarly, Figure 9 shows an alternative means
for securing
the riser plate 200 to the existing anvil plate 204 via rivets 218 extending
through the
apertures 220 of the annular projections 212 of the riser plate 200.
(0066) Figures 12-16 are directed to an alternative where the previously
described
anvil plates 14, 14a and 204 arc formed integrally as a unitary component with
the riser
plates 82 and 200, respectively. In Figures 12 and 13, it can be seen that
there is an anvil
plate portion 222 that is offset from the raised riser plate portion 224 in
the unitary anvil
and riser plate member 226. This component is advantageous in that it avoids
the need to
machine the scalloped projections 228_ In this form, the plate member 226 is
preferably of
a steel material that is formed on a punch press without the need for
subsequent machining
of the locating projections 228 thereof. As can be seen best in Figure 13,
these projections
228 extend from shoulder or transitional wall 230 of the plate member 226
outwardly
from riser plate portion 224 toward and above the offset, recessed anvil plate
portion 222
with the projections 228 extending down to the top surface of the anvil plate
portion 222.
- 18 -
CA 02654179 2008-12-02
WO 2007/143120
PCT/US2007/012986
[0067] The plate member 226 is adapted to for use on a belt fastener
installation
tool 232, as shown in Figs 14-16. In this tool 232, the base 234 is an
extruded component
such as of aluminum and has a raised portion 236 and a lowered or recessed
portion 238.
The raised portion 236 has a web 240 the upper surface 241 of which includes
serrations
or ridges 242 along the portion thereof under clamp bar 244. The remainder of
the web
surface 241 is free of such serrations 242. The lowered base portion 238 also
has a web
wall 246 with its upper surface 248 recessed below the surface portion 244 and
serrated
surface 242 so that a shoulder or step 250 is formed therebetween. As best
seen in Figure
15, the anvil and riser plate member 226 is secured to the base 234 so that
the anvil plate
portion 222 extends along the surface 248 and the riser plate portion 224
extends along the
surface portion 244. As shown, the top pointed edges 242a of the serrations or
ridges 242
are approximately level with the upper, smooth surface 251 of the riser plate
portion 224.
In this manner, the smooth surface 251 guides the belt as it is inserted
between the fastener
plates 32 and 34 over the lower plate 34.
[00681 The inverted T-shaped clamp bar 245 is operated by a screw
clamp 252
that includes an enlarged screw head handle 254 that rotates threaded shaft
256. The shaft
extends through a threaded nut block 258 fixed to the bottom of the channel
240 so that
turning the screw head 254 in the tightening direction lowers the clamp bar
244 onto the
belt 28 to tightly compress it onto the serrations 242 therebelow. As can be
seen in
Figures 12 and 14-16, the plate members 226 are each adapted to seat four
fasteners 22 on
the anvil plate portion 222 thereof. Depending on the length of the belt 28,
several of such
plate members 226 are secured to the recessed portion 238 of the extruded
ahuninum
channel base 234, as shown in Figure 16.
[0069] Figures 17-19 are directed to another alternative of a belt
ftener
installation tool 260. In belt fastener installation tool 260, the base 262 is
also an extruded
component, preferably of aluminum similar to base 234 in that it includes a
raised portion
264 and a lowered portion 266. However, in this extruded base 262, the entire
raised belt
guiding surface 268 is formed integrally on the web wall 270 of the base
raised portion
264. Accordingly, a separate component that includes a raised surface portion
such as the
previously described riser plate portion 245a is avoided. The raised surface
268 includes a
serrated surface portion 272 under the clamp bar 244 and a smooth surface
portion 274
- 19 -
SUBSTITUTE SHEET (RULE 26)
- CA 02654179 2008-12-02
that extends toward the recessed surface 276 from the serrated surface portion
272, as can
be seen in FIGS 18 and 19, As previously discussed, the smooth surface portion
274
allows the belt so ride thereover with a minimum of hang ups for smooth
sliding of the belt
28 in between the belt fastener plates 32 and 34. As shown, the recessed
surface 276 is
formed on the top smface of the web wail 278 of the lowered base portion 266_
In the
tool 260, the anvil plates 14b are separate components that are secured to the
web wall 278
supported on surface 276 thereof.
t0070] The base 262 has a shoulder surface 282 extending
vertically between the
raised surface 268 and the recessed surface 276. The shoulder surface 282 is
scalloped to
include edge projections 284 extending therefrom. The extrusion of the base
262 requires
that these projections 284 be separately machined into the surface 282 and
thus is less
desirable from a manufactuting cost standpoint than the previously-described
versions'
including scalloped projections formed on separate components, i.e the risen
plates 82
and 200, and the anvil and riser plate member 226_ As shown in FIG. 18, the
anvil plates
I4b have corresponding recesses 286 for being located by the projections 284
in a manner
similar to the lower plates of the belt fasteners 22, as has been previously
described.
- 20 -