Note: Descriptions are shown in the official language in which they were submitted.
CA 02655706 2009-02-26
WALL MOUNTED PROGRAMMABLE TIMER SYSTEM
BACKGROUND
At least one embodiment of the invention relates to a programmable wall
mounted timer
for controlling electronic components. This wall mounted timer can be
programmed with a
plurality of different settings.
Other wall mounted timers are known in the art. For example, U.S. Patent No.
6,121,889
to Janda discloses an in-wall electronic timer having a user interface. In
addition, U.S. Patent
No. 5,638,947 to Firine which issued on June 17, 1997 discloses a modular
timer having multiple
finished extension members.
However, there continues to be a need for a wall mounted timer which is easy
to install in
a standard wall mounted electrical box, which can be used in a single and
multiple ganged
electrical boxes which blend with other dimmers and switches. In at least one
instance, these
timers can be controlled from multiple locations wherein settings can be
adjusted based on a
user's need from minutes to hours.
SUMMARY
At least one embodiment of the invention relates to a wall mounted timer for
use in
controlling at least one component. The wall mounted timer can be easily
programmed so that it
is adaptable in a plurality of different situations. The timer can be
programmed in any number of
ways. For example, the wall mounted timer can have a face plate that has at
least one interface
-1-
CA 02655706 2009-02-26
which forms a key having a setting to indicate how many timer settings are to
be indicated on a
face of the device. When the face plate is coupled to the body or the housing
of the device, this
preconfigures the device so that at least one embodiment is now set with a
particular number of
lights or indications, and can be optionally set with a particular timer
settings for these lights or
indications.
Alternatively, the wall mounted timer can be programmed via a second interface
comprising any number of rocker buttons, dimmer switches or push buttons,
coupled to
actuators, such that when a user presses on these buttons or switches in a
particular manner, the
user can program the timer condition including the number of timer settings,
and a particular
time for each timer setting.
Another manner for adjusting or programming the timer is through wireless
communication. The timer can also communicate wirelessly with a remote
control, wherein this
remote control can have any number of buttons or switches coupled to actuators
which when
pressed in a particular manner, result in communications being sent to the
timer to program the
timer condition, including the number of timer settings and to set a
particular time for each timer
setting.
The three different ways for adjusting the timer settings or timer condition
can be used
together in a hybrid manner so that at least one embodiment includes an
adjustable timer that can
be adjusted by all three of the above methods, including adjusting the timer
setting via a
-2-
.. . ._ .. k ...... ......, _....,.,.. ... . ... ... ..... . . . ...._.., .. .
.._ ..
CA 02655706 2009-02-26
key and interface, adjusting the timer setting via the interface on the
housing, and adjusting the
timer settings via wireless transmission.
Along with this universal programmability, the timer is also adjustable in
appearance.
Depending on the number of timer times set, and the time periods for each
timer time, different
face plates or labels can be coupled to the timer to reflect the timer
condition programmed into
the timer.
BRIEF DESCRIPTION OF THE DRAWINGS
Other objects and features of the present invention will become apparent from
the
following detailed description considered in connection with the accompanying
drawings. It is to
be understood, however, that the drawings are designed as an illustration only
and not as a
definition of the limits of the invention.
In the drawings, wherein similar reference characters denote similar elements
throughout
the several views:
FIG. 1 is a schematic block diagram of electrical components associated with
the
embodiments shown in FIGS. 2-5;
FIG. 2 is a first embodiment of the timer;
FIG. 3 is another embodiment of the timer;
FIG. 4 is another embodiment of the timer;
-3-
CA 02655706 2009-02-26
FIG. 5 is a side perspective view of a cover plate having a key;
FIG. 6 is a front view of a housing having an interface for interfacing with
the coverplate
of FIG. 5;
FIG. 7 is a flow chart for programming and using the timer;
FIG. 8 is a more detailed flow chart for at least one step in FIG. 7;
FIG. 9 is a flow chart for at least one step in FIG. 7; and
FIG. 10 is a flow chart for another embodiment shown in FIG. 7.
DETAILED DESCRIPTION
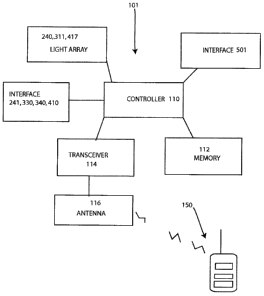
FIG. 1 shows a schematic block diagram of the electronic components 101 of the
timer
device shown in FIGS. 2-5. For example, this design can be incorporated into
any one of the
housings in any one of the embodiments 200, 300, 400 and 500. This design
includes a series of
electronic components 101 which are used to control the setting of this timer
system. The
components can be in any form of components but in this example, include a
controller 110 such
as a microprocessor. A memory 112 is in communication with controller 110
which stores
settings and a controlling program to instruct controller 110. Memory 112 is
shown as one unit,
and can be in the form of a flash memory such as an EEPROM or in the form of
multiple
memoryunits. In addition, a transceiver 114 is in communication with
controller 110 as well as
an antenna 116 which is in communication with transceiver 114. There is also a
light array in
communication with controller 110 which can be in the form of light array 240,
light array 311,
-4-
. ,. . __
CA 02655706 2009-02-26
or light array 427 shown in FIGS. 2, 3 and 4. Controller 110 is also in
communication
with optional interface 501 (See FIG. 5) wherein controller 110 receives
information from
interface 501, and stores this information in memory 112.
In addition, there is also an interface which corresponds to any one of
interfaces or series
of buttons 241, 330, 340, and 410 which may be coupled to associated actuators
disposed inside
the housing in a known manner and used to control the timer settings and
program the timer
settings. These interfaces, in the form of associated buttons paddles or
switches, can be pressed
in particular sequences to relay new timer settings to controller 110. The
program stored in
memory 112, has values associated with the pressing of buttons on the
controller so that these
instructions sent to controller I 10 are then stored in memory 112 and
operated on by controller
110 to either change a desired time of an associated timer setting, switch to
a particular timer
countdown, or remove timer settings as well.
Another way to program or interface with controller 110 is through wireless
transmission
of information to controller 110. For example, a remote control 150 can be
used to set the timer
condition of the timer including the number of timer settings and the time
periods for each
setting. As disclosed above, the timer settings can be controlled wirelessly
by relaying
information from remote control 150 to controller 110 through antenna 116 and
transceiver 114
and then setting the appropriate number of timer settings, setting the desired
timer increments, or
setting a particular time for counting down, and then storing these
characteristics in memory 112.
The antenna system 116 can be formed in any suitable manner such as a manner
similar to that
-5-
CA 02655706 2009-02-26
shown' in U.S. Patent Application Serial No. 11/ 559,646, filed on November
14, 2006, the
disclosure of which.is hereby incorporated herein by reference.
FIG. 2 is a front view of a first embodiment of the timer 200. With this view,
there are
multiple lights shown, each with a different setting. There are indicia
disposed on a front face,
which can be either pre-printed thereon, placed thereon with a label, or
omitted depending on the
user's desire. This indicia indicates the amount of time left in each timer
setting. Shown in
FIG.2 are the time intervals 5, 10, 20, 30, and 60 minutes. These time
intervals are shown for
illustrative purposes only and the intervals may be set to any suitable
lengths of time as desired
by the user. Timer 200, as shown, includes an inner cover plate 210, an
intermediate outer face
plate 220 and an additional outer face plate 230. A series of buttons 241
including buttons 242,
244, 246, 248, and 250 and 260 are disposed on the front face adjacent to the
light array 240
which for example, includes associated indicating lights 243, 245, 247, 249,
251, and 253. In
this case, these indicating lights can be in the form of LED indicating lights
that are disposed
behind a light pipe. The number of exposed lights on this face are controlled
by the size and
shape of cover plate 210 which is coupled to face plate 220. For example, in
this embodiment,
unused actuators 252 and 254 are shown by dashed circles and are disposed
beneath cover plate
210. These unused actuators are consequently programmed to be inactive based
upon the
instructions sent by a user. Thus, these unused actuators are covered by plate
210. Similarly,
unused lights 255 and 257 are shown by dashed lines disposed beneath and
covered by plate 210.
The settings relating to the number of lights, and the number of buttons is
controlled by
-6-
CA 02655706 2009-02-26
either pressing on particular buttons 242-260, through wirelessly sending
instructions from a
remote control or through the insertion of a unique faceplate. An example of
this process is
shown by way of example in FIGS. 7 and 8.
This face shows an example of settings wherein with these settings, button 242
when
pressed, selects the 60 minute time period which then activates the 60 minute
LED light 243. In
addition, the 30 minute button 244 can then be selectively pressed to set the
30 minute time
period which then activates the 30 minute light 245 to indicate that this time
has been set as well.
Accordingly, the 20 minute button 246 can be pressed which then activates the
20 minute light
247 which sets this time. Other buttons such as ten minute button 248 or five
minute button 250
can be pressed to set these times as well. Alternately, the unit can be
programmed such that any
suitable button, or buttons, can activate and suitable light, or lights.
FIG. 3 is a front view of another embodiment 300. With this embodiment, there
is a front
plate 308 which is coupled to a cover plate 310. In addition, a rocker paddle
330 is coupled to
plate 310 wherein this entire assembly can be stored into a single gang
electrical enclosure.
There is also a series of lights in a light array 311. These lights are 312,
314, 318, 320, 322, 324,
326 and 327 (shown covered) which indicate, in this case, a particular time
for counting down.
In addition, there is also a dimmer button 340 which may be used to program
the device. For
example, as explained in step 1001, (See FIG. 10) the paddle 330 can be
pressed along with
dimmer button 340 to set a particular time. For example, if the user presses
both the rocker
paddle 330 and the dimmer button 340 then the user can preset a particular
time as indicated by
-7-
CA 02655706 2009-02-26
LED lights 312, 314, 318, 320, 322, 324, and 326. By pressiiig the rocker
paddle 330 up along
with dimmer button 340, the highest timer setting 312 can be set.
Alternatively, once this time is
selected a user can scroll down to lower times by pressing on the down section
of rocker paddle
330 so that the lower times are set as well.
Therefore, the user can then scroll down from a highest setting as indicated
by light 312
down to a next highest setting as indicated by light 314, to a next highest
setting as indicated by
light 318, down to the additional settings associated with lights 320, 322,
324, and 326.
Alternatively, the process for programming this embodiment can be used to
program dimmer
intensity levels as well. Instead of using the process for program timers, a
dimmer can be set
wherein the dimmer setting can be set by scrolling through or setting a
highest dimmer setting as
designated by light 312 and then scrolled down to lower dimmer levels
indicated by lights 314,
318, 322, 324, 326, and 327. Likewise, any other suitable electrical load
could be controlled by
this embodiment such as, but not limited to, motors, appliances, lamp shades,
and so on.
Thus, by pressing rocker paddle 330 up along with dimmer button 340 this sets
the
highest dimmer level. Once this dimmer level is set, a user can scroll down to
lower dimmer
settings by pressing on the down section of the rocker paddle 330. The light
then scrolls down
through the various dimmer levels rather than incrementally via dimmer button
340.
FIG. 4 shows an alternative embodiment which shows a face -plate 401, a cover
plate 410
and a series of buttons 412, 414, 416, 418, and 420 which can be set by
pressing them and
-8-
f,
CA 02655706 2009-02-26
holding them to set the appropriate time. Shown in FIG.4 are the time
intervals 10, 20, 30, and
60 minutes. These time intervals are shown for illustrative purposes only and
the intervals may
be set to any suitable lengths of time as desired by the user. Alternatively,
the embodiment may
be programmed with any suitable method. In addition, there is a series of
lights 411, 413, 415,
and 417 and 419 forming a light array. For example, if button 412 is pressed
and held, an
associated light 411 is illuminated indicating that this time has been set.
Alternatively, if button
414 is pressed and held then the associated light 413 is lit indicating that
this time is to be set
instead. Next, if button 416 is pressed and held, light 415 is lit indicating
that this time has been
preset. Next, if button 418 is pressed and held, light 417 is lit indicating
that this time has been
set. Alternatively, if button 420 is pressed and held, light 419 lights up
indicating that the load
(such as a light) has been shut down.
One way to provide an indication of the time left is if, for example, a person
sets the timer
to last for sixty minutes by pressing button 412. This causes light 411 to be
lit, once the time
period approaches the next time indication, the light 411 for example will
flash and then turn off
while light 413 will then turn on indicating that the timer has only thirty
minutes left. The time
will then progressively scroll down until it reaches the off position. A user
can selectively
program whether the off button should remain on or off after all of the lights
have been turned
off.
In addition, as shown in this embodiment, cover plate 410 and face plate 401
can be used
to cover unused actuators 425 which are selectively covered by selecting a
particular face. In this
-9-
CA 02655706 2009-02-26
case, for each button, there is an associated actuator disposed in the housing
and behind each
button. If a user decides to limit the number of timer settings, that user can
cover a particular
actuator, which would not be coupled to a button, and then program controller
110 so that the
covered actuator is registered as inactive.
FIG. 5 shows a side view of a plate or cover 500 having an extension member
550 and a
key 552. This extension member 550 and associated key 552 are designed to
interface with an
associated interface 501, (See FIG. 6) having a series of different sections
510, 512, 514, 516,
518, and 520 for interaction with key 552. These different sections 510-520
may be discrete
electrical contacts which are designed to send different signals or
instructions to
controller I 10 depending on whether these contacts have been contacted by key
552.
Alternatively, the interface may be optical or magnetic in nature responsive
to an approriate key.
Therefore, the positioning of this key 552 on arm 550 is used to determine any
one of the
following: the number of desired timer settings; the number of desired
lighting elements to be
shown; and the times of the timer settings as well. For example, depending on
the section of
interface 501 that is intersected, the key 552 intersects the interface 501 in
particular sections so
that instructions can be sent from interface 501 to an associated processor
such as controller 110
to configure the desired timer conditions.
Alternatively, this key 552 which interacts with the associated interface 501,
can be used
to set dimmer functions as well such that when key 552 interacts with
particular sections, the
information sent from interface 501 is then sent onto controller 110 as a set
of instructions to
-10-
CA 02655706 2009-02-26
pre-program a dimmer interface.
FIG. 7 is a flow chart showing an example for programming any one of the
elements
shown above (such as timers, dimmers, speed controllers, and the like). For
example, in step 701
a user would determine the desired number of timer settings. Depending on the
desired number -
of timer settings the user would in step 702 then select or remove a cover
plate or face for the
timer. The selection of a face is used for both aesthetic reasons and can also
be used to set the
appropriate number of timer settings or steps for programming in a manner as
shown in FIGS. 5
and 6. This.step is shown in greater detail in FIG. 8.
FIG. 8 shows a more detailed process for step 702. For example, in step 801 a
user
selects a cover plate from an array of cover plates to cover the housing of
the timer. Depending
on the type of cover selected, the key is then used to determine the
appropriate number of timer
settings. Next in step 802 the user inserts the cover plate into the housing.
In step 803 the key on
the cover plate (such as key 552) registers with the device by interfacing
with interface 501.
Depending on the section contacted on the interface, a set of signals or
instructions are sent to
controller 110 to set the timer settings. Next, in step 804 the timer
condition is now preset with a
preset number of timer settings for the user to either set originally or reset
depending on the
instructions sent from interface 501 to controller 110. In addition, this key
can also be used so
that when it interacts with interface 501, it also can optionally set the
times for each timer setting.
By setting this cover plate into the device the programming mode is
automatically set.
-11-
,
CA 02655706 2009-02-26
Next, in step 703, the programming mode is set either by pressing on
particular buttons on the
interface or by pressing on buttons on a remote control. The programming mode
is essentially a
mode where each of the timer, or dimmer, devices is now open to programming
changes. Next
step 704 includes programming particular timer buttons, so that the
incremental times are set.
Steps 701-704 essentially set the timer condition. With the present
embodiment, due to
the interchangeable cover plate, and the programmable buttons, the timer
condition is universally
adaptable. A timer condition can be either a characteristic of the number of
timer settings that
are arranged on a front face, and/or include the predetennined time settings
for times as well.
For example, depending on the front face, a timer setting can be four sets of
times, wherein for
example, each incremental timer set is for 20 minute intervals. Thus, there
would be buttons and
indicators for 80 minutes, 60 minutes, 40 minutes and 20 minutes, based
upon these timer conditions. The parameters of these timer conditions can be
varied depending
on the number of buttons or actuators actually presented, and the preset
stored times.
Alternatively, the timer settings can be five different timer settings with
any associated
timer interval such as 10 minutes, (resulting in a 50 minute button; a 40
minute button; a 30
minute button; a 20 minute button; and a 10 minute button), or six different
timer settings with
any associated timer interval such as 10 minutes, 15 minutes, 20 minutes or
even just 5 minutes
as well. These preset settings can be changed after the cover plate
installation as well.
FIGS. 9 and 10 and are flow charts for programming the different embodiments
of
-12-
CA 02655706 2009-02-26
timers, after the face has been inserted into the housing. For example- steps
901 "to 906 and steps
1001 and 1006 are more elaborate representations of step 704.
FIG. 9 shows an example of a process for performing step 704, using the
embodiments
shown in FIGS. 2 and 4. In step 901, a user presses and holds a top, and an
adjacent button such
as a third button (button 246 in FIG. 2 and button 416 in FIG. 4) to initiate
a programming mode.
Next, in step 902, the lights blink to indicate that the device is in the
programming mode. Next,
in step 903, each of the timeout settings are set by pressing and holding onto
each button for a
period of time and then setting the time through pressing on additional
buttons such as one of
two adjacent buttons indicatirig an associated increase or decrease in time.
FIG. 10 is -an example of the process for performing step 704 for the timer
shown in FIG.
3. FIG. 3 shows a series of timer settings or timeouts 312-326. The setting of
these timeouts
occurs through step 1001 by pressing either a rocker button 330 and paddle or
dimmer button
340 up or down, to start the programming mode. Accordingly, in step 1002 the
lights blink
indicating that the programming mode has started. Once each of the timeouts is
set, in step 1003,
a user can store these timeouts in step 1004. The storage of these timeouts is
then stored in an
associated memory, (See memory 112 in FIG. 1 as an example) which can be part
of a controller
or a separate unit. Next, in step 1005 the user can optionally change or alter
a faceplate by
removing a faceplate or inserting a label such as in step 1006 on the
faceplate to have new set of
designations for the device. In this way, the description on the front of the
faceplate can
accurately match the designations associated with the timer.
-13-
u_.._...._,. ~ .... __
CA 02655706 2009-02-26
Once all of the times for any one of the processes described above have been
set, a user
can finally store all of the changes in step 705 (See FIG. 7). Next, in step
706 a user can turn a
light on. Next, a user can then initiate a timer countdown in step 707. During
this timer
countdown, the controller 110 can initiate a lock mode, as disclosed in step
708a, wherein a light
associated with a particular timer setting would blink indicating that the
timer is moving down to
the next time interval. Alternatively, in step 708b, a user can select a warn
mode by pressing and
holding a button such as any one of buttons 242-260 or buttons 412 to 418 or
420. The lock
mode is for locking the light on or off depending on whether a user presses
and holds either a
timer button to keep the light on, or an off button to turn the light off.
Alternatively; in the embodiment shown in FIG. 3, the user can press the
dimmer button
340 or the rocker button 330 for a predefined period of time so that the timer
switches to the lock
mode. In this state, the side LEDs go to an off mode so as to indicate a lock
mode.
Once this lock mode has been set, there are ways to terminate this mode. For
example, a
user can turn the lights OFF using a rocker paddle such as rocker paddle 330.
Next, the timer
turns off along with the side bar display and the last adjusted timeout
settings. Next time when
the light is turned on, the user may terminate the lock mode by pressing down
the rocker down
button. In this case, the timer then returns to the previously set timeout
settings.
These same steps described in FIGS. 7-10 can be performed using a wireless
remote
control 150 wherein having the same or substantially similar user interfaces
as those shown in
-14-
CA 02655706 2009-02-26
FIGS. 2, 3, and 4.
In addition, the steps shown in FIGS. 7-10 can also be adapted so that these
steps can be
used to program a dimmer as well. For example, a user can select a particular
face for a dimmer
as described in step 702. Next, to set to programming mode, a user can either
insert a particular
cover plate, and hold particular buttons such as the top and third buttons as
described in step 901
or press and hold the rocker and dim buttons in step 1001.
For example, steps 901-906 can be adapted to address dimmers so that in step
901 a user
can press and hold top and third buttons to set the programming modes. Next,
in step 902 the
lights associated with these buttons would blink to indicate that the
device is in a programming mode. Next, in step 903 the dimmer levels can be
set and then in
step 904 the timeouts can be stored. Next, in step 905 the faceplate can be
optionally reset based
upon the changes to the dinuner. Finally any labels that are desired can be
set so that the
necessary indications are applied next to these buttons.
In addition, steps 1001-1006 can be modified so that they can be used to
program a
dimmer as well. In this case, as described above, a user can press and hold
the rocker paddle and
dim button in step 1001 to initiate a programming mode. Next, in step 1002 the
lights associated
with this device would blink indicating the device is in a programming mode.
Next in step 1003
the dimmer settings can be set, as described above. In this case, the dimmer
settings are set on a
staggered basis which can be based upon the number of buttons where each
setting corresponds
-15-
CA 02655706 2009-02-26
to a percentage of light level for the dimmer or on an entirely customized
level as well wherein
each button has its own individual light level. Next, in step 1004 the dimmer
levels are stored,
wherein in step 1005 the faceplate can then be optionally reset while in step
1006 a label can be
placed on the faceplate to indicate the dimmer levels as well.
Overall, these designs create a universally adjustable timer, dimmer, speed
control, or
other suitable controller, for controlling electronic components such as
lights, or other
downstream loads. With these designs, the number of timer settings, as well as
the individual
timer times can be universally set. The three types of.setting control can be
either with the
insertion of a unique faceplate into an interface on the housing, through
manual programming via
buttons or paddles on the timer itself, or through wireless transmission from
a remote control to
the device to control the number of timer settings and the time for the
settings. The three
different types of timer control can be used exclusively to control the time
or, on at least one
embodiment, any one of the three types of setting control can be used in a
partial manner so that
the setting of a light can occur partially through insertion of a faceplate,
partially through the
programing of buttons and partially wirelessly. Through adjustments in the
number of timer
settings, each time setting and the associated face plate, a user could, with
one single timer,
create the number of settings and desired time settings that they wish.
Accordingly, while only a few embodiments of the present invention have been
shown
and described, it is obvious that many changes and modifications may be made
thereunto without
departing from the spirit and scope of the invention.
-16-