Note: Descriptions are shown in the official language in which they were submitted.
CA 02668237 2012-02-06
-1-
SYSTEM AND METHOD FOR
MEASURING AN ANALYTE IN A SAMPLE
FIELD
The present disclosure relates to methods and systems for determining analyte
concentration of a sample.
BACKGROUND
Analyte detection in physiological fluids, e.g. blood or blood derived
products, is
of ever increasing importance to today's society. Analyte detection assays
find use in a
variety of applications, including clinical laboratory testing, home testing,
etc., where the
results of such testing play a prominent role in diagnosis and management in a
variety of
disease conditions. Analytes of interest include glucose for diabetes
management,
cholesterol, and the like. In response to this growing importance of analyte
detection, a
variety of analyte detection protocols and devices for both clinical and home
use have
been developed.
One type of method that is employed for analyte detection is an
electrochemical
method. In such methods, an aqueous liquid sample is placed into a sample-
receiving
chamber in an electrochemical cell that includes two electrodes, e.g., a
counter and
CA 02668237 2009-06-03
- 2 -
working electrode. The analyte is allowed to react with a redox reagent to
form an
oxidizable (or reducible) substance in an amount corresponding to the analyte
concentration. The quantity of the oxidizable (or reducible) substance present
is then
estimated electrochemically and related to the amount of analyte present in
the initial
sample.
Such systems are susceptible to various modes of inefficiency and/or error.
For
example, variations in temperatures can affect the results of the method. This
is
especially relevant when the method is carried out in an uncontrolled
environment, as is
often the case in home applications or in third world countries. Errors can
also occur
when the sample size is insufficient to get an accurate result. Partially
filled test strips
can potentially give an inaccurate result because the measured test currents
are
proportional to the area of the working electrode that is wetted with sample.
Thus,
partially filled test strips can under certain conditions provide a glucose
concentration
that is negatively biased. A user can have difficulty determining whether an
electrode
area of a test strip is completely covered by a sample. Many test strips,
including the
ones described herein, have a relatively small volume (<one microliter) making
it
difficult for a user to see and judge whether there is a small area of an
electrode that is
unwetted. This can especially be a problem for people with diabetes that often
have
poor visual acuity.
SUMMARY
Various aspects of a method of calculating an analyte concentration of a
sample
are provided. In one aspect the method accounts for temperature variation and
includes
applying a sample to a test strip and applying a first test voltage for a
first time interval
between a first electrode and a second electrode sufficient to oxidize a
reduced mediator
at the second electrode. A second test voltage can be applied for a second
time interval
between the first electrode and the second electrode that is also sufficient
to oxidize the
reduced mediator at the first electrode. A first glucose concentration can be
calculated
based on the test current values during the first time interval and the second
time
interval. Additionally, the test meter can measure a temperature value.
Accordingly, a
temperature corrected glucose concentration can be calculated based on the
first glucose
concentration and the temperature value.
CA 02668237 2016-02-04
- 3 -
More particularly, there is disclosed a method for measuring a temperature
corrected
glucose concentration over a temperature range, the method comprising:
applying in a test meter, a first test voltage for a first time interval
between a first
electrode and a second electrode in communication with a sample disposed on a
test strip
received within the test meter, the first time interval being sufficient to
oxidize a reduced
mediator at the second electrode;
following the application of the first test voltage, applying a second test
voltage for a
second time interval between the first electrode and the second electrode
sufficient to oxidize the
reduced mediator at the first electrode;
calculating a first glucose concentration based on test current values
measured during the
first time interval and the second time interval;
measuring a temperature value using a temperature reading device incorporated
into the
test meter that receives the test strip; and
calculating the temperature corrected glucose concentration based on the first
glucose
concentration and the measured temperature value, wherein the step of
calculating the
temperature corrected glucose concentration includes:
calculating a correction value based on the measured temperature value and the
first glucose concentration; and
calculating the temperature corrected glucose concentration based on the first
glucose concentration and the correction value, wherein the correction value
is calculated
with a first function if the measured temperature value is greater than a
first temperature
threshold, and wherein the correction value is calculated with a second
function if the
measured temperature value is not greater than the first temperature
threshold, in which
the first function is a first equation, the first equation being:
Corr2 = -Ki(T - TRT) + K2 X G1 (T ¨ TRT)
where Corr2 is the correction value, K1 is a first constant, T is the measured
temperature
value, TRT is a room temperature value, K2 is a second constant, and G1 is the
first glucose
concentration.
In another aspect there is provided a method for measuring a temperature
corrected
analyte concentration over a temperature range, the method comprising:
applying a sample to a test strip;
CA 02668237 2016-02-04
- 3a -
applying a first test voltage for a first time interval between a first
electrode and a second
electrode sufficient to oxidize a reduced mediator at the second electrode;
following the application of a first test voltage, applying a second test
voltage for a
second time interval between the first electrode and the second electrode
sufficient to oxidize the
reduced mediator at the first electrode;
calculating a first analyte concentration based on test current values during
the first time
interval and the second time interval;
measuring a temperature value; and
calculating the temperature-corrected analyte concentration based on the first
analyte
concentration and the temperature value, wherein the step of calculating the
temperature
corrected analyte concentration includes:
calculating a correction value based on the temperature value and the first
analyte
concentration;
calculating a temperature corrected concentration based on the first analyte
concentration and the correction value, wherein the correction value is
calculated with a
first function if the measured temperature value is greater than a first
temperature
threshold, and wherein the correction value is calculated with a second
function if the
measured temperature value is not greater than the first temperature
threshold, in which
the first function is a first equation, the first equation being:
Corr2= -Ki(T - TRT) + K2 X A1 (T ¨ TRT)
where Corr2 is the correction value, K1 is a first constant, T is the measured
temperature
value, TRT is the room temperature value, K2 is a second constant, and A1 is
the first analyte
concentration.
In another disclosed aspect of a method of calculating an analyte
concentration of a
sample, the method is configured to determine whether a test strip is
sufficiently filled with a
sample. The method includes applying a first test voltage between a first
electrode and a second
electrode of a test strip. The first test voltage can have both an AC voltage
component and a DC
voltage component. The AC voltage component can be applied at a predetermined
amount of
time after the application of the first test voltage. The DC voltage component
can have a
magnitude sufficient to cause a limiting test current at the second electrode.
Accordingly, a
CA 02668237 2014-10-16
- 3b -
portion of the resulting test current from the AC voltage component can be
processed into a
capacitance value.
BRIEF DESCRIPTION OF THE DRAWINGS
The present disclosure will be more fully understood from the following
detailed
description taken in conjunction with the accompanying drawings, in which:
FIG. lA is a perspective view of a test strip;
FIG. 1B is an exploded perspective view of the test strip of FIG. 1A;
FIG. 1C is a perspective view of a distal portion of the test strip of FIG.
1A;
FIG. 2 is a bottom plan view of the test strip of FIG. 1A;
FIG. 3 is a side plan view of the test strip of FIG. 1A;
FIG. 4A is a top plan view of the test strip of FIG. 1A;
FIG. 4B is a partial side view of the distal portion of the test strip
consistent with arrows
4B-4B of FIG. 4A;
FIG. 5 is a simplified schematic showing a test meter electrically interfacing
with the test
strip contact pad;
CA 02668237 2009-06-03
- 4 -
FIG. 6 shows a test voltage waveform in which the test meter applies a
plurality
of test voltages for prescribed time intervals;
FIG. 7 shows a test current transient generated with the test voltage waveform
of
FIG. 6;
FIG. 8 is a flow diagram showing an embodiment of a method of determining a
glucose concentration;
FIG. 9 is a flow diagram showing an exemplary embodiment of a blood glucose
algorithm and a hematocrit correction;
FIG. 10 is a chart showing a correlation between measured hematocrit levels
using a reference method and measured hematocrit levels using the test strip
of FIG. 1;
FIG. 11 is a bias plot showing a plurality of test strips that were tested
with blood
samples having a wide range of hematocrit levels;
FIG. 12 is a flow diagram showing an embodiment of a method of applying a
temperature correction when a sample is blood;
FIG. 13 is a bias plot showing a plurality of test strips that were tested
with blood
samples having a wide range of hematocrit levels, a wide range of glucose
levels, and a
wide range of temperature levels without temperature correction;
FIG. 14 is a bias plot showing a plurality of test strips that were tested
with blood
samples having a wide range of hematocrit levels, a wide range of glucose
levels, and a
wide range of temperature levels with temperature correction;
FIG. 15 is a flow diagram showing an embodiment of a method of applying a
temperature correction when a sample is control solution;
CA 02668237 2009-06-03
- 5 -
FIG. 16 is a bias plot showing a plurality of test strips that were tested
with
control solution samples having a wide range of glucose levels and a wide
range of
temperature levels without temperature correction;
FIG. 17 is a bias plot showing a plurality of test strips that were tested
with
control solution samples having a wide range of glucose levels and a wide
range of
temperature levels with temperature correction;
FIG. 18 is a flow diagram depicting an embodiment of a method of identifying
system errors;
FIG. 19 is a chart showing a correlation of capacitance and bias to a
reference
glucose measurement (YSI, Yellow Springs Instrument) where capacitance values
were
measured for blood samples during the third test voltage of FIG. 6;
FIG. 20 is a chart showing a correlation of capacitance and bias to a
reference
glucose measurement (YSI, Yellow Springs Instrument) where capacitance values
were
measured for blood samples during the second test voltage of FIG. 6 (e.g.,
after
approximately 1.3 seconds);
FIG. 21 is a chart showing a correlation of capacitance and bias to a
reference
glucose measurement (YSI, Yellow Springs Instrument) where capacitance values
were
measured for control solution samples during the second test voltage of FIG. 6
(e.g.,
after approximately 1.3 seconds);
FIG. 22 shows a test current transient of the second test time interval when a
user
performs a double dose (solid line) and does not perform a double dose (dotted
line);
FIG. 23 shows a test current transient of the second test time interval when a
late
start error occurs (solid line) and does not occur (dotted line) with the test
meter;
_
CA 02668237 2009-06-03
- 6 -
FIG. 24 shows a test current transient of the third test time interval for a
test strip
having a high resistance track (squares) and a low resistance track
(triangles);
FIG. 25 is a chart showing a plurality of ratio values indicating that a high
resistance test strip lot can be distinguished from a low resistance test
strip lot;
FIG. 26 shows a plurality of test current transients for a test strip lot
having
leakage between a spacer and the first electrode (squares) and for test strip
lots having a
sufficiently low amount of leakage (circles and triangles); and
FIG. 27 is a chart showing a plurality of ratio values for identifying leakage
of
liquid for test strip lots prepared with different manufacturing conditions.
DETAILED DESCRIPTION
Certain exemplary embodiments will now be described to provide an overall
understanding of the principles of the structure, function, manufacture, and
use of the
devices, systems, and methods disclosed herein. One or more examples of these
embodiments are illustrated in the accompanying drawings. Those skilled in the
art will
understand that the devices and methods specifically described herein and
illustrated in
the accompanying drawings are non-limiting exemplary embodiments and that the
scope
of the present disclosure is defined solely by the claims. The features
illustrated or
described in connection with one exemplary embodiment may be combined with the
features of other embodiments. Such modifications and variations are intended
to be
included within the scope of the present disclosure.
The subject systems and methods are suitable for use in the determination of a
wide variety of analytes in a wide variety of samples, and are particularly
suited for use
in the determination of analytes in whole blood, plasma, serum, interstitial
fluid, or
derivatives thereof. In an exemplary embodiment, a glucose test system based
on a thin-
layer cell design with opposing electrodes and tri-pulse electrochemical
detection that is
fast (e.g., about 5 second analysis time), requires a small sample (e.g.,
about 0.4 ptL),
and can provide improved reliability and accuracy of blood glucose
measurements. In
the reaction cell, glucose in the sample can be oxidized to gluconolactone
using glucose
CA 02668237 2009-06-03
- 7 -
dehydrogenase and an electrochemically active mediator can be used to shuttle
electrons
from the enzyme to a palladium working electrode. A potentiostat can be
utilized to
apply a tri-pulse potential waveform to the working and counter electrodes,
resulting in
test current transients used to calculate the glucose concentration. Further,
additional
information gained from the test current transients may be used to
discriminate between
sample matrices and correct for variability in blood samples due to
hematocrit,
temperature variation, electrochemically active components, and identify
possible
system errors.
The subject methods can be used, in principle, with any type of
electrochemical
cell having spaced apart first and second electrodes and a reagent layer. For
example, an
electrochemical cell can be in the form of a test strip. In one aspect, the
test strip may
include two opposing electrodes separated by a thin spacer for defining a
sample-
receiving chamber or zone in which a reagent layer is located. One skilled in
the art will
appreciate that other types of test strips, including, for example, test
strips with co-planar
electrodes may also be used with the methods described herein.
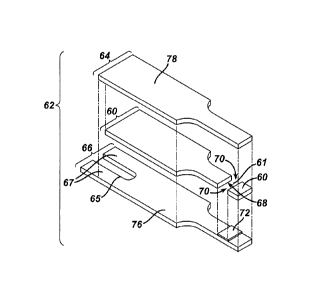
FIGS. 1A to 4B show various views of an exemplary test strip 62 suitable for
use
with the methods and systems described herein. In an exemplary embodiment, a
test
strip 62 is provided which includes an elongate body extending from a distal
end 80 to a
proximal end 82, and having lateral edges 56, 58, as illustrated in FIG. 1A.
As shown in
FIG. 1B, the test strip 62 also includes a first electrode layer 66, a second
electrode layer
64, and a spacer 60 sandwiched in between the two electrode layers 64 and 66.
The first
electrode layer 66 can include a first electrode 166, a first connection track
76, and a
first contact pad 67, where the first connection track 76 electrically
connects the first
electrode 166 to the first contact pad 67, as shown in FIGS. 1B and 4B. Note
that the
first electrode 166 is a portion of the first electrode layer 66 that is
immediately
underneath the reagent layer 72, as indicated by FIGS. 1B and 4B. Similarly,
the second
electrode layer 64 can include a second electrode 164, a second connection
track 78, and
a second contact pad 63, where the second connection track 78 electrically
connects the
second electrode 164 with the second contact pad 63, as shown in FIGS. 1B, 2,
and 4B.
Note that the second electrode 164 is a portion of the second electrode layer
64 that is
above the reagent layer 72, as indicated by FIG. 4B.
_ ____________________________________________________________________________
CA 02668237 2012-02-06
-8-
As shown, the sample-receiving chamber 61 is defined by the first electrode
166, the
second electrode 164, and the spacer 60 near the distal end 80 of the test
strip 62, as shown in FIG.
1B and 4B. The first electrode 166 and the second electrode 164 can define the
bottom and the top
of sample-receiving chamber 61, respectively, as illustrated in FIG. 4B. A
cutout area 68 of the
spacer 60 can define the sidewalls of the sample-receiving chamber 61, as
illustrated in FIG. 4B. In
one aspect, the sample-receiving chamber 61 can include ports 70 that provide
a sample inlet
and/or a vent, as shown in FIGS. lA to 1C. For example, one of the ports can
allow a fluid sample
to ingress and the other port can allow air to egress.
In an exemplary embodiment, the sample-receiving chamber 61 can have a small
volume.
For example, the chamber 61 can have a volume in the range of from about 0.1
microliters to about
5 microliters, about 0.2 microliters to about 3 microliters, or, preferably,
about 0.3 microliters to
about 1 microliter. To provide the small sample volume, the cutout 68 can have
an area ranging
from about 0.01 cm2 to about 0.2 cm2,
about 0.02 cm2 to about 0.15 cm2, or, preferably, about 0.03 cm2 to about 0.08
cm2. In addition,
first electrode 166 and second electrode 164 can be spaced apart in the range
of about 1 micron to
about 500 microns, preferably between about 10 microns and about 400 microns,
and more
preferably between about 40 microns and about 200 microns. The relatively
close spacing of the
electrodes can also allow redox cycling to occur, where oxidized mediator
generated at first
electrode 166, can diffuse to second electrode 164 to become reduced, and
subsequently diffuse
back to first electrode 166 to become oxidized again. Those skilled in the art
will appreciate that
variations in such volumes, areas, and/or spacing of electrodes is within the
present disclosure.
In one embodiment, the first electrode layer 66 and the second electrode layer
64 can be a
conductive material formed from materials such as gold, palladium, carbon,
silver, platinum, tin
oxide, iridium, indium, or combinations thereof (e.g., indium doped tin
oxide). In addition, the
electrodes can be formed by disposing a conductive material onto an insulating
sheet (not shown)
by a sputtering, electroless plating, or a screen printing process. In one
exemplary embodiment, the
first electrode layer 66 and the second electrode layer 64 can be made from
sputtered palladium
and sputtered gold, respectively. Suitable materials that can be employed as
spacer 60 include a
variety of insulating materials, such as, for example, plastics (e.g., PET,
PETG, polyimide,
CA 02668237 2012-02-06
-9-
polycarbonate, polystyrene), silicon, ceramic, glass, adhesives, and
combinations thereof. In one
embodiment, the spacer 60 may be in the form of a double sided adhesive coated
on opposing
sides of a polyester sheet where the adhesive may be pressure sensitive or
heat activated. Those
skilled in the art will appreciate that various other materials for the first
electrode layer 66, the
second electrode layer 64, and/or the spacer 60 may be substituted for the
materials disclosed
herein.
Various mechanisms and/or processes can be utilized to dispose a reagent layer
72 within
the sample-receiving chamber 61. For example, the reagent layer 72 can be
disposed within the
sample-receiving chamber 61 using a process such as slot coating, dispensing
from the end of a
tube, ink jetting, and screen printing. In one embodiment, the reagent layer
72 can include at least a
mediator and an enzyme and is deposited onto first electrode 166. Examples of
suitable mediators
include ferricyanide, ferrocene, ferrocene derivatives, osmium bipyridyl
complexes, and quinone
derivatives. Examples of suitable enzymes include glucose oxidase, glucose
dehydrogenase (GDH)
using a pyrroloquinoline quinone (PQQ) co-factor, GDH using a nicotinamide
adenine
dinucleotide (NAD) co-factor, and GDH using a flavin adenine dinucleotide
(FAD) co-factor
[E.C.1.1.99.10]. The reagent layer 72 can be prepared from a formulation that
contains 33 mM
potassium citraconate, pH 6.8, 0.033% Pluronic P103, 0.017% Pluronic F87, 0.85
mM CaC12, 30
mM sucrose, 286 gM PQQ, 15 mg/mL apo-GDH, and 0.6 M ferricyanide.
Alternatively, the PQQ
can be left out of the formulation and the apo-GDH can be replaced with FAD-
GDH. Pluronics are
a block copolymers based on ethylene oxide and propylene oxide, which can
function as
antifoaming agents and/or wetting agents.
The formulation can be applied at 570 pL/min using a 13 gauge needle poised
about 150
gm above a palladium web moving at about 10 m/min. Alternatively, the
concentration of the
solids in the reagent can be increased by 50% and the flow rate can be reduced
to 380 gL/min in
order to maintain a constant reagent coating density. Before coating the
palladium web with the
enzyme formulation, it can be coated with 2-mercaptoethane sulfonic acid
(MESA). A 95 gm thick
spacer with a 1.2 mm wide channel cut in it can be laminated to the reagent
layer and the
palladium web at 70 C. Next, a MESA-coated gold web can be laminated to the
other side of the
spacer. The spacer can be made from PET coated on both sides with a
thermoplastic such as Vitel,
CA 02668237 2009-06-03
- 10 -
which is a linear saturated copolyester resin having a relatively high
molecular weight.
The resulting laminate can be cut such that the fill path of the sample-
receiving chamber
is about 3.5 mm long, thus giving a total volume of about 0.4
In one embodiment, the reagent layer 72 may have an area larger than the area
of
the first electrodes 166. As a result a portion of the spacer 60 may overlap
and touch the
reagent layer 72. The spacer 60 may be configured to form a liquid impermeable
seal to
the first electrode 166 even though a portion of the reagent layer 72 is
between the
spacer 60 and the first electrode 166. The spacer 60 may intermingle or
partially
dissolve a portion of the reagent layer 72 to form a liquid impermeable bond
to the first
electrode 166 sufficient to define the electrode area for at least the total
test time. Under
certain circumstances where the reagent layer 72 is not sufficiently dry, the
spacer 60
may not be able to form a liquid impermeable seal and, as a result, the liquid
may seep
between the spacer 60 and the first electrode 166. Such a leakage event may
cause an
inaccurate glucose measurement to occur.
Either the first electrode 166 or the second electrode 164 can perform the
function of a working electrode depending on the magnitude and/or polarity of
the
applied test voltage. The working electrode may measure a limiting test
current that is
proportional to the reduced mediator concentration. For example, if the
current limiting
species is a reduced mediator (e.g., ferrocyanide), then it can be oxidized at
the first
electrode 166 as long as the test voltage is sufficiently greater than the
redox mediator
potential with respect to the second electrode 164. In such a situation, the
first electrode
166 performs the function of the working electrode and the second electrode
164
performs the function of a counter/reference electrode. Note that one skilled
in the art
may refer to a counter/reference electrode simply as a reference electrode or
a counter
electrode. A limiting oxidation occurs when all reduced mediator has been
depleted at
the working electrode surface such that the measured oxidation current is
proportional to
the flux of reduced mediator diffusing from the bulk solution towards the
working
electrode surface. The term bulk solution refers to a portion of the solution
sufficiently
far away from the working electrode where the reduced mediator is not located
within a
depletion zone. It should be noted that unless otherwise stated for test strip
62, all
potentials applied by test meter 100 will hereinafter be stated with respect
to second
electrode 164.
CA 02668237 2009-06-03
- 11 -
Similarly, if the test voltage is sufficiently less than the redox mediator
potential,
then the reduced mediator can be oxidized at the second electrode 164 as a
limiting
current. In such a situation, the second electrode 164 performs the function
of the
working electrode and the first electrode 166 performs the function of the
counter/reference electrode.
Initially, performing an analysis can include introducing a quantity of a
fluid
sample into a sample-receiving chamber 61 via a port 70. In one aspect, the
port 70
and/or the sample-receiving chamber 61 can be configured such that capillary
action
causes the fluid sample to fill the sample-receiving chamber 61. The first
electrode 166
and/or second electrode 164 may be coated with a hydrophilic reagent to
promote the
capillarity of the sample-receiving chamber 61. For example, thiol derivatized
reagents
having a hydrophilic moiety such as 2-mercaptoethane sulfonic acid may be
coated onto
the first electrode and/or the second electrode.
FIG. 5 provides a simplified schematic showing a test meter 100 interfacing
with
a first contact pad 67a, 67b and a second contact pad 63. The second contact
pad 63 can
be used to establish an electrical connection to the test meter through a U-
shaped notch
65, as illustrated in FIG. 2. In one embodiment, the test meter 100 may
include a second
electrode connector 101, and a first electrode connectors (102a, 102b), a test
voltage unit
106, a current measurement unit 107, a processor 212, a memory unit 210, and a
visual
display 202, as shown in FIG. 5. The first contact pad 67 can include two
prongs
denoted as 67a and 67b. In one exemplary embodiment, the first electrode
connectors
102a and 102b separately connect to prongs 67a and 67b, respectively. The
second
electrode connector 101 can connect to second contact pad 63. The test meter
100 can
measure the resistance or electrical continuity between the prongs 67a and 67b
to
determine whether the test strip 62 is electrically connected to the test
meter 100. One
skilled in the art will appreciate that the test meter 100 can use a variety
of sensors and
circuits to determine when the test strip 62 is properly positioned with
respect to the test
meter 100.
In one embodiment, the test meter 100 can apply a test voltage and/or a
current
between the first contact pad 67 and the second contact pad 63. Once the test
meter 100
recognizes that the strip 62 has been inserted, the test meter 100 turns on
and initiates a
fluid detection mode. In one embodiment, the fluid detection mode causes test
meter
CA 02668237 2009-06-03
-12-
100 to apply a constant current of about 1 microampere between the first
electrode 166
and the second electrode 164. Because the test strip 62 is initially dry, the
test meter 100
measures a relatively large voltage, which can be limited by the analog-to-
digital
converter (A/D) within test meter 100. When the fluid sample bridges the gap
between
the first electrode 166 and the second electrode 164 during the dosing
process, the test
meter 100 will measure a decrease in measured voltage that is below a
predetermined
threshold causing test meter 100 to automatically initiate the glucose test.
In one embodiment, the test meter 100 can perform a glucose test by applying a
plurality of test voltages for prescribed intervals, as shown in FIG. 6. The
plurality of
test voltages may include a first test voltage Vi for a first time interval th
a second test
voltage V2 for a second time interval t2, and a third test voltage V3 for a
third time
interval t3. A glucose test time interval tG represents an amount of time to
perform the
glucose test (but not necessarily all the calculations associated with the
glucose test).
Glucose test time interval tG can range from about 1 second to about 5
seconds. Further,
as illustrated in FIG. 6, the second test voltage V2 can include a constant
(DC) test
voltage component and a superimposed alternating (AC), or oscillating, test
voltage
component. The superimposed alternating test voltage component can be applied
for a
time interval indicated by tcap. The inset of FIG. 6 magnifies the high
frequency AC
component.
The plurality of test current values measured during any of the time intervals
may be performed at a frequency ranging from about 1 measurement per
nanosecond to
about one measurement per 100 milliseconds. While an embodiment using three
test
voltages in a serial manner is described, one skilled in the art will
appreciate that the
glucose test can include different numbers of open-circuit and test voltages.
For
example, as an alternative embodiment, the glucose test could include an open-
circuit
for a first time interval, a second test voltage for a second time interval,
and a third test
voltage for a third time interval. One skilled in the art will appreciate that
names "first,"
"second," and "third" are chosen for convenience and do not necessarily
reflect the order
in which the test voltages are applied. For instance, an embodiment can have a
potential
waveform where the third test voltage can be applied before the application of
the first
and second test voltage.
_
CA 02668237 2009-06-03
- 13 -
Once the glucose assay has been initiated, the test meter 100 may apply a
first
test voltage VI (e.g., -20 mV in FIG. 6) for a first time interval t1 (e.g., 1
second in FIG.
6). The first time interval t1 can range from about 0.1 seconds to about 3
seconds and
preferably range from about 0.2 seconds to about 2 seconds, and most
preferably range
from about 0.3 seconds to about 1 seconds.
The first time interval t1 may be sufficiently long so that the sample-
receiving
chamber 61 can fully fill with sample and also so that the reagent layer 72
can at least
partially dissolve or solvate. In one aspect, the first test voltage V1 may be
a value
relatively close to the redox potential of the mediator so that a relatively
small amount of
a reduction or oxidation current is measured. FIG. 7 shows that a relatively
small
amount of current is observed during the first time interval t1 compared to
the second
and third time intervals t2 and t3. For example, when using ferricyanide
and/or
ferrocyanide as the mediator, the first test voltage V1 can range from about -
100 mV to
about -1 mV, preferably range from about -50 mV to about -5 mV, and most
preferably
range from about -30 mV to about -10 mV.
After applying the first test voltage V1, the test meter 100 applies a second
test
voltage V2 between first electrode 166 and second electrode 164 (e.g., ¨0.3
Volts in FIG.
6), for a second time interval t2 (e.g., about 3 seconds in FIG. 6). The
second test
voltage V2 may be a value sufficiently negative of the mediator redox
potential so that a
limiting oxidation current is measured at the second electrode 164. For
example, when
using ferricyanide and/or ferrocyanide as the mediator, the second test
voltage V2 can
range from about ¨600 mV to about zero mV, preferably range from about ¨600 mV
to
about ¨100 mV, and more preferably be about ¨300 mV.
The second time interval t2 should be sufficiently long so that the rate of
generation of reduced mediator (e.g., ferrocyanide) can be monitored based on
the
magnitude of a limiting oxidation current. Reduced mediator is generated by
enzymatic
reactions with the reagent layer 72. During the second time interval t2, a
limiting
amount of reduced mediator is oxidized at second electrode 164 and a non-
limiting
amount of oxidized mediator is reduced at first electrode 166 to form a
concentration
gradient between first electrode 166 and second electrode 164.
CA 02668237 2009-06-03
- 14 -
In an exemplary embodiment, the second time interval t2 should also be
sufficiently long so that a sufficient amount of ferricyanide can be generated
at the
second electrode 164. A sufficient amount of ferricyanide is required at the
second
electrode 164 so that a limiting current can be measured for oxidizing
ferrocyanide at the
first electrode 166 during the third test voltage V3. The second time interval
t2 may be
less than about 60 seconds, and preferably can range from about 1 second to
about 10
seconds, and more preferably range from about 2 seconds to about 5 seconds.
Likewise,
the time interval indicated as tcap in FIG. 6 may also last over a range of
times, but in
one exemplary embodiment it has a duration of about 20 milliseconds. In one
exemplary embodiment, the superimposed alternating test voltage component is
applied
after about 0.3 seconds to about 0.4 seconds after the application of the
second test
voltage V2, and induces a sine wave having a frequency of about 109 Hz with an
amplitude of about +1-50 mV.
FIG. 7 shows a relatively small peak ipb at the beginning of the second time
interval t2 followed by a gradual increase of an absolute value of an
oxidation current
during the second time interval t2. The small peak ipb occurs due to an
initial depletion
of reduced mediator at about 1 second. The gradual absolute increase in
oxidation
current after the small peak ipb is caused by the generation of ferrocyanide
by reagent
layer 72, which then diffuses to second electrode 164.
After applying the second test voltage V2, the test meter 100 applies a third
test
voltage V3 between the first electrode 166 and the second electrode 164 (e.g.,
about
+0.3 Volts in FIG. 6) for a third time interval t3 (e.g., 1 second in FIG. 6).
The third test
voltage V3 may be a value sufficiently positive of the mediator redox
potential so that a
limiting oxidation current is measured at the first electrode 166. For
example, when
using ferricyanide and/or ferrocyanide as the mediator, the third test voltage
V3 can
range from about zero mV to about 600 mV, preferably range from about 100 mV
to
about 600 mV, and more preferably be about 300 mV.
The third time interval t3 may be sufficiently long to monitor the diffusion
of
reduced mediator (e.g., ferrocyanide) near the first electrode 166 based on
the magnitude
of the oxidation current. During the third time interval t3, a limiting amount
of reduced
mediator is oxidized at first electrode 166 and a non-limiting amount of
oxidized
mediator is reduced at the second electrode 164. The third time interval t3
can range
CA 02668237 2009-06-03
- 15 -
from about 0.1 seconds to about 5 seconds and preferably range from about 0.3
seconds
to about 3 seconds, and more preferably range from about 0.5 seconds to about
2
seconds.
FIG. 7 shows a relatively large peak ip, at the beginning of the third time
interval
t3 followed by a decrease to a steady-state current iõ value. In one
embodiment, the
second test voltage V2 can have a first polarity and the third test voltage V3
may have a
second polarity that is opposite to the first polarity. In another embodiment,
the second
test voltage V2 can be sufficiently negative of the mediator redox potential
and the third
test voltage V3 can be sufficiently positive of the mediator redox potential.
The third test
voltage V3 may be applied immediately after the second test voltage V2.
However, one
skilled in the art will appreciate that the magnitude and polarity of the
second and third
test voltages can be chosen depending on the manner in which analyte
concentration is
determined.
FIG. 8 illustrates one method of determining a glucose concentration by way of
a
flow diagram. A user can insert a test strip into a test meter and then apply
a sample to
the test strip. The test meter detects the presence of the sample and applies
a test
voltage, as shown in a step 1802. In response to the test voltage, the test
meter measures
a test current, as shown in a step 1804. A microprocessor of the test meter
can then
process the resulting test current values so that an accurate glucose
measurement can be
determined and to ensure that there are no system errors.
Another step in the method, as shown in step 1806, can be performing a control
solution (CS)/blood discrimination test. As indicated in step 1808, if the
CS/blood
discrimination test determines that the sample is blood, then method 1800
moves to a
series of steps that include: the application of a blood glucose algorithm
1810,
hematocrit correction 1812, blood temperature correction 1814, and error
checks 1000;
and if the CS/blood discrimination test determines that the sample is CS
(i.e., not blood),
then method 1800 moves to a series of steps that include: the application of a
CS glucose
algorithm 1824, CS temperature correction 1826, and error checks 1000. After
performing the error checks 1000, step 1818 can be performed to determine if
there are
any errors. If there are no errors, then the test meter outputs a glucose
concentration, as
shown in a step 1820, but if there are errors, then the test outputs an error
message, as
shown in a step 1822.
,
CA 02668237 2009-06-03
- 16 -
Control Solution (CS)/Blood Discrimination Test
The CS/blood discrimination test 1806 can include a first reference value and
a
second reference value. The first reference value can be based on current
values during
the first time interval t1 and the second reference value can be based on
current values
during both the second time interval t2 and the third time interval t3. In one
embodiment
the first reference value can be obtained by performing a summation of the
current
values obtained during the first time current transient when using the test
voltage
waveform of FIG. 6. By way of non-limiting example, a first reference value
isum can be
represented by Equation 1:
Eq. 1 i sum = Ei(t)
t=0.05
where the term isum is the summation of current values and t is a time. The
second
reference value, sometimes referred to as the residual reaction index, can be
obtained by
a seventh ratio R7 of current values during the second time interval and the
third time
interval, as shown in Eq. 2:
Eq. 2 R7 = abs( i(3.8)
i(4.15)
where abs represents an absolute function and 3.8 and 4.15 represent the time
in seconds
of the second and third time intervals, respectively, for this particular
example. A
discrimination criterion can be used to determine if the sample is either
control solution
or blood based on the first reference value of Eq. 1 and the second reference
of Eq. 2.
For example, the first reference value of Eq. 1 can be compared to a pre-
determined
threshold and the second reference value of Eq. 2 can be compared to a pre-
determined
threshold equation. The pre-determined threshold may be about 12 microamperes.
The
pre-determined threshold equation can be based on a function using the first
reference
value of Eq. 1. More specifically, as illustrated by Eq. 3, the pre-determined
threshold
equation can be:
_
CA 02668237 2009-06-03
-17-
Eq. 3
Z, * xum-12)
isum
where Z1 can be a constant such as, for example, about 0.2. Thus, the CS/Blood
discrimination test 1806 can identify a sample as blood if
'sum >12 and if R7 <Z1*(is. ¨1'sum
isum
else the sample is a control solution.
Blood Glucose Algorithm
If the sample is identified as a blood sample, the blood glucose algorithm of
step
1810 can be performed on the test current values. A first glucose
concentration G1 can
be calculated using a glucose algorithm as shown in Equation 4:
P
Eq. 4 G, =4iJx(a. x ¨z)
i3
where 11 is a first test current value, i2 is a second test current value, i3
is a third
test current value, and the terms a, p, and z can be empirically derived
calibration
constants. All test current values (e.g., i1, i2, and i3) in Equation 4 use
the absolute value
of the current. The first test current value I, and the second test current
value i2 can each
be defined by an average or summation of one or more predetermined test
current values
that occur during the third time interval t3. The third test current value i3
can be defined
by an average or summation of one or more predetermined test current values
that occur
during the second time interval t2. One skilled in the art will appreciate
that names
"first," "second," and "third" are chosen for convenience and do not
necessarily reflect
the order in which the current values are calculated.
Equation 4 can be modified to provide an even more accurate glucose
concentration. Instead of using a simple average of summation of test current
values,
the term 11can be defined to include peak current values ipb and and the
steady-state
CA 02668237 2012-02-06
- 18 -
current iõ, as shown in Equation 5:
Ii ¨ 2ipb
Eq. 5I =12
ipo +
where a calculation of the steady-state current is, can be based on a
mathematical model,
an extrapolation, an average at a predetermined time interval, a combination
thereof, or
any number of other ways for calculating a steady-state current. Some examples
of
methods for calculating iss can be found in U.S. Patent Nos. 5,942,102 and
6,413,410.
Alternatively, iss may be estimated by multiplying the test current value at 5
seconds with a constant 1C8 (e.g., 0.678). Thus, i(5) x 1(8). The term Ks
can be
estimated using Equation 6:
i(5)
Eq. 6 iss =
(¨ 41r2Dx0.975
1+ 4exp )
L2
where the number 0.975 is about the time in seconds after the third test
voltage V3 is
applied that corresponds to i(5), which, assuming a linear variation over the
time
between about 0.95 seconds and 1 second, is the average current between 0.95
and 1
second, the term D is assumed to be about 5 x 10⁻⁶cm2/sec as a typical
diffusion
coefficient in blood, and the term L is assumed to be about 0.0095 cm, which
represents
the height of the spacer 60.
Turning again to Eq. 5, ip, may be the test current value at 4.1 seconds, and
ipb
may be the test current value at 1.1 seconds, based on the test voltage and
test current
waveforms in FIGS. 6 and 7.
5
Turning back to Eq. 4, i2 can be defined to be i2 = i(t)
and i3 can be defined to
1=4.4
4
be i3 = i(t)
1=1 4
CA 02668237 2009-06-03
- 19 -
Equation 5 can be combined with Equation 4 to yield an equation for
determining a more accurate glucose concentration that can compensate for the
presence
of endogenous and/or exogenous interferents in a blood sample, as shown in
Equation 7:
(= (
Eq. 7 G1= x axi2 X P
i c ¨ 2ipb +iss z
i
\3) pc ss }
where the first glucose concentration G1 is the output of the blood glucose
algorithm and
the terms a, p, and z are constants that can be derived empirically.
CS Glucose Algorithm
If the sample is identified as a CS, the CS glucose algorithm of step 1824 can
be
performed on the test current values. A first glucose concentration G1 for CS
can be
calculated using Equation 7 above, although the values for a, p, and z for CS
can be
different than those for blood.
Analyte Detection at Extreme Hematocrit Levels:
In addition to endogenous interferents, extreme hematocrit levels under
certain
circumstances can affect the accuracy of a glucose measurement. Thus,
hematocrit
correction 1812 can be applied by modifying G1 to provide a second glucose
concentration G2 that is accurate even if the sample has an extreme hematocrit
level
(e.g., about 20% or about 60%).
Methods and systems of accurately measuring glucose concentrations in extreme
hematocrit samples are provided herein. For example, FIG. 9 is a flow diagram
depicting a method 2000 for calculating an accurate glucose concentration that
accounts
for blood samples having an extreme hematocrit level. A user can initiate a
test by
applying a sample to the test strip, as shown in a step 2001. A first test
voltage V1 can
be applied for a first time interval ti, as shown in a step 2002. The
resulting test current
is then measured for the first time interval t1, as shown in a step 2004.
After the first
time interval t1, the second test voltage V2 is applied for a second time
interval t2, as
shown in a step 2006. The resulting test current is then measured for the
second time
interval t2, as shown in a step 2008. After the second time interval t2, the
third test
CA 02668237 2009-06-03
-20 -
voltage V3 is applied for a third time interval t3, as shown in a step 2010.
The resulting
test current is then measured for the third time interval t3, as shown in a
step 2012.
Now that test current values have been collected by a test meter, a first
glucose
concentration G1 can be calculated, as shown in a step 2014. The first glucose
concentration G1 can be calculated using Equations 4 or 7. Next, a hematocrit
level H
can be calculated, as shown in a step 2016.
The hematocrit level may be estimated using test current values acquired
during
the glucose test time interval tG. Alternatively, the hematocrit level H may
be estimated
using test current values acquired during the second time interval t2 and the
third time
interval t3. In one embodiment, the hematocrit level H can be estimated using
a
hematocrit equation based upon the first glucose concentration Gland i2. An
exemplary
hematocrit equation is shown in Equation 8:
Eq. 8 H = K5 ln(1i21) + K6 ln(Gi) + K7
where H is the hematocrit level, i2 is at least one current value during the
second time
interval, K5 is a fifth constant, K6 is a sixth constant, and K7 is a seventh
constant. When
GDH-PQQ is the enzyme, K5, K6, and K7 may be about ¨76, 56, and 250,
respectively.
When FAD-GDH is the enzyme, K5, 1(6, and K7 may be about ¨73.5, 58.8, and 213,
respectively. FIG. 10 shows that the estimated hematocrit levels using
Equation 8 has
an approximately linear correlation with actual hematocrit levels measured
with a
reference method.
Once the hematocrit level H has been calculated in step 2016, it is compared
to a
lower predetermined hematocrit level HL, as shown in a step 2018. The lower
predetermined hematocrit level Hi, may be about 30%. If the hematocrit level H
is less
than lower predetermined hematocrit level HL, then the first glucose
concentration G1 is
compared to an upper predetermined glucose concentration Gu, as shown in a
step 2020.
The upper predetermined glucose concentration Gu may be about 300 mg/dL. If
the
hematocrit level H is not less than lower predetermined hematocrit level HL,
then the
hematocrit level H is compared to an upper predetermined hematocrit level Hu,
as
shown in a step 2022. The upper predetermined hematocrit level Hu may be about
50%.
If the hematocrit level H is greater than Hu, then the first glucose
concentration G1 is
CA 02668237 2009-06-03
- 21 -
compared to a lower predetermined glucose concentration GL, as shown in a step
2028.
The lower predetermined glucose concentration GI, may be about 100 mg/dL.
Steps
2018 and 2022 indicate that method 2000 will output first glucose
concentration G1, as
shown in a step 2034, if the hematocrit level H is not less than HL and not
greater than
Hu.
A first function can be used to calculate a correction value Corr, as shown in
a
step 2024, if the first glucose concentration G1 is less than the upper
predetermined
glucose concentration Gu. The first function may be in the form of Equation 9:
Eq. 9 Corr KI(Hu - Gi
where K1 is a first constant and HI, is the lower predetermined hematocrit
level. In one
embodiment K1 and HL may be about -0.004 and about 30%, respectively.
However, if the first glucose concentration G1 is not less than the upper
predetermined glucose concentration Gu, then the second function can be used
to
calculate the correction value Corr, as shown in a step 2026. The second
function may
be in the form of Equation 10:
Eq. 10 Corr = KAHL - (Gmax - Gi)
where K2 is a second constant and G.. is a predetermined maximum glucose
concentration. In one embodiment 1(2 and G. may be about -0.004 and about 600
mg/dL, respectively. The correction value Corr for Equations 9 and 10 may be
restricted to a range of about ¨5 to about zero. Thus, if Corr is less than
¨5, then Corr
is set to ¨5 and if Corr is greater than zero, then Corr is set to zero.
A third function can be used to calculate a correction value Corr, as shown in
a
step 2030, if the first glucose concentration G1 is less than lower
predetermined glucose
concentration GL. The third function may be in the form of Equation 11:
Eq. 11 Corr = 0
_
CA 02668237 2009-06-03
- 22 -
however, if the first glucose concentration G1 is not less than the lower
predetermined
glucose concentration GL, then the fourth function can be used to calculate
the
correction value Corr, as shown in a step 2032. The fourth function may be in
the form
of Equation 12:
Eq. 12 Corr = K4(H ¨ Hu) (G1 ¨
where K4 is a fourth constant, which may be about 0.011. The correction value
Corr for
Equation 12 may be restricted to a range of about zero to about six. Thus, if
Corr is less
than zero, then Corr is set to zero and if Corr is greater than six, then Corr
is set to six.
After calculating Corr with the first function in step 2024, the first glucose
concentration is compared to 100 mg/dL in a step 2036. If the first glucose
concentration is less than 100 mg/dL, then the second glucose concentration G2
is
calculated using a first correction equation, as shown in a step 2038. Note
that the 100
mg/dL represents a glucose threshold and should not be construed as a limiting
number.
In one embodiment, the glucose threshold may range from about 70 mg/dL to
about 100
mg/dL. The first correction equation may be in the form of Equation 13:
Eq. 13 G2 Gi COff.
If the first glucose concentration G1 is not less than 100 mg/dL based on step
2036, then
the second glucose concentration G2 is calculated using a second correction
equation, as
shown in a step 2040. The second correction equation may be in the form of
Equation
14:
G2 = G (1+ Corr)
Eq. 14
100
After the second glucose concentration G2 is calculated in either steps 2038
or 2040, it is
outputted as a glucose reading in a step 2042.
CA 02668237 2009-06-03
- 23 -
After calculating Corr in step 2026, 2030, or 2032, the second glucose
concentration G2 can be calculated using Equation 14, as shown in step 2040.
When
Corr equals zero (as for the third function), the second glucose concentration
G2 equals
the first glucose concentration G1, which can then be outputted as a glucose
reading in
step 2042.
The method 2000 for calculating accurate glucose concentrations in blood
samples having extreme hematocrit levels was verified using blood from several
donors.
FIG. 11 shows a bias plot for a plurality of test strips that were tested with
blood
samples having a wide range of hematocrit levels and glucose concentrations.
More
specifically, FIG. 11 shows the effect of whole blood samples having a wide
range of
hematocrit on the accuracy and precision of the new test system. As shown, the
bias of
the sensor response with respect to the YSI 2700 (Yellow Springs Instruments,
Yellow
Springs, Ohio) is plotted against the plasma glucose concentration. The data
were
obtained with 3 batches of sensors and 4 blood donors. The hematocrit was
adjusted to
20% (squares), 37-45% (circles) or 60% (triangles) prior to spiking the
samples with
glucose. These data suggest that the thin layer cell and tri-pulse approach
for
electrochemical measurement offers the opportunity for improved analytical
performance with blood glucose test systems. Thus, the use of the correction
value
Corr, which depends on the hematocrit level H and the first glucose
concentration G1,
allows for the determination of a more accurate second glucose concentration
G2 even if
the blood sample has an extreme hematocrit level.
Blood Temperature Correction:
Turning back to FIG. 8, blood temperature correction 1814 can be applied to
the
test current values to provide a glucose concentration with an improved
accuracy
because of a reduced effect from temperature. A method for calculating a
temperature
corrected glucose concentration can include measuring a temperature value and
calculating a second correction value Corr2. The second correction value Corr2
can be
based on a temperature value and either first glucose concentration G1 or
second glucose
concentration G2 glucose concentration, both of which as described previously
do not
include a correction for temperature. Accordingly, the second correction value
Corr2
can then be used to correct the glucose concentration G1 or G2 for
temperature.
CA 02668237 2009-06-03
- 24 -
FIG. 12 is a flow diagram depicting an embodiment of the method 1814 of
applying a blood temperature correction. Initially, a glucose concentration
uncorrected
for temperature can be obtained such as first glucose concentration G1 from
step 1810 or
a second glucose concentration G2 from step 1812. While a blood temperature
correction can be applied to either G1 or G2, for simplicity the blood
temperature
correction will be described using G2.
As shown in a step 1910 of the method 1814, a temperature value can be
measured. The temperature can be measured using a thermistor or other
temperature
to reading device that is incorporated into a test meter, or by way of any
number of other
mechanisms or means. Subsequently, a determination can be performed to
determine
whether the temperature value T is greater than a first temperature threshold
T1. As
illustrated in FIG. 12, the temperature threshold T1 is about 15 C. If the
temperature
value T is greater than 15 C, then a first temperature function can be
applied to
determine the second correction value Corr2, as shown in a step 1914. If the
temperature value T is not greater than 15 C, then a second temperature
function can be
applied to determine the second correction value Corr2, as shown in a step
1916.
The first temperature function for calculating the second correction value
Corr2
can be in the form of Equation 15:
Eq. 15 Corr2 = -K9(T - TRT) + 1(10 X GAT ¨ TRT)
where Corr2 is the correction value, K9 is a ninth constant (e.g., 0.57 for
GDH-PQQ and
0.89 for FAD-GDH), T is a temperature value, TRT is a room temperature value
(e.g., 22
C), Kul is a tenth constant (e.g., 0.00023 for GDH-PQQ and 0.00077 for FAD-
GDH),
and G2 is the second glucose concentration. When T is about equal to TRT,
Corr2 is
about zero. In some instances, the first temperature function can be
configured to have
essentially no correction at room temperature such that variation can be
reduced under
routine ambient conditions. The second temperature function for calculating
the second
correction value Corr2 can be in the form of Equation 16:
Eq. 16 Corr2 = (T - TRT) + K12 X GAT ¨ TRT) ¨ K13 X
GAT ¨
T1) K14 X GAT ¨ T1)
CA 02668237 2009-06-03
- 25 -
where Corr2 is the correction value, K11 is an eleventh constant (e.g., 0.57
for GDH-
PQQ and 0.89 for FAD-GDH), T is a temperature value, TRT is a room temperature
value, Kly is a twelfth constant (e.g., 0.00023 for GDH-PQQ and 0.00077 for
FAD-
S GDH), G1 is a first glucose concentration, K13 is a thirteenth constant
(e.g., 0.63 for
GDH-PQQ and 1.65 for FAD-GDH), T1 is a first temperature threshold, and K14 is
a
fourteenth constant (e.g., 0.0038 for GDH-PQQ and 0.0029 for FAD-GDH).
After the Corr2 is calculated using either step 1914 or 1916, a couple of
truncation functions can be performed to ensure that Corr2 is constrained to a
pre-
determined range, thereby mitigating the risk of an outlier. In one embodiment
Corr2
can be limited to have a range of-10 to +10 by using a step 1918 and/or a step
1922. In
the step 1918, a determination can be performed to determine whether Corr2 is
greater
than 10. If Corr2 is greater than 10, the Corr2 is set to 10, as shown in a
step 1920. If
Corr2 is not greater than 10, then a determination is performed to determine
whether
Corr2 is less than -10, as shown in a step 1922. Corr2 can be set to ¨10 if
Corr2 is less
than ¨10, as shown in a step 1924. If Corr2 is a value already in between -10
and +10,
then there generally is no need for truncation.
Once Corr2 is determined, a temperature corrected glucose concentration can be
calculated using either a step 1928 or a step 1930. In a step 1926, a
determination can
be performed to determine whether the glucose concentration uncorrected for
temperature (e.g., G2) is less than 100 mg/dL. If Gy is less than 100 mg/dL,
then an
Equation 17 can be used to calculate the temperature corrected glucose
concentration G3
by adding the correction value Corr2 to the second glucose concentration G2:
Eq. 17 G3 = Gy+ COITy.
If Gy is not less than 100 mg/dL, then an Equation 18 can be used to calculate
the
temperature corrected glucose concentration G3 by dividing Corr2 by one
hundred,
adding one; and then multiplying by the second glucose concentration Gy:
Eq. 18 G3 = G2 [1 + 0.01 x Corr2}.
¨ .
CA 02668237 2009-06-03
- 26 -
Once a third glucose concentration is determined that has been corrected for
the
effects of temperature, the third glucose concentration can be outputted, as
shown in a
step1932.
The method 1814 for blood temperature correction was verified using blood in a
glove box over a temperature range of about 5 C to 45 C. The blood samples
had a
hematocrit range of about 20-50 hematocrit and a glucose range of about 20-600
mg/dL equivalent plasma glucose concentration. The glove box was an enclosed
chamber that could hold a pre-determined constant temperature. The glove
portion of
the glove box allowed a tester outside of the glove box to perform a glucose
test inside
the glove box. The tester inserted test strips into a test meter and dose
sampled in an
environment having both a controlled temperature and relative humidity (RH).
The RH
was maintained at about 60% in order to keep evaporation of the sample
droplets at a
relatively low level during the test. Generally the RH should not be too high
to prevent
condensation from occurring on the test meter. The blood was equilibrated to
37 C
outside the glove box, pipetted onto parafilm, rapidly moved into the glove
box, and
applied to the strips. This particular method allowed for the simulation of
dosing
capillary blood off a finger. FIG. 13 shows that temperature has a substantial
bias on the
blood results when there is no temperature compensation function in the test
meters
because only about 83.4% of biases were within 15% or 15 mg/dL of the
reference
glucose value. In contrast, as seen in FIG. 14, there is much less bias on the
blood
results when there is a temperature compensation in the test meters because
far less
biases percentage-wise were located outside of the 15% or 15 mg/dL range of
the
reference glucose value when compared to the results of FIG. 13.
Control Solution Temperature Correction:
FIG. 15 is a flow diagram depicting an embodiment of the method 1826 of
applying a CS temperature correction. The CS temperature correction is similar
to the
blood temperature correction except that the temperature function for
calculating Corr2
is different.
Initially, a glucose concentration uncorrected for temperature can be obtained
such as first glucose concentration G1 from step 1824. Next, a temperature
value can be
measured, as shown in a step 1910. A third temperature function can be applied
to
_
_
CA 02668237 2009-06-03
- 27 -
determine the second correction value Corr2 for CS, as shown in a step 1934.
The third
temperature function for calculating the second correction value Corr2 can be
in the
form of Equation 19:
Eq. 19 Corr2= -1C15(T - TRT) - K16 X GAT - TRT)
where K15 is a fifteenth constant (e.g., 0.27 for GDH-PQQ and 0.275 for FAD-
GDH), T
is a temperature value, TRT is a room temperature value (e.g., 22 C), K16 is
a sixteenth
constant (e.g., 0.0011 for GDH-PQQ and 0.00014 for FAD-GDH), and G2 is the
second
glucose concentration.
After the Corr2 is calculated using step 1934, a couple of truncation
functions
can be performed to ensure that Corr2 is constrained to a pre-determined
range. In one
embodiment Corr2 can be limited to have a range of ¨10 to +10 by using a step
1918
and/or a step 1922, as shown in FIG. 20. In step 1918, a determination can be
performed to determine whether Corr2 is greater than 10. If Corr2 is greater
than 10, the
Corr2 can be set to 10, as shown in a step 1920. If Corr2 is not greater than
10, then a
determination can be performed to determine whether Corr2 is less than -10, as
shown in
a step 1922. Corr2 can be set to ¨10 if Corr2 is less than ¨10, as shown in a
step 1924.
Once Corr2 is determined, a temperature corrected glucose concentration for CS
can be calculated using either a step 1928 or a step 1930. In a step 1926, a
determination can be performed to determine whether the glucose concentration
uncorrected for temperature (e.g., G1) is less than 100 mg/dL. If G1 is less
than 100
mg/dL, then third glucose concentration G3 can be calculated by adding G1 +
Corr2, as
shown in step 1928. If G1 is not less than 100 mg/dL, then third glucose
concentration
G3 can be calculated by dividing Corr2 by one hundred, adding one, and then
multiplying by the second glucose concentration to give a temperature
corrected
concentration, as shown in step 1930. Once a third glucose concentration for
CS is
determined that is corrected for the effects of temperature, the third glucose
concentration can be outputted, as shown in a step1932, to either the next
step in method
1800 or to error checks 1000.
CA 02668237 2009-06-03
- 28 -
The method 1826 for CS temperature correction was verified in a glove box over
a temperature range of about 5 C to 45 C. The relative humidity (RH) was
maintained
at about 60%. FIG. 16 shows that temperature has a substantial bias on the CS
results
when there is no temperature compensation function in the meters because a
fair amount
of the results fall outside of 15% or 15 mg/dL of the reference glucose value.
In
contrast, as seen in FIG. 17, there is much less bias on the blood results
when there is a
temperature compensation in the test meters because none of the results were
located
outside of the 15% or 15 mg/dL range of the glucose value.
Identifying System Errors:
Various embodiments of a method for identifying various system errors, which
may include user errors when performing a test, test meter errors, and
defective test
strips, are also provided. The system can be configured to identify a test
utilizing a
partial fill or double-fill of a sample chamber. Also, the system can be
configured to
identify those situation where the sample may be leaking from the sample
chamber
thereby compromising the integrity of the testing and/or those situations
where some
portion of system (e.g., the test strip) is damaged.
For example, FIG. 18 is a flow diagram depicting an exemplary embodiment of a
method 1000 of identifying system errors in performing an analyte measurement.
As
shown, a user can initiate a test by applying a sample to a test strip, as
shown in a step
1002. After the sample has been dosed, the test meter applies a first test
voltage V1 for a
first time interval t1, as shown in a step 1004a. A resulting test current is
then measured
for the first time interval th as shown in a step 1005a. During the first time
interval ti,
the test meter can perform a double dose check 1006a and a maximum current
check
1012a. If either the double dose check 1006a or maximum current check 1012a
fails,
then the test meter will display an error message, as shown in a step 1028. If
the double
dose check 1006a and maximum current check 1012a both pass, then the test
meter can
apply a second test voltage V2 for a second time interval t2, as shown in a
step 1004b.
A resulting test current is measured for the second time interval t2, as shown
in a
step 1005b. During the application of the second test voltage V2, the test
meter can
perform a sufficient volume check 1030, a double dose check 1006b, a maximum
current check 1012b, and a minimum current check 1014b. If one of the checks
1030,
CA 02668237 2012-02-06
- 29 -1006b, 1012b, or 1014b fails, then the test meter will display an error
message, as shown
in step 1028. If all of the checks 1030, 1006b, 1012b, and 1014b pass, then
the test
meter will apply a third test voltage V3, as shown in a step 1004c.
A resulting test current is measured for the third time interval t3, as shown
in a
step 1005c. During the application of the third test voltage V3, the test
meter can
perform a double dose check 1006c, maximum current check 1012c, a minimum
current
check 1014c, a high resistance check 1022c, and a sample leakage check 1024c.
If all of
the checks 1006c, 1012c, 1014c, 1022c, and 1024c pass, then the test meter
will display
a glucose concentration, as shown in a step 1026. If one of the checks 1006c,
1012c,
1014c, 1022c, and 1024c fails, then the test meter will display an error
message, as
shown in step 1028. The following will describe the system checks and how
errors can
be identified using such system checks.
Sufficient Volume Check
In one embodiment for performing a sufficient volume check, a capacitance
measurement is used. The capacitance measurement can measure essentially an
ionic
double-layer capacitance resulting from the formation of ionic layers at the
electrode-
liquid interface. A magnitude of the capacitance can be proportional to the
area of an
electrode coated with sample. Once the magnitude of the capacitance is
measured, if the
value is greater than a threshold and thus the test strip has a sufficient
volume of liquid
for an accurate measurement, a glucose concentration can be outputted, but if
the value
is not greater than a threshold and thus the test strip has an insufficient
volume of liquid
for an accurate measurement, then an error message can be outputted.
By way of non-limiting example, methods and mechanisms for performing
capacitance measurements on test strips can be found in U.S. Patents Nos.
7,195,704 and
7,199,594. In one
method for measuring capacitance, a test voltage having a constant component
and an
oscillating component is applied to the test strip. In such an instance, the
resulting test
current can be mathematically processed, as described in further detail below,
to
determine a capacitance value.
CA 02668237 2009-06-03
- 30 -
Generally, when a limiting test current occurs at a working electrode having a
well-defined area (i.e., an area not changing during the capacitance
measurement), the
most accurate and precise capacitance measurements in an electrochemical test
strip can
be performed. A well-defined electrode area that does not change with time can
occur
when there is a tight seal between the electrode and the spacer. The test
current is
relatively constant when the current is not changing rapidly due either to
glucose
oxidation or electrochemical decay. Alternatively, any period of time when an
increase
in signal, which would be seen due to glucose oxidation, is effectively
balanced by a
decrease in signal, which accompanies electrochemical decay, can also be an
appropriate
time interval for measuring capacitance.
An area of first electrode 166 can potentially change with time after dosing
with
the sample if the sample seeps in between the spacer 60 and the first
electrode 166. In
an embodiment of a test strip, reagent layer 72 can be have an area larger
than the cutout
area 68 that causes a portion of the reagent layer 72 to be in between the
spacer 60 and
the first electrode layer 66. Under certain circumstances, interposing a
portion of the
reagent layer 72 in between the spacer 60 and the first electrode layer 66 can
allow the
wetted electrode area to increase during a test. As a result, a leakage can
occur during a
test that causes the area of the first electrode to increase with time, which
in turn can
distort a capacitance measurement.
In contrast, an area of second electrode 164 can be more stable with time
compared to the first electrode 166 because there is no reagent layer in
between the
second electrode 164 and the spacer 60. Thus, the sample is less likely to
seep in
between the spacer 60 and the second electrode 164. A capacitance measurement
that
uses a limiting test current at the second electrode 164 can thus be more
precise because
the area does not change during the test.
Referring back to FIG. 6, once liquid is detected in the test strip, a first
test
voltage V1(e.g., -20 mV) can be applied between the electrodes for about 1
second to
monitor the fill behavior of the liquid and to distinguish between control
solution and
blood. In Equation 1, the test currents are used from about 0.05 to 1 second.
This first
test voltage V1can be relatively low (i.e., the test voltage is similar in
magnitude to the
redox potential of the mediator) such that the distribution of ferrocyanide in
the cell is
disturbed as little as possible by the electrochemical reactions occurring at
the first and
CA 02668237 2009-06-03
- 31 -
second electrodes.
A second test voltage V2 (e.g., -300 mV) having a larger absolute magnitude
can
be applied after the first test voltage V1 such that a limiting current can be
measured at
the second electrode 164. The second test voltage V2 can include an AC voltage
component and a DC voltage component. The AC voltage component can be applied
at
a predetermined amount of time after the application of the second test
voltage V2, and
further, can be a sine wave having a frequency of about 109 Hertz and an
amplitude of
about +1-50 millivolts. In a preferred embodiment, the predetermined amount of
time
can range from about 0.3 seconds to about 0.4 seconds after the application of
the
second test voltage V2. Alternatively, the predetermined amount of time can be
a time
where a test current transient as a function of time has a slope of about
zero. In another
embodiment, the predetermined amount of time can be a time required for a peak
current
value (e.g., ipb) to decay by about 50%. As for the DC voltage, it can be
applied at a
beginning of the first test voltage. The DC voltage component can have a
magnitude
sufficient to cause a limiting test current at the second electrode such as,
for example,
about ¨0.3 volts with respect to the second electrode.
Consistent with FIG. 4B, the reagent layer 72 is not coated onto the second
electrode 164, which causes the magnitude of the absolute peak current ipb to
be
relatively low compared to the magnitude of the absolute peak current ipc. The
reagent
layer 72 can be configured to generate a reduced mediator in a presence of an
analyte,
and the amount of the reduced mediator proximate to first electrode can
contribute to the
relatively high absolute peak current ipc. In one embodiment at least the
enzyme portion
of the reagent layer 72 can be configured to not substantially diffuse from
the first
electrode to the second electrode when a sample is introduced into the test
strip.
The test currents after ipb tends to settle to a flat region at approximately
1.3
seconds, and then the current increases again as the reduced mediator
generated at the
first electrode 166, which can be coated with the reagent layer 72, diffuses
to the second
electrode 164, which is not coated with the reagent layer 72. Generally, the
glucose
algorithm requires test current values both before and after the test interval
of about 1.3
to about 1.4 seconds. For example, ipb is measured at 1.1 seconds in Equation
7and test
4
currents are measured at 1.4 seconds onwards for i3 = Ei(t).
t=1,4
..
CA 02668237 2009-06-03
- 32 -
In one embodiment, a capacitance measurement can be performed at a relatively
flat region of the test current values, which can be performed at about 1.3
seconds to
about 1.4 seconds. Generally, if the capacitance is measured before 1 second,
then the
capacitance measurement can interfere with the relatively low first test
voltage Vi that
can be used in the CS/blood discrimination test 1806. For example, an
oscillating
voltage component on the order of +/- 50 mV superimposed onto a -20 mV
constant
voltage component can cause significant perturbation of the measured test
current. Not
only does the oscillating voltage component interfere with the first test
voltage VI, but it
can also significantly perturb the test currents measured after 1.4 seconds,
which in turn
can interfere with the blood glucose algorithm 1810. Following a great deal of
testing
and experimentation, it was finally determined that, surprisingly, measuring
the
capacitance at about 1.3 seconds to about 1.4 seconds resulted in accurate and
precise
measurements that did not interfere with the CS/blood discrimination test or
the glucose
algorithm.
After the second test voltage V2, the third test voltage V3 (e.g., +300 mV)
can be
applied causing the test current to be measured at the first electrode 166,
which can be
coated with the reagent layer 72. Te presence of a reagent layer on the first
electrode
can allow penetration of liquid between the spacer layer and the electrode
layer, which
can cause the electrode area to increase.
As illustrated in FIG. 6, in an exemplary embodiment a 109 Hz AC test voltage
( 50 mV peak-to-peak) can be applied for 2 cycles during the time interval
tcap. The
first cycle can be used as a conditioning pulse and the second cycle can be
used to
determine the capacitance. The capacitance estimate can be obtained by summing
the
test current over a portion of the alternating current (AC) wave, subtracting
the direct
current (DC) offset, and normalizing the result using the AC test voltage
amplitude and
the AC frequency. This calculation provides a measure of the capacitance of
the strip,
which is dominated by the strip sample chamber when it is filled with a
sample.
In one embodiment the capacitance can be measured by summing the test current
over one quarter of the AC wavelength on either side of the point in time
where the
input AC voltage crosses the DC offset, i.e. when the AC component of the
input
voltage is zero (the zero crossing point). A derivation of how this translates
to a
measure of the capacitance is described in further detail below. Equation 20
can show
CA 02668237 2009-06-03
- 33 -
the test current magnitude as a function of time during the time interval
tcap:
Eq. 20 i(t) = io + St + I sin(cot + (1))
where the terms io + st represent the test current caused by the constant test
voltage
component. Generally, the DC current component is considered as changing
linearly
with time (due to the on-going glucose reaction generating ferrocyanide) and
is thus
represented by a constant 10, which is the DC current at time zero (the zero
crossing
point), and s, the slope of the DC current change with time. The AC current
component
is represented by I sin(c)t + 0, where I is the amplitude of the current wave,
co is its
frequency, and 0 is its phase shift relative to the input voltage wave. The
term co can
also be expressed as 2nf, , where f is the frequency of the AC wave in Hertz.
The term I
can also be expressed as shown in Equation 21:
V
Eq. 21 = ¨
1Z1
where V is the amplitude of the applied voltage signal and 21 is the magnitude
of the
complex impedance. The term 21 can also be expressed as shown in Equation 22:
Eq. 22 IZI = _____
-V1+ tan2 0 0)2R2c2
where R is the real part of the impedance and C is the capacitance.
Equation 20 can be integrated from one quarter wavelength before the zero
crossing point to one quarter wavelength after the zero crossing point to
yield Equation
23:
Eq. 23 Pvf i(t) = i0 fry
4f +_s 1.2 Y4f
+/Of sin(cot + 0) ,
/4f Y4./ 2 4f 74f
_
CA 02668237 2009-06-03
- 34 -
which can be simplified to Equation 24:
p, I sin
f
Eq. 24 /(t) ¨ +
74f 2f nf
By substituting Eq. 21 into Eq. 20, then into Eq. 23, and then rearranging,
Equation 25
results:
Eq. 25
2V (,Y4 2f )
The integral term in Equation 25 can be approximated using a sum of currents
shown in
an Equation 26:
n
Eq. 26 raf i(t) n k.1
2f
where the test currents ik are summed from one quarter wavelength before the
zero
crossing point to one quarter wavelength past the zero crossing point.
Substituting
Equation 26 into Equation 25 yields Equation 27:
1 "
-Eik o
Eq. 27 C = n __ ".1
4Vf
in which the DC offset current io can be obtained by averaging the test
current over one
full sine cycle around the zero crossing point.
In another embodiment, the capacitance measurements can be obtained by
summing the currents not around the voltage zero crossing point, but rather
around the
maximum AC component of the current. Thus, in Equation 26, rather than sum a
quarter wavelength on either side of the voltage zero crossing point, the test
current can
CA 02668237 2009-06-03
- 35 -
be summed a quarter wavelength around the current maximum. This is tantamount
to
assuming that the circuit element responding to the AC excitation is a pure
capacitor, so
0 is 7r/2. Thus, Equation 24 can be reduced to Equation 28:
Eq. 28
i4f 2f IV'
This is a reasonable assumption in this case as the uncoated electrode is
polarized such
that the DC, or real, component of the current flowing is independent of the
voltage
applied over the range of voltages used in the AC excitation. Accordingly, the
real part
of the impedance responding to the AC excitation is infinite, implying a pure
capacitive
element. Equation 28 can then be used with Equation 25 to yield a simplified
capacitance equation that does not require an integral approximation. The net
result is
that capacitance measurements when summing the currents not around the voltage
crossing point, but rather around the maximum AC component of the current,
were more
precise.
In one exemplary embodiment the microprocessor of the test meter can have a
heavy load with calculating the glucose concentration. In such an instance,
because the
capacitance data acquisition needs to be made part way through the test rather
than at its
beginning, it can be necessary to defer the processing of the capacitance
measurement
data until after the determination of the glucose concentration is completed.
Thus, once
the glucose measurement part of the test is completed, the capacitance can be
calculated,
and if the capacitance is below a pre-determined threshold, a partial fill
error can be
flagged.
Under certain circumstances the capacitance measurement can depend on the
environmental temperature. To measure capacitance in an accurate and precise
manner
for determining electrode fill volumes, the effect of temperature can be
reduced using a
temperature correction for blood as shown in Equation 29:
Eq. 29 Capc.õ = Cap ¨1.9 x T
CA 02668237 2009-06-03
- 36 -
where Cancorr is the temperature corrected capacitance value, Cap is
capacitance, and T
is temperature.
The effect of temperature can be removed using a temperature correction for CS
as shown in Equation 30:
Eq. 30 Cap., = Cap ¨0.56 x T.
The temperature-corrected capacitance values from Equations 29 and 30 can be
used for
identifying partially filled test strips.
As illustrated by Table 1 below, a different temperature-corrected capacitance
threshold value will be required for blood and control solution. The threshold
should
generally be set four (4) standard deviation units below the mean.
Statistically this
equates to a 99.994% certainty that no complete fill will be identified as a
partial fill.
The temperature-corrected capacitance threshold value for blood will be about
450 nF,
and the corresponding value for control solution will be about 560 nF. These
values can
be programmed into a memory portion of the test meters. In an alternative
embodiment,
the threshold value can be adjusted by the operator depending on the intended
use.
Table 1 - Temperature-corrected capacitance values for complete fills
Parameter All bloods results All CS results
Mean capacitance (nF) 515 664
SD (nF) 16 27
Mean -4*SD (nF) 451 556
The chart of FIG. 19 shows a correlation of capacitance and bias to a
reference
glucose measurement (YSI, Yellow Springs Instrument). The measured glucose
concentrations were converted to a bias by comparing it to a glucose
measurement
performed with a reference instrument. Several test strips were filled with
various
volumes of blood, and the capacitance and glucose concentrations were measured
with
the test voltage waveform of FIG. 6. More particularly, the capacitance was
measured
during the third test voltage V3 where the test current is relatively large
and decreases
rapidly with time. Additionally, the capacitance measurements were performed
where
-
CA 02668237 2009-06-03
- 37 -
the limiting test current occurs on the first electrode, which has a reagent
layer coating.
If it is assumed that the main contributor to the bias to YSI is caused by the
percentage partial coverage of the electrodes with liquid, then the
capacitance values
should form a straight line with relatively little scatter when correlated to
the YSI bias.
For example, a 50% negative bias to YSI should correspond to a 50% decrease in
capacitance compared to a fully-filled test strip. Thus, if it is also assumed
that the strip-
to-strip variation in bias is relatively small, then the relatively large
scatter of data points
in FIG 19 can be ascribed to a relatively large variation in the capacitance
measurements. It was found that capacitance variation was caused by performing
the
capacitance measurement during the third test voltage where the test current
values are
generally not relatively constant.
A relatively large scatter in the capacitance measurements could cause a
significant number of fully-filled test strips to be rejected. Further, a
large capacitance
variation can cause some capacitance measurements to be biased low, and thus,
be
below a sufficiently filled threshold resulting in a falsely identified
partial fill.
The chart of FIG. 20 shows a correlation of capacitance (measured at about 1.3
seconds) and bias to a reference glucose measurement (YSI, Yellow Springs
Instrument). Several test strips were filled with various volumes of blood,
and the
capacitance and glucose concentrations were measured with the test voltage
waveform
of FIG. 6. More particularly, the capacitance was measured during the second
test
voltage V2 where the test current is relatively constant. In addition, the
capacitance
measurement was performed where the limiting test current occurs on the second
electrode, which did not have a reagent layer coating. In contrast to FIG. 19,
the data in
FIG. 20 shows that the capacitance values are less scattered.
The chart of FIG. 21 shows a correlation of capacitance (measured at about 1.3
seconds) and bias to a reference glucose measurement (YSI, Yellow Springs
Instrument). Several test strips were filled with various volumes of CS, and
the
capacitance and glucose concentrations were measured with the test voltage
waveform
of FIG. 6. Similar to FIG. 20, the data in FIG. 21 shows that the capacitance
values
have a relatively low amount of variation when performed during this time
interval.
CA 02668237 2009-06-03
- 38 -
Double-Dosing Events
A double dose occurs when a user applies an insufficient volume of blood to a
sample-receiving chamber and then applies a subsequent bolus of blood to
further fill
the sample-receiving chamber. An insufficient volume of blood expressed on a
user's
fingertip or a shaky finger can cause the occurrence of a double-dosing event.
The
currently disclosed system and method can be configured to identify such
double-fill
events. For example, FIG. 22 shows a test current transient where a user
performed a
double-dosing event during the second test time interval t2 that caused a
spike to be
observed (see solid line). When there is no double-dosing event, the test
current
transient does not have a peak (see dotted line of FIG. 22).
A double-dosing event can cause a glucose test to have an inaccurate reading.
Thus, it is usually desirable to identify a double-dosing event and then have
the meter
output an error message instead of outputting a potentially inaccurate
reading. A
double-dosing event initially causes the measured test current to be low in
magnitude
because the electrode area is effectively decreased when only a portion is
wetted with
sample. Once the user applies the second dose, a current spike will occur
because of a
sudden increase in the effective electrode area and also because turbulence
causes more
reduced mediator to be transported close to the working electrode. In
addition, less
ferrocyanide will be generated because a portion of the reagent layer is not
wetted by
sample for the entire test time. Thus, an inaccurate glucose reading can
result if a test
current value used in the glucose algorithm is depressed or elevated as a
result of the
double-dosing.
A method of identifying a double-dosing event (1006a, 1006b, or 1006c) may
include measuring a second test current and a third test current where the
second test
current occurs before the third test current. An equation may be used to
identify double-
dosing events based on a difference between the absolute value of the third
test current
and the absolute value of the second test current. If the difference is
greater than a
predetermined threshold, the test meter may output an error message indicative
of a
double-dosing event. The method of identifying the double-dosing event may be
performed multiple times in serial manner as the test current values are
collected by the
test meter. The equation can be in the form of Equation 31 for calculating a
difference
value Z2 for determining whether a double-dosing event had occurred:
_
CA 02668237 2009-06-03
- 39 -
Eq. 31 Z2 = abs(i(t+x)) ¨ abs(i(t))
where i(t) is a second test current, i(t+x) is a third test current, t is a
time for the second
test current, and x is an increment of time in between current measurements.
If the value
Z2 is greater than a predetermined threshold of about three (3) microamperes,
then the
test meter may output an error message due to a double-dosing event. The
predetermined thresholds disclosed herein are illustrative for use with test
strip 100 and
with the test voltage waveform of FIG. 6 where working electrode and reference
electrode both have an area of about 0.042 cm2 and a distance between the two
electrodes ranging from about 90 microns to about 100 microns. It should be
obvious to
one skilled in the art that such predetermined thresholds may change based on
the test
strip design, the test voltage waveform, and other factors.
In another embodiment for identifying a double-dosing event (e.g., 1006a,
1006b, or 1006c), a method may include measuring a first test current, a
second test
current, and third test current where the first test current occurs before the
second test
current and the third test current occurs after the second test current. An
equation may
be used to identify double-dosing events based on two times the absolute value
of the
second test current minus the absolute value of first test current and minus
the absolute
value of the third test current. The equation may be in the form of Equation
32 for
calculating a summation value Y for determining whether a double-dosing event
had
occurred:
Eq. 32 Y = 2*abs(i(t)) ¨ abs(i(t-x)) ¨
abs(i(t+x))
where i(t) is a second test current, i(t-x) is a first test current, i(t+x) is
a third test
current, t is a time for the second test current, and x is an increment of
time in between
measurements, and abs represents an absolute function. If the summation value
Y is
greater than a predetermined threshold, then the test meter may output an
error message
due to a double-dosing event. The predetermined threshold may be set to a
different
value for the first time interval ti, second time interval t2, and third time
interval t3.
¨ ¨
CA 02668237 2009-06-03
-40 -
In one embodiment the predetermined threshold may be about two (2)
microamperes for the first time interval t1, about two (2) microamperes for
the second
time interval t2, and about three (3) microamperes for the third time interval
t3. The
predetermined thresholds may be adjusted as a result of the following factors
such as
noise in the test meter, frequency of test current measurements, the area of
the
electrodes, the distance between the electrodes, the probability of a false
positive
identification of a double-dosing event, and the probability of a false
negative
identification of a double-dosing event. The method of identifying the double-
dosing
event using Equation 32 can be performed for multiple portions of the test
current
transient. It should be noted that Equation 32 can be more accurate than
Equation 31 for
identifying double-dosing events because the first test current and third test
current
provide a baseline correction. When using the test voltage waveform of FIG. 6,
the
double-dosing check can be performed at a time period just after the beginning
of the
first, second, and third time intervals because a peak typically occurs at the
beginning of
the time intervals. For example, the test currents measured at zero seconds to
about 0.3,
1.05, and 4.05 seconds should be excluded from the double-dosing check.
Maximum Current Check
As referred to in steps 1012a, 1012b, and 1012c of FIG. 18, a maximum current
check can be used to identify a test meter error or a test strip defect. An
example of a
test meter error occurs when the blood is detected late after it is dosed. An
example of a
defective test strip occurs when the first and second electrode are shorted
together. FIG.
23 shows a test current transient where the test meter did not immediately
detect the
dosing of blood into the test strip (see solid line). In such a scenario, a
late start will
generate a significant amount of ferrocyanide before the second test voltage
V2 is
applied causing a relatively large test current value to be observed. In
contrast, when the
test meter properly initiates the test voltage waveform once blood is applied,
the test
current values for the second time interval are much smaller, as illustrated
by the dotted
line in FIG. 23.
A late start event can cause an inaccurate glucose reading. Thus, it would be
desirable to identify a late start event and then have the meter output an
error message
instead of outputting an inaccurate reading. A late start event causes the
measured test
CA 02668237 2009-06-03
- 41 -
current to be larger in magnitude because there is more time for the reagent
layer to
generate ferrocyanide. Thus, the increased test current values will likely
distort the
accuracy of the glucose concentration.
In addition to a test meter error, a short between the first and second
electrode
can cause the test current to increase. The magnitude of this increase depends
on the
magnitude of the shunting resistance between the first and second electrode.
If the
shunting resistance is relatively low, a relatively large positive bias will
be added to the
test current causing a potentially inaccurate glucose response.
Maximum current check (1012a, 1012b, and 1012c) can be performed by
comparing the absolute value of all of the measured test current values to a
predetermined threshold and outputting an error message if the absolute value
of one of
the measured test current values is greater than the predetermined threshold.
The
predetermined threshold can be set to a different value for the first, second,
and third test
time intervals (t1, t2, and t3). In one embodiment, the predetermined
threshold may be
about 50 microamperes for the first time interval ti, about 300 microamperes
for the
second time interval t2, and about 3000 microamperes for the third time
interval t3.
Minimum Current Check:
As referred to in steps 1014b and 1014c of FIG. 18, a minimum current check
can be used to identify a false start of a glucose test, an improper time
shift by a test
meter, and a premature test strip removal. A false start can occur when the
test meter
initiates a glucose test even though no sample has been applied to the test
strip.
Examples of situations that can cause a test meter to inadvertently initiate a
test are an
electrostatic discharge event (ESD) or a temporary short between first and
second
electrodes. Such events can cause a relatively large current to be observed
for a least a
short moment in time that initiates a test even though no liquid sample has
been
introduced into the test strip.
An inadvertent initiation of a glucose test can cause a test meter to output a
low
glucose concentration even though no sample has yet been applied to the test
strip.
Thus, it would be desirable to identify an inadvertent initiation of a glucose
test so that
the test meter does not output a falsely low glucose reading. Instead, the
test meter
should provide an error message that instructs the user to re-insert the same
test strip or
CA 02668237 2009-06-03
- 42 -
to insert a new test strip for performing the test again.
A time shifting error by the test meter can occur when the third test voltage
V3 is
applied early or late. An early application of the third test voltage V3
should cause the
test current value at the end of the second time interval t2 to be a
relatively large current
value with a positive polarity instead of a relatively small current value
with a negative
polarity. A late application of the third test voltage V3 should cause the
test current
value at the beginning of the third time interval to be a relatively small
current value
with a negative polarity instead of a relatively large current value with a
positive
to polarity. For both the early and late application of the third test
voltage V3, there is a
possibility of causing an inaccurate glucose result. Therefore, it would be
desirable to
identify a time shifting error by the test meter using the minimum current
check so that
an inaccurate glucose reading does not occur.
A premature removal of a test strip from the test meter before the end of a
glucose test can also cause an inaccurate glucose reading to occur. A test
strip removal
would cause the test current to change to a value close to zero potentially
causing an
inaccurate glucose output. Accordingly, it would also be desirable to identify
a
premature strip removal using a minimum current check so that an error message
can be
provided instead of displaying an inaccurate glucose reading.
The minimum current check may be performed by comparing the absolute value
of all of the measured test current values during the second and third time
intervals (t2
and t3) to a predetermined threshold and outputting an error message if the
absolute
value of one of the measured test current values is less than a predetermined
threshold.
The predetermined threshold may be set to a different value for the second and
third test
time intervals. However, in one embodiment, the predetermined threshold may be
about
1 microampere for the first time interval t1 and the second time interval t2.
Note that the
minimum current check was not performed for the first time interval because
the test
current values are relatively small because the first test voltage Vi is close
in magnitude
to the redox potential of the mediator.
High Resistance Track:
As referred to in step 1022c of FIG. 18, a high resistance track can be
detected
on a test strip that can result in an inaccurate glucose reading. A high
resistance track
CA 02668237 2009-06-03
- 43 -
can occur on a test strip that has an insulating scratch or a fouled electrode
surface. For
the situation in which the electrode layers are made from a sputtered gold
film or
sputtered palladium film, scratches can easily occur during the handling and
manufacture of the test strip. For example, a scratch that runs from one
lateral edge 56
to another lateral edge 58 on first electrode layer 66 can cause an increased
resistance
between first contact pads 67 and first electrode 166. Sputtered metal films
tend to be
very thin (e.g., 10 to 50 nm) making them prone to scratches during the
handling and
manufacture of the test strip. In addition, sputtered metal films can be
fouled by
to exposure to volatile compounds such as hydrocarbons. This exposure
causes an
insulating film to form on the surface of the electrode, which increases the
resistance.
Another scenario that can cause a high resistance track is when the sputtered
metal film
is too thin (e.g., <<10 nm). Yet another scenario that can cause a high
resistance track is
when the test meter connectors do not form a sufficiently conductive contact
to the test
strip contact pads. For example, the presence of dried blood on the test meter
connectors can prevent a sufficiently conductive contact to the test strip
contact pads.
FIG. 24 shows two test current transients during a third time interval t3 for
a test
strip having a high resistance track (squares) and a low resistance track
(triangles). A
sufficiently high track resistance R that is between the electrode and the
electrode
contact pad can substantially attenuate the magnitude of the effectively
applied test
voltage Veff, which in turn can attenuate the magnitude of the resulting test
current. The
effective test voltage Veff can be described by Equation 33:
Eq. 33 Veff V ¨ i(t)R.
Generally, Veff will be the most attenuated at the beginning of the third time
interval t3
where the test current will generally have the highest magnitude. The
combination of a
relatively large R and a relatively large test current at the beginning of the
third time
interval t3 can cause a significant attenuation in the applied test voltage.
In turn, this
could cause an attenuation of the resulting test current at the beginning of
the third time
interval t3, as illustrated in FIG. 24 at t=4.05 seconds. Such attenuation in
the peak
current immediately at about 4.05 seconds can cause the calculated glucose
concentration to be inaccurate. In order to avoid significant attenuation in
the applied
-
CA 02668237 2009-06-03
- 44 -
test voltage, R should be a relatively small value (i.e., low track
resistance). In one
embodiment, a low resistance track may be represented by an electrode layer
having a
resistivity of less than about 12 ohms per square and a high resistance track
may be
represented by an electrode layer having a resistivity of greater than about
40 ohms per
square.
A determination of whether a test strip has a high track resistance can use an
equation based on a first test current ii and a second test current i2 that
both occur during
the third time interval t3. The first test current i may be measured at about
a beginning
of the third time interval t3 (e.g., 4.05 seconds) where the magnitude is at a
maximum or
close to the maximum. The second test current i2 may be measured at about an
end of
the third time interval t3 (e.g., 5 seconds) where the magnitude is at the
minimum or
close to the minimum.
The equation for identifying a high track resistance may be in the form of
Equation 34:
Eq. 34 R1= ____
11 ¨ 12
If first ratio R1 is greater than a predetermined threshold, then the test
meter may output
an error message due to the test strip having a high resistance track. The
predetermined
threshold may be about 1.2. It is significant that the first test current i1
is about a
maximum current value because it is the most sensitive to resistance
variations
according to Equation 33. If a first test current ill is measured at a time
that was closer to
the minimum current value, then Equation 34 would be less sensitive for
determining
whether a high resistance track was present. It is advantageous to have
relatively low
variation in the first ratio R1when testing low resistance test strips. The
relatively low
variation decreases the likelihood of mistakenly identifying a high resistance
track test
strip. As determined and described herein, the variation of first ratio R1
values for test
strips having a low resistance track is about four times lower when a first
test current
value i1 was defined as a current value immediately after the application of
the third test
voltage V3, as opposed to being a sum of current values during the third time
interval t3.
When there is a high variation in first ratio R1values for low resistance test
strips, the
CA 02668237 2009-06-03
-45 -
probability of mistakenly identifying a high resistance track increases.
FIG. 25 is a chart showing a plurality of R1 values calculated with Equation
34
for two test strip lots where one lot has a high resistance track and the
other lot has a low
resistance track. One lot of test strip was purposely manufactured with a high
resistance
track by using palladium electrodes that were purposely fouled by an exposure
to gas
containing hydrocarbons for several weeks. The second test strip lot was
manufactured
without purposely fouling the electrode surface. To prevent fouling, a roll of
sputtered
coated palladium was coated with MESA before coating with the reagent layer.
All of
the low resistance test strips, which were not fouled, had R1 values of less
than 1.1
indicating that Equation 34 could identify low track resistance test strips.
Similarly,
essentially all of the high resistance test strips, which were purposely
fouled, had R1
values of greater than 1.1 indicating that Equation 34 could identify high
track resistance
test strips.
Leakage
As previously referred to in step 1024c in FIG. 18, a leakage can be detected
on a
test strip when the spacer 60 does not form a sufficiently strong liquid
impermeable seal
with the first electrode layer 66. A leakage occurs when liquid seeps in
between the
spacer 60 and the first electrode 166 and/or the second electrode 164. Note
that FIG. 4B
shows a reagent layer 72 that is immediately adjacent to the walls of the
spacer 60.
However, in another embodiment (not shown) where leakage is more likely to
occur,
the reagent layer 72 can be have an area larger than the cutout area 68 that
causes a
portion of the reagent layer 72 to be in between the spacer 60 and the first
electrode
layer 66. Under certain circumstances, interposing a portion of the reagent
layer 72 in
between the spacer 60 and the first electrode layer 66 can prevent the
formation of a
liquid impermeable seal. As a result, a leakage can occur which creates an
effectively
larger area on either the first electrode 166, which in turn, can cause an
inaccurate
glucose reading. An asymmetry in area between the first electrode 166 and the
second
electrode 164 can distort the test current transient where an extra hump
appears during
the third time interval t3, as illustrated in FIG. 26.
CA 02668237 2009-06-03
- 46 -
FIG. 16 shows test current transients during a third time interval t3 for
three
different types of test strip lots where test strip lot 1 (squares) has a
leakage of liquid
between the spacer and the first electrode. Test strip lot 1 was constructed
using a dryer
setting that did not sufficiently dry the reagent layer and also was laminated
with a
pressure setting that was not sufficient to form a liquid impermeable seal to
the
electrodes. Normally, the reagent layer is sufficiently dried so that an
adhesive portion
of the spacer 60 can intermingle with the reagent layer and still form a
liquid
impermeable seal to the first electrode layer 166. In addition, sufficient
pressure must
be applied so that the adhesive portion of the spacer 60 can form the liquid
impermeable
seal to the first electrode layer 166. The test strip lot 2 was prepared
similarly to test
strip lot 1 except that they were stored at about 37 degrees Celsius for about
two weeks.
The storage of the test strip lot 2 caused the spacer to reform creating a
liquid
impermeable seal to the electrodes. Test strip lot 3 was constructed using a
dryer setting
that was sufficient to dry the reagent layer and also was laminated with a
pressure
setting sufficient to form a liquid impermeable seal. Both test strip lots 2
and 3
(triangles and circles respectively) show a more rapid decay in the test
current
magnitude with time compared to test strip 1 (squares), as illustrated in FIG.
26.
A determination of whether a test strip leaks can be performed using an
equation
based on a first test current, a second test current, a third test current,
and a fourth test
current that occur during the third test time interval. A first logarithm of a
second ratio
can be calculated based on a first test current ii and a second test current
i2. A second
logarithm of a third ratio can be calculated based on a third test current i3
and a fourth
test current i4. An equation may be used to calculate a fourth ratio R4 based
on the first
logarithm and the second logarithm. If the fourth ratio R4 is less than a
predetermined
ratio, then the test meter will output an error message due to leakage. The
predetermined threshold may range from about 0.95 to about 1. The equation for
identifying leakage can be in the form of Equation 35:
logL
i2
Eq. 35 R4=
log(-1.3
14
CA 02668237 2009-06-03
-47 -
In one embodiment, the first test current ii and the second test 12 current
may be about
the two largest current values occurring the third time interval t3, the
fourth test current
14 may be a smallest current value occurring the third time interval t3, and
the third test
current i3 may be selected at a third test time so that a difference between
the fourth test
time and a third test time is greater than a difference between a second test
time and a
first test time. In one illustrative embodiment, the first test current, the
second test
current, the third test current, and the fourth test current may be measured
at about 4.1
seconds, 4.2 seconds, 4.5 seconds, and 5 seconds, respectively.
FIG. 27 is a chart showing a plurality of 124 values calculated with Equation
35
for the three test strip lots described for FIG. 26. Accordingly, test strip
lot 1 has fourth
ratio values less than one and both test strip lots 2 and 3 have fourth ratio
R4 values
greater than one indicating that Equation 35can successfully identify strip
leakages.
In an alternative embodiment, a determination of whether a test strip has a
leakage can be performed using an equation based on only three test current
values
instead of using four test current values as shown in Equation 35. The three
test current
values may include a first test current 11, a third test current 13, and a
fourth test current 14
that all occur during the third test time interval t3. A third logarithm of a
fifth ratio may
be calculated based on the first test current 11 and the third test current
13. A second
logarithm of a third ratio may be calculated based on the third test current
13 and the
fourth test current 14. An equation may be used to calculate a sixth ratio R6
based on the
third logarithm and the second logarithm. If R6 is less than a predetermined
ratio, then
the test meter will output an error message due to leakage. The equation for
identifying
leakage may be in the form of Equation 36:
i3
Eq. 36 R5= . =
log(-13
14
)
One skilled in the art will appreciate further features and advantages of the
present disclosure based on the above-described embodiments. Accordingly, the
present
disclosure is not to be limited by what has been particularly shown and
described, except
CA 02668237 2012-02-06
- 48 -
as indicated by the appended claims.