Note: Descriptions are shown in the official language in which they were submitted.
CA 02674784 2013-08-08
,
,
LINEAR COMPENSATOR TOOL FOR DRILL COUNTERSINKING AND SEAL
GROOVE MACHINING
Field of the Invention
This invention relates in general to machining applications, and in particular
to a linear
compensator tool for drill countersinking and seal groove machining. The
linear compensator
tool ensures accurate drill countersinking and seal groove machining
capabilities without control
system feedback.
1
CA 02674784 2009-07-29
Background of the Invention
Current fabrication processes for trimming and drilling, and machining fuel
seal grooves
in composite and metallic aircraft panels utilize standard 3, 4, and 5 axis
Numerically Controlled
(NC) machine tools. Numerous machines of this type exist at aerospace
companies which do not
have integrated capabilities for machining operations to achieve specific seal
groove
widths/depths. Furthermore, these machines typically do not have integrated
capabilities for
performing drill countersinking operations to achieve specific countersink
sizes/depths, and are
relegated to drill-only operations which do not require specific depth
control.
NC machines required to perform these types of processes are forced to
integrate a
complicated, expensive, and time consuming process of measuring and recording
surface profile
variations prior to actual machining and drilling. These recorded part surface
variations are then
used to adjust, or offset, the NC program to account for the deviations from
the engineered
nominal surface. NC Machines outfitted with the capability to perform these
types of processes
are substantially more expensive and complicated due to the added components
and control
hardware and software to operate the system. The lack of viable low-cost drill
countersinking
tools forces companies to convert these machines into accurate drill
countersinking machines
with expensive modifications and/or total machine replacement. This situation
is prevalent
throughout the aircraft industry, both in the commercial and military sectors.
Numerous machines exist today in production throughout the world without the
capability to accurately machine seal grooves and drill countersink without
substantial additional
processes to accommodate the variations seen in composite and/or metallic
panels, including
surface profile variations. Numerically Controlled machines are programmed to
move to a
specific point in space without regard to where the actual part might be
located. It is assumed
2
CA 02674784 2009-07-29
that the part is located within a specific tolerance within the machine's work
cell to achieve the
desired level of accuracy during processing. Very small variations in machine
accuracy and part
location (i.e., as small as .001" ¨smaller than the thickness of a human hair)
will result in seal
groove widths and depths, and countersink diameters out of tolerance.
The primary issues with accurate seal groove machining and drill
countersinking of
composite or metallic parts is knowing or being able to reference the part's
surface profile that
will be machined, or the part's surface that will be drilled. All seal grooves
and countersinks are
referenced by this surface. There is currently no Commercial-Off-The-Shelf
(COTS) seal groove
machining system available in industry which can accurately machine a seal
groove to a
specified width and depth while adjusting to varying part surface profiles
real time without some
type of control system feedback or extensive measurement operations to
identify the actual part
surface profile.
In an expensive and complicated Automated Drilling Machine or Intelligent
Drilling
System the capability of sensing this surface location is incorporated into
the machine and
control system. This allows the machine to countersink to a depth relative to
the sensed part
surface. When the surface is located physically, or by non-contact methods,
the drill countersink
tool is fed a specific distance into the part relative to that surface to
achieve the desired
countersink diameter/depth.
Retrofitting existing machines without the specific designed-in countersinking
and seal
groove machining capabilities is very expensive and results in substantial
machine downtime
during retrofit. Most NC Machines have no or limited available control lines
to the spindle for
intelligent drilling systems. Integration costs for intelligent drilling
systems are extremely costly
and impact machine operations during installation/debugging.
3
CA 02674784 2009-07-29
Summary of the Invention
The drill countersinking and seal groove machining tool proposed in this
patent
application precludes having to implement substantial changes to the machine
and/or additional
processes to accommodate an accurate drill countersinking or seal groove
machining operation.
The functionality of the linear compensator tool allows it to be used like any
other standard tool
which does not require any interface to the control system or special NC
Programming
allowances. This tool can be setup and adjusted off-line of the machine,
unlike many of the
specially designed drill countersinking machines. This tool can be stored as a
standard tool in
the machine's automated tool storage/retrieval system.
This tool effectively turns an ordinary NC milling machine into an automated
drilling
machine at a much lower cost and allows the use of existing machines without
upgrading or
replacing the equipment. This tool effectively turns an ordinary NC milling
machine into an
accurate seal groove milling machine without the need for elaborate
measurements of the part
surface profiles.
The seal groove machining and drill countersinking tool incorporates a linear
compensator design which applies sufficient force to react to the drilling or
seal groove
machining process, but not so much force as to distort the work piece being
drilled or machined.
Additionally, the linear compensator design ensures that the reactant force
does not exceed the
machine force override allowances. Varying spring rates and/or air pressures
on the linear
compensator system will accommodate most applications. The tool is designed to
absorb over
travel of the machining tool, in order to ensure that the surface to be
machined is always in
contact with the tool. Incorporation of the linear compensator system provides
countersinking
4
CA 02674784 2013-08-08
=
and seal groove machining capabilities that do not require some form of
control system
feedback.
The linear compensator design can be adapted to virtually any numerical
control machine
spindle interface (i.e., HSK Holders, CAT Tapered Holders, etc.) with very
minor modifications
to the machine. A variety of adjustable micro-stop countersinking and seal
groove machining
assemblies can be adapted to the linear compensator system, enabling reaction
to part surface
profile variations and producing an accurate countersink or seal groove real
time.
A particular aspect of the invention is a linear compensator tool for
attachment to a
machining apparatus having a rotatably driven spindle that can be advanced
along an axis to a
selected point in space that includes a compensator member, a nose piece, a
shaft, a bias
member, and a stop member. The compensator member has first and second ends
where the first
end has a coupling for mounting to the spindle for axial movement therewith
and the
compensator member is mounted to the machining apparatus for non rotation with
the spindle.
The nose piece has a bore with an axis into which a machining tool is inserted
and retained. The
nose piece is mounted to the second end for axial movement of the compensator
member relative
to the nose piece between first and second positions and the nose piece is non
rotatable relative
to the compensator member. The shaft is carried by the coupling for rotation
in unison with the
spindle whenever the spindle is rotating. The shaft is configured to carry a
machining tool that
extends through the nose piece for performing a machining operation on the
workpiece. The bias
member is mounted between first and second ends and urges the compensator
member toward
the first position. The stop member is non rotatably carried by the nose piece
for contacting the
surface of the workpiece and preventing further movement of the nose piece and
the second end
toward the workpiece, so that if the contact occurs before the spindle reaches
the selected point
CA 02674784 2013-08-08
in space, continued axial movement of the compensator member toward the point
in space causes
the compensator member to overcome the bias member and move from the first
position toward
the second position.
Another particular aspect of the invention is a linear compensator tool for
connection
with a machining apparatus capable of repeatedly moving a spindle in a
direction toward a
workpiece to a fixed point in space where the linear compensator tool includes
a tool holder, an
outer casing, an inner casing, a bias member, a nose piece, a shaft assembly,
a clocking ring, a
stop member, and a machining tool. The tool holder is for connecting the
compensator tool to
the spindle of the machining apparatus. The outer casing is connected to and
axially extends
from the tool holder. The inner casing is axially disposed within the outer
casing and is capable
of limited axial movement relative to the outer casing between an extended and
a contracted
position. The bias member is located between the inner casing and outer casing
for biasing the
inner casing toward an extended position relative to the outer casing. The
nose piece is
connected to and axially extends from the inner casing for axial movement in
unison with the
inner casing relative to the outer casing. The shaft assembly is mounted to
the tool holder for
rotation in unison with the spindle at all times the spindle is rotating and
extends through the
outer casing, the inner casing and into the nose piece. The clocking ring is
cooperatively
associated with the tool holder and the inner and outer casings for preventing
rotation of the
inner and outer casings and the nose piece with the spindle and the shaft. The
stop member is on
an end of the nose piece and is for contacting a surface of the workpiece and
preventing further
movement of the nose piece toward the workpiece. The machining tool is
connected to the shaft
assembly for rotation therewith relative to the inner and outer casings and
the nose piece and
extends axially from the stop member. If the stop member contacts the surface
of the workpiece
5a
CA 02674784 2013-08-08
prior to the machining apparatus moving the spindle to the fixed point in
space, continued movement
of the machining apparatus toward the fixed point in space causes the inner
casing to move toward
the contracted position while the machining tool continues to protrude past
the stop member a
constant distance.
Yet another particular aspect of the present invention is a method of
machining a workpiece
with a machining apparatus that includes (a) mounting a nose piece with a stop
member to a
compensator member with first and second ends, the compensator member being
capable of
movement relative to the nosepiece between first and second positions, and the
stop member carried
by the nose piece for contacting the surface of a work piece, (b) determining
a point in space for
advancing a spindle of the machining apparatus to complete a machining
operation on a workpiece
having a surface profile a selected maximum distance from the point in space,
(c) mounting the
compensator member to the spindle of the machining apparatus, (d) inserting a
machining tool into
the nose piece, (e) urging the compensator member to the first position by
introducing fluid between
the first and second ends of the compensator member, (f) rotating the tool,
moving the spindle toward
the point in space, and thereby moving the tool into the workpiece, (g)
engaging the stop member
with the surface of the workpiece, (h) if the point in space has not yet been
reached by the spindle
when the stop member engages the surface profile of the workpiece due to the
surface profile of the
workpiece being closer to the point in space than the maximum distance,
continuing movement of the
spindle toward the point in space and the compensator member toward the
workpiece while the nose
piece and the machining tool are prevented by the stop member from further
axial movement,
thereby causing the compensator member to move from the first position toward
the second position,
and (i) in step (h) if the point in space is reached simultaneously with the
stop member engaging the
surface profile of the workpiece, immediately stopping further movement of the
compensator
member toward the workpiece.
5b
CA 02674784 2009-07-29
Brief Description of the Drawings
Figure 1 is a schematic side view of a standard tool holder connected to a NC
machine.
Figure 2 is a schematic sectional view of a hollow shaft air cylinder linear
compensator
tool attached to a standard tool holder and NC machine.
Figure 3 is a schematic side view of a micro-stop nose piece.
Figure 4 is an exploded isometric view of the micro-stop nose piece of Figure
3.
Figure 5A is a schematic sectional view of the linear compensator tool of
Figure 2 at the
beginning of a machining operation of a maximum thickness panel.
Figure 5B is a schematic sectional view of the linear compensator tool of
Figure 2 at the
beginning of a machining operation of a nominal thickness panel.
Figure 5C is a schematic sectional view of the linear compensator tool of
Figure 2 at the
beginning of a machining operation of a minimum thickness panel.
Figure 6A is a schematic sectional view of the linear compensator tool of
Figure 2 when
first contacting the maximum thickness panel.
Figure 6B is a schematic sectional view of the linear compensator tool of
Figure 2 when
first contacting the nominal thickness panel.
Figure 6C is a schematic sectional view of the linear compensator tool of
Figure 2 when
first contacting the minimum thickness panel.
Figure 7A is a schematic sectional view of the linear compensator tool of
Figure 2 after
drill countersinking a maximum thickness panel.
Figure 7B is a schematic sectional view of the linear compensator tool of
Figure 2 after
drill countersinking a nominal thickness panel.
6
CA 02674784 2009-07-29
Figure 7C is a schematic sectional view of the linear compensator tool of
Figure 2 after
drill countersinking a minimum thickness panel.
Figure 8 is a schematic sectional view of a linear bearings with springs
linear
compensator tool.
Figure 9 is a schematic sectional view of the linear compensator tool of
Figure 8 after
absorbing over travel.
Figure 10 is a schematic sectional view of a mechanical sleeve with spring
linear
compensator tool.
Figure 11 is a schematic sectional view of the linear compensator tool of
Figure 10 after
absorbing over travel.
7
CA 02674784 2009-07-29
Detailed Description of the Invention
Referring to Figure 1, standard tool holder 21 has a shaft 25 with a splined
receptacle
capable of receiving and rotating a tool. In this instance, the tool is a
countersinking drill bit 24.
Tool holder 21 may hold one of a number of machining tools, including a seal
groove cutter.
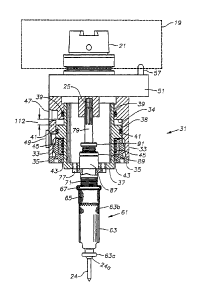
Referring to Figure 2, a linear compensator tool (LCT) is connected to a
standard tool
holder 21 to ensure accuracy in machining processes. The standard tool holder
21 is connected
to a spindle of an NC machine 19. The LCT can exist in a number of embodiments
including a
linear bearing with springs LCT 121 (Figures 8 and 9) and a mechanical sleeve
with spring LCT
141 (Figures 10 and 11). In this example, the LCT is a hollow shaft air
cylinder LCT 31. As
illustrated by Figure 2, LCT 31 is connected to tool holder 21 by means of a
clocking ring 51 and
a bearing (not visible). The bearing (not visible) is connected to clocking
ring 51 by means of
connector snap 55. The bearing (not visible) and clocking ring 51 are
connected to tool holder
21 by means of connector snap 53. Locking pin 57 extends vertically from the
top surface of
ring 51, and slides into a bushing (not visible) on the face of NC machine 19.
Clocking ring 51,
the bearing (not visible), and locking pin 57 ensure that the body of LCT 31
is fixed and does not
rotate with tool holder 21 and countersinking drill bit 24.
Attached to the bottom of clocking ring 51 is outer casing 33 of LCT 31.
Casing 33 is
generally cylindrical in shape with the exterior portion of casing 33 being
smooth. In an
alternate embodiment, casing 33 could take other forms such as a square or
rectangle. The
interior surface of casing 33 is machined in a manner to enable it to receive
inner casing 37. The
upper interior surface of casing 33 forms a downward facing shoulder 34.
Inner casing 37, generally cylindrical in shape, slidingly engages outer
casing 33. In an
alternate embodiment, casing 37 could take other forms such as a square or
rectangle. The outer
8
CA 02674784 2009-07-29
surface of casing 37 forms a flange section 38. Flange section 38 and shoulder
34 limit the
movement of casing 37 within casing 33. 0-ring seals 39, 41 ensure that the
contact surfaces
between outer casing 33 and inner casing 37 are properly sealed. A cap 35 is
placed around
inner casing 37, on the bottom of LCT 31, and is secured to outer casing 33.
Cap 35 is generally
circular in shape and has a T-shaped cross section that produces a small
annulus between inner
casing 37 and cap 35. 0-ring seal 43 ensures that the contacting surfaces
between inner casing
37 and cap 35 are sealed. Inner casing 37 is free to telescope in and out of
casing 33, but is
limited in range by cap 35 and shoulder 34.
A spring 45 surrounds inner casing 37, and is located in the annulus between
inner casing
37 and cap 35. Spring 45 acts to compress inner casing 37 as far as possible
towards clocking
ring 51. Air ports 47, 49 are located in outer casing 33. Port 47 is connected
to a compressed air
line, whereas port 49 is open to the atmosphere.
Micro-stop nose piece 61 is attached to the bottom of inner casing 37 by way
of mounting
flange 77. As illustrated by Figures 3 and 4, micro-stop nose piece 61 is
comprised of various
components. These components include nose piece 63, locking collar 65, locking
ring 67,
threaded fixture 69, shaft 79, and tool casing 85. Locking ring 67 is
threaded, and is screwed on
to threads 71 on fixture 69. Locking collar 65 slides onto fixture 69, and is
positioned around
threads 71. A pin (not visible) is located on the inner surface of collar 65,
and slides into slot 75
on fixture 69. The pin (not visible), captured in slot 75, ensures that collar
65 can not rotate
around fixture 69. One end of collar 65 is saw tooth patterned. Nose piece 63
is threaded on one
end 63b, and is screwed onto the threads 73 on fixture 69. End 63b of nose
piece 63 has teeth
that align with the teeth on collar 65, preventing rotation of nose piece 63.
End 63a of nose piece
9
CA 02674784 2009-07-29
63 has an aperture that extends from the main body of the nose piece 63, and
allows a machining
tool to pass through the aperture, forming a shoulder.
One end of shaft 79 is splined, and the other extends through fixture 69,
where tool collar
85 surrounds it. Just above collar 85, a thrust bearing 83 is placed on shaft
79. Pinned collar 81,
located just above bearing 83, holds bearing 83 in place on shaft 79. The
shaft assembly is
inserted into nose piece fixture 69. Section 87 of the nose piece assembly 61
contains a close
tolerance pilot that controls the center line of shaft 79. Just above section
87 is a locking ring 89
which locks the pilot in place. Just above the locking ring 89 is another
locking ring 91 which
locks shaft 79 into the micro-stop nose piece assembly 61. Once mounted to
inner casing 37, the
splined end of shaft 79 is connected to the tool holder shaft hub 25. Shaft 79
can move axially
within LCT 31 due to the splined end and hub.
As illustrated by Figures 5A, 5B, and 5C, hollow shaft air cylinder LCT 31 is
connected
to a standard tool holder 21 for countersinking. Standard tool holder 21 is
connected to a spindle
of NC machine 19. LCT 31 is connected to tool holder 21 as previously
discussed.
A countersinking drill bit 24 is inserted into the micro stop nose piece
assembly 61. Bit
24 has a counterbore portion 24a at its upper end that extends below end 63a
of nose piece 63.
Referring back to Figures 3 and 4, nose piece 63 is adjusted to ensure the
desired countersink
depth. The desired depth is determined by the extent that bit 24, and in
particular counterbore
portion 24a extends below the aperture on end 63a of nose piece 63. Nose piece
63 is adjusted
by screwing ring 67 toward connector flange 77. Locking collar 65 is then free
to move up or
down on fixture 69. Nose piece 63 is then rotated on threads 73 in order to
control the extent
that counterbore portion 24a of bit 24 extends below end 63a. Once the desired
depth is set,
locking collar 65 is positioned to lockingly engage the teeth on end 63b of
nose piece 63.
CA 02674784 2009-07-29
=
Locking ring 67 is then tightened securely against collar 65, locking the nose
piece 63 in position
and ensuring the desired drill depth of bit 24.
NC machine 19 is programmed to lower tool holder 21 from a starting point 106
to a
point 107 based on the thickness of the minimum thickness panel 105.
Programming will ensure
that counterbore portion 24a of bit 24 cuts to the proper depth of the panel
regardless of whether
the panel is one of maximum thickness 101, nominal thickness 103, or minimum
thickness 105.
Typical variations in panel thickness are illustrated by 109, and in one
embodiment, may be less
than 0.020 inches.
The programmed point 107 is the same point in space regardless of the
thickness of
panels 101, 103, 105. Programmed point 107 is determined by measuring the
amount of travel it
takes for end 24a to form the counterbore in minimum thickness panel 105 to
the correct depth.
The travel of tool holder 21 to point 107 should equal the distance d in
Figure 5C. The traveled
distance of tool holder 21 to point 107 will be slightly greater than the
distance d'; which is the
distance counterbore end 24a travels to cut the counterbore to the proper
depth in medium
thickness panel 103 (Figure 5B). The traveled distance of LCT 31 to point 107
will be even
greater than the distance d", which is the distance counterbore end 24a
travels to cut the
counterbore to the proper depth in maximum thickness panel 101 (Figure 5A).
Referring back to Figure 2, pressure is supplied to LCT 31 by an air source
(not shown),
which pumps air into LCT 31. Air enters LCT 31 through port 47 and fills the
annulus between
outer casing 33 and inner casing 37. As LCT 31 is pressurized, inner casing 37
fully extends
outwards from casing 33. As inner casing 37 extends outwards from casing 33,
port 49 ensures
that any air trapped below flange 38 in the annulus between casing 37 and
casing 33 is vented to
the atmosphere. When casing 37 is fully extended, a gap 112 exists between
shoulder 34 and
11
CA 02674784 2009-07-29
flange 38. Gap 112 is designed to absorb over travel of tool holder 21, and in
one embodiment,
gap 112 is designed to absorb up to 0.100 inches of over travel. The air
pressure is sufficient so
that drill bit 24 will not cause shoulder 34 to move toward flange 38 as it
drills. However, when
nose piece end 63a contacts the surface of one of the panels 101, 103, 105 it
will stop downward
travel of flange 38 (Figure 7).
As illustrated by Figures 5A, 5B, and 5C, the tool holder 21 starts at the
same elevation
106 and ends at the same elevation 107. NC machine 19 rotates countersinking
drill bit 24 and
begins lowering tool holder 21 and bit 24 toward programmed point 107. Given
the different
thicknesses of panels 101, 103, 105, tool holder 21 is at a different distance
from the panel
depending on the panel thickness.
Considering minimum thickness panel 105, when bit 24 first contacts panel 105,
the
pressure of LCT 31 is such that bit 24 will penetrate the panel surface and
continue toward the
desired point 107 without any change in the position of flange 38, as
illustrated by Figure 6C.
As NC machine 19 continues to lower tool holder 21, bit 24 rotates and
continues downwards
until it has penetrated the panel and drill bit counterbore portion 24a has
cut the proper
counterbore depth in panel 105. The pressure of LCT 31 is regulated such that
the once the
shoulder on end 63a contacts the panel surface, the force acting upwards
against nose piece 63 is
greater than the force acting downwards on inner casing 37. However, when
machining the
minimum thickness panel 105, end 63a contacts the surface when tool holder 21
is at point 107,
as illustrated by Figure 7C. The NC machine 19 stops drilling once tool holder
21 has reached
point 107.
Considering nominal thickness panel 103, bit 24 starts drilling sooner than
with panel 105
because it contacts panel 103 at a lesser distance d'. The pressure of LCT 31
is such that bit 24
12
CA 02674784 2009-07-29
will penetrate the panel surface and continue toward the desired point 107
without any change in
the position of flange 38, as illustrated by Figure 6B. When nose piece 63a
contacts panel 103,
tool holder 21 is not yet at point 107. The resistance of nosepiece 63a
overcomes the air
pressure, causing shoulder 34 to advance toward flange 38. As shoulder 34
advances toward
flange 38, shaft 79 advances further into receptacle 25 (Figure 2). Drill bit
24 does not move
further downward, however, as it has fully cut the counterbore and nosepiece
63a prevents
further downward movement.
For maximum thickness panel 101, the same occurs as with nominal thickness
panel 103.
Bit 24 starts drilling sooner than with panels 105, 103 because it contacts
panel 101 at a lesser
distance d". The pressure of LCT 31 is such that bit 24 will penetrate the
panel surface and
continue toward the desired point 107 without any change in the position of
flange 38, as
illustrated by Figure 6A. Drill bit counterbore 24a will have cut to the full
depth before LCT 31
has reached point 107. As LCT 31 moves further downward, nosepiece 63a
prevents further
downward movement of drill bit portion 24a, causing shoulder 34 to advance
toward flange 38.
As shoulder 34 advances toward flange 38, shaft 79 advances further into
receptacle 25 (Figure
2).
As illustrated by Figures 7A, 7B, and 7C, LCT 31 continues downward until
reaching
point 107. The amount of over travel absorbed by LCT 31 varies with the panel
thickness. As
illustrated by Figure 7C, when drilling a panel of minimum thickness 105, LCT
31 absorbs the
least amount or no over travel. Due to the thickness of panel 105, the
shoulder formed by the
aperture on end 63b of nose piece 63 contacts the panel surface when tool
holder 21 reaches
point 107, which is programmed for the minimum thickness panel 105. In one
example, there is
13
CA 02674784 2009-07-29
no over travel to be absorbed. Accordingly, at the end of the machining
operation, the original
gap 112 between flange 38 and shoulder 34 remains.
As illustrated by Figure 7B, when drilling a panel of nominal thickness 103,
LCT 31
absorbs over travel. Due to the thickness of panel 103, the shoulder formed by
the aperture on
end 63b of nose piece 63 contacts the panel surface before tool holder 21
reaches point 107,
which is programmed for the minimum thickness panel 105. As a result, LCT 31
must absorb
the over travel distance 110, which is equal to the difference between d' and
d (Figures 5B and
5C). In one example, shoulder 34 has advanced towards flange 38, leaving a gap
113.
Referring to Figure 7A, when drilling a panel of maximum thickness 101, LCT 31
absorbs the greatest amount of over travel. Due to the thickness of panel 101,
the shoulder
formed by the aperture on end 63b of nose piece 63 contacts the panel surface
before tool holder
21 reaches point 107, which is programmed for the minimum thickness panel 105.
As a result,
LCT 31 must absorb the over travel distance 111, which is equal to the
difference between d"
and d (Figures 5A and 5C). In one example, the over travel distance 111 is
equal to original
distance 112 that LCT 31 was designed to absorb. Accordingly, when tool holder
21 reaches
point 107, flange 38 is in contact with shoulder 34.
LCT 31 operates as previously discussed when connected to a standard tool
holder 21 for
seal groove machining. The only change in regard to the operation of LCT 31
when seal groove
machining is countersinking drill bit 24 is replaced with a seal groove
cutting tool. As explained
above, the gap between flange 38 and shoulder 34 allows LCT 31 to absorb over-
travel by the
tool holder, which guarantees nosepiece 63 contacts the panel surface
resulting in a consistent
seal groove width / depth regardless of the panel thickness. The variations in
panel thickness
illustrated above may be present over the surface profile of a single panel
sought to be machined.
14
CA 02674784 2009-07-29
During the seal groove machining process, LCT 31 responds to variations in the
surface profile
of a panel by compressing (absorbing over travel) or extending depending on
the panel thickness
at a given point.
Referring to Figures 8 and 9, an alternate embodiment LCT is illustrated in
the form of
linear bearings with spring LCT 121. LCT 121 is connected to tool holder 21 by
means of
clocking ring 51 and a bearing (not visible). Bearing (not visible) is
connected to clocking ring
51 by means of connector snap 55. Bearing (not visible) and clocking ring 51
are connected to
tool holder 21 by means of connector snap 53. Locking pin 57 extends
vertically from the top
face of ring 51, and slides into a bushing (not visible) on the face of the NC
machine. Clocking
ring 51, bearing (not visible), and locking pin 57 ensure that the body of LCT
121 is fixed and
does not rotate with tool holder 21 and drill countersinking bit 24. .
A plurality of flanged linear bearings 127 are attached to the bottom of
clocking ring 51.
Bearings 127 extend downward towards mounting plate 123. Mounting plate 123 is
circular in
shape, but in an alternate embodiment could take other forms such as a square
or rectangle. A
rod 129 travels through each linear bearing 127 and extends downward before
connecting to
mounting plate 123. Locking nuts 130 are attached to the end of rods 129
opposite mounting
plate 123. Nuts 130 ensure that rods 129 are fixed between clocking ring 51
and mounting plate
123. Rods 129 can move axially in linear bearings 127, but are limited in
range of movement
due to nut 130 on one end and linear bearing 127 on the other.
Surrounding each rod 129 and linear bearing 127 is a spring 131, which is
connected
between clocking ring 51 and mounting plate 123. Spring 131 acts to ensure
that LCT 121 is
fully extended in its natural state, ensuring a maximum gap between clocking
ring 51 and
mounting plate 123. Plate 125 is connected to the bottom of mounting plate
123.
CA 02674784 2009-07-29
Micro-stop nose piece 61 is attached to the bottom of plate 125 by way of
mounting
flange 77. Once micro-stop nose piece assembly 61 is mounted to plate 125, the
splined end of
shaft 79 is connected to tool holder shaft hub 25. Shaft 79 can move axially
within LCT 121 due
to the splined end and hub.
Linear bearings with spring LCT 121 performs just as LCT 31. Figure 8
illustrates LCT
121 in a natural state, prior to contacting a workpiece. Gap 133 between
linear bearings 127 and
mounting plate 123 is the largest when plate 123 is fully extended. Figure 9
illustrates LCT 121
absorbing over travel, as indicated by the decreased size of gap 133.
Referring to Figures 10 and 11, an alternate embodiment LCT is illustrated in
the form of
spring actuated cylinder LCT 141. LCT 141 is connected to tool holder 21 by
means of clocking
ring 51 and a bearing (not visible). Bearing (not visible) is connected to
clocking ring 51 by
means of connector snap 55. Bearing (not visible) and clocking ring 51 are
connected to tool
holder 21 by means of connector snap 53. Locking pin 57 extends vertically
from the top face of
ring 51, and slides into a bushing (not visible) on the face of the NC
machine. Clocking ring 51,
bearing (not visible), and locking pin 57 ensure that the body of LCT 141 is
fixed and does not
rotate with tool holder 21 and drill countersinking bit 24. .
Attached to the bottom of clocking ring 51 is mounting plate 143. Mounting
plate 143 is
generally cylindrical and flat, with a T-shaped cross section 144 on each
side. Outer casing 145
is machined to slide over and connect securely to mounting plate 143 of LCT
141. Casing 145 is
generally cylindrical in shape with the exterior portion of casing 145 being
smooth. In an
alternate embodiment, casing 145 could take other forms such as a square or
rectangle. The
interior surface of casing 145 is machined in a manner to enable it to receive
inner casing 147.
The lower interior surface of casing 145 forms an upward facing shoulder 146.
16
CA 02674784 2009-07-29
Inner casing 147, generally cylindrical in shape, slidingly engages outer
casing 145. In
an alternate embodiment, casing 147 could take other forms such as a square or
rectangle. The
outer surface of casing 147 forms a flange section 148. Flange section 148 of
casing 147,
shoulder 146 of casing 145, and T-cross section 144 of plate 143 limit the
movement of casing
147 within casing 145. Plate 143, outer casing 145, and inner casing 147 are
machined to
connect to one another with extremely close tolerances to form a mechanical
sleeve. A small
annulus if formed between the inner casing 147 and T-shaped cross section 144
of plate 143.
Inner casing 147 is free to telescope in and out of casing 145, but is limited
in range by section
144 of plate 143 and shoulder 146 of outer casing 145.
A spring 149 surrounds inner casing 147, and is located in the annulus between
inner
casing 147 and outer casing 145. Spring 149 acts to ensure that LCT 141 is
fully extended in its
natural state, ensuring a maximum gap between flange 148 and T-section 144.
Air ports 151 are
located on the exterior of outer casing 145. Air ports 151 are open to the
atmosphere and ensure
that LCT 141 does not become pressurized with the telescoping movement of
inner casing 147.
Micro-stop nose piece 61 is attached to the bottom of inner casing 147 by way
of
mounting flange 77. Once micro-stop nose piece assembly 61 is mounted to
casing 147, the
splined end of shaft 79 is connected to the tool holder shaft hub 25. Shaft 79
can move axially
within LCT 141 due to the splined end and hub.
Spring actuated cylinder LCT 141 performs just as LCT 31 and LCT 121. Figure
10
illustrates LCT 141 in a natural state prior to contacting a workpiece. Gap
153, between flange
148 and T-section 144 is the largest when casing 147 is fully extended. Figure
11 illustrates
LCT 141 absorbing over travel, as indicated by the decreased size of gap 153.
17
CA 02674784 2013-08-08
While the invention has been shown in only one of its forms, it should be
apparent to
those skilled in the art that it is not so limited but is susceptible to
various changes without
departing from the scope of the invention as defined by the appended claims.
For example,
linear compensator tool could be used in a number of various machining
applications requiring
material surface accuracy.
18