Note: Descriptions are shown in the official language in which they were submitted.
CA 02778666 2012-05-31
A SURGICAL FASTENER FOR APPLYING A LARGE STAPLE
THROUGH A SMALL DELIVERY PORT
REFERENCE TO RELATED APPLICATIONS
[0001] This application is a continuation-in-part of US Pending Application
13/015,977 filed on
January 28, 2011 and claims priority to US Patent Application 13/015,966 filed
on
January 28, 2011; US Patent Application 12/690,311 filed on January 20, 2010;
US
Patent Application 12/690,285 filed on January 20, 2010; US Patent Application
12/608,860 filed on October 29, 2009; US Patent Application 12/609,336 filed
on
October 30, 2009; US Patent Application 12/359,351 filed on January 26, 2009;
Pending
US Patent Application 12/359,354 filed on January 26, 2009 and US Patent
Application
12/359,357 filed on January 26, 2009.
FIELD OF THE INVENTION
[0002] The present invention relates in general to surgical tissue fastening.
The present
invention also relates in general to surgical tissue fastening for the
treatment of obesity
and other metabolic diseases. The present invention has even further relation
to powered
and robotic surgery.
BACKGROUND OF THE INVENTION
[0003] Obesity is a medical condition affecting more than 30% of the
population in the United
States. Obesity affects an individual's quality of life and contributes
significantly to
morbidity and mortality. Obesity is most commonly defined by body mass index
(BMI),
a measure which takes into account a person's weight and height to gauge total
body fat.
It is a simple, rapid, and inexpensive measure that correlates both with
morbidity and
mortality. Overweight is defined as a BMI of 25 to 29.9 kg/m2 and obesity as a
BMI of
30 kg/m2. Morbid obesity is defined as BMI >_ 40kg/m2 or being 100 lbs.
overweight.
Obesity and its co-morbidities are estimated to cost an excess of $100 billion
dollars
annually in direct and indirect health care costs. Among the co-morbid
conditions which
have been associated with obesity are type 2 diabetes mellitus, cardiovascular
disease,
hypertension, dyslipidemias, gastroesophageal reflux disease, obstructive
sleep apnea,
Page 1 of 35
CA 02778666 2012-05-31
urinary incontinence, infertility, osteoarthritis of the weight-bearing
joints, and some
cancers. These complications can affect all systems of the body, and dispel
the
misconception that obesity is merely a cosmetic problem. Studies have shown
that
conservative treatment with diet and exercise alone may be ineffective for
reducing
excess body weight in many patients.
[0004] A surgical procedure has been developed for involuting the gastric
cavity wall to reduce
stomach volume as a treatment for obesity. In the gastric volume reduction
(GVR)
procedure (e.g., reduction gastroplasty, gastric plication, greater curvature
plication,
anterior surface plication, etc.), multiple pairs of suture anchoring devices,
such as T-Tag
anchors, are deployed through the gastric cavity wall. Preferably, the suture
anchors are
deployed through a small diameter port in a minimally invasive surgical
procedure to
reduce trauma to the patient. Following deployment of the T-Tag anchors, the
suture
attached to each individual pair of anchors is cinched to approximate the
tissue and
secured to involute the cavity wall between the anchors. This procedure is
described in
greater detail in co-pending U.S. Patent Application Serial Numbers
11/779,314,
11/779,322, 12/113,829, 12/179,600, 12/359,351, 12/609,336, and 12/690,311,
which are
hereby incorporated herein by reference in their entirety. Procedure
variations of
particular interest include the case where the involution occurs about the
midline of the
anterior surface of the stomach, the case where the involution occurs about
the greater
curvature of the stomach following the removal or relaxing of attachment
points along
the greater curve (e.g., dissection of the short gastric vessels, dissection
of the omentum
from the gastric wall, etc.), and combinations of these (e.g., the involution
begins near the
gastro-esophageal junction and extends about the greater curve and transitions
to the
anterior surface near the incisura angularis). Preclinical outcomes around
fastener
durability for gastric plication procedures in a canine model are discussed in
Menchaca et
al. "Gastric plication: preclinical study of durability of serosa-to-serosa
apposition". Surg
Obes Relat Dis 2011;7:8-14. Clinical outcomes discussing different gastric
plication
procedures are discussed in Brethauer et al. "Laparoscopic gastric plication
for the
treatment of severe obesity". Surg Obes Relat Dis 2011;7:15-22. One effect of
the
procedure is to more rapidly induce feelings of satiation defined herein as
achieving a
level of fullness during a meal that helps regulate the amount of food
consumed. Another
Page 2 of 35
CA 02778666 2012-05-31
effect of this procedure is to prolong the effect of satiety which is defined
herein as
delaying the onset of hunger after a meal which in turn regulates the
frequency of eating.
By way of a non-limiting list of examples, positive impacts on satiation and
satiety may
be achieved by a GVR procedure through one or more of the following
mechanisms:
reduction of stomach capacity, rapid engagement of stretch receptors,
alterations in
gastric motility, pressure induced alteration in gut hormone levels, and
alterations to the
flow of food either into or out of the stomach. As an example, a stomach with
a reduced
capacity will distend more quickly for a given volume of food. This distension
of the
stomach may trigger stretch receptors which in turn trigger a sense of
satiation. In
another example, the procedure will limit the stomach's ability to expand,
effectively
reducing its capacity or fill volume. Additionally, the procedure may induce a
beneficial
hormonal effect due either to the more rapid triggering of stretch receptors
in certain
regions of the stomach or the prevention of hormone release by eliminating
triggering
mechanisms from being engaged in the infolded region that no longer
experiences stretch
in the same manner. In yet another example, the procedure may alter gastric
emptying by
preventing efficient antral contractions. Additionally, the infolded region
may provide a
restrictive inlet into the stomach just distal to the esophagogastric
junction. The GVR
procedures described in these applications require individual placement of
each suture
anchor pair into the cavity wall tissue, and subsequent tensioning of the
suture between
the anchor pairs in order to involute the tissue. This individual placement of
the T-Tag
anchors and manual suture tensioning is time intensive; increasing the
duration,
complexity and cost of the GVR procedure. Accordingly, it is desirable to have
a
simpler, faster, and less expensive means for forming a tissue fold within the
peritoneal
cavity.
[0005] It is known to use surgical staples for binding and holding body
tissues together
following an anastomosis, skin closure, or other surgical procedure.
Traditionally, these
staples have had a wide U-shape in the undeformed state, requiring a large
incision site or
wide diameter trocar cannula to accommodate the staples and stapler. Staples
and
staplers having a lower profile have been developed for use in smaller
diameter (i.e. 5mm
or 10mm) trocars. However, these devices suffer from a number of deficiencies
which
make them impractical for use in the GVR procedure. In particular, such
staplers require
Page 3 of 35
CA 02778666 2012-05-31
bending the staple a full 180 from the pre-deployment, stacked condition in
the stapler to
the closed, deployed condition in the tissue. Obtaining this degree of plastic
deformation
requires that the staple be composed of a soft, ductile material, such as soft
titanium.
However, the use of a soft ductile material decreases the strength and holding
power of
the formed staple, thus making the staple unsuitable for the pressures
associated with
involuting the gastric cavity wall without an impractical number of staples.
Staples
having a triangular pre-firing configuration have also been developed for
deployment
through a low profile stapler. However, the triangular shape of these staples
prevents the
staples from being stacked and fed longitudinally through the stapler shaft.
Instead, the
staples are stacked and fed vertically within the stapler, which reduces the
number of
staples that can be deployed from the stapler while still maintaining a low
profile
diameter. Since some versions of the GVR procedure may require a large number
of
staples to involute the cavity wall, vertical stacking would necessitate using
more than
one stapler to complete a procedure. Additionally, previous staplers have bent
staples at
three or fewer points during formation and deployment, which reduces the
amount of
work hardening and, thus, strengthening within the formed staple.
[0006] Accordingly, to facilitate GVR and other surgical procedures, it is
desirable to have an
improved surgical staple and deploying stapler for fastening layers of tissue
within the
peritoneal cavity. It is desirable that the stapler has a low profile for use
through a small
diameter laparoscopic port, a single trocar containing multiple small
laparoscopic ports,
or through a semi-rigid or flexible endoscopic platform (e.g., for use in
natural orifice
surgical procedures), yet be capable of deploying staples with a large tissue
purchase.
Further, it is desirable that the staples have a folded, box shape, and that a
large quantity
of the staples be deliverable by a single stapler during a procedure.
Additionally, it is
desirable to have a stapler which alters the configuration of a staple from a
low profile,
reduced width prior to deployment to a wider, operable width following
deployment.
BRIEF DESCRIPTION OF THE DRAWINGS
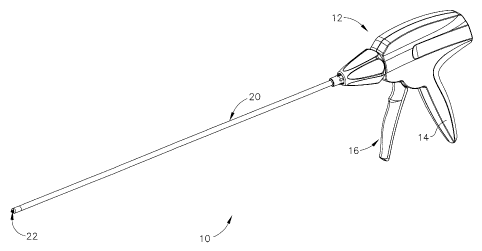
[0007] FIG. 1 is an isometric view of an exemplary low profile surgical
stapler of the present
invention;
Page 4 of 35
CA 02778666 2012-05-31
[0008] FIG. 2 is a top view of an exemplary staple embodiment shown in an
initial, undeployed
condition;
[0009] FIG. 3 is a top view of the staple of FIG. 2 shown in an intermediate
deployment
condition;
[0010] FIG. 4 is a top view of the staple of FIG. 2 shown in a final, deployed
condition;
[0011] FIG. 5 is an exploded isometric view of the staple housing and
deploying assembly for
the stapler of FIG. 1;
[0012] FIG. 6 is an exploded isometric view, partially in section, of the
former, shoe and staple
housing of FIG. 5;
[0013] FIG. 7 is a side, partially sectional view of the distal end of the
stapler handle;
[0014] FIG. 8 is an isometric view of the stapler of FIG. 1, shown with a
portion of the left side
of the handle casing detached;
[0015] FIG. 9 is an exploded isometric view of the stapler of FIG. 8 shown
with the left side of
the handle casing removed;
[0016] FIG. 10 is an exploded isometric view of the right side of the stapler,
showing a number
of handle components, viewed from the lower proximal end of the stapler;
[0017] FIG. 11 is a more detailed, isometric view of the right side of the
clamp yoke shown in
FIG. 10;
[0018] FIG. 12 is a side, partially sectional view of the distal end and
handle of the stapler
showing an initial deployment condition;
[0019] FIG. 13 is a side, partially sectional view of the distal end of the
stapler showing the
staple deploying assembly in an initial deployment condition;
[0020] FIG. 14 is a right side view of the proximal end of the stapler in an
initial deployment
condition, shown with the outer cover removed;
Page 5 of 35
CA 02778666 2012-05-31
[0021] FIG. 15 is a side, partially sectional view of the distal end and
handle of the stapler
showing the actuator lobes pivoted distally to release the anvil latch;
[0022] FIG. 16 is a side, partially sectional view showing the distal end of
the stapler in the same
deployment condition as FIG. 15, with the anvil retracted proximally against
the clamp;
[0023] FIG. 17 is a right side view of the proximal end of the stapler with
the outer cover
removed, showing the same deployment condition as FIG. 15;
[0024] FIG. 18 is a side, partially sectional view of the distal end and
handle of the stapler
showing the former, anvil and clamp in a proximal-most position;
[0025] FIG. 19 is a side, partially sectional view showing the distal end of
the stapler in the same
deployment condition as FIG. 18, with a staged staple being deposited into the
discharge
channel;
[0026] FIG. 20 is a right side view of the proximal end of the stapler with
the outer cover
removed, showing the same deployment condition as FIG. 18;
[0027] FIG. 21 is a side, partially sectional view of the distal end and
handle of the stapler
showing a deployment condition in which the actuator advances the clamp
distally;
[0028] FIG. 22 is a side, partially sectional view showing the distal end of
the stapler in the same
deployment condition as FIG. 21, with the clamp contacting the back span of a
staged
staple;
[0029] FIG. 23 is a right side view of the proximal end of the stapler with
the outer cover
removed, showing the same deployment condition as FIG. 21;
[0030] FIG. 24 is a side, partially sectional view of the distal end and
handle of the stapler
showing a deployment condition in which the actuator advances the clamp and
anvil
distally;
[0031] FIG. 25 is a side, partially sectional view showing the distal end of
the stapler in the same
deployment condition as FIG. 24, with the clamp pushing the staged staple and
anvil
distally through the deployment opening;
Page 6 of 35
CA 02778666 2012-05-31
[0032] FIG. 26 is a right side view of the proximal end of the stapler with
the outer cover
removed, showing the same deployment condition as FIG. 24;
[0033] FIG. 27 is a side, partially sectional view of the distal end and
handle of the stapler
showing a deployment condition in which the clamp and anvil are locked in a
fully distal
position;
[0034] FIG. 28 is a side, partially sectional view showing the distal end of
the stapler in the same
deployment condition as FIG. 27, with the fully distal clamp and anvil opening
the staple
outside the distal deployment opening;
[0035] FIG. 29 is a right side view of the proximal end of the stapler with
the outer cover
removed, showing the same deployment condition as FIG. 27;
[0036] FIG. 30 is a side, partially sectional view of the distal end and
handle of the stapler
showing a deployment condition in which the actuator is released open during a
pause in
the deployment sequence;
[0037] FIG. 31 is a side, partially sectional view showing the distal end of
the stapler in the same
deployment condition as FIG. 30, with the fully distal clamp and anvil holding
the open
staple outside the distal deployment opening;
[0038] FIG. 32 is a right side view of the proximal end of the stapler with
the outer cover
removed, showing the same deployment condition as FIG. 30;
[0039] FIG. 33 is a side, partially sectional view of the distal end and
handle of the stapler
showing a deployment condition in which the actuator is re-closing and pushing
the
former distally;
[0040] FIG. 34 is a side, partially sectional view showing the distal end of
the stapler in the same
deployment condition as FIG. 33, with the former advancing to close the staple
outside
the distal deployment opening;
[0041] FIG. 35 is a right side view of the proximal end of the stapler with
the outer cover
removed, showing the same deployment condition as FIG. 33;
Page 7 of 35
CA 02778666 2012-05-31
[0042] FIG. 36 is a side, partially sectional view of the distal end and
handle of the stapler
showing a deployment condition in which the actuator pivots open to draw the
former
and clamp back proximally from the closed staple;
[0043] FIG. 37 is a side, partially sectional view showing the distal end of
the stapler in the same
deployment condition as FIG. 36, with the clamp and former drawn back
proximally
from the closed staple;
[0044] FIG. 38 is a right side view of the proximal end of the stapler with
the outer cover
removed, showing the same deployment condition as FIG. 36;
[0045] FIG. 39 is a sectional, histological view at 8 weeks of a distal
(pyloric) portion of a
plication site from a canine model;
[0046] FIG. 40 is a sectional, histological view from a canine model showing a
plication formed
using a single suture attachment row;;
[0047] FIG. 41 is a sectional, histological view at 8 weeks of a proximal
(esophageal) portion of
a plication site from a canine model;
[0048] FIG. 42 is a schematic, sectional view of the anterior surface of a
gastric cavity following
an LGCP procedure showing a plication formed with two attachment rows of
staples; and
[0049] FIG. 43 is a schematic, sectional view taken along line 43-43 of FIG.
42.
DETAILED DESCRIPTION OF THE INVENTION
[0050] Referring now to the drawing figures, in which like numerals indicate
like elements
throughout the views, FIG. 1 illustrates an exemplary low profile fastener
applying
device or stapler for use in GVR and other small incision site surgical
procedures in the
peritoneal cavity including, but not limited to, reinforcement of staple lines
(e.g., "over-
sewing" of a vertical sleeve gastrectomy), closing of surgical defects (e.g.,
gastronomy
closure), and fixation of temporary (e.g., liver retraction) or permanent
(e.g., hernia mesh,
gastric band securement) medical devices. As shown in FIG. 1, the stapler 10
includes a
handle 12 having a pistol grip 14 shaped for grasping by a surgeon. A trigger
or actuator
16 is pivotably attached to handle 12 to be drawn towards the pistol grip 14
in a trigger
Page 8 of 35
CA 02778666 2012-05-31
plane during staple deployment. An elongated staple housing 20 having a
longitudinal
axis extends distally from handle 12. Housing 20 has sufficient length (on the
order of
18") to enable use within an obese patient at numerous trocar access sites for
traditional
laparoscopic approaches. Likewise, housing 20 is sized to allow for passage
through a
small (3-5mm) diameter trocar, although functional devices of a larger
diameter are also
possible without departing from the overall scope of the invention. A staple
deploying
assembly is at least partially disposed within the interior of housing 20 for
discharging
staples from a distal deployment opening 22. Staples are individually advanced
outside
of the open stapler end 22, and expanded open through actuation of the handle.
After the
staple pierces or otherwise engages the tissue sections to be joined, the
stapler draws the
expanded staple legs back inward to close the staple through the tissue.
[0051] To obtain a large tissue purchase (which is desirable in GVR
procedures) while using a
small diameter delivery shaft, stapler 10 deploys fasteners or staples having
a folded,
closed loop configuration. These closed loop or "box" staples have a small
width in the
initial, unformed condition. The width of the staple is expanded during
opening and
forming to allow the staple to obtain a large tissue purchase. FIG. 2
illustrates an
exemplary box staple 30 for deployment from stapler 10. Staple 30 comprises a
length of
wire formed into a crown or back span 32 and first and second leg portions 34,
36 that
intersect with opposite ends of the back span. The wire has a cylindrical
cross-section,
but may have other shapes (e.g., rectangular, elliptical, etc.) to provide
optimal strength
for the application or to aid in the feeding of the staples, and may or may
not be uniform
along the length of the wire. Leg portions 34, 36 intersect with back span 32
at an
approximate angle a of 90 and extend in a substantially parallel fashion
forward of the
back span. Opposite back span 32, leg portions 34, 36 are bent inward to form
staple end
segments 40, 42. In a loop shape, two lengths of wire may be disposed across
one side of
the shape to enclose the shape, as demonstrated by the end segments 40, 42.
Staple legs
portions 34, 36 are bent at end segments 40, 42 to make one of the leg
portions at least
one wire diameter longer in length than the other leg portion. The longer
length of one
leg portion (i.e. staple leg 34 in FIG. 2) enables the end segments 40, 42 to
lie in a
common plane with back span 32. The tips of end segments 40, 42 are angled to
form
sharp prongs 46 for piercing tissue.
Page 9 of 35
CA 02778666 2012-05-31
[0052] FIG. 3 shows staple 30 in a second, intermediate deploying condition.
In this
intermediate state, staple legs portions 34, 36 are bent outward to describe a
maximum
width between the distal tips of the staple legs. In FIG. 3, staple legs 34,
36 are shown
expanded open approximately 180 into substantially lateral alignment with the
initial
back span position, with end segments 40, 42 projecting distally. However, it
should be
understood that staple legs 34, 36 can be expanded open to an angle less than
or greater
than 180 . Staple legs 34, 36 are bent outward by applying a deploying force
(indicated
by arrow 38 in FIG. 2) to a mid section of back span 32 while the staple is
held fixed
inside at the intersections between the staple legs and back span. The
application of force
38 against the opposite, fixed forces at the staple leg intersections pulls
the staple legs 34,
36 outward, expanding open the staple, while substantially simultaneously
indenting the
center of the back span 32. As staple legs 34, 36 are bent outward, back span
32 retains a
non-linear characteristic. The outward bending of staple legs 34, 36 creates
an enlarged
opening into the staple 30 that is preferably in the range of twice the width
of the stapler
housing. Without a loss in generality, the width may be adjusted for different
applications. As an example, the width may be smaller for applications such as
mesh
fixation.
[0053] Staple 30 is transformed to a third, fully deployed form, shown in FIG.
4, by the
application of force to laterally spaced points along staple legs 34, 36. This
force
application is indicated by arrows 44 in FIG. 3. In the final deployment
condition, staple
leg portions 34, 36 are drawn back towards the center of the staple, with
prongs 46 again
pointing inward through the intervening tissue to penetrate and hold the
tissue. The
length of staple 30 decreases between the initial and final deployment
conditions, with an
ensuing increase in the staple width, so that the final width dimension of the
formed
staple (described by the distance between staple legs 34, 36) is greater than
the initial
width dimension. During deployment, staple 30 transitions between the initial,
intermediate, and final formed conditions in a series of steps which may be
substantially
simultaneous, but which are preferably carried out sequentially, so as to
first open staple
30 to the intermediate condition of FIG. 3, and then bend each of the staple
legs 34, 36
back around into the formed condition shown in FIG. 4. Staples used in this
application
are preferably biocompatible, implantable, and may optionally be absorbable. A
non-
Page 10 of 35
CA 02778666 2012-05-31
limiting list of candidate materials includes: metals such as titanium and its
numerous
alloys, stainless steel, Nitinol, magnesium, and iron; plastics such as PEEK,
ProleneTM;
absorbable materials such as PDSTM, VicrylTM, and polylactic acid (PLA); and
combinations of these materials or these classes of materials. Further, these
fasteners
may contain or be coated with therapeutic agents that are selectively or
immediately
released over time to aid in healing, prevent or minimize infection (e.g.,
triclosan, a-
Lauroyl-L-arginine ethyl ester), reduce swelling or edema, etc.
[0054] The staple shown in FIGS. 2-4 is intended to be one non-limiting
example of a closed-
form staple with substantially parallel legs. Additional detail regarding
staple designs, as
well as staple applicators, procedure applications, and methods of use are
disclosed in co-
pending U.S. Patent Application Serial Number 12/359,351 filed January 26,
2009
entitled "A SURGICAL STAPLER FOR APPLYING A LARGE STAPLE THROUGH
A SMALL DELIVERY PORT AND A METHOD OF USING THE STAPLER TO
SECURE A TISSUE FOLD", co-pending U.S. Patent Application Serial Number
12/359,354 filed January 26, 2009, entitled "A SURGICAL STAPLER FOR APPLYING
A LARGE STAPLE THROUGH A SMALL DELIVERY PORT AND A METHOD OF
USING THE STAPLER TO SECURE A TISSUE FOLD", co-pending U.S. Patent
Application Serial Number 12/359,357 filed January 26, 2009 entitled "A
SURGICAL
STAPLER FOR APPLYING A LARGE STAPLE THROUGH A SMALL DELIVERY
PORT AND A METHOD OF USING THE STAPLER TO SECURE A TISSUE FOLD",
co-pending U.S. Patent Application Serial Number 12/608,860 filed October 29,
2009,
entitled "BOX STAPLE METHOD WHILE KEEPING SAID BACK SPAN IN
SUBSTANTIALLY ITS ORIGINAL SIZE AND SHAPE", co-pending U.S. Patent
Application Serial Number 12/609,336 filed October 30, 2009, entitled "A
METHOD
FOR APPLYING A SURGICAL STAPLE", and co-pending U.S. Patent Application
Serial Number 12/690,285 filed January 20, 2010 entitled "APPARATUS FOR
FEEDING STAPLES IN A LOW PROFILE SURGICAL STAPLER", which are hereby
incorporated herein by reference in their entirety. In applying the staple
designs
disclosed in the cited US Patent Applications to the present invention, the
staple designs
would preferably include a non-linear back span. In addition to the staple
designs
disclosed herein, it is anticipated that other alternative staple designs may
also be
Page 11 of 35
CA 02778666 2012-05-31
conceived and used with the present invention without departing from the scope
of the
invention.
[0055] Turning now to FIG. 5, which shows an exemplary staple deploying
assembly for
deploying staples 30 in accordance with the invention. As shown in FIG. 5,
stapler 10
includes a staple former 50 attached to the distal end of staple housing 20
for forming and
closing staples. Staple deployment opening 22 is located at the distal end of
former 50.
Former 50 includes an inner channel (not shown) for conveying staples through
the
former and outside the stapler during deployment. Staples 30 are individually
conveyed
through former 50 and a distance outside of distal opening 22 by an anvil 52.
Anvil 52
includes a pair of longitudinally extending, inwardly biased spring arms
having upwardly
curved, staple holding tines 56 at the distal end. The proximal face of each
anvil tine 56
is preferably rounded with an inward radius to aid in positioning and
retaining a staple on
the tines during deployment. These proximal faces may have a non-perpendicular
angle
(e.g., acute or undercut) to the plane of the fed staple to further aid in
retaining the staple.
Individual staples are held against the anvil tines during passage through the
former 50.
The proximal end of anvil 52 is shaped for connecting the anvil to an anvil
extension 54.
Anvil extension 54 extends proximally from anvil 52, through housing 20, and
inside
handle 12.
[0056] A staple firing bar or clamp 60 extends substantially along the surface
of anvil 52.
Clamp 60 comprises an elongated strip having substantially planar upper and
lower
surfaces and a width slightly narrower than the width of the unformed staples
30. Clamp
60 preferably has as small a length as necessary to cover the anvil 52. The
distal end of
clamp 60 is shaped for mating engagement with staple back span 32 for engaging
and
pushing the staple through former 50. The distal end of clamp 60 is angled
inwardly to a
center tip at approximately a 45 angle relative to the longitudinal stapler
axis, although
lesser or greater angles may be used to vary the opening size of the staple.
The angled
clamp tip includes an inward radius for mating against the outer circumference
of the
staple back span 32. Anvil 52 combines with the distal face of clamp 60 and
former 50 to
form the discharge channel of the staple deploying assembly. During the
deployment
Page 12 of 35
CA 02778666 2012-05-31
sequence, clamp 60 advances distally within the discharge channel to deform
the back
span of a staged staple and thereby open the staple.
[0057] The proximal end of clamp 60 is attached to a driving assembly in
handle 12 via a clamp
extension. The clamp extension includes an upper section 64 and a lower
section 66.
Upper clamp extension 64 comprises an elongated, planar strip supporting a
staple stack
70. A longitudinally-extending trough 72 is located midway across the width of
upper
extension 64, beneath staple stack 70, and extends from the distal end beyond
the
proximal end of the staple stack. Lower clamp extension 66 has an elongated,
grooved
surface to accommodate trough 72. A staple driving member comprising a
substantially
rigid, cylindrical rod 74 is retained within trough 72 in a spaced
relationship from the
plane of staple stack 70. A plurality of outwardly projecting staple advancers
76 are
evenly spaced apart substantially along the length of rod 74. Staple advancers
76 extend
to at least the proximal end of staple stack 70 to ensure that a staple
advancer engages the
proximal-most staple in the stack. The proximal end of staple driving rod 74
is curved at
approximately a 90 angle relative to the longitudinal rod axis to form a
control pin 80.
[0058] Rod 74 is retained within trough 72 so as to translate distally and
then back proximally
with the clamp extension during each staple deployment. Additionally, rod 74
rotates
within trough 72 about the longitudinal rod axis. Upper clamp extension 64
includes a
plurality of notches spaced apart along a side of trough 72. The notches are
aligned with
staple advancers 76 to allow the advancers on rod 74 to rotate out of trough
72 and above
the surface of the clamp extension. The distal end of rod 74 extends through
an open
distal end of trough 72 into clamp 60. The staple advancer at the distal end
of rod 74 is
located in a groove in the proximal end of clamp 60. Rod 74 rotates relative
to clamp 60,
with the distal-most staple advancer extending up through a notch in the
clamp. Rod 74
and the attached staple advancers 76 are advanced and retracted by the clamp
extension
to index staple stack 70 distally approximately one staple length during each
staple
deployment.
[0059] A staple guide 82 is located proximal of former 50 inside staple
housing 20. The outer
perimeter of staple guide 82 is shaped to conform to the inner circumference
of staple
housing 20 to enable the staple guide to extend concentrically within the
staple housing.
Page 13 of 35
CA 02778666 2012-05-31
Staple guide 82 is fixed at a proximal end within the stapler handle 12 by a
key 78 to
prevent translation of the guide along the longitudinal housing axis during
staple
deployment. Distal housing bushing 106, into which key 78 extends, includes
two
notches 108 located 180 degrees apart on the circumference of bushing 106 to
permit the
staple guide 82 to rotate with staple housing 20 about the longitudinal
housing axis for
positioning the staple prongs 46. A slot 87 is formed in staple housing 20
adjacent guide
key 78. Guide key 78 extends up through slot 87 to allow staple housing 20 to
translate
along the longitudinal housing axis relative to the fixed staple guide 82.
[0060] Staple guide 82 includes a plurality of flexible, longitudinally-spaced
anti-backup arms
83 (shown in FIG. 13) extending in the direction of staple stack 70. The anti-
backup arms
flex in and out of contact with the staples in stack 70 to prevent the stack
from moving
proximally within the staple housing during the staple deployment sequence.
Proximal of
the anti-backup arms, a closed, contoured guide path (not shown) is formed
into the
surface of staple guide 82 facing control pin 80. Control pin 80 extends into
and rides
along the guide path to translate staple driving rod 74 relative to the fixed
staple guide 82.
While control pin 80 transverses the guide path, the angular direction of the
pin changes.
The directional changes of control pin 80 rotate rod 74 within trough 72. As
rod 74
rotates, staple advancers 76 are rotated from a position inside trough 74 to a
position
above the surface plane of upper clamp extension 64. Above clamp extension 64,
the
staple advancers 76 rotate up into the closed loops of the staples in stack
70. The guide
path includes a forward track, in which control pin 80 pivots to rotate
stapler advancers
76 up inside the loops of staples 30 to advance the staple stack; and a return
track, in
which control pin 80 pivots to rotate the staple advancers down into trough 72
to allow
the staple advancers to retract beneath the advanced staple stack, back to the
initial
position.
[0061] Staple stack 70 extends longitudinally through housing 20, between
staple guide 82 and
clamp extension 64, in a plane parallel to the longitudinal axis of the
housing. Staples 30
are conveyed within stack 70 to the distal end of the stapler prior to
deployment. Within
stack 70, each staple 30 is oriented such that the abutting end segments 40,
42 of the
staple are positioned nearest the open stapler end 22. Within the staple
stack, staples may
Page 14 of 35
CA 02778666 2012-05-31
be spaced apart from other staples, in contact with other staples, or
alternate between
states of contact and spaced. The legs 34, 36 of each staple 30 are aligned
substantially
parallel to and may be in contact with the walls of staple guide 82 to
maintain the forward
orientation of the staples. Any number of staples 30 can be included within
stack 70,
with the preferred stapler embodiment capable of holding 20 or more staples to
facilitate
procedures, such as GVR, which require a large number of tissue appositions or
junctions. The distal end of staple stack 70 is conveyed along the surface of
clamp 60
prior to the dropping of the individual staples onto anvil 52 for deployment.
[0062] Staple stack 70 is adjacent to the inner surface of staple guide 82 to
enable the anti-
backup arms 83 to contact the staples within the stack. As shown in FIGS. 5
and 6, a
staple transporter or shoe 84 extends from the distal end of staple guide 82
into former 50
for transferring staples from stack 70 onto anvil 52. Shoe 84 is cantilevered
between
staple guide 82 and former 50 with the pivot point at the proximal end within
the staple
guide. The distal end of shoe 84 flexes to index a single, distal-most staple
in stack 70
from the surface of clamp 60 into a staging position on anvil 52 during each
deployment
sequence. The proximal end of shoe 84 is shaped to facilitate movement of
staples
beneath the shoe as the stack 70 is advanced through housing 20 beneath staple
guide 82.
The staple advancer 76 at the distal end of staple driving rod 74 pushes the
next staple in
the stack 70 under shoe 84 during each deployment cycle. Shoe 84 includes a C-
channel,
indicated at 86, through which the distal end of staple stack 70 passes. The
lower sides of
C-channel 86 are co-planar with the staple conveying surface of clamp 60 to
pass the
staple stack 70 through the channel as the stack is advanced along the surface
of the
clamp. C-channel 86 aids in maintaining staple alignment at the distal end of
stack 70,
and prevents the distal-most staple in the stack from prematurely tilting into
the discharge
channel during retraction of clamp 60.
[0063] During the staple deployment process, clamp 60 moves distally through
the discharge
channel, advancing against the back span of a staple 30, and pinning the
staple between
the distal clamp tip and anvil tines. As clamp 60 advances, the distal end of
shoe 84
flexes up against a downward bias by the contact between the advancing clamp
and the
proximal sloped surfaces of shoe side rails 88. As the distal-most staple
moves
Page 15 of 35
CA 02778666 2012-05-31
underneath shoe side rails 88, the side rails push the staple legs 34, 36 down
onto clamp
60. The staple remains in this position, between shoe 84 and clamp 60, and
against the
proximal face of former 50, during the opening and forming of the previous
staple.
When clamp 60 retracts following staple forming, shoe 84 pushes the staple
downward
into the discharge channel between the distal clamp face and retracting anvil
tines,
thereby staging the staple for the next deployment sequence. In the present
invention, the
staple deploying components within housing 20 are substantially the same size
as the pre-
deployment staples 30, in order to maximize the staple size and, thus, tissue
purchase
during deployment, while maintaining a small (3-5mm) profile for the stapler.
The distal
deployment opening 22 in former 50 is sized to allow clamp 60, anvil 52, and
the
deploying staple 30 to pass outside of the former during the deployment
process, while
the proximal face of the former serves as an end stop for staple stack 70.
Additional
details regarding the staple deploying assembly can be found in US Patent
Application
12/359,351 entitled "A SURGICAL STAPLER FOR APPLYING A LARGE STAPLE
THROUGH A SMALL DELIVERY PORT AND A METHOD OF USING THE
STAPLER TO SECURE A TISSUE FOLD" and US Patent Application 12/690,285
entitled "METHOD AND APPARATUS FOR FEEDING STAPLES IN A LOW
PROFILE SURGICAL STAPLER", which have been previously incorporated into this
application by reference.
[0064] In a surgical application, stapler 10 is manipulated through a trocar
(in a laparoscopic
procedure) or flexible endoscopic platform (in natural orifice, endoluminal or
transluminal procedures) so that deployment opening 22 is adjacent to the
tissue area to
be fastened. Staple housing 20 may be rotated relative to handle 12 to change
the
orientation of deployment opening 22. As shown in FIG. 7, one manner of
rotating
housing 20 is by way of a knob 90 connected about the circumference of the
housing.
Knob 90 includes a flange 92 which rotates within a slot at the distal end of
handle 12.
The location of flange 92 within the handle slot allows rotation of knob 90
about the
longitudinal housing axis, while preventing the knob from translating along
the axis. As
knob 90 is rotated, housing 20 is in turn rotated by a connection between the
housing and
the knob. A connection also exists between knob 90 and the staple deploying
assembly
inside of housing 20 to rotate the deploying assembly in conjunction with the
housing
Page 16 of 35
CA 02778666 2012-05-31
about the longitudinal housing axis. Accordingly, as housing 20 rotates, the
legs of staple
30 rotate relative to the surrounding tissue, thereby altering the position at
which the
staple prongs will pierce the tissue during deployment.
[0065] As shown in further detail in FIGS. 5 and 7, staple housing 20 may be
formed of two
separate sections, identified as 94, 96, connected by an adjustment member,
such as a
castle nut 100. The distal housing end, identified at 94, has a threaded end
which is
screwed into the distal end of nut 100. The proximal housing end, identified
at 96, also
has a threaded end which is screwed into the opposite, proximal end of nut
100. One end
of nut 100 has right-handed threads while the opposite end has left-handed
threads. The
opposite threading allows the two housing sections 94, 96 to be adjustably
connected
together via the nut 100. Either section 94 or 96 of the staple housing can be
rotated
relative to nut 100 to increase or decrease the effective longitudinal length
of the housing.
Adjusting the effective length of housing 20 in turn alters the distance which
staples are
conveyed outside the housing distal opening 22 by anvil 52. Adjusting the
length of
staple housing 20 during assembly of the stapler 10 provides tolerance for
slight
manufacturing deviations that might otherwise adversely affect the forming and
closing
of staples at distal deployment opening 22.
[0066] Nut 100 includes a plurality of longitudinally extending grooves 102
evenly spaced apart
around the outer circumference of the nut. The inner circumference of rotating
knob 90
has at least one longitudinally extending rib (not shown) sized to fit within
grooves 102.
After staple housing 20 is adjusted via nut 100 to the proper deployment
length, the nut is
rotated slightly to align the nearest nut groove 102 with a groove 104 on the
exterior of
distal housing bushing 106 (shown in FIG. 9). Knob 90 is then connected over
nut 100
and distal housing bushing 106, with ribs inside the knob aligned with and
engaging
grooves 102 on nut 100 and grooves 104 on bushing 106. The interaction of the
knob rib
with the nut and bushing grooves locks the angular position of nut 100, and
thereby fixes
the longitudinal length of the staple housing 20. The interconnection between
the knob
rib and nut groove also enables the knob to rotate the housing about the
longitudinal
housing axis as described above. Stapler 10 is depicted as having a rigid
housing 20 for
open surgical applications or laparoscopic applications using trocars.
However, in
Page 17 of 35
CA 02778666 2012-05-31
alternative embodiments housing 20 may also include at least one articulation
joint
allowing the housing to deflect in a controlled manner from the primary axis,
or be
substantially flexible and of an increased length allowing for less invasive,
natural orifice
(e.g., transoral, transvaginal, etc.) access to regions of the patient
requiring a treatment
(e.g., within the peritoneal cavity of the patient). In each of these
configurations, it is
conceived that the device may also be compatible with a single trocar
containing multiple
ports.
[0067] Turning now to FIGS. 8-10 which show the proximal, handle end of
stapler 10 in an
initial deployment position. Handle 12 includes a housing 110 comprising an
outer cover
with an interior molded frame integrally formed with the cover. Casing 110 may
be
formed from a plastic or other similar material, in sections which are joined
together
during the manufacturing process by any of a number of suitable means known in
the art.
The proximal end 96 of staple housing 20 extends into handle 12, through
distal bushing
106, and includes a former bushing 112 at the proximal end. A former return
spring 114
encircles housing 20 between the distal face of former bushing 112 and the
proximal end
of distal bushing 106. Staple guide 82 extends proximally through housing 20
into
handle 12. A staple guide stop 116 (shown in FIG. 5) is located at the
proximal end of
staple guide 82. Staple guide stop 116 holds staple guide 82 stationary with
respect to
handle 12. Lower clamp extension 66 extends proximally into handle 12 through
former
bushing 112. The proximal end of lower clamp extension 66 includes a clamp
bushing
120. A clamp return spring 122 surrounds clamp extension 66 between clamp
bushing
120 and a clamp spring stop 126 (shown in FIG. 12).
[0068] Clamp bushing 120 is mounted within the frame of a clamp yoke 124. As
shown in
greater detail in FIG. 11, clamp yoke 124 includes a clamp lockout member,
identified at
128, on a side opposite clamp bushing 120. Clamp lockout member 128 includes a
lockout spring 130 which interacts with a lockout tongue 131 on housing casing
110
(shown in FIG. 14) during the staple deployment sequence. The interaction of
lockout
spring 130 and tongue 131 prevents a stapler jam in the event that actuator 16
is fired too
quickly. Clamp yoke 124 also includes a proximal clamp stop 132 which engages
a stop
in the handle frame to hold clamp 60 in a proximal-most position. As shown in
FIGS. 9-
Page 18 of 35
CA 02778666 2012-05-31
10, a clamp L-latch 134 is located beneath yoke 124 and pivots about a pin
136. An L-
latch spring 138 biases L-latch 134 in the direction of yoke 124.
[0069] Anvil extension 54 extends proximally through the open end of housing
20 and beyond
clamp bushing 120. The proximal end of anvil extension 54 includes an anvil
stop 140,
shown in FIG. 8, with a proximally-extending anvil release member 142. An
anvil spring
144 extends between anvil stop 140 and a distal stop, indicated at 146 in FIG.
10, formed
into the frame of handle 12. An opening 150 is located in the proximal end of
the handle
cover for external, operator access to anvil release 142.
[0070] Actuator 16 includes a distally facing trigger grip 152 extending
outside handle housing
110. Opposite trigger grip 152, actuator 16 is divided into a pair of lobes
154 extending
up into the body of handle 12. An anvil latching lever 160 is pivotally
connected by a pin
between the upper ends of lobes 154 to extend proximally from the actuator. A
pair of
pins 162 extend laterally from the proximal end of anvil latching lever 160
into a cam
path 164 shaped into the interior sides of handle casing 110. Pins 162 are
driven along
cam path 164 by the motion of actuator 16. Between pins 162, latching lever
160
includes a flexible latching arm 170 having a proximally-extending, tabbed
end. A
transfer wheel 172 having a plurality of outwardly-extending pawls rotates
about a pin
adjacent to anvil latching lever 160. In the initial deployment condition
shown in FIG.
12, one of the transfer wheel pawls engages the tab at the proximal end of
flexible
latching arm 170. The contact between the latching arm 170 and transfer wheel
172
rotates the wheel as the latching lever 160 is driven distally along cam path
164. A
second pawl on transfer wheel 172 contacts the distal end of a proximal clamp
latch 180.
In the initial position shown in FIG. 12, proximal clamp latch 180 holds clamp
yoke 124
in a forward position. A clamp latch spring 182 biases clamp latch 180 down
into the
locking position. A third pawl of transfer wheel 172 is positioned adjacent a
mating
detent on an anvil latch 184. An anvil latch spring 186 is attached to the
proximal end of
anvil latch 184 to bias the latch into an initial locking position, in which
the latch applies
a distal force against anvil stop 140 to hold the anvil forward against the
force of anvil
return spring 144.
Page 19 of 35
CA 02778666 2012-05-31
[0071] A link member 190 is also pivotally connected between the actuator
lobes 154, below
anvil latching lever 160, as shown in FIGS. 8-10. Link member 190 extends
distal of
actuator lobes 154 within the handle 12. The opposite, unattached end of link
member
190 includes two laterally extending pins 192 which are biased, with, for
example, a
spring, to continuously engage three-dimensional transfer cam path 194. Pins
192 engage
a three-dimensional transfer cam path 194 formed into the interior of handle
housing 110.
Link pins 192 slide within cam path 194 perpendicular to the trigger plane,
following the
circuitous path loop, as actuator 16 is twice squeezed closed and reopened to
deploy a
staple. The movement of pins 192 about cam path 194 drives the advancing and
retracting of the clamp and former during the staple deployment sequence. Cam
path 194
includes a series of four different steps or elevation changes to transition
link 190
between the different stages in the deployment sequence, as will be described
in more
detail below. Actuator 16 includes cam surfaces 200 shaped into the distal
faces of lobes
154. Actuator cams 200 are proximally spaced from but aligned to make contact
with the
proximal face of clamp bushing 120 when the trigger grip 152 is squeezed
towards pistol
grip 14. A former lever 202 is mounted between former bushing 112 and link
member
190 to pivot about a pin 204 formed into the handle casing 110. Former lever
202
includes a cam surface that is longitudinally aligned with former bushing 112
to apply a
distally directed force to the bushing when the lever is pivoted in the distal
direction.
[0072] Actuator 16 pivots about a pin 210 that extends through actuator 16
between trigger grip
152 and lobes 154. As shown in FIGS. 10 and 12, actuator 16 includes a handle
lockout
feature comprising a plurality of ratchet teeth, indicated at 212, ending in a
distal release
notch 214. A spring-loaded pawl 216 is connected to the frame of pistol grip
14. Teeth
212 are angled to catch pawl 216 as the teeth move proximally over the pawl.
Pawl 216
engages successive ratchet teeth 212 as trigger grip 152 is squeezed, to
prevent a
premature reopening of actuator 16 in the absence of a squeezing force. As
actuator 16
pivots to a fully-closed position against pistol grip 14, teeth 212 move
proximally beyond
pawl 216, pushing the pawl into release notch 214. At release notch 214, the
top of pawl
216 rotates clockwise against the angle of teeth 212, allowing the pawl to
slide over the
teeth back to a proximal-most position. A return spring 220 is connected
between
actuator 16 and pistol grip 14 for biasing the actuator into an open position.
Return
Page 20 of 35
CA 02778666 2012-05-31
spring 220 is connected so that the spring expands as actuator 16 is squeezed
closed.
Spring 220 returns actuator 16 to an open condition as pawl 216 reaches
release notch
216, and the squeezing force on the trigger grip 152 is released.
[0073] In the initial deployment position shown in FIGS. 12-14, the upper
lobes 154 of actuator
16 are in a proximal-most position, with anvil latching lever 160 in a
proximal-most
position engaging transfer wheel 172. Anvil latch 184 is in a down position
with the
latch arm pushing against anvil stop 140 to hold the anvil in a distal-most
position, as
shown in FIG. 13, in which anvil tines 56 extend outside distal deployment
opening 22.
Proximal clamp latch 180 is also in a downward position in contact with the
proximal end
of clamp yoke 124 to hold clamp 60 in a forward position, inside deployment
opening 22,
and beneath the distal-most staple in stack 70. Shoe side rails 88 push the
distal-most
staple down against the upper surface of clamp 60, while the next staple in
stack 70 is
held within C-channel 86 on the upper surface of the clamp. Clamp lockout
spring 130 is
positioned on the upper surface of lockout tongue 131, as shown in FIG. 14,
and L-Latch
134 is pushed down by the distal end of clamp yoke 124. In this initial
position, link
member 190 is also at a proximal-most position within transfer cam path 194.
Former
lever 202 is pivoted away from former bushing 112, allowing former return
spring 114 to
fully expand, and former 50 to be retracted back proximally from anvil tines
56.
[0074] To deploy a staple 30, stapler 10 is inserted through a small diameter
port or flexible
endoscopic platform to reach the desired tissue area inside a body cavity. At
the
appropriate tissue location, stapler end 22 is placed adjacent the tissue or
tissue fold to be
stapled, with rotating knob 90 being turned as necessary to position the
staple prongs 46.
With stapler 30 appropriately positioned against the targeted tissue area,
trigger grip 152
is manually squeezed in the direction of pistol grip 14 to begin the staple
deployment
sequence. As trigger grip 152 is squeezed actuator 16 pivots about pin 210,
causing the
upper lobes 154 to pivot distally within the handle. The distally moving lobes
154 pull
anvil latching lever 160 distally within anvil cam path 164. As latching lever
160 moves
distally, latching arm 170 pulls on the first transfer wheel pawl, causing the
wheel to
rotate. As transfer wheel 172 rotates, the second pawl on the wheel begins to
apply a
downward force to proximal clamp latch 180. The downward force is initially
Page 21 of 35
CA 02778666 2012-05-31
insufficient to overcome clamp latch spring 182 and release clamp 60 back
proximally.
Simultaneously, the third transfer wheel pawl applies a proximal force to the
detent on
anvil latch 184. The force on the anvil latch detent overcomes the force of
anvil latch
spring 186, pivoting the latch up and out of contact with anvil stop 140, as
shown in FIG.
15. As anvil latch 184 pivots away from anvil stop 140, the anvil stop is
released to
move proximally under the force of anvil spring 144, drawing anvil tines 56
back inside
of distal deployment opening 22 and against the distal clamp face, as shown in
FIG. 16.
Clamp 60 remains locked in position by proximal clamp latch 180, thereby
preventing
additional proximal movement by anvil 52. As actuator lobes 154 pivot
distally, link
member 190 also begins to drive pins 192 distally up the first leg of cam path
194, as
shown in FIG. 17.
[0075] As actuator lobes 154 continues pivoting distally, anvil lever 160
moves further distally
within anvil cam path 164, rotating transfer wheel 172. The rotating wheel 172
applies
increased force to the proximal end of clamp latch 180, overcoming the force
of clamp
latch spring 182, and releasing clamp yoke 124 to retract proximally under the
force of
clamp return spring 122, as shown in FIG. 18. Clamp yoke 124 draws clamp 60
proximally until proximal clamp stop 132 bottoms out against the handle frame,
as shown
in FIG. 20. Anvil 52 retracts proximally with the clamp 60 until anvil stop
140 reaches
the proximal end stop in the housing frame, as shown in FIGS. 18 and 20. In
this fully
retracted position, the tip of clamp 60 is proximal of the distal-most staple
in stack 70 and
anvil tines 56 are spaced distally forward of the clamp tip. The retracted
position of
clamp 60 allows shoe 84 to push the distal-most staple down into the discharge
channel
and over anvil tines 56, as shown in FIG. 19. The proximal stop of clamp yoke
124
positions clamp bushing 120 at the distal face of actuator cams 200.
[0076] The proximal movement of clamp yoke 124 also drives lockout spring 130
up and over
the proximal tip of lockout tongue 131, as shown in FIG. 20. As the lockout
spring 130
drops below lockout tongue 131, the clamp lockout member 128 resets inside
clamp yoke
124, allowing the clamp yoke to advance beneath the adjoining frame of the
housing
casing during subsequent steps in the deployment sequence. In the event that
actuator 16
is moved very rapidly, the actuator cams 200 can, in some cases, prevent the
clamp yoke
Page 22 of 35
CA 02778666 2012-05-31
124 (and thus clamp 60) from fully retracting to the proximal end stop. In
this event,
clamp 60 will remain forward within the discharge channel and prevent the
staged staple
from dropping properly into the channel. If the staged staple does not drop
properly into
the discharge channel, a staple jam can occur when the clamp 60 advances
distally. To
prevent this possibility, lockout spring 130 will get held and fail to drop
below lockout
tongue 131 on the housing casing if the actuator 16 is moved too quickly. In
this event,
the lockout spring 130 will keep the lockout member 128 lifted above the
surface of the
clamp yoke 124, thereby preventing the clamp yoke from advancing distally
beneath the
adjoining section of the casing frame indicated at 222. To reset the device
for normal
function, the user fully releases trigger grip 152, causing lockout spring 130
to drop
below lockout tongue 131, and restarting the staple firing sequence.
[0077] As actuator lobes 154 continue pivoting distally from the squeezing
force on trigger 152,
cam surfaces 200 apply a distal driving force against clamp bushing 120, as
shown in
FIG. 21. The distal force advances clamp 60 through the discharge channel and
into
contact with staple back span 32, as shown in FIG. 22. As clamp 60 begins
advancing,
staple driving rod 74 rotates staple advancers 76 above the surface of clamp
extension 64.
Staple advancers 76 push staple stack 70 distally as the clamp advances. In
addition, the
movement of lobes 154 drives link member 190 forward up the first leg of
transfer cam
path 194. At the proximal handle end, anvil latching lever 160 continues
moving distally
along anvil cam path 164. Anvil latching arm 170 advances distally beyond the
first pawl
of transfer wheel 172, as shown in FIG. 23, disconnecting the lever 160 from
the transfer
wheel, and preventing further rotation of the wheel. The release of transfer
wheel 172
allows the proximal end of clamp latch 180 to pivot downward under the force
of clamp
latch spring 182. This positions the clamp latch 180 to engage the proximal
face of
clamp yoke 124 as the yoke advances distally beyond the latch.
[0078] Actuator cams 200 continue pushing clamp bushing 120 distally against
the force of
clamp return spring 122, advancing clamp yoke 124, and allowing clamp latch
180 to
pivot down behind the proximal end of the clamp yoke. The distal movement of
lobes
154 drives link member 190 within cam path 194, dropping the link pins 192
from the
first to the second path leg as shown in FIGS. 24 and 26. As clamp 60 advances
distally
Page 23 of 35
CA 02778666 2012-05-31
within the discharge channel, the inward radius at the distal clamp tip
engages the back
span 32 of the staged staple and pushes the staple against the proximal face
of the anvil
tines 56, holding the staple back span fixed between the clamp and anvil
tines. As
actuator 16 continues applying force to clamp bushing 120, clamp 60 drives the
staple 30
and anvil 52 forward through the open stapler end 22, as shown in FIG. 25. As
anvil
tines 56 and the staged staple 30 progress through the distal stapler opening,
the anvil
tines remain inwardly biased, adjacent the intersection between the staple
legs 34, 36 and
back span 32. With staple 30 held outside the open stapler end by clamp 60 and
anvil
tines 56, anvil stop 140 bottoms out against the handle casing, as shown in
FIG. 27,
stopping further distal movement of anvil 52. Anvil latch 184 pivots down into
contact
with the proximal face of anvil stop 140 to hold the anvil 52 forward outside
the open
stapler end.
[0079] When anvil 52 reaches its fully distal position, as shown in FIG. 28,
the back span of
staple 30 is firmly held between the tip of clamp 60 and the proximal face of
anvil tines
56. After anvil 52 reaches its distal stop, actuator 16 continues advancing
clamp bushing
120 and, thus, clamp 60 relative to the fixed anvil tines. As clamp 60
advances, the
clamp tip moves between anvil tines 56, pushing the tines outward against the
inside
surfaces of staple 30 at the intersections between staple legs 34, 36 and back
span 32.
The advancing clamp tip applies a distally directed force against staple back
span 32
between anvil tines 56. The distally directed force of clamp 60 drives the
anvil arms out
laterally and deforms back span 32 between the anvil tines. The deforming
force of
clamp 60 against the fixed back span 32 drives the anvil tines 56 laterally
into staple legs
34, 36, expanding open the staple 30. As staple 30 is expanding open, staple
legs 34, 36
are bent back against the distal angled face of clamp 60. The angle at which
staple legs
34, 36 bend open can vary, depending in part upon the angle of the clamp
distal tip. As
staple 30 expands open from its initial, closed-form shape, prong tips 46 move
from an
inward, overlapping position to the open, spread position described above,
producing an
increased width dimension in the staple. The substantial increase in width
between the
closed, folded staple condition and the open, expanded staple condition
enables the staple
to obtain a substantial tissue purchase while utilizing a small diameter
delivery shaft.
Page 24 of 35
CA 02778666 2012-05-31
[0080] Clamp 60 opens staple 30 at the distal end of the clamp advancement. At
this point, L-
latch 134 springs up into engagement with clamp yoke 124 to lock the clamp
forward,
with the staple pinned between the clamp and anvil tines. The link member 190
has
advanced to the distal end of the second leg of the cam path 194, as shown in
FIGS. 27
and 29. The distal advance of clamp yoke 124 has also pulled clamp lockout
spring 130
back around the distal end of the lockout tongue 131. As staple 30 expands
open,
actuator 16 pivots to a fully closed position, with lockout pawl 216 advancing
to release
notch 214. At release notch 214, lockout pawl 216 pivots free of the ratchet
teeth 212,
allowing actuator 16 to pivot open under the force of actuator return spring
220. As
actuator 16 reopens, link member 190 is drawn back down the second leg of cam
path
194. A step between the first and second cam path legs prevents link pins 192
from
reversing back into the first leg of the path. At the proximal end of the
second cam path
leg, the link pins 192 drop over another step into the proximal end of the
third path leg, as
shown in FIGS. 30 and 32. At this point in the deployment sequence, actuator
16 does
not return to the fully open, initial position due to the more proximal
location of the link
pins 192 in the cam path 194. Anvil link pins 162 retract within anvil cam
path 164 as
actuator 16 pivots open. However, because the actuator 16 does not return to
the fully
open, initial position, latching arm 170 and transfer wheel 172 remain
disconnected.
With staple 30 fully expanded and stabilized between clamp 60 and anvil tines
56, as
shown in FIG. 31, the release of actuator 16 provides a pause in the
deployment process
to allow the surgeon to manipulate the open, exposed staple 30 to pierce or
otherwise
engage the intended tissue.
[0081] After the prongs 46 of the expanded staple 30 have been inserted at the
desired tissue
locations, the staple is formed through the tissue by again applying squeezing
pressure to
trigger grip 152. The pressure on grip 152 pivots actuator 16, causing link
member 190
to advance distally within the third leg of transfer cam path 194. As link
member 190
advances distally, the link applies force against the former lever 202, which
in turn
pushes against former bushing 112, as shown in FIGS. 33 and 35. The force of
link
member 190 drives the bushing 112 forward, compressing former return spring
114.
Former bushing 112 pushes housing 20 distally relative to the fixed staple
deploying
assembly, with slot 87 sliding past guide key 78 as the housing advances
relative to the
Page 25 of 35
CA 02778666 2012-05-31
fixed staple guide 82. Housing 20 moves former 50 distally, drawing grooves at
the
distal end of the former against the expanded staple legs 34, 36. The expanded
staple is
held fixed relative to the moving former 50 by clamp 60 and anvil tines 56.
The distal
pushing force of former 50 against the expanded staple legs 34, 36 forces the
legs to bend
forward about the fixed anvil tines 56, closing the staple, as shown in FIG.
34.
[0082] In the finished, closed shape, the width of the staple is greater than
the previous,
undeployed width, due to the different bending points along the staple length.
This
change in staple width enables the staple to have a low profile during
delivery and a
larger profile when formed through tissue. As staple legs 34, 36 are bending
forward,
prongs 46 are drawn back inward, grabbing onto the tissue or material in the
spread
between the prongs. As prongs 46 move inward, staple ends 40, 42 traverse an
arc
through the tissue, drawing the tissue into the closing staple. As prongs 46
reach an
inward, preferably overlapping position, in which the staple 30 passes through
the
gripped tissue, former 50 reaches its distal-most position. Inside handle 12,
handle
lockout pawl 216 advances over ratchet teeth 212, preventing distal movement
of former
50 until the former is in a distal-most position, as shown in FIG. 35. At the
distal-most
position, lockout pawl 216 reaches release notch 214, enabling actuator 16 to
pivot back
open under the force of return spring 220.
[0083] As actuator 16 pivots open, as shown in FIGS. 36 and 38, actuator lobes
154 rotate back,
pulling link member 190 back proximally, and dropping link pins 192 from the
third to
the fourth leg of transfer cam path 194. As link member 190 moves proximally,
the force
against former lever 202 is removed, allowing the lever and former bushing 112
to retract
proximally from the release of compression in former return spring 114. As
former 50
retracts, key 78 moves to the distal end of housing slot 87, and former 50 is
drawn away
from the closed staple 30, as shown in FIG. 37, releasing the staple from the
former. As
link member 190 continues moving back proximally through the fourth leg of cam
path
194, the link pushes against the distal angled face of clamp L-latch 134, as
shown in FIG.
36. The contact with L-latch 134 pushes the latch down from clamp yoke 124, as
shown
in FIG. 38. Clamp yoke 124 then retracts back into contact with proximal clamp
latch
180, pulling clamp 60 back proximally inside former 50. As clamp 60 retracts,
control
Page 26 of 35
CA 02778666 2012-05-31
pin 80 rotates staple advancers 76 down into clamp extension through 72. The
staple
advancers 76 retract back beneath the staple stack 70, leaving the stack in a
distally
indexed condition. Staple guide arms 83 hold the individual staples in stack
70 distally as
the clamp extension retracts beneath the staples. As clamp 60 retracts
proximally, the
anvil arms retract back inward within the closed staple 30, releasing the
pressure of anvil
tines 56 against staple legs 34, 36. The formed staple 30 remains locked in
the tissue (not
shown), and held against anvil tines 56 outside the open stapler end 22. With
the anvil
arms retracted, staple 30 can be released from the stapler by maneuvering the
anvil 52
away from the staple. As actuator 16 pivots fully open, link pins 192 reach
the proximal
end of the transfer cam path 194, resetting the link member back to the
initial deployment
position shown in FIGS. 12 and 14. Actuator 16 opens fully to the initial
deployment
position, and the stapler 10 resets back to the initial deployment condition,
with the
distal-most staple in stack 70 again staged between shoe side rails 88 and
clamp 60 in
preparation for the next deployment sequence.
[0084] If anvil tines 56 retract back inside former 50 before staple 30 is
released, the anvil 52
can be pushed out distally by inserting a forceps or similar tool into the
proximal handle
opening 150. Through opening 150, the forceps can push against anvil release
member
142 to drive anvil stop 140 distally. Release member 142 is configured with a
concave
surface to receive the forceps or similar tool. Other geometries may also be
employed to
engage the tool. Release member 142 can be pushed until anvil stop 140 is
again locked
forward by anvil latch 184, to hold the anvil tines 56 outside the open end 22
of the
stapler. Release member 142 provides an alternative, mechanism for advancing
anvil 52
independent of actuator 16.
[0085] After the staple 30 is released from anvil 52, stapler 10 is preferably
moved to a second
targeted location along an intended fold line in a cavity wall or tissue
apposition.
Additional staples are preferably deployed along the cavity wall to extend the
length of
the fold. Additional details regarding GVR procedures and the use of a
stapling device,
such as the staple deploying device of the present invention, in a GVR
procedure; as well
as other surgical applications for the stapling device of the present
invention, can be
Page 27 of 35
CA 02778666 2012-05-31
found in commonly assigned U.S. Patent Application Serial Number 12/359,351,
which
was previously incorporated by reference into this application.
[0086]
[0087] As mentioned above, one of the many beneficial applications for stapler
10 is forming
plications in a gastric volume reduction (GVR) procedure such as a
laparoscopic greater
curvature plication (LGCP). The previously referenced article by Menchaca et
al.
discloses an LGCP procedure for using different fasteners and patterns for
creating
durable plications in a canine model. FIG. 39 shows a histological view from
Menchaca
et al. depicting a first attachment pattern in which multiple rows of suture
were used to
form a durable plication. In FIG. 39, reference numeral 390 indicates the
locations or
spaces where suture was placed in forming the plication. The internal tunica
muscularis
392 is denoted by the region containing the letter `M', and the external
tunica muscularis
394 is denoted by the region containing the letter `m'. The serosa surfaces
have been
replaced with a dense collagen scar 396 denoted by the region containing the
letter `S'.
FIG. 40 shows a second histological view from Menchaca et al. In FIG. 40,
fibrous
healing 400 of the plication is evident on the exterior (serosa) surface of
the stomach.
The mucosa 404 is denoted by the region containing the letter `M' and the
submucosa
406 is denoted by the region containing the letters `SM'. The tunica
muscularis 408 is
denoted by the region containing the letters `TM'. In contrast to FIG. 39, a
serosa space,
indicated by 402, is present within the region of the fold. The plication in
FIG. 40 was
formed with a single row of suture in an interrupted pattern. The single row
of suture had
a spacing of 2-3cm. Menchaca et al. states that "Intermittent point failures
in serosa
apposition occurred in those dogs that had received only 1 row of fasteners;
in regions of
the fold not containing fasteners, the serosa surfaces had not bonded". Thus,
while FIG.
40 shows exterior serosa healing at 400, this healing was intermittent and did
not occur
consistently along the length of the plication.
[0088] FIG. 41 shows an unpublished histological view from a similar study
performed with the
stapler described in this application. In this study, three attachment lines
or rows of
staples were used to create a plication in a canine model. As shown in FIG.
41, in this
study the folded gastric wall was fused together by chronic
inflammation/fibrosis 410
Page 28 of 35
CA 02778666 2012-05-31
denoted by the region containing the letter `F' at the base of the fold (base
of the pre-
existing serosa). The procedure was performed using a coarse 2-3cm spacing
between
staples on the inner two attachment rows and an approximately 1cm spacing
between
staples on the outermost attachment row. This study showed two areas of serosa
fusion
in the fold interior, as indicated at 412, aside from the region of fibrosis
410 which
corresponded to the outermost or final row of staples. Regions of the fold
remained
unbounded between the staple attachment lines, resulting in free space, as
indicated at
414, but no intermittent point failures were observed at the exterior (serosa)
surface.
Thus, the pattern from the study shown in FIG. 41 is uniquely more durable
than that
described in Menchaca et al due to the elimination of point failures which
created
unintended exterior serosa spaces. Further, that this durability was achieved
with the
presence of free space between the attachment rows allows for easier reversal
of this
procedure as tissue dissection planes are easily identified. This is a
significant advantage
noted by potential patients of this procedure or any other bariatric surgical
procedure.
[0089] It is envisioned that performing an LGCP procedure similar to the study
shown in FIG.
41 on a human patient, using stapler 10 described above, will comprise the
following
steps. The patient is placed in a supine position and a five trocar port
technique is set up,
typically using five 5mm ports, to access the exterior of the gastric cavity.
A Veress
needle technique or Hassan technique can be utilized to establish
pneumoperitoneum. A
5-mm trocar is placed above the umbilicus and slightly to the right of
midline. The
laparoscope is inserted and the abdomen is inspected. Trocars are then placed
in the
following locations under direct visualization: a 5-mm trocar in the right
upper quadrant,
a 5-mm trocar in the right upper quadrant below the 10-mm trocar at the
auxiliary line, a
5-mm trocar below the xiphoid appendices, and a 5-mm trocar in the left upper
quadrant.
Percutaneous graspers and magnetically guided camera systems may be used to
reduce
the number of trocars used in this procedure. The greater curvature is then
freed from its
attachment points. The dissection starts at the distal body of the stomach
along the
greater curvature and continues proximally to the Angle of His. The left crus
should be
seen and the fundus mobilized off of the left crus. The dissection is then
continued
distally along the greater curvature to within 4-6 cm of the pylorus.
Posterior gastric
adhesions can be taken down as needed. Care should be taken to ensure that the
Page 29 of 35
CA 02778666 2012-05-31
dissection occurs approximately 0.5-1.0 cm from the greater curvature to avoid
thermal
damage to the gastric wall.
[0090] As shown in FIGS. 42 and 43, in the LGCP procedure of the present
invention a plication
is formed along the greater curvature preferably using at least 2 separate
attachment lines
or rows of staples. To create the attachment rows of staples, an endoscope,
bougie, or
other specialized intraluminal or extraluminal sizing device may be inserted
into the
patient and/or the cavity 420 to provide visibility and sizing. The greater
curvature is
folded into the interior of the cavity 420 beginning at the angle of His,
indicated at 422,
and continuing to within 4-6 cm of the pylorus 424. The greater curvature is
folded by
grasping and piercing the exterior surface of the cavity and targeting the
muscularis of the
gastric wall with the exposed staple prongs. A first one of the staple prongs
is inserted
into the exterior surface of the cavity on one side of the greater curvature.
The greater
curvature is then infolded into the interior of the cavity as the second
staple prong is
drawn into contact with the cavity exterior wall on the opposite side of the
greater
curvature. As the staple is formed the staple prongs are pulled inwardly,
piercing the
muscularis, and securely apposing adjoining serosa surfaces. The first staple
is
preferably placed approximately 2 cm from the Angle of His. The first
attachment row of
staples is indicated by arrows 430. Approximately 10 staples are preferably
used
(depending on the geometry of the stomach) in this first attachment row, with
the spacing
between the staples maintained at approximately 2-3 cm. When creating
plications, care
must be taken not to obstruct at the EG junction and the angularis incisura as
these are the
two most common sites of obstruction. Intraoperative endoscopy, bougies with
features,
pressure based measurement systems, etc. may be used to aid in the sizing of
the plication
during its formation.
[0091] To create the second attachment row of staples, indicated by arrows
432, the tissue
grasping and staple forming process is repeated starting near the Angle of His
422.
Tissue is grasped using a staple prong inserted on the first side of the
previously formed
attachment line. The second staple prong is then inserted into the exterior
cavity wall on
the opposite side of the previous attachment line, to draw the two sections of
the cavity
wall together about the original attachment line and, thereby, form a second
fold about
Page 30 of 35
CA 02778666 2012-05-31
the first fold along the greater curvature. The second attachment line is
continued,
forming a second fold about the first fold, to extend the plication to the
vicinity of the
pylorus 424. In the embodiment shown in FIGS. 42 and 43, the second attachment
line
432 is intended to be the final, outermost row of staples, and the spacing
between the
staples is preferably no greater than 1 cm. It is conceived that approximately
30 staples
should be in this outermost row for an average sized human stomach. The 1 cm
spacing
has been determined by the inventors to provide the optimum serosa to serosa
contact for
uniform healing. Staple spacing of greater than 2cm on the outermost row leads
to
deterioration of the serosa attachment and point failures. The inner
attachment row
provides for easier, quicker stapling of the outermost row, as well as greater
serosa
contact for more effective, uniform, exterior serosa fusion. Two areas of
serosa fusion
are formed corresponding to the attachment rows, and regions of free space
414, shown
in FIG. 43, are created inside the first attachment row and between the two
rows. The 1
cm or less spacing in the outermost row provides for the development of
uniform serosa
adhesion along the outer edge of the fold, as indicated at 434 in FIG. 43.
After the
second, outer attachment row is in place, a leak test with methylene blue can
be
performed, or an insufflations test with the endoscope can be used, to check
for a leak.
While the procedure is described with an outer attachment line spacing of no
more than 1
cm, it is conceived that the spacing between staples in the outer attachment
line could be
expanded to no greater than 2 cm, while still maintaining the desired serosa
to serosa
attachment and uniform adhesion. Other grasping methods such as the use of
babcocks
or other grasping instruments may be used to facilitate this procedure.
[0092] To complete the laparoscopic greater curvature plication (LGCP)
procedure described
herein, and in the previously referenced article by Brethauer et al, using
stapler 10, it is
envisioned that the stapler should be able to fire at least forty staples
without the need for
reloading the device. Additionally, as mentioned above, it is conceived that
stapler 10
will have beneficial application in many other procedures and will have the
capability of
firing at least twenty staples during these procedures without the need for
reloading the
device. Applying an approximate spacing of 1 cm along a significant portion of
the
greater curvature of the stomach with a sutured pattern requires significant
time and skill.
The stapler of the present invention, when used with the GVR plication pattern
of the
Page 31 of 35
CA 02778666 2012-05-31
present invention (e.g., at a minimum employing at least one row with
approximately 1
cm spacing on the outermost row), provides unique and unforeseen advantages
over
existing technology. A durable plication can be more quickly and easily formed
using
the stapler 10 than with traditional suturing methods. Stapler 10 allows for
simulating an
interrupted suture pattern with uniform external adhesion along the fold line,
without the
presence of intermittent point failures. The resulting plication with the
presence of free
space between the attachment lines facilitates easier reversal with standard
laparoscopic
techniques.
[0093] Preferably, the invention described herein will be processed before
surgery. First, a new
or used instrument is obtained and if necessary cleaned. The instrument can
then be
sterilized. In one sterilization technique, the instrument is placed in a
closed and sealed
container, such as a plastic or TYVEK bag. The container and instrument are
then placed
in a field of radiation that can penetrate the container, such as gamma
radiation, x-rays,
ethylene oxide (EtO) gas, or high-energy electrons. The radiation kills
bacteria on the
instrument and in the container. The sterilized instrument can then be stored
in the sterile
container. The sealed container keeps the instrument sterile until it is
opened in the
medical facility.
[0094] In addition to reconditioning, stapler 10 of the present invention may
also be reloaded
with an additional stack of staples for use in multiple different surgical
procedures. To
reload the stapler, the distal end 94 of the staple housing is unscrewed from
castle nut
100. Housing 20 is removed to expose the inner components of the staple
deploying
assembly. Staple guide 82 and clamp extension 64 are then separated and a new
staple
stack 70 laid in position between the two parts. After the stack of staples is
loaded, the
staple guide and clamp extension are repositioned on opposite planar surfaces
of the
stack. The staple housing 20 is then slid back over the staple deploying
assembly and
reattached at the proximal end to castle nut 100. Staple housing 20 can be
adjusted via
castle nut 100, as described above, to obtain the optimal staple housing
length for
opening and forming staples during deployment.
Page 32 of 35
CA 02778666 2012-05-31
[0095] Any patent, publication, application or other disclosure material, in
whole or in part, that
is said to be incorporated by reference herein is incorporated herein only to
the extent that
the incorporated materials does not conflict with existing definitions,
statements, or other
disclosure material set forth in this disclosure. As such, and to the extent
necessary, the
disclosure as explicitly set forth herein supersedes any conflicting material
incorporated
herein by reference. Any material, or portion thereof, that is said to be
incorporated by
reference herein, but which conflicts with existing definitions, statements,
or other
disclosure material set forth herein will only be incorporated to the extent
that no conflict
arises between that incorporated material and the existing disclosure
material.
[0096] The foregoing description of preferred embodiments of the invention has
been presented
for purposes of illustration and description. It is not intended to be
exhaustive or to limit
the invention to the precise form disclosed. Obvious modifications or
variations are
possible in light of the above teachings. The embodiments were chosen and
described in
order to best illustrate the principles of the invention and its practical
application to
thereby enable one of ordinary skill in the art to best utilize the invention
in various
embodiments and with various modifications as are suited to the particular use
contemplated. The handle described above could easily be removes and replaced
with a
means for attaching the device to a surgical robot. In addition, the device
could be power
operated through the use of batteries or other known power sources. It is
intended that the
scope of the invention be defined by the claims appended hereto.
Page 33 of 35