Note: Descriptions are shown in the official language in which they were submitted.
POWER SAW CROWN MOLDING CUTTING GUIDE
[0001] This paragraph intentionally removed.
Field
[0002] This patent relates generally to power tool cutting guides and
particularly to
power tool cutting guides for guiding a circular saw through a workpiece.
Background
[0003] Power saws are a type of cutting tool, which are useful for quickly
and easily
cutting material, such as construction lumber and other building products. A
common type of
power saw is a portable circular saw, which includes a foot and a circular saw
blade that extends
below the foot. Typically, a user cuts a workpiece with a circular saw by
resting the foot on the
workpiece, aligning the saw blade with a desired cut path, and then manually
guiding the
circular saw in the direction of the cut path, often following a marked line
on the workpiece.
[0004] If not carefully guided relative to the workpiece, however,
most circular saws
are easily movable along a cut path that deviates from the desired cut path,
making the task of
accurately guiding the circular saw difficult for some users. Therefore, it is
desirable to provide
1
CA 2790990 2018-10-25
CA 02790990 2012-09-27
a cutting guide, which simplifies the alignment and guiding of a circular saw
through a
workpiece.
Summary
[00051 According to one embodiment of the disclosure a cutting guide
includes a first
guide structure and a second guide structure. The first guide structure
includes (i) a first base,
(ii) a first saw support attached to the first base and defining a first saw
contact surface, and (iii)
a second saw support attached to the first base and defining a second saw
contact surface that is
spaced apart from the first saw contact surface so as to define a first
elongated cutting slot
therebetween. The second guide structure includes (i) a second base, (ii) a
third saw support
attached to the second base and defining a third saw contact surface, and
(iii) a fourth saw
support attached to the second base and defining a fourth saw contact surface
that is spaced apart
from the third saw contact surface so as to define a second elongated cutting
slot therebetween.
The first elongate cutting slot defines (i) a first slot portion, (i) a second
slot portion that is
contiguous with the first slot portion, and (iii) a third slot portion that is
contiguous with the
second slot portion. The second slot portion is interposed between the first
slot portion and the
third slot portion. The second elongate cutting slot defines (i) a fourth slot
portion, (i) a fifth slot
portion that is contiguous with the fourth slot portion, and (iii) a sixth
slot portion that is
contiguous with the fifth slot portion, the fifth slot portion being
interposed between the fourth
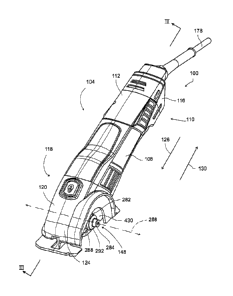
slot portion and the sixth slot portion. The first base defines a first
workpiece passage and a
second workpiece passage that are spaced apart from each other so as to define
a first workpiece
space therebetween. The second base defines a third workpiece passage and a
fourth workpiece
2
CA 02790990 2012-09-27
passage that are spaced apart from each other so as to define a second
workpiece space
therebetween. The first base defines a first cavity positioned below the first
elongated cutting
slot. The second base defines a second cavity positioned below the second
elongated cutting
slot. The first cavity includes (i) the first work piece space, (ii) a first
cutting member start space
.. positioned on one side of the first workpiece space, and (iii) a first
cutting member end space
positioned on an opposite side of the first workpiece space. The second cavity
includes (i) the
second work piece space, (ii) a second cutting member start space positioned
on one side of the
second workpiece space, and (iii) a second cutting member end space positioned
on an opposite
side of the second workpiece space. The first cutting member start space is
positioned below the
first slot portion, (ii) the first workpiece space is positioned below the
second slot portion, and
(iii) the first cutting member end space is positioned below the third slot
portion. The second
cutting member start space is positioned below the fourth slot portion, (ii)
the second workpiece
space is positioned below the fifth slot portion, and (iii) the second cutting
member end space is
positioned below the sixth slot portion.
[0006] According to another embodiment of the disclosure a cutting guide
includes a first
guide structure and a second guide structure. The first guide structure
includes (i) a first base,
(ii) a first saw support attached to the first base and defining a first saw
contact surface, and (iii)
a second saw support attached to the first base and defining a second saw
contact surface that is
spaced apart from the first saw contact surface so as to define a first
elongated cutting slot
therebetween. The second guide structure includes (i) a second base, (ii) a
third saw support
attached to the second base and defining a third saw contact surface, and
(iii) a fourth saw
support attached to the second base and defining a fourth saw contact surface
that is spaced apart
3
CA 02790990 2012-09-27
from the third saw contact surface so as to define a second elongated cutting
slot therebetween.
The first base defines a first workpiece passage and a second workpiece
passage that are spaced
apart from each other so as to define a first workpiece space therebetween.
The first workpiece
space is positioned below the first elongated cutting slot. The second base
defines a third
workpiece passage and a fourth workpiece passage that are spaced apart from
each other so as to
define a second workpiece space therebetween, the second workpiece space being
positioned
below the second elongated cutting slot. The first base defines a first cavity
positioned below the
first elongated cutting slot, the first cavity including the first workpiece
space. The second base
defines a second cavity positioned below the second elongated cutting slot,
the second cavity
including the second workpiece space. The first base includes a first passage
surface and a
second passage surface that are spaced apart from each other so as to define
the first workpiece
passage therebetween. The first base further includes a first guide wall
portion positioned in the
first cavity, the first guide wall portion defining a first guide surface
portion. The second base
includes a third passage surface and a fourth passage surface that are spaced
apart from each
other so as to define the third workpiece passage therebetween. The second
base further includes
a second guide wall portion positioned in the second cavity, the second guide
wall portion
defining a second guide surface portion. The first passage surface, the third
passage surface, the
first guide surface portion, and the second guide surface portion lie in a
first plane.
Brief Description of the Figures
4
CA 02790990 2012-09-27
[0007] The above-described features and advantages, as well as others,
should become
more readily apparent to those of ordinary skill in the art by reference to
the following detailed
description and the accompanying figures in which:
[0008] FIG. 1 shows a perspective view of a first side of a saw
assembly as described
herein;
[0009] FIG. 2 shows a perspective view of an opposite side of the saw
assembly of
FIG. 1;
[0010] FIG. 3 shows a cross sectional view taken along the line of
FIG. 1;
[0011] FIG. 4 shows a portion of the cross sectional view of FIG. 3;
[0012] FIG. 5 is a front perspective view of a portion of the saw assembly
of FIG. 1,
showing a guard structure and a flat cutting wheel;
[0013] FIG. 6 is a front perspective view of a portion of the saw
assembly of FIG. 1,
showing the guard structure and a flush cutting wheel;
[0014] FIG. 7 shows a front elevational view of the flat cutting wheel
for use with the
saw assembly of FIG. 1;
[0015] FIG. 8 shows a side elevational view of the flat cutting wheel
of FIG. 7;
[0016] FIG. 9 shows a front perspective view of the flush cutting
wheel for use with the
saw assembly of FIG. 1;
[0017] FIG. 10 shows a side elevational view of the flush cutting
wheel of FIG. 9;
[0018] FIG. 11 is a side elevational view of the saw assembly of FIG. 1
showing a
lockout power switch;
[0019] FIG. 12 is a perspective view of a portion of the lockout power
switch of FIG. 11;
5
CA 02790990 2012-09-27
100201 FIG. 13 is an exploded perspective view of a portion of the
lockout power switch
of FIG. 11;
[0021] FIG. 14 is a cross sectional view of a portion of the saw
assembly of FIG. 1,
showing the lockout power switch in a denergized position;
[0022] FIG. 15 is a cross sectional view of a portion of the saw assembly
of FIG. 1,
showing the lockout power switch in an energized position;
[0023] FIG. 16 is a cross sectional view of a portion of the saw
assembly of FIG. 1,
showing a lock on structure for maintaining the lockout power switch in the
energized position,
the lock on structure is shown in a disengaged position;
[0024] FIG. 17 is a cross sectional view of a portion of the saw assembly
of FIG. 1,
showing the lock on structure in an engaged position;
[0025] FIG. 18 is a side elevational view of a portion of the saw
assembly of FIG. 1
showing the guard structure of the saw assembly and the flat cutting wheel;
100261 FIG. 19 is a bottom plan view of the saw assembly of FIG. 1
showing the flush
cutting wheel positioned in a protective pocket of the guard structure.
[0027] FIG. 20 is a side perspective view of the saw assembly of FIG.
1 showing the saw
assembly part way through a workpiece cutting operation;
100281 FIG. 21. is a side perspective view of a portion of the saw
assembly of FIG. 1
showing a foot of the saw assembly in a position of maximum cutting depth and
also showing a
spring for biasing the foot;
6
CA 02790990 2012-09-27
[0029] FIG. 22 is a side perspective view of a portion of the saw
assembly of FIG. 1
showing the foot of the saw assembly in the position of maximum cutting depth
and also
showing the spring for biasing the foot;
100301 FIG. 23 is a side perspective view of a portion of the saw
assembly of FIG. I
.. showing the foot of the saw assembly in a position of minimum cutting depth
and also showing
the spring for biasing the foot;
100311 FIG. 24 is a top perspective view of a portion of the saw
assembly of FIG. 1
showing the spring of FIG. 21 as it is received by the foot;
[0032] FIG. 25 is a perspective view of a portion of the saw assembly
showing an inlet
dust port and an adapter;
[0033] FIG. 26 is a perspective view of a portion of the saw assembly
of FIG. 1, the
adapter, and a vacuum hose, additionally a schematic view of a vacuum source
and a bin is also
shown;
[0034] FIG. 27 is a perspective view of a portion of the saw assembly
of FIG. 1 showing
an inside surface of the dust port;
100351 FIG. 28 is a perspective view of the adapter of FIG. 25;
[0036] FIG. 29 is a perspective view of a portion of saw assembly of
FIG. 1, showing a
portion of a base lock assembly;
[0037] FIG. 30 is a perspective view of a clamp component of the base
lock assembly of
FIG. 29.
[0038] FIG. 31 is a perspective view of a knob of the base lock
assembly of FIG. 29;
7
CA 02790990 2012-09-27
rµ
[0039] FIG. 32 is a perspective view of a portion of the saw assembly
of FIG. 1 showing
another portion of the base lock assembly of FIG. 29;
[0040] FIG. 33 is a side elevational view of a portion of the saw
assembly of FIG. 1
showing a depth gauge and an angle gauge and also showing the foot in the
position minimum
cutting depth;
100411 FIG. 34 is a top elevational view of a portion of the saw
assembly of FIG. 1
having a T-square assembly attached thereto;
[0042] FIG. 35 is a bottom perspective view of a portion of the saw
assembly of FIG. 1
and the T-square assembly of FIG. 34;
[0043] FIG. 36 is a top perspective view of the saw assembly of FIG. 1 and
the T-square
assembly of FIG. 34 part way though a workpieee cutting operation;
[0044] FIG. 37 shows a bottom perspective view of the saw assembly of
FIG. 1 with a
portion of a housing of the saw assembly removed to show a gear housing of the
saw assembly;
[0045] FIG. 38 is a side elevational view showing the saw assembly of
FIG. 1 connected
to a table saw assembly;
[00461 FIG. 39 shows a top perspective view of a cutting guide for use
with the saw
assembly of FIG. 1;
[0047] FIG. 40 shows a top plan view of the cutting guide of FIG. 39;
[0048] FIG. 41 shows a bottom perspective view of the cutting guide of
FIG. 39;
[00491 FIG. 42 shows a top perceptive view of the saw assembly of FIG. 1
and the
cutting guide of FIG. 39, the saw assembly positioned to make a bevel cut
through a workpiece;
8
CA 02790990 2012-09-27
100501 FIG. 43 shows a bottom perspective view of the saw assembly of
FIG. 1 and the
cutting guide of FIG. 39, with the cutting wheel of the saw assembly extending
through a cutting
slot of the cutting guide;
100511 FIG. 44 shows a top perspective view of a cutting guide for use
with the saw
assembly of FIG. 1;
[0052] FIG. 45 shows a top plan view of the cutting guide of FIG. 44;
[0053] FIG. 46 shows a bottom perspective view of the cutting guide of
FIG. 44;
[0054] FIG. 47 shows a bottom plan view of the cutting guide of FIG.
44;
[0055] FIG. 48 shows a bottom perspective view of the foot of the saw
assembly of
FIG. 1 in isolation;
[0056] FIG. 49 shows a rear perspective view of the foot of the saw
assembly of FIG. 1
in isolation;
[0057] FIG. 50 is a bottom perspective view of the saw assembly of
FIG. 1 and the
cutting guide of FIG. 39;
[0058] FIG. 51 is a perspective view of a deburring accessory for use with
the saw
assembly of FIG. 1;
[0059] FIG. 52 is a perspective view of the deburring accessory of
FIG. Si connected to
the power saw of FIG. 1;
[0060] FIG. 53 is a top plan view of the deburring accessory of FIG.
51; and
[0061] FIG. 54 is a
cross sectional view taken along the line of FIG. 53 showing
the deburring accessory positioned to deburr a first pipe and a second pipe;
9
CA 02790990 2012-09-27
Detailed Description
[0062] For the purpose of promoting an understanding of the principles
of the disclosure,
reference will now be made to the embodiments illustrated in the drawings and
described in the
following written specification. It is understood that no limitation to the
scope of the disclosure
is thereby intended. It is further understood that the disclosure includes any
alterations and
modifications to the illustrated embodiments and includes further applications
of the principles
of the disclosure as would normally occur to one skilled in the art to which
this disclosure
pertains.
[0063] As shown in FIGs. 1 and 2, a saw assembly 100 includes a
housing 104. The
housing 104 includes a sleeve 108, a rearward housing portion 110 having an
upper left shell 112
and an upper right shell 116, and a forward housing portion 118 having a lower
left shell 120 and
a lower right shell 124. The upper left shell 112 and the upper right shell
116 are connected to
an reward side of the sleeve 108, and the lower left shell 120 and the lower
right shell 124 are
connected to a forward side of the sleeve. Movement from the rearward housing
portion 110 to
the forward housing portion 118 is defined herein to be in the forward
direction 126. While
movement from the forward housing portion 118 to the rearward housing portion
110 is defined
herein to be in the rearward direction 130. The housing 104 is formed from
injection molded
thermoplastic and defines an interior space 128 (FIG. 3) within the housing.
[0064] Drivetrain
[0065] As shown in FIG. 3, a drivetrain 132 is at least partially
positioned within the
interior space 128 defined by the housing 104. The drivetrain 132 includes an
electric motor
CA 02790990 2012-09-27
,01?
136, a worm gear 140, a drive member 144, and an arbor assembly 148. The
electric motor 136
is at least partially positioned within the interior space 128 and includes a
stator 152 and a rotor
156. The stator 152 is fixedly connected to the sleeve 108 of the housing 104
within the internal
space 128. The stator 152 generates a magnetic field within a rotor space 164.
[0066] The rotor 156 includes a winding portion 168 and a motor shaft 172.
The winding
portion 168 is fixedly connected to the motor shaft 172 and is positioned at
least partially within
the rotor space 164. The motor shaft 172 is a generally cylindrical metal
shaft, which extends
from the rotor space 164 and is supported for rotation relative to the stator
152 and the housing
104 about a motor axis 176. The rotor 156 and the motor shaft 172 rotate
relative to the stator
152 and the housing 104 when the electric motor 136 is supplied with
electrical energy.
[0067] With reference to FIG. 3, the motor 136 is supplied with
electrical energy through
an electrical cord 178 extending through a rear housing opening 182. It is
noted that the forward
direction 126 may also be defined herein as the path of movement from the
electrical cord 178
toward the drive member 144
[0068] As shown in FIG. 4, the motor shaft 172 includes a set of external
threads 180 and
a smooth shaft portion 184 and defines a shoulder 188. The external threads
180 are located on
an end portion 192 of the motor shaft 172. The smooth shaft portion 184 is
located between the
external threads 180 and the shoulder 188. The smooth shaft portion 184 is a
cylindrical portion
of the motor shaft 172.
[0069] The worm gear 140 is positioned in the internal space 128 of the
housing 104 and,
in particular, is positioned within a metal gear housing 196 (FIG. 3). The
worm gear 140
includes a set of worm gear teeth 200, a bore structure 204, and a worm gear
shaft 208. The bore
11
CA 02790990 2012-09-27
structure 204 defines a blind bore 212 and an opening 216, which leads to the
blind bore. The
bore structure 204 includes a set of internal threads 220 and a smooth bore
portion 224. The
internal threads 220 are positioned within the blind bore 212 at a position
that is spaced apart
from the opening 216. The internal threads 220 are configured to meshingly
engage with the
external threads 180 of the motor shaft 172 to connect the worm gear 140 to
the motor shaft 172.
The smooth bore portion 224 is positioned within the blind bore 212 between
the internal threads
220 and the opening 216.
[00701 With reference to FIG. 4, the worm gear shaft 208 is coupled to
the motor shaft
172, such that rotation of the motor shaft causes rotation of the worm gear
140 about the motor
axis 176. In particular, the external threads 180 are located within the blind
bore 212, such that
the external threads are meshingly engaged with the internal threads 220 to
connect the worm
gear 140 to the motor shaft 172. As the external threads 180 are meshingly
engaged with the
internal threads 220, the opening 216 is moved closer to the shoulder 188.
When the worm gear
shaft 172 is coupled to the motor shaft 172, the opening 216 is positioned
adjacent to the
shoulder 188.
10071] The smooth bore portion 224 of the bore structure 204 interacts
with the smooth
shaft portion 184 of the motor shaft 172 to accurately align the worm gear 140
with the motor
shaft 172. To this end, the smooth shaft portion 184 defines an outside
diameter 222 and the
smooth bore portion defines an inside diameter 226. The outside diameter 222
and the inside
diameter 226 are substantially equal (the outside diameter is slightly smaller
than the inside
diameter to allow entry of the motor shaft 172 into the bore 224), such that
the smooth shaft
12
CA 02790990 2012-09-27
portion 184 fills the smooth bore portion 224 causing the worm gear 140 to
become aligned with
the motor shaft 172.
[00721 As shown in FIG. 3, the motor shaft 172 and the worm gear 140
are supported by
a floating bearing 228, a floating bearing 232, and a floating bearing 236.
The floating bearing
236 supports a right end portion of the motor shaft 172, the floating bearing
232 supports a left
end portion of the motor shaft, and the floating bearing 228 supports a left
end portion of the
worm gear 140.
100731 As shown in FIG. 4, the floating bearing 228 includes an inner
race 240, an outer
race 244, numerous ball bearings 248, and an elastomeric support member 252.
The inner race
240 is fixedly connected to the worm gear 140 for rotation with the worm gear.
The ball
bearings 248 are positioned between the inner race 240 and the outer race 244.
The outer race
244 is received by the elastomeric support member 252. The elastomeric support
member 252 is
received by the gear housing 196. The inner race 240 is configured to rotate
relative to the outer
race 244 and the elastomeric support member 252 in response to rotation of the
worm gear 140.
.. The floating bearing 232 and the floating bearing 236 are substantially
identical, except that the
inner races of the floating bearings 232, 236 are fixedly connected to the
motor shaft 172 and the
elastomeric support of the floating bearing 236 is received by the housing
104.
[00741 The floating bearing 228 is referred to as "floating" since the
elastomeric support
member 252 enables movement of the inner race 240 and the outer race 244
relative to the gear
housing 196 and the housing 104. Accordingly, the floating bearings 228, 232,
236 are suited to
dampen vibrations of the motor shaft 172 and the worm gear 140, which occur
due to machine
tolerances and other factors, which cause the motor shaft and the worm gear to
be slightly
13
CA 02790990 2012-09-27
unbalanced. The floating bearings 228, 232, 236 dampen these vibrations so
that the saw
assembly 100 is comfortable to hold during cutting operations.
[00751 With reference to FIG. 4, the drive member 144 of the
drivetrain 132 is operably
coupled to the worm gear 140 and includes a pinion gear 256 and a driveshaft
260 both of which
are at least partially positioned within the gear housing 196. The pinion gear
256 includes a set
of gear teeth 264 positioned to rneshingly engage the worm gear teeth 200. The
driveshaft 260 is
fixedly connected to the pinion gear 256, such that rotation of the worm gear
140 results in
movement of the driveshaft in a repeating pattern. Specifically, when the
electric motor 136 is
energized, rotation of the motor shaft 172 and the worm gear 140 results in
rotation of the
driveshaft 260 about an axis of rotation 268 (see FIG. 1, extends into and out
of the page in FIG.
4), which is perpendicular to the motor axis 176 of the motor shaft 172. The
axis of rotation 268
and the motor axis 176 are not coincident. The motor axis 176 is perpendicular
to a motor axis
plane 272 and the axis of rotation 268 of the driveshaft 260 and the pinion
gear 256 is
perpendicular to a driveshaft plane 278 (not shown, parallel to a face 280 of
the pinion gear 256).
The motor axis plane 272 is perpendicular to the driveshaft plane 278. A
portion of the
driveshaft 260 extends through an opening 282 (FIG. 1) in the lower right
shell 124 of the
forward housing portion 118.
[0076] As shown in FIG. 1, the arbor assembly 148 includes an arbor
bolt 284, a spacer
288 (also shown in FIG. 19), and a washer 292. The arbor bolt 284 extends
through an opening
(not shown) of the spacer 288, an opening (not shown) of the washer 292, and
is threadingly
received by a threaded opening (not shown) of the driveshaft 260. As shown in
FIG. 5, the arbor
assembly 148 connects a flat cutting wheel 296 to the saw assembly 100 for
rotation with the
14
CA 02790990 2012-09-27
driveshaft 260. As shown in FIG. 6, the arbor assembly 148 connects a flush
cutting wheel 300
to the saw assembly 100 for rotation with the driveshaft 260.
[0077] As shown in FIGs. 7 and 8, the flat cutting wheel 296, which is
also referred to
herein as a flat cutoff wheel or a flat saw member, is generally circular and
includes a flat hub
portion 304 and a cutting structure 308. The hub portion 304 defines an
opening 312 in the
center of the cutting wheel 296 through which the arbor bolt 284 extends when
the cutting wheel
is mounted to the driveshaft 260. The cutting structure 308 is positioned on
the periphery of the
cutting wheel 296. As shown in FIG. 8, a plane 316 extends through the hub
portion 304 and the
cutting structure 308. The cutting structure 308 is abrasive and is at least
partially formed form
to carbide.
10078] As shown in FIGs. 9 and 10, the flush cutting wheel 300 is
generally circular and
includes a domed hub portion 320 and a cutting structure 324. The domed hub
portion 320
defines an opening 312 in the center of the cutting wheel 300 through which
the arbor bolt 284
extends when the cutting wheel is mounted to the driveshaft 260. The cutting
structure 324 is
positioned on the periphery of the cutting wheel 300. A hub plane 332 extends
through the hub
portion 320, and a cutting plane 336 extends through the cutting structure
324. The hub plane
332 is parallel to the cutting plane 336 and is offset from the cutting plane,
such that the cutting
plane extends further from the arbor assembly 148 than does the plane 316 of
the flat cutting
wheel 296 when the cutting wheel 300 is mounted on the driveshaft 260.
[0079] The cutting structure 308 of the cutting wheel 296 and the cutting
structure 324 of
the cutting wheel 300 each include numerous scallops 340. The scallops 340
assist in removing
debris from a kerf formed in a workpiece during cutting operations.
CA 02790990 2012-09-27
10080] The cutting structure 308 and the cutting structure 324
differentiate the cutting
wheel 296 and the cutting wheel 300 from traditional saw blades (not shown)
that include cutting
teeth. Accordingly, when one of the cutting wheels 296, 300 is connected to
the saw assembly
100, the saw assembly may be referred to as a grinder or a circular saw. When
a traditional saw
blade is connected to the saw assembly 100, the saw assembly may be referred
to as a circular
saw.
100811 Lockout Power Switch
[0082] As in FIGs. 11, 12, and 13, the saw assembly 100 includes a
power lever 342 for
operating a switch unit 394 (FIG. 14) that couples electrical energy to the
electric motor 136.
The power lever 342 includes a trigger referred to herein as a paddle 344, a
lockout lever 346,
and a spring 348 (FIGs. 12 and 13).
[0083] The paddle 344 includes a pivot structure 350 and an abutment
structure 352 and
defines a paddle cavity 354 and a contact surface 356. The pivot structure 350
is positioned on
an end portion of the paddle 344 and includes a barb 360. The barb 360 of the
pivot structure
350 is positioned within the interior space 128 defined by the housing 104.
Specifically, when
the barb 360 is inserted into the housing 104 it interlocks with the housing
to prevent the paddle
344 from being removed from the housing.
[0084] The paddle 344 pivots about the pivot structure 350 between an
off position (also
referred to herein as the de-energized position) (FIG. 14) and an on position
(also referred to
herein as the energized position) (FIG. 15) about a path of movement 362. As
shown in FIG. 11,
16
CA 02790990 2012-09-27
the paddle 344 at least partially extends through a housing opening 358 formed
in both the sleeve
108 and the rearward housing portion 110.
[0085] As shown in FIG. 14, the abutment structure 352 is positioned
on an opposite end
portion of the paddle 344 and is at least partially positioned within the
interior space 128 of the
housing 104. The abutment structure 352 includes a switch surface 364 located
on a top side of
the abutment structure and a catch feature or lock-on notch 366 located on a
bottom/opposite
side of the abutment structure. The switch surface 364 is positioned to engage
an actuator 398 of
a switch unit 394 of the saw assembly 100. The lock-on notch 366 cooperates
with a lock-on
structure 402 of the saw assembly 100, as described below.
[0086] With reference to FIG. 13, the paddle cavity 354 is foimed in the
paddle 344
between the pivot structure 350 and the abutment structure 352 on an outer
side of the paddle,
which faces away from the electric motor 136. The paddle cavity 354 defines a
generally
concave paddle cavity surface 372. The paddle cavity 354 receives at least a
portion of the
lockout lever 346 and at least a portion of the spring 348. The paddle cavity
354 has a length of
approximately 2.5 centimeters (2.5 cm) and a width of approximately 2.0
centimeters (2.0 cm).
[0087] The paddle 344 includes an opening 368, an opening 370, and a
lever opening
374. The opening 368 and the opening 370 are in fluid communication with the
paddle cavity
354 and are used to pivotally connect the lockout lever 346 to the paddle, as
described below.
The lever opening 374 is formed in the cavity surface 372 and fluidly couples
the interior space
128 to the paddle cavity 354.
[0088] The contact surface 356 is at least a portion of the outer side
of the paddle 344.
The contact surface 356 is a portion of the power lever 342 that a user
contacts to use the power
17
CA 02790990 2012-09-27
lever. The contact surface 356 is a convex surface such that fits comfortably
in the hand of the
user. The contact surface 356 has a width of approximately 2.3 centimeters
(2.3 cm) and a
length of approximately 6.0 centimeters (6.0 cm).
[0089] The lockout lever 346 includes a finger contact portion
provided as an actuator
portion 376, a connection structure 378, and a blocking member provided as a
lockout tab 380.
The actuator portion 376 extends from the connection structure 378 and is
generally semicircular
in shape.
[0090] The connection structure 378 defines a pivot opening 382 for
receiving a pivot
shaft 384. In particular, the pivot shaft 384 extends through the opening 368,
the pivot opening
382, and the opening 370 to pivotally connect the lockout lever 346 to the
paddle 344. The
lockout lever 346 extends through the lever opening 374 formed in the paddle
344 and into the
interior space 128. The lockout lever 346 pivots about the pivot shaft 384
between a lockout or
locked position (FIG. 14) and a non-lockout or an unlocked position (FIG. 15).
[0091] The lockout tab 380 extends from the connection structure 378
and is at least
partially positioned in the interior space 128. The lockout tab 380 is
positioned on a generally
opposite side of the connection structure 378 from the actuator portion 376.
As shown in
FIG. 14, when the lockout lever 346 is in the locked position, the lockout tab
380 is positioned in
a first location relative to the paddle 344 against a stop structure 386 of
the housing 104. As
shown in FIG. 15, however, when the lockout tab 380 is in the unlocked
position, the lockout tab
is moved to a second position relative to the paddle 344 away from the stop
structure 386.
[0092] With reference again to FIG. 13, the spring 348 is a torsion
spring, which includes
a coil 388, an arm 390, and an aiin 392. The pivot shaft 384 extends through
the coil 388 to
18
CA 02790990 2012-09-27
position the arm 392 against the cavity surface 372 and the arm 390 against
the actuator portion
346. The spring 348 biases the lockout lever 346 toward the locked position as
shown in FIG.
14. In particular, the spring 348 biases the actuator portion 376 in the
rearward direction 130
(FIG. 14) and biases the lockout tab 380 in the forward direction 126 (FIG.
14).
[0093] As shown in FIG. 14, the switch unit 394 that is operated by the
power lever 342
includes a switching element 396 and an actuator 398 positioned in the
interior space 128 of the
housing 104. The actuator 398 is movable between an actuated position (FIG.
15) and a
deactuated position (FIG. 14). When the actuator 398 is in the actuated
position the switching
element 396 couples electrical energy to the electric motor 136 and the
electric motor operates to
move the driveshaft 260 in the repeating pattern. When the actuator 398 is in
the deactuated
position the switching element 396 decouples electrical energy from the
electric motor 136 and
the motor does not operate to move the driveshaft 260 in the repeating
pattern. The actuator 398
is spring biased in the deactuated position. The actuator 398 contacts the
switch surface 346 of
the paddle 344 to bias the paddle toward the de-energized position.
[0094] The power lever 342 prevents users from inadvertently energizing the
electric
motor 136. As shown in FIG. 14, the paddle 344 is in the de-energized position
and the lockout
lever 346 is in the locked position. When the lockout lever 346 is in the
locked position, the
lockout lever prevents the paddle 344 from being moved to the energized
position due to
physical interaction of the lockout tab 380 and the stop structure 386. In
particular, as shown in
FIG. 14, the lockout tab 380 is positioned against the stop structure 386 to
prevent movement of
the paddle 344. Pivotal forces imparted on the paddle 344 which tend to move
the abutment
structure 352 toward the electric motor 136 about the path of movement 362,
wedge the lockout
19
CA 02790990 2012-09-27
tab 380 against the stop structure 386 and the portion 400 of the paddle, such
that no pivotal
movement of the paddle occurs.
[0095] With reference to FIGs. 14 and 15, when the lockout lever 346
is in the unlocked
position movement of the paddle 344 to the energized position is enabled due
to the lockout tab
380 being moved away from the stop structure 386. Accordingly, to energize the
electric motor
136, first the lockout lever 346 is moved to the unlocked position and then
the paddle 344 is
pivoted to the energized position. The lockout lever 346 is pivoted to the
unlocked position by
moving the actuator portion 376 in the forward direction 126. Pivoting of the
lockout lever 346
is typically done by pressing the tip of the little finger against the
actuator portion 376 and then
squeezing the actuator portion against the cavity surface 372. The forward
direction 126
movement of the actuator portion 376 causes the lockout tab 380 to move in the
rearward
direction 130.
[0096] The actuator 398 is moved to the energized position and the
switch 394 energizes
the electric motor 136 in response to the paddle 344 moving to the energized
position. As shown
in FIG. 15, when the lockout lever 346 is in the unlocked position the lockout
tab 380 is
positioned behind the stop structure 386, such that the lockout tab is
misaligned with the stop
structure and does not interfere with pivoting of the paddle 344. The paddle
344 is moved to the
energized position by squeezing the paddle. Typically, when moving the paddle
344 to the
energized position, the fingers contact the contact surface 356 and the palm
contacts an upper
side of the sleeve 108. The user moves the paddle 344 to energized position by
initiating a
squeezing movement of the hand, which causes the paddle to pivot about the
pivot structure 350
and also causes the switch surface 364 to abut the actuator 398 and to move
the actuator to the
CA 02790990 2012-09-27
energized position. It is noted that the saw assembly 100 is configured for
one hand operation;
therefore, the same hand that moves the lockout lever 346 to the unlocked
position is used to
move the paddle to the energized position. The same hand is also used to guide
the saw
assembly 100 through the workpiece.
[0097] To return the paddle 344 to the de-energized position from the
energized position
the user releases the squeezing force on the paddle 344. This causes the
actuator 398 of the
switch 394 to pivot the paddle 344 back to the de-energized position. When the
paddle 344 is
positioned in the de-energized position the actuator 398 is in the deactuated
position and the
motor 136 does not operate. Also, when the paddle 344 reaches or nearly
reaches the de-
actuated position, the torsion spring 348 returns the lockout lever 346 to the
locked position.
100981 The power lever 342 is positioned on the housing 104 in an
ergonomic location.
The power lever 342 is positioned to be easily contacted by the user's fingers
on an underside of
the sleeve 108. Additionally, the force that the user applies to the saw
assembly 100 to move the
saw through a workpiece assists the user in maintaining the paddle 344 in the
energized position.
[0099] As shown in FIGs. 16 and 17, the saw assembly 100 also includes a
lock-on
member or structure 402, which includes a slider 404 and a spring 406. The
slider 404 includes a
push button portion 408 on a first end of the slider and a catch feature or a
hook member 410 on
an opposite second end of the slider. A flange 412 of the slider 404 is
positioned between the
push button 408 and the hook member 410.
1001001 The slider 404 is at least partially positioned within the internal
space 128. In
particular, the slider 404 is positioned in a slider cavity 414. The slider
cavity 414 includes a
shoulder 416, a shoulder 418, and a button opening 420. The slider 404 extends
through the
21
CA 02790990 2012-09-27
button opening 420, such that the push button portion 408 is positioned
outside of the internal
space 128 and the hook portion 410 is positioned within the internal space.
[00101] The spring 406 is an extension spring positioned between the
flange 412 of the
and shoulder 418. The spring 406 biases the flange 412 against the shoulder
416.
[00102] The slider 404 is movable between a non-interference position or
disengaged
positioned (FIG. 16) and an interference position or an engaged position (FIG.
17). As shown in
FIG. 16, the spring 406 biases the slider 404 in the disengaged position. As
shown in FIG. 17,
the slider 404 is movable to the engaged position by moving the slider toward
the paddle 344
against the biasing force of the spring 406. When the slider 404 is in the
engaged position, at
Po least a portion of the slider is in the path of movement 362 of the
paddle 344. When the slider
404 is in the disengaged position the slider is spaced apart from the path of
movement 362.
[00103] The lock on structure 402 maintains the paddle 344 in the
energized position
without user intervention. To lock the paddle 344 in the energized position,
first the paddle is
moved to the energized position along the path of movement 362. Then, with the
paddle 344 in
the energized position, the slider 404 is moved the engaged position.
Thereafter, the squeezing
force on the paddle 344 is released and the slider 404 maintains the paddle in
the energized
position. The paddle 344 is maintained in the energized position without user-
contact of the
power lever 342 or the push button 408.
[00104] The hook portion 410 of the slider 404 engages the lock-on
notch 366 to maintain
the paddle 344 in the energized position. As shown in FIG. 17, when the paddle
344 is in the
energized position and the slider 404 is in the engaged position, the lock-on
notch 366 is
positioned above the hook portion 410. Accordingly, when the force maintaining
the paddle 344
22
CA 02790990 2012-09-27
in the energized position is released, the lock-on notch 366 becomes seated in
the hook portion
410, thereby preventing the paddle from returning to the de-energized
position. The spring 406
supplies a biasing force that ensures the hook portion 410 and the lock-on
notch 366 remain
engaged without user intervention.
[00105] To release the paddle 344 from the lock-on structure, the switch
surface 364 of
the paddle 344 is moved slightly closer to the switching element 396 (not
shown in FIGs. 16 and
17), which moves the lock-on notch 366 away from the hook member 410 and
disengages the
lock-on notch from the hook member. When lock-on notch 366 and the hook member
410 are
disengaged, the spring 406 returns the slider 404 to the disengaged position.
Thereafter, the
force on the paddle 344 may be released to allow the actuator 398 to return
the paddle to the
disengaged position.
[00106] Guard Structure
[00107] As shown in FIGs. 5 and 18, the saw assembly 100 includes a
guard assembly 422
in which the one of the flat cutting wheel 296 and the flush cutting wheel 300
are partially
positioned. The guard assembly 422 is secured to the housing 104 and includes
a concave
structure 424, a partition 426, and a flange 428.
[00108] The concave structure 424 extends from a wall portion 430 of
the housing 104
and defines a protected space 432 for receiving at least a portion of one of
the cutting wheel 296
and the cutting wheel 300. The partition 426 is secured to the concave
structure 424 within the
protected space 432. In particular, the partition 426 extends from the concave
structure 424
toward the axis of rotation 268. The flange 428 projects from the partition
426 in a direction
23
CA 02790990 2012-09-27
parallel to the axis of rotation 268. The wall portion 430, the concave
structure 424, the partition
426, the flange 428, and the lower right shell 124 are integrally molded
together in a monolithic
part formed from injection molded thermoplastic.
[001091 As shown in FIG. 18, the shape of the partition 426 is defined
in relation to a
.. workpiece contact plane 434 and an arbor plane 436. The workpiece contact
plane 434 is
defined by a workpiece contact surface 466 (FIG. 19) of a foot 456 (FIG. 19)
of the saw
assembly 100. As described in detail below, the workpiece contact surface 466
is positioned
against and moved across a workpiece during cutting operations of the saw
assembly 100. The
workpiece contact surface 466 is in the workpiece contact plane 434. The axis
of rotation 268 is
parallel to the workpiece contact plane 434.
1001101 The arbor plane 436 is parallel to the workpiece contact plane
434 and intersects
the axis of rotation 268. The arbor plane 436 also intersects a leading
portion 438 and a trailing
portion 440 of the partition 426. The leading portion 438 is located forward
of the axis of
rotation 268 in relation to the forward direction 126 of movement of the saw
assembly 100. The
arbor plane 436 intersects the leading portion 438 for an amount referred to
as the leading
intersection distance. The trailing portion 440 of the partition 426 is
located behind the axis of
rotation 268 in relation to the forward direction 126 movement of the saw
assembly 100. The
arbor plane 436 intersects the trailing portion 440 for an amount referred to
as the trailing
intersection distance. The leading intersection distance is less than the
trailing intersection
distance.
1001111 As shown in FIG. 19, the partition 426 divides the protected
space 432 into a
cutting wheel space 442 and another cutting wheel space 444. The cutting wheel
space 442 is
24
CA 02790990 2012-09-27
positioned on a side of the partition 426 nearest the wall portion 430, such
that the cutting wheel
space 442 is interposed between the wall portion 430 and the partition 426.
The cutting wheel
space 444 is positioned an opposite side of the partition 426 and is defined
by the flange 428.
[001121 With reference to FIG. 5, the flange 428, which is also
referred to herein as a
guard wall, defines a lateral guard wall surface 446 and a lower guard wall
surface 448. The
lateral guard wall surface 446 is positioned against a workpiece or cutting
guide during cutting
operations that utilize the flush cutting wheel 300. The lateral guard wall
surface 446 is angled
with respect to the lower guard wall surface 448 by approximately ninety
degrees (90 ). A bevel
portion 450 of the lateral guard surface 446 / concave structure 424 is
beveled with respect to the
lower guard wall surface 448.
1001131 The guard assembly 422 guards at least two types of cutting
wheels including the
flat cutting wheel 296 and the flush cutting wheel 300 without requiring any
user configuration
of the guard when switching between the cutting wheels. As shown in FIG. 5,
the flat cutting
wheel 296 is connected to the arbor assembly 148 and is at least partially
positioned in the
cutting wheel space 442 (FIG. 18). When the electric motor 136 is supplied
with electric energy
the driveshaft 260 rotates the cutting wheel 296 about the axis of rotation
268 so that the cutting
structure 308 is advanced through the cutting wheel space 442.
1001141 As shown in FIG. 20, the shape of the partition 426 enables a
user of the saw
assembly 100 to view a leading edge 452 of the cutting wheel 296 positioned in
the cutting
wheel space 442 as it moves through a workpiece W. For example, a cutting line
454 may be
drawn on the workpiece W, representative of a desired cutting path. The shape
of the partition
426 enables the user to view point of intersection between the leading edge
452 and the cutting
CA 02790990 2012-09-27
=
line 454 during the cutting operation. This simplifies the task of guiding the
saw assembly 100
along a desired cutting line 454.
1001151 As shown in FIG. 6, the flush cutting wheel 300 is connected
to the arbor
assembly 148 and is at least partially positioned in the cutting wheel space
444 (FIG. 18). When
the electric motor 136 is supplied with electric energy the driveshaft 260
rotates the cutting
wheel 300 about the axis of rotation 268 so that the cutting structure 324 is
advanced through the
cutting wheel space 444.
[00116] Pivotable Foot
[00117] As shown in FIGs. 21 and 22, the saw assembly 100 includes a foot
456 pivotally
connected to the housing 104 and biased by a spring 457. The foot 456 includes
a base 458, a
hinge structure 460, and an extension structure 462, which arc integrally
molded together in a
monolithic part formed from injection molded thermoplastic.
[00118] As shown in FIG. 21, the base 458 defines an upper surface
464, a workpiece
contact surface 466, and a cutting wheel passage 468. The workpiece contact
surface 466 is
positioned against a workpiece W or a guide 780 (FIG. 39) during cutting
operations. The base
458 includes numerous grooves 470 (FIG. 19) to reduce the surface area of the
workpiece
contact surface 466, such that the workpiece contact surface slides easily on
most workpieces.
[00119] As shown in FIG. 23, the cutting wheel passage 468 is formed
in the base 458 and
is defined on three sides by the base. The passage 468 has a generally
rectangular shape. The
passage 468 is positioned on the side of the base 458 near the arbor assembly
148, such that a
26
CA 02790990 2012-09-27
portion of the cutting wheel 296, 300 extends therethrough. The cutting wheel
passage 468 may
also be referred to herein as a base opening.
[00120] The hinge structure 460 includes a riser 472 extending from the
base 458 and a
conduit structure or a generally cylindrical member 474 extending from the
riser. The riser 472
extends from the upper surface 464. The cylindrical member 474 defines a
central channel 476
that extends completely through the cylindrical member and which is defined by
an opening 478
and an opening 480. The cylindrical member 474 also defines a longitudinal
axis 482, which is
parallel to the axis of rotation. A left portion 484 of the cylindrical member
474 is positioned on
a left side of the riser 472, and a right portion 486 of the cylindrical
member is positioned on a
right side of the riser.
[00121] The cylindrical member 474 of the hinge structure 460 is
received by the housing
104 to enable the foot 456 to pivot relative to the housing or, stated
differently, to enable the
housing to pivot relative to the foot. In particular, as shown in FIG. 21, the
lower left shell 120
defines a hinge bore 488 or a hinge receptacle, and as shown in FIG. 22, the
lower right shell 124
defines a hinge bore 490 or a hinge receptacle. The hinge receptacles 488, 490
have an inside
diameter that is approximately equal to an outside diameter of the cylindrical
member 474 to
enable the hinge receptacle 488 to receive left portion 484 and to enable the
hinge receptacle 490
to receive the right portion 486. The foot 456 is pivotable about the hinge
structure 460 relative
to the housing 104 about a pivot axis 492 that is coaxial with the
longitudinal axis 482. The foot
456 is shown in FIGs. 21 and 22 pivoted to a position of maximum cutting depth
(also referred to
as the non-rest position) and is shown in FIG. 23 pivoted to a position of
minimum cutting depth
(also referred to as the rest position).
27
CA 02790990 2012-09-27
=
=
[00122] As shown in FIG. 23, the extension structure 462 includes a
lower end portion
494 and an upper end portion 496 and defines an opening 498. The lower end
portion 494 is
attached to the upper surface 464. The extension structure 462 extends from
the base 458 along
a generally arcuate path into the interior space 128, such that the upper end
portion 496 is
.. positioned in the interior space. The opening 498 is a generally arcuate
opening that extends
from near the lower end portion 494 to near the upper end portion 496. The
opening 498
cooperates with a base lock assembly 576 for fixing the position of the foot
456 relative to the
housing 104.
[00123] As shown in FIG. 24, the upper end portion 496 defines a spring
arm contact
surface 500 for contacting the spring 457 and includes a protrusion 502 and a
protrusion 504.
The protrusion 502 extends from the upper end portion 496, such that a portion
of the protrusion
502 is positioned above the spring arm contact surface 500. Similarly, the
protrusion 504
extends for an approximately equal distance from the upper end portion 496,
such that a portion
of the protrusion 504 is positioned above the spring arm contact surface 500.
The protrusion 502
is spaced apart from the protrusion 504 so as to define a gap 506 therebetween
that is slightly
wider than an arm 510 of the spring 457.
[00124] With reference again to FIG. 21, the spring 457 is a torsion
spring, which includes
a coiled portion 508, an ailil 510 connected to the coiled portion, and
another arm 512 connected
to the coiled portion. The coiled portion 508 is a generally circular coil
including approximately
three (3) coils of the wire used to form the spring 457. The coil 508 defines
a center axis 514,
and the spring 457 generates a resistive force when the arm 510 is pivoted
about the center axis
relative to the arm 512 (and vice versa).
28
CA 02790990 2012-09-27
=
[00125] The spring 457 is arranged in the interior space 128.
Specifically, the coil 508 is
supported by a mount 516 extending from the left lower shell 120. The mount
516 defines a
generally circular periphery having a diameter that is slightly smaller than a
diameter of the coil
508, such that the mount extends through the coil.
[00126] As shown in FIG. 24, the arm 510 is positioned on the spring
contact surface 500
between the protrusion 502 and the second protrusion 504. The protrusions 502,
504 prevent the
arm 501 from sliding off the spring contact surface 500 in the directions
parallel to the axis 514.
A width 518 of the arm 510 is less than the gap 506. Accordingly, the
protrusions 502, 504
enable the arm 510 to move relative to the spring contact surface 500 in the
direction 520 and in
the direction 522 in response to the movement of the foot 456. The spring 457
includes an elbow
526 so that the arm 510 is in the proper position for being positioned on the
spring contact
surface 500.
[00127] As shown in FIG. 23, the ann 512 of the spring 457 is
positioned against a stop
tab 524 of the left lower shell 120. The arm 512 remains in a generally fixed
position in
response to pivoting of the foot 456.
[00128] The arm 510 of the spring 457 slides on the spring contact
surface 500 during
pivoting of the foot 456 relative to the housing, which may alternatively be
described as pivoting
of the housing relative to the foot. The spring 457 biases the foot 456 toward
the position of
minimum cutting depth (FIG. 23). In this position, an end 526 of the arm 510
is positioned
adjacent to the protrusion 502. As the foot 456 is pivoted to the position of
maximum cutting
depth (FIG. 21) the spring arm 510 slides on the spring contact surface 500
such that the end
portion 526 is separated from the protrusion 502 by the distance 526. The arm
510 slides on the
29
CA 02790990 2012-09-27
spring contact surface 500 as a result of the axis 514 being offset from the
axis 482.
Additionally, pivoting the foot 456 from the position of minimum cutting depth
(FIG. 23) to the
position of maximum cutting depth (FIG. 21) causes at least a portion of the
cutting wheel 296,
300 to be advanced through the cutting wheel passage 468.
30
CA 02790990 2012-09-27
[00129] Dust Port
[00130] As shown in FIGs. 25 and 26, the saw assembly 100 includes a
dust port assembly
528, which includes a dust inlet or an inlet port 530, a dust channel or
central channel 476, a dust
outlet or an outlet port 534, a coupling component or a connection structure
536, and a hose
adapter 538. The inlet port 530 is a generally circular opening formed in the
lower right shell
124. The inlet port 530 is formed in the wall portion 430 and is in fluid
communication with the
hinge receptacle 490 (FIG. 22). The inlet port 530 defines a center point and
has a diameter of
approximately eight millimeters (8 mm). The center point of the inlet portion
530 is aligned with
the pivot axis 492 of the foot 456. As shown in FIG. 20, during a cutting
operation the inlet port
530 is positioned near the point of intersection between the leading edge 452
of the cutting wheel
296, 300 and the cutting line 454. The inlet port 530 is aligned with the
opening 478 and is
juxtaposed with the protected spaced 432 defined by the flange 428.
[00131] With reference to FIG. 25, the dust channel is provided as the
central channel 476
in the cylindrical member 474 of the hinge structure 460. The dust channel
476, which may also
be referred to as a conduit passage, is a bore that extends from the opening
478 on a first side of
the cylindrical member 474 to the opening 480 on an opposite end of the
cylindrical member.
The dust channel 476 is a generally cylindrical channel that defines the
longitudinal axis 482,
which is coaxial with the pivot axis 492 of the foot 456.
[00132] As shown in FIG. 27, the outlet port 534 is an opening formed in
the lower left
shell 120. The outlet port 534 is in fluid communication with the hinge
receptacle 488. The
outlet port 534 is also in fluid communication with the opening 480, the dust
channel 476, the
31
CA 02790990 2012-09-27
opening 478, and the inlet port 530. The outlet port 534 is a generally
circular port that defines a
center point that is aligned with the pivot axis of the foot 456.
[00133] The connection structure 536 is formed in the lower left shell
120 and defines a
receptacle or a circular bore 540 that is concentric with the outlet port 534.
The connection
structure 536 also includes numerous friction ribs 542 and a wall 544. The
friction ribs 542
extend radially inward from the circular bore 540 for approximately one
millimeter (1 mm). The
friction ribs 542 are generally evenly spaced around the periphery of the
circular bore 540. The
wall 544 terminates the circular bore 540.
[00134] As shown in FIG. 28, the adapter 538 includes a coupling
component or inlet
structure 546, a funnel portion 548, and an outlet structure 550. The adapter
538 is formed from
injection molded thermoplastic. The inlet structure 546 is a generally
cylindrical structure
defining a central opening 552 and an adapter passage 554. The outside
diameter of the inlet
structure 546 is approximately equal to an inside diameter of the circular
bore 540, such that the
inlet structure is configured to mate with the connection structure 536 to
secure the adapter 538
to the housing 104. When the inlet structure 546 is mated with the connection
structure 536, the
adapter passage 554 is in fluid communication with the outlet port 534. The
outlet structure 550
is also a generally cylindrical structure defining a central opening 556 and
an outlet passage 558.
[00135] The funnel portion 548 fluidly connects the adapter passage 554
of the inlet
structure 546 to the outlet passage 558 of the outlet structure 550. To this
end, the funnel portion
defines a dust channel (not shown) that is narrowest near the inlet structure
546 and that is widest
near the outlet structure 550. The funnel portion 548 defines an elbow 562,
such that the inlet
structure 546 is offset from the outlet structure 550.
32
CA 02790990 2012-09-27
[00136] As shown in FIG. 26, the dust port assembly 528 is used with a
vacuum hose/tube
564, a vacuum source 566, and a collection bin 568 to draw dust generated by
the cutting wheel
296, 300 to the collection bin. To use the dust port assembly 528, first the
adapter 538 is
connected to the saw assembly 100 by inserting the inlet structure 546 into
the bore 540 until the
.. inlet structure contacts the bottom wall 544. The exterior of the inlet
structure 546 contacts the
friction ribs 542 when it is inserted into the connection structure 536, such
that a friction fit is
established between the connection structure and the inlet structure. Due to
the friction fit, the
adapter 538 remains in a fixed position relative to the connection structure
536 without user
intervention. Nonetheless, the adapter 538 is easily rotated about the pivot
axis 492 to a desired
to position. Next, the vacuum tube 564 is connected to the outlet structure
550 of the adapter 538.
The vacuum tube 564 includes a fitting 570 that frictionally fits within the
outlet structure 558.
To connect the vacuum tube 564 to the adapter 538 the fitting 570 is inserted
within the outlet
structure 558.
[00137] Thereafter, the vacuum source 566 is energized and a workpiece
W is cut with the
.. cutting wheel 296, 300. As the cutting wheel 296, 300 moves through the
workpiece W dust and
debris is generated at a point near the inlet port 530. Accordingly, when the
vacuum source 566
is activated air and the dust and debris are drawn into the inlet port 530,
through the dust channel
476, through the adapter passage 554, through the dust channel 560, through
the outlet passage
558, through a hose passage 572 of the vacuum hose 564, and into the
collection bin 568.
[00138] Base Lock Assembly
33
CA 02790990 2012-09-27
[00139] As shown in FIGs. 22 and 29, the saw assembly 100 includes a
base lock
assembly 576 having a clamp component 578 (FIG. 29) and a clamp actuator 580
(FIG. 22).
With reference to FIG. 29, the clamp component 578 includes a clamping surface
582 and a bore
structure 584 (shown in phantom). The clamping surface 582 is a portion of the
gear housing
196 that surrounds the bore structure 584. The clamping surface 582 is
generally flat and defines
a plane that is perpendicular to the workpiece contact plane 434. The clamping
surface 582 is
positioned within the interior space 128.
[00140] The bore structure 584 is formed in the gear housing 196. The
bore structure 584
defines a longitudinal axis 586 that is parallel to the axis of rotation 268.
The bore structure 584
includes a plurality of internal threads 588 (shown in phantom). The internal
threads 588 are
left-handed threads.
[00141] The clamp actuator 580 includes a clamp component 590 (FIG. 29)
and a knob
592 (FIG. 22). With reference to FIG. 30, the clamp component 590 includes a
post 594, a drive
structure 596, and a clamping surface 598. The clamp component 590 is formed
from metal. In
other embodiments, however, the clamp component 590 is formed from injection
molded
thermoplastic or another hard material.
[001421 The post 594 is generally cylindrical and includes a threaded
portion 600 and a
smooth portion 602. The post 596 is approximately seventeen millimeters (17mm)
in length.
The threaded portion 600 includes a set of external threads 604 and has a
length of
approximately ten millimeters (10mm). The external threads 604 are "left-
handed" threads that
are sized to mesh with the internal threads 588 of the bore structure 584. The
smooth portion
602 is positioned between the threaded portion 600 and the drive structure
596. The smooth
34
CA 02790990 2012-09-27
portion 602 is generally cylindrical and has a length of approximately six
millimeters (6mm) and
a diameter of approximately six millimeters (6mm).
[00143] The drive structure 596 is positioned on an end of the clamp
component 590 that
is opposite the threaded portion 600. The drive structure 596 includes an
exterior polygonal-
.. shaped surface, which has six sides and can be driven by an eight
millimeter (8mm) wrench /
spanner. The drive structure 596 has width that is wider than a width of the
post 594 and a
length of approximately nine millimeters (9mm). The drive structure 596
defines an internally
threaded bore 604 centered about a longitudinal axis 586 of the clamp
component 590. The
threaded bore 604 includes a set of "right-handed" internal threads 606.
113 [00144] The clamping surface 598 is positioned at the junction
of the drive structure 596
and the post 594 and is defined by an end surface of the drive structure. The
clamping surface
598 defines a plane that is parallel to the plane defined by the clamping
surface 582.
[00145] As shown in FIG. 31, the knob 592 includes a hub 608, a lever
610, and a tab 612
each of which is integrally formed from injection molded thermoplastic. The
hub 608 includes a
drive structure 614 and an opening 616. The drive structure 614 is
correspondingly sized and
shaped to mate with the drive structure 596. In particular, the drive
structure 614 includes an
interior polygonal-shaped surface that mates with the exterior polygonal-
shaped surface of the
drive structure 596.
[00146] The opening 616 extends through the hub 608 and is centered
about the
longitudinal axis 586 of the clamp component 590. A fastener 618 (FIG. 27)
extends through the
opening 616 and into the threaded bore 604 to connect the knob 592 to the
clamp component
CA 02790990 2012-09-27
590. When the drive structure 614 is mated with the drive structure 596,
rotation of the knob 592
results in rotation of the clamp component 590.
[00147] The lever 610 extends from a first side of the hub 608. The
lever 610 defines a
push surface 620 and a push surface 622. The push surfaces 620, 622 are
contacted when
rotation of the lever 592 is desired.
[00148] The tab 612 extends from a side of the hub 608 opposite the
lever 610. The tab
612, which may also be referred to herein as a limiter, includes a contact
surface 624 on one side
of the tab and a contact surface 626 on an opposite side of the tab.
[00149] As shown in FIG. 32, when the clamping structure 590 is
threadingly received by
the bore structure 584, the extension structure 462 extends between the
clamping surface 582 and
the clamping surface 598. The extension structure 462 remains positioned
between the clamping
surface 582 and the clamping surface 598 during pivoting of the foot 456
relative to the housing
104
[00150] The clamp actuator 580 is rotatable between a first actuator
position (an
unclamped position) and a second actuator position (a clamped position). When
the clamp
actuator 580 is in the unclamped position the clamping surface 582 is spaced
apart from the
clamping surface 598 by an open distance. The open distance is greater than a
width 628 of the
extension structure 462, such that the extension structure is able to advance
between the
clamping surface 582 and the clamping surface 598 when the clamp actuator 580
is in the
.. unclamped position. In the unclamped position the base 458 is pivotal about
pivot axis 492
relative to the housing 104.
36
CA 02790990 2012-09-27
[001511 When the clamp actuator 580 is rotated counterclockwise to the
clamped position,
the clamping surface 598 advances toward the clamping surface 582. In
particular, in the
clamped position the clamping surface 598 is separated from the clamping
surface 582 by a
closed distance. The closed distance is less than the open distance and is
approximately equal to
the width 628 of the extension aim 462. The closed distance positions the
clamping surface 598
and the clamping surface 582, such that the extension structure 462 is clamped
between the
clamping surface 598 and the clamping surface 582 so that pivoting of the base
458 relative to
the housing 104 is inhibited.
[00152] As shown in FIG. 27, the housing 104 includes a limiter 630
that is positioned to
interact with the tab 612 of the base lock assembly 576. In particular, the
housing 104 includes a
limiter 630 extending from an exterior surface of the lower left shell 120.
The limiter 630
includes an arcuate structure 632 attached to the exterior surface. The
arcuate structure 632
includes a contact surface 634 at one end and a contact surface 636 at the
opposite end. If the
arcuate structure 632 were extended to form a circle, a center point of the
circle would be aligned
with the longitudinal axis 586 of the clamp component 590.
1001531 The limiter 630 interacts with the tab 612 to prevent the clamp
actuator 580 from
being rotated beyond the clamped position and from being rotated beyond the
undamped
position. In particular, rotation of the clamp actuator 580 in the clockwise
direction (as viewed
in FIG. 27) is prevented by physical interaction (i.e. contact) between the
contact surface 624 of
the tab 612 and the contact surface 634 of the limiter 630. Likewise, rotation
of the clamp
actuator 580 in the counterclockwise direction (as viewed in FIG. 27) is
prevented by physical
37
CA 02790990 2012-09-27
interaction (i.e. contact) between the contact surface 626 of the tab 612 and
the contact surface
636 of the limiter 630.
[00154] The limiter 630 and the tab 612 prevent the clamp actuator 580
from becoming
over tightened and under tightened. In particular, interaction between the
contact surface 624
and the contact surface 634 prevents the clamp actuator 580 from being rotated
to a position in
which the clamp component 590 becomes separated from the bore structure 584.
In this way, the
clamp actuator 580 does not become lost or separated from the saw assembly
100. Additionally,
the interaction between the contact surface 626 and the contact surface 636
ensures that the when
these two surfaces 626, 636 meet the clamp actuator 580 applies a consistent
clamping force to
the extension structure 462. The consistent clamping force is one that has
been determined to fix
the pivotal position of the base 458 securely over the life of the saw
assembly 100.
Accordingly, the limiter 630 and the tab 612 prevents the clamp actuator 580
from being rotated
to a rotational position that applies a damaging clamping force to the
extension structure 462.
The damaging clamping force deforms the extension structure 462 so that it
does not pivot about
the pivot axis 492 effectively.
[00155] Depth Gauge
[00156] As shown in FIG. 27, the saw assembly 100 includes a depth
gauge assembly 640,
which includes an indicator projection 642, an indicator opening 644, a first
depth gauge portion
646, and a second gauge portion 648. With reference to the foot 456, as shown
in FIG. 32, the
indictor projection 642 includes an arm 650 and a marker 652. The arm 650
extends from the
38
CA 02790990 2012-09-27
upper end portion 496 of the extension structure 462. The marker 652 extends
from the arm 650
in a direction parallel to the pivot axis 492.
[00157] Referring again to FIG. 27, the opening 644 is formed in the
lower left shell 120
of the housing 104. The opening 644 has a generally arcuate shape of
approximately the same
radius as the opening 498 in the extension structure 462. The marker 652 is
positioned to extend
through the opening 644. The position of the marker 652 within the opening 644
depends on the
position of the foot 456 relative to the housing 104. In particular, when the
foot 456 is in the
position of minimum cutting depth (FIG. 33) the marker 652 is positioned at
the bottom of the
opening 644, and when the foot 456 is in the position of maximum cutting depth
(FIG. 27) the
to .. marker 652 is positioned at the top of the opening 644.
[00158] The depth gauge portion 646 is positioned on a first side of
the opening 644 and
includes indicia denoting 1/8 inch, 1/4 inch, IA inch, and 3/4 inch cutting
depths. The depth gauge
portion 648 is positioned on the second side of the opening 644 and includes
indicia denoting 0
mm, 5 mm, 10 mm, 15 mm, and 20 mm cutting depths. Both the depth gauge portion
646 and
.. the depth gauge portion 648 are integrally formed into the lower left shell
120.
[00159] The depth gauge assembly 640 is used to indicate the distance
that the cutting
wheel 296, 300 extends below the workpiece contact surface 466. For example,
the foot 456
may be moved relative to the housing 104 until the marker 652 is aligned with
a desired cutting
depth as shown on the depth gauge portion 646 or the depth gauge portion 648.
When the
desired cutting depth is achieved, the foot 456 is locked in position relative
to the housing 104
with the base lock assembly 576.
39
CA 02790990 2012-09-27
1001601 1-Square Accessory
[00161] As shown in FIGs. 34 to 36, a T-square 660 may be used with the
saw assembly
100. The T-square 660 includes a guide member 662 connected to a positioning
rod 664 with a
connector 666. The guide member 662 includes a body 668, a guide structure
670, and
numerous support ribs 672. The body 668 is a generally flat member from which
the guide
structure 670 extends. The support ribs 672 are positioned to contact the body
668 and the guide
structure 670, thereby increasing the rigidity of the guide member 662. The
body 668, the guide
structure 670, and the support ribs 672 are integrally molded together in a
monolithic part formed
from injection molded thermoplastic.
[00162] As shown in FIG. 35, the guide structure 670 defines a generally
flat guide
surface 674. The guide surface 674 is positioned against a workpiece W (see
FIG. 36) when the
T-square 660 is in use. The guide surface 674 is generally rectangular and has
a length of
approximately fifteen centimeters (15 cm) and a height of approximately two
centimeters (2 cm).
The guide surface 674 is free from protrusions or other irregularities that
may interfere or
prohibit sliding of the guide member 662 against the workpiece W.
[00163] The body 668 further defines a rod pocket 676 and a rod pocket
678. The rod
pocket 676 defines an opening 680 in the guide structure 670 and an opening
682 in the body
668. The second rod pocket 678 defines an opening 684 in the guide structure
670 and a
connector opening (not shown), which is substantially identical to the opening
682.
[00164] The positioning rod 664 is a generally straight rod haying a
generally rectangular
cross section. The positioning rod 664 has a length of approximately 25
centimeters (25cm), a
width of approximately 1 centimeter (1 cm) and a thickness of approximately
0.3 centimeters
CA 02790990 2012-09-27
(0.3 cm). The positioning rod 664 defines a threaded opening 686. Another
threaded opening is
positioned on the opposite end of the positioning rod 664, but is not visible
since it is shown
having received a portion of the connector 666. The positioning rod 664 is
sized to extend
through the opening 680 and the opening 684. The positioning rod 664 is formed
from metal.
[00165] As shown in FIG. 35, the positioning rod 664 is received by the
base 458. To this
end, the base 458 defines a rod channel 688 (FIG. 3) and includes a connecting
structure 690.
The rod channel 688 has a length that is parallel to thc axis of rotation 268.
[00166] The connecting structure 690 includes a fastener 692 and a
clamp member
provided as a square nut 694. The fastener 692 is threadingly received by the
square nut 694.
The connecting structure 690 is positioned within a clamp pocket 696 formed in
the base 458.
The clamp pocket 696 is fluidly connected to the rod channel 688, such that
the fastener 692 is at
least partially positionable within the rod channel.
[00167] The connector 666 includes a fastener 698 extending from a
handle 700. The
fastener 698 is sized to be threadingly received by the opening 686 in the
positioning rod 664.
The handle 700 is fixedly connected to the fastener 698.
[00168] As shown in FIG. 35, the T-square 660 is assembled and
connected to the base
458 by inserting an end portion of the positioning rod 664 into the rod pocket
678. The rod
pocket 678 is positioned such that when the positioning rod 664 is received
therein, the
positioning rod extends from the guide structure 670 in a direction that is
perpendicular to the
guide surface 674. Next, the connector 666 is used to connect the positioning
rod 664 to the
guide member 662. Thereafter, the positioning rod 664 is inserted into the rod
channel 688 until
41
CA 02790990 2012-09-27
the guide surface 674 is a predetermined distance from the cutting wheel 296.
Thereafter, the
fastener 698 is advanced into the rod channel 688 to fix the position of the
positioning rod 664.
[00169] As shown in FIG. 36, with the T-square 660 connected to the saw
assembly 100 a
user may make rip cuts in a workpiece W along a desired cut path 702. In
particular, to use the
T-square 660 the guide surface 674 is positioned against an edge E of the
workpiece W. Then
the saw assembly 100 is energized and moved along the cut path 702 to advance
the cutting
wheel 296 through the workpiece W. By maintaining the guide surface 674
against the edge E,
the cutting wheel 296 is advanced through the workpiece W by the predetermined
distance from
the edge E.
[00170] Attachment Structures
[00171] As shown in FIGS. 29 and 37, the gear housing 196 includes an
attachment bore
750 and an attachment bore 752. The attachment bore 750 defines a longitudinal
axis 754 that is
parallel to the axis of rotation 268. The attachment bore 750 includes a
plurality of internal
threads. As shown in FIG. 33, the lower left shell 120, defines a circular
opening 756 having a
center point positioned in alignment with the longitudinal axis 754.
[001721 As shown in FIG. 37, the attachment bore 752 is also formed in
the gear housing
196. The attachment bore 752 includes a plurality of internal threads. As
shown in FIG. 19, the
base 458 defines an opening 758 that is positioned in alignment with the
attachment bore 752
when the foot 456 is in the position of the maximum cutting depth. When the
foot 456 is moved
to positions other than the position of maximum cutting depth, the opening 758
is not positioned
42
CA 02790990 2012-09-27
in alignment with the attachment bore 752. Both the attachment bore 750 and
the attachment
bore 752 have the same internal thread count/structure.
[00173] The attachment bore 750 and the attachment bore 752 are used to
connect
accessories (not shown) to the saw assembly 100 or to connect the saw assembly
100 to an
accessory element. For example, a handle (not shown) having a shaft with a
threaded tip may be
threadingly received by the attachment bore 750 by inserting the shaft through
the opening 756
and into the attachment bore.
[001741 As shown in FIG. 38, for example, the attachment bore 752 may
be used to
connect the saw assembly 100 to a table saw assembly 760. The table saw
assembly 760 includes
a table 762 defining a countersunk bore 764 and a cutting wheel opening (not
shown). The saw
assembly 100 is connected to the table 762 by first positioning the foot 456
in the position of
maximum cutting depth. Next, a fastening member 766 is inserted through the
bore 764 in the
table 762, through the opening 758 in the base 458, and into the threaded bore
752. With the saw
assembly 100 connected to the table 762, the cutting wheel 296 (not shown in
FIG. 38) extends
through the cutting wheel opening and is positioned above a workpiece support
surface 768 of
the table 762. The saw assembly 100 and table saw assembly 760 are used to cut
workpieces W
in a manner similar to table saws known to those of ordinary skill in the art.
[00175] Miter Cutting Guide Accessory
[00176] As shown in FIGs. 39 and 40, a cutting guide 780 is provided for
use with the saw
assembly 100. The cutting guide 780 includes a guide structure 782 and a guide
structure 784.
43
CA 02790990 2012-09-27
The cutting guide 780 is formed from injection molded thermoplastic. The guide
structure 782 is
provided as a bevel cutting guide. The guide structure 784 is provided as a
miter cutting guide.
[00177] The guide structure 782 includes a saw support 786 and a saw
support 788, both
of which are attached to a base 790. The saw support 786 defines a saw contact
surface 792, a
step structure 794, and a step structure 796. The saw contact surface 792 is a
generally flat
surface that is positioned in a plane.
[00178] The step structure 794 is offset from the saw contact surface
792 and is positioned
at a first end of the saw support 786. The step structure 796 is also offset
from the saw contact
surface 792 and is positioned at an opposite end of the saw support 786. The
saw contact surface
.. 792 extends between the step structure 794 and the step structure 796. The
step structure 794
and the step structure 796 each define a contact surface 798, 800 that is
positioned perpendicular
to the plane defined by the saw contact surface 792.
[00179] The saw support 788 defines another saw contact surface 802.
The saw contact
surface 802 is a generally flat surface that is positioned in a plane. The
plane defined by the saw
contact surface 792 intersects the plane defined by the saw contact surface
802 to define an angle
of intersection having a magnitude of ninety degrees (90 ). In other
embodiments, the angle of
intersection has a magnitude greater than eighty degrees (80 ) and less than
one hundred degrees
(100 ).
[00180] The saw contact surface 802 is spaced apart from the saw
contact surface 792 to
as to define a window or an elongated cutting slot 804 therebetween. The
cutting slot 804 is
oriented along a slot axis 806 and includes a first slot portion 808, a second
slot portion 810, and
a third slot portion 812. The second slot portion 810 is contiguous with the
first slot portion 808
44
CA 02790990 2012-09-27
and the third slot portion 812. The second slot portion 810 is interposed
between the first slot
portion 808 and the third slot portion 812.
[00181] As shown in FIG. 41, the base 790 of the guide structure 782
defines a first cavity
814 positioned below the cutting slot 804. The first cavity 814 includes a
first workpiece space
816, a first cutting member start space 818 positioned on a first side of the
first workpiece space
816, and a first cutting member end space 820 positioned on an opposite second
side of the first
workpiece space 816. The first workpiece space 816 is positioned below the
second slot portion
810 and receives a workpieee W to be cut by the saw assembly 100 during a
cutting operation.
The first cutting member start space 818 is positioned below the first slot
portion 808 and is
where the cutting wheel 300 is positioned at the beginning of the cutting
operation. The first
cutting member end space 820 is positioned below the third slot space 812 and
is where the
cutting wheel 300 is positioned at the end of the cutting operation.
[00182] The base 790 of the guide structure 782 includes first sidewall
822, a second
sidewall 824, and end wall 826, and an end wall 828. The first sidewall 822
and the second
sidewall 824 are positioned generally parallel to each other. The end wall 826
extends between
the first sidewall 822 and the second sidewall 824 at an end portion of the
guide structure 782.
The end wall 828 is positioned at an opposite end portion of the guide
structure 782 and extends
between the first sidewall 822 and the second sidewall 824.
[00183] As shown in FIG. 41, the base 790 of the guide structure 782
defines the first
workpiece space 816. Specifically, the workpiece space 816 defined by a first
workpiece
passage 830 and a second workpiece passage 832. The first workpiece passage
830 is formed in
the first sidewall 822 and is defined by a first lateral passage surface 834
that is spaced apart
CA 02790990 2012-09-27
from a second lateral passage surface 836. The second workpiece passage 832 is
formed in the
second sidewall 824 and is defined by a third lateral passage surface 838 that
is spaced apart
from a fourth lateral passage surface 840. The first workpiece passage 830 is
spaced apart from
the second workpiece passage 832 so as to define the first workpiece space 816
therebetween.
[00184] The guide structure 782 further includes a guide wall 844 to assist
in positioning
the cutting guide 780 on a workpiece W. The guide wall 844 is positioned in
the cavity 814 and
defines a first guide surface portion 846. The guide surface portion 846 is
positioned under the
cutting slot 804. The guide surface portion 846 and the first lateral passage
surface 834 are
positioned in a plane that includes both surfaces. The slot axis 806 is
perpendicular to the plane
in which the first lateral passage 834 and the guide surface portion 846 are
positioned.
[00185] As shown in FIG. 40, the saw support 786 defines a cutout 848
in the saw contact
surface 792. The cutout 848 is contiguous with the cutting slot 804. The guide
surface portion
846 is positioned under the cutout 848 so that visualization of the guide
surface portion is
enhanced.
[00186] As shown in FIG. 39, the base 790 includes a reference indicia mark
842
positioned on the first sidewall adjacent the first lateral passage surface.
The reference indicia
mark 842 indicates a pivot point for use with the guide structure 784, as
described below.
[00187] As shown in FIG. 41, the saw support 786 also defines a first
workpiece contact
surface 850 and a second workpiece contact surface 852. The first workpiece
contact surface
850 is an underside portion of the saw support 786 and is generally parallel
to the cutting slot
804. The second workpiece contact surface 852 is an underside portion of the
saw support 788
and is generally parallel to the cutting slot 804. The workpiece contact
surface 850 and the
46
CA 02790990 2012-09-27
workpiece contact surface 852 are positioned in the cavity 814. It is noted
that the cutting slot
804 may be defined by the first workpiece contact surface 850 being spaced
apart from the
second workpiece contact surface 852.
[00188] The guide structure 784 extends from the guide structure 782
and includes a first
guide wall 854, a second guide wall 856, and numerous support ribs 858 that
extend between the
first guide wall and the second guide wall. The first guide wall 854 extends
from the base 790
and defines a first guide surface 860. The first guide wall 854 includes a leg
862 attached the
base 790. The leg 862 supports the guide structure 784 during use of the
cutting guide 780.
[00189] The second guide wall 856 extends from the base 790 and defines
a second guide
surface 864. The second guide wall 856 extends perpendicularly from the second
sidewall 856
of the base 790. The second guide wall 856 intersects the first guide wall 854
to define a corner
866.
[00190] The second guide wall 856 includes a leg 868 and a leg 870. The
leg 868 extends
downwardly from the second guide wall 856 and, in particular, extends
downwardly from the
.. corner 866. The leg 870 extends downwardly from the second guide wall 856.
The leg 868 and
the leg 870 are spaced apart to define a third workpiece passage 872. The leg
868 and the leg
862 are spaced apart to define a fourth workpiece passage 874.
[00191] The first guide wall 854 and the second guide wall 856 form an
angle having a
magnitude between thirty degrees (30 ) and sixty degrees (60 ). The angle
between the first
guide wall 854 and the second guide wall 856 is forty five degrees (45 ). The
angle between the
first guide wall 854 and the second guide wall 856 is used to make miter cuts
in the workpiece W
at the angle. The guide structure 784 includes numerous reference indicia 876
and magnitudes
47
CA 02790990 2012-09-27
formed on the first guide wall 854, the second guide wall 856, and the ribs
858. The second
indicia 876 are used to position the guide structure 784 when making cuts that
are different than
the angle between the first guide wall 856 and the second guide wall 856.
[00192] The guide structure 784 further includes a clamp structure 878
extending from the
.. second guide wall 856. The clamp structure 878 includes a flat clamp
surface 880 and numerous
support ribs 882. The clamp structure 878 receives a clamping force, which
connects the cutting
guide 780 to a workpiece W. The flat clamp surface 880 typically contacts a
clamp member and
the support ribs 882 increase the structural integrity of the cutting guide
780 so that it is not
deformed or otherwise damage as a result of the clamping force.
[00193] As shown in FIG. 41, the guide structure 784 includes a second
workpiece space
884 that receives a workpiece W. The second workpiece space 884 is defined by
the third
workpiece passage 872 and the fourth workpiece passage 874. The second
workpiece space 884
is aligned with the first workpiece space 816, such that a workpiece W
extending through the
first workpiece passage 830 extends through the first workpiece space and the
second workpiece
.. space.
[00194] As shown in FIG. 42 and 43, in operation, the cutting guide 780
is used to make
bevel cuts and miter cuts on a workpiece W with the saw assembly 100 being
equipped with the
flush cutting wheel 300. The guide structure 782 is used to make a bevel cut.
First, the
workpiece W is positioned in the workpiece space 816. The workpiece W is
positioned against
the first lateral passage surface 834, the guide wall 844, the leg 868, the
first workpiece contact
surface 850, and the second workpiece contact surface 852. This arrangement
positions the
cutting slot 804 perpendicularly to the edge E of the workpiece W.
48
CA 02790990 2012-09-27
[00195] Next, the user "fine tunes" the position of the cutting guide
780 on the workpiece
W. To do this, the user looks through the cutout 848 and locates first guide
surface portion 846.
The guide surface portion 846 is positioned a predetermined distance from the
desired cutting
path through the workpiece W. Accordingly, the position of the cutting guide
780 is adjusted
until the guide surface portion 846 is the predetermined distance from the
desired cutting path.
Thereafter, a clamp (not shown) is affixed to the clamp structure 878 and the
workpiece W to
prevent further movement of the cutting guide 780 relative to the workpiece.
[00196] The user next positions the saw assembly 100 on cutting guide
780 with the
workpiece contact surface 466 of the foot 456 positioned against the first saw
contact surface
792 and with the flange 428 positioned against the second saw contact surface
802. The first
guide structure 782 supports the saw assembly 100 on two sides to ensure that
saw assembly is
maintained at the proper bevel angle for the duration of the cut.
[00197] As shown in FIG. 43, the flush cutting wheel 300 extends though
the cutting slot
804 into the cutting member start space 818 of the cavity 814. The start space
818 of the cavity
814 provides the user with a region in which the saw assembly 100 can be
energized to bring the
cutting wheel 300 up to full rotational speed without the cutting wheel being
in contact with the
workpiece W. After the saw assembly 100 is energized the saw assembly 100 is
moved toward
the end wall 828 through the workpiece to cut the workpiece at a bevel angle
of forty five
degrees (45 ).
[00198] The saw assembly 100 is moved toward the end wall 828 with the
workpiece
contact surface 466 positioned against the first saw contact surface 792 until
the leading sidewall
886 of the foot 456 contacts the step structure 794, which is positioned to
stop any additional
49
CA 02790990 2012-09-27
forward movement of the saw assembly 100. At this point the cutting operation
is complete and
the user may release the paddle 344 to deenergize the electric motor 136. It
is noted that the step
structure 796 stops movement of the saw assembly 100 in the reward direction
by contacting a
trailing sidewall 888 of the base 458.
[00199] The guide structure 784 is used to make miter cuts with the saw
assembly 100.
To prepare the saw assembly 100 to make miter cuts the user typically connects
the flat cutting
wheel 296 to the arbor assembly 148; although, the flush cutting wheel 300 is
also usable. Next,
the cutting guide 780 is positioned on the workpiece W. In particular, the
workpiece W is
positioned against the guide wall 844 and the leg 868 in the first workpiece
space 816 and the
second workpiece space 884. Next the flange 428 is positioned against the
first guide surface
860. Thereafter, the rotating cutting wheel 296 is moved through the workpiece
with the flange
428 being maintained against the first guide surface 860.
[00200] In the above configuration, the first guide surface 860 is
positioned to make a
forty five degree (450) miter cut through the workpiece. The cutting guide 780
is pivotable about
the first lateral passage surface 834 to a desired cutting angle as indicated
by the indicia 876.
[00201] Crown Molding Cutting Guide
[00202] As shown in FIGs. 44 to 47, a cutting guide 900 is provided for
use with the saw
assembly 100. The cutting guide 900 includes a first guide structure 902
connected to a second
guide structure 904 by an intermediate part 906. The cutting guide 900 is
formed from injection
molded thermoplastic.
CA 02790990 2012-09-27
[00203] As shown in FIG. 44, the first guide structure 902 includes a
first saw support 908
and a second saw support 910, both of which are attached to a base 912. The
first saw support
908 defines a first saw contact surface 914, a first step structure 916, and a
second step structure
918. The first saw contact surface 914 is a generally flat surface that is
positioned in a plane.
[00204] The first step structure 916 is offset from the first saw contact
surface 914 and is
positioned at a first end of the first saw support 908. The second step
structure 918 is also offset
from the first saw contact surface 914 and is positioned at an opposite second
end of the first saw
support 908. The first step structure 916 and the second step structure 918
each define a contact
surface 920, 922 that is positioned perpendicular to the plane defined by the
first saw contact
surface 914.
[00205] The second saw support 910 defines a second saw contact
surface 924. The
second saw contact 924 surface is a generally flat surface that is positioned
in a plane. The plane
defined by the first saw contact surface 914intersects the plane defined by
the second saw
contact surface 924 to define an angle of intersection Al having a magnitude
of ninety degrees
.. (90 ). In other embodiments, the angle of intersection el has a magnitude
greater than eighty
degrees (80 ) and less than one hundred degrees (100 ).
[00206] As shown in FIG. 45, the second saw contact surface 924 is
spaced apart from the
first saw contact surface 914 to as to define a first elongated cutting slot
926 therebetween. The
cutting slot 926 is oriented along a slot axis 928 and includes a first slot
portion 930, a second
slot portion 932, and a third slot portion 934. The second slot portion 932 is
contiguous with the
first slot portion 930 and the third slot portion 934. The second slot portion
932 is interposed
between the first slot portion 930 and the third slot portion 934.
51
CA 02790990 2012-09-27
1002071 With reference to FIG. 46, the base 912 of the first guide
structure 902 defines a
first cavity 936 positioned below the cutting slot 926. The first cavity 936
includes a first
workpiece space 938, a first cutting member start space 940 positioned on a
first side of the first
workpiece space, and a first cutting member end space 942 positioned on an
opposite second side
of the first workpiece space. The first workpiece space 938 is positioned
below the second slot
portion 932 and receives a workpiece W to be cut by the saw assembly 100
during a cutting
operation. The first cutting member start space 940 is positioned below the
first slot portion 930
and is where the cutting wheel 300 is positioned at the beginning of the
cutting operation. The
first cutting member end space 942 is positioned below the third slot portion
934 and is where
the cutting wheel 300 is positioned at the end of the cutting operation.
1002081 As shown in FIG. 47, the base 912 of the first guide structure
902 includes first
sidewall 944, a second sidewall 946, an end wall 948, and a common end wall
950. The first
sidewall 944 and the second sidewall 946 are positioned generally parallel to
each other. The
first end wall 948 extends between the first sidewall 944 and the second
sidewall 946. The
common end wall 950 is positioned at a guide end portion of the first guide
structure 902 and
extends between the first sidewall 944 and the second sidewall 946 and also
the side walls of the
guide structure 904.
1002091 As shown in FIG. 46, the base 912 of the first guide structure
902 defines the first
workpiece space 938. The workpiece space 938 is defined by a first workpiece
passage 952 and
a second workpiece passage 954. The first workpiece passage 952 is formed in
the first sidewall
944 and is defined by a first passage surface 956 that is spaced apart from a
second passage
surface 958. The second workpiece passage 954 is formed in the second sidewall
946 and is
52
CA 02790990 2012-09-27
defined by a third passage surface 960 that is spaced apart from a fourth
passage surface 962.
The first workpiece passage 952 is spaced apart from the second workpiece
passage 954 so as to
define the first workpiece space 938 therebetween.
[00210] As shown in FIG. 47, the first guide structure 902 includes a
first guide wall 964
and a second guide wall 966 to assist in positioning the cutting guide 900 on
a workpiece W.
The first guide wall 964 is positioned in the cavity 936 and defines a first
guide surface portion
968. The second guide wall 966 is positioned in the cavity 936 and defines a
second guide
surface portion 970. The first guide surface portion 968 and the second guide
surface portion
970 are positioned under the cutting slot 926.
[00211] As shown in FIG. 45, the first saw support 908 defines a first
cutout 972 and a
second cutout 974 in the first saw contact surface 914. The first cutout 972
and the second
cutout 974 are each contiguous with the cutting slot 926. The guide surface
portion 968 is
positioned under the first cutout 974 so that visualization of the first guide
surface portion is
enhanced. The guide surface portion 970 is positioned under the second cutout
972 so that
visualization of the second guide surface portion is enhanced.
[00212] The first guide structure 902 also defines a first workpicce
contact surface 976
and a second workpiece contact surface 978. The first workpiece contact
surface 976 is an
underside portion of the saw support 910 that is generally parallel to the
cutting slot 926. The
second workpiece contact surface 978 is an underside portion of the saw
support 908 that is
generally parallel to the cutting slot 926. The workpiece contact surface 976
and the workpiece
contact surface 978 are positioned in the cavity 936.
53
CA 02790990 2012-09-27
[00213] The guide structure 904 is substantially identical to the guide
structure 902.
However, for completeness the guide structure 904 is described in detail. The
guide structure
904 includes a saw support 980 and a saw support 982, both of which are
attached to a base 984.
The first saw support 980 defines a first saw contact surface 986, a first
step structure 988, and a
second step structure 990.
[00214] The second saw support 982 of the guide structure 904 defines a
second saw
contact surface 992. The plane defined by the first saw contact surface 986
intersects the plane
defined by the second saw contact surface 992 to define an angle of
intersection 02 having a
magnitude of ninety degrees (90'). In other embodiments, the angle of
intersection 02 has a
magnitude greater than eighty degrees (800) and less than one hundred degrees
(100 ).
[00215] The second saw contact surface 992 is spaced apart from the
first saw contact
surface 986 so as to define a cutting slot 994 therebetween. The cutting slot
994 is oriented
along a slot axis 995 and includes a first slot portion 996, a second slot
portion 998, and a third
slot portion 1000. The slot axis 995 and the slot axis 928 intersect at an
acute angle e (FIG. 44).
The acute angle 0 has a magnitude that is greater than forty five degrees
(450) and less than
seventy five degrees (75').
[00216] As shown in FIGS. 46 and 47, the base 984 of the guide
structure 904 defines a
cavity 1002 positioned below the cutting slot 994. The cavity 1002 includes a
workpiece space
1004, a cutting member start space 1006 positioned on a first side of the
first workpiece space
1004, and a first cutting member end space 1008 positioned on an opposite
second side of the
first workpiece space 1004. The first workpiece space 1004 is positioned below
the second slot
54
CA 02790990 2012-09-27
portion 998 and receives a workpiece W to be cut by the saw assembly 100
during a cutting
operation. The first cutting member start space 1006 is positioned below the
first slot portion
996 and is where the cutting wheel 300 is positioned at the beginning of the
cutting operation.
The first cutting member end space 1008 is positioned below the third slot
space 1000 and is
where the cutting wheel 300 is positioned at the end of the cutting operation.
[00217] The base 984 of guide structure 904 includes first sidewall
1010, a second
sidewall 1012, and end wall 1014, and the common sidewall / end wall 950. The
first sidewall
1010 and the second sidewall 1012 are positioned generally parallel to each
other. The first end
wall 1014 extends between the first sidewall 1010 and the second sidewall
1012. The common
end wall 950 is positioned at a guide end portion of the first guide structure
902 and extends
between the first sidewall 1010, the second sidewall 1012, and the also the
sidewalls 944, 946 of
the other guide structure 902.
[00218] As shown in FIG. 46, the base 984 of the guide structure 904
defines the
workpiece space 1004. The workpiece space 1004 is defined by a first workpiece
passage 1018
.. and a second workpiece passage 1020. The first workpiece passage 1018 is
formed in the first
sidewall 1010 and is defined by a first passage surface 1022 that is spaced
apart from a second
passage surface 1024. The second workpiece passage 1020 is formed in the
second sidewall
1012 and is defined by a third passage surface 1026 that is spaced apart from
a fourth passage
surface 1028. The first workpiece passage 1018 is spaced apart from the second
workpiece
passage 1020 so as to define the workpiece space 1004 therebetwcen.
[00219] The guide structure 904 includes the guide wall 964 and the
guide wall 966 to
assist in positioning the cutting guide 900 on a workpicce. The first guide
wall 964 is positioned
CA 02790990 2012-09-27
in the cavity 1002 and defines a first guide surface portion 1034. The first
guide surface portion
1034 is positioned under the cutting slot 994. The passage surface 956, the
passage surface
1022, the guide surface portion 968, and the guide surface portion 1034 lie in
a plane 1038. The
second guide wall 966 is positioned in the cavity 1002 and defines a second
guide surface
portion 1036. The second guide surface portion 1036 is positioned under the
cutting slot 994.
The passage surface 958, the passage surface 1024, the guide surface portion
970, and the guide
surface portion 1036 all lie in a second plane 1040 that is parallel to the
plane 1038.
[00220] The saw support 980 defines a cutout 1042 and a cutout 1044 in
the first saw
contact surface 986. The cutout 1042 and the cutout 1044 are each contiguous
with the cutting
slot 994. The guide surface portion 1036 is positioned under the cutout 1024
so that
visualization of the guide surface portion 1036 is enhanced. The guide surface
portion 1034 is
positioned under the cutout 1044 so that visualization of the guide surface
portion 1034 is
enhanced.
[00221] The guide structure 904 also defines a first workpiece contact
surface 1046 and a
second workpiece contact surface 1048. The first workpiece contact surface
1046 is an
underside portion of the saw support 980 that is generally parallel to the
cutting slot 994. The
second workpicce contact surface 1048 is an underside portion of the saw
support 982 that is
generally parallel to the cutting slot 994. The workpiece contact surface 1046
and the workpiece
contact surface 1048 are positioned in the cavity 1002.
[002221 The intermediate part 906 is positioned between first guide
structure 902 and the
second guide structure 904. The intermediate part 906 is connected to the
sidewall 946 and the
sidewall 1012 and fixes the position of the guide structure 902 relative to
the guide structure 904.
56
CA 02790990 2012-09-27
An interguide space 1050 is defined below the intermediate part 906. Since the
guide structure
902 is spaced apart from the guide structure 904 a space exists therebetween
and is referred to as
the interguide space 1050.
[002231 The intermediate part 906 includes a first abutment structure
1052 and a second
.. abutment structure 1054. The first abutment structure 1052 is located in
the cavity 1002, the
interguide space 1050, and the cavity 936. Accordingly, the abutment structure
1052 is
positioned under both the cutting slot 926 and the cutting slot 994. The
abutment structure 1052
defines an abutment surface 1056 against which a workpiece is positioned
during cutting
operations. The abutment structure 1052 includes the guide wall portion 970
and the guide wall
portion 1036. The passage surface 958, the passage surface 1024, and the
abutment surface 1056
lie in the plane 1040.
[002241 The abutment structure 1054 is located in the cavity 936, the
interguide space
1050, and the cavity 1002. Accordingly, the abutment structure 1054 is
positioned under both
the cutting slot 926 and the cutting slot 994. The abutment structure 1054
defines an abutment
surface 1058 against which a workpiece is positioned during cutting
operations. The abutment
structure 1054 includes the guide wall portion 968 and the guide wall portion
1034. The passage
surface 956, the passage surface 1022, and the abutment surface 1058 lie in
the plane 1038.
[002251 The intermediate part 906 further includes a clamp structure
1060 including a flat
clamp surface 1062 and numerous support ribs 1064 The clamp structure 1060
receives a
clamping force, which connects the cutting guide 900 to the workpiece. The
support ribs 1064
increase the structural integrity of the cutting guide 900 so that it is not
deformed or otherwise
damage as a result of the clamping force.
57
CA 02790990 2012-09-27
[00226] In operation, the cutting guide 900 is used to guide the
cutting wheel 300 of the
saw assembly 100 through a workpiece. Specifically, the cutting guide 900 is
used to make a
compound miter cut in a workpiece. A compound miter cut is a cut that is
beveled and mitered.
These type of cuts are frequency performed when cutting sections of crown
molding to be joined
at an inside or an outside corner of the room.
[00227] To make a cut with the cutting guide 900 the workpiece is
positioned in one or
more of the workpiece space 938 and the workpiece space 1004. An edge of the
workpiece is
positioned against one or more of the abutment surface 1056 and the abutment
surface 1058.
The cutting guide 900 is moved along the workpiece until the desired line of
cut is aligned with
the one of the guide surface portions 968, 970, 1034, 1036 which are visible
through the cutouts
972, 974, 1042, 1044. Depending on the desired cutting orientation a face of
the workpiece may
be positioned against or away from the workpiece contact surfaces 976, 978,
1046, 1048. Also,
the saw assembly 100 should be equipped with the flush cutting wheel 300 when
being used with
the cutting guide 900. After the cutting guide 900 has been aligned, a cutting
operation is
performed in same manner as is performed with the bevel guide structure 782
described above.
[00228] Features of the Foot Related to Miter Cutting
Guide and Crown Molding Cutting Guide
[00229] The foot 456 of the saw assembly 100 is suited for operation
with the miter
cutting guide 780 and the crown molding cutting guide 900. As shown in FIGs.
48 and 49, the
base 458 of the foot 456 includes a main portion 1110, a first cantilevered
portion 1112, and a
second cantilevered portion 1114. The main portion 1110 includes an upper base
surface 1116, a
58
CA 02790990 2012-09-27
lower base surface 1118, and a lateral sidewall surface 1120. The lower base
surface 1118 is
positioned against the saw contact surface 792 during cutting operations in
which the cutting
guide 780 is used. The lateral sidewall 1120 surface extends between the lower
base surface
1118 and the upper base surface 1116.
[00230] The first cantilevered portion 1112 extends laterally from the main
portion 1110
and terminates to define a leading surface 1122 of the lateral sidewall
surface 1120. The leading
surface 1122 is beveled with respect to the lower base surface 1118. The
second cantilevered
portion 1114 also extends laterally from the main portion 1110 and terminates
to define a trailing
surface 1124 of the lateral sidewall surface 1120. The trailing surface 1124
is also beveled with
respect to the lower base surface 1118. The first cantilevered portion 1112
and the second
cantilevered portion 1114 are spaced apart from each other to define the
cutting member opening
or cutting wheel passage 468.
1002311 As shown in FIG. 49, when the base 458 is viewed in a cross
section the leading
surface 1122 and the lower base surface 1118 define an angle 1126 of
approximately one
hundred thirty five degrees (135'). Similarly, when the base 458 is viewed in
cross section the
trailing surface 1124 and the lower base surface 1118 define an angle 1128 of
approximately one
hundred thirty five degrees (135'). In another embodiment of the foot 456, the
angle defined by
the leading surface 1122 and lower base surface 1118 and the angle defined by
the trailing
surface 1124 and the lower base surface 1118 may be greater than one hundred
twenty degrees
(120 ) and less than one hundred fifty degrees (150 ).
1002321 As shown in FIG. 50, the above-described structure of the foot
456 prevents any
portion of the foot from extending below the cutting slot 804 during cutting
operations in which
59
CA 02790990 2012-09-27
the cutting guide 780 and the cutting guide 900 are utilized. If the foot 456
were to extend below
the cutting slot 804 and into the cavity 814, the foot would abut the
workpiece W as the user
attempts to slide the saw assembly 100 toward workpiece, thereby preventing
cutting of the
workpiece. Accordingly, the foot 456 enables the flush cutting wheel 300 to
extend through the
cutting slot 804, while preventing the base 458 from extending through the
cutting slot (i.e. the
base is spaced apart from the cutting slot) when the lower base surface 1118
is positioned in
contact with the saw contact surface 792 (FIG. 39) and the flange 428 is
positioned in contact
with the saw contact surface 802 (FIG. 39).
[00233] Additionally, as describe above with respect to the guard
assembly 422, the
beveled surface 450 of the guard ensures that the guard is spaced apart from
the cutting slot 804
and ensures that no portion of the guard assembly 422 extends through the
cutting slot where it
could abut the workpiece and interfere with a cutting operation.
[00234] Deburring Accessory
[00235] As shown in FIGs. 50 to 52, the saw assembly 100 is includes a
fastener assembly
or a deburring accessory 1150. The deburring accessory 1150 includes a
fastener structure or
support structure 1152 and an abrasive member or abrasive element 1154. As
shown in FIG. 53,
the support structure 1152 includes a post or a shaft 1156, a platform or a
shoulder 1158, and a
drive portion or a head 1160. The support structure 1152 is formed from metal.
In another
embodiment of the deburring accessory 1150, the support structure 1152 is
formed from hard
plastic.
CA 02790990 2012-09-27
[00236] The shaft 1156 includes a threaded portion 1162 and an
unthreaded portion 1164.
The threaded portion 1162 includes a set of external threads sized to be
threadingly received by
the opening 1166 in the driveshaft 260 of the arbor assembly 148 to connect
the deburring
accessory 1150 to the saw assembly 100. The unthreaded portion 1164 extends
from the
threaded portion 1162.
[00237] The shoulder 1158 extends from the unthreaded portion 1164 and
from the head
1160. The shoulder 1158 includes a lower clamping surface or a lower seat 1166
that is
positioned against the cutting wheel 296, an upper support surface or an upper
seat 1168 that
supports the abrasive element 1154, and a washer recess 1170. The shoulder
1158 defines a
.. generally circular periphery and has a diameter of approximately twenty one
millimeters (21
mm). The upper seat 1168 extends from the head 1160 for approximately six
millimeters (6.0
mm). The washer recess 1170 is defined in the shoulder 1158 and is located
adjacent to the
lower seat 1166. The washer recess 1170 extends around the shaft 1156.
[00238] As shown in FIG 52, the head 1160 extends from the shoulder
1158 and the
unthreaded portion 1164. The head 1160 defines a generally circular periphery
and has a
diameter of approximately nine millimeters (9.0 mm). The head 1160 defines a
tool opening or a
recess 1172 having a drive surface. The recess 1172 is polygonal-shaped and is
configured to
receive a fastening tool, such as a hex key (not shown).
[00239] The abrasive element 1154 is connected to the head 1160 and the
shoulder 1158.
The abrasive element 1154 includes a grinding stone 1174 defining an interior
surface 1176 and
a central passage 1178, a lower surface 1180, and an exterior side surface
having a tapered
exterior surface portion 1182. The abrasive element 1154 is secured to the
support structure
61
CA 02790990 2012-09-27
1152 so that the head 1160 is located within the central passage 1178. In
particular, the interior
surface 1176 is secured to an exterior side surface of the drive portion and
the lower surface
1180 is secured to the upper seat 1168.
[00240] As shown in FIG. 50, the tapered exterior surface 1182 is a
generally conical
deburring surface. At the bottom of the deburring surface (nearest the
shoulder 1158) the
abrasive element has a width of approximately twenty one millimeters (21 mm).
At the top of
the deburring surface (positioned furthest from the shoulder 1158) the
abrasive element 1157 has
a width of approximately thirteen millimeters (13.0 mm).
[00241] The grinding stone 1174 of the abrasive element is formed from
aluminum oxide.
Specifically, the abrasive element may be provided as the aluminum oxide as
provided in the
Dremel 952 Aluminum Oxide Grinding Stone manufactured by the Robert Bosch Tool
Corporation. In an alternative embodiment of the deburring accessory 1150, the
abrasive
element 1154 is formed from silicon carbide, such as the silicon carbide as
provided in the
Dremel 84922 Silicon Carbide Grinding Stone manufactured by the Robert Bosch
Tool
Corporation. In yet another alternative embodiment of the deburring accessory
1150 the abrasive
element 1154 is formed from industrial diamonds, any alumina-based abrasive,
cubic boron
nitride ("CBN"), and the like.
[00242] The deburring accessory 1150 is used to secure the cutting
wheel 296 to the saw
assembly 100 in place of the arbor bolt 284 (FIG. 1) and the washer 292 (FIG.
1). The threaded
portion 1162 is threaded into the opening 1166 in the driveshaft 260. When the
deburring
accessory 1150 is tightened onto the driveshaft 260, the cutting wheel 296 is
clamped between
the lower surface 1180 and the spacer 288 (FIG. 1) for rotation with the
driveshaft.
62
CA 02790990 2012-09-27
[00243] After securing the deburring accessory 1150 and the cutting
wheel 296 to the
driveshaft 260, the saw assembly is used to perform a cutting operation on a
pipe or other tubular
structure. As a result of the cutting operation a burr 1184 (FIG. 53) is
formed on the cut edge of
the pipe.
[00244] After performing the cutting operating, the deburring accessory
1150 is used to
remove the burr 1184 without requiring any changes or configuration of the saw
assembly 100.
The abrasive element 1154 of the deburring accessory 1150 is used to smooth
the cut edge of a
pipe, tube, or conduit that has been cut by the cutting wheel 296.
Specifically, the abrasive
element 1154 is used to remove the burr or ridge formed on the cut end of the
pipe after the pipe
is cut with the cutting wheel. To use the abrasive element 1154, the rotating
conical deburring
surface 1182 is urged against the burr or ridge to wear away the burr or
ridge.
[00245] As shown in FIG. 53, the conical shape of the abrasive element
1154 uniformly
removes the burr or ridge from the inside edge of the pipe Pl, P2. The conical
deburring surface
1182 is positionable against the inside edge of a pipe having an inside
diameter that is greater
than the diameter of the top of the deburring surface and that is less than
the diameter of the
bottom of the deburring surface. The pipe P1 has an inside diameter of
approximately one half
inch (0.5 in), and the pipe P2 has an inside diameter of approximately the
three quarters of one
inch (0.75 in). The abrasive element 1154 uniformly removes the burr 1184 or
ridge since the
conical deburring surface 1182 contacts most or all of the inside edge of the
pipe at the same
time.
[00246] In addition to being usable with the saw assembly 100, the
deburring accessory
1150 is also usable with other saw assemblies, grinders, and power cutting
tools. For example,
63
CA 02790990 2012-09-27
the deburring accessory 1150 is usable with circular saw and grinders that are
typically used to
cut metal pipe/conduit. Additionally, the deburring accessory 1150 is usable
with, for example,
portable band saws, which are typically used to cut metal pipe/conduit.
[00247] In another embodiment of the deburring accessory 1150, the head
1160 and the
shaft 1156 are connected together and are separate from the shoulder 1158 and
the abrasive
member 1154. In this embodiment, the head 1160 and the shaft 1156 are provided
as a separate
bolt (not shown) that is similar to the arbor bolt 284 (FIG. 1). The shoulder
1158 defines an
opening having a diameter larger than a diameter of the shaft 1156, but
smaller than the
diameter/width of the head 1160 so that the head is positioned against the
shoulder when the
deburring accessory 1150 is connected to the saw assembly 100.
[00248] While the disclosure has been illustrated and described in
detail in the drawings
and foregoing description, the same should be considered as illustrative and
not restrictive in
character. It is understood that only the preferred embodiments have been
presented and that all
changes, modifications and further applications that come within the spirit of
the disclosure are
desired to be protected.
64